Chuck
-
Posts
9,026 -
Joined
-
Last visited
Content Type
Profiles
Forums
Gallery
Events
Everything posted by Chuck
-
 I am sure it will look just fine. Try not to get discouraged. I am enjoying watching your progress... Chuck
 -
Really nice!!!! Just as it is supposed to look at this stage. Chuck
- 152 replies
-
- 1
-

-
- medway longboat
- Syren Ship Model Company
- (and 1 more)
-
Thats pretty normal for shipping wood actually. Although the handling charge is crazy. It doesnt matter what the species. I am fortunate to have a local source for my Cedar and just drive to pick it up. I would recommend that you try and find such a source. You would be surprised by what your local lumberyards carry. In addition please keep calling different places.....you will find a place that doesnt rip you off on shipping. There are dozens of such suppliers. My local guy doesnt ship at all. He just supplies local builders. Its pick-up only. Chuck
- 421 replies
-
- 5
-
-
- medway longboat
- Syren Ship Model Company
- (and 1 more)
-
You can actually still use the first version. It doesnt matter a whole lot that it doesnt fit snug. The inboard side will be painted red. It will be fine. Chuck
-
How goes progress on this beauty? 😊 You are doing such a great job on this Cheerful.
-
Not if your careful. But i think that would be too much of the light wood visually speaking. At least for my tastes, but this is a very personal thing based on your own tastes.
- 421 replies
-
- 4
-
-
- medway longboat
- Syren Ship Model Company
- (and 1 more)
-
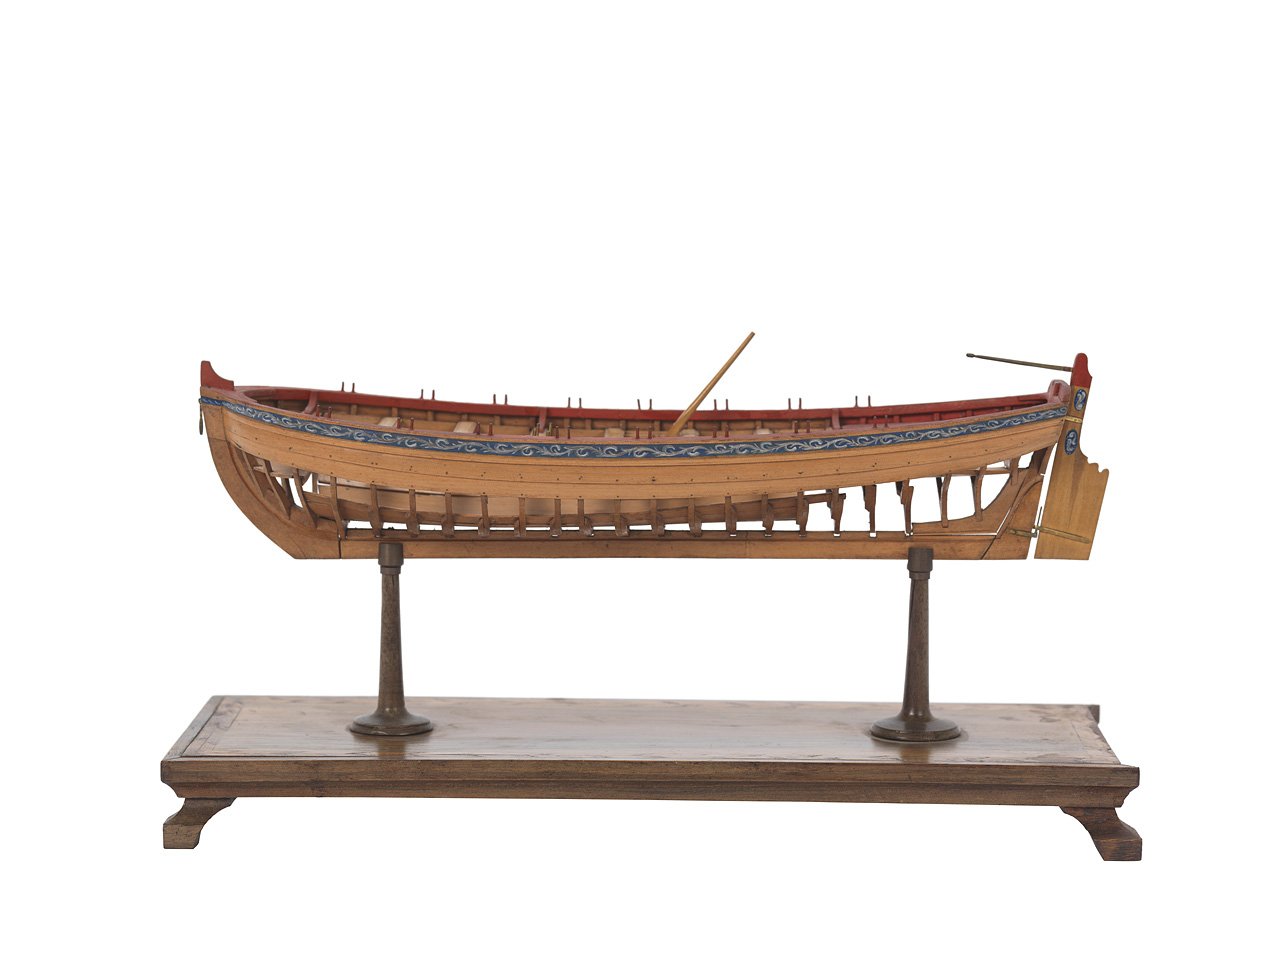
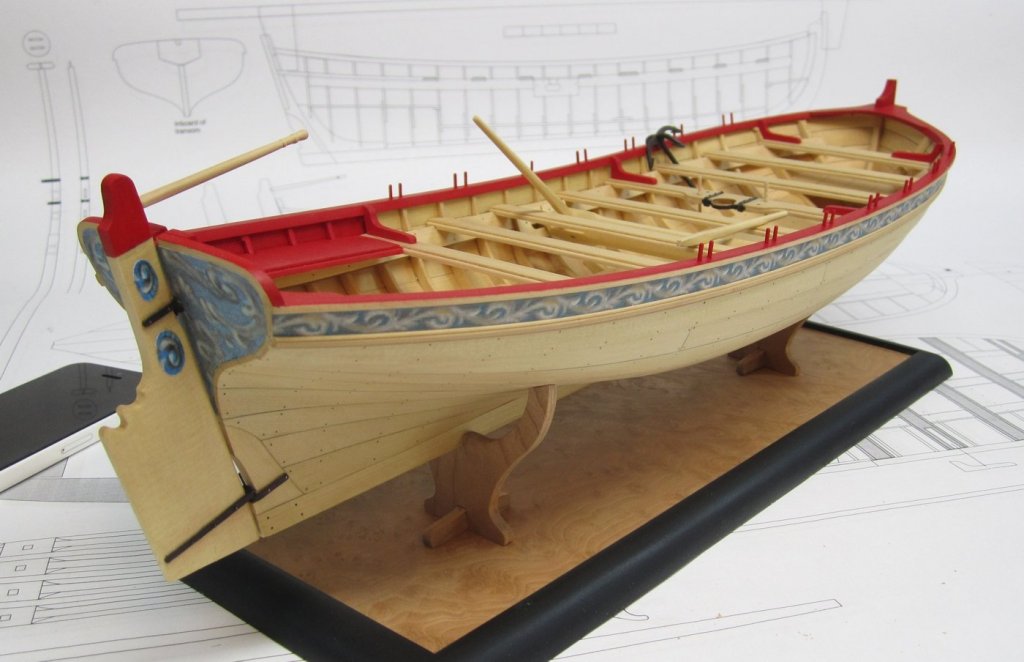
Ken the baseboard is a piece of MDF I think. Then it had a veneer glued to it. Lastly some quarter round molding was glued all around it and painted black. I have to measure it...but I think its just 4 x 12" before the quarter round was added. Mike made that for me and I will bring it on Tuesday. Chuck
- 421 replies
-
- 9
-
-
- medway longboat
- Syren Ship Model Company
- (and 1 more)
-
Plank length for longboats
Chuck replied to tkay11's topic in Building, Framing, Planking and plating a ships hull and deck
Look in Mays book and you will see an original draft of a longboat with a planking expansion. That is where I took my planking scheme from with a little adjustment to make it easier to plank in kit form. You should start a build log for this......this is a great scratch project to watch as it develops. Chuck -
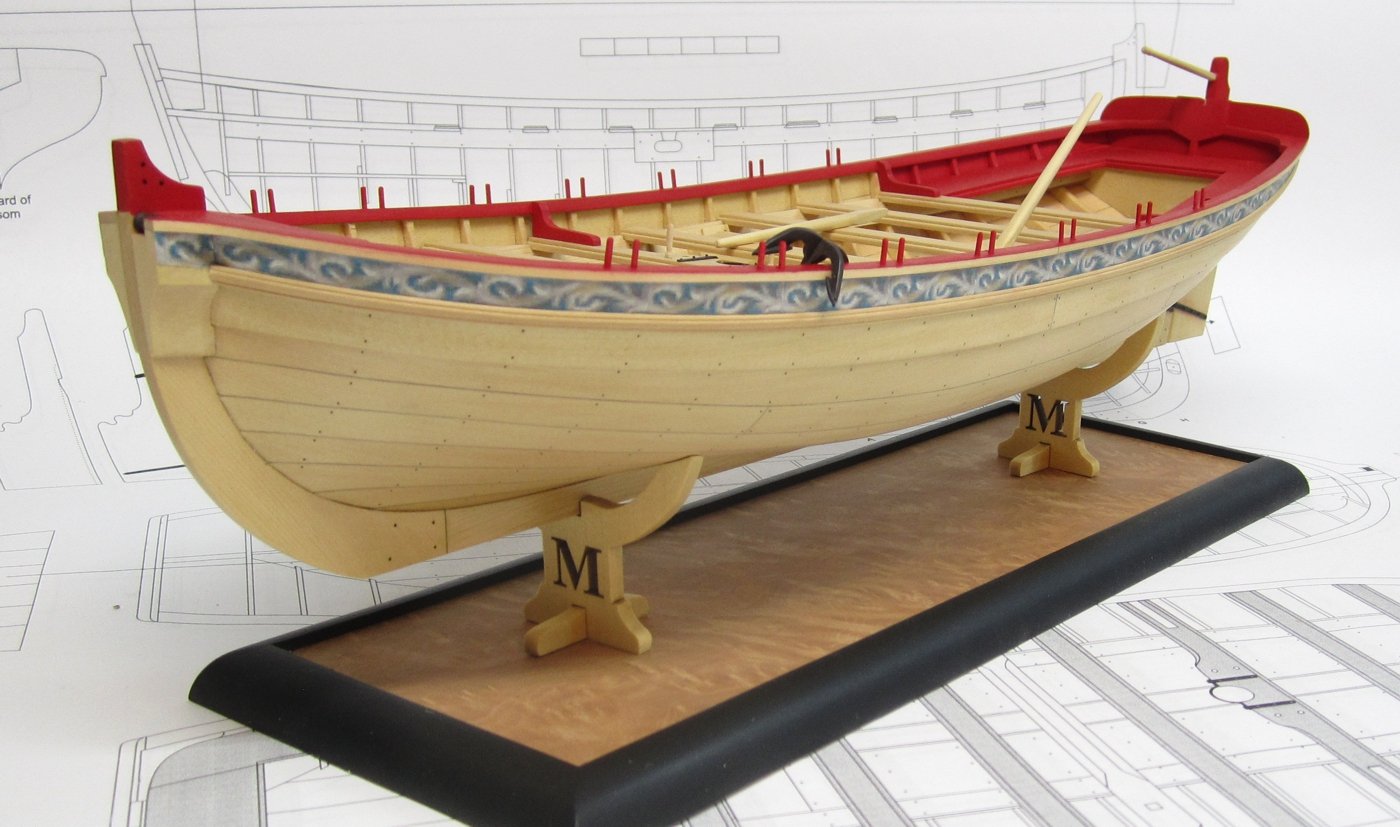
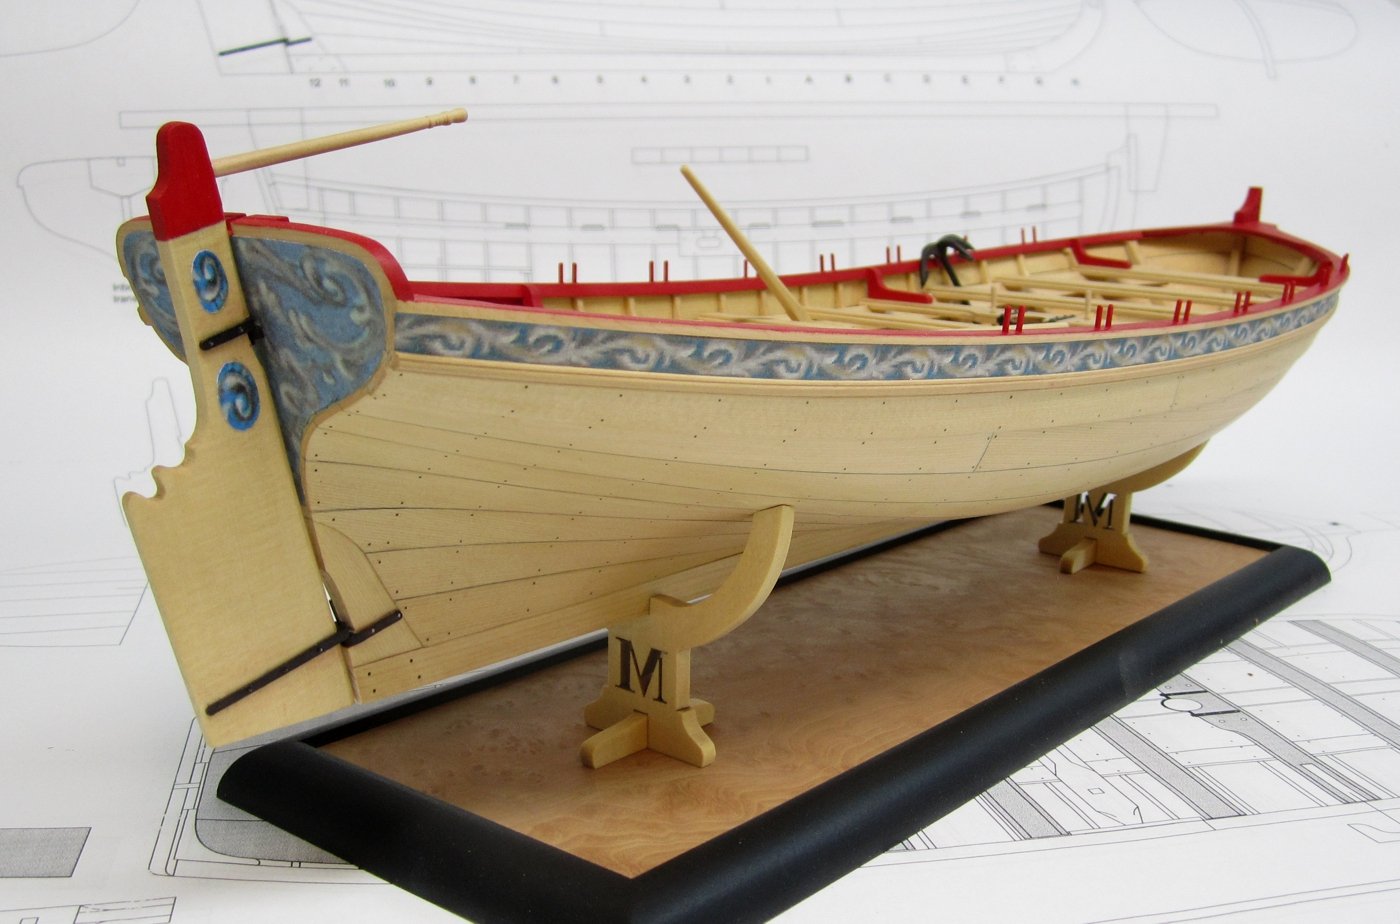
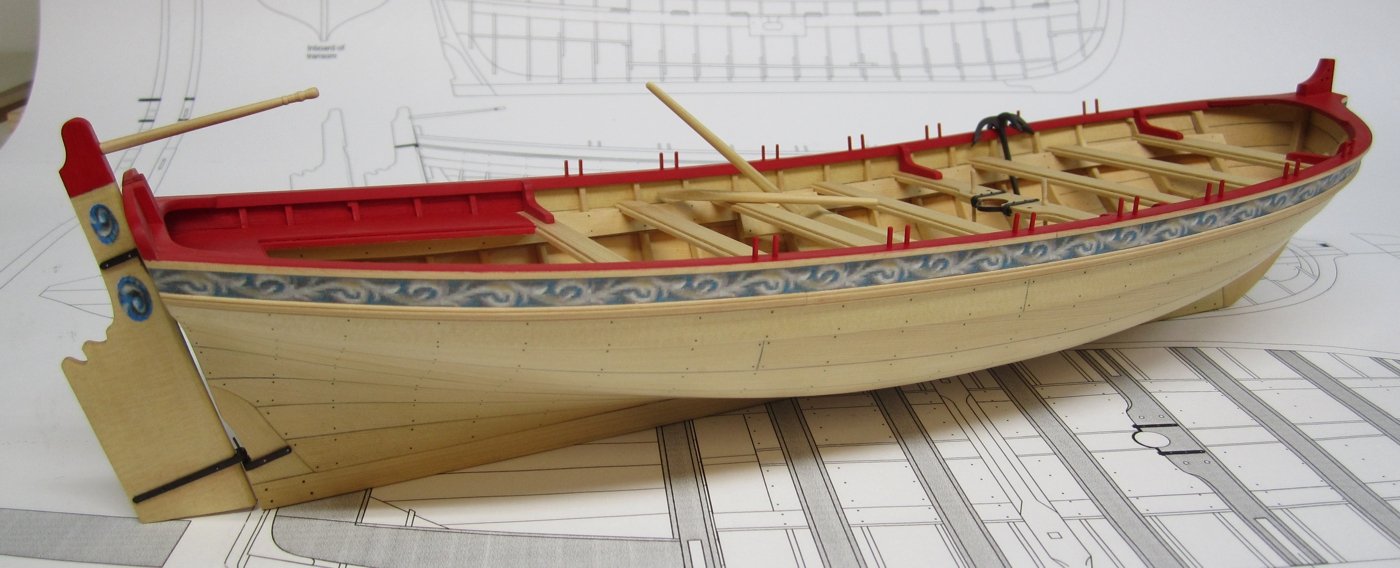
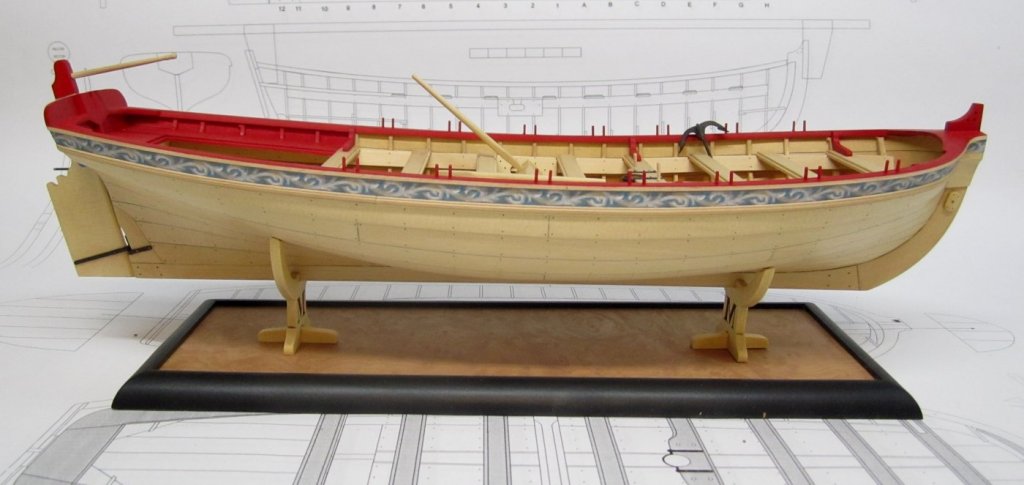
Indeed she will be fully rigged.....first with no sails, because that is probably what most will do. Then I will rig it again with sails. VERSION TWO of the stand. In yellow cedar. I like this one better.


- 421 replies
-
- 27
-
-
- medway longboat
- Syren Ship Model Company
- (and 1 more)
-
Thanks guys.... Working on making a simple stand/cradle. This isnt a small model especially after its rigged so I want it to be sturdy. These will be added to the masting and rigging kit when its made available. Toying around with trying to lasercut them in plexi but as it stands now they will be cherry. I may also paint them black but wanted to see if they were less obtrusive the same color as my baseboard....not included. Chuck
- 421 replies
-
- 26
-
-
- medway longboat
- Syren Ship Model Company
- (and 1 more)
-
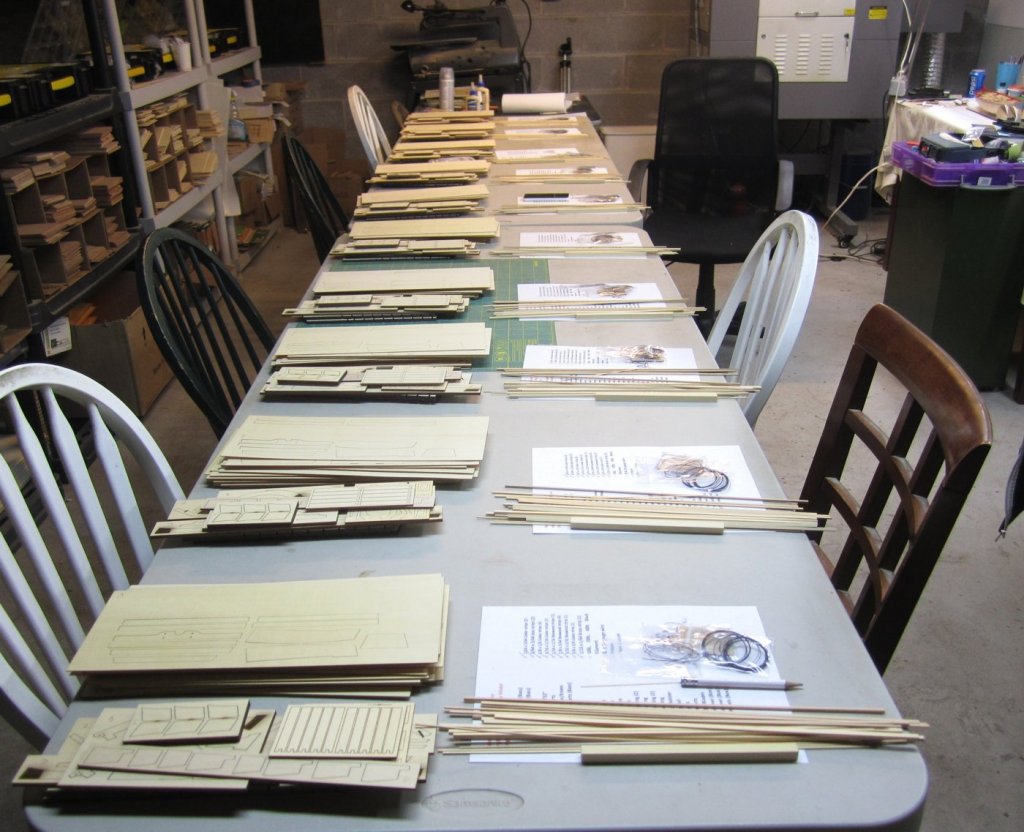
Thank You all for the orders and business!!! Enjoy the kit guys. And for a sneak peak into the exciting world of a one-man shop........the Syren sweat shop......longboat kit production in progress. Today's abysmally tedious, stick a fork in my eye excitement!!!! 😊
-
Ok guys.....the next batch of ten kits is available. I know that they wont last very long. I apologize in advance for the wait but I am making them as fast as I can. The next batch of ten kits will be a few weeks in all probability as I wait for the next load of milled Cedar sheets and the holidays. I am still waiting on my order from the sawmill, then they are given to my wood guy to mill into sheets. Then I can start kit production on teh next batch. Happy Thanksgiving guys. Chuck
-
You can use the laser char as a guide and when he char has been removed from each frame edge you are done.
-
Doubt it.....there really isnt anything extraordinary about it. Its just a matter of being careful. But we will see.
-
Looking excellent Rich!!!! Brind some 220 grit and 320 grit sandpaper to the meeting. We will do a little demo.
-
Nobody has said you cant!!! To each is their own. Its just a matter of choosing what you prefer. When you get yours, you can drill straight through. Chuck
-
I couldnt say....best to try them both both and select the one you like best. I have never used the water-based version.
-
Nicely done Jim.....glad to see you making steady progress. Now its time to make some frames after the stern transom is glued into place.
-
I believe I used a bigger drill bit. But it isnt necessary to go all the way through like a real bolt. This is just a cosmetic appearance for those bolts. Why risk tear-out on the back side or the drill bit wandering if you can get neater results just simulating the process. Since you can only look at one side at a time...it doesnt really even matter that they are perfectly lined up. Who would ever know!!! My preference is NOT to needlessly complicate things when it can be avoided without compromising on the appearance or accuracy of the model. But I realize some folks are sticklers for such things and that is perfectly fine as well.
-
Welcome aboard Simon......It will be great to see your progress on the longboat. I am sure you will find it a very enjoyable experience to be part of the group...
-
Looks great Ken.....hope to see the progress in person at our next meeting. 😊 Chuck
-
That might be tough but they are very small. They are about 1/4" long and 1/32" diameter. So I place a short length of square boxwood 3/64" into my dremel and have it stick out about 5/8 ". Then I round it off with a sanding stick. Each one is good for a pair of Thole pins and takes just a minute or two to make. Chuck
- 421 replies
-
- 8
-
-
- medway longboat
- Syren Ship Model Company
- (and 1 more)
-
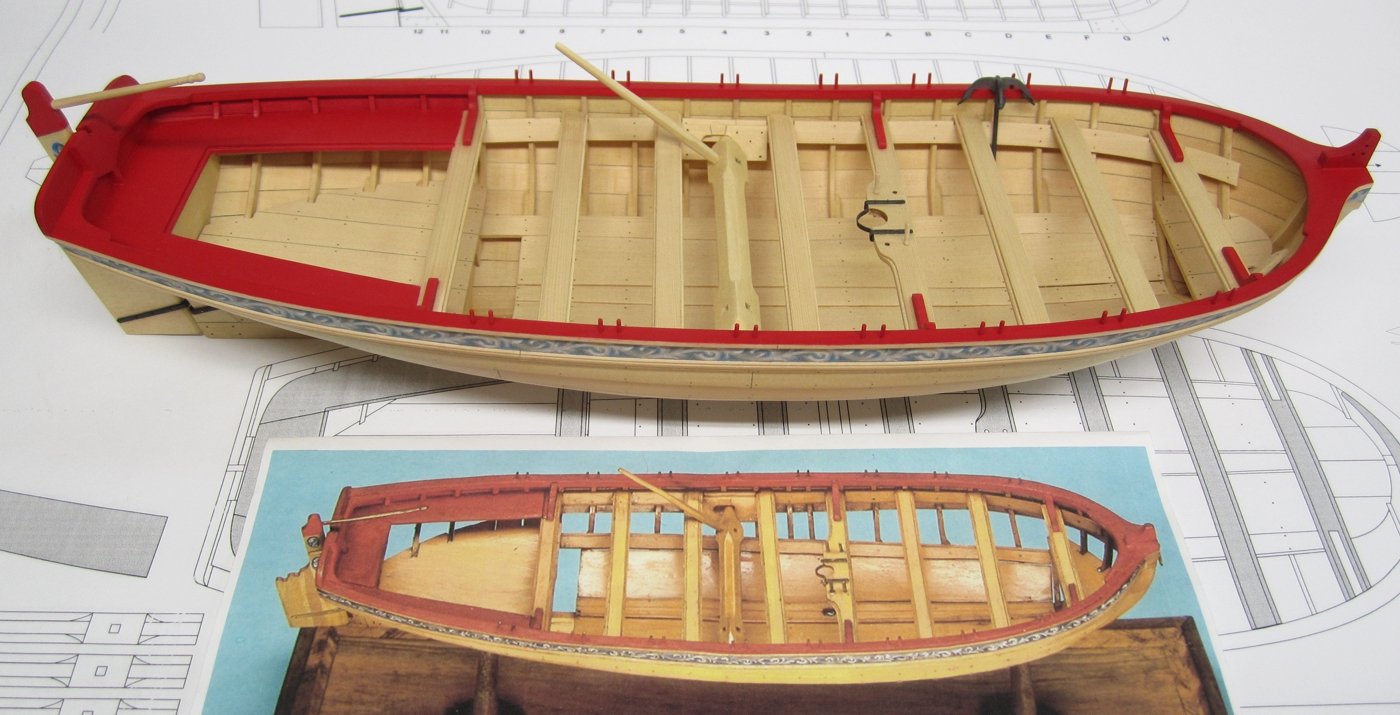
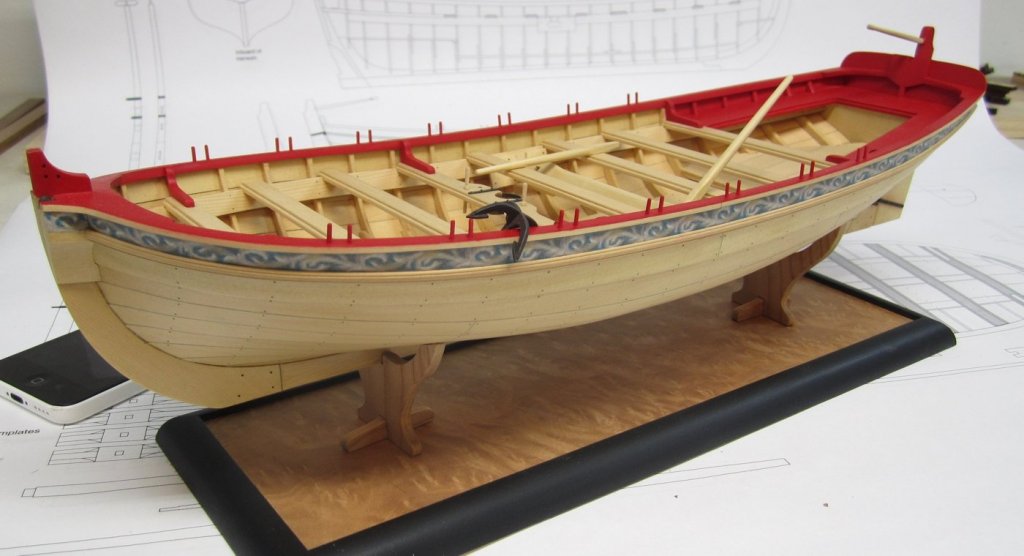
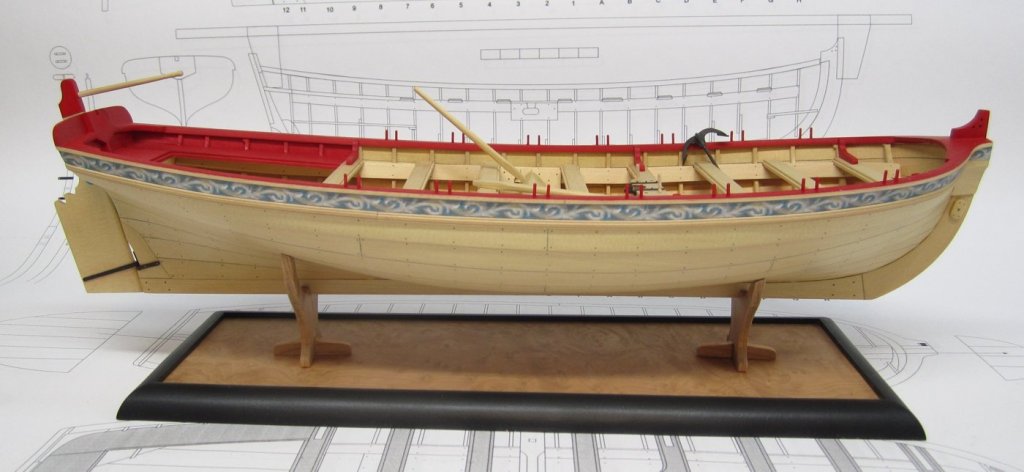
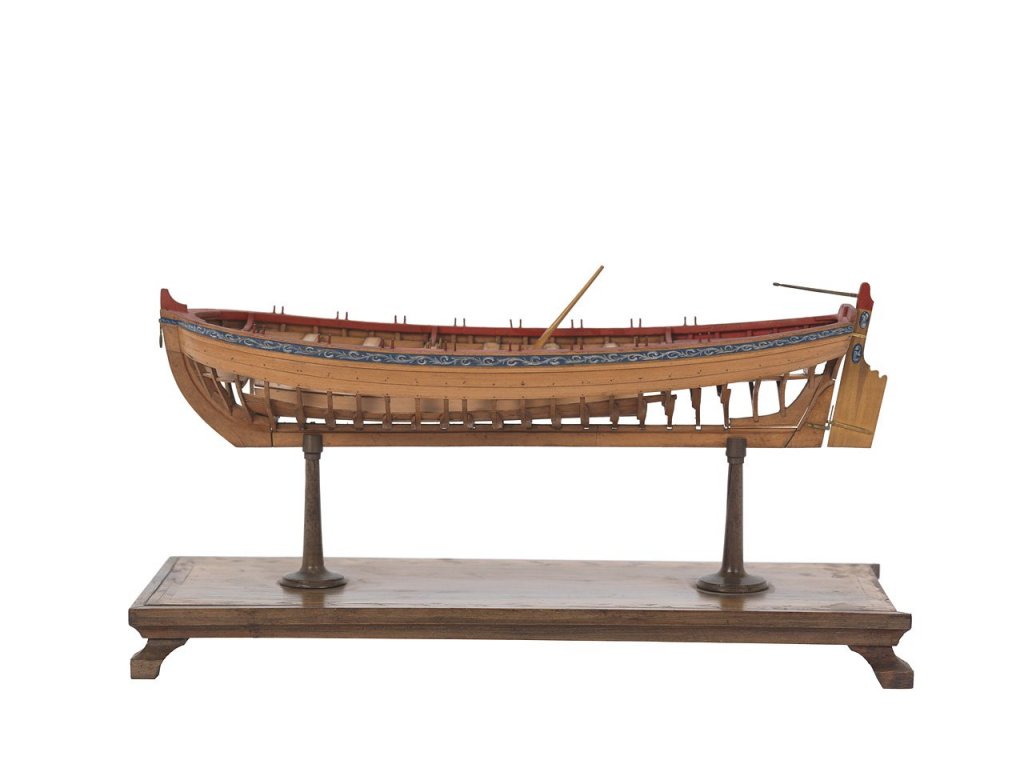
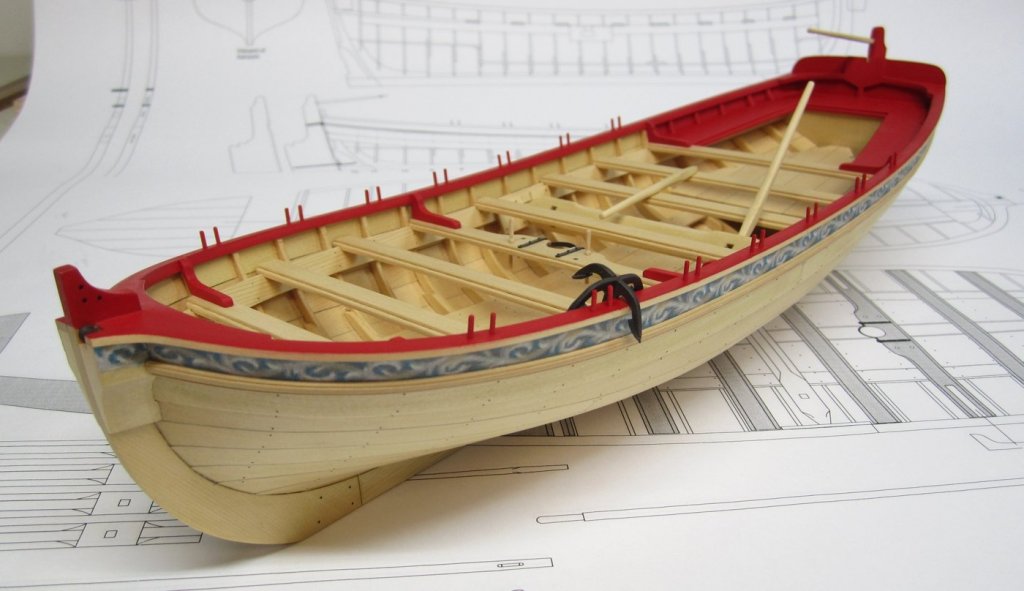
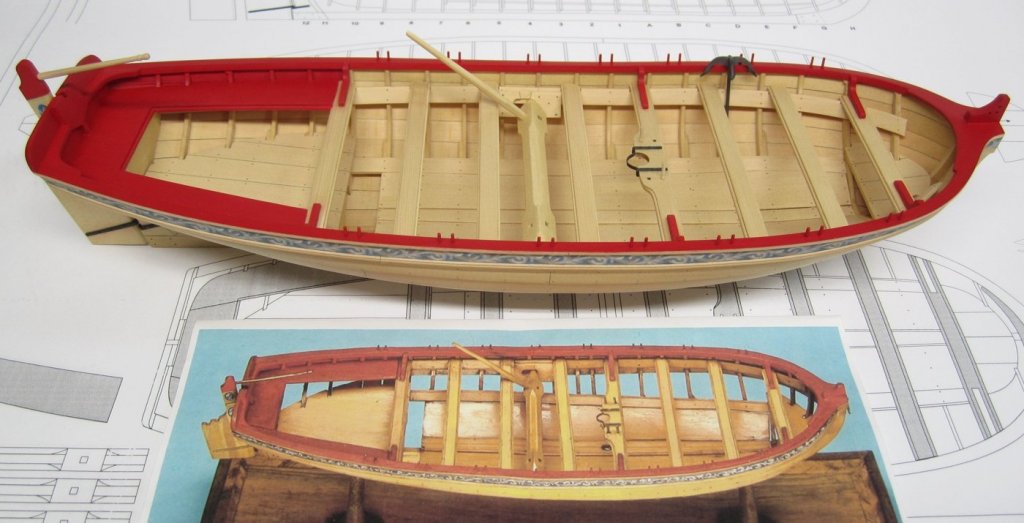
The photo below shows the thole pins on the contemporary model. There is a discrepancy between this model and the other contemporary model. This one has an extra row or two more pairs of thole pins than the other model. I opted to go with fewer. I made my thole pins from boxwood but you guys can easily replace with wire if you wanted. I took a 3/64" x 3/64" strip and rounded it off in my Dremel. I dont like the way the wire takes paint and because of this large scale I opted for wood instead, but this means you must also round off your stock in a Dremel as well. If that is too much of a hassle though then wire can be used in its place....probably 16 gauge or 18 gauge. I drilled holes along the cap rail with a #55 drill bit and glued them in place. Then they were painted red. But you could leave them natural too....if you use the boxwood that comes with the kit. THIS COMPLETES THE HULL!!! Except for the oars but I will do that after I rig it......So let the masting and rigging begin.

- 421 replies
-
- 29
-
-

-
- medway longboat
- Syren Ship Model Company
- (and 1 more)
-
Yupp....that is exactly right....it isnt an exact science and it has a lot to do with getting familiar with the feel of the strip as you bend and twist it. My advice is to just keep practicing and experimenting. Chuck
-
No I dont think so. I have never had an issue. It is a technique easier shown than described. Even in a video. It just takes some practice. Dont be afraid to get the hair dryer really close to the plank. You will get some spring back but that is normal. Try holding the bend in position until the plank cools a little bit. Your plank might also be too thick for this method. My planks are usually no thicker than 3/64". Chuck