Chuck
-
Posts
9,719 -
Joined
-
Last visited
Content Type
Profiles
Forums
Gallery
Events
Everything posted by Chuck
-
 Its quite pertinent to the discussion...I like the heaviness of the iron....even the small one does the trick. I like the additional surface area better too. I really dont like those small heater things. Just my preference. You can heat up a 3" length of plank quickly if not a longer section and really press it down firmly with the iron. You wont get the same affect on the plank with that.
- 1,784 replies
-
- 2
-

-
- winchelsea
- Syren Ship Model Company
- (and 1 more)
-
😂..all done.....man you guys are demanding....LOL.
- 1,784 replies
-
- 2
-
-
- winchelsea
- Syren Ship Model Company
- (and 1 more)
-
it works like a charm......its my method of choice.....well done!!! Its a very quick method to use. It requires few tools.....you could always use any old full sized iron. But having the smaller one is much better. You also wont get in trouble from the admiral, LOL.
- 1,784 replies
-
- 2
-
-
- winchelsea
- Syren Ship Model Company
- (and 1 more)
-
Thank you Martyn!!!! If we were in a pub I would buy you a pint.
-
1) How long do you need to keep the iron on the wood? Not very long....you will need to experiment. Just a few minutes and move the iron back and forth just like you are ironing. If you get too much spring-back...just bend it some more. You will get a feel for it. Once you wet the strip with your finger....just dip in a container of water and run it across the strip first. When you apply the iron...it will sizzle as the water evaporates. As far as the time and temp...it all depends on the type of wood you are using. No absolutes. You must experiment. Cedar doesnt take long at all but boxwood will take longer. Some things are best discovered by experimenting on some scrap wood in your shop. Your conditions and equipment will vary from mine. The important thing is the concept. 2) How long does the wood need to cool before you unclamp it? Just a minute or so. OK - just thought of a 3rd question - if you're using a hair dryer, how long do you need to heat the wood? Same applies. It depends on the thickness and type of wood. Best way to find out is test it. Just bend a few test strips and play with it. It all depends on how hot your hair dryer is. Some folks like to use a heat gun but I find those too hot and dangerous. Should you guys give this a try please do share your thoughts and experiences in your build logs. I am certain that the answers to the questions above will differ from person to person. Like everything else, there is a learning curve!!!! So keep at it until you have that "light bulb" "ahhaa" moment. It would be good to see how you guys do this and what your opinions and experience were. Chuck
- 1,784 replies
-
- 7
-
-
- winchelsea
- Syren Ship Model Company
- (and 1 more)
-
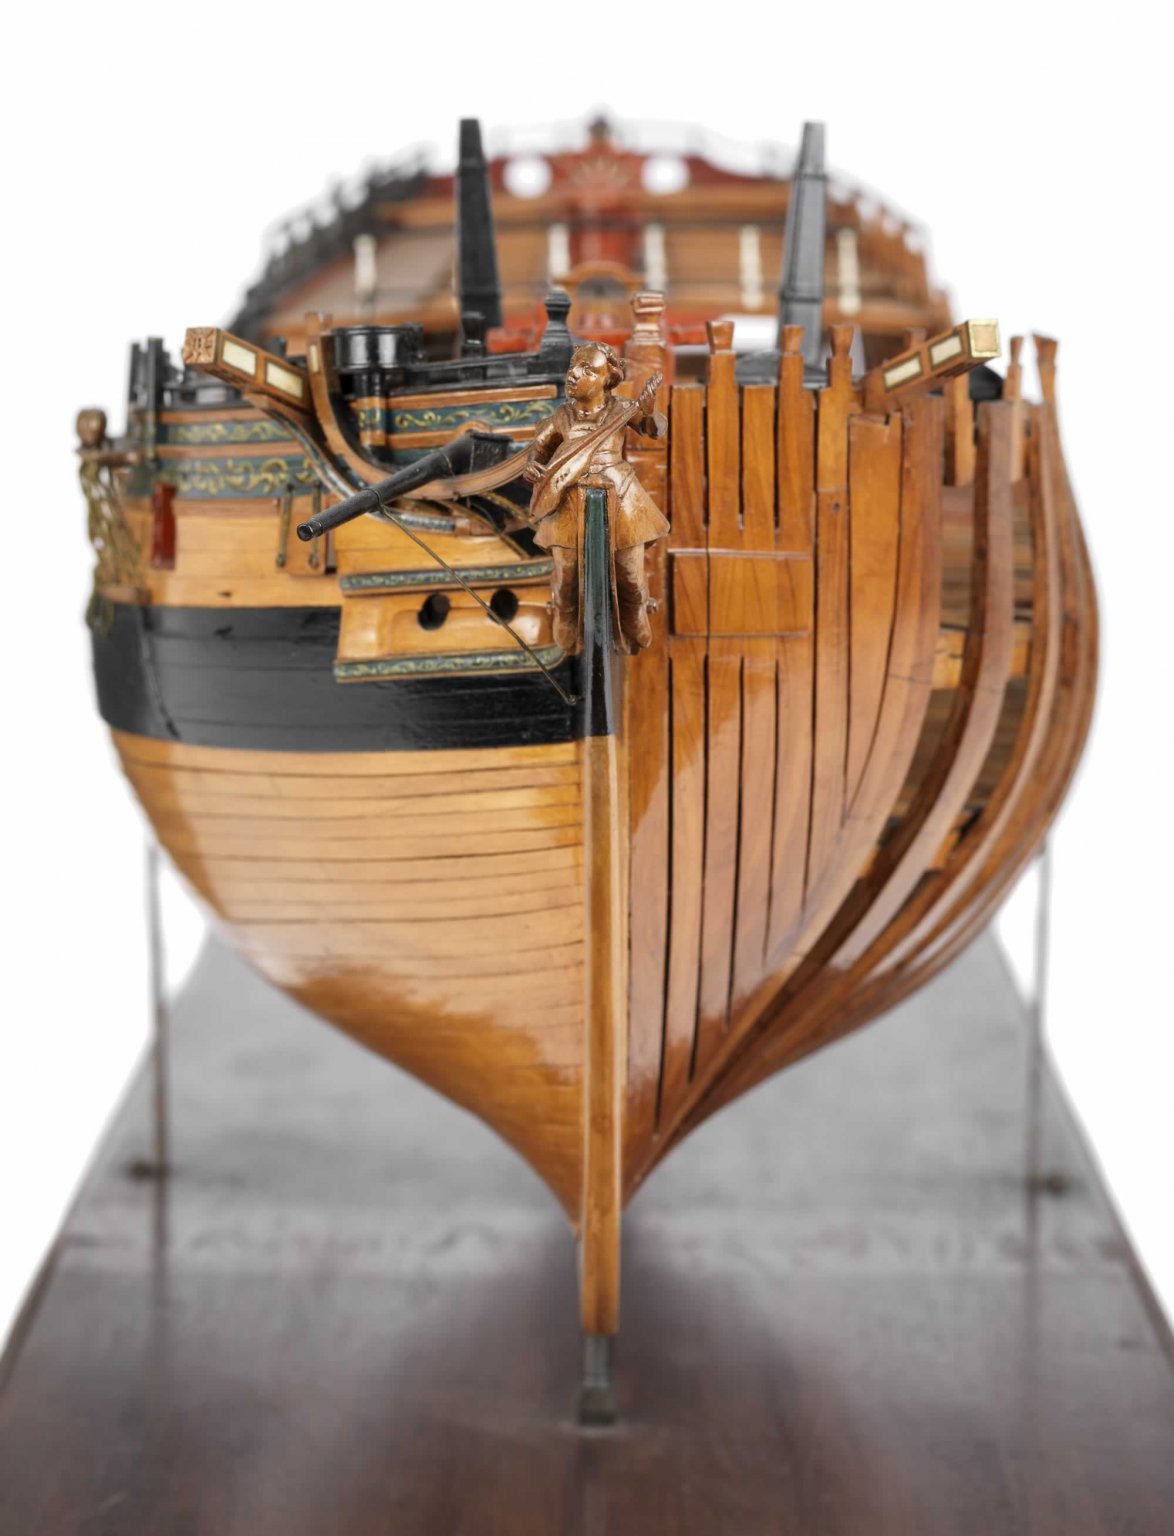
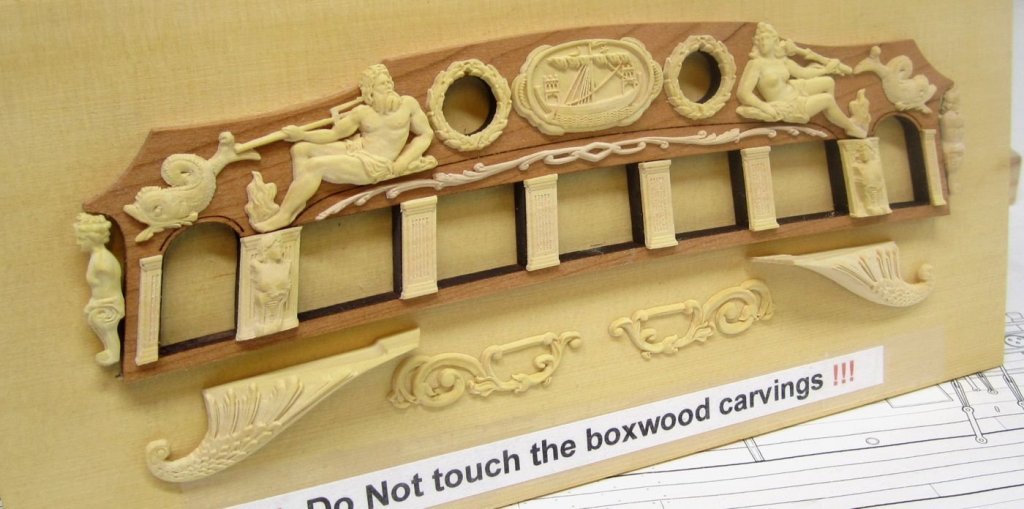
As you guys know, The decorations for the Winnie can be purchased in either milled wood or as cast resin pieces. There are 18 individual carvings so this is a large set. There is of course the figurehead.....and then there are the stern decorations, drops and trailboards. See below....although the columns are not included. These will be made via laser cutter. The columns are something that cant be CNC carved because the ones for the quarter galleries will differ from model to model. This also reduces the cost of these....which will be expensive. The figures on the two columns will be provided but not with the columns. They will be separated from them. You can buy the CNC milled carvings directly from Jack (HJX) and he will give you those details. They are available milled in two different woods. Boxwood and a Chinese Jujubewood. They look almost identical, however the boxwood versions are slightly more polished when milled. Jack will explain. The JuJubewood is much more yellow when a finish is applied. Here is a photo showing both woods....cant really tell them apart. jujubewood below... And boxwood below... The Boxwood sets will cost you.... The price of the whole set of boxwood sculptures including the figurehead is $320, including postage. Jujube $270, including postage too. Contact Jack directly for these. I am in the process of making cast resin sets in tan which dont need to be painted. They look really great. If you want to buy these instead, I dont know the final cost yet but the set will run you around $150. Here is an image of the resin cast figurehead. I dont yet have the stern castings to show.

- 82 replies
-
- 13
-
-
Nicely done!!!
-
Check out my latest posts in my Winnie build log. I have tweaked my method a little and posted the process.
-
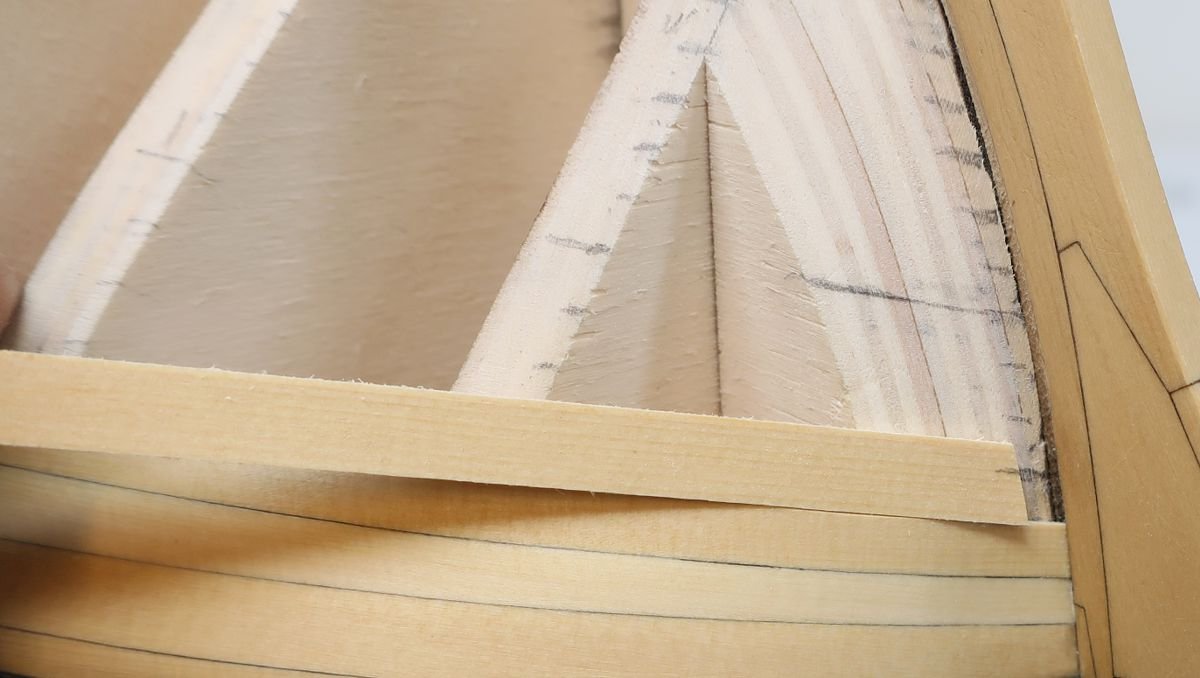
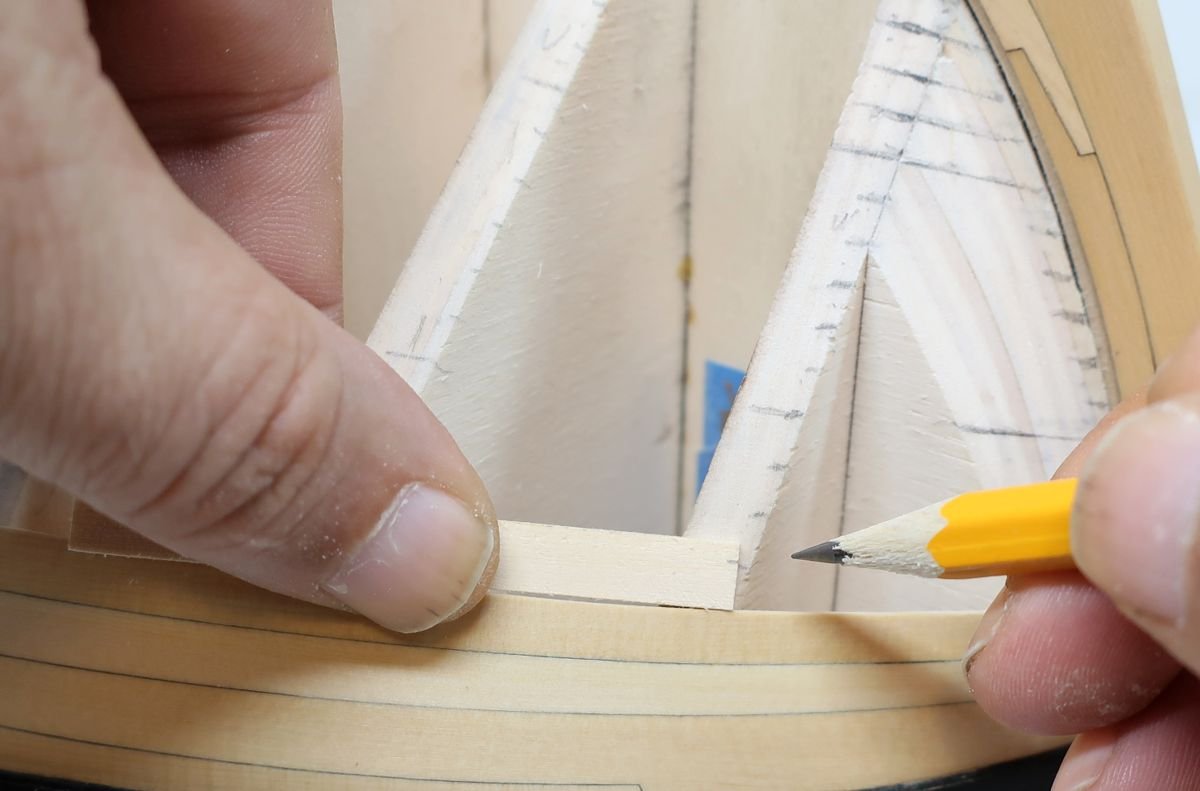
I was just asked via PM how you determine the size and shape of the curve before you bend the plank. Excellent question. Please if you have a question, dont hesitate to ask it in the open forum. I am sure many of you have the same question. Anyway....I forgot to show how I do that. But luckily I have an image from the Cheerful project. To determine the curve need, just hold the plank straight against the hull so it reveals the gap as shown below. This will reveal the curve you need more or less. I mark the widest point of the gap which is the apex of the curve. I marl it on the plank with a pencil. Then I take it to my "bending station" and position the apex under my hold down device so it becomes the center of the bend. I hope this clear. Its very hard to describe in writing. Once again you can see that the curve needed is not that severe.
- 1,784 replies
-
- 16
-
-
- winchelsea
- Syren Ship Model Company
- (and 1 more)
-
One important thing I forgot to mention. I am shifting the butt joints every TWO bulkheads using a 4 plank shift pattern as is typical. Every two bulkheads. If you only shifted one bulkhead which most folks do then the resulting pattern gets to busy and distracting.
- 1,784 replies
-
- 2
-
-
- winchelsea
- Syren Ship Model Company
- (and 1 more)
-
yes you can use this method. If you are using cedar, you can use a straight edge or metal ruler and a sharp blade to just cut the plank when tapering. Then finish it off with a sanding stick. Also, with the cedar there is no need to bend the strip the other way. It is so pliable that after edge-bending you are good to go.
- 1,784 replies
-
- 2
-
-
- winchelsea
- Syren Ship Model Company
- (and 1 more)
-
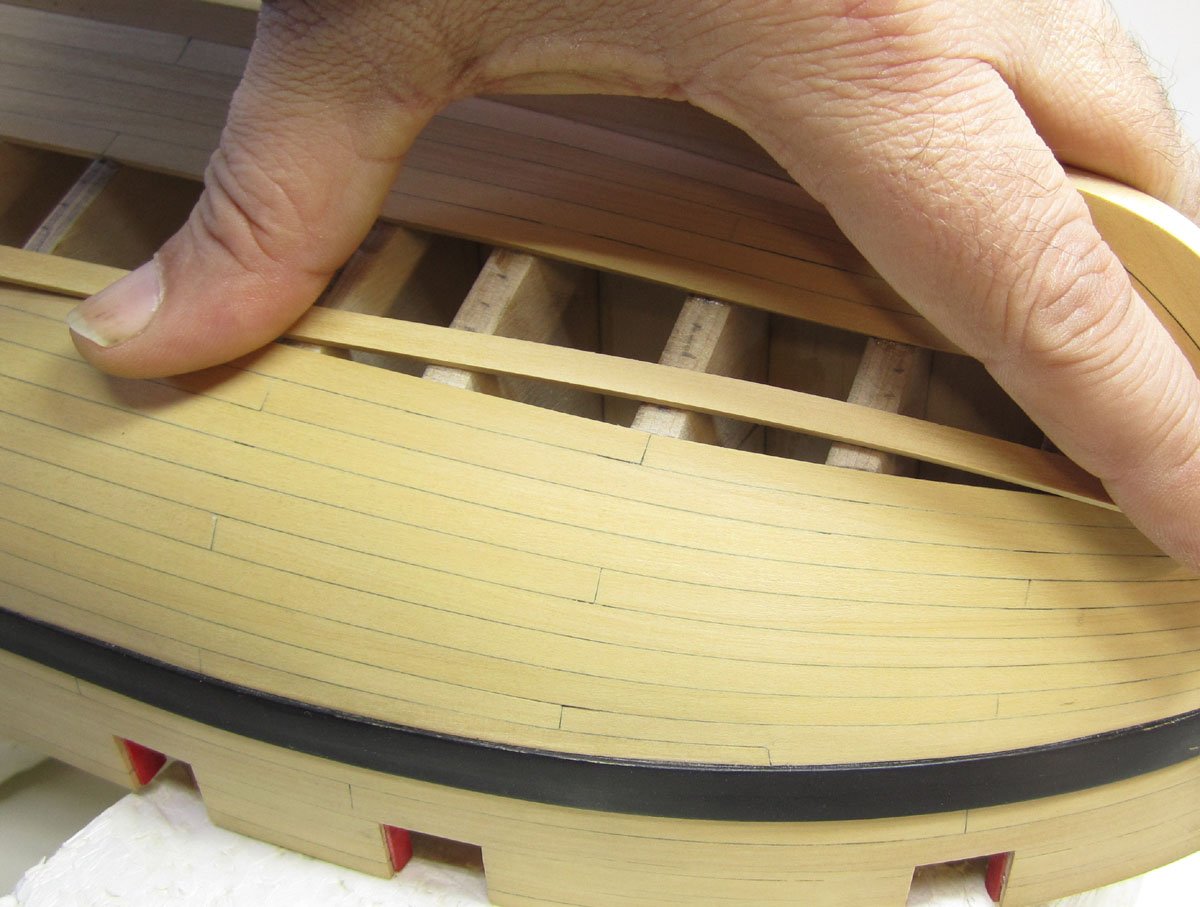
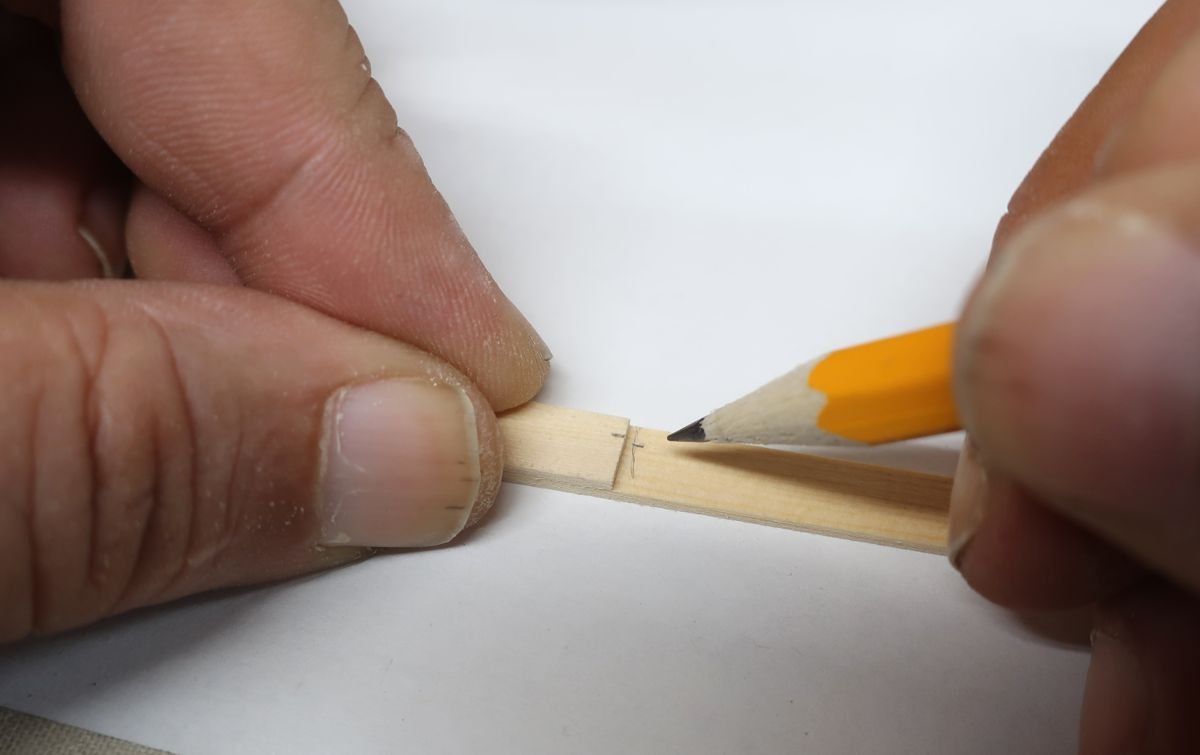
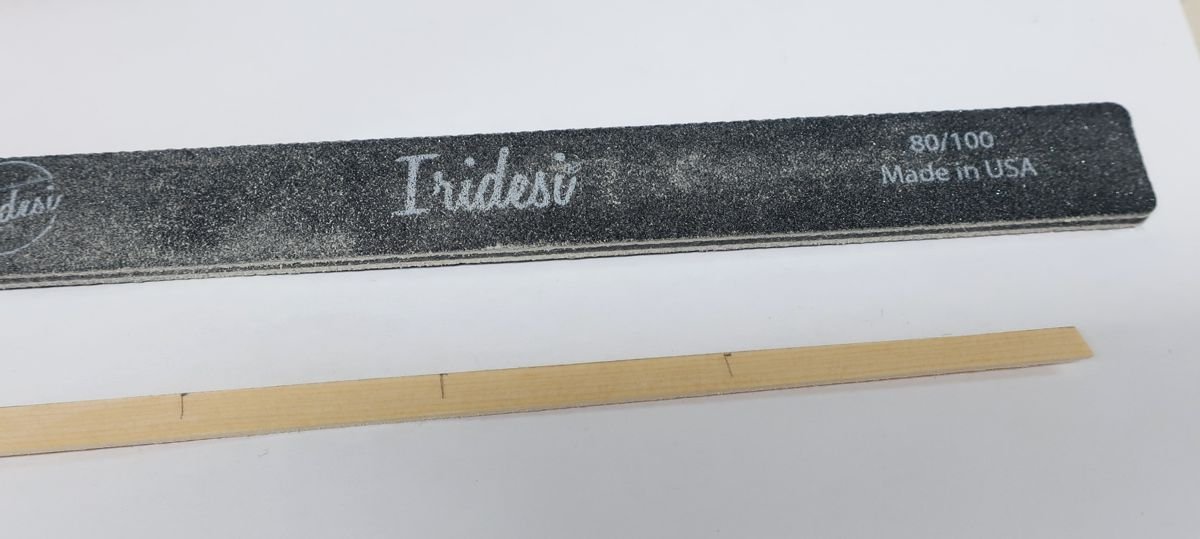
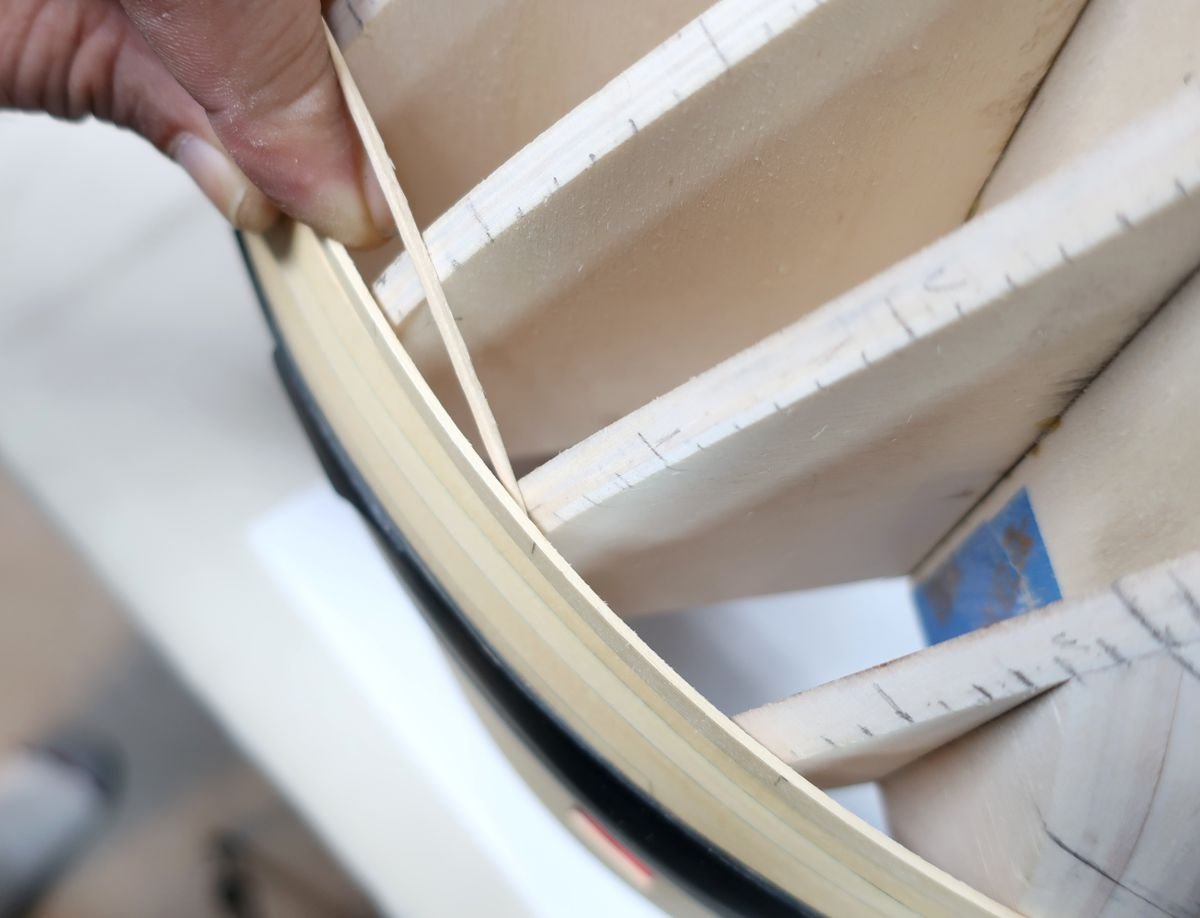
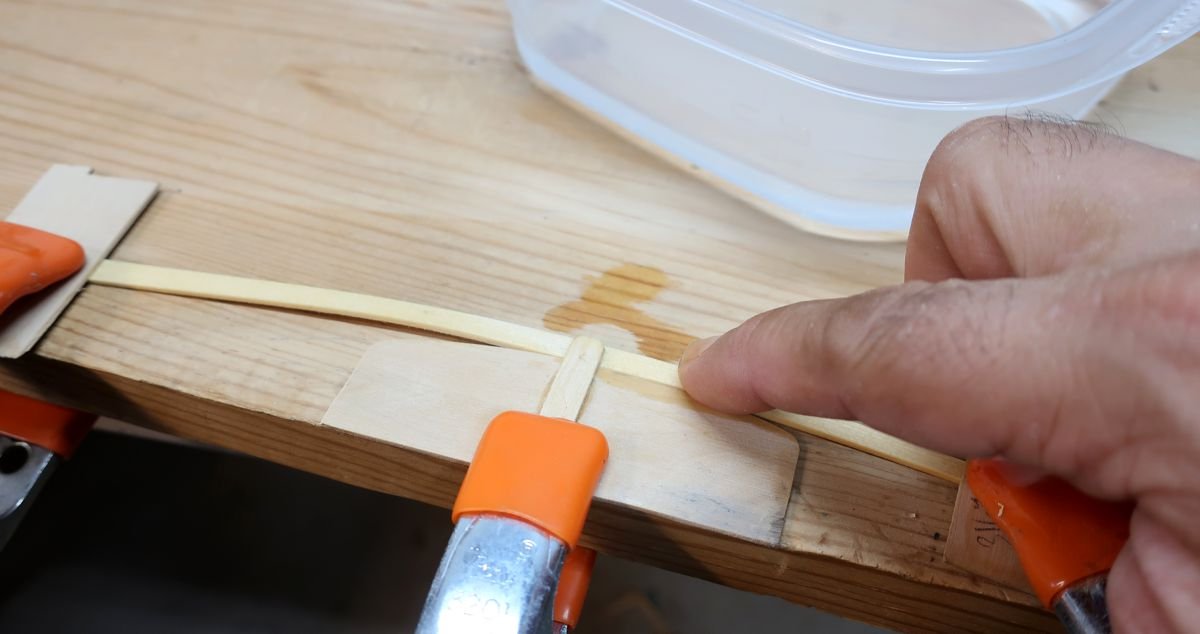
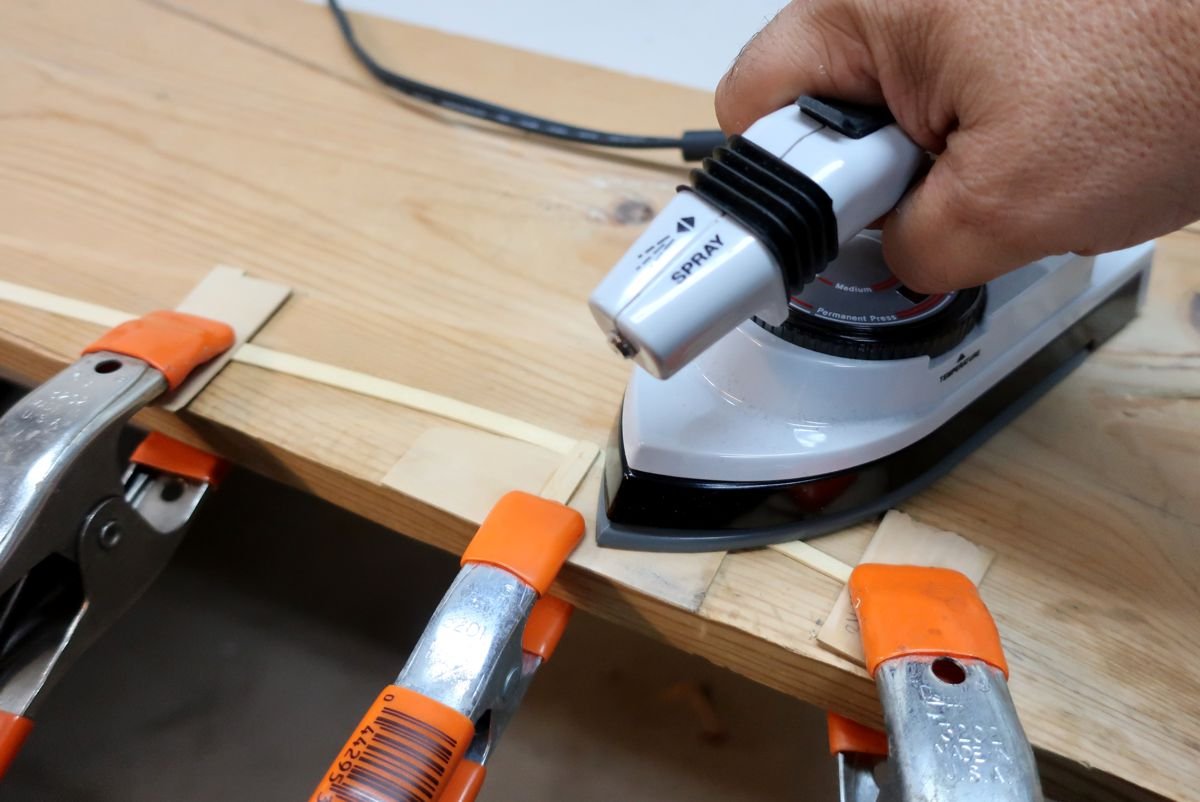
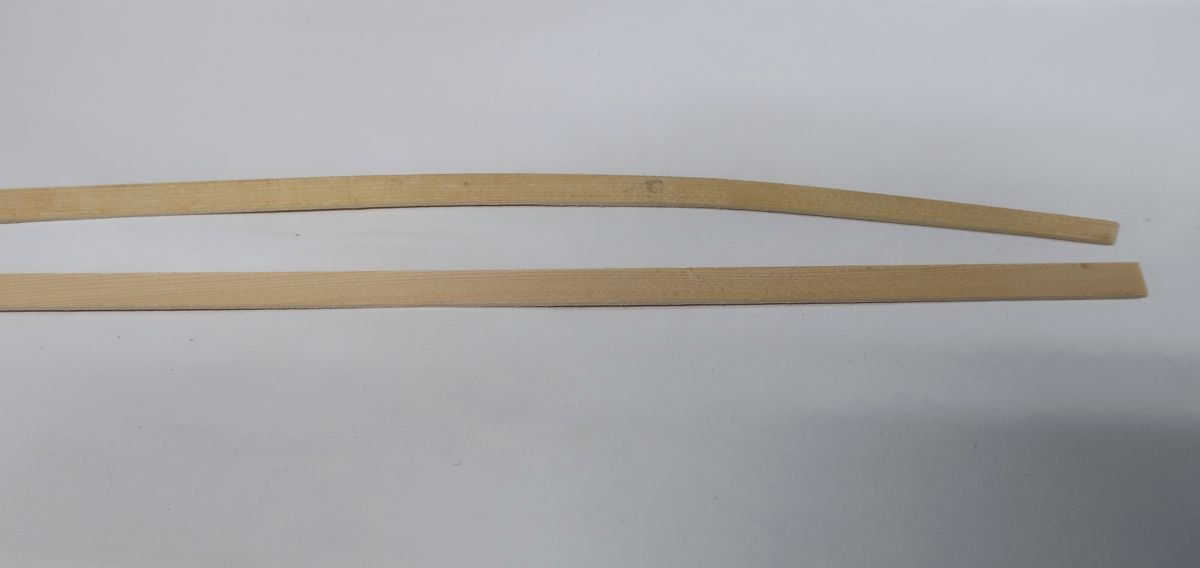
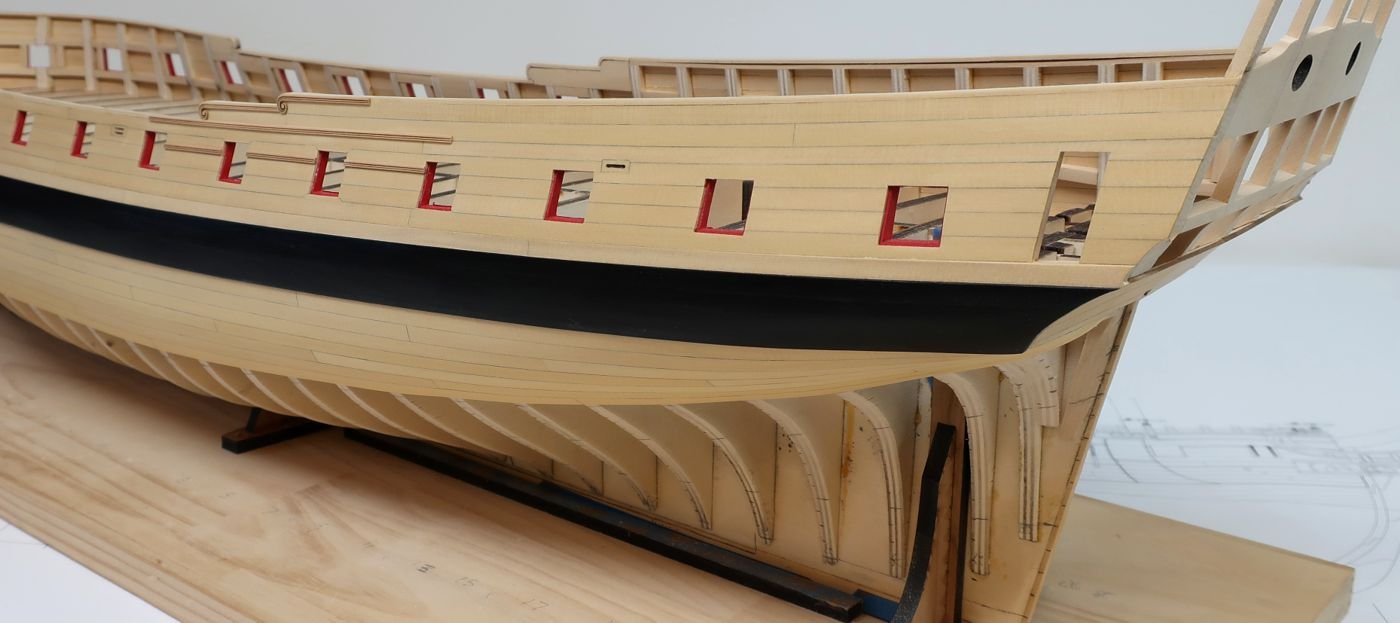
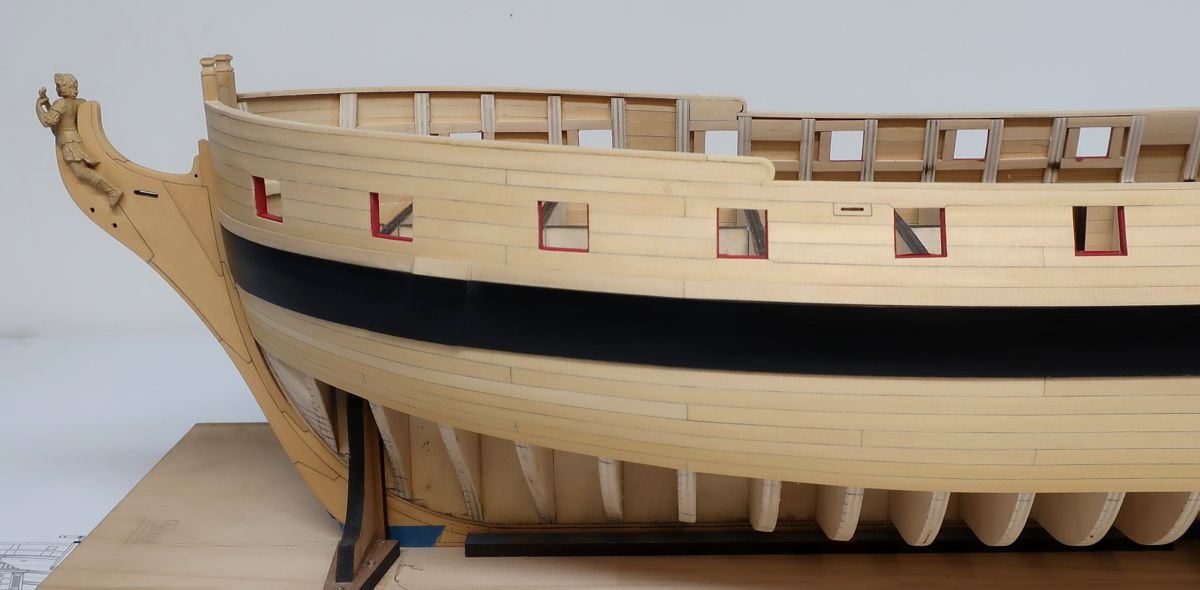
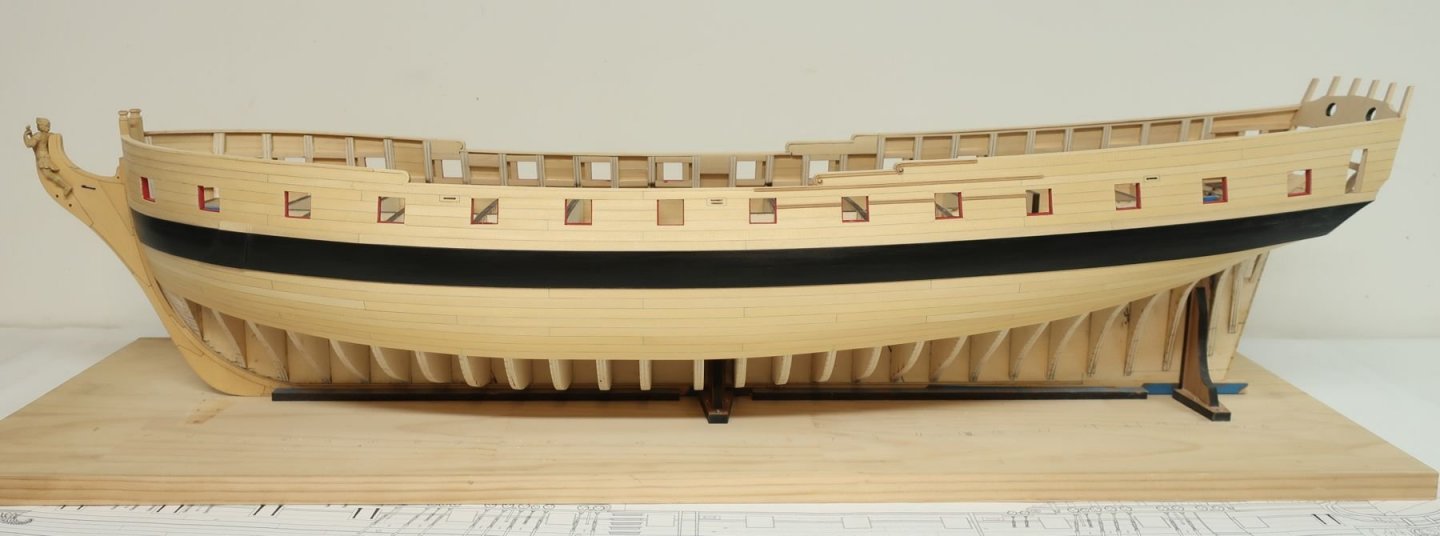
Started planking the belts today below the wales. Let me describe how I plank at the bow by edge bending rather than spiling the curved planks from sheets. You guys should give it a try. The first belt uses 1/4" wide planking strips exclusively. They are 3/64" thick. I will break it sown into steps and hopefully this reads well. I took still photos from the port side and I will do it again using video when I plank the starboard side. 1. - Take a strip and sand the angle to fit the stem. It will require beveling. Then mark the width of the plank from your lining off on that front edge. lets taper the plank for the bow. 2. - Then mark the locations for the bulkheads (the front edge with the tick marks). Dont obsess over the locations...you can just approximate. 3. Take a scrap length of 1/4" strip so you can mark the width of the plank at each bulkhead. 4. Transfer that mark to that bulkhead mark on your plank. 5. Then connect the dots with a sharp pencil using a straight edge. Then use a sanding stick, or blade to file the taper into your plank. 6. So far so good....but as many folks do, if you tried to force this plank on the hull it wont go well for you at this point. If you force the plank against the one already on the hull, the top edge pulls away from the hull dramatically. The photo below shows this....I even dropped a toothpick in the gap so you guys can see it better. You will never be able to force that top edge down. Instead, some builder create a creative run for the plank which is historically incorrect. OR they start putting the first of about five stealers and drop planks. Not the way to go. This plank needs to be curved to fit the shape of the hull while laying flat against the bulkhead edges. Here is one way to do this. My favorite way.....EDGE BENDING> 7. To bend the plank edge-wise, create a simple hold down device for the strip (center). Its just a 3/64" thick piece of scrap with a small length glued on top. Once clamped to your bench, the planks is held down by it. Note how the top edge is curved. I also clamp the forward end of the plank and the other end while edge-bending it dry. Now you can see that the plank is starting to lift up. Bend it until it just starts to lift up. Clamp it down but use some scrap on top of the plank so the clamps dont damage the strip. I prefer dry heat bending....but if you must....just dip your finger in some clean water and run it down the area of the strip being bent. Not a lot.....just to wet it a bit. I am doing this for each plank. 8. NOW...I bet you thought I would be using a hair dryer to heat - bend this plank. I do use one.....BUT, I have since switched to something different. It works even better!!!! Its great for wider planks. I still use the hair dryer to twist and bend strips the other way. But at the bow....you only need to edge bend it. Note that the strip is already flattened out where it was starting to lift....you are ironing it flat again. Works great. This is a travel iron...its really small. They only cost about $20. I use this only for edge-bending and then switch to a hair dryer for twisting and other bends. They are not as hot as those soldering iron things with the fancy tips. Those get super hot....too hot. This small travel iron gets to around 400 degrees and you can adjust it. I use it on a pretty hot setting....around 300 - 350 degrees. 9. Below is the plank I bent in comparison to a straight plank. You dont have to bend them all that much. Sometimes when you test it on the model, there will still be lifting....that means you need a more severe bend. So take it back and bend it some more. Other times you may not have bent it to the proper curve meaning the distance from the end of the plank at the bow for the center of the curve wasnt correct. Then take it back and bend it again. No big deal. I find that the apex or center of the bend falls between the 2nd and 3rd bulkheads at the bow. As you work your way towards the keel, that location will change. The severity of the curve will also change. 10. Now I can take that strip and fit it in the rabbet and hold the plank with just one finger. No forcing. It lays flat against the bulkhead edges. But note, there will be gaps between this plank and the one already on the hull. You must tweak it so you get a tight fit with no gaps. It may require some beveling too. This is also when you check your taper to see if the plank fits within the tick marks you lined off on the bulkheads. If it needs some tweaking so you can stay on "plan" with your lining off....do that before gluing it into position. But once you have a good fit, cut the other end to length and darken the edge with a pencil to simulate the caulking. Then glue it into position. I do use CA for all my planking. Its the only thing I use it for. This plank below still needs some tweaking because there are gaps after bending. I managed to almost finish the first belt on the port side today. I have just one last strake to put on. Then I will switch to the Starboard side. I work one belt at a time on each side. Then I switch sides. Here are some photos and it is starting to come together nicely. I am sure I forgot to mention a few things on this long post but feel free to ask me any questions. This is basically how I plank every hull after lining it off. I must also mention that I bend and twist the strakes at the stern with the hair dryer to get the best fit after I establish the taper...just like I did above.

- 1,784 replies
-
- 45
-
-
- winchelsea
- Syren Ship Model Company
- (and 1 more)
-
Nice progress. 😀
-
I should have chapter two done in a few weeks. I may not be completed with the planking but I can describe the process. Once hull is planked its the end of chapter two..... Chapter 3 will be the framing and completion of the stern transom and quarter galleries. This is where the fun really starts!!!
-
Beautiful.....you will be caught up with me pretty quickly!!!
-
Nicely done.....make sure those brackets will fit between bulkheads. They look a little wide. But otherwise everything is shaping up!!!
-
No 8-9 in total for everything. Two for the false keel and six for the bulkheads.
-
seven will do it but buy eight or nine in case one is horribly warped. Are you taking the plunge? Start a log and join the party!!!!
-
Thank you for saying...that alone makes it all worthwhile to do. I am glad you have started cutting and gluing parts. I do wish more would dive in and get some progress made. That is the hardest part. Just get started and the rest will fall into place. Chuck
- 1,784 replies
-
- 5
-
-
- winchelsea
- Syren Ship Model Company
- (and 1 more)
-
Guys I dont mind being asked. I usually do a lot more with these projects than most so its a fair question. But rest assured, you guys will do a great job on the planking. The hull size makes things much easier. If you are using the cedar that is an advantage as well. It is very pliable and bends so easy. You can literally tie thinner pieces into a knot. Its just a matter of going slow and getting a tight fit. Having the lining off completed will allow you guys to really concentrate on the craftsmanship aspect of planking and getting some really tight joints. My only advice.....try not to over analyze things. It causes "analysis paralysis" ....just dive in and start making some progress, otherwise your shop floor will remain too clean and absent of sawdust. This is a long term project so you need to get started and build up some momentum....otherwise it will never get finished. You will figure it all out once its on your work table.
- 1,784 replies
-
- 8
-
-
- winchelsea
- Syren Ship Model Company
- (and 1 more)
-
It’s not really important. Just use any scrap you have laying around. Make sure the base is larger than the model is long and wider as well. That’s about it. The strips can’t be wider or taller than the keel but anything will work.
-
Just a little more as it gets lower. Down by the bobstay holes. The top of the stem is fine. Check out the cont. model. Nice tight joints on those stem pieces by the way!!!!!

-
No you will have to pre shape each plank but I will explain how I do it. The last thing I need is to pre-spile 180 planks so you guys can have it even easier....LOL. Everyone does it differently anyway. On this particular model I wont be spiling the planks at all. I will be edge bending them all after tapering them. No need to cut them from a flat sheet to the correct curve. The hull is so large that the curve needed at the bow or stern is not that sharp. It should go very easily. I am also going to try making a video of the process. Because every strake is lined off on the hull you already know its width and length and how it should be shaped. The rest is easy.... I will start planking this weekend. Basically I do this.....in this order. I will try and detail each step. Just five steps. I dont clamp.....I dont wet my planks. 1. Taper a planking strip using my lining out at each bulkhead to find the width at each bulkhead. 2. Edge-bend the strip with heat after cutting the taper. 3. Twist the strip to fit on the hull if needed with heat. Every strip (especially at the bow and stern) needs to be bent, then twisted to lay flat against the bulkheads 4. Test it in position.....repeat steps 1-3 until good fit-trim its length to fit my butt joint pattern. 5. Bevel the edge of the strake with a sanding stick to fit tight against the plank already on the hull....line the edge with pencil to simulate caulking and glue it on. Repeat about 190 times ......until its all done!!!! I estimated 4 planks in each strake multiplied by 23 strakes on each side.....
- 1,784 replies
-
- 13
-
-
- winchelsea
- Syren Ship Model Company
- (and 1 more)
-
You are welcome....but it is a shortcut. I will always continue to urge folks to line off their hulls. It gets a bit tiring sometimes as many just think its too hard or daunting. Then they wonder why their planking looks "off". I will admit that it isnt fun to do. But it does make the planking process more fun and easy afterwards. And the results can not be argued with. My hope is that after doing it for folks just this once, that when they plank the Winnie hull they will see how different it looks. They will recognize how important it is to have a planking plan developed so when they plank the next model.....they will give it a try. Here is the other tutorial I did on the subject which also includes some info on spiling. Its my presentation on the subject when I give one at conferences and meetings. http://modelshipworldforum.com/resources/Framing_and_Planking/Lining Off your hull for planking.pdf Chuck
- 1,784 replies
-
- 7
-
-
- winchelsea
- Syren Ship Model Company
- (and 1 more)
-
Thanks for saying!!! The pdf docs of the tick strips are below....I will also place them in the downloads area. It cant get much easier than this. I am about to start planking in a day or so. Its my favorite part of the project actually. tickstrips.pdf tickstrips2.pdf Chuck
- 1,784 replies
-
- 8
-
-
- winchelsea
- Syren Ship Model Company
- (and 1 more)