Chuck
-
Posts
9,065 -
Joined
-
Last visited
Content Type
Profiles
Forums
Gallery
Events
Everything posted by Chuck
-
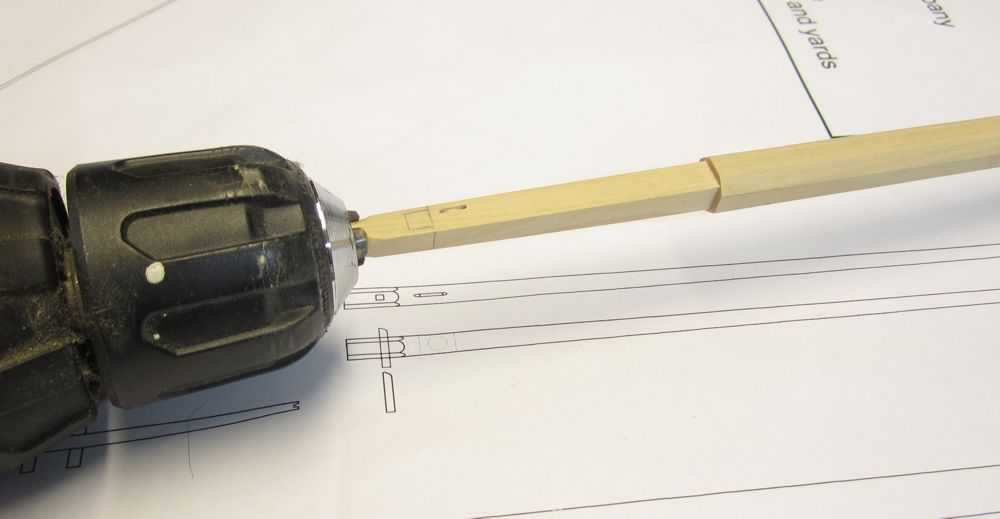
 One hand holding the drill.....the other has sand paper curled up and thats the hand you use to stabilize it. As you are running the folded paper back and forth you are keeping the stick from vibrating. Its much easier to do than it is to visualize.
- 1,048 replies
-
- 5
-

-
- cheerful
- Syren Ship Model Company
- (and 1 more)
-
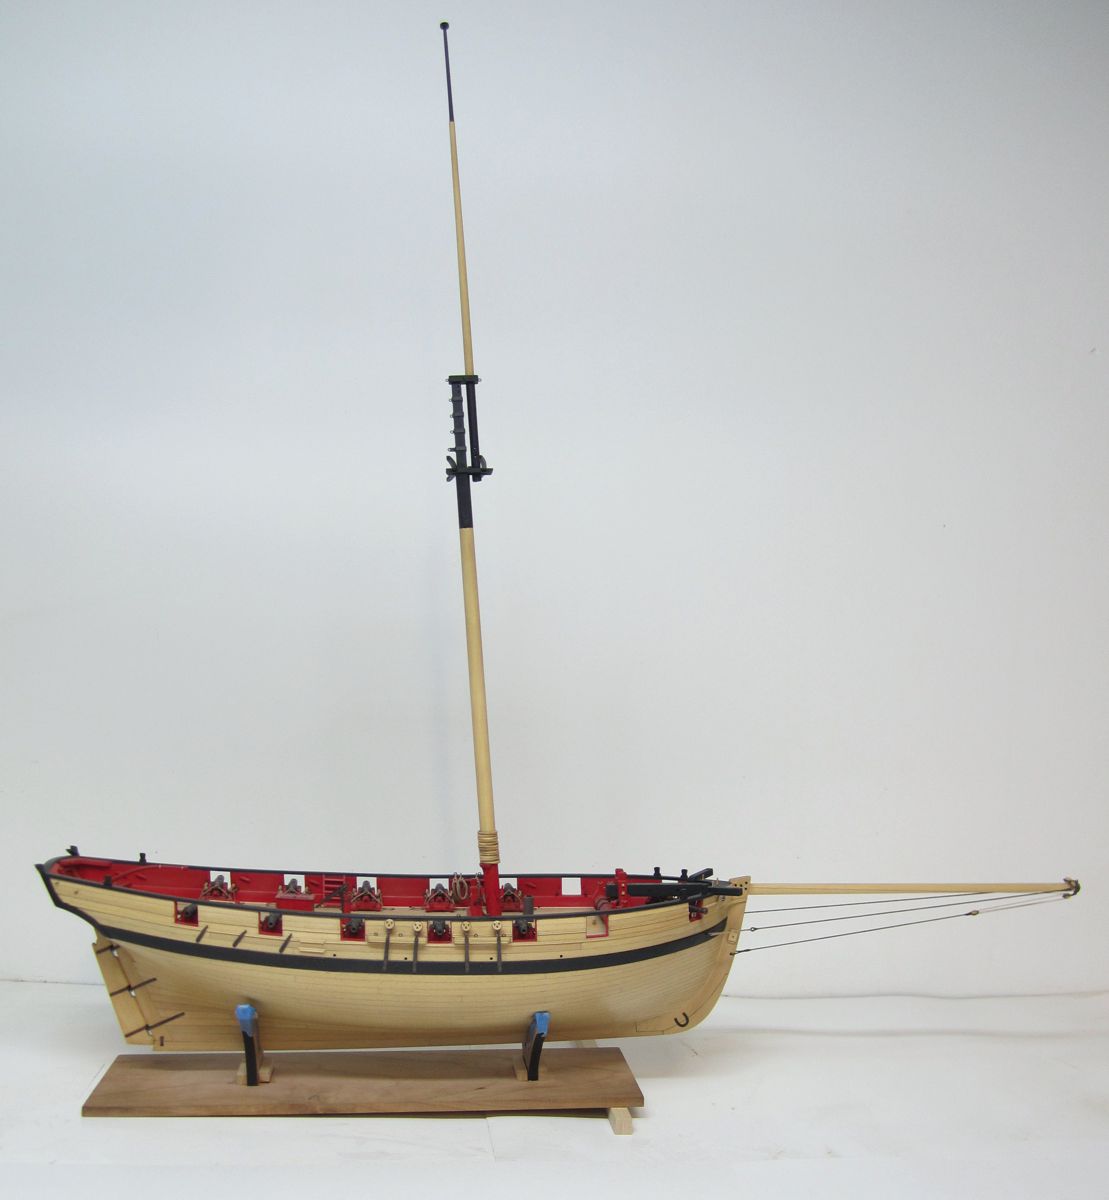
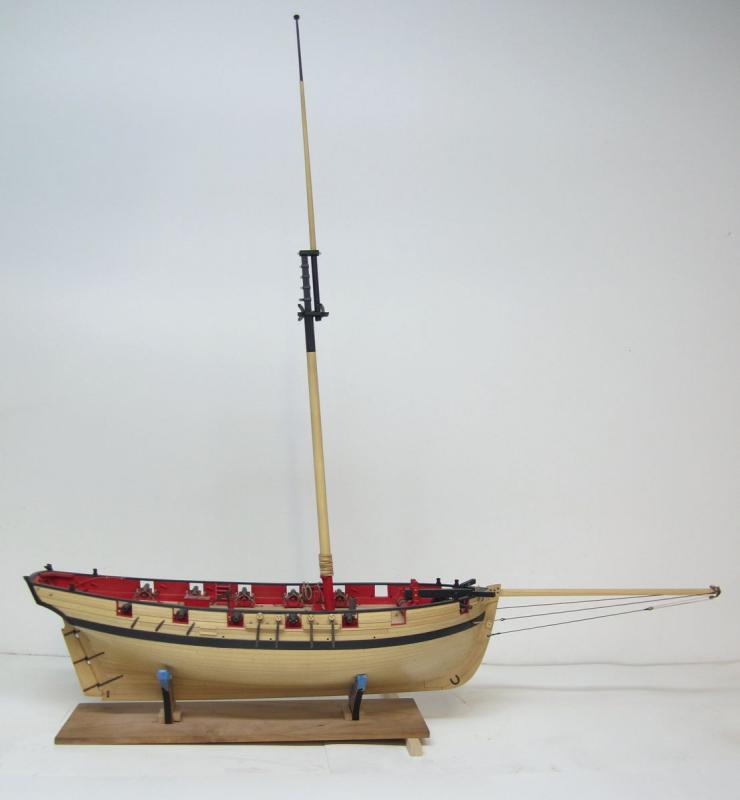
Thank You so much guys. Today I finished the topmast. Its all painted and the entire mast is now completed. Rather than start on the standing rigging with the pendants, shrouds and stays....I will be building the boom and gaff first. On this model it will be much easier to rig the finished gaff and boom first before tackling the shrouds and stays. This way I wont have to reach behind the standing rigging to rig them. Especially the where the rigging is close to the lower mast at deck level.

- 1,048 replies
-
- 35
-
-
- cheerful
- Syren Ship Model Company
- (and 1 more)
-
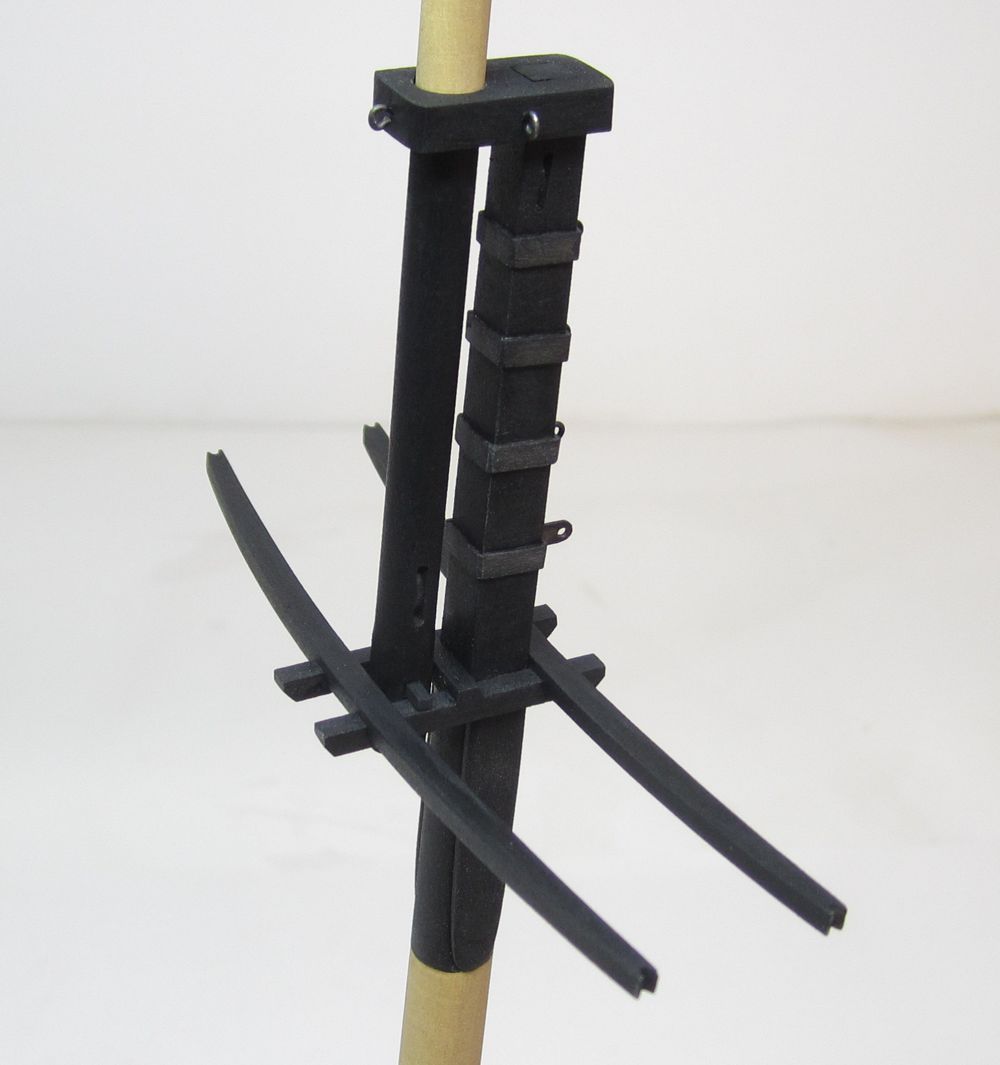
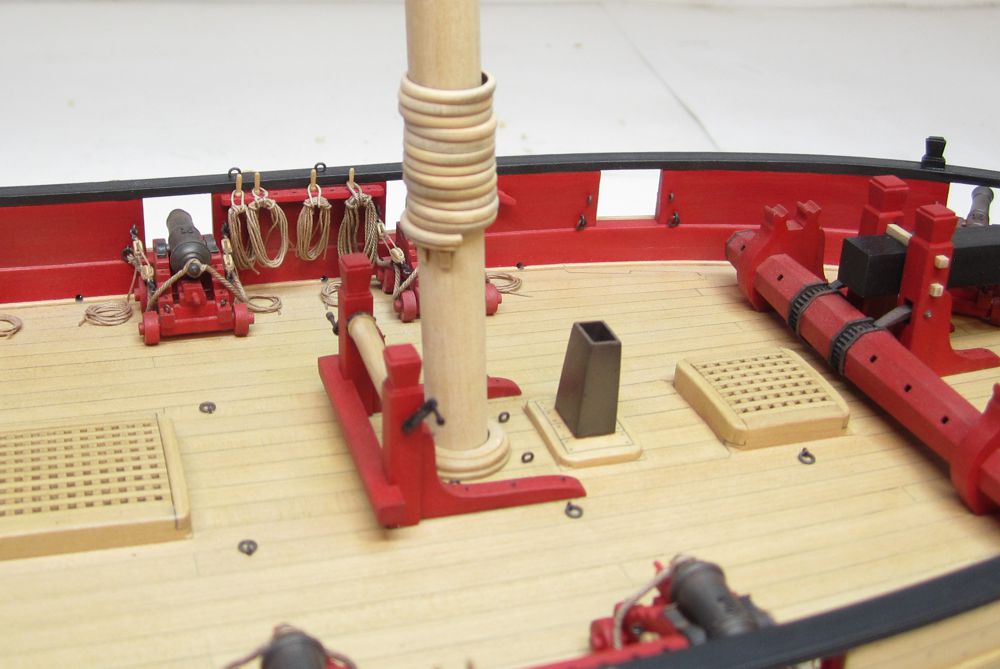
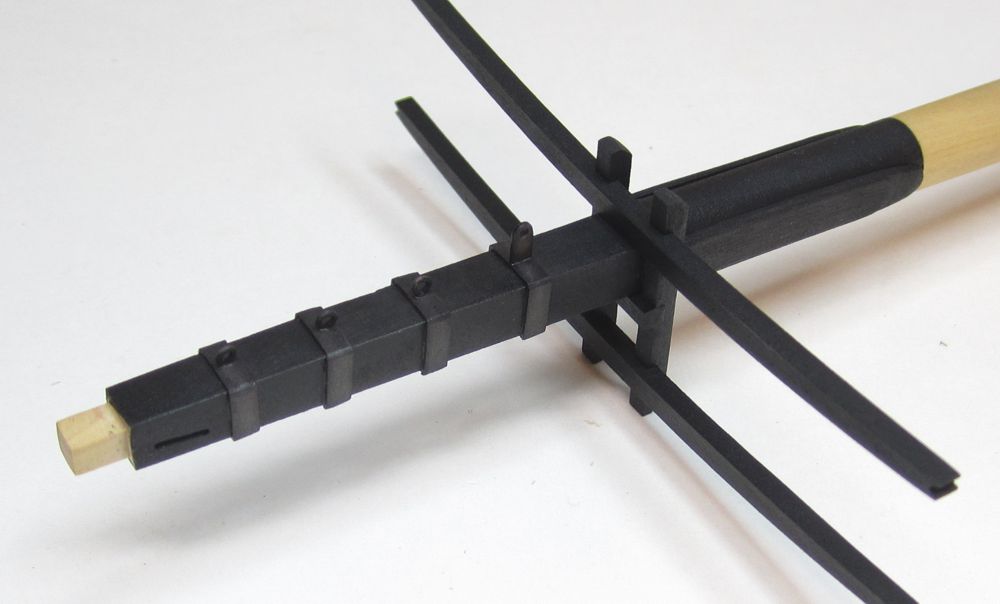
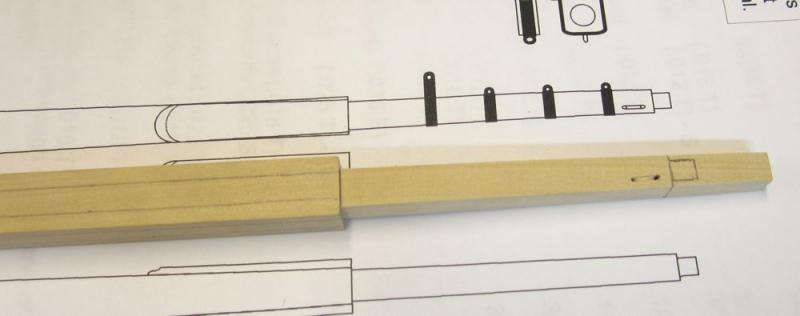
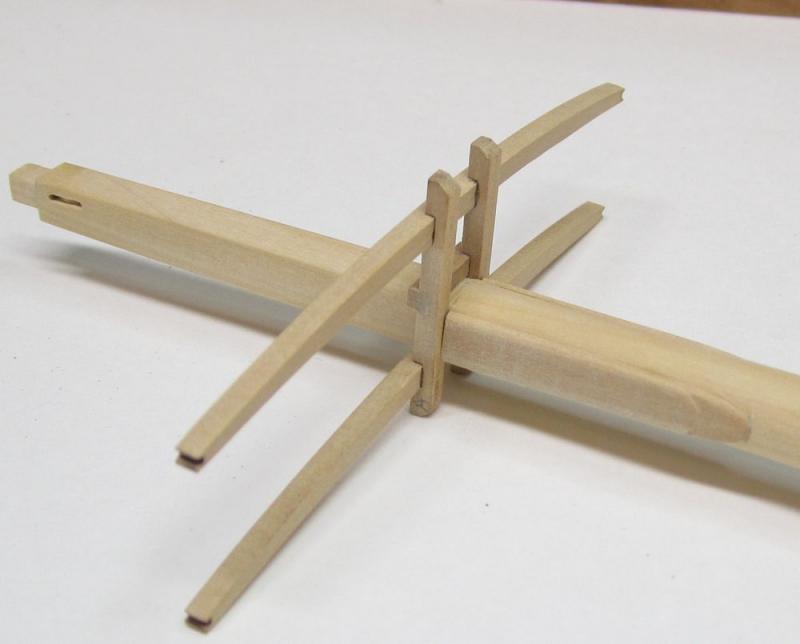
I figured the same Dan. The lower mast has been completed and I am now working on the topmast. To begin, I started with square boxwood stock. Then I squared up and tapered the top according to the plans using some chisels and sanding sticks. But before doing that I drilled the holes for the sheave as you can see. Once the top portion was squared off and tapered I finished up the sheave by rounding it off and cleaning it up. You can also see the 7/10/7 ratio applied to the lower mast. I am about to chisel it to an octagon in preparation for rounding it off. The entire mast was left a bit long so I have some extra to chock it in my hand drill. It was chocked and rounded off with some sandpaper. I also carefull added the taper to the rounded portion while sanding it. Then the boom rest was fabricated from a washer of boxwood 3/32" thick. Just like the mast coat it was shaped with its profile using needle files and sanding sticks. It was cut in half and then the small chocks were added around the perimeter after it was glued into position. I still have to add the cleats around the base of the lower mast as well. I made sure to make the mast hoops using the mini-kits from Syren and slip those on the mast before adding the trestle tree permanently. I was afraid that I would forget but I didnt. The trees were crafted from boxwood using the plans as a guide. It was pretty straight forward except for the fact that it must be angled properly on the mast. Once the cheeks were shaped and glued to the mast the proper angle for the trees was filed into the mast. The mast is angled or raked aft and the trees must remain parallel to the deck. So considerable time was used to establish the correct angle. Finally the cleats were added and the lower portion painted red. Then the masthead area from the bottom of the cheeks upwards was painted black. That was done after adding the mast bands and eyebolts. These will be used for the boom and gaff rigging later.


- 1,048 replies
-
- 36
-
-
- cheerful
- Syren Ship Model Company
- (and 1 more)
-
Great to see you in the shop Ryland....hope you are doing well. Enjoy the carving. One thing I did was draw in on the blank where all of my stop cuts were going to go before I started carving.
-
No fair....for you its just like cutting out a gall bladder. You must do that that ten times a week. But seriously, that looks very good I hope you had fun with it. I am curious how folks will think about the removal process. Dunk it in some alcohol and give it a go.
-
That looks very good.....lovely work. I was indeed hoping more would join in. Many carving blanks were sold yet nobody is joining in on the fun.... Hope to see more folks starting up soon.
-
Thanks The small barge is a project I am working on that will become a kit. So yes, you can build it once I complete it......but it will be a while.
-
Nothing other than gluing them to the base before carving.
-
Make sure you just give those vulnerable area a gently poke to make sure they are glued down good. Chuck
-
I have no idea....but either the six pounders as I have used or smaller would work. But even the smaller 3 pounders would be hairy to work in such a confined space. Either way we know they were there its just we have no idea how they handled them. I am pretty confident in going with the six pounders as indicated on the draft itself...I will however leave it up to the imagination as to how they were worked. Chuck
- 1,048 replies
-
- 10
-
-
- cheerful
- Syren Ship Model Company
- (and 1 more)
-
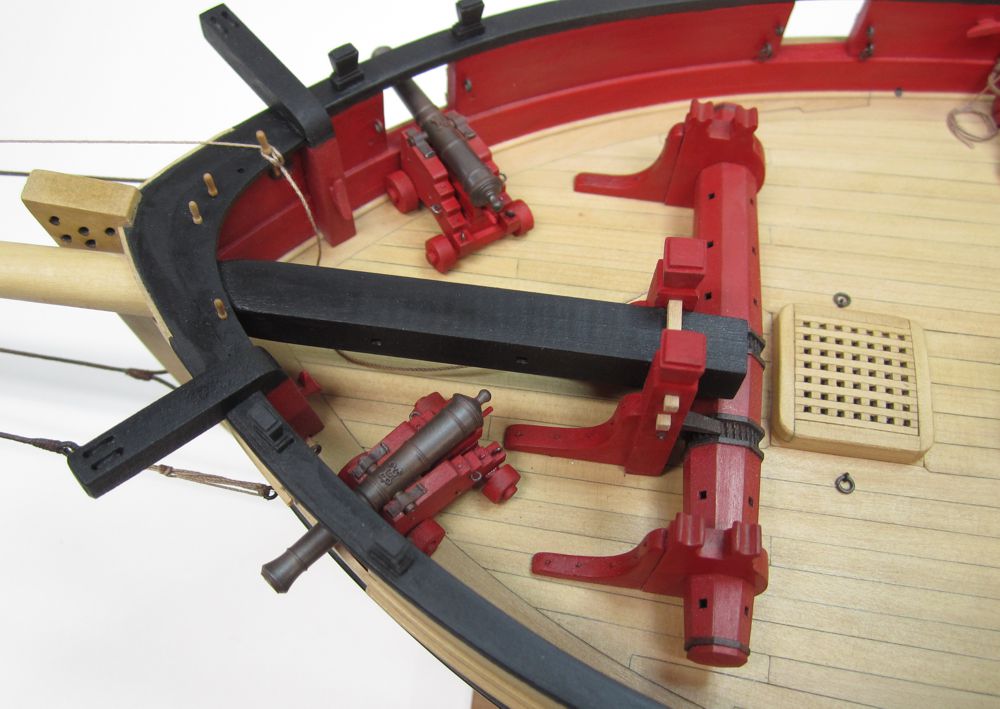
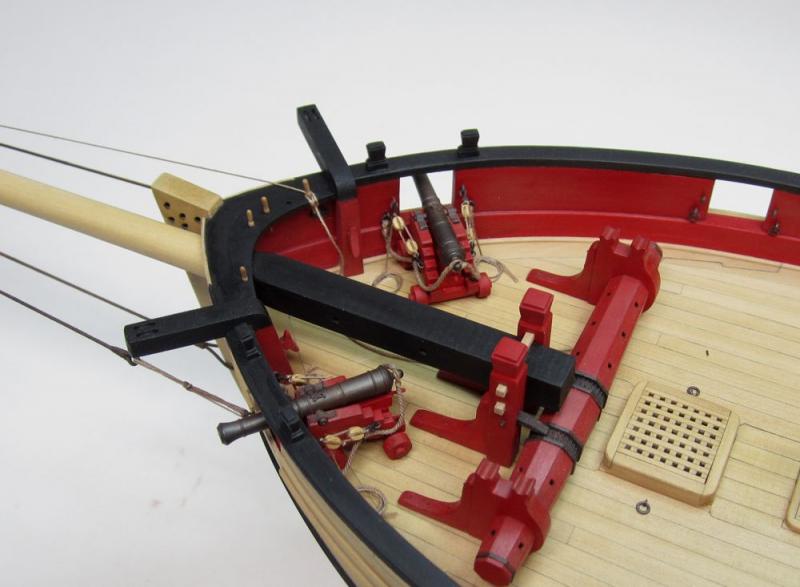
Here is what the six pounders look like rigged....... Those wishing to replace and use the smaller 3 pounder barrels just remember that the carriages will need to be reworked. They will need to be made the same height but reduced in length.
- 1,048 replies
-
- 22
-
-
- cheerful
- Syren Ship Model Company
- (and 1 more)
-
Thanks.....so my 1 11/64" barrels would be a great fit for those wishing to go with a 3 pounder gun instead. I am going to leave it as is however based on the notation on the draft. Plus its already completely rigged. Next up I will start making the lower mast. Thanks Druxey
- 1,048 replies
-
- 8
-
-
- cheerful
- Syren Ship Model Company
- (and 1 more)
-
I do agree with that Druxey 100%. Please help me with some math..... In fact, lets assume that as documented on the original draft that six pounders were used as chase guns. Based on my research, a short six pounder was around 6 feet long. At 1:48 scale that would be 1 1/2" long. The cannon on my model are actually 1 29/64" long or slightly shorter than the historical norm for a short 6'. So basically they are right on the money so-to-speak. So what you are looking at on my model is representative of a short six pounder if my math is correct. I could have gone shorter but that wouldnt bear out with the info I have on ordinance fro the time period. Not that this helps with the way they appear on the model.... But these guns are the size of short six pounder cannon 6' long. Have I made a math error though???? Math wasnt exactly my strong-suit. I also considered going with my 1 11/64" barrels but they are closer to 4 pounders and very small for the scale. So this was my thinking when deciding to go with this size barrel and the only thing I can think of is that my assumption of a six foot long short six is wrong. Can someone confirm that 6' long is an accurate premise for a short six pounder at this time? I am using several sources for this info Arming and fitting.....Goodwin Ship of the line.....Lavery Volume II of Swan series....Antscherl
- 1,048 replies
-
- 7
-
-
- cheerful
- Syren Ship Model Company
- (and 1 more)
-
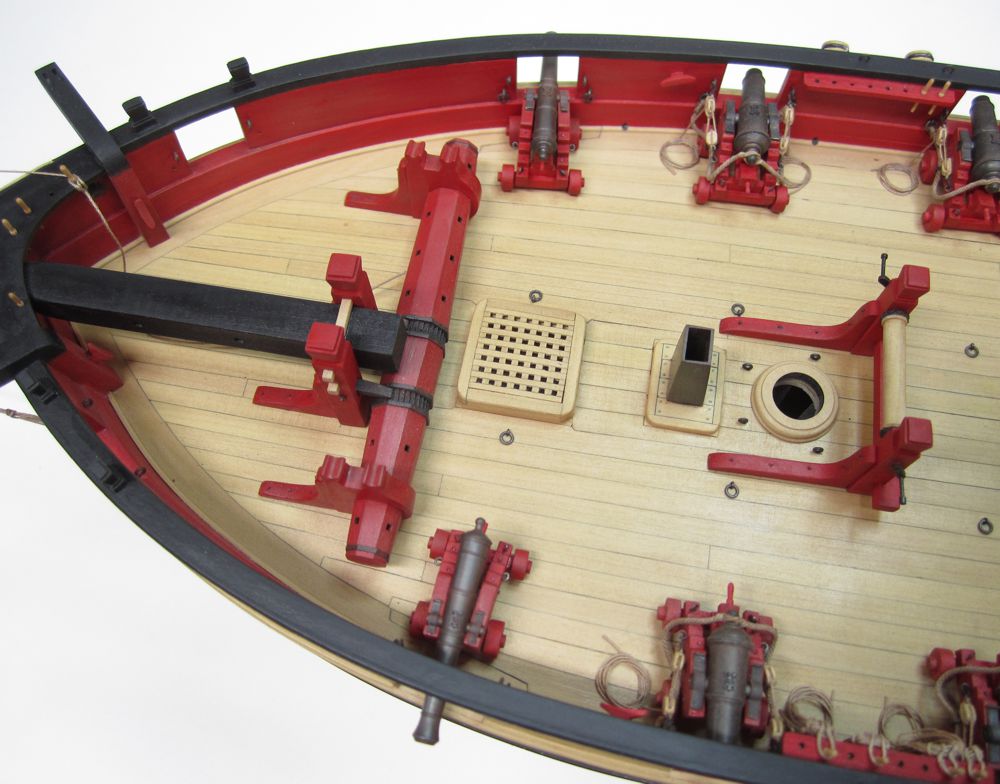
In light of the overwhelming contemporary evidence I cant really ignore it on my model. There most certainly were no port lids. Rather than just speculate based on a gut feeling its better to leave all possibilities open for individual consideration. But for my model I will rig them as bow chasers as stated on the original draft. Image below. Now one other possibility would be to go with a smaller 6 pounder cannon but correspondence from the period and written accounts from her time at sea also indicate they were actually 12 pounders. My guns are 1 29/64" long or the size of short six pounders at this scale. I think either size would have little impact on how functional they would be just looking at them 225 years later crammed into that tiny space, but I would rather think that the methods that made them useful are just not known to us at this time. That it would be wrong to simply ignore all of the contemporary accounts and evidence because we just have a gut feeling. But that doesnt mean that others building Cheerful cant come to a different conclusion. Hopefully it will be based on actual contemporary information and research however rather than just a casual impression based on current limited impressions and generalities. Just my thoughts on it. So I will finish up the rigging and just move ahead to constructing the lower mast. I do appreciate and find the discussion fascinating none the less. Chuck
- 1,048 replies
-
- 8
-
-
- cheerful
- Syren Ship Model Company
- (and 1 more)
-
Indeed you are correct. These barrels are in fact the length of short sixes. I just cant figure it out. If you look at the contemporary model the same problem exists although loading would not be an issue because its a carronade on the one pictured. Rather than sit it on it and over contemplate I am just going to rig them as bow chasers. I am sure that additional info will come to light soon after but I hate to ignore contemporary sources. They must have known something we dont. Even six pounders with a barrel about 3/32" - 1/8" shorter would be problematic. ....at least to us 225 years later anyway. Chuck
- 1,048 replies
-
- 6
-
-
- cheerful
- Syren Ship Model Company
- (and 1 more)
-
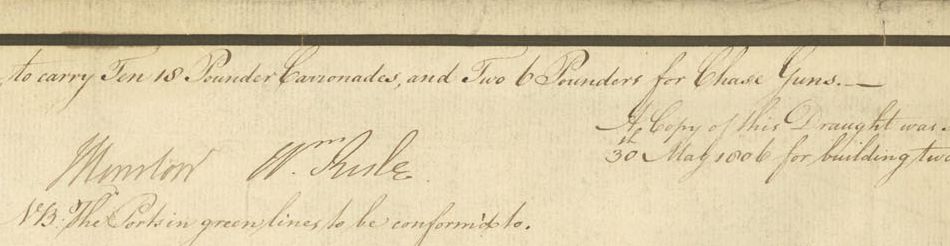
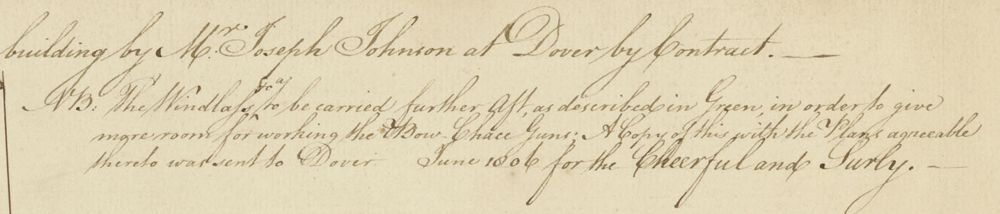
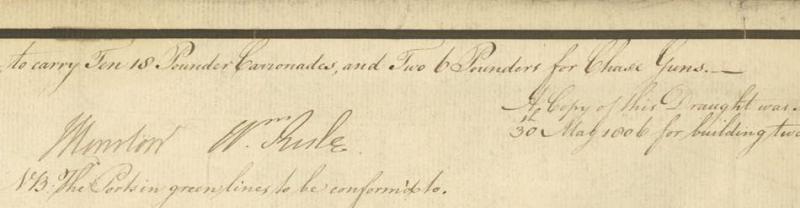
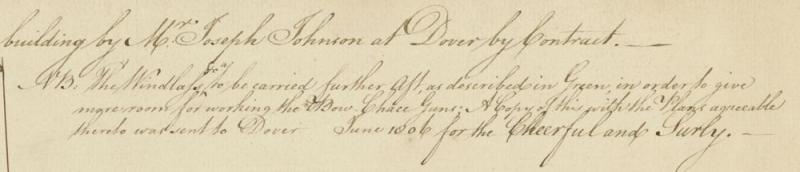
The contemporary model isnt Cheerful even though it is called Cheerful. It has been wrongfully identified. It is the same period though. The Cheerful had only ten 18 pound Carronade and 2 six pounders according to the draft "to be used as chase guns". Other contemporary sources indicate she had two long 12's instead of six pounders. So I am sticking to the contemporary sources and just going with 12 guns total.
- 1,048 replies
-
- 5
-
-
- cheerful
- Syren Ship Model Company
- (and 1 more)
-
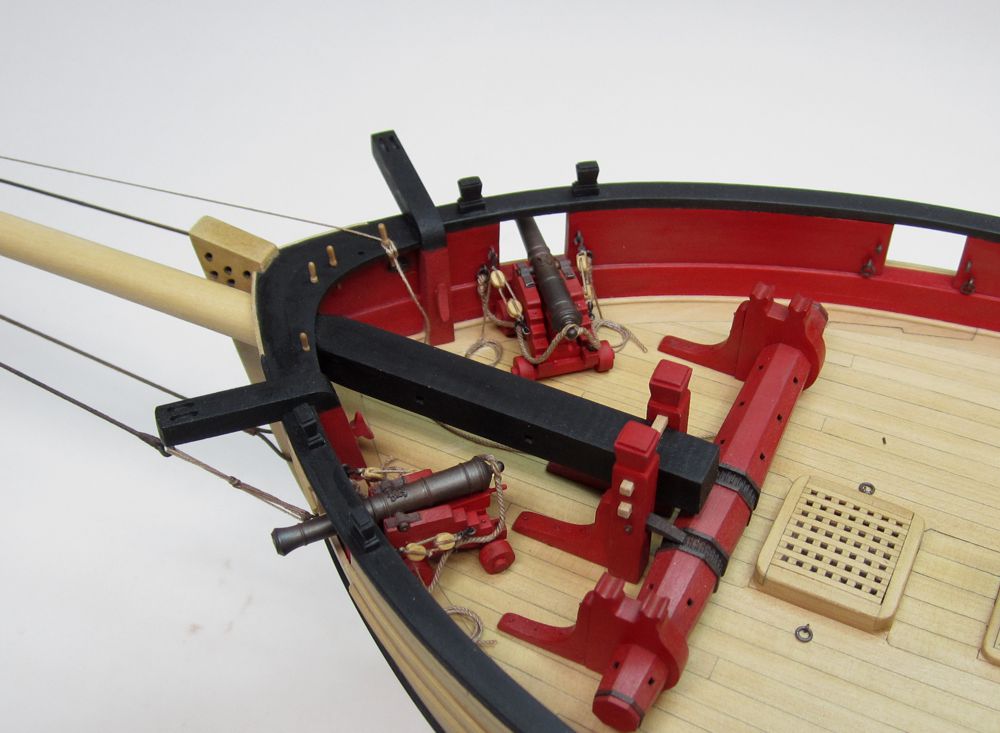
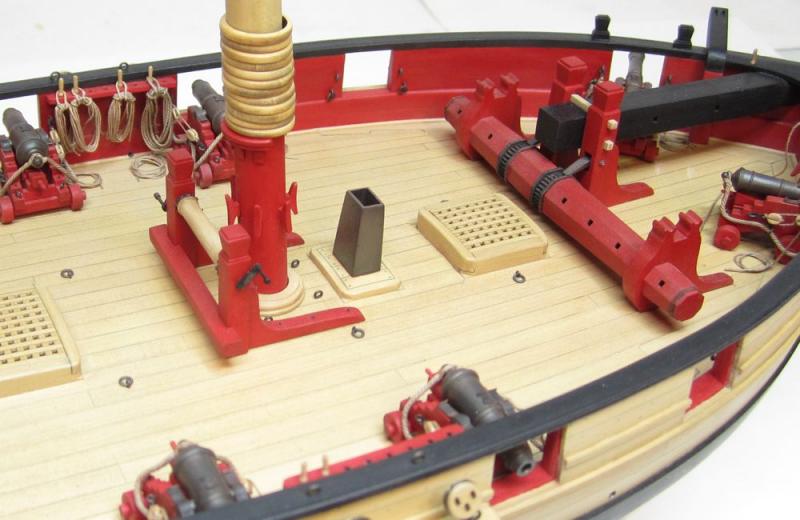
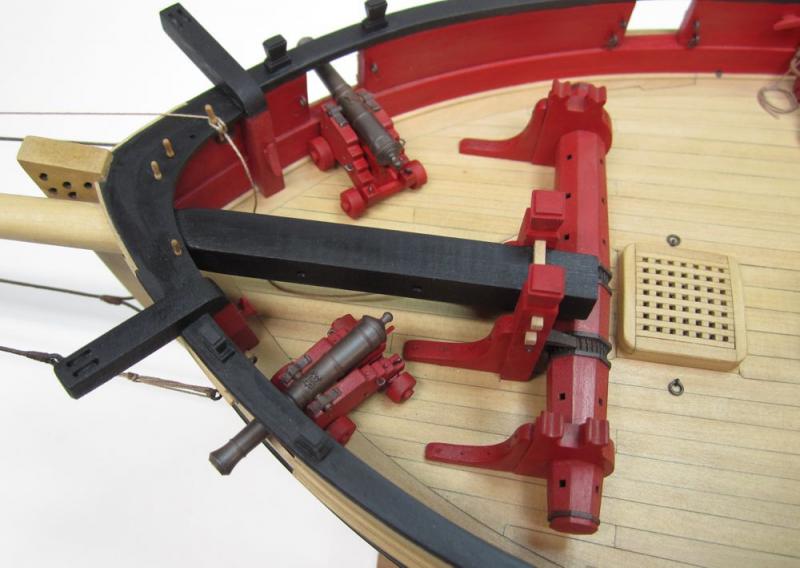
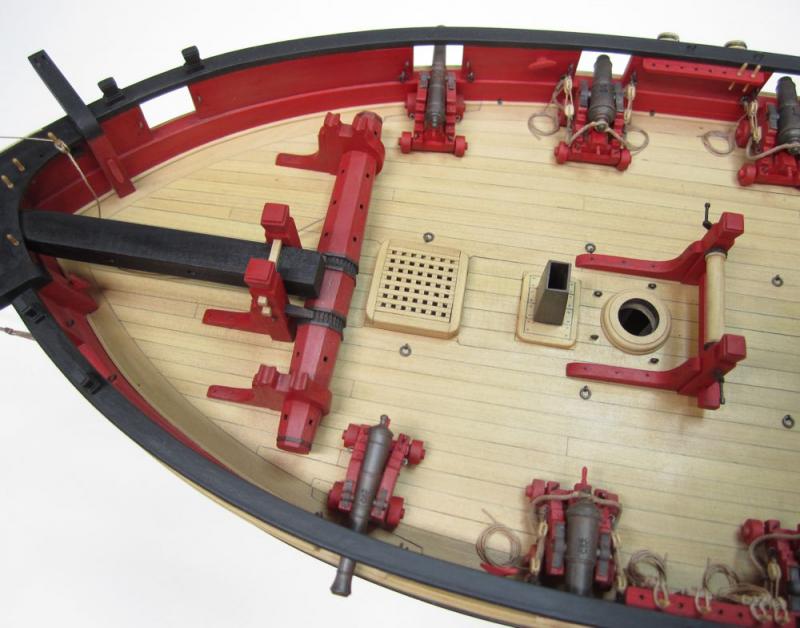
I am about the rig the long guns at the bow. The dilemma is the usual concern about how they could have possibly worked the port side gun. But there is so much ample evidence that this is indeed where the long guns were placed. Several contemporary model examples show them just as jammed in there. I have posted a pic of the Rogers collection model although it uses a carronade vs. a long gun. The original draft even shows the windlass being moved back two feet to .....as noted on the draft....." make room for the chase guns" There is also another possibility, it could be mounted in the second port aft of the windlass. I figured I would show an image of the guns in both positions so anyone building the model can see it before committing. I havent decide yet but will by the end of the day. I am curious what you guys think? Any thoughts??

- 1,048 replies
-
- 22
-
-
- cheerful
- Syren Ship Model Company
- (and 1 more)
-
HM Cutter Cheerful 1806 by Erik W - 1:48 scale
Chuck replied to Erik W's topic in - Build logs for subjects built 1801 - 1850
I am very sorry to hear about your Dad. But I am glad you will be back at it soon. Hang in there!! -
Very nice. When I am carving I usually slice the char off first all the way down to the base and then round off the edges afterwards. Its very addicting isnt it? Once you start its hard to stop. You got through that design very quickly.
-
Looking forward to seeing some progress. Have fun with it....
-
Maybe....but I am going to leave it as it seems to look just fine after I applied the wipe on poly. They are removed from the base so I dont want to mess with them at this point. but maybe I will try on the others I have yet to start.
-
There is a download in the other forum on signing up....it shows them the actual size.
-
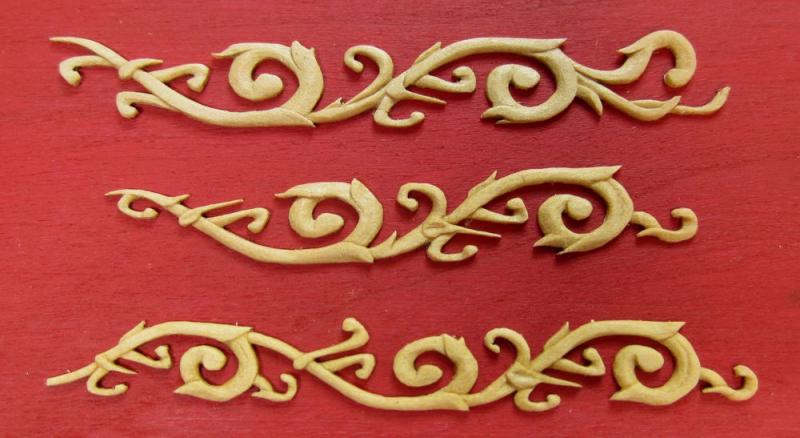
Thanks, I do know about those but never thought about using them on wood. I finished the third leaf design needed for the starboard side of the barge last night. I applied some Wipe-On-Poly and I am happy with how they look, so rather than continue noodling with these I am just going to press on. I have 5 more carving designs to get done for the model. Next I will mount these three on a piece of scrap wood so I can make a mold. I will pull a bunch of castings in resin for those who dont wish to carve them for their model. I just hope these masters dont get ruined in the process because I plan on adding them to the model shortly after. Chuck
- 45 replies
-
- 31
-
-
I am just using a #11 blade right out of the package. But I do know folks who make their own micro chisels in different shapes. That is above and beyond my abilities and time allotment for these so I am going to stick with whatever I can buy already made. Like Keith said...I think its just my technique and stroke and its something that will get better with learned experience. It would always be nice to find a trick or product that does the job....a silver bullet so-to-speak........ but I think its just a matter of learning the correct touch and the correct amount of pressure and angles while slicing. I dont want to over analyze my attempt because then you end up never finishing. So rather than fall prey to "analysis Paralysis" I am just going to keep going and apply a finish. There is always the next project and I will just find comfort that I will hopefully get better with more practice. I find myself slipping into the paralysis and must fight that....its a horrible thing.
- 45 replies
-
- 10
-