HOLIDAY DONATION DRIVE - SUPPORT MSW - DO YOUR PART TO KEEP THIS GREAT FORUM GOING! (Only 13 donations so far - C'mon guys!)
×


Chuck
-
Posts
9,660 -
Joined
-
Last visited
Content Type
Profiles
Forums
Gallery
Events
Everything posted by Chuck
-
 If its true and I suspect that it is.....then its not just the kit from Ocre that should be banned. Its the only way they will learn but yes....lets see what they have to say.
- 346 replies
-
- 9
-

-
- terror
- polar exploration
- (and 2 more)
-
This is a snapshot of what folks feel is the best or worst kit. It is based on their experiences. I would be inclined to say it is very fair. Folks shouldnt read into it so much. We ask folks what they like based on their experience and what they dont like. They are voting honestly and that data collected is very good and very useful for others wanting to get an idea of what one of these MFGs are like. Some people want to over complicate things like this poll ..... it is ....what it is. And very useful. Certainly the kits built more will have higher numbers....but that doesnt mean the data is incorrect. If fewer people have built a brand of kit and all of the polling indicates that it was a good experience then that data is worth knowing. If a company has a high percentage of unfavorable votes, no matter how much market share they have, I think that is very good to know. Dont over think it. If you have a differing opinion based on your experience then vote......the numbers either way are a very honest and accurate depiction. Remember...you shouldnt look at this poll as a way to judge a winner like its a horse race. You should look at this poll as an indication of what people think about the one brand they voted on. If you only have access to AL kits from brick and mortar stores and think they are awful then let us know. If you think they are wonderful.....let us know. The reason why a company like AL has such high negatives is based on that personal experience. It will certainly help someone who wants to build something better without worrying about being disappointed after buying a kit with no review or polling. With the internet, all brands are available anywhere....it may cost more but a poll like this may give someone a reason to pay a bit more for one if they have great polling vs. bad polling.
-
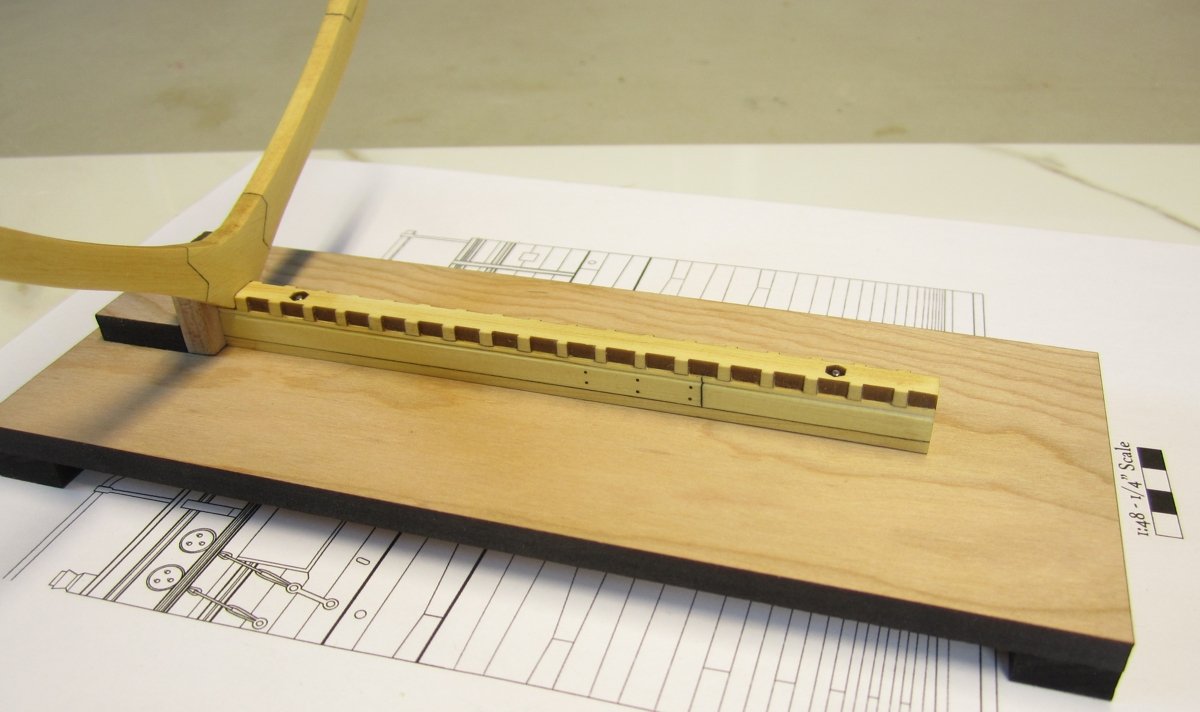
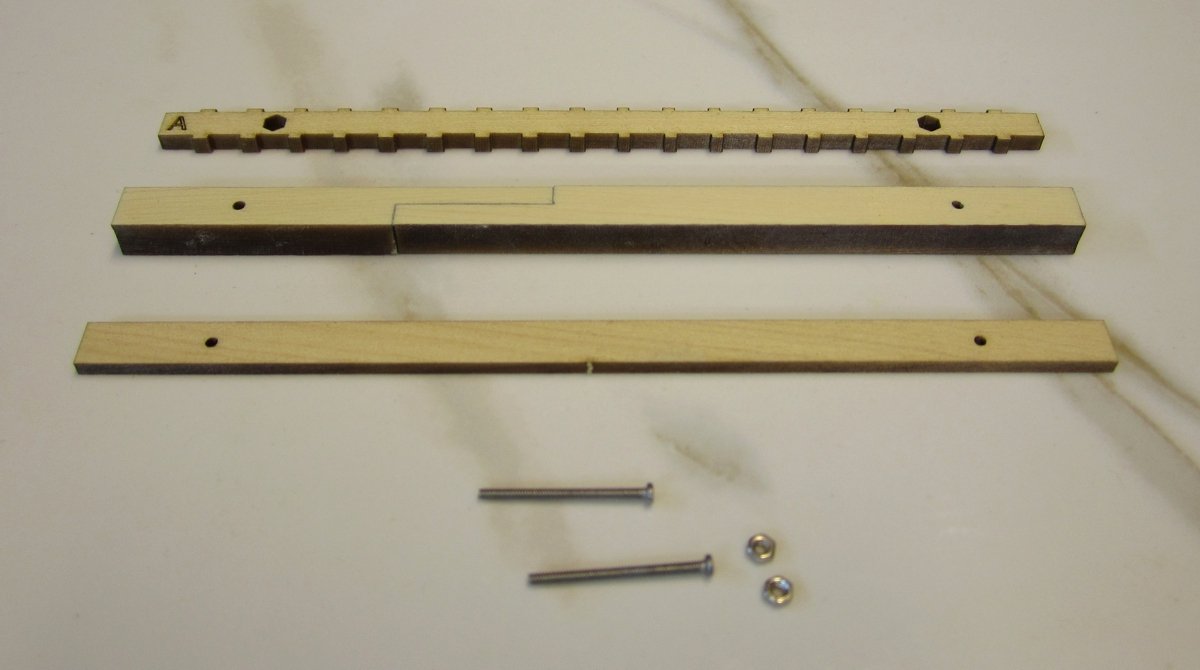
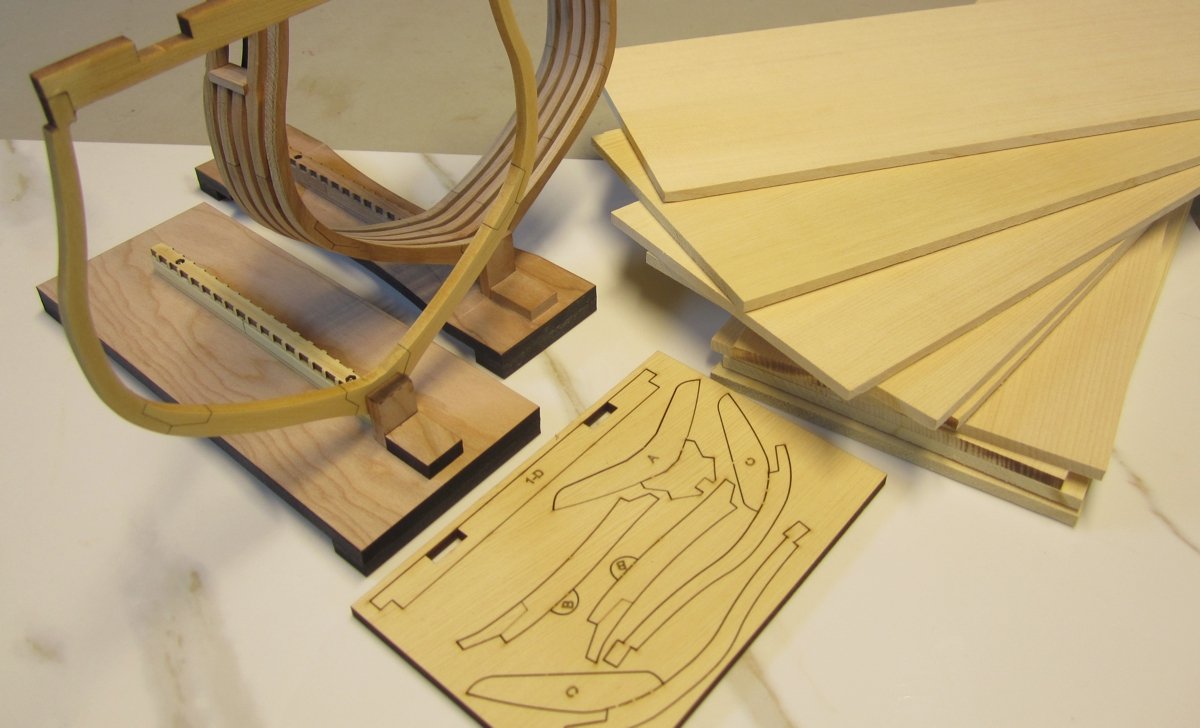
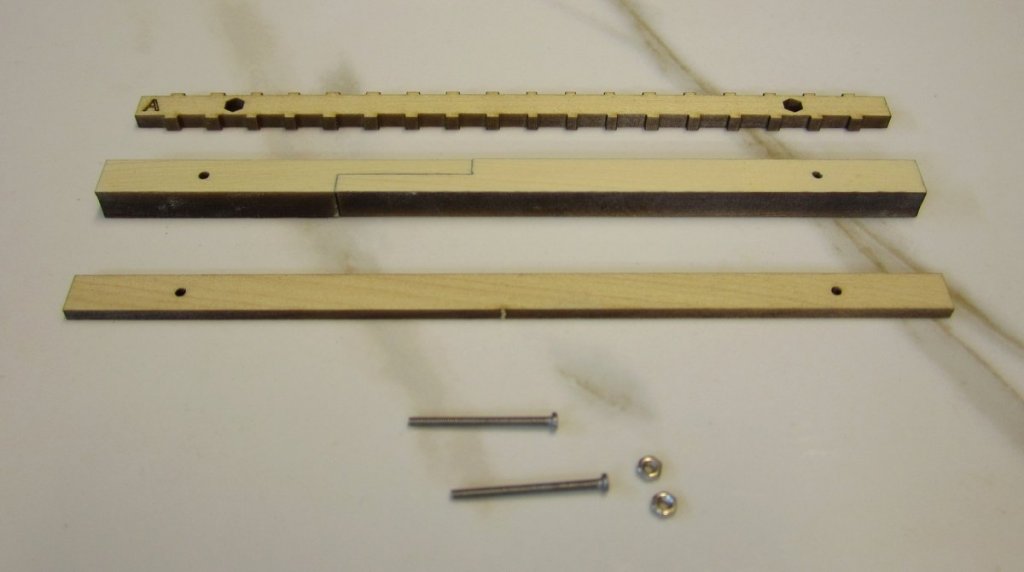
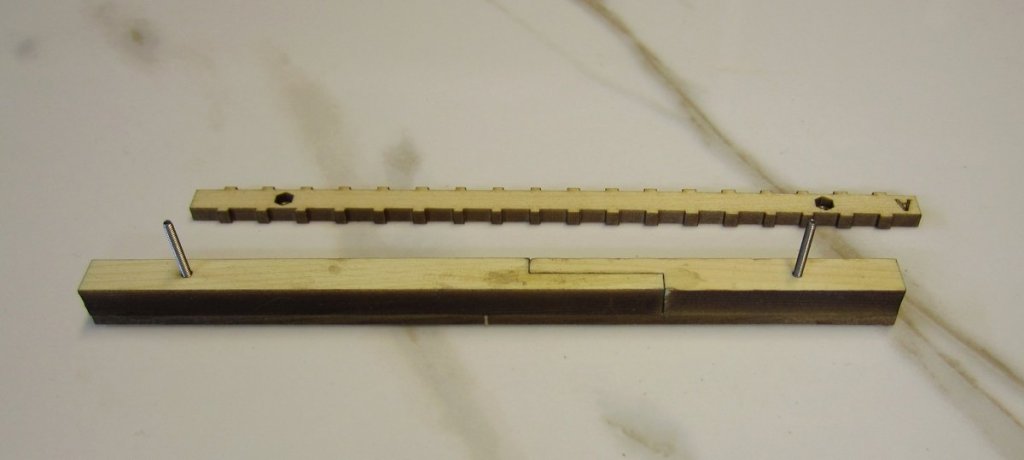
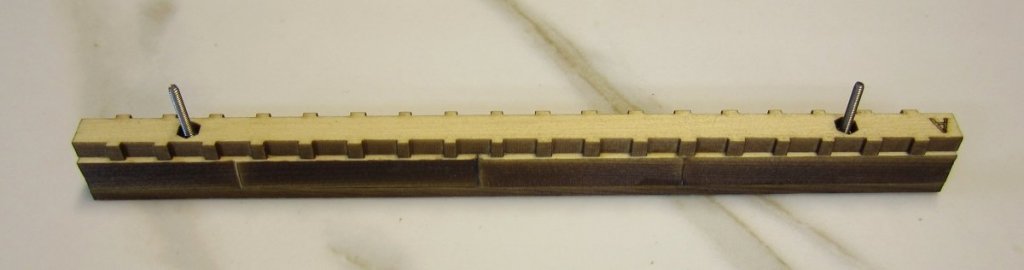
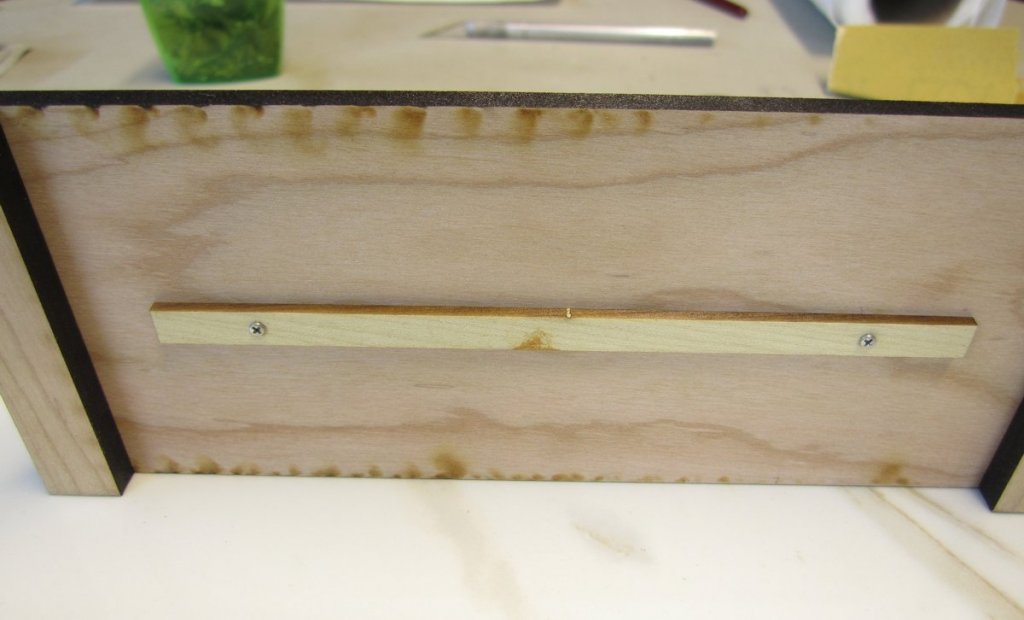
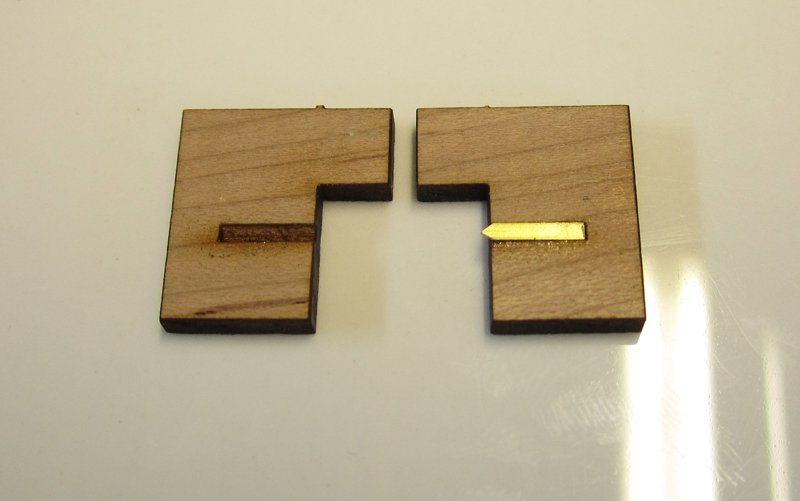
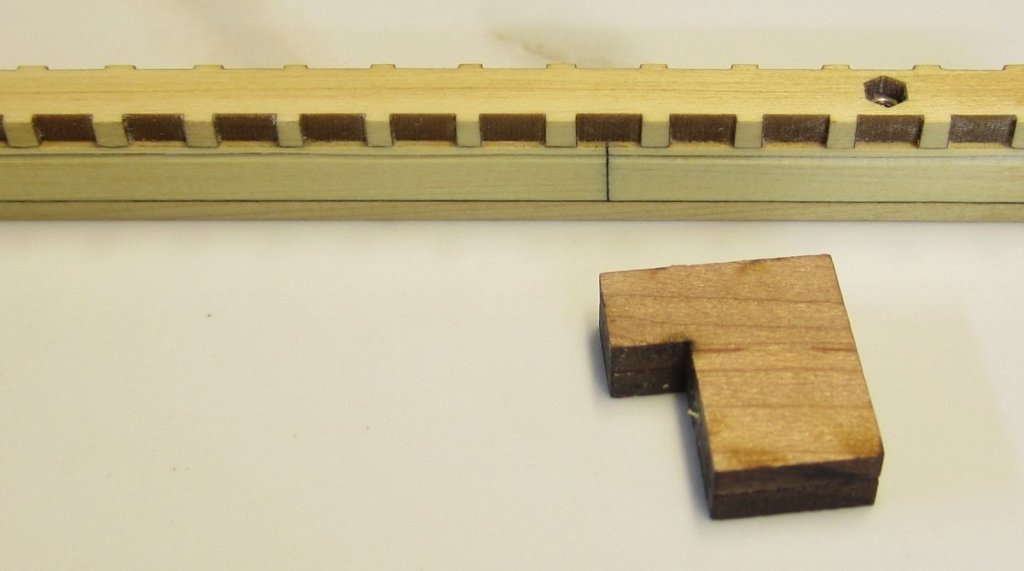
After assembling the build board, I began assembling the keel pieces. In the photo below you see the three elements..The rising wood on top, the two keel pieces glued together in the center and the false keel below that. I darkened the seam between the two keel parts so they would really stand out using a soft pencil. I had my two screws and bolts ready as well. I used the screws to help align the layers and glue them together. Note how I left all the laser char in place until after all the keel parts were glued together. I also darkened the seam between the keel and false keel. Then the rising wood was added but first I needed to glue the two nuts into the laser cut holes provided for them. I simply placed a nut on the table and positioned the rising wood over the top of it. Then I pressed down firmly to push the wood over the nut. This placed the nut perfectly. I added a drop of glue around the nuts perimeter to secure it flush with the bottom of the rising wood. I was careful not to get any glue on the threads of the nut. Then I glued it to the top of the keel. After applying some titebond I actually screwed it into position to be aligned. The middle keel was intentionally left a bit wider because now I will remove the laser char. There is more char on the thicker keel pieces so I left that thicker so it wouldnt be over sanded in the process. It cleaned up pretty good. I was careful not to remove too much. I applied some wipe on poly afterwards. All cleaned up and test fit with the screws on the work base which you might notice I made a bit wider in this final version...The bottom of the base uses another piece of laser cut wood to make sure the screws dont stick out to far on top of the rising wood. There are several supplied to use as spacers if need be. Then I removed the keel to start on the rabbet. To make the rabbet I used a laser cut scraper tool designed especially for the job. See below as it is pretty self explanatory. Brass strip filed to a point and used to make the rabbet. Several light passes at first working from the center outward. Then I cleaned up the rabbet with some sand paper and files. To finish off the keel, I used some 20 pound black fishing line for the bolts. I realize these would have been copper but I really dont like that look. But you guys can substitute if you prefer. I like them blackened as shown instead. Next up I will detail how to build the frames.


- 130 replies
-
- 36
-
-
So...forgive me if parts of this repeats from earlier posts. But after the tweaking and experimenting I have started on the final prototype version of the Pegasus cross section. In the end I abandoned experiments with that new wood. The reason being, the cross grain was just not working. Whenever I applied any finish to the end grain of pieces they just turned very very dark. Almost black actually. This was a deal breaker. So although much more expensive, I will be using Alaskan Yellow cedar for the cross section and also in the end offering it in cherry as well. This is my cedar version from start to finish....a quick photo to show them both side by side first. Cedar is a beautiful wood and the only reason why I didnt use it to begin with was its slightly more expensive cost and lack of a reliable supplier. But that situation has now been solved. So its a win-win all around.

- 130 replies
-
- 22
-
-
That is what I figured and noticed on other framed builds. And it they are not filled nicely they do look bad. So I will leave that up to the experts to bash. This gives a nice clean appearance. I am also thinking hard about the treenails on each frame. Again not something a care too include on mine because they are nearly invisible. And they sometimes look like mistakes or blemishes. So I may just leave them out and if folks care to include them they can. I will be bringing this to the joint clubs Rusty.....also some laser cut frames for folks to play with. Greg sorry to hear you wont make it. I was looking forward to seeing you and talking about the project. Chuck
-
Thanks Paul It also creates a flat top so the entire model can be flipped to help with planking and fairing. Something I noticed was a real pain when other folks were making their cross sections. Chuck
-
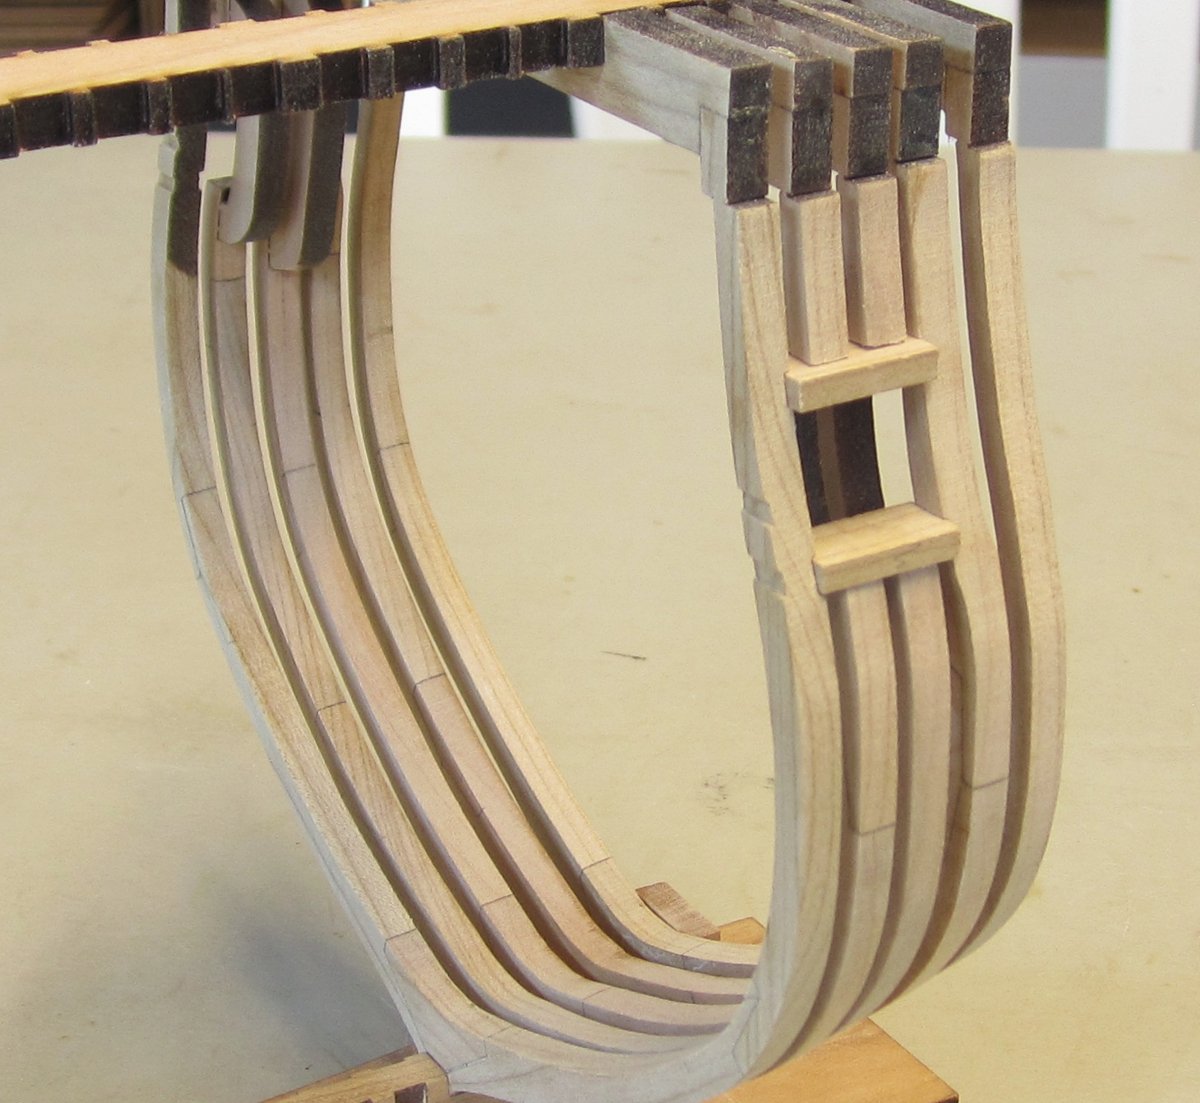
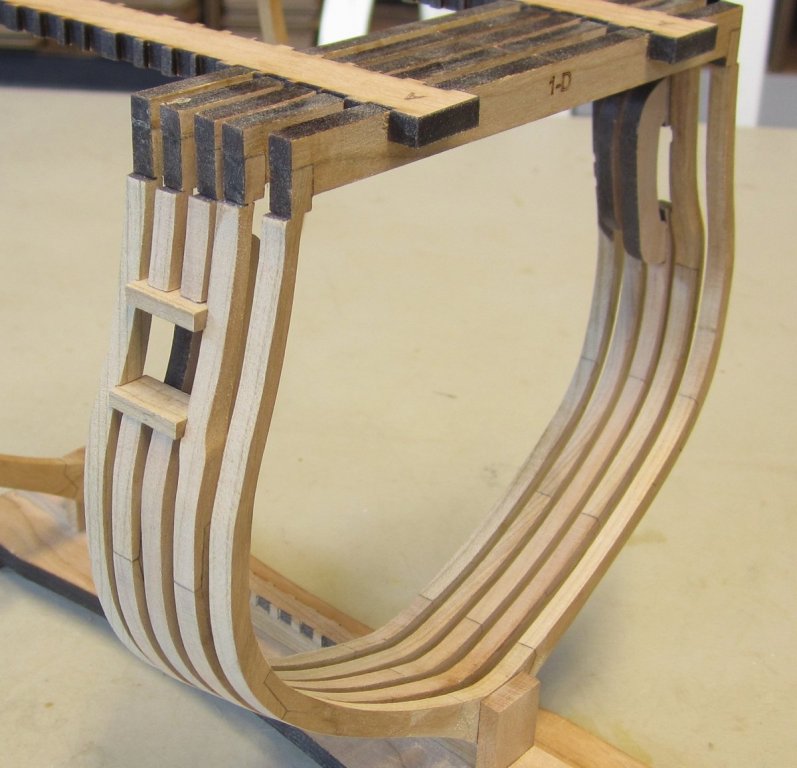
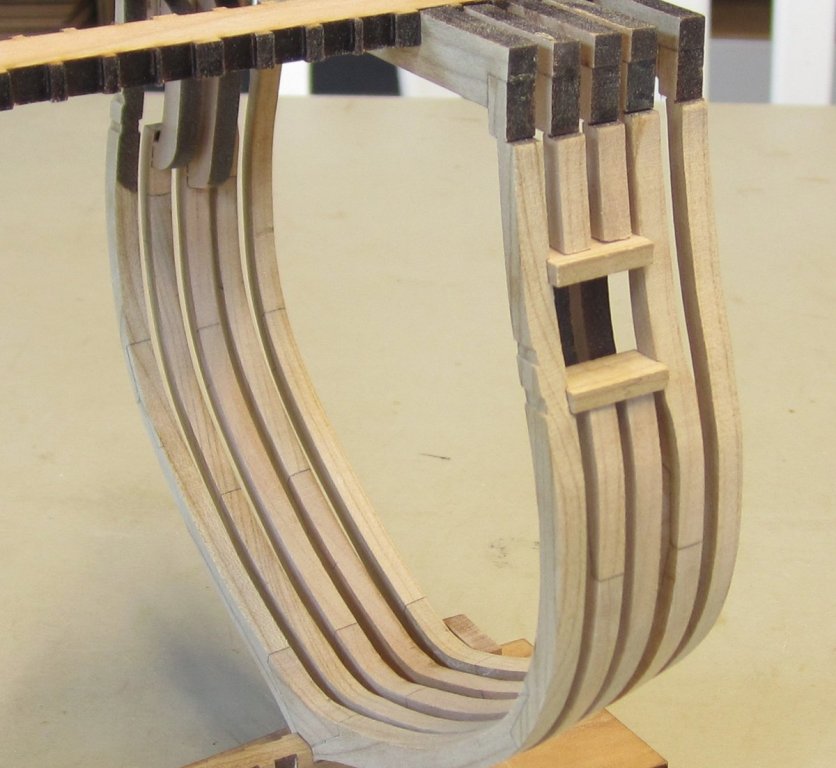
Here is what it looks today. It may not look like much more was done but its very deceiving. I have been making a great deal of progress by tweaking the drafts...refining the construction concepts etc. In these pictures you can see I added a few more frames. But more importantly I have faired the frames. This was important for my design and needed to be done now to test that the chocks would not be sanded away. Also to test the overall shape but I was pretty convinced that they were OK. Everything worked out wonderful. What you might find interesting is the fact that none of these frames are glued into the keel....they are all just test fit together and this is also true of my initial test for the port framing. All the pieces are just dry fit together. The port sills are not faired yet as you can see. The fit on all of the pieces and frames was surprisingly good which is what enabled me to fair the inside and out without too much difficulty, although you would/should not try this at this stage. Its not recommended. The port framing is purposely simplified as some of you know. I believe they were called fish tail joints in actuality but these are just simplified squared off mortises which will be fine. For those folks who have more experience and want to create the fish tail joints instead, that will be very easy to do with just a slight modification to the laser etched notches I am using in this kit. Remember, this is my throw-away test prototype. I want to get two more frames done and see how the sweep port framing goes and how the scupper tubes fit. Once that is done I will discard this mess and start over. Not to mention that after a few tweaks in the concept and build sequence the next iteration will be much better. I learned a great deal and its almost time for phase two...I will start posting more details at that time once I get this preliminary testing done. One quick note....I am well aware that other folks creating drafts and making kits dont do this kind of up front work. Its just something I feel I have to do before releasing anything. I am constantly making little tweaks that make everything hopefully just a little bit better. This is the cherry version by the way, but I am still going back and forth about using the new wood on the finished one which I will start in a few weeks. Just a little more testing to do!!!
- 130 replies
-
- 32
-
-

-
Its good to have you back making sawdust Jim....
-
Yes you are correct...its the length between the two ends. But you must also realize that the longer you make the rope the more difficult it becomes and there really isnt any reason why you should try and lay up a 40 foot length when you could more easily and more comfortably make two 20 foot lengths. Its not worth risking something going wrong and wasting time and material. It gets trickier when you make excessively long lengths. I have done so just out of curiosity but like I said it just doesnt make any logical sense to do so. And to answer the other question about where I get my material for making rope.....that is the one secret I will not reveal. Its a very competitive industry and I need and want to keep this particular tidbit as a Syren secret. Sorry folks. I have no issue showing you how I make rope and even providing you with the exact same machine....but the source of my wonderful Cotolin thread will remain hidden.
- 22 replies
-
- 11
-
-
- ropewalk
- rope rocket
- (and 1 more)
-
You guys will be so surprised how strong that is going to be after the stern is all planked up. But I would refrain from sanding all of the top timbers of the bulkheads down until after the entire hull is planked. Just the stern frames will be sufficient. Chuck
- 574 replies
-
- 3
-
-
- cheerful
- Syren Ship Model Company
- (and 1 more)
-
This program still exists...just letting folks know. Just send your inquiries to Kurt....Toni....or any other NRG director. In the past they were sent to me but since I am no longer a director all inquiries should be directed to one of the other folks on the NRG board. This is an exciting program and as noted the guild just released their latest project from this grant program see here https://www.thenrg.org/genericsharpie.php Chuck
-
Looking good.... But to correct Dave, there are actually quite a few fully rigged models of her in existence. Most had followed the Corrothers plans rather than the Hahn plans. Most notable is the Camaratta model hi-lighted in an old issue of model shipwright pictured below. Chuck

-
Thats the way to do it!!!! wonderful plank shaping. It makes it so much easier to glue into position. Well done
- 120 replies
-
- 4
-
-
- queen anne barge
- Syren Ship Model Company
- (and 1 more)
-
Really nice start....enjoy the project and dont hesitate to contact me with any questions you might have.
- 103 replies
-
- 2
-
-
- queen anne barge
- Syren Ship Model Company
- (and 1 more)
-
nope...it actually strengthens it.
- 74 replies
-
- 3
-
-
- queen anne barge
- Syren Ship Model Company
- (and 1 more)
-
MS Katy of Norfolk kit issues and parts replacement
Chuck replied to kearnold's topic in Wood ship model kits
You just need to use the plans as a guide....and measure the part in imperial or use a ruler with metric. Then buy what ever is close. Dont buy based on scale......actually measure the part from the plans. Chuck- 14 replies
-
- 4
-
-
- schooner
- katy of norfolk
- (and 4 more)
-
Wonderful!!! When thinning down the frames inboard I always bend back the corners of my sandpaper so they wont catch on one of the frames and break them. Its hard to explain but Im sure you will see what I mean when you start that procedure. Chuck
- 74 replies
-
- 6
-
-
- queen anne barge
- Syren Ship Model Company
- (and 1 more)
-
MS Katy of Norfolk kit issues and parts replacement
Chuck replied to kearnold's topic in Wood ship model kits
That is very typical of those older solid hull kits. You get a hull...a few bits of wood sheet and strips and some string. Then you get a few packs of bad blocks to boot. Folks expect to get more these days but back then ....that Katy kit was what you usually got. With the plans you could make those into a great model but the instructions were about 3 pages long and of no help what-so-ever. Start a build log here and you will get some help as you build her. You can try Syren (link at bottom of my post) for the blocks and rope. Chuck- 14 replies
-
- 4
-
-
- schooner
- katy of norfolk
- (and 4 more)
-
Not yet as that project is a ways off. I wont begin until after the cross section and winnie are released.....
-
I couldnt say....I am hopeful that by the time I am ready to begin one of the two sources I have for info will allow me to use the lines they have taken off of the contemporary model.
-
The molding should have added only 1/32" as it was 1/32" thick so I would suggest another 1/32" less. I know you went with a different molding strip but that makes all the difference in the world when it comes to the thickness of the caprail when it is finished up. Chuck
- 47 replies
-
- 2
-
-
- queen anne barge
- Syren Ship Model Company
- (and 1 more)