
Supplies of the Ship Modeler's Handbook are running out. Get your copy NOW before they are gone! Click on photo to order.
×


Chuck
-
Posts
9,449 -
Joined
-
Last visited
Reputation Activity
-

 Chuck got a reaction from marsalv in Sloop Speedwell 1752 by Chuck - Ketch Rigged Sloop - POF - prototype build
To scupper or not to scupper.
Most contemporary models do not show the scuppers. In fact the contemporary model of Speedwell doesnt show the scuppers. I didnt add the scuppers on my Winnie build which was typical. But I am going to show them on my speedwell. Nothing fancy. These arent too crazy to do. Not like the hawse holes will be. But you do have to be careful. You need to carefully measure them inboard and outboard so they look like they line up. You can actually use the deck planking templates because I have marked the inboard locations for all of the scuppers.
When I drill my scuppers I dont even try to drill them all the way through. That adds unnecessary difficulty. I drill shallow holes only about 1/16" deep or slightly more. Inboard, I start with a small pilot hole with a small drill bit. Then in this case, I used a #47 drill bit afterwards to make them larger. Finally I used a round file to smooth out the hole’s insides. I lightly sanded the inboard bulwarks over the scuppers with some 400 grit sandpaper to smooth out any fraying. This will require some paint touch-up later when they are all done. The scupper holes were made flush with the deck level or just a hair above.
I prefer to use a soft pencil to darken the inside of the holes. I made sure to cover the entire inside surface of the scuppers including the back of the hole. Then I touch up the red bulwark paint. On this model I drilled the scuppers before I added the waterway. I just wanted to try something new. It worked out really well for me. No chipping or fraying of the water way at all. You can do it whichever way is more comfortable for you.
The picture below shows the holes drilled and darkened with the pencil. They are nice and dark. I touched up the red paint as well on the bulwarks afterwards. You can see the waterway strip also prepared in advance and ready to be glued into position.
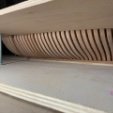
The waterway is a 3/64" x 3/64" strip of cedar. I sanded one of the four corners of the strip down its entire length. I used an Emory board or sanding stick. Basically I made it triangular in profile. Then I held it in position so I could mark the positions for the scuppers along its length. I really tried to get these exactly where they should be located. I used a round mini file to make the half round openings along the length of the waterway where the scuppers were marked out. Once in position this really looked good. I used the same soft pencil to darken the round notches I made along the waterway as well. Below you can see how the scuppers inboard turned out. I made the waterway in two pieces for the gun deck rather than use one long strip that spanned across the whole length.
I also prepared the waterway for the poop deck, port and starboard. This was easy...no scuppers, LOL. Just make the strip triangular. Dont worry about trying to make it concave or anything fancy.
Here is a photo.
Finally to the outboard side. No difference here really. I used those outboard templates we used way back when....remember those. If you have to shift the template fore and aft a bit to line them up with the inboard scuppers you made on the opposite side of the deck/hull its no big deal. But this template will give you a really good start and can be rested atop the wales.
I drilled with a small drill bit first and again made the holes larger using the #47 bit. I cleaned them up a bit and darkened them with a soft pencil. Once again...no need to drill all the way through and hope you meet the same scupper hole you drilled on the inboard side. Fake it ...till you make it .....I always say. I drilled part way through once again. Make sure you really darken them inside the holes nicely and completely.
Dont add the waterway on the fcastle deck yet. I think it best to drill the hawse holes first. I will be doing that next me thinks.
-
Chuck got a reaction from marsalv in HMS Portland 1770 by scrubbyj427 - 1:48 - 4th rate 50-gun ship
Beautiful....simply beautiful.
-
 Chuck got a reaction from ccoyle in Sloop Speedwell 1752 by Chuck - Ketch Rigged Sloop - POF - prototype build
To scupper or not to scupper.
Most contemporary models do not show the scuppers. In fact the contemporary model of Speedwell doesnt show the scuppers. I didnt add the scuppers on my Winnie build which was typical. But I am going to show them on my speedwell. Nothing fancy. These arent too crazy to do. Not like the hawse holes will be. But you do have to be careful. You need to carefully measure them inboard and outboard so they look like they line up. You can actually use the deck planking templates because I have marked the inboard locations for all of the scuppers.
When I drill my scuppers I dont even try to drill them all the way through. That adds unnecessary difficulty. I drill shallow holes only about 1/16" deep or slightly more. Inboard, I start with a small pilot hole with a small drill bit. Then in this case, I used a #47 drill bit afterwards to make them larger. Finally I used a round file to smooth out the hole’s insides. I lightly sanded the inboard bulwarks over the scuppers with some 400 grit sandpaper to smooth out any fraying. This will require some paint touch-up later when they are all done. The scupper holes were made flush with the deck level or just a hair above.
I prefer to use a soft pencil to darken the inside of the holes. I made sure to cover the entire inside surface of the scuppers including the back of the hole. Then I touch up the red bulwark paint. On this model I drilled the scuppers before I added the waterway. I just wanted to try something new. It worked out really well for me. No chipping or fraying of the water way at all. You can do it whichever way is more comfortable for you.
The picture below shows the holes drilled and darkened with the pencil. They are nice and dark. I touched up the red paint as well on the bulwarks afterwards. You can see the waterway strip also prepared in advance and ready to be glued into position.
The waterway is a 3/64" x 3/64" strip of cedar. I sanded one of the four corners of the strip down its entire length. I used an Emory board or sanding stick. Basically I made it triangular in profile. Then I held it in position so I could mark the positions for the scuppers along its length. I really tried to get these exactly where they should be located. I used a round mini file to make the half round openings along the length of the waterway where the scuppers were marked out. Once in position this really looked good. I used the same soft pencil to darken the round notches I made along the waterway as well. Below you can see how the scuppers inboard turned out. I made the waterway in two pieces for the gun deck rather than use one long strip that spanned across the whole length.
I also prepared the waterway for the poop deck, port and starboard. This was easy...no scuppers, LOL. Just make the strip triangular. Dont worry about trying to make it concave or anything fancy.
Here is a photo.
Finally to the outboard side. No difference here really. I used those outboard templates we used way back when....remember those. If you have to shift the template fore and aft a bit to line them up with the inboard scuppers you made on the opposite side of the deck/hull its no big deal. But this template will give you a really good start and can be rested atop the wales.
I drilled with a small drill bit first and again made the holes larger using the #47 bit. I cleaned them up a bit and darkened them with a soft pencil. Once again...no need to drill all the way through and hope you meet the same scupper hole you drilled on the inboard side. Fake it ...till you make it .....I always say. I drilled part way through once again. Make sure you really darken them inside the holes nicely and completely.
Dont add the waterway on the fcastle deck yet. I think it best to drill the hawse holes first. I will be doing that next me thinks.
-
 Chuck reacted to niwotwill in HM Cutter Cheerful 1806 by niwotwill - Syren Ship Model Company - scale 1:48
Finished the boom crutches final shaping and applied the first coat of black paint.
Next to be built are the mounting steps with the first being creating a scraping tool to make the edge shapes. Using a 1/32" thick piece of brass sheet I files the shape making sure the sides would fit the piece of woods thickness.
Using the tool the shapes were drawn onto the wood strip. The strip was cut into 6 correct lengths and sanded to the finished shapes.
Shape shown on end of strip before being cut to length.
After carefully removing a section of strip the steps were glued in place as shown on the plans using a piece of masking tape to ensure step alignment.
Next to paint and apply wipe on poly to the bare wood matching the existing.
-
 Chuck got a reaction from KARAVOKIRIS in Sloop Speedwell 1752 by Chuck - Ketch Rigged Sloop - POF - prototype build
To scupper or not to scupper.
Most contemporary models do not show the scuppers. In fact the contemporary model of Speedwell doesnt show the scuppers. I didnt add the scuppers on my Winnie build which was typical. But I am going to show them on my speedwell. Nothing fancy. These arent too crazy to do. Not like the hawse holes will be. But you do have to be careful. You need to carefully measure them inboard and outboard so they look like they line up. You can actually use the deck planking templates because I have marked the inboard locations for all of the scuppers.
When I drill my scuppers I dont even try to drill them all the way through. That adds unnecessary difficulty. I drill shallow holes only about 1/16" deep or slightly more. Inboard, I start with a small pilot hole with a small drill bit. Then in this case, I used a #47 drill bit afterwards to make them larger. Finally I used a round file to smooth out the hole’s insides. I lightly sanded the inboard bulwarks over the scuppers with some 400 grit sandpaper to smooth out any fraying. This will require some paint touch-up later when they are all done. The scupper holes were made flush with the deck level or just a hair above.
I prefer to use a soft pencil to darken the inside of the holes. I made sure to cover the entire inside surface of the scuppers including the back of the hole. Then I touch up the red bulwark paint. On this model I drilled the scuppers before I added the waterway. I just wanted to try something new. It worked out really well for me. No chipping or fraying of the water way at all. You can do it whichever way is more comfortable for you.
The picture below shows the holes drilled and darkened with the pencil. They are nice and dark. I touched up the red paint as well on the bulwarks afterwards. You can see the waterway strip also prepared in advance and ready to be glued into position.
The waterway is a 3/64" x 3/64" strip of cedar. I sanded one of the four corners of the strip down its entire length. I used an Emory board or sanding stick. Basically I made it triangular in profile. Then I held it in position so I could mark the positions for the scuppers along its length. I really tried to get these exactly where they should be located. I used a round mini file to make the half round openings along the length of the waterway where the scuppers were marked out. Once in position this really looked good. I used the same soft pencil to darken the round notches I made along the waterway as well. Below you can see how the scuppers inboard turned out. I made the waterway in two pieces for the gun deck rather than use one long strip that spanned across the whole length.
I also prepared the waterway for the poop deck, port and starboard. This was easy...no scuppers, LOL. Just make the strip triangular. Dont worry about trying to make it concave or anything fancy.
Here is a photo.
Finally to the outboard side. No difference here really. I used those outboard templates we used way back when....remember those. If you have to shift the template fore and aft a bit to line them up with the inboard scuppers you made on the opposite side of the deck/hull its no big deal. But this template will give you a really good start and can be rested atop the wales.
I drilled with a small drill bit first and again made the holes larger using the #47 bit. I cleaned them up a bit and darkened them with a soft pencil. Once again...no need to drill all the way through and hope you meet the same scupper hole you drilled on the inboard side. Fake it ...till you make it .....I always say. I drilled part way through once again. Make sure you really darken them inside the holes nicely and completely.
Dont add the waterway on the fcastle deck yet. I think it best to drill the hawse holes first. I will be doing that next me thinks.
-
 Chuck got a reaction from Tobias in Sloop Speedwell 1752 by Chuck - Ketch Rigged Sloop - POF - prototype build
To scupper or not to scupper.
Most contemporary models do not show the scuppers. In fact the contemporary model of Speedwell doesnt show the scuppers. I didnt add the scuppers on my Winnie build which was typical. But I am going to show them on my speedwell. Nothing fancy. These arent too crazy to do. Not like the hawse holes will be. But you do have to be careful. You need to carefully measure them inboard and outboard so they look like they line up. You can actually use the deck planking templates because I have marked the inboard locations for all of the scuppers.
When I drill my scuppers I dont even try to drill them all the way through. That adds unnecessary difficulty. I drill shallow holes only about 1/16" deep or slightly more. Inboard, I start with a small pilot hole with a small drill bit. Then in this case, I used a #47 drill bit afterwards to make them larger. Finally I used a round file to smooth out the hole’s insides. I lightly sanded the inboard bulwarks over the scuppers with some 400 grit sandpaper to smooth out any fraying. This will require some paint touch-up later when they are all done. The scupper holes were made flush with the deck level or just a hair above.
I prefer to use a soft pencil to darken the inside of the holes. I made sure to cover the entire inside surface of the scuppers including the back of the hole. Then I touch up the red bulwark paint. On this model I drilled the scuppers before I added the waterway. I just wanted to try something new. It worked out really well for me. No chipping or fraying of the water way at all. You can do it whichever way is more comfortable for you.
The picture below shows the holes drilled and darkened with the pencil. They are nice and dark. I touched up the red paint as well on the bulwarks afterwards. You can see the waterway strip also prepared in advance and ready to be glued into position.
The waterway is a 3/64" x 3/64" strip of cedar. I sanded one of the four corners of the strip down its entire length. I used an Emory board or sanding stick. Basically I made it triangular in profile. Then I held it in position so I could mark the positions for the scuppers along its length. I really tried to get these exactly where they should be located. I used a round mini file to make the half round openings along the length of the waterway where the scuppers were marked out. Once in position this really looked good. I used the same soft pencil to darken the round notches I made along the waterway as well. Below you can see how the scuppers inboard turned out. I made the waterway in two pieces for the gun deck rather than use one long strip that spanned across the whole length.
I also prepared the waterway for the poop deck, port and starboard. This was easy...no scuppers, LOL. Just make the strip triangular. Dont worry about trying to make it concave or anything fancy.
Here is a photo.
Finally to the outboard side. No difference here really. I used those outboard templates we used way back when....remember those. If you have to shift the template fore and aft a bit to line them up with the inboard scuppers you made on the opposite side of the deck/hull its no big deal. But this template will give you a really good start and can be rested atop the wales.
I drilled with a small drill bit first and again made the holes larger using the #47 bit. I cleaned them up a bit and darkened them with a soft pencil. Once again...no need to drill all the way through and hope you meet the same scupper hole you drilled on the inboard side. Fake it ...till you make it .....I always say. I drilled part way through once again. Make sure you really darken them inside the holes nicely and completely.
Dont add the waterway on the fcastle deck yet. I think it best to drill the hawse holes first. I will be doing that next me thinks.
-
 Chuck got a reaction from cotrecerf in HMS Portland 1770 by scrubbyj427 - 1:48 - 4th rate 50-gun ship
Beautiful....simply beautiful.
-
 Chuck got a reaction from Jorge_Goncalves in Sloop Speedwell 1752 by Chuck - Ketch Rigged Sloop - POF - prototype build
To scupper or not to scupper.
Most contemporary models do not show the scuppers. In fact the contemporary model of Speedwell doesnt show the scuppers. I didnt add the scuppers on my Winnie build which was typical. But I am going to show them on my speedwell. Nothing fancy. These arent too crazy to do. Not like the hawse holes will be. But you do have to be careful. You need to carefully measure them inboard and outboard so they look like they line up. You can actually use the deck planking templates because I have marked the inboard locations for all of the scuppers.
When I drill my scuppers I dont even try to drill them all the way through. That adds unnecessary difficulty. I drill shallow holes only about 1/16" deep or slightly more. Inboard, I start with a small pilot hole with a small drill bit. Then in this case, I used a #47 drill bit afterwards to make them larger. Finally I used a round file to smooth out the hole’s insides. I lightly sanded the inboard bulwarks over the scuppers with some 400 grit sandpaper to smooth out any fraying. This will require some paint touch-up later when they are all done. The scupper holes were made flush with the deck level or just a hair above.
I prefer to use a soft pencil to darken the inside of the holes. I made sure to cover the entire inside surface of the scuppers including the back of the hole. Then I touch up the red bulwark paint. On this model I drilled the scuppers before I added the waterway. I just wanted to try something new. It worked out really well for me. No chipping or fraying of the water way at all. You can do it whichever way is more comfortable for you.
The picture below shows the holes drilled and darkened with the pencil. They are nice and dark. I touched up the red paint as well on the bulwarks afterwards. You can see the waterway strip also prepared in advance and ready to be glued into position.
The waterway is a 3/64" x 3/64" strip of cedar. I sanded one of the four corners of the strip down its entire length. I used an Emory board or sanding stick. Basically I made it triangular in profile. Then I held it in position so I could mark the positions for the scuppers along its length. I really tried to get these exactly where they should be located. I used a round mini file to make the half round openings along the length of the waterway where the scuppers were marked out. Once in position this really looked good. I used the same soft pencil to darken the round notches I made along the waterway as well. Below you can see how the scuppers inboard turned out. I made the waterway in two pieces for the gun deck rather than use one long strip that spanned across the whole length.
I also prepared the waterway for the poop deck, port and starboard. This was easy...no scuppers, LOL. Just make the strip triangular. Dont worry about trying to make it concave or anything fancy.
Here is a photo.
Finally to the outboard side. No difference here really. I used those outboard templates we used way back when....remember those. If you have to shift the template fore and aft a bit to line them up with the inboard scuppers you made on the opposite side of the deck/hull its no big deal. But this template will give you a really good start and can be rested atop the wales.
I drilled with a small drill bit first and again made the holes larger using the #47 bit. I cleaned them up a bit and darkened them with a soft pencil. Once again...no need to drill all the way through and hope you meet the same scupper hole you drilled on the inboard side. Fake it ...till you make it .....I always say. I drilled part way through once again. Make sure you really darken them inside the holes nicely and completely.
Dont add the waterway on the fcastle deck yet. I think it best to drill the hawse holes first. I will be doing that next me thinks.
-
Chuck got a reaction from KARAVOKIRIS in Sloop Speedwell 1752 by Chuck - Ketch Rigged Sloop - POF - prototype build
While I was away, I had taken a bunch of milled cedar strips of various widths. All were 3/64" thick. I spent my evenings planking the decks which was quite nice and relaxing. My wife was also enjoying some wine from the local vineyards while working on her own relaxing projects while overlooking the Long Island Sound.
Not much to say about how to plank the decks as the gun deck and poop were planked like any other deck. Just taper the strips following the provided deck plans. You must cut around the hatches and coamings as usual. These were the most difficult planks to cut but not awful. It just takes careful planning and cutting.
These were the last two planks which I waiting to return home so I could photograph them before gluing them in permanently.
Here are some photos of the completed deck planking. The forecastle deck planks were cut from a 3/64" sheet because of their curvature as I mentioned. But the gun deck and poop were planked with strips. The curves are not that severe and it was a lot easier this way. Note the gentle curve of the planks.
NOW...how much deck planking should be added. Its really just a personal decision. What do like more....or less.
I have an extra strake on the gun deck where the cannon will be located. I dont particularly like when the carriage trucks are hanging over the edge if there were too few strakes. But maybe you are OK with that. This planking scheme matches the plans I provided but you guys can change to suit your sensibilities. Looking at the photos you can see why I omitted all of the deck knees (hanging and lodging). You can try really hard but would ever be able to see even a whisper of them. It just doesnt make sense to add them with this planking layout. I hope you will agree.
Next up will be something I have been blissfully ignoring. Its a bit terrifying for any ship modeler. I will be drilling the scupper holes and hawse holes. Usually I drill the scuppers after adding the waterway. But this usually chips and frays the waterway. So I am going to try something new. I will drill the scuppers first and then add the waterway strip. I will mark and file the waterway strip so it will hopefully not get damaged. We shall see.
The hawse holes are a different story. Those will require some really careful planning.
But waiting any longer to do these will only make them more terrifying.
Chuck
-
 Chuck got a reaction from Freebird in Sloop Speedwell 1752 by sfotinos - Syren Ship Model Company - 1:32 Scale - POF Sloop
Im not sure…i will check though. Its a ton of work to set up. Let me see what the guys think about it as well…meaning the mods and admin.
-
Chuck got a reaction from Freebird in Sloop Speedwell 1752 by sfotinos - Syren Ship Model Company - 1:32 Scale - POF Sloop
nope...You are good. I changed that part of the deadwood later on after I built it. The current plans are correct which match your parts which are also correct.
It just made sense to change it after I built it the first time and makes building that area easier for all of you. My model and log will sometimes be slightly different as improvements are made after the fact....so just follow the plans and instructions and you will be fine.
It will make adding the wing transom and creating the square tuck much easier.
-
 Chuck got a reaction from Mike Y in Sloop Speedwell 1752 by Chuck - Ketch Rigged Sloop - POF - prototype build
To scupper or not to scupper.
Most contemporary models do not show the scuppers. In fact the contemporary model of Speedwell doesnt show the scuppers. I didnt add the scuppers on my Winnie build which was typical. But I am going to show them on my speedwell. Nothing fancy. These arent too crazy to do. Not like the hawse holes will be. But you do have to be careful. You need to carefully measure them inboard and outboard so they look like they line up. You can actually use the deck planking templates because I have marked the inboard locations for all of the scuppers.
When I drill my scuppers I dont even try to drill them all the way through. That adds unnecessary difficulty. I drill shallow holes only about 1/16" deep or slightly more. Inboard, I start with a small pilot hole with a small drill bit. Then in this case, I used a #47 drill bit afterwards to make them larger. Finally I used a round file to smooth out the hole’s insides. I lightly sanded the inboard bulwarks over the scuppers with some 400 grit sandpaper to smooth out any fraying. This will require some paint touch-up later when they are all done. The scupper holes were made flush with the deck level or just a hair above.
I prefer to use a soft pencil to darken the inside of the holes. I made sure to cover the entire inside surface of the scuppers including the back of the hole. Then I touch up the red bulwark paint. On this model I drilled the scuppers before I added the waterway. I just wanted to try something new. It worked out really well for me. No chipping or fraying of the water way at all. You can do it whichever way is more comfortable for you.
The picture below shows the holes drilled and darkened with the pencil. They are nice and dark. I touched up the red paint as well on the bulwarks afterwards. You can see the waterway strip also prepared in advance and ready to be glued into position.
The waterway is a 3/64" x 3/64" strip of cedar. I sanded one of the four corners of the strip down its entire length. I used an Emory board or sanding stick. Basically I made it triangular in profile. Then I held it in position so I could mark the positions for the scuppers along its length. I really tried to get these exactly where they should be located. I used a round mini file to make the half round openings along the length of the waterway where the scuppers were marked out. Once in position this really looked good. I used the same soft pencil to darken the round notches I made along the waterway as well. Below you can see how the scuppers inboard turned out. I made the waterway in two pieces for the gun deck rather than use one long strip that spanned across the whole length.
I also prepared the waterway for the poop deck, port and starboard. This was easy...no scuppers, LOL. Just make the strip triangular. Dont worry about trying to make it concave or anything fancy.
Here is a photo.
Finally to the outboard side. No difference here really. I used those outboard templates we used way back when....remember those. If you have to shift the template fore and aft a bit to line them up with the inboard scuppers you made on the opposite side of the deck/hull its no big deal. But this template will give you a really good start and can be rested atop the wales.
I drilled with a small drill bit first and again made the holes larger using the #47 bit. I cleaned them up a bit and darkened them with a soft pencil. Once again...no need to drill all the way through and hope you meet the same scupper hole you drilled on the inboard side. Fake it ...till you make it .....I always say. I drilled part way through once again. Make sure you really darken them inside the holes nicely and completely.
Dont add the waterway on the fcastle deck yet. I think it best to drill the hawse holes first. I will be doing that next me thinks.
-
 Chuck got a reaction from whitejamest in Sloop Speedwell 1752 by Chuck - Ketch Rigged Sloop - POF - prototype build
To scupper or not to scupper.
Most contemporary models do not show the scuppers. In fact the contemporary model of Speedwell doesnt show the scuppers. I didnt add the scuppers on my Winnie build which was typical. But I am going to show them on my speedwell. Nothing fancy. These arent too crazy to do. Not like the hawse holes will be. But you do have to be careful. You need to carefully measure them inboard and outboard so they look like they line up. You can actually use the deck planking templates because I have marked the inboard locations for all of the scuppers.
When I drill my scuppers I dont even try to drill them all the way through. That adds unnecessary difficulty. I drill shallow holes only about 1/16" deep or slightly more. Inboard, I start with a small pilot hole with a small drill bit. Then in this case, I used a #47 drill bit afterwards to make them larger. Finally I used a round file to smooth out the hole’s insides. I lightly sanded the inboard bulwarks over the scuppers with some 400 grit sandpaper to smooth out any fraying. This will require some paint touch-up later when they are all done. The scupper holes were made flush with the deck level or just a hair above.
I prefer to use a soft pencil to darken the inside of the holes. I made sure to cover the entire inside surface of the scuppers including the back of the hole. Then I touch up the red bulwark paint. On this model I drilled the scuppers before I added the waterway. I just wanted to try something new. It worked out really well for me. No chipping or fraying of the water way at all. You can do it whichever way is more comfortable for you.
The picture below shows the holes drilled and darkened with the pencil. They are nice and dark. I touched up the red paint as well on the bulwarks afterwards. You can see the waterway strip also prepared in advance and ready to be glued into position.
The waterway is a 3/64" x 3/64" strip of cedar. I sanded one of the four corners of the strip down its entire length. I used an Emory board or sanding stick. Basically I made it triangular in profile. Then I held it in position so I could mark the positions for the scuppers along its length. I really tried to get these exactly where they should be located. I used a round mini file to make the half round openings along the length of the waterway where the scuppers were marked out. Once in position this really looked good. I used the same soft pencil to darken the round notches I made along the waterway as well. Below you can see how the scuppers inboard turned out. I made the waterway in two pieces for the gun deck rather than use one long strip that spanned across the whole length.
I also prepared the waterway for the poop deck, port and starboard. This was easy...no scuppers, LOL. Just make the strip triangular. Dont worry about trying to make it concave or anything fancy.
Here is a photo.
Finally to the outboard side. No difference here really. I used those outboard templates we used way back when....remember those. If you have to shift the template fore and aft a bit to line them up with the inboard scuppers you made on the opposite side of the deck/hull its no big deal. But this template will give you a really good start and can be rested atop the wales.
I drilled with a small drill bit first and again made the holes larger using the #47 bit. I cleaned them up a bit and darkened them with a soft pencil. Once again...no need to drill all the way through and hope you meet the same scupper hole you drilled on the inboard side. Fake it ...till you make it .....I always say. I drilled part way through once again. Make sure you really darken them inside the holes nicely and completely.
Dont add the waterway on the fcastle deck yet. I think it best to drill the hawse holes first. I will be doing that next me thinks.
-
Chuck reacted to scrubbyj427 in HMS Portland 1770 by scrubbyj427 - 1:48 - 4th rate 50-gun ship
The preliminary design for the stern carvings are now complete, I’m going to review them and make any adjustments necessary and proceed with the prototype sets. Looks like I need to get moving on the model so I have something to attach these beauties to.
JJ
-
 Chuck got a reaction from Jim Rogers in Sloop Speedwell 1752 by Chuck - Ketch Rigged Sloop - POF - prototype build
To scupper or not to scupper.
Most contemporary models do not show the scuppers. In fact the contemporary model of Speedwell doesnt show the scuppers. I didnt add the scuppers on my Winnie build which was typical. But I am going to show them on my speedwell. Nothing fancy. These arent too crazy to do. Not like the hawse holes will be. But you do have to be careful. You need to carefully measure them inboard and outboard so they look like they line up. You can actually use the deck planking templates because I have marked the inboard locations for all of the scuppers.
When I drill my scuppers I dont even try to drill them all the way through. That adds unnecessary difficulty. I drill shallow holes only about 1/16" deep or slightly more. Inboard, I start with a small pilot hole with a small drill bit. Then in this case, I used a #47 drill bit afterwards to make them larger. Finally I used a round file to smooth out the hole’s insides. I lightly sanded the inboard bulwarks over the scuppers with some 400 grit sandpaper to smooth out any fraying. This will require some paint touch-up later when they are all done. The scupper holes were made flush with the deck level or just a hair above.
I prefer to use a soft pencil to darken the inside of the holes. I made sure to cover the entire inside surface of the scuppers including the back of the hole. Then I touch up the red bulwark paint. On this model I drilled the scuppers before I added the waterway. I just wanted to try something new. It worked out really well for me. No chipping or fraying of the water way at all. You can do it whichever way is more comfortable for you.
The picture below shows the holes drilled and darkened with the pencil. They are nice and dark. I touched up the red paint as well on the bulwarks afterwards. You can see the waterway strip also prepared in advance and ready to be glued into position.
The waterway is a 3/64" x 3/64" strip of cedar. I sanded one of the four corners of the strip down its entire length. I used an Emory board or sanding stick. Basically I made it triangular in profile. Then I held it in position so I could mark the positions for the scuppers along its length. I really tried to get these exactly where they should be located. I used a round mini file to make the half round openings along the length of the waterway where the scuppers were marked out. Once in position this really looked good. I used the same soft pencil to darken the round notches I made along the waterway as well. Below you can see how the scuppers inboard turned out. I made the waterway in two pieces for the gun deck rather than use one long strip that spanned across the whole length.
I also prepared the waterway for the poop deck, port and starboard. This was easy...no scuppers, LOL. Just make the strip triangular. Dont worry about trying to make it concave or anything fancy.
Here is a photo.
Finally to the outboard side. No difference here really. I used those outboard templates we used way back when....remember those. If you have to shift the template fore and aft a bit to line them up with the inboard scuppers you made on the opposite side of the deck/hull its no big deal. But this template will give you a really good start and can be rested atop the wales.
I drilled with a small drill bit first and again made the holes larger using the #47 bit. I cleaned them up a bit and darkened them with a soft pencil. Once again...no need to drill all the way through and hope you meet the same scupper hole you drilled on the inboard side. Fake it ...till you make it .....I always say. I drilled part way through once again. Make sure you really darken them inside the holes nicely and completely.
Dont add the waterway on the fcastle deck yet. I think it best to drill the hawse holes first. I will be doing that next me thinks.
-
.thumb.jpg.6d6ee4bdbfaac2c58ecc77e7b80ae374.jpg) Chuck got a reaction from Matt D in Sloop Speedwell 1752 by Chuck - Ketch Rigged Sloop - POF - prototype build
Chuck got a reaction from Matt D in Sloop Speedwell 1752 by Chuck - Ketch Rigged Sloop - POF - prototype build
While I was away, I had taken a bunch of milled cedar strips of various widths. All were 3/64" thick. I spent my evenings planking the decks which was quite nice and relaxing. My wife was also enjoying some wine from the local vineyards while working on her own relaxing projects while overlooking the Long Island Sound.
Not much to say about how to plank the decks as the gun deck and poop were planked like any other deck. Just taper the strips following the provided deck plans. You must cut around the hatches and coamings as usual. These were the most difficult planks to cut but not awful. It just takes careful planning and cutting.
These were the last two planks which I waiting to return home so I could photograph them before gluing them in permanently.
Here are some photos of the completed deck planking. The forecastle deck planks were cut from a 3/64" sheet because of their curvature as I mentioned. But the gun deck and poop were planked with strips. The curves are not that severe and it was a lot easier this way. Note the gentle curve of the planks.
NOW...how much deck planking should be added. Its really just a personal decision. What do like more....or less.
I have an extra strake on the gun deck where the cannon will be located. I dont particularly like when the carriage trucks are hanging over the edge if there were too few strakes. But maybe you are OK with that. This planking scheme matches the plans I provided but you guys can change to suit your sensibilities. Looking at the photos you can see why I omitted all of the deck knees (hanging and lodging). You can try really hard but would ever be able to see even a whisper of them. It just doesnt make sense to add them with this planking layout. I hope you will agree.
Next up will be something I have been blissfully ignoring. Its a bit terrifying for any ship modeler. I will be drilling the scupper holes and hawse holes. Usually I drill the scuppers after adding the waterway. But this usually chips and frays the waterway. So I am going to try something new. I will drill the scuppers first and then add the waterway strip. I will mark and file the waterway strip so it will hopefully not get damaged. We shall see.
The hawse holes are a different story. Those will require some really careful planning.
But waiting any longer to do these will only make them more terrifying.
Chuck
-
 Chuck got a reaction from yvesvidal in Sloop Speedwell 1752 by Chuck - Ketch Rigged Sloop - POF - prototype build
To scupper or not to scupper.
Most contemporary models do not show the scuppers. In fact the contemporary model of Speedwell doesnt show the scuppers. I didnt add the scuppers on my Winnie build which was typical. But I am going to show them on my speedwell. Nothing fancy. These arent too crazy to do. Not like the hawse holes will be. But you do have to be careful. You need to carefully measure them inboard and outboard so they look like they line up. You can actually use the deck planking templates because I have marked the inboard locations for all of the scuppers.
When I drill my scuppers I dont even try to drill them all the way through. That adds unnecessary difficulty. I drill shallow holes only about 1/16" deep or slightly more. Inboard, I start with a small pilot hole with a small drill bit. Then in this case, I used a #47 drill bit afterwards to make them larger. Finally I used a round file to smooth out the hole’s insides. I lightly sanded the inboard bulwarks over the scuppers with some 400 grit sandpaper to smooth out any fraying. This will require some paint touch-up later when they are all done. The scupper holes were made flush with the deck level or just a hair above.
I prefer to use a soft pencil to darken the inside of the holes. I made sure to cover the entire inside surface of the scuppers including the back of the hole. Then I touch up the red bulwark paint. On this model I drilled the scuppers before I added the waterway. I just wanted to try something new. It worked out really well for me. No chipping or fraying of the water way at all. You can do it whichever way is more comfortable for you.
The picture below shows the holes drilled and darkened with the pencil. They are nice and dark. I touched up the red paint as well on the bulwarks afterwards. You can see the waterway strip also prepared in advance and ready to be glued into position.
The waterway is a 3/64" x 3/64" strip of cedar. I sanded one of the four corners of the strip down its entire length. I used an Emory board or sanding stick. Basically I made it triangular in profile. Then I held it in position so I could mark the positions for the scuppers along its length. I really tried to get these exactly where they should be located. I used a round mini file to make the half round openings along the length of the waterway where the scuppers were marked out. Once in position this really looked good. I used the same soft pencil to darken the round notches I made along the waterway as well. Below you can see how the scuppers inboard turned out. I made the waterway in two pieces for the gun deck rather than use one long strip that spanned across the whole length.
I also prepared the waterway for the poop deck, port and starboard. This was easy...no scuppers, LOL. Just make the strip triangular. Dont worry about trying to make it concave or anything fancy.
Here is a photo.
Finally to the outboard side. No difference here really. I used those outboard templates we used way back when....remember those. If you have to shift the template fore and aft a bit to line them up with the inboard scuppers you made on the opposite side of the deck/hull its no big deal. But this template will give you a really good start and can be rested atop the wales.
I drilled with a small drill bit first and again made the holes larger using the #47 bit. I cleaned them up a bit and darkened them with a soft pencil. Once again...no need to drill all the way through and hope you meet the same scupper hole you drilled on the inboard side. Fake it ...till you make it .....I always say. I drilled part way through once again. Make sure you really darken them inside the holes nicely and completely.
Dont add the waterway on the fcastle deck yet. I think it best to drill the hawse holes first. I will be doing that next me thinks.
-
 Chuck got a reaction from woodartist in Medway Longboat 1742 by MajorChaos - 1:24 scale
Pre-bending with heat and even wetting down the plank a bit using a hair dryer is the better way to go. Force bending it dry makes it so much tougher to get a nice fit. You will also get lots of dents and imperfections with all of those pins.
-
 Chuck got a reaction from Trussben in Sloop Speedwell 1752 by Chuck - Ketch Rigged Sloop - POF - prototype build
To scupper or not to scupper.
Most contemporary models do not show the scuppers. In fact the contemporary model of Speedwell doesnt show the scuppers. I didnt add the scuppers on my Winnie build which was typical. But I am going to show them on my speedwell. Nothing fancy. These arent too crazy to do. Not like the hawse holes will be. But you do have to be careful. You need to carefully measure them inboard and outboard so they look like they line up. You can actually use the deck planking templates because I have marked the inboard locations for all of the scuppers.
When I drill my scuppers I dont even try to drill them all the way through. That adds unnecessary difficulty. I drill shallow holes only about 1/16" deep or slightly more. Inboard, I start with a small pilot hole with a small drill bit. Then in this case, I used a #47 drill bit afterwards to make them larger. Finally I used a round file to smooth out the hole’s insides. I lightly sanded the inboard bulwarks over the scuppers with some 400 grit sandpaper to smooth out any fraying. This will require some paint touch-up later when they are all done. The scupper holes were made flush with the deck level or just a hair above.
I prefer to use a soft pencil to darken the inside of the holes. I made sure to cover the entire inside surface of the scuppers including the back of the hole. Then I touch up the red bulwark paint. On this model I drilled the scuppers before I added the waterway. I just wanted to try something new. It worked out really well for me. No chipping or fraying of the water way at all. You can do it whichever way is more comfortable for you.
The picture below shows the holes drilled and darkened with the pencil. They are nice and dark. I touched up the red paint as well on the bulwarks afterwards. You can see the waterway strip also prepared in advance and ready to be glued into position.
The waterway is a 3/64" x 3/64" strip of cedar. I sanded one of the four corners of the strip down its entire length. I used an Emory board or sanding stick. Basically I made it triangular in profile. Then I held it in position so I could mark the positions for the scuppers along its length. I really tried to get these exactly where they should be located. I used a round mini file to make the half round openings along the length of the waterway where the scuppers were marked out. Once in position this really looked good. I used the same soft pencil to darken the round notches I made along the waterway as well. Below you can see how the scuppers inboard turned out. I made the waterway in two pieces for the gun deck rather than use one long strip that spanned across the whole length.
I also prepared the waterway for the poop deck, port and starboard. This was easy...no scuppers, LOL. Just make the strip triangular. Dont worry about trying to make it concave or anything fancy.
Here is a photo.
Finally to the outboard side. No difference here really. I used those outboard templates we used way back when....remember those. If you have to shift the template fore and aft a bit to line them up with the inboard scuppers you made on the opposite side of the deck/hull its no big deal. But this template will give you a really good start and can be rested atop the wales.
I drilled with a small drill bit first and again made the holes larger using the #47 bit. I cleaned them up a bit and darkened them with a soft pencil. Once again...no need to drill all the way through and hope you meet the same scupper hole you drilled on the inboard side. Fake it ...till you make it .....I always say. I drilled part way through once again. Make sure you really darken them inside the holes nicely and completely.
Dont add the waterway on the fcastle deck yet. I think it best to drill the hawse holes first. I will be doing that next me thinks.
-
 Chuck got a reaction from KenW in Sloop Speedwell 1752 by Chuck - Ketch Rigged Sloop - POF - prototype build
To scupper or not to scupper.
Most contemporary models do not show the scuppers. In fact the contemporary model of Speedwell doesnt show the scuppers. I didnt add the scuppers on my Winnie build which was typical. But I am going to show them on my speedwell. Nothing fancy. These arent too crazy to do. Not like the hawse holes will be. But you do have to be careful. You need to carefully measure them inboard and outboard so they look like they line up. You can actually use the deck planking templates because I have marked the inboard locations for all of the scuppers.
When I drill my scuppers I dont even try to drill them all the way through. That adds unnecessary difficulty. I drill shallow holes only about 1/16" deep or slightly more. Inboard, I start with a small pilot hole with a small drill bit. Then in this case, I used a #47 drill bit afterwards to make them larger. Finally I used a round file to smooth out the hole’s insides. I lightly sanded the inboard bulwarks over the scuppers with some 400 grit sandpaper to smooth out any fraying. This will require some paint touch-up later when they are all done. The scupper holes were made flush with the deck level or just a hair above.
I prefer to use a soft pencil to darken the inside of the holes. I made sure to cover the entire inside surface of the scuppers including the back of the hole. Then I touch up the red bulwark paint. On this model I drilled the scuppers before I added the waterway. I just wanted to try something new. It worked out really well for me. No chipping or fraying of the water way at all. You can do it whichever way is more comfortable for you.
The picture below shows the holes drilled and darkened with the pencil. They are nice and dark. I touched up the red paint as well on the bulwarks afterwards. You can see the waterway strip also prepared in advance and ready to be glued into position.
The waterway is a 3/64" x 3/64" strip of cedar. I sanded one of the four corners of the strip down its entire length. I used an Emory board or sanding stick. Basically I made it triangular in profile. Then I held it in position so I could mark the positions for the scuppers along its length. I really tried to get these exactly where they should be located. I used a round mini file to make the half round openings along the length of the waterway where the scuppers were marked out. Once in position this really looked good. I used the same soft pencil to darken the round notches I made along the waterway as well. Below you can see how the scuppers inboard turned out. I made the waterway in two pieces for the gun deck rather than use one long strip that spanned across the whole length.
I also prepared the waterway for the poop deck, port and starboard. This was easy...no scuppers, LOL. Just make the strip triangular. Dont worry about trying to make it concave or anything fancy.
Here is a photo.
Finally to the outboard side. No difference here really. I used those outboard templates we used way back when....remember those. If you have to shift the template fore and aft a bit to line them up with the inboard scuppers you made on the opposite side of the deck/hull its no big deal. But this template will give you a really good start and can be rested atop the wales.
I drilled with a small drill bit first and again made the holes larger using the #47 bit. I cleaned them up a bit and darkened them with a soft pencil. Once again...no need to drill all the way through and hope you meet the same scupper hole you drilled on the inboard side. Fake it ...till you make it .....I always say. I drilled part way through once again. Make sure you really darken them inside the holes nicely and completely.
Dont add the waterway on the fcastle deck yet. I think it best to drill the hawse holes first. I will be doing that next me thinks.
-
Chuck reacted to Blue Ensign in Medway Longboat 1742 by Blue Ensign - FINISHED - Syren Ship Model Company - ½” scale
Thank you Chuck, it was the elegant sheer that attracted me to the model. Overall it is a thing of beauty.
Post 20
In continuation.
4753
The re-made bow Breasthook/knee has been glued into place, I think I’ve got a close fit.
4754
I have continued to clean up the woodwork prior to applying a coat of w-o-p.
With w-o-p applied to the frames and inner boarding it is time to consider paint.
As with the Queen Anne Barge I will be using Vallejo acrylics.
3434(1)
For that build I used Flat Red for the Barge paintwork.
The uniforms for the Royal Company of Watermen were of a brighter hue.
4837
Before I committed to the paint shade I compared the likely Vallejo options.
I think Flat Red (top option) still has the edge so I’ll stick with that.
4848
A first coat of thinned paint is applied, the first of several, and a first opportunity for the paint to reveal where areas need attention.
4842
4846
On with the show.
B.E.
27/05/2024
-
Chuck reacted to the learner in Sloop Speedwell 1752 by Chuck - Ketch Rigged Sloop - POF - prototype build
You're progressing nicely, thank you for your dedication!
-
 Chuck got a reaction from Archi in Sloop Speedwell 1752 by Chuck - Ketch Rigged Sloop - POF - prototype build
To scupper or not to scupper.
Most contemporary models do not show the scuppers. In fact the contemporary model of Speedwell doesnt show the scuppers. I didnt add the scuppers on my Winnie build which was typical. But I am going to show them on my speedwell. Nothing fancy. These arent too crazy to do. Not like the hawse holes will be. But you do have to be careful. You need to carefully measure them inboard and outboard so they look like they line up. You can actually use the deck planking templates because I have marked the inboard locations for all of the scuppers.
When I drill my scuppers I dont even try to drill them all the way through. That adds unnecessary difficulty. I drill shallow holes only about 1/16" deep or slightly more. Inboard, I start with a small pilot hole with a small drill bit. Then in this case, I used a #47 drill bit afterwards to make them larger. Finally I used a round file to smooth out the hole’s insides. I lightly sanded the inboard bulwarks over the scuppers with some 400 grit sandpaper to smooth out any fraying. This will require some paint touch-up later when they are all done. The scupper holes were made flush with the deck level or just a hair above.
I prefer to use a soft pencil to darken the inside of the holes. I made sure to cover the entire inside surface of the scuppers including the back of the hole. Then I touch up the red bulwark paint. On this model I drilled the scuppers before I added the waterway. I just wanted to try something new. It worked out really well for me. No chipping or fraying of the water way at all. You can do it whichever way is more comfortable for you.
The picture below shows the holes drilled and darkened with the pencil. They are nice and dark. I touched up the red paint as well on the bulwarks afterwards. You can see the waterway strip also prepared in advance and ready to be glued into position.
The waterway is a 3/64" x 3/64" strip of cedar. I sanded one of the four corners of the strip down its entire length. I used an Emory board or sanding stick. Basically I made it triangular in profile. Then I held it in position so I could mark the positions for the scuppers along its length. I really tried to get these exactly where they should be located. I used a round mini file to make the half round openings along the length of the waterway where the scuppers were marked out. Once in position this really looked good. I used the same soft pencil to darken the round notches I made along the waterway as well. Below you can see how the scuppers inboard turned out. I made the waterway in two pieces for the gun deck rather than use one long strip that spanned across the whole length.
I also prepared the waterway for the poop deck, port and starboard. This was easy...no scuppers, LOL. Just make the strip triangular. Dont worry about trying to make it concave or anything fancy.
Here is a photo.
Finally to the outboard side. No difference here really. I used those outboard templates we used way back when....remember those. If you have to shift the template fore and aft a bit to line them up with the inboard scuppers you made on the opposite side of the deck/hull its no big deal. But this template will give you a really good start and can be rested atop the wales.
I drilled with a small drill bit first and again made the holes larger using the #47 bit. I cleaned them up a bit and darkened them with a soft pencil. Once again...no need to drill all the way through and hope you meet the same scupper hole you drilled on the inboard side. Fake it ...till you make it .....I always say. I drilled part way through once again. Make sure you really darken them inside the holes nicely and completely.
Dont add the waterway on the fcastle deck yet. I think it best to drill the hawse holes first. I will be doing that next me thinks.
-
Chuck got a reaction from Matt D in Sloop Speedwell 1752 by Chuck - Ketch Rigged Sloop - POF - prototype build
To scupper or not to scupper.
Most contemporary models do not show the scuppers. In fact the contemporary model of Speedwell doesnt show the scuppers. I didnt add the scuppers on my Winnie build which was typical. But I am going to show them on my speedwell. Nothing fancy. These arent too crazy to do. Not like the hawse holes will be. But you do have to be careful. You need to carefully measure them inboard and outboard so they look like they line up. You can actually use the deck planking templates because I have marked the inboard locations for all of the scuppers.
When I drill my scuppers I dont even try to drill them all the way through. That adds unnecessary difficulty. I drill shallow holes only about 1/16" deep or slightly more. Inboard, I start with a small pilot hole with a small drill bit. Then in this case, I used a #47 drill bit afterwards to make them larger. Finally I used a round file to smooth out the hole’s insides. I lightly sanded the inboard bulwarks over the scuppers with some 400 grit sandpaper to smooth out any fraying. This will require some paint touch-up later when they are all done. The scupper holes were made flush with the deck level or just a hair above.
I prefer to use a soft pencil to darken the inside of the holes. I made sure to cover the entire inside surface of the scuppers including the back of the hole. Then I touch up the red bulwark paint. On this model I drilled the scuppers before I added the waterway. I just wanted to try something new. It worked out really well for me. No chipping or fraying of the water way at all. You can do it whichever way is more comfortable for you.
The picture below shows the holes drilled and darkened with the pencil. They are nice and dark. I touched up the red paint as well on the bulwarks afterwards. You can see the waterway strip also prepared in advance and ready to be glued into position.
The waterway is a 3/64" x 3/64" strip of cedar. I sanded one of the four corners of the strip down its entire length. I used an Emory board or sanding stick. Basically I made it triangular in profile. Then I held it in position so I could mark the positions for the scuppers along its length. I really tried to get these exactly where they should be located. I used a round mini file to make the half round openings along the length of the waterway where the scuppers were marked out. Once in position this really looked good. I used the same soft pencil to darken the round notches I made along the waterway as well. Below you can see how the scuppers inboard turned out. I made the waterway in two pieces for the gun deck rather than use one long strip that spanned across the whole length.
I also prepared the waterway for the poop deck, port and starboard. This was easy...no scuppers, LOL. Just make the strip triangular. Dont worry about trying to make it concave or anything fancy.
Here is a photo.
Finally to the outboard side. No difference here really. I used those outboard templates we used way back when....remember those. If you have to shift the template fore and aft a bit to line them up with the inboard scuppers you made on the opposite side of the deck/hull its no big deal. But this template will give you a really good start and can be rested atop the wales.
I drilled with a small drill bit first and again made the holes larger using the #47 bit. I cleaned them up a bit and darkened them with a soft pencil. Once again...no need to drill all the way through and hope you meet the same scupper hole you drilled on the inboard side. Fake it ...till you make it .....I always say. I drilled part way through once again. Make sure you really darken them inside the holes nicely and completely.
Dont add the waterway on the fcastle deck yet. I think it best to drill the hawse holes first. I will be doing that next me thinks.
-
 Chuck got a reaction from fake johnbull in Sloop Speedwell 1752 by Chuck - Ketch Rigged Sloop - POF - prototype build
To scupper or not to scupper.
Most contemporary models do not show the scuppers. In fact the contemporary model of Speedwell doesnt show the scuppers. I didnt add the scuppers on my Winnie build which was typical. But I am going to show them on my speedwell. Nothing fancy. These arent too crazy to do. Not like the hawse holes will be. But you do have to be careful. You need to carefully measure them inboard and outboard so they look like they line up. You can actually use the deck planking templates because I have marked the inboard locations for all of the scuppers.
When I drill my scuppers I dont even try to drill them all the way through. That adds unnecessary difficulty. I drill shallow holes only about 1/16" deep or slightly more. Inboard, I start with a small pilot hole with a small drill bit. Then in this case, I used a #47 drill bit afterwards to make them larger. Finally I used a round file to smooth out the hole’s insides. I lightly sanded the inboard bulwarks over the scuppers with some 400 grit sandpaper to smooth out any fraying. This will require some paint touch-up later when they are all done. The scupper holes were made flush with the deck level or just a hair above.
I prefer to use a soft pencil to darken the inside of the holes. I made sure to cover the entire inside surface of the scuppers including the back of the hole. Then I touch up the red bulwark paint. On this model I drilled the scuppers before I added the waterway. I just wanted to try something new. It worked out really well for me. No chipping or fraying of the water way at all. You can do it whichever way is more comfortable for you.
The picture below shows the holes drilled and darkened with the pencil. They are nice and dark. I touched up the red paint as well on the bulwarks afterwards. You can see the waterway strip also prepared in advance and ready to be glued into position.
The waterway is a 3/64" x 3/64" strip of cedar. I sanded one of the four corners of the strip down its entire length. I used an Emory board or sanding stick. Basically I made it triangular in profile. Then I held it in position so I could mark the positions for the scuppers along its length. I really tried to get these exactly where they should be located. I used a round mini file to make the half round openings along the length of the waterway where the scuppers were marked out. Once in position this really looked good. I used the same soft pencil to darken the round notches I made along the waterway as well. Below you can see how the scuppers inboard turned out. I made the waterway in two pieces for the gun deck rather than use one long strip that spanned across the whole length.
I also prepared the waterway for the poop deck, port and starboard. This was easy...no scuppers, LOL. Just make the strip triangular. Dont worry about trying to make it concave or anything fancy.
Here is a photo.
Finally to the outboard side. No difference here really. I used those outboard templates we used way back when....remember those. If you have to shift the template fore and aft a bit to line them up with the inboard scuppers you made on the opposite side of the deck/hull its no big deal. But this template will give you a really good start and can be rested atop the wales.
I drilled with a small drill bit first and again made the holes larger using the #47 bit. I cleaned them up a bit and darkened them with a soft pencil. Once again...no need to drill all the way through and hope you meet the same scupper hole you drilled on the inboard side. Fake it ...till you make it .....I always say. I drilled part way through once again. Make sure you really darken them inside the holes nicely and completely.
Dont add the waterway on the fcastle deck yet. I think it best to drill the hawse holes first. I will be doing that next me thinks.