


Chuck
-
Posts
9,391 -
Joined
-
Last visited
Reputation Activity
-

 Chuck got a reaction from Archi in HM Cutter Cheerful 1806 by Chuck - FINISHED - 1:48 scale - kit prototype
After planking the bulwarks I painted it red. The finished bulwarks were 5/32" thick. Maybe slightly thinner. Then it was time to add the caprail. It will be added in two pieces. First the main rail which is 1/16" thick. This was sanded flush both inboard and outboard. Another strip will eventually be placed outboard as a fancy molding. It is scraped like the others and is 1/6" x 1/32". But it wasnt added yet.
First I had to create the hawse hole plates....which are essentially 1/32" thick pieces with the holes ut for the hawse holes and the bowsprit. This sits flush with the top of the caprail so I had to add it first before I could add the fancy molding strip along the caprail outboard. I didnt drill the hawse holes yet. This will be done next. But the hawse plates in position makes it easy to find their locations. So that will be done in a day or two.
Lastly I added that fancy molding strip outboard for the cap rail which stands proud of the hull planking and finishes it off. This is where I am to date and after drilling the hawse holes and hole for the bowsprit I will make preparations to start planking the deck. Its getting there...
I am contemplating painting the hawse plates and the stem above the ear molding black.....along with the fashion pieces at the stern. But I have time to decide that. So I will live with it as it is shown for a while before I commit to it. Maybe after I drill and file the holes for the bowsprit and such...we shall see.
-
 Chuck got a reaction from Elmer Cornish in HM Cutter Cheerful 1806 by Chuck - FINISHED - 1:48 scale - kit prototype
After planking the bulwarks I painted it red. The finished bulwarks were 5/32" thick. Maybe slightly thinner. Then it was time to add the caprail. It will be added in two pieces. First the main rail which is 1/16" thick. This was sanded flush both inboard and outboard. Another strip will eventually be placed outboard as a fancy molding. It is scraped like the others and is 1/6" x 1/32". But it wasnt added yet.
First I had to create the hawse hole plates....which are essentially 1/32" thick pieces with the holes ut for the hawse holes and the bowsprit. This sits flush with the top of the caprail so I had to add it first before I could add the fancy molding strip along the caprail outboard. I didnt drill the hawse holes yet. This will be done next. But the hawse plates in position makes it easy to find their locations. So that will be done in a day or two.
Lastly I added that fancy molding strip outboard for the cap rail which stands proud of the hull planking and finishes it off. This is where I am to date and after drilling the hawse holes and hole for the bowsprit I will make preparations to start planking the deck. Its getting there...
I am contemplating painting the hawse plates and the stem above the ear molding black.....along with the fashion pieces at the stern. But I have time to decide that. So I will live with it as it is shown for a while before I commit to it. Maybe after I drill and file the holes for the bowsprit and such...we shall see.
-
 Chuck got a reaction from justsayrow in HM Cutter Cheerful 1806 by Chuck - FINISHED - 1:48 scale - kit prototype
Thanks guys...its nice to be back working on her. The deck planking is the last major project on the model. I have to start with making the coamings and gratings first.
Chuck
-
 Chuck got a reaction from Senior ole salt in HM Cutter Cheerful 1806 by Chuck - FINISHED - 1:48 scale - kit prototype
After planking the bulwarks I painted it red. The finished bulwarks were 5/32" thick. Maybe slightly thinner. Then it was time to add the caprail. It will be added in two pieces. First the main rail which is 1/16" thick. This was sanded flush both inboard and outboard. Another strip will eventually be placed outboard as a fancy molding. It is scraped like the others and is 1/6" x 1/32". But it wasnt added yet.
First I had to create the hawse hole plates....which are essentially 1/32" thick pieces with the holes ut for the hawse holes and the bowsprit. This sits flush with the top of the caprail so I had to add it first before I could add the fancy molding strip along the caprail outboard. I didnt drill the hawse holes yet. This will be done next. But the hawse plates in position makes it easy to find their locations. So that will be done in a day or two.
Lastly I added that fancy molding strip outboard for the cap rail which stands proud of the hull planking and finishes it off. This is where I am to date and after drilling the hawse holes and hole for the bowsprit I will make preparations to start planking the deck. Its getting there...
I am contemplating painting the hawse plates and the stem above the ear molding black.....along with the fashion pieces at the stern. But I have time to decide that. So I will live with it as it is shown for a while before I commit to it. Maybe after I drill and file the holes for the bowsprit and such...we shall see.
-
 Chuck got a reaction from KenW in HM Cutter Cheerful 1806 by Chuck - FINISHED - 1:48 scale - kit prototype
Thanks guys...its nice to be back working on her. The deck planking is the last major project on the model. I have to start with making the coamings and gratings first.
Chuck
-
 Chuck got a reaction from Model Mariner in HM Cutter Cheerful 1806 by Chuck - FINISHED - 1:48 scale - kit prototype
After planking the bulwarks I painted it red. The finished bulwarks were 5/32" thick. Maybe slightly thinner. Then it was time to add the caprail. It will be added in two pieces. First the main rail which is 1/16" thick. This was sanded flush both inboard and outboard. Another strip will eventually be placed outboard as a fancy molding. It is scraped like the others and is 1/6" x 1/32". But it wasnt added yet.
First I had to create the hawse hole plates....which are essentially 1/32" thick pieces with the holes ut for the hawse holes and the bowsprit. This sits flush with the top of the caprail so I had to add it first before I could add the fancy molding strip along the caprail outboard. I didnt drill the hawse holes yet. This will be done next. But the hawse plates in position makes it easy to find their locations. So that will be done in a day or two.
Lastly I added that fancy molding strip outboard for the cap rail which stands proud of the hull planking and finishes it off. This is where I am to date and after drilling the hawse holes and hole for the bowsprit I will make preparations to start planking the deck. Its getting there...
I am contemplating painting the hawse plates and the stem above the ear molding black.....along with the fashion pieces at the stern. But I have time to decide that. So I will live with it as it is shown for a while before I commit to it. Maybe after I drill and file the holes for the bowsprit and such...we shall see.
-
 Chuck reacted to Kevin in HM Cutter Cheerful 1806 by Chuck - FINISHED - 1:48 scale - kit prototype
wow chuck - i have missed so much of this project, lovely to catch up
-
 Chuck got a reaction from Timmo in HM Cutter Cheerful 1806 by Chuck - FINISHED - 1:48 scale - kit prototype
After planking the bulwarks I painted it red. The finished bulwarks were 5/32" thick. Maybe slightly thinner. Then it was time to add the caprail. It will be added in two pieces. First the main rail which is 1/16" thick. This was sanded flush both inboard and outboard. Another strip will eventually be placed outboard as a fancy molding. It is scraped like the others and is 1/6" x 1/32". But it wasnt added yet.
First I had to create the hawse hole plates....which are essentially 1/32" thick pieces with the holes ut for the hawse holes and the bowsprit. This sits flush with the top of the caprail so I had to add it first before I could add the fancy molding strip along the caprail outboard. I didnt drill the hawse holes yet. This will be done next. But the hawse plates in position makes it easy to find their locations. So that will be done in a day or two.
Lastly I added that fancy molding strip outboard for the cap rail which stands proud of the hull planking and finishes it off. This is where I am to date and after drilling the hawse holes and hole for the bowsprit I will make preparations to start planking the deck. Its getting there...
I am contemplating painting the hawse plates and the stem above the ear molding black.....along with the fashion pieces at the stern. But I have time to decide that. So I will live with it as it is shown for a while before I commit to it. Maybe after I drill and file the holes for the bowsprit and such...we shall see.
-
 Chuck got a reaction from Rustyj in HM Cutter Cheerful 1806 by Chuck - FINISHED - 1:48 scale - kit prototype
Thanks guys...its nice to be back working on her. The deck planking is the last major project on the model. I have to start with making the coamings and gratings first.
Chuck
-
 Chuck got a reaction from Canute in HM Cutter Cheerful 1806 by Chuck - FINISHED - 1:48 scale - kit prototype
Thanks guys...its nice to be back working on her. The deck planking is the last major project on the model. I have to start with making the coamings and gratings first.
Chuck
-
 Chuck got a reaction from Chuck Seiler in HM Cutter Cheerful 1806 by Chuck - FINISHED - 1:48 scale - kit prototype
After planking the bulwarks I painted it red. The finished bulwarks were 5/32" thick. Maybe slightly thinner. Then it was time to add the caprail. It will be added in two pieces. First the main rail which is 1/16" thick. This was sanded flush both inboard and outboard. Another strip will eventually be placed outboard as a fancy molding. It is scraped like the others and is 1/6" x 1/32". But it wasnt added yet.
First I had to create the hawse hole plates....which are essentially 1/32" thick pieces with the holes ut for the hawse holes and the bowsprit. This sits flush with the top of the caprail so I had to add it first before I could add the fancy molding strip along the caprail outboard. I didnt drill the hawse holes yet. This will be done next. But the hawse plates in position makes it easy to find their locations. So that will be done in a day or two.
Lastly I added that fancy molding strip outboard for the cap rail which stands proud of the hull planking and finishes it off. This is where I am to date and after drilling the hawse holes and hole for the bowsprit I will make preparations to start planking the deck. Its getting there...
I am contemplating painting the hawse plates and the stem above the ear molding black.....along with the fashion pieces at the stern. But I have time to decide that. So I will live with it as it is shown for a while before I commit to it. Maybe after I drill and file the holes for the bowsprit and such...we shall see.
-
 Chuck got a reaction from augie in HM Cutter Cheerful 1806 by Chuck - FINISHED - 1:48 scale - kit prototype
After planking the bulwarks I painted it red. The finished bulwarks were 5/32" thick. Maybe slightly thinner. Then it was time to add the caprail. It will be added in two pieces. First the main rail which is 1/16" thick. This was sanded flush both inboard and outboard. Another strip will eventually be placed outboard as a fancy molding. It is scraped like the others and is 1/6" x 1/32". But it wasnt added yet.
First I had to create the hawse hole plates....which are essentially 1/32" thick pieces with the holes ut for the hawse holes and the bowsprit. This sits flush with the top of the caprail so I had to add it first before I could add the fancy molding strip along the caprail outboard. I didnt drill the hawse holes yet. This will be done next. But the hawse plates in position makes it easy to find their locations. So that will be done in a day or two.
Lastly I added that fancy molding strip outboard for the cap rail which stands proud of the hull planking and finishes it off. This is where I am to date and after drilling the hawse holes and hole for the bowsprit I will make preparations to start planking the deck. Its getting there...
I am contemplating painting the hawse plates and the stem above the ear molding black.....along with the fashion pieces at the stern. But I have time to decide that. So I will live with it as it is shown for a while before I commit to it. Maybe after I drill and file the holes for the bowsprit and such...we shall see.
-
Chuck got a reaction from KenW in HM Cutter Cheerful 1806 by Chuck - FINISHED - 1:48 scale - kit prototype
After planking the bulwarks I painted it red. The finished bulwarks were 5/32" thick. Maybe slightly thinner. Then it was time to add the caprail. It will be added in two pieces. First the main rail which is 1/16" thick. This was sanded flush both inboard and outboard. Another strip will eventually be placed outboard as a fancy molding. It is scraped like the others and is 1/6" x 1/32". But it wasnt added yet.
First I had to create the hawse hole plates....which are essentially 1/32" thick pieces with the holes ut for the hawse holes and the bowsprit. This sits flush with the top of the caprail so I had to add it first before I could add the fancy molding strip along the caprail outboard. I didnt drill the hawse holes yet. This will be done next. But the hawse plates in position makes it easy to find their locations. So that will be done in a day or two.
Lastly I added that fancy molding strip outboard for the cap rail which stands proud of the hull planking and finishes it off. This is where I am to date and after drilling the hawse holes and hole for the bowsprit I will make preparations to start planking the deck. Its getting there...
I am contemplating painting the hawse plates and the stem above the ear molding black.....along with the fashion pieces at the stern. But I have time to decide that. So I will live with it as it is shown for a while before I commit to it. Maybe after I drill and file the holes for the bowsprit and such...we shall see.
-
 Chuck got a reaction from usedtosail in HM Cutter Cheerful 1806 by Chuck - FINISHED - 1:48 scale - kit prototype
After planking the bulwarks I painted it red. The finished bulwarks were 5/32" thick. Maybe slightly thinner. Then it was time to add the caprail. It will be added in two pieces. First the main rail which is 1/16" thick. This was sanded flush both inboard and outboard. Another strip will eventually be placed outboard as a fancy molding. It is scraped like the others and is 1/6" x 1/32". But it wasnt added yet.
First I had to create the hawse hole plates....which are essentially 1/32" thick pieces with the holes ut for the hawse holes and the bowsprit. This sits flush with the top of the caprail so I had to add it first before I could add the fancy molding strip along the caprail outboard. I didnt drill the hawse holes yet. This will be done next. But the hawse plates in position makes it easy to find their locations. So that will be done in a day or two.
Lastly I added that fancy molding strip outboard for the cap rail which stands proud of the hull planking and finishes it off. This is where I am to date and after drilling the hawse holes and hole for the bowsprit I will make preparations to start planking the deck. Its getting there...
I am contemplating painting the hawse plates and the stem above the ear molding black.....along with the fashion pieces at the stern. But I have time to decide that. So I will live with it as it is shown for a while before I commit to it. Maybe after I drill and file the holes for the bowsprit and such...we shall see.
-
 Chuck got a reaction from yvesvidal in HM Cutter Cheerful 1806 by Chuck - FINISHED - 1:48 scale - kit prototype
After planking the bulwarks I painted it red. The finished bulwarks were 5/32" thick. Maybe slightly thinner. Then it was time to add the caprail. It will be added in two pieces. First the main rail which is 1/16" thick. This was sanded flush both inboard and outboard. Another strip will eventually be placed outboard as a fancy molding. It is scraped like the others and is 1/6" x 1/32". But it wasnt added yet.
First I had to create the hawse hole plates....which are essentially 1/32" thick pieces with the holes ut for the hawse holes and the bowsprit. This sits flush with the top of the caprail so I had to add it first before I could add the fancy molding strip along the caprail outboard. I didnt drill the hawse holes yet. This will be done next. But the hawse plates in position makes it easy to find their locations. So that will be done in a day or two.
Lastly I added that fancy molding strip outboard for the cap rail which stands proud of the hull planking and finishes it off. This is where I am to date and after drilling the hawse holes and hole for the bowsprit I will make preparations to start planking the deck. Its getting there...
I am contemplating painting the hawse plates and the stem above the ear molding black.....along with the fashion pieces at the stern. But I have time to decide that. So I will live with it as it is shown for a while before I commit to it. Maybe after I drill and file the holes for the bowsprit and such...we shall see.
-
 Chuck got a reaction from rtropp in HM Cutter Cheerful 1806 by Chuck - FINISHED - 1:48 scale - kit prototype
After planking the bulwarks I painted it red. The finished bulwarks were 5/32" thick. Maybe slightly thinner. Then it was time to add the caprail. It will be added in two pieces. First the main rail which is 1/16" thick. This was sanded flush both inboard and outboard. Another strip will eventually be placed outboard as a fancy molding. It is scraped like the others and is 1/6" x 1/32". But it wasnt added yet.
First I had to create the hawse hole plates....which are essentially 1/32" thick pieces with the holes ut for the hawse holes and the bowsprit. This sits flush with the top of the caprail so I had to add it first before I could add the fancy molding strip along the caprail outboard. I didnt drill the hawse holes yet. This will be done next. But the hawse plates in position makes it easy to find their locations. So that will be done in a day or two.
Lastly I added that fancy molding strip outboard for the cap rail which stands proud of the hull planking and finishes it off. This is where I am to date and after drilling the hawse holes and hole for the bowsprit I will make preparations to start planking the deck. Its getting there...
I am contemplating painting the hawse plates and the stem above the ear molding black.....along with the fashion pieces at the stern. But I have time to decide that. So I will live with it as it is shown for a while before I commit to it. Maybe after I drill and file the holes for the bowsprit and such...we shall see.
-
Chuck got a reaction from Archi in HM Cutter Cheerful 1806 by Chuck - FINISHED - 1:48 scale - kit prototype
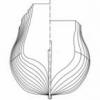
They are thinned down....thats their finished thickness. Check the plans.
See this example of a cutter stern from inboard...see how the frames are exposed? The top is the Cheerful from rogers collection and the bottom is Surly from the museum in Ontario.
Chuck
-
 Chuck got a reaction from mikegerber in HM Cutter Cheerful 1806 by Chuck - FINISHED - 1:48 scale - kit prototype
After planking the bulwarks I painted it red. The finished bulwarks were 5/32" thick. Maybe slightly thinner. Then it was time to add the caprail. It will be added in two pieces. First the main rail which is 1/16" thick. This was sanded flush both inboard and outboard. Another strip will eventually be placed outboard as a fancy molding. It is scraped like the others and is 1/6" x 1/32". But it wasnt added yet.
First I had to create the hawse hole plates....which are essentially 1/32" thick pieces with the holes ut for the hawse holes and the bowsprit. This sits flush with the top of the caprail so I had to add it first before I could add the fancy molding strip along the caprail outboard. I didnt drill the hawse holes yet. This will be done next. But the hawse plates in position makes it easy to find their locations. So that will be done in a day or two.
Lastly I added that fancy molding strip outboard for the cap rail which stands proud of the hull planking and finishes it off. This is where I am to date and after drilling the hawse holes and hole for the bowsprit I will make preparations to start planking the deck. Its getting there...
I am contemplating painting the hawse plates and the stem above the ear molding black.....along with the fashion pieces at the stern. But I have time to decide that. So I will live with it as it is shown for a while before I commit to it. Maybe after I drill and file the holes for the bowsprit and such...we shall see.
-
 Chuck got a reaction from archjofo in HM Cutter Cheerful 1806 by Chuck - FINISHED - 1:48 scale - kit prototype
After planking the bulwarks I painted it red. The finished bulwarks were 5/32" thick. Maybe slightly thinner. Then it was time to add the caprail. It will be added in two pieces. First the main rail which is 1/16" thick. This was sanded flush both inboard and outboard. Another strip will eventually be placed outboard as a fancy molding. It is scraped like the others and is 1/6" x 1/32". But it wasnt added yet.
First I had to create the hawse hole plates....which are essentially 1/32" thick pieces with the holes ut for the hawse holes and the bowsprit. This sits flush with the top of the caprail so I had to add it first before I could add the fancy molding strip along the caprail outboard. I didnt drill the hawse holes yet. This will be done next. But the hawse plates in position makes it easy to find their locations. So that will be done in a day or two.
Lastly I added that fancy molding strip outboard for the cap rail which stands proud of the hull planking and finishes it off. This is where I am to date and after drilling the hawse holes and hole for the bowsprit I will make preparations to start planking the deck. Its getting there...
I am contemplating painting the hawse plates and the stem above the ear molding black.....along with the fashion pieces at the stern. But I have time to decide that. So I will live with it as it is shown for a while before I commit to it. Maybe after I drill and file the holes for the bowsprit and such...we shall see.
-
Chuck got a reaction from Rustyj in HM Cutter Cheerful 1806 by Chuck - FINISHED - 1:48 scale - kit prototype
After planking the bulwarks I painted it red. The finished bulwarks were 5/32" thick. Maybe slightly thinner. Then it was time to add the caprail. It will be added in two pieces. First the main rail which is 1/16" thick. This was sanded flush both inboard and outboard. Another strip will eventually be placed outboard as a fancy molding. It is scraped like the others and is 1/6" x 1/32". But it wasnt added yet.
First I had to create the hawse hole plates....which are essentially 1/32" thick pieces with the holes ut for the hawse holes and the bowsprit. This sits flush with the top of the caprail so I had to add it first before I could add the fancy molding strip along the caprail outboard. I didnt drill the hawse holes yet. This will be done next. But the hawse plates in position makes it easy to find their locations. So that will be done in a day or two.
Lastly I added that fancy molding strip outboard for the cap rail which stands proud of the hull planking and finishes it off. This is where I am to date and after drilling the hawse holes and hole for the bowsprit I will make preparations to start planking the deck. Its getting there...
I am contemplating painting the hawse plates and the stem above the ear molding black.....along with the fashion pieces at the stern. But I have time to decide that. So I will live with it as it is shown for a while before I commit to it. Maybe after I drill and file the holes for the bowsprit and such...we shall see.
-
 Chuck got a reaction from lb0190 in HM Cutter Cheerful 1806 by Chuck - FINISHED - 1:48 scale - kit prototype
After planking the bulwarks I painted it red. The finished bulwarks were 5/32" thick. Maybe slightly thinner. Then it was time to add the caprail. It will be added in two pieces. First the main rail which is 1/16" thick. This was sanded flush both inboard and outboard. Another strip will eventually be placed outboard as a fancy molding. It is scraped like the others and is 1/6" x 1/32". But it wasnt added yet.
First I had to create the hawse hole plates....which are essentially 1/32" thick pieces with the holes ut for the hawse holes and the bowsprit. This sits flush with the top of the caprail so I had to add it first before I could add the fancy molding strip along the caprail outboard. I didnt drill the hawse holes yet. This will be done next. But the hawse plates in position makes it easy to find their locations. So that will be done in a day or two.
Lastly I added that fancy molding strip outboard for the cap rail which stands proud of the hull planking and finishes it off. This is where I am to date and after drilling the hawse holes and hole for the bowsprit I will make preparations to start planking the deck. Its getting there...
I am contemplating painting the hawse plates and the stem above the ear molding black.....along with the fashion pieces at the stern. But I have time to decide that. So I will live with it as it is shown for a while before I commit to it. Maybe after I drill and file the holes for the bowsprit and such...we shall see.
-
 Chuck got a reaction from cog in HM Cutter Cheerful 1806 by Chuck - FINISHED - 1:48 scale - kit prototype
After planking the bulwarks I painted it red. The finished bulwarks were 5/32" thick. Maybe slightly thinner. Then it was time to add the caprail. It will be added in two pieces. First the main rail which is 1/16" thick. This was sanded flush both inboard and outboard. Another strip will eventually be placed outboard as a fancy molding. It is scraped like the others and is 1/6" x 1/32". But it wasnt added yet.
First I had to create the hawse hole plates....which are essentially 1/32" thick pieces with the holes ut for the hawse holes and the bowsprit. This sits flush with the top of the caprail so I had to add it first before I could add the fancy molding strip along the caprail outboard. I didnt drill the hawse holes yet. This will be done next. But the hawse plates in position makes it easy to find their locations. So that will be done in a day or two.
Lastly I added that fancy molding strip outboard for the cap rail which stands proud of the hull planking and finishes it off. This is where I am to date and after drilling the hawse holes and hole for the bowsprit I will make preparations to start planking the deck. Its getting there...
I am contemplating painting the hawse plates and the stem above the ear molding black.....along with the fashion pieces at the stern. But I have time to decide that. So I will live with it as it is shown for a while before I commit to it. Maybe after I drill and file the holes for the bowsprit and such...we shall see.
-
 Chuck got a reaction from albert in HM Cutter Cheerful 1806 by Chuck - FINISHED - 1:48 scale - kit prototype
After planking the bulwarks I painted it red. The finished bulwarks were 5/32" thick. Maybe slightly thinner. Then it was time to add the caprail. It will be added in two pieces. First the main rail which is 1/16" thick. This was sanded flush both inboard and outboard. Another strip will eventually be placed outboard as a fancy molding. It is scraped like the others and is 1/6" x 1/32". But it wasnt added yet.
First I had to create the hawse hole plates....which are essentially 1/32" thick pieces with the holes ut for the hawse holes and the bowsprit. This sits flush with the top of the caprail so I had to add it first before I could add the fancy molding strip along the caprail outboard. I didnt drill the hawse holes yet. This will be done next. But the hawse plates in position makes it easy to find their locations. So that will be done in a day or two.
Lastly I added that fancy molding strip outboard for the cap rail which stands proud of the hull planking and finishes it off. This is where I am to date and after drilling the hawse holes and hole for the bowsprit I will make preparations to start planking the deck. Its getting there...
I am contemplating painting the hawse plates and the stem above the ear molding black.....along with the fashion pieces at the stern. But I have time to decide that. So I will live with it as it is shown for a while before I commit to it. Maybe after I drill and file the holes for the bowsprit and such...we shall see.
-
 Chuck got a reaction from pitu in HM Cutter Cheerful 1806 by Chuck - FINISHED - 1:48 scale - kit prototype
After planking the bulwarks I painted it red. The finished bulwarks were 5/32" thick. Maybe slightly thinner. Then it was time to add the caprail. It will be added in two pieces. First the main rail which is 1/16" thick. This was sanded flush both inboard and outboard. Another strip will eventually be placed outboard as a fancy molding. It is scraped like the others and is 1/6" x 1/32". But it wasnt added yet.
First I had to create the hawse hole plates....which are essentially 1/32" thick pieces with the holes ut for the hawse holes and the bowsprit. This sits flush with the top of the caprail so I had to add it first before I could add the fancy molding strip along the caprail outboard. I didnt drill the hawse holes yet. This will be done next. But the hawse plates in position makes it easy to find their locations. So that will be done in a day or two.
Lastly I added that fancy molding strip outboard for the cap rail which stands proud of the hull planking and finishes it off. This is where I am to date and after drilling the hawse holes and hole for the bowsprit I will make preparations to start planking the deck. Its getting there...
I am contemplating painting the hawse plates and the stem above the ear molding black.....along with the fashion pieces at the stern. But I have time to decide that. So I will live with it as it is shown for a while before I commit to it. Maybe after I drill and file the holes for the bowsprit and such...we shall see.
-
 Chuck got a reaction from Jack12477 in HM Cutter Cheerful 1806 by Chuck - FINISHED - 1:48 scale - kit prototype
After planking the bulwarks I painted it red. The finished bulwarks were 5/32" thick. Maybe slightly thinner. Then it was time to add the caprail. It will be added in two pieces. First the main rail which is 1/16" thick. This was sanded flush both inboard and outboard. Another strip will eventually be placed outboard as a fancy molding. It is scraped like the others and is 1/6" x 1/32". But it wasnt added yet.
First I had to create the hawse hole plates....which are essentially 1/32" thick pieces with the holes ut for the hawse holes and the bowsprit. This sits flush with the top of the caprail so I had to add it first before I could add the fancy molding strip along the caprail outboard. I didnt drill the hawse holes yet. This will be done next. But the hawse plates in position makes it easy to find their locations. So that will be done in a day or two.
Lastly I added that fancy molding strip outboard for the cap rail which stands proud of the hull planking and finishes it off. This is where I am to date and after drilling the hawse holes and hole for the bowsprit I will make preparations to start planking the deck. Its getting there...
I am contemplating painting the hawse plates and the stem above the ear molding black.....along with the fashion pieces at the stern. But I have time to decide that. So I will live with it as it is shown for a while before I commit to it. Maybe after I drill and file the holes for the bowsprit and such...we shall see.