

Remcohe
-
Posts
607 -
Joined
-
Last visited
Content Type
Profiles
Forums
Gallery
Events
Posts posted by Remcohe
-
-
Beautiful Karl!
- Elmer Cornish and Jeronimo
-
 2
2
-
Maybe seal the stain first with minwax poly before gluing? I had the same issue with my first bottle of stain.
It looks great with the deck slats .
Remco
-
Danny, it real looks great.
Remco
-
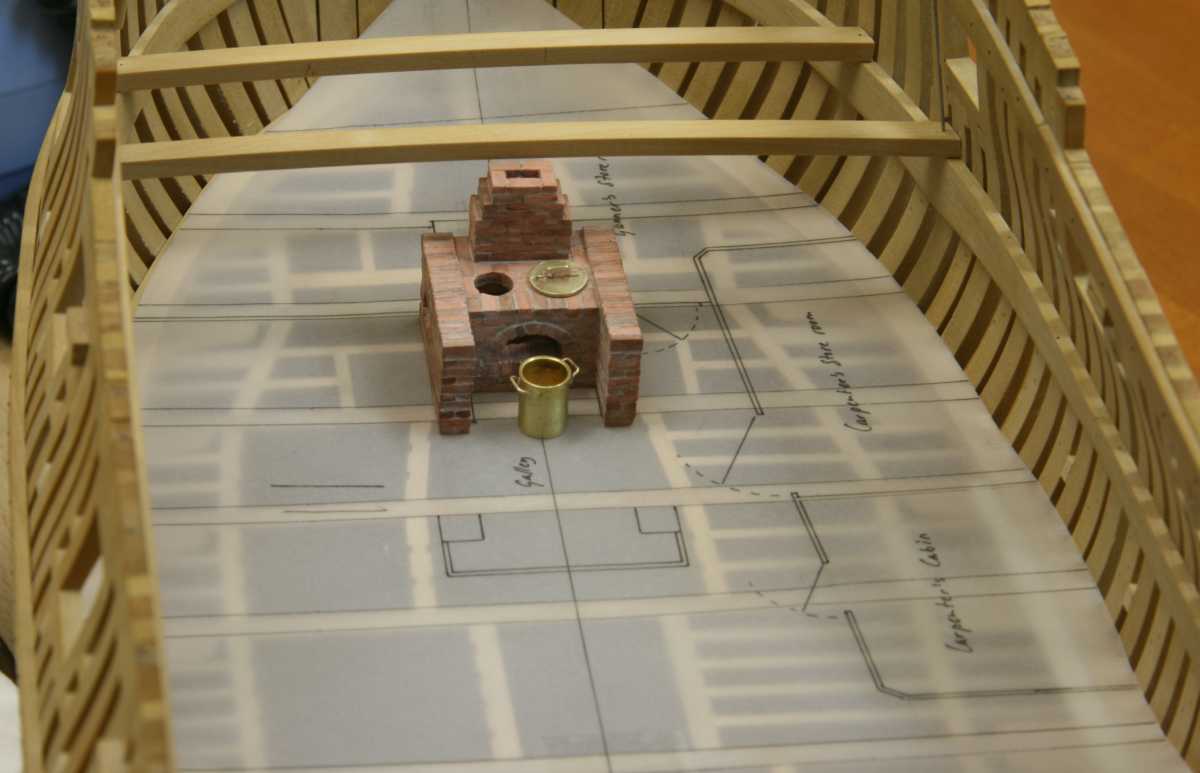
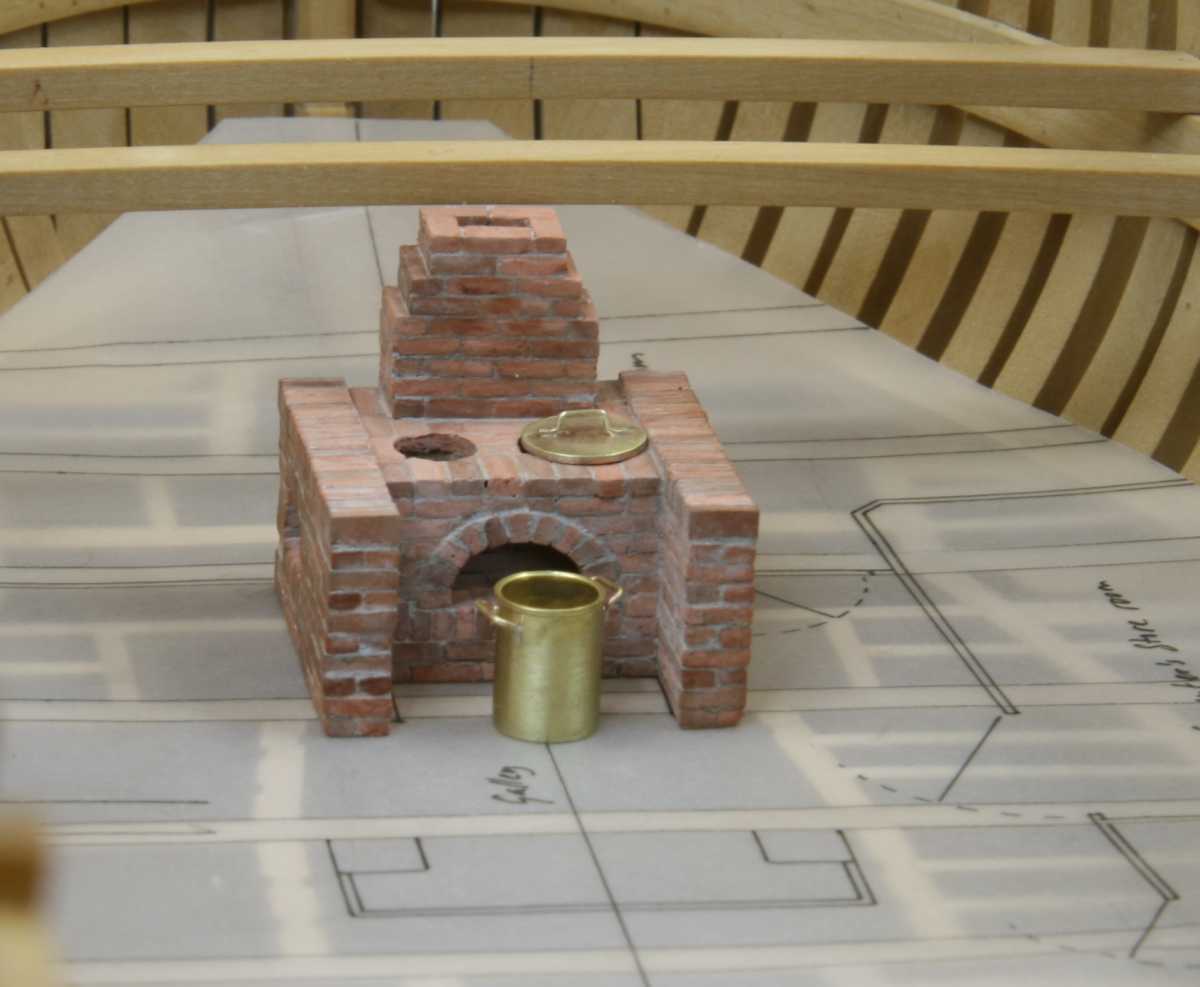
A chart room.... lets's see. look now, Piet's getting carried away already

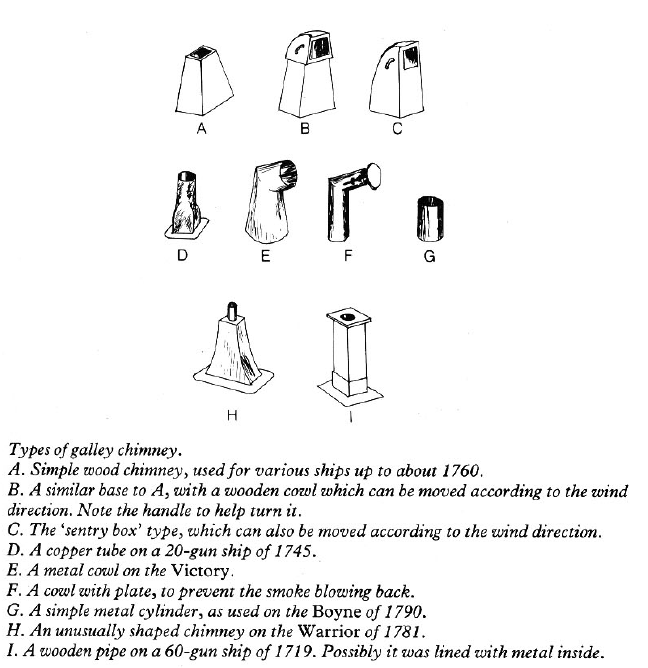
First the chimney, I was looking through my books because these came in al sorts and shapes
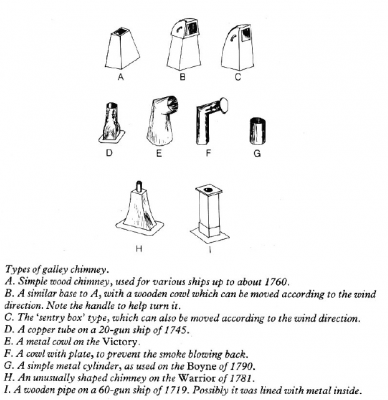
But fortunately TFFM hinted me to also check my NMM plans and guess what the chimney was drawn in so getting the shape right was easy peasy. (reminder look more on the NMM plans there is more on it than I had thought)
The pyramid shape was diver soldered from some scrap pieces, the funnel turned and tapered on the lathe.
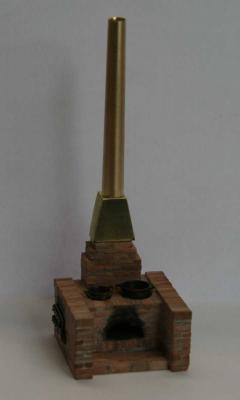
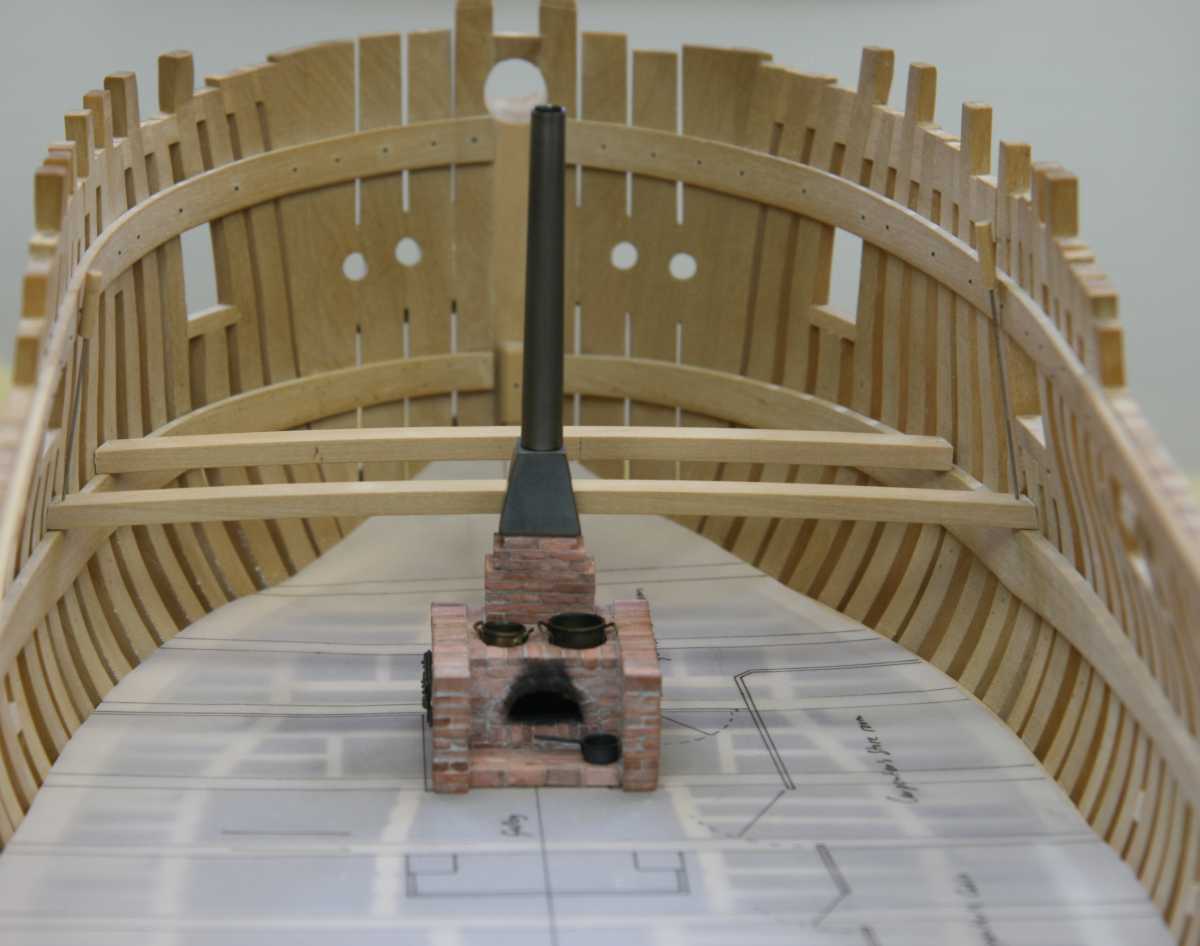
The floor was added in front of the stove. And here it is ready to be lit
 this was really a fun challenge to do, thank you Druxey for inspiring me to give it a try.
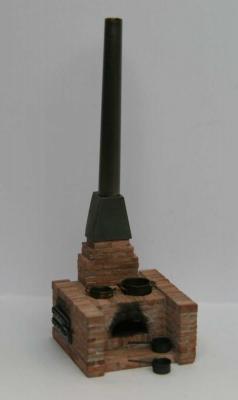

Remco
- egen, Martin W, Mirabell61 and 27 others
-
30
-
Hi Piet, so I went to my scrap box only to find out I had scrapped the scrap box some time ago when I sold or threw away all my plastic kits.
 Of the kits I still have left I could not find appropriate sized handwheels. I looked on the internet and I think you guess pretty good that railway supply's are the best place to look. Sorry I couldn't help you out on this one....
Remco
-
Thanks guys.
Ed, I will make a brick base underneath. My NMM plans don't show additional carlings or pillars so I'll leave the layout as it is.
Yes Sir Druxey, soot coming up, I had to make a little fire in the hearth to create this
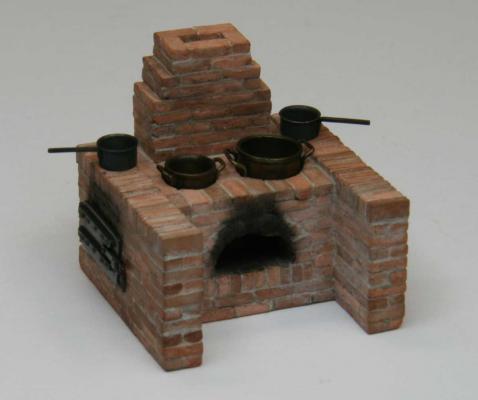
All it needs now is a chimney to the upper deck and then I'll ask permission to call this challenge completed
Remco
- Jeronimo, archjofo, Elmer Cornish and 24 others
-
27
-
That's lovely Gary. Pan's are on my to do list as I plan to make some sort of cupboard opposite of the hearth. But only a few, I don't want to turn the galley into a doll house......
-
Such a torch is good for general soldering, but if you need to do really small stuff you'll need something like this:


Remco
- WackoWolf and sonicmcdude
-
2
-
Piet, maybe it's an idea to look for a simple PE set to add details to the gun or scavenge a 1/48 plastic artillery kit for parts ? I'll have a look in my scrap box for you.
Remco
- WackoWolf, Piet and popeye the sailor
-
3
-
Christian, based on what I know probably a brick hearth or a Brody style stove, but not a real Brody stove.
Sure Gary, I'll start taking orders
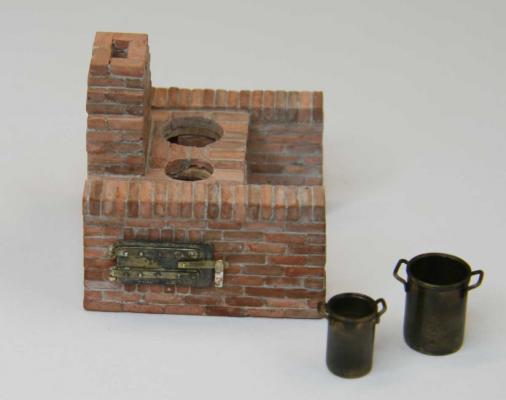
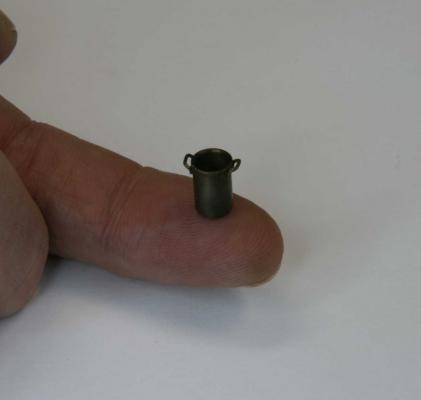
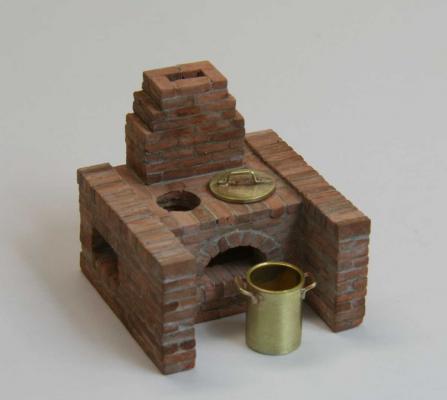
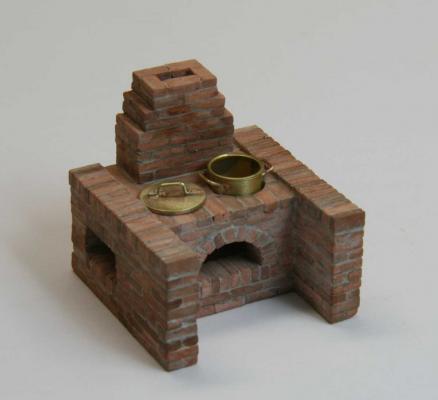
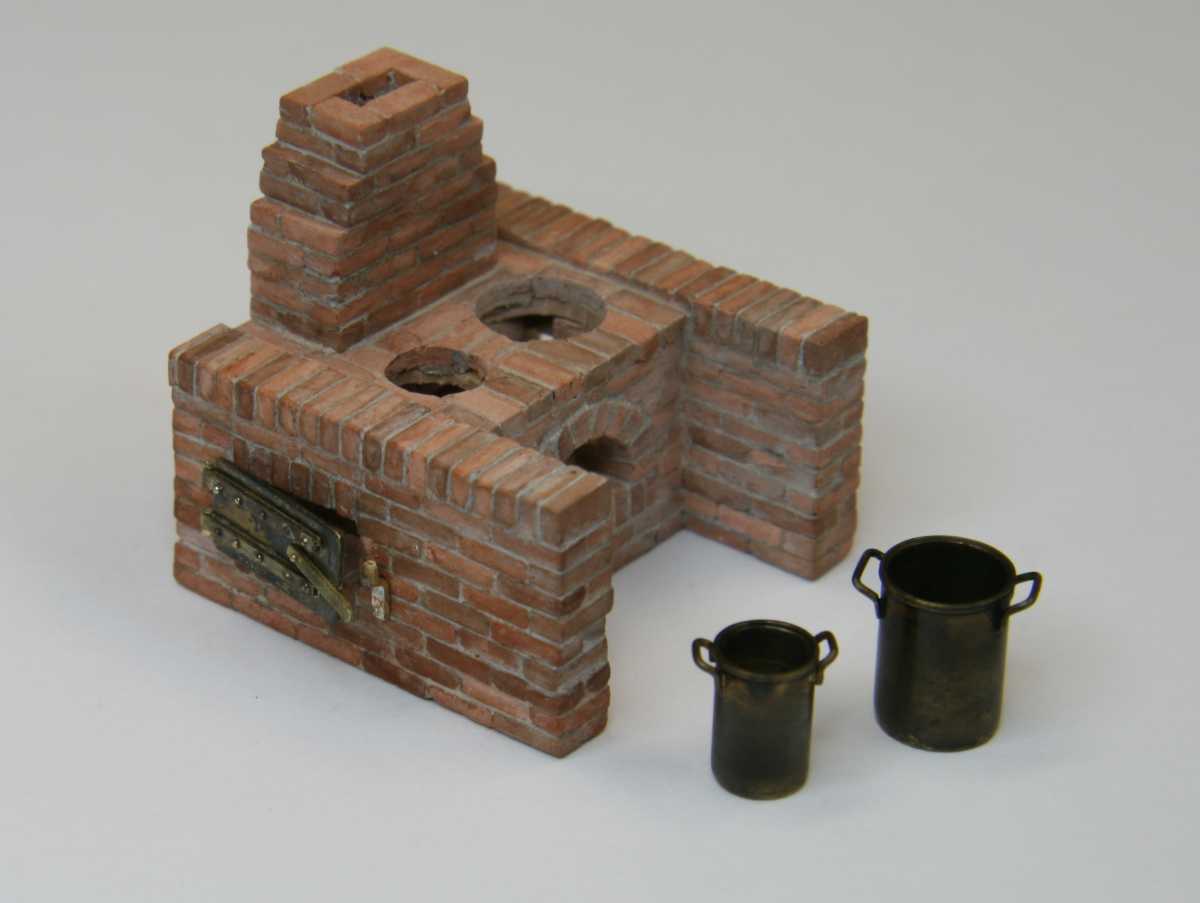
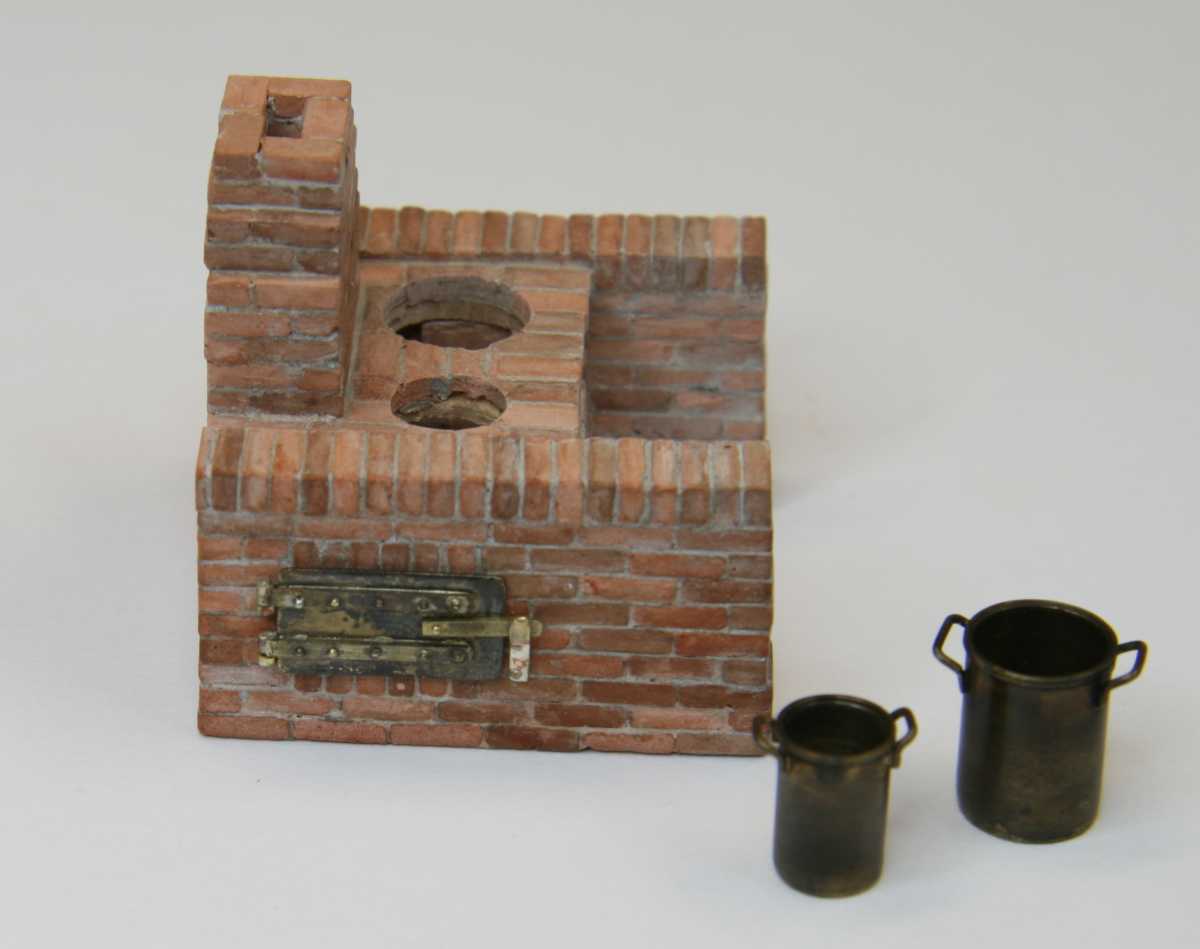
The pots are tubes turned on the lathe to give it a small rim, bottom and handles silver soldered. I made a smaller fish pot for the stove. Work began on the doors fitted to the sides of the stove, hinges and locking mechanism works, I think they look a bit heavy for a simple door, looks more like a safe door. Have to think about this .....

Grant, remember the wicker basket...
Remco
-
Wow thanks guys! It's really fun to build this little stove, much more than I had imagined. Now I understand why people build small buildings from individual brick, one ought to try once.
Tony, I think a simple stew would be appropriate.
Gee Rusty you're tough to please
So chimney added, time to make some pots and pans....


Remco
- dnputnam, sonicmcdude, Jason and 33 others
-
36
-
Tricky soldering job Piet, really nice!
-
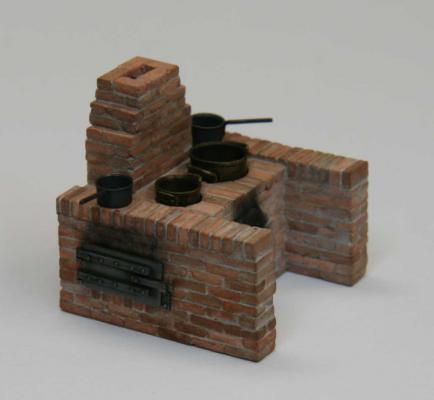
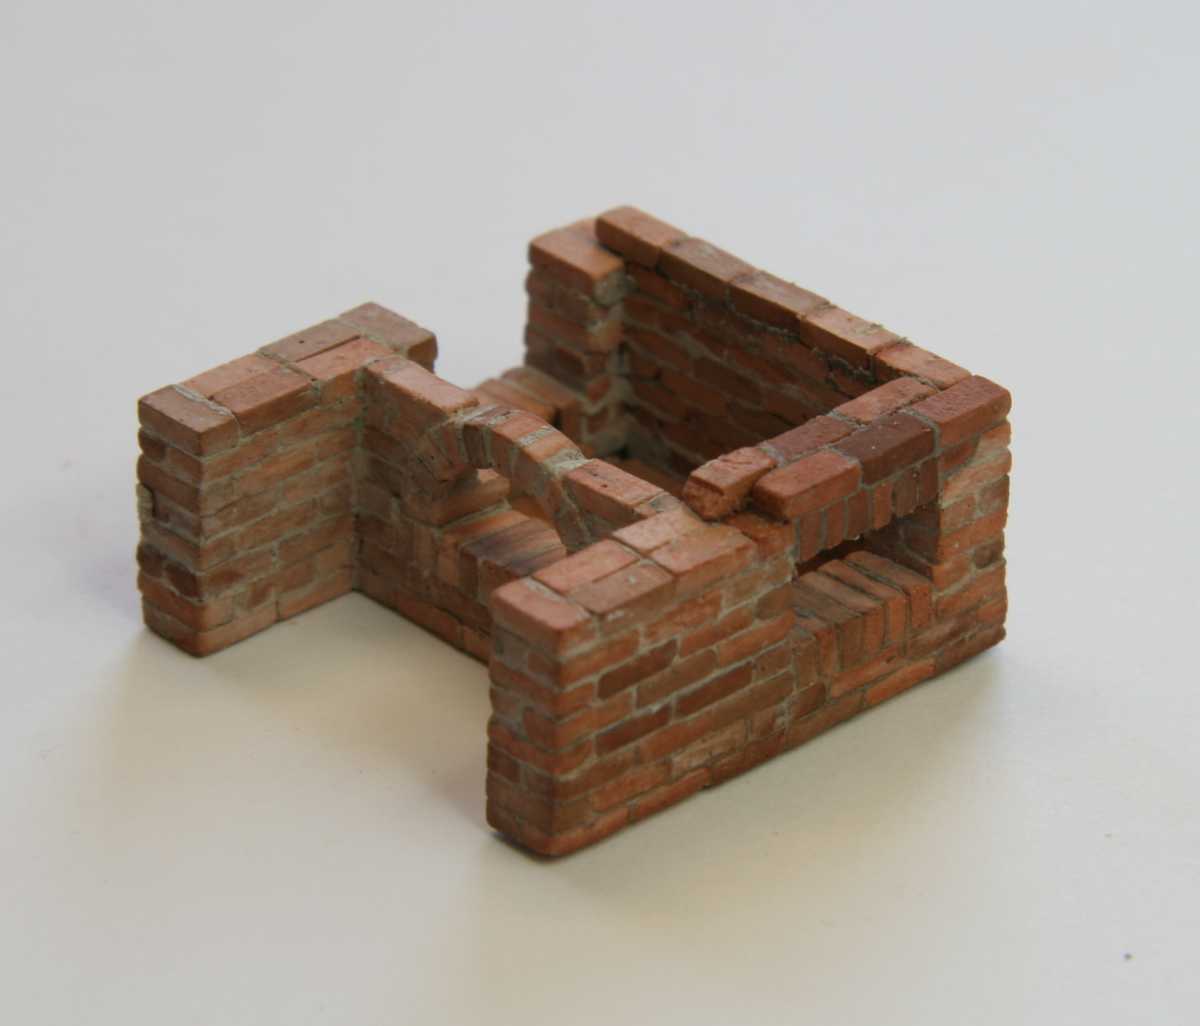
An other trade to master, stone masonry ...
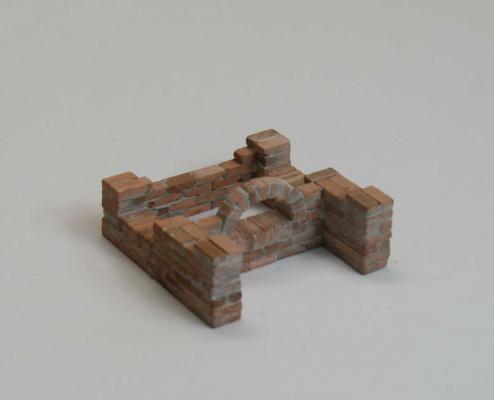
I cancelled the stones I had ordered and got a rubber mold from dioramadebris.co.uk instead , now I can cast my own bricks in the color I want. First I made a big batch with slightly different colors (plaster & pigment)
Then I had to find a way to make the mortar. At first I glued the sones with thin paper sheet in-between to get an even spacing. I had planned to use sculpey to make the mortar but this doesn't stick to plaster :-(
So I had to find an other solution, from the DYI shop I got a pack with powder mixed with water this is used to fill holes in walls, as this dries in just under 1 hour it looked good, but this didn't stick to the plaster too :-(

So I mixed it with titebond and pigment and this was a working formula. The surplus removed just before it dries and with a wet brush I softened the flushing.

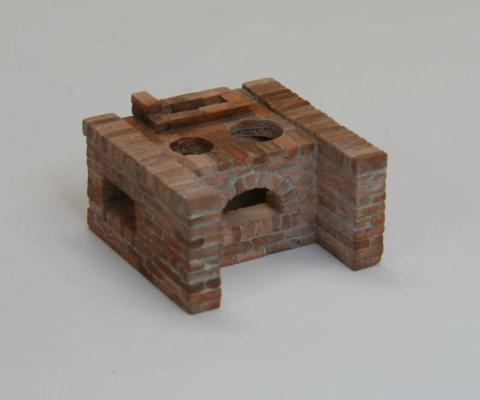
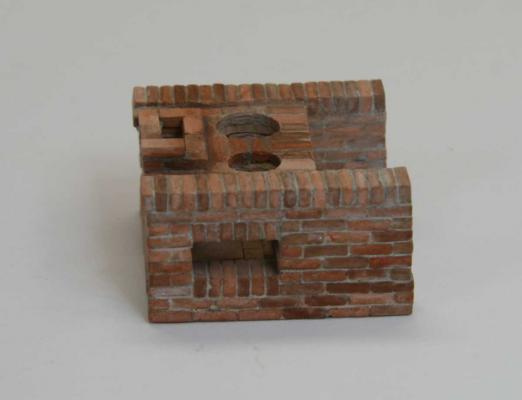
At this point the chimney needs to be made, I'll make this from brick and not steel like my original plan. In the two holes two big cooking pans are fitted. The square hole's on the sides will get a metal hinged doors. Opposite to the hearth I'll make a pantry with different kitchen utensils. I must say it's really time consuming to make but this is really a lot of fun to do. The admiral is complaining she didn't see me all weekend :-D
Remco
-
Your stove look tremendous Sir. Lovely display of metalworking.
Remco
-
Hi Alexander,
Hann is correct my NMM plan also shows the drop in hight on the deck plan. But I noticed this too late and the deck was already installed, I'm not going to tear this out as long as all you guys at MSW don't tell anybody about my mistake. I followed the deck plan from TFFM and the layout of the hanging knee's that's why there is no additional hanging knee at the bow.
Remco
- WackoWolf, harvey1847 and mtaylor
-
3
-
Ok , I accept the challenge Mr Druxey.........
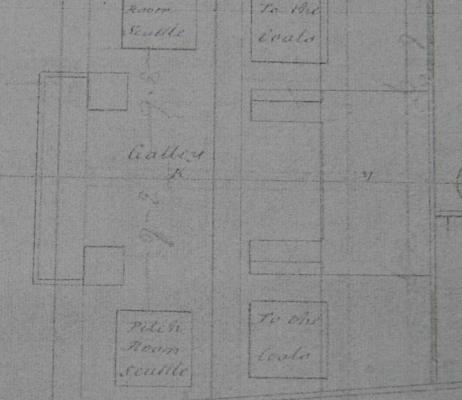
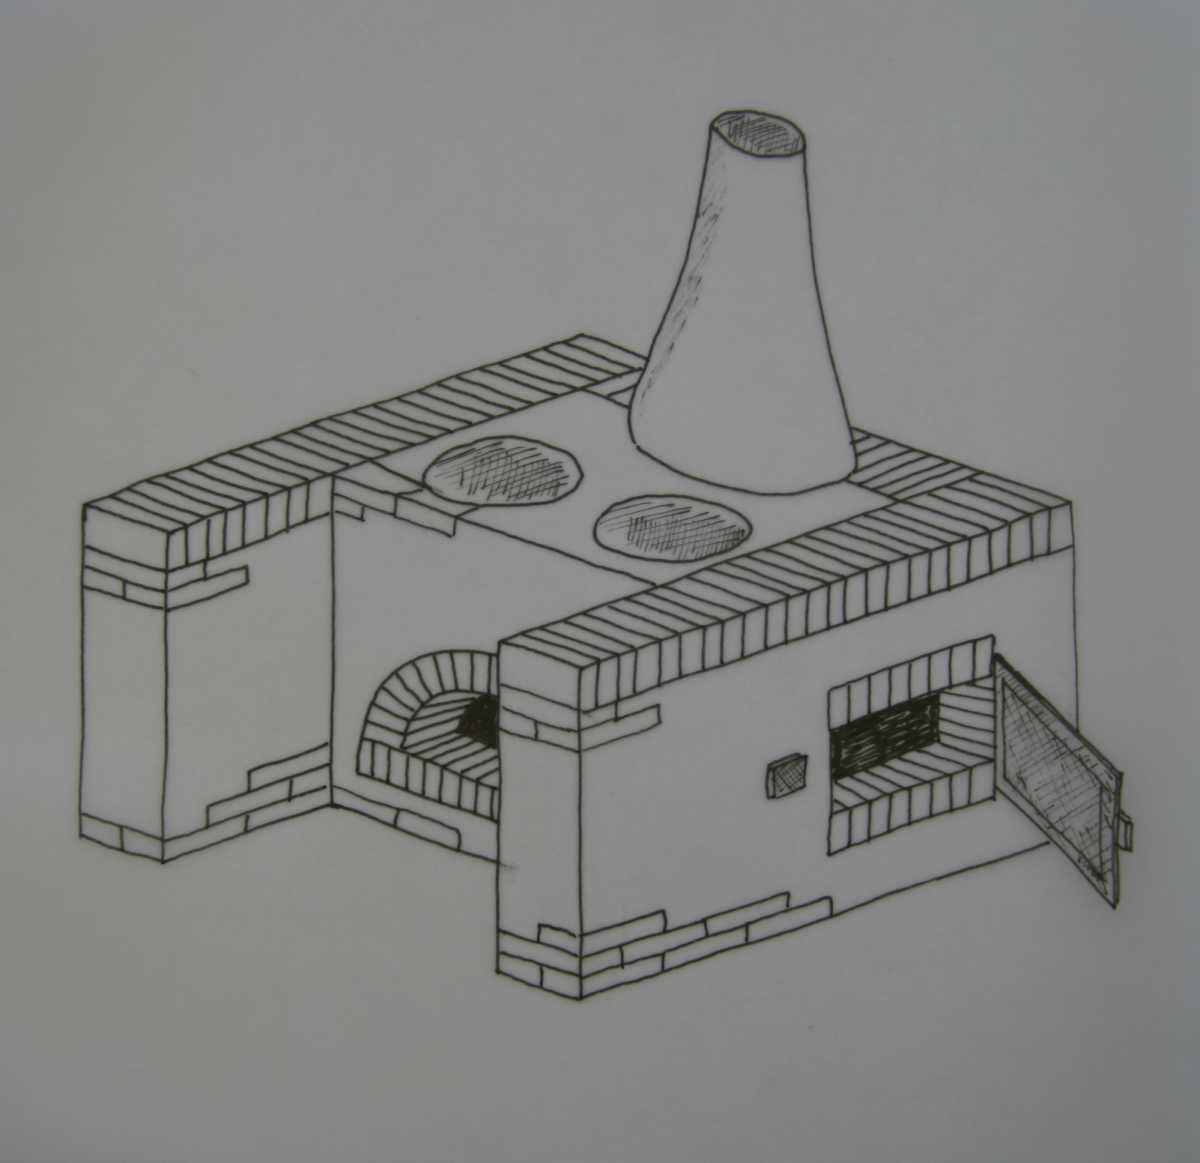
So first I need a plan to work from. Based on what I found researching the hearth I drafted this, no grill on the opposite side I guess as the hearth stands agains a bulkhead. Comments more than welcome!

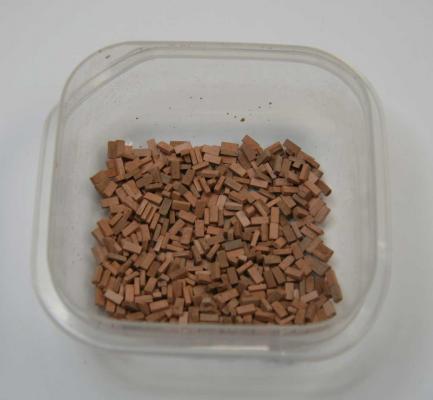
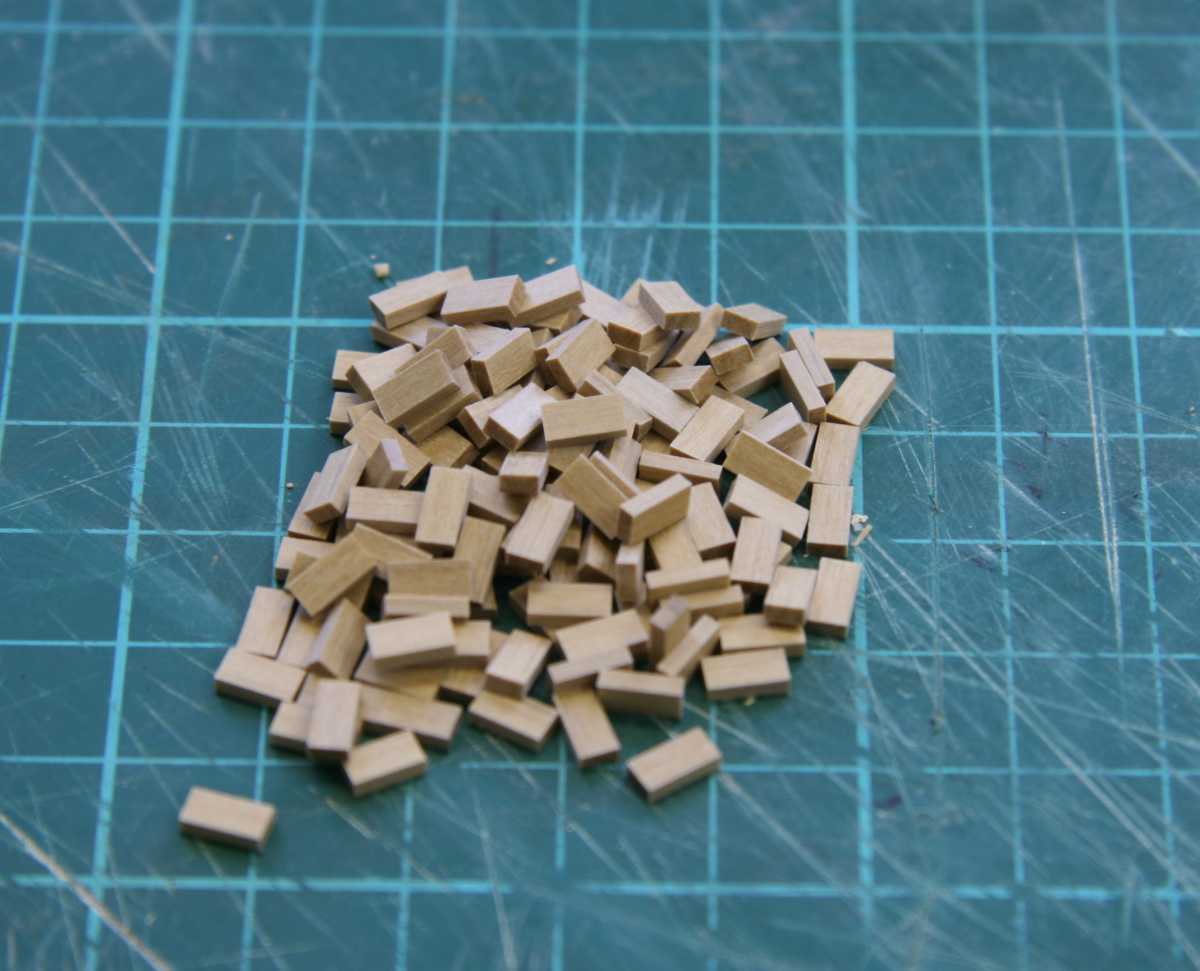
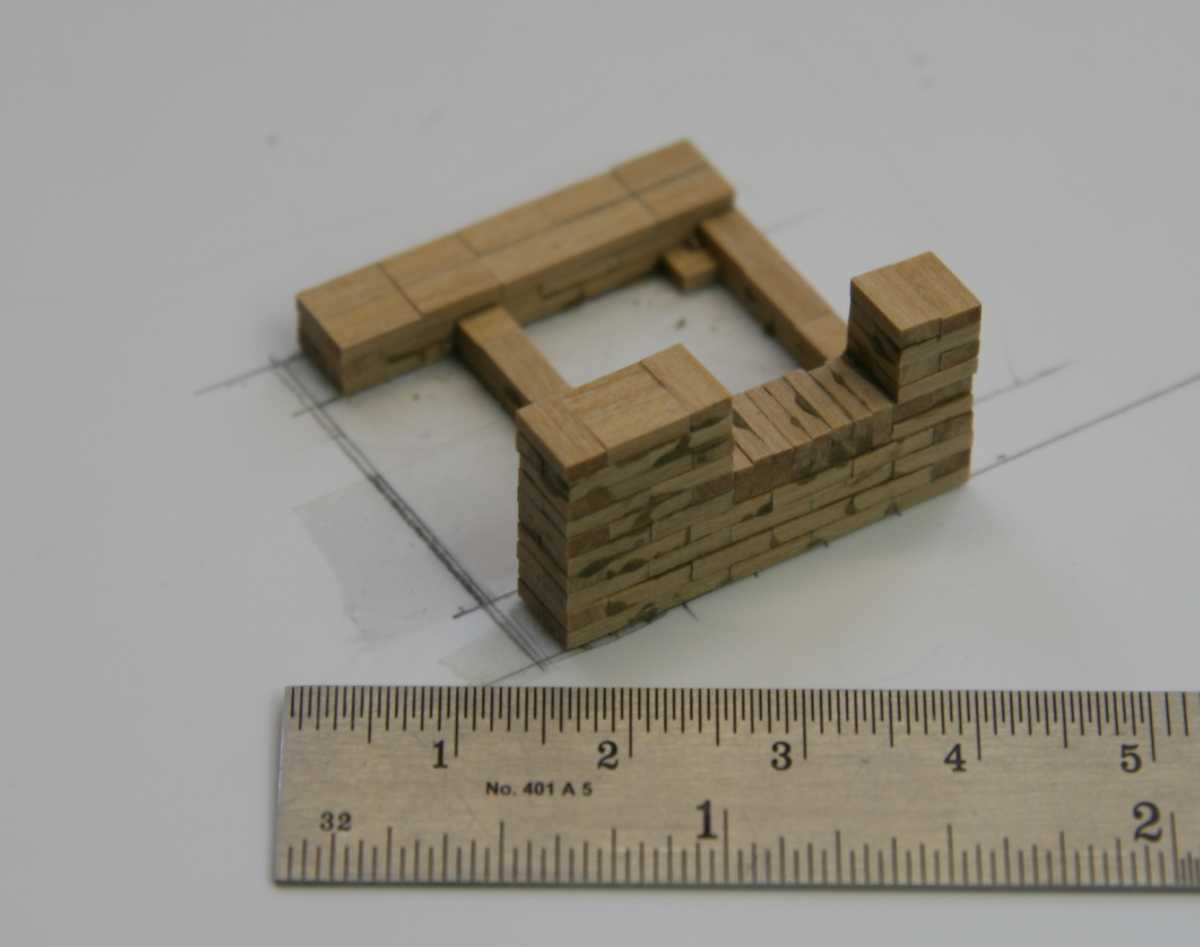
Now how about making it from real bricks.... First a little testing with dummy wooden bricks to see if this could work.
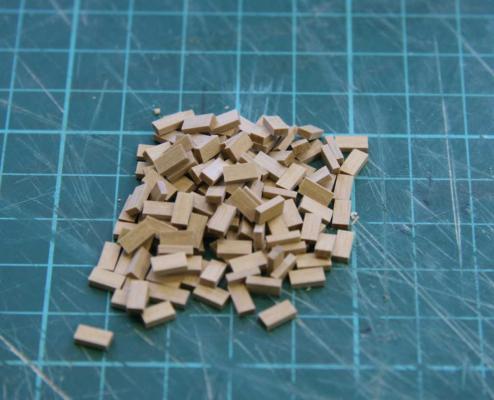
Woodglue tinted with pigment to give a mortar look. Not quite satisfied with that its to thin to make a real layer... need to think about this, maybe thin strips of paper to make the spacing between the bricks first..

This could work so I ordered some ceramic bricks from a modelshop, now all you guys have to do is wait until they arrive....
Remco
- Elmer Cornish, texxn5, dnputnam and 15 others
-
18
-
Well Druxey let's see what song this Swan is going to sing over the stove.... I might make an early brick type galley to see how it looks and decide then.
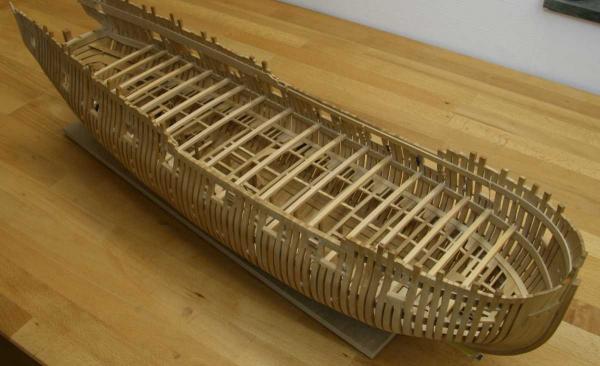
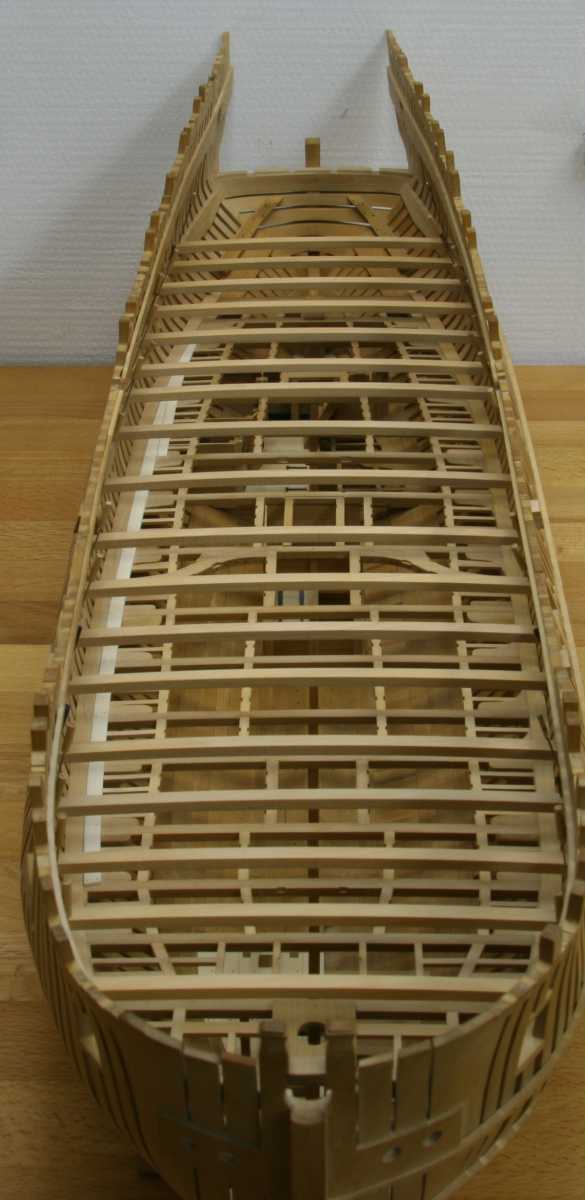
Between looking at stoves, hearths and all that comes with that (does give an appetite seeing those big grill's...) I dry fitted most of the upper deck beams so now I can sart working on the bulkheads on the lower deck.

Remco
-
Glad to be of help Gary, the table with the stove's dimensions is quite comprehensive.
Jan, I added a picture of the plan, in the middle you'll see two beams just above each other.
Thanks Mark, you're so right. I guess the positive side of our learning is that now we know how it should be, it's just that the model is one version behind our current understanding. I guess the only way to overcome our agony is to build less time-consuming projects like ship's boats. Then making a second one is just a matter of weeks.
Remco
- mtaylor, WackoWolf and Elmer Cornish
-
3
-
Nice Ben you'll be treated with hours of fun.
Remco
-
-
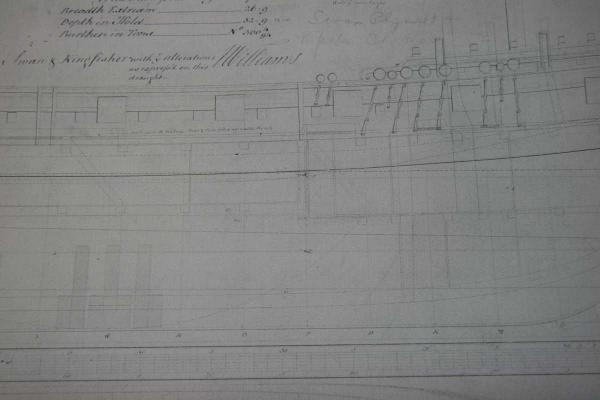
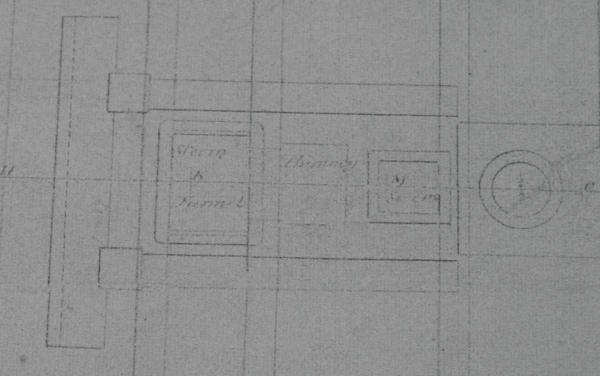
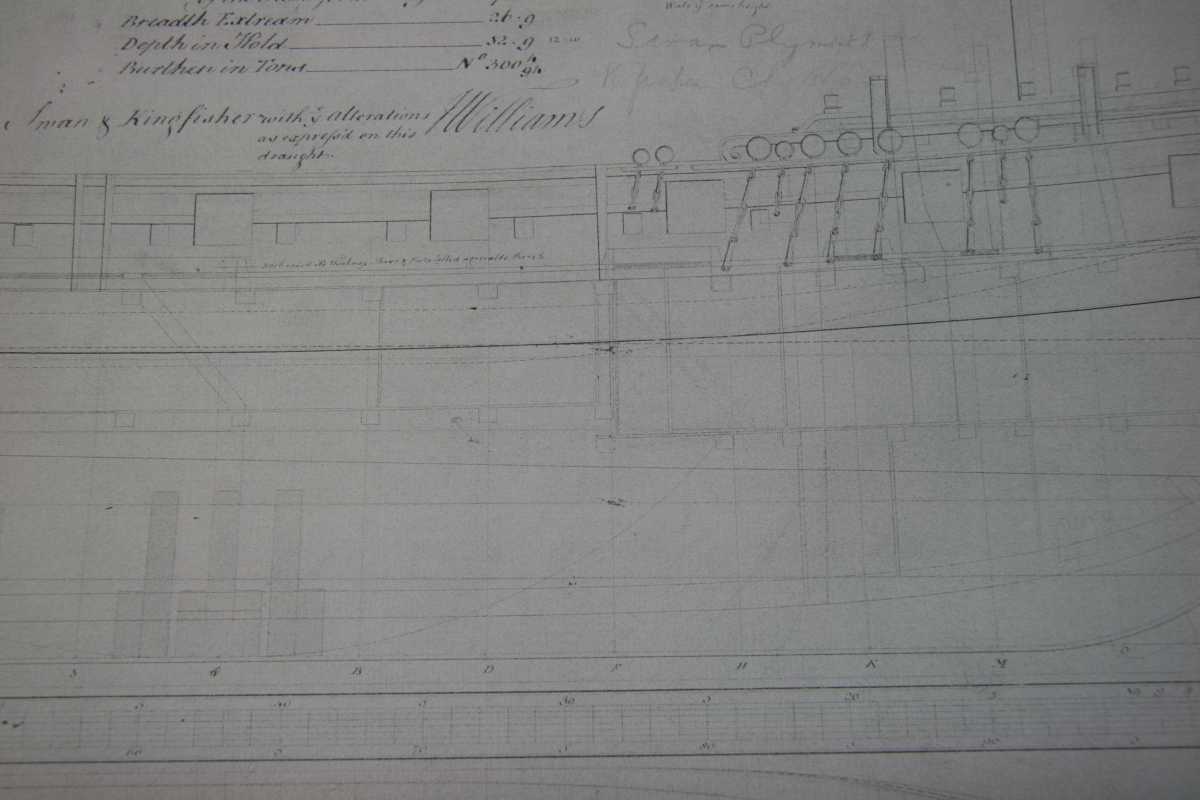
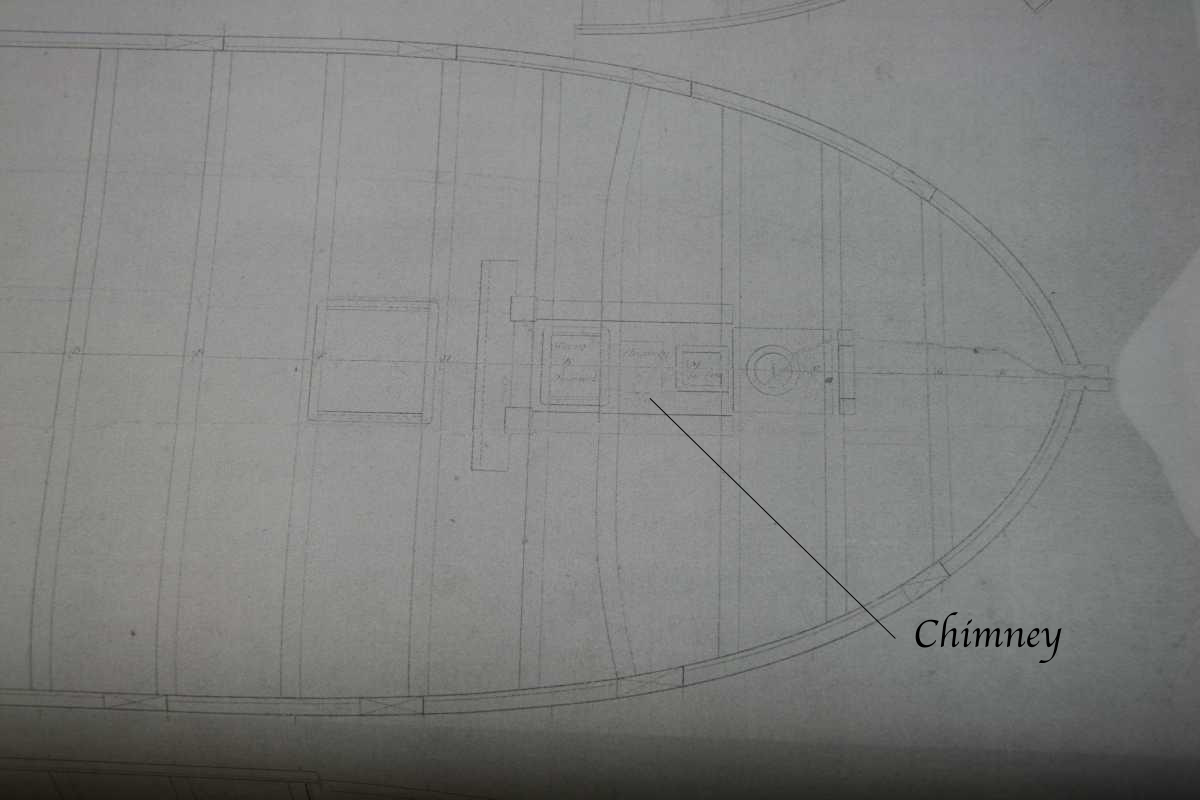
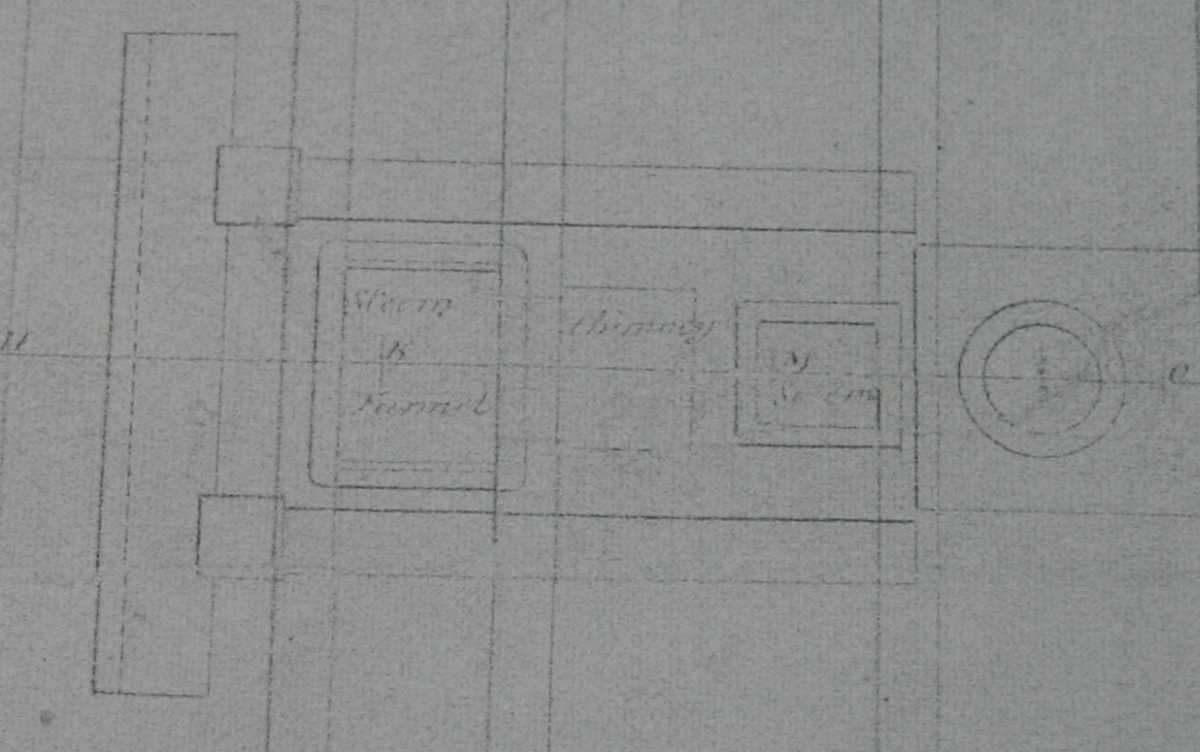
Jim, thanks for enhancing the picture, Ron's right, it say's steam funnel. When I look at my original NMM copy I can see it now.
Gary thanks for pointing me to your references. It's clear the Kingfisher could not have a real Brodie stove. Although when I did more research I found that iron fire hearths "had become fairly general in 1757" (Lavery, The Arming and Fitting of English Ships of War 1600-1815 p197) so a Brodie style stove was used in the era KF was designed and build. More sources show a lot of Brodie style stoves, but Mr Alexander Brodie was so clever to apply for a patent and become exclusive supplier for almost 30 years until Lamb & Nicholson took over.
Lavery also shows a brick hearth of 1741 with a shape exactly the same as the U shape on my plan.
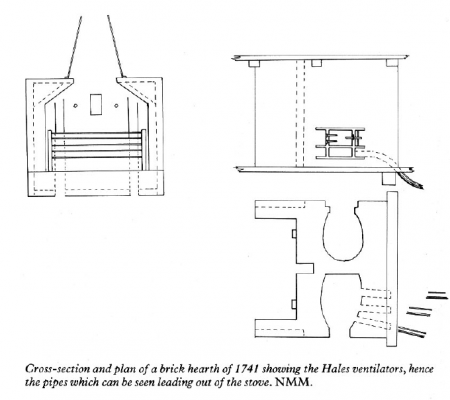
So interesting that while iron stoves were a big improvement over brick hearths the NMM plan still has the more 'obsolete' on it. How it was eventually build on the Kingfisher we will probably never know. But nice to do a little research on the topic.
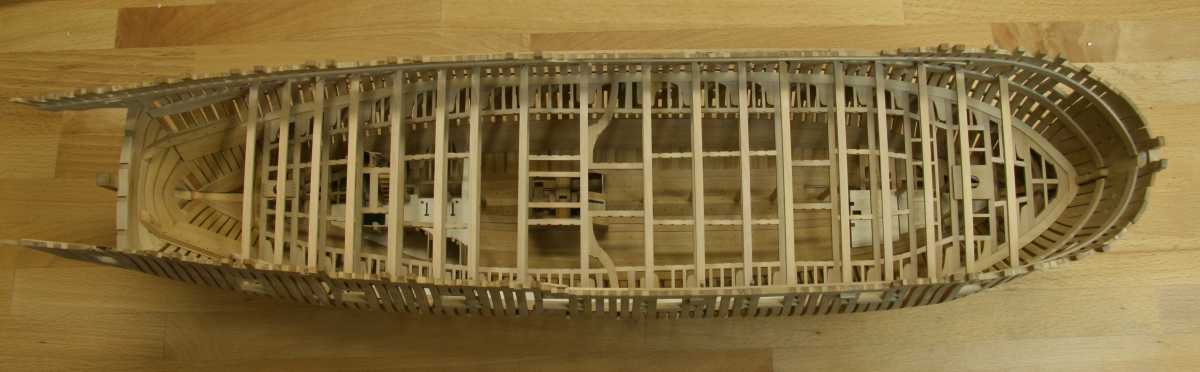
Now back to how I will proceed. Because there are more differences from the actual KF and the model I'm building. A few years back (well into the build) when I got my NMM plans I noticed that KF has an additional gun port on each side. The 'kit' where my build started from omitted this. Also, and I noticed this studying the deck plan this week, the lower deck is in two sections, you can see this on one of the previous pictures. The aft part is 12" higher. So apart from the boxing around the hawseholes my ship is anything but the Kingfisher.
Time to rename her? But to what....
Remco
-
Thanks Karl.
Mark, John, glad to have given you a nice idea back, I got lots from your log.
So not a progress picture but a question.
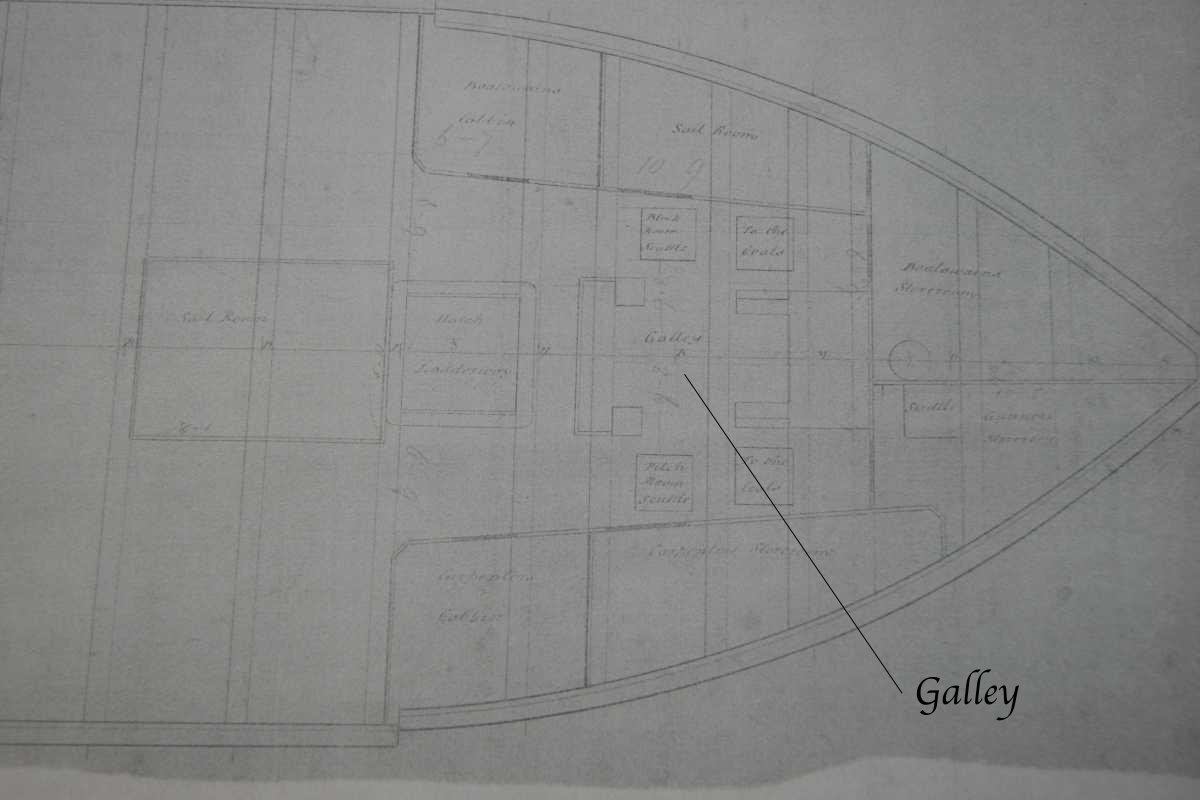
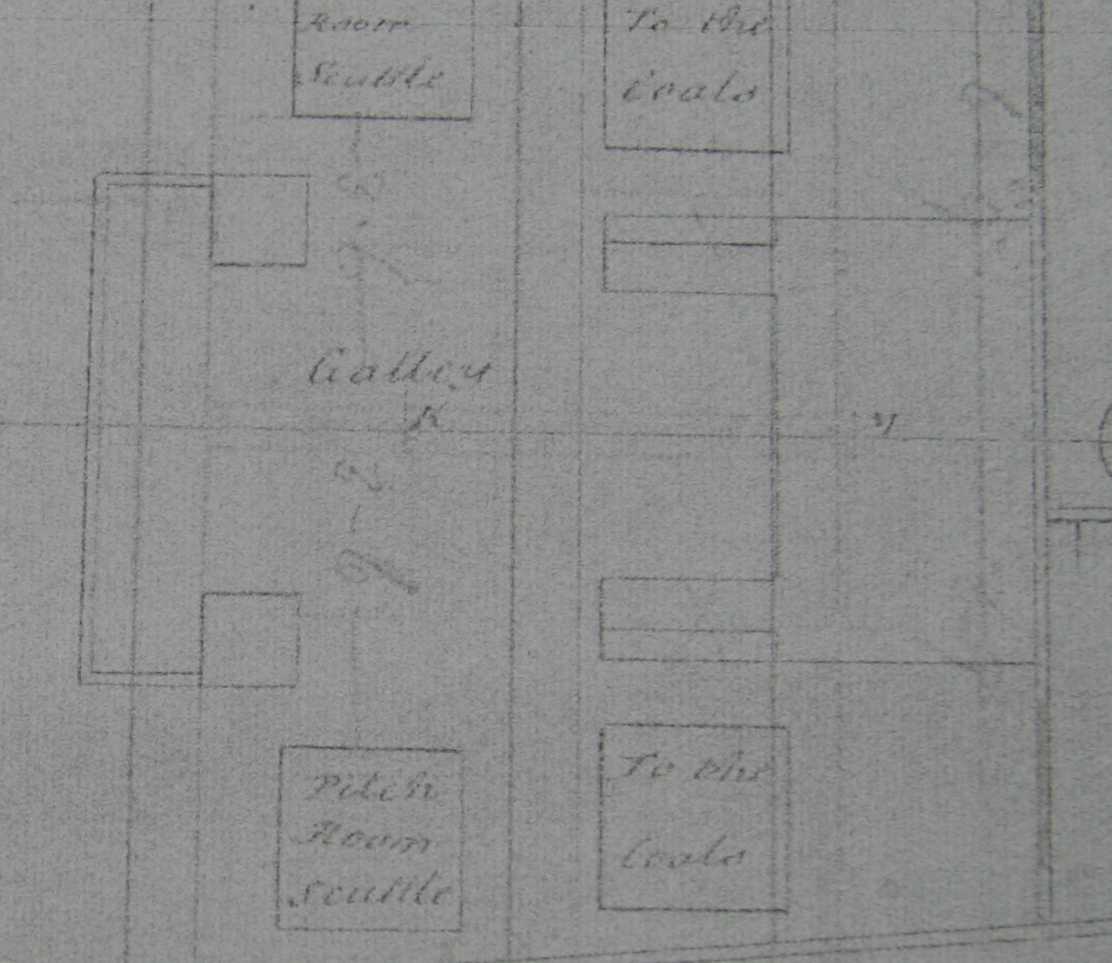
While studying the deck plans to prepare my lower deck layout I noticed something that's puzzling me. All of the Swann models I've seen have the galley on the upper deck but my drawings from the Kingfisher suggest the stove is on the lower deck. Could this be right? It could fit between the bulkhead of the boatswains strore room and the riding bitts. Allthough the U shaped object drawn in, is smaller than a galley stove

On the upper deck there is a notation for the chimney and something I cannot make out
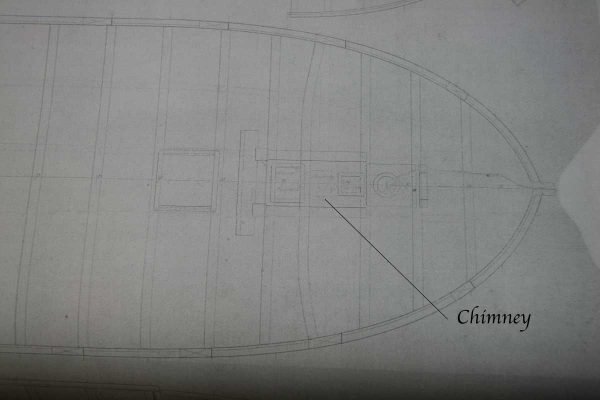
The square part aft of the chimney location looks like the layout of a coaming for a grating
Remco
- mtaylor, Elmer Cornish and Elia
-
3
-
-


Hr. Ms. O 19 1938 by Piet - FINISHED - scale 1:50 - submarine of the Royal Navy Netherlands in service 1939 - 1945
in - Build logs for subjects built 1901 - Present Day
Posted
Nice hinge work Piet, looking at the pictures it's easy to forget how small they actually are. I guest if you used the 0.5 mm tubes, the hinges would have looked to flimsy.
Remco