

CDW
-
Posts
7,217 -
Joined
-
Last visited
Content Type
Profiles
Forums
Gallery
Events
Posts posted by CDW
-
-
1 hour ago, Haliburton said:
Thanks CDW and everyone for the likes. CDW can’t wait to see you start your Dora!
The Dora will require about a lot of shelf space. Lots of parts, too.
- Canute, mtaylor, Haliburton and 1 other
-
 4
4
-
3 minutes ago, wefalck said:
I haven't build anything with decals since about 1980*, I think. Decal technology must have advanced considerably since then.
If I understand the process correctly, then you can apply the 'softener' to already set decals in order to coerce them around obstacles?
I am asking this question, because I just had the idea of laser-printing flags onto decal-sheet and then apply the decals on both sides to a piece of aluminium foil cut to the right size. With this softening and drying technique, the aluminium foil with the decals on could be 'draped' realistically. Does this sound feasible?
*apart from the white boot-topping above the waterline that I put onto my current project, for which I used thin strips of white decal-sheet.
That's exactly what I do/have done on my 1:700 and 1:350 warship models, except I used commercially available scale flag decals.
PS: I first place the decals on the foil and allow it to dry before shaping the flag to appear as though it's waving in the wind.
-
Wow, that's a lot of decal work.
- davec, king derelict, Canute and 5 others
-
8
-
37 minutes ago, Jack12477 said:
I wouldn't know @CDW , was never a big fan of Cadillac cars! But then in my youth my buddies always told me a Cadillac drove like a tank. 😉😊😇
But I can say this is by far the simplest tank kit I've built. There are no interior details to mess with, everything is exterior. And true to Tamiya standards, no flash, no ill fitting part, superb detail in the exterior castings. A great kit for a beginner modeler. Other than painting it olive drab green when I finish assembling, I haven’t decide on how much, if any, weathering I want to do. It does have 3 figures which will be a challenge to paint.
The parents of one of my best friends from junior high school days used to drive new Cadillacs. They would drive us over to Daytona Beach for the weekends where we spent many hours on the boardwalk, riding the rides and playing the games of chance. I always thought riding in those Cadillacs was a big deal back then. They went down the road super smooth, quiet, and the air conditioning was superb. My oldest brother had several convertible Caddys down through time. They rode the best of them all because they weighed more. Super smooth rides.
I bought the same M-41 kit just to get the turret mounted .50 caliber machine gun from it, which I used on an Israeli Sherman tank. One day I should find another .50 cal to replace the one I stole then build my M-41, too. Looking forward to seeing how yours turns out.
-
The M41 was made by Cadillac. Wonder if it was as comfortable inside as a Cadillac? 😀
-
On 3/22/2024 at 9:29 PM, Keith Black said:
Hard to believe that's paper, nice stuff.
Agree 100 percent!
- AJohnson, Keith Black, mtaylor and 7 others
-
10
-
What a gun! Great looking model. I’ve wanted this one, too. Seeing it built is fun to watch.
- Egilman, king derelict, Haliburton and 5 others
-
8
-
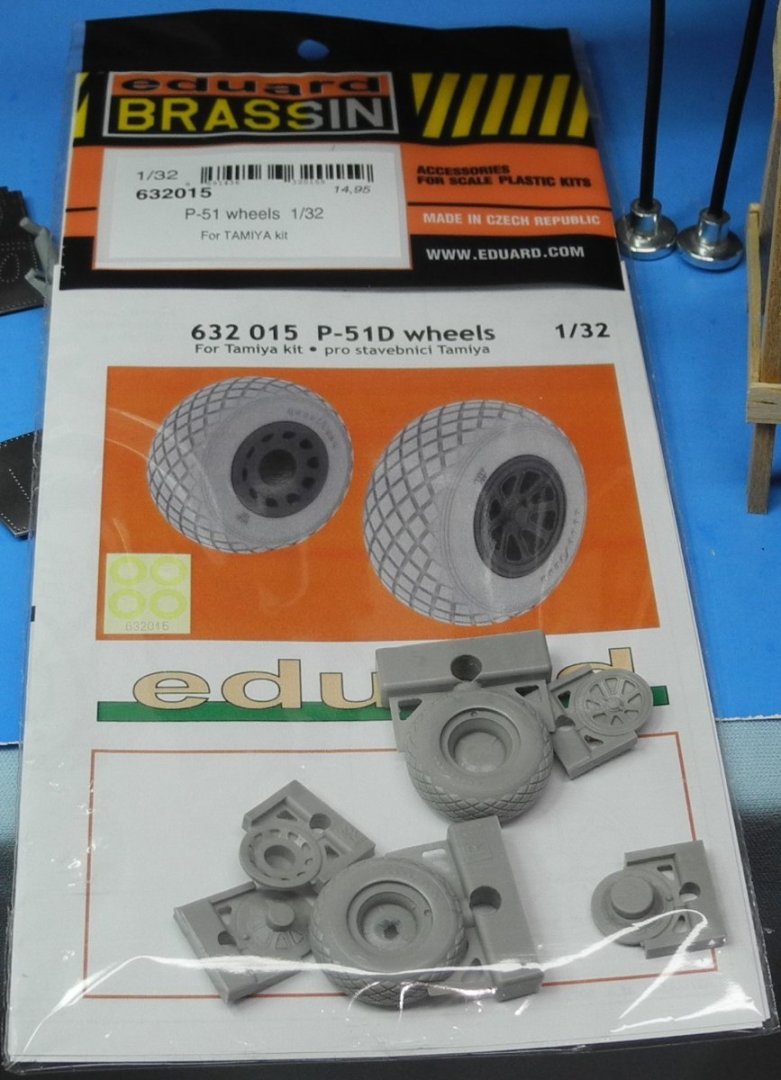
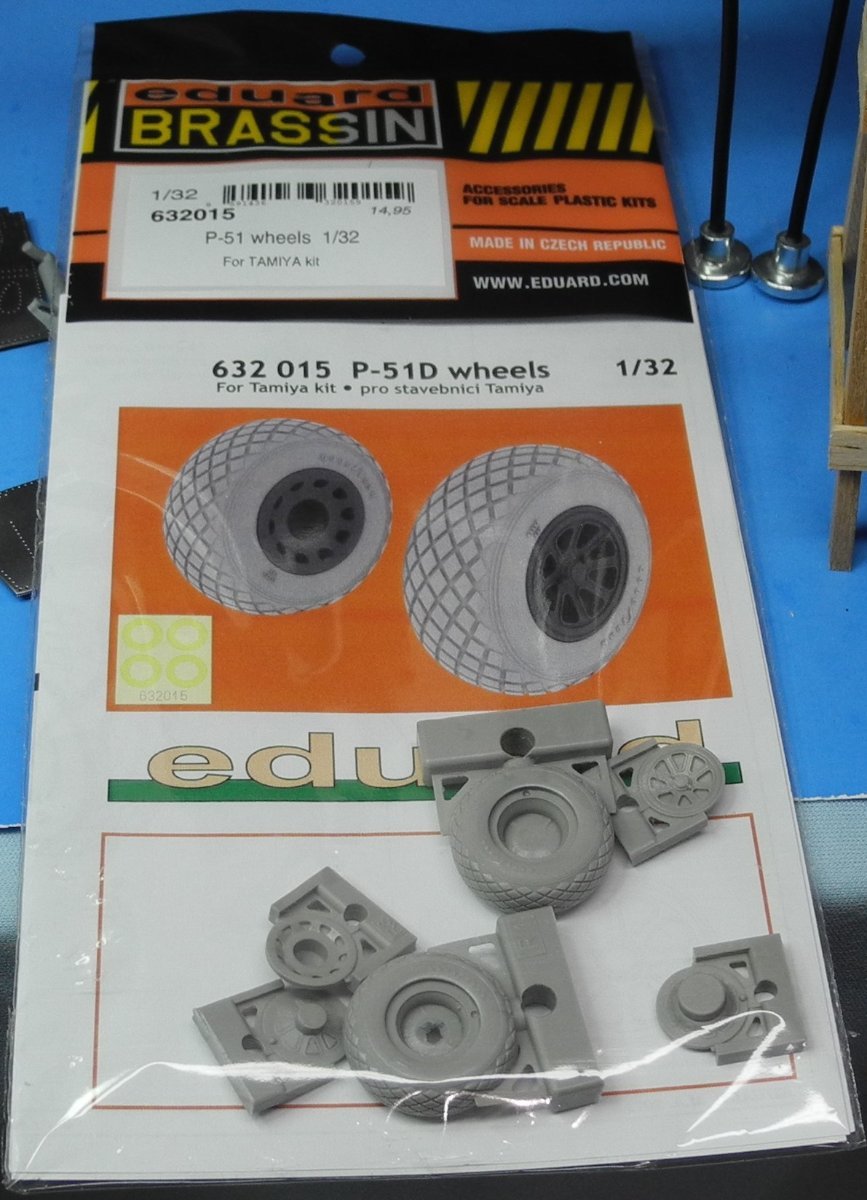
When test fitting the stock wheels and rubber tires, I discovered the tires are too big for the wheels. Either Dragon didn't do any proof build of their kit before putting it out there for the public to buy, or they knew about the fit issues and put it out there anyway. Whatever the cause, I needed to find and purchase a set of wheels and tires as a replacement. I bought these Eduard wheels for that purpose.
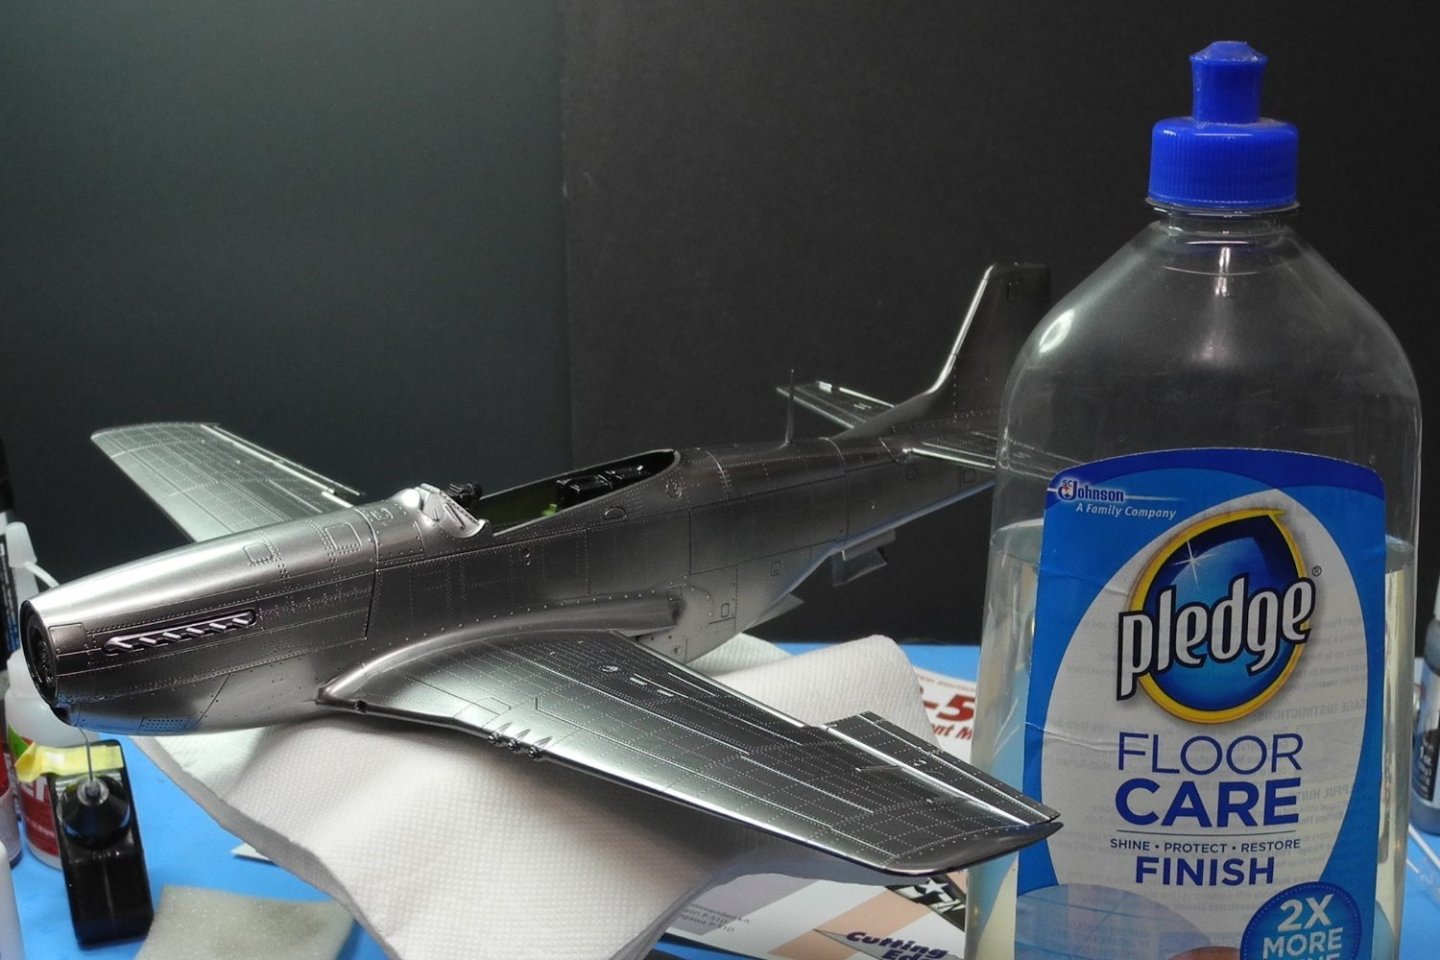
I ran a little test on the drop tanks and wing mounts. I mixed Mr. Color super silver2 with Mr. Color leveling thinner 400 at a ratio of 1 part paint to 10 parts thinner. I sprayed on the highly reduced paint in light, thin coats, at 12psi ala Alclad application style. The silver was applied over a base of AK Xtreme Metal black base. The black base is a lacquer. It went down super smooth and glossy, very fast drying. The black base was shot straight from the bottle using my airbrush. I believe the silver finish may take a light polish. It is said to have much better durability with handling and masking than does Alclad, no clear coat needed. I'm interested to see how it works out. I like the silver finish, much similar to the Alclad in appearance. Very fine silver pigment.

- Canute, Haliburton, yvesvidal and 11 others
-
14
-
-
If you ever try building a ship model using a Pontos detail and photo etch set, a new high water mark will be set for photo etch sequence difficulty. The good news is, perseverence and patience usually pays dividends in either case.
Your work is coming along real nice.
- chadwijm6, Old Collingwood, mtaylor and 4 others
-
7
-
39 minutes ago, Jack12477 said:
Mine too! I search his site first. And delivery to me is 2 days max. Altho I never understand USPS' routing, NH to Albany, then Albany down Thruway to Newburgh driving right past Saugerties, then Newburgh back north on Thruway to Saugerties.
I once had a good friend from Newburgh. He and his wife both have passed away now. He used to tell me tales about his good friend “Jimmy” from Newburgh and all the mischief they got into a long time ago. One time Jimmy drove down from New York and I got to meet the legend. He came down in a big new Lincoln Town Car. Turned out Jimmy was a hit-man for the good fellas. I was nervous as a cat on a tin roof around that guy. A man of few words but he meant what he said when he did speak.
- Jack12477, mtaylor, Old Collingwood and 3 others
-
6
-
-
13 hours ago, Danstream said:
Sorry, I don't intend to contradict you, but I cannot see your point. Just fill the engraved details and then paint the wing with a paint that mimic the original one as, for example, shown in the following article:
Best regards,
Dan
Hi Dan
Don't worry about a thing. I enjoyed learning more about the original, factory finish on this aircraft by everything you shared with me here. Thanks and don't hesitate to contribute in this way to any of my build threads.
4 hours ago, Egilman said:Yeah the eduard Mustang has those canyons for panel lines... Very well, I concede the point my friend.... That's a model manufacturers engineering error/failure...
Yes they are puttied to smooth the wing, you have to fill them to get a decent build out of that kit... Modelers have been doing that for years... {chuckle} But in scale, 1/48 & smaller shouldn't have recessed panel lines they would also need to be filled on a 1/32 scale model as well...
On the 1/1 bird they were filled to cover the micrometer sized edges and gaps, maybe only a few thousandths of an inch. This is why when the paint is stripped off you don't notice the fill...
Windtunnel testing in 1940 established that the filling/smoothing added 20kts to the planes top speed...
The practice continued into the 50's... North American deleted the process on the F-86 when tunnel testing showed that it made no difference to the planes top speed... Laminar flow was dropped when power overcame drag sufficiently till where it just simply didn't matter anymore... In the 1940's they were looking at everything that could conceivably make a plane go faster, Laminar Flow gave the Mustang a 5% boost in airspeed, with the supercharged Merlin, that boost became 10% over 20kft, and created a legend.
Scaling it down to show it on a relatively small scale model, what's the point? you can't scribe a line small enough to represent the actual size of the panel gaps from a real P-51... Engineering defects caused by deficient thinking in the production of a model aren't the fault of the airplane being modeled and we as modelers have been fixing such for generations...
It all comes down to the modelers minds eye and what he/she sees when they look at the real thing... It's why we build to suit our view of the subject...
I didn't check to see if the Airfix or Trumpeter kits has those canyons, but the newer Tamiya's don't... (At least the one I have doesn't)
I'll put it this way, the filling and smoothing done in the factory was never really noticed in the field when they had to strip and repaint the aircraft, that's how small the effect was...
And thank you Dan for reminding me that we shouldn't be derailing a great log...
My humble apologies....
And likewise, thanks to you as well, EG. You are a storehouse of knowledge on so many subjects we model, and I always look forward to you sharing that information on my build threads.
-
When listening to the YouTube video (posted on page 2) narrated by Bud Anderson, he says his ground crew worked all night stripping his aircraft to bare metal. While he doesn't mention putty, it seems likely to me that the crew stripped everything on top of the metal skin to lay it bare.
- Old Collingwood, Canute, mtaylor and 4 others
-
7
-
1 hour ago, Old Collingwood said:
That guy owns some Stunning planes.
OC.
What a lucky guy he is. All those warbirds along with the cash it takes to own, maintain, and fly them at will. Amazing indeed.
- Jack12477, Old Collingwood, Canute and 3 others
-
6
-
1 hour ago, Danstream said:
Yes, even the metallic ones had the wing surfaces puttied and painted with aluminum paint (with the exception of removable panels). This was intended to get the maximum advantage from the newly introduced laminar wing sections. I don't know whether you might want to implement that at this stage.
Very nice finish and I love the blue nose with its glossy finish.
Cheers,
Dan
Thanks Dan.
I have no reference photos to use as a guide for the putty. Modern restored P-51’s show no evidence of the putty so I won’t try to model it now. Maybe on another build when I have reference to work from.
- Ryland Craze, Dave_E, mtaylor and 6 others
-
9
-
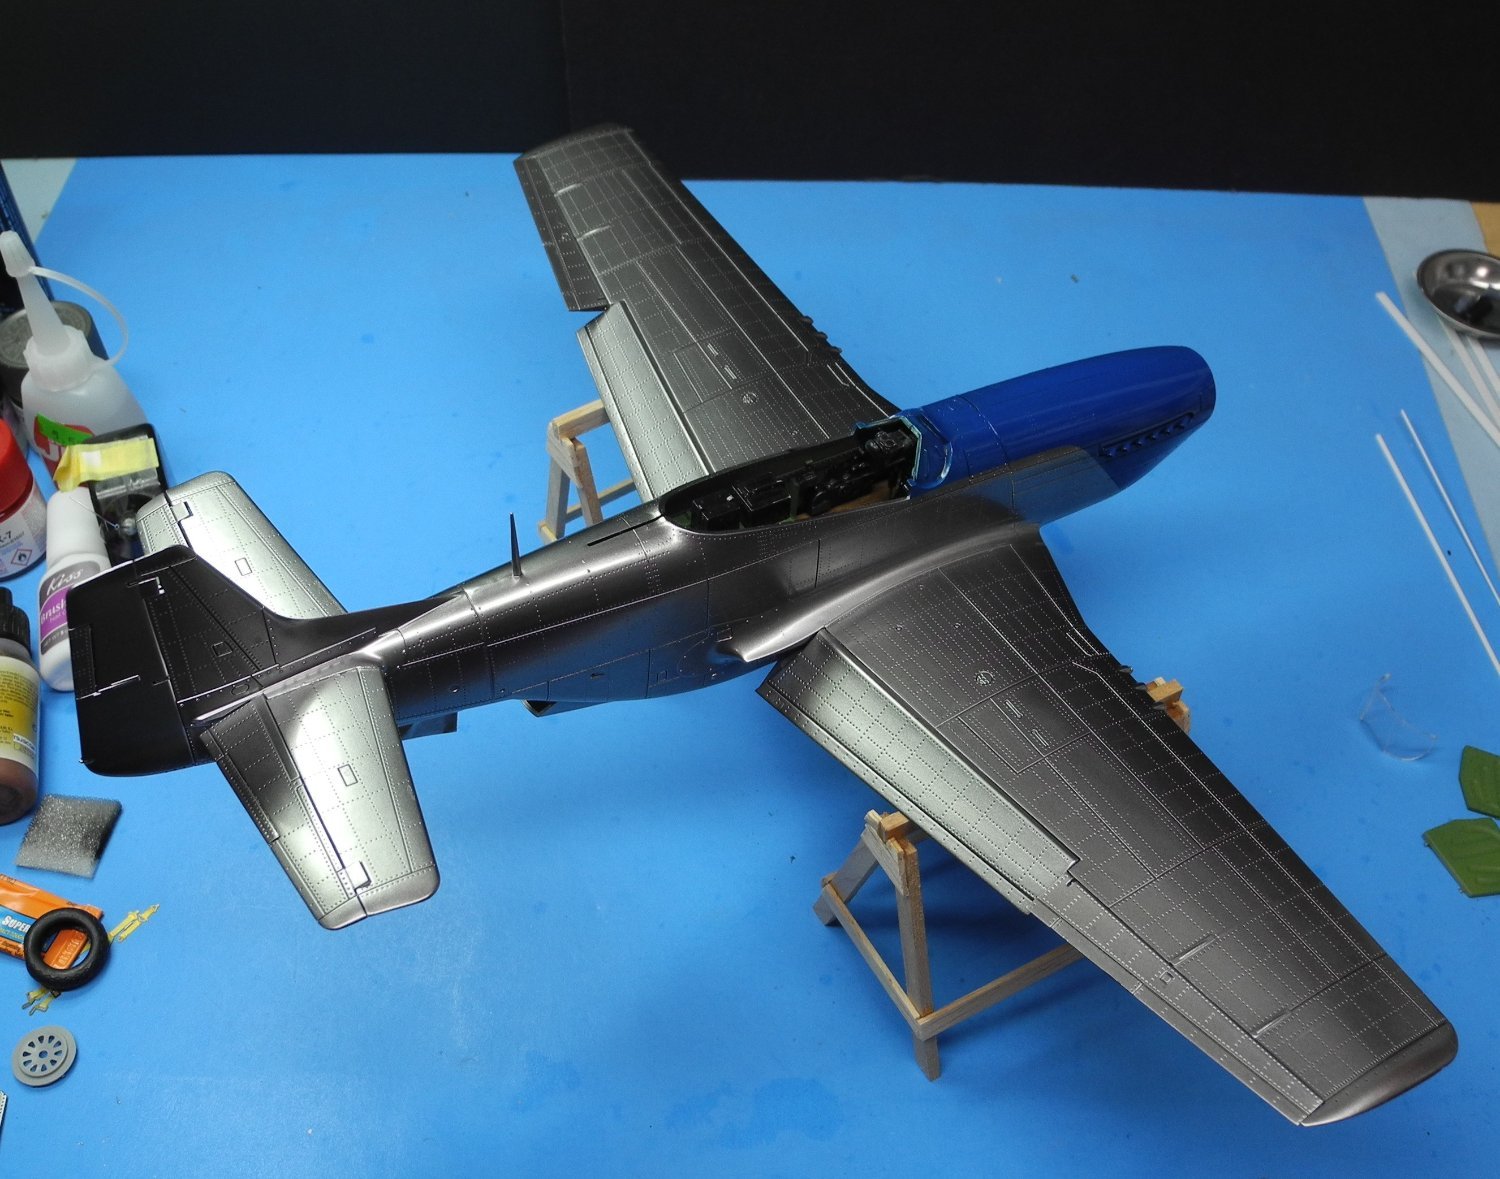
I'm thinking about breaking up all that shiny aluminum with some various shades of aluminum on different panels.
- mtaylor, AJohnson, Old Collingwood and 6 others
-
9
-
2 minutes ago, Canute said:
The blue covered nicely.
Primarily because of the smooth finish under it. But it's always that way with paint. It's only going to be as good as the surface it's painted on. I forgot to mention, the blue is Tamiya lacquer, "Pure Blue". it may be a tad darker blue than it should be, but I can live with it.
-
-
-
-
14 hours ago, Jack12477 said:
Thanks ! Master Box Ltd is a Ukrainian company based in Dinipro. Don't know how they are able to continue producing such really detailed kits with a war going on in their backyard. They have a really nice line of WWII military & civilian figures in addition to these "fantasy style" subjects. And they recently came out with Ukrainian Army figures. SCALEHobbyist in Hudson NH near you carries their line.
Great looking project, Jack.
I've often wondered the same thing about products from Ukraine. How the heck are they doing it with all that's happening. I own quite a few of their figure kits but have yet to crack open one to finish. Your work is inspirational.
On 3/15/2024 at 8:47 AM, Canute said:Interesting build there, Jack. What's the doohickey on his back and arm? Odd flame-thrower or an adult beverage dispenser?
That could be a beer-bong, Ken. A high-speed libations dispenser of sorts.
-
4 hours ago, chadwijm6 said:
Morning, I hope you don't mind but another question CDW.
Why use pledge, could you also use an airbrush to apply a gloss acrylic varnish?
Thanks
James
mostly it’s trial and error experience. What’s worked for me in the past I stick with and the rest I discard. I suspect Pledge works best as it has no adverse effect on the Alclad finish, plus it’s cheap and readily available. The airbrush tends to be unreliable as it’s hard to lay it down smoothly without pooling, sags, and runs. I get more control with a soft brush and Pledge self-levels. -
Using Pledge, applied with a soft, wide brush to protect the Alclad chrome finish. Keeping brush strokes gentle and minimal to avoid marring the bright finish of the Alclad. Being careful not to allow droplets to appear along edges from over applying the Pledge. Less is more. The self-leveling qualities of the clear acrylic will take care of itself, so don't "over-brush" it.
I'll lay down two coats before it's finished then allow a couple of days for it to cure before masking or decals.


Krupp 420mm Big Bertha by Haliburton - Takom - 1/35
in Non-ship/categorised builds
Posted
What I would like to know, was Bertha really as big as she appears in the photo? She seems to dwarf her husband. Perhaps the name, "Big Bertha" was literal in more than one sense of the words. Look at the size of her hands! Sheesh.