HOLIDAY DONATION DRIVE - SUPPORT MSW - DO YOUR PART TO KEEP THIS GREAT FORUM GOING! (83 donations so far out of 49,000 members - C'mon guys!)
×


tkay11
-
Posts
1,829 -
Joined
-
Last visited
Content Type
Profiles
Forums
Gallery
Events
Everything posted by tkay11
-
 Steve's correct about the deadeyes. I thought the plans had shown them correctly, as well as how to thread them. Nice work, though. Tony
- 49 replies
-
- 3
-

-
- sherbourne
- caldercraft
- (and 1 more)
-
Comparison between Lady Nelson and Sherbourne
tkay11 replied to Sailor1234567890's topic in Wood ship model kits
They are indeed very similar as cutters and I almost bought the Lady Nelson kit as a first model except that they were out of stock at the time and I took the Sherbourne instead. If you're talking of the Amati/Victory Models version of the Lady Nelson, there's plenty of pictures and builds to see on this forum and the web to compare with the Sherbourne -- as well as with the various kit suppliers, but essentially rigging, spars, deck layout, pump positions, companionway, number of guns, age. The Lady Nelson design also is not of any particular real ship, whilst the Sherbourne is based to a large extent on the plans of the ship in 1763 at the National Maritime Museum in the UK. If you're talking of Chris Watton who designed the kit of the Lady Nelson, he designed kits of the Victory and several other ships, but I didn't know he designed the kit of the Sherbourne. The original designer of the Sherbourne was Sir Thomas Slade, who also designed the Victory, so I am not sure about the point you are making about the designers. Tony -
Ed, you're a marvel! Thanks so much for all the info. I'll collect all the addenda and have downloaded the list. I'll definitely start a log, though, because of house moving this summer, it may be some time before I can make my decision. In the meantime I'm planning very carefully! Tony
-
Thanks a lot, Shawn. That's cleared it all up! Tony
-
Oops! After more careful going through the text, I think I've answered at least part of my question. It seems I am indeed missing plan 4 (the centreline structure drawing) which I now see is referenced as such in Volume 1 on page 19. I think two copies of plan 3 were sent by mistake instead of one copy each of plans 3 and 4. However, I'd still like to know if there's a plan 2A, if anyone can help. Thanks Tony
-
I recently received my copies of Vol I and II of the Naiad books, and have just started studying the plans so that I can determine whether I go ahead and start the build or postpone it till I have better skills. However, I am puzzled by the plan numbering, and just want to check that I do in fact have all the plans. It would be great if someone could provide a list of the plans and what they contain. With volume 1 of the Naiad I have the following: I sheet each of plans 1, 2, 2B, then 2 sheets of plan 3, and then 1 copy of 13A-D With volume 2 I have: 1 sheet each of Plans 5-12, and plan 14. I presume plan 13 from volume 1 is the plan 13 for the second volume. My question is: am I missing plan sheets 2A and 4 or are there no plans with that numbering? I haven't read through the volumes thoroughly yet, but I can't see any obvious listing of the plan sheets. I'd be grateful for any advice. I've written to Bob and Cathy at Seawatch Books, but I'm posting here in case there's a simple answer. Tony
-
Looking forward to this build! You're pretty much guaranteed lots of support because of the large number of people who've built the Sherbourne. Don't forget that when you post a log it's not just so you can obtain support, though. Every builder gives ideas to others as well. Tony
- 49 replies
-
- 1
-
-
- sherbourne
- caldercraft
- (and 1 more)
-
Thanks, Gunther. Even my wife likes it, so it must be ok! Tony
- 132 replies
-
- 3
-
-
- triton cross-section
- cross-section
- (and 1 more)
-
A wonderful idea, Geert. I look forward to that cross-section. I'll be visiting one of the Brixham Trawlers for a trip on 4th June, so will be taking lots of pics, I hope, unless the weather calls it all off. Thanks very much for the appreciation, by the way!
- 132 replies
-
- 2
-
-
- triton cross-section
- cross-section
- (and 1 more)
-
Thanks, Pete. That means a lot to me. Tony
- 132 replies
-
- 3
-
-
- triton cross-section
- cross-section
- (and 1 more)
-
Thanks, Jörgen. I look on builds in another way. For me I find that because each different part or stage involves making a model of its own, with its different skills, materials and challenges, that it's rather like building lots of models each one of which is finished (and each one of which may take several tries to complete!). I was surprised to find that on completion of each of the models I didn't feel any particular interest or excitement, other than thinking about a next build or builds. I do occasionally look back at the Sherbourne and now the Triton and think "That was quite an interesting experience, and quite nice to look at" and it's nice to show others some of the details of these ships and how they were built, but other than that I don't really think about them at all. This may be because my interest is not so much in the finished product but in finding out about these ships in the terms of how they were constructed and how they functioned, as well as in the challenges of finding out how to make small replicas of their individual parts. You may have noticed that I don't really care too much about the final finish in terms of sanding or perfect appearance (including my lack of interest in treenailing), and I suspect that's because of the particular way I think about the hobby. It's more like a very intriguing game, perhaps a computer game or a game of chess, for which I have to find the solutions and, having found them, progress to the next level of complexity. However, I also have to admit to having a sneaking regard for all those who do spend time on the appearance and finish of the models as in truth the finish provides another level of beauty! Maybe once I become more proficient at the basics I'll be able to spend more time on the finish. I should imagine that different modellers have very different approaches to their models based on their own experiences, expectations and mindsets, and even that they will approach different models with different expectations and mindsets. With your Sherbourne build, for example, it made me think hard about how I think about treenailing, and whether I really should spend more time on such detail as it is so well executed, so it just may be that my mindset will change as well! Tony
- 132 replies
-
- 4
-
-
- triton cross-section
- cross-section
- (and 1 more)
-
Thanks, Mike and Dave, and Meddo for the like. Yes, it's the sharing that makes this forum such a pleasure to follow. Tony
- 132 replies
-
- 2
-
-
- triton cross-section
- cross-section
- (and 1 more)
-
Thanks, Carl and Dirk. Much appreciated! Interesting you focus on the educational, Carl, as that has been a prime motivation for me in the build logs. I thought it would be very useful for other novices like myself to go into the challenges for these particular builds and ways of getting round those challenges at this basic level. So if I help other newbies persevere, I'll have counted the exercise worth it. Tony
- 132 replies
-
- 4
-
-
- triton cross-section
- cross-section
- (and 1 more)
-
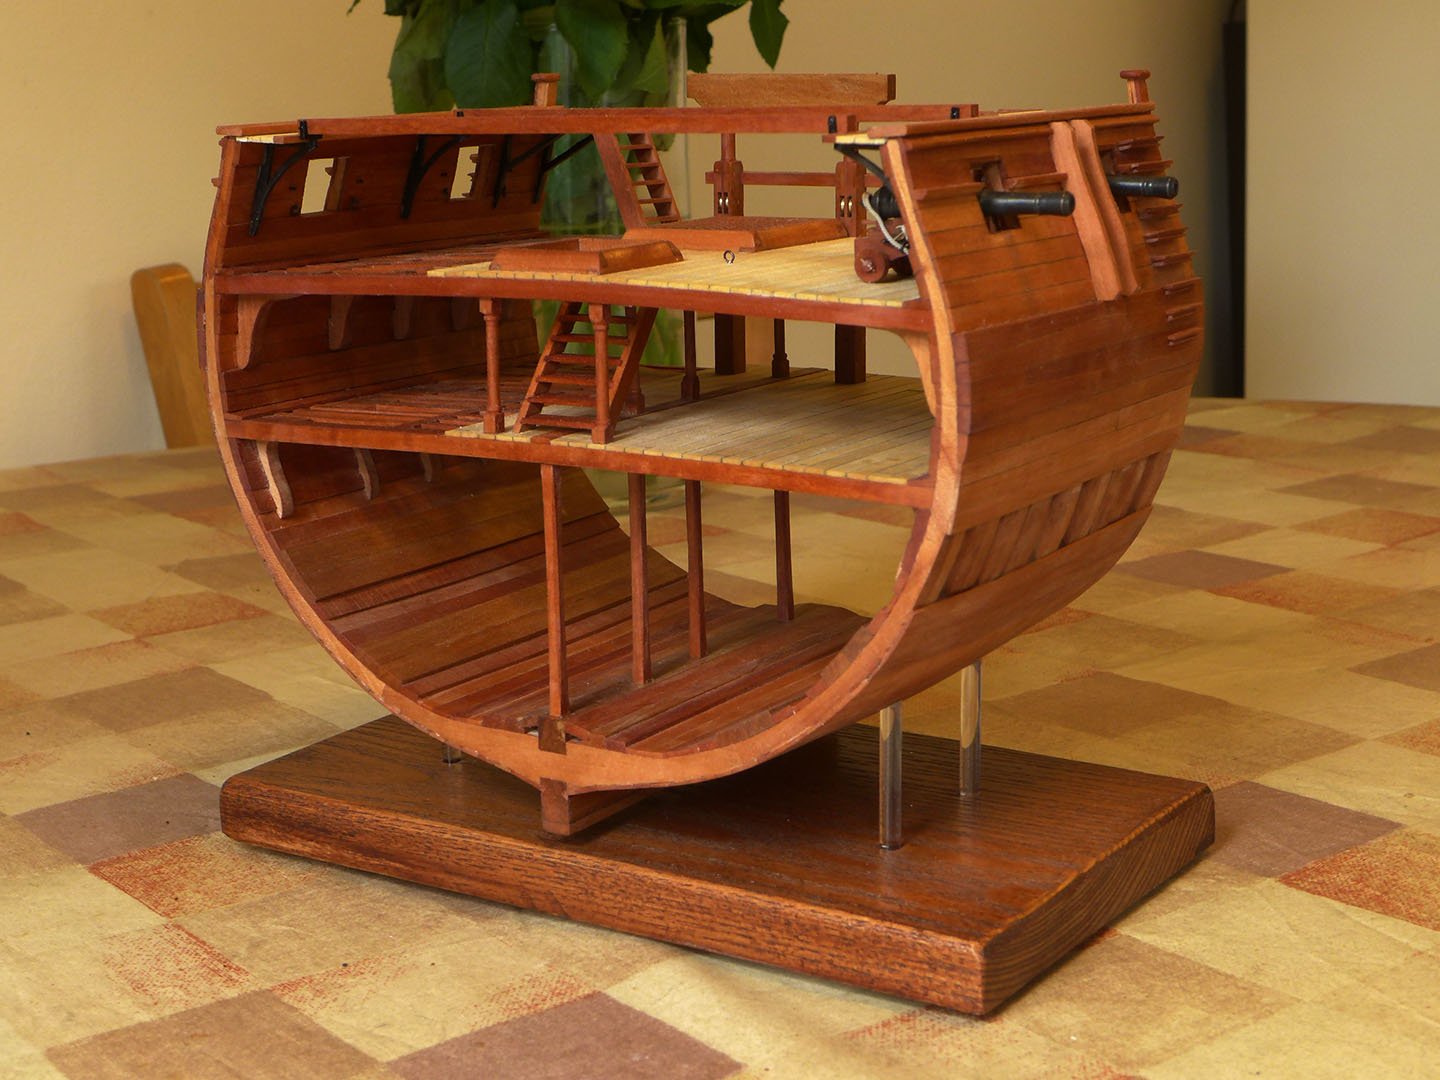
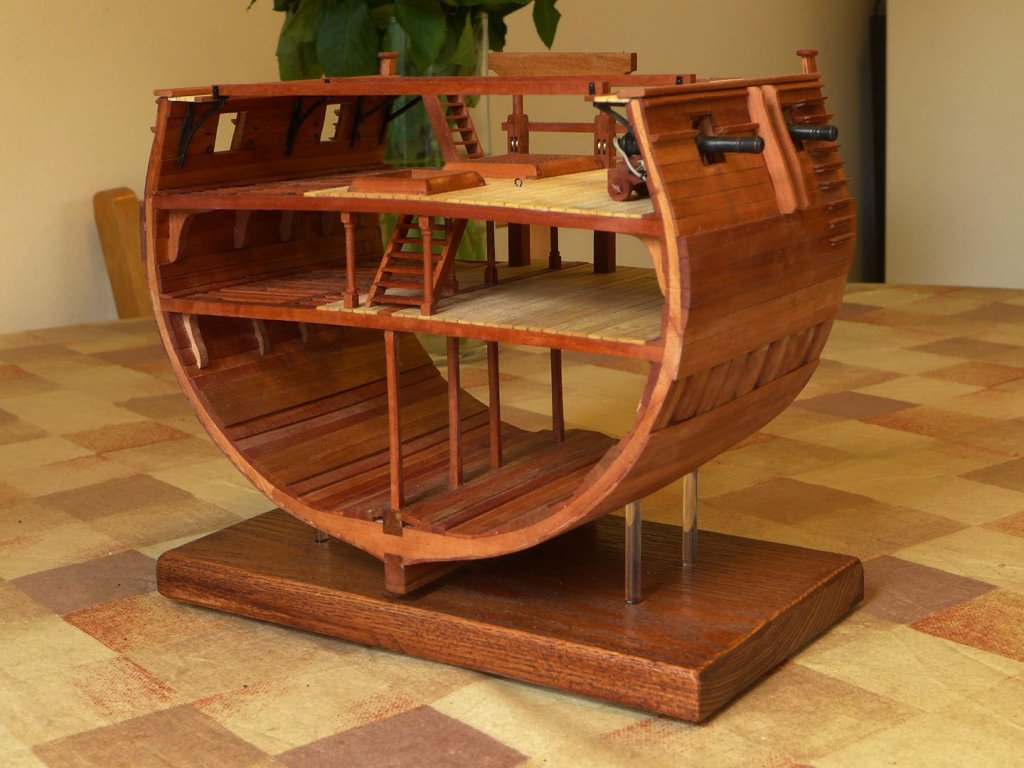
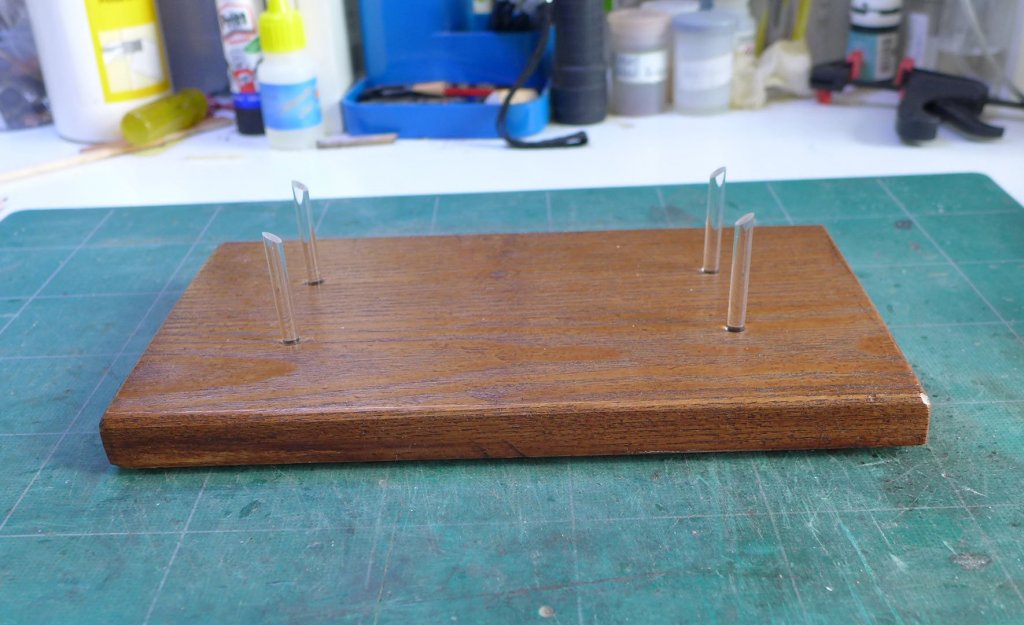
A VERY SIMPLE BASE Because this model really was just to learn and is nothing special compared with the other Triton builds, and will, in any case, be kept just to show grandchildren what the structures looked like, I decided to make as simple a base as possible. As usual, my road came in handy. A neighbour was having his floorboards discarded, so I just picked a couple up. One of them became a base for my wife's doorstep plants, while the other was converted to use as base for the cross section. I planed it flat (or as flat as I cared to) and drilled four holes for 5mm perspex rods. As the wood was very light, I varnished it with a polyurethane varnish. The colour is not quite right, but it was declared satisfactory by my wife who is the judge in all matters aesthetic. I worked out the angle for the tops of the rods by using my TurboCAD tracings of the frames, and sanded the tops to the correct angle. I left the heights of the rods so that the keel would be just above the base. Although I may still apply another coat of my made-up Danish oil to the ship (unlikely), I've decided to end this log and call the model completed. While we're in the throes of selling (with luck) our house, I'll now just concentrate on planning the next build -- a toss-up between Le Rochefort, Naiad, Brixham Trawler Valerian and (outsider) La Jacinthe. I have the plans for all of these, but each has their attractions. Thanks to everyone not only for their 'likes' and appreciation that have given me added motivation during this build and the Sherbourne, but also for the enormously kindly and generous advice which I've had in various ways to help me complete these builds. And yet again I congratulate those who designed and made the plans freely available for this really useful learning exercise. Tony
- 132 replies
-
- 17
-
-
- triton cross-section
- cross-section
- (and 1 more)
-
I still vaguely think about making one for my Proxxon FET, but so far have made do. It's a good idea though, and you've made a nice one. Tony
- 968 replies
-
- 4
-
-
- hahn
- oliver cromwell
- (and 1 more)
-
Simulated wipe on poly
tkay11 replied to Slowhand's topic in Painting, finishing and weathering products and techniques
I've made my own with a third each of linseed oil, mineral spirits and matt polyurethane varnish. Woodworker sites give this mix and say different people use different ratios for their own preferences. Tony -
I like transferring plans to CAD and then working from the drawings that result. This allows for easy checking of consistency on the plans as well as easy changing of the scale. But this habit made me highly aware of the problem you raise. When working from the printed plans, I've seen that all builders have worked to the outside edge of the line, and this is what I do when tracing with CAD. The lines on the plans are (I seem to remember) about 0.3mm thick, which, at 1:48, means .59" or 14.9mm at full size -- so there's plenty of room for error creep if even larger scales are used. At 1:48 the errors are within a scalpel cut of each other, or a swipe of a file, so mostly not that noticeable. As you say, though, there are lots of ways to fix the errors or just ignore them as they occur. It's been pointed out to me several times that a key question is whether you can see or notice the difference. If the errors are consistent, you might end up with a longer or shorter model than expected, but as long as you compensate and use the same amount of error for the other parts, then you just end up with a model with a slightly different scale to the one you expected. I don't think that answers your question but at least you know someone else has grappled with the problem! Tony
-
Now I'm jealous! Lovely work again! Tony
-
Well, if I carry it in person, might be a good opportunity to learn some of your skills. Tony
- 132 replies
-
- 2
-
-
- triton cross-section
- cross-section
- (and 1 more)
-
Thanks to those who've added their appreciations with the 'like' button. I'm still thinking about the mounting board because my wife doesn't want me to throw it away just yet. In fact I've been thinking it might be a useful source for bits and pieces in a future build -- a kind of formed scrap box. A bit like people did with Egyptian tombs, ancient Rome and temple sites around the world. In the end also a bit like us as we're de-structured for our atoms and genes for future generations and other animal or plant life. I'm beginning to quite like this re-cycling idea. Tony
- 132 replies
-
- 2
-
-
- triton cross-section
- cross-section
- (and 1 more)
-
Thanks for the info, Dave. That must be recent as I check quite regularly. Anyway, that's great news! Tony
- 132 replies
-
- 2
-
-
- triton cross-section
- cross-section
- (and 1 more)
-
Thanks, Dave, Dirk and all the 'likes'. It's been an enjoyable journey, with lots of learning. Those who designed it really did have the learner in mind. So even though my own build is really basic, it will allow me to take on a new build with more confidence about the basics. That's the real value of this Triton cross-section. It's a pity that it's been closed to new builds because I can't think of anything similar that has been so well designed with such a lot of support that's also free (apart from the wood, of course!). The other aspect is that as it is clearly aimed at the learner (although some have made it into a something much more professional), I had a great time fixing mistakes which, on a more serious build, would have caused me much more grief. I'll state my view yet again that it was not a good idea to close the build for new learners. The plans are out there, so I can't see the gain in closing the build. If the plans continue to be available here for free, people are surely going to come here in preference to buying them. Congratulations yet again to those who designed this cross-section but please re-consider the closure of the build to others! Tony
- 132 replies
-
- 4
-
-
- triton cross-section
- cross-section
- (and 1 more)
-
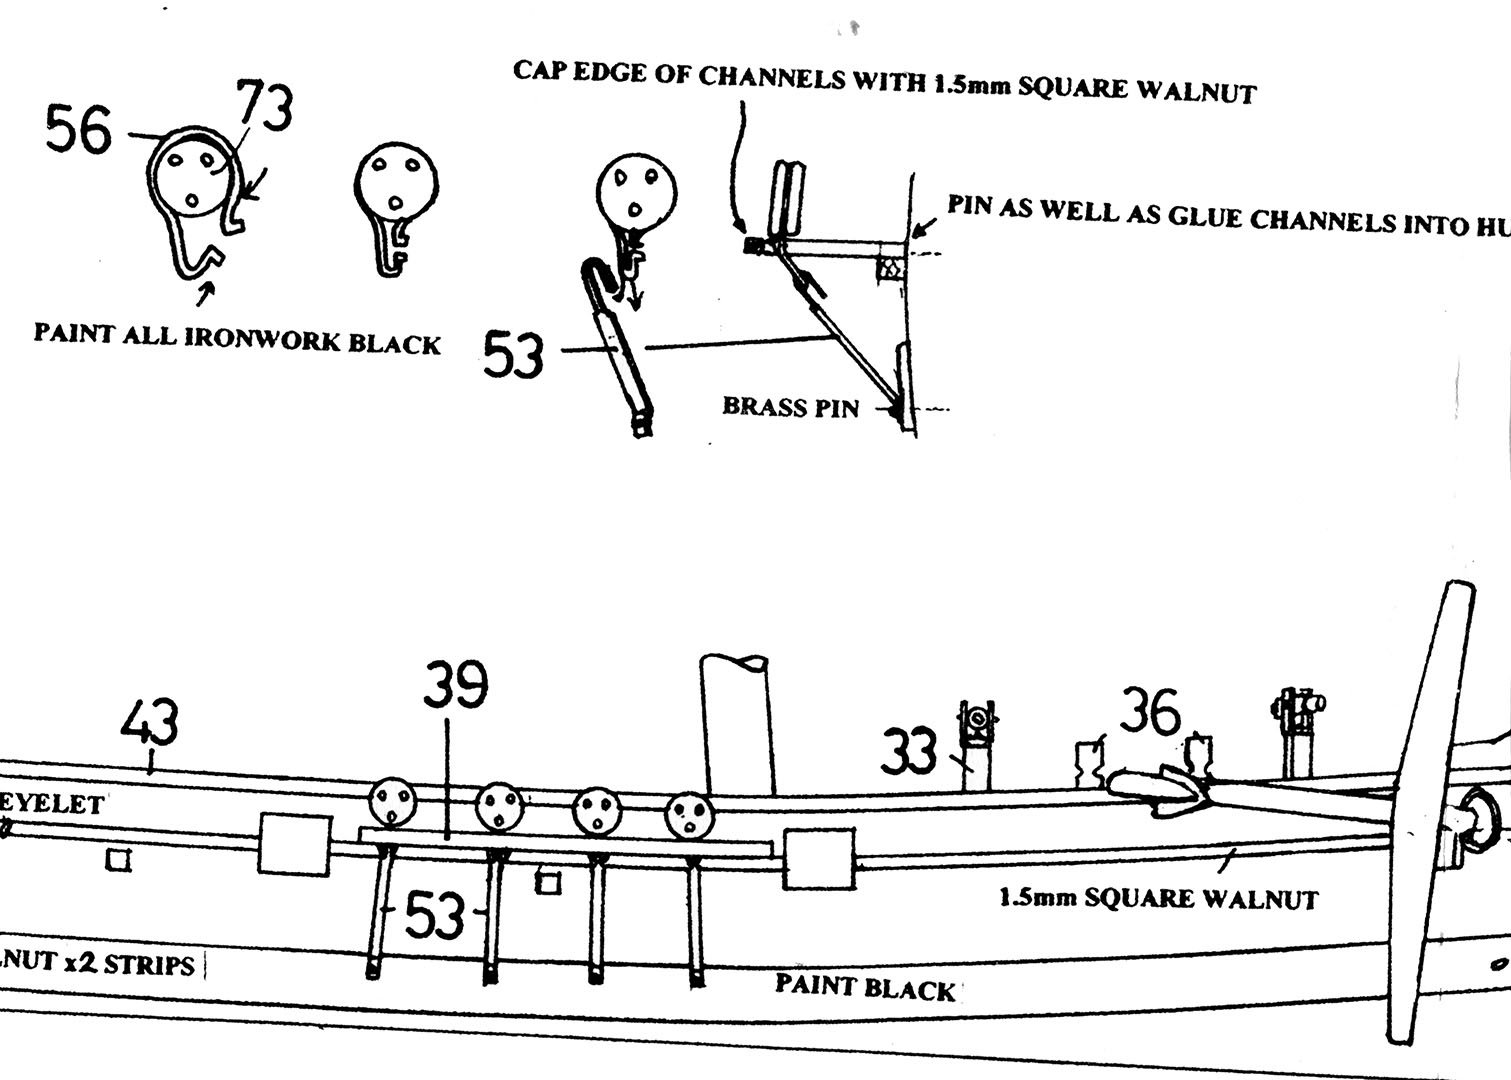
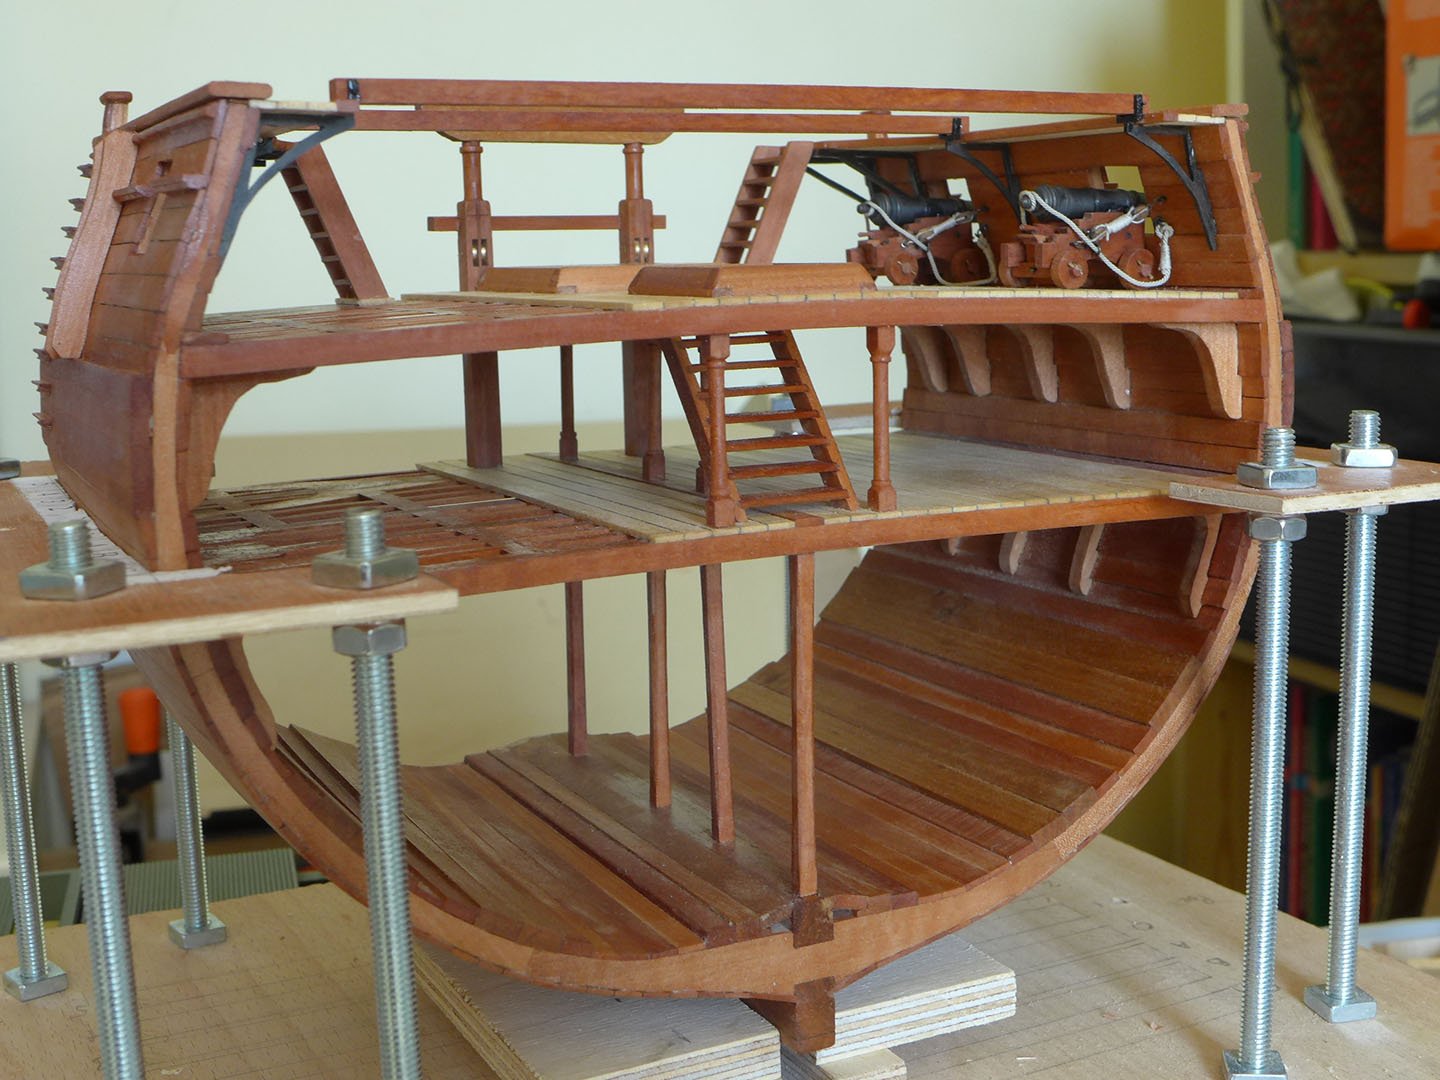
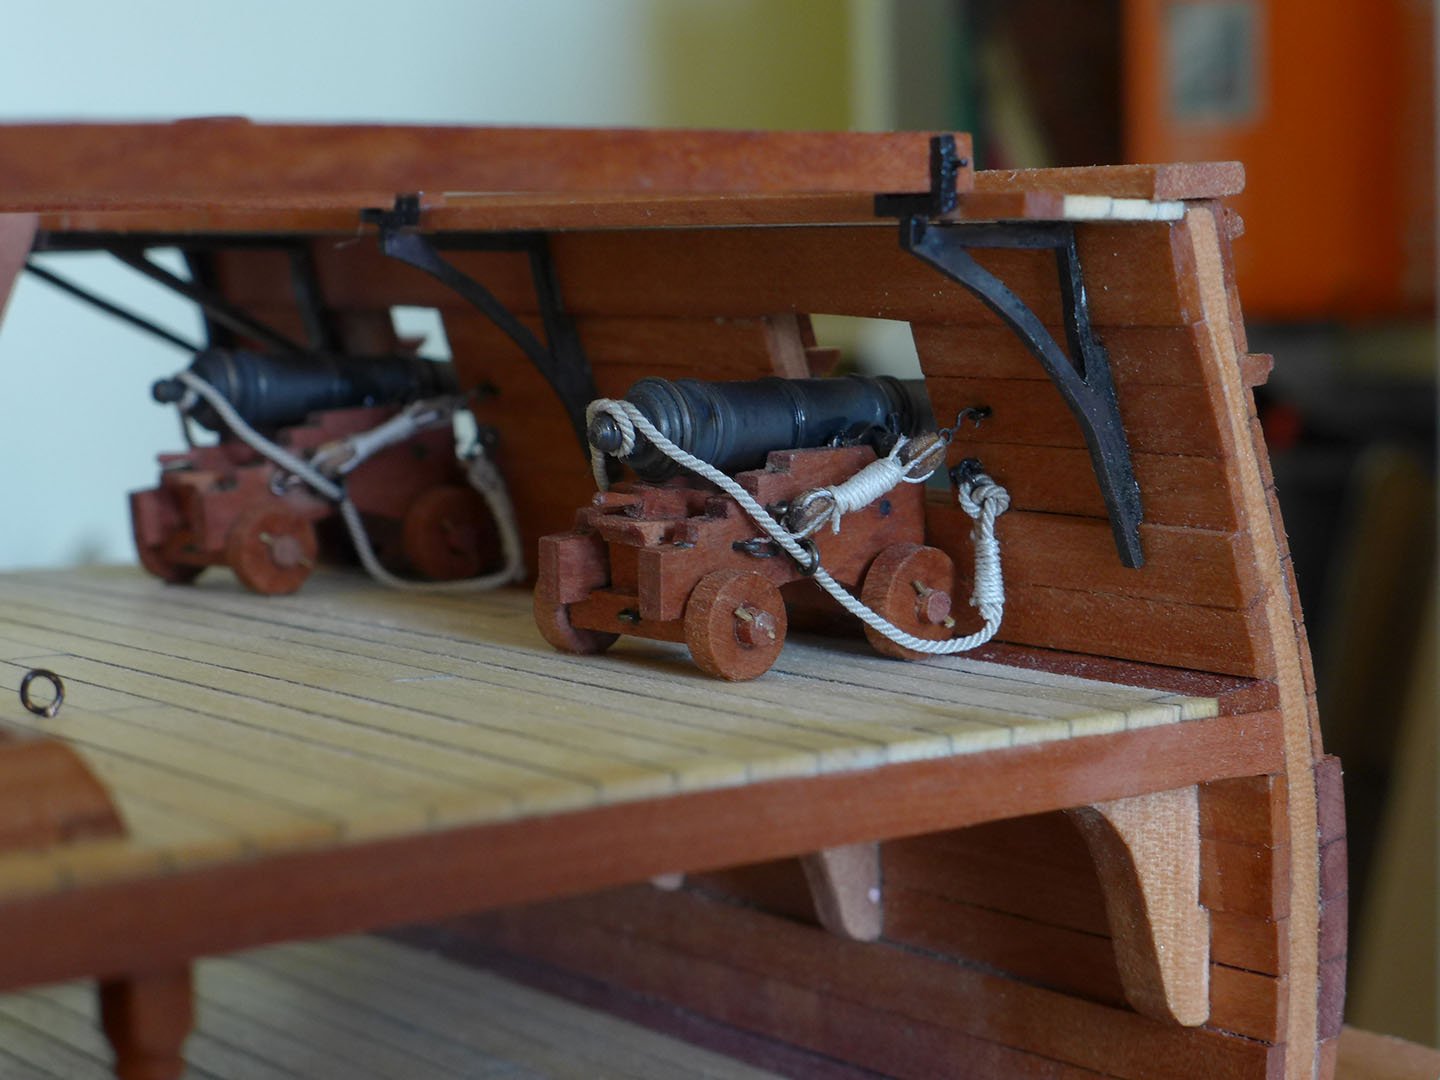
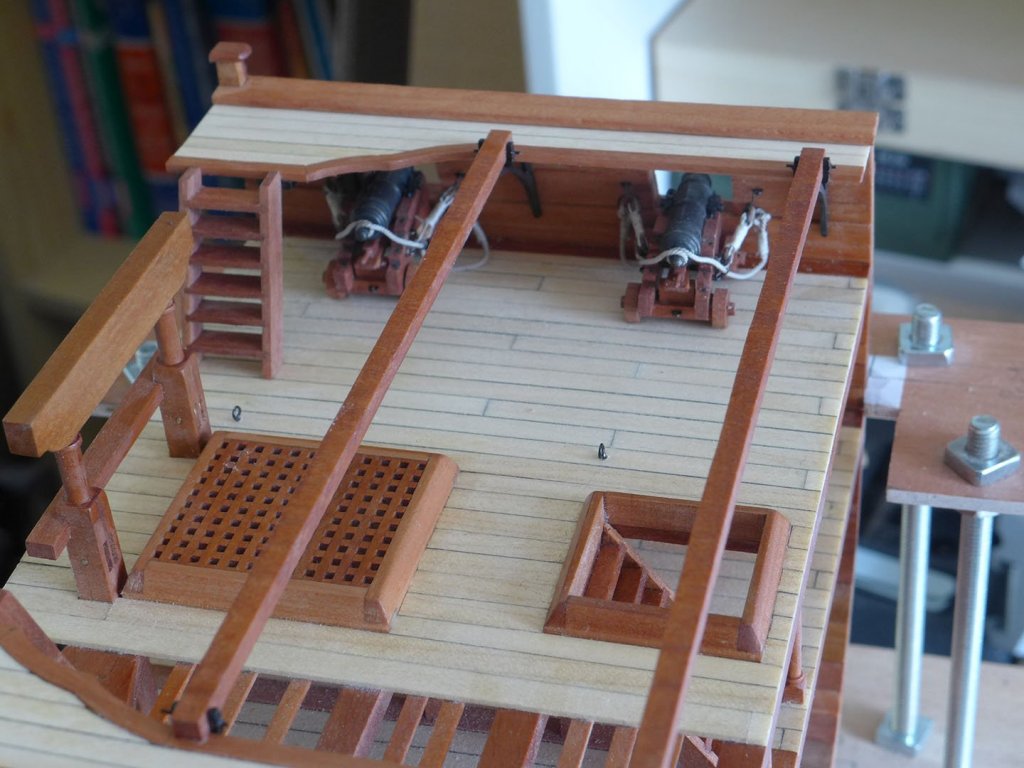
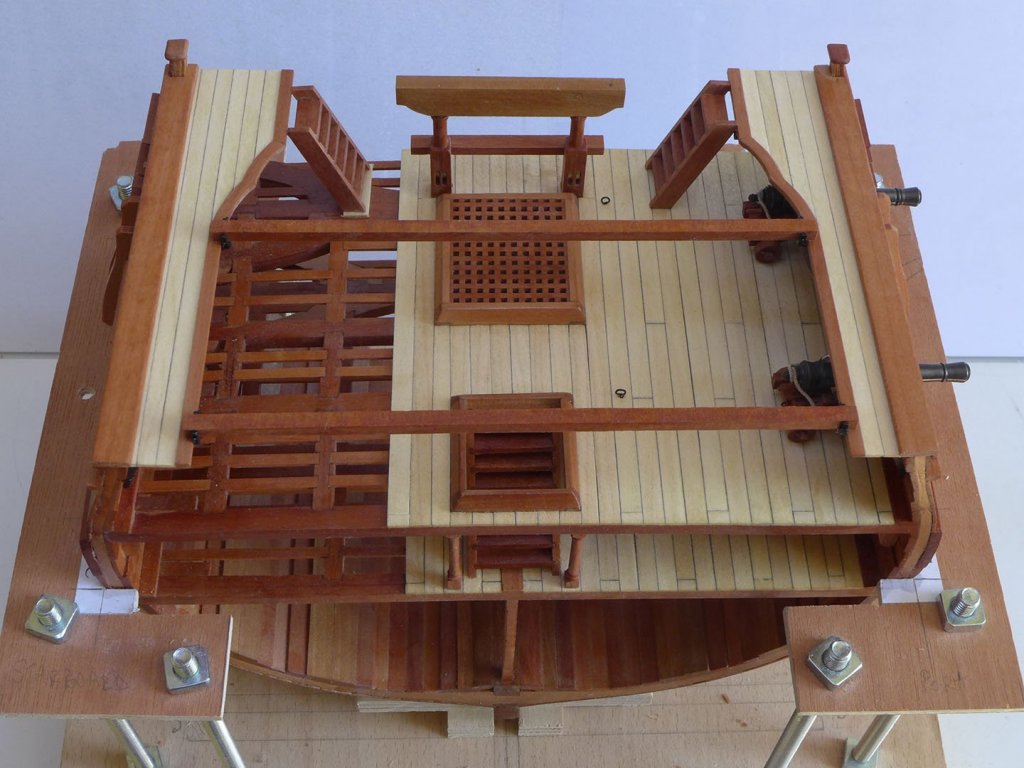
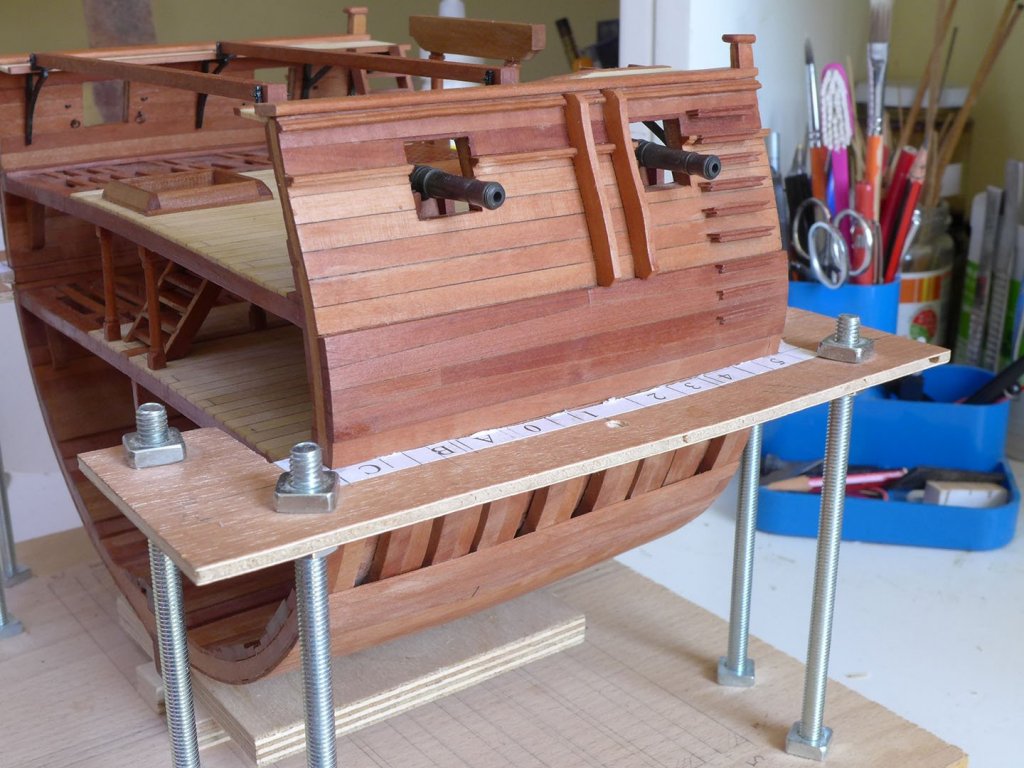
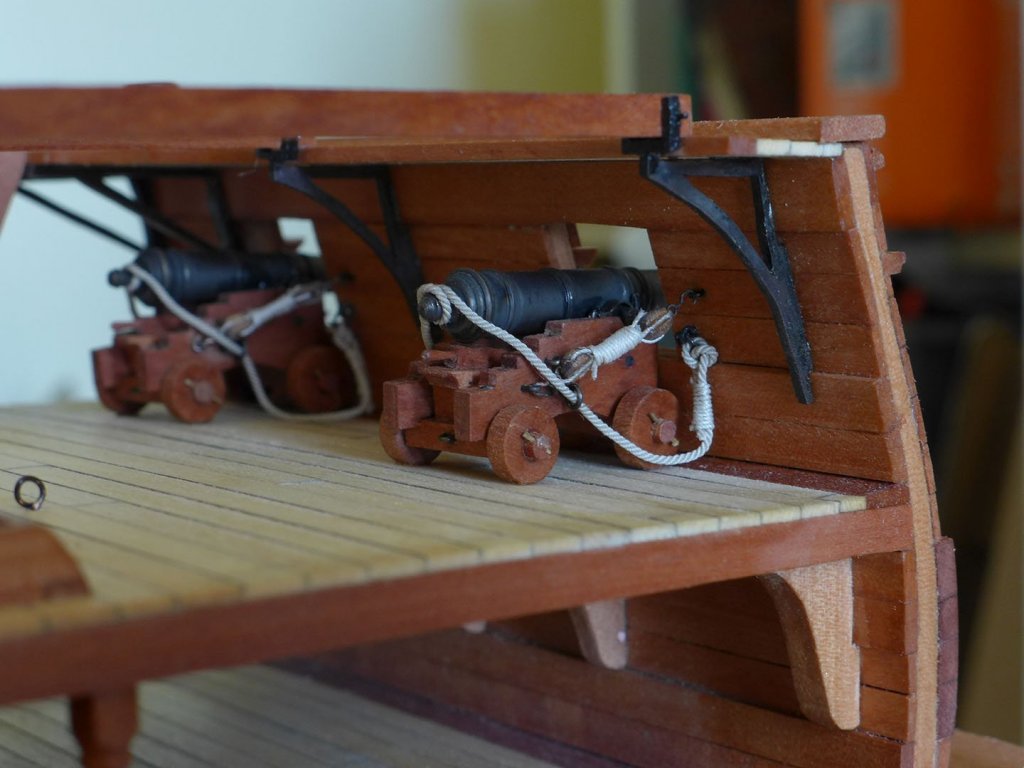
SKID BEAMS AND THOSE LITTLE BITS AT THE TOP I then glued the brackets to the knees with quick-drying epoxy using the pins previously mentioned. I held the skid beams in the brackets (to ensure alignment), and, when the brackets had dried, glued in the skid beams. By the way, you'll note that I'm leaving all the wood unstained and unpainted. This is quite deliberate, as I rather like the plain look. However, I have used my home-made varnish (mineral spirits, polyurethane varnish, linseed oil) to coat all the wood parts. I may have to give a second coat (some of the pictures show the patchiness), but I'm showing it in the current state. I added a sheer rail to the top of the rearmost frame but remain dissatisfied with the look of it. I’ll remain dissatisfied because I’m not going to change it! I’ll have a think about mounting it on a board, but as we may be selling our house soon, am not sure when I’ll be able to do it. Tony

- 132 replies
-
- 22
-
-
- triton cross-section
- cross-section
- (and 1 more)