EJ_L
-
Posts
2,246 -
Joined
-
Last visited
Content Type
Profiles
Forums
Gallery
Events
Everything posted by EJ_L
-
 Back to work on La Couronne this week and I have started to build the foremast yards. Not a whole lot to do for them as far as blocks go and since there were no foot ropes in this part of the 17th century I don't have to worry about those either. It is interesting to note that in the earlier part of the 17th century, the rigging attachments to the yards was relatively simple but once off the yards, it became much more complex as it travels through a series of blocks and crows feet down to the deck. As time goes on and we come to the late 17th and 18th centuries, the rigging becomes more complex on the yard itself and simpler as it travels down to the deck. Tonight I start building the parrels and halyards. I need to go bead shopping first on my way home from work. I found some beads that I think will work at Hobby Lobby a few months back. My main concern is if they are too big for the scale. They do not have to be an exact match but if 3 beads goes around the mast that will not work! Anyway, till then here is a picture of the yards so far.
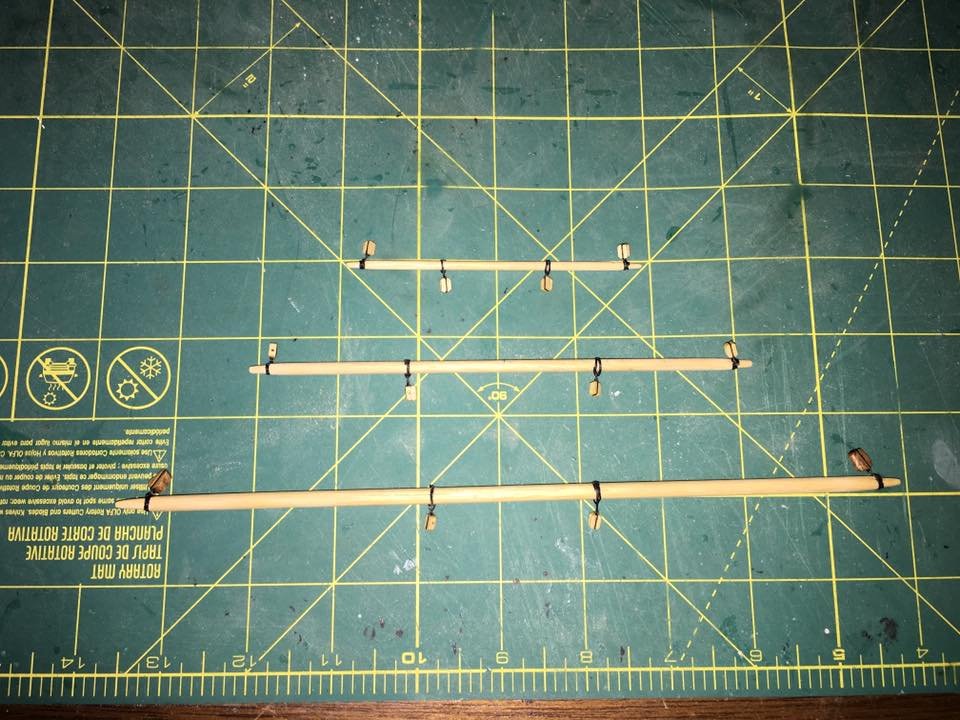
- 608 replies
-
- 8
-

-
- la couronne
- corel
- (and 1 more)
-
That windlass turned out extremely well and looks great on your Bounty along with all the other fine parts you have made. Great job!
- 291 replies
-
- 2
-
-
- bounty
- billing boats
- (and 1 more)
-
The saying is to measure twice and cut once but sometimes it is more along the lines of measure 3 times, look at it another way, measure again, walk away for a while to clear your head, measure again from a different angle, have a drink to cloud you head and get another perspective, measure again and finally find the mistake then redo the whole thing and finally cut and hope it is right! Ive actually seen this issue of the gun ports not lining up correctly on several builds especially of these larger first rates. I'm thinking that the problems are partially coming from translating the locations from 2D drawings onto a 3D object and also not having a solid reference point to start from. Plus side is the starboard side will be easier as I now know what to do to make the layout work.
-
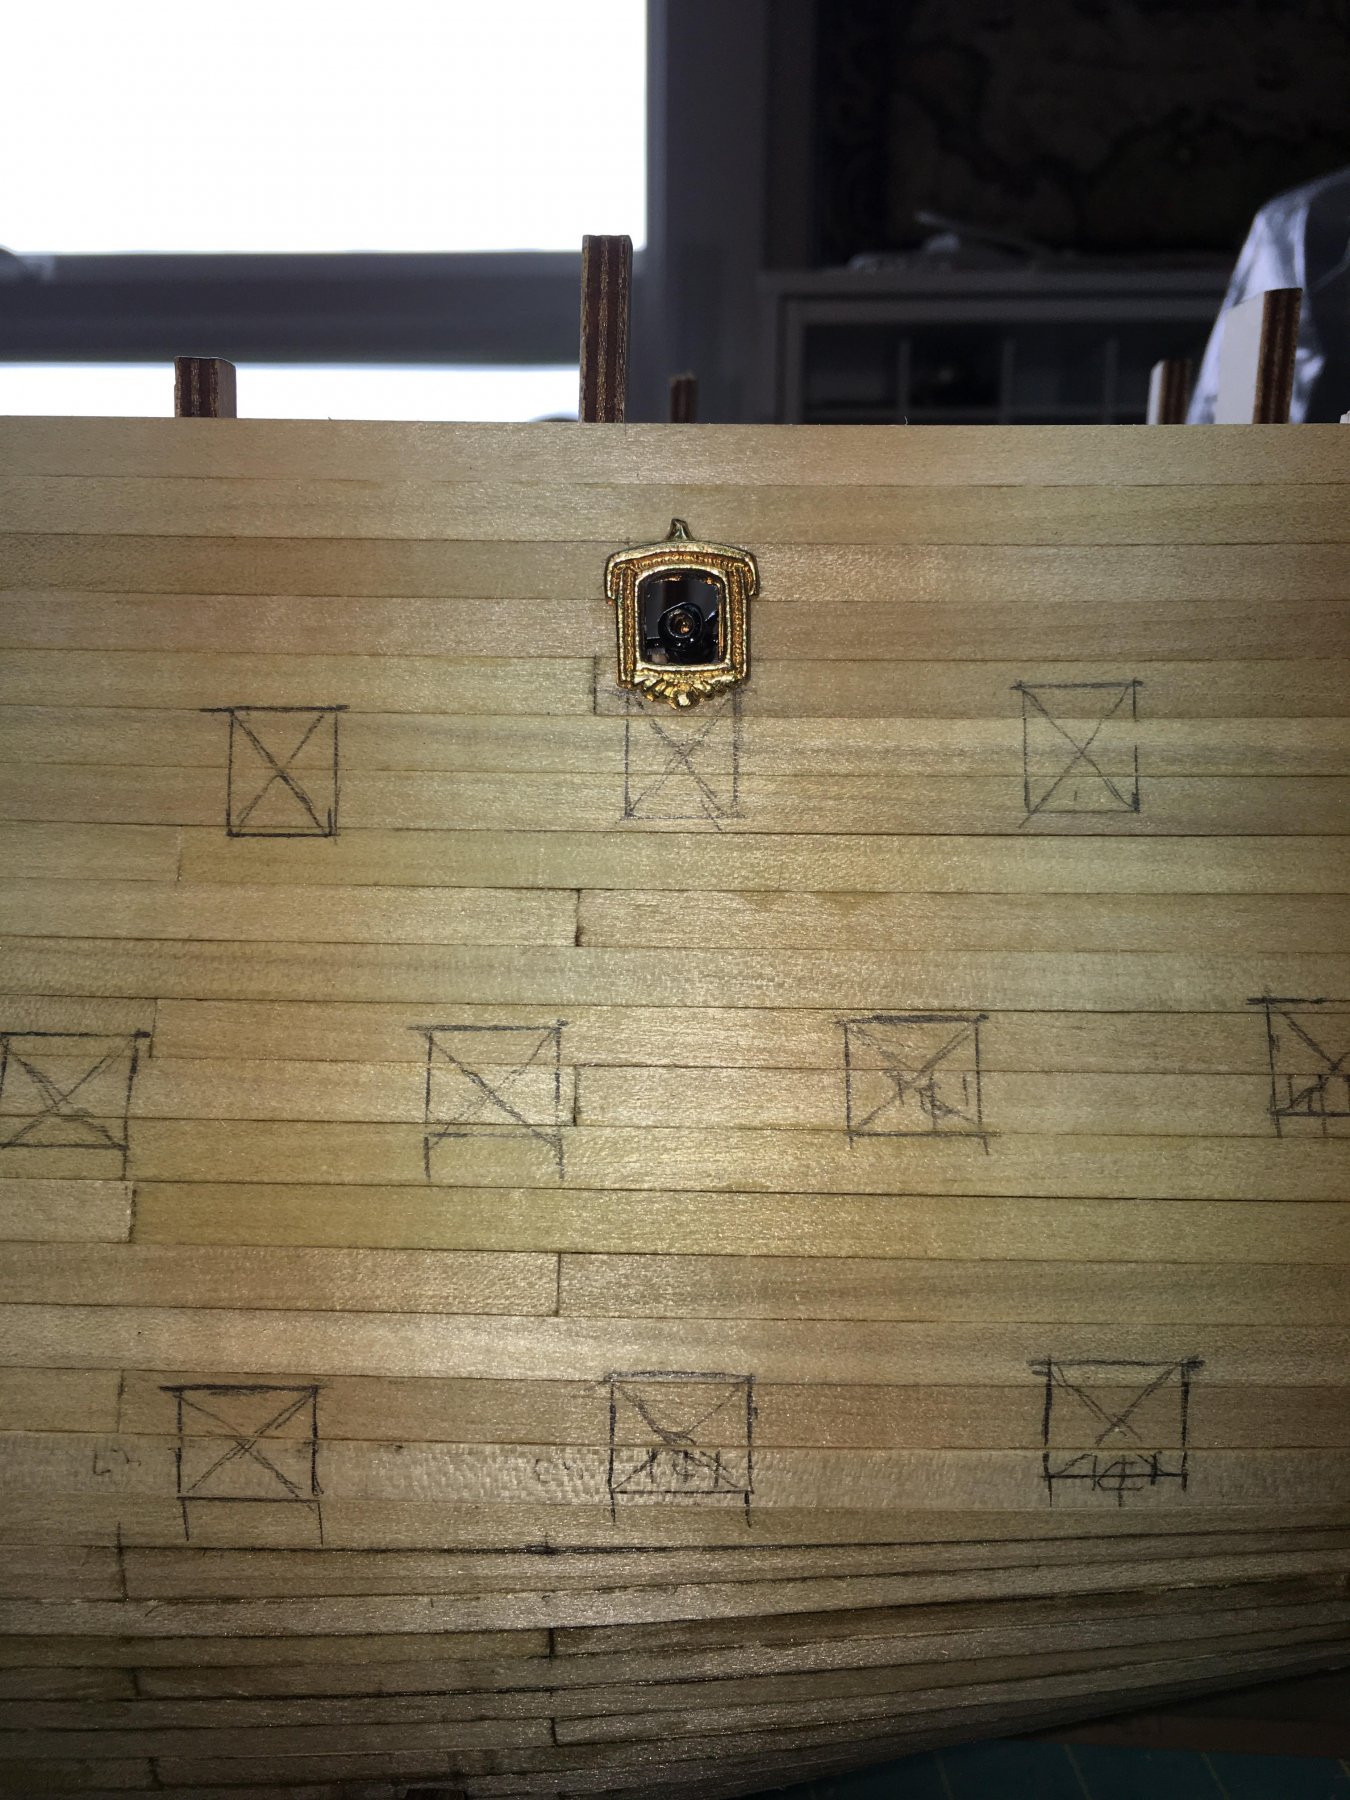
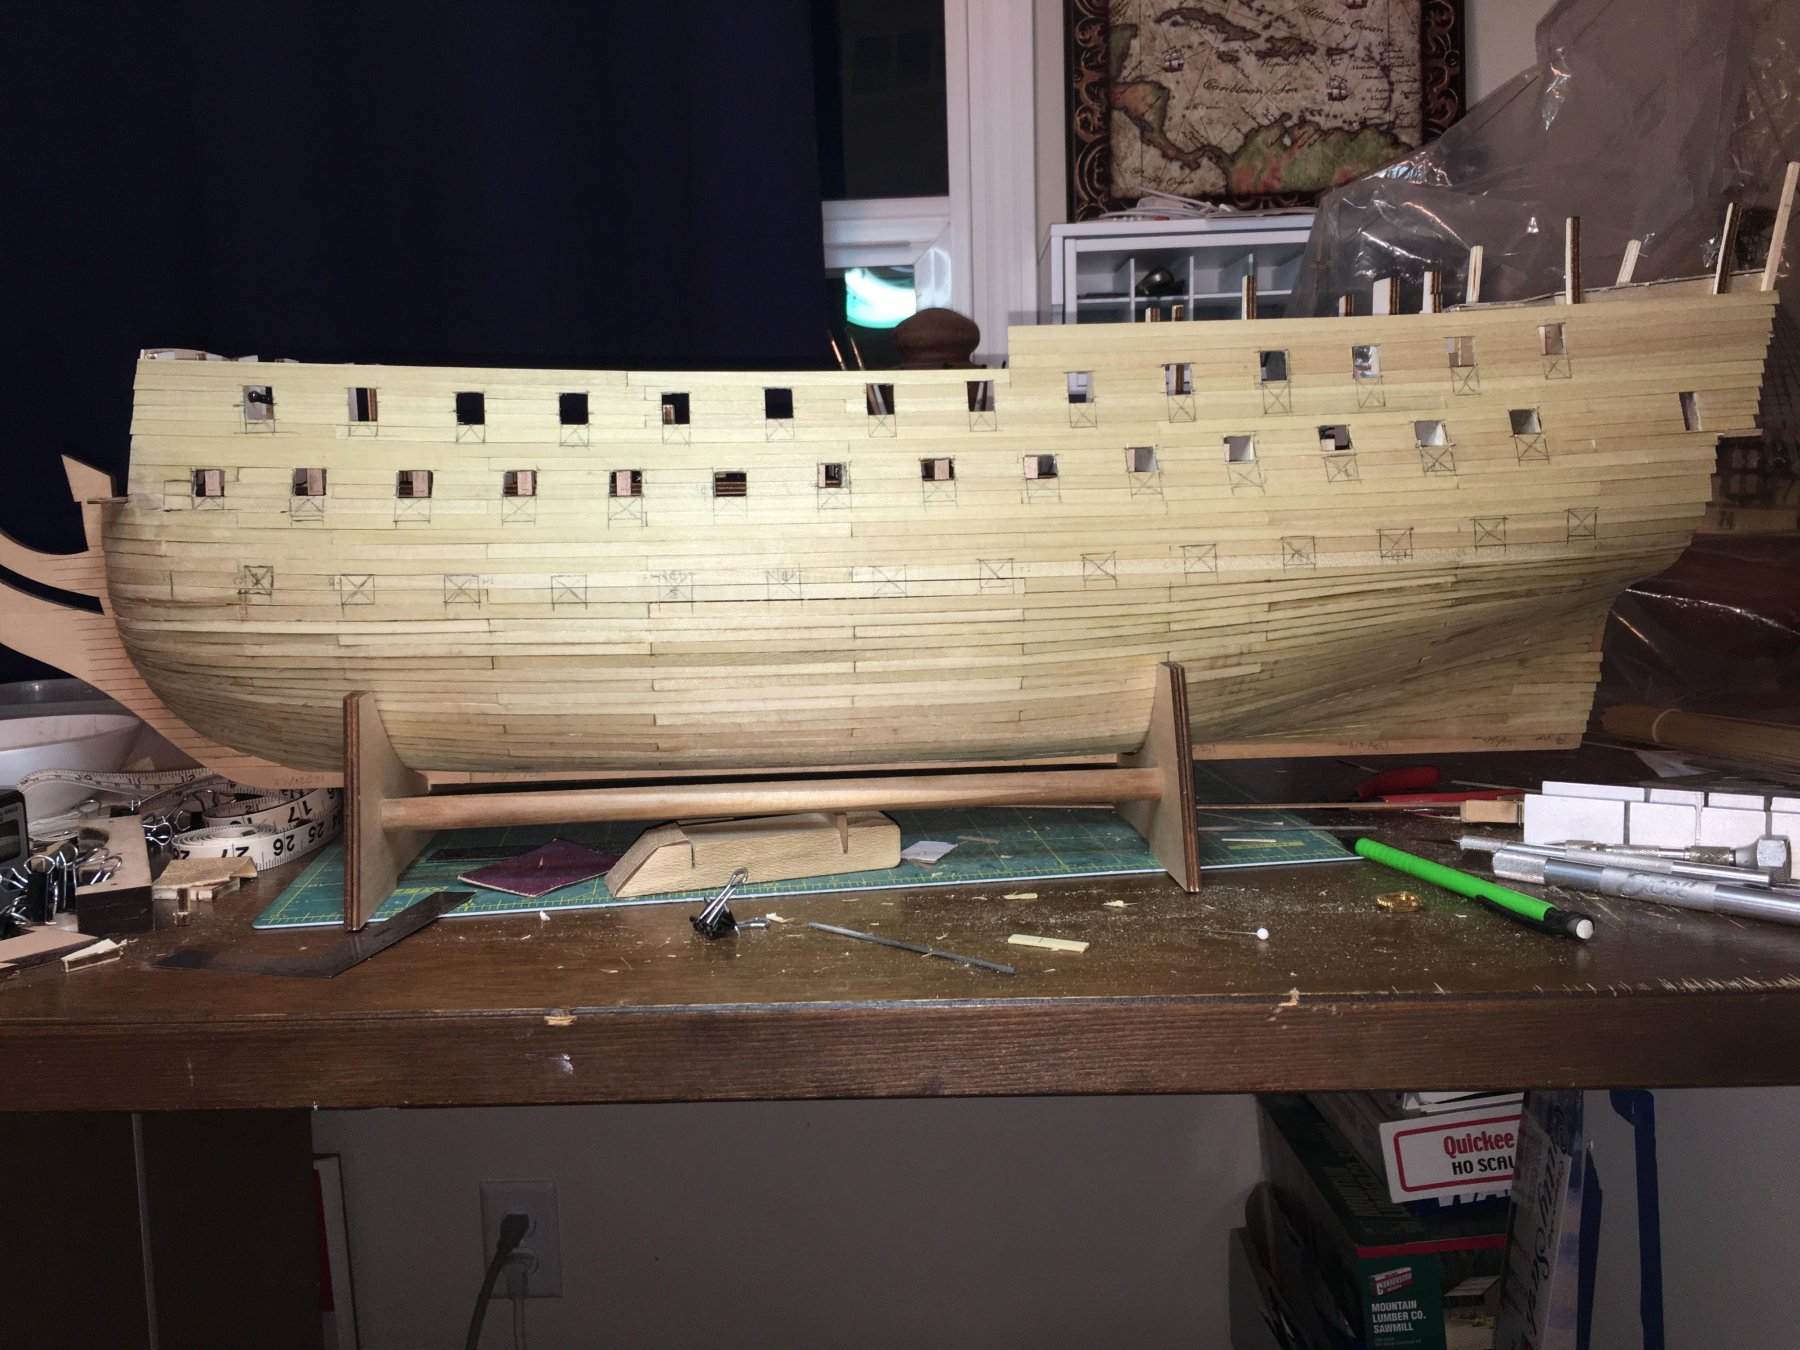
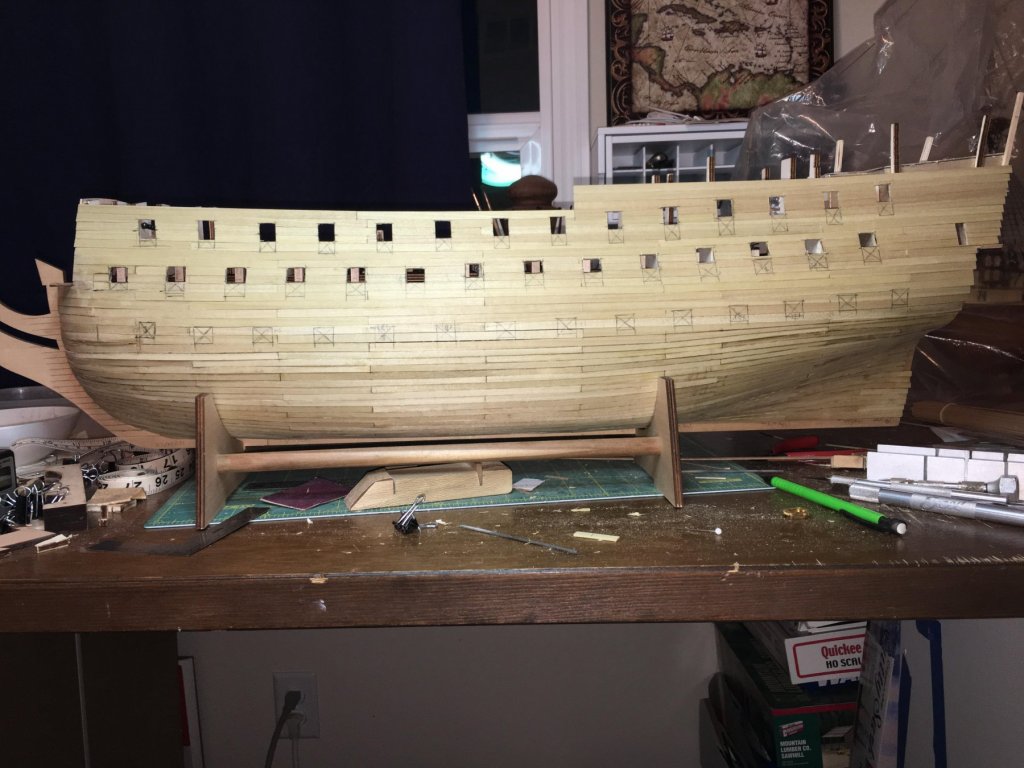
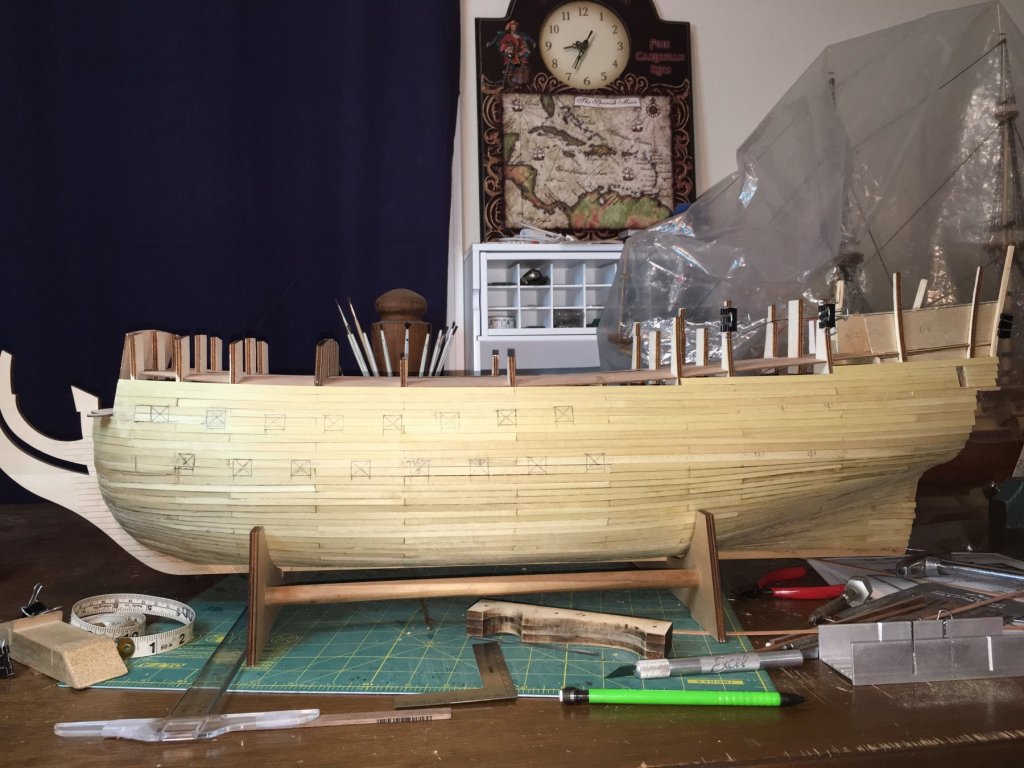
Building continues but I hit a major speed bump in the gun port layouts. I finished the main deck planking on the port side and decided to raise up the hull planking some more while I had that side of the ship facing me. Once up high enough I started to lay out the gun ports for that deck and quickly noted that something was off on the layout. So I quickly built one of the gun carriages and mounted a barrel on it then set it in place and uh oh! Obviously this was not going to work. After remeasuring everything on both the model and the drawings plus checking to make sure I didn't install something backwards, upside down or for another ship, I have come to the conclusion that the drawings simply do not match the precut locates for the gun ports on the false decks. So in order to keep the correct layout, I now had to shift all the ports up in addition to the horizontal rearrangement already done. Then start from the main deck and work down to get the spacing right between decks. As you can see, it was not a minor adjustment. Truthfully this was something I was concerned with when I first started to build the cabins and modify the interiors. I noticed a lot of alignment issues then and wondered if they would extend out across the ship. Well they did. I'm glad I decided to go ahead and run the hull planking and start the port layouts as it is fairly easy to fix and adjust whatever needs to be in order to make this work. So now back on track and moving forward again. Got the gun ports located properly and cut out on the main deck and upper gun deck. Still have to do the lower gun deck and once that is done I need to adjust several of the dummy blocks for the gun barrels as a lot of the locates with the kit do not work. That will have to wait for a while as I am stopping to go work on La Couronne. Here she is as of tonight. Starting to have the shape of a ship of the line now.


- 961 replies
-
- 14
-
-
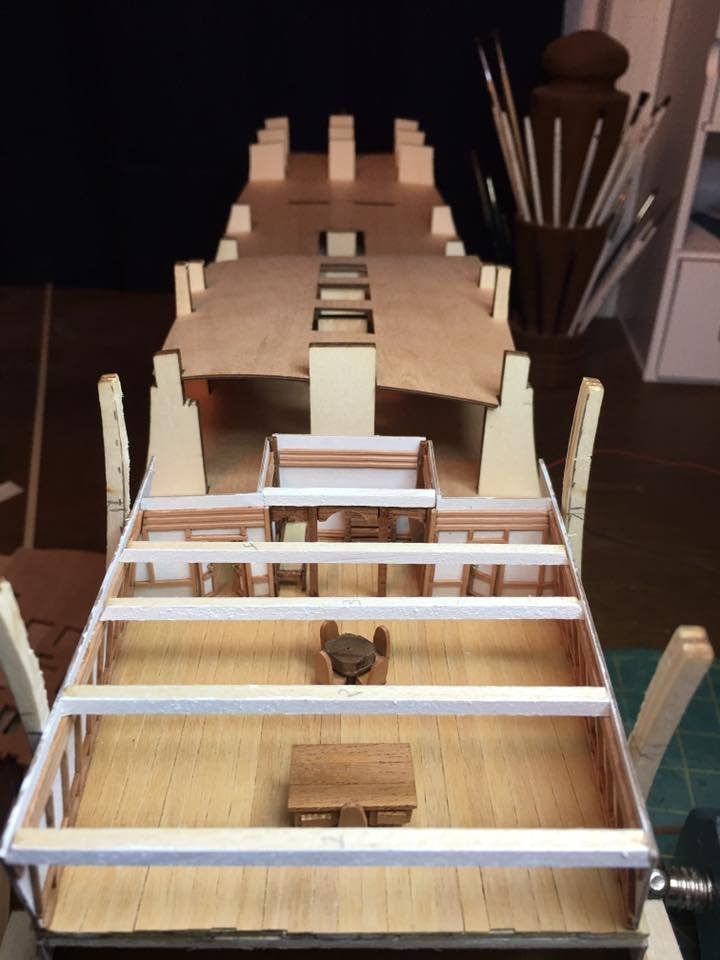
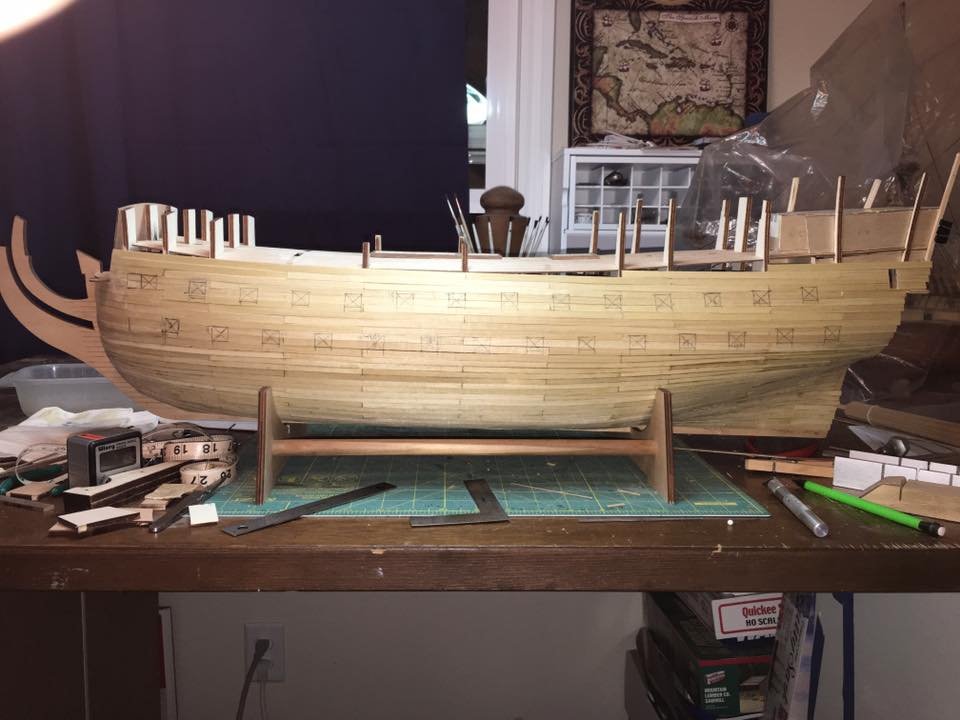
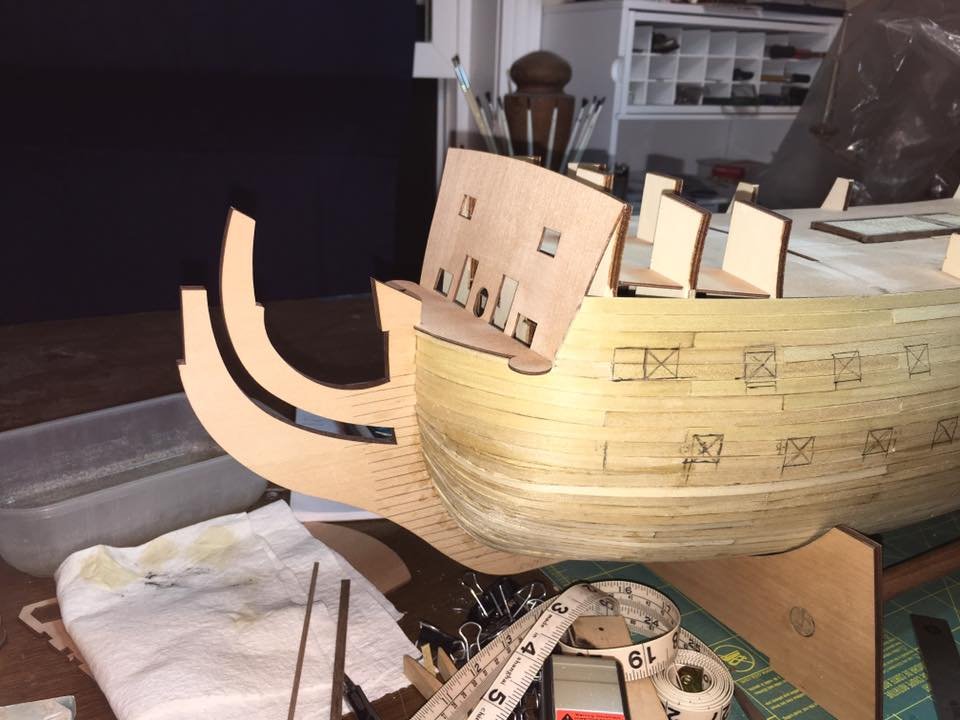
Well after more consideration I am leaning towards not building an entry way. While I have a feeling one was probably added at a later refit, there was a good chance she didn't have it at the start. I have read that that was a common practice and that the entry ways were usually added if the ship was going to be designated for an admiral's flag ship or if they were expecting the King to be on board. This was not always know during initial construction and was a common item to be added in later during refitting. I cannot say for certain if this is the case for S.R. but, it is currently my line of thought. The other deciding factor is that the entry way would have been located on the upper gun deck which on this model is a false deck. Not that I could not make something work but unless I am shown or told something to convince me otherwise the crew is just going to have to climb all the way to the top. So now on to new work! I have been busy so far this week as I decided to do some "easy" work and rest the brain, eyes and fingers before diving back into rigging la Couronne. Therefore I have installed the planking on the port side up to the main deck. Starboard side has to remain open until the wiring is complete. This has allowed me to finish laying out the first 28 gun ports as I showed in my earlier post. I think I found a layout that will work the length of the hull though I may need to adjust some of the dummy blocks for the canons when I cut open the holes. I also installed the forward bulkhead and have test fitted the sub deck at the bow. Next up I decided to start work on the main deck. Framed out the cargo hatches and built the gratings. Then I started planking. I also have begun cutting out the excess false bulkhead pieces and I will replace them with supports that more closely represent actual framing. You can see behind the aft cargo hatch where center supports have been removed as well as forward of the main hatch. Lots more to go so enjoy till the next update!

-
I ran into similar alignment problems on La Couronne and I have seen many other builds of these 1st rates that have alignment issues also. I think the main problems come from how the framing actually works on the model. The ports are laid out on the drawings as though the framing was built realistically. The model however uses false framing in the form of bulkheads. With actual framing, the ports can be inserted anywhere as the frame members can be cut and framed out to accommodate this. With the bulkheads, that solid panel of wood makes those modifications much harder. What I have done in the past and intend to do on S.R. is that on the false decks I can adjust the layout enough to get the ports off the bulkhead frames and that will be fine. The upper decks that get finished I cut away all the excess false bulkheads to simulate actual framing. This to me not only makes the finished model look better but it allows for the gun ports to be installed where they are supposed to be and for the guns to have their rigging installed without having a large wood panel in the way. For an example, l look at how I cut away the excess false bulkhead wood to allow for the cabin build outs. I just trim away the bulkheads until a proper frame thickness is left that can be planked over properly.
-
Looking good indeed! Speaking of your work bench, it is looking more and more like a veteran builder's desk with nice storage, tools, clutter and only a tiny space left to actually build on!
- 228 replies
-
- 4
-
-
- gunboat
- model shipways
- (and 1 more)
-
Welcome back! Good to hear you had a nice trip and I agree that typically the lesser know places are better to visit than the main tourist attractions. I will have to add those two places to my list. Smart thinking ahead on the sanding. Looking good!
-
My first reaction is to say leave it, especially if you are a long way into it. My next thought though is I have seen you redo just as much for even less noticeable reasons and so I think this will bother you the rest of the build and after and therefore tear it out. That sucks but I think you will feel better and with the effort you are putting into this build I think it is the right thing to do. As for what to use instead, I think the cherry wood may come out too dark for a red ocher. I used pear on my Couronne build and while it is more pinkish than red, I think it works and I can just say it is sun bleached!
-
I've been planking the hull some more on the port side and started to lay out the gun ports. I have quickly noticed that they are not lining up with the dummy blocks that were installed before hand. Not a big deal to move or install new ones but a little annoying. The more frustrating part is that some of the ports are intersecting the frames. So I had to do some shuffling of the ports and I think I now have a pattern that will work. We shall see... While laying out the port holes I got to wondering if S.R. had an actual entryway? As most 1st rates did and being as tall as she is I cannot imagine there not being one however, there is no detail showing an entry. I have no problem scratch building one as that is what I did for La Couronne but I thought I would ask if anyone knew the answer or had seen a model or drawing showing an entry. And now on tot he picture!
- 961 replies
-
- 10
-
-
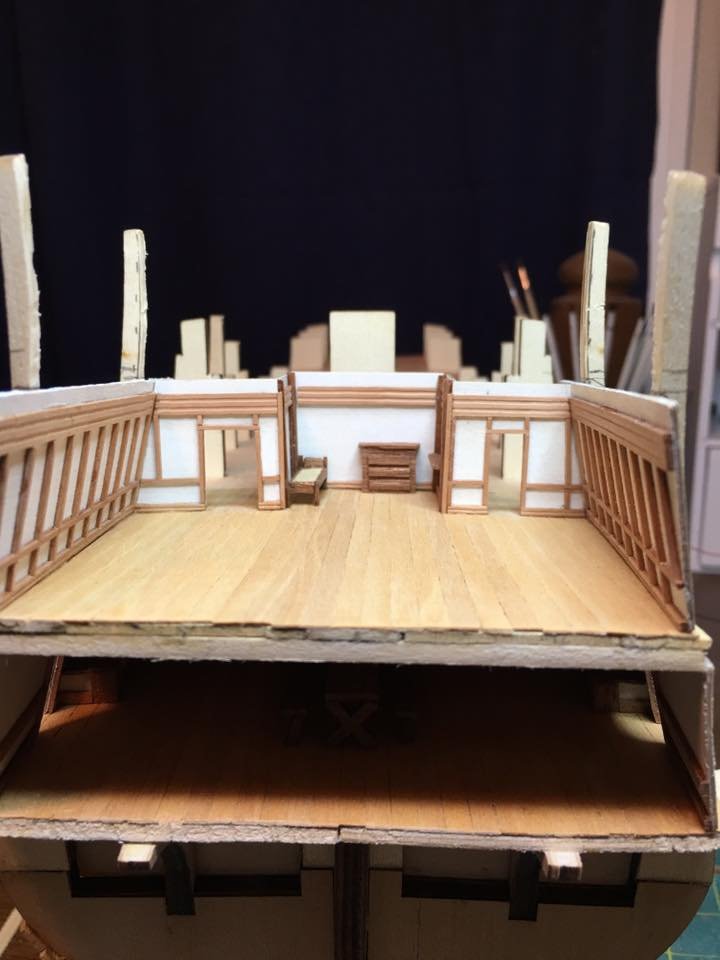
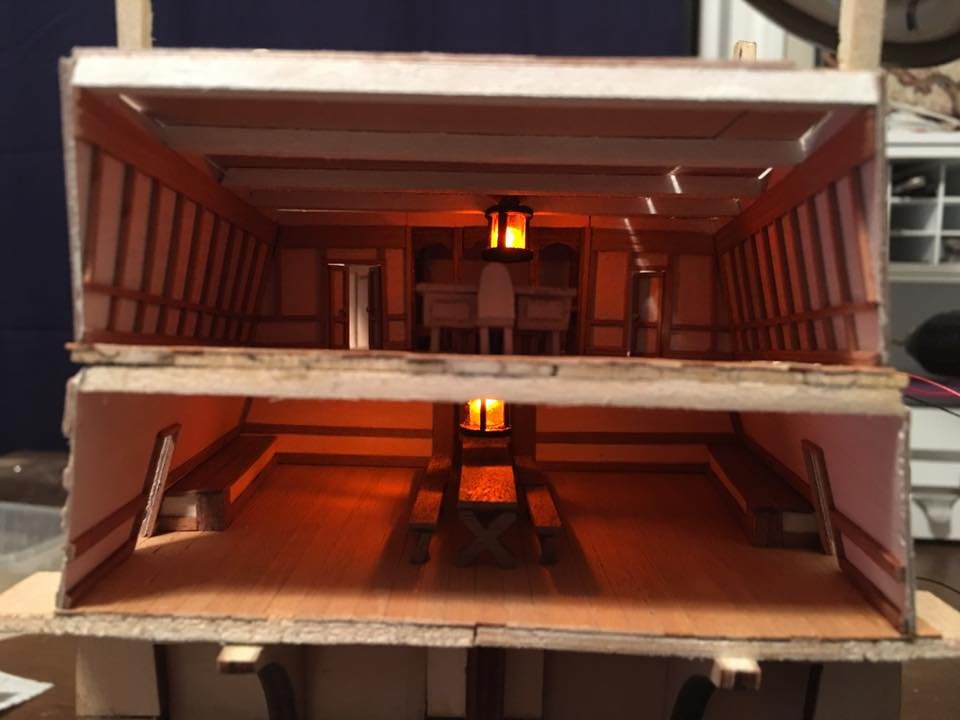
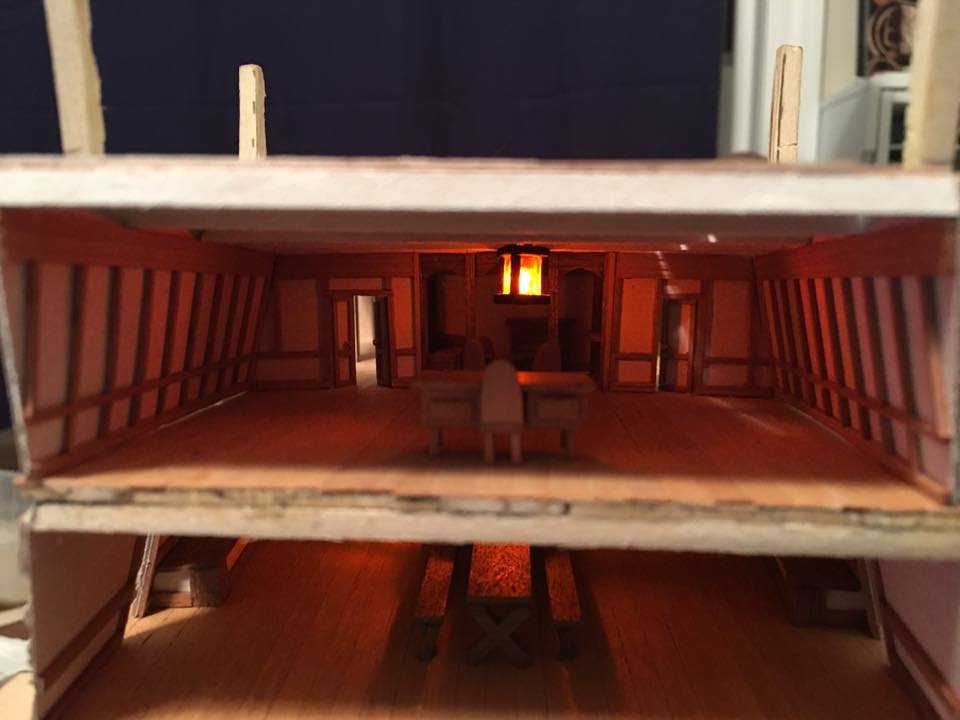
Thanks Scott! Not throughout the whole ship but all the cabins and the stern lanterns. If the lower gun decks were detailed out and not just dummy decks I would probably do the whole ship but outside of the cabins, everything else can be fairly easily seen. Now for the update: Admiral's cabin is complete! Spent almost the entire day minus a few breaks for food, drink, bathroom and puppy play time but still logged in 8 solid hours of building furniture and finishing the cabin today. The Captain's cabin is next but before that one gets built I think I will spend some time back on La Couronne. However, before that I think I need to give the eyes, fingers and brain a break from tiny detail work so I am thinking that it is time to run more planking. I have a lot of deck planking I can get started on as well as raising the hull planking up at least on one side. The other still needs to remain down till I can finish running all the wiring down through the hull. Plus, the table is in a nice messy state that is perfect for cutting wood and not so much for rigging so may as well keep on with the same type of mess! As always thanks for looking in and for the likes and comments. More will be on the way!

- 961 replies
-
- 10
-
-
Technically, they would not be diagonal unless sailing however, as I am building for my own enjoyment, I could place them however I want! I am planning on setting them square however which makes her width about twelve inches and so my case ill probably end up around 14 inches deep. that would be too deep for most of my standard depth cabinets and shelves but I am planning on building a new curio style cabinet that is designed around La Couronne as a focal point. The rest of the spaces will be for other collectables of the Admiral and myself.
- 608 replies
-
- 4
-
-
- la couronne
- corel
- (and 1 more)
-
Looks great and even better, it works! Have fun with your newest addition to the fleet!
- 96 replies
-
- 3
-
-
- tugboat
- Tippecanoe Boats
- (and 2 more)
-
You are right in that thinking. Luckily I am building the case myself so I can make it however big I need but as I want to have the case done long before the cross section will be complete.... it is indeed a chicken/egg issue.
- 608 replies
-
- 3
-
-
- la couronne
- corel
- (and 1 more)
-
CDW, thank you and welcome! Plenty more to see so pull up a chair and get comfortable as this will be a long build! That would save some work being able to purchase scribed wood molding but, I don't mind making my own as much with those new scrappers I recently bought. They work great though on harder woods they do take some time. When I go to build my new train layout I may have to look that company up though and see what all they offer if they have resumed business in Canada.
-
Thanks! I don't think I am going to lay carpet but, I was considering a rug... So more progress tonight. Support columns dividing the sleeping area from the main space have been installed. Doors are also in place closing off the forward cabins. Little by little she is coming together. Next up I have started to build the table and then the chairs which are still under design. I think I am going to have a lot of good build time this weekend and if so then we may just see this cabin finished out.
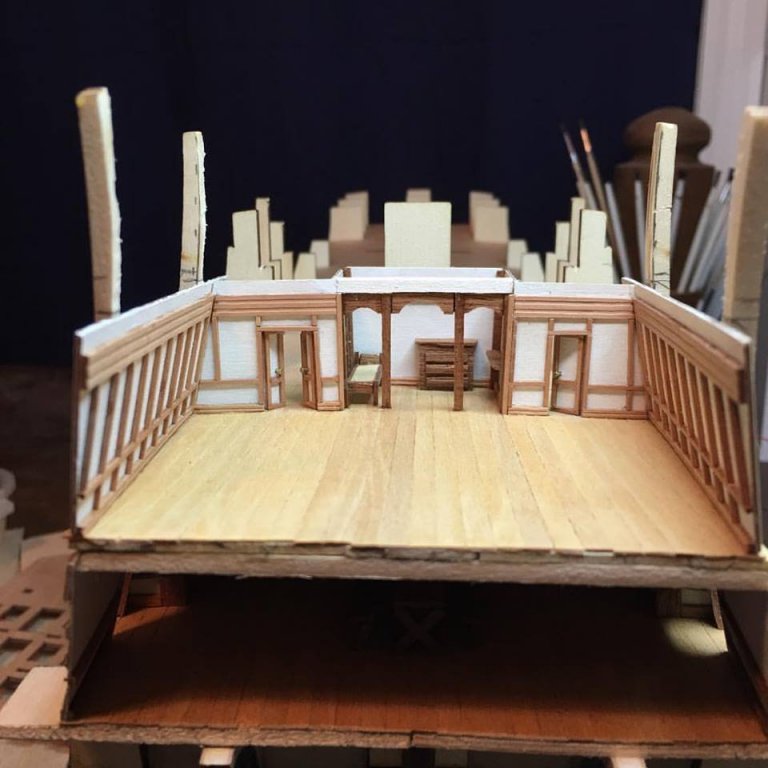
- 961 replies
-
- 12
-
-
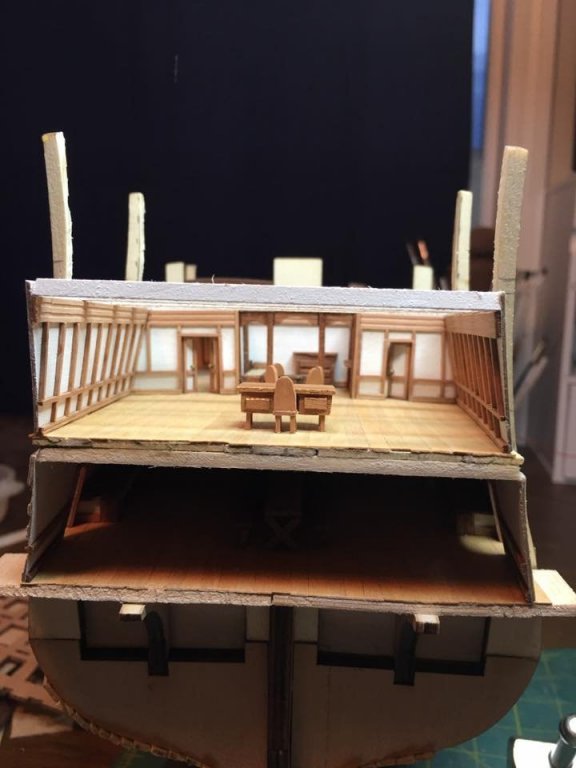
Few more walls and some furniture are now in place and the Admiral's cabin is starting to look like something. Still have several things that need to go in before I close this cabin off. Table and chairs, and some structural components and doors leading into the forward compartments. Also the lantern for lighting or all of this is pointless!! More updates soon!

-
That has been one of my thoughts as well. I would like to add people and so I am thinking, depending upon what the actual dimensions come out to be 1:87 or 1:72 is most likely but 1:48 would be nice and big also and could lend to some great detailing but I have to see how big that would make the model.
- 608 replies
-
- 3
-
-
- la couronne
- corel
- (and 1 more)
-
No new work as I am still building interiors on S.R. however, as I am nearing the end of this build (relatively speaking) I am thinking of the next project which I intend to be a scratch build cross section of La Couronne. I have decided that I will do mid ship at the main mast but my current debate is scale. I am going back and forth between two options and so opinions and/or suggestions are welcome. Something to keep in mind is that I plan on displaying both models together when they are done. The first idea is to keep the 1:100 scale that the Couronne is built at. This would make the cross section look like I sliced a section directly from La Couronne. At this scale I would also build the entire main mast. Down side of course is that I am stuck detailing again at a small scale. The second idea is to enlarge the cross section. I will have to play around with dimensions to see what would work best. This plan brings up another question. Do I maintain the full mast or stop at the main top? Keeping the main mast means I would probably have to keep the scale still fairly small however, stopping at the main top would mean larger scale and better details for inside the hull which to me is the whole point of a cross section. I would love for ideas and suggestions as I plan on pairing all my builds with their cross sections to complete the display.
- 608 replies
-
- 4
-
-
- la couronne
- corel
- (and 1 more)
-
Looking very sharp! The more you do, the more I am loving the colors the entire look they are creating. While I typically am more of a fan of using natural wood colors, my hat is off to you with how you have painted this one. As for the lettering, you could try printing the name on a clear decal sheet. Experiment to get the right font and size with regular paper and then you can print it onto the clear decal paper. Testors makes some specifically for this purpose that I have used on my model railroad to create my own signs and things. Here is a link to them on Amazon.
- 291 replies
-
- 2
-
-
- bounty
- billing boats
- (and 1 more)
-
Been looking forward to seeing you start this build Elijah. Gonna pull up a chair and enjoy what I know will be another fine journey. Happy building!
- 228 replies
-
- 4
-
-
- gunboat
- model shipways
- (and 1 more)
-
Thanks Eddie and welcome to the build. Good to have you along for the journey. I have done done a little more work on the cabin today but I have not taken any new pictures yet. Might have an update tomorrow evening depending how the day goes. The Admiral and I are out enjoying the band Blues Traveler in concert tonight so no new work. 😀