
Jsk
-
Posts
101 -
Joined
-
Last visited
Content Type
Profiles
Forums
Gallery
Events
Posts posted by Jsk
-
-
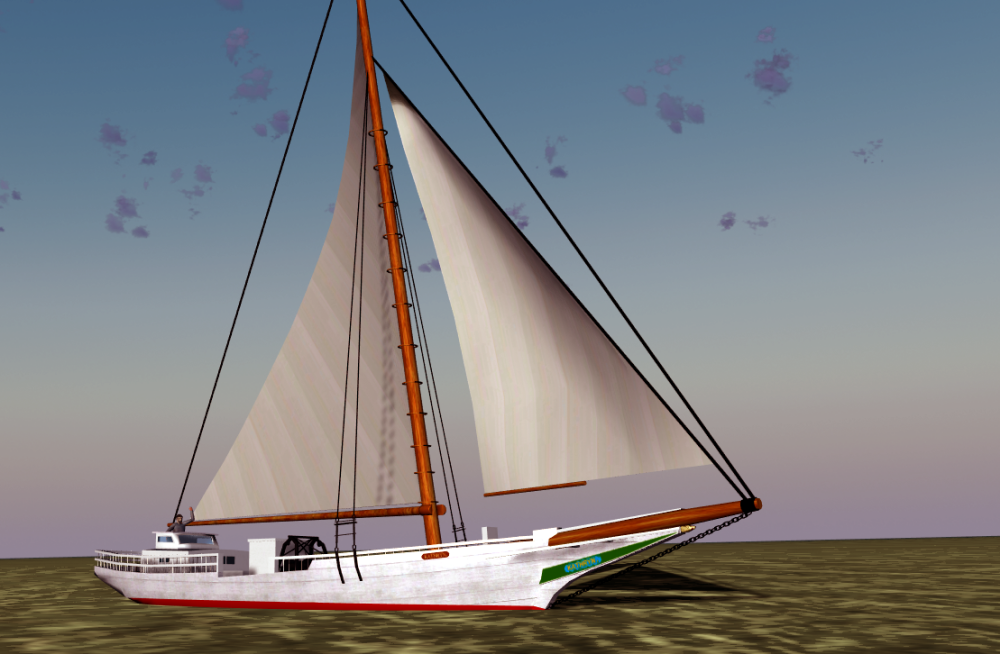
Well, the vendor (Plastic Model Company, not Paper Model Company as I typed in the OP) came through. The HMS Captain kit arrived March 2nd. So not bad timing. The Captain has got to be one of the ugliest ships in history. That's part of the charm of these late Victorian, transitional ships. They always remind me of over exuberant Gothic Revival architectural styles.
Still, I think the kit's a bit beyond my skill level for now. Certainly a nice addition to the stash, though.
- GrandpaPhil, mtaylor, Canute and 2 others
-
 5
5
-
Thanks @Ian_Grant. You should try it. It's almost mess free modelling!
Thanks for the links @modeller_masa. I see quite a bit of variety in rigging. But, yes, it does appear that the jib boom was offset.
-
On 2/29/2024 at 5:00 PM, Richard44 said:
Wind the thread gently around a dowel 10 times, measure the length, divide by 10.🙂
I didn't have a dowel handy so I used a bottle of schnapps. Came out to 111 inches so the thread must be 11.1 inches. Who knew it was so easy to find the length! 😉
-
Jerry,
First off, Hi! Took me awhile to make the association but you and I used to fly together in RB3D when I went by the nom de guerre Kugelfang. There's a trip down nostalgia road!
If you don't already have it Warren Ripley's 'Artillery and Ammunition of The Civil War' needs to be in your library. I see a couple copies on ABE books. On page 218 there is a photograph of Mendota's 9" on a pivot carriage. Just below that is a line drawing of what appears to be the same carriage. There's an appendix of statistics covering a lot of carriages but I don't see Navy carriages specifically identified there.
Sadly, my scanner is kaput, but I could take a photo of the Mendota photo if it would be helpful.
--jeff
-
Does anyone know the status of Orel in Ukraine? I think I saw somewhere that they were not fulfilling orders due to the current situation. However, on February 13th I impulsively ordered HMS Captain off Amazon. I thought I was buying it directly from Orel but upon digging a little deeper it looks like Paper Model Company (also in Ukraine) was the vendor. There's a long delivery window (March 5 - March 27) which is fine since I'm in no hurry. But I keep going back to the Orel site and finding more and shiny things I need. Just curious.
- mtaylor, thibaultron and Canute
-
3
-
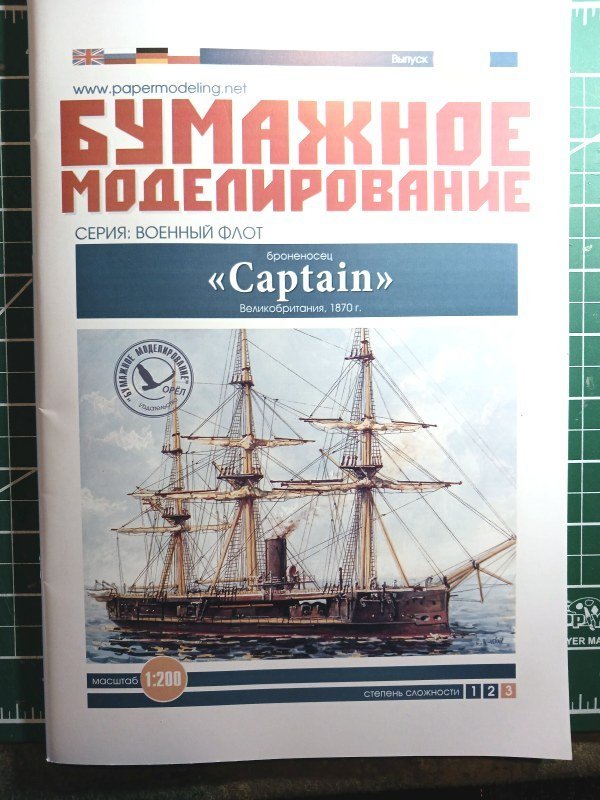
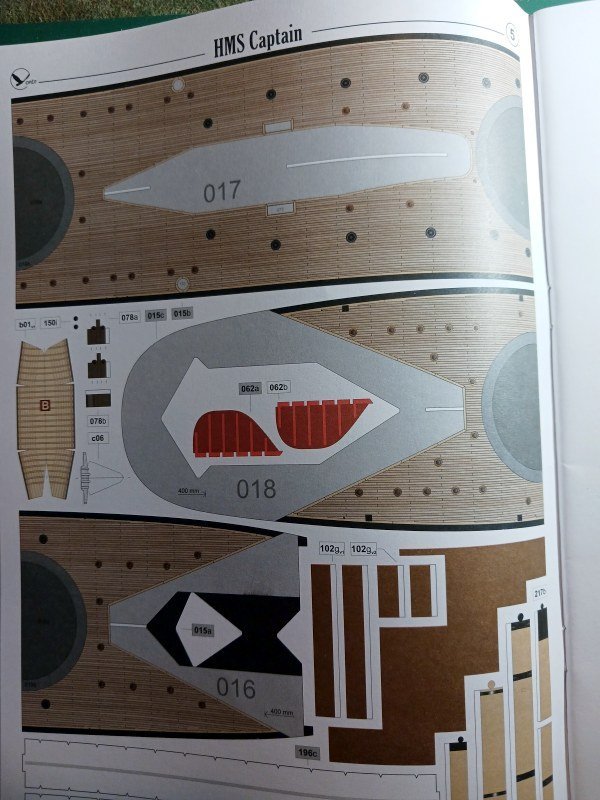
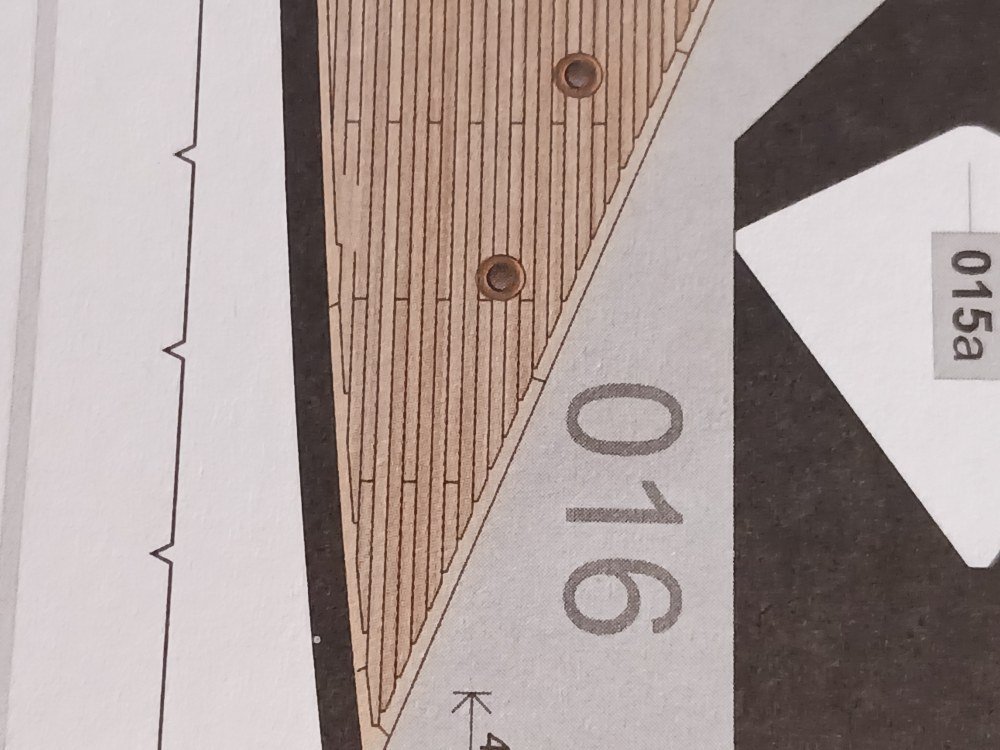
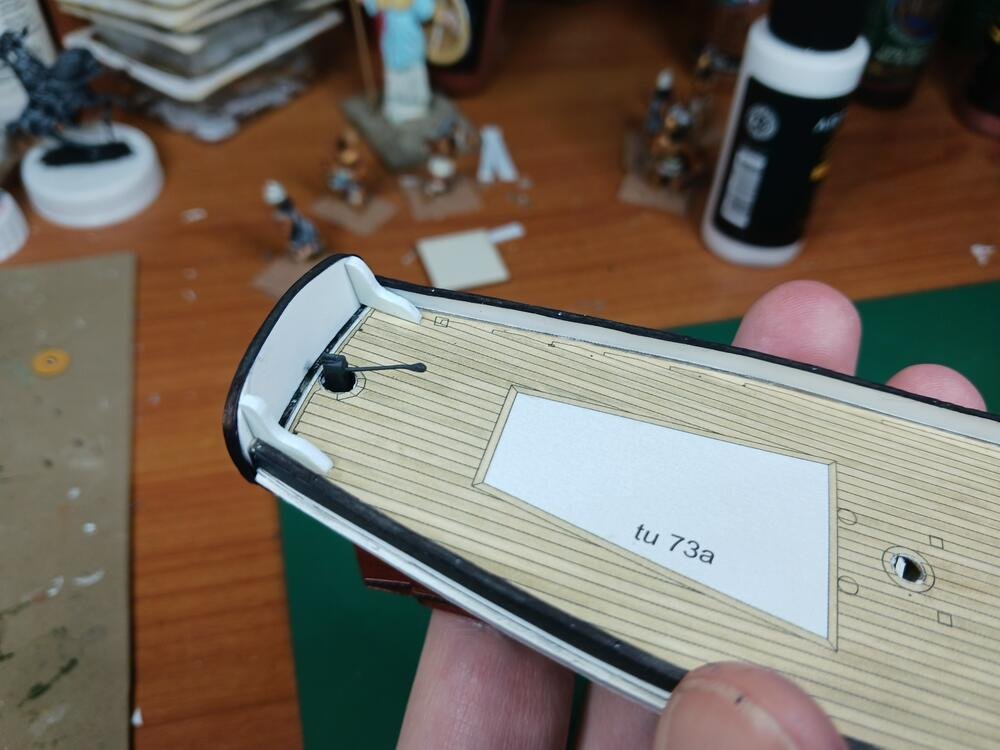
I could use some assistance from the rigging gurus. There's no key for the drawings with this kit so help in deciphering the rigging diagram would be appreciated. Also, I haven't quite mastered the terminology so please bear with me if I use incorrect names.
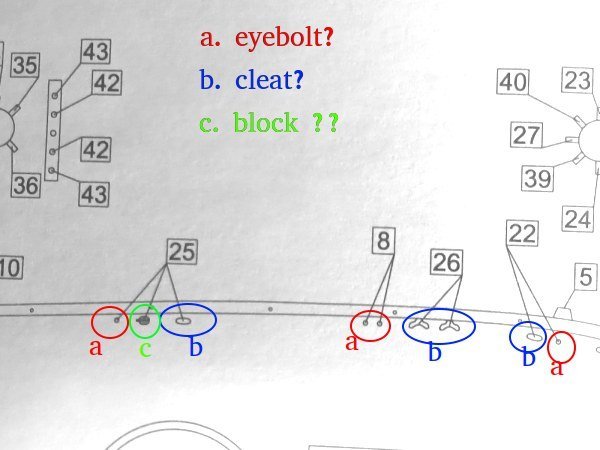
Are my notes correct regarding these belaying points in the drawing above? I'm fairly certain 'a' represent eyebolts in the deck. I think 'b' represents cleats in the deck and on the bulwarks (for line '26'). 'C' has me puzzled. Is that a block attached to an eyebolt in the deck?
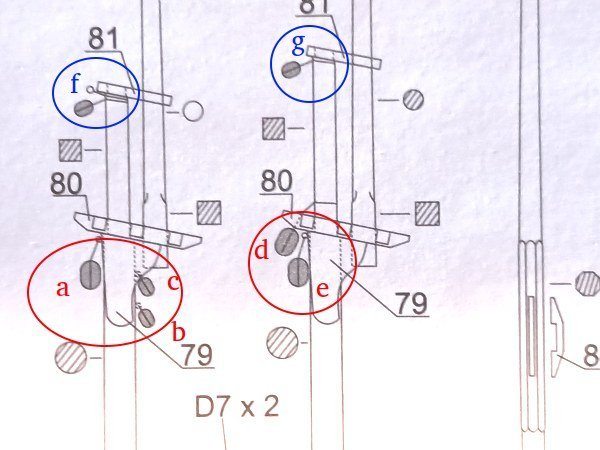
Next: Are blocks a - e attached to eyebolts in the masts? Though 'd' may be seized to the mast above the top? Are 'f' and 'g' seized to the masts just below the caps?
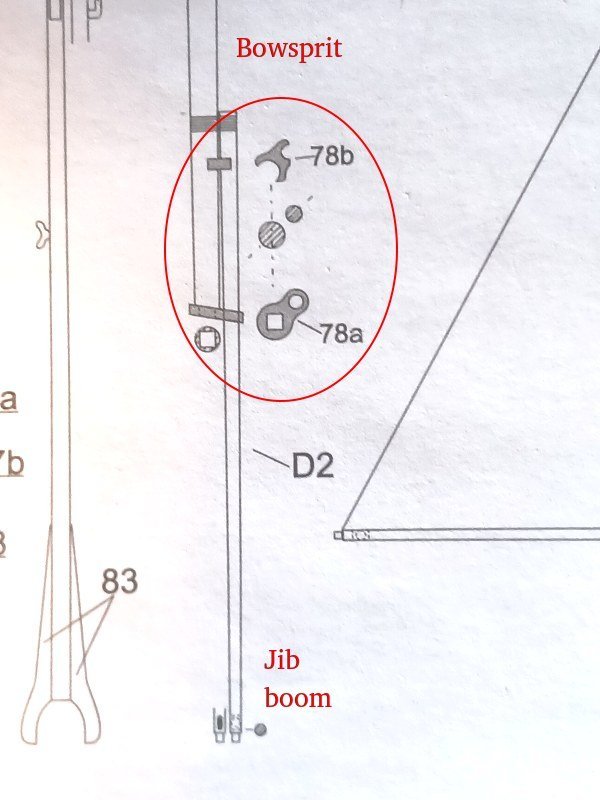
And finally, with parts 78a and 78b it looks to me that the jib boom is positioned off-center of the bowsprit. If you were looking straight at the bow and the bowsprit was a clock face, then the jib boom would be around 10pm?
Thanks in advance.
- modeller_masa, Canute and John Fox III
-
3
-
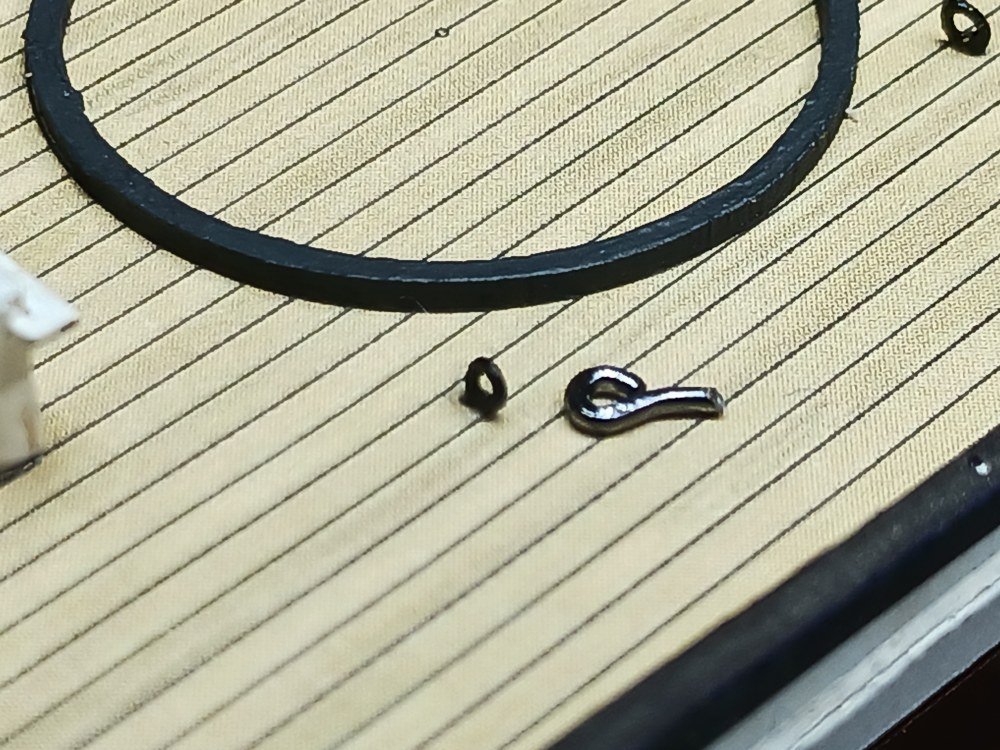
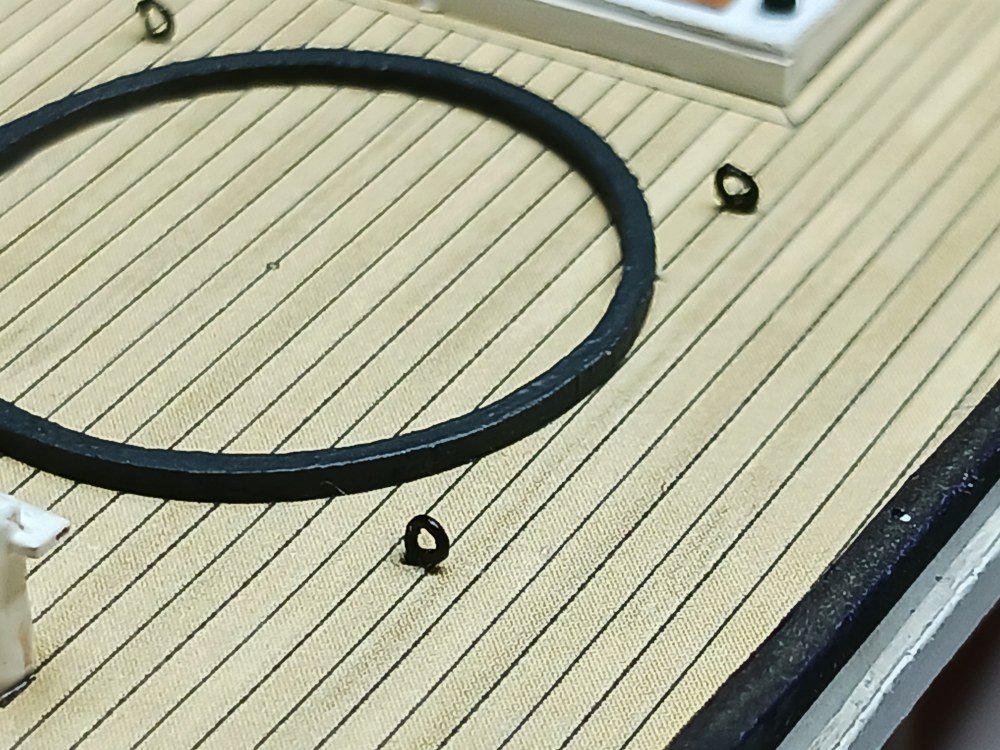
I thought I discovered a solution to eye-bolts. Fishhooks! Actually, I saw the idea in an old post by @DrPR and jumped on board. Not knowing anything about fishhooks I bought a variety pack of various sizes thinking clipping eyelets off the smallest would probably work for 1/72 scale eye-bolts. Hmmm... no. Too big. So I surprised myself and was able to make a few passable rings by wrapping 23 gauge wire around the tip of a new set of fine point tweezers. After attaching them to the pivot gun sled and the deck the next step was to start rigging the gun.
Using what I had on hand didn't work so well. I don't know anything about the thread I have. I purchased a spool of black and a spool of tan (really more of a gold) for rigging 1/600 scale wargaming ships (My COVID lockdown project of 2020). While I was able to attach the breech rope I was not able to seize it decently. Two reasons for this: 1) I used CA to tack it to the eye-bolt which made folding it back almost impossible; 2) I don't have any 'small stuff' to seize with. I ended up with something of a stiff overhand knot which, to be frank, looks horrible. For now I think I'll leave it, though.
Since the next step is to rig the gun tackle I wanted to see if my thread would even work. Since the Cutter model mostly uses 2 and 3mm blocks my spool of nondescript thread was clearly too thick. It took me almost an hour to tease the thread through the sheave of a single block. It was a snug fit. Even using CA or PVA to stiffen the string made the thread too thick to fit. It might work for stropping the blocks, though I haven't tried it yet. I wish I had some way to measure the diameter of what I have but I don't have anything that sensitive. Frankly, I can't even see the measurement on my little brass caliper when I try to measure the thread.
The model plans call for thread in 0.2, 0.3, 0.4, 0.5 and 0.6 mm diameters for various parts of the standing rigging. I think 0.3 mm is used for the running rigging. I feel like I need to start accumulating rigging supplies (since I've been stashing 1/72 and 1/100 scale models), but I'm not sure I need that much variety. It think I might buy some 0.3 and 0.6 (and some small stuff) from 'Ropes of Scale' and use what I have for the other sizes.
Meanwhile, I'm almost finished shaping the masts and spars. My next exercise is going to be stropping. Wish me luck! Better yet, any suggestions for a far sighted, one-eyed model shipbuilder struggling with his first rigging job? Tools? Techniques? I wish I'd used some foresight and ordered an extra set of blocks (or two) for this kit. Goodness knows, I expect to lose half of 'em to the floor gods! Perhaps another order to Seahorse is in the not too distant future.
@0Seahorse, thanks for checking in with my build log, Tomeck! And thanks for the tip about fairing the framework. I considered it but wasn't sure if it was standard practice for card models. I got conflicting information off the web. Sometimes my motto is 'When it doubt, take the lazy way out!' But it makes sense and fits what I was experiencing with the build. I'll know for the next one. One thing I am learning from this build is that card models can be very precise and if your work isn't as precise as the design... well, you're in for a challenge!- ccoyle, John Fox III, GrandpaPhil and 3 others
-
6
-
Phil,
I just wanted to pop into your log and say how much I've learned from it. As a new modeler working on a similar model (though in card, not wood) you've answered many of my basic rigging questions.
Thanks again,
--jeff
-
Dude! You're killing me! I can only keep up with so many build logs! 😉
- GrandpaPhil, Canute and mtaylor
-
3
-
-
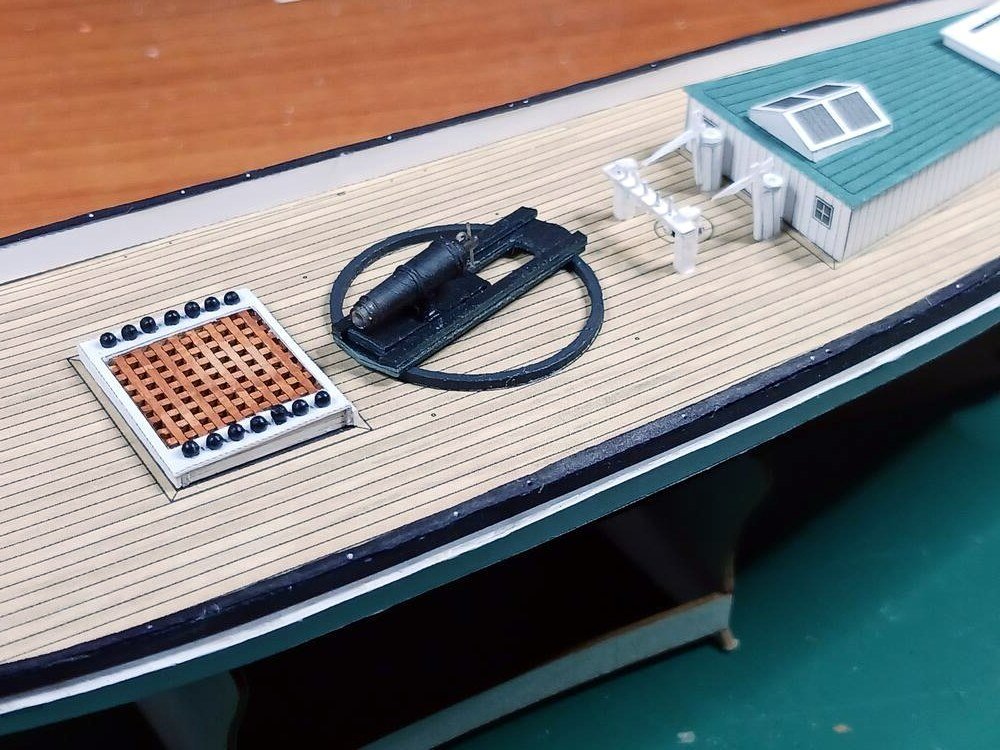
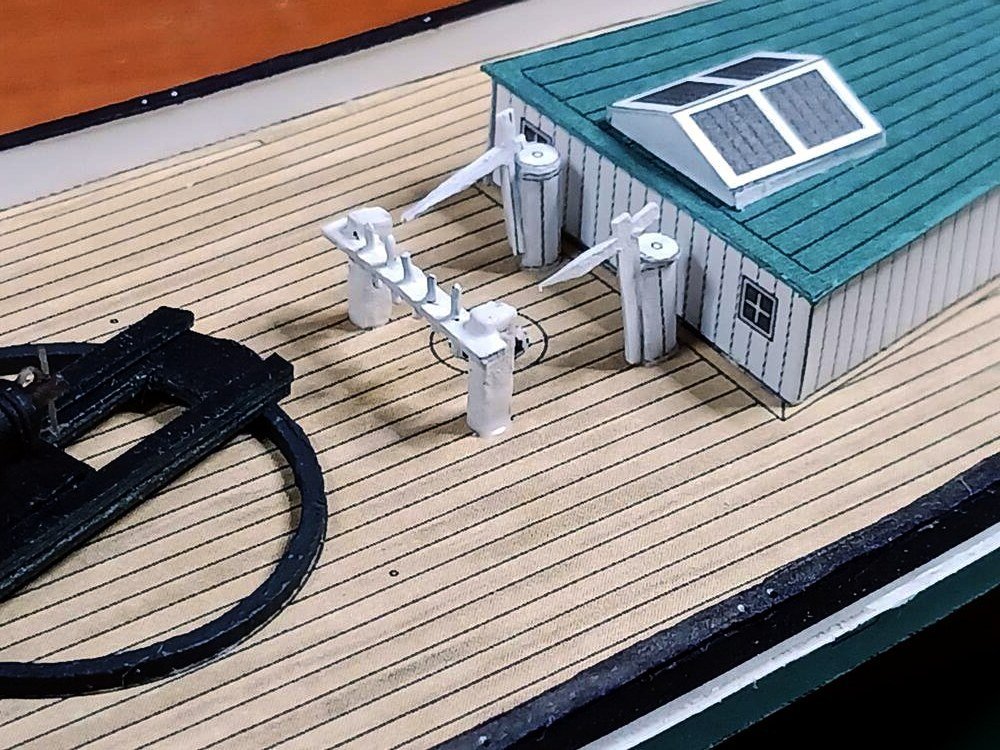
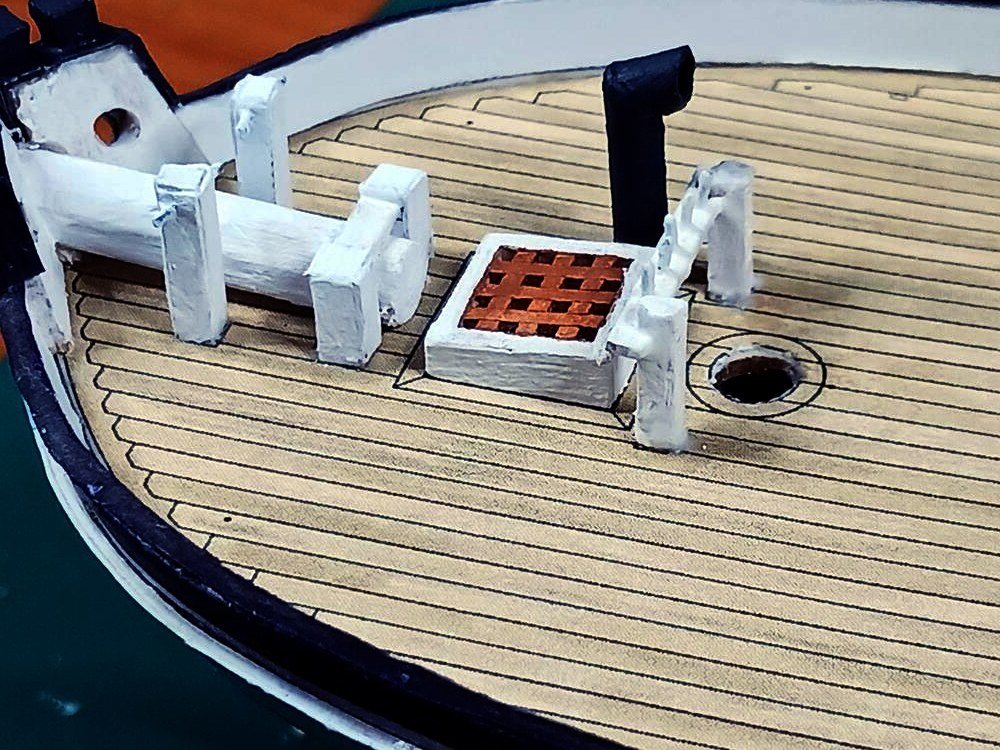
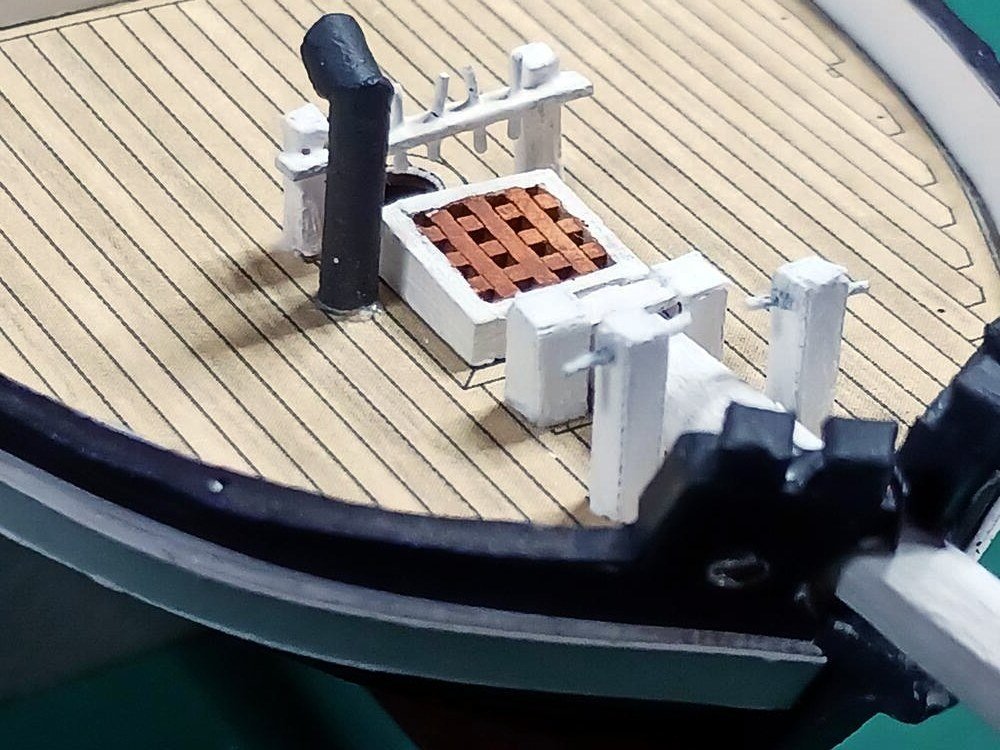
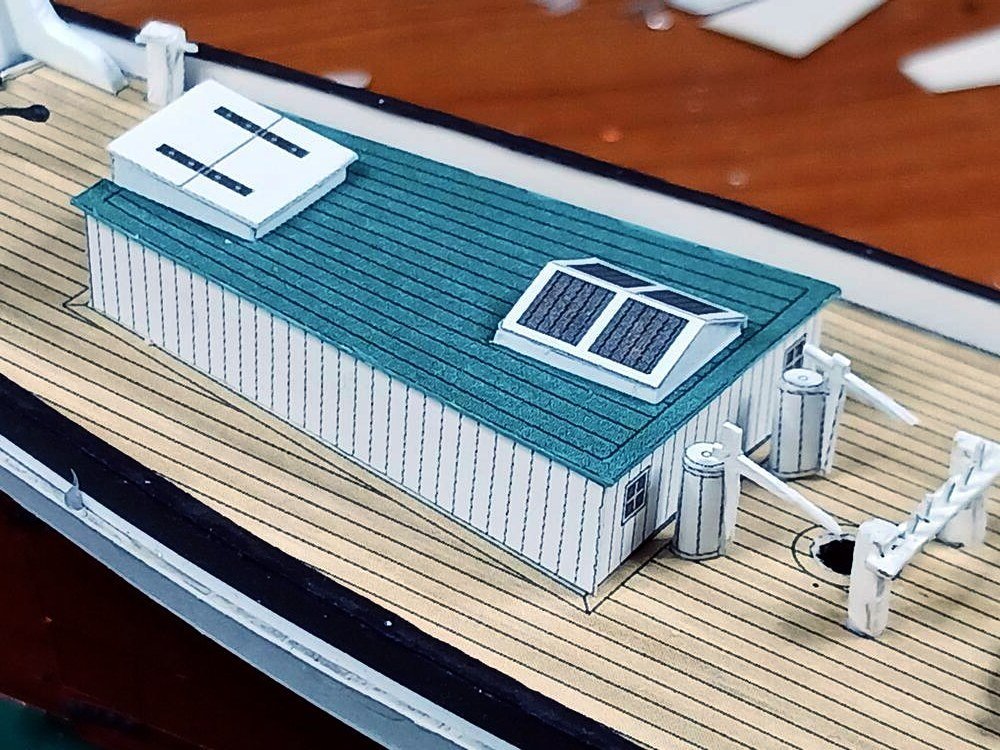
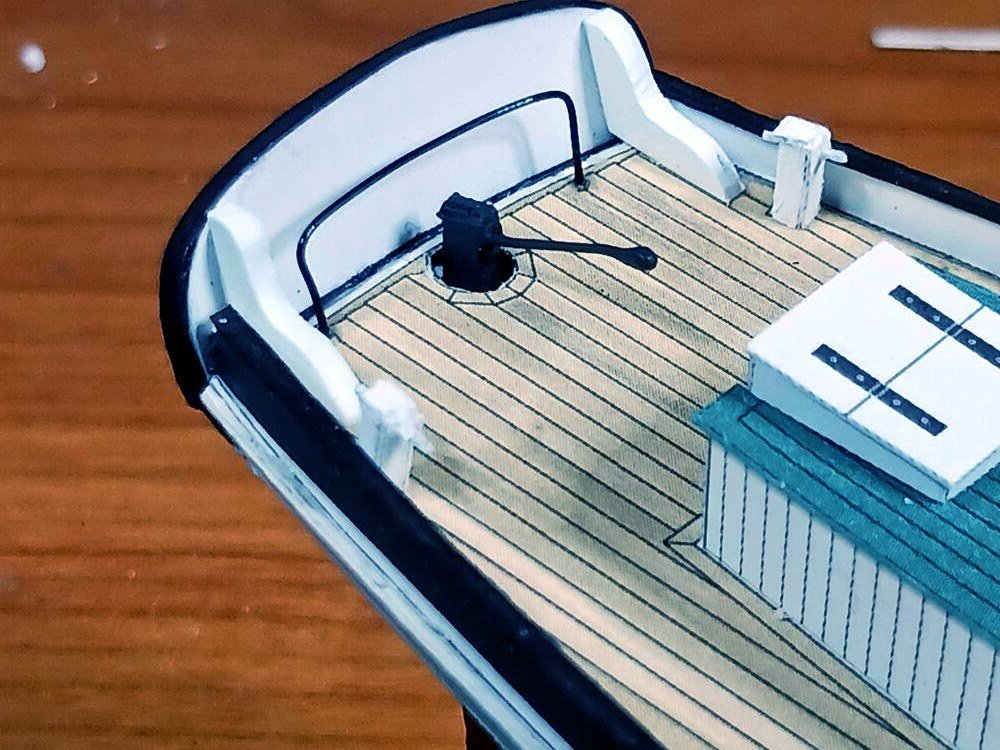
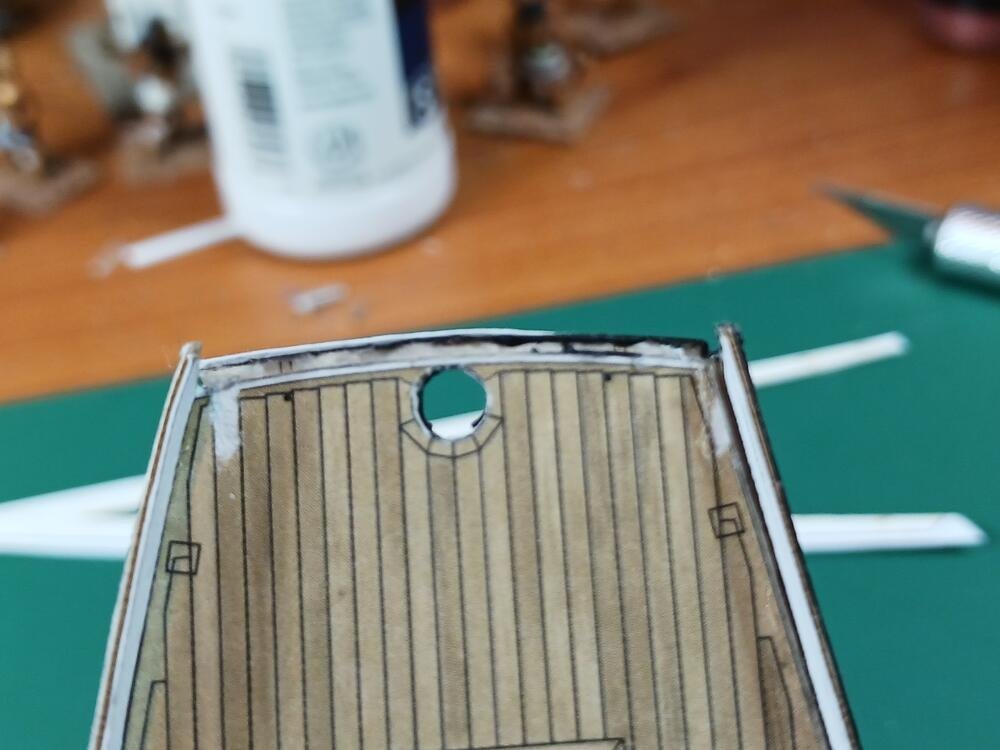
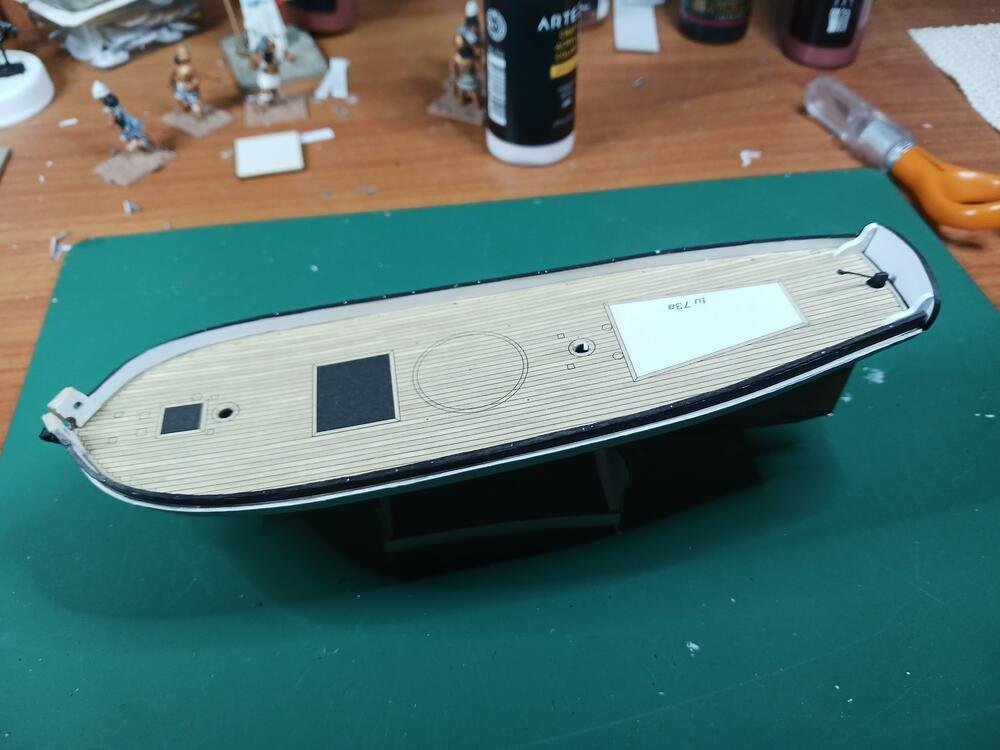
I've got most of the deck fittings done now. While it looks sort of sloppy in the close-up pictures I'm please with the build--even if I won't get high marks for symmetry. In fact, I've been able to construct some of the small bits that I thought would be beyond my abilities. I'm particularly fond of the galley stack. Rolled and butt joined. I could not for the life of me construct the posts for the pin rails, though. So the rail is the laser cut part but the posts are carved down from a match stick. The belaying pins are short lengths of 28 gauge wire about 3/16 of an inch long. Oddly enough, I had no problems with the other posts. I'm now studying the drawings on how to rig the pivot gun and trying to find a way to make bolt rings. This will be my first time working with blocks and 'serious' rigging. A little bit of trepidation setting in!
I've found a couple of the build logs for this model on other sites. From what I can tell using Google Translate, I'm not the only one who found minor problems with the stern pieces and skinning. Nothing major, just something to be aware of when building.
- Richard44, John Fox III, Canute and 5 others
-
8
-
Yeah, I chose not to scan because I'd have to disconnect my new laser printer and reconnect my old inkjet scanner printer (which no longer prints). Plus, there was an extra set of printed parts included in the kit due to Seahorse being displeased with the original print job. But when it came down to it I didn't want to cut up the spare sheets!
-
Huh! I'm impressed that the stiffened thread spokes actually support the plane. Looks good.
- Old Collingwood, Egilman, mtaylor and 3 others
-
6
-
I'm not terribly concerned about longevity of my card models. A five to ten year lifespan is really all I desire (for the models!). I'm sure by that time I'll want the space for some other project and--at least for now--my skill level is not so advanced that anyone else would want them. To be honest, the build is more enjoyable to me than the end product.
Would shellac work the same way as varnish to stiffen card? I tend to avoid CA, too, and anything with strong fumes is going to be an issue in my home (The Admiral has respiratory issues). I've been looking for some way to seal the card models that is not aerosol or water based. I was looking at 'Clear, dewaxed' shellac flakes and wondering if it would be worth experimenting. I think the alcohol base should evaporate quickly enough to avoid problems and I don't think it would affect the paper. Since I just purchased a cheap laser printer I don't think ink bleed due to the alcohol will be an issue, either. But I'm not sure there would be any real advantage.
- thibaultron and Canute
-
2
-
Welcome, Shipific!
Are you familiar with Warlord Games' Black Seas 1/700 scale ships of the Napoleonic wars? They're gaming pieces rather than models but I've seen much worse.

- Shipific, mtaylor and Keith Black
-
3
-
No judgement here! We all enjoy our hobbies in our own way. I'm enjoying watching your build so I know what's coming up in mine!
- modeller_masa, Canute and catopower
-
2
-
 1
1
-
One of my favorite early aircrafts. It's looking charming! The engine bears a remarkable resemblance to a Wright 4-40 4-cylinder engine c. 1911, without the flywheel, of course. (see https://wright-brothers.org/Information_Desk/Just_the_Facts/Engines_&_Props/440_Engine.htm). If so, there was not a lot of wiring involved.
-
Wow, you are really zipping through this build! It's looking great. Having not seen one of your builds before I thought the beginning was looking a little rough-and-ready. But she's turning into a beauty!
- GrandpaPhil, Canute and mtaylor
-
2
-
1
-
Progress has been a bit slower lately but I'm happy with the way the cutter is turning out.
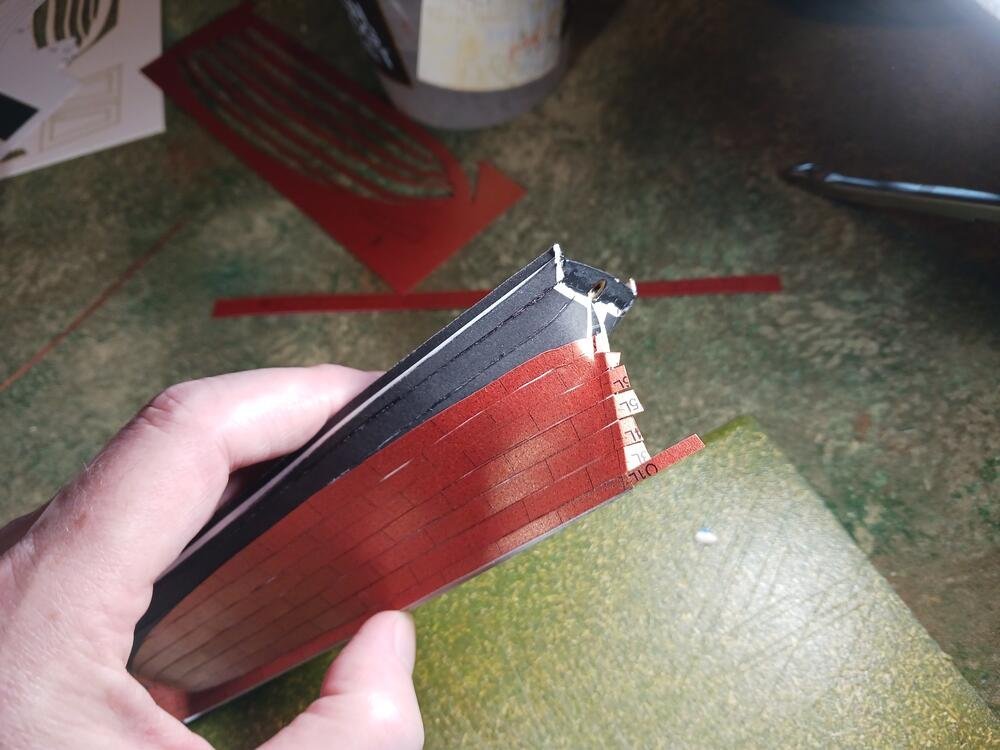
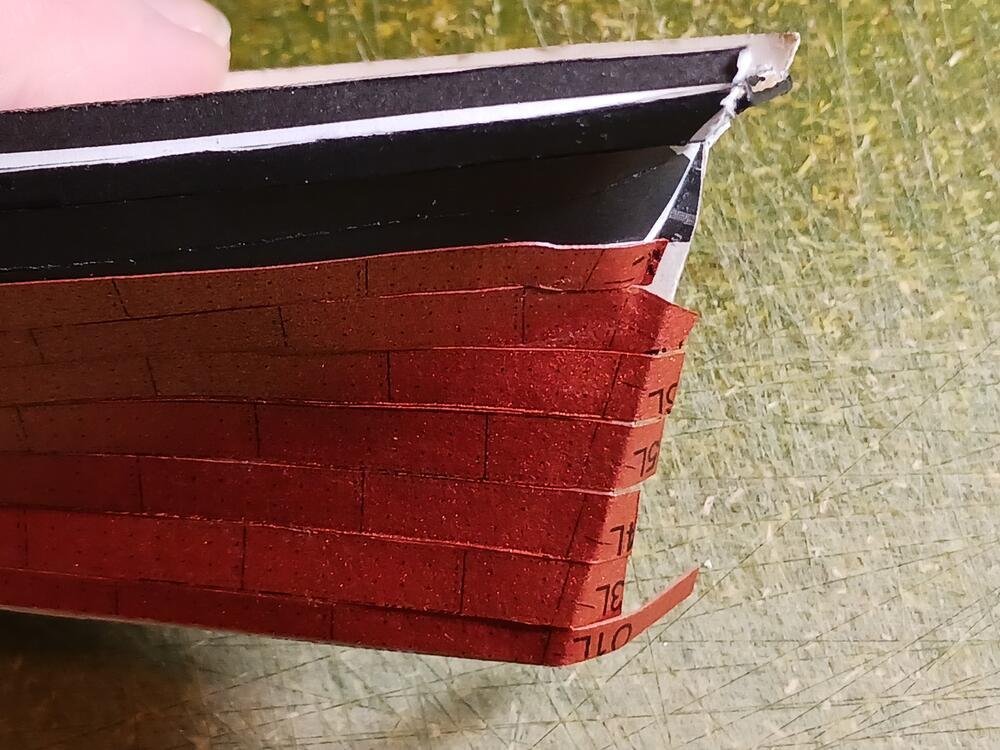
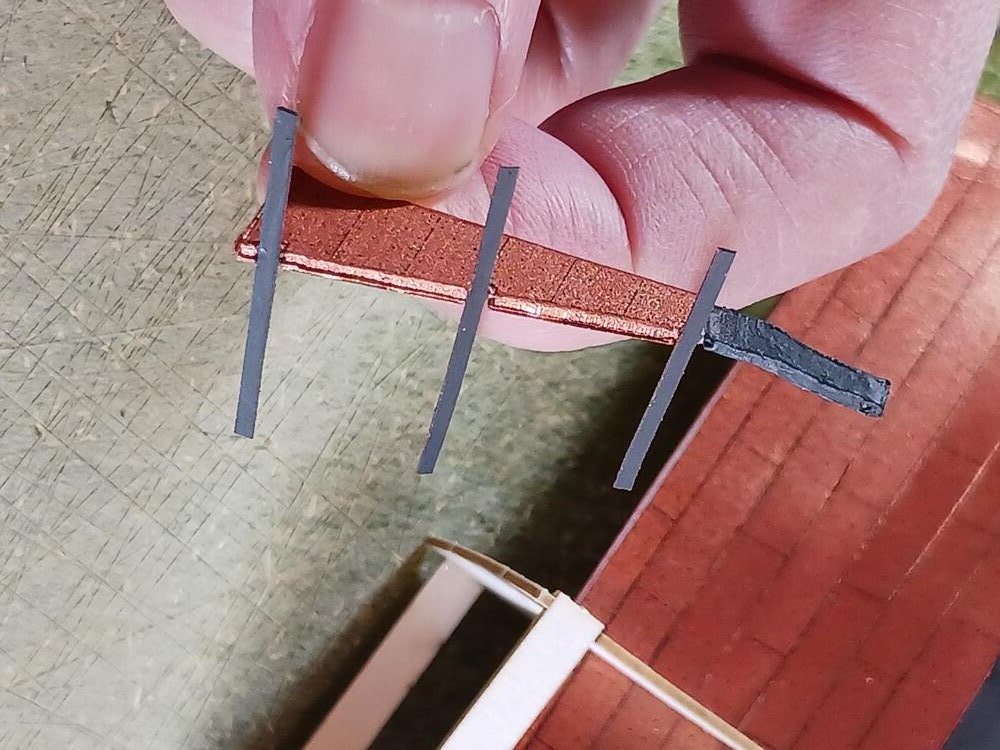
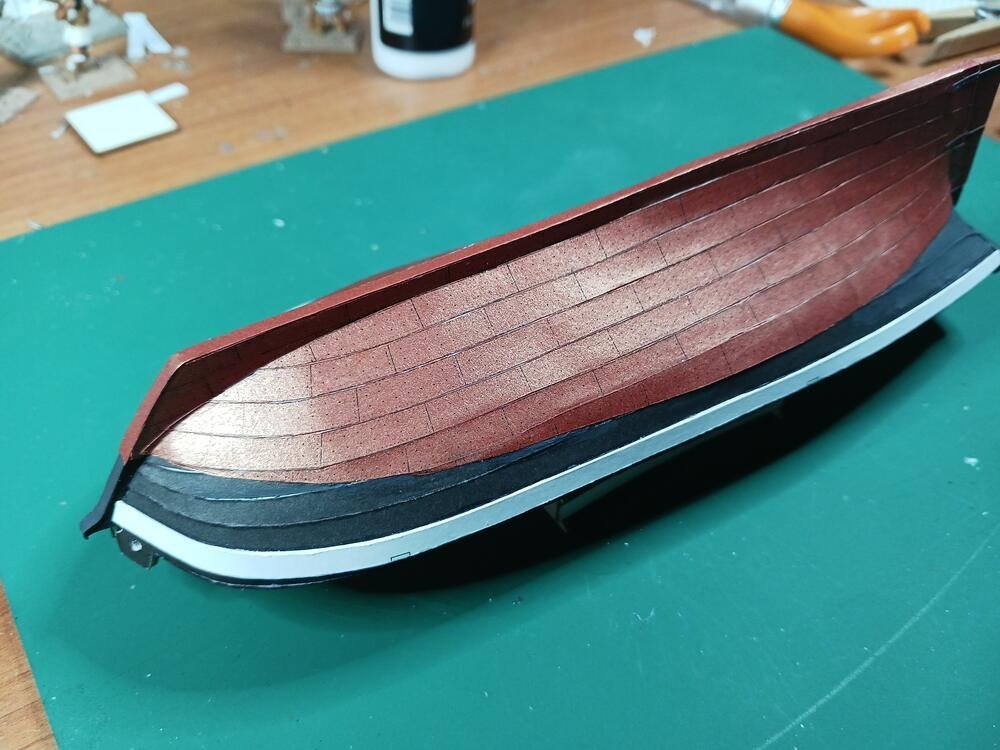
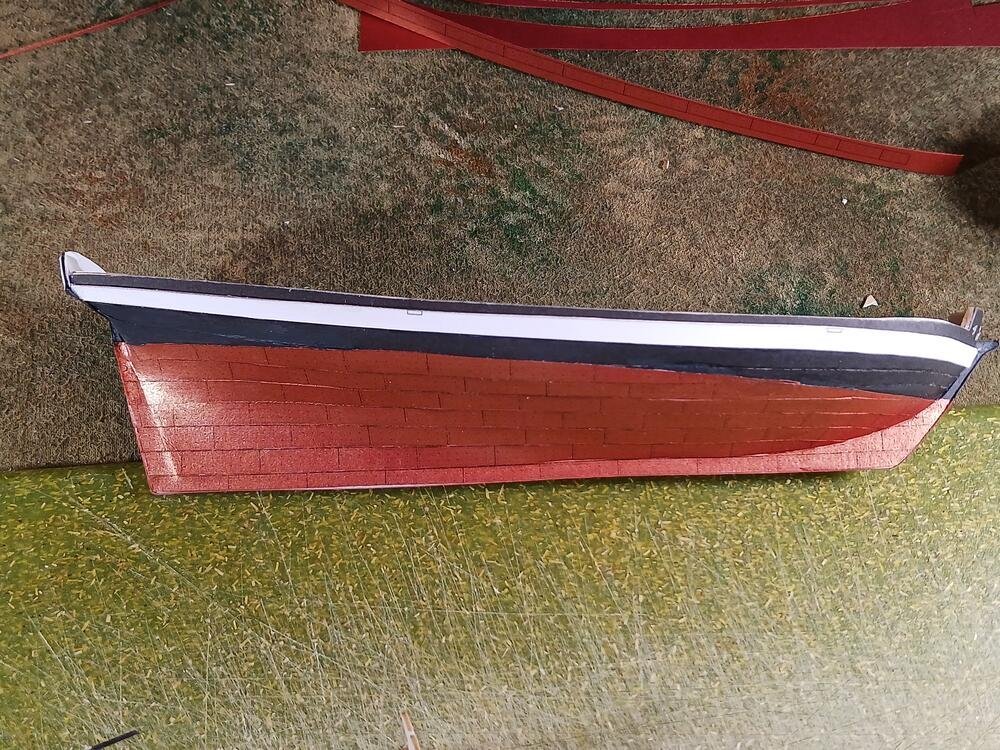
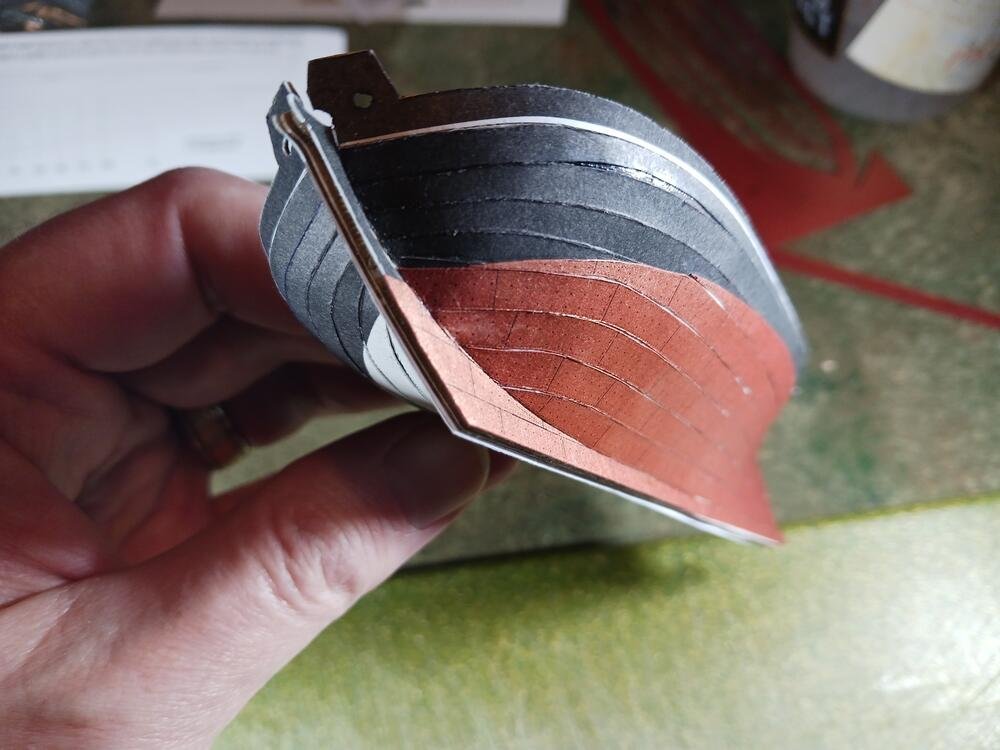
Forging ahead, the next task was adding the copper plating to the bottom. The kit provided some copper paper printed with strakes on one side or individual plates on the other giving the builder the option of fast or detailed. I chose fast and used the strakes. No complaint. I did notice that the copper strakes, like the hull strakes, seemed a bit short for the the hull. While I normally attribute these types of shortcomings (!) to my lack of experience I'm beginning to think there might be a small glitch in the design. It's almost as if the laser cut parts are just a bit longer than they should be. I've come across issues with the strakes, the coppering, the bulwarks and even the deck. Nothing that can't be overcome--I've adopted the practice of leaving extra material on the ends of long pieces to allow some extra and then cut them to length once I've determined how much extra is needed. I also discovered that I have the perfect shade of copper paint in my hobby supplies!
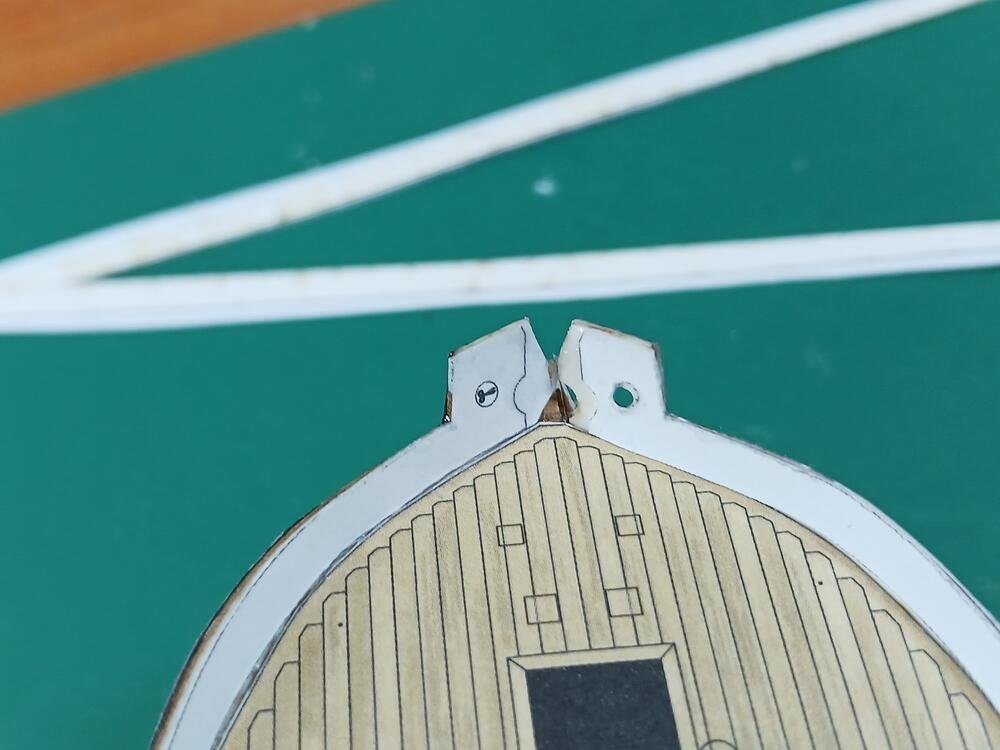
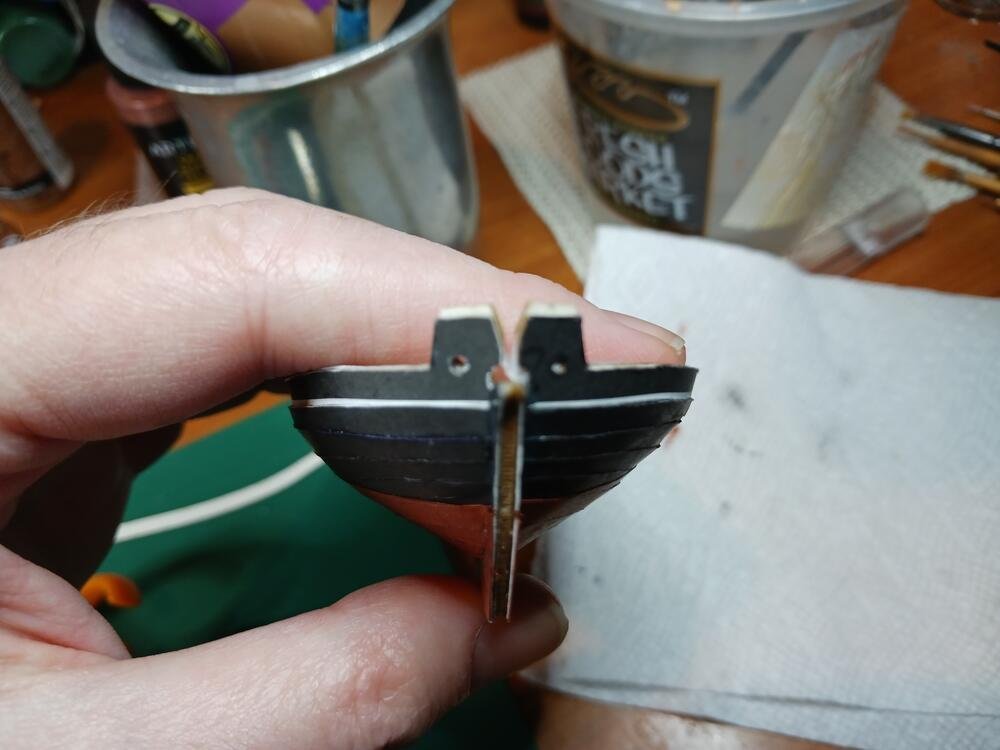
After coppering both sides I added the white wale which hid a number of blemished I introduced with the planking. Then I had to do some fixing of the stern. I ended up installing the transom and a pair of knees that support it and then decided I wasn't happy with the slight gap where the deck planking ended before the transom. Unfortunately, I ended up destroying the transom and knees when I removed them so I had to scratch build replacements. I was not successful in recreating the knees out of card so I ended up carving them out of plastic. They might be a bit too large but I'm OK with it. I also made a new counter piece since the original seemed too small and I was unhappy with the way it fit.
I also learned that cheap thin CA glue has potent fumes! I normally use Gorilla brand gel superglue and have never had a reaction to it. I wanted to try thin CA to stiffen up the counter piece and boy did I get a reaction! My eyes watered for a full hour. I think I'll pitch the cheap stuff and see if Gorilla makes a thin CA and if I react to that.
The inside of the gunwales were the next pieces where the chronic shortness bit me. I worked from the back forward and probably should have started at the front. Consequently, I'll have to do some fixing when I install the bow sprit.
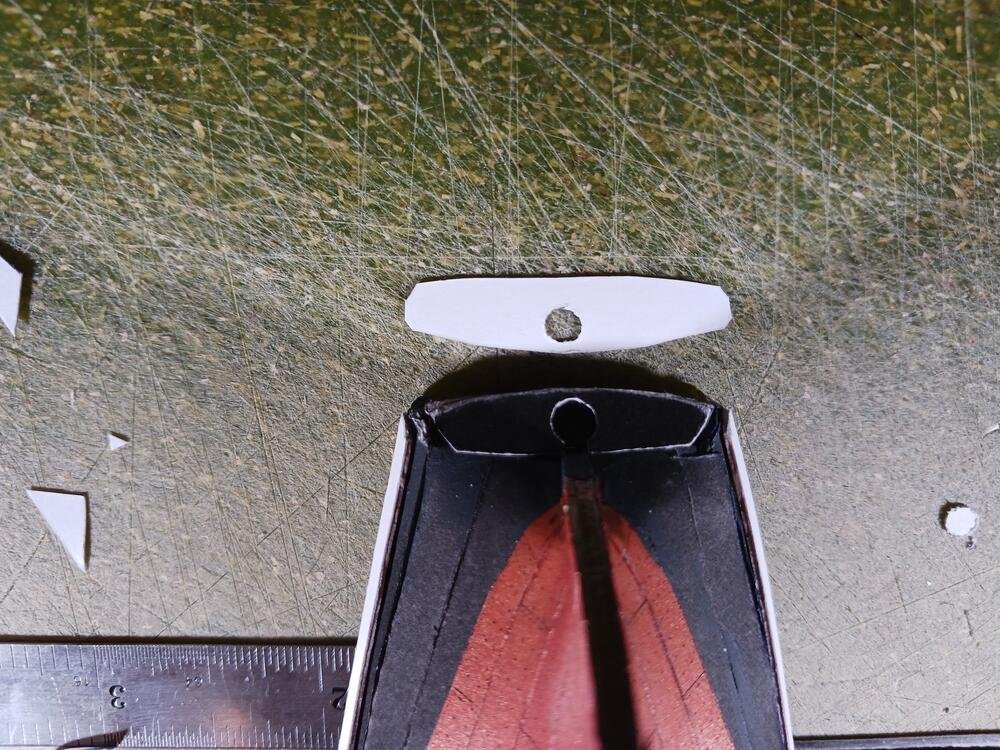
The rudder was next on the agenda. While the model has small, rolled pintles I knew I was never going to be able to make something so small. So I fudged it. Again, the rudder straps may be a bit oversized but... it works for me.
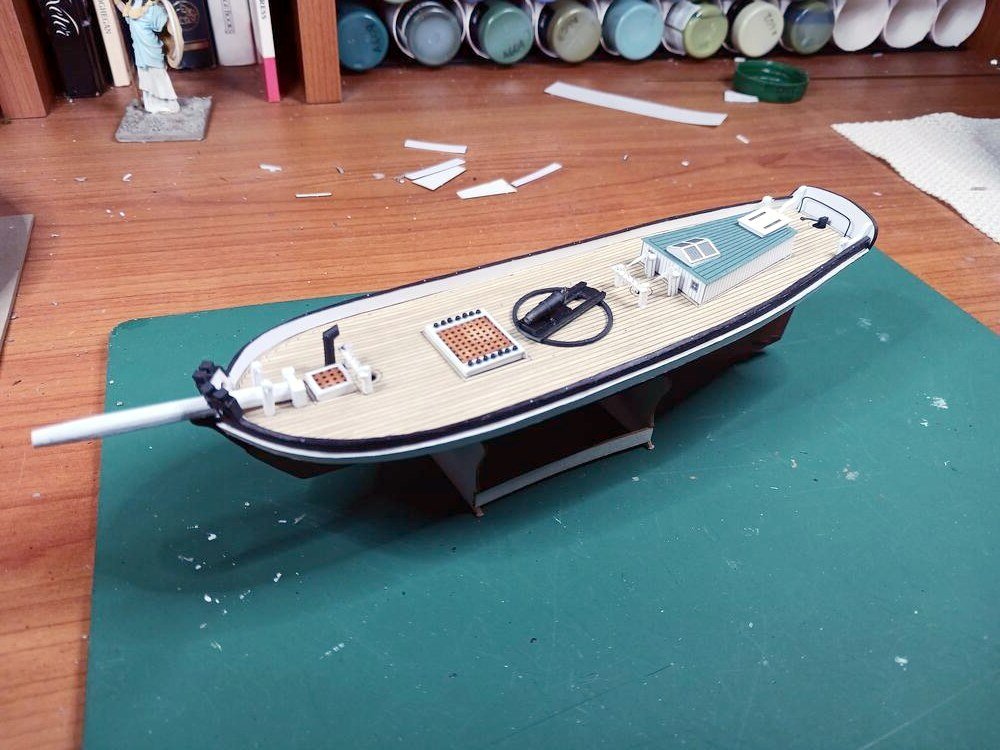
The most recent work was installing the cap rails and the tiller.

That's where she stands at this point. I'll start the deck fittings during the next week.

-
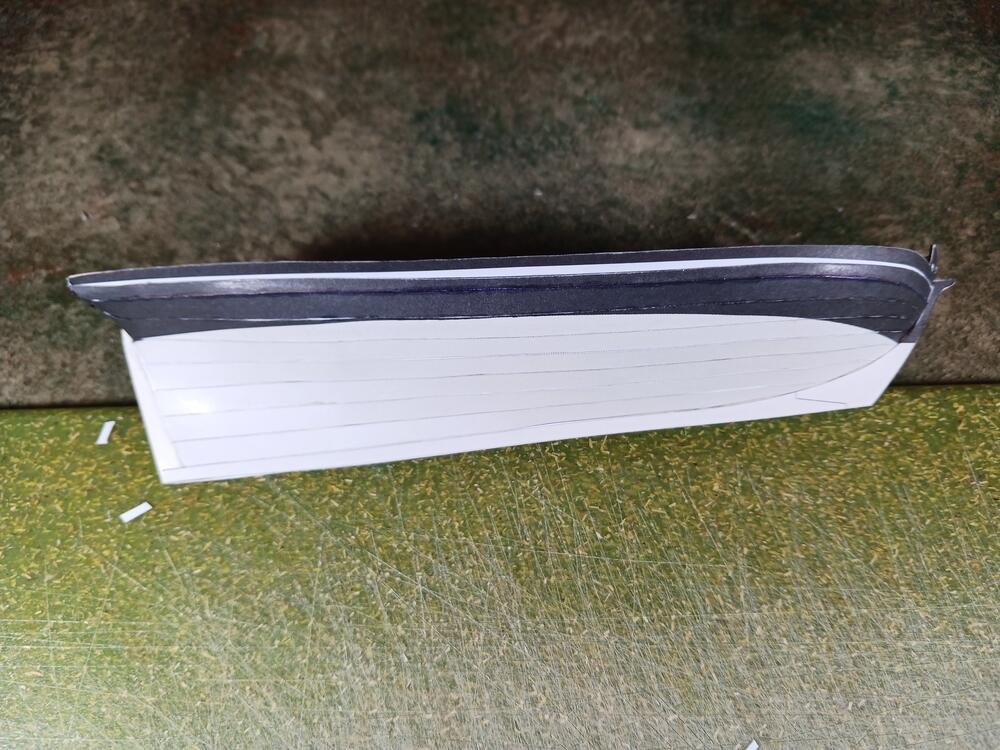
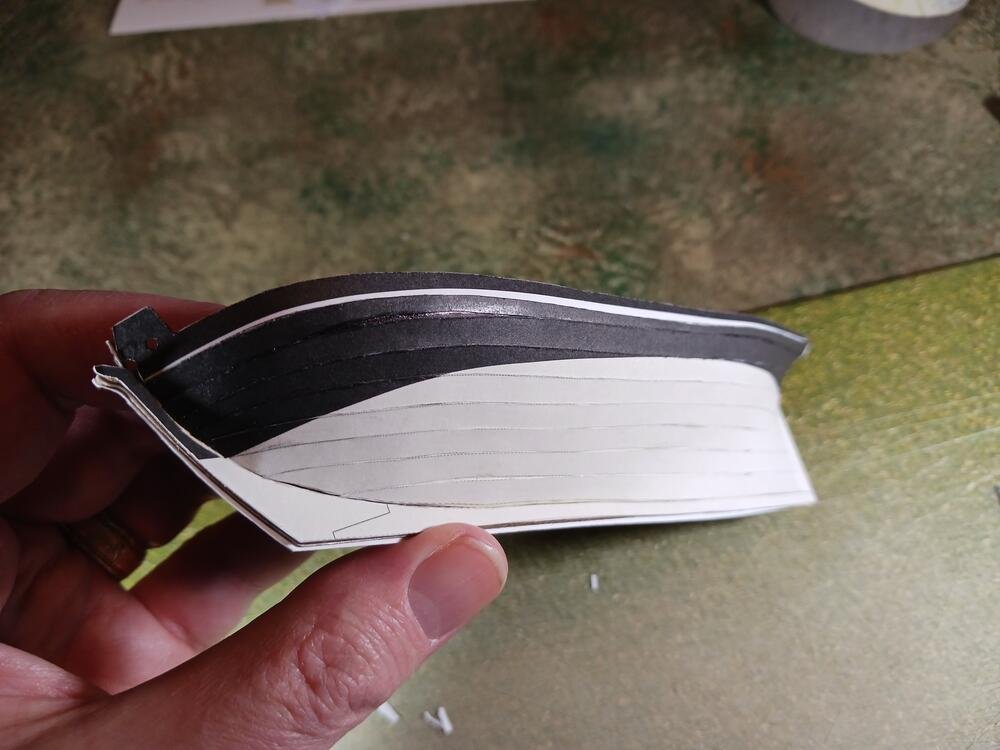
Slowly progressing with the Revenue Cutter. I've got the third layer of the hull completed. Next step is the copper bottom.
Interestingly enough, I had some fit problems here and I'm not sure why. You can see on the last couple of pictures how the strakes didn't seem to be long enough to reach all the way to the stern. This has really got me puzzled as everything else in the design has been really precise. I suspect it's caused by my asymmetric building snowballing into something larger. Nevertheless, I compensated by leaving some extra material on the strakes, making them longer, and made it work. I'll need to do a little bit of patching and some painting to make it all match but that's no big deal. I was thinking about adding some weathering effects anyway--particularly on the copper bottom which I want to have greenish tinge.
Still having a lot of fun with this kit. So much so that I've ordered another three kits from Seahorse. So the stash is growing!

- GrandpaPhil, Canute, wtimlen and 4 others
-
7
-
Welcome, Dave! And as a coworker likes to say... "The perfect is the enemy of the good." 😉
- Ryland Craze, mtaylor, Keith Black and 1 other
-
4
-
-
Wonderful! One of my favorite ships of all time and you've done her proud.
- Ryland Craze and Canute
-
2
-
Wow!
Are you sure you want to go with that bright green for the stand? Makes the whole thing look a little garish. 😉
--jeff
- GrandpaPhil, mtaylor and Canute
-
3
US Revenue Cutter 1815 by Jsk - Seahorse - 1/72 - CARD
in - Kit build logs for subjects built from 1801 - 1850
Posted
Thanks everyone for the likes and comments. They really help keep the motivation going. I needed that today.
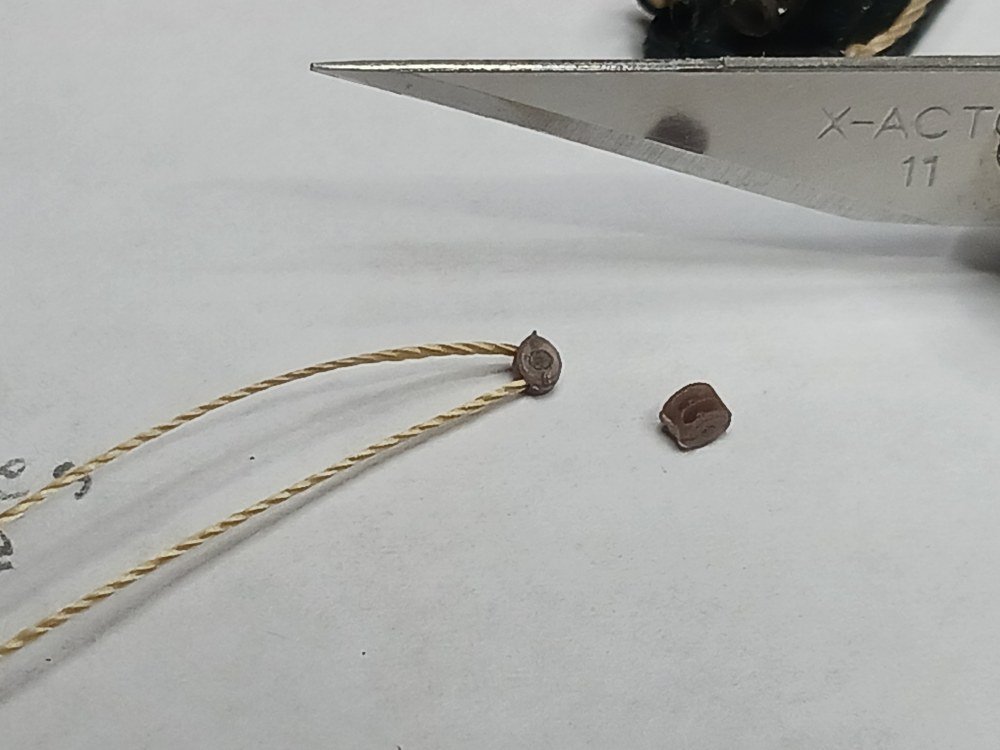
I had one goal this weekend: rig the pivot gun. Ugh! The week started out well. I ordered an extra set of blocks and various standing rigging line from Seahorse and some hooks and 0.3mm rope from Syren for the running rigging. The masts and spars were mostly shaped over the weekday evenings so they're about ready. Syren's stuff arrived within two days and I really like it. Comparing the good rope to what I had on hand was instructive. Looks like what I have is slightly smaller than the 0.3mm stuff.
Syren on the right. My generic stuff on the left.
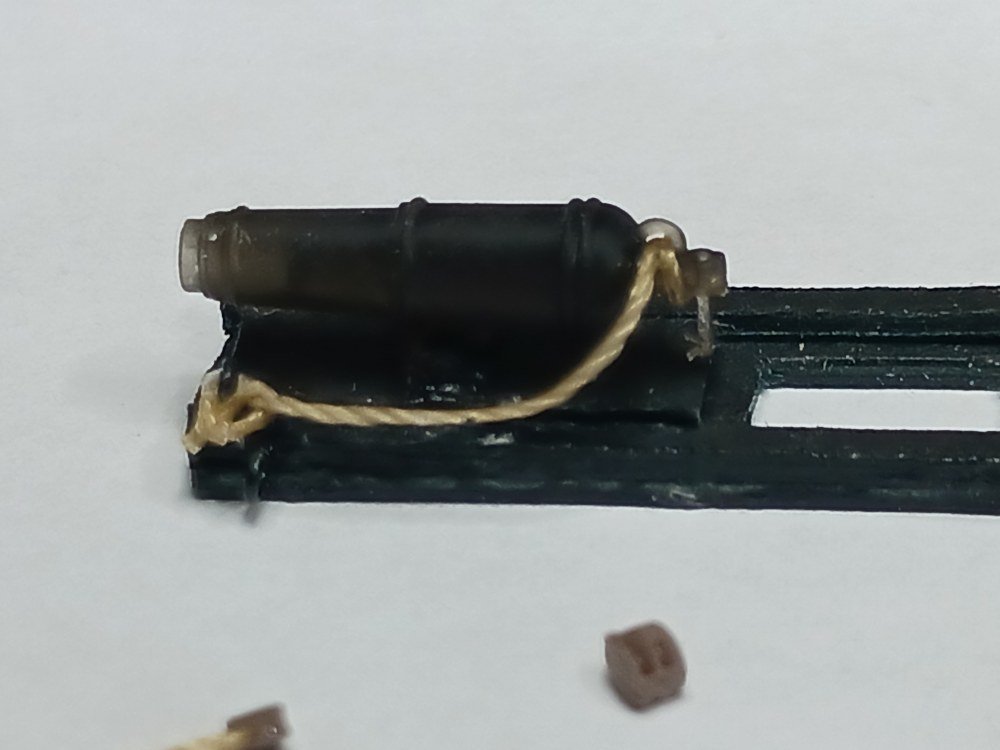
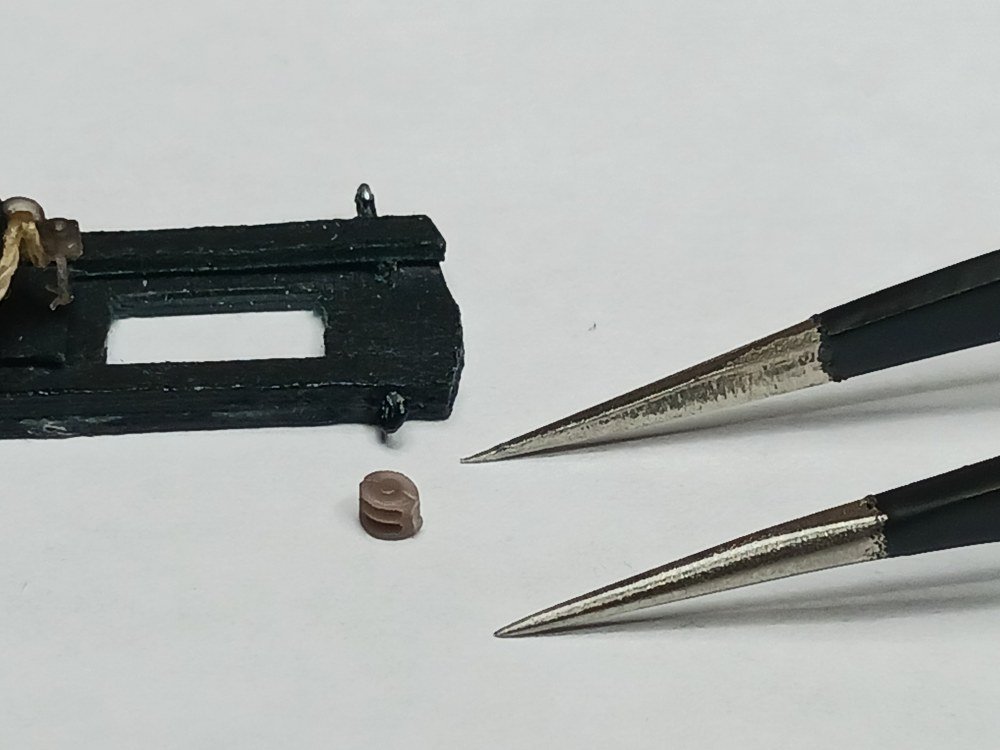
Since I knew the tiny size of the holes in the blocks was going to be an issue (and since I'm loath to use the good stuff on my very first kit build) I decided to use the generic stuff for the pivot gun rigging--at least as a learning exercise. The real challenge is the size of the blocks. These 2mm things are tiny, tiny, tiny. Tying the line to the Syren hooks was not a problem. But stropping the block? Let's just say it's taken me two days to reeve two lines through a total of four blocks. While the plan calls for four lines for the pivot gun I think I'll follow @Dr PR's lead and stop at two. I may need to experiment with the paper blocks to see if they might be easier to work with.
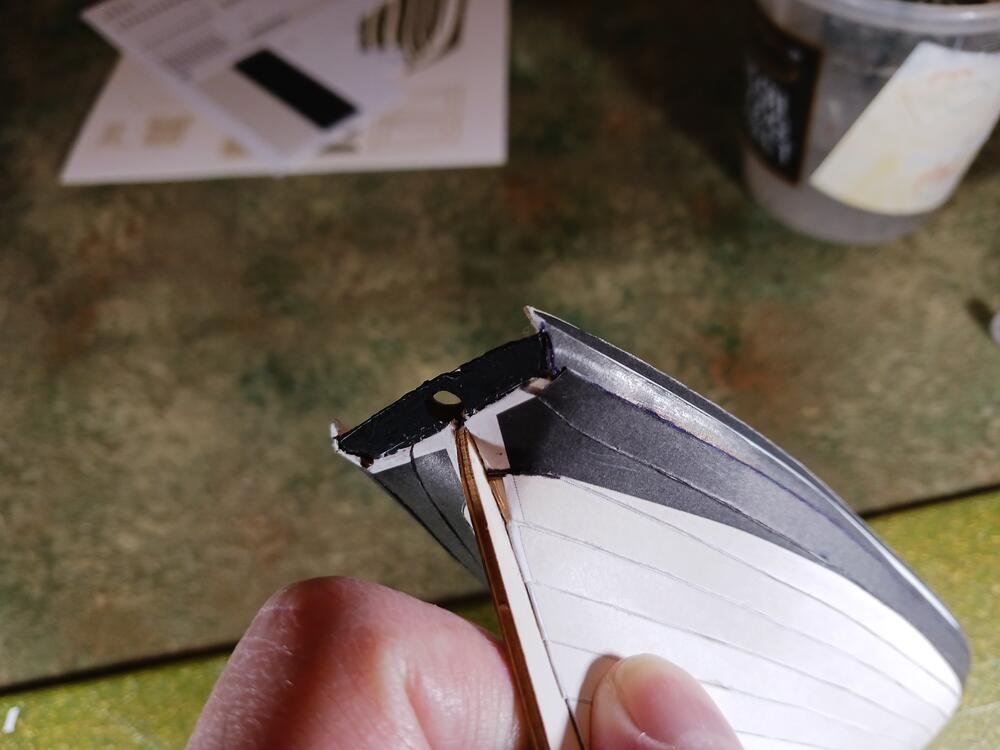
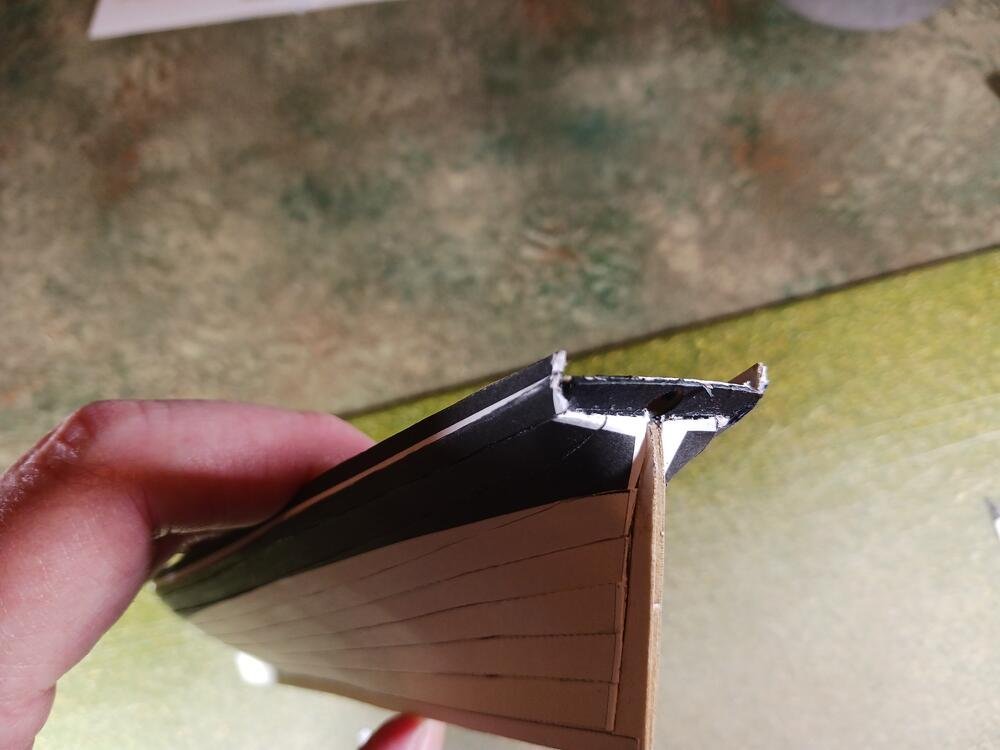
But the worst part of the day was when I picked up the hull in order to drill holes in the deck for the eyebolts I've been making. I noticed that the cabin has been crushed! How that happened I have no idea. It had to be me when I was dry-fitting the masts. We have no pets, no kids, no visitors and the Admiral rarely visits my lair.
Time to walk it off. Maybe a way to fix the new issue will come to me in the sunshine. Where did I leave the schnapps?