


mbp521
-
Posts
1,003 -
Joined
-
Last visited
Content Type
Profiles
Forums
Gallery
Events
Posts posted by mbp521
-
-
2 minutes ago, Keith Black said:
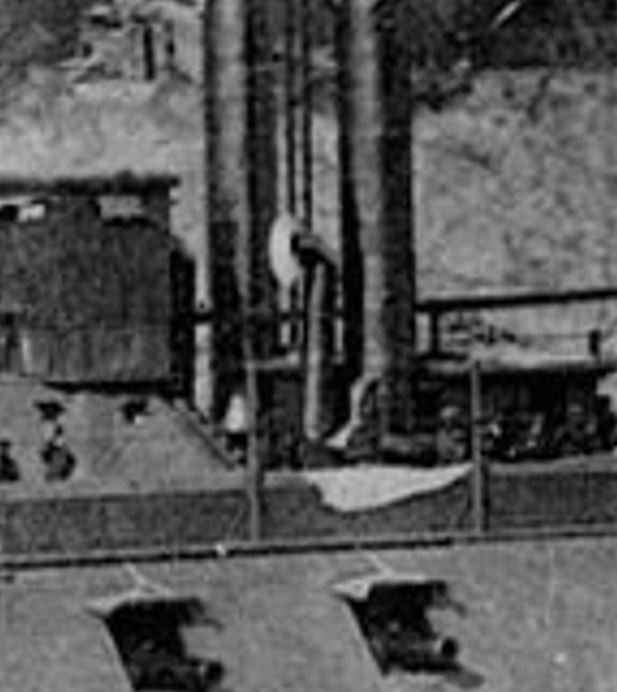
Brian, that's directly over a gun port. Even if the gun ports had been closed during dumping, when they were reopened would ash dust have been an issue?
Keith,
I had thought the same thing, and that is why I threw in the tarp cover idea. This could have been thrown over the side of the casement between the gun ports to allow the ash & slag to slide down the incline without damaging the painted surface. I know this is far stretch, just trying to toss some ideas out there that were feasible. Without Mark's "way back machine" we may never really know. But it sure is fun coming up with theories.
-Brian
- mtaylor, Keith Black and Canute
-
 3
3
-
1 hour ago, johnhoward said:
They didn't need a hatch in the Hurricane deck for this activity because they already had two perfectly safe ventilation funnels that protruded thru the Fire-Room ceiling [actually the Hurricane Deck]. All they had to do was temporarily remove the upper funnel section and drop a line with a hook from a portable winch to pull up a bucket of ash & slag and dump it over the Hurricane deck edge or into some other container.
Johnhoward,
I think you may be on to something there. That seems like a totally viable solution. I went back and looked at some of the photos and found the one of the Mound City. It clearly shows the port forward funnel either removed and leaned up against the chimney, or at least extended out a good bit further than normal. I know this may be stretching it a bit, but they also look to have a cover over the hammock racks in the general area of where they could be dumping something overboard.
Just additional food for thought.
-Brian
- Canute, Keith Black and mtaylor
-
3
-
John,
What an interesting build, this is a very unique vessel. I know I'm a little late to the show, but I will follow along through the rest of your journey. Wonderful job so far.
-Brian
-
Beautiful work Eberhard! I’ve often thought of building a sea diorama, just not up to trusting my skills yet in that medium and don’t want to risk messing up any of my builds.
-Brian
-
-
Tim, so excited to see more of these pictures of the build. They look to have posted perfectly. Can’t wait to see more. Keep them coming!
-Brian
- mtaylor, Canute and Keith Black
-
3
-
-
-
-
1 hour ago, mtaylor said:
It looks like the entire boiler area was below the waterline including the overhead. Would that be a correct assumption?
Mark, pretty much a safe assumption. From my research and the picture below it shows the top of the boiler tubes were pretty much even with the Gun Deck level. These boats drew about six feet of water putting the waterline just about a foot below the knuckle of the casements, and the majority of the boiler below the waterline with maybe the exception of the top foot or so.
-Brian
- Cathead, Keith Black, mtaylor and 1 other
-
4
-
1 hour ago, kurtvd19 said:
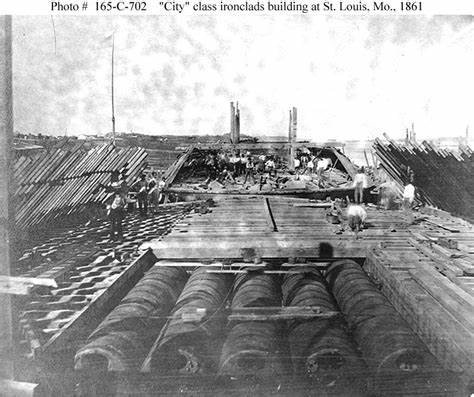
The two drawings below show how ash and slag was disposed of on riverboats of the era and why wouldn't they have followed what I believe was a routine way of handling the hot ash, etc. The dumping of the hot ash, slag overboard was done w/o wheelbarrows or buckets.
Kurt, given that the boiler was located in the hold, below the waterline and pretty much on the keel of these boats, wouldn't having the ash well cause a flooding problem? Seems like that would be no different than having a hole in the bottom. But, that gives me another theory. What if they had some sort of setup like a pipe that extended above the waterline, say like an opening at the level of the Gun Deck that they could shovel the ash and slag into. It could have been close to the Ash pit, or next to the bulkheads that ran along the outboard keels. This would/could have been in the area that was lost during salvage as well and the reason there is no documentation for it. Just a thought, I could just be trying to invent things.
-Brian
-
Johnhoward,
I wanted to thank you again for speaking with me the other day. I apologize for taking up so much of you time, but I took a great deal of very useful information away from our conversation.
13 hours ago, johnhoward said:This still remains as one of our most perplexing ironclad operating issues and since this activity is never mentioned in the USS St. Louis' log or any other document, it must therefore have been a mundane task like normal house-keeping, not worthy of comment . We still haven't found any evidence of our latest theory for a hatch in the ceiling of the Fireroom which would be thru the Hurricane Deck and a manually operated winch to safely hoist a bucket of slag and ash to dump overboard. This hatch, if it existed would have been roughly aft of the pilot house, near the cook stove chimney exhaust, and between the firebox smoke-stacks. We previously studied, and rejected, more advanced techniques for ash and slag removal, which were only invented after the Civil war. Any other ideas?
One theory that I had on the removal of the slag, ash and coals could have been a bucket brigade. The fire men could have simply filled the buckets up from the fireboxes, hoisted them up the ladders, and the crew could have passed them across the Gun Deck and deposited the contents in the river through one of the gun ports. They could have done this on both sides for more efficiency. Just a thought.
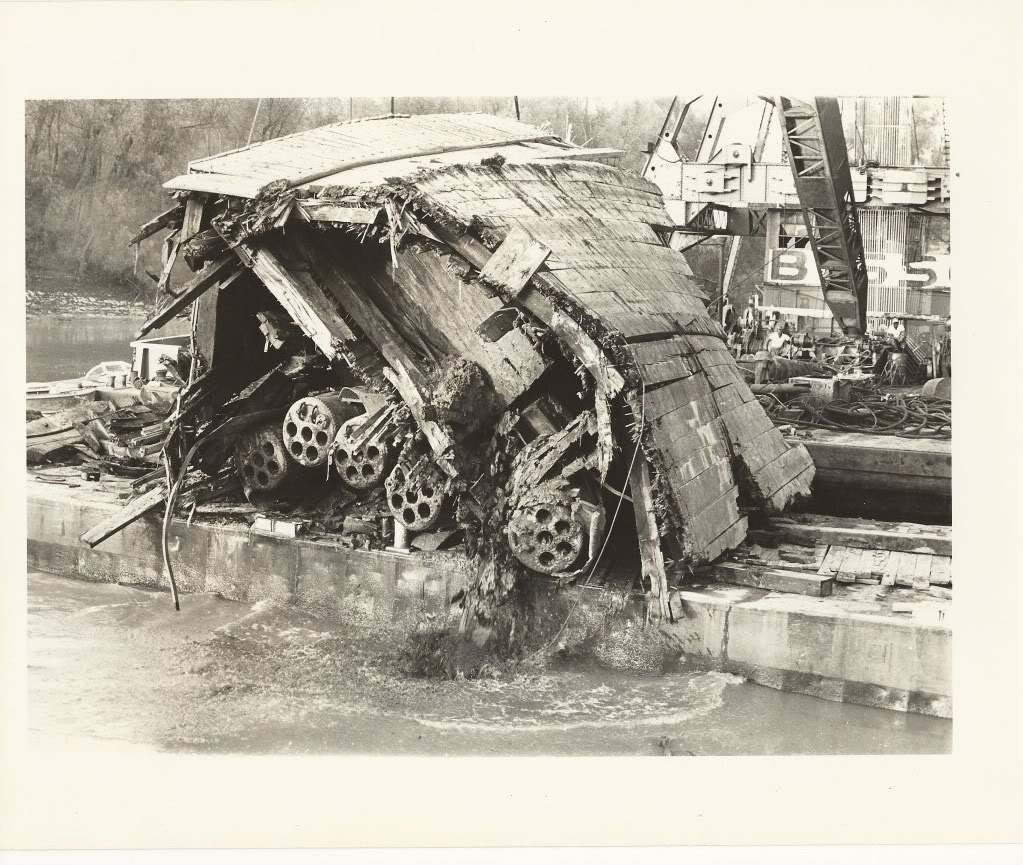
13 hours ago, johnhoward said:The steel floor covering for the main keel can be seen in the center of the fire room.
As for the steel floor, was this just placed in front of the fire boxes? From what I have been able to determine, from the HSR pg. 38 (which could be wrong) the fire box was lined with brick. The only other mention of this area that I was able to locate was in Ed Bearss' book Hardluck Ironclad where they describe in the initial plans "Beneath the boilers would be a fire box, with it's bed lined with fire brick, and enclosed in good sheet iron". Neither of these references go into great detail as to how this was actually constructed.
This area was surely lost during recovery efforts, since the entire section collapsed when they brought it up as shown in the sad picture below. None of the other info that I have been able to find mentions anything of the boiler floor construction, but it would seem that they would have recovered something, steel or brick, and had it either on display or mentioned in the list of artifacts. However, I was thinking that could they be describing that the floor was lined with brick then a layer of sheet iron placed on top of the brick? The brick would insulate the wooden hull from the heat of the coal fire and the steel would give a smooth surface for cleaning out the fire box. Is this a safe assumption? Either way, I am surprised at the lack of info on this particular area.
-Brian
- Canute, mtaylor, Keith Black and 1 other
-
4
-
George,
Nifty little jig for drilling your chainplates. Good idea to leave them attached to the strip that way. Makes it much easier to work with.
As for the boat configuration, I’m not sure if there was a standard configuration for them but it would make more sense to load them up where they fit better, but also leave room between them to work around when deploying or stowing them. Just my opinion.
She’s really coming along nicely.
-Brian
-
4 hours ago, johnhoward said:
I have no problem sharing this data but you'll have to guide me thru the process of doing so
Johnhoward, I just sent you a PM to discuss the process. I'll keep an eye out for your response.
-Brian
- Canute, mtaylor and Keith Black
-
3
-
@Keith Black @KeithAug @FriedClams
Thank you all for the kind comments. I just realized from your comments that I haven't posted a picture of the entire ship in quite a while. I guess I get so involved in updating the log with all the small bits that I forget to show an overall progress. I'll definitely try to do better in the future.
-Brian
- FriedClams, mtaylor, Canute and 1 other
-
4
-
19 hours ago, johnhoward said:
Isn't this fun?
Johnhoward, I am loving this! So much information to process, but so worth it.
I have not seen those NPS drawings that you just posted, if you don't mind me asking, would they be a file that you would be willing to share? I can PM you my email address if you are willing to. They look like something that I would love to peruse on a larger scale.
22 hours ago, johnhoward said:The ventilation funnels are a good example. We found some of them were either in impossible locations or the lower deck drawings were incorrect. I tend to believe that Captain Walke did actually witness and remember one such funnel protruding out of a wall as he sketched, but maybe not this wall!
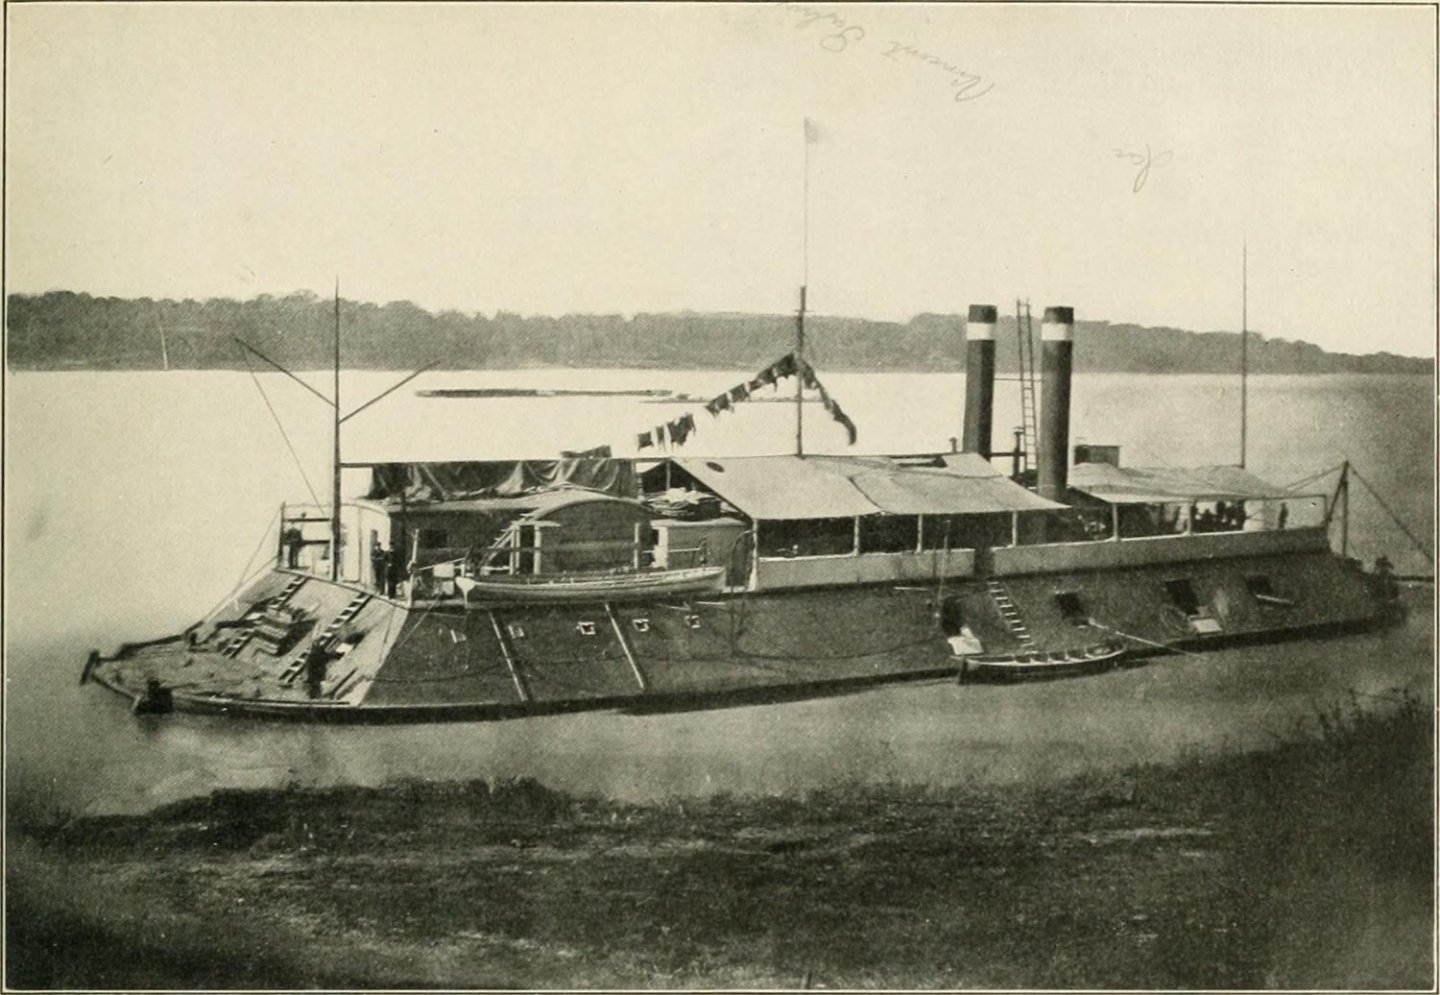
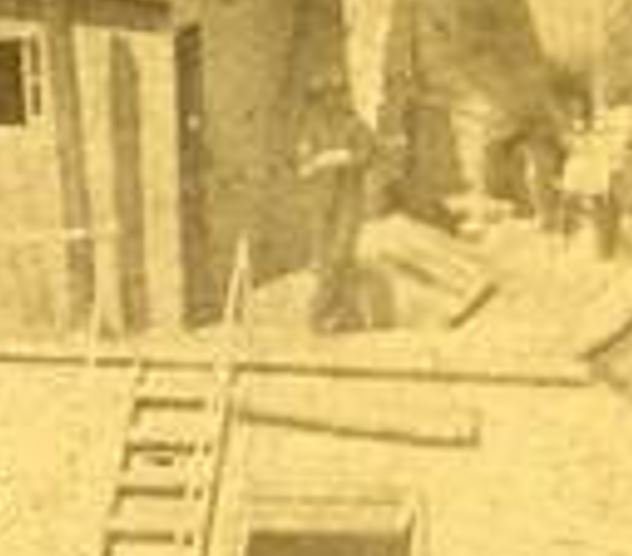
Seems like every time that I start looking at these old photographs I see something different. Last night I was doing a stare and compare whit the Cairo and St. Louis photos and noticed that there is definitely a difference in the placement of the aft funnels between the two ships. The ones on the St. Louis are located almost in the middle of the forward and aft hog chain posts and outboard of them, while the ones on Cairo are in front of the forward hog chain post and inboard of them. This is just one of the subtle differences that I have come across in the photos, but its hard to tell if these were alterations over time or just differences that were done between the two shipyards. I also wonder as the builds progressed that they didn't tweak certain features on the later ones to make building them easier.
2 hours ago, johnhoward said:The stairway on the left could also possibly lead to the munitions magazine below the gundeck.
This is a topic that I am struggling with. There were several hatches along the gun deck recovered with the Cairo, and all seemed to be pretty much the same size, roughly 24" x 24". This wouldn't seem big enough to incorporate a stairway into, but a ladder would make perfect sense to gain access to the hold. However, I can't help but ask myself, could they be referring to a ladder as a stairway?
This one goes back to our conversation on resupply. I had noticed in this picture of the Cincinnati that the three starboard guns are not in place. I didn't think too much of it at the time, I just thought that maybe they were doing some routine maintenance on them while they were tied up. It wasn't until this afternoon that I was looking at it that it occurred to me that they could have been moved out of the way to allow them to load supplies or coal through the gun ports. Although there is no ramp from the boat to the ship, and it does seem a long ways from the shoreline, I thought that maybe they used the ships boats to transfer the coal. But then I noticed the rope going from the shore to the third gun port and again my brain started to wonder if they didn't have some sort of transfer line they used to swing goods over to the ship from the shore, kind of like an old clothes line. They were known to bag the coal up for loading, so they could have done it that way. Just another random thought.
-Brian
- Cathead, mtaylor, Keith Black and 1 other
-
4
-
25 minutes ago, KeithAug said:
Brian
Re - I happened by the Admirals craft room where she was hard at work making stencils for T-shirt on her Cricut.
I need one of those. Must get my wife into making stencils for T shirts then I can buy her one for Christmas.
Also I am always amazed that the photographs of your work space and model never have a speck of dust on them. How is this possible?
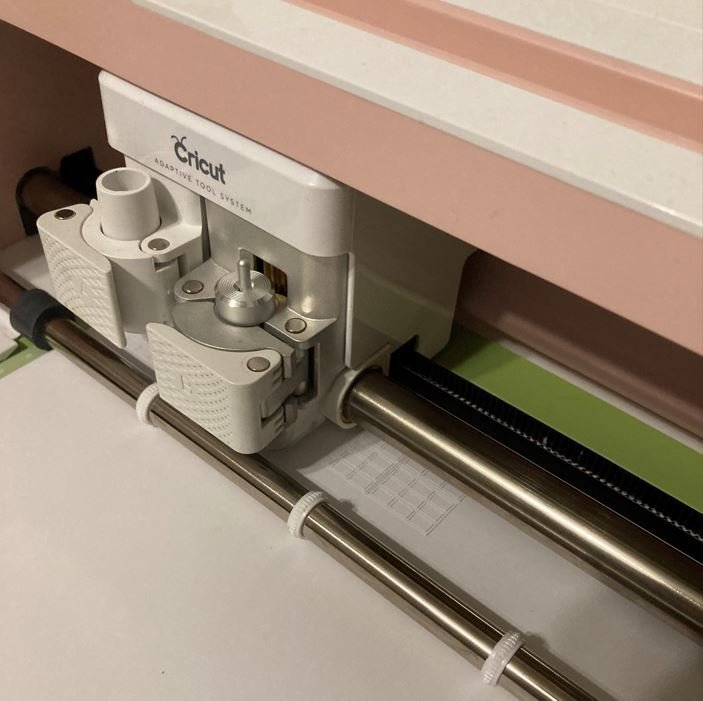
Keith, they are really neat machines and easy to use. She had been wanting one for a few years so I finally broke down and got it for her. Good decision on my part. I never figured that I would find a use for it.
As for my tidy workspace, I try to make it a habit of clearing a small area when I take pictures and since they are such large files, I generally crop out some of the picture to get it to a size that will upload to MSW.
If you truly want to see what my work space looks like while I work, here you go.
Hopefully it doesn't scare you too much.
-Brian
-
1 hour ago, mtaylor said:
Brian, might be better if you buy your own Cricut. There's a fine line out there on using the wife's stuff.
Mark, I would buy me one if the things weren't so dang expensive. I can tiptoe around her and use it when she's not looking. If I get caught, I'll just aske her about the many tools of mine she has laying around her room. Might not keep her quiet, but it may buy me some time to make my escape. 😁
-Brian
-
On 3/8/2022 at 5:46 PM, Keith Black said:
Brian, wonderful stuff and lots of it. You've been busy! I think my wife needs a Cricut. I'm almost certain it will be of benefit to her with her many projects.

Keith, I bought the Cricut a couple of Christmas' ago for me.... I mean her, and it was a great investment. I just learned how to use it a couple of weeks ago, but I see lots of projects coming in the near future now that I know that it has the capability to cut thin basswood. 😜
On 3/8/2022 at 7:53 PM, mtaylor said:Your heavy research and some luck (the TV program) are really paying off.
BTW, soldering aluminum isn't easy.... seriously. You might have had better luck with brass. OTH, the styrene is working extremely well.
Mark, I love watching the History Channel, and here lately they have had a lot of American Civil War shows on. I watched one the other day on Ulysses S. Grant that was fantastic, as well as the one on Abraham Lincoln. The research is really helping with the build, I really wish I had started a lot earlier, there are several interior features that I would have changed, but I was anxious to get started. So far I feel that I have a somewhat true representation of the ship, but going forward, since the exterior is the most exposed, I really want to make sure that I get this part right.
As for the soldering the aluminum, that was a lesson learned. At first I was going to make the davits out of brass but I was having trouble finding 1/8" brass stock. Must have been a run on them, that is why I went with aluminum. I am getting to where I really like working with the styrene more and more though it just that the 1/8" styrene was a little too flimsy for the davits.
On 3/8/2022 at 10:07 PM, Nunnehi (Don) said:Brilliant, just brilliant, Brian. I do a lot of work with youth groups and a big part of the training we do is knowing and using resources - this is a textbook example, thanks for sharing.
Don
Don, Thank you for the kind words and my pleasure. As a kid I remember hating to have to research things. I got over that in college, and started to enjoy it. College was a long time ago and not a lot of research was done after that, except for the occasional look up of something of interest, but nothing too in depth. Then with my last build I really started to get into it. Then came this build. I had no idea what I was getting into, but I love it. Kids today have it a lot easier with the internet at their disposal, but it's almost too much information and not all of it is correct. Thanks to people like you, they have mentors that can guide them in the right direction and let them know what and how to look for the correct info.
On 3/9/2022 at 12:13 AM, BANYAN said:Nice use of modern tech to achieve a great result . A very fine model you are producing.
cheers
Pat
Pat, Thank you for the kind words. When I first approached the Admiral about using her Cricut to make the window frames, she told me that was cheating and that there was nothing wrong with the way that I was doing them before. This was just her way of kindly telling me that she didn't want to show me how to use the machine for fear of me taking it over. But I explained to her that it wasn't really cheating, I mean the Cricut is basically a CNC machine and that is what the model kit companies use to make their kits. She finally caved and now I have my window frames and Cricut knowledge. Time to take over her machine.
-Brian
- mtaylor, Cathead, Nunnehi (Don) and 4 others
-
7
-
Johnhoward,
Thank you for sharing the sketch. This really opens up a ton of new questions.
You are definitely correct when you said that the perspective is way off, without delving too deep into scaling and math, this representations would have the area between the casement and the boiler room wall at well over 25' which would only leave another 26' for the starboard side of the gun deck and the boiler room. It just doesn't add up. The quarters were much closer than that. Given that the 8" Smoothbore(?) in the second port was almost 10' long and about half of it is still sitting inside the casement, measuring that across the floor level would make it well over 25' (just rough math).
The other thing that gets me about the sketch is the funnel imbedded in the wall. The Cairo plans and all photographs that I have seen of the sister ships, show the forward funnels directly forward of the chimneys. Given that the chimneys were at least twice as wide as the funnels, wouldn't they, along with the flume, protrude through the boiler room wall as well? I guess that this sketch could have been drawn after a modification where they moved the funnels outboard some, or they were damaged after a battle and adjusted for more efficiency. I'm just spit balling here.
A few things that I really noticed from the sketch that stick in my brain are:
1) the drawing looks to show, in my opinion, what seems like hard walled Jr. officers quarters with doors and framing. This would coincide with other drawings, models and the HSR plans. But I am taking this sketch with a grain of salt due to the other irregularities, and they quite possibly could just be tent walled structures.
2) I noticed that in the back by the boiler wall where the sketch calls out a stairway, would this not actually be the engines? If the boiler walls were built around the boiler and with it's dimensions, if I remember correctly, the boiler was wide enough to where it sat between the outer two keels and the engines were mounted on the outboard sides of the outer keels. Placement of the "stairway" in this area would not really be feasible.
3) In the back, by the aft gun there seems to be a lot of daylight, especially over the gun itself. I am just wondering. I took another look at the photograph you sent of the backside of the Baron DeKalb and I noticed a structure on the starboard deck behind the crewman. At first glance I thought that it might just be a crate, but after staring at it for a bit, it almost looks as if there were windows on top that match that of the hatch and forward skylight that I found on the Cairo photograph. It also has the angles that would allow water to shed off, if it were indeed a hatch. That could explain the reason the sketch shows the lighting over the aft gun. Just speculation, and a may be trying put things there that don't actually exist.
One other thought is that there were not actually stairwells down though these hatches but ladders that could be easily removed and stowed to keep the areas clear for the crew. There had to be some sort of this method for access to the pilot house, since the only way to get there was from the gun deck, so this would be a possible method, and this is how I incorporated access into my build. These are just some of the thoughts that popped into my head, so please forgive me if I am rambling, but this is definitely interesting to see new material and I'm sure it will spawn even more questions and thoughts.
-Brian
- Keith Black, Canute and mtaylor
-
3
-
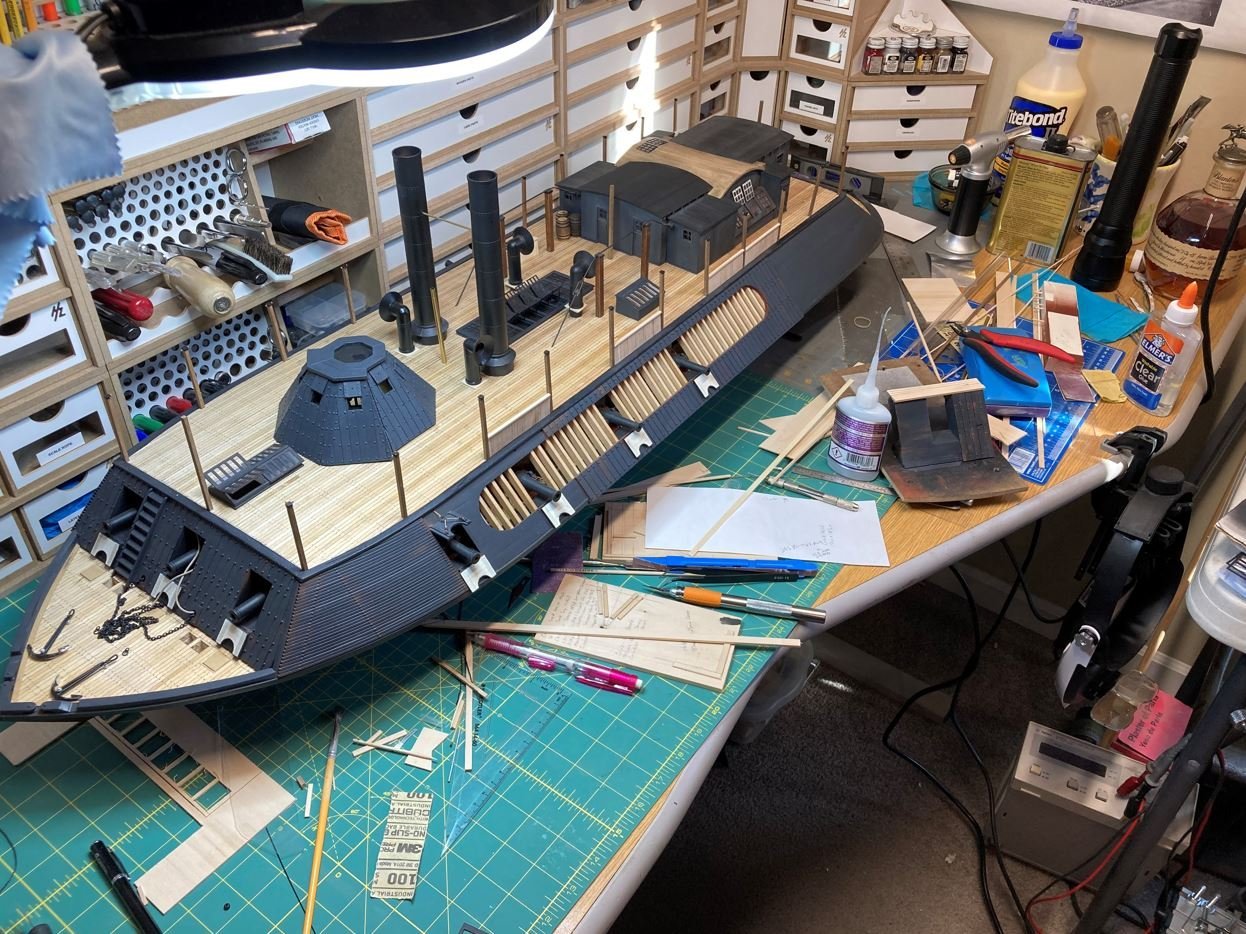
Hello again everyone,
I am back with a brief update. The past few weeks have been spent building and then rebuilding due to finding out more details on the high-res picture that I discovered.
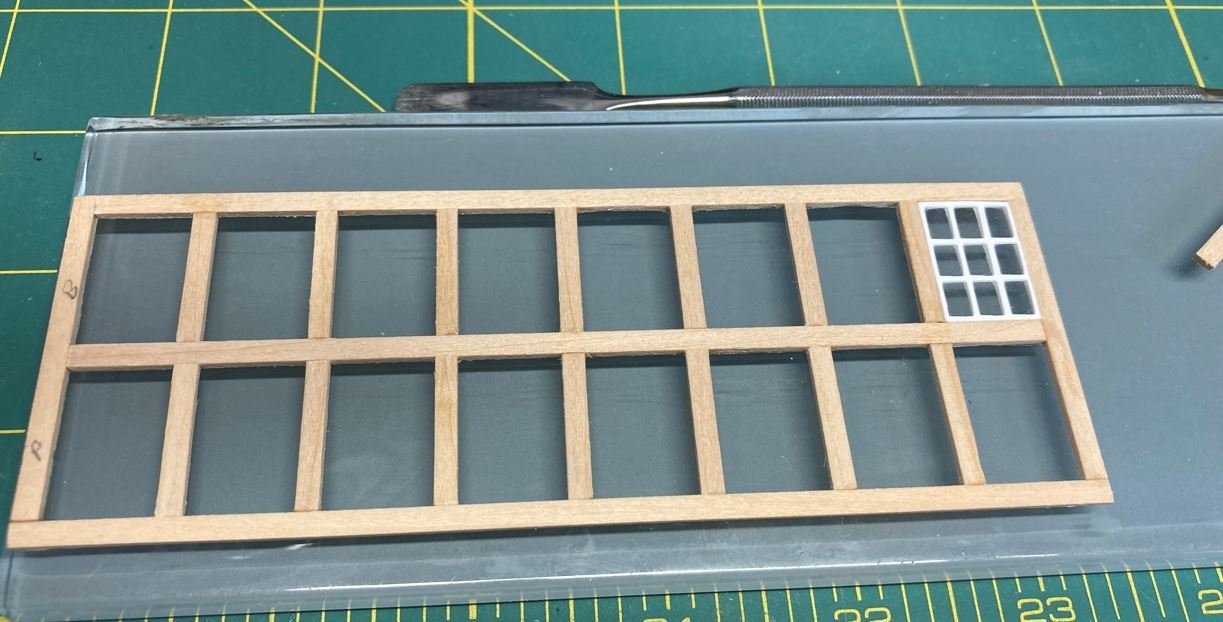
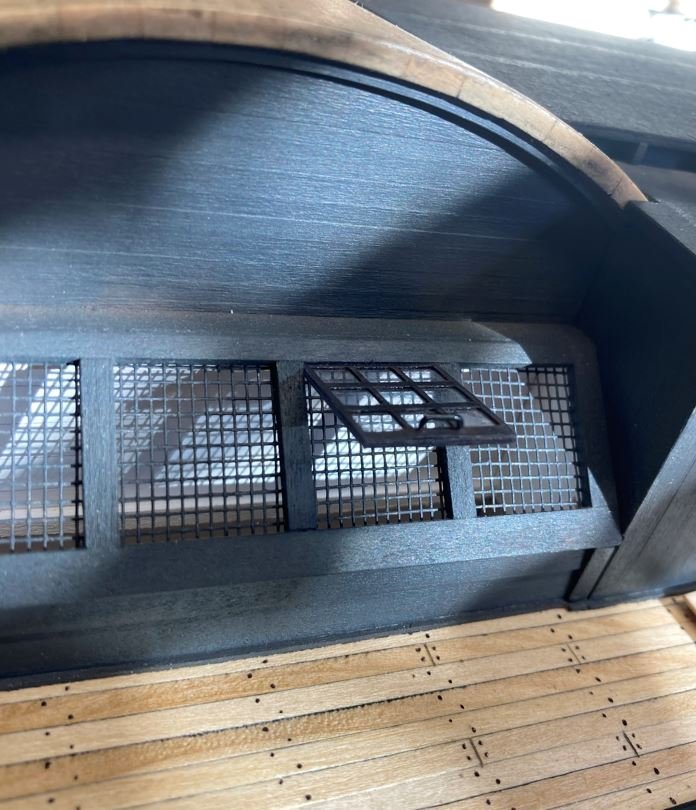
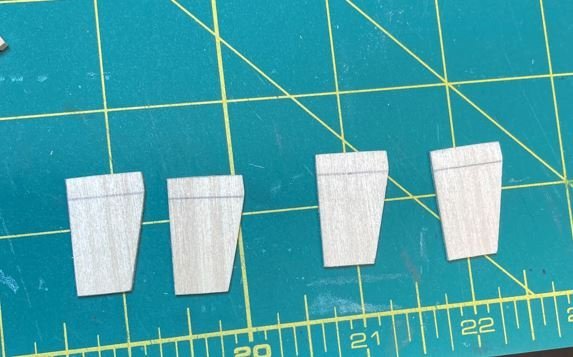
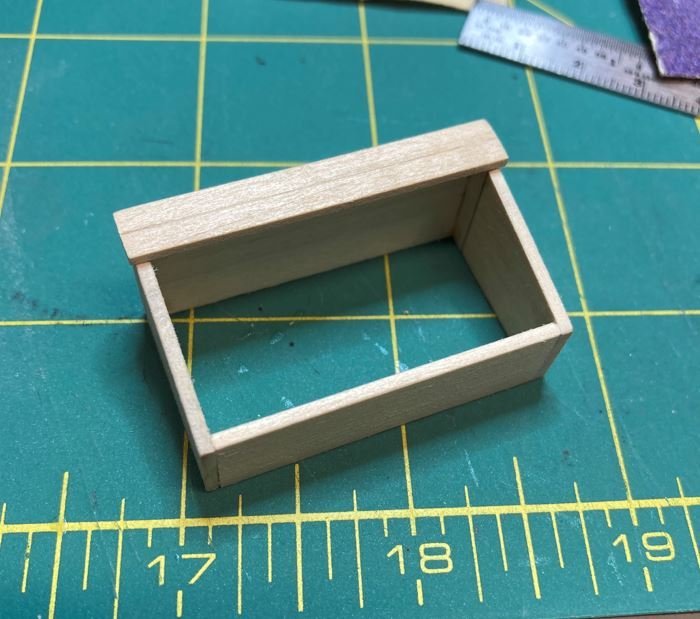
Starting off, I built up the forward skylight. I constructed the basic frames from 1/16" basswood strips.
Then I installed some mesh underneath, which I assumed would provide some protection from drunk crew members falling through when the hatch windows were open. Actually was thinking that it was to somewhat protect the crew on the Gun Deck from flying shrapnel during battles.
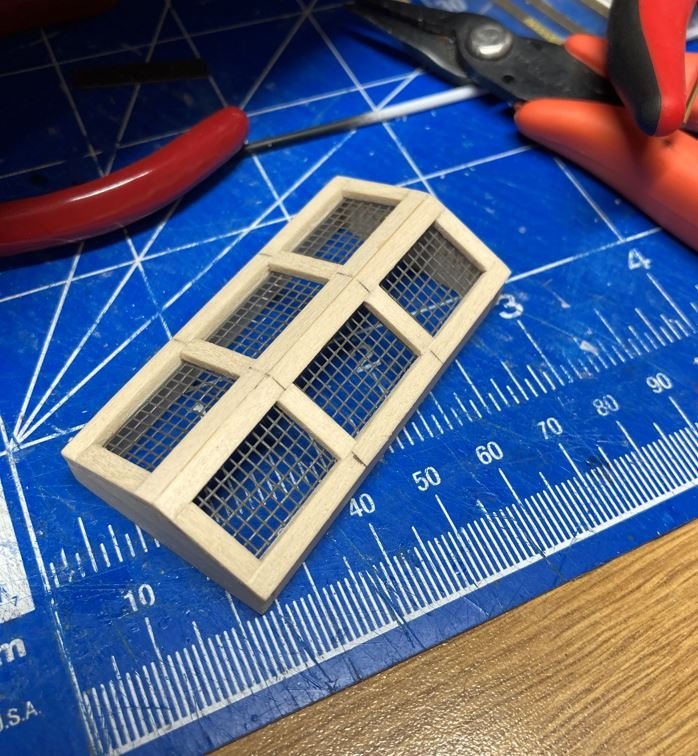
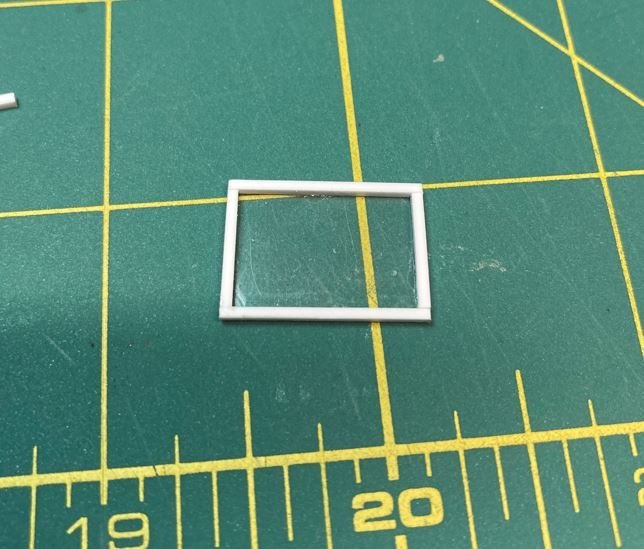
Once I had the basic frames built up, I painted it up and made the window hatches. These were made from .040 square styrene strips backed by clear plastic. This was definitely a tedious process, cutting all the tiny pieces and sanding them to fit just perfectly.
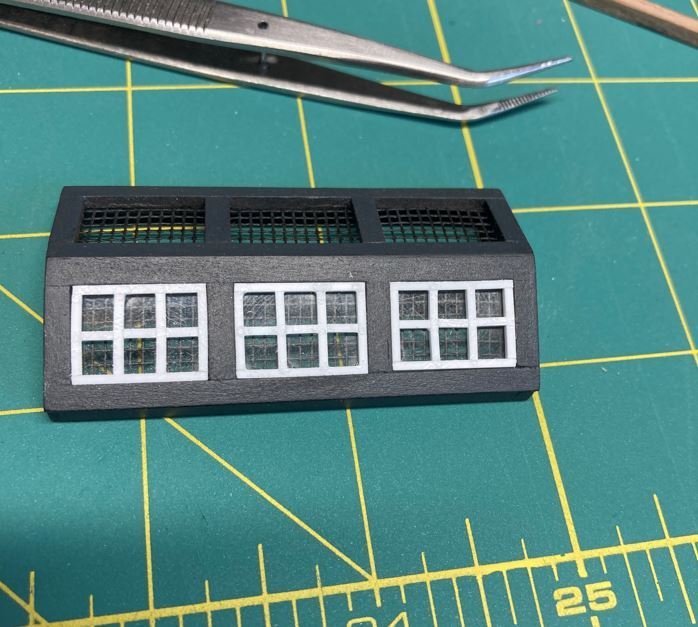
Once they were completed, they were then temp installed in place.
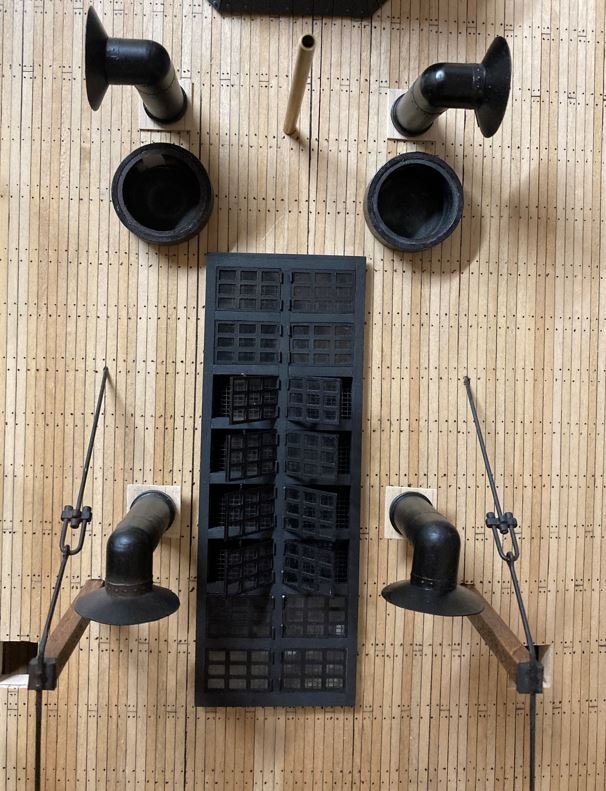
Once the forward skylight was done, I moved on to the center skylight. Again with the tedium, I measured out and started building the 16 windows that make up the central skylight, This area was used a ventilation for the boiler area below. The funnels on the Hurricane deck could be directed into the wind to force cooler air down below and these skylight hatches could be opened to allow the hot air from the boiler to vent out. 19th century air conditioning.
One down 15 more to go.
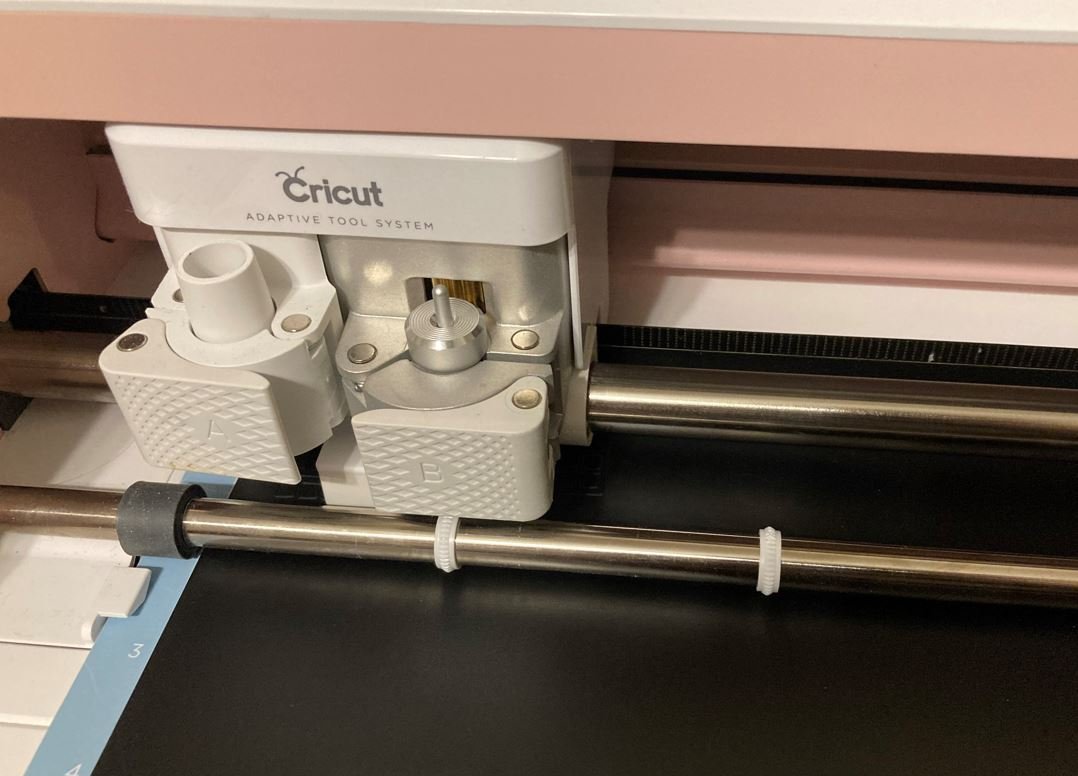
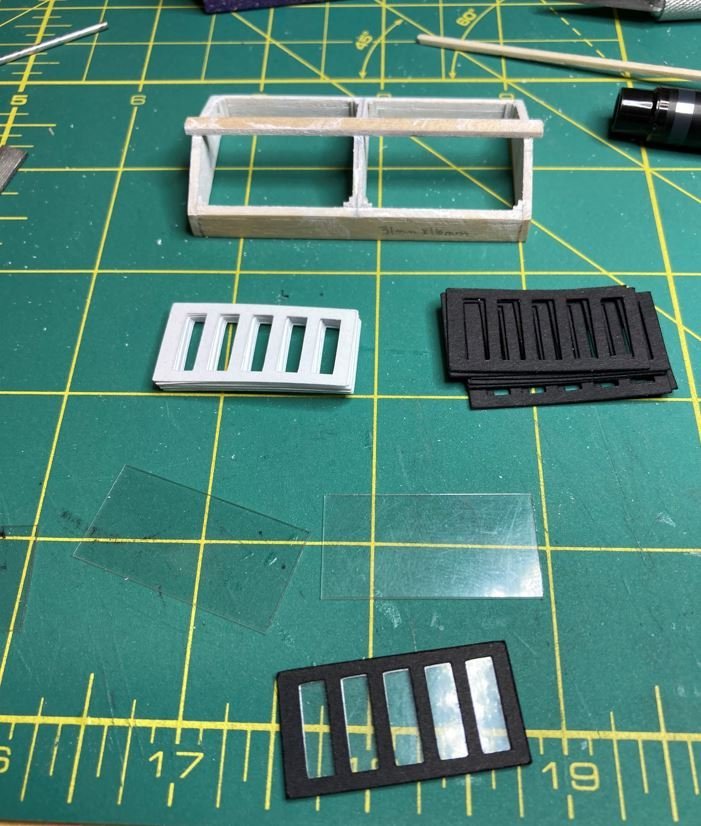
Needless to say, building up all these windows got old really fast. So, I put my little pea brain to work trying to come up with a better, more efficient way to do this. While I pondered a solution, I happened by the Admirals craft room where she was hard at work making stencils for T-shirt on her Cricut. Then it hit me! I wonder...
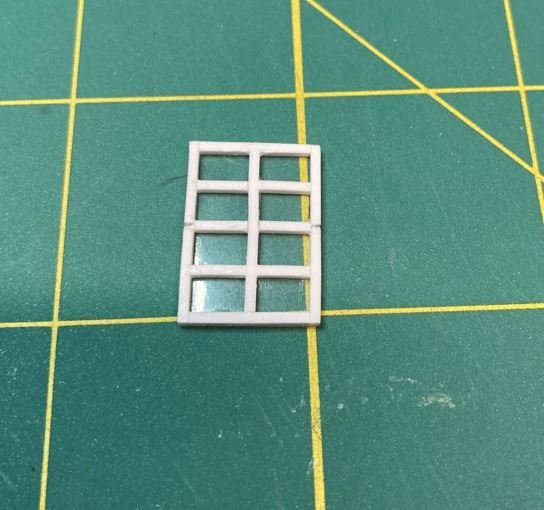
So I inquired with the Admiral as to what types of material could that Cricut cut? Here response was, "pretty much anything you need". Well that really got the wheels to turning, and it just so happened that I had some white 0.020 styrene sheets laying around that I thought would work perfectly for the window frames. So I got a crash course in the Cricut canvass, which is a simplified CAD program and went to work. I measured out the the widow widths and entered everything into the program and away she went.
The end result was perfect window frames. All built in the program and cut in less time that it took for me to put together one the other way.
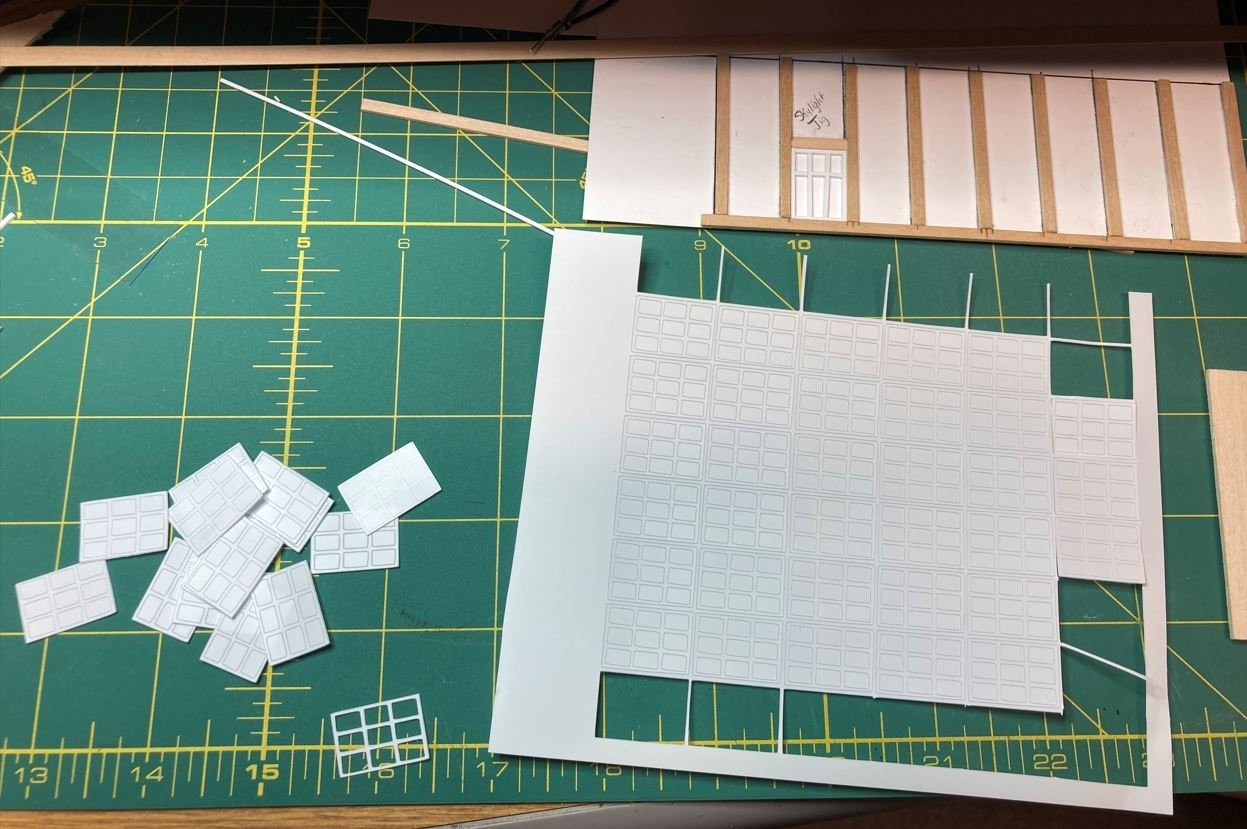
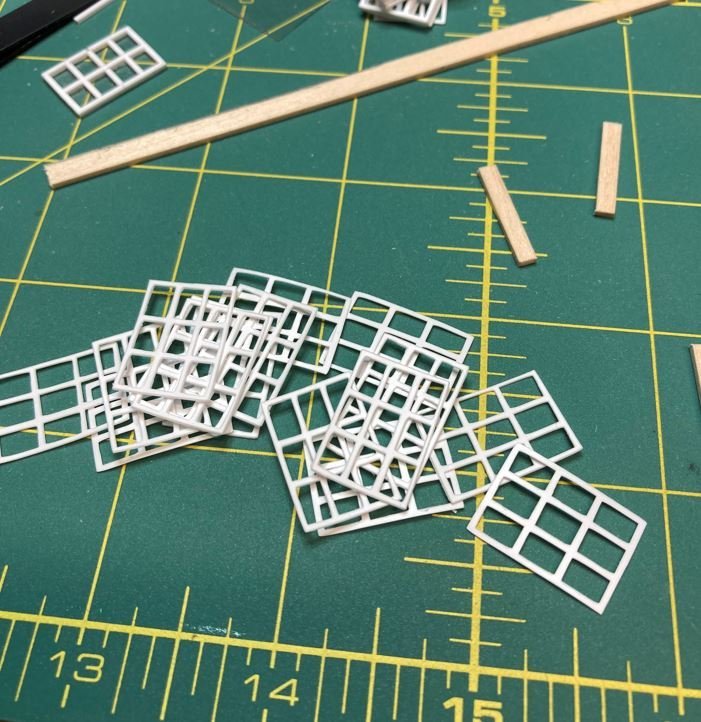
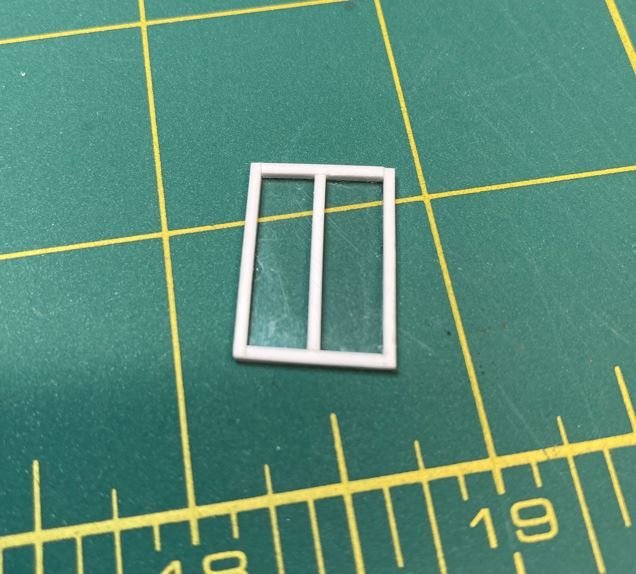
So I took the frames and sandwiched a piece of clear styrene between two of them and started making up the windows.
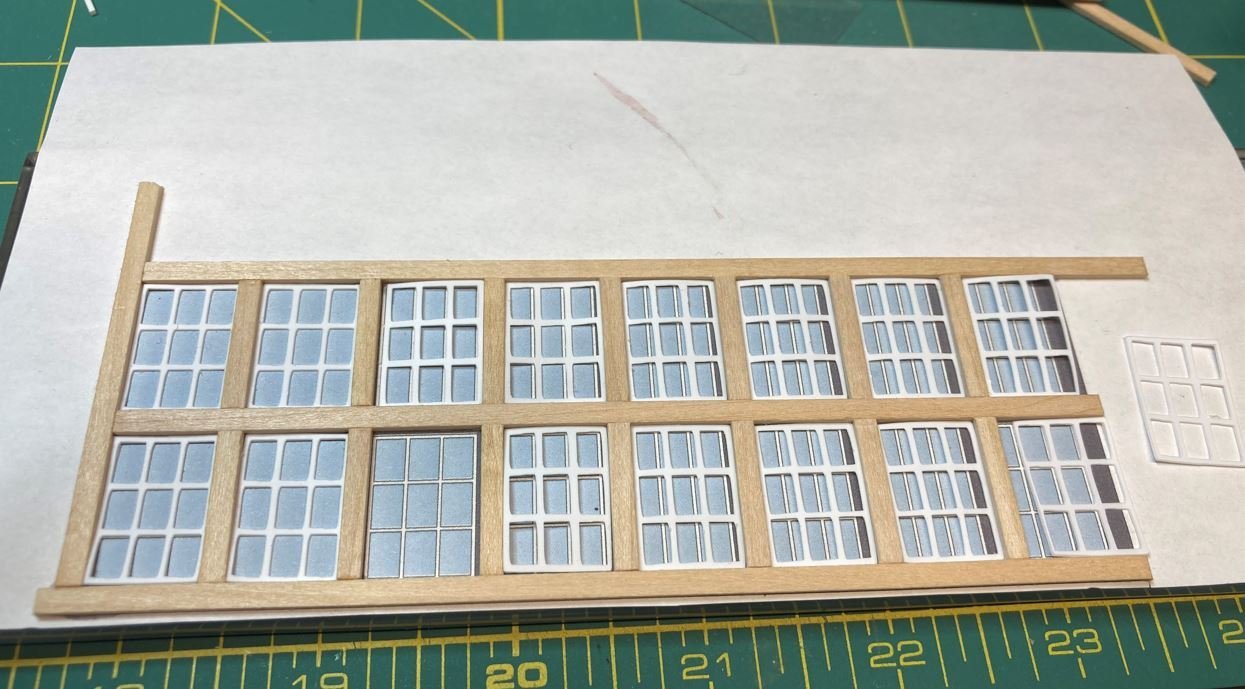
It was at about this time that another idea hit me. I was going to have to paint the tops of these windows black to match the rest of the deck and not stand out like a sore thumb. So I commenced to painting the first one and found out real quick that this was going to take way too much work and not come out like I wanted them to. So it was on to Amazon for some black .020 styrene and back to the Cricut.
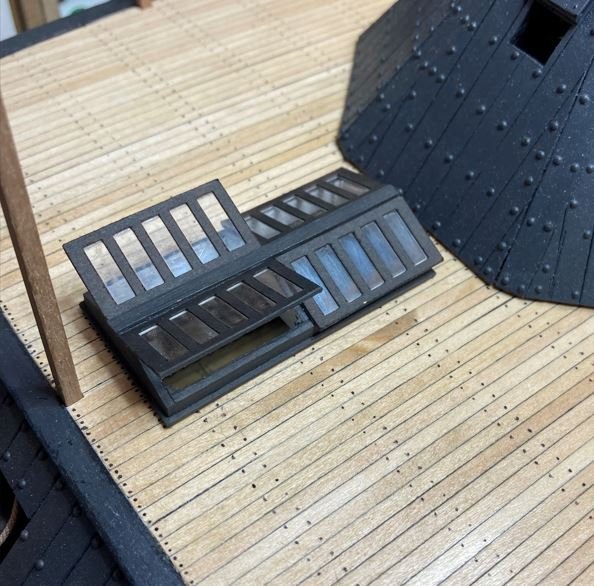
This made thing so much easier.
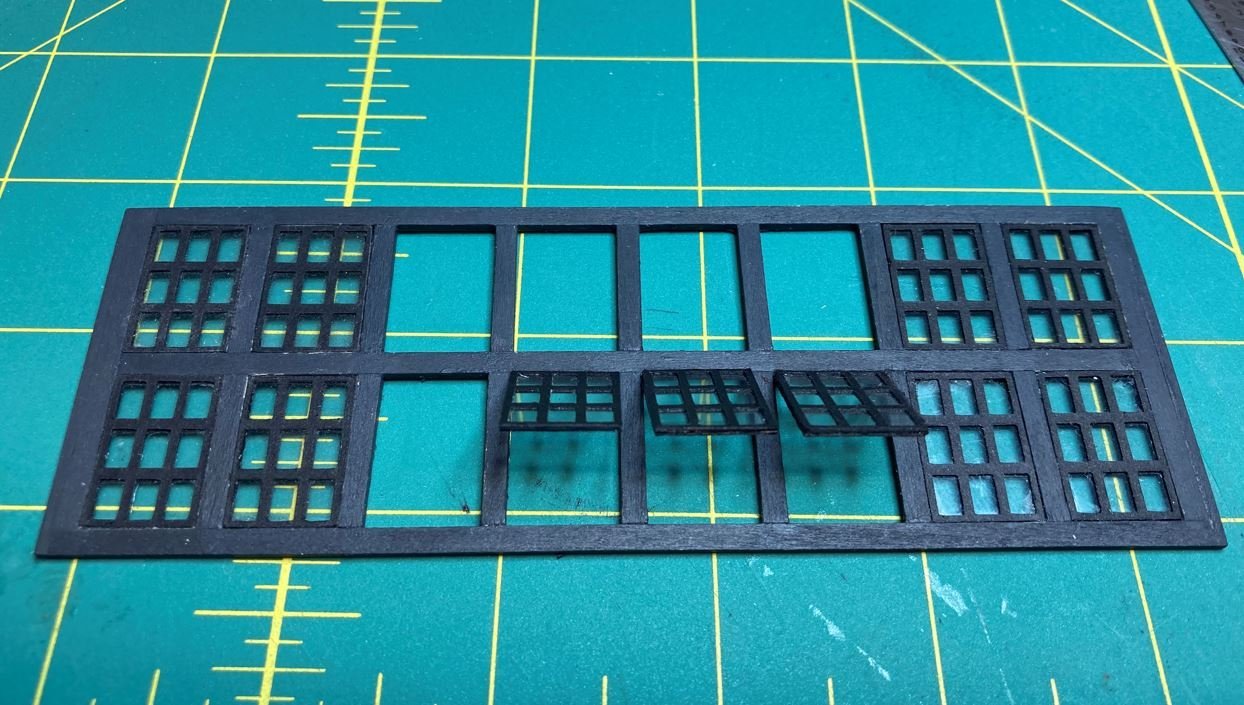
Putting in the hinges.

In place on the deck.
Before getting them fully installed I propped some of them open with prop-rods. Since I was not able to dig up any information on this area of the boat, I followed the HSR plans for this part as I did for the forward skylight.
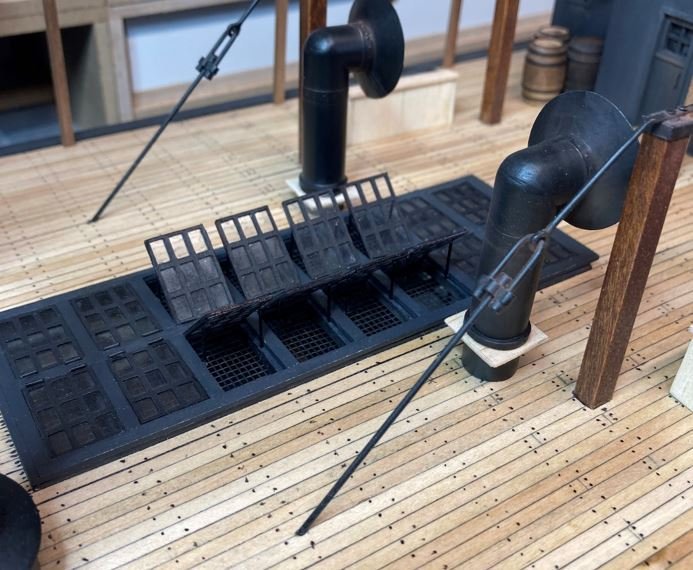
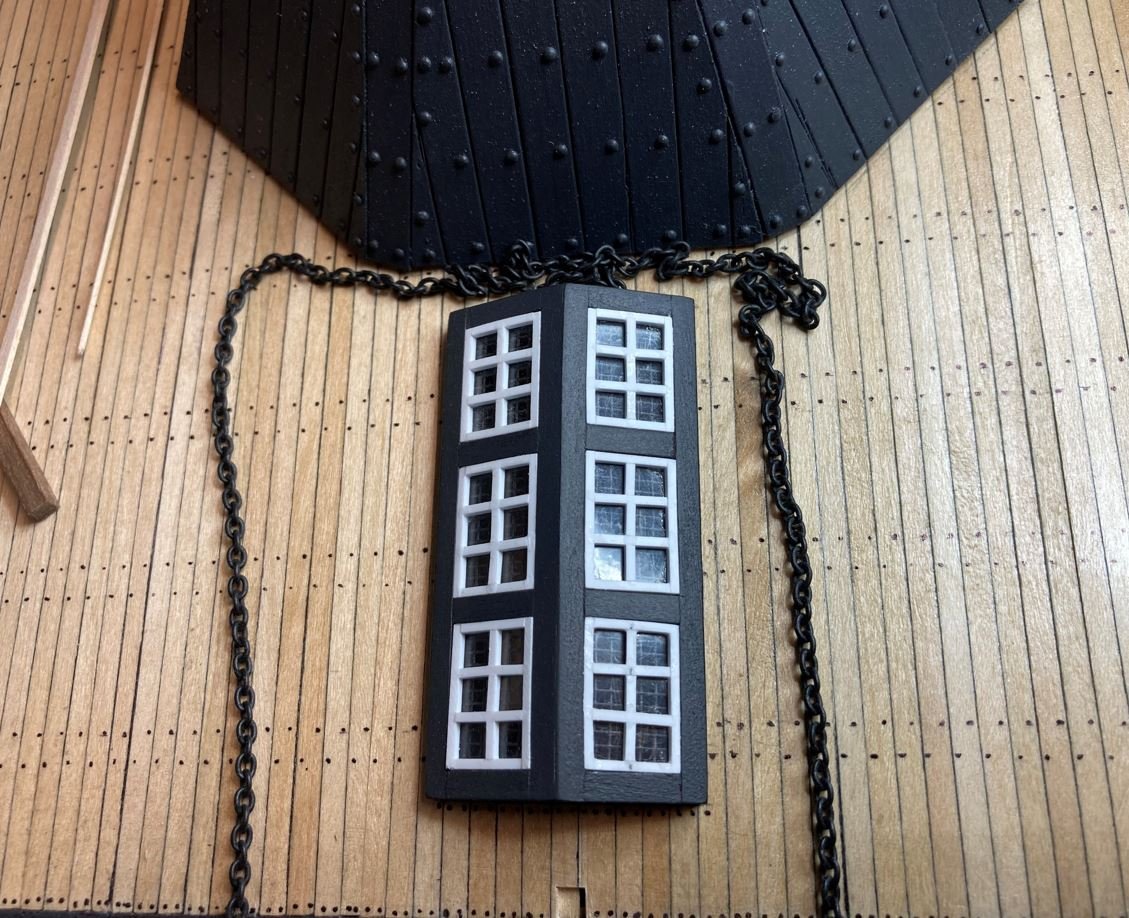
These windows worked out so well, I continued on with the hatches over the paddlewheel cranks. Same methods as before, I sandwiched a clear piece of styrene between a black and white frame and mounted them in place.

First one tested for fit. Since I assumed that these would have been opened manually, none of the pictures show any rigging going to them otherwise, I installed a handle on each one to help open it for ventilation.
Port side all installed, hinges added and a little weathering to see how it looks.

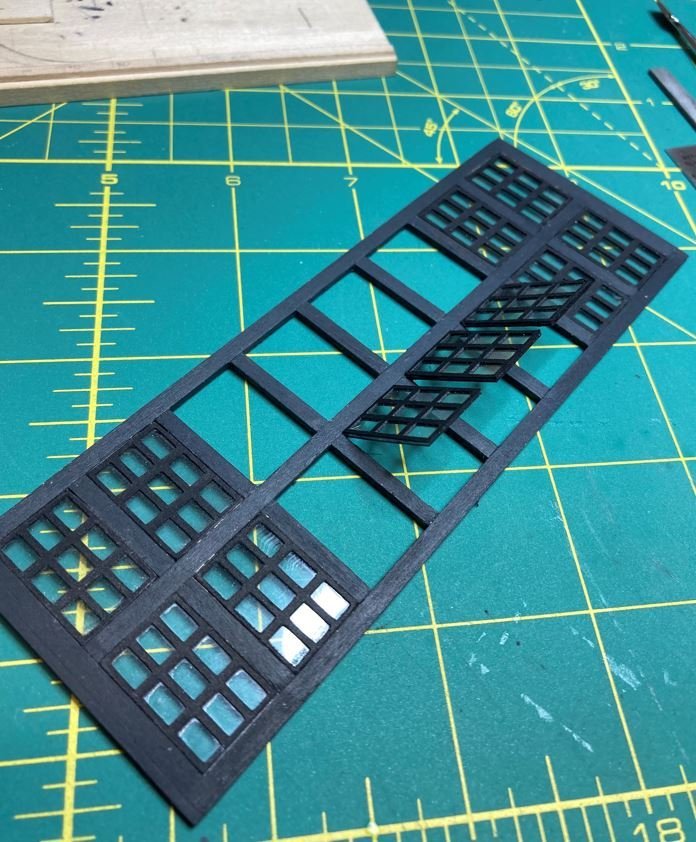
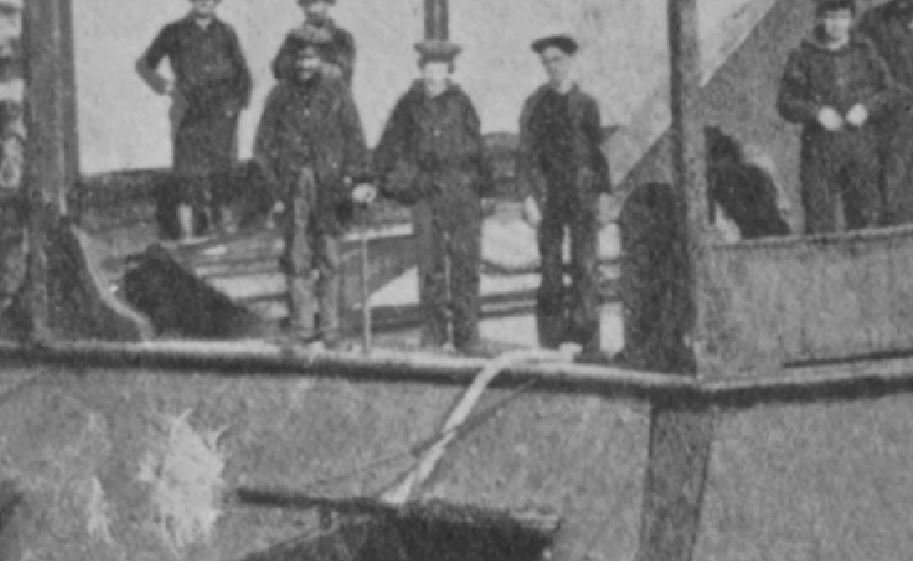
It was at this point when I found the high-res picture of the Cairo and things slowed to a crawl. The Admiral and I were watching a Civil War documentary on the History Channel and they just so happened to have a segment on Iron Clad Gunboats. Well they also had the photograph of the Cairo on there and as they were showing it, I noticed a few details that I had not seen before. I hit the pause button, slow rewind and forward staring at the picture. There were details that I had not seen in the many version of this picture that I had downloaded from the internet. So I figured that there had to be a better version than the ones I had out there, so to the Web I went. Now I know that I said that I found the picture, but I really have to give the credit to the Admiral, she is actually the one that found the high-res version that I have been using lately. So when I mean things slowed to a crawl, the literally did. I spent endless hours staring at the new photo pouring over details I was not able to see before. One of those details was the forward skylight, I had totally gotten it wrong, and so did the HSR.
From the below screen shot you can see the skylight is made up of only two panels on each side and not three. The port forward hatch looks to be fully open while the starboard and both aft hatches are only partially open. You can just make out the frame lines on the port aft hatch that show that they had long narrow panes in them and not a divided lite style like the HSR plans. So I decided to go about rebuilding my first version.
I started with a frame much like version 1. Borrowed the Admirals Cricut once more to make the window frames.
And constructed version 2. I have to say that a lot of work went into version 1, but I like version 2 much better.
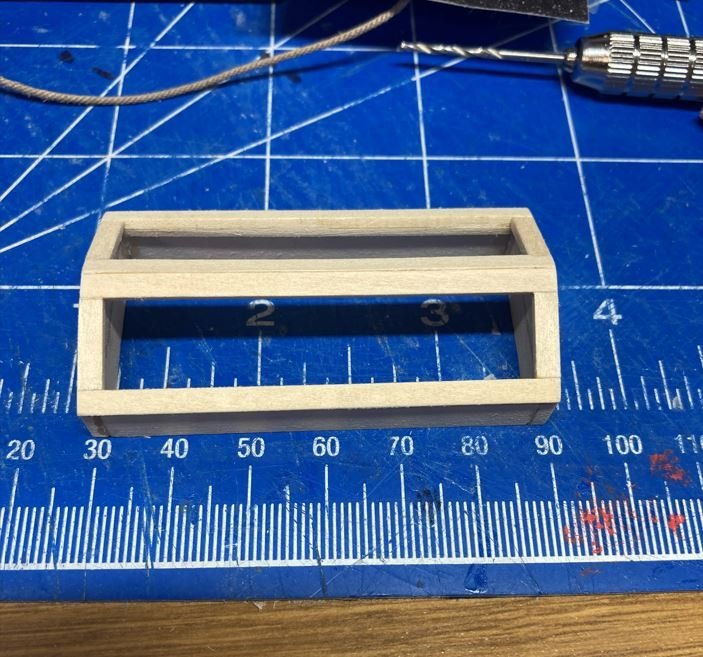
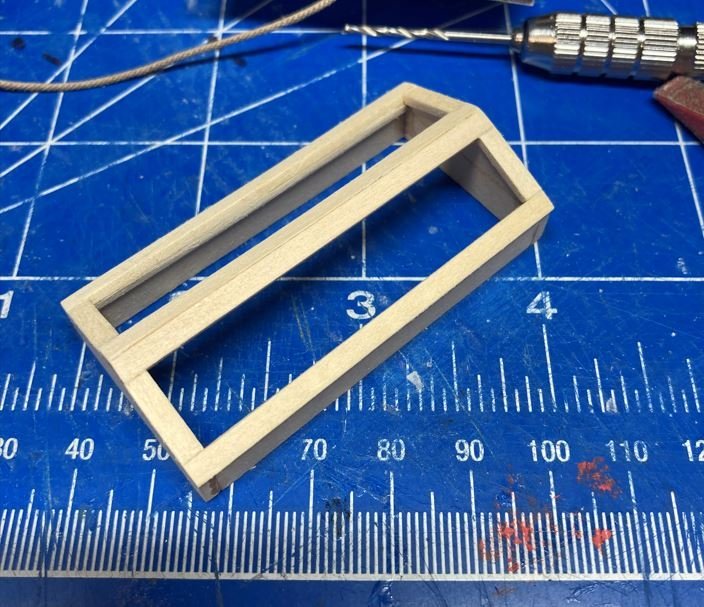
Next up was a newly discovered feature that I have been discussing at length with Johnhoward over on the St. Louis build. I mentioned this feature in an earlier post (#462) of what looks to be a deck access hatch from the Hurricane Deck to the Gun Deck below. Well I decided to go ahead and build these up, since it would make sense that there would be some sort of access the lower deck to aid in resupply, as well as add a easier way for the crew to scramble below deck during battles. I am still in the research phase of this part, but I wanted to see how they looked and if it made sense to have these.
The side walls have been cut out.
Structure complete, minus the hatch window.
Hatches in their proposed location.
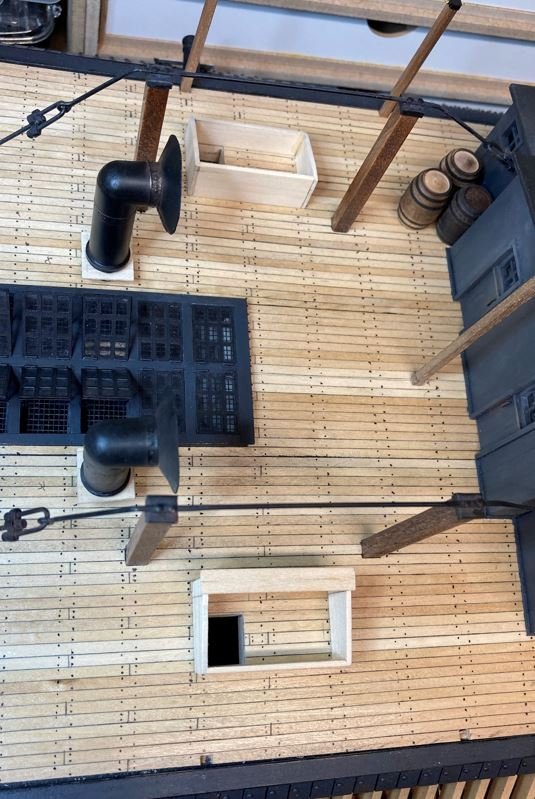
Hatch window constructed the same as the others on the skylights.
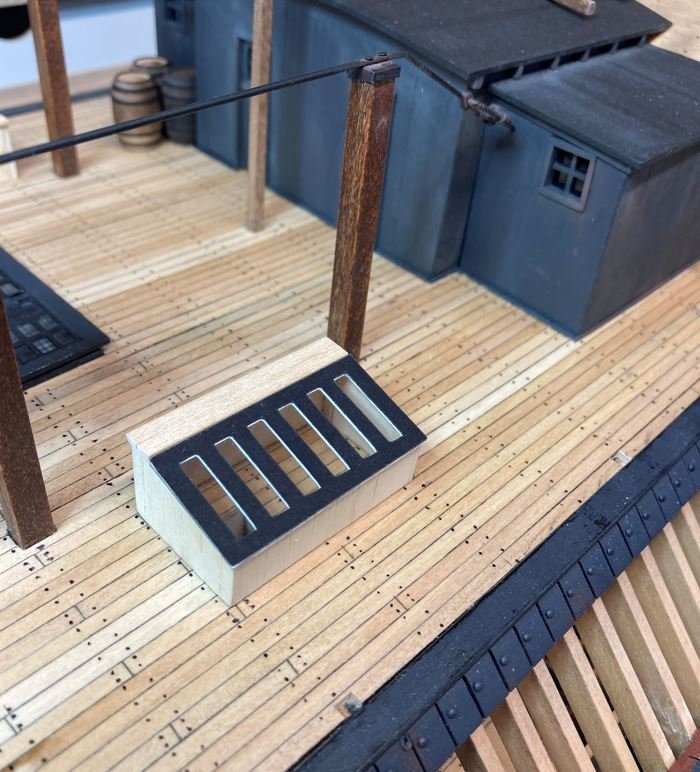
I am going to hold off on painting these until I can uncover more info on their actual existence. Seems like they would be, according to the picture, but we'll see.
Last up was the construction of the davits and anchors.
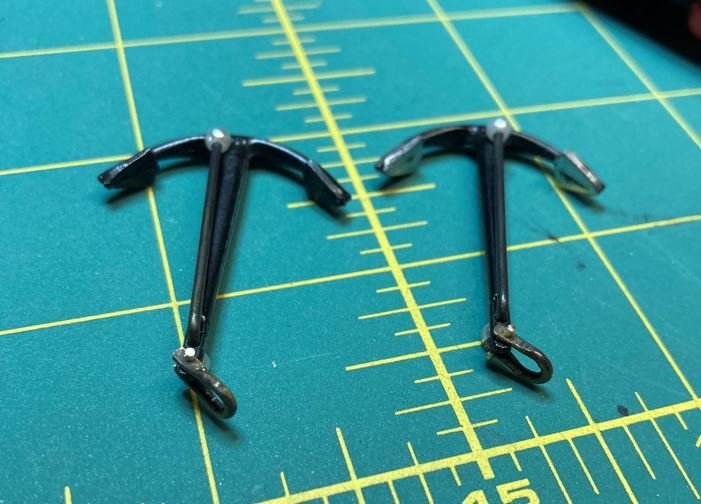
The anchors were pretty much straight forward. I purchased a couple of 38mm Corel anchors from Model Expo a while back and figured they would work perfectly for the scale of this build. They were standard, wooden stock anchors that I converted to iron stock ones, more like what was aboard these Iron Clads.
Some of the mold seams have been filed away and the iron stock was made from brass wire and beads.
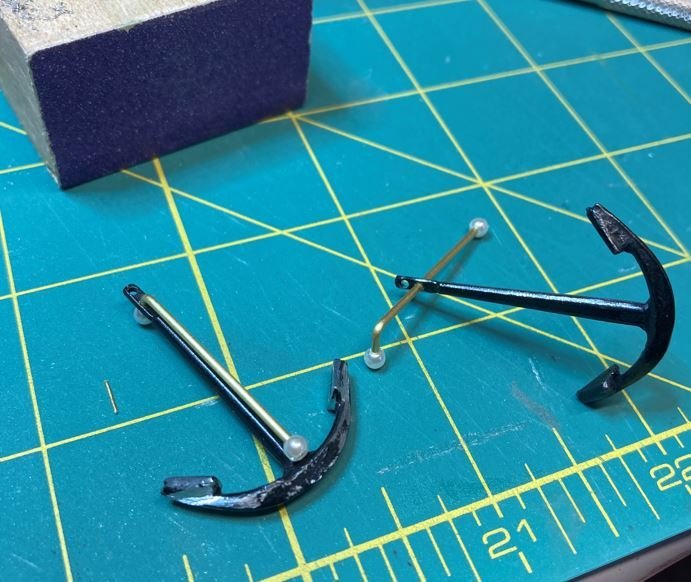
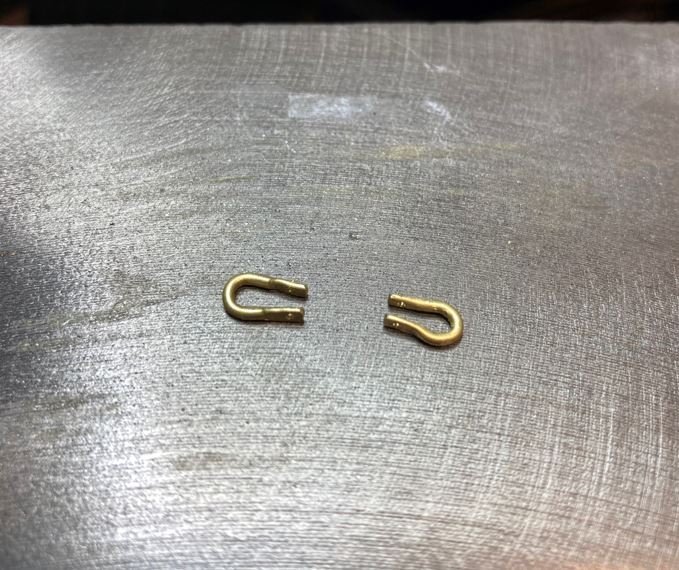
The shackles I made out of brass wire as well, just hammered flat on the ends and bent to shape.
The finished anchors, minus paint.
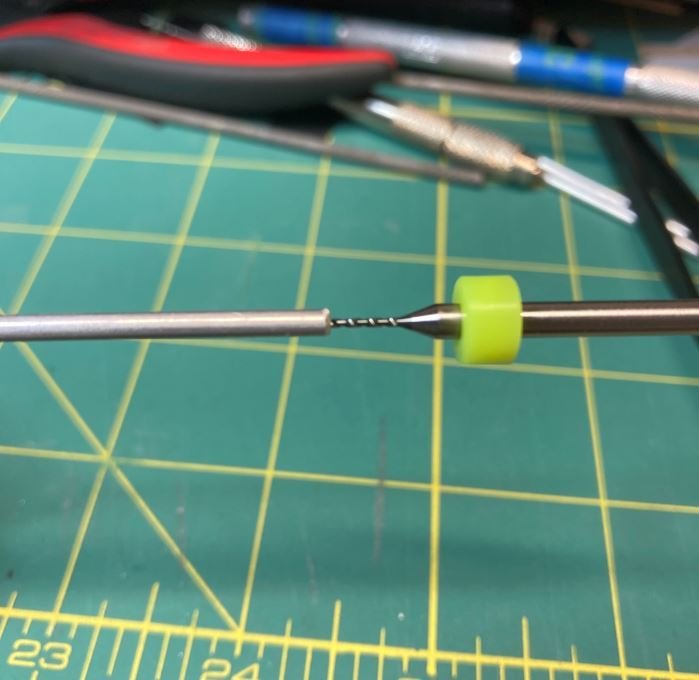
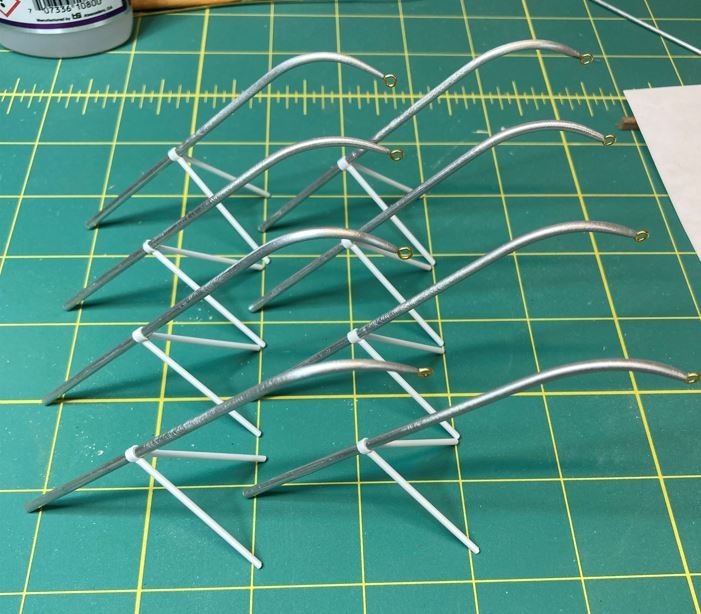
Finally the davits were constructed. These were made from 1/8" aluminum rod. I started by drilling a pilot hole in one end of the rod to receive the eyebolt to form the ring for the blocks.
I then tapered the end to almost a point by chucking the rod in my drill and using a fine file to the desired taper.
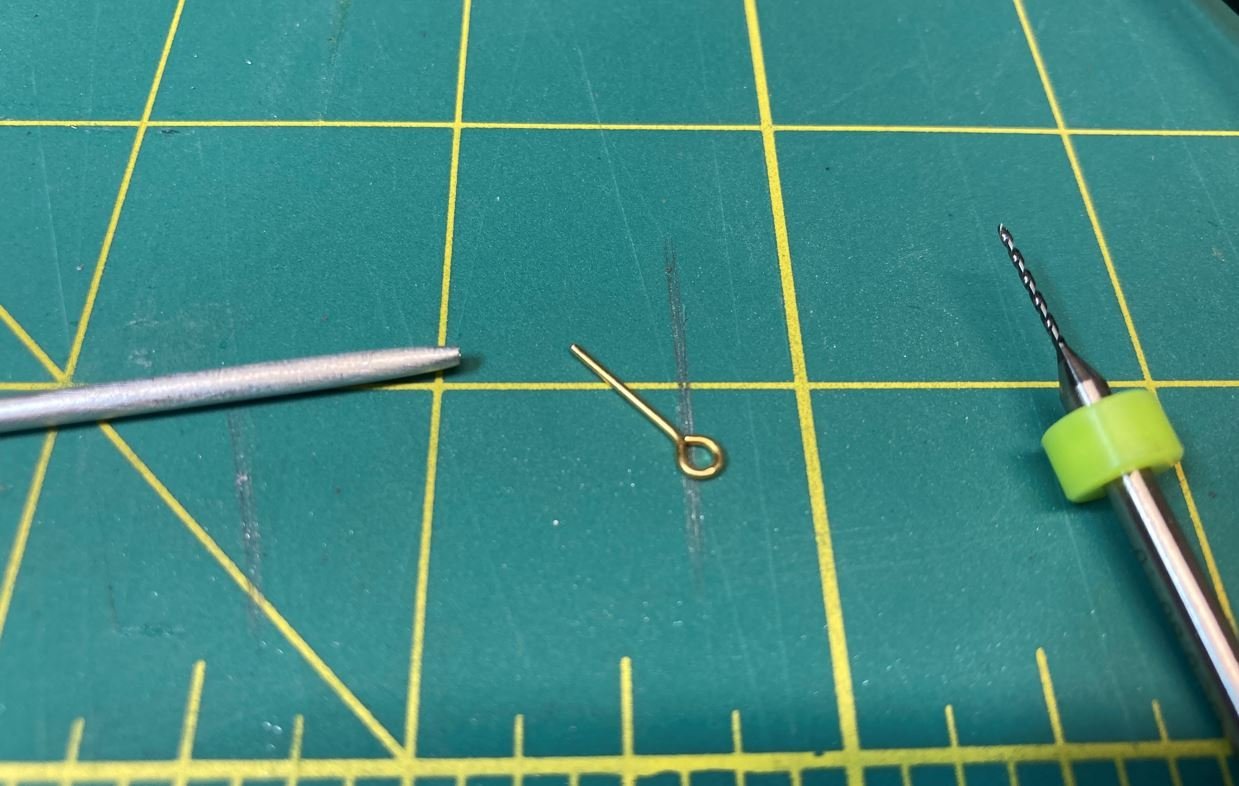
Then I made up a jig to get all eight davits a consistent radius on their bend.
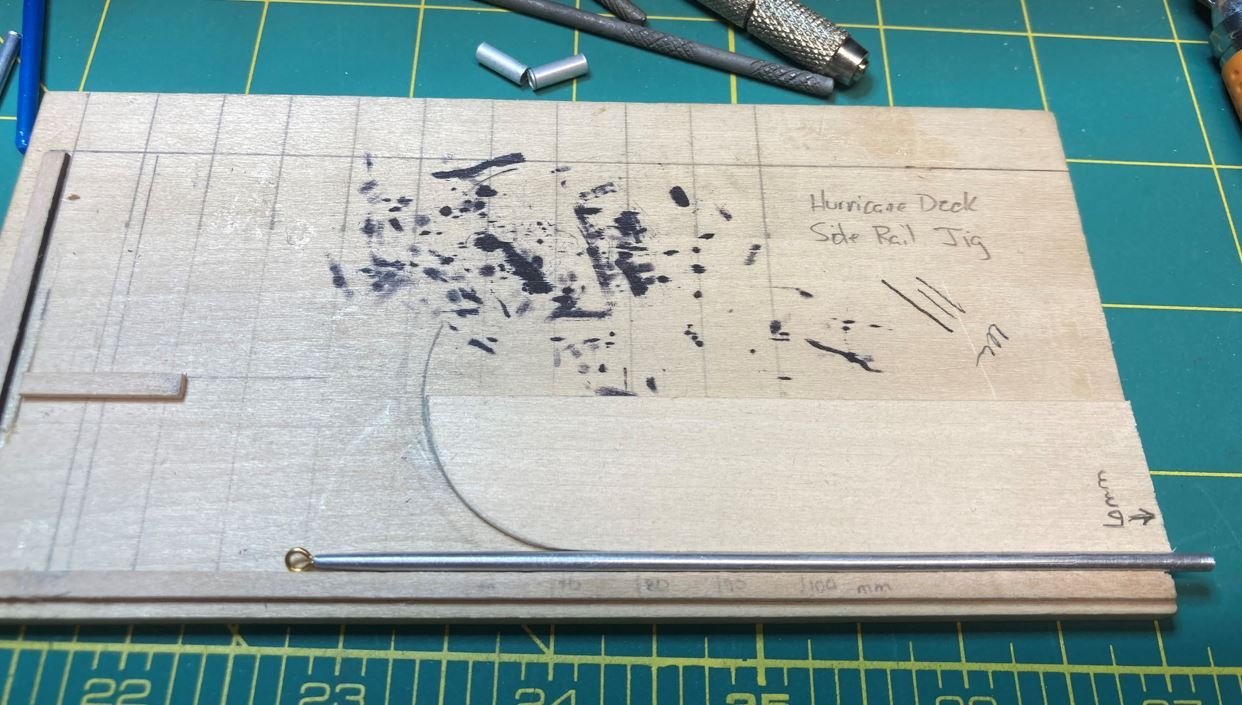
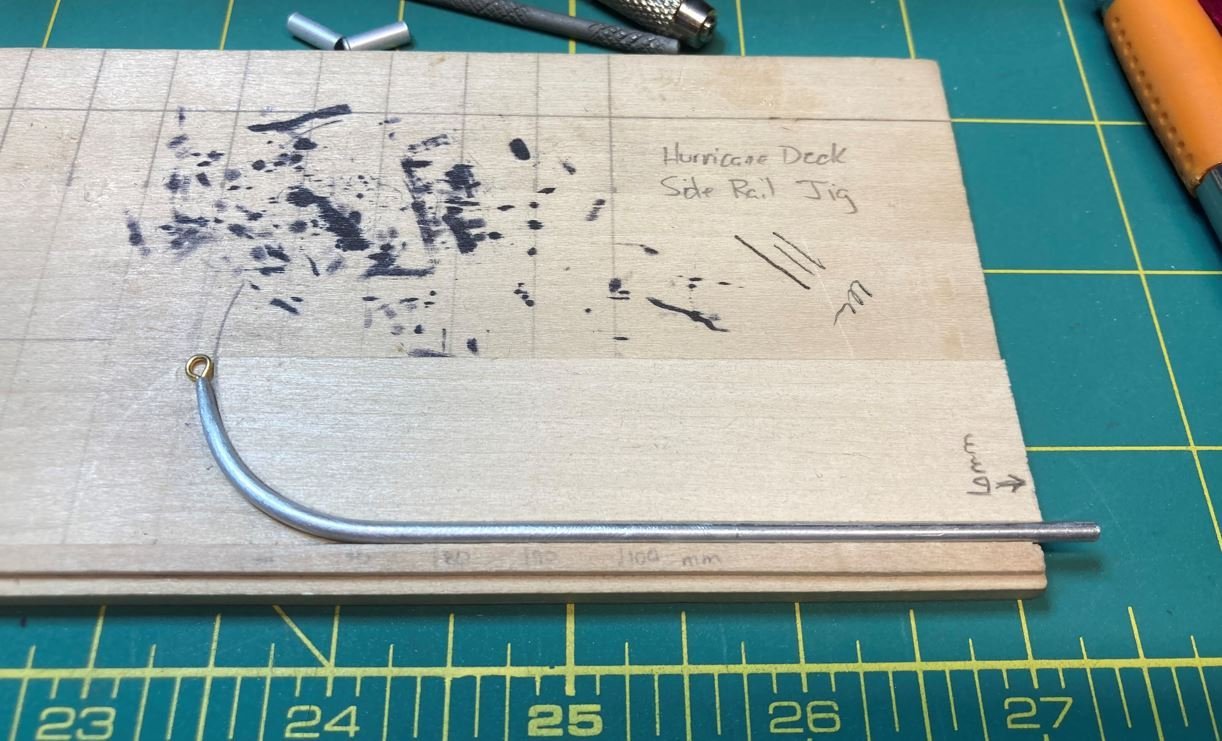
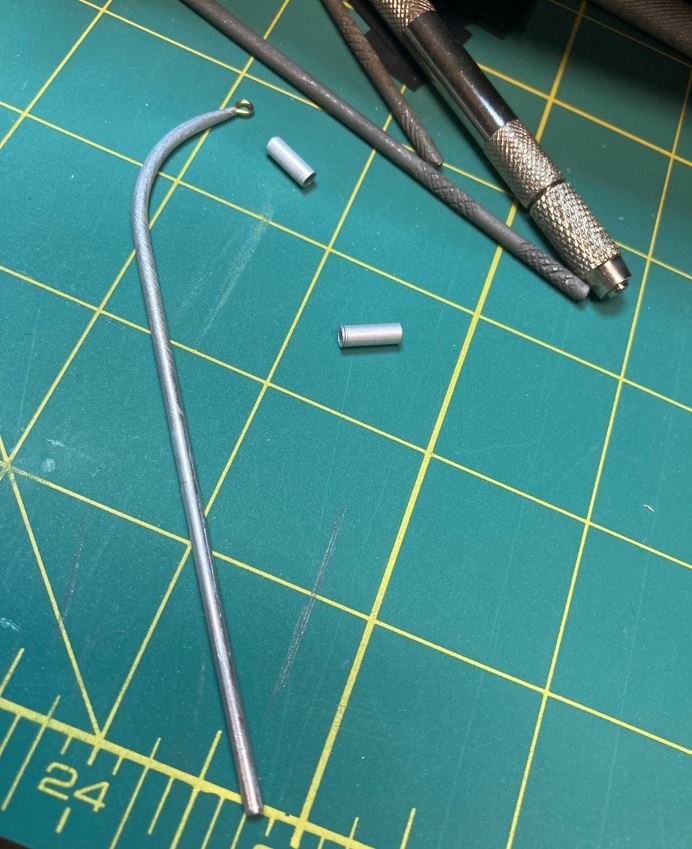
Next up was the support brackets. I started off making these out of 1/16" aluminum tube for the supports and 1/8" ID tubing for the collars. I made up another jig to keep the angles consistent and then after several failed attempts to solder the support rods to the collars, I finally gave up.

Version 2 of these, I decided to go with styrene rod and tubing. This method worked so much better and with a dab of CA I was well on my way with a solid joint between the collars and supports.
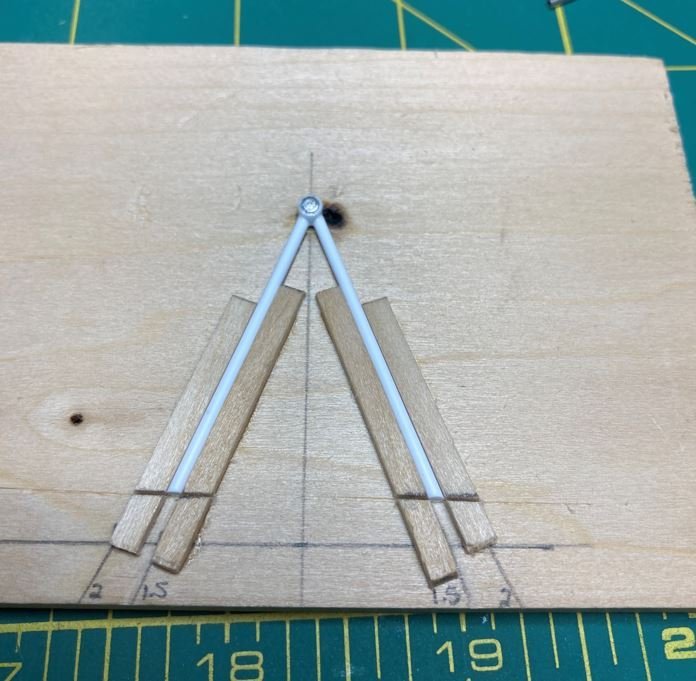
All eight completed davits, ready for paint.
Now it is on to getting the anchors and davits painted up. I still have more research to do on the access hatches and I will start working on the hammock nets. Hopefully I will have those completed by next update.
As always, thank you all for stopping by and liking my work as well as all the kind comments and input.
-Brian
-
1 hour ago, johnhoward said:
I think it would be fair to conclude that this could be any of the City Class ironclads unless someone can determine the color of the Smoke Stack Stripes on a black and white photo. There were some subsequent changes made to most of the "Sisters"which can minimize confusion.
Johnhoward,
I agree 100% with that assessment. What I wouldn’t give to have a time machine to go back and have a look at these boats, not only in action, but to also see their construction.
As stated before, I am a novice at best, at maritime research, and to be honest, I have relied heavily on the information that you and your group have found along the way and have presented in your build log. Needles to to say there is no way that I could thank you guys enough for putting that info out there for myself and others that decide to take on the challenge of building these unique boats.
While my research is nowhere near as extensive as your group, I feel that given my lack of experience, I can still say that I have put forth my best effort to make as true a representation of this boat as I can, and I will always be more than happy to contribute in any way to help you guys (and others) as well. This is one of the things that I love most about the MSW community, the willingness to share all sorts of information, tips, tricks and other data that will help each modeler be successful in their builds. Not to mention, what my old boss used to call “learning opportunities “ to improve.
I am anxious to see if you are able to uncover any additional information on the deck hatches. I think this will go a long way in uncovering the mystery of how they were resupplied efficiently. Over the weekend, after another couple of hours of staring at the Cairo photograph, I believe I have uncovered another discrepancy in the placement of the aft funnels. From the looks of it, I believe they were mounted a little more inboard than the plans are showing to put them more in line with the forward funnels. I also think that they may have had a little more forward placement to put them between the third and fourth guns. This may be a point of perspective, but given that the starboard aft funnel is actually showing to be in front of the aft starboard hog chain post, I believe my theory may hold water. I want to look into this a bit more before going in and cutting new holes I my deck. The good thing is that if I do have to move my funnels, the newly found hatches may be end up being located over the holes that I currently have for the aft funnel location. We’ll have to see. Thanks again for all of your groups efforts and for putting up with my endless questions.
-Brian- Keith Black, Canute and mtaylor
-
3
-
-
3 hours ago, johnhoward said:
How was the identity of the USS Cairo photo documented?
Johnhoward,
I can go back through some of the reading material to verify where I read about this picture being the Cairo. I’m pretty sure Edwin Bearss mentions it in his book Hardluck Ironclad. Also, it has been almost eight years since I visited the Cairo museum, but I am almost positive that they mention something about the photograph on a plaque by the huge mural they have on the wall of the museum with this same picture. Not to mention the Vicksburg NMP website also verifies it here. I know this doesn’t give very many details about the validity of the photograph or where they arrived at this claim, but one would hope the museum personnel would have done their research before posting this information.
-Brian
- mtaylor, Keith Black and Canute
-
3


USS ST LOUIS by thorn21g - 1:24 - POF - Civil War Ironclad - Gateway Model Shipcrafter's Guild
in - Build logs for subjects built 1851 - 1900
Posted
Here is another thought. To keep the ash from being blown around everywhere they employed an ash chute to dump the waste overboard. This could be similar to the trash chutes you sometimes see on multi-story buildings under construction.
Maybe something like this.
The chute would have been flexible, made of canvas or asbestos and could have been folded or rolled up for easy stowage.
-Brian