-
Posts
946 -
Joined
-
Last visited
Content Type
Profiles
Forums
Gallery
Events
Posts posted by mbp521
-
-
Eric,
Funny with all of today’s technology and precise laser cutting CNC machines that there can be such a significant difference with the frame widths from one model to the next. One would think that they would all come out exactly the same each time. Well maybe in a perfect world.
Toni had a lot of great information on her presentation this morning and your comment above was, in my opinion, one of the most valued. Fix your errors as soon as you can before it gets too late. Sound advice! I look back on some of my earlier builds and think of how much I have learned over the years and that I can’t believe I built something that way and left it. All learning opportunities and growth as a model builder.
Great job on getting the frames fared up. This is one of the parts of a build that I dread the most since getting the hull shaped correctly is critical in the overall appearance. It’s amazing at how much just a millimeter out of whack can affect everything.
-Brian
-
1 hour ago, Lewes 5 said:
Beautiful job !! Question . What kind of cord are you using for your breeching ropes ?
Lewes 5,
Thank you for the question. I used .045 (1.14mm) rope from Syren Ship Model Company. Chuck has some fantastic and great quality products for model shipbuilder on his site.
-Brian
- Canute, FriedClams, Keith Black and 1 other
-
 4
4
-
14 hours ago, mtaylor said:
'm trying to remember where I saw it but some of those vessels had "armored" hatches which were closed for loading.
Mark,
I believe that the USS Tennessee and the USS Atlanta both had the armored gun ports. Ironically, both of these ships were captured CSS ships, which poses the question, did the Southern shipbuilders come up with the idea for the armored ports or did the Northern shipbuilders? I do know that the City Class gunboats port doors did little more than shed some of the rain water out of the gun deck. The timbers they were constructed from were only about 2" thick and would provide minimal protection from musket fire and zero defense against a cannon ball.
You also have a good point on maneuvering the guns around. The smaller ones wouldn't be as much of an issue as the larger ones. However, Cairo's guns ranged from 3550 lbs. on the Parrots to 8465 lbs. on the 42 pounders. That still a lot of iron and wood to be moving around in such tight quarters, especially with only six men per gun.
Also, thank you for clarifying the "Training Tackle" term for the running rig on the cannons. My nautical terminology glossary is a tad bit limited.
-Brian
- Keith Black, Cathead, mtaylor and 2 others
-
 5
5
-
Don, Pat, Steven, Gary & Eric, Thank you so much for the kind comments. I appreciate your continued support.
5 hours ago, mtaylor said:Beautiful. I hate to ask this but are the breech ropes correct? It appears that they might be too short for the gun to recoil. Since this on is pretty much buried it may not really be seen or noticed when finished.
Mark,
Thanks for the kind comment and not to worry about asking about the breech ropes, this is an interesting question which could possibly use some more discussion. While they do look like they are somewhat short, I based my rig on some of the research pictures that I found on how the 19th century naval guns were rigged. Most of the ones that I found show breech ropes that look like they barely allow for clearance to reload after recoil, most of these navy ships had almost vertical gun ports. Since the gun ports on these Iron Clads were sloped at 35° angles (port and starboard sides) & 45° angles (fore and aft sides), I would guess that this drastically reduced the amount of clearance for reloading. I'm wondering if the breach ropes were just used to keep the guns from recoiling too far back given the limited space on the gun deck and were only used to keep most of the strain off the smaller ropes and blocks of the running rigging and the running rig was used to run the guns in and out for reloading. Many of the examples I used show fairly short breech ropes.
One of the examples that I used can be found here at this link. This was a drawing that I had found a while back and Eric posted the link in a previous post. It is a beautiful break down of the Cairo showing the artists interpretation of what she may have looked like on the interior as well as a breakdown of her guns.
Now I do have to admit that I did reverse the eyebolts for the running rig and the breech ropes since with the sloped sides it made it impossible for me to install the keeper pins for the breech rope anchors, so they had to be placed through the gun ports. A minor deviation that hopefully will not be noticed too terribly much. I am also not 100% sure that I did get the lengths right due to my interpretation, this was just my best guess. However you have got me to thinking more and more about it and I may need to go back and revisit some of my research. 😁
-Brian
-
Hello again everyone,
Back with another update, this time with more to report.
Before I start though, I wanted to show a couple of acquisitions I recently purchased. First is a little reading material I found "What Finer Tradition: The Memoirs of Thomas O. Selfridge, Jr., Rear Admiral U.S.N". Thomas Selfridge Jr. was Captain of the Cairo at the time of her sinking. Along with the book I have an autograph of Rear Admiral Thomas O. Selfridge Jr. himself.
A big thank you Keith Black for sending me the info for the autograph, this will make a nice addition to incorporate into the display when I am finished.
Now on to my accomplishments since the last update.
First up was work on more of the steam plumbing. Before I was able to complete the plumbing, there were a couple of things that needed to be done first. Since the some of the steam exhaust plumbing is attached to the smokestacks I was going to have to install the boiler. But before I could do that I had to verify all the wiring was good and the lights worked since the wiring was all under the boiler assembly.
Testing out the lighting.
...and everything seems to work. And yes the pictures are a little out of order, since I forgot to take the pictures of the lighting before the plumbing was done.
So starting the plumbing, I needed the four exhaust pipes, two of which ran from each of the pre-heaters to the smokestacks and out into the wheel house.
This part was one of those projects where I felt like I painted myself into a corner, since there were several walls that needed to be in place before running the pipes, and also needed to be in place to line up the holes. For the piping, I again used styrene rods. This material is so easy to work with and coupled with the heat shrink rings, gives the perfect illusion of pipefittings.
Rearward exhaust pipes.
Forward running pipes going in. I worked out a solution to be able to run the plumbing through the bulkheads without having to build all of the interior walls. I used a couple of short pieces of brass tubing to form a coupling between the boiler room bulkhead and the engine room bulkhead. This allowed me to insert one short piece from the pre-heaters to the couplers and the longer piece can go the length of the boilers to the smokestacks. The coupler also functions as a heat shield against the timber walls.
Since none of this plumbing survived the recovery, this was another build that I used my best judgment on and some builders liberties. I used the drawings that the guys building the St. Louis used as my design (I didn't post that picture here since the picture belongs to their build log but if you would like to take look at it it, the drawing can be found at the following link, post #21).
Before the couplers were added. I wasn't able to make the multiple bends in the styrene rods and get everything lined up properly.
Couplers added.
All painted and in place.
Next up was finishing up on the bollards. These have been in place for a while, but it was time to get them finished up and painted. I used some of the aluminum foil tape to make caps for the timbers to prevent them from prematurely rotting from water penetrating the exposed end grain.
First cap in place.
All timbers capped.
Painted up.
As of this posting, I realized that I didn't take a picture of the finished bollards in place. I'll see if I can remember to take some and post them in the next update.
Next up was the placement of the inside gunwales (I'm guessing that is the proper term for them on this type of boat) along with the eyebolts for the cannon rigging.
Waterways added to the bottom.
Port and Starboard sides in place, painted and varnished.
Next on the list was the construction of the Pittman arms. Very little of these will be seen, but I wanted to put some detail in them without going overboard.
Finally for this update, was the rigging of the first cannon. I started with the aft cannons, the 30 pound Parrot Rifle and 32 pound Smooth Bore due to their placement and accessibility. These need to be installed before I can complete the Captains quarters due to the confined space available. As it is, these were a royal pain to get the outboard rigging in place. The first cannon I completed was the 30 pound Parrot Rifle.
I started the rigging in my casemate mockup to get the correct lengths on the ropes.
Breech ropes in place.
Ends seized.
Photoetched hooks for the blocks and running rigging.
Forward assist ropes in place.
Now the fun part, placing them in their ports.
Rear assist rigging in place.
One final picture, I am not sure what happened here, but I can promise you the cannon is not bent. I guess it is all in the lighting, but I just wanted to get a view of the cannon in it's port.
If I may, I have to give plug to Chuck over at Syren Ship Model Company for the outstanding quality ropes, hooks and blocks I used for the cannon rigging. He doesn't fool around on getting them shipped to you either. From ordering to my mailbox was about three days. Thanks Chuck!
That is all I have for now. I am going to finish up on the 32 pound smooth bore, more of the internal walls, and the crank arms for the next update.
Thank you all for stopping by and the kind comments and likes.
Until next time, please stay safe and well.
-Brian
-
….and away you go.
Looking forward to another wonderful and informative build from you Eric.
Love the property, we are in the process of getting our property the way we want it as well. We’ve only been going at it for a little over four years and still have a long way to go, but just like model shipbuilding, it takes time and patience.
-Brian
-
1 hour ago, FriedClams said:
Great progress Brian. The paint job looks terrific and a good choice on the cut-away color.
Gary
Thank you Gary. I’m liking the way it’s coming along and the paint definitely makes look more complete, even though I have a long ways to go.
-Brian
- FriedClams, mtaylor, Cathead and 1 other
-
 4
4
-
-
Pat/MCB/wefalck/Eric,
Thank you all for the valued input. I am definitely happy with the way the colors turned out.
-Brian
- Keith Black, mtaylor, Canute and 1 other
-
 4
4
-
15 hours ago, Keith Black said:
Brian, I was originally unsure but seeing it done I like it a lot. As Mark requested, more photos if possible, please.
You need this for your Cairo collection.
https://www.ebay.com/itm/154046974912?hash=item23ddea4bc0:g:kwsAAOSwuhZeY~OY
Keith,
Now there is a tempting purchase. I could incorporate Selfridge’s signature into the display somehow when I’m done. What a conversation piece that would make. Thanks for the link.
-Brian
- mtaylor, Canute, Keith Black and 1 other
-
 4
4
-
15 hours ago, mtaylor said:
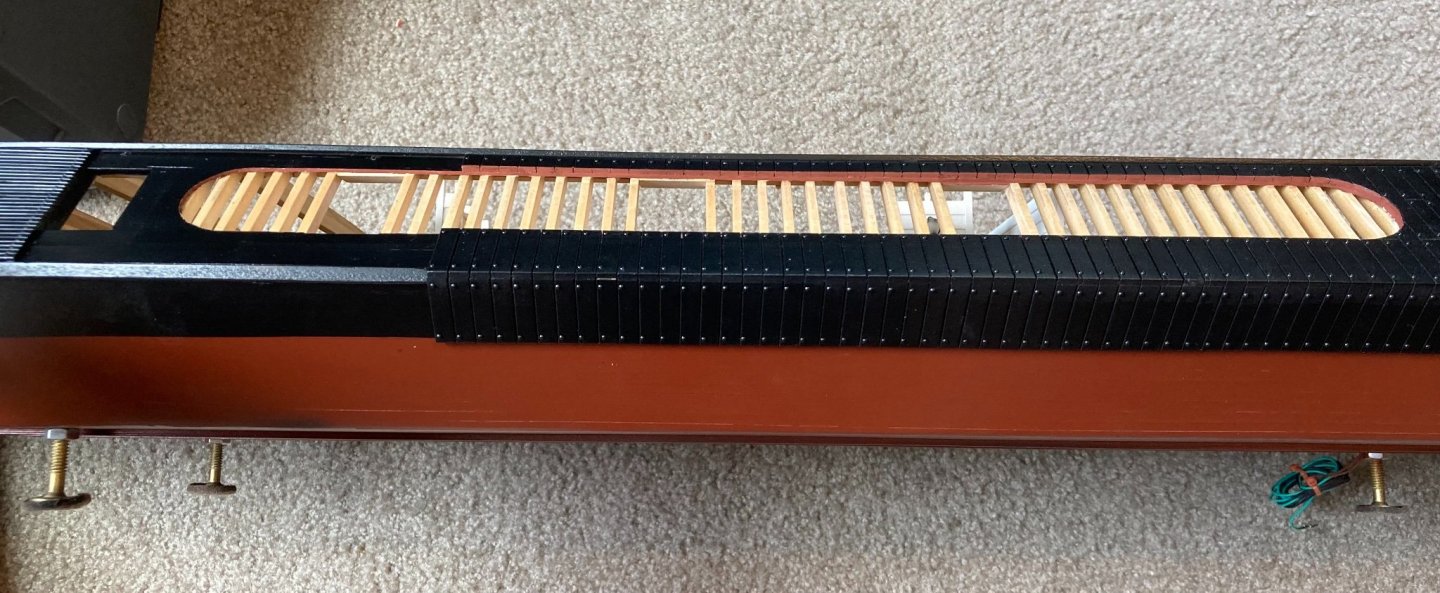
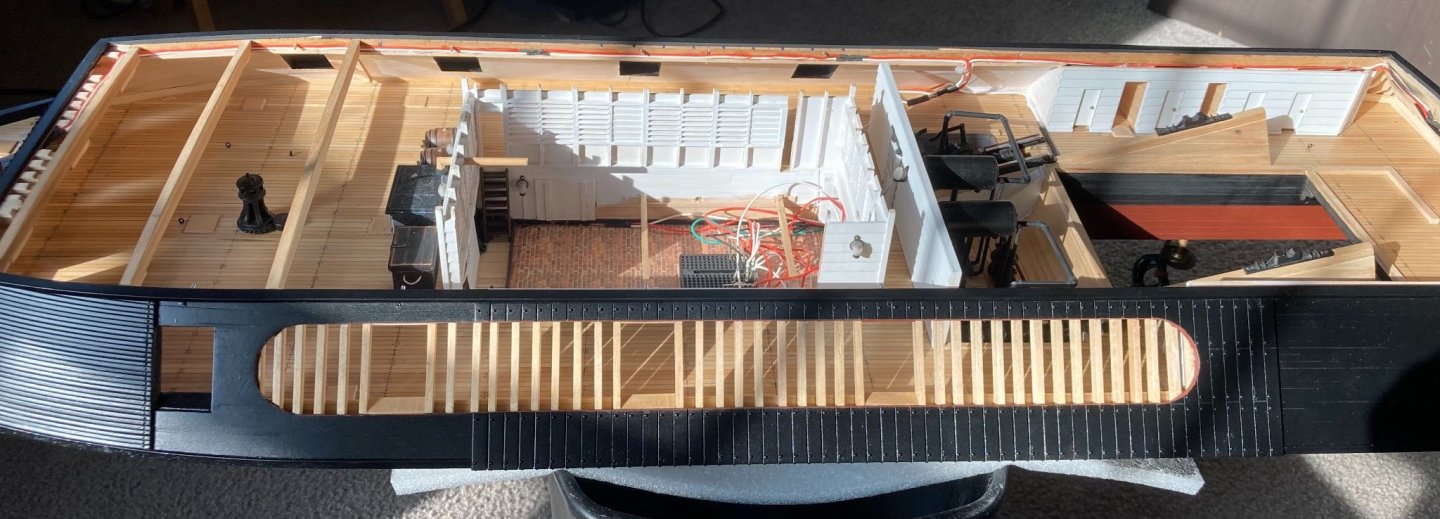
I like it also. Usually, cut outs I've seen are rather irregular but with yours I think the paint sets it off so a viewer won't think it's part of the hull. Can you post a photo from side?
Mark,
As requested, here are a few from Port and Starboard sides. I assumed you were wanting a clearer or overall picture of the cutaway, but I took pictures of both sides just in case.
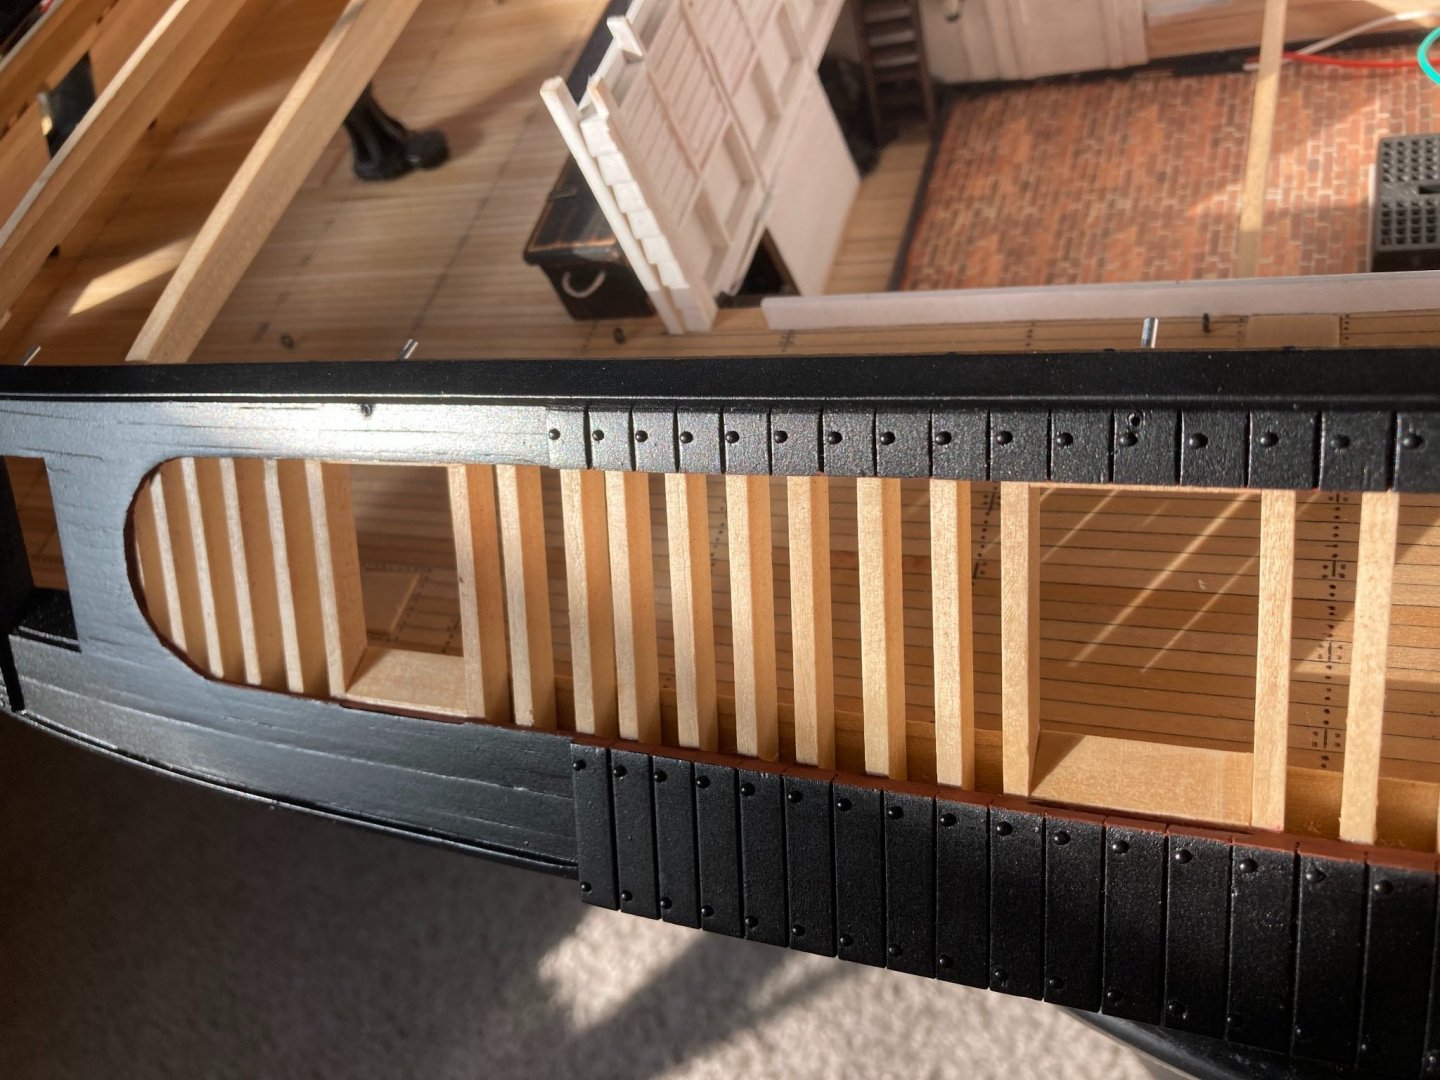
I very much appreciate the input.
-Brian
-
Vlad,
Just catching up on the progress, and I must say you are moving along at a Clippers pace. Beautiful job on the bowsprit and the planking is coming along great!
Nice to see the fine lines of these beautiful ships come together.
-Brian
- Keith Black and mtaylor
-
 2
2
-
Hello everyone,
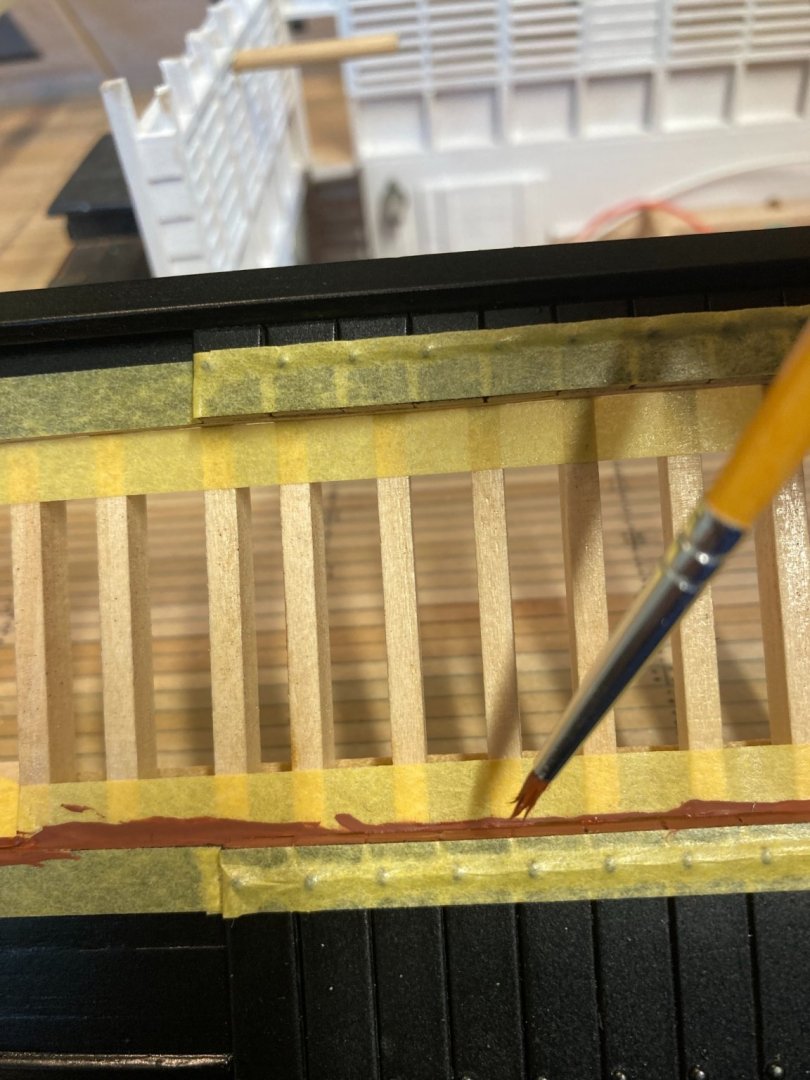
Looking for an opinion here. I painted up the cutaway edge with the reddish-brown I used for the hull. I’m liking the color and think it provides a nice separation from the black paint and the natural wood color of the frames. I just thought I’d throw this out there to see what everyone else’s thought.
Please feel free to chime in, I always welcome constructive criticism.
-Brian
- ERS Rich, Roger Pellett, mcb and 15 others
-
 18
18
-
-
Eric,
Excellent job on the anchor. One of the things I enjoy most about your builds are that you make use of materials you have on your property. I try to incorporate something in each of my builds as well, albeit most of them are are small obscure pieces, like the woodpile on my Chaperon (which by the way I took your advice and entered in the contest as well).
While I was in Kentucky last month I picked up a few barrel staves from one of the distilleries we visited and I plan on using some of that material on my Cairo. Haven’t quite decided yet on where, but it will be a nice French White Oak addition to the build (with the wonderful aroma of bourbon).
Glad to see that you are on your way to completing this build soon. Can’t wait to see what you have in store for us next. I truly have enjoyed this one.
-Brian
-
On 7/20/2021 at 8:25 PM, Cathead said:
Wow, that looks great. You're definitely right about the paint bringing out the realistic look. Nice job on the texturing. I like the idea of a dark/rusty maroon, something that sets off the edge a little but doesn't highlight it.
I found a detailed painting of the Cairo's interior on another modeling forum in a log for the BlueJacket kit. Not going to directly post it here as I'm not sure about copyright issues (not even sure if it's from the kit or some other source), but here's a link. It's a bit grainy, but appears to show gun rigging that looks fairly standard for naval cannons. If it is from the kit, I wonder if you could source a good copy directly from BlueJacket? If nothing else, I bet they'd be willing to discuss their own research used to develop that kit and maybe help you find new information?
Eric,
Thank you for the kind comments. I have actually been using that drawing in your link for a while now. If I remember correctly they have the same drawing at the Cairo Museum and this is where I got the template for building my crew quarters from. There is no documentation or photos of the actual crew bunks available but the HSR drawings show the toe-board outlines on them and this picture has the full structure, so with those two references, that Is what I based my build on. Now as to it's historical accuracy, that is an unknown, so once again I took my builders liberties and built it the way I wanted.
As for the cannon rig in the drawing, it does look to be a standard Naval rig so in keeping with that theme, I am most likely going to rig them that way and as Keith suggested, let the viewer make the connection on how they were maneuvered out of the way during resupply.
-Brian
- Cathead, Keith Black, mtaylor and 3 others
-
 6
6
-
On 7/20/2021 at 4:49 PM, Keith Black said:
Brian, why not just go with the standard rigging and let the viewers imagination make the necessary connections as to what the cannon would have looked like when bringing aboard stores and munitions?
Keith,
I think you hit the nail on the head with this one. Hadn't really thought about letting the viewers imagination do the work.
One option that I had considered was taking one of the cannons in the cutaway section and turning it sideways to show the access, but all I could think of was people asking why it was mounted that way then having to explain. I still may do this, but you are right, I may just go with a standard rig and leave it at that.
-Brian
- Keith Black, mtaylor and Canute
-
 3
3
-
On 7/20/2021 at 4:47 PM, leclaire said:
Brian - I admire your idea of "slow progress" and "not getting much done". It sure looks to me like you made a whole bunch of progress.
Regarding your decision to paint the inside edges of the viewing ports red, you might want to consider painting them more of a maroon color rather than bright red. I agree the red would tend to detract from the overall look and using a maroon would make it more of a weathered presentation. Just a thought.
Bob
Bob,
Thank you for stopping by. It's mostly when I look back on previous posts of mine that I see a lot more pictures in them than my last that makes it look like not a whole lot of work was done. In reality, the most time consuming work of my last post was masking everything off. The painting, as everyone knows, was a lot of hurry up and wait between coats. Without the wait time included, I had about 10 hours worth of work done. By my normal standards, that is not much over a weeks time. Plus given the fact that it has been a month since my last post, I really feel that progress has slowed down tremendously.
But enough of my rambling, I am seriously thinking of using the reddish-brown color that I used for the hull to trim the cutaway in. It's a nice muted color and brings the color up from the bottom to a more focused on spot without being too distracting. I'll give it a shot and see how it looks. Nice thing about paint, if you don't like the color you can always change it.
On 7/20/2021 at 4:53 PM, Keith Black said:I'd be more inclined to go with white or natural wood instead of red. She looks great the way she sits.
Keith,
Thank you Keith. I had pondered that as well, but since I was leaving the framing in its natural color, I wanted to show some separation between the two. Like I told Bob above, I'm going to give the reddish-brown color a try and see how it comes out.
On 7/20/2021 at 8:24 PM, BANYAN said:Hi Brian; wow! looks great. If it is only the edges of the planking in the cutaway area, I say go for it. As you say, it will highlight the area and differentiate between the planking and framing (which look in natural timber).
Pat,
Thank you for the input. These great comments are always welcome. I think this is going to be one of my next steps to see how the reddish-brown looks trimming the cutaway out. I'll be sure to post photos of the look, even if I do change my mind and go with a different color.
-Brian
- Keith Black, Canute, BANYAN and 2 others
-
 5
5
-
Hello again Everyone,
I know it has been a while since my last update. Progress has slowed to a crawl lately with other projects taking priority while I can get to them. Lots of physical labor involved, and by the time I am done for the day I am just wore out and just want to kick back in the recliner and relax with a cold beverage. Temps are starting to get a LOT warmer here so I may spend some of the hotter parts of the day at the workbench instead of baking in the Texas sun.
So with my lame excuses out of the way, I did get a little work done this past week, and I do mean a little.
I painted up one of my cannons and assembled it to the carriage. Haven't got the rigging done on it yet, I'm still sorting out how to do that. It's hard to find a good layout of how these were setup. I thought of just using the standard cannon ring for all 19th century American war ships, but the thought occurred to me that the cannon ports were also used as access to load stores and munitions, so the cannons would have most likely been pulled out and turned sideways to make room for the supplies being loaded. So the more I pondered it, the more frustrated I got on trying to figure it out and finally just set them aside for now.
Anyway, here is the 30lb Parrot Rifle in its carriage.
Next up I decided that she finally needed a coat of paint. I'm almost to the point that I'm ready to start installing the cannon port doors, and rather than go through the trouble of painting twice I decided to go ahead and get the casemates painted up so I can then place the painted doors and make minor touch ups as needed. I think that I am going to go with all port doors in the open position. This will allow for somewhat easier viewing of the inside details, not to mention it will save me from having to get the cannons all perfectly centered on the pierced hole with them closed.
First coat of black going on the bow casemates.
Port first coat.
Bow after three coats of black and three coats of satin clear. I did a little texturing with the back paint on the armor plating to give it a more "wrought iron" look and feel. I thought it came out looking pretty good.
Painted port side. I am still debating with myself as to whether or not I want to paint the inside edges of the viewing port red to symbolize the cutaway. I see this on a lot of cutaway sections and I like it, even the guys working on the St. Louis are doing it, I just don't know if the red will stick out too much and detract from the rest of the model. I still haven't made the decision yet, but there's still plenty of time.
Painted stern
And finally the overall boat painted and all masking removed. It's amazing what a few coats of paint can do to the look. It's really starting to look like an Ironclad.
That all for now. Thanks for sticking with me on the slow progress. Hopefully I can get more done in the coming weeks.
Until next time, I appreciate all the great comments and likes.
-Brian
- Keith Black, Moab, GrandpaPhil and 17 others
-
 19
19
-
 1
1
-
Eric,
In my opinion she looks great. I think the figureheads add a nice touch (authentic or not). Your build pretty my represents what I have always envisioned Viking ships looking like.
I am with you on the the deck crowding. This was a subject that I wrestled with on my last build. Where to draw the line at too much. I think you have just the right amount to get the point across of what these people traveled with without the deck looking too cluttered.
I have been toying with the idea of entering my Chaperon in the NRG photo contest, just not sure if my photography skills are there yet. Not to mention our farm projects have really eaten up my time as of lately.
Really looking forward to seeing the final rigging and it’s in place. I know you’ve had your struggles with this build, but you have definitely overcome them and produced a great looking build.
-Brian
- Balclutha75, Cathead, FriedClams and 2 others
-
 5
5
-
-
Vlad,
Even with all the trials you are facing so far, she is still looking good. Besides, has there ever been a scratch build that has ever gone smoothly? With your skills though I’m sure they will not be much of a problem for you.
-Brian
-
11 hours ago, mtaylor said:
Good work on the port doors. So they were actually pierced then? For some reason, I thought they would be solid with no gun port. And that's great finding Parrot guns. They will look perfect.
Mark,
Thank you for the kind words. The pierced port doors were almost a necessity. These boats carried some big guns on them and would have taken up a lot of limited real-estate on the gun deck if they were stowed inside. The 42 & 32 pounders alone were over 10.5 feet long and weighed over four tons each. Without them being stowed through the doors the way they were, they would have been an imposing item to have to maneuver around during daily life onboard.
I am extremely happy with the guns (I think I may have mentioned that before). I'm glad I went the route that I did instead of the wooden ones. Thankfully my uncle was able to direct me to his friend who is a machinist. It took a while for him to get them done, but they were worth the wait. I'm anxious to get them cleaned up and dressed to see how they are going to look rigged and in place.
-Brian
- Keith Black, Cathead, FriedClams and 3 others
-
 6
6
-
14 hours ago, Keith Black said:
Brian, very nice work. Nice to see a update, good to have you back.
Keith, thank you. Good to be back at it. Funny how being away for a couple of weeks tends to draw you back in.
-Brian
- Canute, Keith Black, FriedClams and 2 others
-
 5
5



USS Cairo 1862 by MPB521 – FINISHED - Scale 1:48 - American Civil War Ironclad - First Scratch Build
in - Build logs for subjects built 1851 - 1900
Posted
Roger,
Interesting story about the Monitors. I love these little known tidbits of history.
I appreciate the clarification on the “piping” definition. Out of curiosity, we’re you a pipe fitter by trade?
In my younger days I worked as a loss prevention officer at a department store that underwent major renovation while I was there. During that time I was assigned to escort the pipe fitters who were replacing the buildings cooling system (towers and chillers). That’s a job that that requires some great skills in measuring and welding. Being in my late teens then I was in awe of the preciseness of their work.
-Brian