


Overworked724
-
Posts
1,263 -
Joined
-
Last visited
Content Type
Profiles
Forums
Gallery
Events
Everything posted by Overworked724
-
 Thanks @CPDDET @Tim Murphy. I'm still sleeping on it. I decided to start with a redo of the hinges on the sweep port doors first. Slowly eek my way in to modeling again...so I will save the decision on repeating the coppering for later. It just looks dirty...no prints but there were some blemishes from the packaging that simply will not come out. Not certain how to clean it without tearing the plates up. However, those plates are stuck on beautifully...they just aren't beautiful copper anymore! @Tim Murphy I actually know many folks from the Rope and recently (just a couple weeks ago) visited their 48th Boat show in Ginza district in Tokyo. We live on the southern tip of Kyushu at present...so it's still a bit of a hike.
 -
Man…I really don’t like the way the copper patina ended up after a year in storage. I’m seriously considering ripping off the copper plating and committing to a full redo.
-
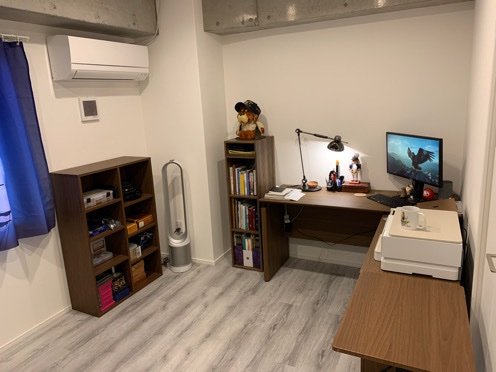
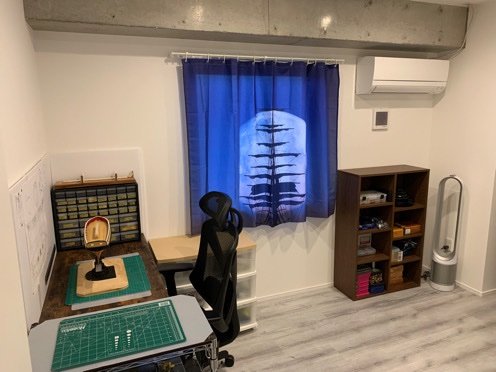
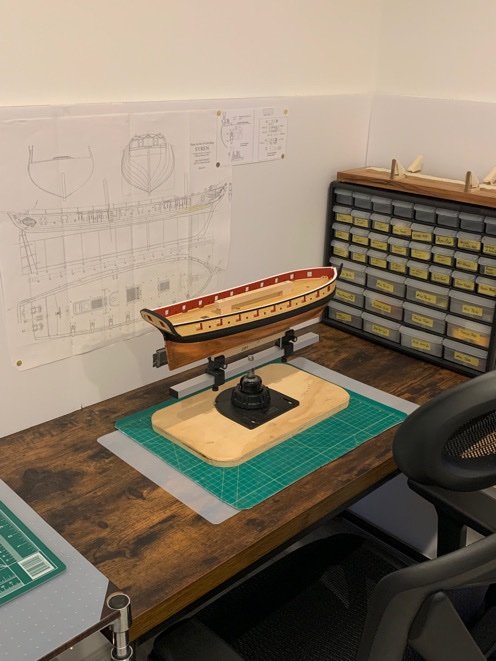
My tiny shipyard and Syren have finally been unpacked! Good news…the copper plating is still holding fast. The bad news is the new penny look is gone. A few spots on the copper got marred during shipping, and the patina isn’t weathered as evenly as I’d hoped. But other than that…all else looks ok. A few bonus pics for fun. No more excuses now…I have a functional office and semi functional shipyard. 👍🏽
-
I don’t know, Dave…I think you need to go smaller. 🤣
-
Wish I had some pics. Sorry. 😔
-
Yes. 🤣 The garboard was a bit of a pain. I ended up creating some ‘cushioned’ clamps to attach to the keel and keep external pressure on the garboard planks as the dried. I basically cut some wood clothes pins and wrapped the jaws in rubber bands so they wouldn’t bruise the keel when I attached them. The other side of the garboard was held in place by some binder clips clamped to the bulkhead sections.
-
Looks great, Bob! You’ll be extremely happy you added those full piece fillers. The additional surface area will be a huge boon during your planking. 👍🏽 You are right about the bending jig. I ended using a plank bender, but the best result I had was pre forming wet steamed planks on the ship and letting them dry to shape. It was long and tedious but made for relaxing planking.
-
And...progress update for my mini-shipyard (just keep my thread alive and kicking)...finally ordered a simple desk to use as a mini-work bench. Space in our new apartment is a bit limited, so I am being careful to try to utilize what little space my wife gave me to good use. It will have to do until we have a house (a few years from now....date TBD). But I am itching to get back to work on my Syren. Sabbatical almost over...a few more weeks and shell be in her new home...and Ill be posting again.
-
Brilliant works on those chucks! Love your detail, Dave. 👍🏽
-
Well, the upsweep of the planking towards the stern is a crinkle, but not a bad one. If you have symmetry on both sides, you can run up your bulwarks and then simply trim them down to the appropriate height above the deck per the plans. That might look a bit odd from the exterior, but I’ve seen it happen on other models. The end result still looks beautiful and you’ve done a great job laying in the hull planks thus far. The only option to ‘correct’ the upsweep would be to remove the planking near the stern and do some additional adjustment on where the wales will be. That’s a bit more time but the planking would then line up more closely with the deck lines. Either way, doing a great job so far! Enjoying your build! Pat
-
Looking mighty good! I know you’ve probably started this already, but you should be clear on how you want to mount your ship before you get too far in the build. Same for the mast holes. I got those ironed out very early and was glad I did. Great job on the hull thus far!
-
The stern was a fear of mine too. Until you get your external planking on above the wales they’ll be a concern. After that, it will feel solid as a brick. Enjoying your build!!!
-
Oh yeah…Following you with great interest!! 👍🏽😁
-
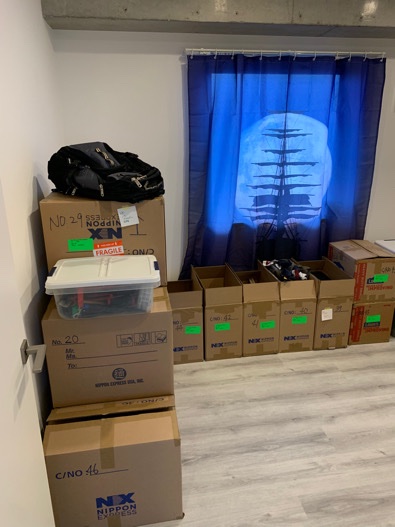
Wooohooo!!! Finally found time and room to unearth my Syren! Only to put it in another box until I can get a bench together. 😣 Good news is that it looks like she traveled well…but not chance to unwrap her yet. But it’s progress!!!
-
See my build log as well. It’s good to take your time here. I overthought it as well. I wanted to be sure I accounted for the width of the deck timber, plus the height of the waterways, plus the width of the carronade mount…and in my case, also the width of the faux deck installed before the deck timber. I saw quite a few builds take the placement of the window sills for granted and realize after the deck was on that the sills were too low to account for the waterways and carronade swivel mounts. It easy to overlook. Measure twice…glue once!
-
Following with interest, Bob!!!
-
Awesome!!! Following another Syren build with interest!!!
-
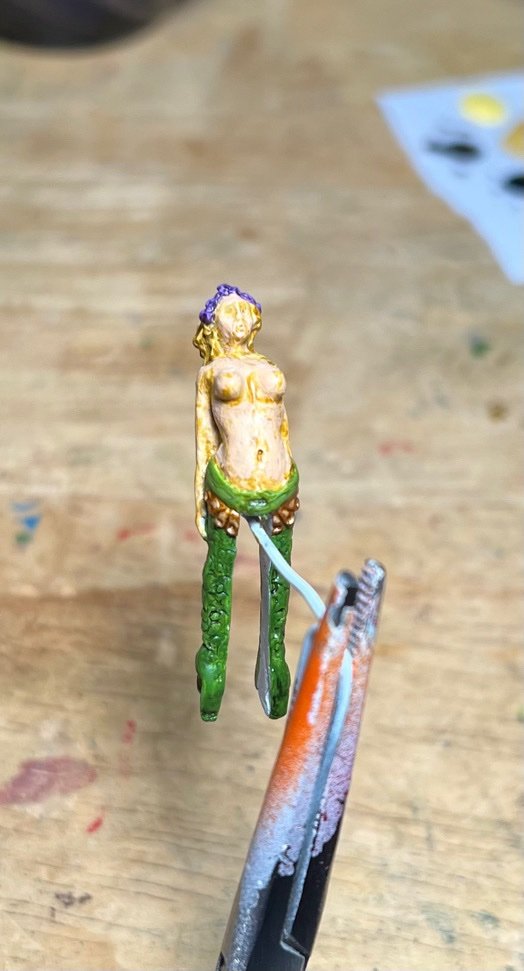
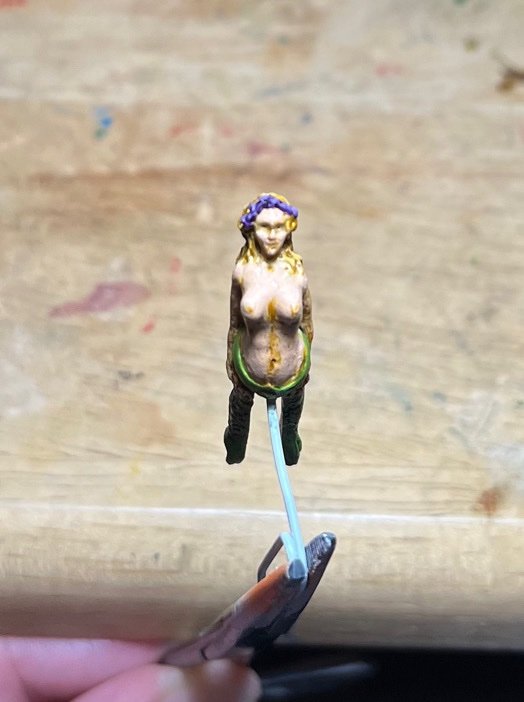
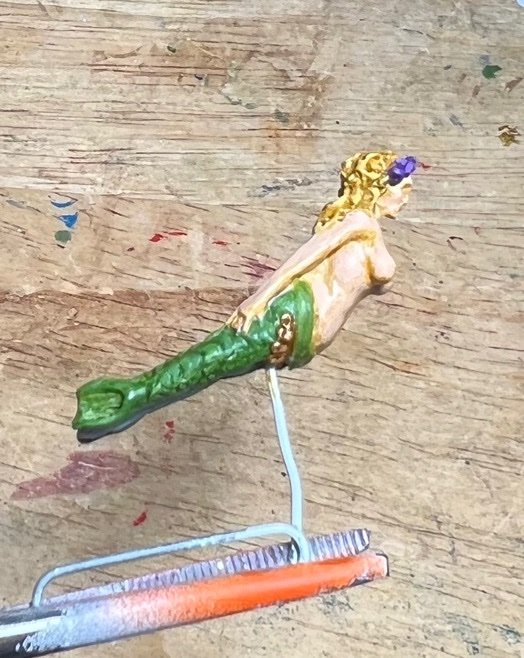
🤣 That's a shower curtain with a ship mast against the moon. I’d never build something that big…of course the Syren comes close! in terms of size…after my Syren, I’ll be doing the Woody Joe model of the Stuart Royal yacht…then I’m scaling down to miniatures due to the issue you raised @bobandlucy…space. There’s definitely not enough in Japan!! 🫡
-
Landed in our new apartment in Kagoshima. My ship room is now under construction. Long way to go but at least our home for the next couple years is getting established. Thinking about how I can setup a little ‘side’ table to work on my Syren. 👍🏽🫡
-
Howdy Shipmates! Just keeping my thread alive. Will be making the final move in December. Really missing my shipyard…and my ship! Hope my Syren made it over to Japan ok. 🙏🏼
-
Well…my mid-life migration to Japan is still proceeding. I miss my Syren (which is packed up and shipped). Seems like a while before I’ll be back in my shipyard, but it will happen. 👍🏽
-
Just an update on my blog. The Syren is now boxed up. My ship room is closing down as I put everything in boxes for our upcoming move. Looks like she’ll be finished in Japan! I’ll be on line occasionally to pipe in on other builds. Stay Tuned…the journey has literally just begun. 👍🏽😎
-
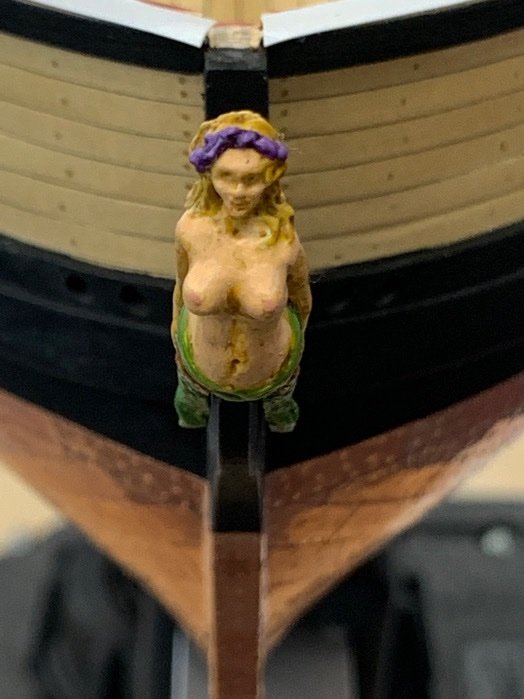
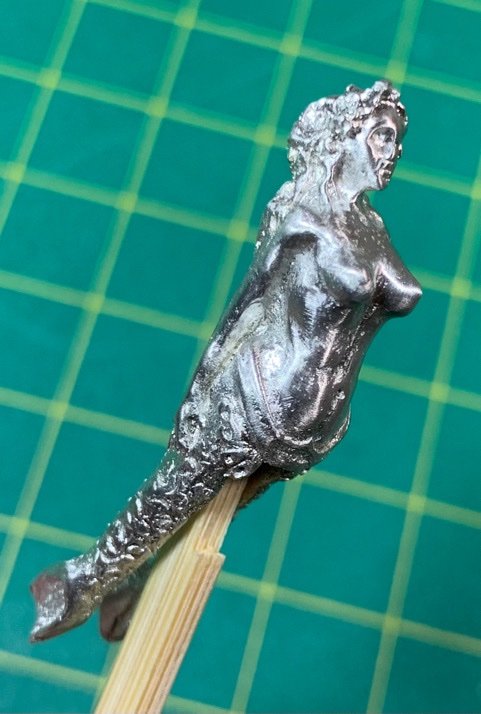
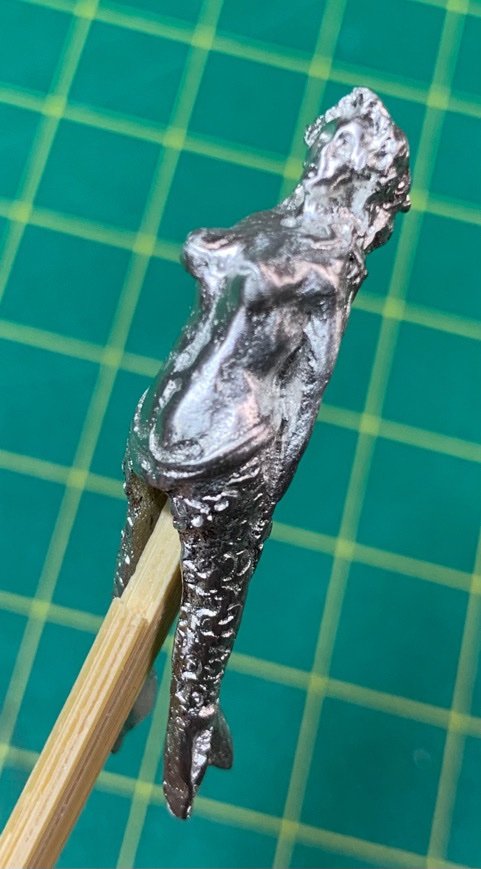
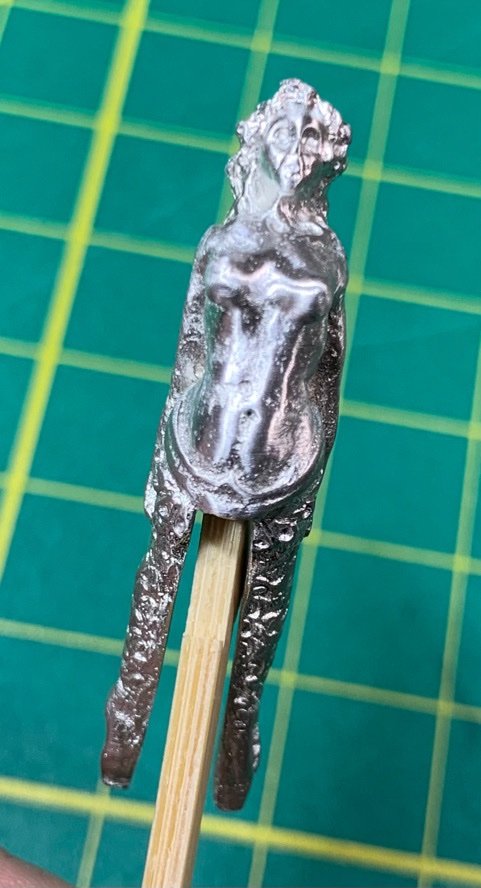
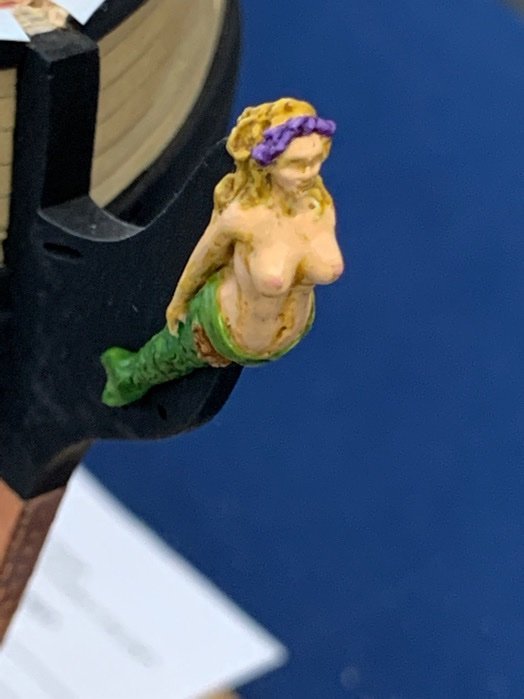
Ok…tales of my demise have been greatly exaggerated! I’m still kicking about…just packing and getting ready to sell our house and move. So these might be the last pics of progress for the remainder of the year. (We shall see!) The kit supplied metal figurehead was one piece I did not feel inclined or proficient enough to bash and achieve superior results. So, as I trimmed, polished, and buffed it until I felt I couldn’t get her in any better shape. After a coat of primer, I originally planned to paint it as if it were simply unpainted wood. But since the detail came out so nice, I decided to go for full detailing. Turned out damned nice! The slight nicks and imperfections actually seem to add warmth. A watered down light brown paint to add some weathering. Followed it up with a coat of dull coat. All in all…I’m happy with the result! Moving on!!! (ok. I have to be honest. This was a team effort. A buddy of mine who paints miniatures offered to help me out on the painting. So I’ll only take 1/2 credit on my figurehead. 😁)
-
Hey Steve. My deepest condolences on your loss. 🙏🏻 I’ll keep you and your family in our prayers. I’ve been forced to take a break recently as well. Always looking to your build for ideas and guidance. Your work is inspiring! 👍🏽
- 157 replies
-
- 1
-

-
- model shipways
- syren
- (and 1 more)
-
Can you reach out to Shipways (Model Expo) to get a replacement? I did that for my frames when they were warped out of the box. No issues. They were really good for customer service.
