


Ian_Grant
-
Posts
1,641 -
Joined
-
Last visited
Content Type
Profiles
Forums
Gallery
Events
Posts posted by Ian_Grant
-
-
On 3/11/2024 at 11:22 PM, Ian_Grant said:
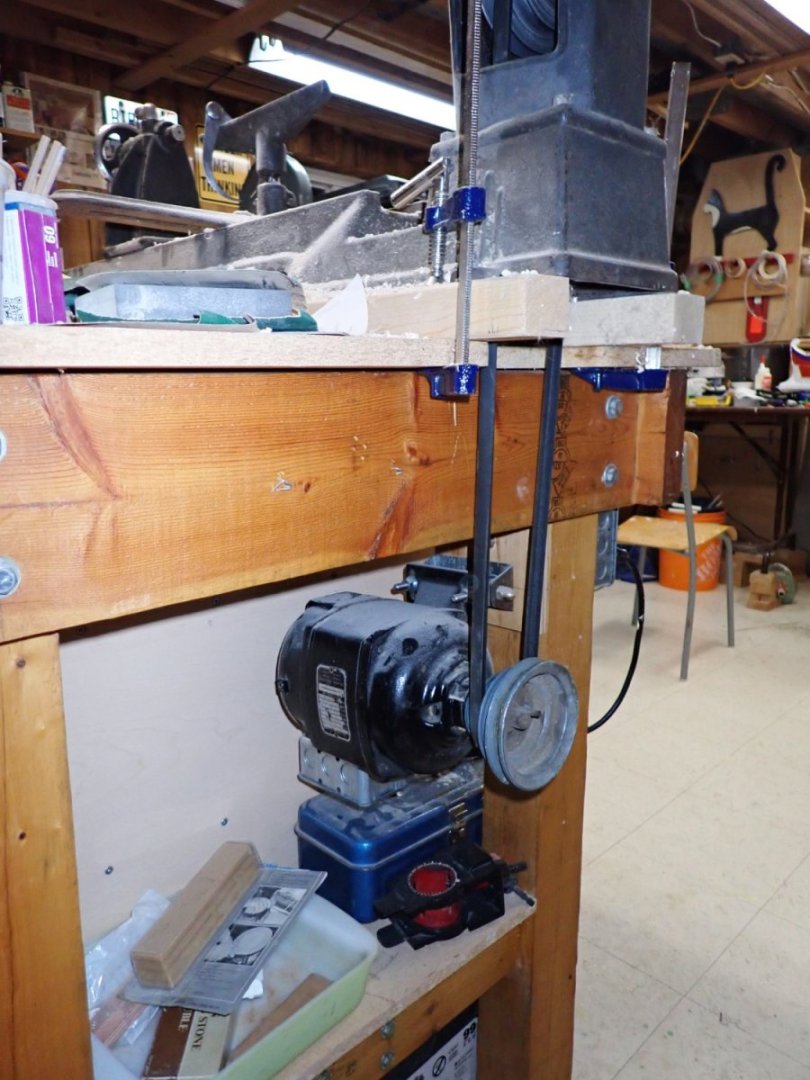
Yes, a nice mini lathe would be good to have for model making. The Rockwell-Beaver I picked up at a used tools place soon after I met Robin. It's pretty smooth even just clamped to my bench. I only have a dead centre for the tailstock (or maybe that's common for wood lathes?) and a faceplate but no chuck for the headstock. Not sure if I could find a chuck now for whatever taper this lathe has. Oddly enough it seems to lack the ability to set a tailstock offset for tapering, or perhaps that's just a metal lathe thing. Probably is.
The mast was turned between centres. I might try some bowls on the faceplate next, for fun. I got the faceplate at Lee Valley years ago; figured I should get one while still available.
Turns out Lee Valley has a line of woodworking chucks, which accept any one of a bunch of different threaded inserts one of which fits this lathe's headstock thread and taper. Food for thought.
- Glen McGuire, mtaylor and Keith Black
-
 3
3
-
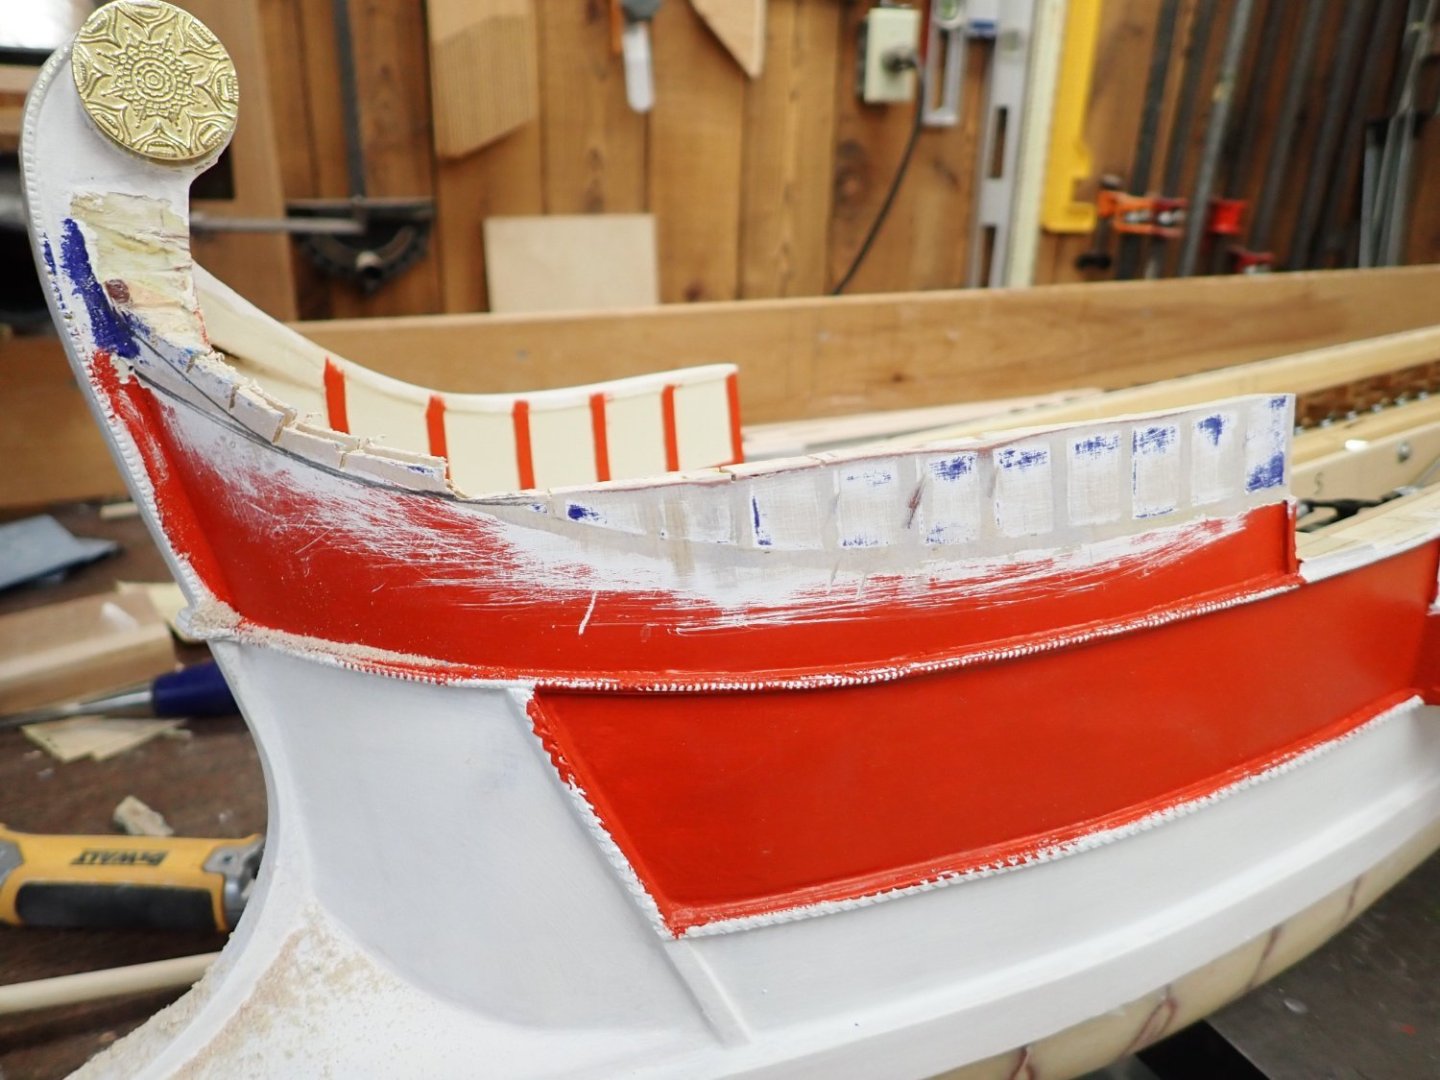
For a while it's been bothering me that the circles at the peaks of the stem and stern are different thicknesses; the stern was padded out by the thick medallions I had 3D-printed but the stem had only the thin medallions I got from Etsy. Finally yesterday I pried the stem medallions off and added 1/8" thick wood discs cut by the laser while I was making parts for the boarding bridge. Only afterwards did I discover that now the port side medallion's rim would interfere with the artemon ("bowsprit").
I woke up this morning having decided in my sleep, apparently, that I would cut the bow bulwarks to a new curve, not only to fix this but because their height has also been bothering me for a while. No one on board could see ahead; I had considered lowering the bulwark but thought it would be too painful. Instead I was going to add a little raised platform at the bow. Well, now that idea is toast.
Here are progress shots on modifying the port side. It wasn't as bad as I thought, though I will need to redo all the decoration and painting. Adding new cap rails will be a problem as regards clamping them with the inner bulwark faces now present. Will have to devise some elastic something or other.
1) Level bulwarks extended much further forward.
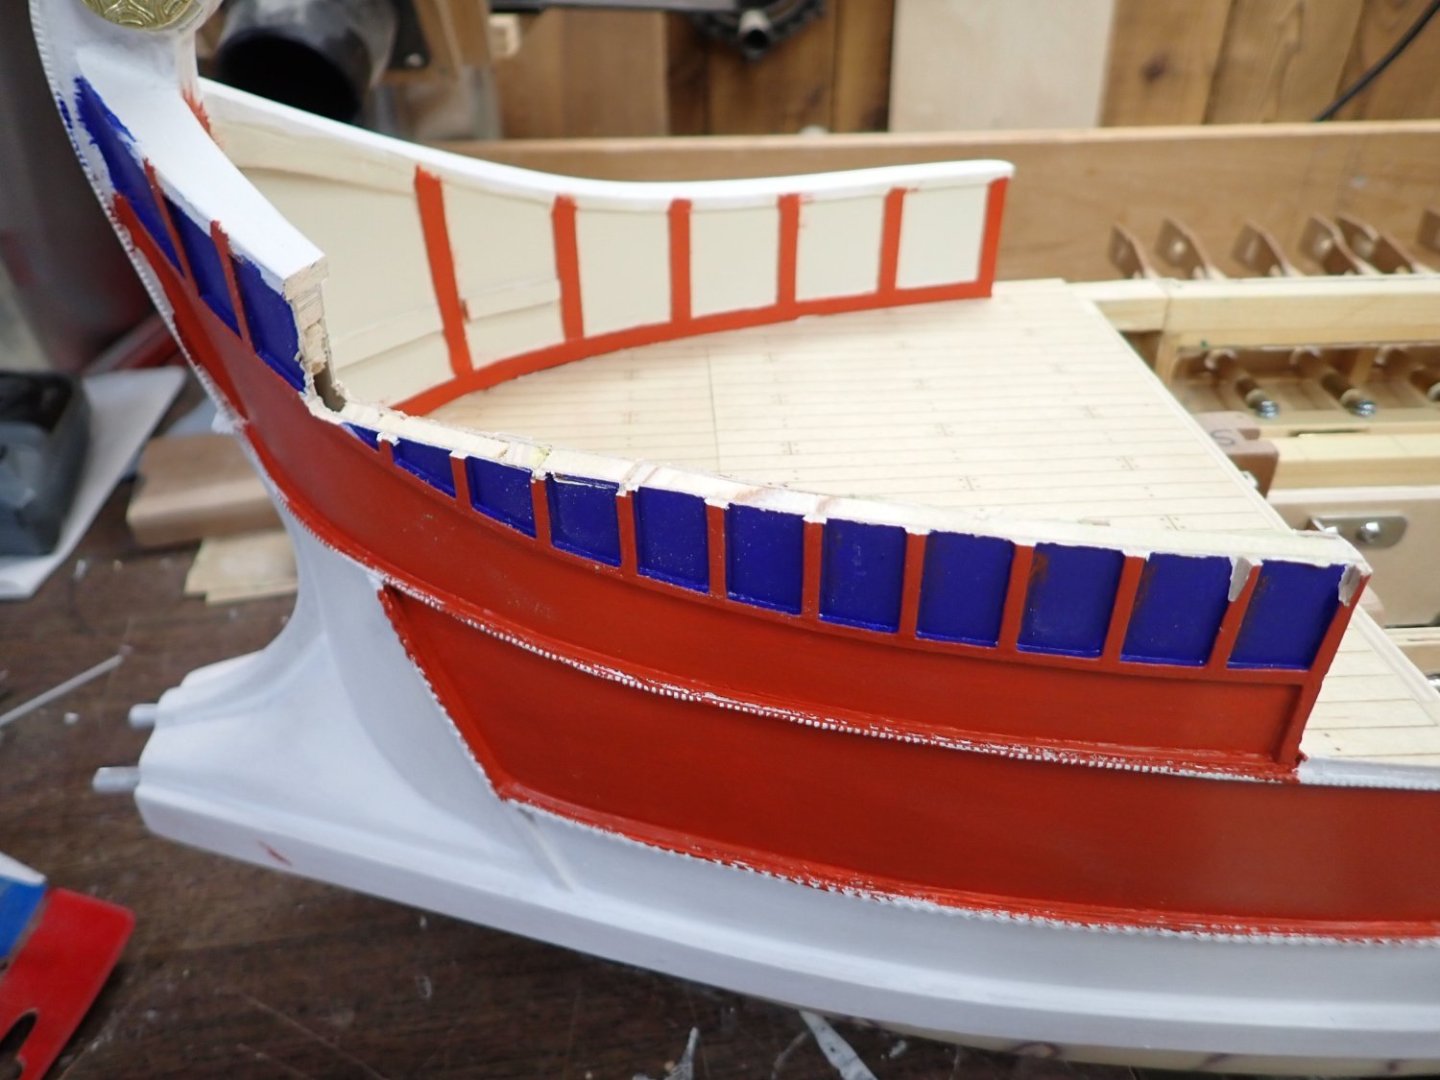
2) Final curve to stem marked and getting cleaned up.
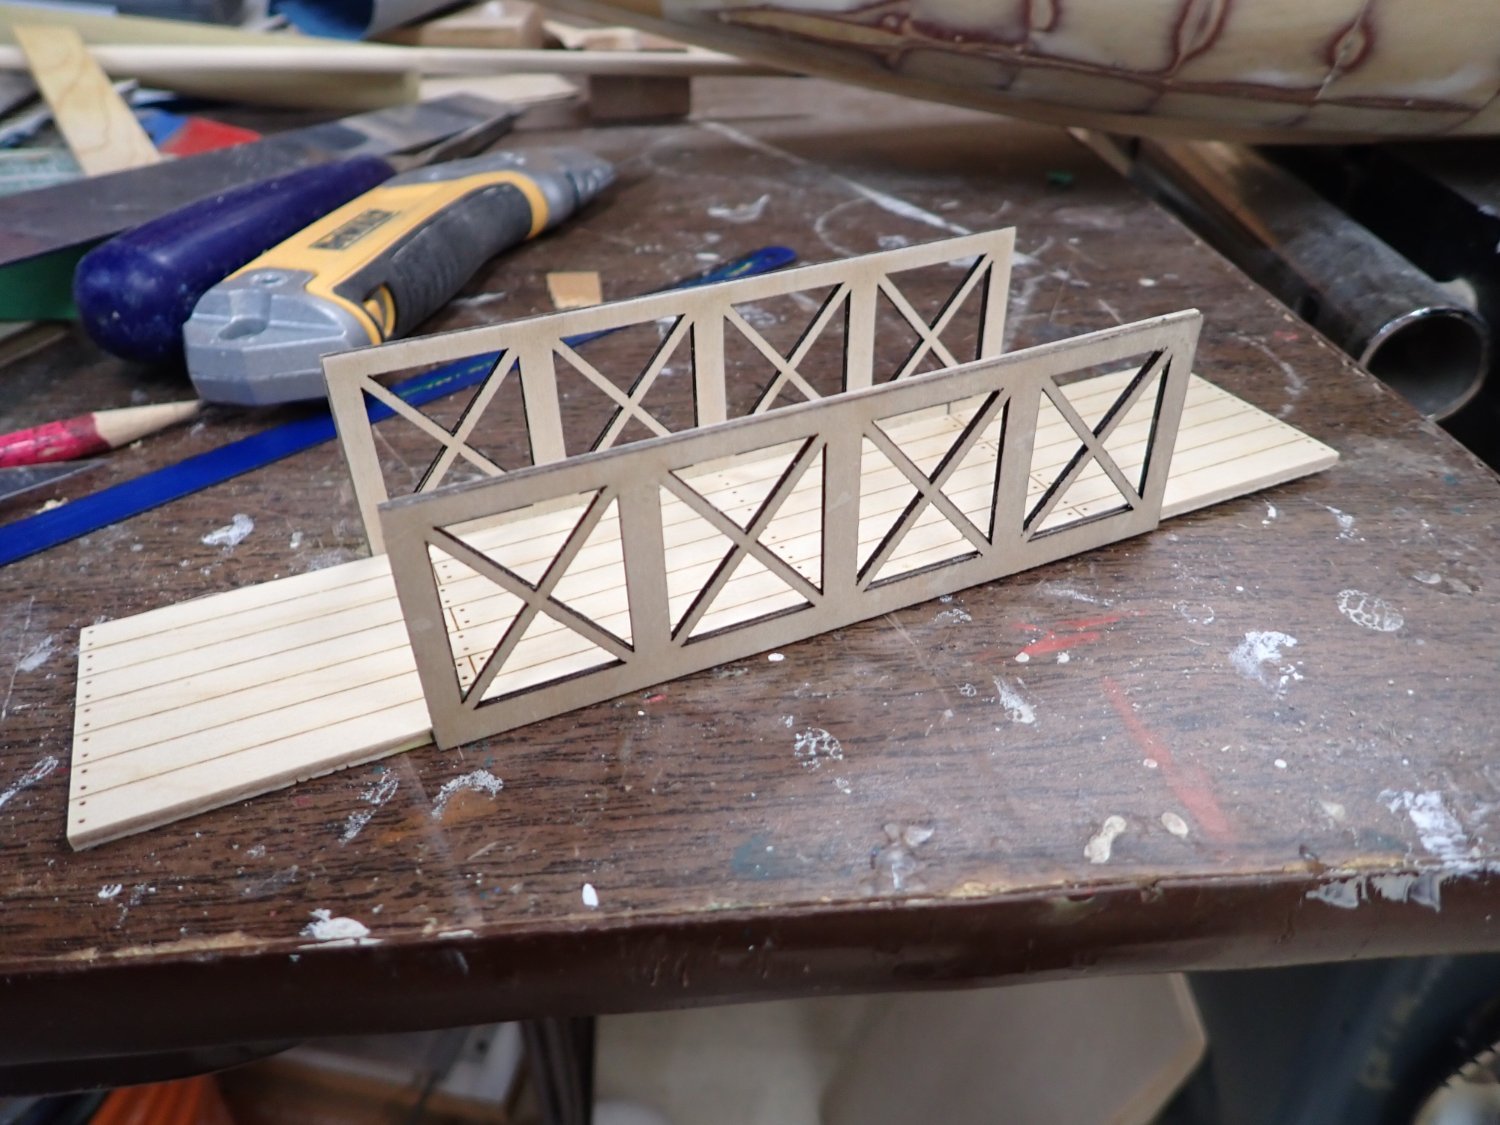
Oh, and here is the basic assembly for the boarding bridge; all laser cut and just glued up by yours truly.

-
5 hours ago, Kevin-the-lubber said:
That’s hilarious - I also have one of those, somewhere. Made at about the same age, 14 or 15, in the metalwork class. For some reason what always stuck in my mind was the magic of knurling, and brazing the head to the handle. Looks like you made a nice job of yours!
Yes, knurling was way cool. That's actually my brother's hammer; can't find mine. But it was better 😏.
What stuck in my mind also was turning aluminum/aluminium. We had contests to see who could get the longest continuous shaving, with a chain of guys supporting it as it lengthened. Fond memories.

- Glen McGuire, mtaylor and Keith Black
-
3
-
That's the one....so I guess I did give it back to you.....and forgot again..... 🤔
-
2 hours ago, rookie said:
what is a 'tailstock offset' ?
It's when the tailstock (undriven end) assembly can be moved across the lathe rails i.e. forward/backward so that the headstock and tailstock axes are no longer in line as seen from above. On a metal lathe the tool carriage moves along parallel to the rails, so if one wants to cut a taper one must offset the tailstock in order for the cutter to do so. Think way,way back to Mr. Brandt's machine shop class and making the hammer in grade 9......🙂
By the way, I have your grade 9 hammer for some reason. Keep forgetting to bring it to you. 🙄
-
Yes, a nice mini lathe would be good to have for model making. The Rockwell-Beaver I picked up at a used tools place soon after I met Robin. It's pretty smooth even just clamped to my bench. I only have a dead centre for the tailstock (or maybe that's common for wood lathes?) and a faceplate but no chuck for the headstock. Not sure if I could find a chuck now for whatever taper this lathe has. Oddly enough it seems to lack the ability to set a tailstock offset for tapering, or perhaps that's just a metal lathe thing. Probably is.
The mast was turned between centres. I might try some bowls on the faceplate next, for fun. I got the faceplate at Lee Valley years ago; figured I should get one while still available.
- mtaylor, GrandpaPhil, Glen McGuire and 2 others
-
5
-
Same Ryobi drill I have - a surprisingly good tool.
Look forward to seeing this ship next time we're down east.
- Canute and NavyShooter
-
2
-
3 hours ago, KeithAug said:
Don't apologise Ian - it gave me a good laugh.
So is your Toyota a 2.5l AWD version?
Yes, all RAV-4 hybrids use a 2.5liter 4 cylinder. They employ Toyota's "adaptive" AWD: front only in normal circumstances; AWD when necessary. Front wheels are driven by engine and/or front electric motor. Rear wheels are driven by rear electric motor only. It's fun to watch the "Energy Flow Diagram" on the dash screen which shows what is powering the wheels at the moment, or energy flowing back into the battery if you take your foot off the gas.
We found on test drives that the hybrid CRV has a noticeable slight hesitation when you "step on it"; apparently this is due to the CVT having to mechanically engage a rear drive shaft to start powering the rear wheels, as opposed to the instant torque from the RAV-4's rear electric motor.
Finally, in my own defence, I've had to live through eight years of Canada's free-spending Liberal government and their self-contradictory policies. The PM is a university dropout whose resume mentions "snowboard instructor" and a brief stint as a "teacher" which was brought to an end with a mysterious NDA. Our finance minister has a degree in Slavic languages. I'm not alone at being tired of the whole gang:
But let's get back to model ships. In my case, today I had a "fail" at a 2nd attempt to 3D-print a part for my ship. Back to the drawing board! 🙄
- Keith Black, KeithAug and Retired guy
-
3
-
1 hour ago, KeithAug said:
I tried self charging hybrids for the first time last Tuesday and loved the "get up and go". I know they don't solve the environmental problem but they are a load of fun.
Keith
Sorry about the grumpy old man. As I said this topic gets me all hot and bothered. One last kick at the horse........
My brother has a hybrid Corolla and in the summer gets as efficient as 3.3litres/100km. If everyone had ordinary non-pluggable regular hybrids we could take a significant bite out of emissions without changing anything else at all. So far we've only driven our new hybrid 42km, and the total average fuel consumption since 0km, reported on the dash, has been steadily drifting down. When we got it the reading was 10litres/100km, based on 5km driven. Today it's at 6litres/100km and falling, as opposed to our 2009 ICE RAV's ten on a good day. And yes, the immediate torque from the electric motors is fun.
")
-
Yeah, we have similar legislation in Canada; all car sales are supposed to be EV by 2035. Ain't gonna happen in that time frame unless the government allows China to take over the auto market and kill all those domestic jobs. The UK is quite compact, but here one can drive hundreds of miles between big cities which is problematic for an EV if it's -20C outside. The recharging infrastructure is miniscule compared to what would be needed. The electrical grid cannot support the projected load without hugely costly upgrades. The EV prices are still far higher than straight hybrids. Early adopters brag about "refilling" their EV with pennies worth of electricity but in the event that ICE cars were obsoleted the government's "gas tax" revenue would be zilch. Governments never downsize, especially here in Canada where a getting-dangerously-large percentage of the population depends on the government for their income, so inevitably they'd start taxing electricity to make up the shortfall. On top of the electricity price increases to fund network and generation upgrades. Also, we currently have zero capacity to recycle those toxic Li ion batteries; bit of a chicken and egg thing there. The environmental zealots are cheering it all, but what will they say when companies want to open some lithium mines in Canada to dig up the ore required? Our idiot PM has given away about $30 billion dollars to VW and Stellantis to build battery plants. Why them? -- because they had the best lobbyists. Once again, know-nothing politicians think they can pick the ultimate winners in a new technology instead of allowing the free market to determine the best solution. Imagine giving Toyota the cold shoulder.
We just took delivery of a hybrid RAV-4 for which we have been waiting for months. Great vehicle! And people agree; hybrid sales here are booming (hybrid RAV only costs about $3300 more than ICE) while EV's sit unsold.
Whew! Sorry, this topic touches several nerves - incompetent politicians, government lobbyists, especially our former Greenpeace activist environment minister, and our idiot PM above all. Spending
usour children and grandchildren into oblivion.- mtaylor, Keith Black, Rick310 and 3 others
-
6
-
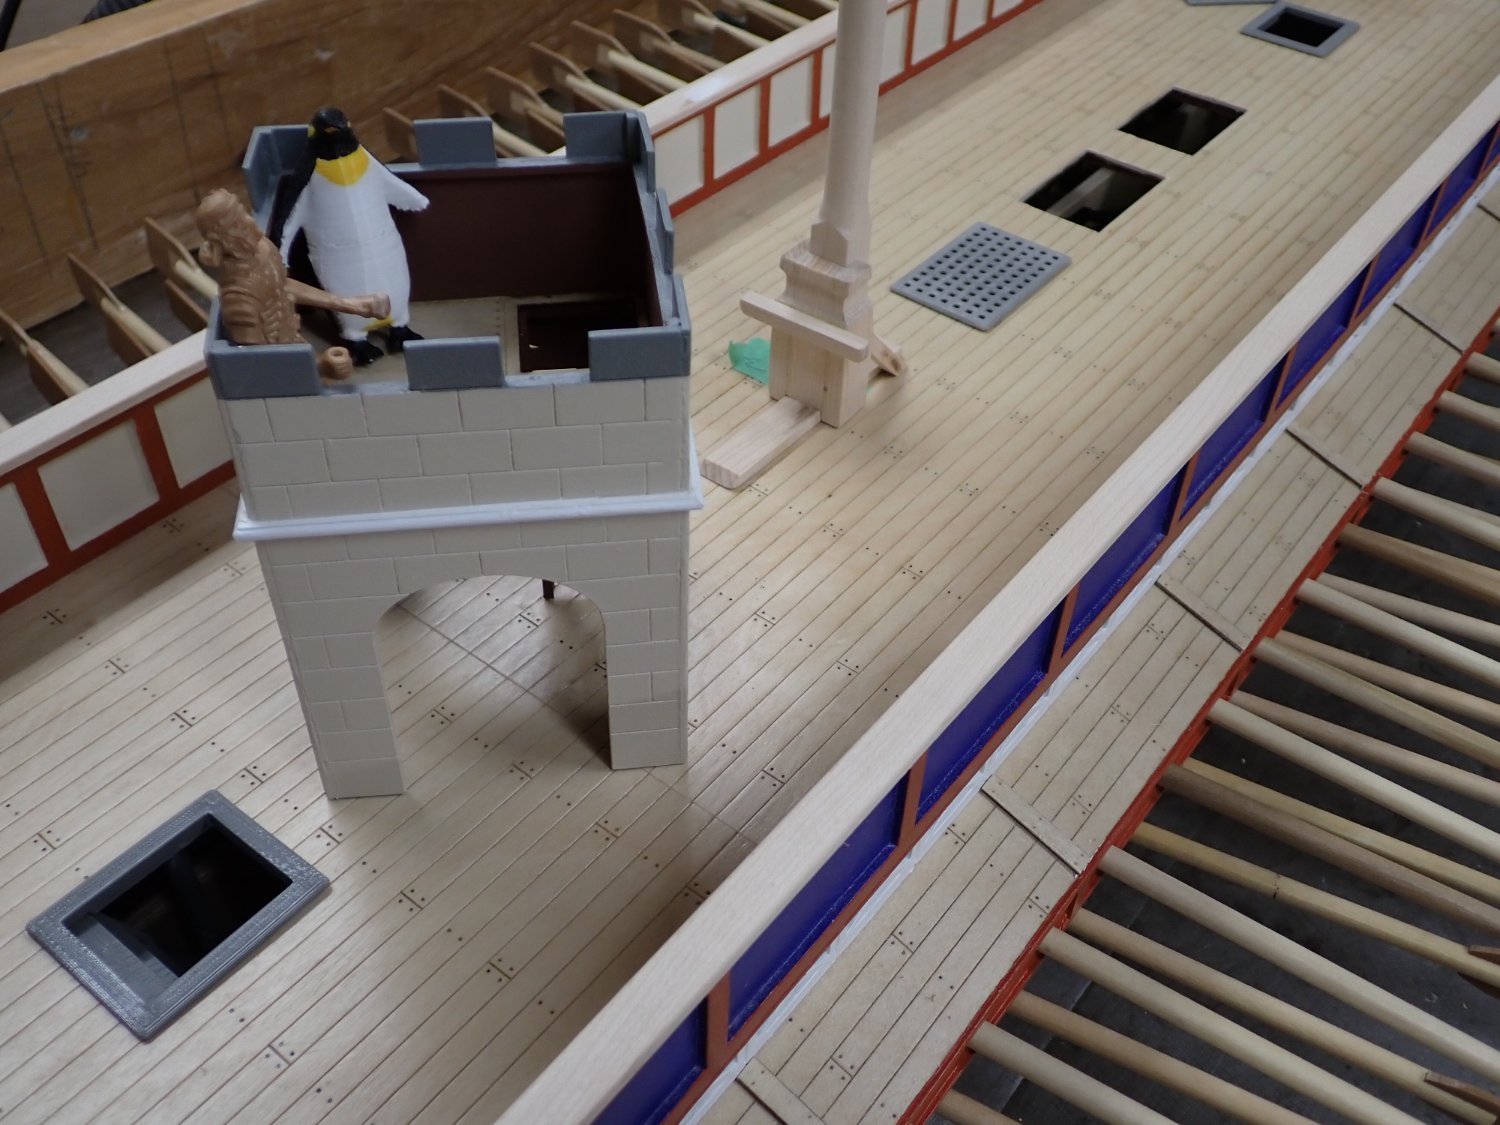
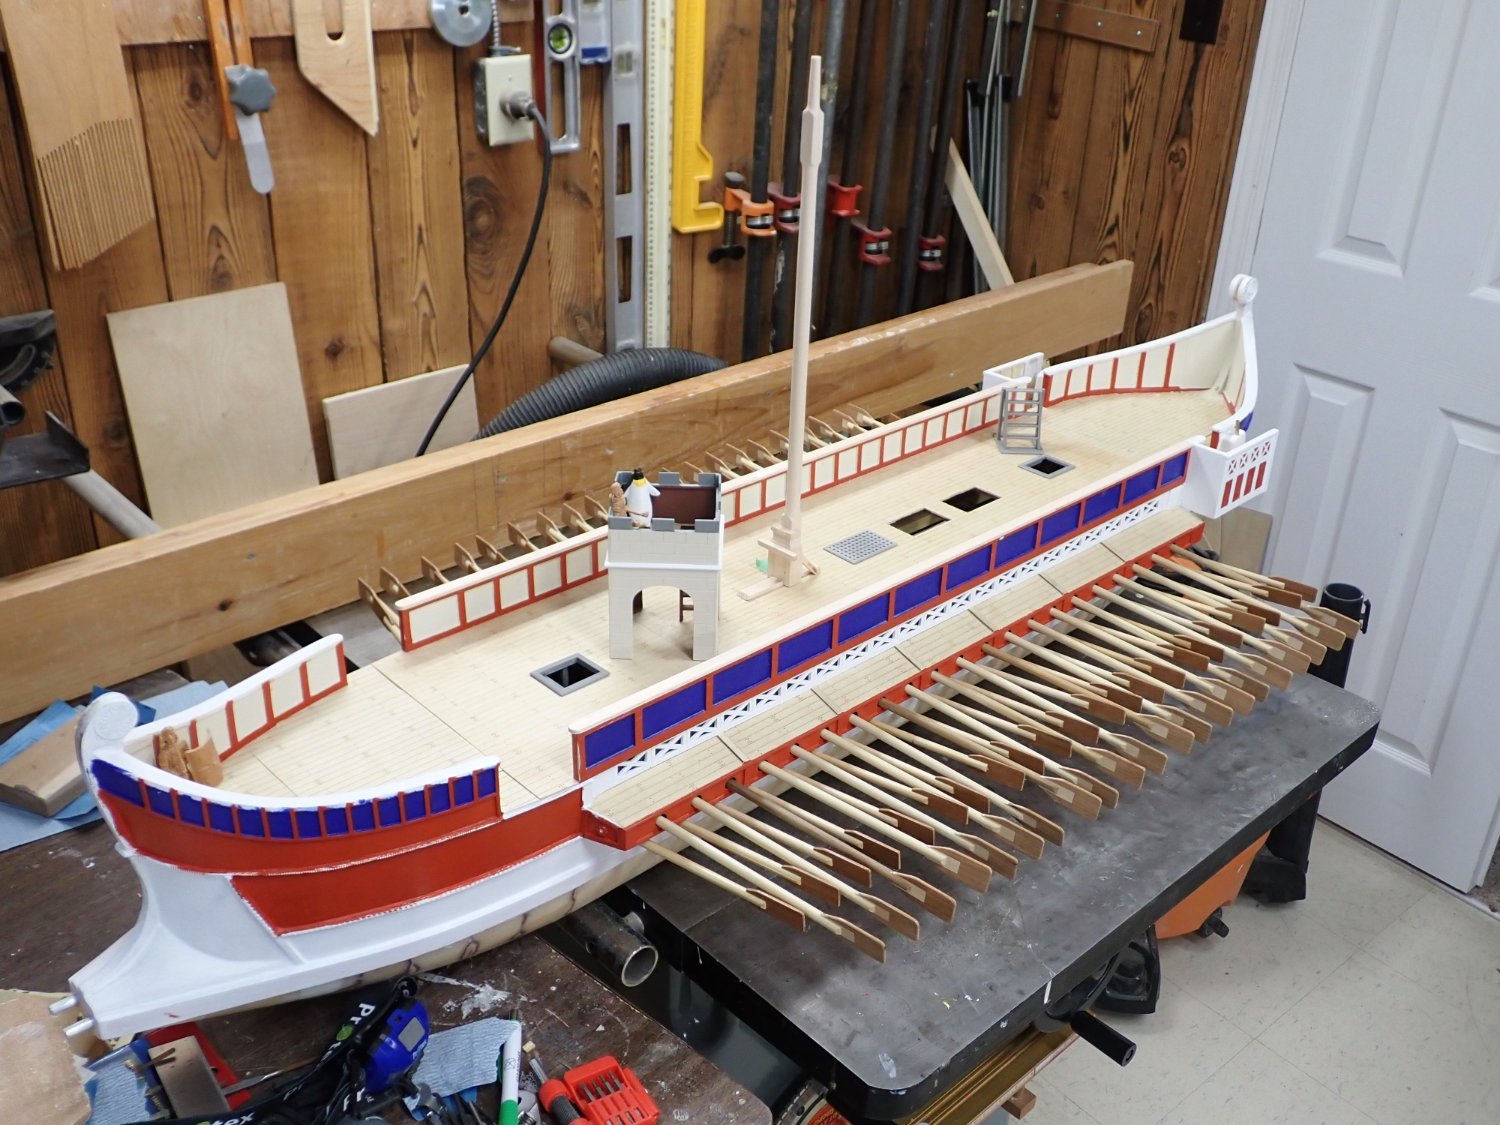
It's been while since I posted; I've been messing around with a few things.
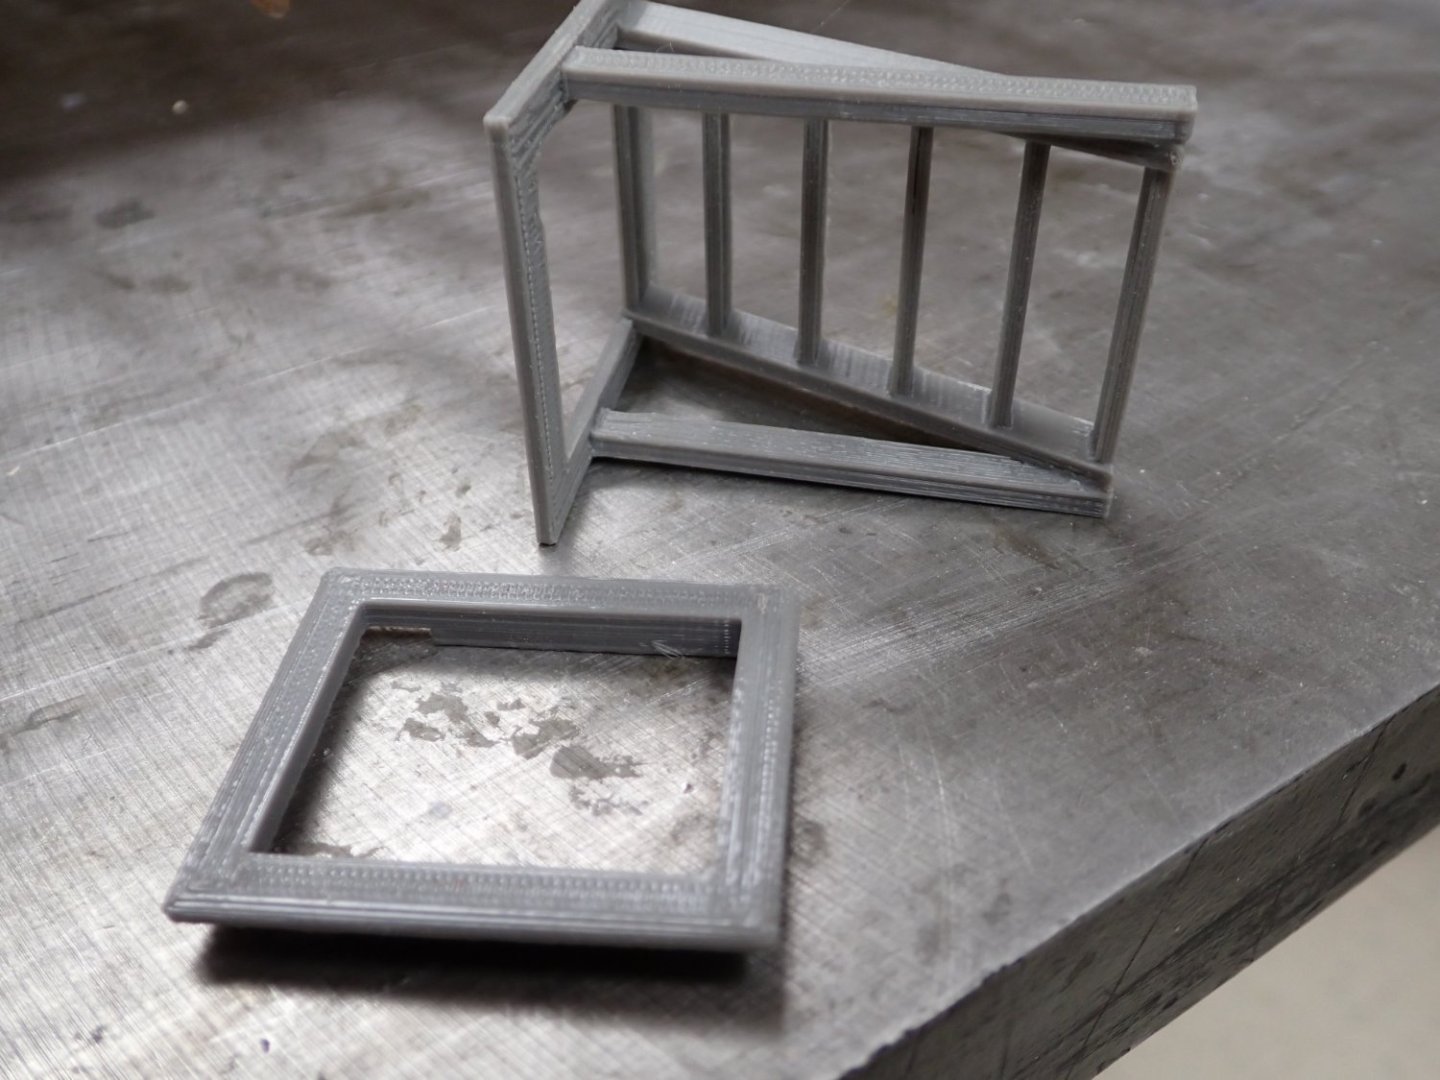
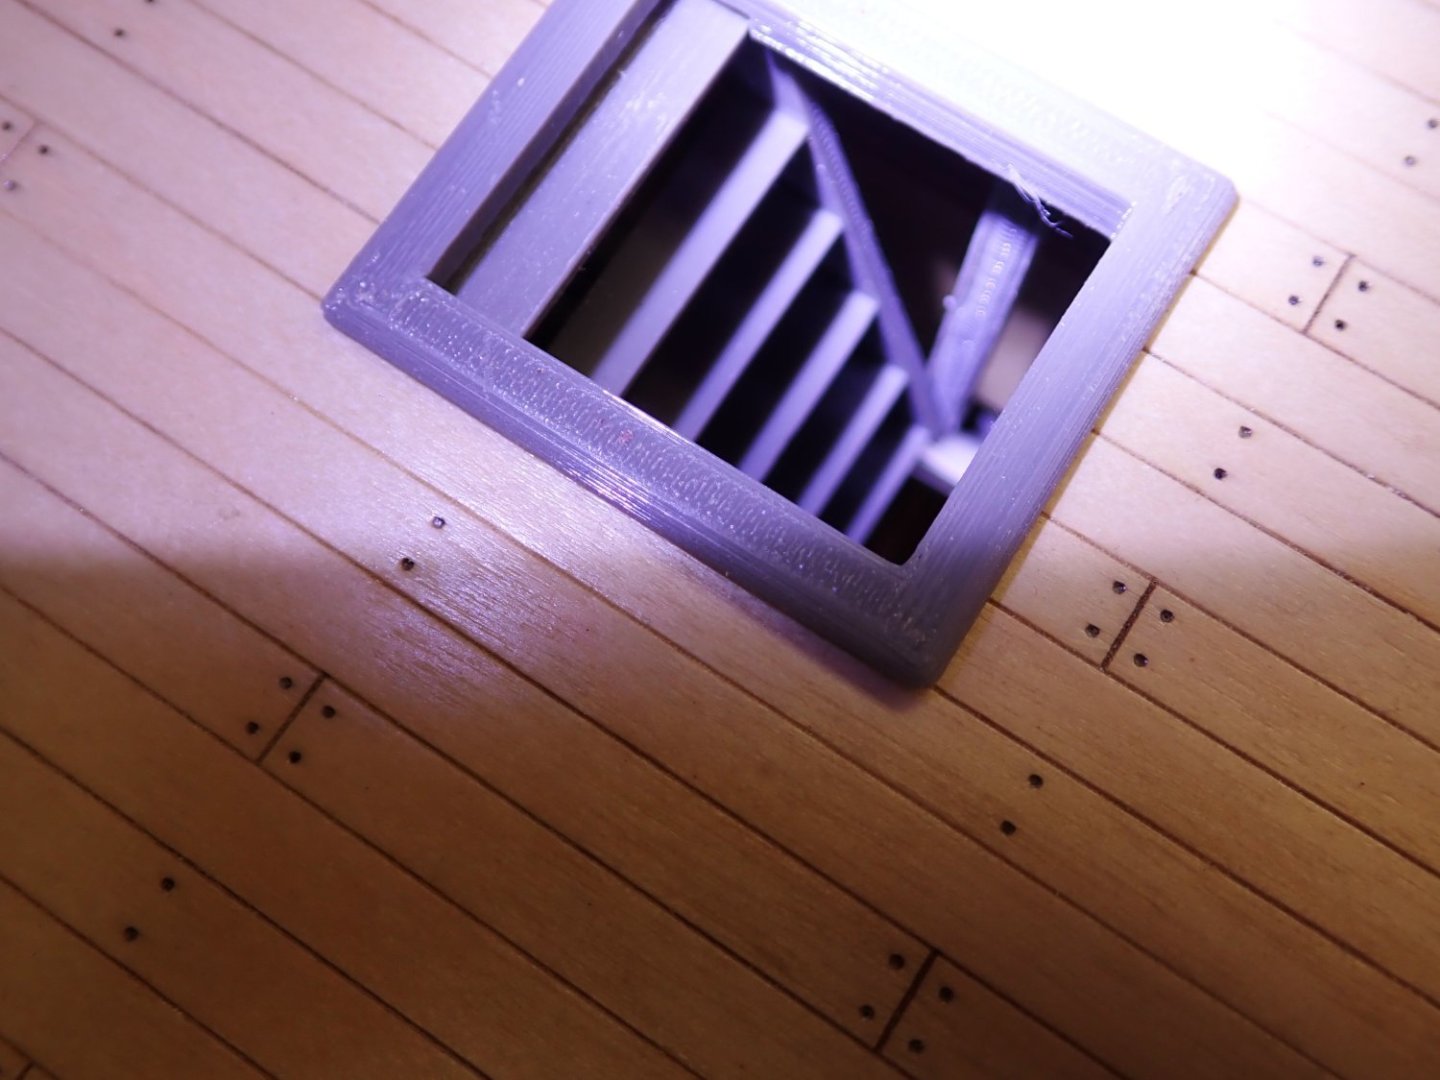
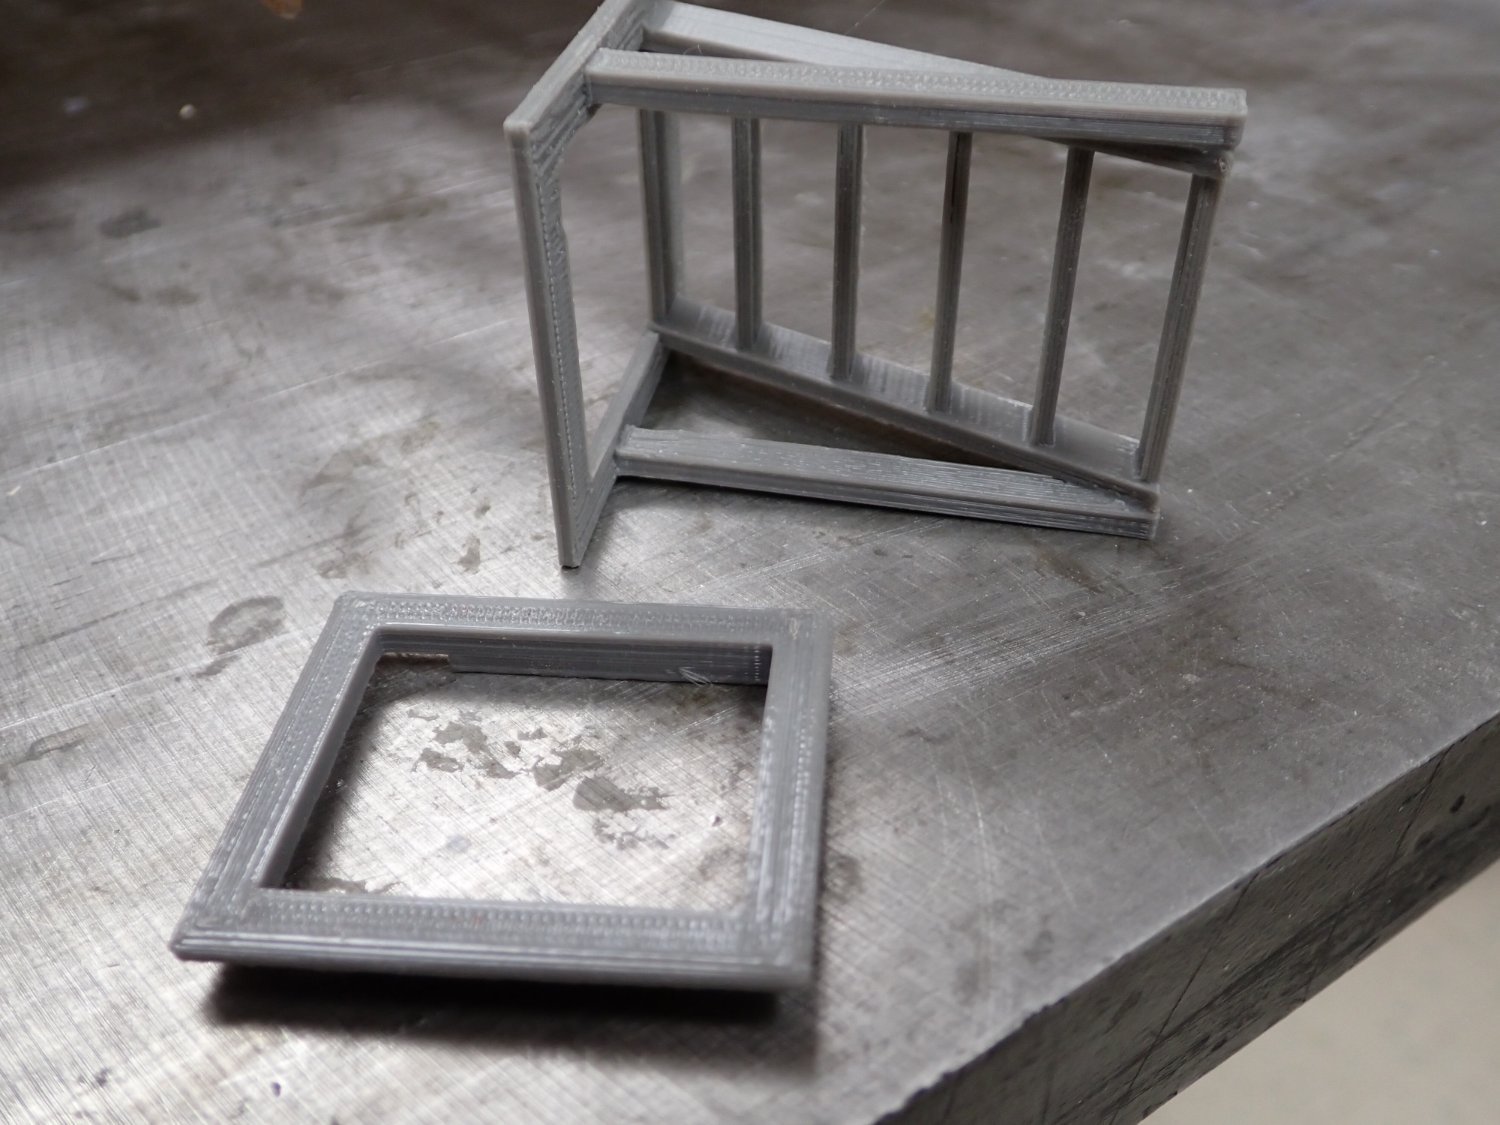
I cut the holes in the deck for access ladders and ventilation gratings. Then it was back to the 3D printers.....
Here is a shot of the ladder assembly to "below decks", printed in 4 pieces, and matching hatch coaming. I printed two sets of these. One ladder is forward of the archery tower, the other is near the stern end of all the oars. Second shot shows "in place" (not glued, the printed coaming is a neat enough fit to hold it). I will be adding a strip of fake deck at the ladder bottom to represent a catwalk between the oarsmen. These ladders occupy the space between the moving oar mechanisms. I do need to move each lift servo 3" towards amidships to get them out of the way; I had planned to do so anyway to make the lift linkages more nearly equal in length.
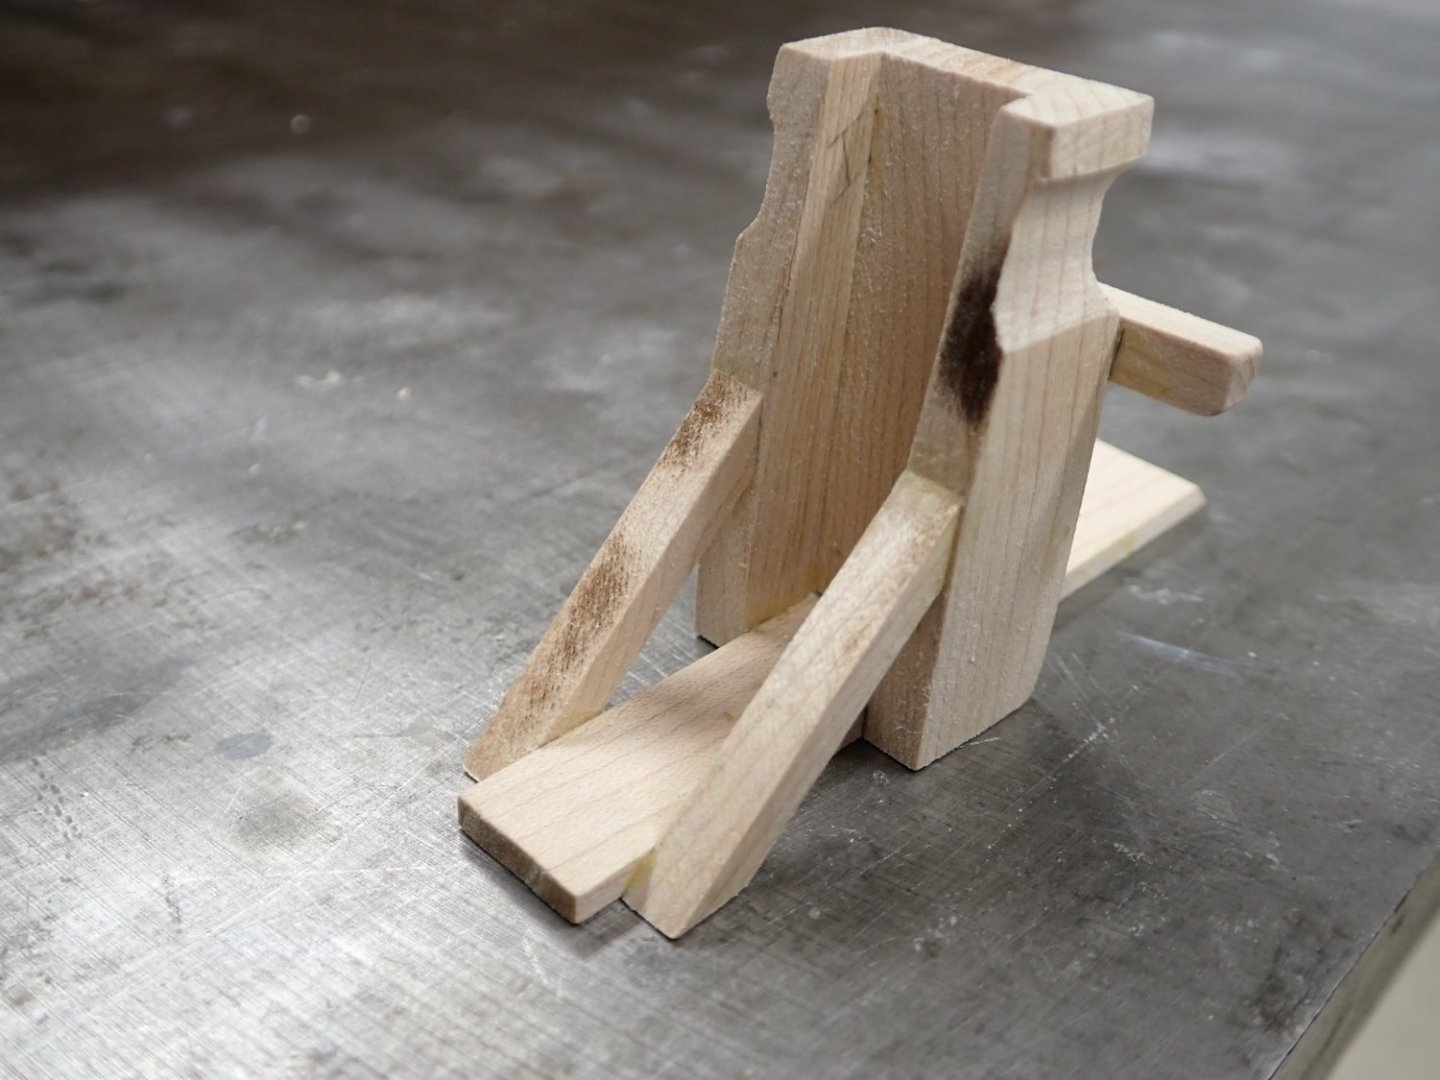
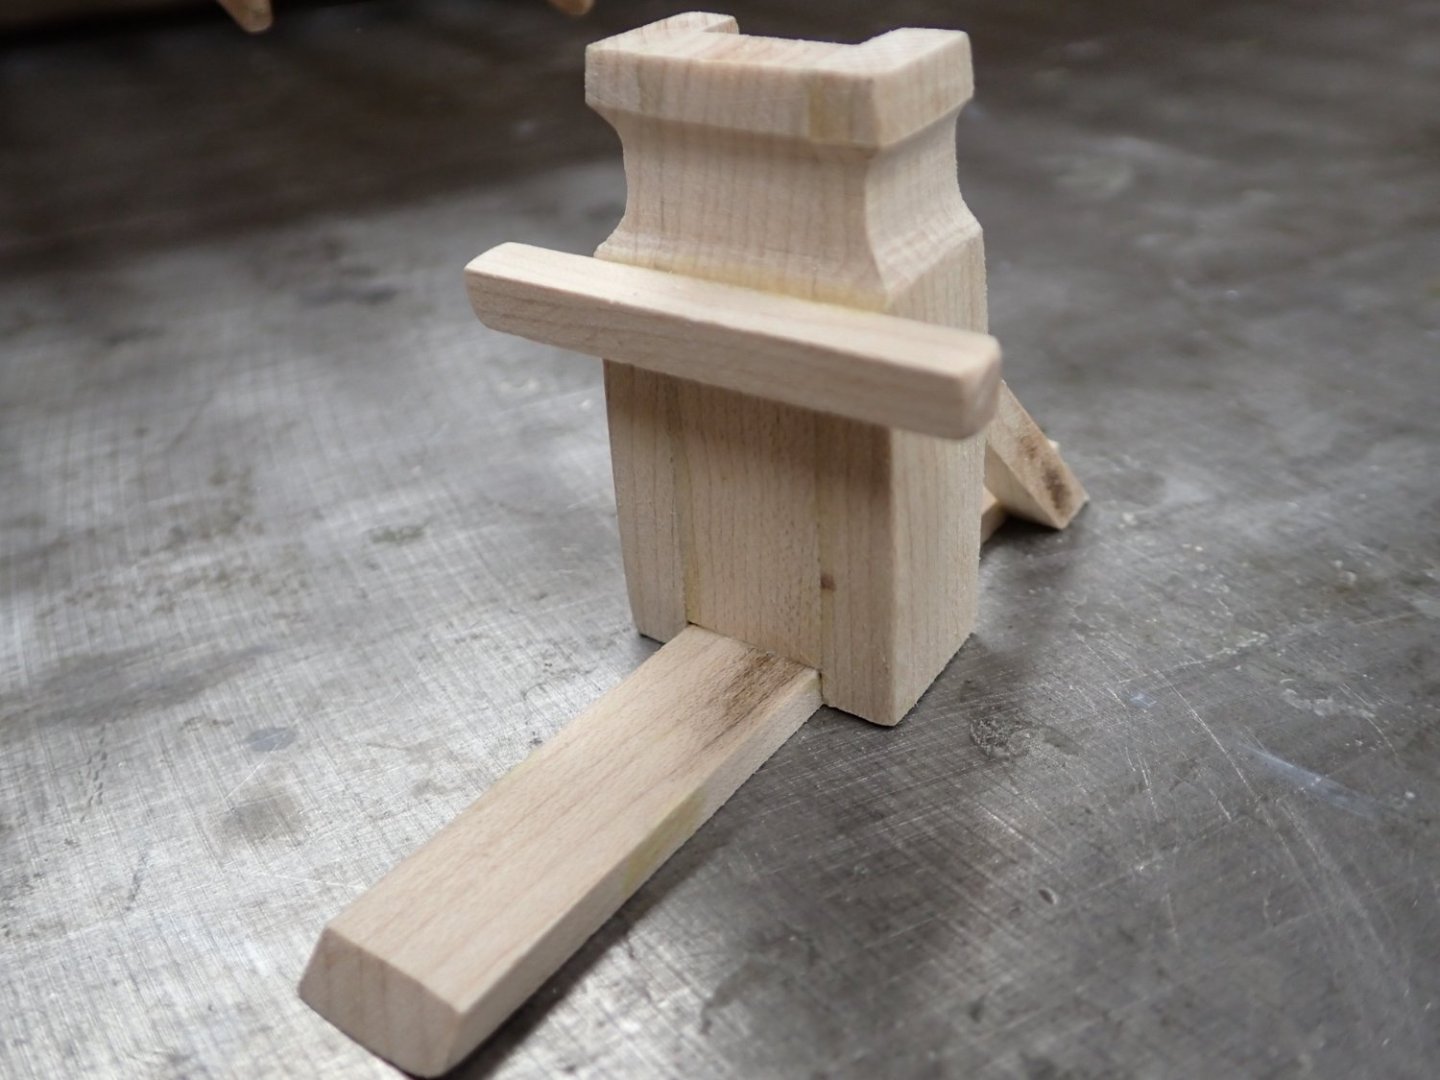
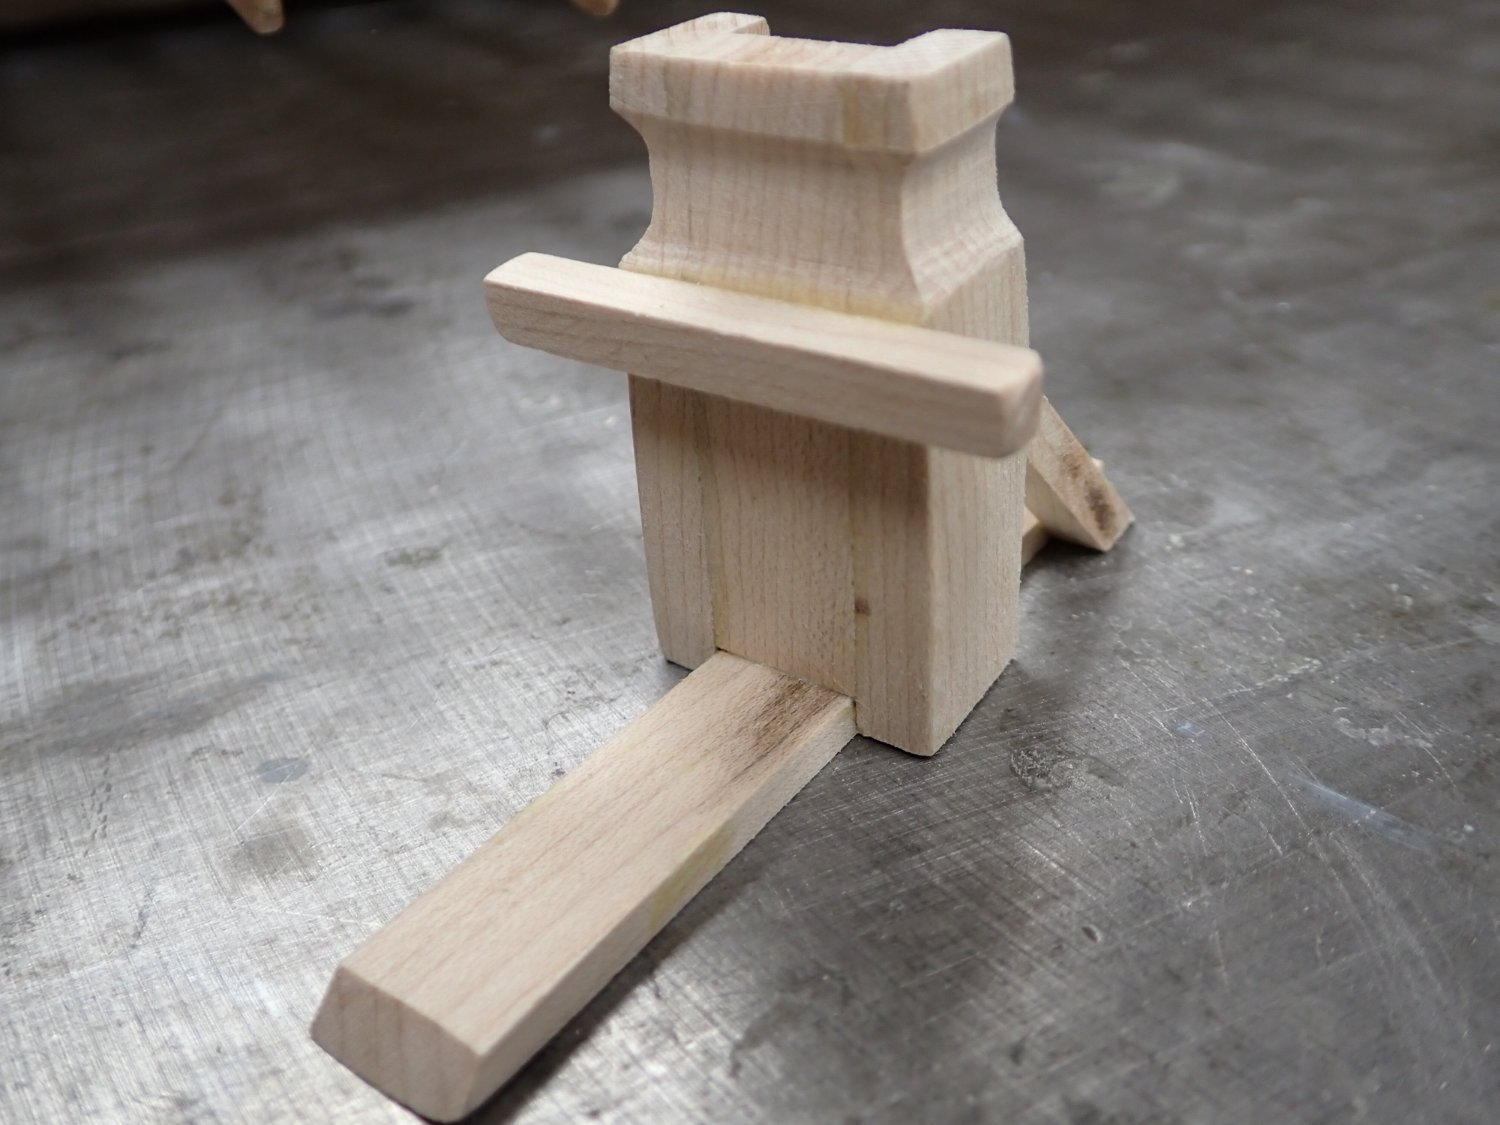
I shamelessly copied Richard Braithwaite's mast tabernacle, in maple. It still needs the small flat square of wood to prevent backwards movement of the mast foot. Pardon the burn marks. It will be painted.
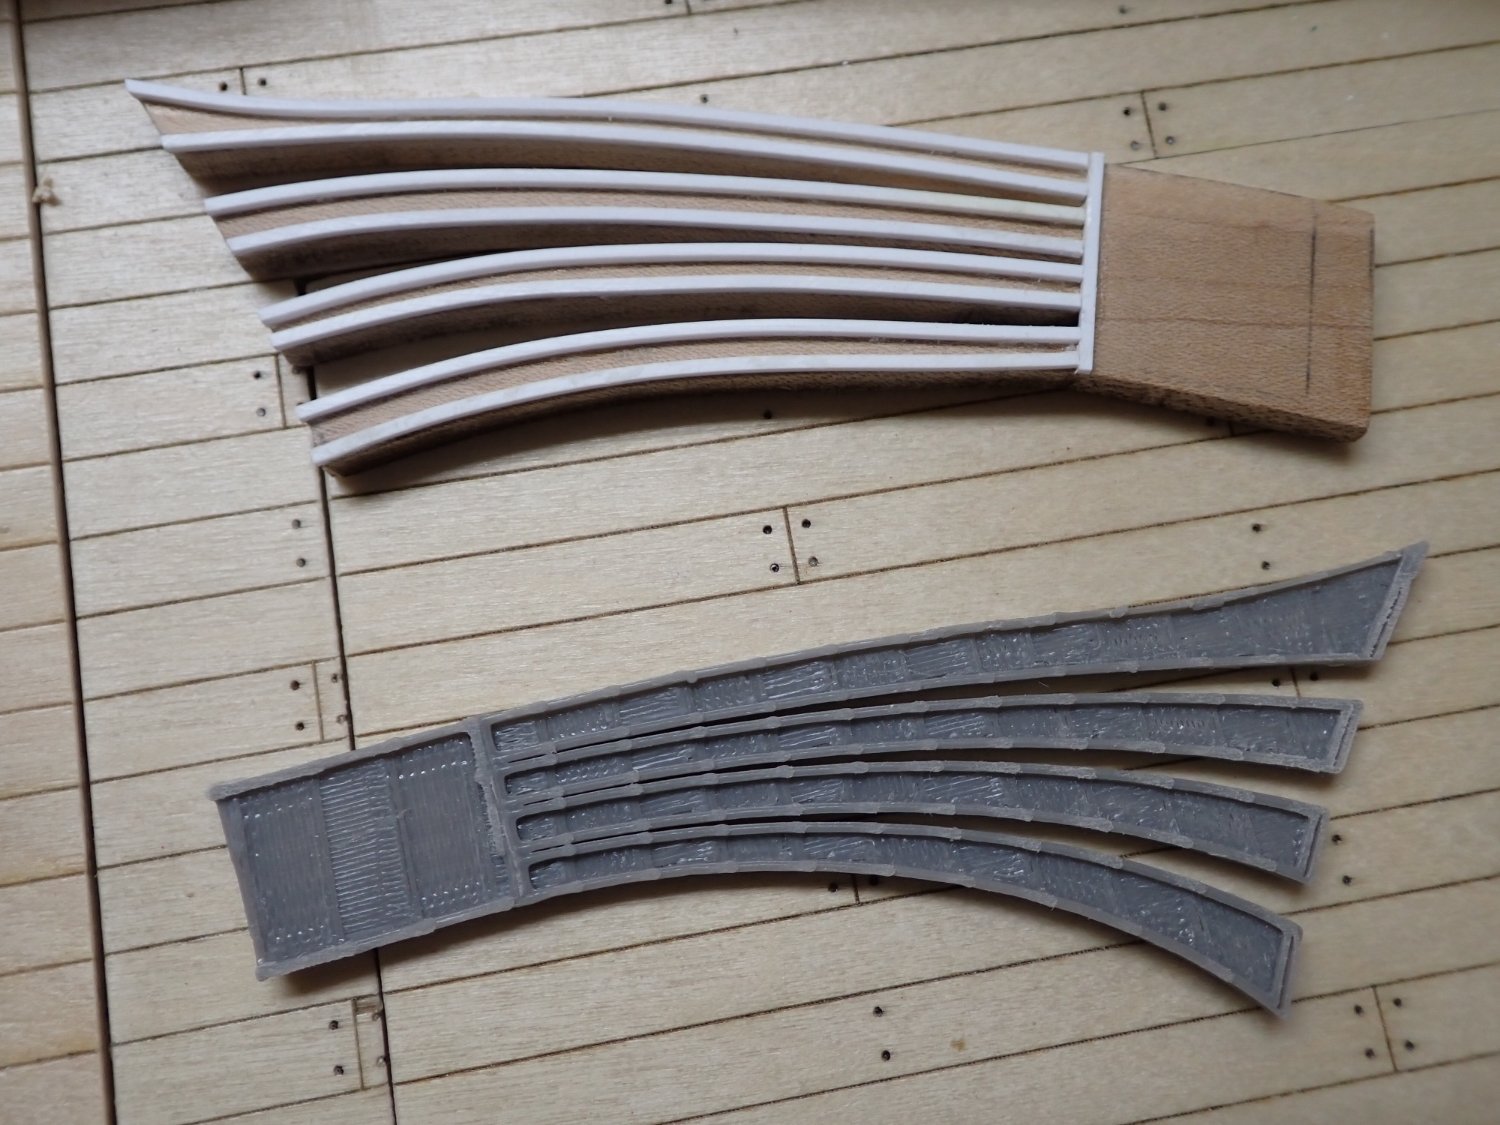
I attempted to make the fantail decoration by hand using 1/8 cherry and 1mm x 1mm Evergreen but I could not get perfect consistency along the fingers, so I bit the bullet and spent several hours painfully drawing it in TinkerCAD using the available shapes. It is a nightmare of elliptical tube segments and multitudes of "hole" shapes to erase parts I don't want. I drew it in two halves so I could get two clean faces out of the PLA printer but the halves were so thin that the library adviser recommended I print them elevated from the drawing plane, and with a tilt. This was to make it easier to separate the thin parts from the print bed. However, the tilt resulted in a stair-step pattern on the faces because the print layer depth is finite. Pic below shows my attempt (it probably would have been good enough) and one of the printed parts. You can see the pattern of lines across it, delineating the stair-steps. I will try again with 1/8" of support under the parts, and no tilt.

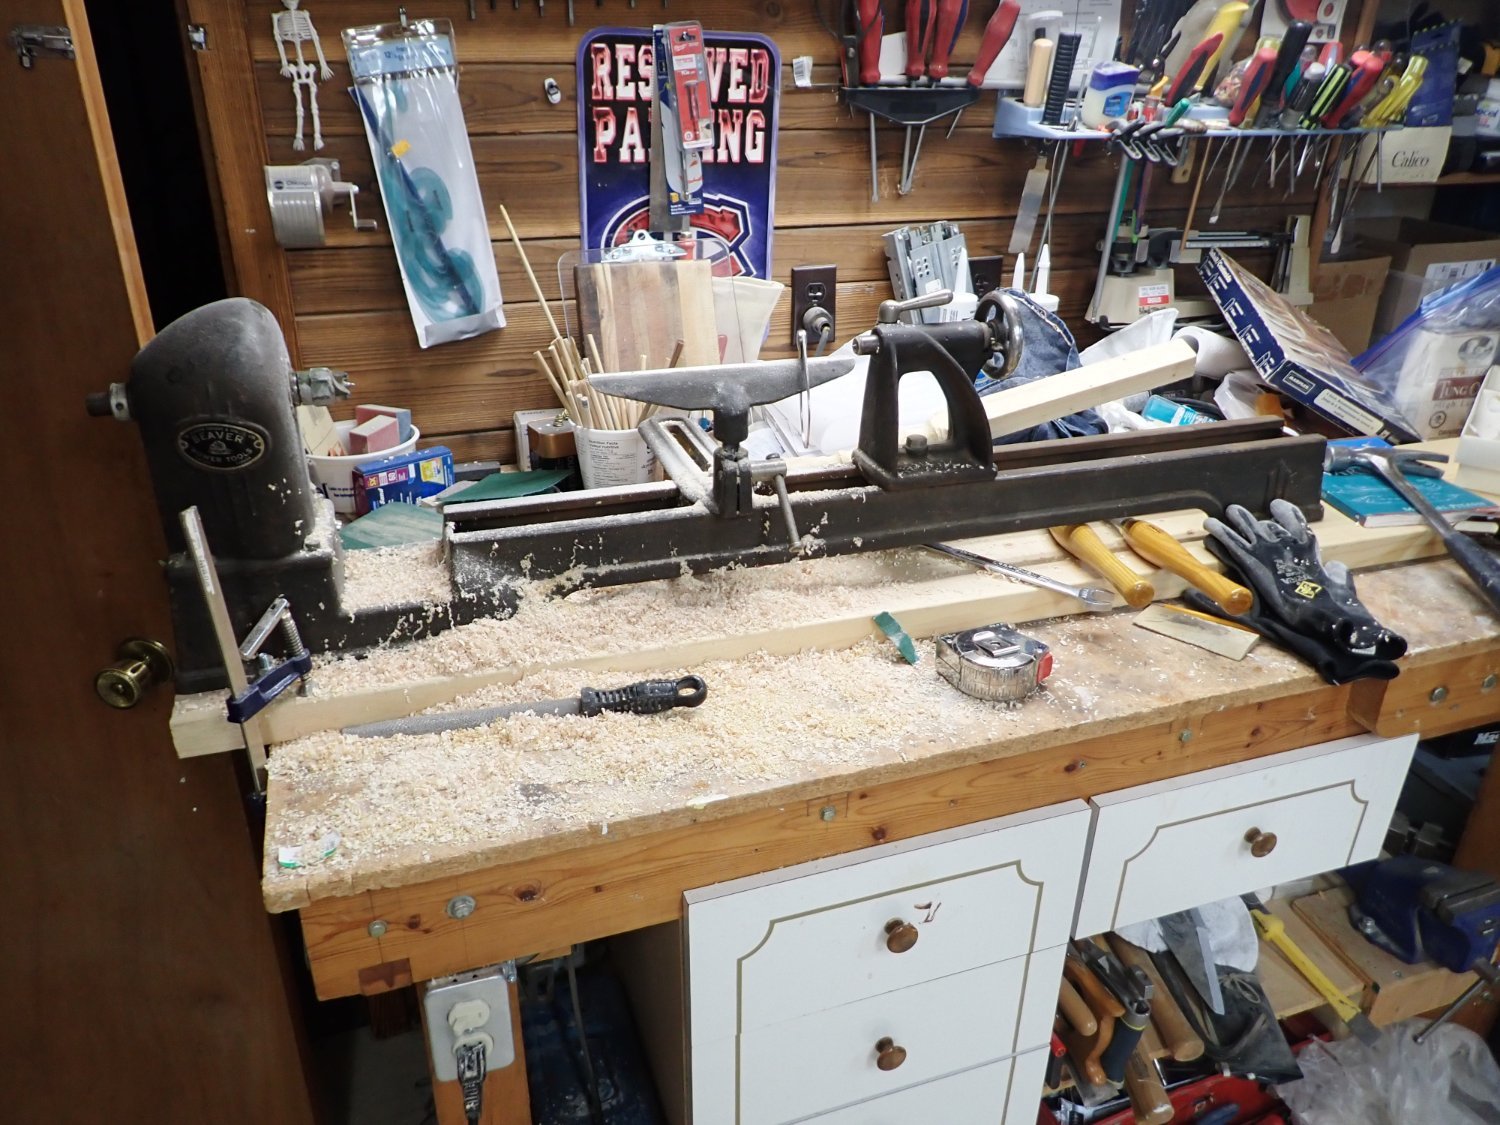
And what's a mast tabernacle without a mast to put into it? Instead of using dowel I decided to use a square blank and turn it, leaving a square cross section at the foot to lock into the tabernacle. For this I pulled out my Rockwell-Beaver lathe which I've had for about 30 years but HAVE NEVER USED! I was given a set of Marples lathe chisels many many Christmases ago; I pulled them out and honed the 3/4" gouge. After reading a bit of how-to about lathe tool use (haven't used a wood lathe since high school in the 70's) I practiced on a junk piece of spruce, then started on a 3/4" x 3/4" blank of clear pine for the real thing. Well, it just was not going to happen with pine. Two blanks snapped in two during rough turning down to 1/2" DIA. I switched to maple and was able to produce a mast fairly easily. I wanted the colour of pine; I guess I will stain the maple but maple doesn't seem to absorb stain so well. Maybe a dye would be better?
Here is my lathe. Many many years ago I mounted it on a long plank for clamping to the work bench, and mounted the motor beneath the bench where it hangs on a pivot to use its weight for belt tensioning. I even went to the trouble of installing an electrical box at the top of the bench's left leg with a switch and an outlet for the lathe motor! Then I slid the lathe on its board under the bench and never used it. 😐

Here is my mast. The square section up high will have the sheave for the yard halyard.

Deck shot; nothing is fixed in place as yet. Still need to print at least two more hatch gratings.

And an overall pic.

Thanks to all who follow!
-
Bill, I've only ever planked one hull and that was in the 70's (which may indicate how much I enjoyed it?). If it was me, with that bluff bow, I would fill ahead of the 1st bulkhead with soft wood and carve to shape.
By the way, is there no rebate to carve along the keel in this model?
-
You seem to have started at your usual blazing pace, Bill. Looking forward to your model's assembly. Especially your first planking....😏.
- Bill97 and Hubac's Historian
-
1
-
 1
1
-
Steven, off topic I know; apologies: with your research into these ancient ships, do you have any idea what scale diameter mast might be suitable for my Roman galley? It must not have been too massive since the guys had to tilt it up into the tabernacle, and also lift it onto the storage racks. I was thinking maybe 14"??? Which would be 7/16" at scale, so 1/2" dowel. What do you think?
- mtaylor and Glen McGuire
-
2
-
Yes, or pour it. That would be a lot of resin for a model the size of the SR, but it would look awesome!
-
Hi Bill .... what I have seen done is to make the water surface from a sheet of lexan with the waterline profile cut out of it; make your wavelets on it and colour it; have clear sides on the stand so the viewer can see the ship u/w too. Some transparent blocks of lexan can be used to support the ship so the "sea" doesn't sag.
-
Well done! But to me the biggest problem with these shroud jigs is the absence of all the served shroud pair centres stacked up the masthead. I suppose one could CA the shroud ends at the base of the masthead (at about the bolster) then "serve" part of the masthead to make it look more like the shrouds are properly constructed.
Having said that, in the "Victory" kit the lower mastheads above the bolster are separate parts from the remainder of the masts. If memory serves, the shroud jig for this kit has a spot for the masthead to attach and then you really can wrap and serve the shroud pairs around the masthead, although Heller still shows the wrong way of seizing them together.
-
I've been really impressed with some of these card builds on the site; first Chris Coyle's airplanes and now ships such as yours (which looks great by the way).
They're amazing when done well. I must try one someday.......
- Jsk, ccoyle, GrandpaPhil and 1 other
-
4
-
Mon Dieu, monsieur! You are going to the nth degree in details Malcolm. Congratulations and if you keep this up your ship will be magnifique!
-
Man, I wouldn't want to have to (carefully) dust your outstanding model ... ☺️
- mtaylor, Canute and Glen McGuire
-
1
-
2
-
I really like the look of your deck Malcolm. And your quarterdeck rail netting... I take it that's your new stuff, compared to the bulwark netting?
Like the coat of arms too.
-
Steven, there's also "Albion Alloys" in the UK which similar to K&S makes brass/aluminium tube and rod down to micro sizes. Last time I needed some 1/32in DIA tubing I obtained it from Albion because K&S would only sell me in large paks, not onesies and twosies. Albion may be in your country too, being British.
- Roger Pellett, Canute, mtaylor and 1 other
-
4
-
17 minutes ago, Malcolm Brown said:
I’m in!! I do the exact same loop coming from our home that is off of Elm Grove Road. Elm Grove turns into Lally Road (Rte 21) just after Murphy’s Point PP. The Narrows Lock Road is a blast to drive. Especially in my convertible😁 Did I mention I have a pub in my basement? 😁
Watch out for cyclists - it could be me. 😏
It is a nice road especially nearer the Narrows end. Remember when it was mostly unpaved from Stanleyville to the Narrows? I remember once coming across a couple whose car had slid into the very sandy ditch at the side. Hopeless - call a tow truck. Geez that was a long time ago.
- mtaylor and Malcolm Brown
-
2
-
Not at all; I just remember the problems I encountered with the kit, and what I did to get around them. Photos trigger the nightmares again. 😉
By the way Malcolm, don't forget about the extra eyebolts at the mast feet for the truss pendants, like we talked about during your visit.


HMS Victory by Malcolm Brown - Heller - 1/100 - PLASTIC
in - Kit build logs for subjects built from 1751 - 1800
Posted
Hi Malcolm; Your rigging is looking nice. I had similar issues with beeswax - lanyard threads looked great until I pulled them through 3 blocks, or six times through deadeye holes, then the fuzzies reappeared. Especially with my .1mm natural for some reason. I smoothed them again between my fingers, where feasible.
Later in the build you'll be finding bits of beeswax on the decks too .... 😠
Out of curiosity, what are the natural threads coming out of the hull forward of the bowsprit shroud ends?