

Tim Curtis
-
Posts
231 -
Joined
-
Last visited
Reputation Activity
-

 Tim Curtis got a reaction from cog in Scottish Maid by Tim Curtis - FINISHED - Artesania Latina - Scale 1:50
Next I have created an iron sling for the lower yard on the foremast. Davis says this is likely to have been used rather than a rope sling after about 1820 (in his Ship Model Builders Assistant). Its just a bit of blackened brass wire, and a chain, and a home made hook.
-
 Tim Curtis got a reaction from knightyo in Scottish Maid by Tim Curtis - FINISHED - Artesania Latina - Scale 1:50
Have been slowly plodding along on my Scottish Maid.
Here are a few things that have happened.
Firstly, here is my first attempt at a Cranse Iron, which I will use on the lower yard on the foremast. I don't know how to solder, so it is made with a few strips of brass, some brass wire and a brass pin and a bit of CA. The armof the iron rotates but not quite as much as it should!
-
 Tim Curtis got a reaction from kier in Scottish Maid by Tim Curtis - FINISHED - Artesania Latina - Scale 1:50
Thanks for the encouragement. I am currently trying to work out how to sort out my blocks. Have worked hard at stropping and am beginning to be satisfied after about 10 attempts. Also I am dropping a bit of brass into the loop or eye of the strop which is super fiddly with a 4mm block but does work, and gives authentic feel. See detail below.
-
 Tim Curtis got a reaction from hexnut in Scottish Maid by Tim Curtis - FINISHED - Artesania Latina - Scale 1:50
Have done some work on the foremast trees, shrouds etc, and was able to dryfit the top mast. I also have fitted a toprope although not shown in the AL plans. Not sure if this correct. Having fun...slow progress.
-
 Tim Curtis got a reaction from Freebird in Scottish Maid by Tim Curtis - FINISHED - Artesania Latina - Scale 1:50
Thanks Chris.
I am also trying to serve rope for the shrouds. Have not done this before and don't have Syren's wonderful Servomatic machine or equivalent. But managed to do these by hand.
-
Tim Curtis got a reaction from kier in Scottish Maid by Tim Curtis - FINISHED - Artesania Latina - Scale 1:50
Mucking around with making hooks and blocks....here are the results.
-
Tim Curtis got a reaction from kier in Scottish Maid by Tim Curtis - FINISHED - Artesania Latina - Scale 1:50
Finally I have bought a little lifeboat kit online (don't worry - its not from one of the banned manufacturers - I checked) and I am in the midst of putting it together. Its probably a couple of decades too old in it's design. But I found it hard to find a good quality little kit of the right size. This was as close as I could find. About $18 AUD. I like it. Not finished yet, but making progress. Its about 80mm long, so the planking is quite tricky.
I have been using the steamer on my coffee machine and a bit of CA (no pins) and a few miniature clothes pegs to bend the planks - and it seems to go pretty well.
-
Tim Curtis got a reaction from kier in Scottish Maid by Tim Curtis - FINISHED - Artesania Latina - Scale 1:50
Have made a bit of progress on the standing rigging. Shrouds for foremast are in place.
Also forestays, served and spliced in order to loop around foremast trees.
Finally created the guys for the bowsprit. This was tricky. First had to create a collar with eyelets either side. Collar also needed the deadeye for the bobstay to be attached to it.
Then made the the bowsprit guys themselves, which are then lashed to the collar. Both collar and guys have eyelets and thimbles. First go at this, but managed to get the hang of making little thimbles, by pushing a dremel head into some small sections of silver coated brass beads (from a bead store). This gives them a bit of shape. Then created a false splice around them. Finally make the little lashing and there we go.
Its 2am, and I have a busy day with kids tomorrow. My wife is going to kill me... Bed time. Happy new year!
-
Tim Curtis got a reaction from hexnut in Scottish Maid by Tim Curtis - FINISHED - Artesania Latina - Scale 1:50
Finally I have bought a little lifeboat kit online (don't worry - its not from one of the banned manufacturers - I checked) and I am in the midst of putting it together. Its probably a couple of decades too old in it's design. But I found it hard to find a good quality little kit of the right size. This was as close as I could find. About $18 AUD. I like it. Not finished yet, but making progress. Its about 80mm long, so the planking is quite tricky.
I have been using the steamer on my coffee machine and a bit of CA (no pins) and a few miniature clothes pegs to bend the planks - and it seems to go pretty well.
-
 Tim Curtis reacted to marsalv in Pandora by marsalv - FINISHED - 1:52
Last part of the small details - euphroes, parrel ribbs, cleats, rack blockas, cathead blocks.
-
Tim Curtis reacted to EdT in Young America 1853 by EdT - FINISHED - extreme clipper
Young America - extreme clipper 1853
Part 197 – Topmast Shroud Deadeyes
The last post showed the forward futtock shrouds installed, but was mainly concerned changes to rigging sizes, so I skipped over the work on the shrouds. This work started with making straps for the deadeyes from copper wire.
The first picture shows wire wrapped around a dowel to make consistent-sized rings that will be formed into straps.
After some testing of ring size, a ¼" dowel was determined to be the right size for this – conveniently. I was hoping to avoid turning a special size. After wrapping tightly, the rings were parted as shown below.
The razor blade shown above makes a clean cut in the 22 gauge wire used for these – but only one or two at a time. The next picture shows some rings before soldering as well as the test assembly fitted into the top.
The next picture shows the top with its six deadeyes fitted through slots in the iron reinforcing strip and the wood rim below.
A variety of futtock shroud materials and methods of fastening were used during the period. Iron bars were coming into use. Where rope was used, connections might be shackles, hooks or lashings. Mast connections varied. I decided on rope with hooks at the top and lashings at the mast eyes, typical of the early clipper years. The next step was to make the hooked-thimbles. Some are shown in the next picture.
These thimbles were cut from 1.5mm brass tube then flared by tapping with a shaped punch. The thimbles shown happened to be blackened first – not necessary. The eyes in the hooks must be large enough to pass the served shroud. To ensure this, the brass rod shown was used as a gauge when forming the hooks. In the last picture the hooked thimbles have been blackened and are shown suspended from the straps, awaiting connection of the shrouds,
Making the shrouds will be described in the next part.
Ed
-
Tim Curtis reacted to giampieroricci in L'Amarante 1749 by giampieroricci - FINISHED - 1:30 - French Corvette
advancement
-
Tim Curtis reacted to jack.aubrey in Gaeta Falcata (Gajeta Falkusa) by jack.aubrey - FINISHED - Marisstella - 1:20 Scale
Friday, February 17, 2017
Finally, I almost finished this long and tedious task . . now only a few small details are still missing.
While considering that I haven't spent a lot of time on shipmodeling in this period, due to various setbacks, it was still a job that has challenged the "prince" of ship modeling attitudes: being patient.
Could I spend less time if I used the CA glue instead of the vinyl one?
Most probably, but certainly the strength of the joints would not be the same, and here it is necessary to emphasize that this framework, for this specific model, plays a structural role rather seriously. In fact, now that the skeleton is almost complete, it works very well as an element that keeps rigid and not deformable the whole hull. This wasn't the same before this task, when it appeared like an empty shell. However, to avoid more risks, I left two fixed reinforcements (visible in the photos) plus one removable, that I will disinstall at the proper moment; they should prevent the shell to change its original shape.
I consider myself quite satisfied with the result even though, after a closer inspection, not all the ribs are perfectly aligned, perpendicular and equally spaced between them.
This goal seems like a pretty easy job to be achieved in the theory world, but incredibly difficult in practice. Indeed, probably impossible, because it is a problem that lies in the method of construction adopted, that is, 1) to prepare first the hull shell and 2) then subsequently build inside the backbone structure. There is the need to bend in the right shape every piece, to obtaining the correct camber bevel, to glue and clamp etc .. with all this matter to consider, errors of a few tenths of millimeter are very common.
Anyway it should be emphasized that very little of this complex rib structure will be really visible when all the remaining fitting details will be installed.
For this reason, to avoid hiding almost the incredibly profused workload to get here, I'm thinking to setup the bottom fitting not completely closed, perhaps completely removable, in order to see these interesting details.
We will see later. Now here are some photos of the model as it is today. Sincerely, Jack.
01 - 20170217_094533.jpg
02 - 20170217_094602.jpg
03 - 20170217_094623.jpg
04 - 20170217_094611.jpg
05 - 20170217_094631.jpg
06 - 20170217_094641.jpg
-
-
Tim Curtis reacted to robnbill in Brig Eagle by robnbill - 1:48
Here is the Eagle as she sits in the dock today. The upper mast sections for the foremast are still to be done. On the spanker mast I decided to go with 12 rings. This was based on the Model Expo Niagara. It was slightly less than what I had calculated but given the boom and the angle of the gaff was well within the tolerances. Since the Niagara was what Dr. Crisman used as his basis for rigging, this is the rig I turn to when questions arise in my build.
Once the foremast is complete, I will start on the bowsprit assembly. The masts are currently just lightly wedged in place so ignore any misalignment. The final angles will be set with the shrouds. The mast sections are also not glued together. I plan on rigging the masts in place. Of course, as always, my plans are subject to change!
-
Tim Curtis reacted to Moonbug in USF Confederacy by Augie & Moonbug - FINISHED - Model Shipways - 1:64
I've been working on a little bit of double duty as I get closer to the finish of the Confederacy. I've started the ships boats, but have also been working on anchors and small details of the ship.
Nothing particularly complicated with the anchors. As with most of the laser cut parts, the anchor stocks are pretty beefy and required a fair amount of sanding. I used pin files to notch them of course, but the wood itself is soft, so I used nothing grittier than 400 grain sandpaper to ease them down bit by bit and bevel them.
Pretty standard stuff with the bolts, just clipped off some nails and blackened them.
Likewise with the bands - once again the instructions call for card stock, which I think is a perfectly viable option and probably even simulates a better thickness to the bands. But I love the look of using metal instead, so I trimmed some more strips and blackened them as well.
After test fitting both the anchors I stained them up - then finished off the rings and served them with thread.
My intent was to just lash the anchors to the model - as Chuck points out in his primer, that was the case with Navy Board style models (even though I've taken some liberties elsewhere. After lashing the starboard anchor, I realized that because I added a couple extra upper deck cannon to the port side - simply lashing the anchor would interfere!
So here's where I went rogue... I decide to keep the starboard lashed, but rig the port side to the cathead. Crazy talk! I pulled a page from Mastini's book since I couldn't really remember the details, carved out and constructed a pulley and rigged her up. This will be the back side of the model, so I didn't go full-on with details - but I think it looks fair and adds a interesting wrinkle.
I also got the chance to mount the waist stanchions and railings.
Finally - an important transition! I made the switch from the Dremel workbench to the stand. She's getting closer...
-
Tim Curtis reacted to Jim Lad in Thermopylae by popeye the sailor - Sergal - 1:124 scale
Popeye,
Just for reference, these are the pumps on my model of the 'Nautilus' for reference. I would think that your pumps are the same type.
John
-
Tim Curtis reacted to robdurant in HMS Ethalion 1797 by robdurant - FINISHED - Caldercraft - 1:64 - Modified from HMS Diana 1794 kit
"HMS Ethalion in action with the Spanish frigate Thetis off Cape Finisterre, 16th October 1799", Thomas Whitcombe, 1800
(public domain image from Wikipedia)
-
Tim Curtis reacted to Eric W in Pirate Brig by Eric W - FINISHED - BlueJacket Shipcrafters - 1/64
Here is the hull painted above the waterline. I think the French blue came out pretty nice. I did not use a waterline jig. Bluejacket provides one, if you prefer, but I find them too cumbersome. I took measurements from the plans and then marked the hull at intervals.
-
Tim Curtis reacted to JSGerson in Rattlesnake by JSGerson - FINISHED - Mamoli - 1:64 - Using Robert Hunt’s practicum
The last pictures will be posted when the case is finalized, the model cradle is tweaked, and the model is inside.
-
Tim Curtis reacted to KeithAug in Altair 1931 by KeithAug - FINISHED - Scale 1:32 - schooner
Binnacle 2nd attempt:-
The body was made as previously explained. This time I reversed the direction in the chuck and cut the circular plinth as part of the main body. Previously the plinth had been made separately and this introduced the weakness that led to the chip.
The conical cover was made from bar and the first operation was milling the flat and then drilling the hole for mounting the viewing tube / window.
The conical form was then machined on the lathe. Likewise the viewing tube was turned up from bar and the two parts were glued together with CA. The cover was then glued to the stem again with CA.
The bottom square plinth was cut from mahogany and drilled with a central mounting hole and 4 peripheral holes to take the brass balls. The balls were made using "Michaels stanchion method".
-
Tim Curtis reacted to Maury S in Anchor Hoy c. 1825 by Maury S - FINISHED - 1:48 - Harbor craft - POF
The spirketing is being installed.
The spirketing piece is held down on the waterway and against the frame with braces that are notched and clamped to the bulwarks. The notches will be lengthened when I get ready to install the inner bulwark planking (? thin stuff ?).
I had to make up a dummy rudder to make sure the planking on the transom will not inhibit the turning of the rudder. I'll shape the hole as I move up with the transom planks.
Maury
-
Tim Curtis reacted to Stuntflyer in HM Cutter Cheerful 1806 by Stuntflyer (Mike) - FINISHED - 1:48 scale
The sling is now completed. It is made from Chuck's .035 Dark Brown rope and served its entire length with 50wt thread. Adding the thimble and seizing it was straight forward. The rope length was measured so the bottom of the hook falls about 3/16" below the gaff. A small eye was seized to one end of the rope, while being careful to maintain the proper rope length. This was all done off the ship. After feeding the sling around the mast, the remaining end was inserted through the eye and the last intertwined eye was made when the sling was in position. Seizing the last eye proved to be quite tricky. The sling is short, so holding onto it while seizing the eye proved to be awkward. It took several tries before I managed to do it.
Mike
-
Tim Curtis reacted to Hennie in HMS Agamemnon 1781 by Hennie - FINISHED - Caldercraft - Scale 1:64
@Sjors,
Thx Sjors, and yes, I am right behind you now. I am starting with the yards also .
@Joe,
Thx Joe. Its going fast now.
And a small update....
I finished all the backstays now and - like Sjors- I also start with the yards. But I first have to make them all :)
Some pictures which shows where I am right now.........
-
Tim Curtis reacted to Michiel in Prins Willem 1650 by Michiel - 1:50 - POB Zeeland ship from own plans
Just a bit more finetuning and pictures taken in my new photo box
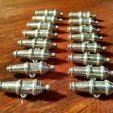
This is what my final guns are going to look like