


gsdpic
-
Posts
843 -
Joined
-
Last visited
Content Type
Profiles
Forums
Gallery
Events
Everything posted by gsdpic
-
Nice! The chrome strips on the lower fenders add a lot to the look, so good job in persevering when they put up a little bit of a fight.
-
Welcome Gerry. You might also want to clarify.....I assume you are referring to Bolton, England, but MSW has members world wide so that might not be obvious to everyone and who knows, maybe my assumption is in correct. Also, search for any local modelling clubs, ship modelling or otherwise, if you have not done so already. Perhaps they will know of someone who can help.
-
Another quick update....I've sprayed the body of the Martini car with Tamiya X-11 chrome silver thinned with Mr Color leveling thinner. Of the two cars, this one is easier to paint but the decals will be a challenge. The Gulf car will be trickier to paint but the decals should be easy. I will likely alternate between working on finishing the chassis of the two cars and working on painting/decaling the bodies. Once I am done with decals, I'll use Tamiya X-22 gloss clear coat.
- 35 replies
-
- 10
-

-
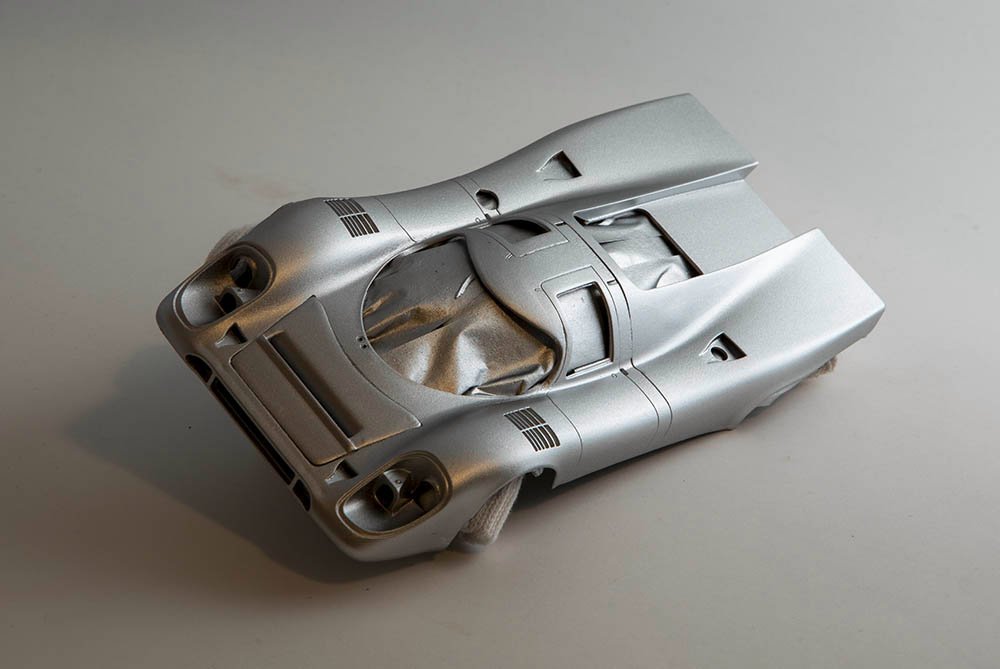
Just to follow up on the Splash Paint tangent....I do have experience with them. Both of these were painted using Splash paints. As for the Porsche 917s, I now have most of the interior details done. The only remaining thing is to add the photo-etch seatbelts to one of them. They are a bit of a pain to bend correctly and get in and I don't think I have the patience for the second one right now. On the Martini car, I've also painted the lower outside part of the tub with the body color, Tamiya X-11....that's the one in back up on the paint jar, though it is hard to tell it is painted silver in this picture. And yes, that is a small second seat. I assume that was there solely to satisfy some regulation. I could have spent a bit more time detailing these and there are a few more (mostly tiny) photo etch parts I did not bother with. Once the model is assembled I don't think the interior will be that visible.

- 35 replies
-
- 11
-
-
Another possible option, if you think you can do an acceptable job of hand-drawing the letters. See post #40 of this non-ship log... In that post, @CDW refers to a white gel pen. He used it for logos on tires but perhaps something like that could be used to draw the letters, either directly onto the model, or perhaps draw them on to clear decal paper and then apply as a decal. That way you would not have to match the background but the edge of the clear decal sheet may still show, especially if the surface the decal is applied to is not smooth and glossy. Applying a matte clear coat may help hide the decal.
-
Nice, I've seen that kit on ebay as well. I don't have much experience with Heller kits.
-
They have both 1k and 2k primer. I assume the activitor is for the 2k stuff, which I stay away from. I have, and use, their 1k primer. Speaking of primer and splash paints....I tried using splash paint over the grey tamiya primer and that did not go well, the splash paint was too "hot" for the primer.
-
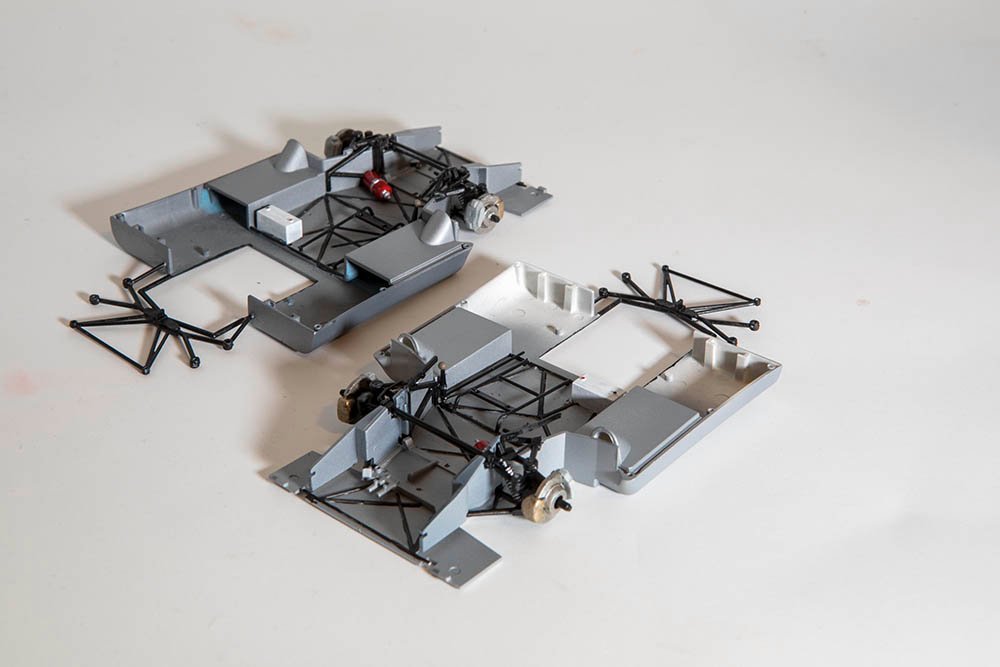
Thanks for the likes and comments, and for just looking in. A quick update...I've now got both models in sync and have the front suspension done on them and the main tub mostly painted. The lower, outside parts of the tubs will get the body color. They still need a front radiator, then on to the dashboard and seats followed by the engine, transmission, and rear suspension. I think I now have both bodies primed and ready for color coats though I will let them cure for another day or two. I had an interesting exchange with Splash Paints. In the past I purchased their "gulf blue" and "gulf orange" colors. Then early this morning I received an email from them indicating they had released several new colors. Among them were colors they called "917 Blue" and "917 Orange" that looked like they were for the Gulf livery on a 917. I sent an email asking about the difference between the 917 Blue/Orange and the Gulf Blue/Orange. I received a rather quick reply that the Gulf colors match the modern formula while the 917 colors match what was used in 1970. The email indicated that the 1970 colors were both darker but looking at the samples on the web page, it appears to me that the 1970 orange is darker but the 1970 blue is lighter. I also have splash paints red and white. I think I'll use the colors I have and once I see them, maybe add a drop or two of white to the blue and a drop or two of red to the orange, if I feel the need.
- 35 replies
-
- 11
-
-
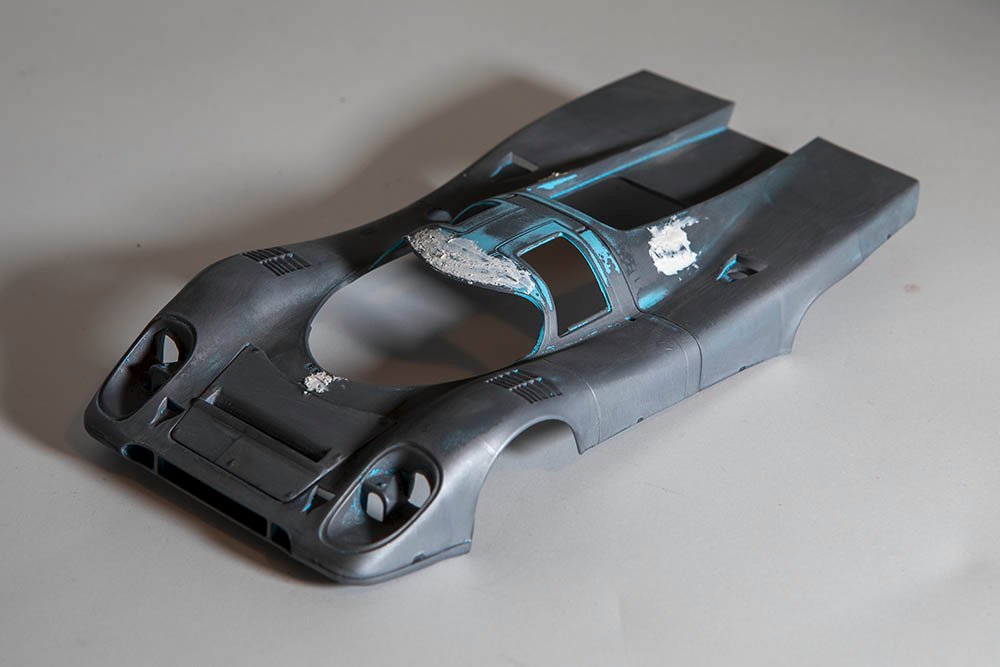
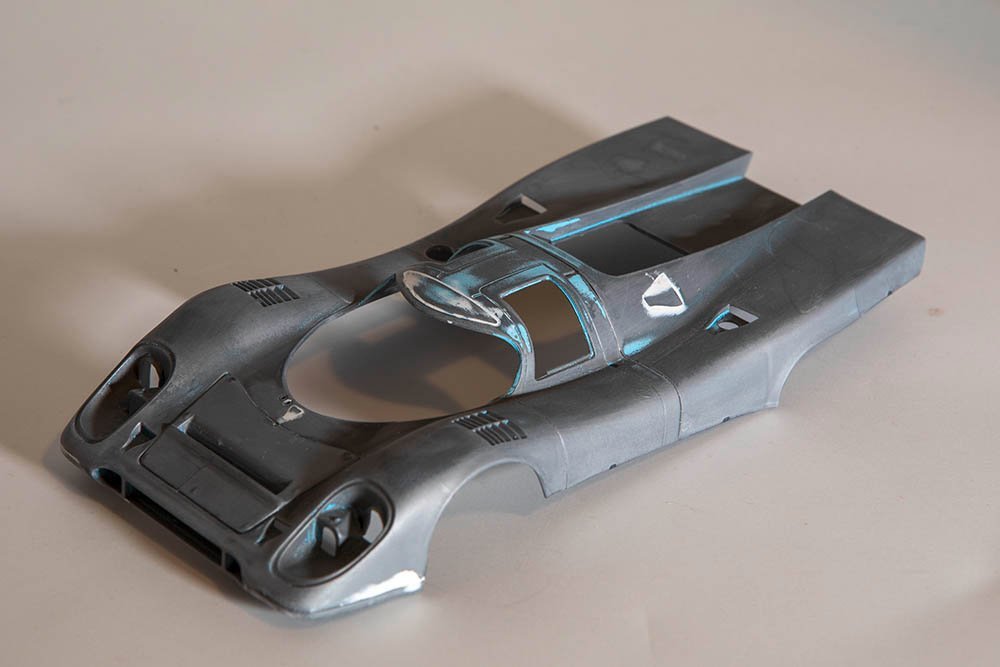
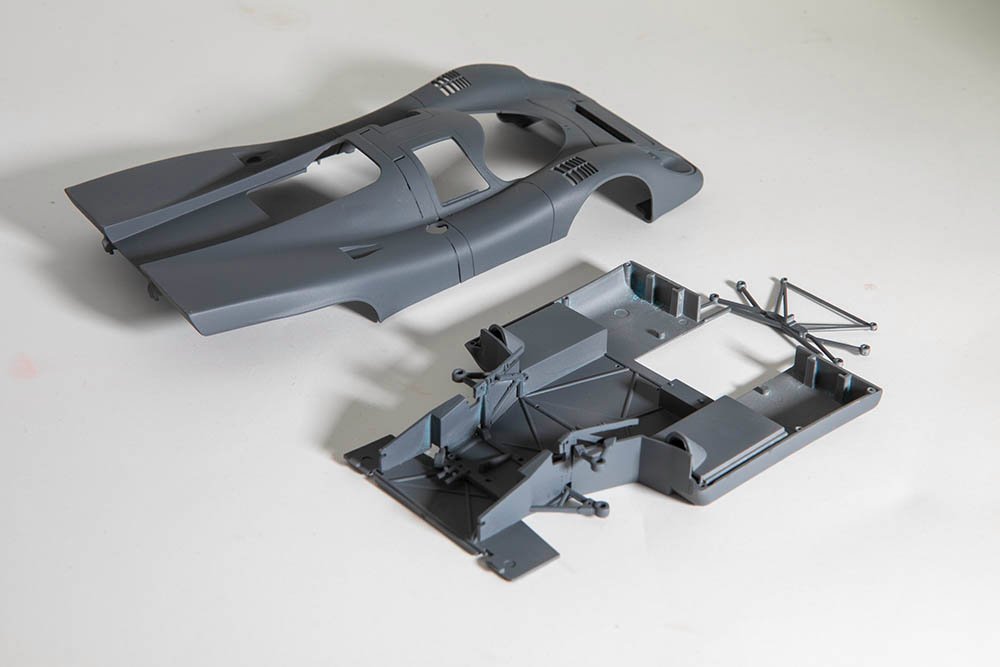
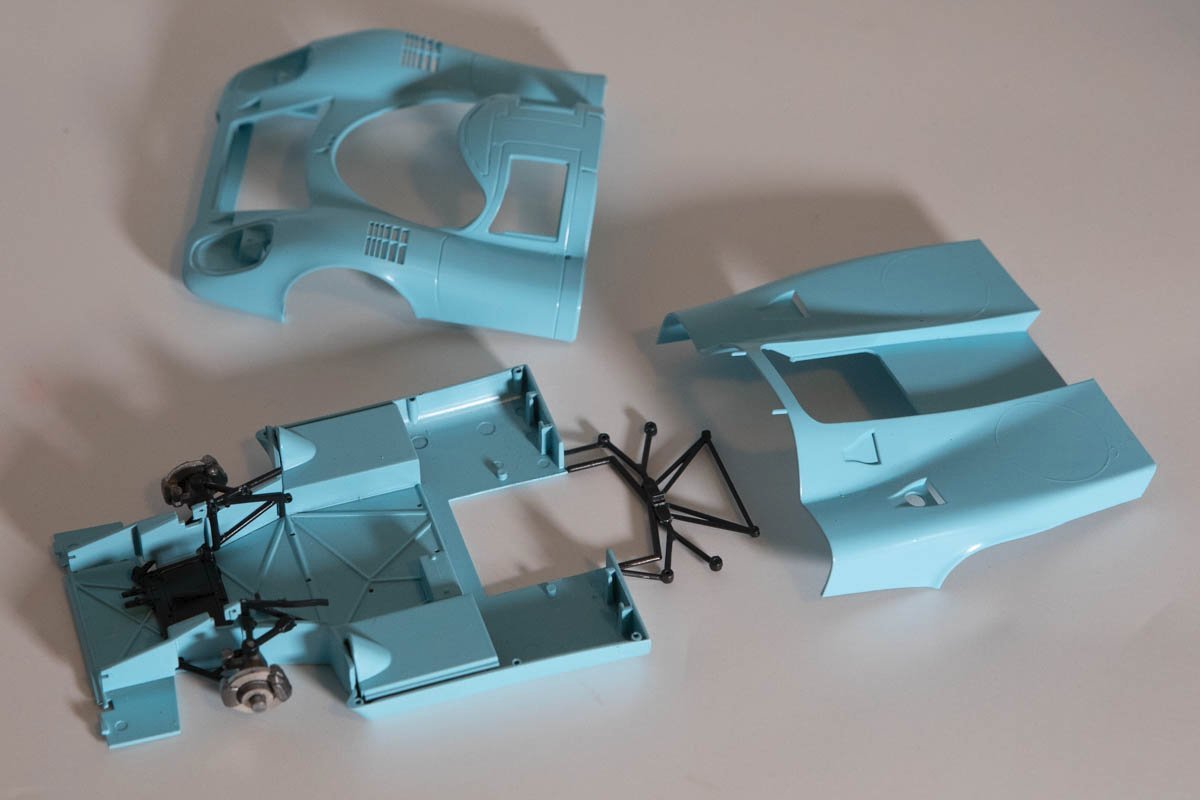
Thanks all for the likes, or just for looking in. And Happy New Year to all. I've continued working on both models, and sort of working on two different parts of both. I've been doing prep work on the bodies, as that will likely take many steps, potentially with a day or two between to let paint or clear coat fully cure. I've also been continuing with the order shown in the instructions, which means working on the basic chassis a bit. The pictures below show my work on the body for the Martini car. The first one, I've stripped most of the blue paint and started filling some gaps with Tamiya putty. The second, I've sanded the putty, and the third has been coated with the Splash Paints dark grey primer. As noted, Fujimi used the same kit for different cars, so there is an extra window in the roof just above the main front windshield that was only used at Daytona. They provide a solid piece to fill that in for other cars but that leaves an extra seam. Likewise, some cars have more or different NACA ducts, so the kit provides fillers for some of them, but that also leaves extra seams. So the putty below is attempting to fill in those seams. I think the primer on this body is just about done, but there are one or two small rough spots that I will need to sand and recoat. On the other body, I've applied putty but no primer yet.
- 35 replies
-
- 12
-
-
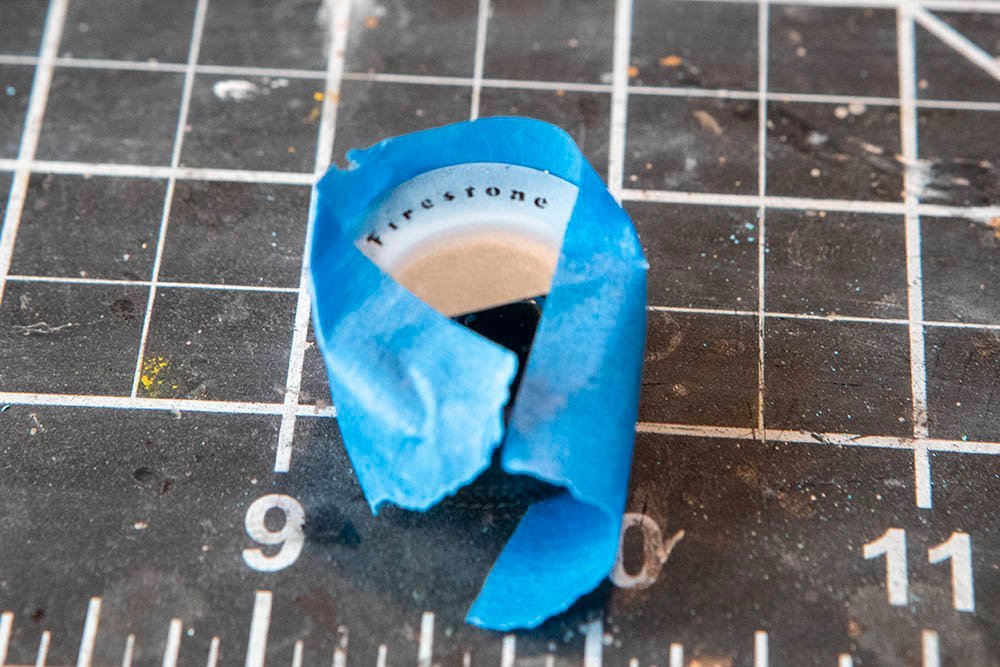
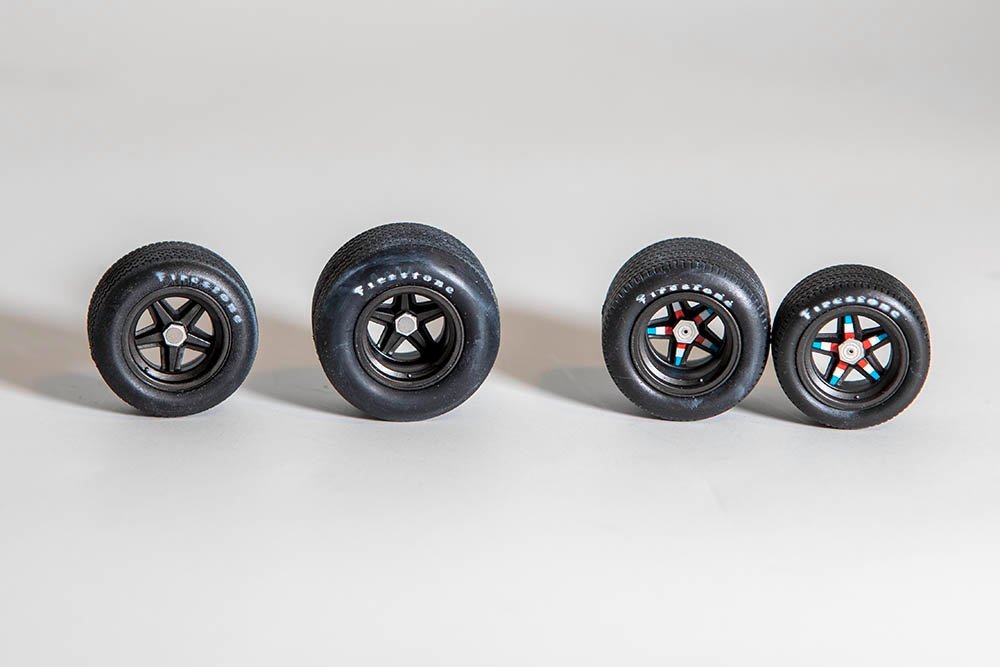
The instructions have you start with the wheels/tires, and so I did. The wheels were molded in black plastic. I sprayed them with a bit of Alclad Steel with no base coat just to try to make them a little more metallic looking. The Martini kit provided 20 tiny decals to put on each of the 5 spokes of the four wheels. That was a bit tedious but not too bad. Sadly I did lose one of those decals so one of the spokes is painted instead of having a decal. It looks ok, though the blue paint was quite a bit darker than the decal. Below, the Martini rear and front wheel are on the right, the Gulf wheels on the left. The center hub is a photo etch piece....the Gulf wheels use the Studio 27 photo etch while the Martini wheels have the more detailed photo etch parts from Fujimi. The Firestone logo on the tires is interesting. The kits included the usual dry-transfer tire logo decals but I have not had a lot of success with them. But the Studio 27 photo etch included a metal, photo etched mask for painting the logo on the tires. I used that, as shown in the second photo, along with the airbrush to paint on the Firestone logo. The blue tape is wrapped around one of the tires and holding the mask. It was a bit tricky and they are not all consistent, but it worked ok. Sometimes when it really went wrong, I just wiped it off with a q-tip with IPA and tried again. You might also notices that the tires are not the same. One kit had slightly larger tires than the other, both front and back. Frankly, I did not realize this until I was putting the tires on the wheels. I am not certain that I kept the correct tire with the correct set of wheels but it should not matter. I've also pretty much stripped the paint from the body parts that were painted blue in the Martini kit.
- 35 replies
-
- 10
-
-
Great progress, Melissa. As for the airbrush, to cover large areas and to use thicker paint (like primer) you likely want something with a large needle. Many airbrushes aimed more at artists have small needle/nozzle and that would take forever to paint your model. And you might want one with a larger paint cup as well so that you do not have to fill it quite so often. I recently bought one of these: https://www.gaahleri.com/products/gaahleri-airbrush-ghac-swallowtail-barbatos. That airbrush includes a 0.7mm needle/nozzle, which is considered fairly large. And it comes with a couple different sized paint cups to choose from. There is also a "fan cap" available which changes the spray pattern from a circle to a wider, thinner area. That might be useful for large areas, though I think the fan cap is only usable with the 0.5mm needle/nozzle. I have only used my new airbrush a couple times, and on much smaller bits, but so far I am pleased with it. It seems much better built than the cheapo one I had before it. I find the "trigger action" airbrushes easier to use than the traditional ones with the lever on top of the air brush. Though I suspect folks doing more artistic work would feel like the traditional lever gives more control, perhaps. I also have a compressor with a tank. Unlike the ones from the big box stores, it is made specifically for airbrushing. The one I have is here: https://spraygunner.com/holiday-gift-ideas/tooty-airbrush-compressor-by-no-name-brand/ As Roger said, having some sort of regulator that allows adjusting the air pressure is essential. You'll want to use lower pressure, down to 10 or 15 PSI, for very thin paint and higher pressure, like 25 to 30 PSI, for thicker paint. I don't think I have gone above 30 PSI when using an airbrush. And yes, unless you buy paint specifically made for airbrushes, you will need to thin it. I found that getting the right consistency of the paint was one of the bigger parts of the air brush learning curve. One caveat to all that I say....I've only used my airbrush when building plastic cars, not on any model ships/boats.
-
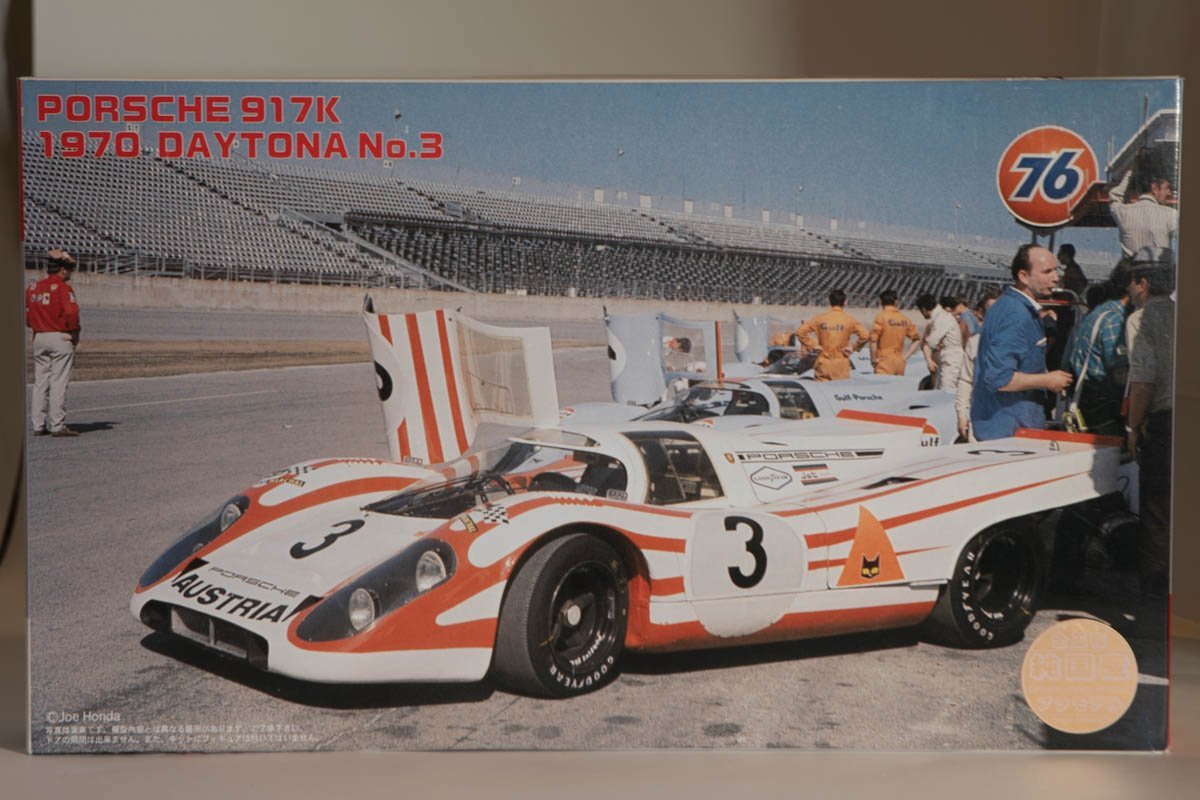
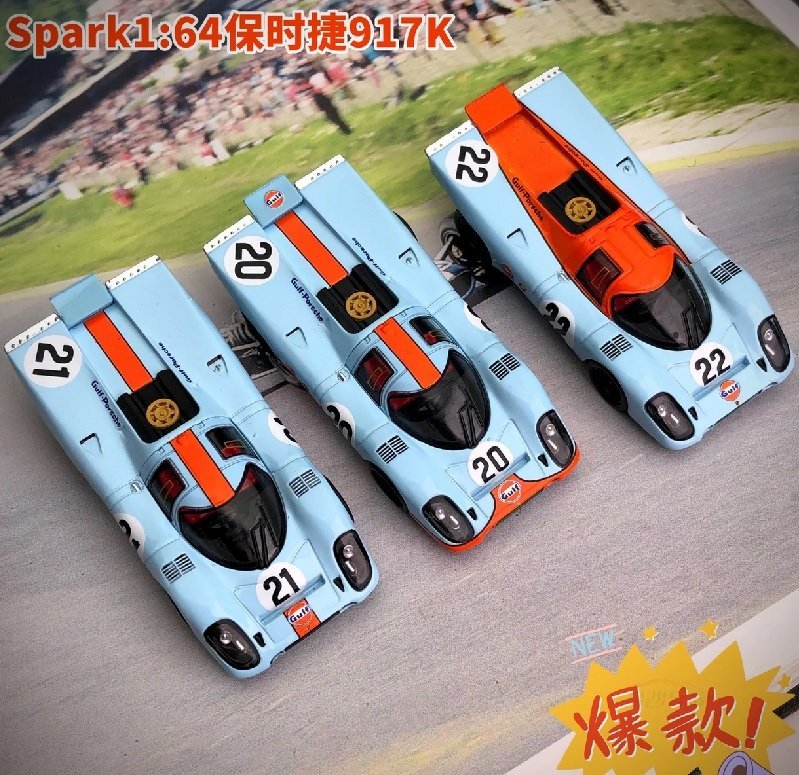
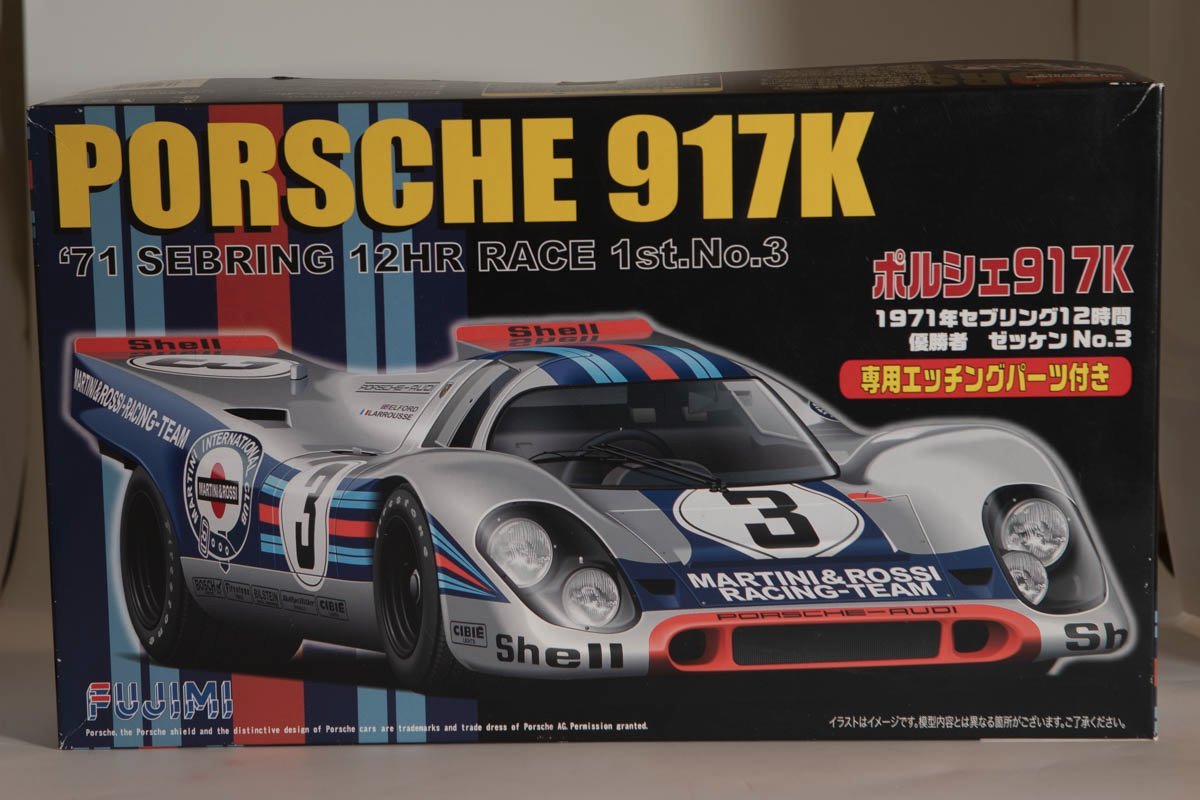
Hello and welcome to my build log for one...or two...Porsche 917K race cars, as I take another break from the Sopwith Camel. I swear one of these days it will be back to wood and something that floats. Apologies for the long intro below. The Car: The Porsche 917 was introduced in 1969 but the initial version was unstable at high speed. With some continued development and aerodynamic changes, it went on to dominate sports car racing in 1970 and 1971, winning at LeMans both years. The 917 was used by multiple teams with a variety of sponsors and paint work. Perhaps the most famous is the Gulf Oil sponsored cars with the classic light blue and orange livery. John Wyer Automotive (JWA) ran three such cars in the 1970 LeMans race. That race was plagued by rain and was a bit of a mash-up and all three of the JWA cars, and many others, failed to finish. However, the race was won by a 917 from another team. The 1970 LeMans race was also the basis for the movie LeMans with Steve McQueen. That movie contains much footage of the actual race. The Steve McQueen character drives one of the JWA/Gulf Oil cars, so it featured prominently in the racing action in the movie. The Kits: Fujimi has produced many, many versions of the Porsche 917 kits in 1/24th scale. I believe that all of them likely have the same, or at least very similar, set of plastic parts, with different decals and possibly different instructions as there are some optional parts that appear on some cars and not others. Some of them are molded in different colors of plastic as well. I believe there are a dozen or more such kits, including a couple with the Gulf Oil livery. At least one of the later versions of the kit also includes some photo etch parts. The kit is a "curbside" kit with only enough engine detail to show what can be seen from above and below. The rear hood is not designed to open. In addition to all the Fujimi variations, there are also third party decals and photo etch parts available. My Plans: Hang on, this gets a little complicated. When I first decided I wanted to build a 917, I was not thinking of the broader context, and just randomly bought one of the Fujimi models off of ebay. This is the one I bought first. Then, of course, I decided I really wanted to build one of the Gulf Oil versions. No problem. I ordered some "Gulf Blue" and "Gulf Orange" paint from Splash Paints and decided I could buy or make decals for the other markings. I also found and bought some of the Studio 27 photo etch parts. Then I noticed that the three JWA cars at Lemans in 1970 had slightly different paint schemes. This image from the web of some die-cast models shows the different schemes I liked the looks of the number 22 car. Then I saw that number 22 was driven by David Hobbs and Mike Hailwood at LeMans. About 15 or 20 years ago, when I followed Formula 1 racing, David Hobbs was a color commentator on the US F1 broadcasts, along with Steve Matchett (a former F1 mechanic). They made the races much more interesting and entertaining. So, as a fan of David Hobbs I felt I had to replicate the number 22 car. Then things got more complicated. Before I started working on that model, I saw a version of this car in silver, with Martini livery, and liked it as much or even more than the Gulf livery. Martini is another well known sponsor of Porsche racing and perhaps even more iconic to the Porsche brand than Gulf. So I could not resist looking for that kit on ebay. I stumbled on one that had already been started. But, ironically, the builder was converting it to the Gulf livery. The body was already painted blue and it had third party Gulf decals as well as the Studio 27 photo etch parts. In addition, the Martini model is one that includes the Fujimi photo etch parts. I won that auction, so I have 2 kits and 3 sets of photo etch parts and 3 sets of decals. I plan to build one of these kits as the #22 car from LeMans 1970 and the other in silver, with the Martini livery. I will likely strip the blue paint from the started kit (I already tested this on a small painted part) and then proceed to paint one with the Splash paints blue and orange and the other with some silver paint, possibly Tamiya X-11. Here's a picture of the blue painted body and the few front suspension parts that have already been assembled. I will likely build these two in parallel, and document both here in this log.
- 35 replies
-
- 13
-
-
Another quick update. I have not done much model building in the last few weeks but will likely restart...with something else. As for the frustrations, it is mostly still about the rigging materials but also another thing that I should have known better. To recap, the kit provides both black fishing line for some of the rigging and thicker black cotton thread for others. The fishing line is ok, but not great. The black cotton thread just seems completely wrong, and it is too thick to fit through the holes in some of the photo etched parts. It just rankles me a bit that the kit cheaped out so much in this regard. I've tried a couple substitutes, including multi strand beading wire. That looks good, but it is very difficult to get it taut, which is key to the appearance. As for the "should have known better", the instructions have you paint the metal parts for the wing struts, and then glue on photo etch parts that have the "turnbuckles" to attach the wing rigging to. Of course the paint does not adhere to the metal real strongly and the photo etch parts are effectively only glued (using CA) to the paint, so just a bit of pressure and they pop off. I did side track and work on a few other things, painting the landing gear parts and starting to work on the propeller.
- 94 replies
-
- 12
-
-
As soon as you said "alclad steel", I could almost see that coming. I also recently used alclad steel for the first time and was surprised/annoyed at just how dark it was. I also put it over a gloss black base. On their website, the "steel" color is in the list that says to use white, gray, or black primer. Maybe the "stainless steel" color is more what we are expecting.
-
Looking good! A lot of careful work here with protractors, levels, plumb bobs. I'm more of an eyeball it and that's close enough type. And seems like a wise move to add the lines to the mast hoops ahead of time, should make attaching sails easier. But it seems you only did that on the main mast. Is there a reason or did you just not think of that idea in time for the fore mast?
- 282 replies
-
- 2
-
-
- Bluenose
- Model Shipways
- (and 1 more)
-
Nice! I could not decide which reaction to use, the thumbs up, the wow, or the thanks, so I had to leave a comment.
-
Great result. Thanks for the videos, I was wondering how on earth you attach the threads to the hull. And yes I noticed the lurking penguin at the end of the first video
- 174 replies
-
- 3
-
-
- Waa Kaulua
- bottle
- (and 1 more)
-
If you start a thread, there is an "add tag" button just under the thread title. People use that to add things like the kit manufacturer or the particular ship being built. Then it is possible to search for all threads with that particular tag if, for example, you are interested in build logs for kits by model shipways. The tags show up in the list of threads, e.g. the yellowish/pinkish/orangeish ovals in the screen capture below (what the heck color is that?)
-
Looking very good to me. The combination of the dark wood and white paint on the deck house and other bits is very attractive. And you are correct, for most of us mere mortals, close up photography reveals flaws that you would never notice at normal viewing distance. There have been numerous times I thought I was done with something, then I took some pictures of it and decided to go back and do some re-work or touch up. But I don't see anything in your photos above that would cause me to consider that.
-
How to manipulate part of an image
gsdpic replied to JKC27's topic in CAD and 3D Modelling/Drafting Plans with Software
Sounds like Gregory is helping you out, but this can easily be done in Microsoft paint (at least the version with windows 10, that is the only one I tried). - load the image - click the down arrow under "select" and pick "free-form selection" - carefully draw a circle around the inner part that you want to modify. It will show a rectangular selection box, but it has really only selected the part you drew around - click the down arrow by "rotate" and then click on "flip horizontal". It should flip that selected inner circle so the bear is facing the other way. -
Will follow along, hoping it goes better. I'm sure you'll turn out another stunning model if you get past the rough start. Long ago I built a few of the tamiya 1/20th F1 cars but have never done one from Fujimi.
-
New member with broken Ship in need of a professional restoration
gsdpic replied to a topic in New member Introductions
Ouch, seems like a tough situation. I too hope for a happy resolution. I wonder if this post would be better in another location as I think many of the ship modellers don't even visit this part of the forum, perhaps in the General Model Kit Discussions area. Maybe an administrator like @James H can suggest a better place or even just move the post to a better location. Also, I know that @MrBlueJacket sometimes does builds or restorations for customers. I've no idea if he'd be willing to take on something like this. -
Ugh, no pictures but I have to say this kit is "this close" to going back on the shelf. Most of the kit is really good....the photo etch parts are well done, the laser cut wood parts are very good, I never thought of that as a high-precision operation but these parts fit together so well. Even the cast metal parts are very nice with minimal flash. But the few parts of the kit that are poor are really bad and really frustrating. I guess I'll leave it at that, just wanted to vent. If you don't see an update for a while, you'll know why.
-
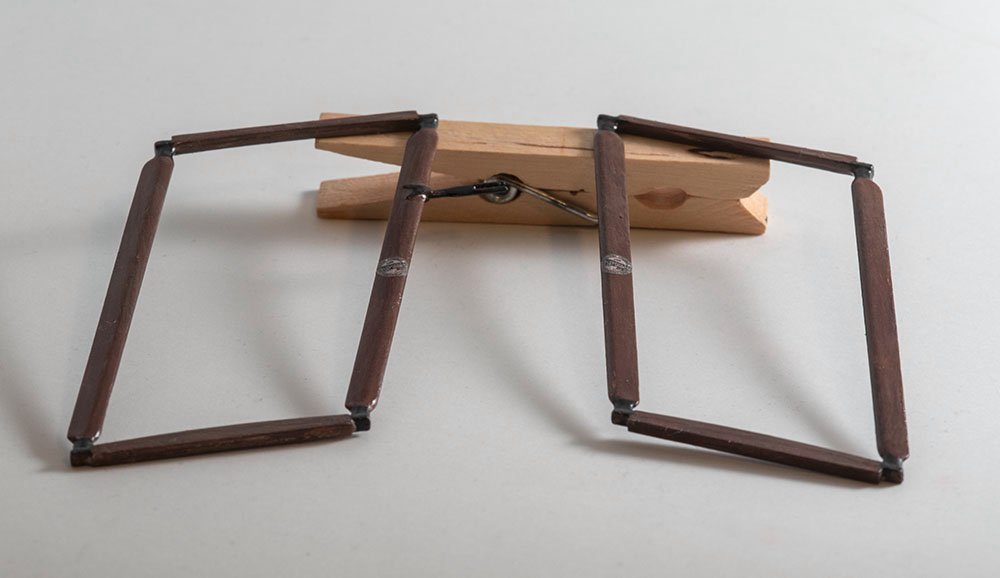
Thanks, and no. The sealant was mainly to protect the little decals and to unify the glossiness as I had used a variety of gloss and flat paint on the parts. Dry brushing is more useful when trying to highlight some texture on the part. But in this case, I used a large, stiff-bristled brush and tried to just lightly touch the part to result in thin streaks of color. i.e. instead of trying to avoid visible brushstrokes while painting, I was trying to leave brushstrokes. To load the brush, I just lightly dipped it into the paint in the cap of the opened jar, then rubbed the brush on a small piece of paper to remove much of the paint before painting the strut.
-
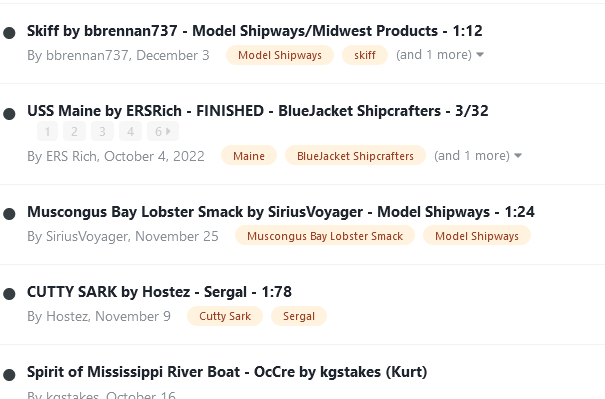
Thanks again for all the likes and for those who have looked in. After a day or two off, I resumed working on the Sopwith Camel, painting the "wooden" struts between the wings. That is in quotes because the pieces are in cast metal. I painted them a medium brown then dry brushed some darker and lighter brown to try to achieve a wood look, though I kept it very subtle. I then painted the black metal connectors at the ends of the struts, applied some "Sopwith" decals, then coated with a semi gloss acrylic. The latter sort of reactived the brown acrylic paint, discoloring the decals just a bit. Oh well. These pieces are not quite done, as they have some photo etch bits that serve as the attachment points for the wing rigging and one of them has a cast metal propeller driven fuel pump to be attached. I admit, though, that the siren song of the Porsche 917 model is getting louder in my ears. Unlike some of the other cars I've built recently, I promise to do a build log if I make that diversion.
- 94 replies
-
- 15
-
-


