
HOLIDAY DONATION DRIVE - SUPPORT MSW - DO YOUR PART TO KEEP THIS GREAT FORUM GOING!
×


gsdpic
-
Posts
819 -
Joined
-
Last visited
Content Type
Profiles
Forums
Gallery
Events
Everything posted by gsdpic
-
Wow, beautiful result! One of my early builds, many years ago, is one of the Dumas Chris Craft boats. I've always loved the mahogany speed boats (who doesn't?) and hope to build another some day. If so, I can only hope it comes out half as nice as yours.
-
Thanks @hof00 for the tip. I've used that technique in the past but right now the only CA I have on hand is the gel variety and it does not work as well for this trick, as it does not soak into the thread. But I also noted that the holes in the photo etch pieces for the main wing are larger and easier to deal with. It is just the ones on the parts on the tail that are problematic. Regardless, I ordered a small spool of stainless steel wire off of amazon. Once that gets here, I plan to experiment with it to see if that would be a better option for the wing bracing.
-
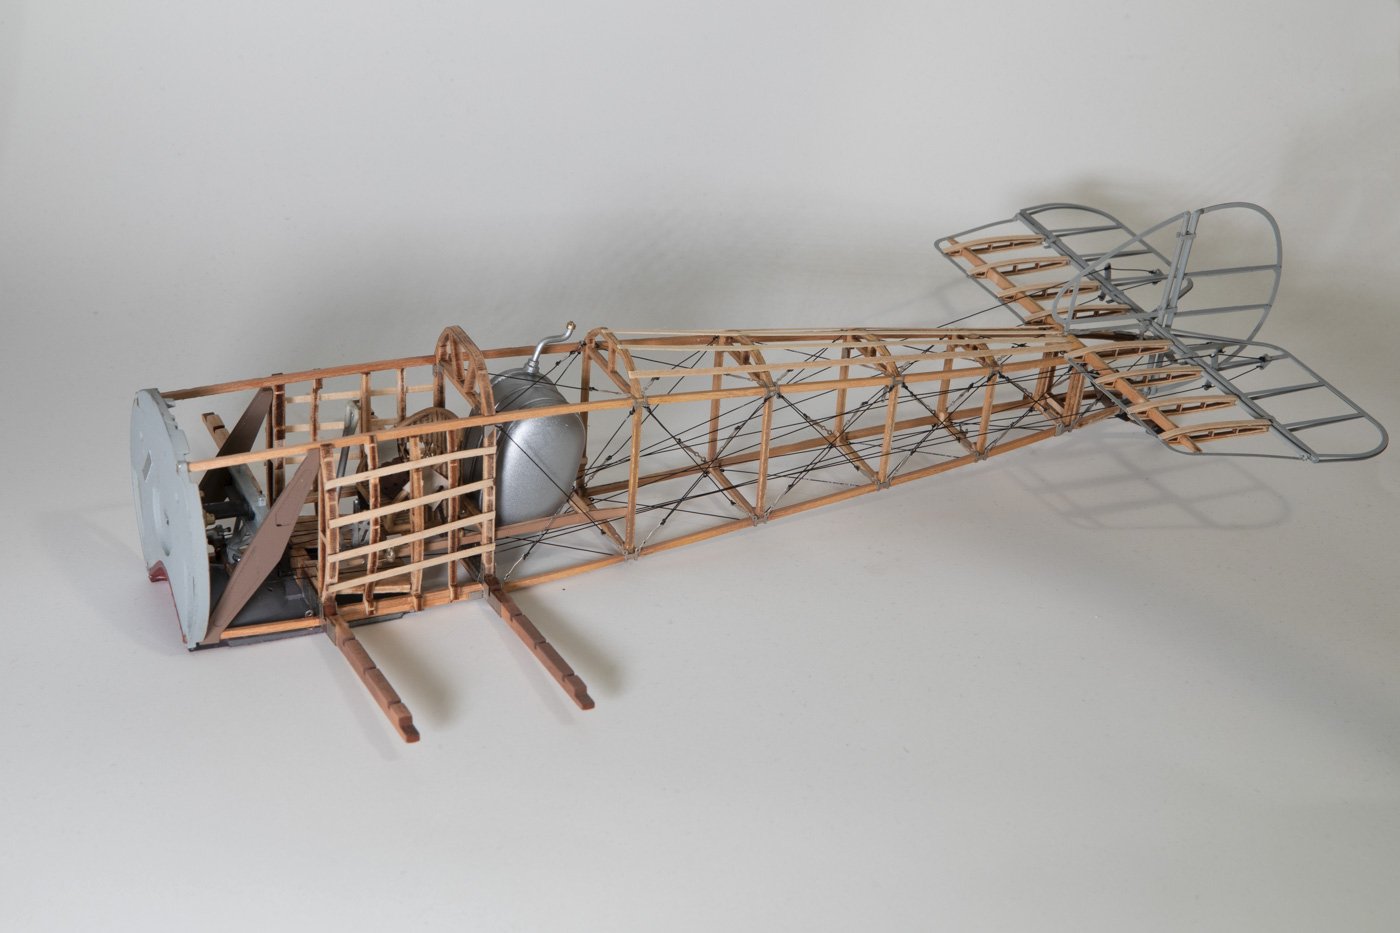
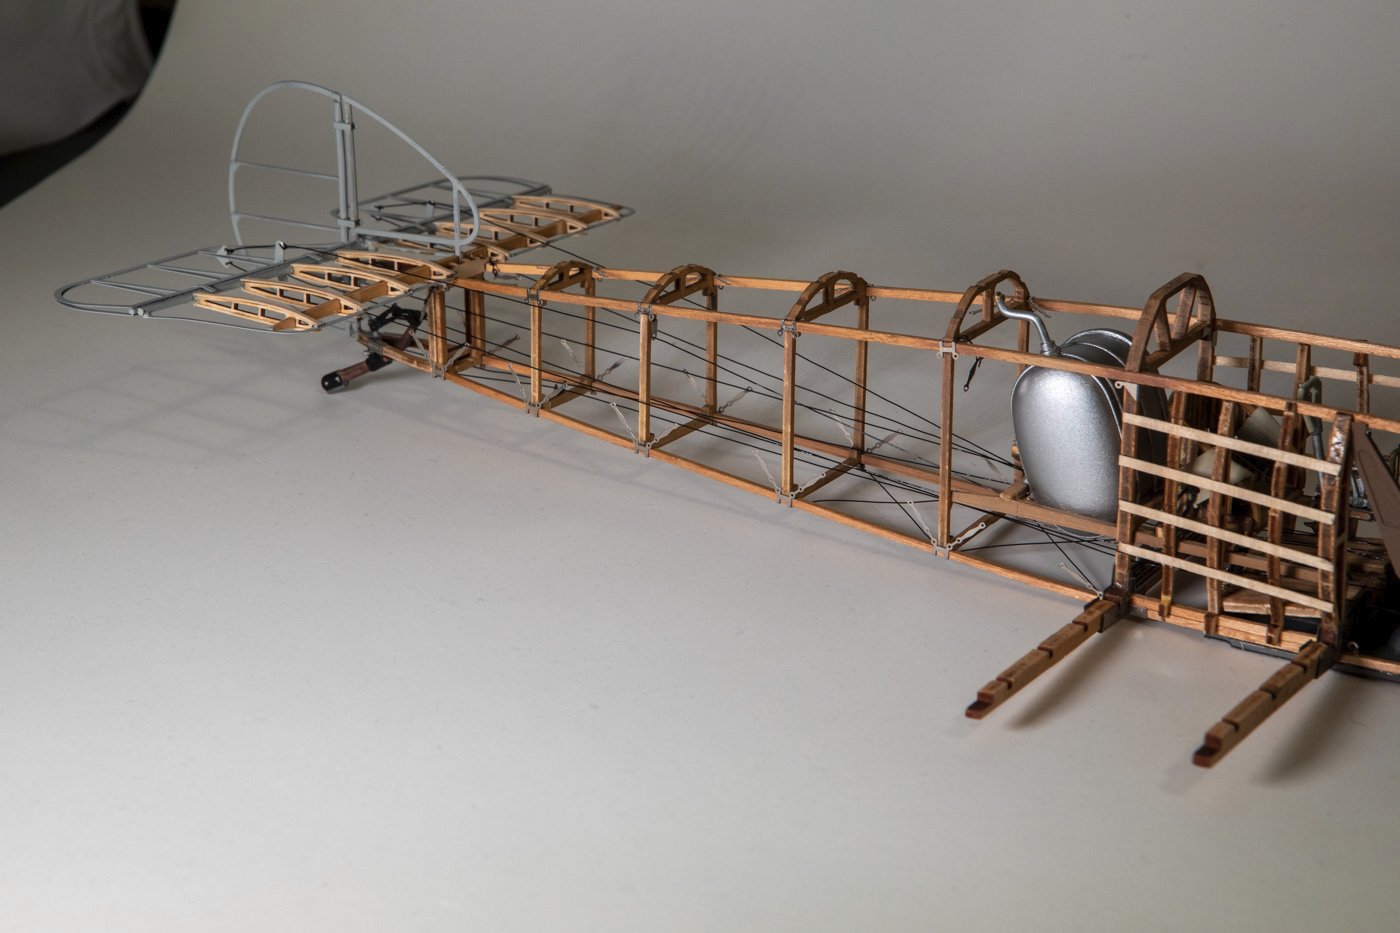
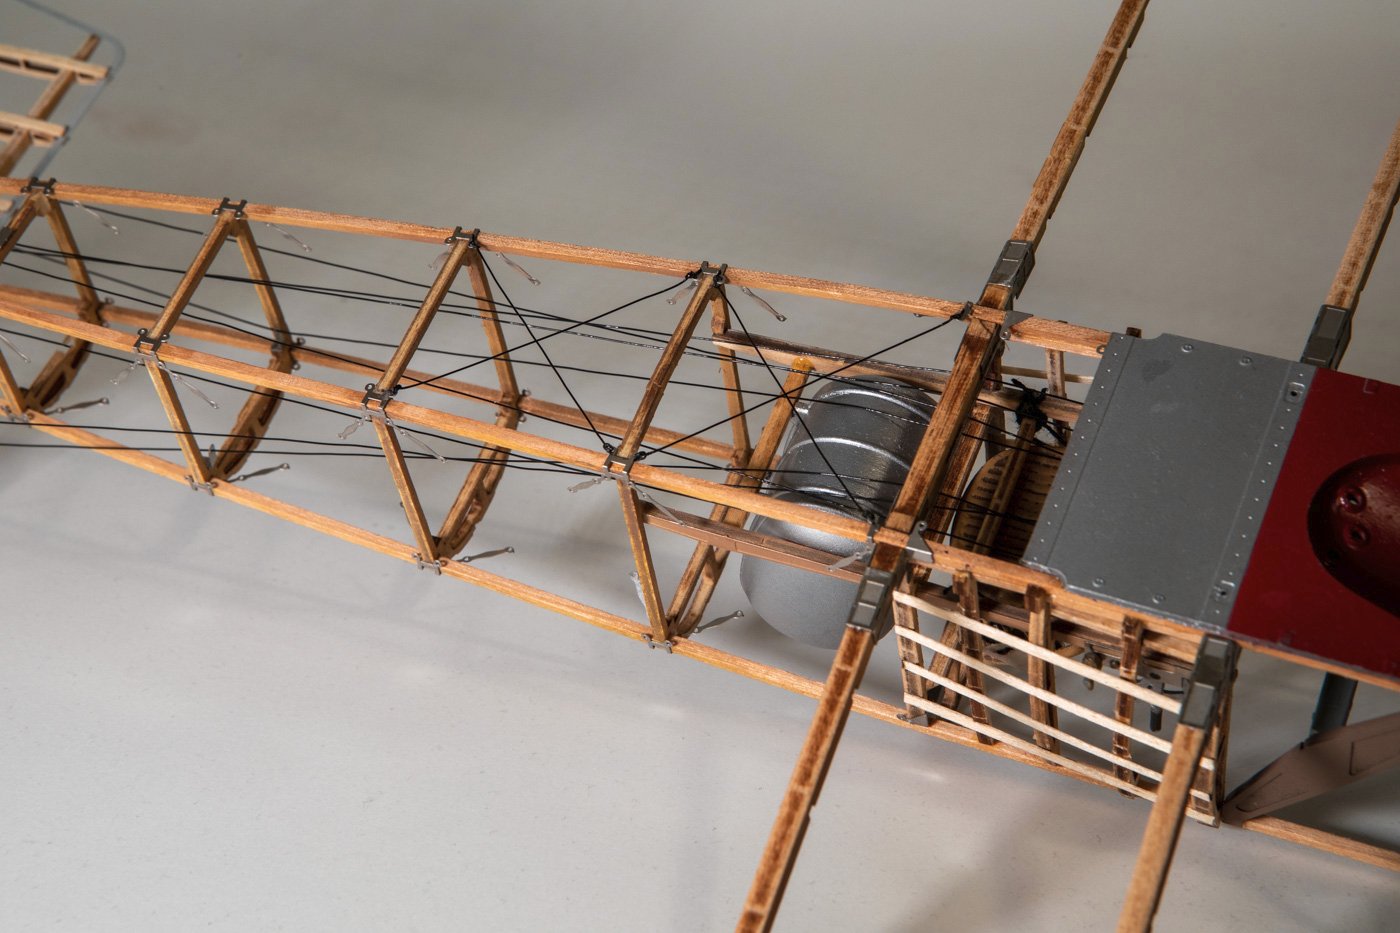
Thanks again for all the likes. I realize these recent pictures pretty much look the same. But, I am now done with the 40 diagonal bracing wires on the fuselage. Who would've thought that a Sopwith Camel model would have more "rigging" than the yacht America? Another example of the dubious order of steps in the instructions....do you see the four lengthwise wood strips across the top/back of the fuselage? The instructions had you glue those in place before doing the diagonal braces directly below them. That's just nuts, and fortunately I noticed and left those off until after the braces were in place. So with that I am through step 17. Next up is some braces between the horizontal stabilizer and the rudder. For some reason, the kit shifts to recommending black cotton thread for these and the braces on the main wings, instead of the black fishing line that has been used so far. The cotton thread is a bit thicker, making it more difficult to feed through the holes in the photo etch bits that serve as end points. So, I am not sure if I will follow the instructions or just continue to use the fishing line for everything. I don't see the fishing line or the cotton thread as particularly representative of the real thing.
- 94 replies
-
- 15
-

-

-
Interesting and unusual subject. After seeing what you did with the Cairo, I'll be following along with interest.
-
Looking good, Andy. Feel free to use anything you see in my build log. But be advised, I am a software guy, not a real engineer
-
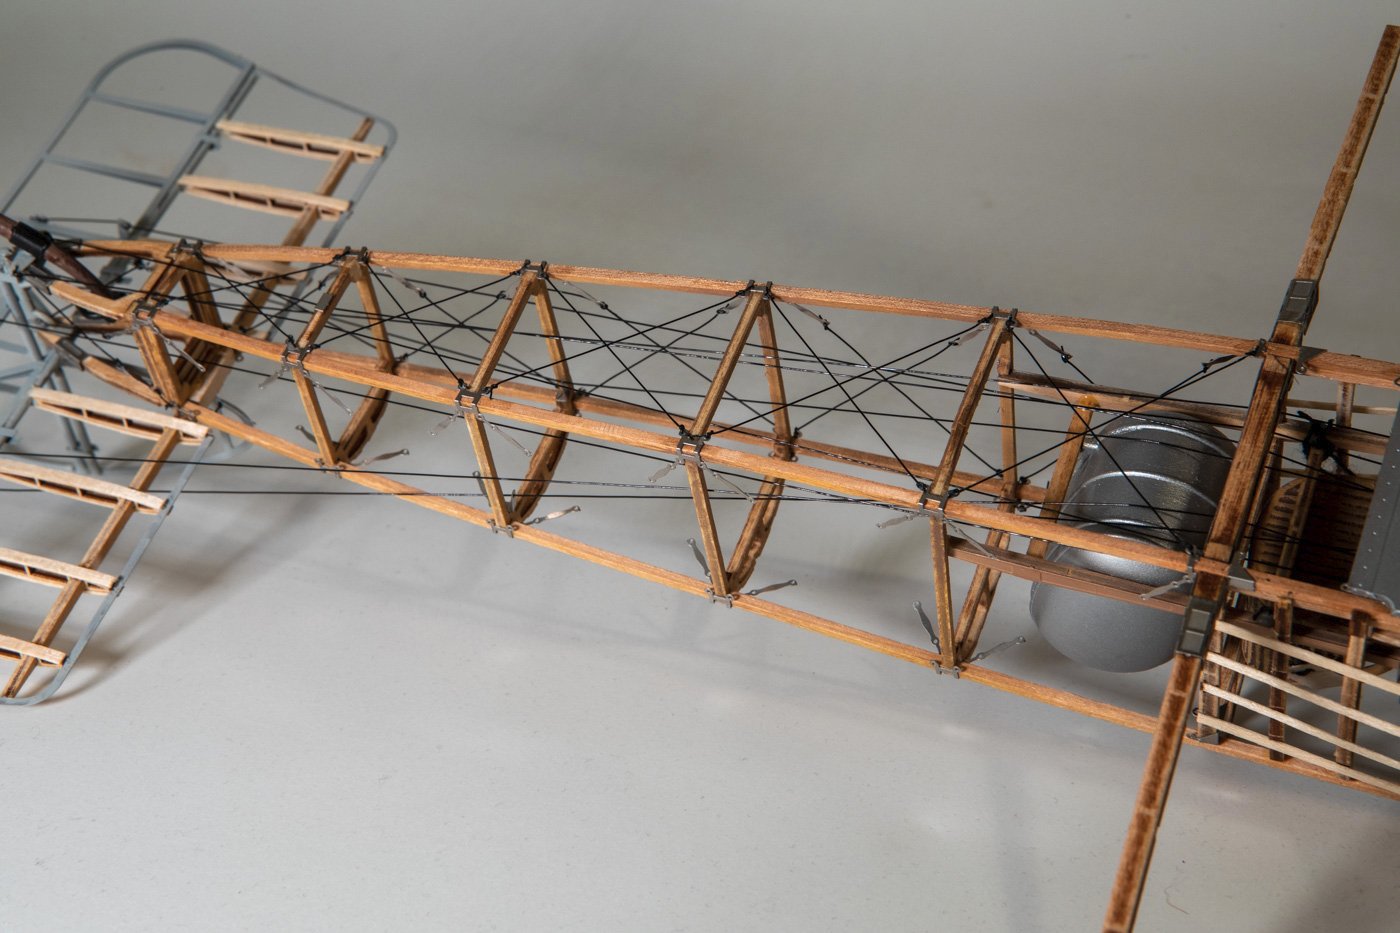
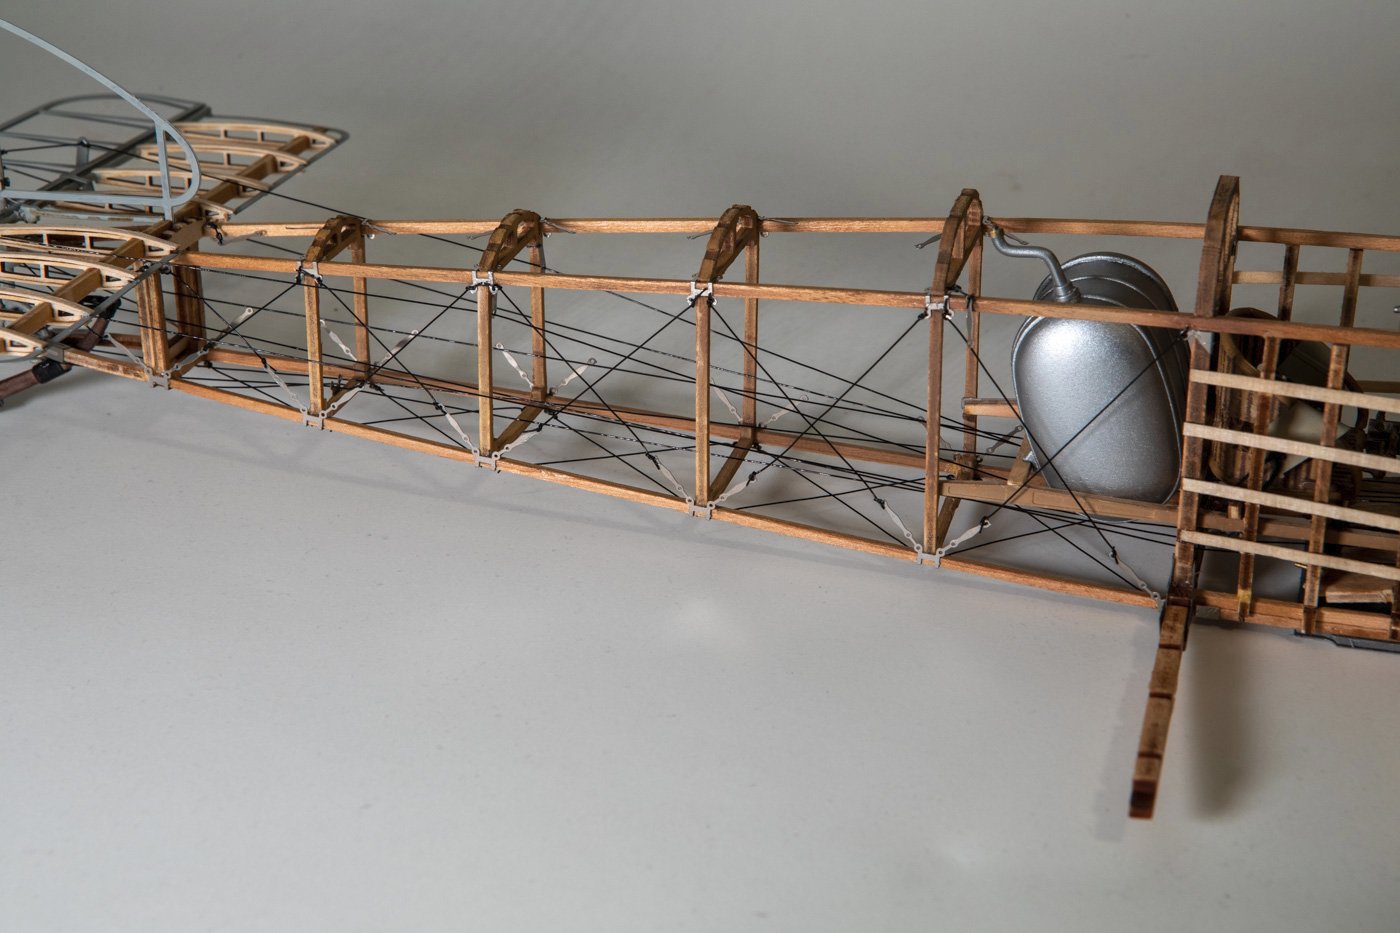
Thanks to those who have looked in and especially to those who've hit the like button. Funny, I think I've been getting more likes for this than I ever did for the America build log. I'll just chalk that up to overall increased traffic on this site over the years. I am now half done with the fuselage tension cables, having completed those on the bottom and on the right side. Top and left side ones yet to do.
- 94 replies
-
- 20
-
-
-
I've decided to proceed with the kit-supplied photo-etched turnbuckles and the fishing line for the tension cables. I figured at normal viewing distance the flat turnbuckles would give a good enough impression. Besides, one of the reasons I opted for this kit over the Model Airways one was the additional photo etch parts of this kit. So I have now glued on (using CA) all the little photo-etched bits including the turnbuckles that act as end points for the tension cables. I then did the first four of those cables, starting on the bottom. It has gone ok so far but my hope is that when I get to the sides and top I will have gotten better at keeping the line taut. I have four done, 36 to go.
- 94 replies
-
- 18
-
-
-
Is the CA old? CA glue does go bad after a time and won't hold, or at least will take longer to hold. Might be wise to try a new bottle of CA and see if it works better.
-
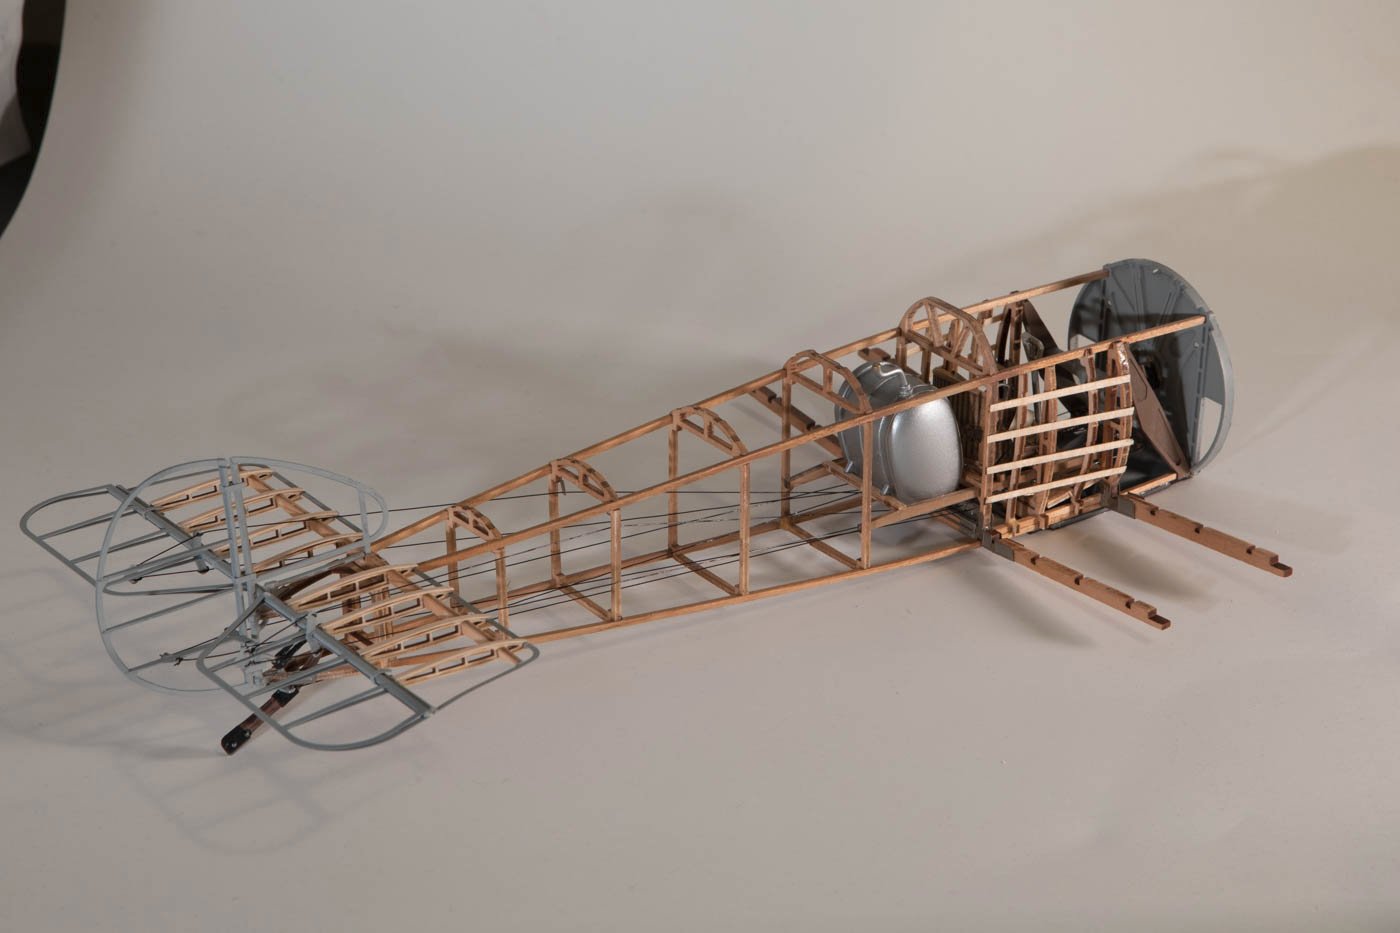
So, I am still out here, and I have resumed working a bit on the Sopwith Camel. The "handsome hound" in Ken/Canute's words found another (permanent, I hope) home a few months back. I then did a couple other smaller modelling projects before getting back to the Camel after the first of the year. The picture below shows the current state. I am now through step 16 in the instructions, out of 47. The primary thing done since the last update are all the control cables for the elevator and rudder. The next step involves the tensioning cables that go diagonally across each of the rectangular spaces in the fuselage, 40 of them in all. Before proceeding with that, I need to decide if I am going to use the photo-etched turnbuckles or try to create something that is a little more three dimensional. I did a few experiments already though want to do more before I decide. There are probably about 100 of the things on the whole model. The stuff I did was not without trials and tribulations. There was one picture in the instructions that was clearly wrong....two parts were glued together, then a couple steps later when they were used, one of those two parts was oriented 180 degrees differently from the picture shown where you glue them together. I am also getting more and more suspicious of the order of the steps. For example, there was no reason to glue in the seat before running those control cables, and all of the cables went under the seat. It would have been much easier to glue in the seat after doing the control cables. Oh well, nothing too serious or too different from most other models.
- 94 replies
-
- 14
-
-
Making brass parts chrome
gsdpic replied to John Ruy's topic in Painting, finishing and weathering products and techniques
The alclad line of paints also have chrome, though not sure if how well they work on brass. I've used their chrome just a couple times on plastic parts. They are also applied by air brush. For chrome you first apply a gloss black base layer, then apply the chrome, then apply a clear top coat, so it is not a quick and easy process. I think, but am not certain, this might be a little more durable than the molotow chrome markers. I've used that once or twice as well, using the marker instead of the refill/airbrush suggested above. -
Happy New Year! Glad to see another Bluejacket America build here. I'll follow along to see how it goes. Looks like you are off to a good start. The "cut out the template and flip it over" is basically the analog version of what I did with the scanner and flipping over the image in photoshop as described in my build log. As for the inner surfaces of the frames....you might want to do at least a little work there. The bilge clamps and sheer clamps run along the inside of the frames and provide a lot of strength to the hull while fairing and planking. Having the inner surfaces smooth and fair may help with attaching the clamps to every frame which should help avoid accidental breakage of the frames.
-
Well done! Beautiful boat. I am sure your FIL will appreciate it very much.
-
Greetings from North Carolina
gsdpic replied to PostCaptainAubrey's topic in New member Introductions
Welcome to MSW! Former Raleigh resident and NC State grad here. I lived in Raleigh in the early and mid '90s. -
Wow, congratulations on finishing this beautiful, intricate build! She's a real show stopper. I very much enjoyed following along.
- 238 replies
-
- 2
-
-

-
- Robert E Lee
- steamboat
- (and 3 more)
-
Looking good! So I guess Nantucket blue is sort of a blue-gray color...I had to google it. I think that is a good choice. As for what to paint, it sounds like you are thinking about a scheme similar to what cathead had in his kit review linked above, except with the blue in place of the green. I think that scheme looks good, but you can double check the review yourself to see what you think.
-
I've never tried this, but seems like an airbrush would be perfect for this. You could attach the silkspan to the frame and then first just put water in the airbrush and spray the silkspan to wet it. Then after it is dry and shrinks to be tight, use the airbrush with diluted paint to apply the color.
-
Uploading pictures
gsdpic replied to wernerweiss's topic in Photographing your work. How to do this.
It may depend on how you are holding your phone when taking the picture, assuming it is a phone pic. It will automatically include rotation data in the picture which in this case is wrong. It would be helpful to know what you are using to take the pictures and what you are using to create the post (windows pc? mac? creating it right on your phone?) See the pinned "uploading pictures" thread in the "How to use the MSW forum" category, particularly posts 15 and 16, especially if using a windows pc to create the post. -
Nice progress. I think your stand is a huge improvement over the kit supplied cradle...it is detailed enough to add some interest to the display yet it does not hide the beautiful lines of the hull.
- 31 replies
-
- 3
-
-
- Shamrock V
- Amati
- (and 2 more)
-
Wow, so many small details on this build. Really a lot to hold the viewer's interest. Looks great so far.
- 238 replies
-
- 2
-
-
- Robert E Lee
- steamboat
- (and 3 more)
-
Greetings and welcome aboard from a fellow Texas resident.
-
Looks like you are off to a great start! I'll follow along....built this kit 6 or 7 years ago. If you have not seen the thread with the review of this kit by @Cathead you might find it useful. However, as mentioned in that thread, Bluejacket was possibly going to update the kit so maybe some issues have been fixed. Edit: Fix the link to point to the top of the review, not the negative comment from another user.
-
Beautiful! Really well done, and like all the upgrades you did with the lifeboat and brass railings and new prop, etc.
-
Just catching up a bit on this cool project. A nice mix of mechanical engineering and software. As for the "if (minsweep <= sweep <= catchend)", I am not an expert on the arduino language but have done C programming for more years (more decades actually) than I care to admit. That is syntactically valid. A condition evaluates to either 0 or 1, so in the second comparison, it is using either 0 or 1 instead of sweep, assuming it evaluates left to right. In other words, it replaces the first "minsweep <= sweep" with either a 0 or a 1, then checks if the 0 or 1 is <= catchend. So both of the <= have a number on both the left and right side, and no reason for the compiler to complain about syntax. Ok, sorry for the pedantry....carry on!
- 536 replies
-
- 2
-
-
- Quadrireme
- radio
- (and 1 more)
-
I think they heard you......
-
Beautiful result! Agree with you about the beauty of the natural wood in several different colors. It would have been a shame to paint it, so I think you made the right choice there.
- 104 replies
-
- 1
-
-
- Bluejacket Shipcrafters
- smuggler
- (and 1 more)