
HOLIDAY DONATION DRIVE - SUPPORT MSW - DO YOUR PART TO KEEP THIS GREAT FORUM GOING!
×


gsdpic
-
Posts
819 -
Joined
-
Last visited
Content Type
Profiles
Forums
Gallery
Events
Everything posted by gsdpic
-
Renault RE20 Turbo by DocRob - FINISHED - Tamiya - 1/12
gsdpic replied to DocRob's topic in Non-ship/categorised builds
I've thrown away quite a few bits of wine cap foil while thinking that it may possibly be useful in modeling....thicker than regular foil but not as thick as aluminum from a soda or beer can. Maybe next time I'll actually save it. And the changes you made are a definite improvement. -
New here: Anyone recognize these models?
gsdpic replied to Patrick P's topic in New member Introductions
Note that the description of the "Bluenose" muddles the original vs the replica. The Bluenose was the original fishing schooner as described on that paper. Bluenose II is a replica that was built later. The sail layout on this "bluenose II" model also looks a bit odd. There's plenty of info about the Bluenose/Bluenose II out there, for example on wikipedia: https://en.wikipedia.org/wiki/Bluenose I agree with Allan that the first is reminiscent of a J class racing yacht. -
Good to see you back and making progress on the Corsaro. Sorry to hear about the illness....I got hit after traveling by air last Christmas. The cough and fatigue dragged on for a while.
- 42 replies
-
- 2
-

-
- Corsaro II
- Corel
- (and 1 more)
-
Looking good! I think you need to source a bunch of small figures of ladies with long skirts and big fancy hats to put on your deck like in that photo. Should be relatively easy to find HO scale figures.
-
Renault RE20 Turbo by DocRob - FINISHED - Tamiya - 1/12
gsdpic replied to DocRob's topic in Non-ship/categorised builds
Nice, off to a great start. Just earlier today I was distracting myself looking at both the Tamiya and Italeri versions of this car on ebay and elsewhere. I have two of the Tamiya 1/12th scale F1 cars in my stash....the Lotus 49 and the Lotus John Player Special. -
Thanks for sharing this, I really enjoyed following this brief build. The joy you had in making it and the joy that I am sure the recipients felt really came through in your log, in part due to the bright colors of these happy little boats. Congrats on this fine build and on...I assume...earning massive brownie points with your wife and her family.
-
Very attractive little boat...just keep it away from the cat! Or at least stop giving the cat reasons to detect or imagine slights
-
3D Brig 'Rose' in Blender 3.3x
gsdpic replied to 3DShipWright's topic in CAD and 3D Modelling/Drafting Plans with Software
This is just jaw-dropping. I recently downloaded blender and just started learning it. Still very much in the phase of making simple cubes or spheres and learning how to view them and move them. I cannot imagine the time taken to learn blender well enough to create a model like this, let alone the time to actually create the model. I guess it brings to mind the old joke...how do you eat an elephant? One bite at a time. Thanks for sharing. -
I only occasionally checked your build log, but this is amazing work and amazing dedication to the project. The result is beautiful and worth all the effort.
-
3D Printing Cannons in Resin
gsdpic replied to thibaultron's topic in 3D-Printing and Laser-Cutting.
Wow, thanks for taking the time to write all this up. I hope to get into 3d printing some, likely later this year, and posts like this will prove to be valuable. -
Nicely done! Both a good learning experience and a fine result. And I second Bob's vote for more small working craft, whether kit or scratch!
-
Following along to see how things go with your RC adventure. It seems well planned out so far, with a couple issues dodged.
-
Welcome to MSW, from a NC State grad and former resident of Raleigh (way back in the late 80s, early 90s). I've always liked the looks of that ship but know nothing about it or the kit. I'd follow a build log if you start one.
-
Wow, that is amazing creativity and execution! The revised, frothier ocean water is much better, very convincing.
-
Mixed bag....three trees with little damage but two with pretty extensive damage. Most heartbreaking was a beautiful live oak that I think was planted when the house was built and was probably 35-40 years old. It had a nice full and symmetrical canopy. Now....well, it looks like a giant kraken took a bite out of the top center of the canopy, probably 50% gone. I had the broken branches cut out but will probably get an arborist out this fall to see if anything more can be done for it. But I did not lose power and usually work from home anyway, so not too much impact. Hope you managed ok through the ice as well.
-
I thought you were going to say "...and I had nightmares all night". Looks good. Definitely the strangest build log on MSW right now.
-
Well done. The green and white is eye catching.
- 20 replies
-
- 1
-
-
- Maine Lobster Boat
- BlueJacket Shipcrafters
- (and 1 more)
-
I'll add a redundant but much deserved "wow!" and "thanks!" It is amazing what you've accomplished with the Germania Nova and very generous of you to document it so thoroughly for the rest of us.
-
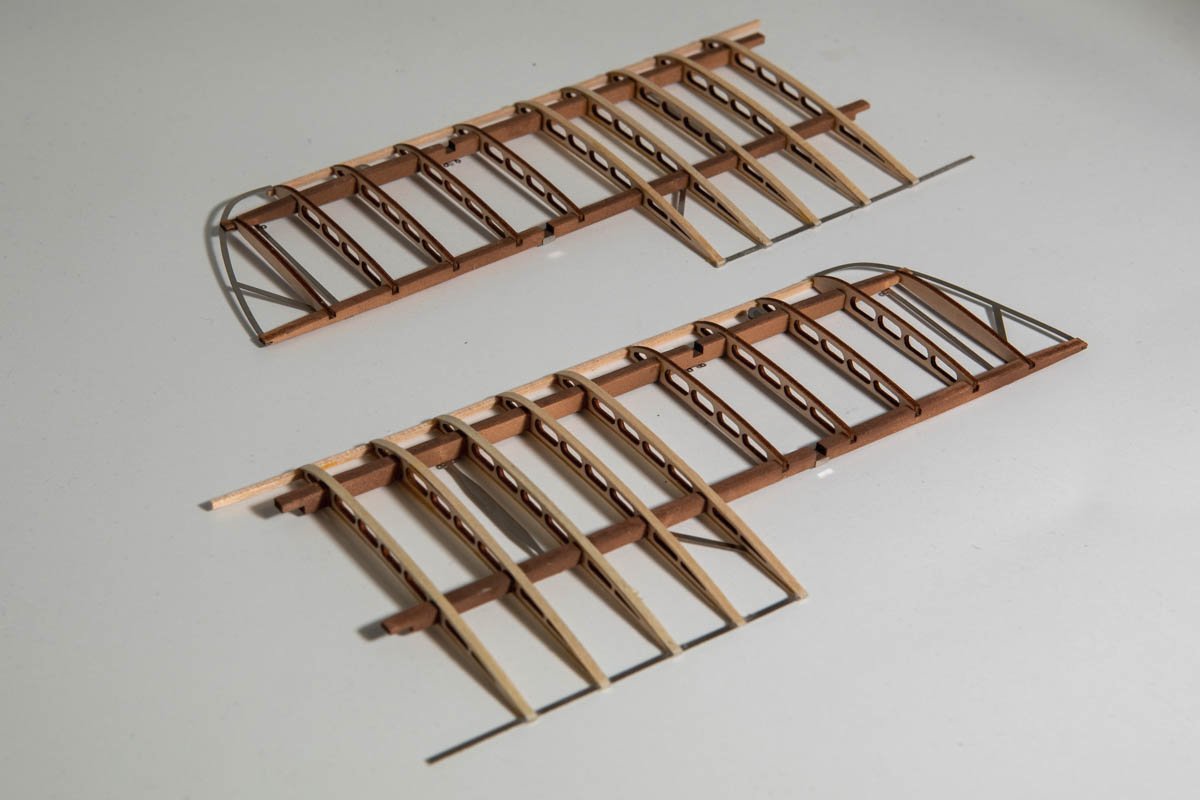
Thanks all for the likes and thanks Mike for the comment. I've been working on the lower wings but have more to do. The picture below shows the current state. You can see that I still need to add the extra strip on the top and bottom of the last 5 ribs on each wing. There are then a few more details to add and of course some more diagonal tension cables and then the ailerons as well. I've made a few minor negative comments about this kit so to balance it out I'll praise the laser cut ribs. I cannot imagine how time consuming and tedious it would be to try to cut those by hand if doing this from scratch. And the laser cutting seems to be really well done, with no char marks on the front or back surfaces of the wood and just a couple very small tabs to hold the parts in. And also the parts fit together well....each rib has two notches that go over the lengthwise wood pieces. Many of them fit nicely without any adjustment and a few needed just a little bit of filing to get a nice fit. At least in some cases they also supplied an extra rib in case you break one. So, it has been a pleasure work on this part of the model.
- 94 replies
-
- 15
-
-
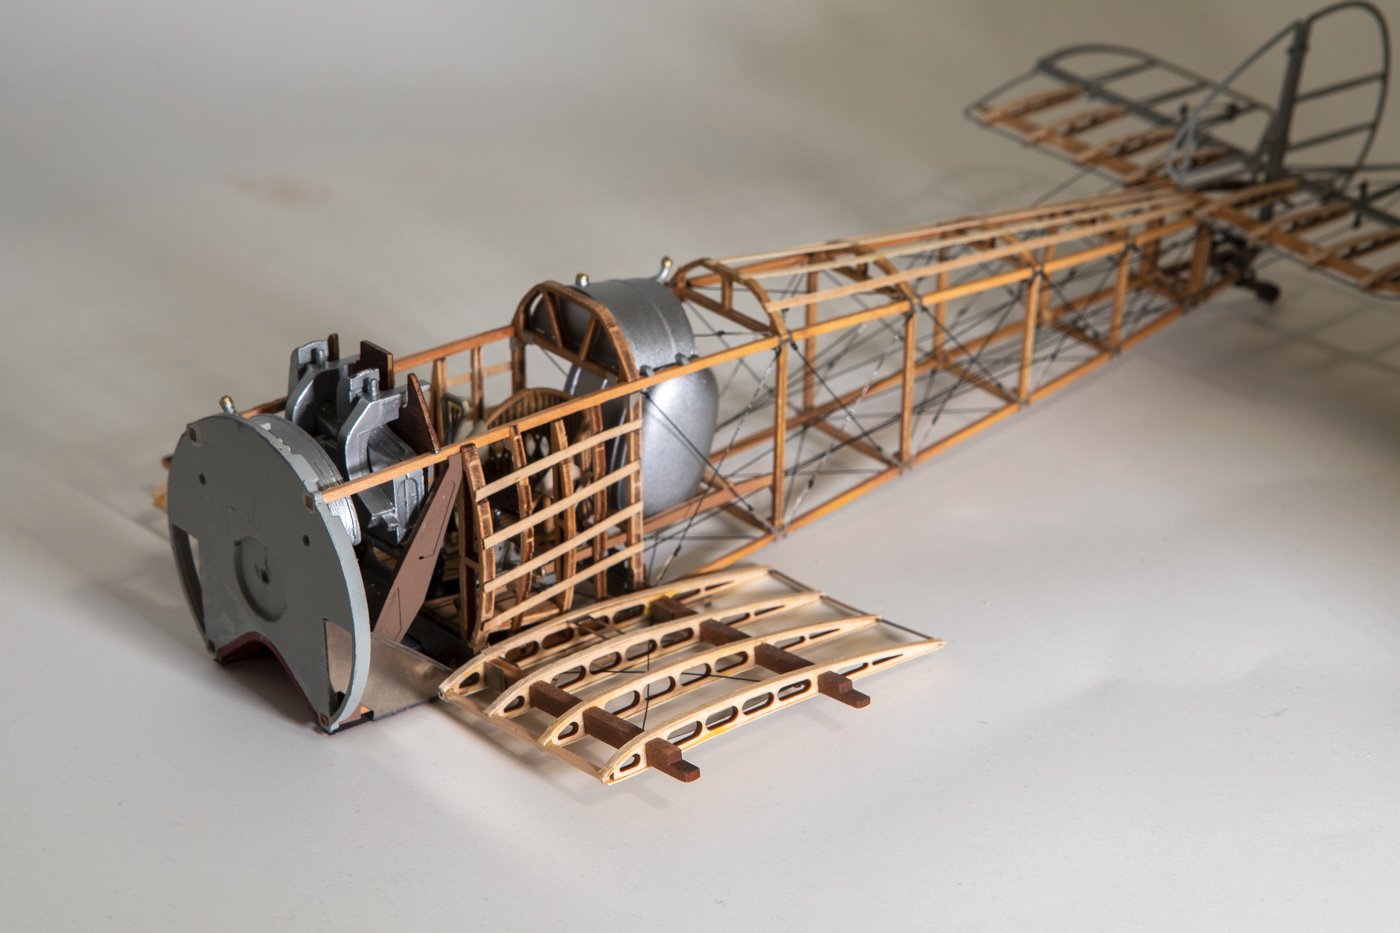
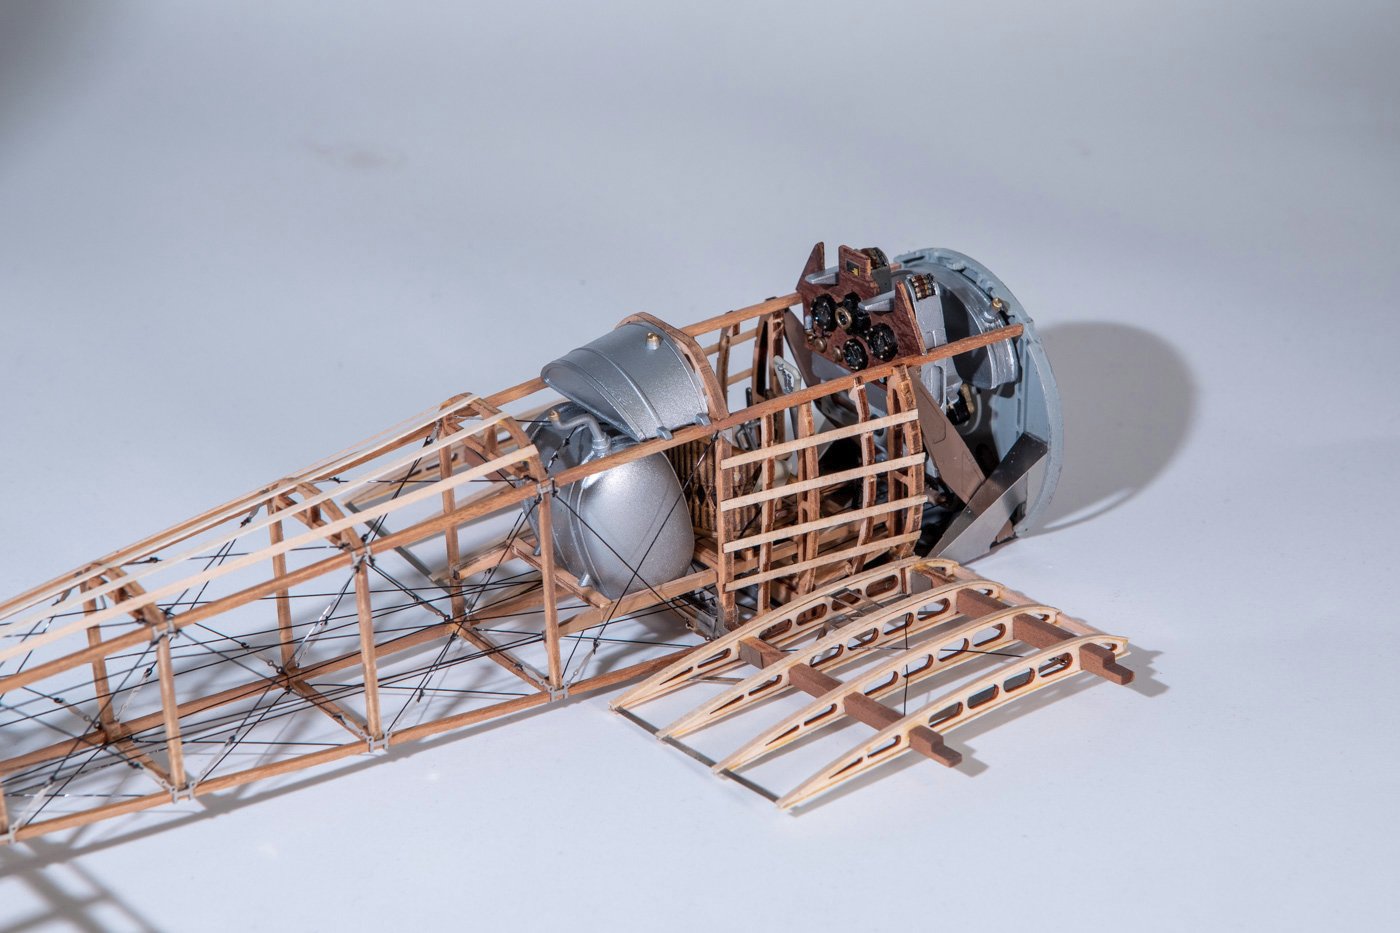
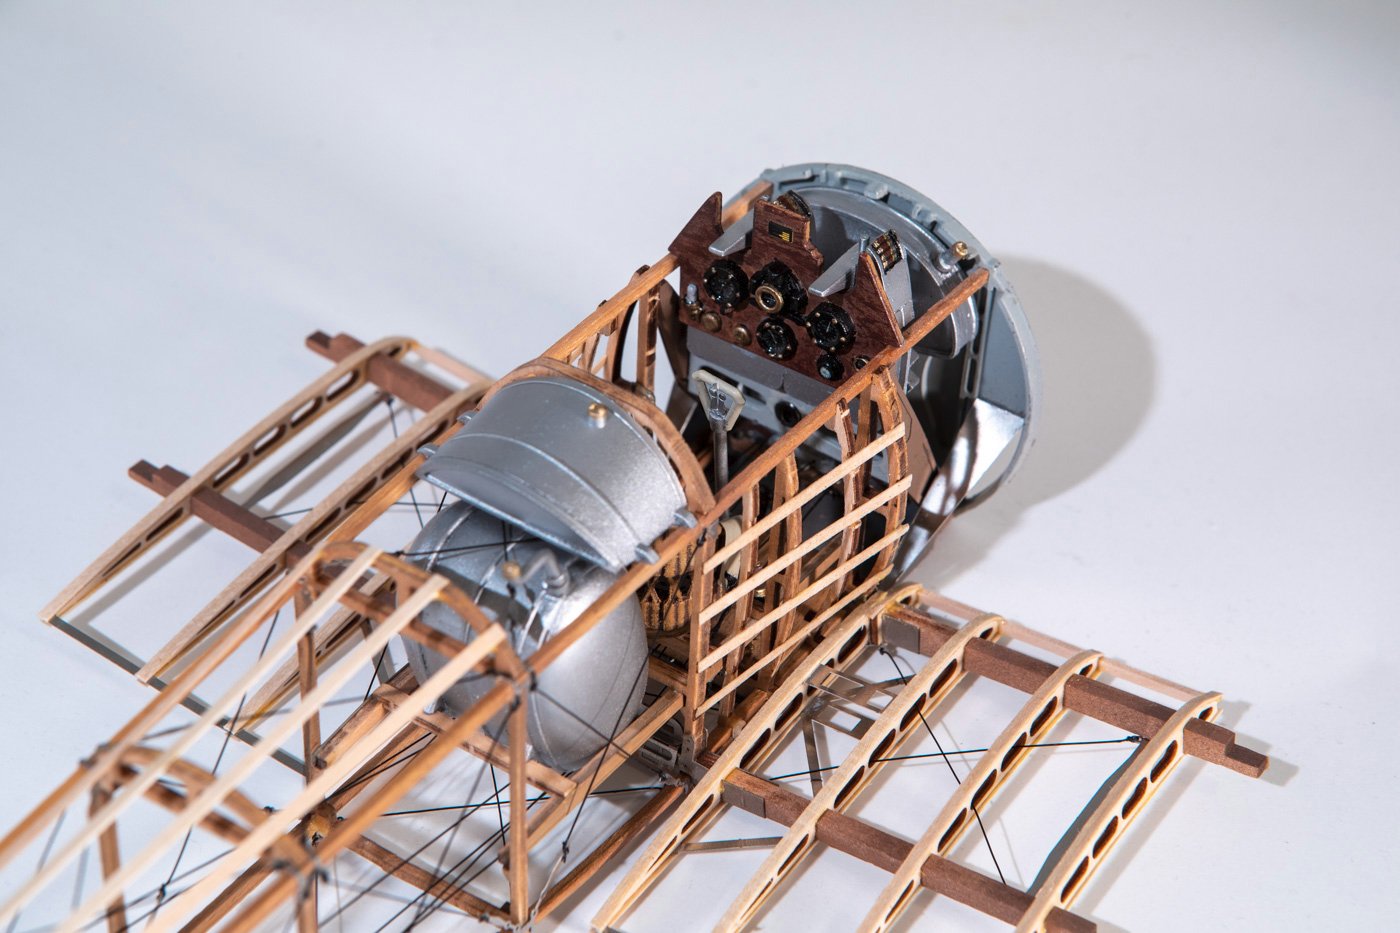
Thanks for the likes and all the suggestions regarding the braces for the stabilizer and wing. I continue to defer that work. I received the wire that I ordered and it might be workable. But, the model also presents some problems with the attachment points for the braces on the stabilizer. So, I am considering that as well. Meanwhile, I skipped that step and continued on with the next steps which added the ribs to the lower wing stubs and also did some additional work on the cockpit including the instrument panel. I got through all of those steps. Next I'll put the fuselage aside and start working on building the two outer sections of the lower wing. It was really good to get back into things where I felt like I was making a lot of progress. Here are the pictures of the current state.
- 94 replies
-
- 15
-
-

-
Hi Andy.....I suspect I know why you are asking this question. The timberheads on the last few frames supplied in my kit (and I suspect your as well) were not very progressive. The indentation on frame 26ish was almost as great as that on the last frame. I attempted to make it follow the plan a bit more and make them more progressive, though probably could have done even more than I did, as I ended up putting a bit of a "kink" in the cap rail at that point instead of allowing a completely smooth curve. I bought a used copy online of the book "The Low Black Schooner" by John Rousmaniere, referenced in one of the other America build logs on MSW. It has quite a few contemporary paintings and a few early photographs from a few decades later. It is often hard to pick up small details in the paintings and often the details differ wildly, but I don't think any of them show any sort of sudden indentation in that area, they all indicate a more smooth curve. So, I'd vote for making it a more gradual transition.
-
It looks like Jaager's links are incorrect. Here is the correct version of the first one....
-
Thanks. The other diagonal braces on the fuselage are black fishing line of unknown strength. It was supplied by the kit in an unlabelled reel. So using that is one alternative. Though I think I'd prefer something more silver or metallic looking. Right, the stuff I bought off of amazon was under their jewelry making/beading category. I did not think to look for any sort of crimps, that could be very useful. And I wonder if a braided wire would be more flexible and easier to work with. Thanks.
