HOLIDAY DONATION DRIVE - SUPPORT MSW - DO YOUR PART TO KEEP THIS GREAT FORUM GOING! (Only 36 donations so far out of 49,000 members - C'mon guys!)
×

Timmo
-
Posts
609 -
Joined
-
Last visited
Content Type
Profiles
Forums
Gallery
Events
Everything posted by Timmo
-
 It was on high in an 1100w microwave. It never ran for more than 8 sec at a stretch as there was not much solution and even that time gave some unnerving crackling noises and fumes. Suspect the ammonia has a lower boiling point and it got close to that as there was a residue left on the jar from small dredges that appeared to have evaporated. I haven't looked very hard as yet, just one hardware store, but can't find a local alternative so might be ordering so e more form cornwall mb soon. Washing the parts in acetone first before dipping in solution gave nice even coverage with no blemishes.
 -
Lost in translation there Blue.. The solution was heated in a glass jar in the microwave and the brass then added to the warmed fluid. Brass and microwaves won't mix. There's probably a saf way someone will suggest. I have read somewhere the ammonia in the solution could evaporate if over heated so care is urged here. Also the black is extremely stable, it's been lightly buffed and shows no sign of coming off anytime soon.
-
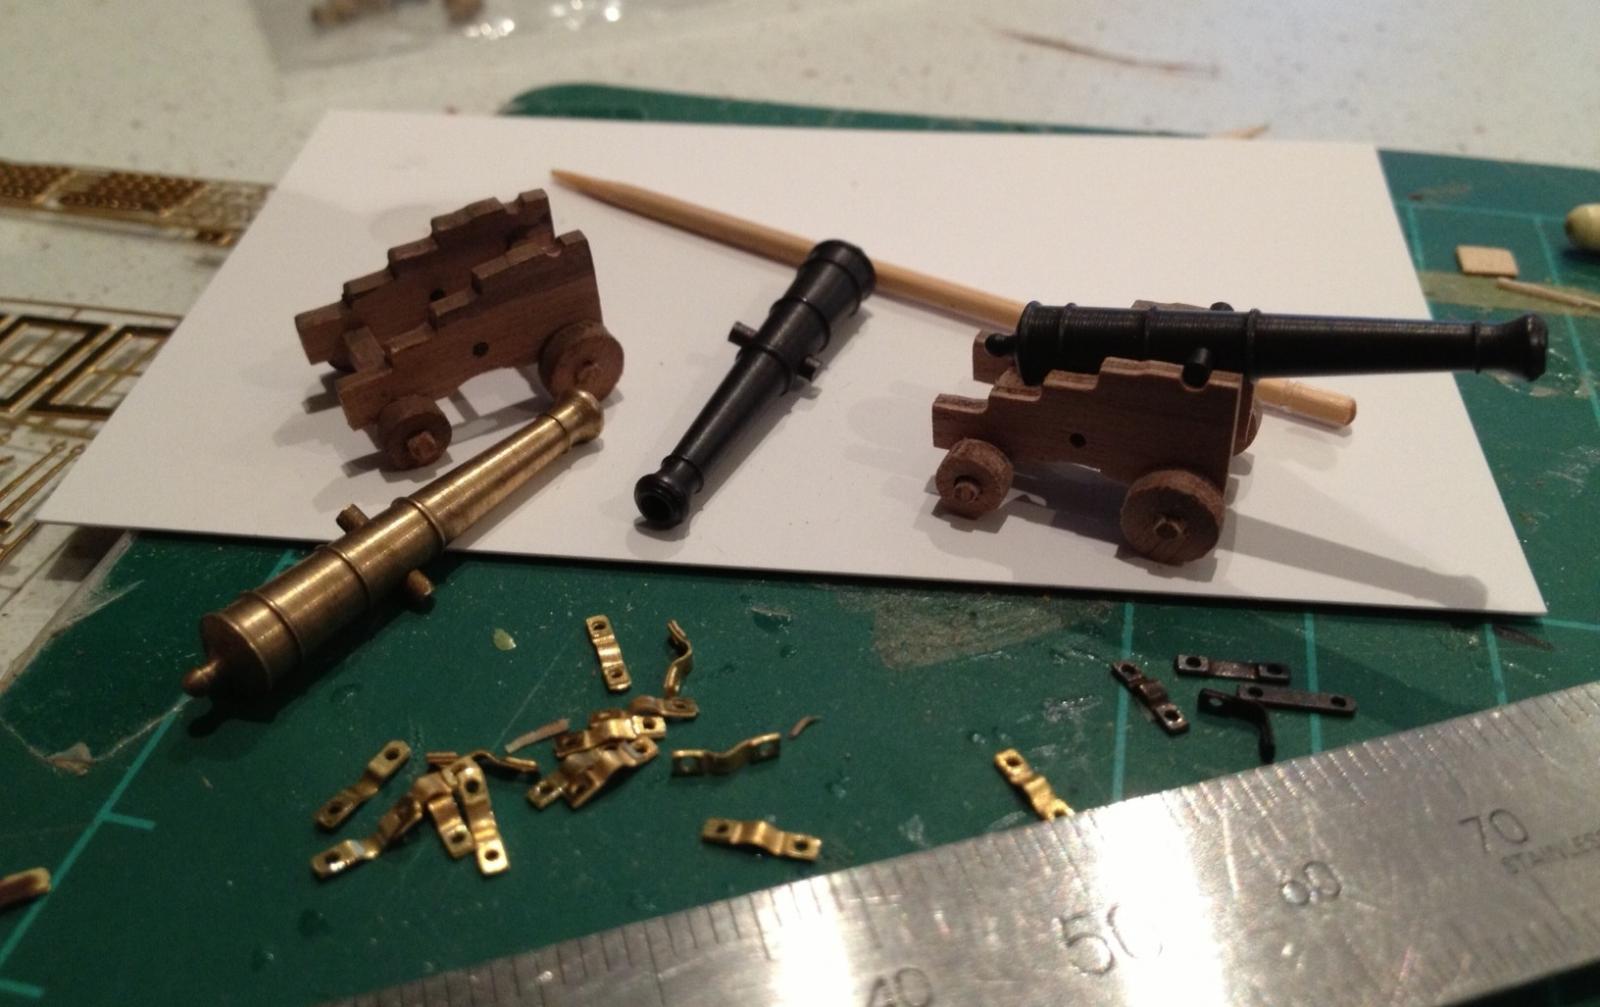
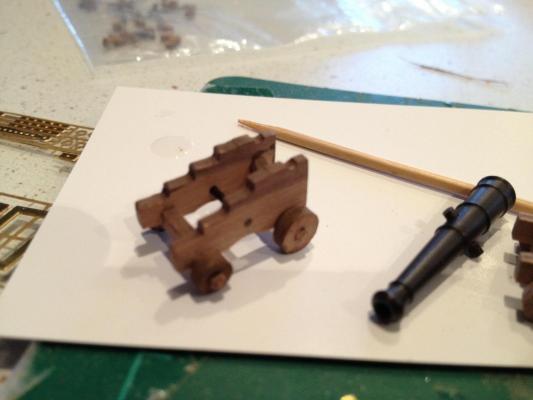
On to the foc'sle. The kit comes with ten four pounder cannon with the option of arranging them all on the broadside or installing a couple of bow chasers. As access under the foc'sle all but disappear once it's installed the guns are installed first. The carriages were made up during a Christmas break at the beach (I'm in the Southern Hemisphere so yes that's the natural order of things) where it rained for far too long. The sheet of walnut ply with the carriages suffered from a dramatic difference in tone on one side,running right through one carriage. As it only touched one this could be hidden under the foc'sle. The only other piece touched by this was the mainmast fighting top which will be painted anyway. After much experimentation I think I've got the hang of brass blackener. After being three quarters of the way through my bottle of Krick blackener I've discovered it's heat that activates this stuff more than the dilution of the solution. A couple of guns and some other fittings have been blackened in a tub of solution heated for about 8 seconds in the microwave and sat in a sink of hot water to keep it warm. After painting the two mortars out of frustration with this solution I'm back on board with it and will use it from here on.

-
Thanks Geoffrey, your Korean build looks like one to watch.
-
Thanks ray. Looking forward to watching the build
-
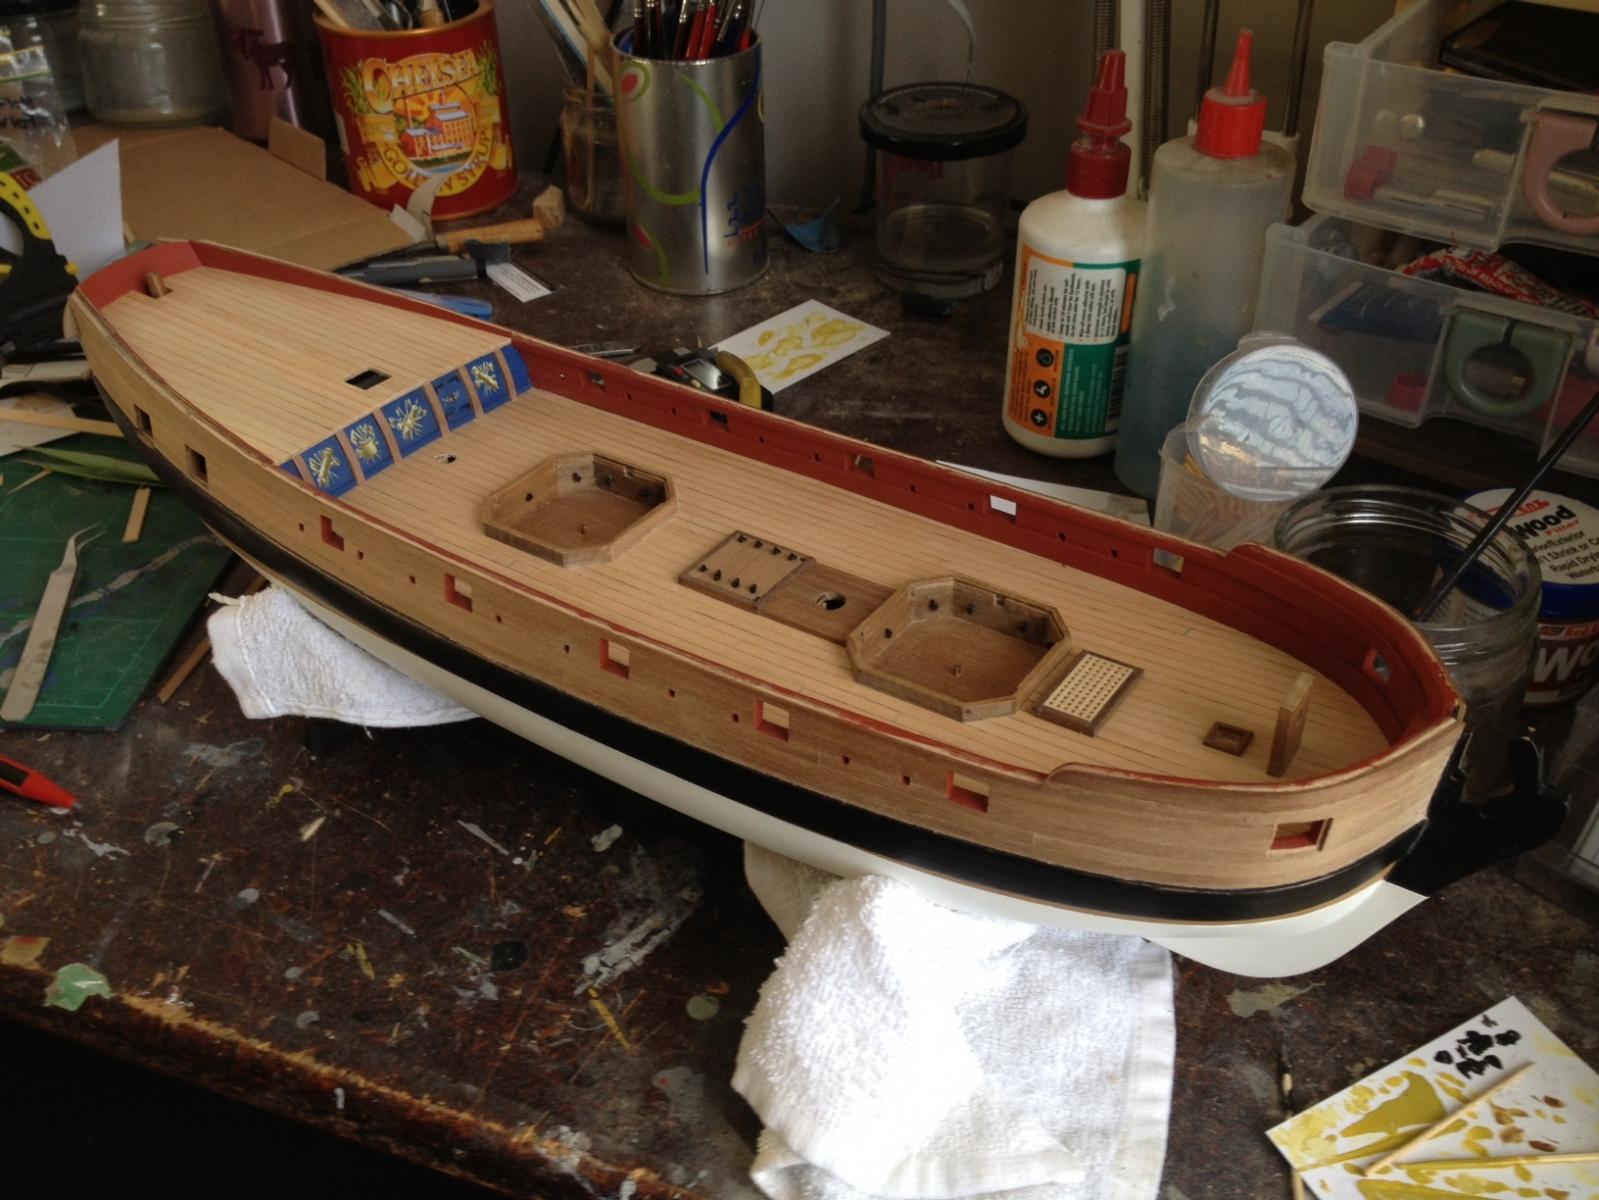
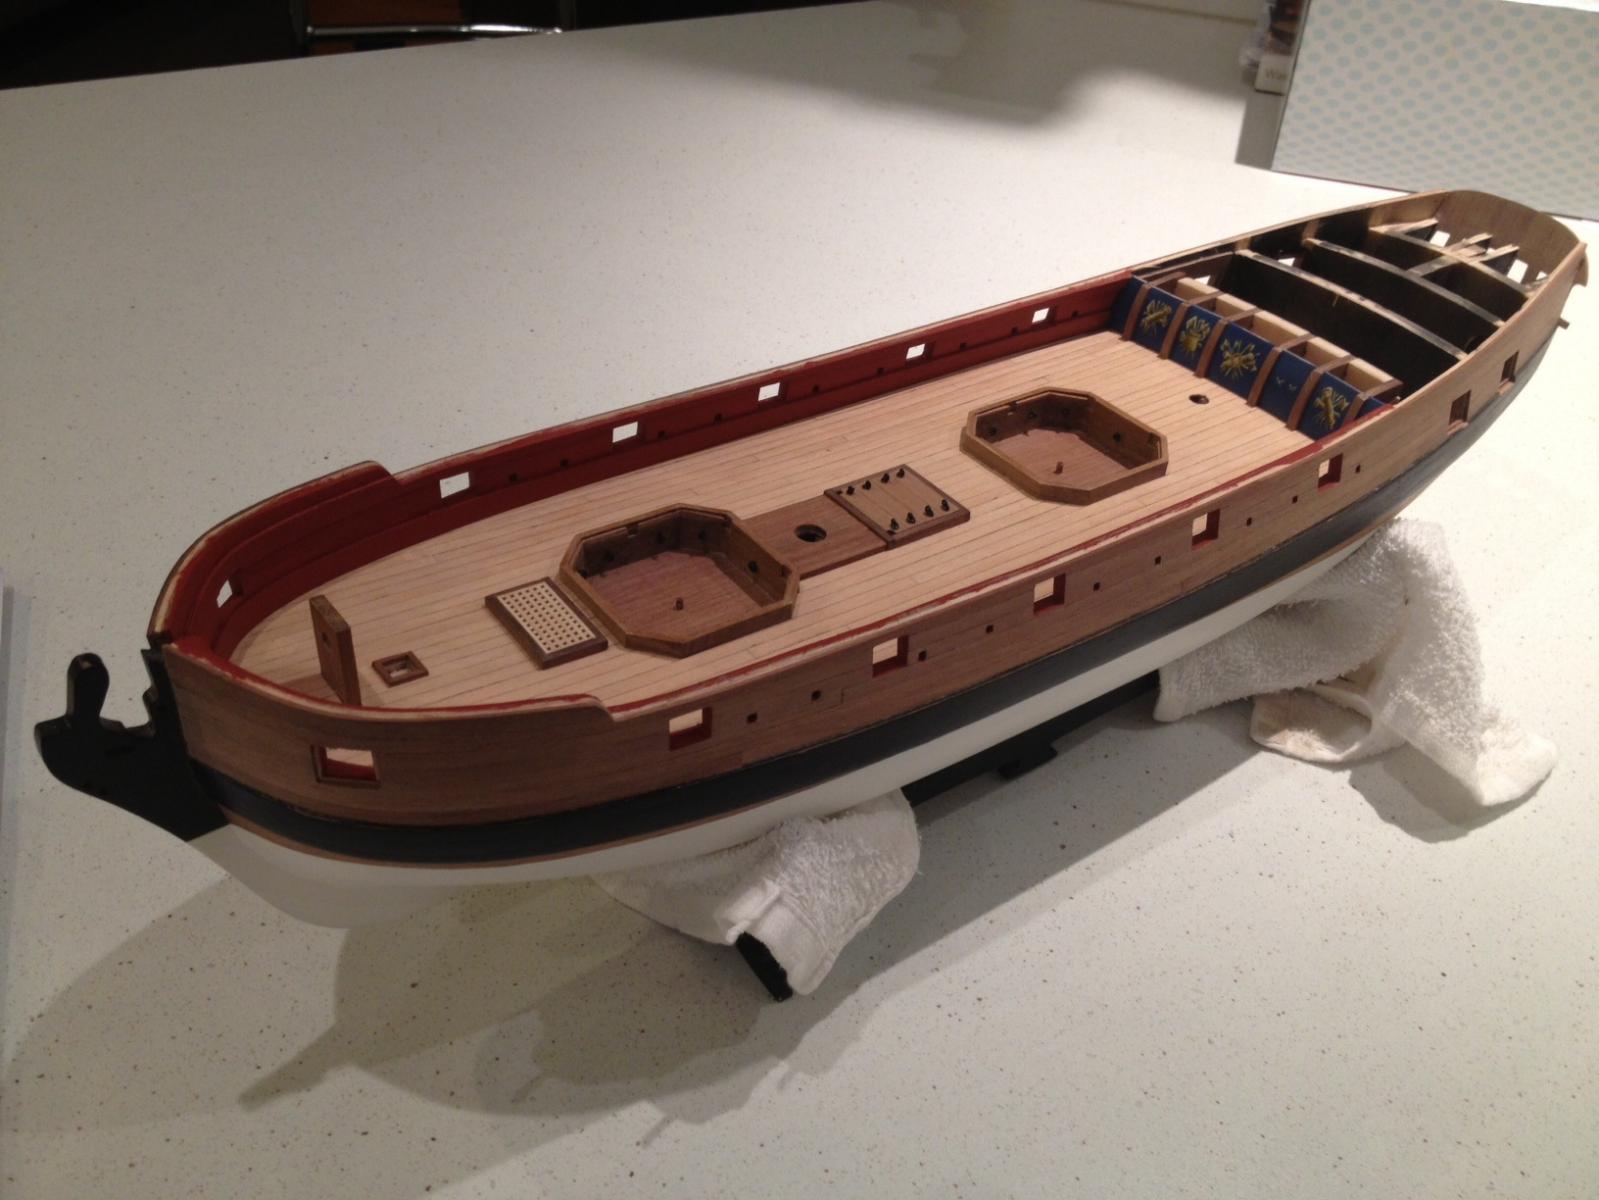
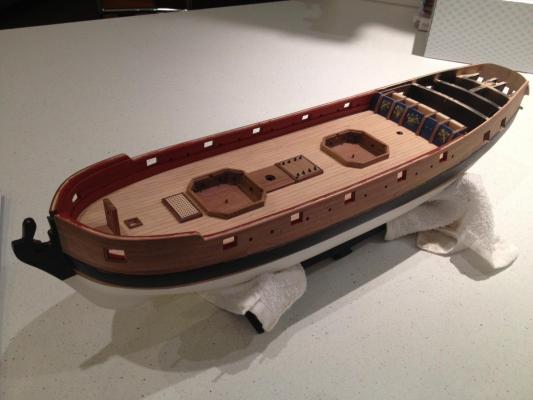
The poop deck has now been planked using contact adhesive. The caulking is just pencil on both faces of the planks. I don't like too much of a contrast there. The bulwark sides were made up off the vessel and painted before being glued into place to avoid damaging the deck with stray sanding or paint. I might add a small beading strip along the front of the poop to cover the face of the ply. It's not too visible but I notice it sometimes. A shot of the stern and overall view so far. No more building today- my wife is whisking me away on a mystery night away for our wedding anniversary. She's even stowed the kids with their grandparents. Magic!


- 366 replies
-
- 5
-

-
- granado
- caldercraft
- (and 1 more)
-
Those boats are looking good jeff. Also a belated nice work on that soldering. Wayne
-
Looking good so far Ray. Clearly a lot of work in the gun deck planking. Keep it up. What's the width if the ply used for the keel? I'm thinking maybe Diana for my next build and am wondering if replacing the ply stem with walnut or something else would be feasible. Wayne
-
Hey slog. That's looking really good. Are you still going to do white stuff below the water line? That timber hull looks quite nice as it is. I've read brown is the historically accurate hull colour but it's never sat well with me. I'm interested as the cc endeavour is on my must-build list one day, as it must be for many Antipodeans. You are doing a fantastic job and this is a log That might sway my next choice of kit. Wayne
-
Airbrush Compressors
Timmo replied to jre8655's topic in Painting, finishing and weathering products and techniques
Take a look here. Excellent advice and points http://modelshipworld.com/index.php?/topic/1187-air-brushing/ -
Airbrush Compressors
Timmo replied to jre8655's topic in Painting, finishing and weathering products and techniques
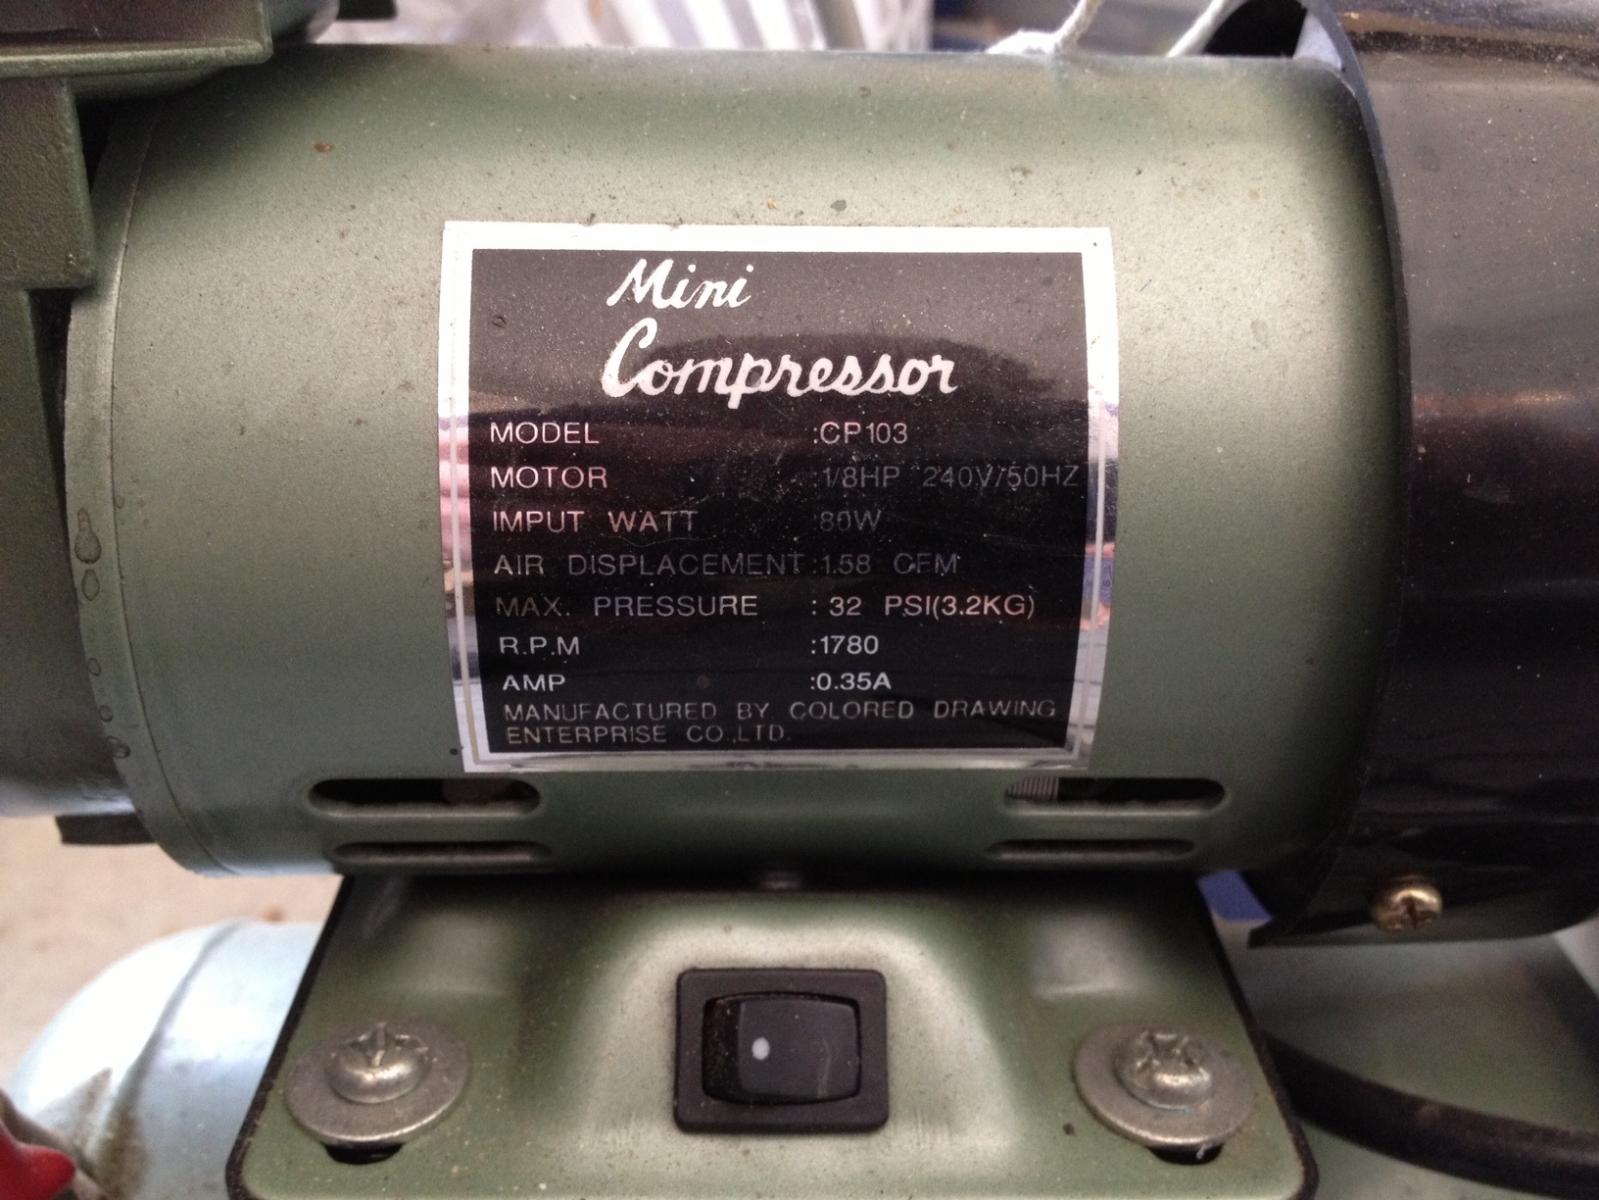
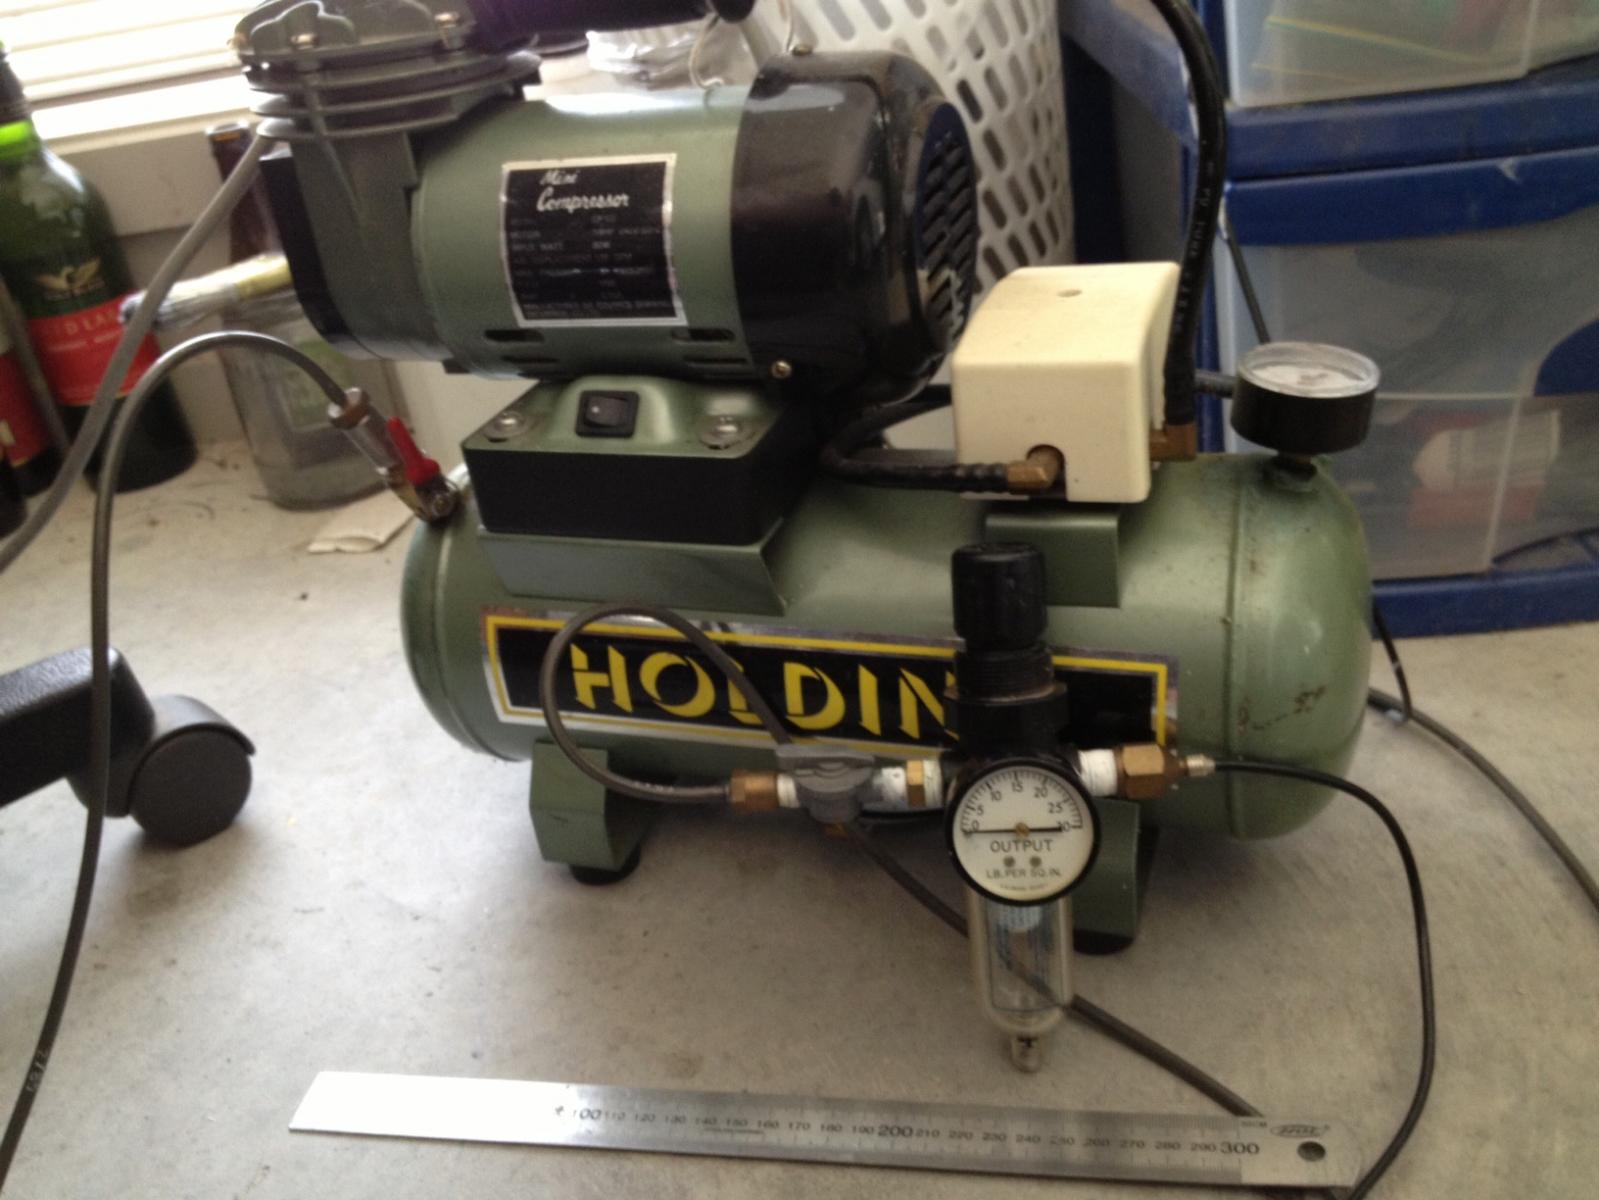
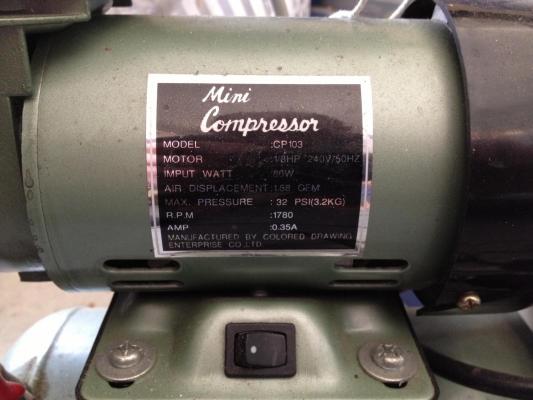
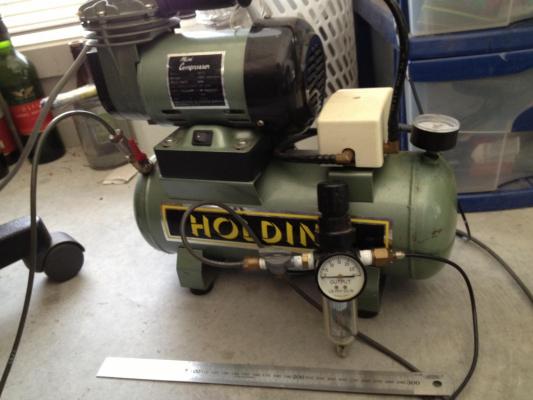
Hi jack. Given the size or the tank on what you looked at it seems strange that there wouldn't be enough volume there for a constant flow. I started airbrushing with a relatively cheap compressor from a hardware store many years ago. It's designed run an Air gun, sprayer, pump tyres etc in a home workshop.The volume of the tank was enough to give constant pressure with no trouble. After long bursts it would empty but would refill again in about 20 seconds. The key here was that this compressor had a psi capability of 100psi. That's way more than you would ever need for airbrushing but high enough that it can keep that tank filled and deliver pressure without pulsing. The only downside with this compressor was the noise- it's extremely loud. Lately I've been using a compressor on loan from a friend. It's designed for an airbrush and is much smaller. Vital statistics here. It's fairly old so I don't know if they are available where you are but there should be similar brands on the market from suppliers online and here in nz they seem to be getting cheaper than they used to be. This has a much smaller tank and psi but creates more than enough constant pressure but must run constantly to do so. I find airbrushing is done at a max of about 20-25psi with lower being suitable for most work. At this pressure a moisture trap (the clear plastic tube with the gauge at right) is a good investment as it acts as a second reservoir and can help even out any pulsing from the compressor. I'd ask the hardware store guy if you can turn one on and adjust the pressure to about 20psi and open the tap to see if it will run without pulsing. If in doubt keep shopping around form something that can put out about 30psi and has a tank of about 4-5litres ( think thats a couple gallons) Hope this ramble helps.
-
Thanks blue. The pics make the contrast appear greater than what it is in person. It's made me have a think about the rest of the painted work on the model. I might look at adding a bit of a shading wash to some of the stern carvings but I'll cross that bridge when I come to it.
-
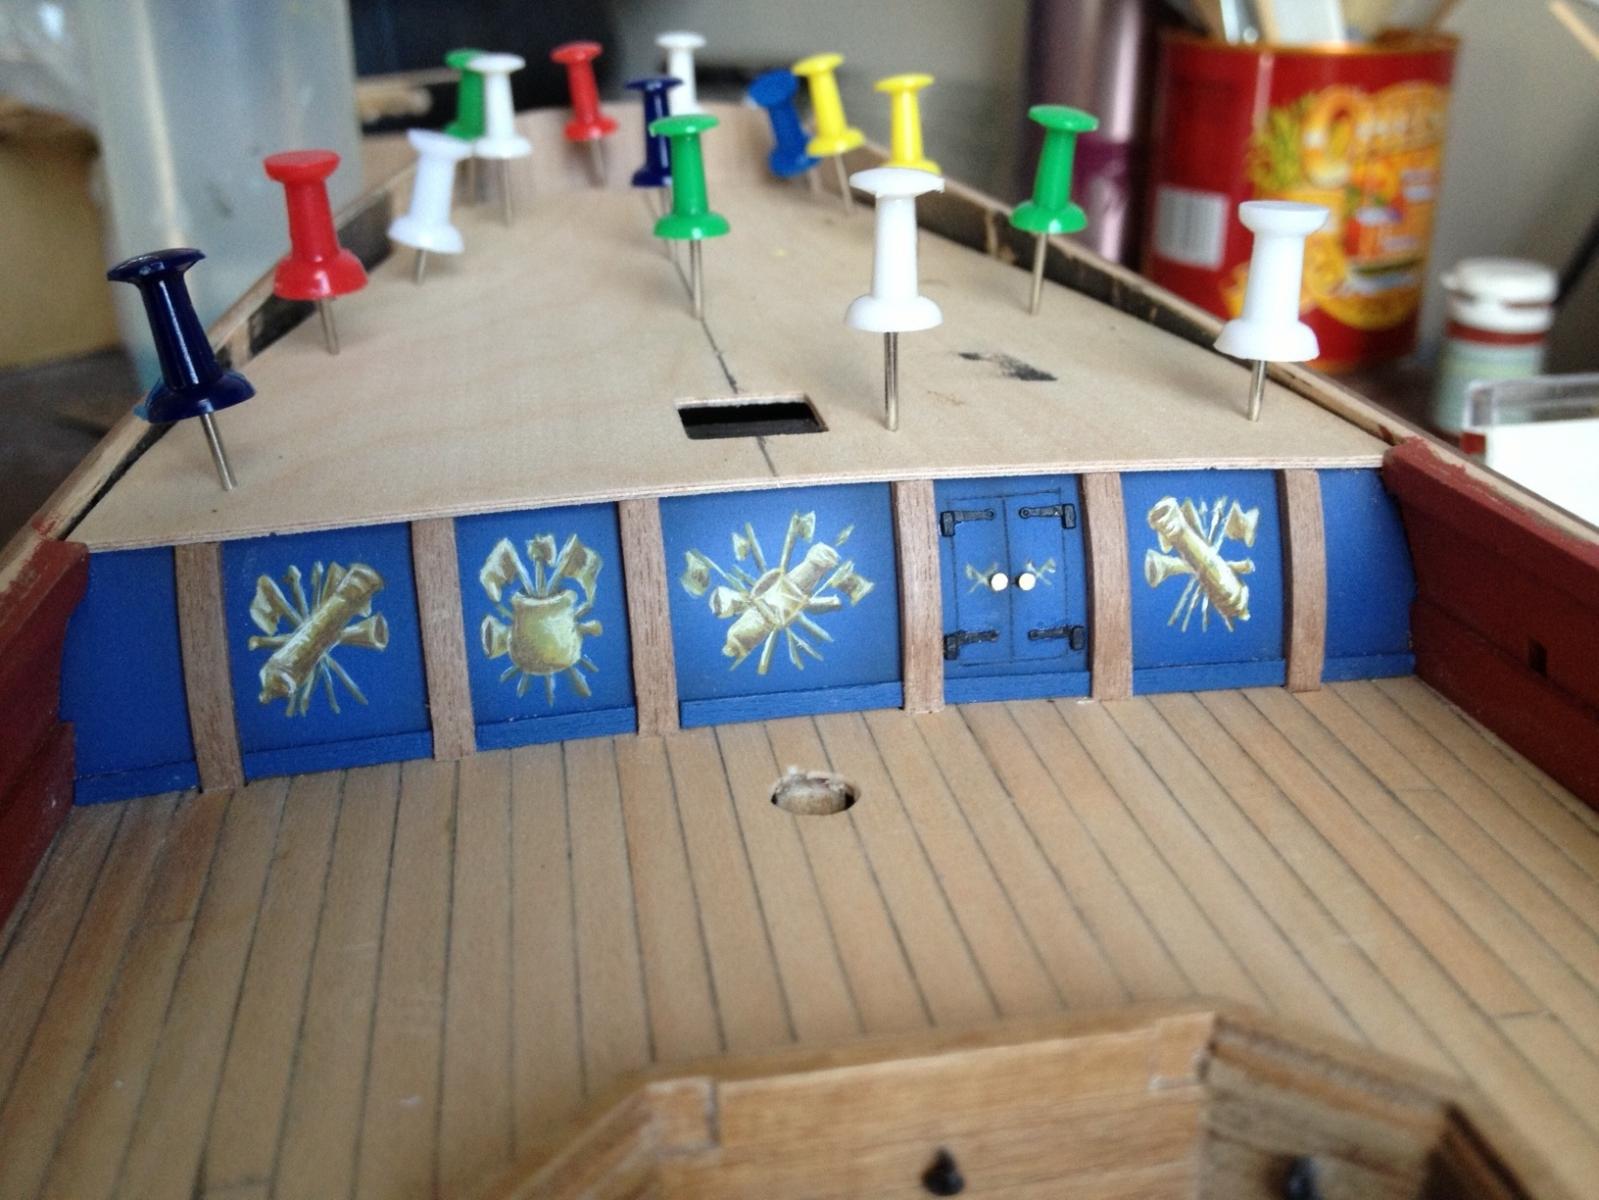
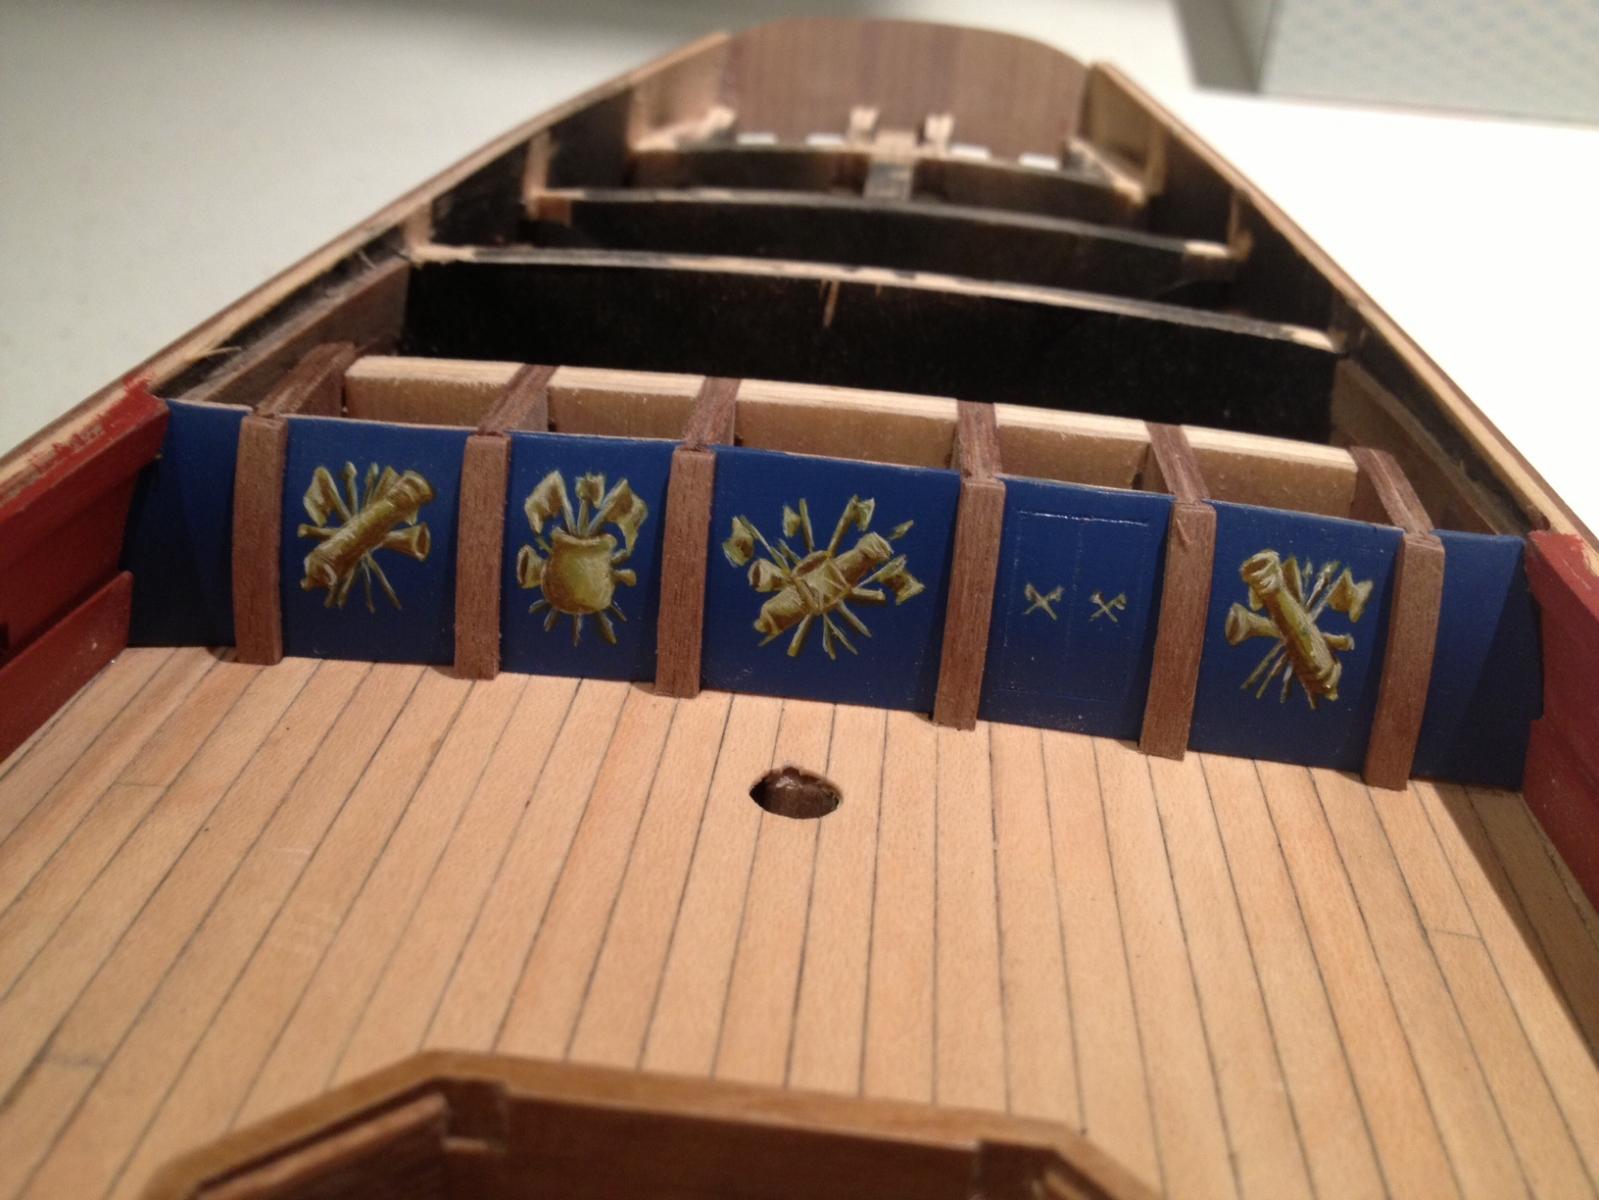
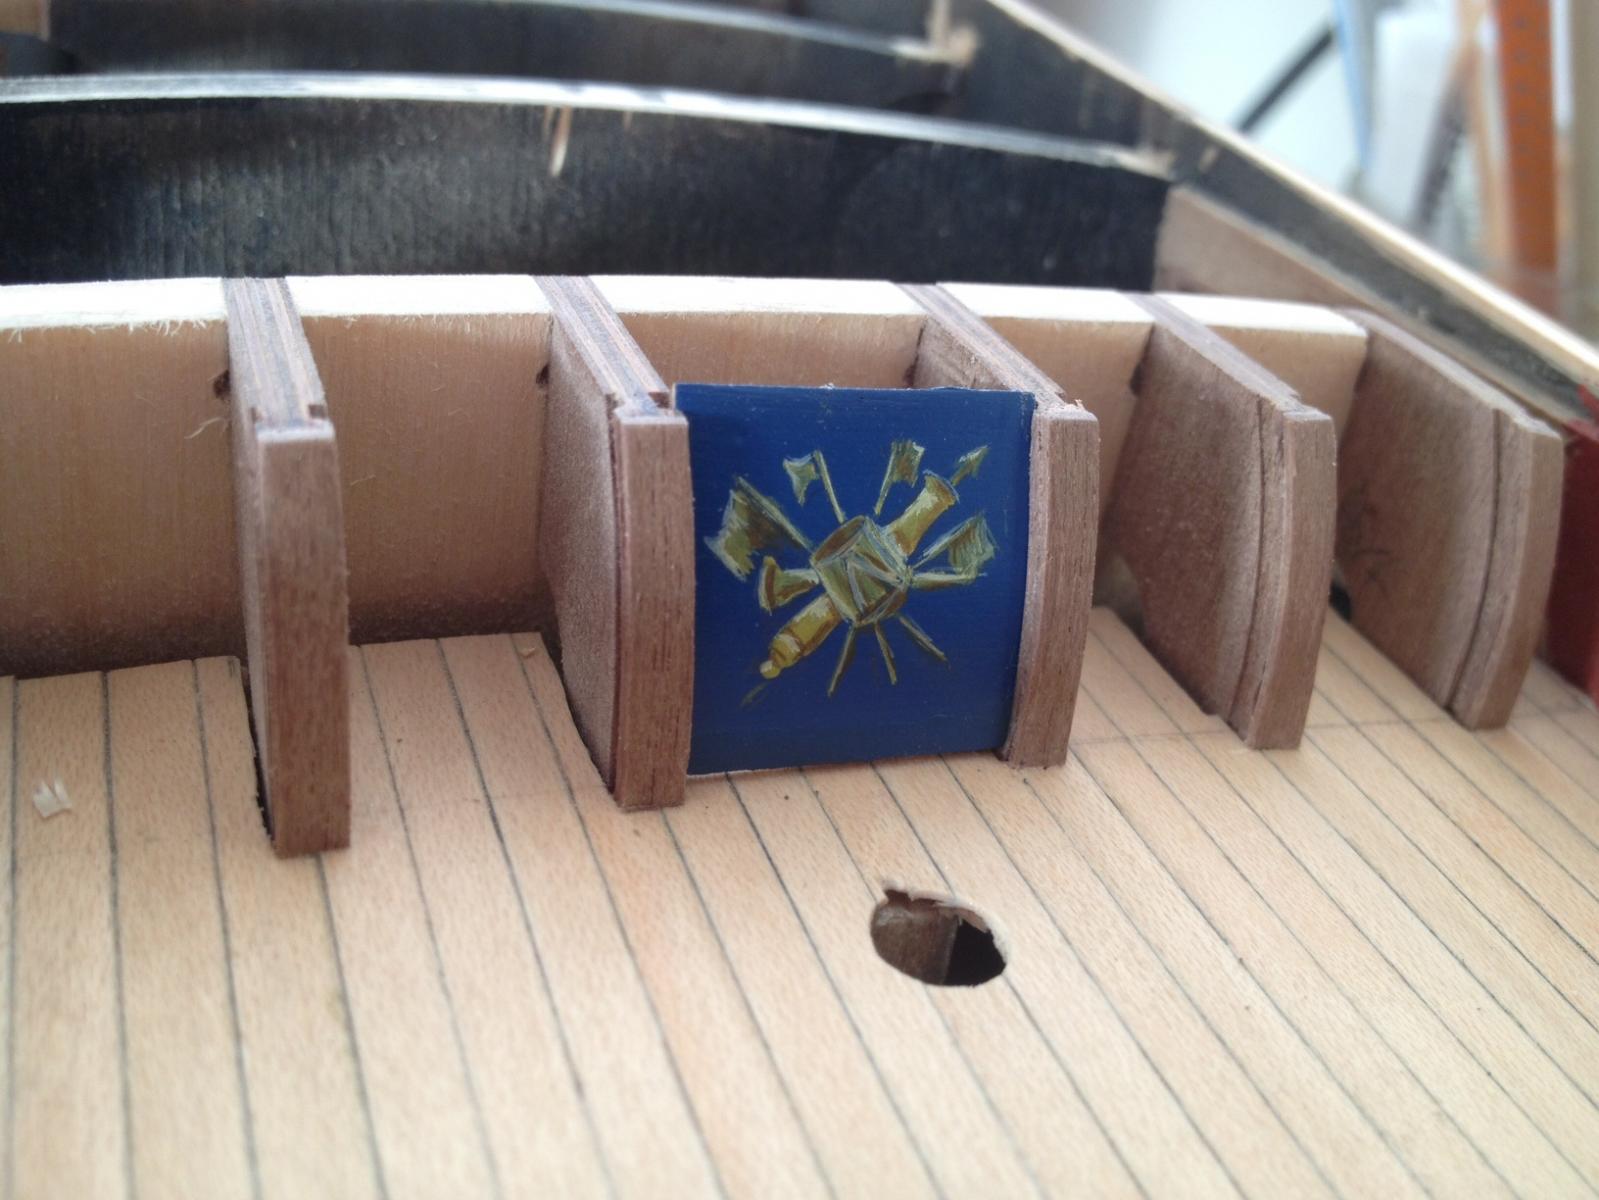
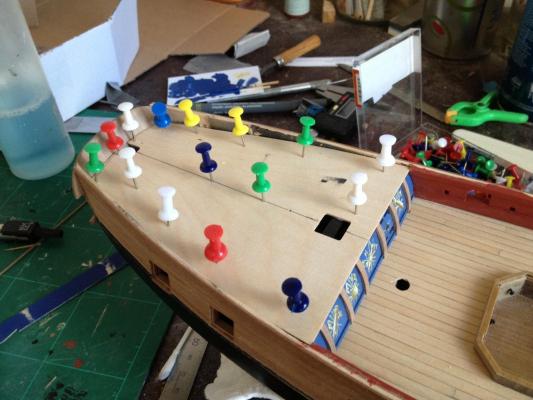
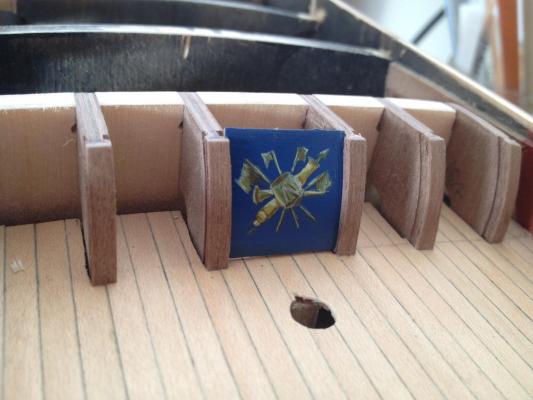
The panels were toned down with a clear matt. A small amount of shading was applied to edge with an airbrush. A dilute dark grey/black along the door panel lines and sides. A waterway on 2mm strip was added to the bottom as per AOTS and some of those brass nails in every kit that I never use made the door handles. A touch of class for the captain! After a bit of cutting a fiddling with the bulwark edges the false poop deck was added.

- 366 replies
-
- 4
-
-
- granado
- caldercraft
- (and 1 more)
-
Looking good there Rod, I'll be following the build and might try the siren myself one day Wayne
-
Thanks guys
-
Wow. Very impressive
-
I couldn't wait and had to install them to see how it looks. At least in here will be safer while the oil dries. It's a pretty thin mix with the humbrol and thinners should be done overnight. . I've had to wait weeks in the past for oils to dry on some projects. And here's a shot of His majesty's bomb vessel Granado in her current state of disrepair. Only other recent additions are the main hatch ring bolts, hole for the main mast and stern fascia, which I'll post a pic of when I head back down that again soon.
- 366 replies
-
- 6
-
-
- granado
- caldercraft
- (and 1 more)
-
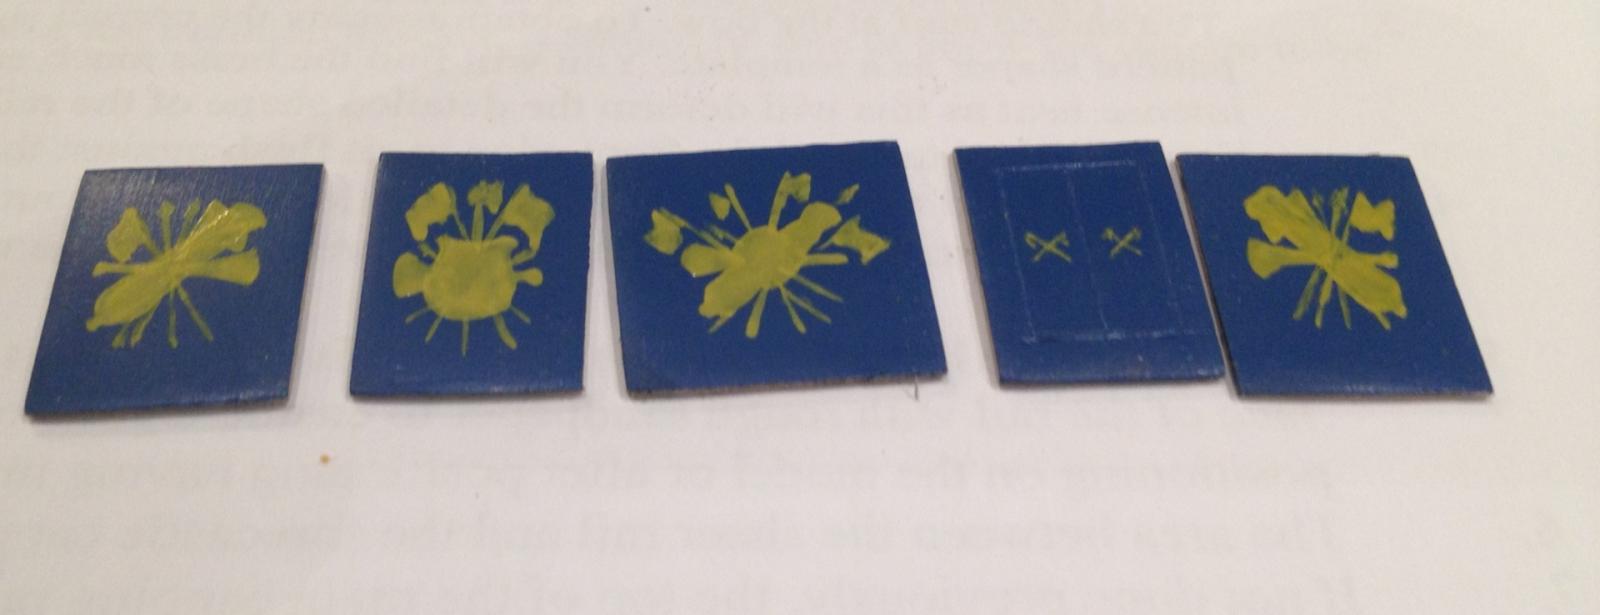
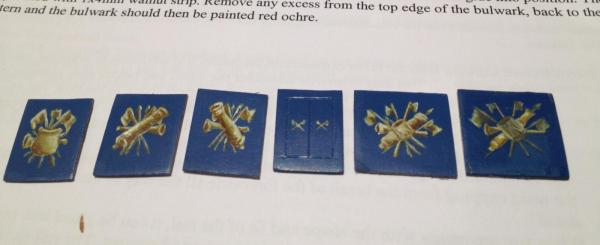
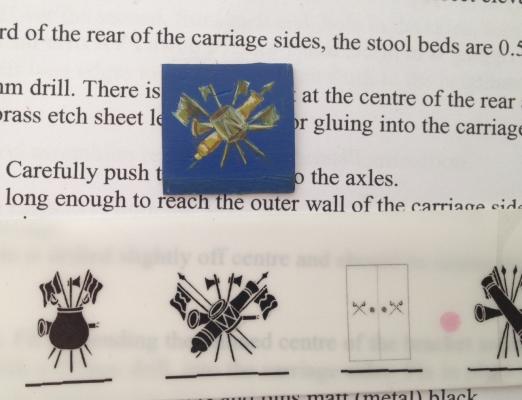
I was quite enthused after painting that test panel and did something unusual for me and worked on the ship in the evening. I usually only stick to daylight hours in the weekend but with my better half at work and the kids tucked in bed I continued on with the rest of the panels using the method described earlier. Here's the basic shape painted on each panel in humbrol 81. Now the shadows added with a dash of raw umber and yellow. Now the highlights with the yellow and white mixed together bringing the lot to life. A better brush probably would have given some better results but that will do me. Colouring might be a little difficult to judge under these kitchen halogens so I'll see what it looks like in the morning. They will need some matt overcoat and possibly a fine spray of a very light and dilute grey or similar through the airbrush to tone the colours down a shade and blend the yellow and blue slightly. Just a little something to take the edge off doc!


- 366 replies
-
- 5
-
-
- granado
- caldercraft
- (and 1 more)
-
A test panel was painted up using humbrol pale yellow 81. Oil mixes took care of the shading to add some depth. the shadow is pale yellow with a dash of raw umber oil paint and the highlight is white oil with the same. The test panel fitted in a slot for a comparison. I'm fairly happy with this as a first go and will continue with the real thing from here.
- 366 replies
-
- 2
-
-
- granado
- caldercraft
- (and 1 more)
-
Thanks BE that ale yellow looks good
-
Looking good so far and can't wait to see more. I've also built a Sherbourne and like you I got a huge amount of help from other posters at MSW. Every contribution like this helps bring it back to better than before.
-
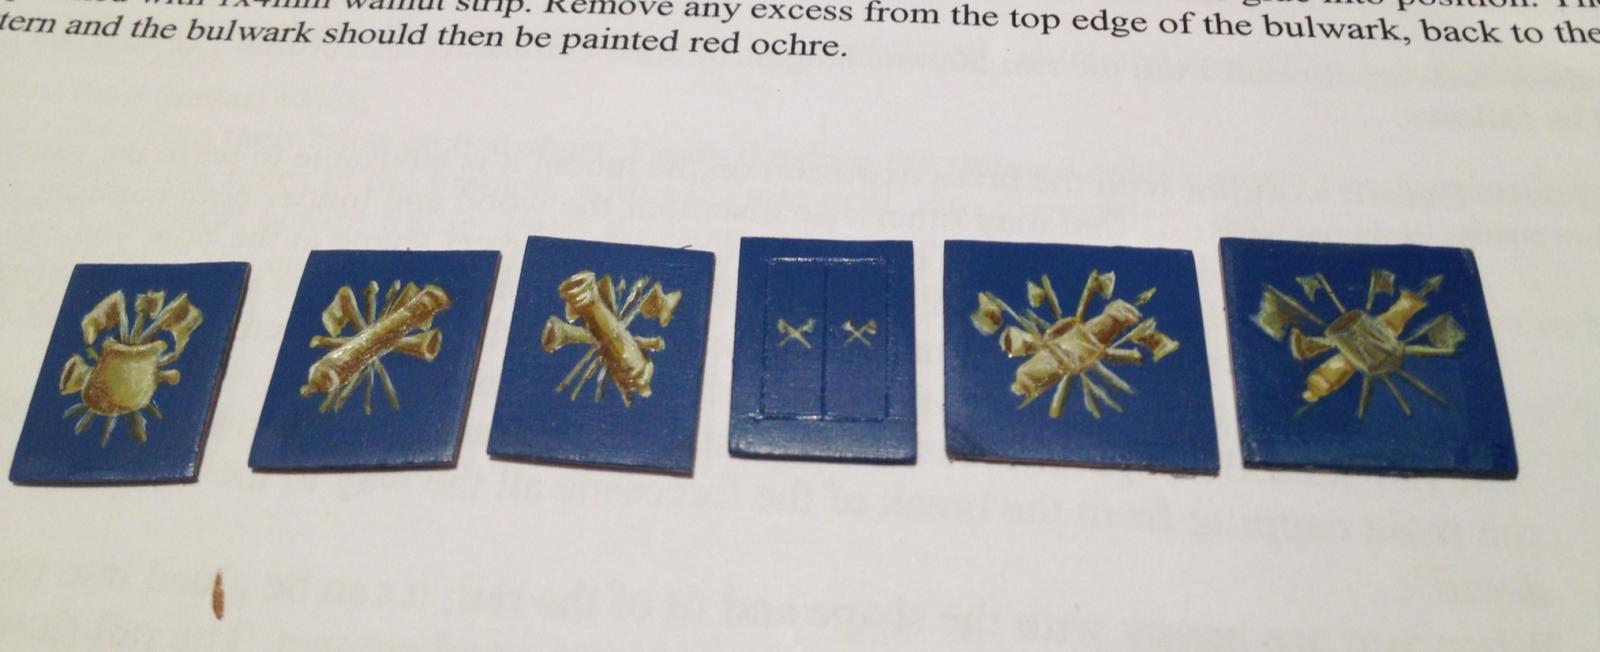
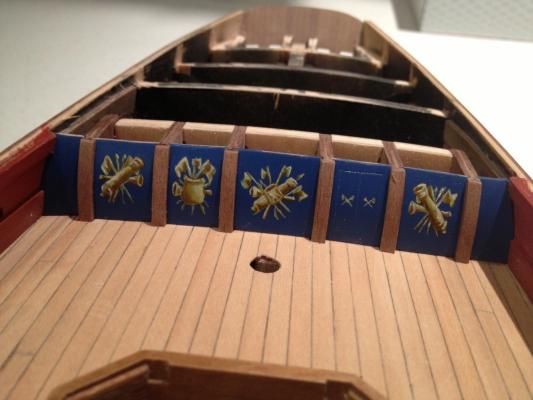
Thanks Blue Ensign, further experimentation awaits on the blue. I'm conscious of not having too glaring a contrast between the yellow ochre design and the blue. I'm thinking something like humbrol 74 linen as a base for that as it will also have to match well against the rest of the yellow items on the build- ie the stern gallery carvings. Any suggestions there welcome. Hi Andy, I've got all that decal setting solution etc to hand from the days of getting tank and aircraft markings to set on plastic kits so it's still an option. I'd like to think that if someone can create all those tiny scale cherubs etc on something like contemporary dockyard model of HMS Bellona with just a paintbrush then I should at least give it a try. Nothing ventured, nothing gained.
-
Incredible workmanship there Robert. It's a museum piece. Wayne
-
Nice work there Ryland. The post with the Minwax products was very informative. It's not one we have here in NZ but shots like that give a good clue to similar items here and the slight darkening of the basswood might come ion handy in future. I sure like the look of Chuck's boat so who knows I might give it a go one day. I'll let intrepid adventurers like you and others in this forum lead the way. Wayne
-
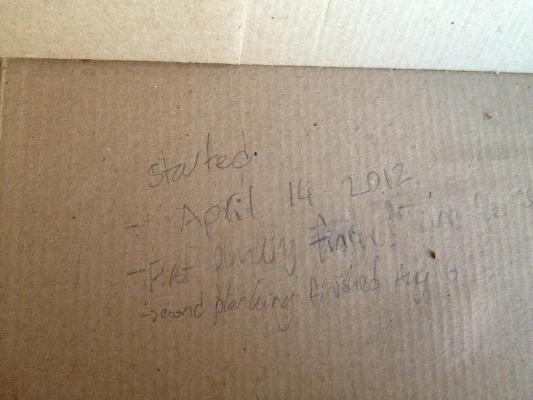
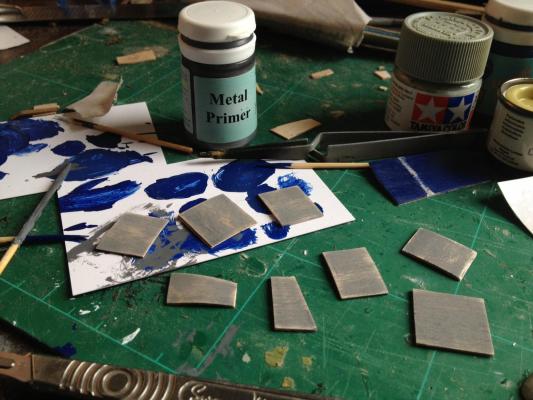
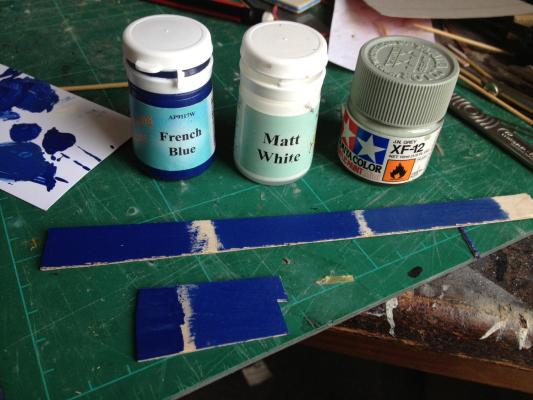
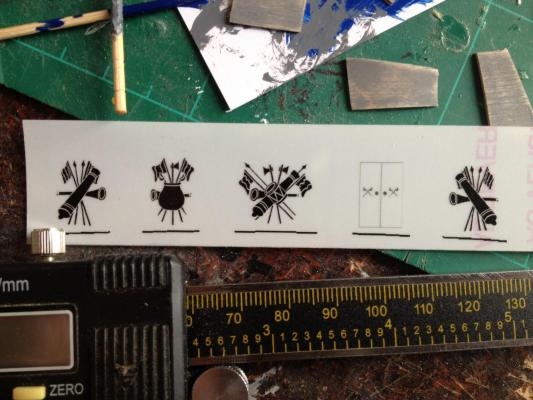
Ha! Just noticed this long forgotten message to self. I've started chalking up major milestones in my builds now with a note inside the box lid as a legacy of my plastic modelling days when a kit would usually take a year and a diorama about two to complete- depending on size. What do you know, it's been about a year (April 2012) since I started the Granado and first planking done by June and second by the end of August. By way of explanation much of the time since August has been work - the day job variety) or working on the mortars and gun carriages. Now the quaterdeck bulkheads fit it's time to paint. They've got a fairly noticeable plywood grain which doesn't look right at this scale. I put some primer on it to fill the gaps and sanded but have also since filled with putting to give a smooth finish for the paint. Colour testing in the meantime. The Admiralty paints French blue is vivid but quite dark. I've paid attention to models in the UK National Maritime Museum (Great website when you are thousands of miles away) and learned friends on MSW like Blue Ensign who is aiming for that same slightly faded look that I like. Each to their own but in my opinion from building German WWII panzers the darker the colour the lighter the shade of it needs to be the smaller the scale gets otherwise it's overwhelming. Here's some test panels. From left is straight admiralty French blue. In the middle is a bit of white mixed in, right is the blue mixed with some Tamiya JN Grey paint which is the only remotely suitable other colour I had in the paint drawser. I'm leaning towards this at this stage. The panels have some nice bellicose images on them, drums, flags, cannon and the like. The kit provides these as decals. I'm not keen on these for two reasons- the potential for decal silvering and that they are flat black. Judging by the common colour scheme of yellow decorative painting on blue seen on 18th C warships it seems a little dull to use black. Also the Granado anatomy of the ship book shows them in yellow, albeit on a red ochre background for the panels, the same as the bulwark sides. It's blue for me though. Better sharpen that paint brush but if it doesn't work there's always the decals to fall back on.