Captain Slog
-
Posts
904 -
Joined
Content Type
Profiles
Forums
Gallery
Events
Everything posted by Captain Slog
-
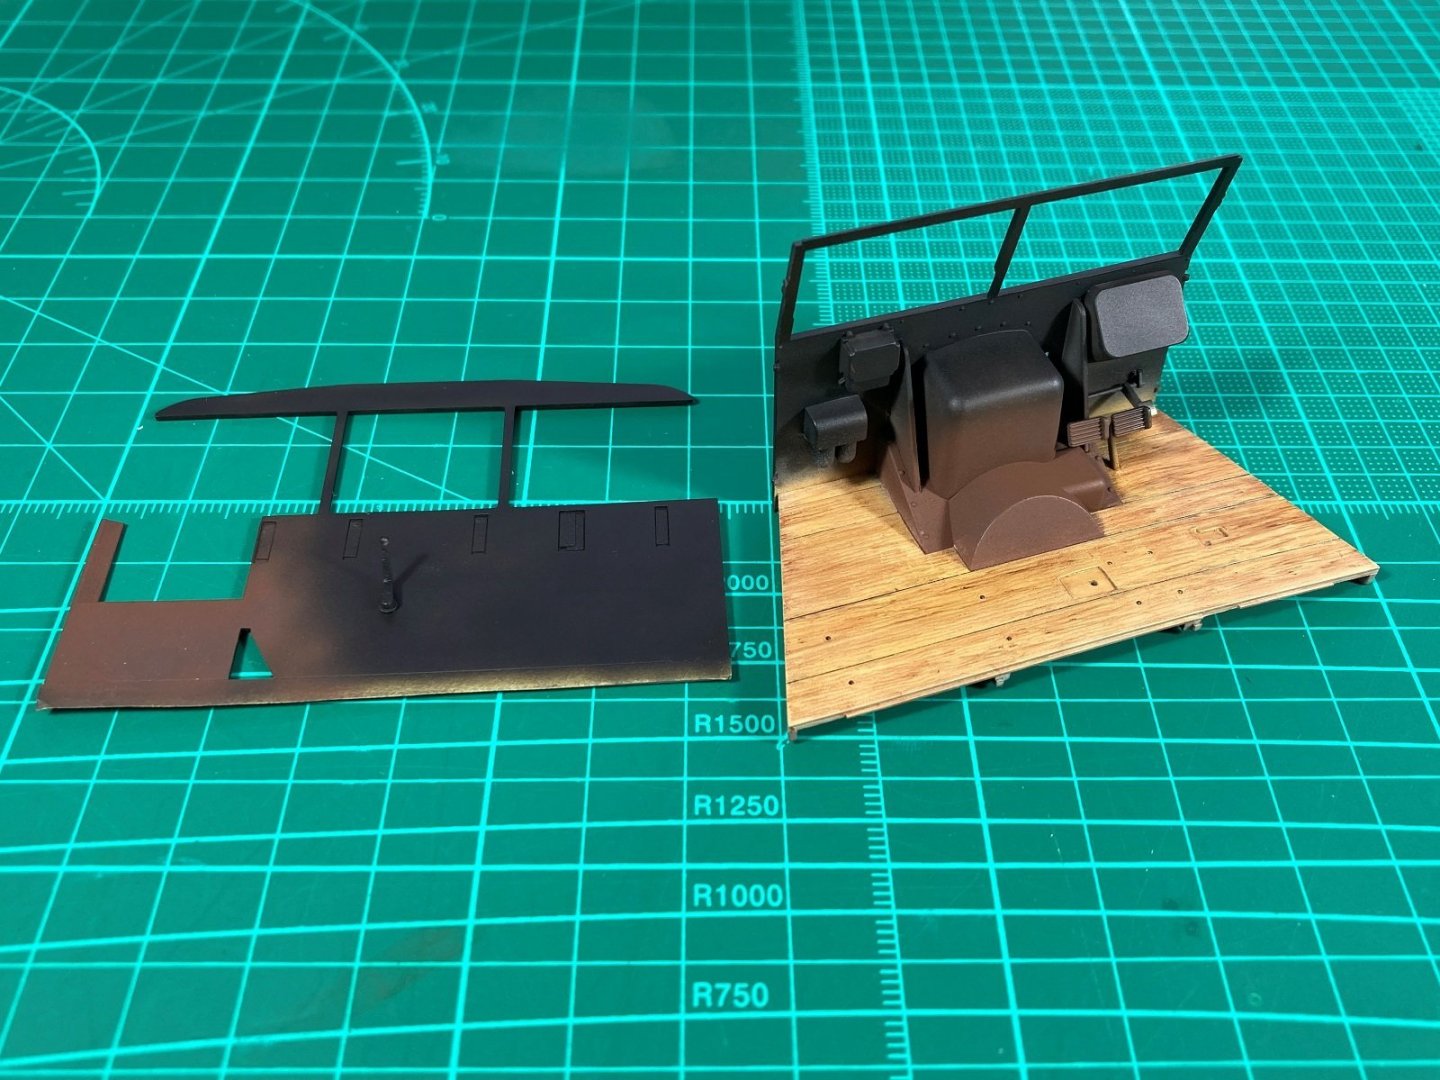
 Thanks for the comment, Welfack. I’m in a similar boat with this being my second attempt at “modern” plastic modelling for want of a better term. A F-8 Crusader, my first, was done a couple years ago. Then close to 4 decades before that! I think they are worth the money from a convenience point of view and for consistency but as you say just repackaged existing products modified for the purpose. Although there are a couple I am not sure what they would be. The wood effect was just a base colour; in this case deck tan as that’s what I had on the shelf. I think starting with a lighter colour is better than say a brown as the effects are more visible and the overall tone darkens with the oils. The ‘grain’ is a couple of different oil colours. I tried placing dots of oils and trying to blend but the better effect was to paint ‘grain’ streaks with the oils and then use the thinners to work and soften/blend the edges. That’s it. The ‘wood’ areas of this kit does have a moulded grain (over scale) which worked in my favour as the oils can go into the moulded grooves to help the overall effect. There are other methods using acrylics but for me more difficult trying to blend and short working time of these as well as can’t go back and rework once dry like you can do with oils. Cheers Slog
 -
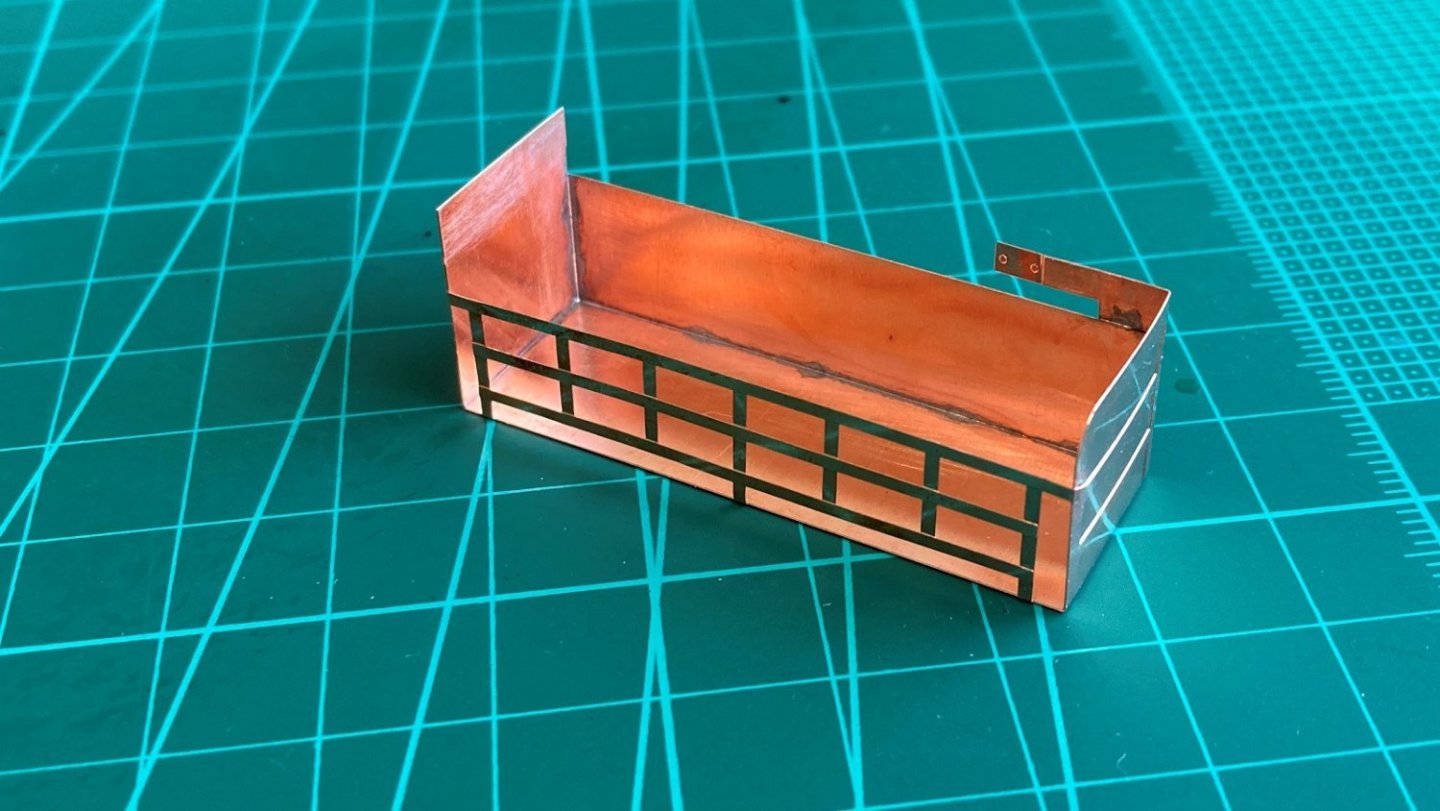
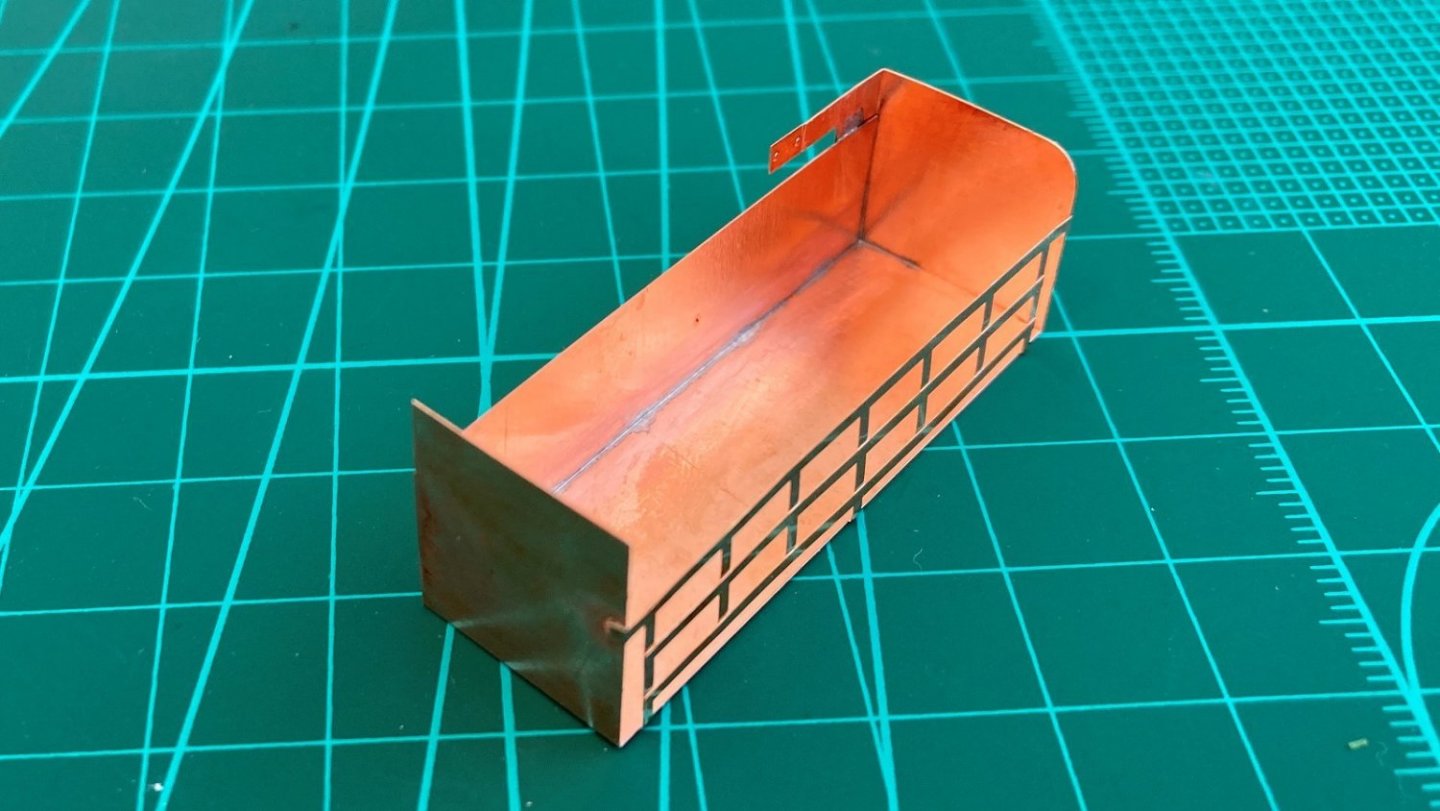
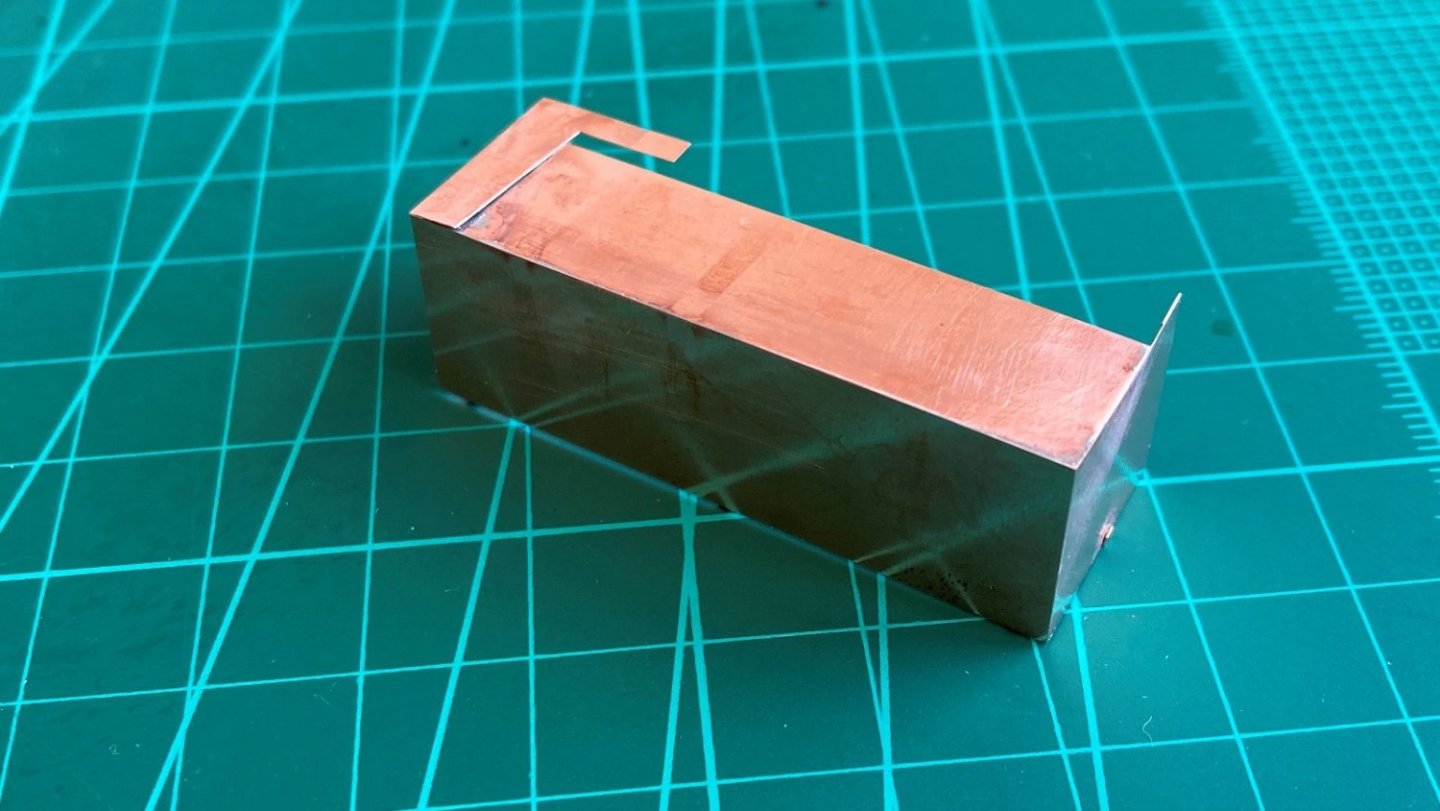
Hi All, Relatively short update this week. The kit provides photo etch for the large cargo basket, which is attached to the chassis under the drivers cab. The video touches on how I work with photo etch and, in this case, soldering it up. I am used to soldering small 0.2mm brass wire but nothing as large as this and tried new to me flux and low melting point (179 degrees Celsius) solder. Back side photo etch could have been fitted better as a gap, but won’t be seen so all good. Cheers Slog
-
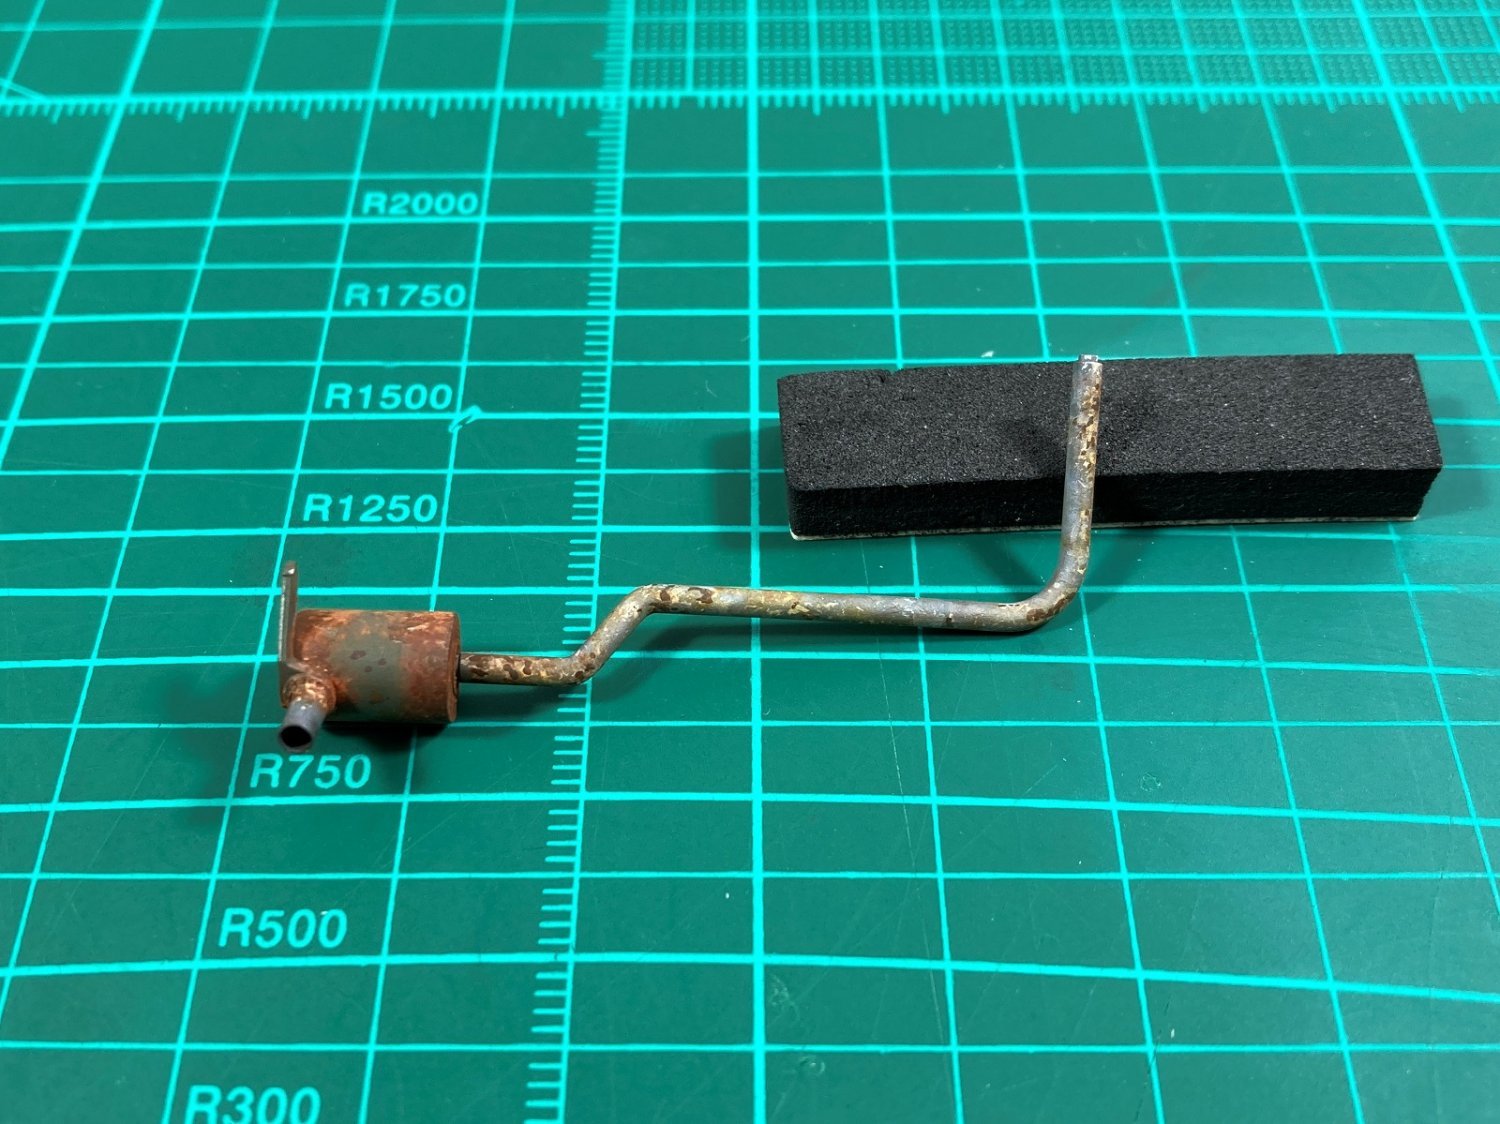
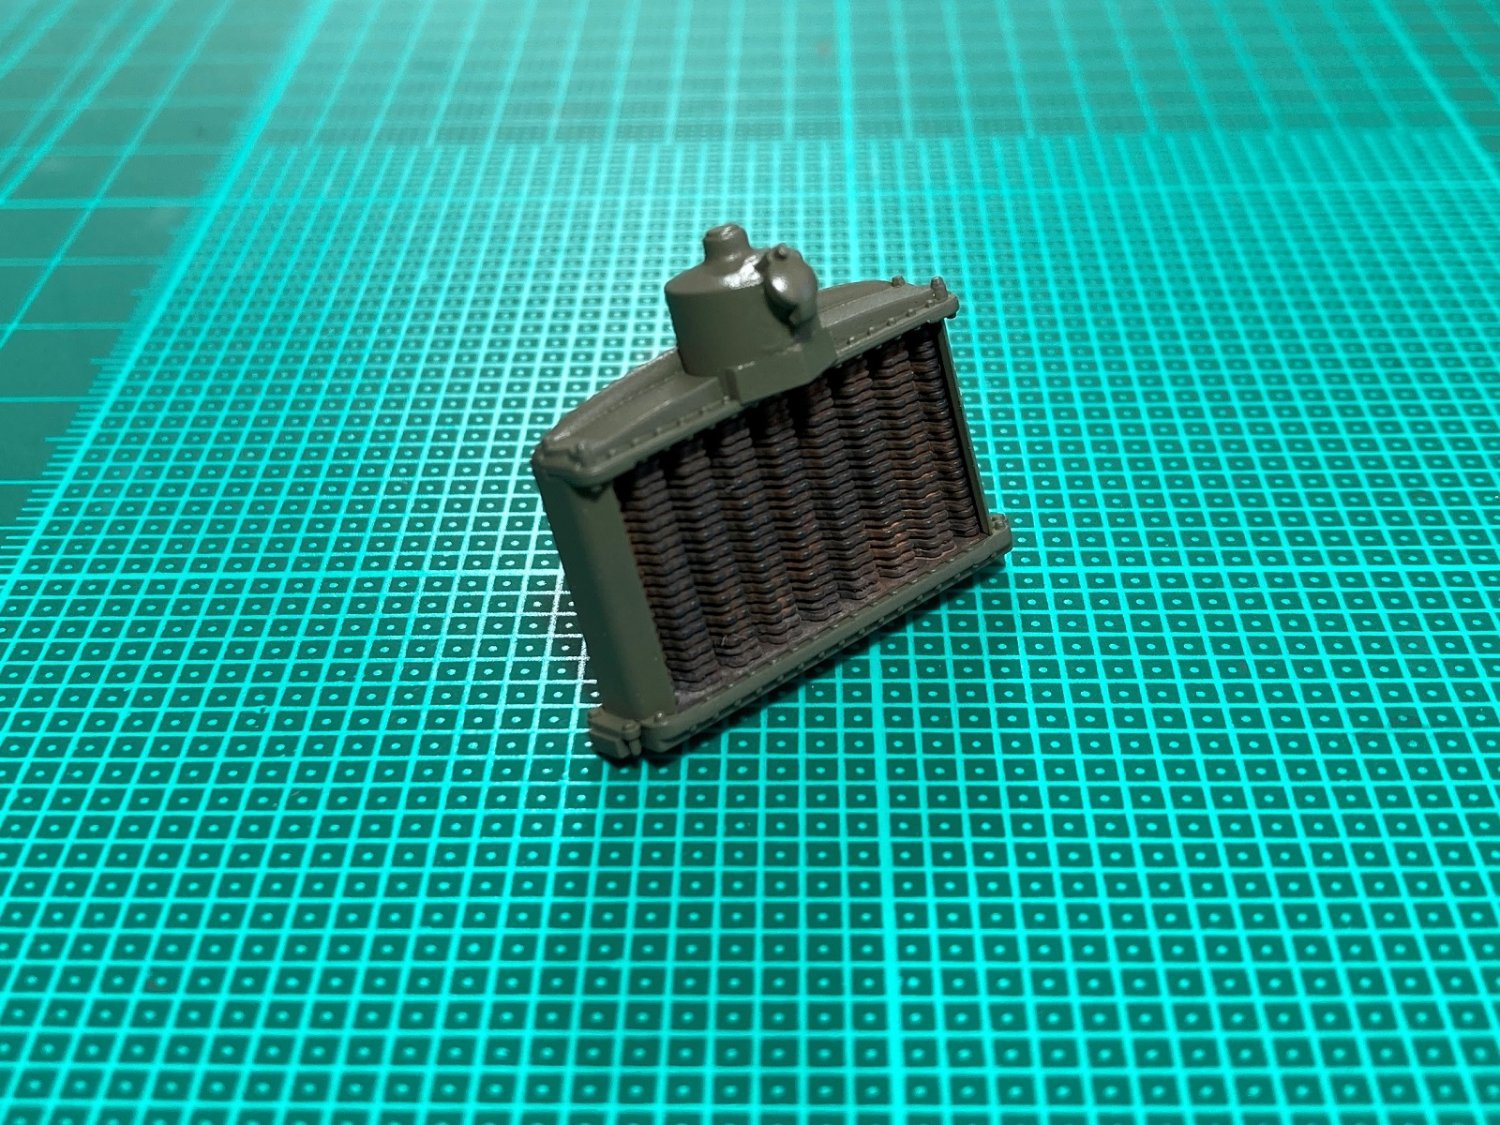
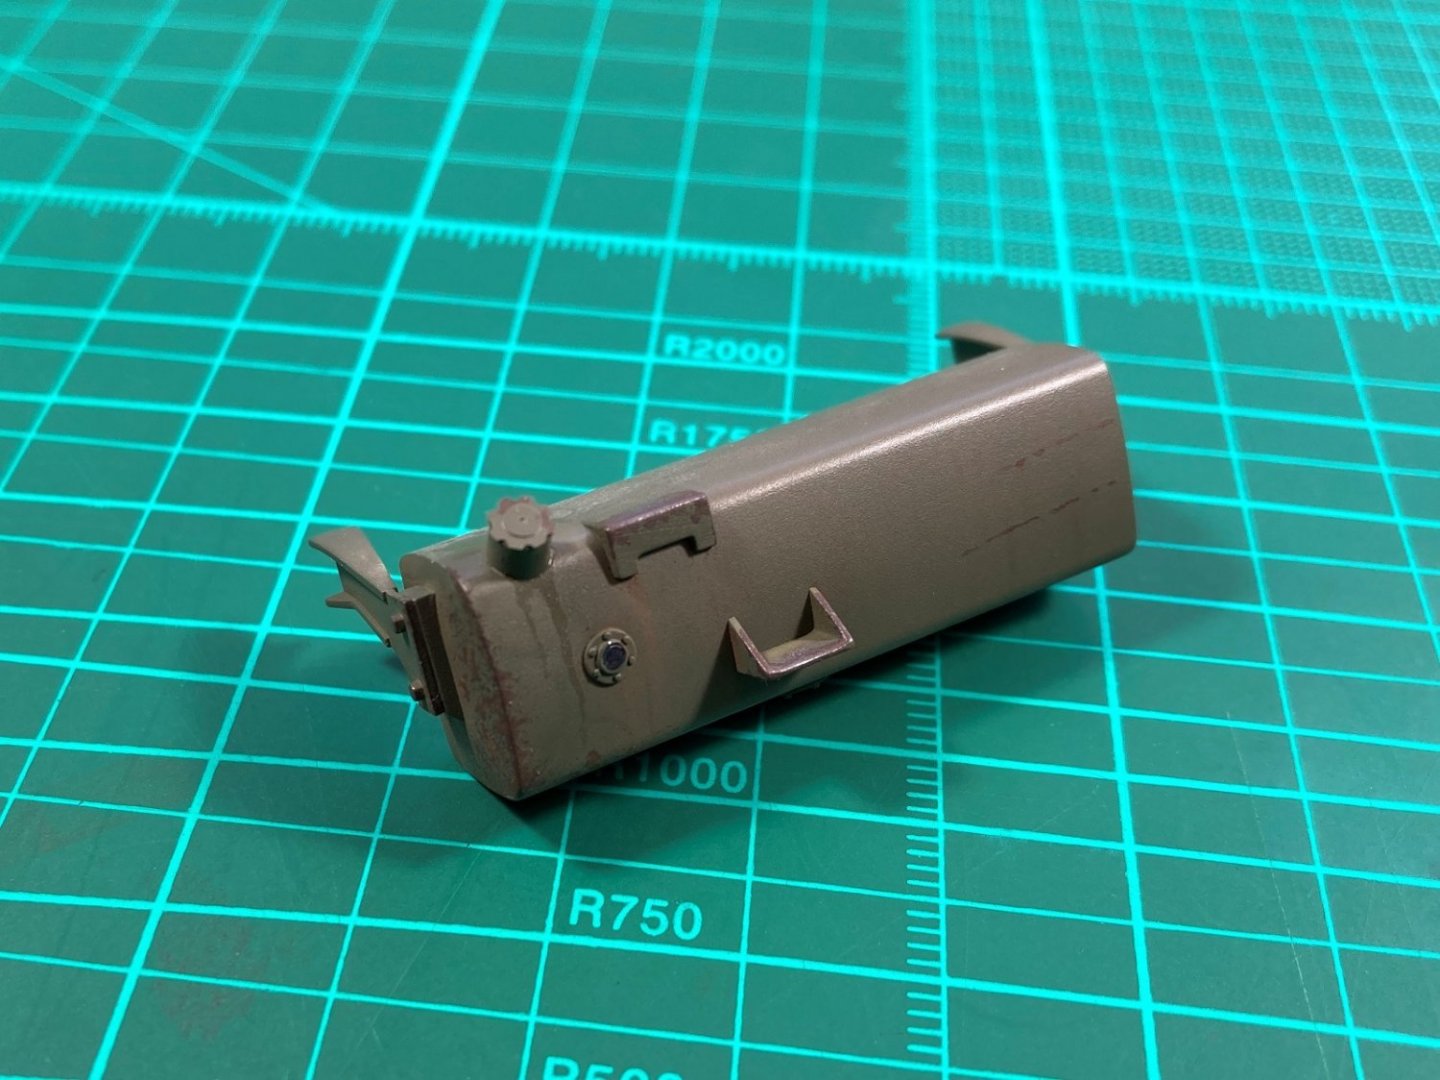
Hi, Part 11 is now up. This is a relatively light one covering only the radiator and the fuel tank. The exhaust, originally going to be included, is missing from the video as explained below. The radiator was pretty straight forward other than the filler/cap is attached to a block which fits into a large cut out in the header tank and the fit is very poor requiring a lot of filling and shaping. Weathering wise only the radiator got some pigments. The header and surround left at base colour stage until fitting, which I am holding off until I can fit the bonnet which needs the drivers cab fitted. The fuel tank has fit problems also with the filler neck which required lots of filling and sanding also. I really wanted to try a lot of things with this, some successful, some less so. It received both sponge and brush chipping, pigments (polished again!) streaking grime (need to improve here and will likely do again once fitted and can do a unifying all over weather) and some fuel staining which was hit or miss. Now on to the exhaust, I actually filmed this but when I was done I just wasn't happy with it enough to include in the video. I tried to emulate one of Night Shift exhaust weathering methods and I feel failed miserably. This style was to use grey and white to show heat affected pipe work. I ended up trying to recover it by throwing on some rust pigments but that's not what I wanted. Of course Night Shift is a master at what he does and has his particular style so I can't be expected to pull it off first time trying. I know where I failed and will either strip it back and try again or try a different technique. Oh, the exhaust pipe isn't fixed to the muffler yet until time to fix to exhaust manifold and chassis. Probably only got 2 or 3 videos to finish it off now. Cheers Slog


-
Thanks for the nice comments guys, appreciated. The Pioneer was first produced in 1927. The R100 variant, which this is model is of was introduced to the British army in 1935 to serve as their heavy artillery tractor. The recovery variant (SV1S & SV1T) in 1936 and the tank transporter (TRCU20) in 1937. (from Wikipedia). Thunder Models have released all 3 versions. Cheers Slog
-
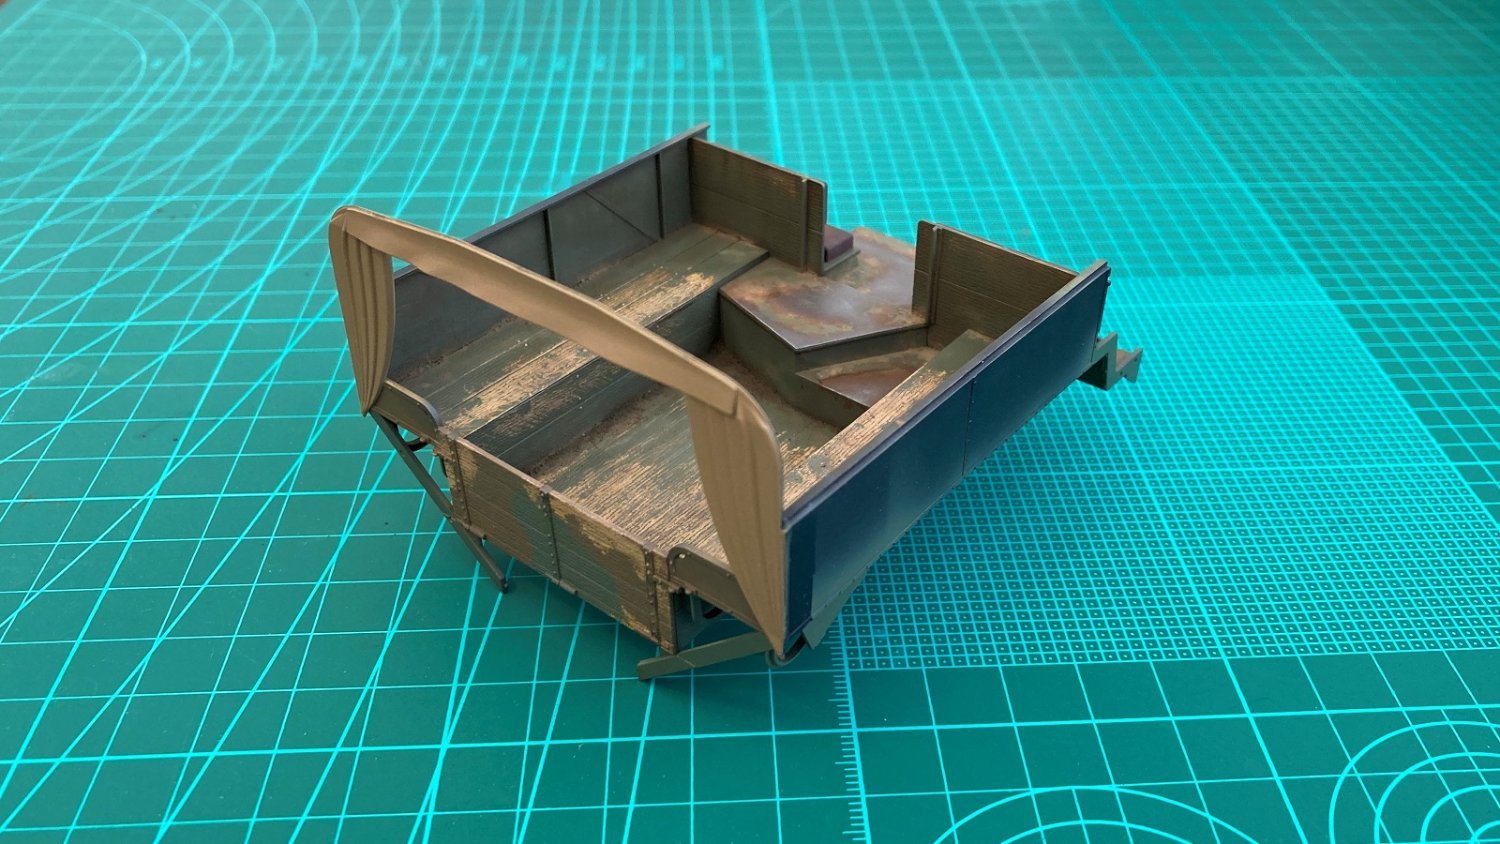
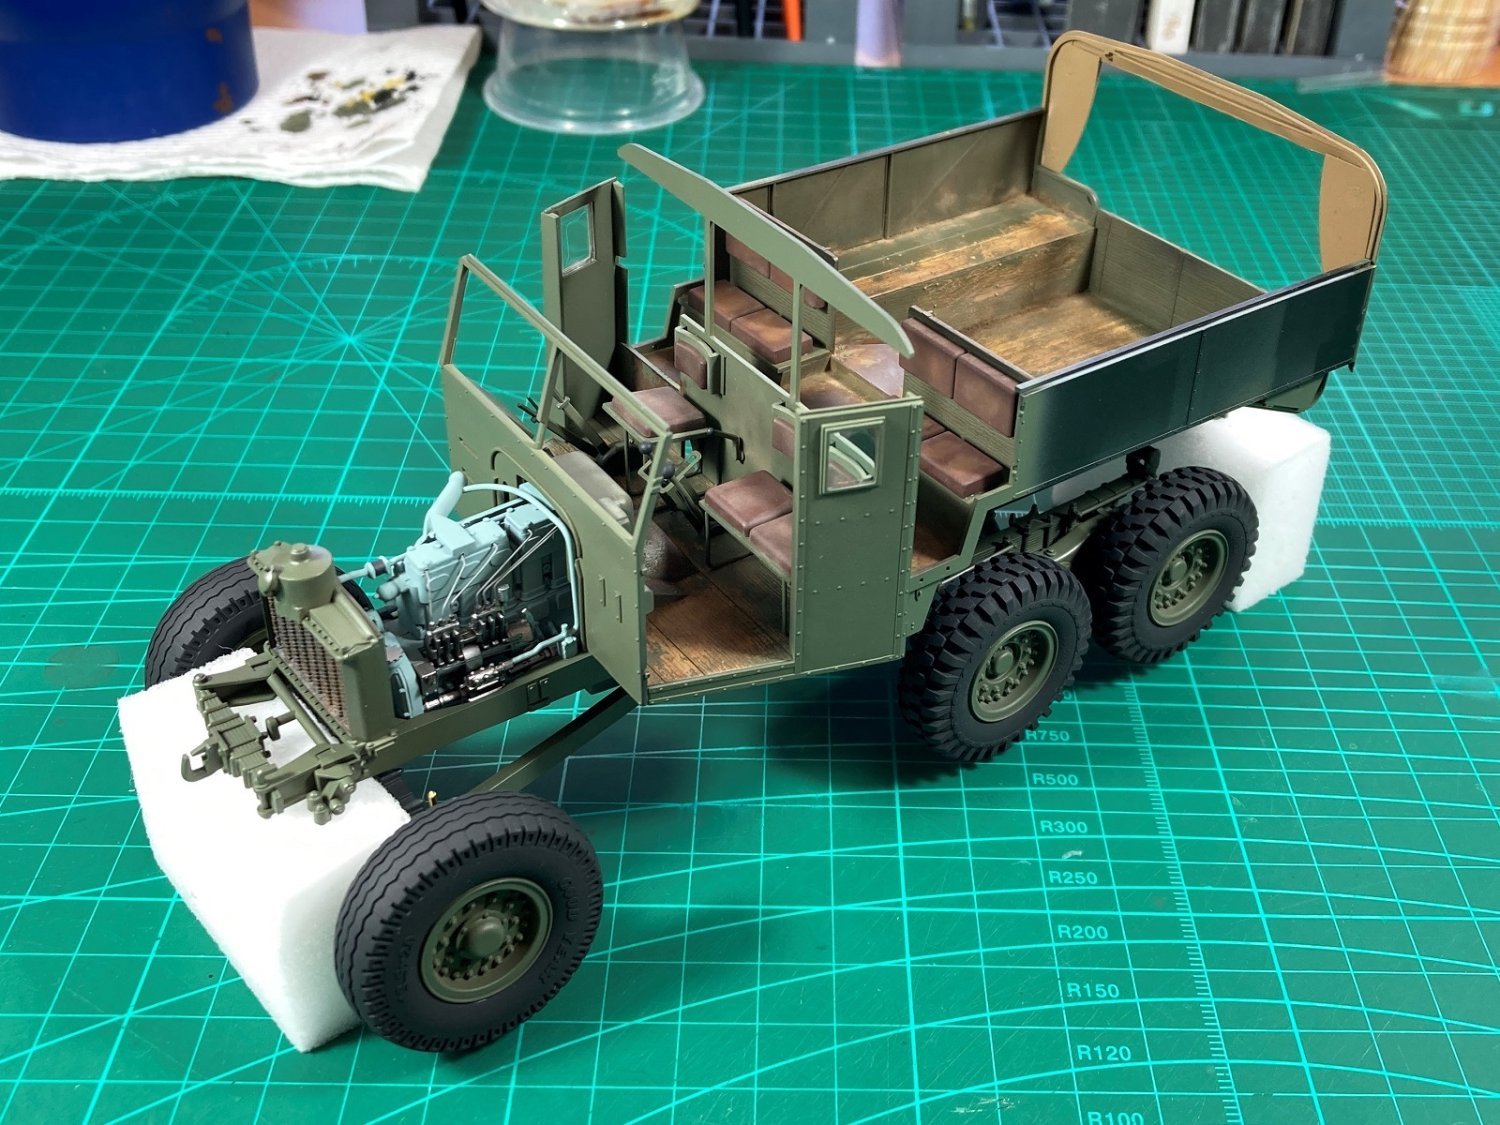
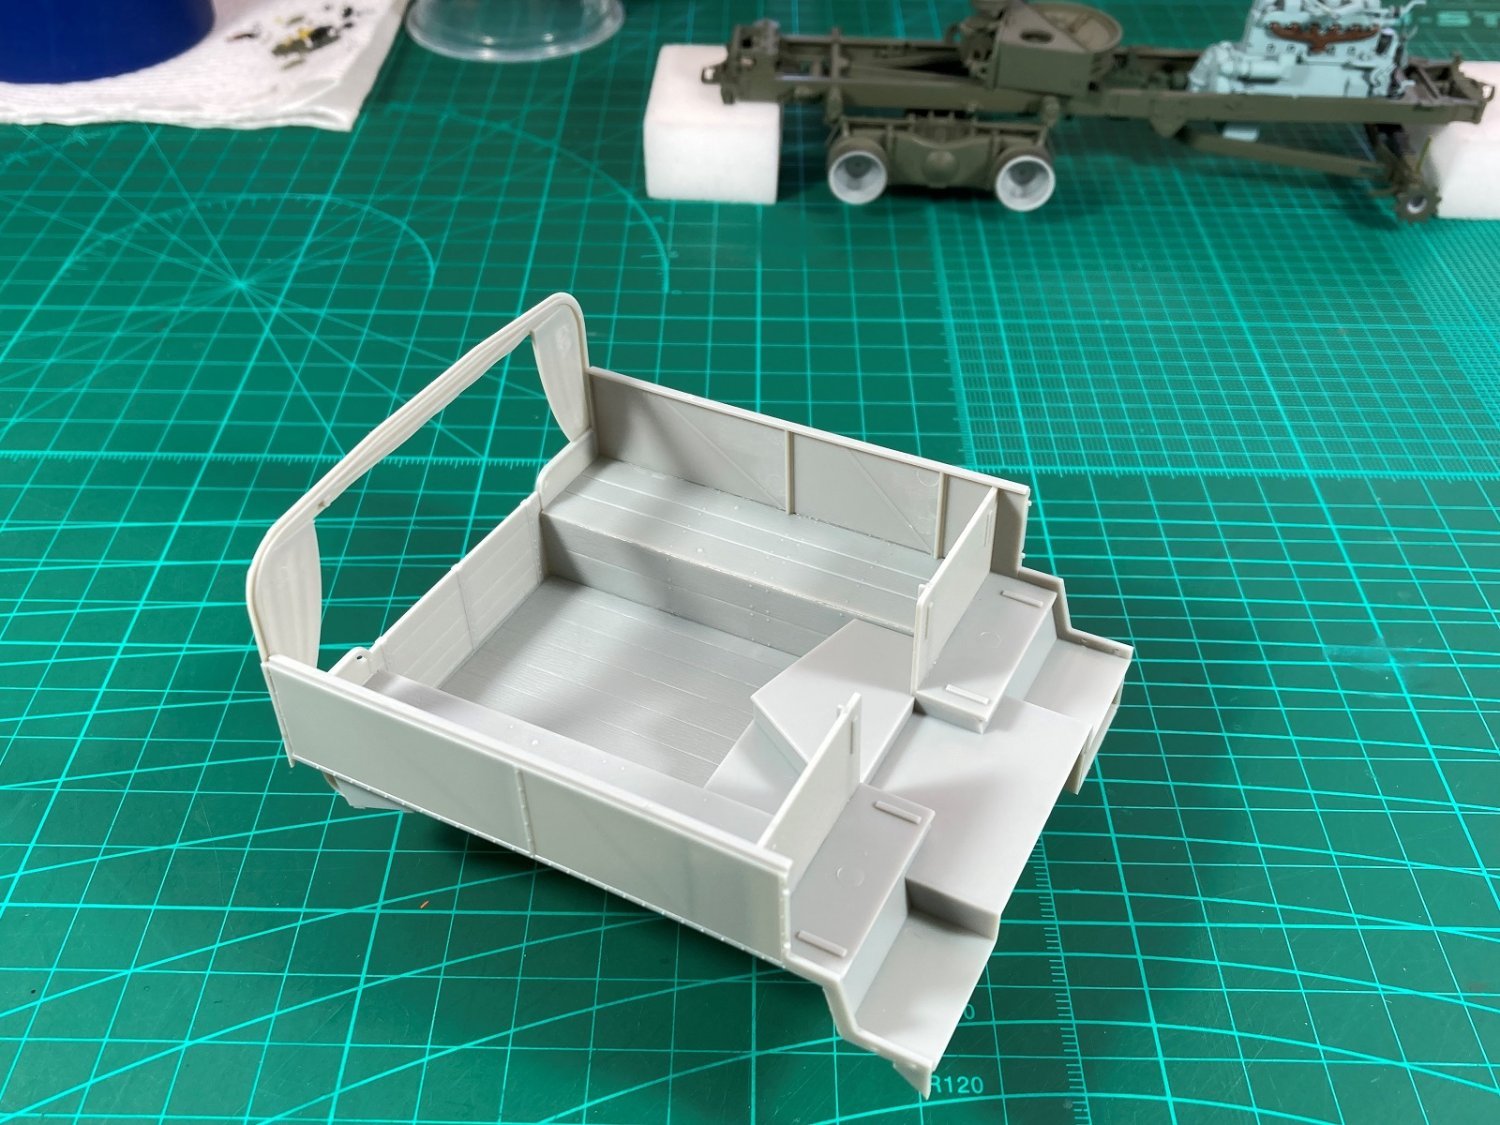
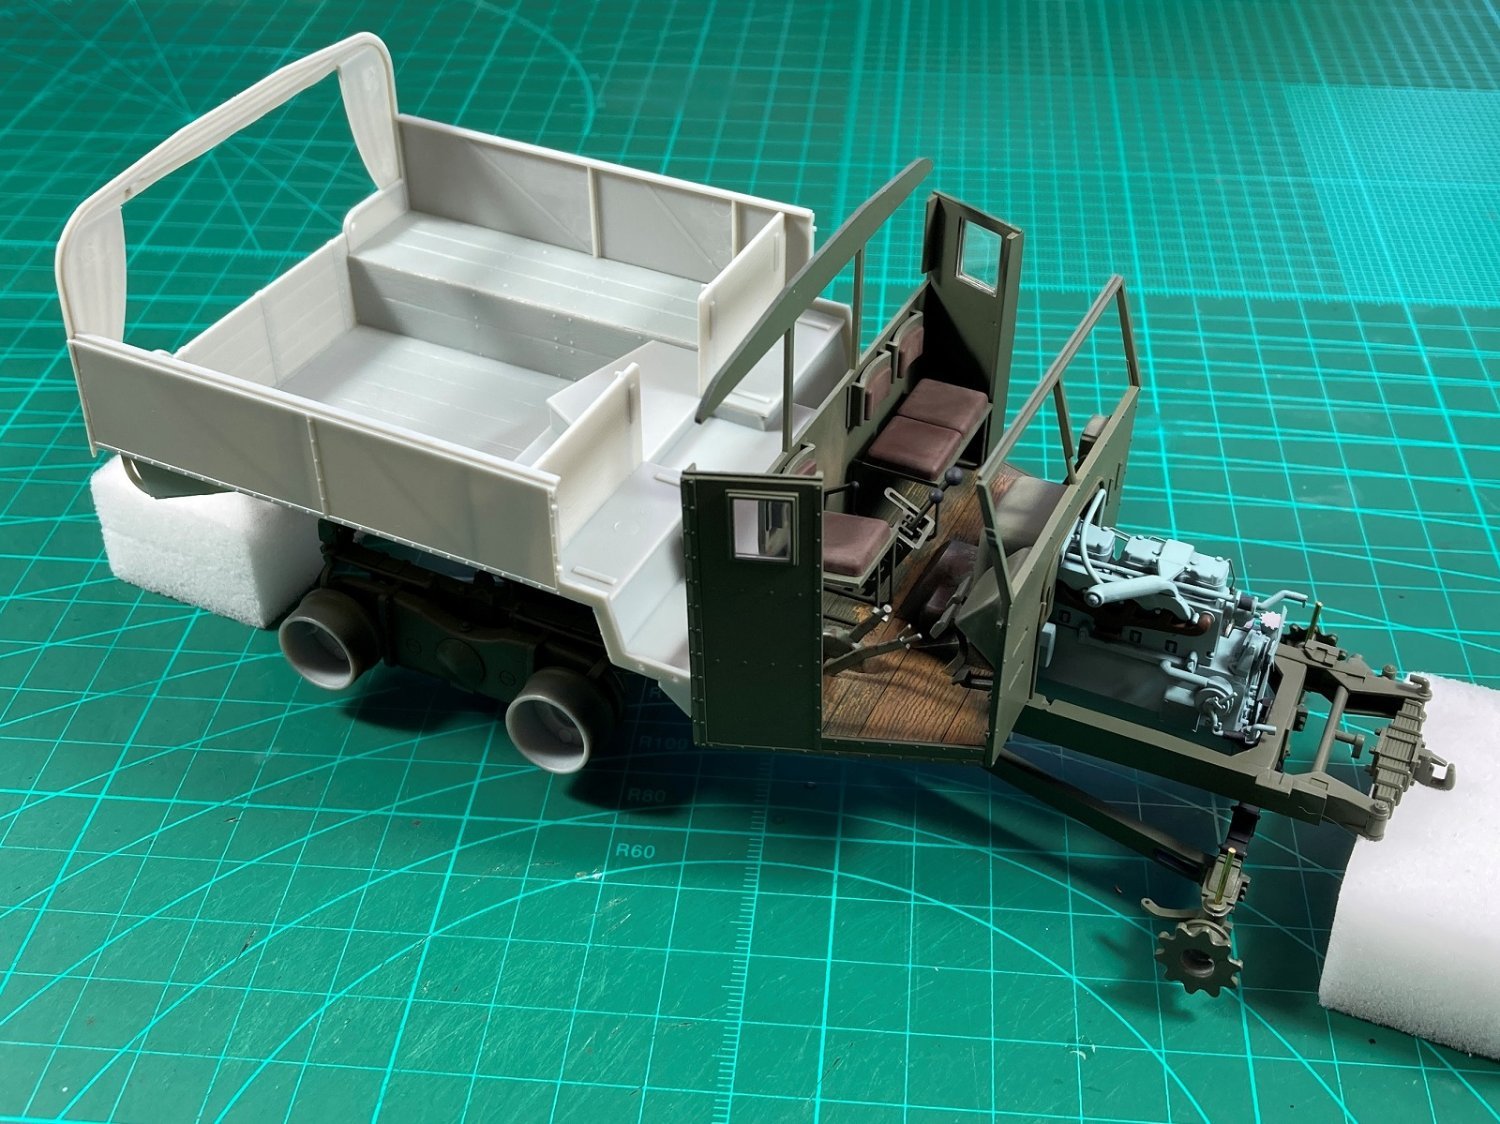
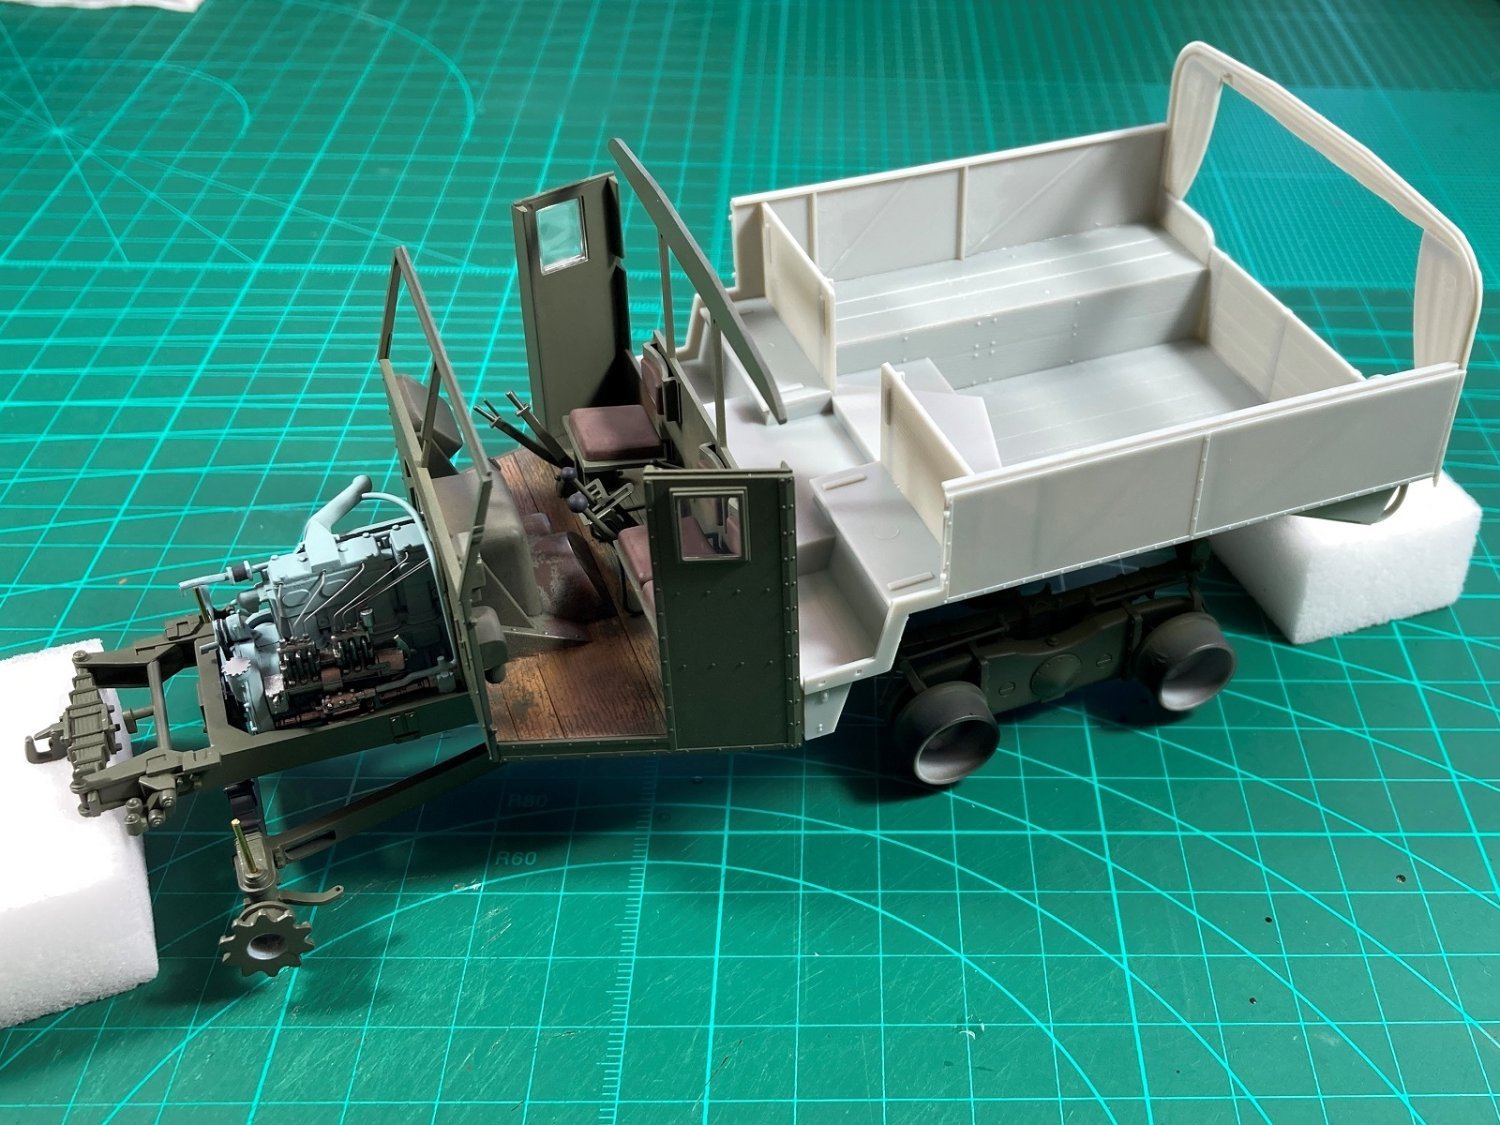
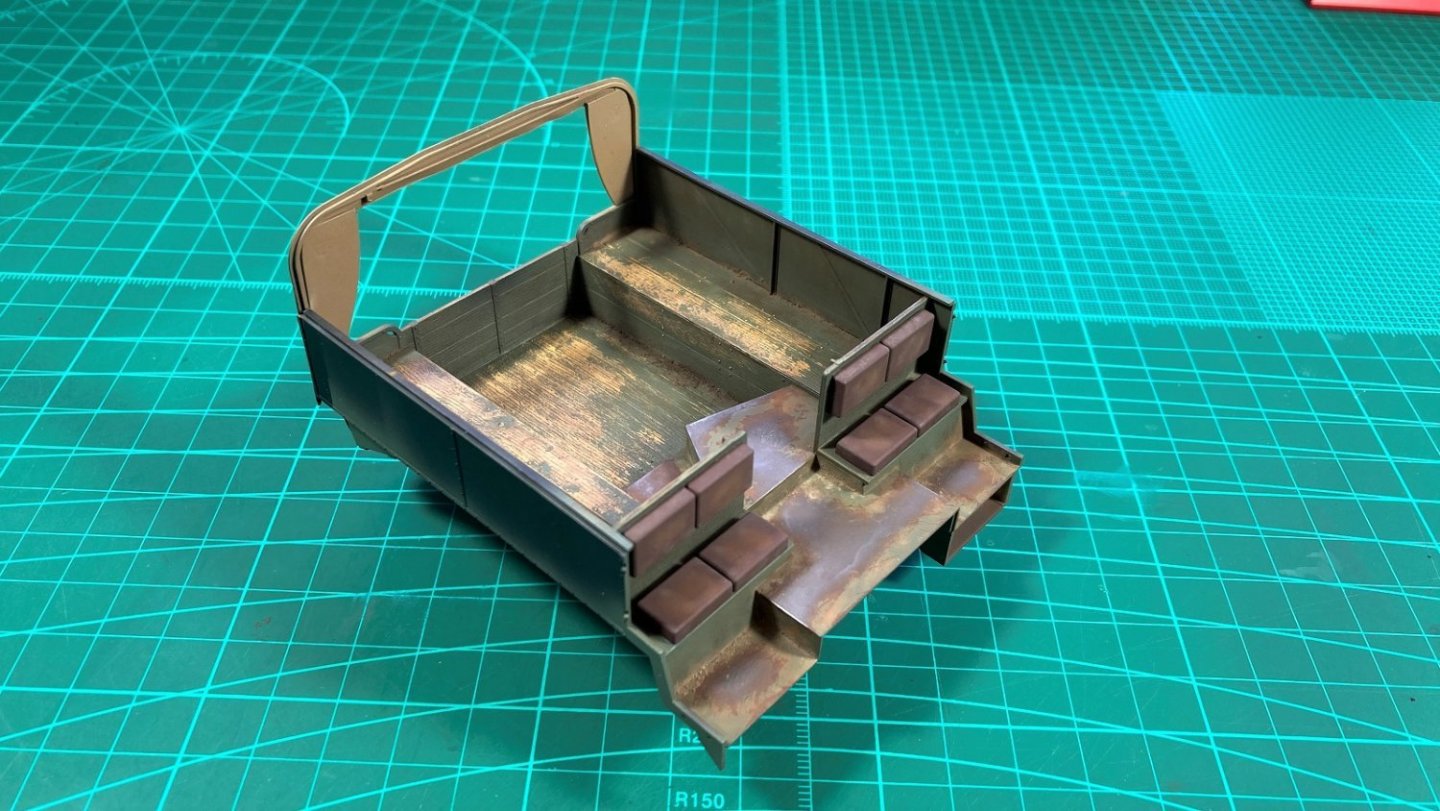
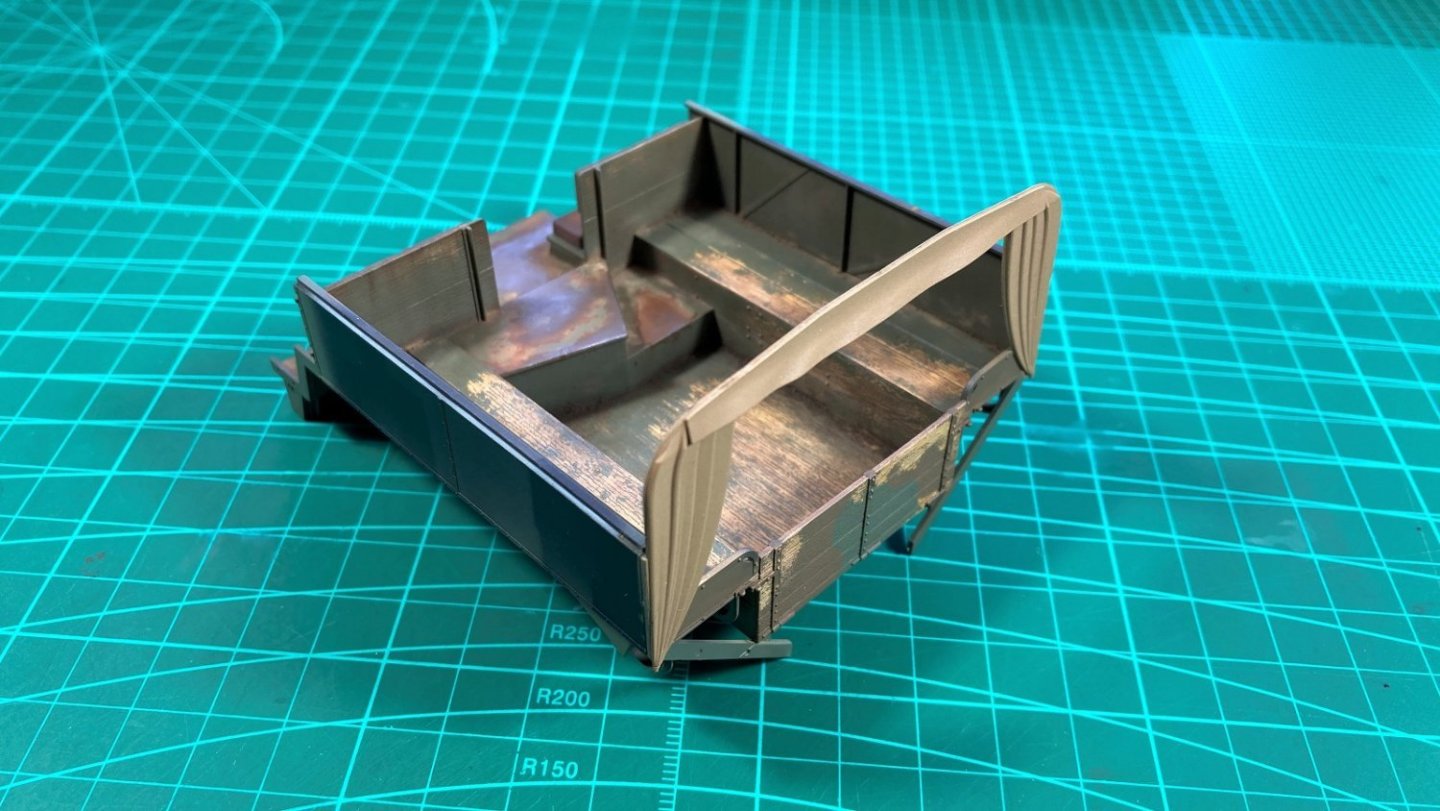
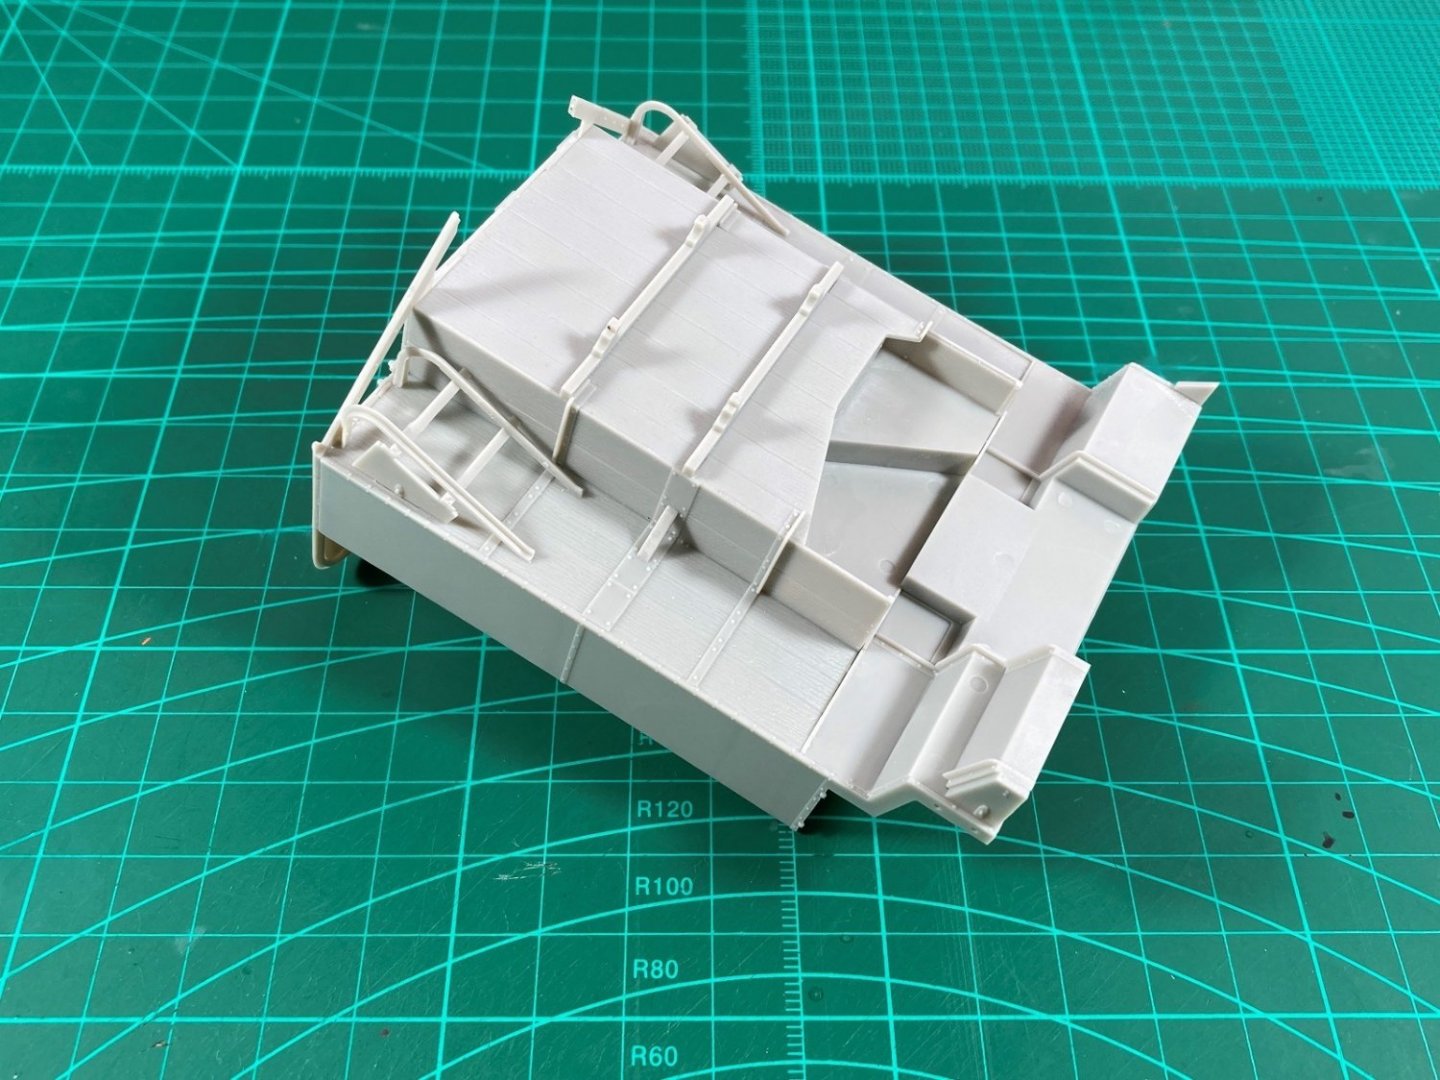
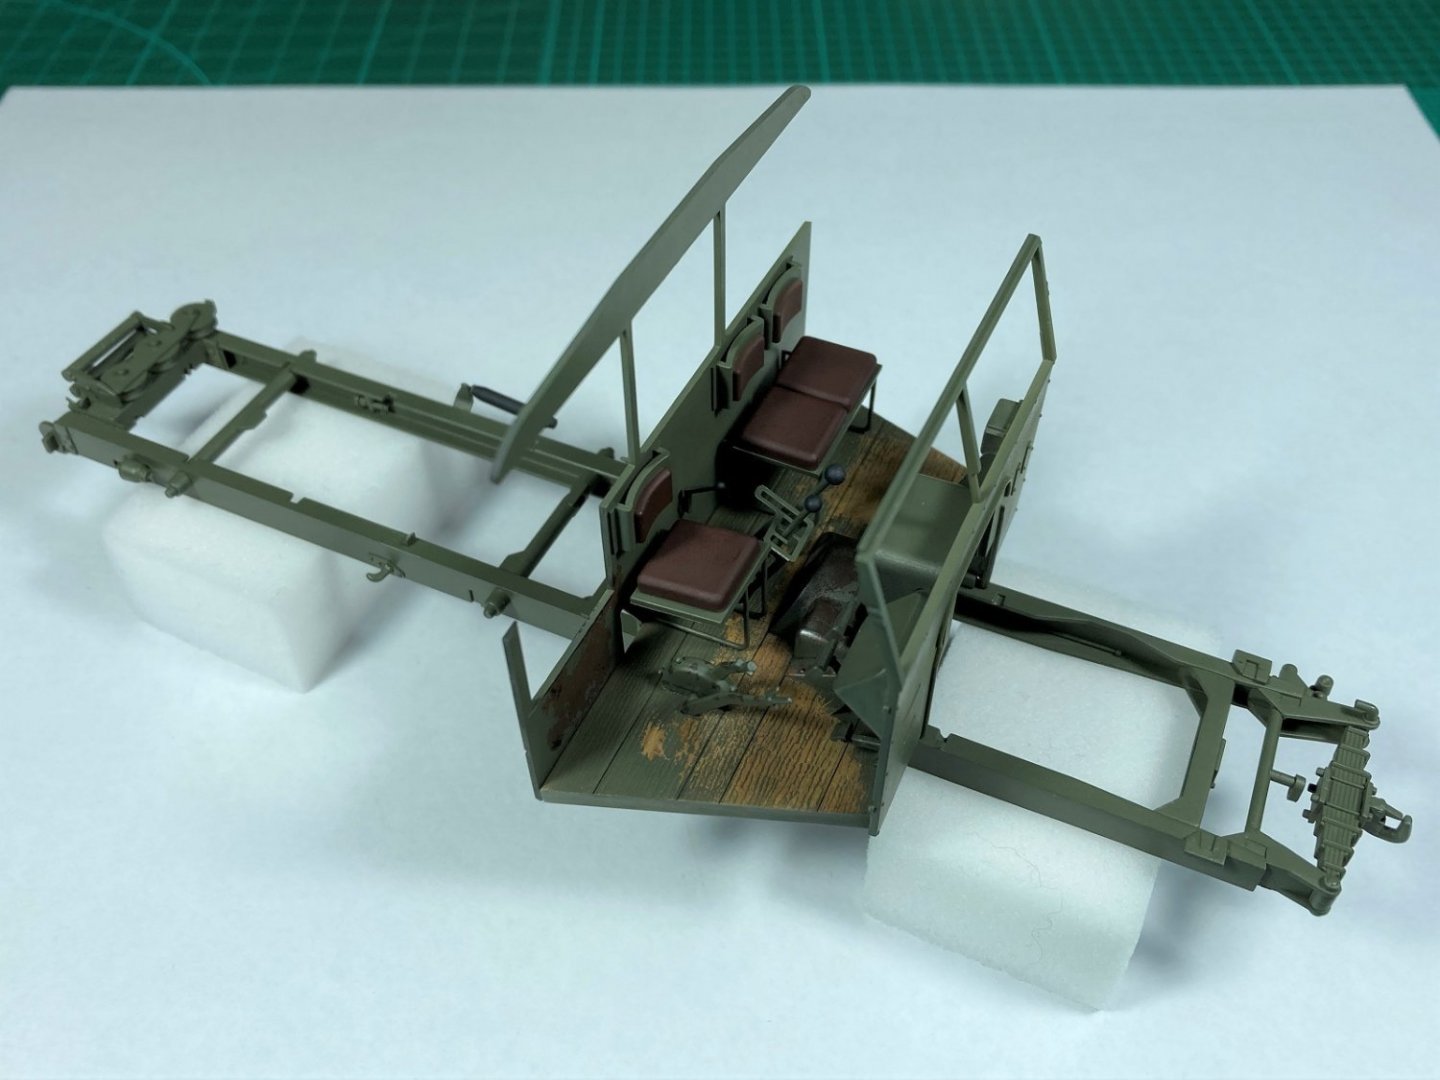
Hi All, Part 10 is up on YouTube covering the assembly, painting and weathering of the cargo bed. The old adage of less is more went out the window and I went to town with pigments, washes and chipping. Lol But this build is a learning curve to try out new (to me) products and techniques so all good. As mentioned in the video the exterior is unpainted and/or unweathered until I can get it mounted permanently on the chassis. Again couldn’t resist dry fitting to the chassis. By lifting the chassis higher I could hang the wheels on the hubs for effect. This is the last of the major components apart from the full length canopy and now just need to concentrate on the remaining bits and pieces and overall weathering. Cheers Slog


- 28 replies
-
- 11
-

-
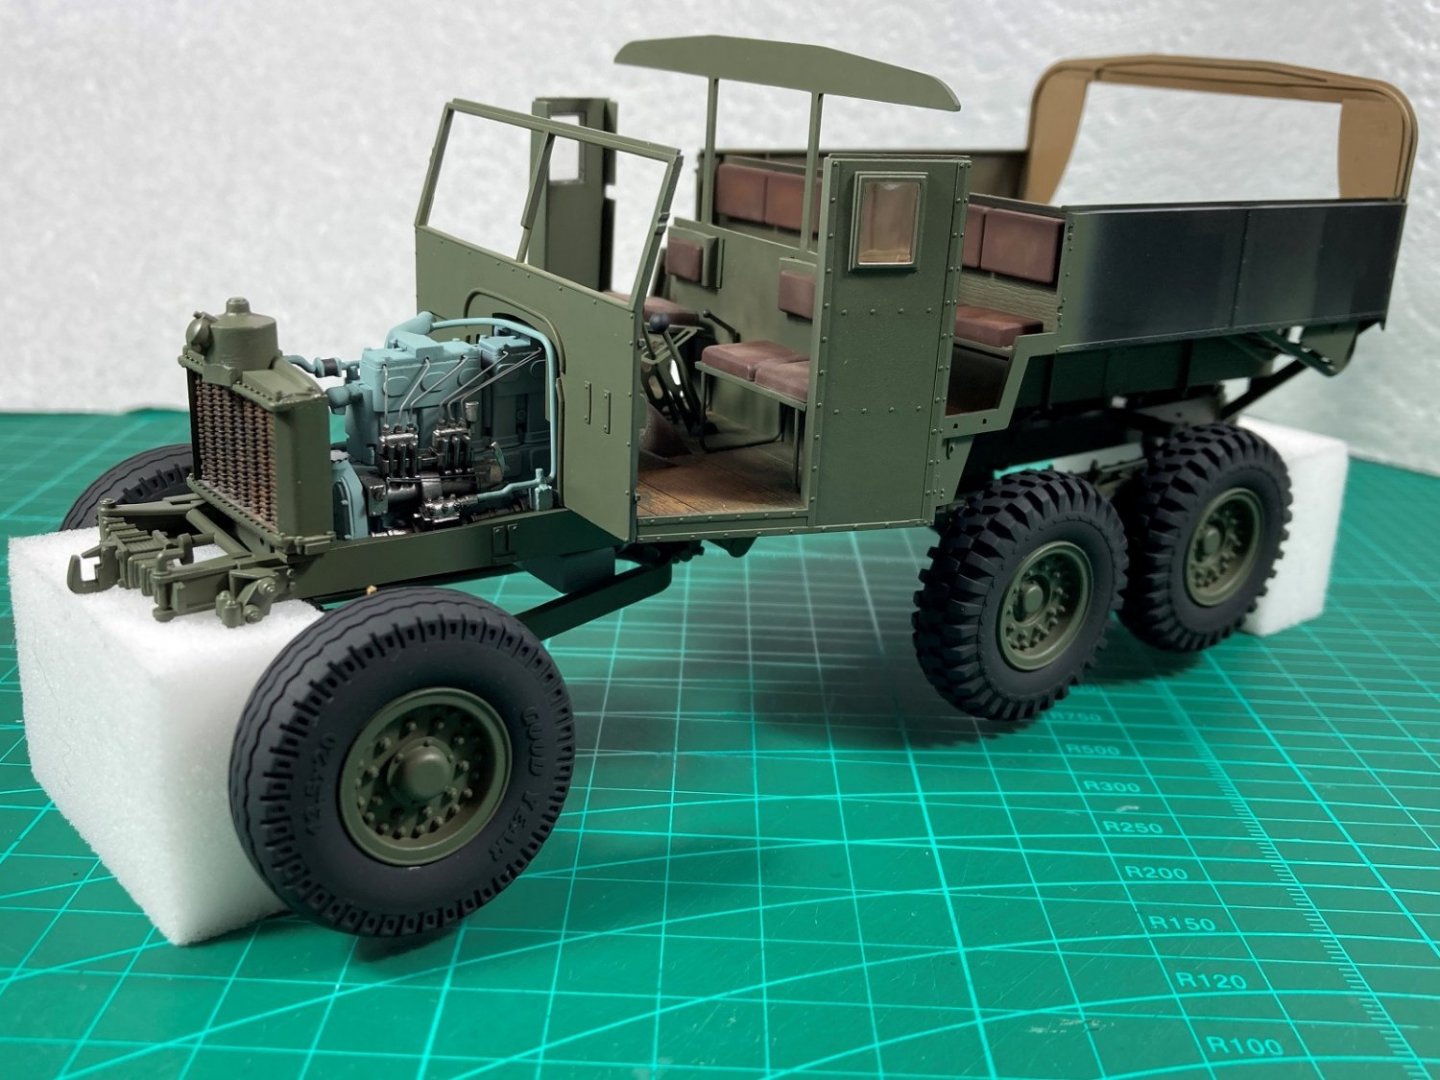
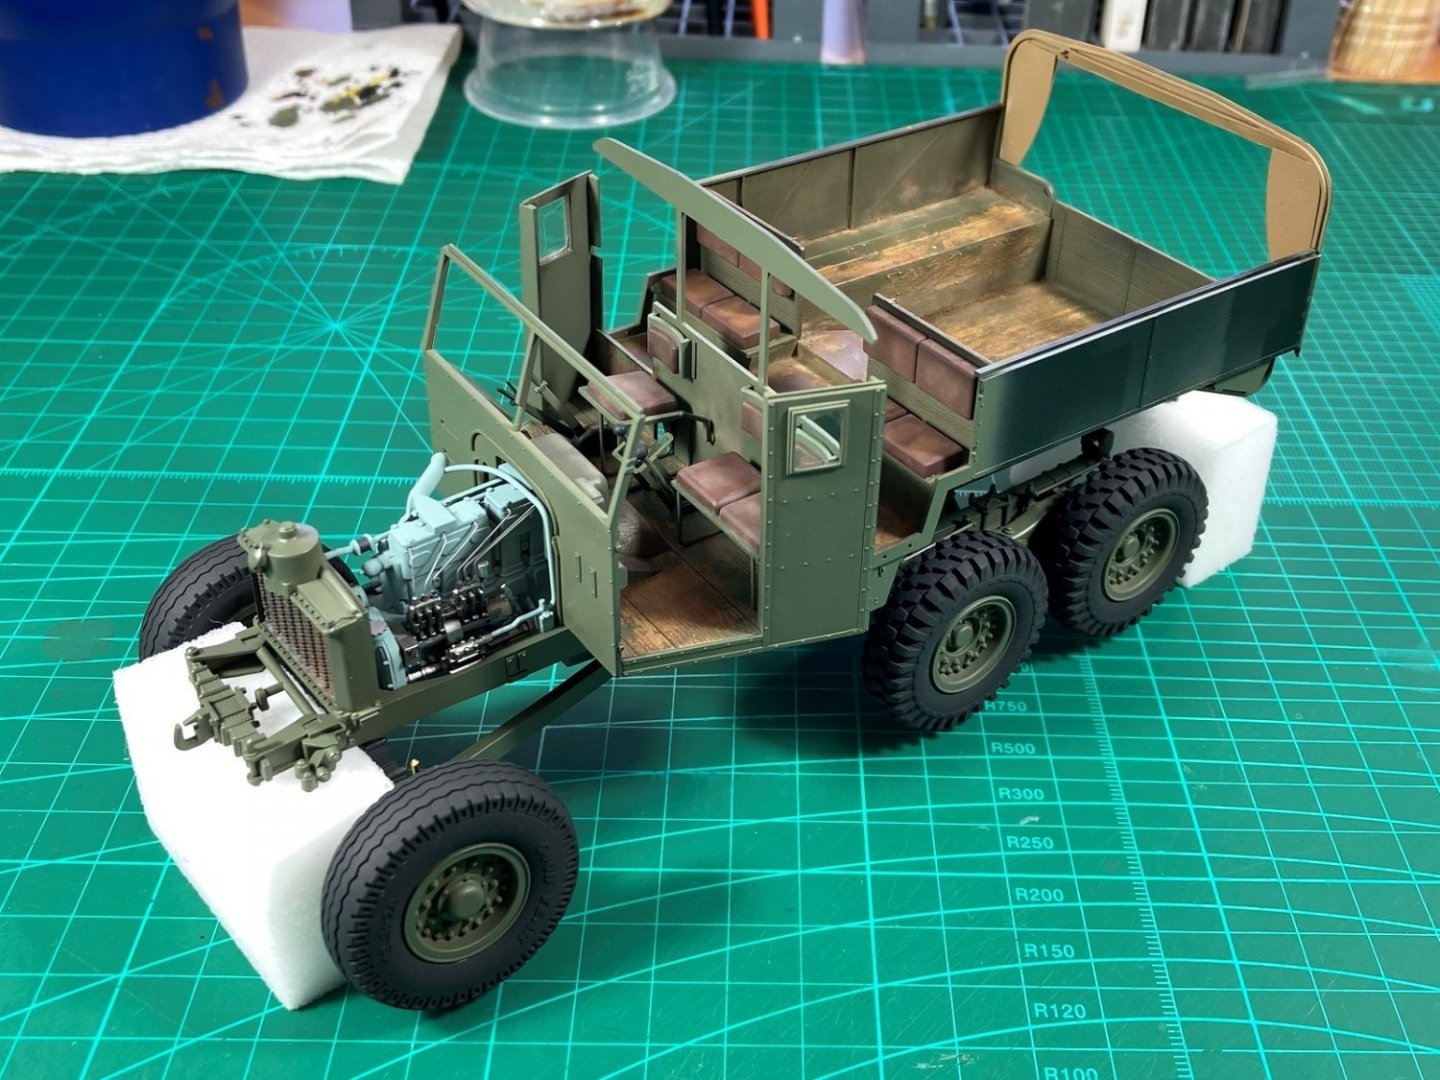
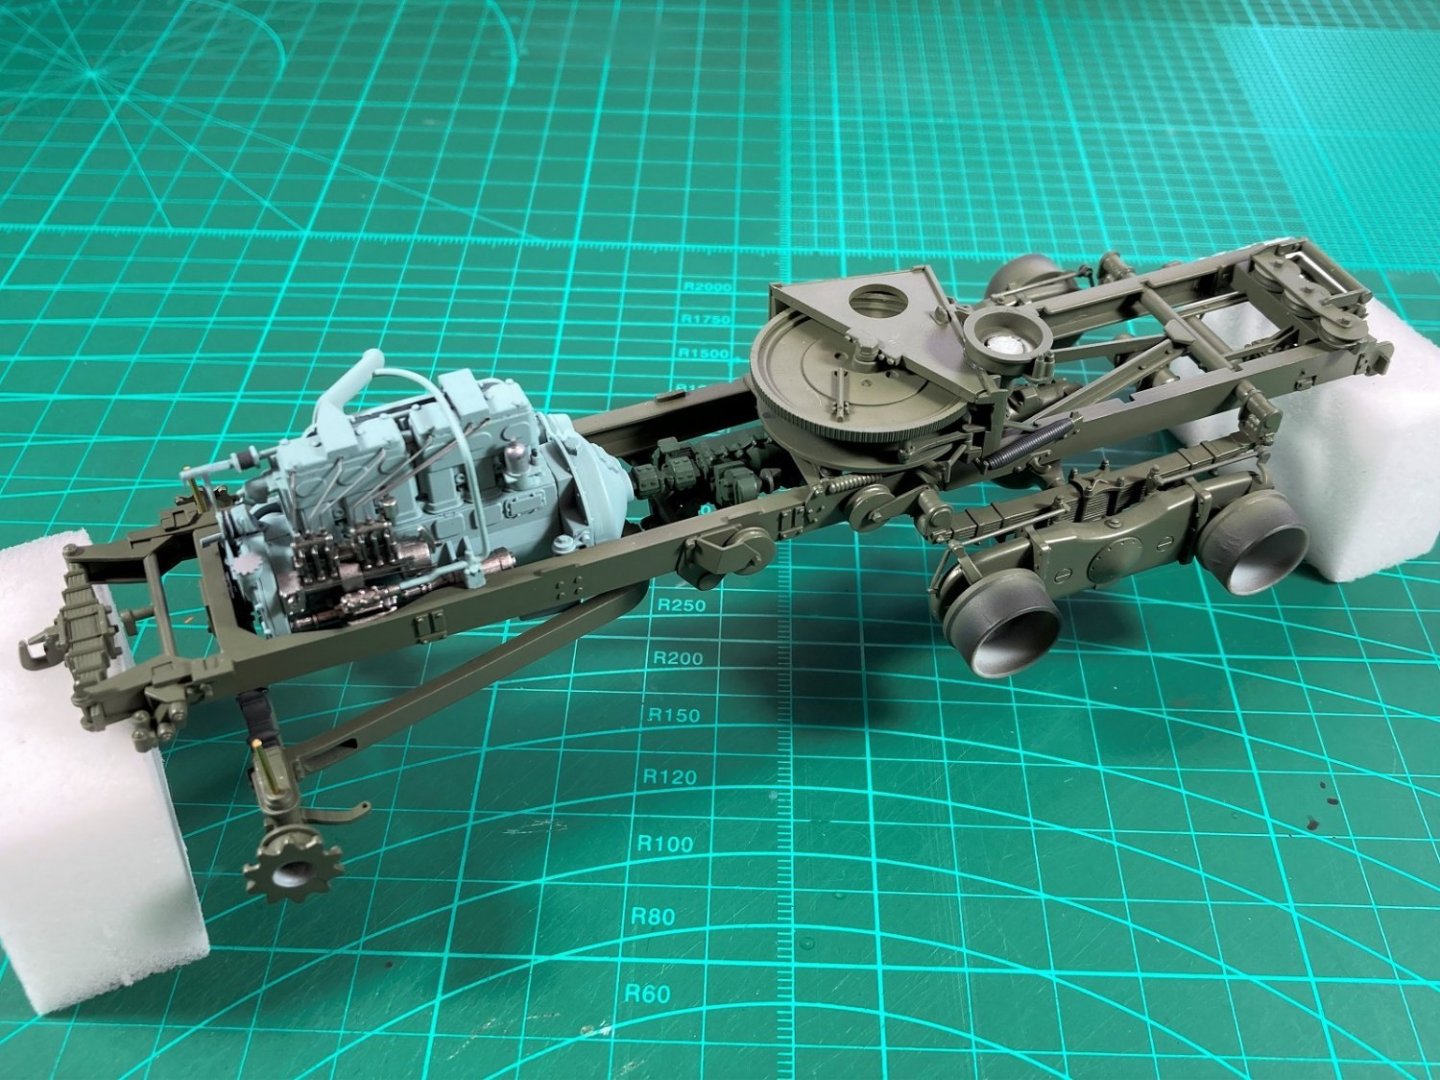
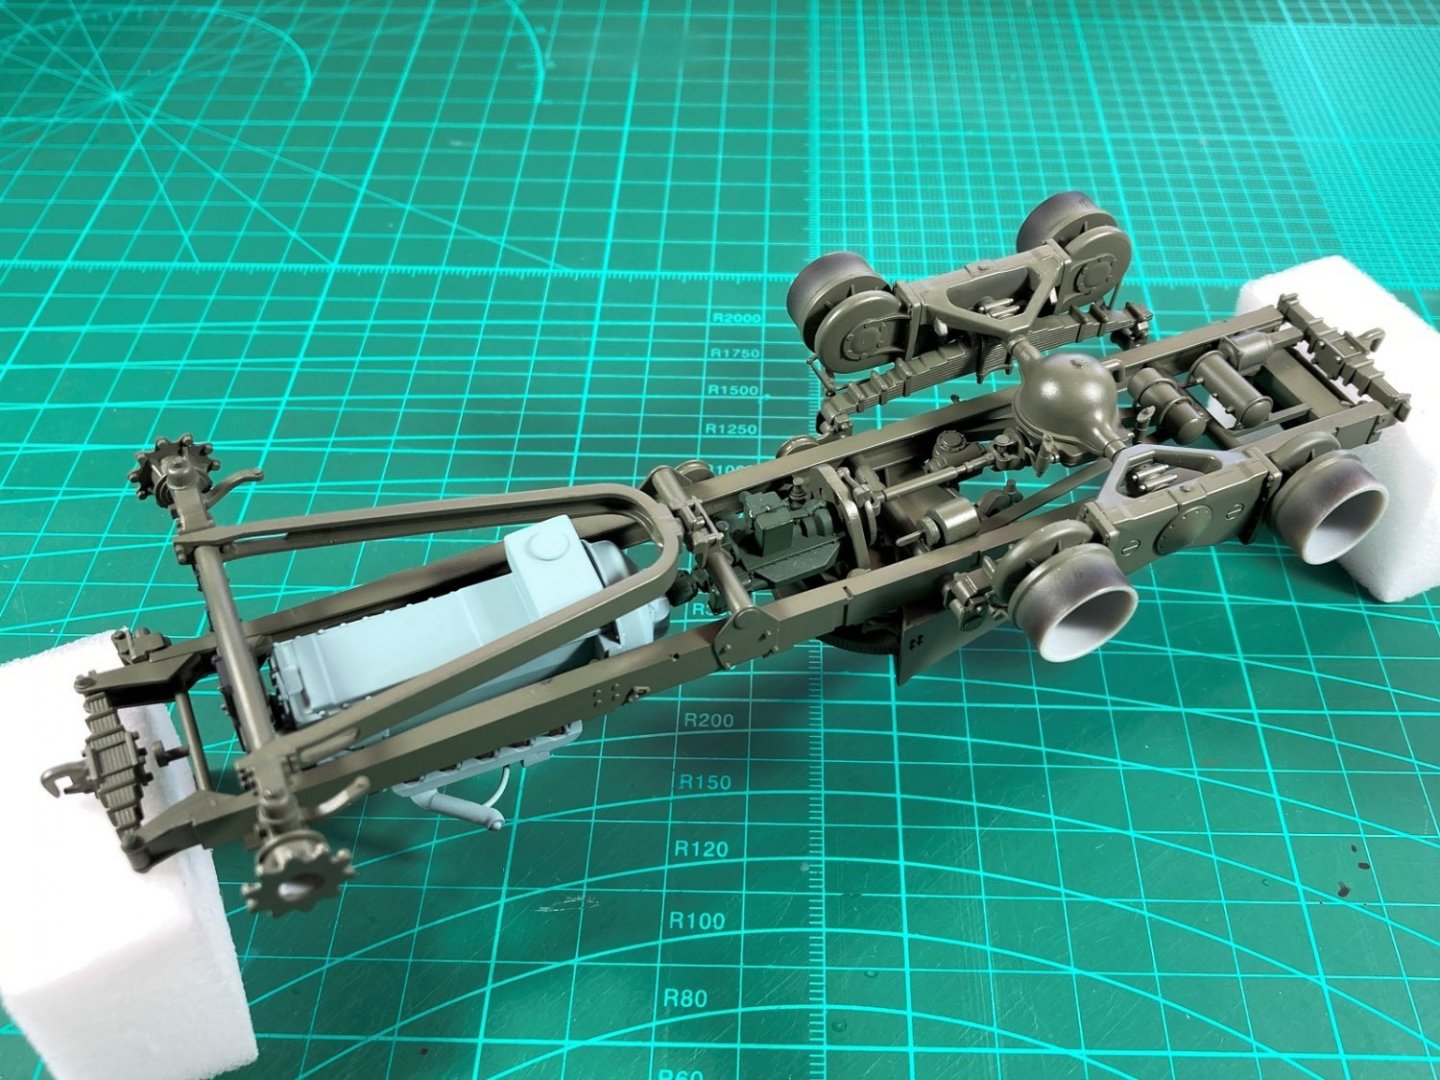
Hi All, Thanks for the likes. A bit more progress. Part 9 is up on YouTube showing weathering the interior of the drivers cab using pigments. (Home made using pastels). The engine, running gear, winch etc have all been permanently fixed to the chassis, as shown in the following 2 photos. I will do overall weathering of this assembly prior to fitting any other components to it such as cab. The crew cab and cargo bed has been fully assembled and will prime, paint and weather as per the front cab. Of course, I just had to do a dry fit of the chassis, cab and cargo area to get an overall feel for it. Unfortunately, the wheels don’t allow a temp fit as these would have been fitted also lol. The next video will be of painting and weathering the cargo area. Cheers Slog


- 28 replies
-
- 11
-
-
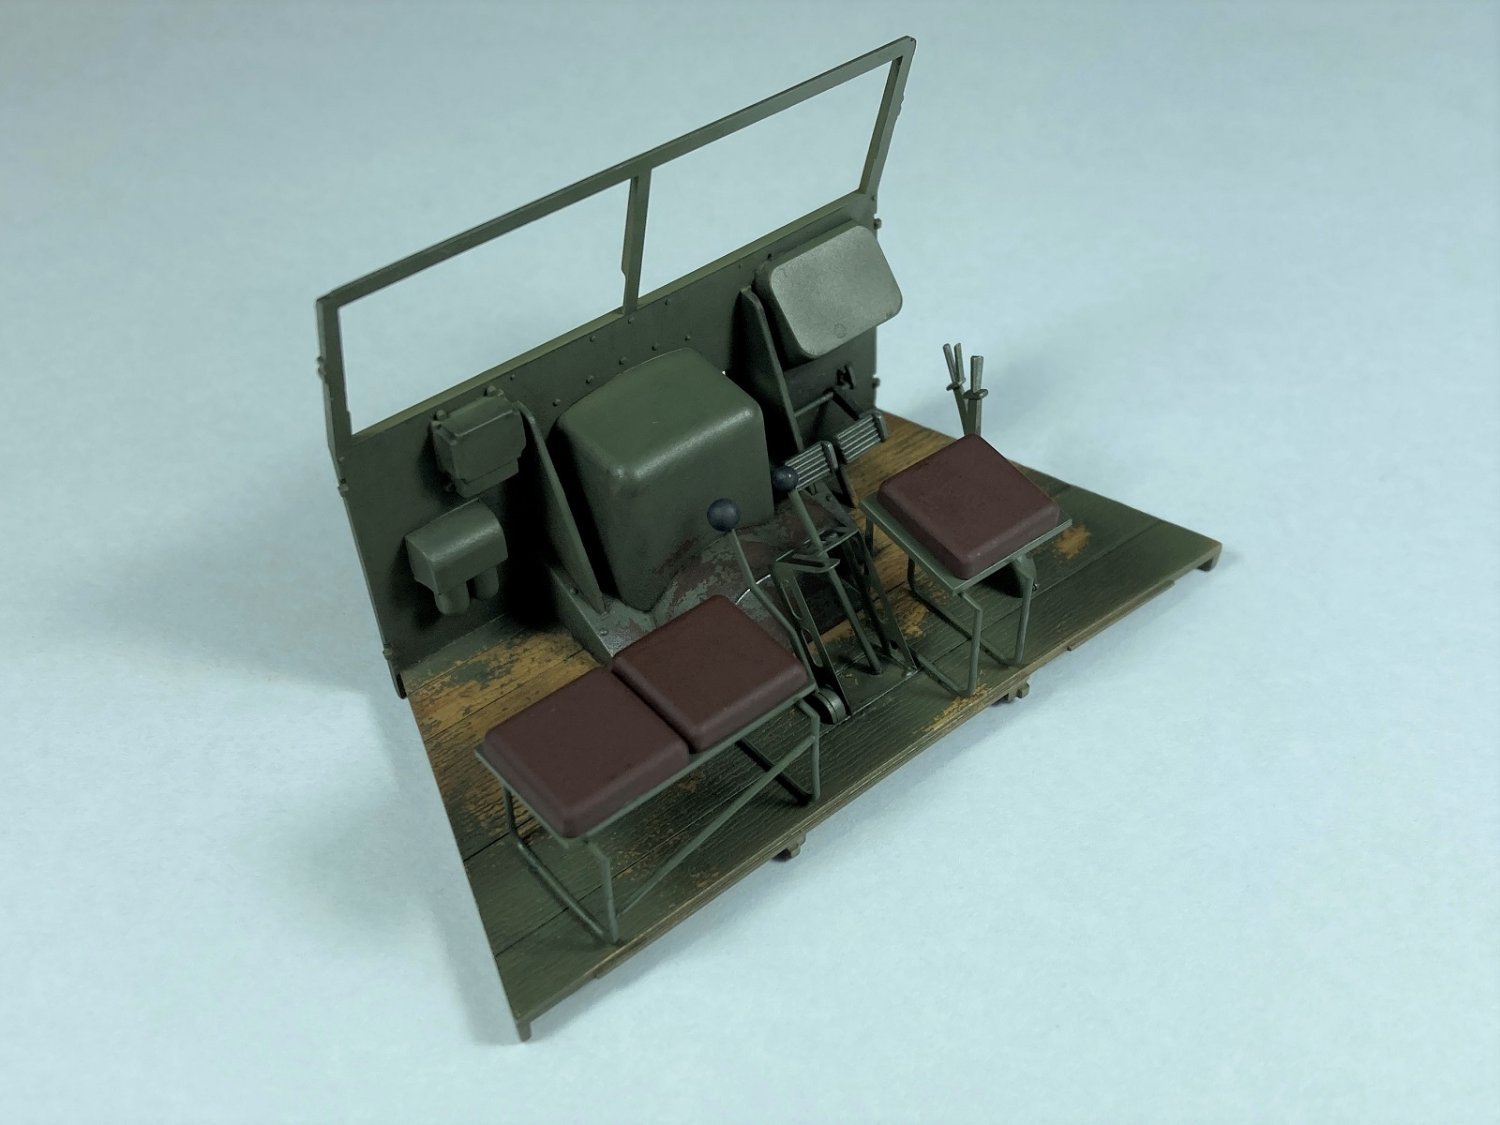
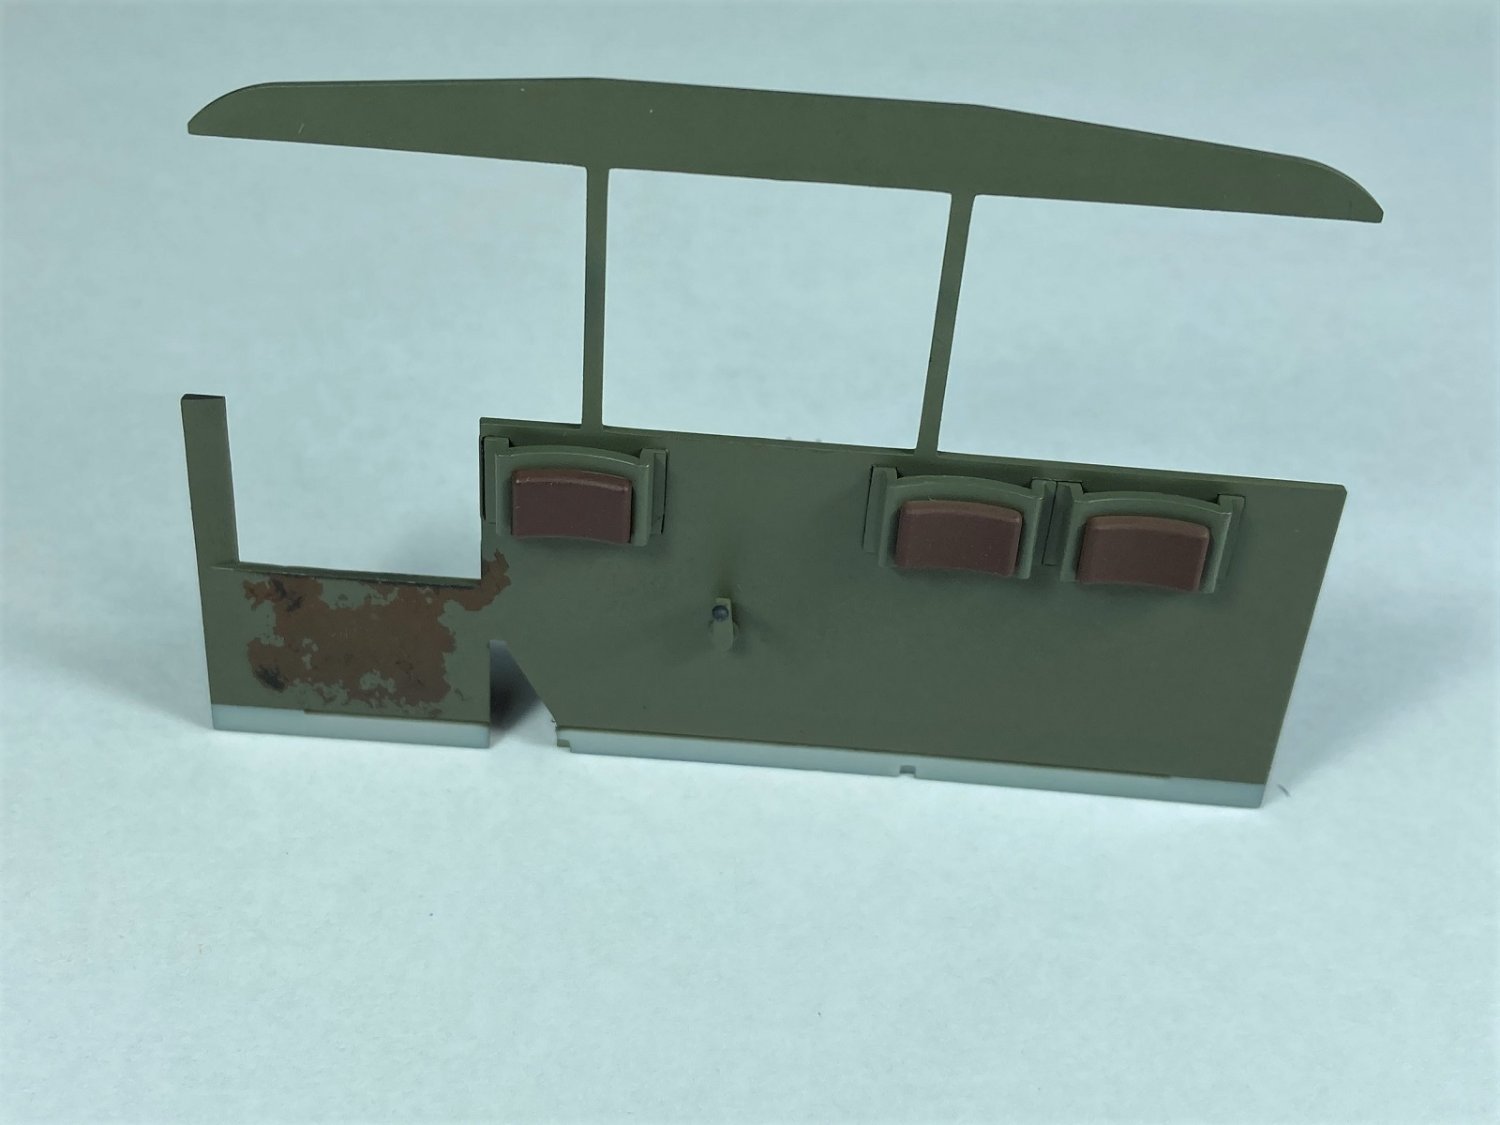
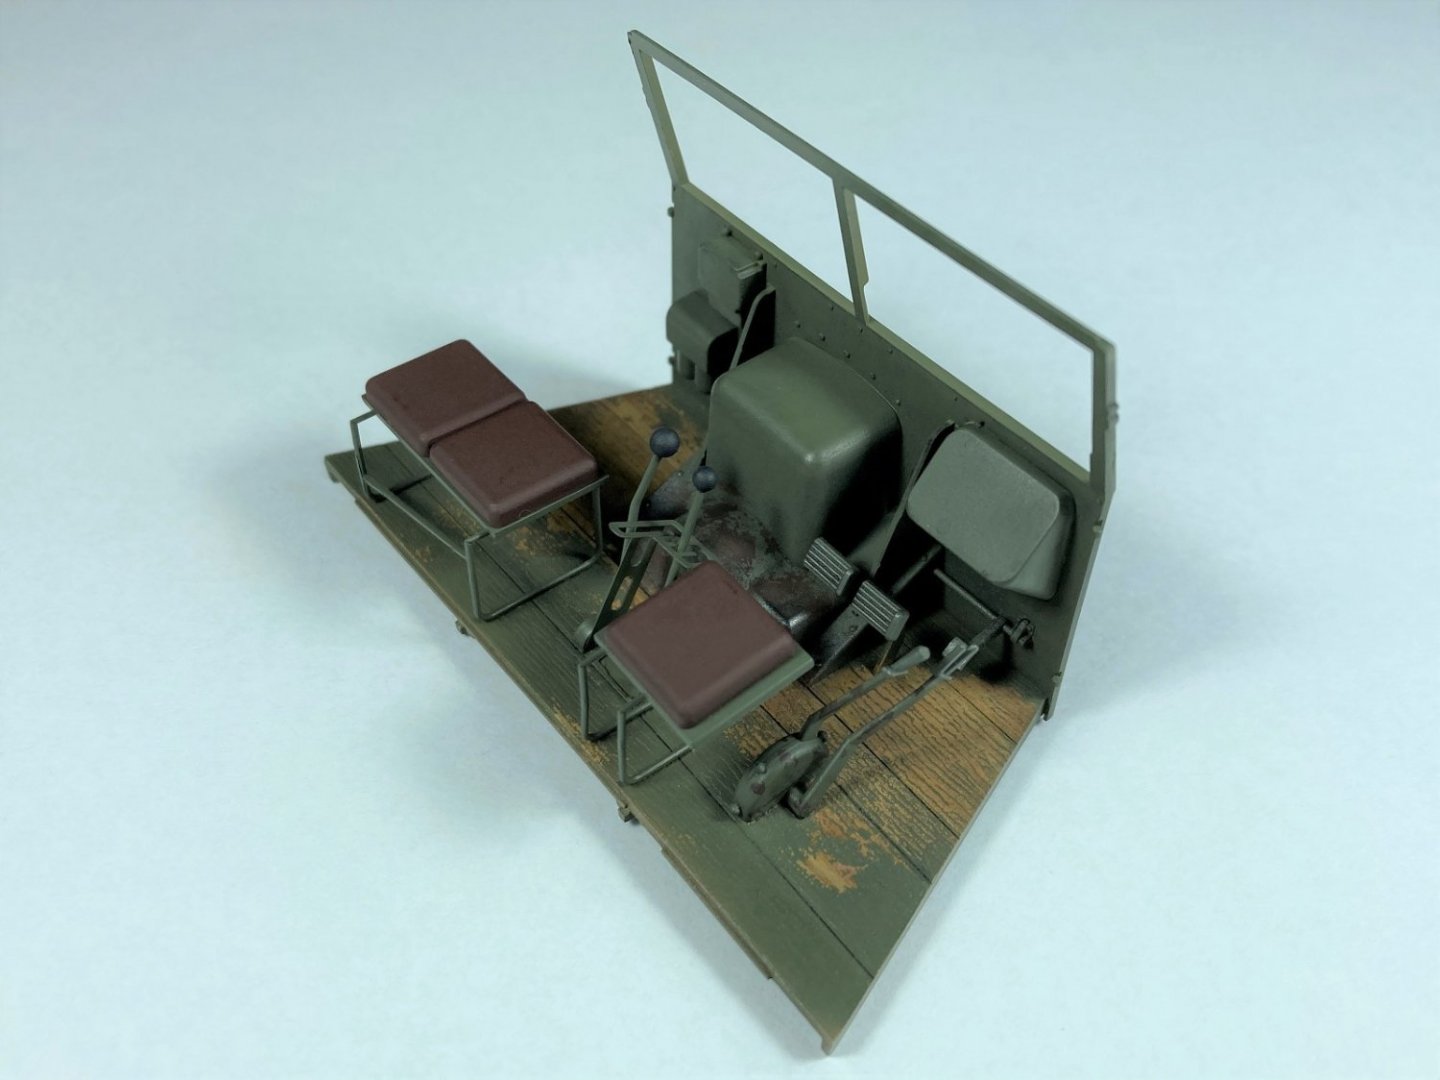
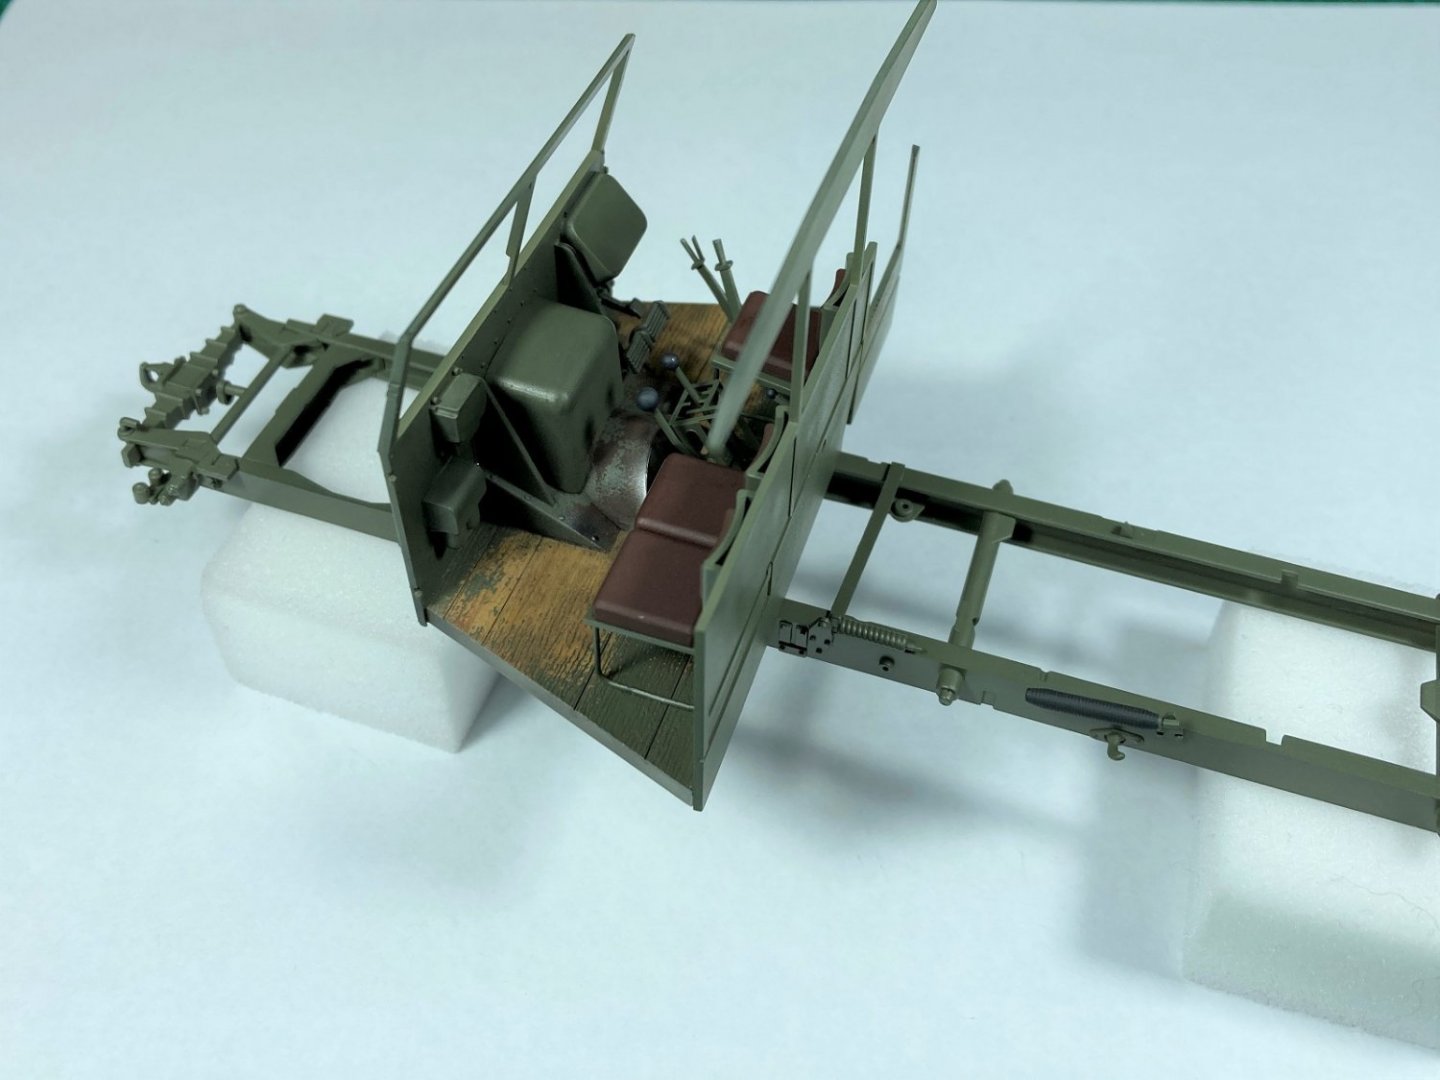
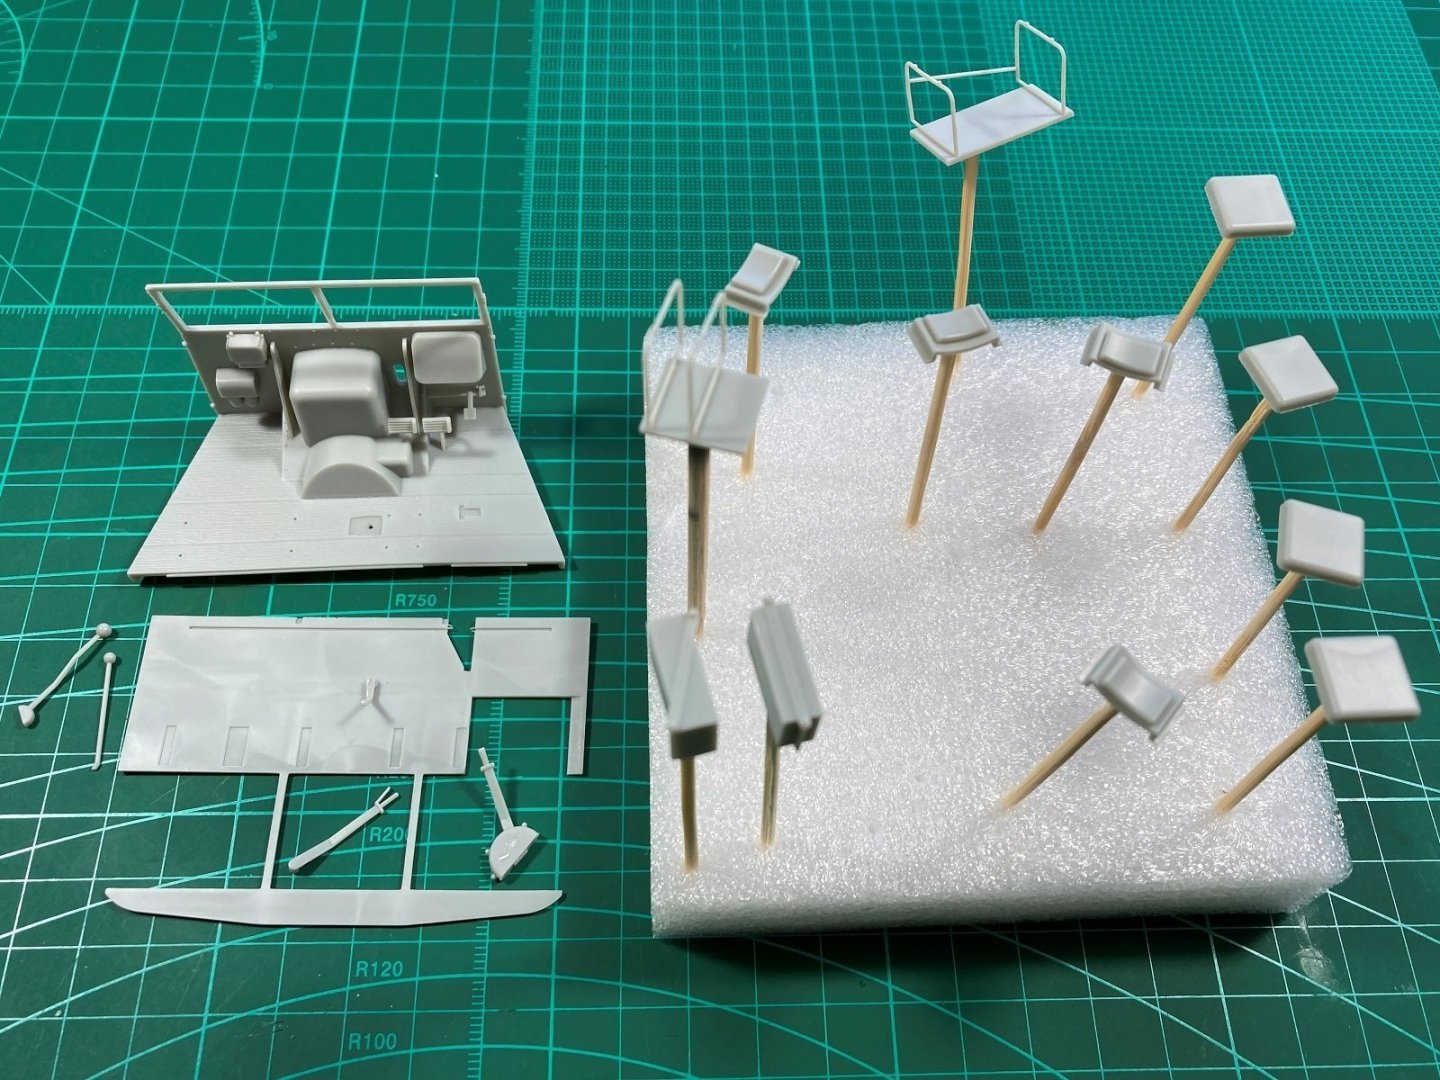
Hi All, A bit more progress on the cab and close to finishing, leaving only the side panels to fix and final interior weathering. A couple of photos of the interior fit out including four levers, the drivers seat and passengers seat. The colour call out asked for Ammo’s Red Leather but just used Tamiya’s Hull Red as had it on hand. The photo doesn’t show it but the seats are a bit more red and a bit brighter. The gear lever gate was a nice photo etch part and the holes down the side had raised edges like they were punched out the same as the real part. According to what I have seen in real videos, I have placed the gear lever in the neutral position. The rear bulkhead with the back rests attached and yet another lever coming through. This one will be linked to the winch. Chipping done on the entry to the crew cab area. A couple of photos showing the cab sitting on the chassis. The box art is deceiving as this vehicle is a lot more stubby than the artwork suggests. Just the side panels to do to finish this stage of the cab. The brake lever (yet another lever!) and the steering wheel/column isn’t fitted until the cab is fixed to the chassis as they themselves are fed through the front and rear of the cab to be fitted to the chassis. Oh, almost forgot the dashboard, this is supplied in a couple of pieces of photo etch however the gauge decals were missing from my kit. I have emailed their replacement part contact address but not holding out much hope as this was a good while back and didn't get a response. Kinda hoping they just appear in the mail but not an issue as pretty simple gauges so will come up with something. Cheers Slog

- 28 replies
-
- 12
-
-
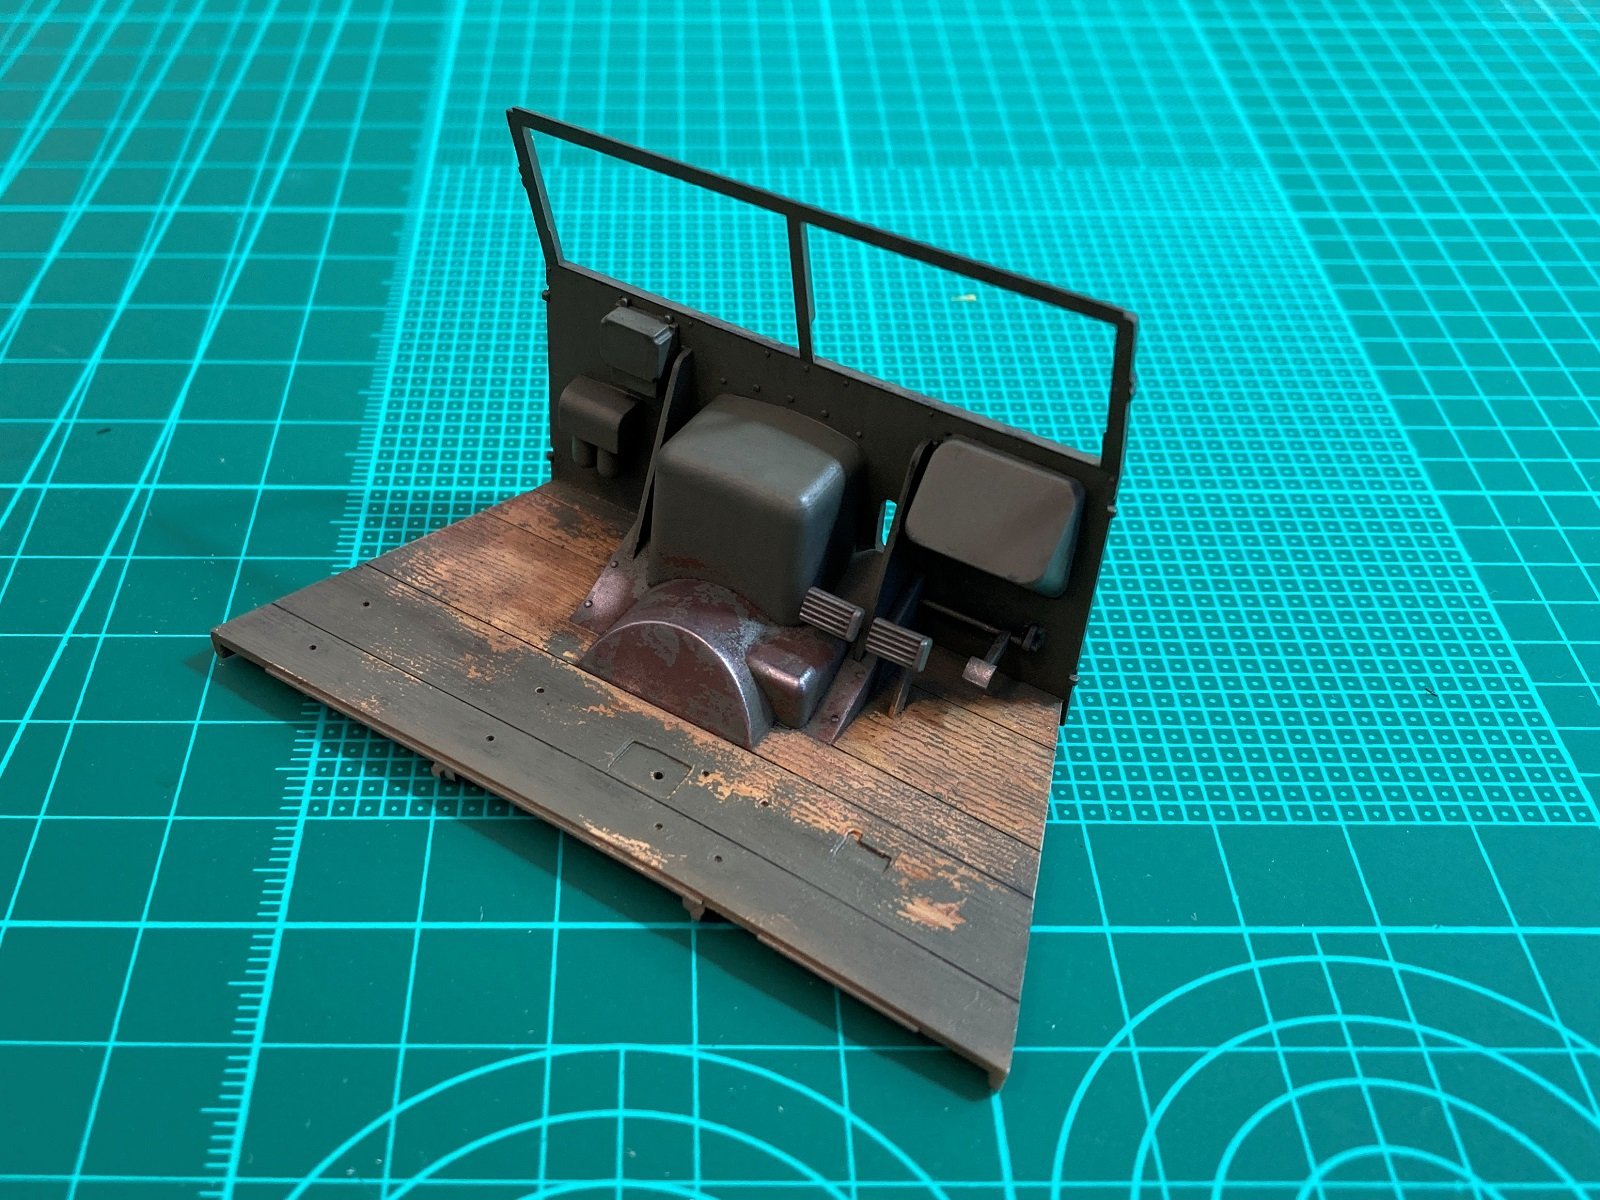
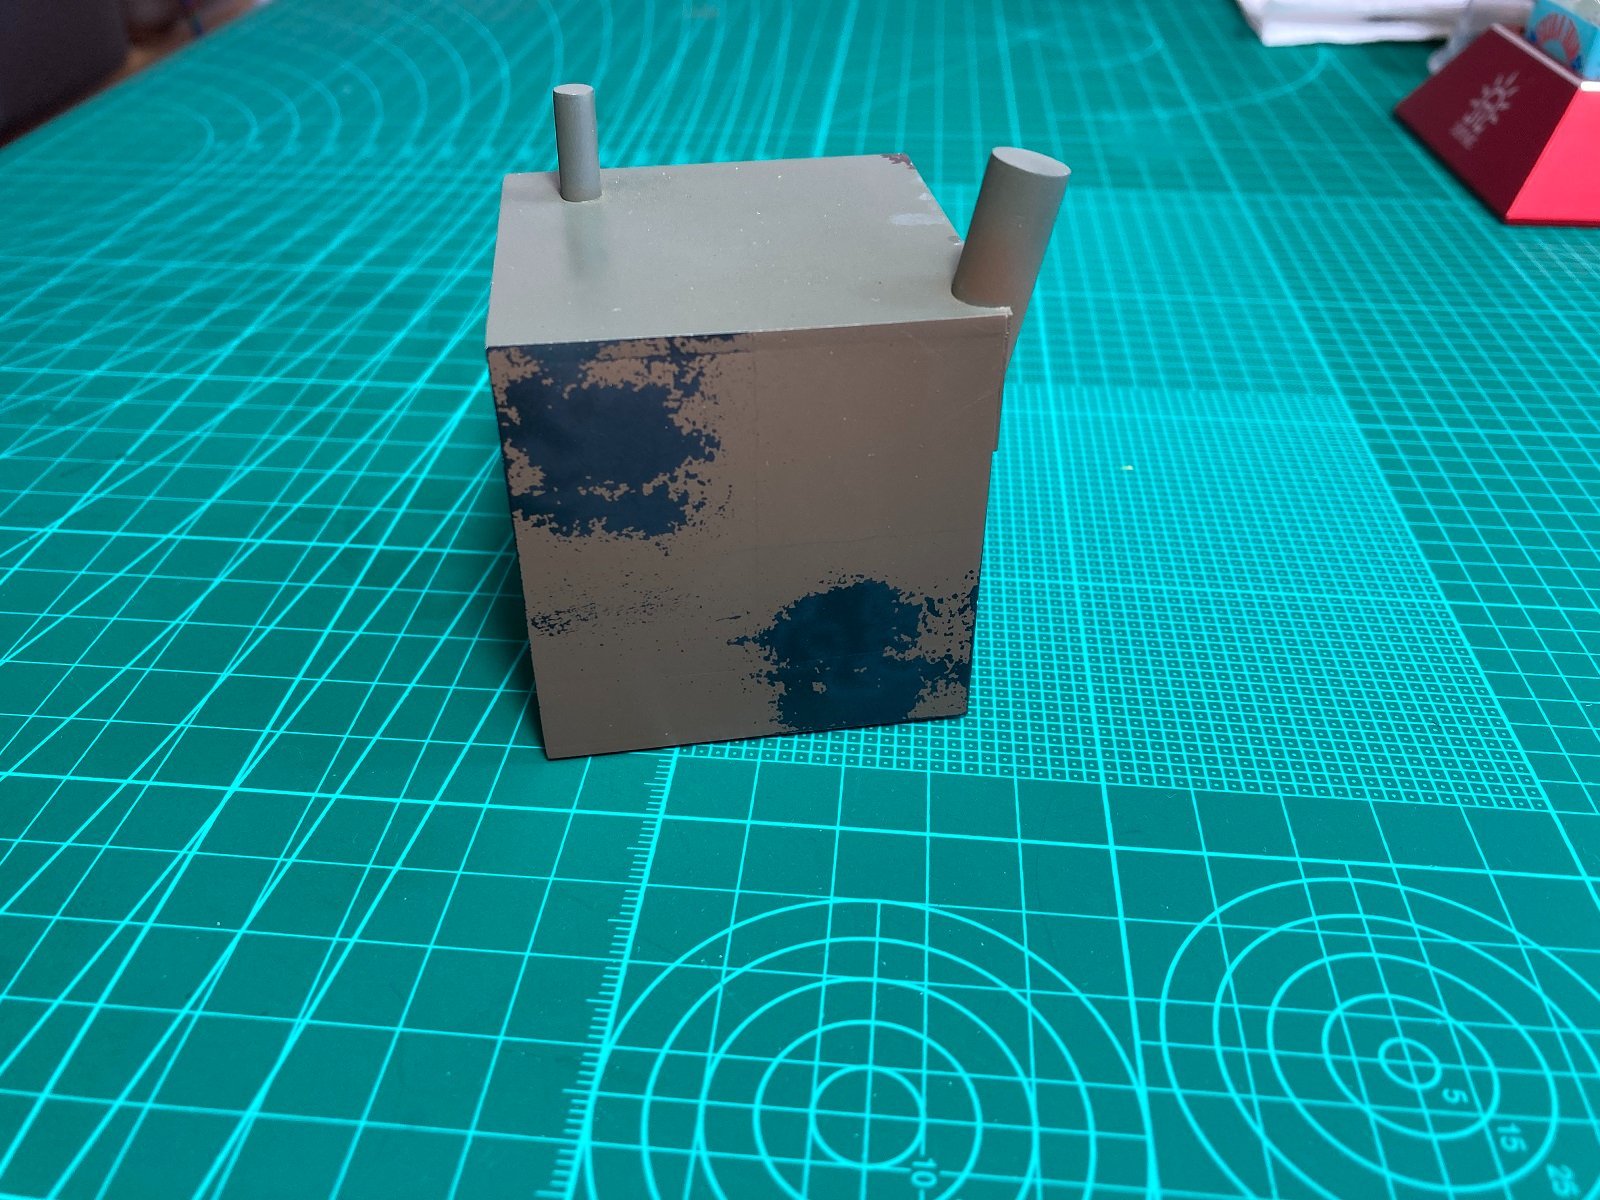
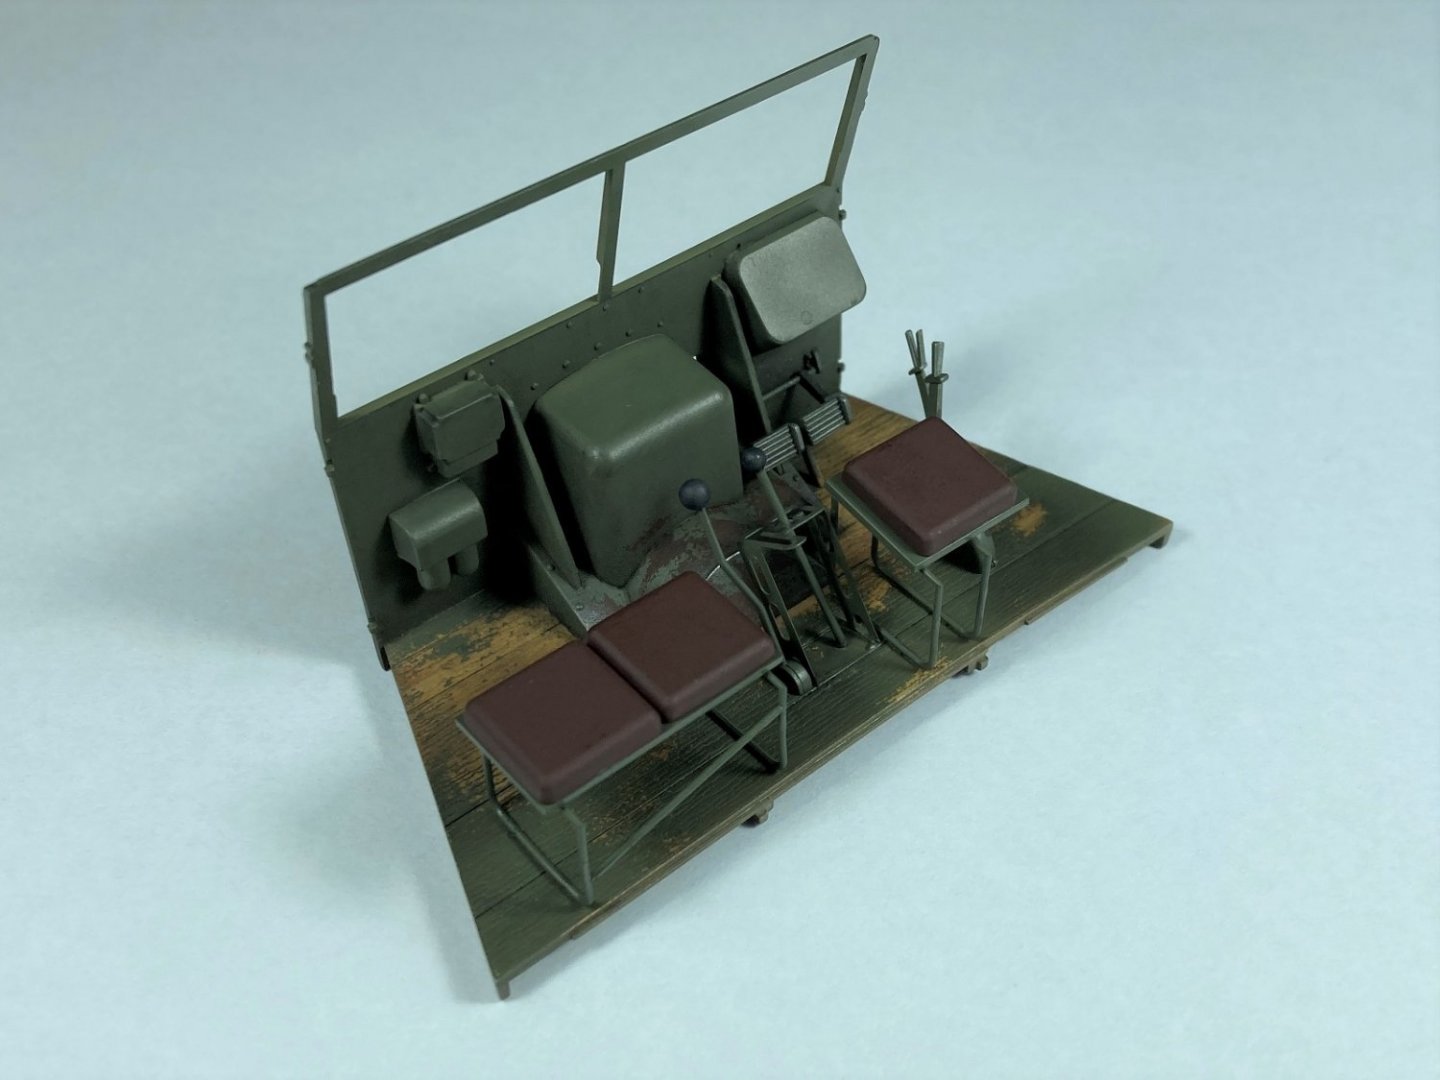
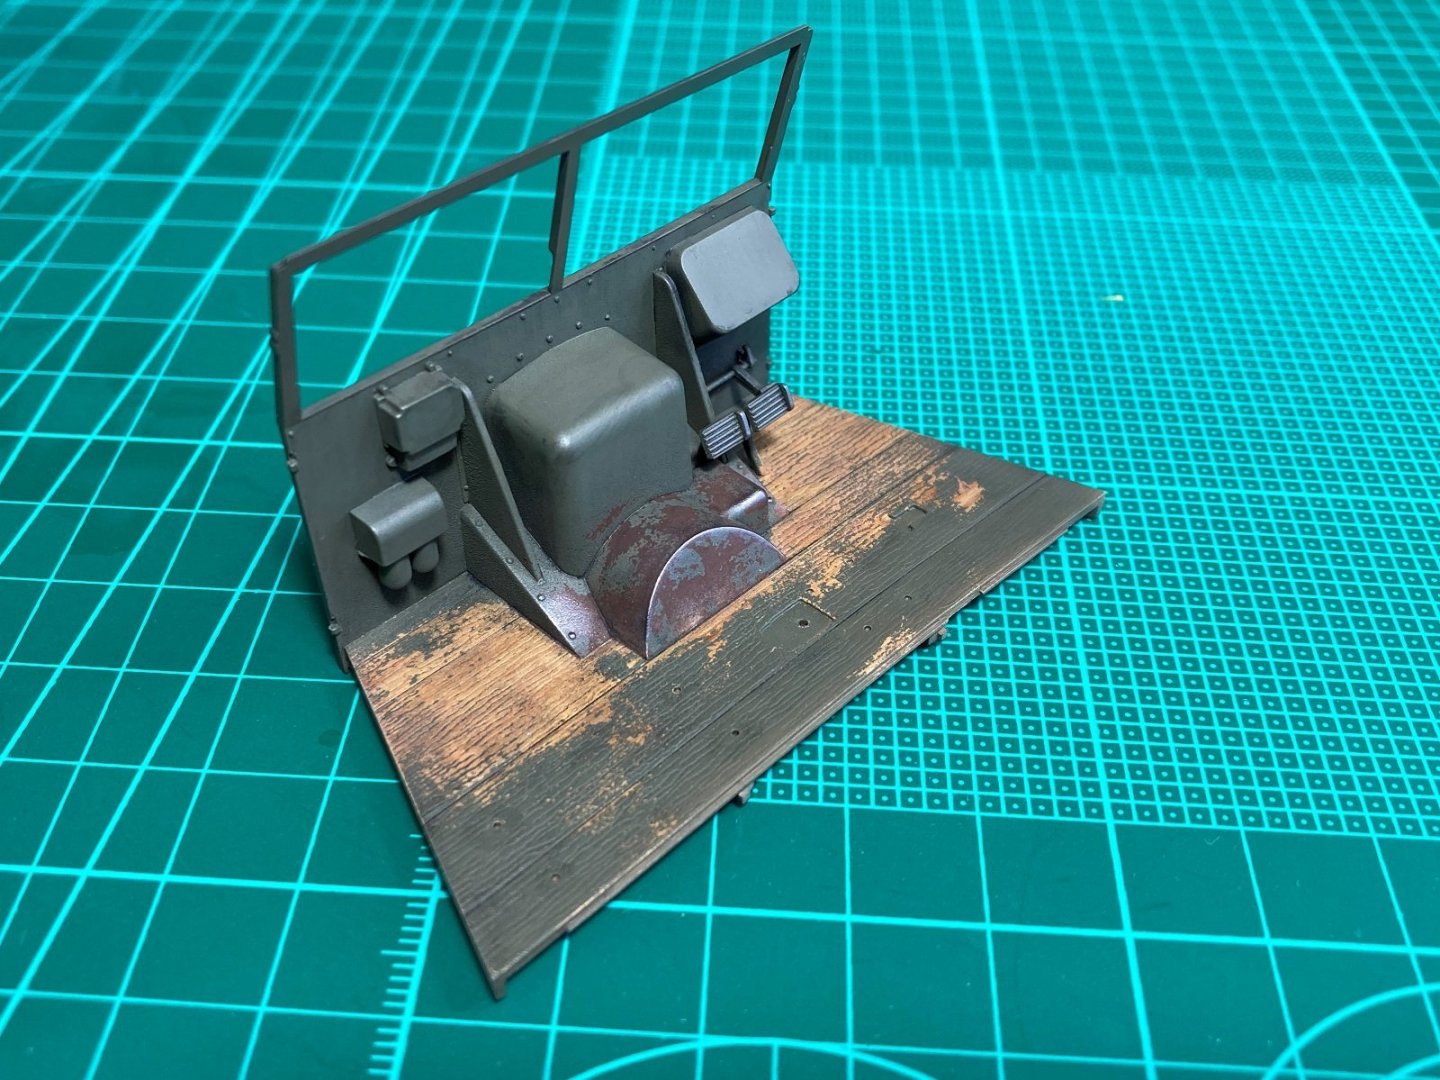
Hi All, Part 8 is up on YouTube covering the initial assembly, painting and weathering of the cab. To keep the videos to a reasonable time, although at 50 minutes it is still too long, I will need to cover the cab in 2 or so parts. The first picture shows a partially assembled cab with pedals and assemblies fixed to the firewall, the rear bulkhead, levers and seating all cleaned up ready for prime. The cab and rear firewall primed ready for paint and chipping. The wood floor was done by first painting with Tamiya Deck Tan and then treated with artist oils to try and replicate the grain. (The photo has blown out the wood, as much darker to the eye). Where I wanted to apply chipping to the ‘metal work’ I used Ammo by Mig acrylic ‘old rust’ After reading the label on Ammo’s chipping fluid I thought I had better try it on my ‘test cube’ first as the label said “after applying the fluid paint with acrylics” or words to that affect. My top colour coats are lacquer. 3 light coats of chipping fluid were applied and once dried which only took as long as flushing it out the airbrush I applied 2 coats of lacquer. I waited just 5 minutes after spraying the lacquer and scrubbing pretty hard with a toothbrush had no effect on the paint! (lacquers are very tough!) I had to scratch the top coat with a needle, which then allowed the water to get to the underlying chipping fluid to activate it. Once it started chipping it was okay and pretty controllable. So with an idea of coats and timings it was on to the cab. The finished result as covered in the video. The thoughts were to wear and chip the paint where most foot traffic occurred such as the door entries but not under seats and where feet have rubbed and chipped the paint off the metal surfaces and polished in places with constant boot contact. The ‘metal’ areas such as edges and corners were polished using Ammo’s Polished Metal pigment. After the video I gave the cab a quick wash with black artist oils and still need to work it a bit. I will at some stage hit it with dust and dirt pigments but need to finish the other parts first. Cheers Slog


- 28 replies
-
- 12
-
-
It plays for me on the iPhone. very nice indeed
- 1,090 replies
-
- 3
-
-
- showcase models
- vendetta
- (and 2 more)
-
Well done for sticking it out, its looking great. I know what a slog it is as I half heartedly attempted the same with a paper Bismarck I started years ago but got fed up with it. Saying that my next paper hull will get the same treatment to prevent denting the paper and having to fill and paint. Good idea about the fibreglass. Perhaps its possible to just use the resin component of it although have zero knowledge in all things GRP. Cheers Slog
- 31 replies
-
- 3
-
-
- Borodino
- Dom Bumagi
- (and 1 more)
-
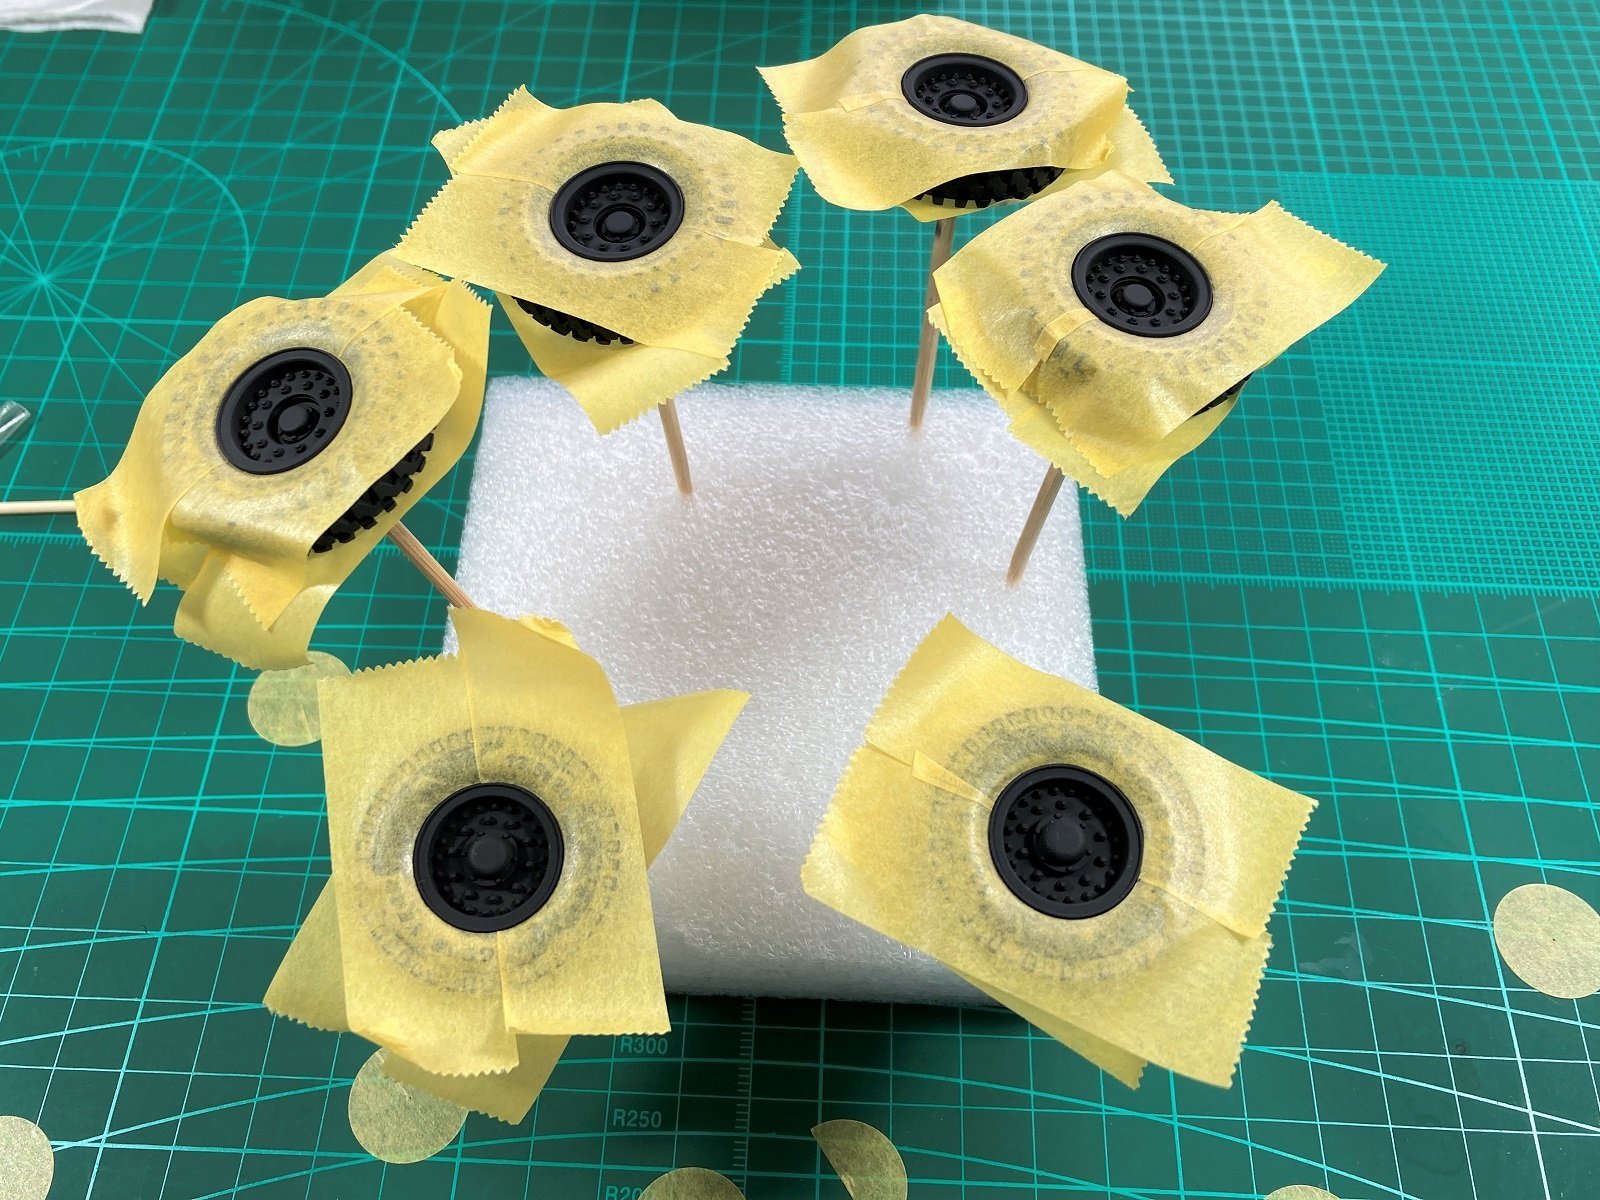
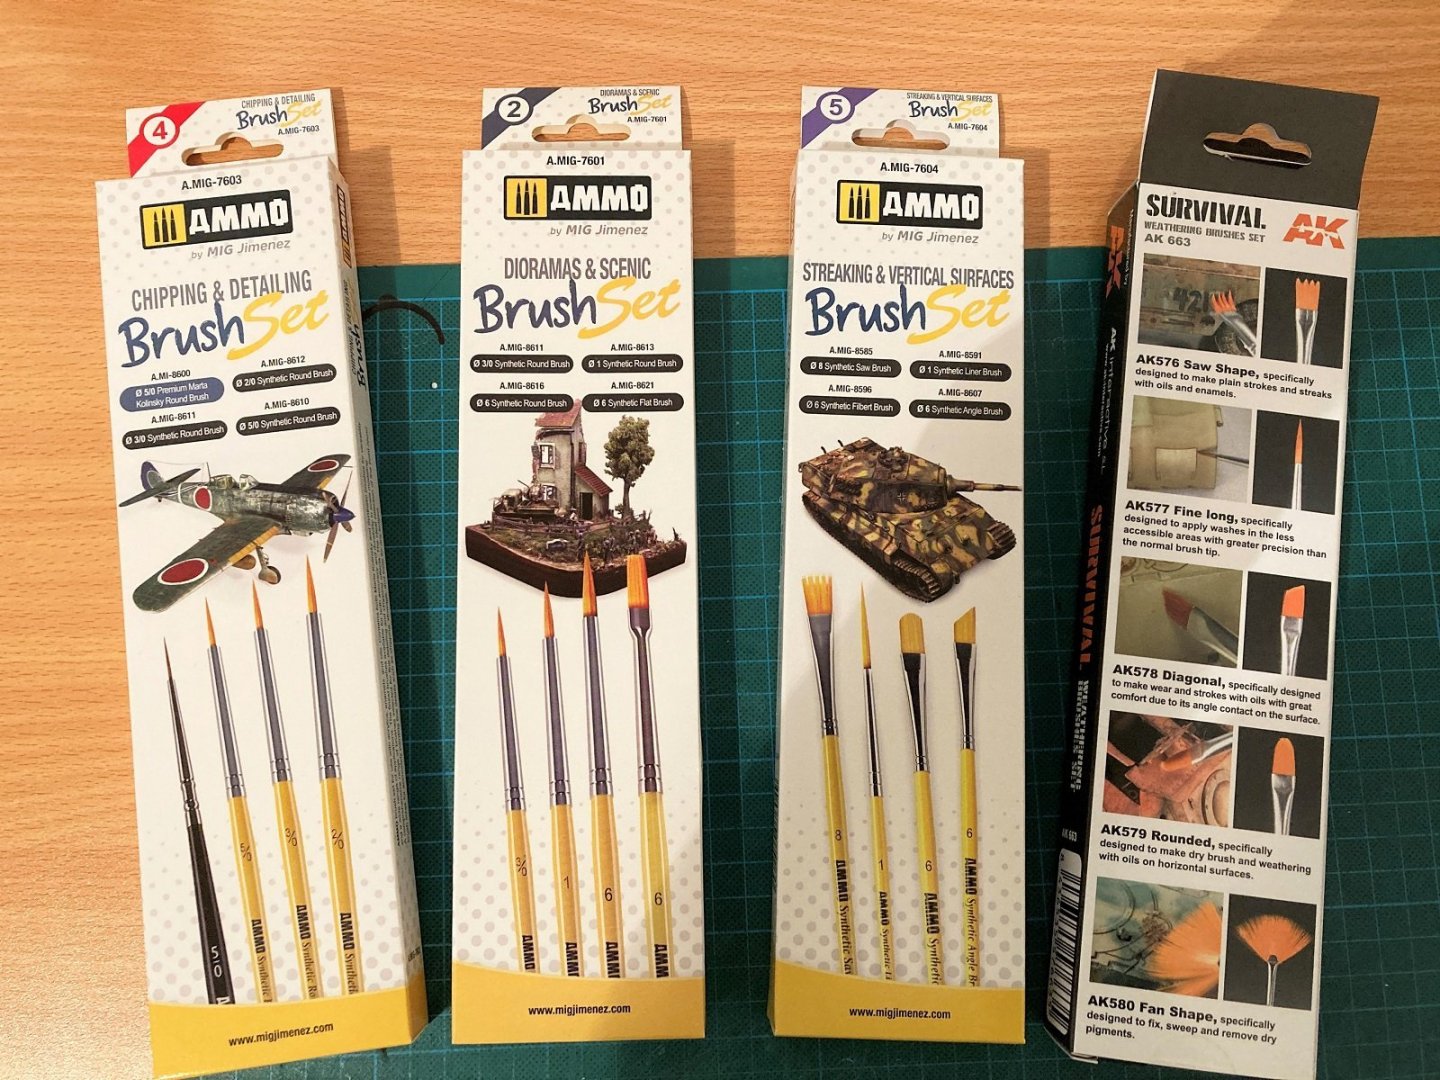
Hi all, thanks for the likes. Part 7 covering the wheels is now up on YouTube. The wheels were primed with the usual black Mr Finishing Surfacer 1500 and the tyres painted with Tamiya Rubber Black. I only had 18mm Tamiya tape so needed 2 strips with the centre hole cut out with a cheapo circle cutter; The completed wheels using SMS lacquer paints; I have been putting off weathering the completed assemblies to date including the wheels as trials with generic office supply brushes wasn't giving me the desired effects so now my order has arrived I am hoping to weather and assemble the chassis, engine running gear etc during the holidays. Cheers Slog

-
Well done Chris, it and the rest of them look stunning. They are so sharp and crisp. Truly inspirational. The mixing of paint for the edge colouring has been worthwhile and spot on, can't see any evidence eye catching edges anywhere! Beautiful.
- 89 replies
-
- 10
-
-
My issue is the trolling the OP received with everyone piling on him and the responses were pretty nasty. He was a new guy and he is being accused of spamming? Click baiting? What with 9 or so posts? Gee you must limit you activity here as this forum is rife with pointless spamming posts. I have made my feelings very clear on that several times. Did you stop to think he didn't realise what he was doing was wrong in his sharing in something he enjoys? Did anyone bother to respond to him to explain his actions were frowned upon? Did anyone click the report button to highlight to the mods his posts were 'inappropriate' ? No he just coped more abuse. The poor guy was essentially being blamed for misguiding a whole generation of novice modellers with his inaccurate videos! How ridiculous is that! I've said my piece, I'll move on, thank you.
-
Yes, I am referring to the YouTube link post and okay you removed it after moderation. But it still looks like the OP was removed also. As far as I can tell he doesn't show up in the member list. Like I say it’s your playground. Yes the ‘Expert’ term was supposed to be patronising and derogatory but chose not to name the member as this would be deemed a personal attack and against the rules. The expert in the post openly attacked the OP thus breaking the rules and subsequent posts called him out on it…moderation? Like I say your playground. Do as you will.
-
I normally keep myself to myself and play by the rules; it is after all, your playground and I just bring my ball. However it would appear that recently a member has been banned?/all trace removed because his nautical knowledge level didn’t meet the requirements of certain MSW ‘Experts’ and/or he had the audacity to show case his (erroneous) workmanship by posting links to his YouTube videos and/or his posting habits didn’t meet the ‘Experts’ expectations. Does this mean 90+ % of MSW will be banned since they have zero posts and the ‘Experts’ can’t confirm their knowledge, or zero posts means they don’t meet the ‘Experts’ posting habits? How about banning the ‘Experts’ whose total post count is showing off their nautical knowledge (well, it would appear to be Expert knowledge on every imaginable topic) but have never posted a single image of all that knowledge put into practice as far as I’m aware. Although I know what a deadeye is and where it goes and I would hope this meets the minimum requirements of the ‘Experts’? I also recently started linking to MY YouTube videos, which I hope the 'Experts' don't deem spamming for view numbers? I feel that if you have started setting basic limits of nautical knowledge and/or posting habits dictated by the ‘Experts’ on who can be a member on MSW, then my time here is done and I’ll take my ball and find another playground. Please feel free to delete my account and remove all my postings. No hard feelings, we just have different expectations. Slog
-
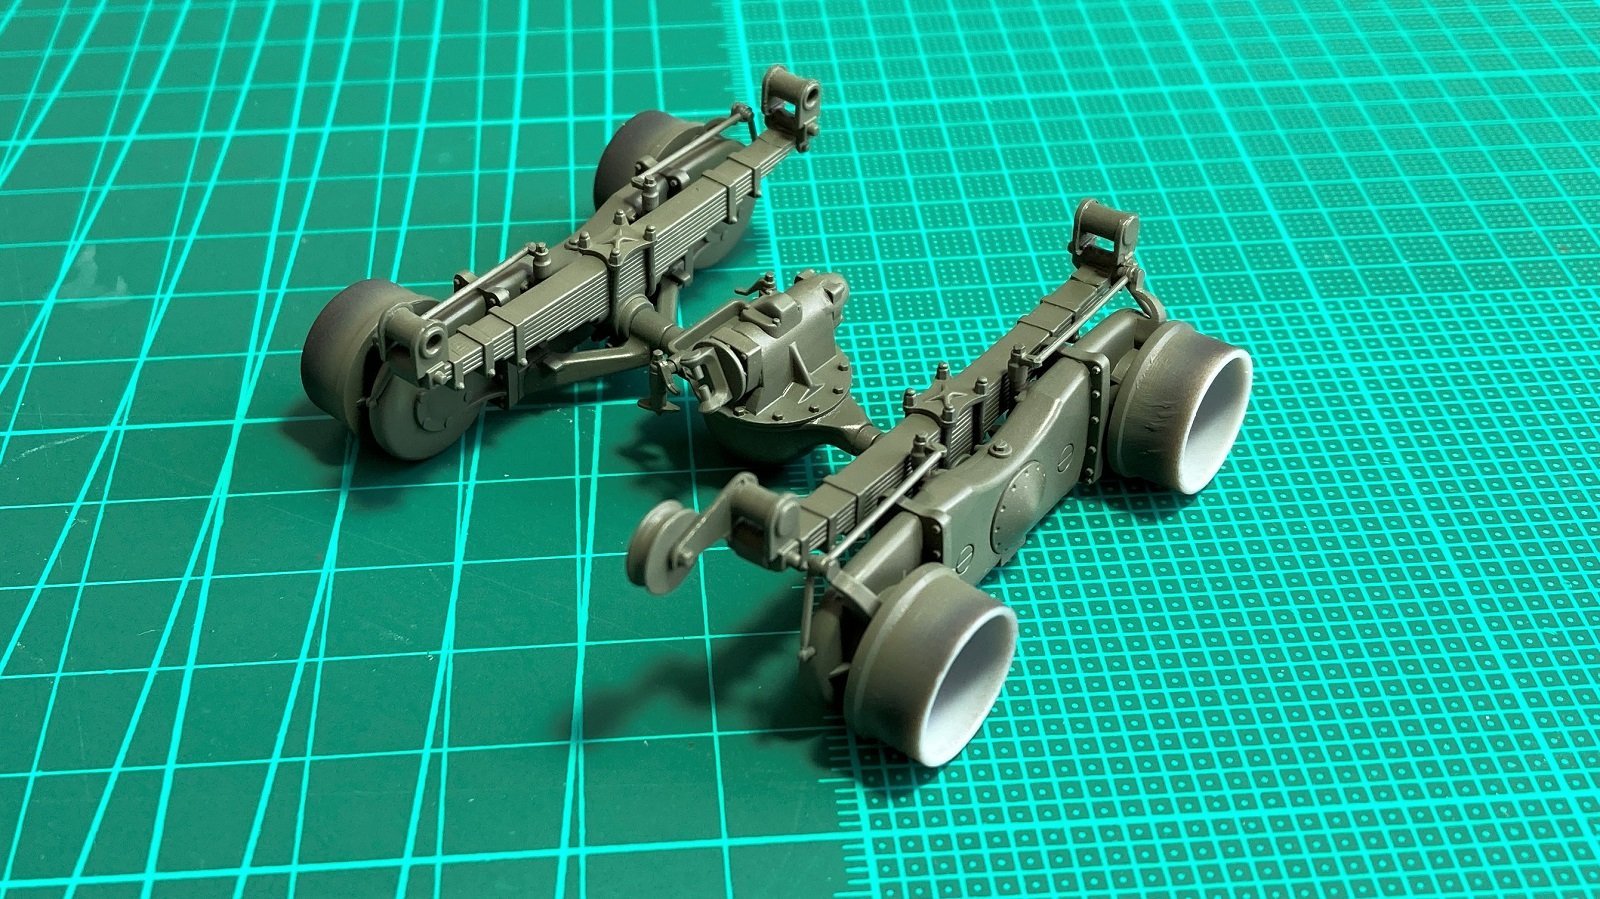
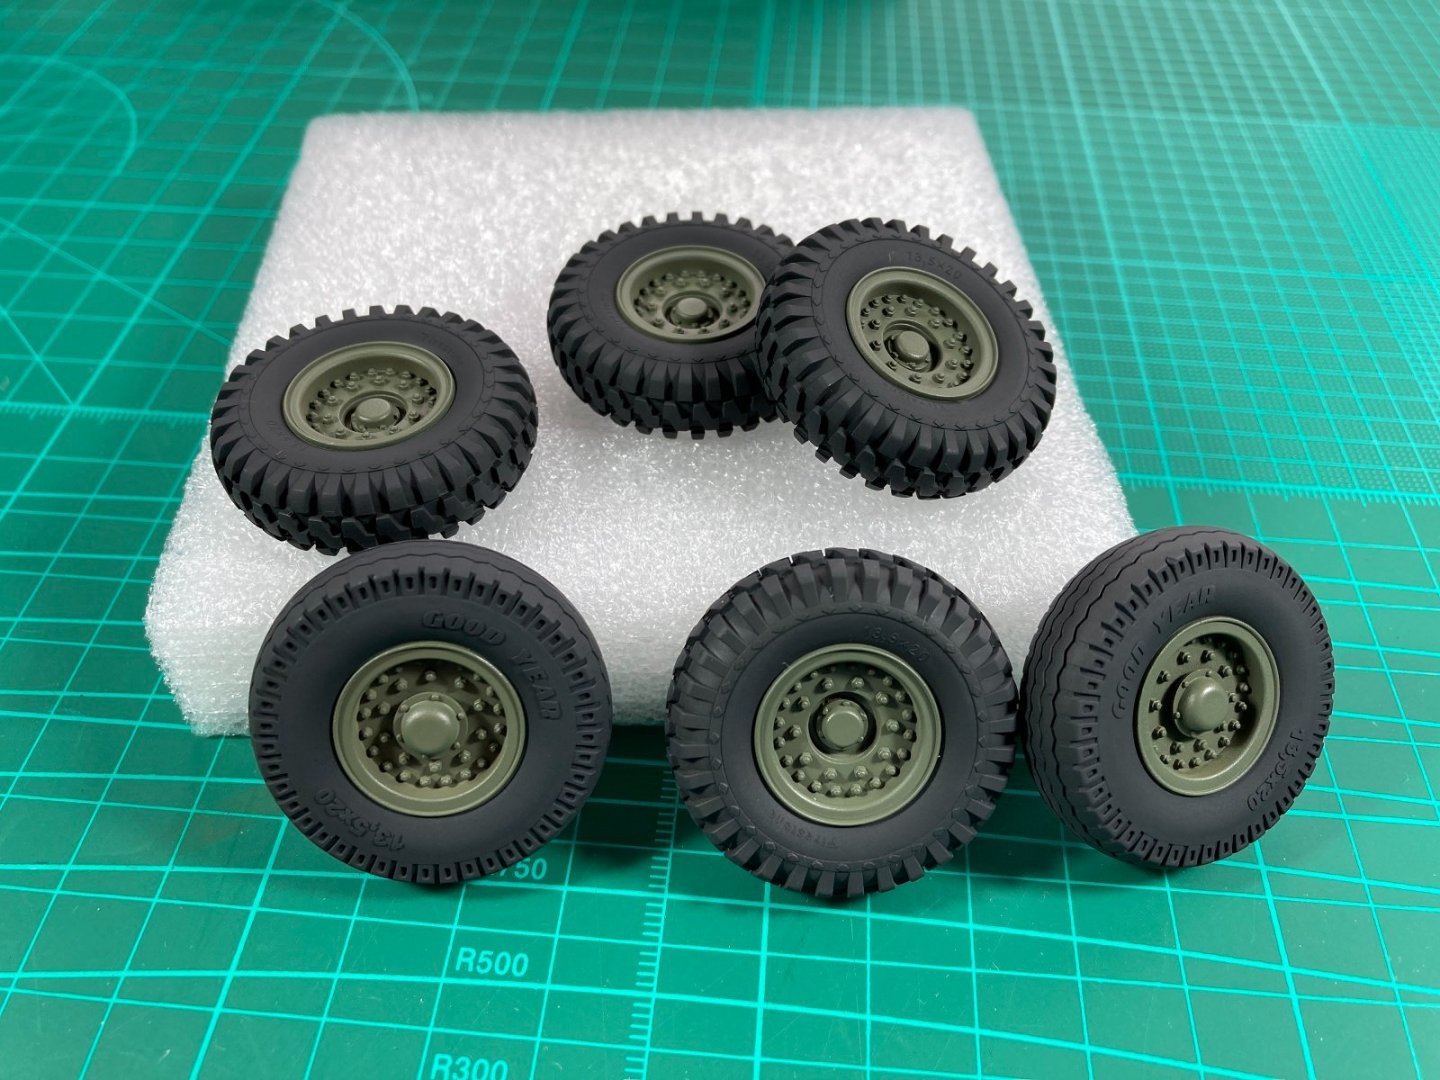
Hi all, Part 6 is now up on YouTube covering the assembly and painting of the rear suspension and drive. Apart from the wheels, which I am working on now, the underside is now complete. I really need to start weathering so I can assemble all the components onto the chassis...but will probably start on the upper sections. Cheers Slog

-
Hi all, Part 5 is now up, where I used SMS lacquer paints for the 1st time. Cheers Slog
-
- place the ruler for the cut line over the part so if blade slips or wanders it will cut into the waste not the part. Slog
-
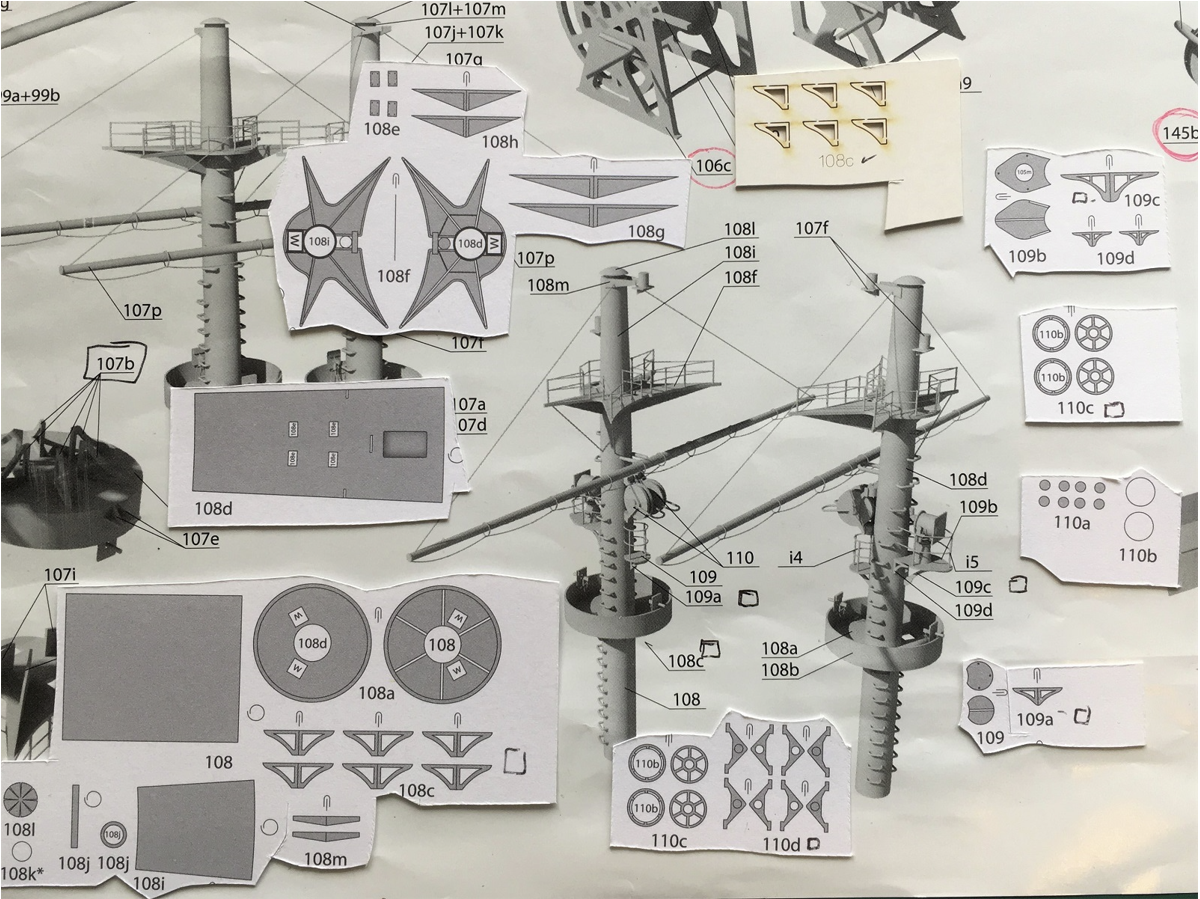
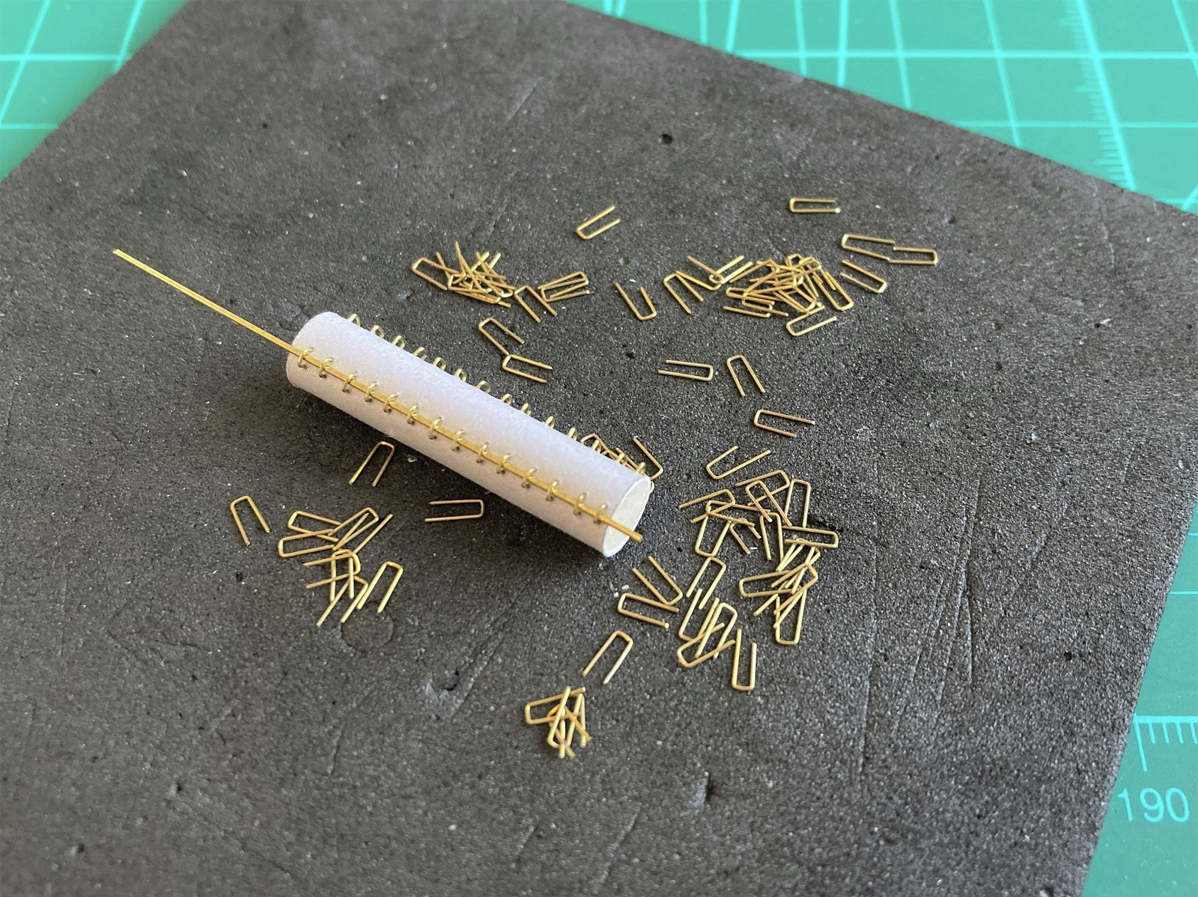
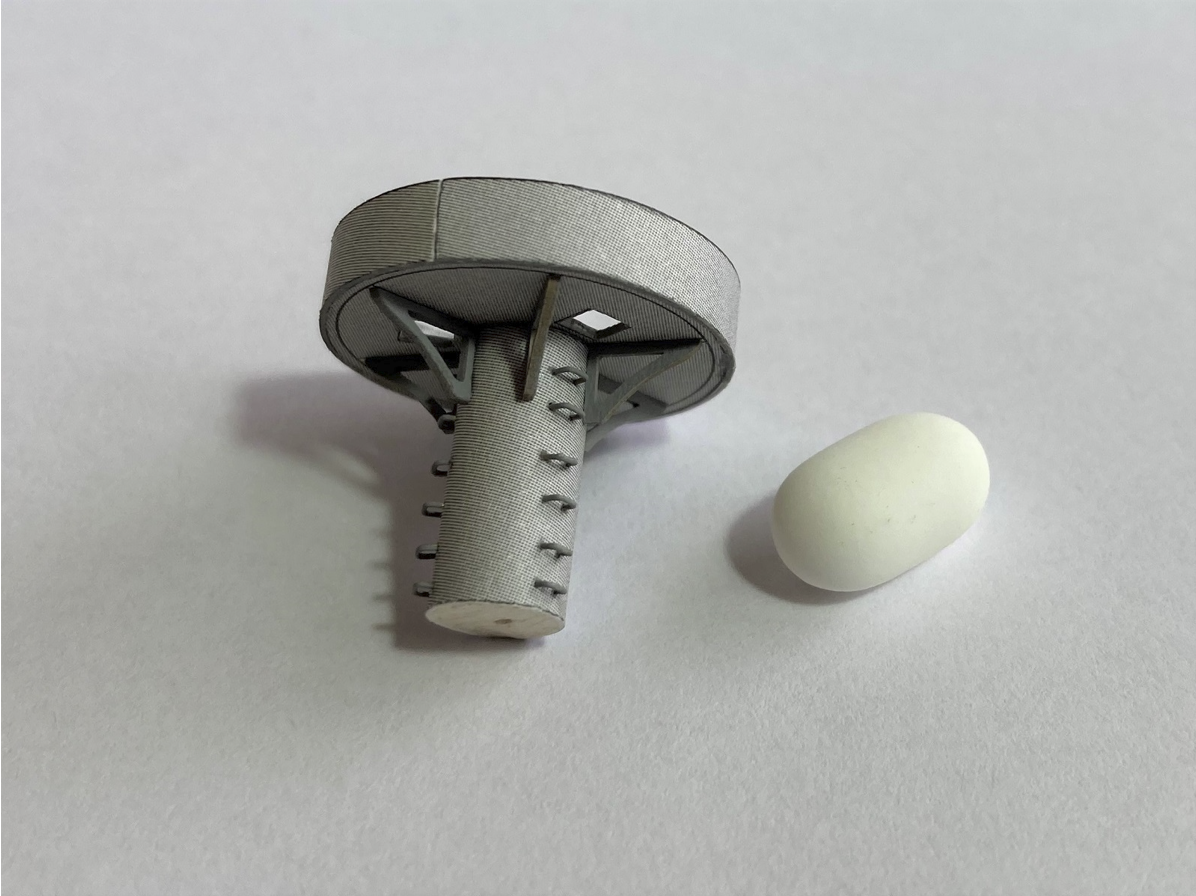
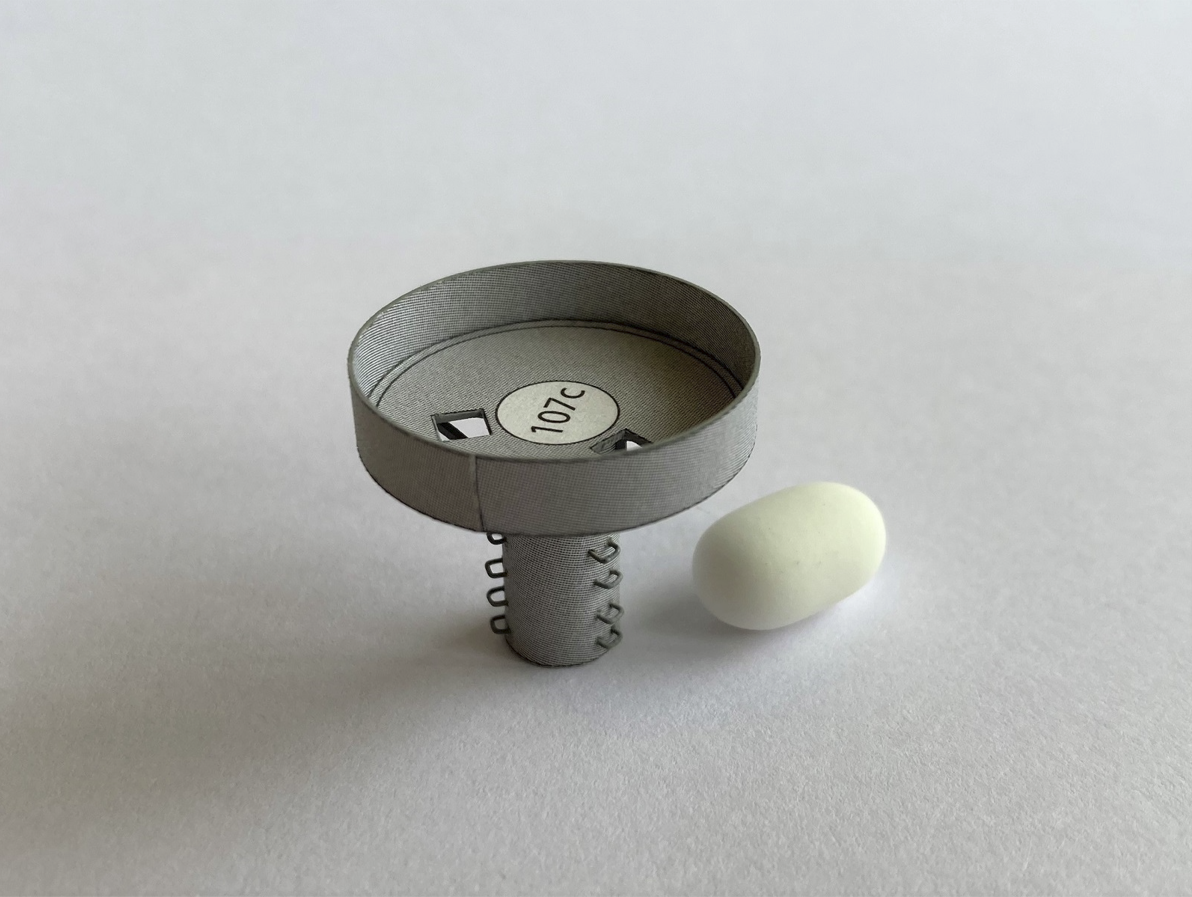
Hi All, Thanks for the kind words and likes. A small bit of progress working on the masts with the foremast being the simpler of the two. The aft mast is a lot more detailed with additional platforms and pulleys for the boat booms. The upper masts are shown on a different render. Disappointingly, the masts don’t show the locations of the step irons like the hull does, so these had to be guessed but were made up of 0.2mm brass wire bent to shape. The 2 lower masts in this post were easy enough being simple tubes with straight runs of steps; but the upper masts are slightly conical and the step irons twist round and up for some of the way, which will take some working out. After inserting the steps into the masts, a length of 0.5mm brass rod was positioned to allow the steps to be pushed fully home with constant spacing before fixing. I also shaped some thin balsa discs to insert into the ends of the tubes for rigidity. A couple of shots of the finished lower fore mast showing bracing, lubber holes and the finished steps. Rather than mx up water colours I used Tamiya XF-19 Sky Gray to paint them as the match was close enough. The laser cut supports were airbrushed with the same. Both lower mast sections are finished. The fore mast is lower but once placed on the super structure the tops will be same height due to the fore superstructure having an additional deck level. The way the masts are made in sections may be problematic trying to align them all but I guess being made of straight and conical sections couldn’t be rolled as one piece. Cheers Slog
- 244 replies
-
- 11
-
-
- borodino
- dom bumagi
- (and 1 more)
-
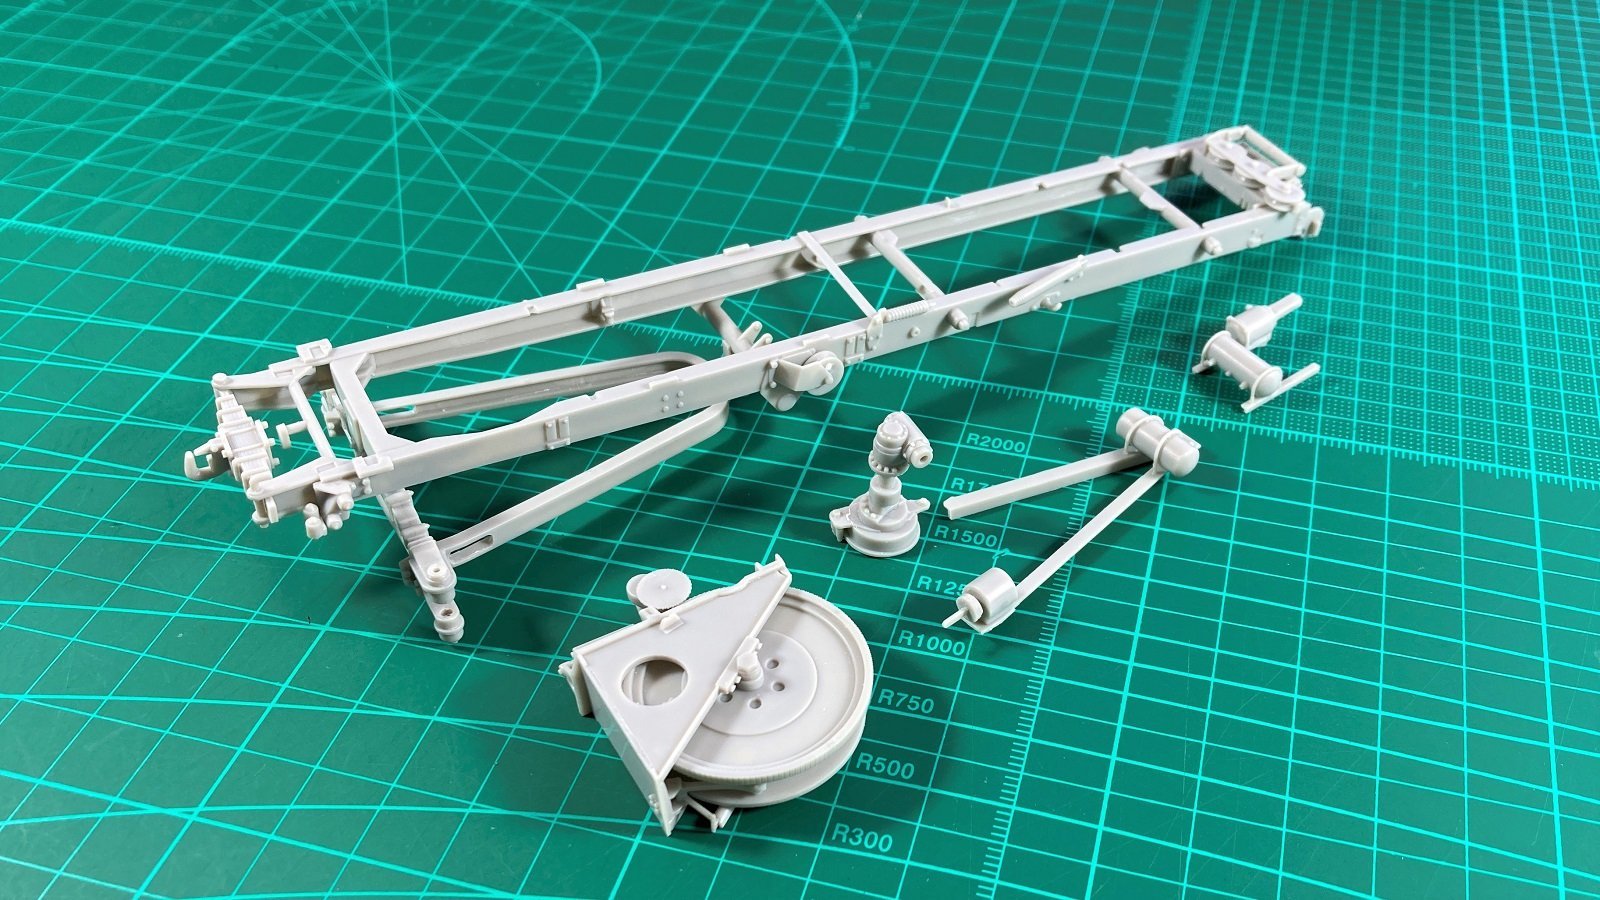
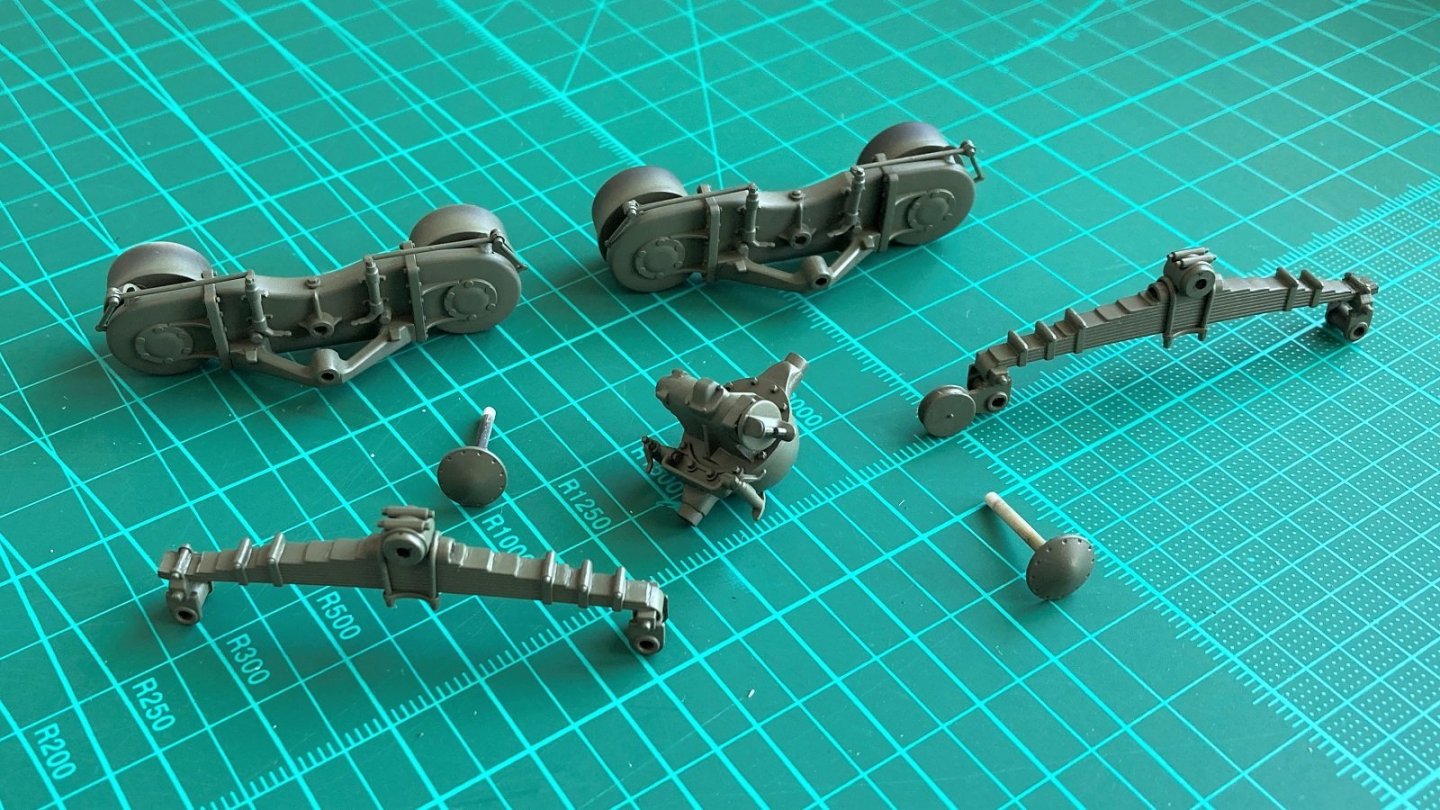
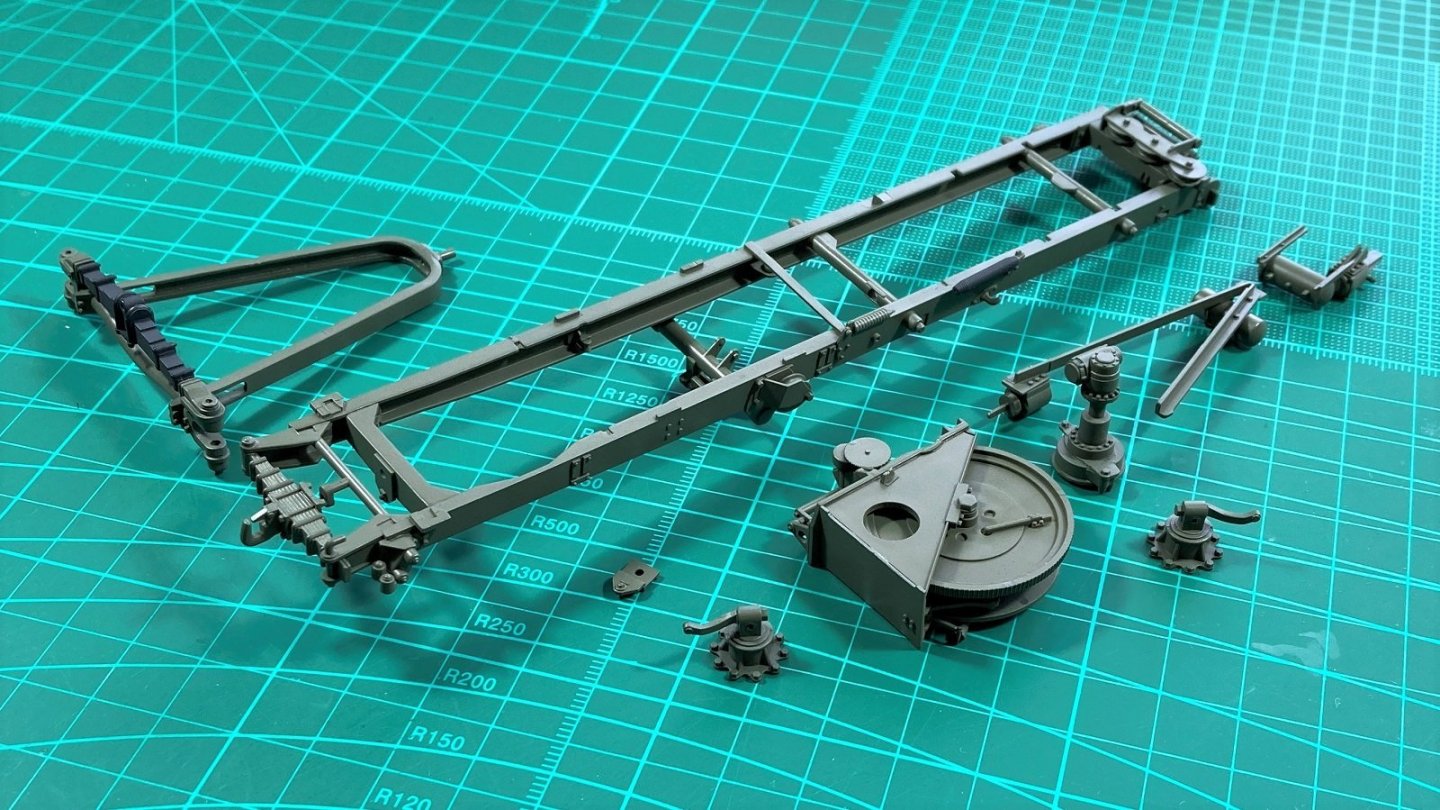
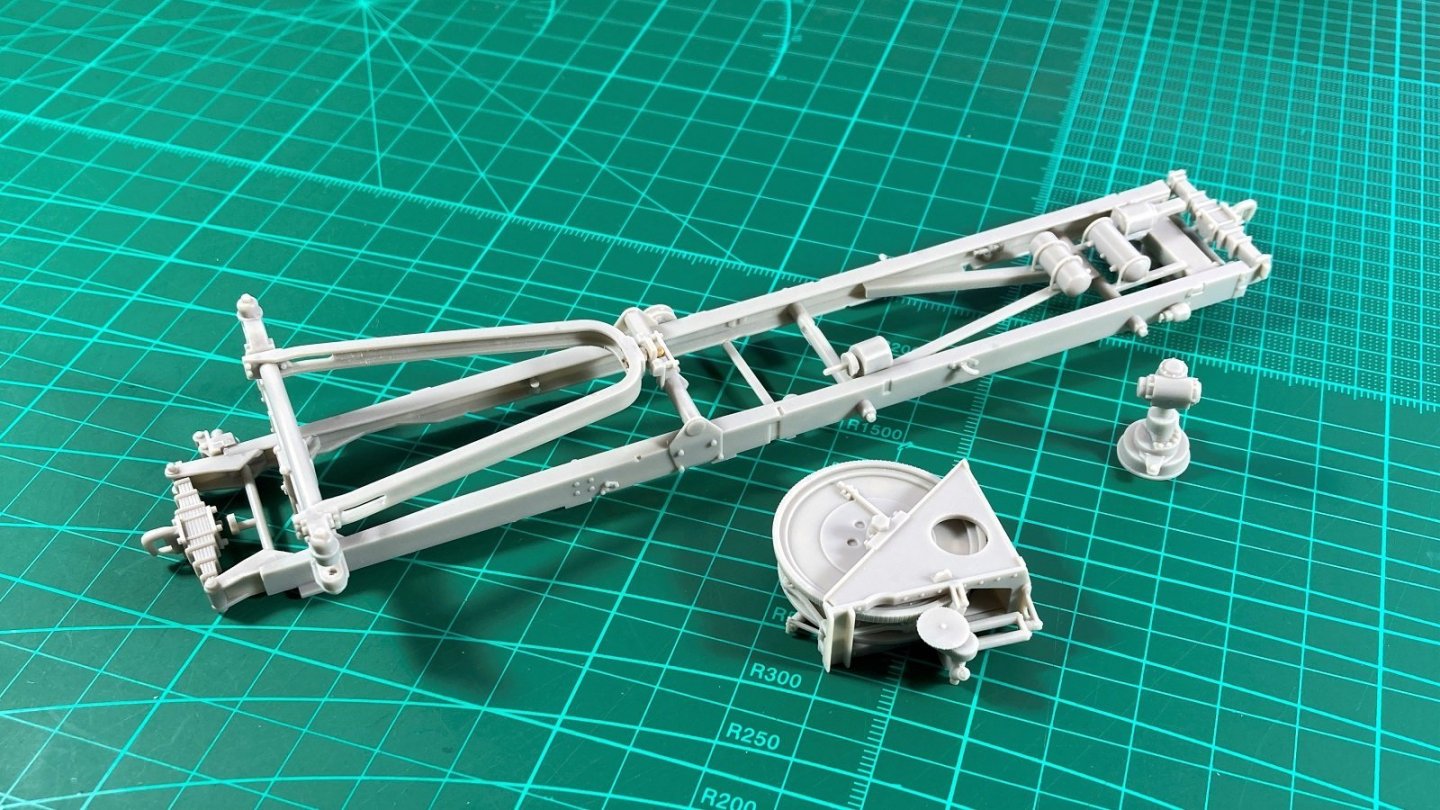
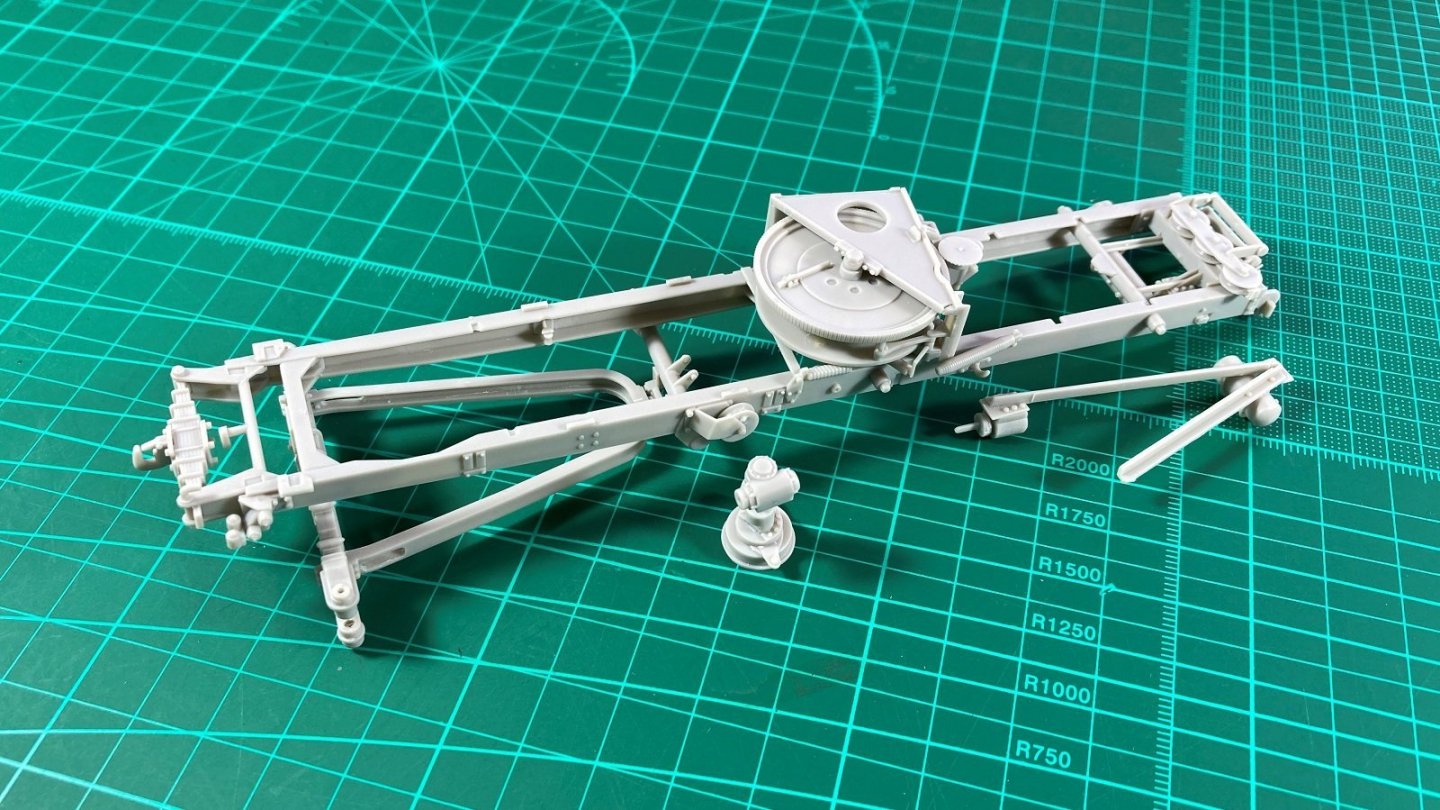
Hi, Part 4 is now up covering the chassis and winch gear. Hopefully next part will see some colour coats going on. Cheers Slog

- 28 replies
-
- 10
-
-
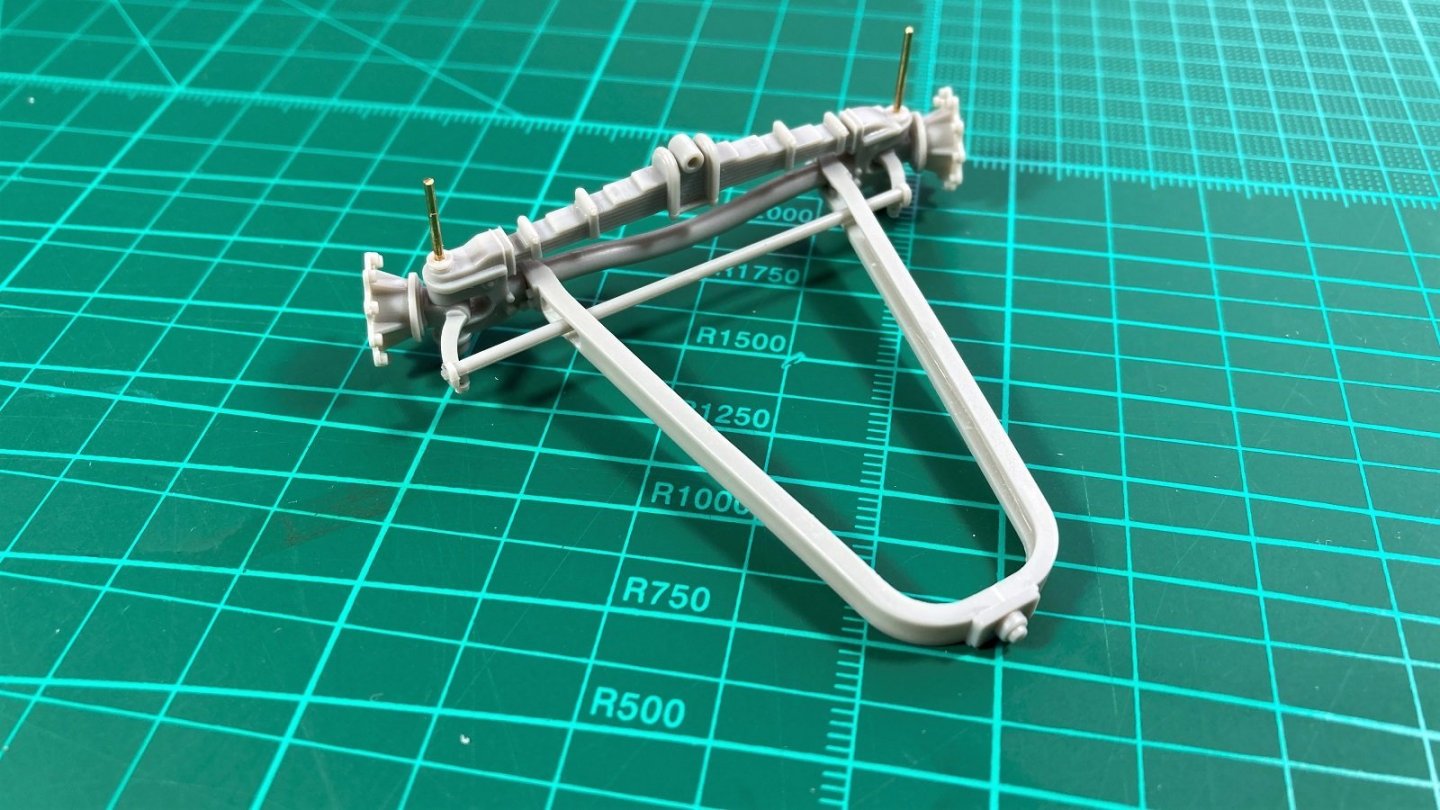
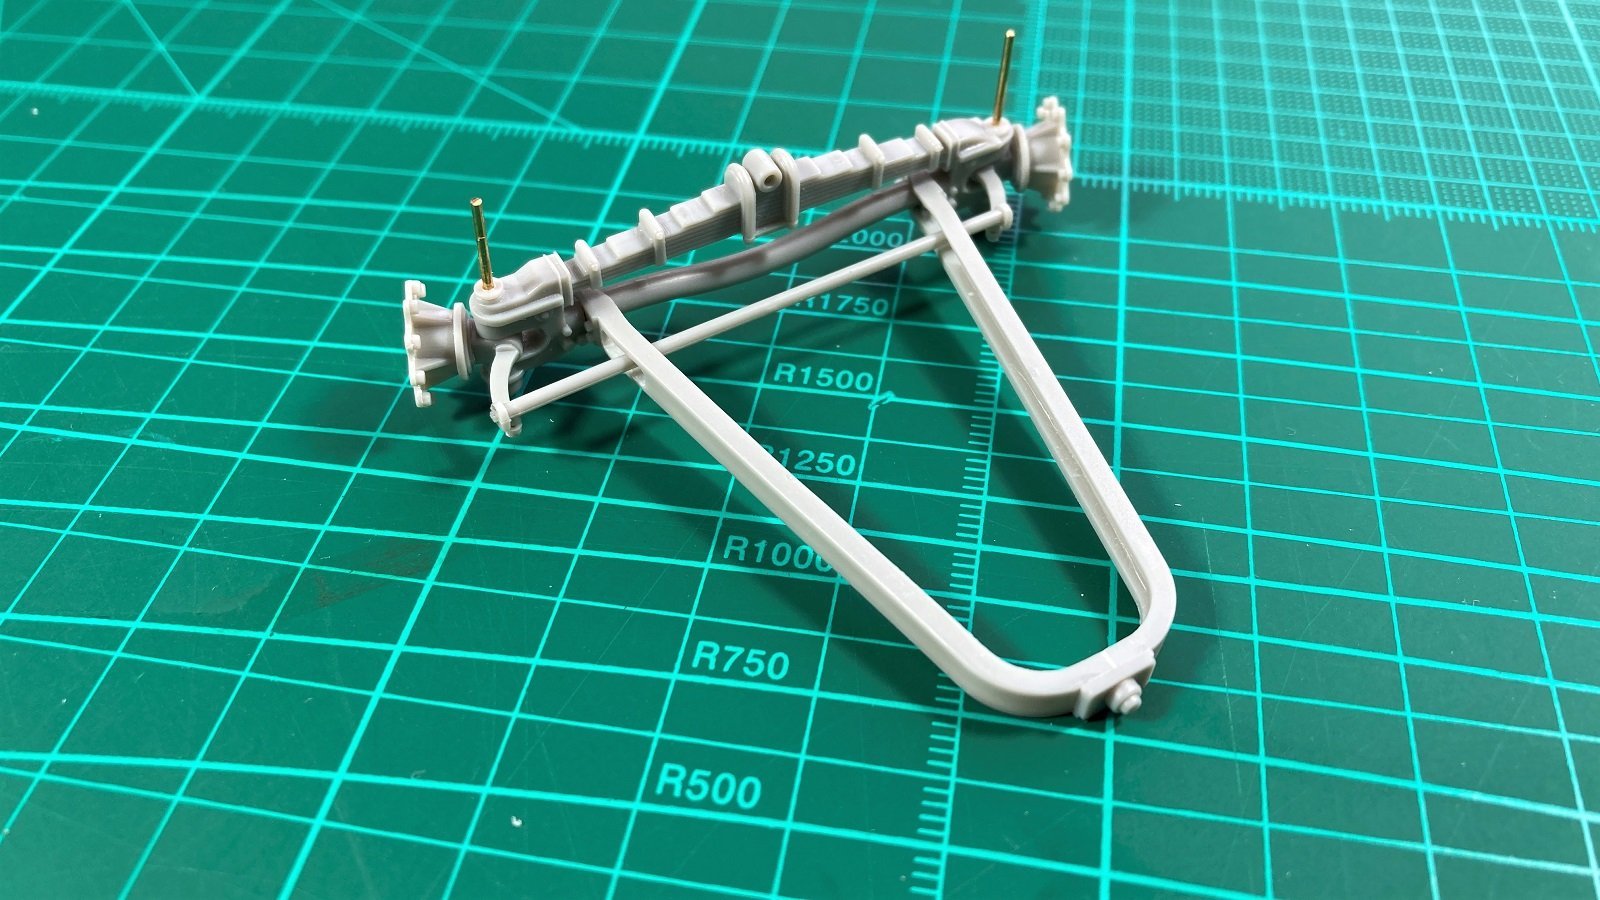
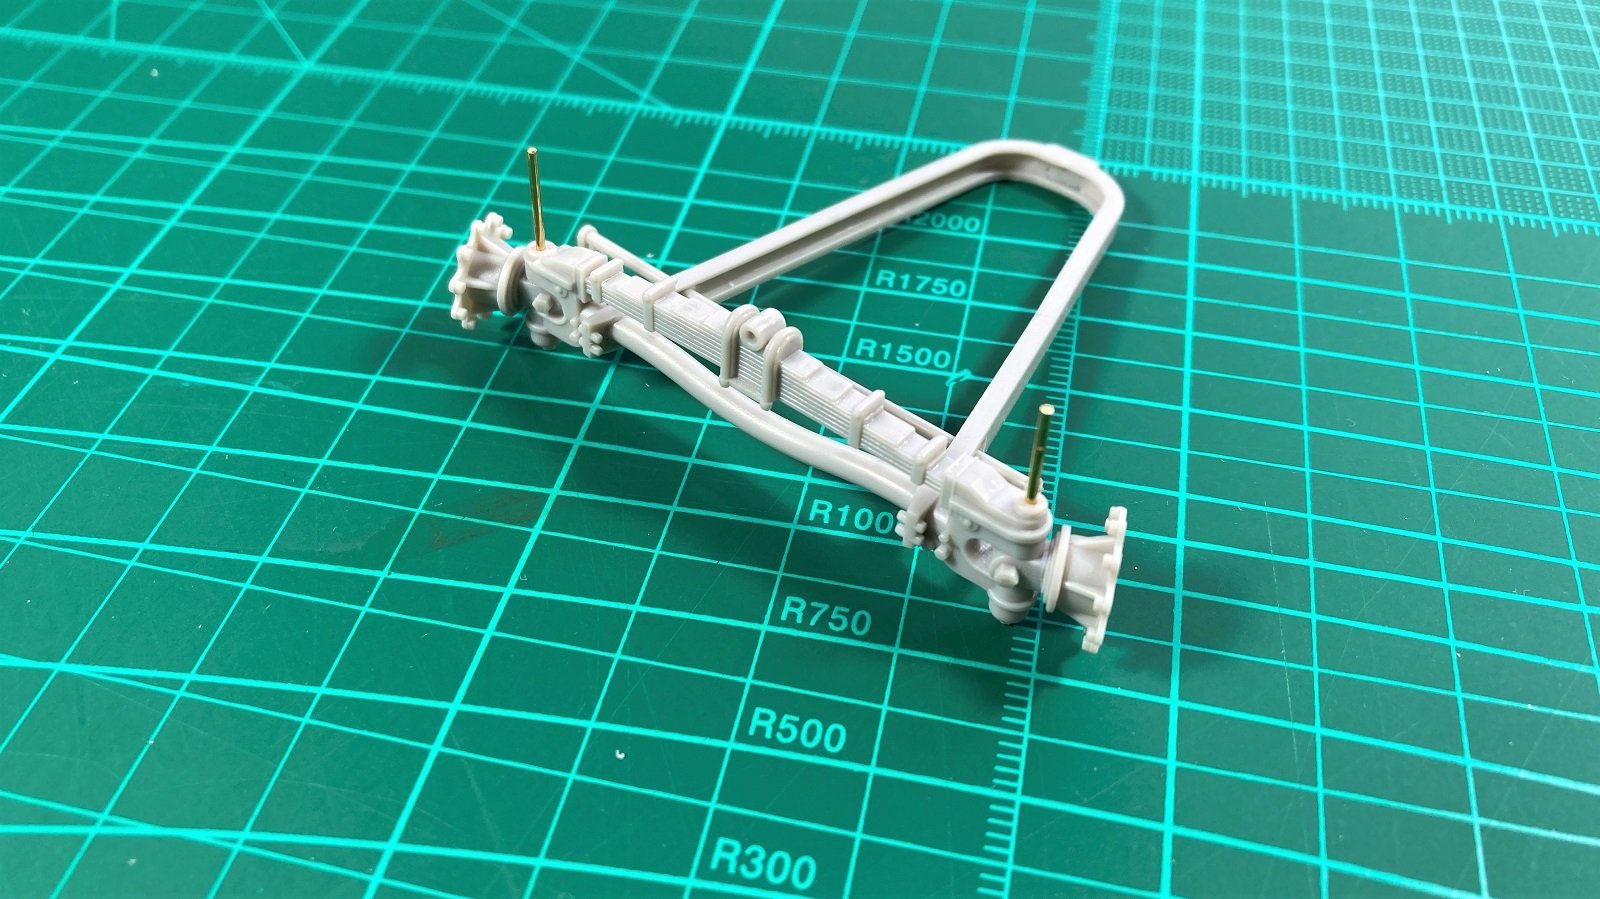
Hi, thanks for all the likes. Part 3 covering the front suspension is now up on YouTube. Small modification to the steering done to allow the front wheels to be poseable. Currently working on the front suspension chassis mounting, the chassis and the winch gear. Cheers Slog