Captain Slog
-
Posts
904 -
Joined
Content Type
Profiles
Forums
Gallery
Events
Everything posted by Captain Slog
-
 Hi Danny, Thanks for dropping in. Although my experience of other publishers is quite limited, based on the 3 Dom Bumagi kits I have I am going to make a bold statement and say that they are up there with the later Halinski’s! I think my work will be cut out for the next couple of lifetimes! I also have 1 to 3 ‘must have’ IJN Battleships to go with the Halinski Fuso that is still waiting patiently…not to mention a few more vehicles I need LOL. Only having every second weekend to model is very frustrating. Cheers Slog
 -
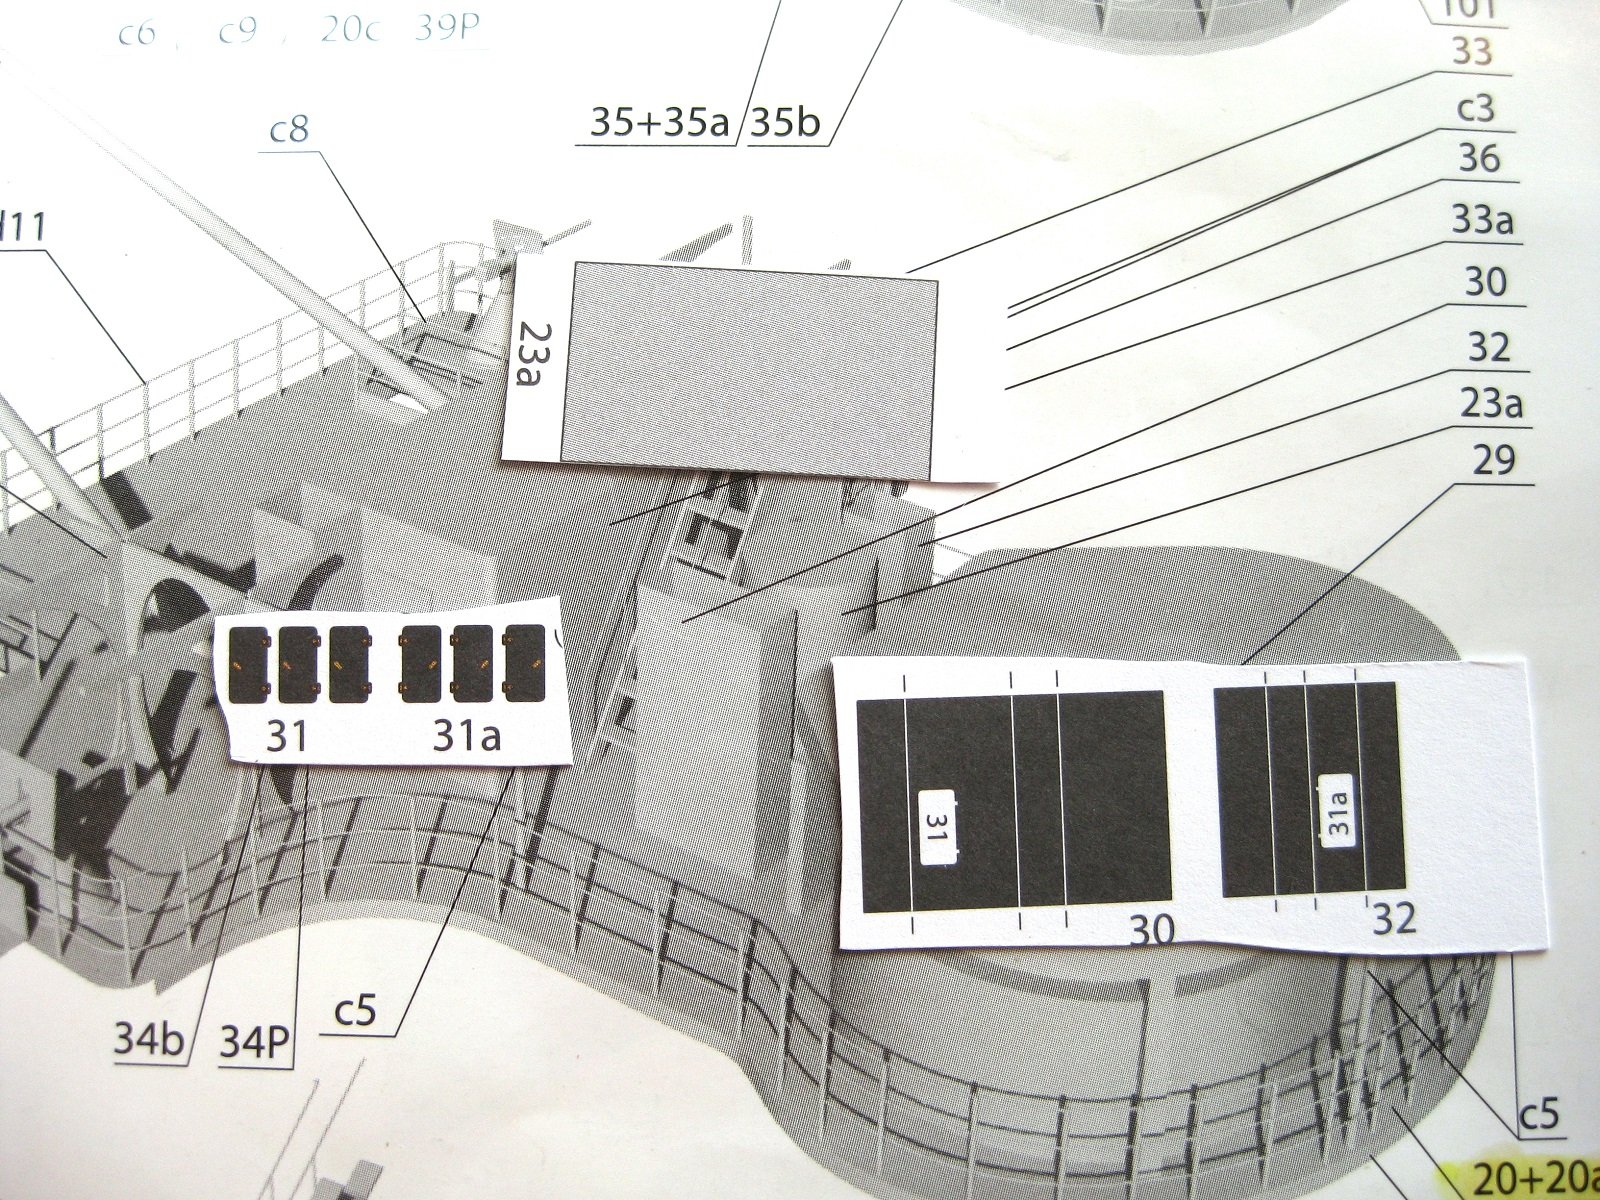
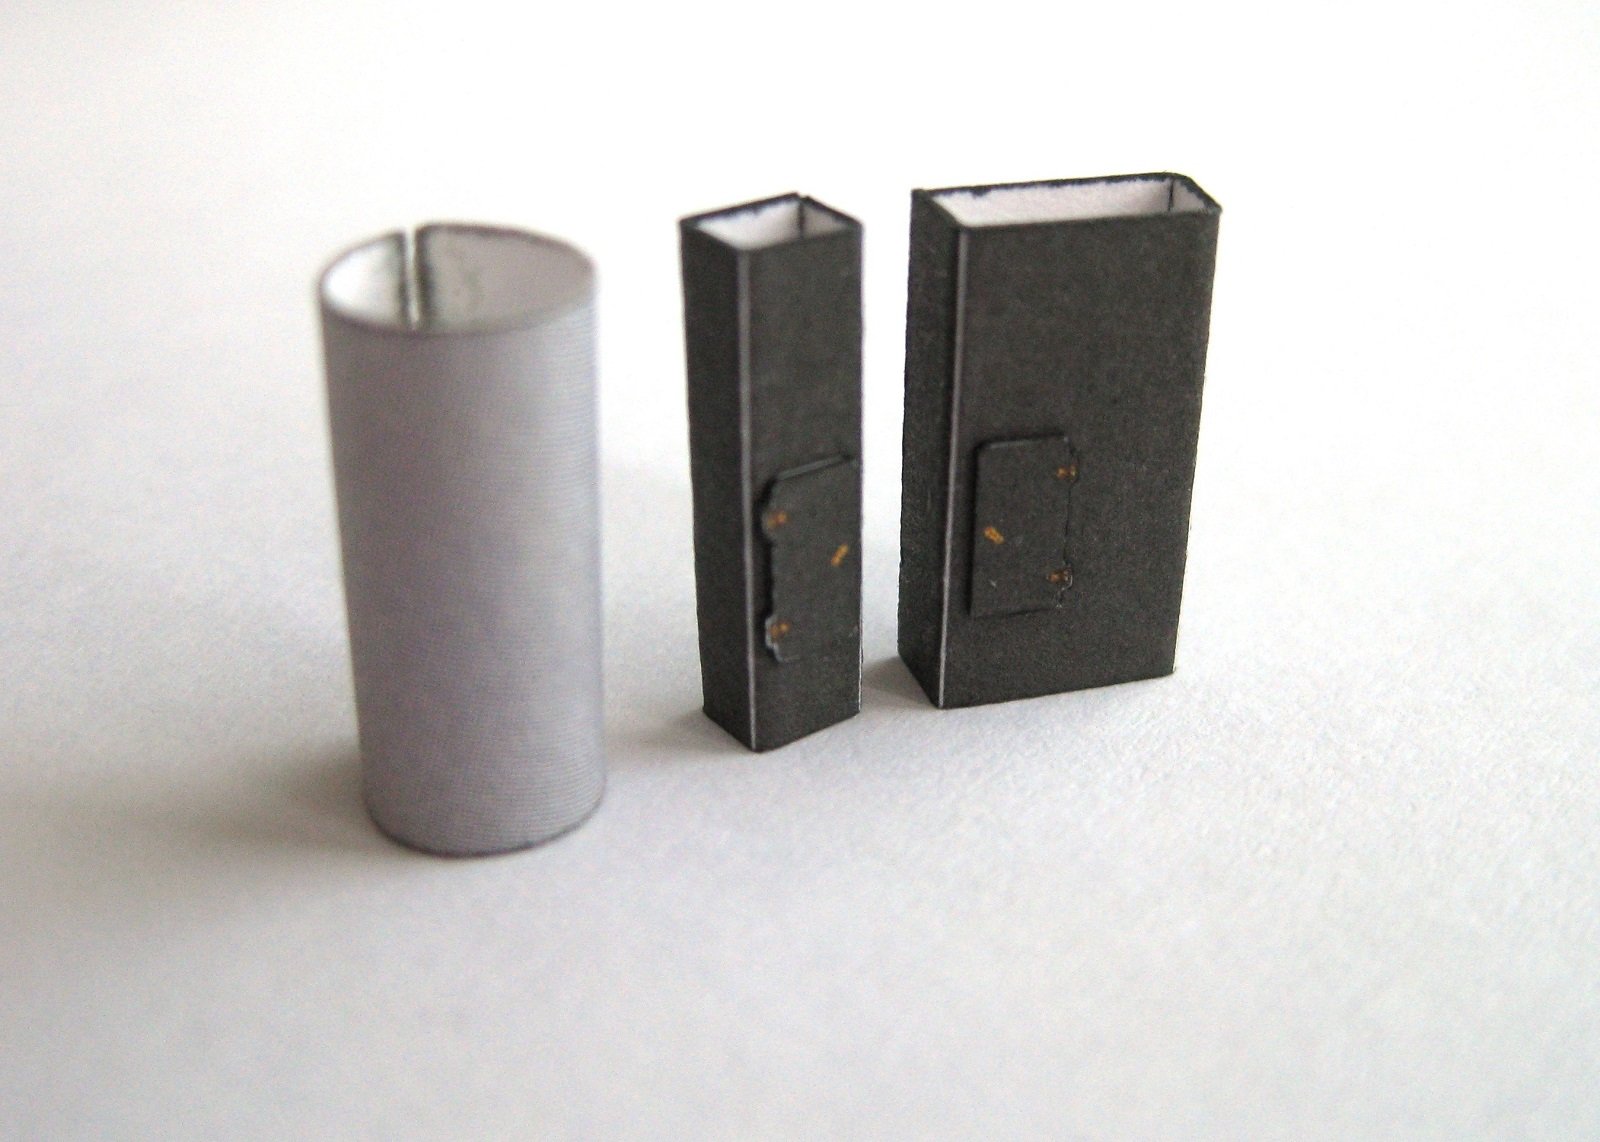
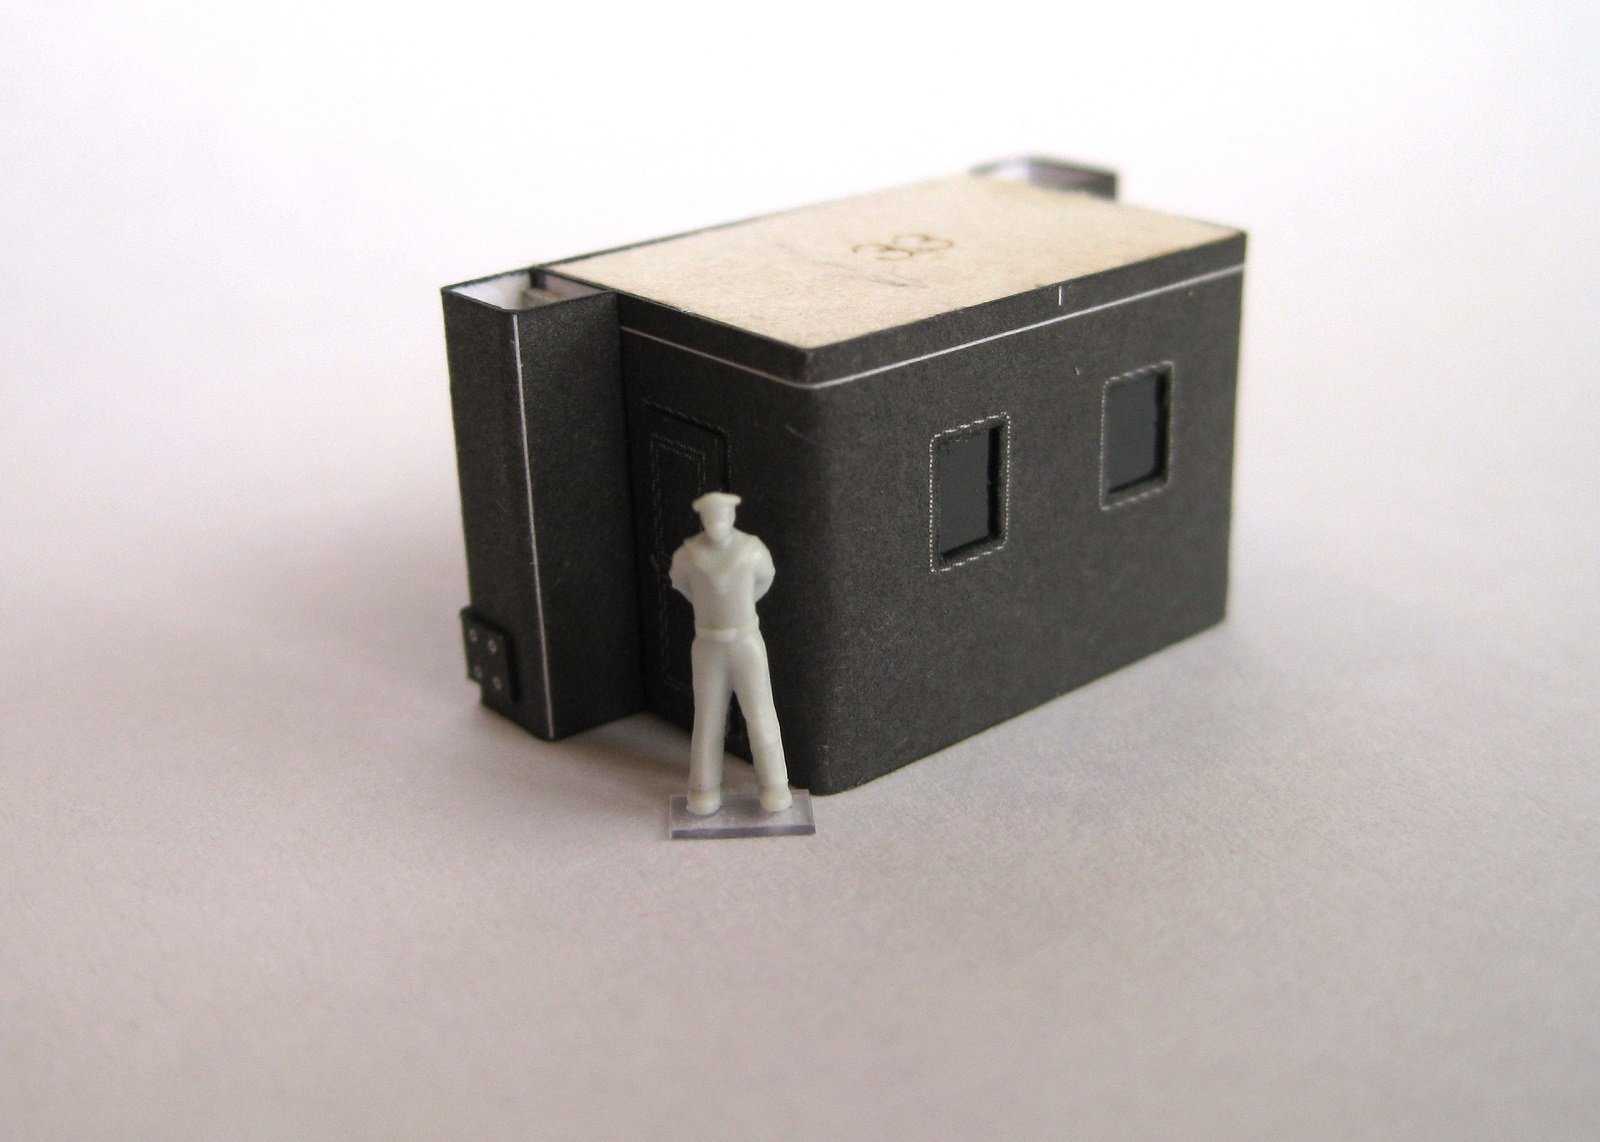
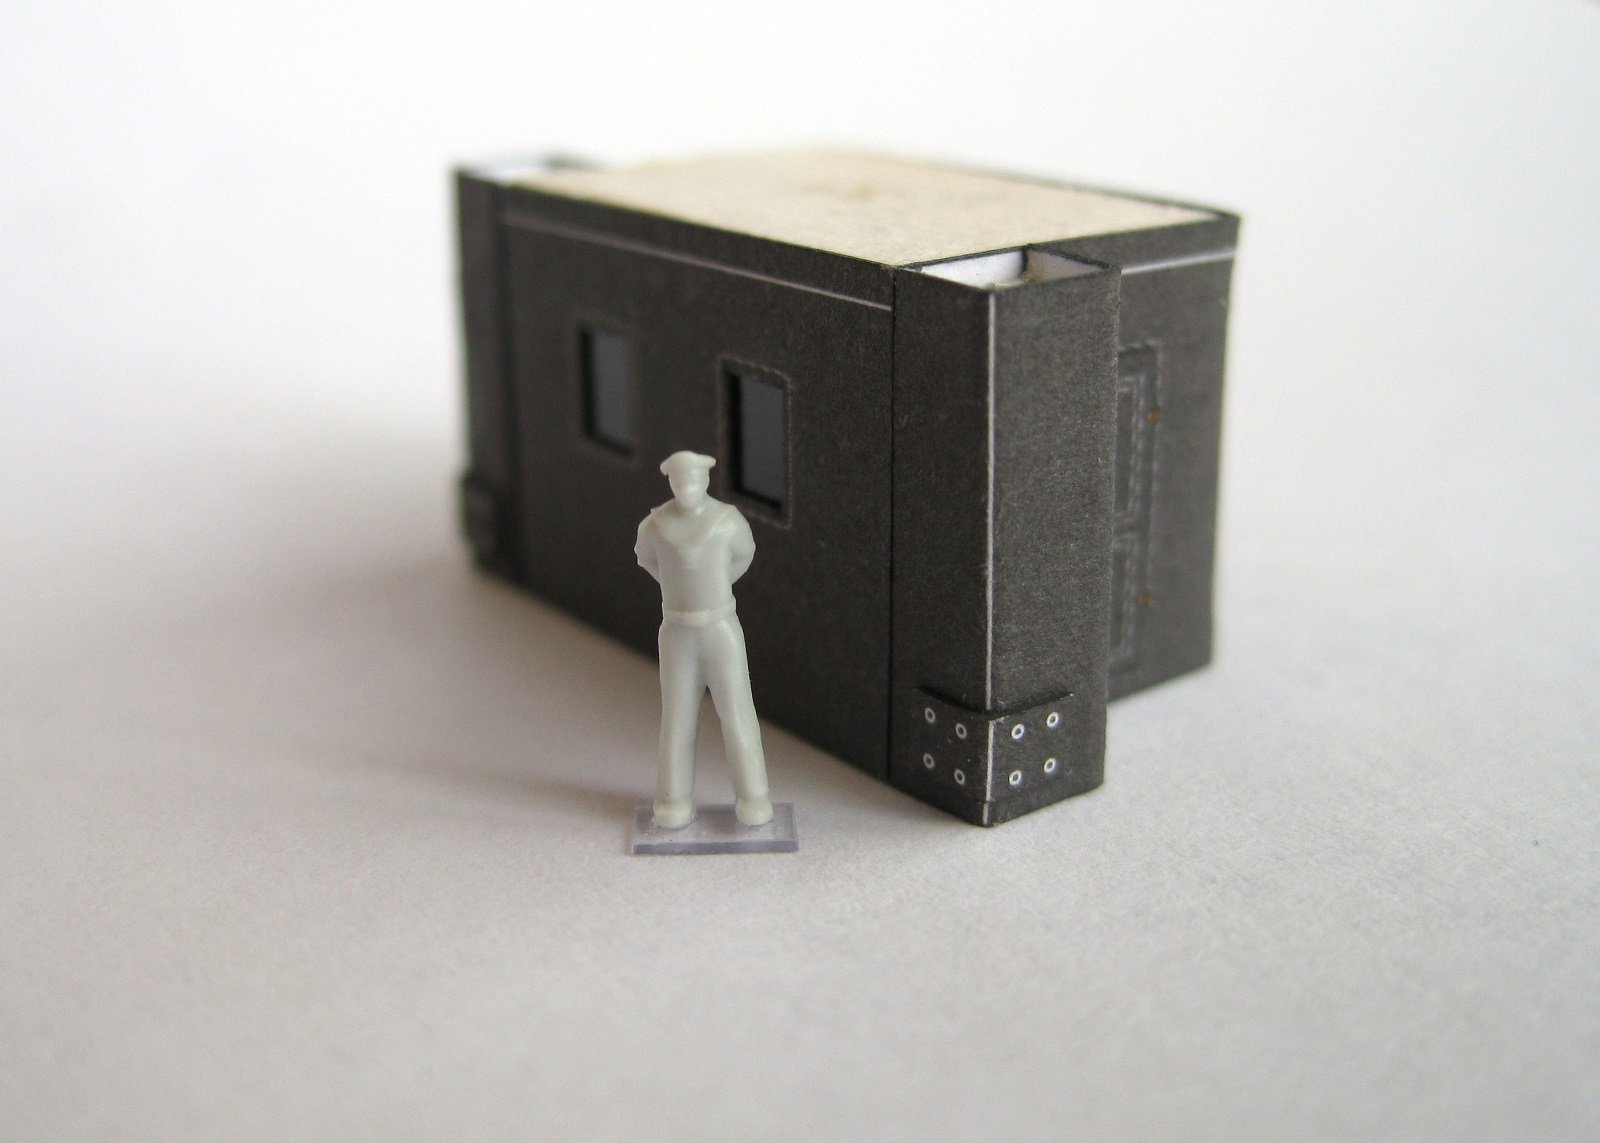
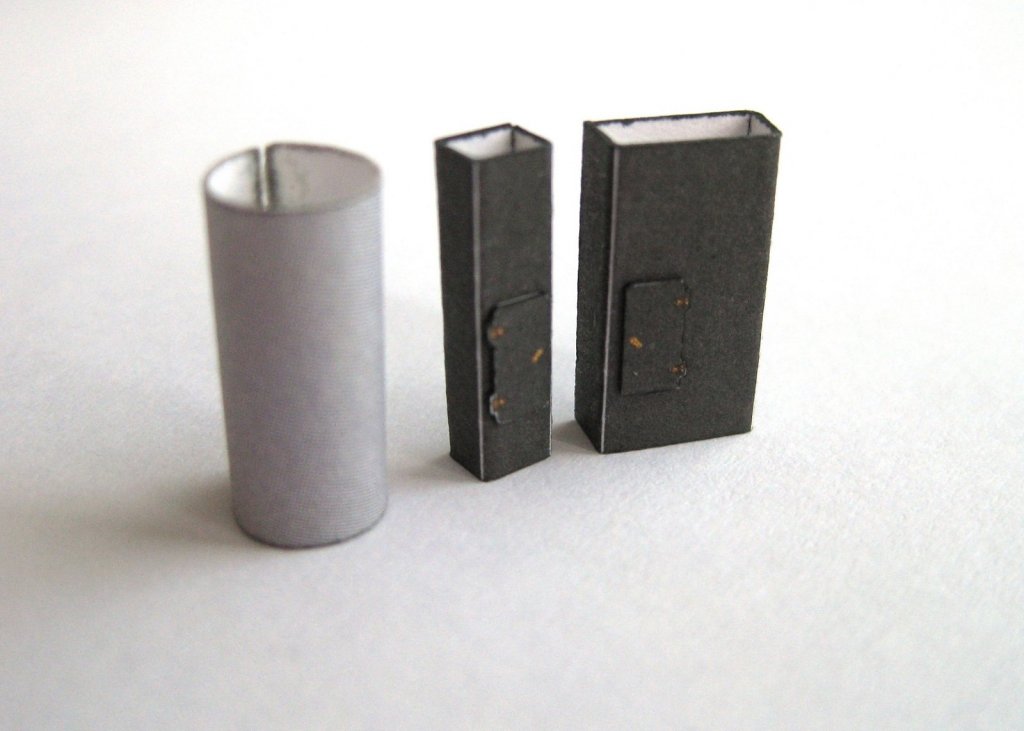
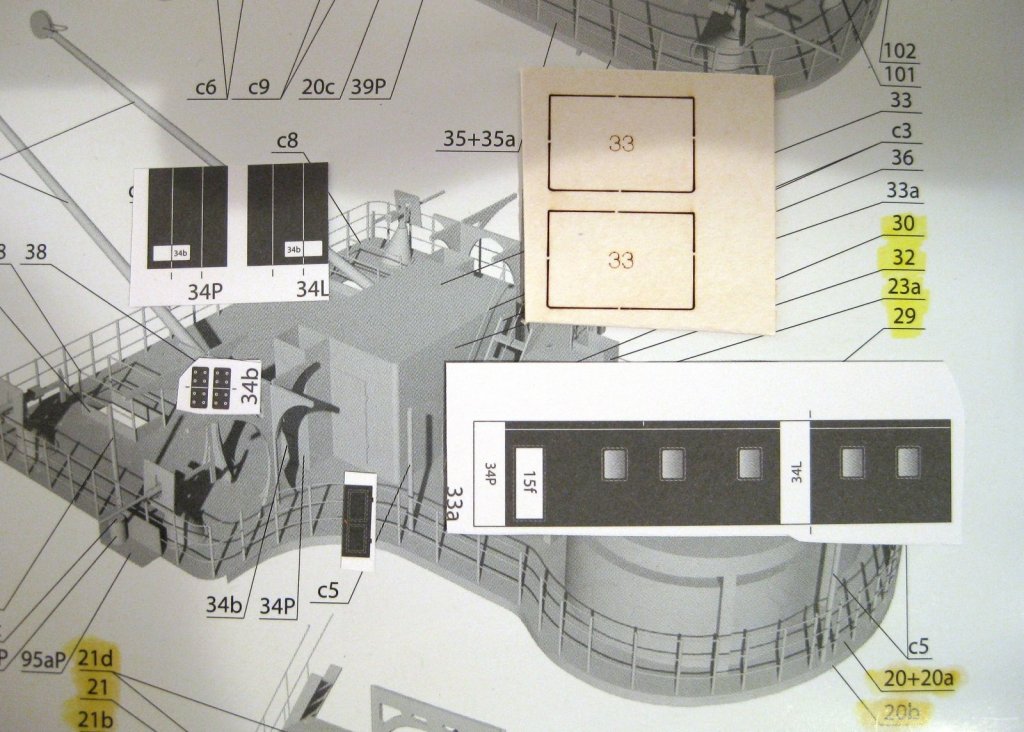
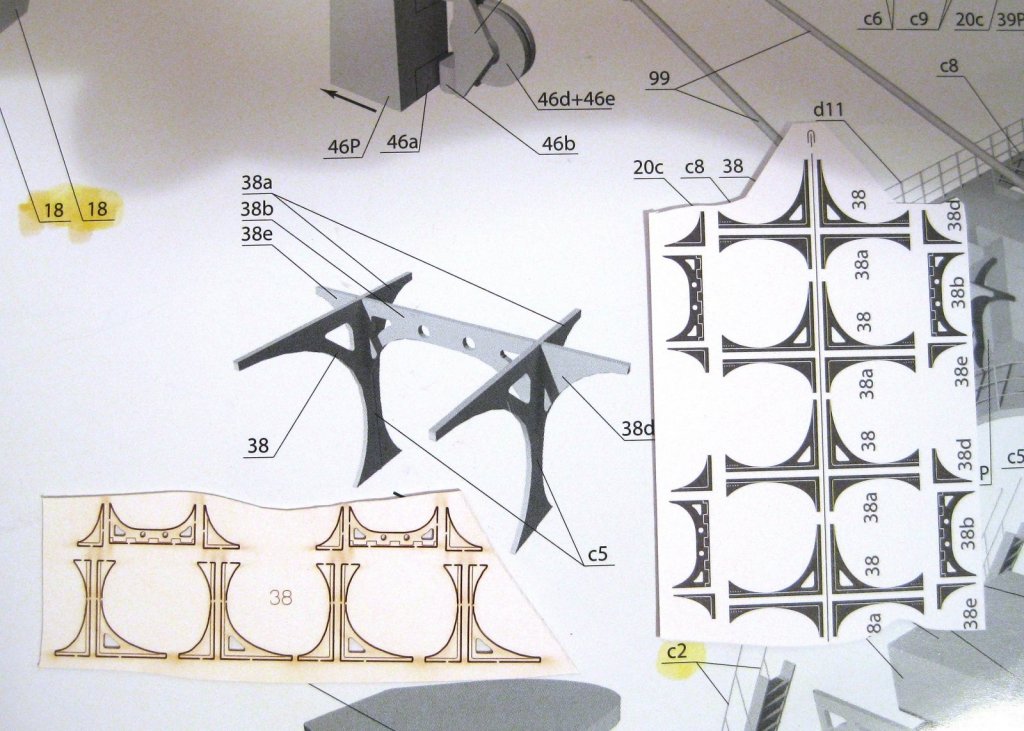
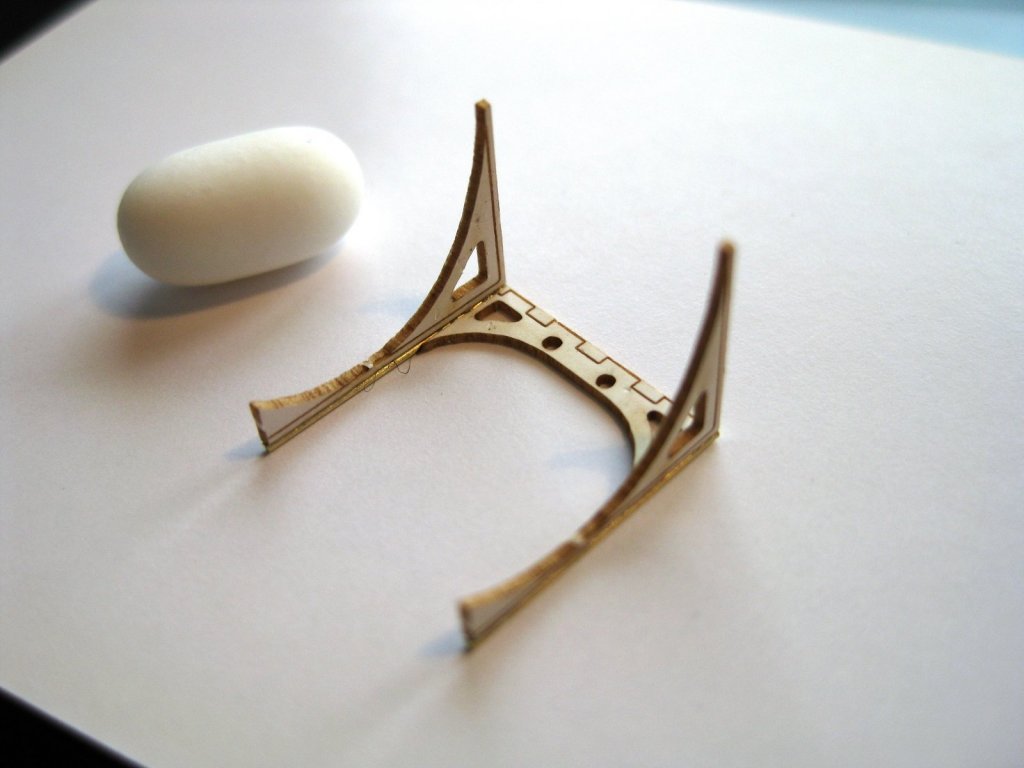
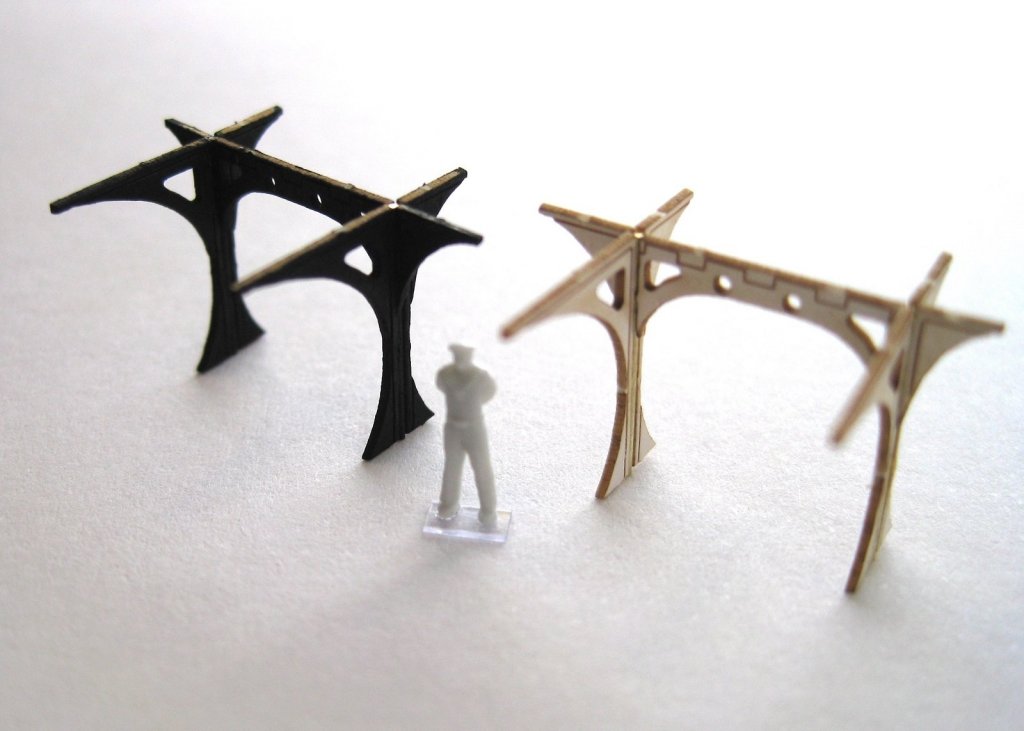
Hi, Continuing on with the Con deck structures we have the next sections of the mast and the services ducts. These are the same as the lower level sections with the exception of access hatches on the ducts. The mast section was again overly long so not sure if it is supposed to wrapped until the diameter is obtained but I cut the excess off and edge glued once I worked out circumference. The next structure is a cabin of some sort with what appears to be more ducts with access hatches. The forms only provide top and bottom parts so once I knew the height of the cabin wall I spaced the top and bottoms apart with balsa and card until the correct distance was met. The windows got the usual treatment. The Con level also has additional supports and bracing for the deck above and again these can be replaced or supplemented with the laser cut forms. There are also 0.5mm brass rod supports. I again decided to only use the thin laser cut forms and discarded the printed paper parts. This progress shot shows the thin forms being glued to the 0.5mm brass rod. Roket card glue is perfect for this and gives a secure bond very quickly. All the support parts are glued to the brass rod. It wasn’t too difficult keeping everything square. Both supports completed and one painted All the Con deck parts to date; with nothing glued yet as I still need to do the perimeter handrail and want to prepare the bridge house deck above so I can double check alignment before fixing. Cheers Slog


- 244 replies
-
- 11
-

-
- borodino
- dom bumagi
- (and 1 more)
-
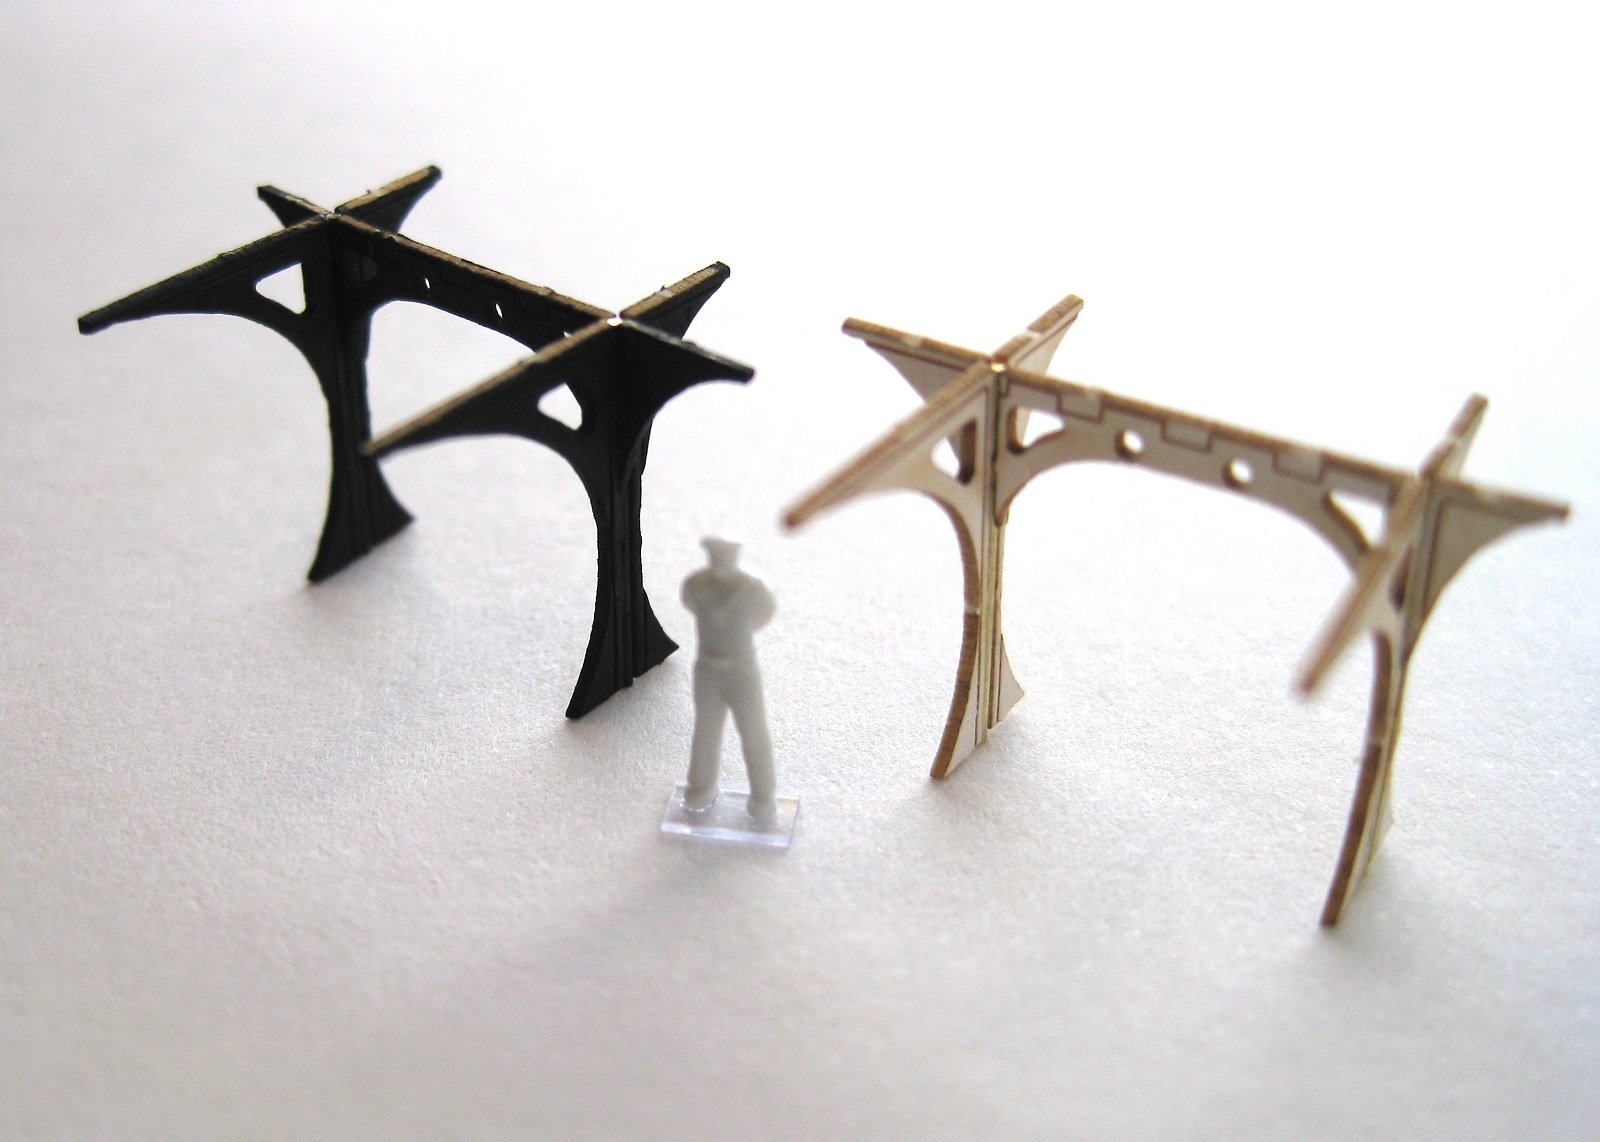
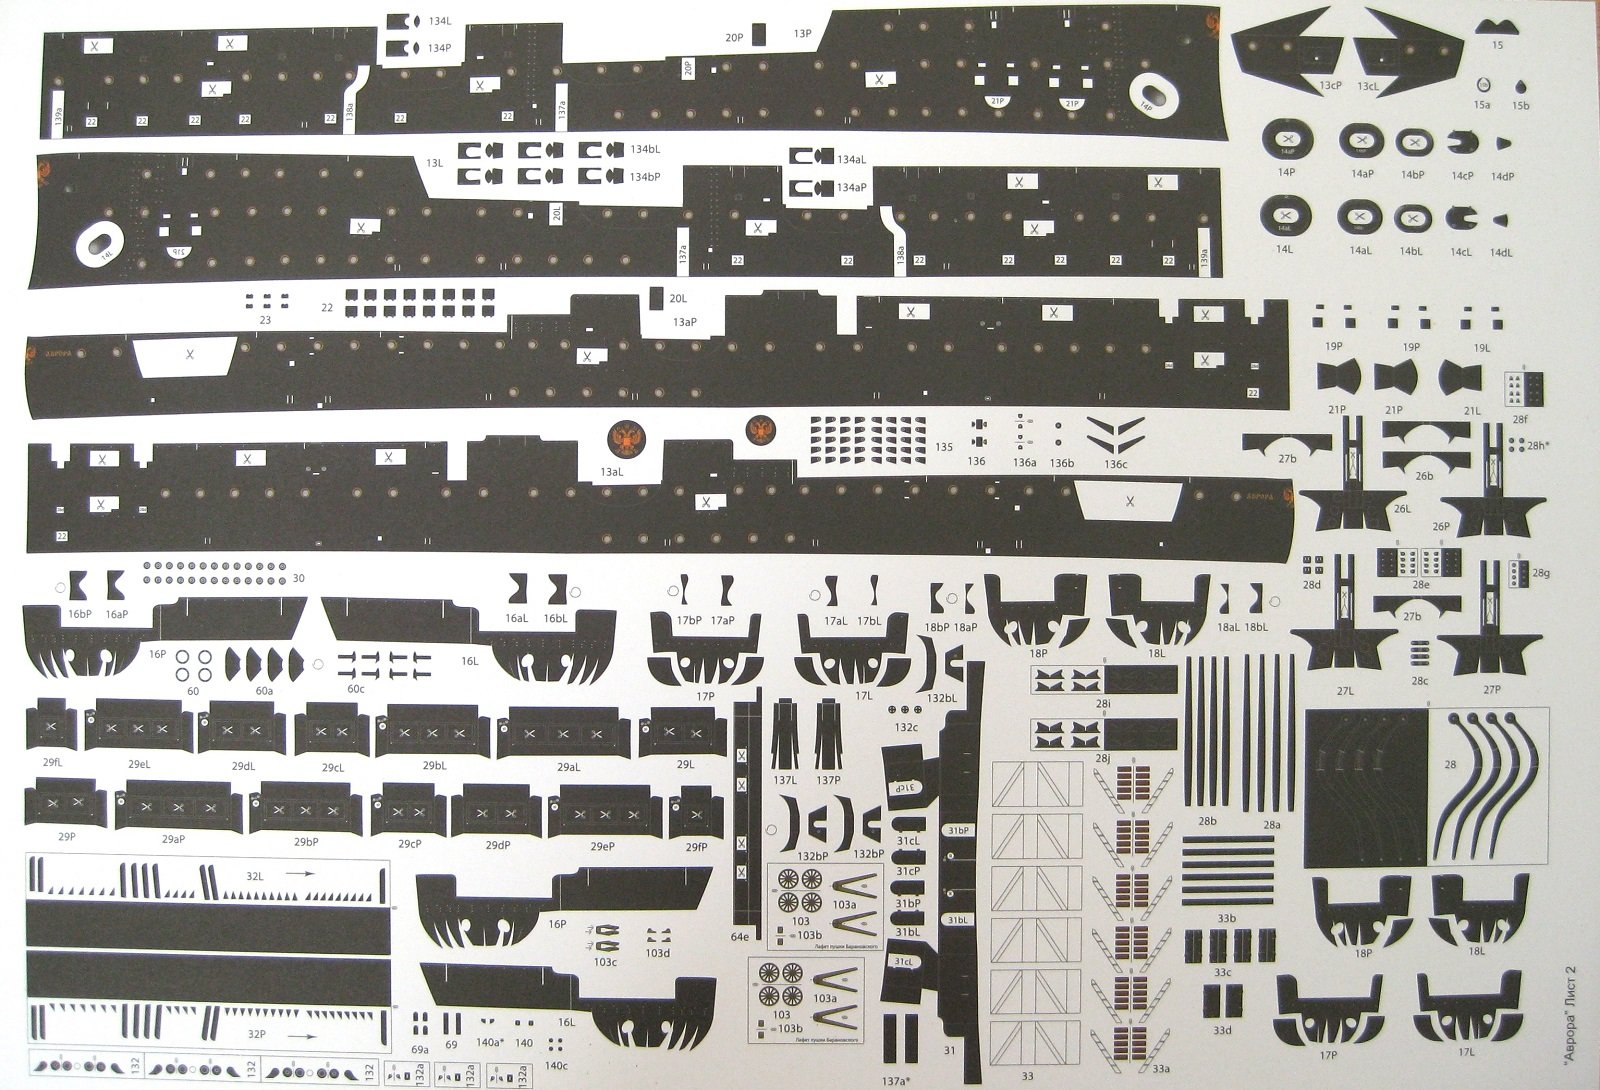
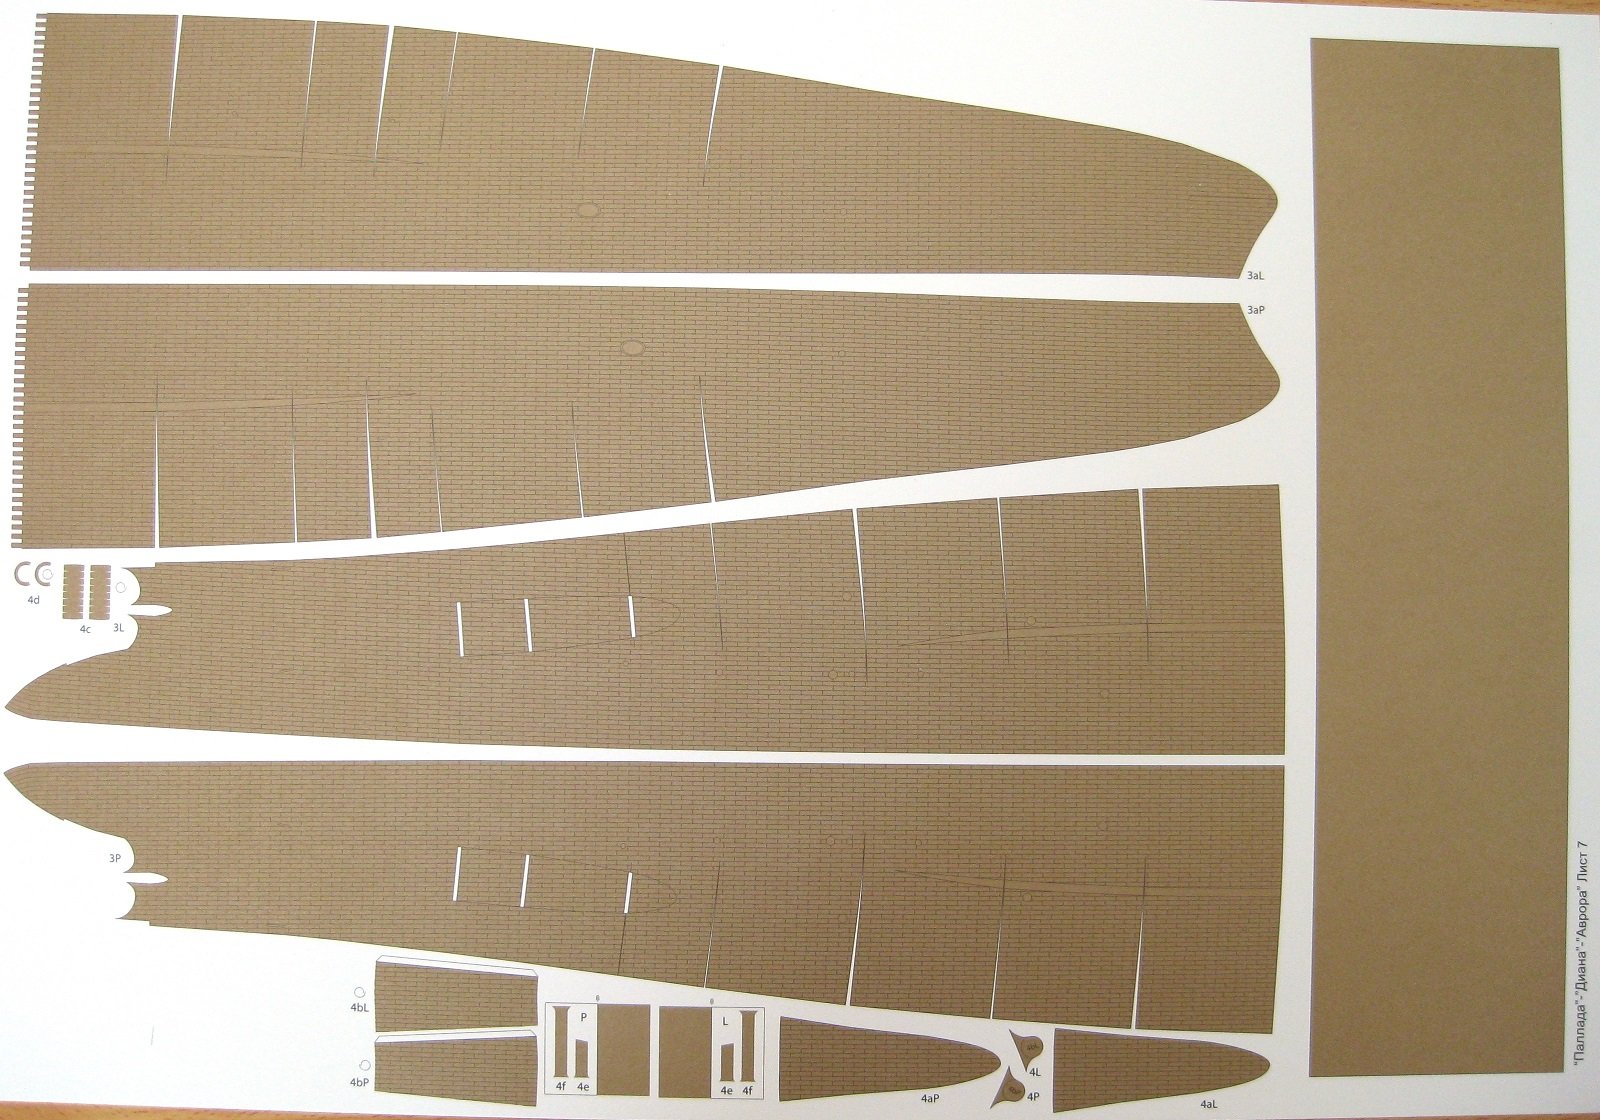
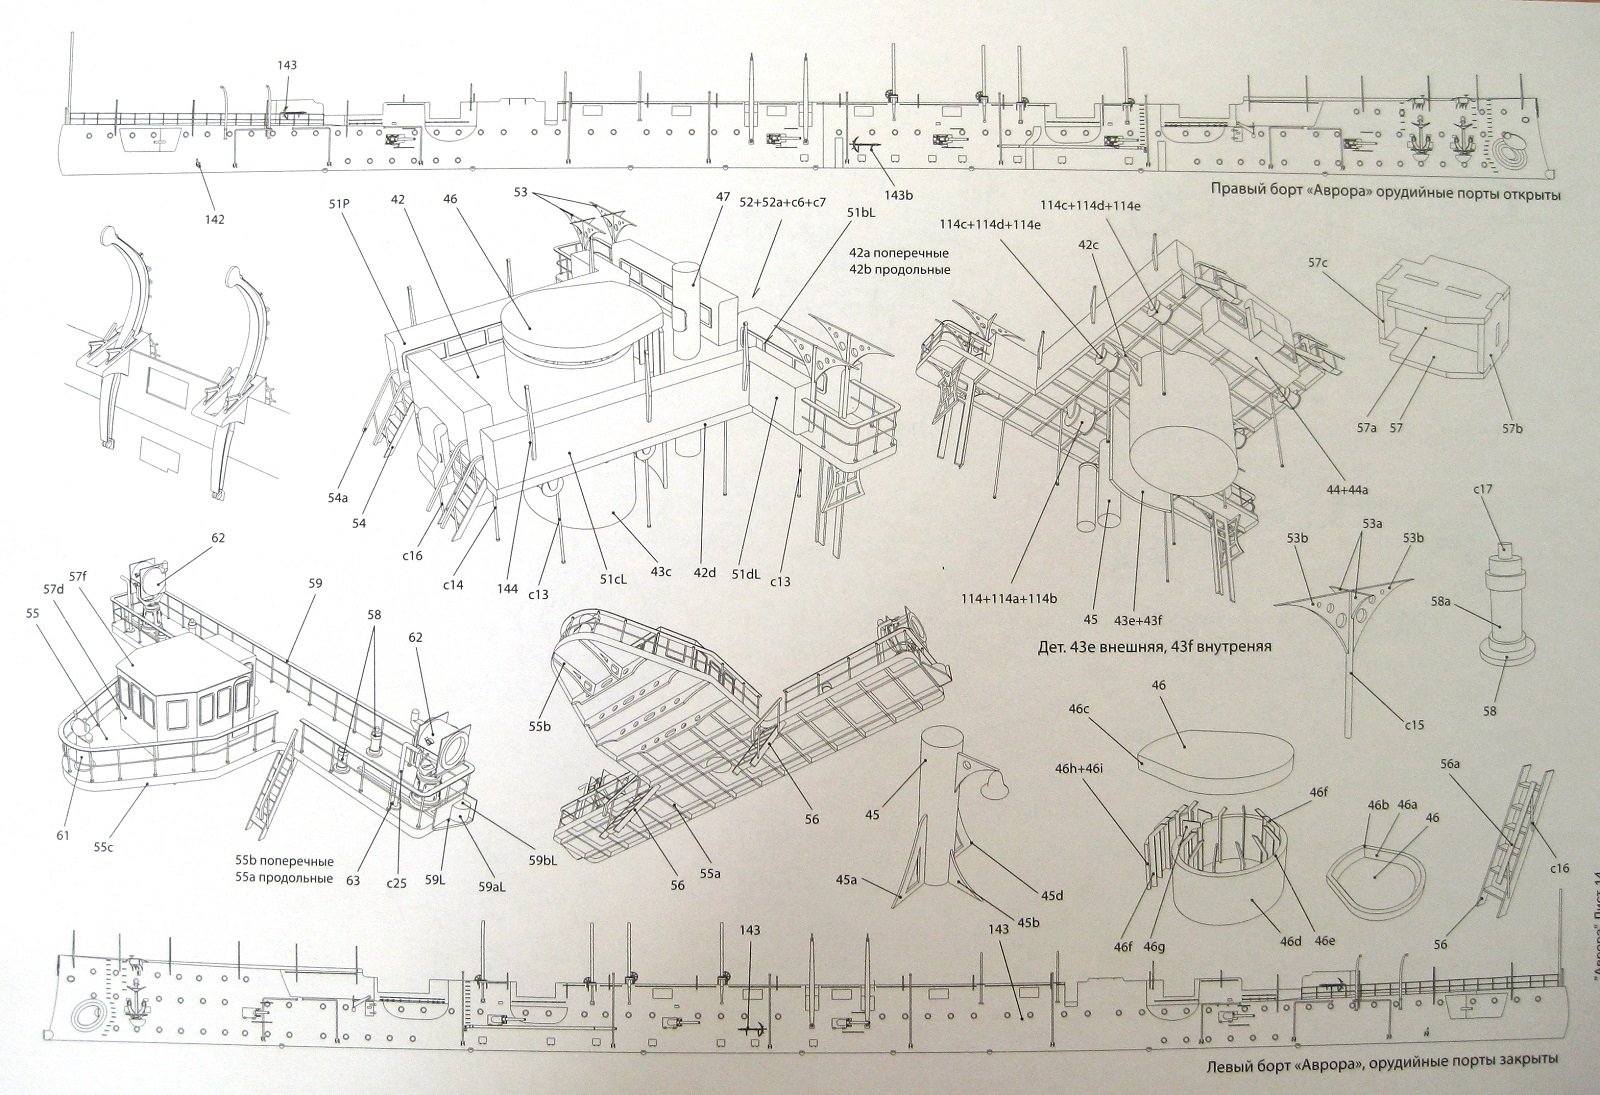
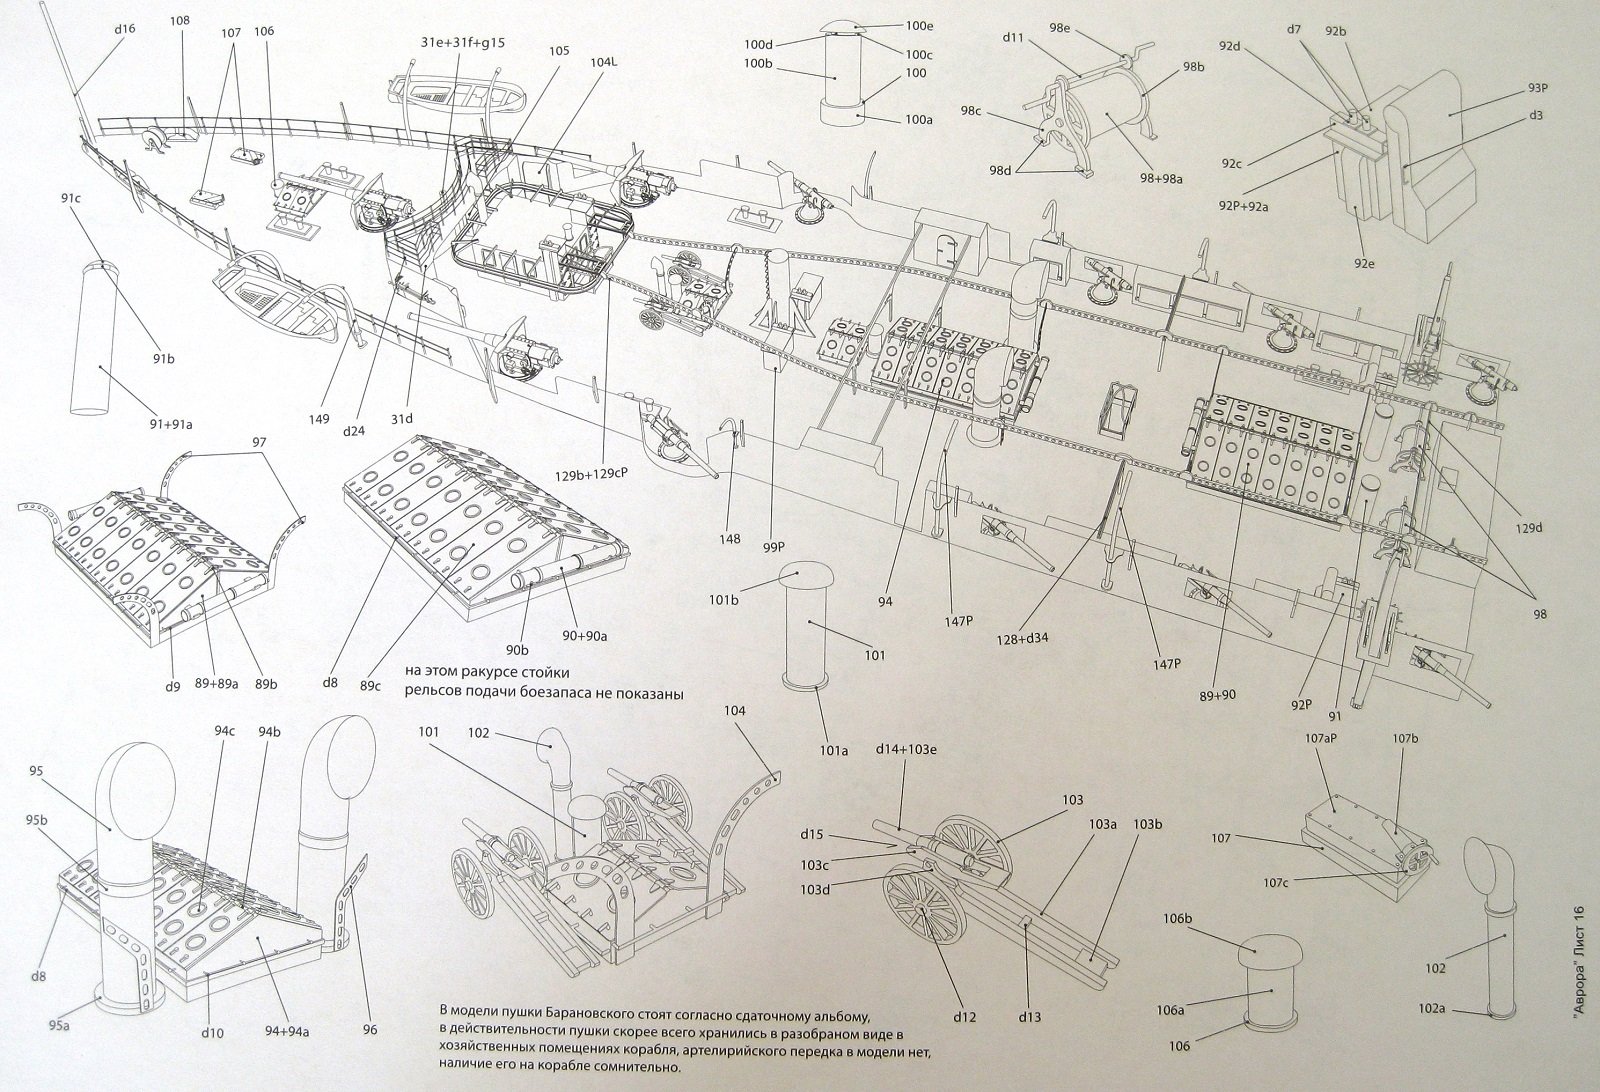
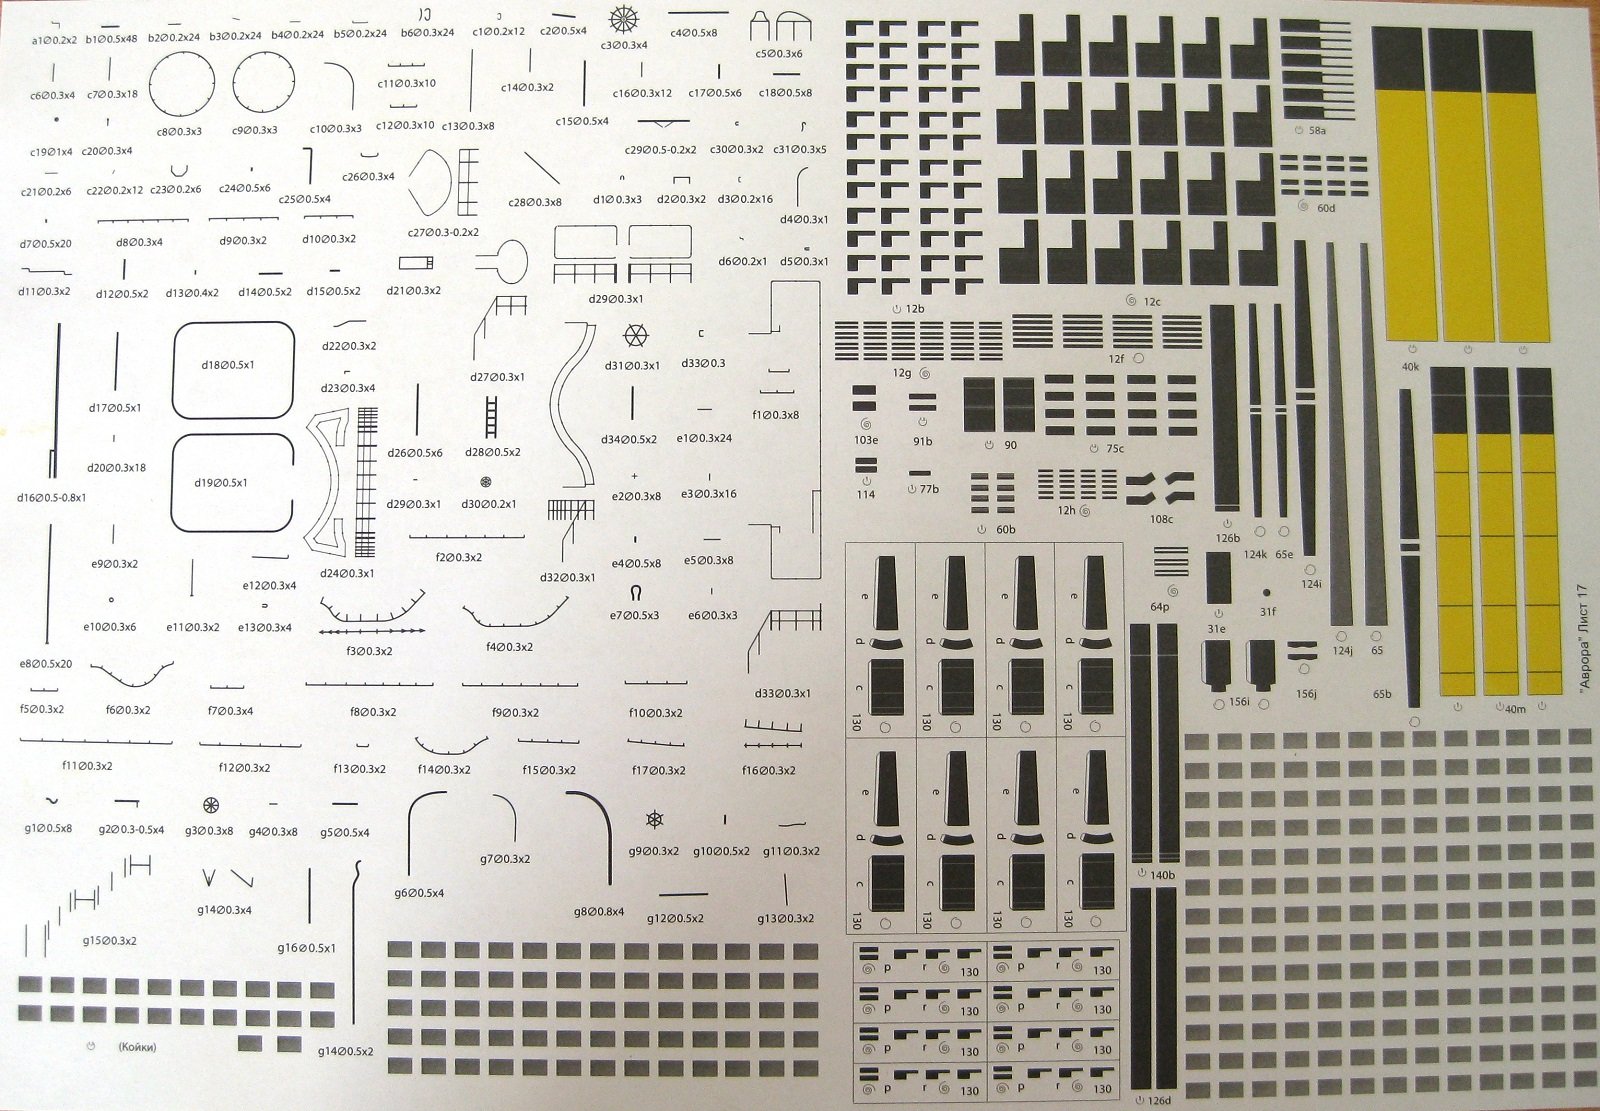
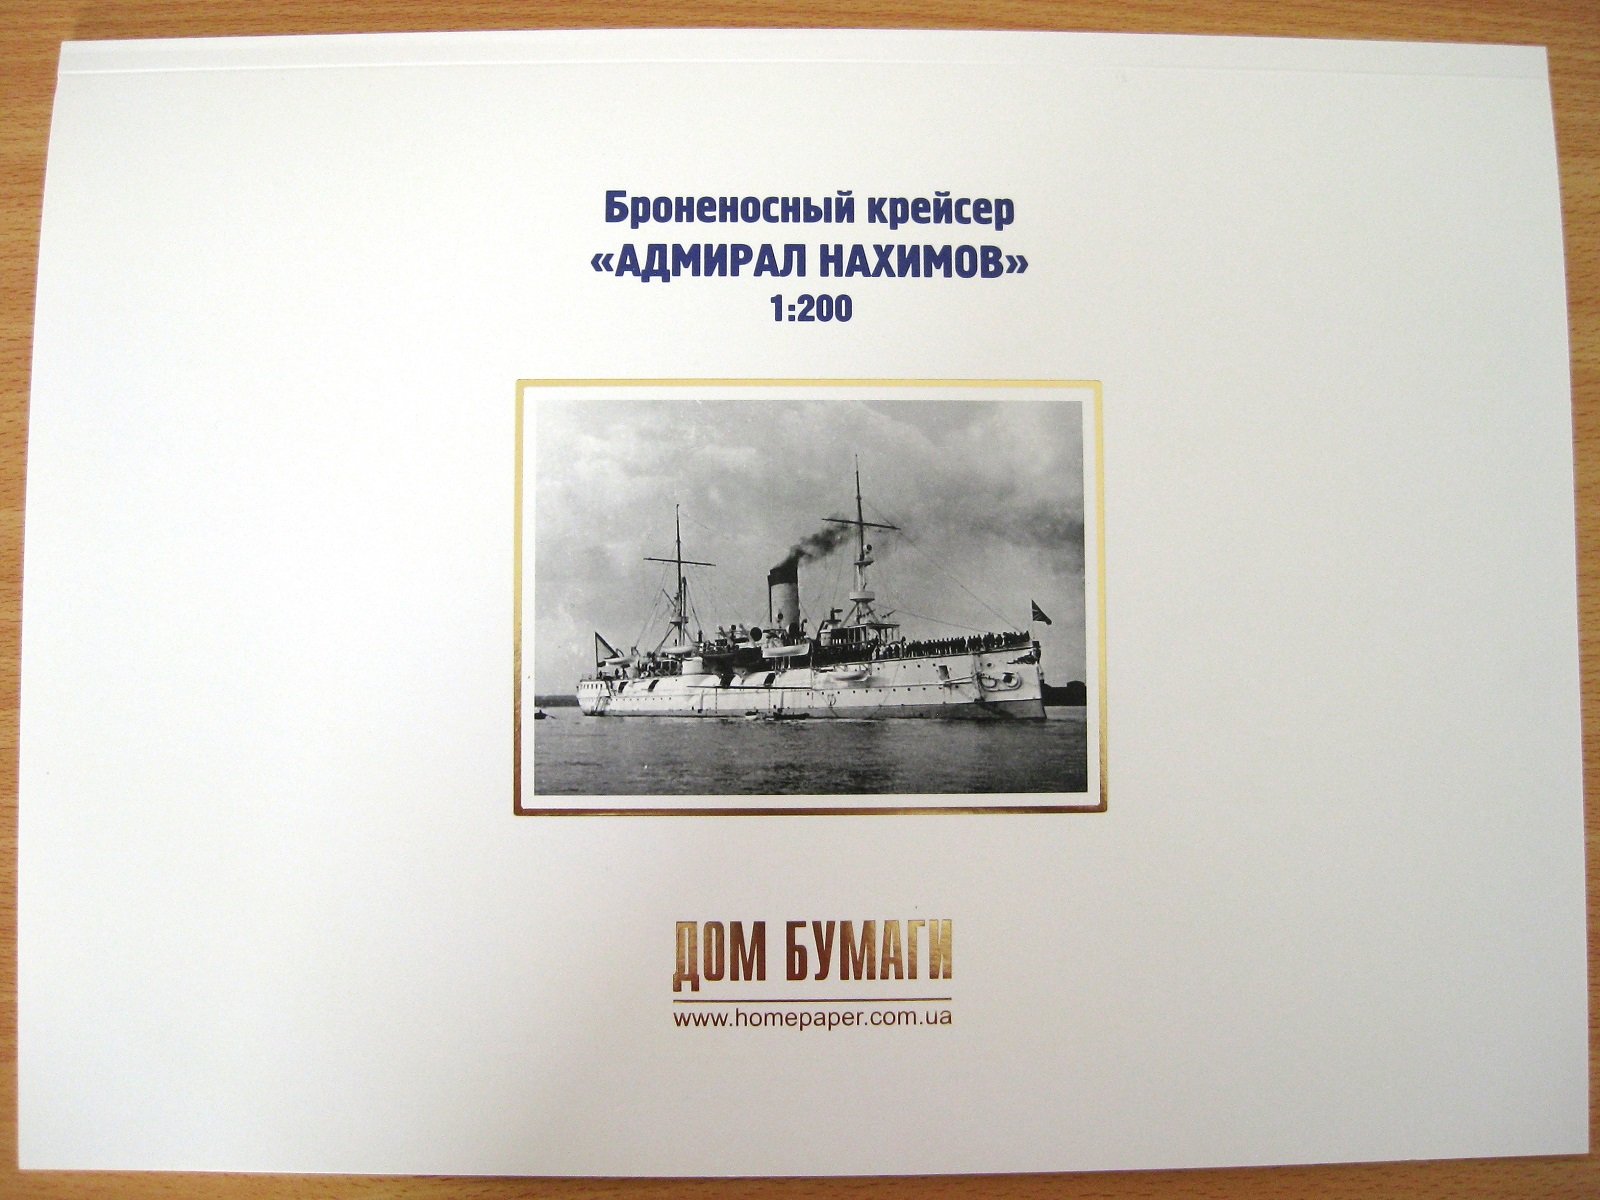
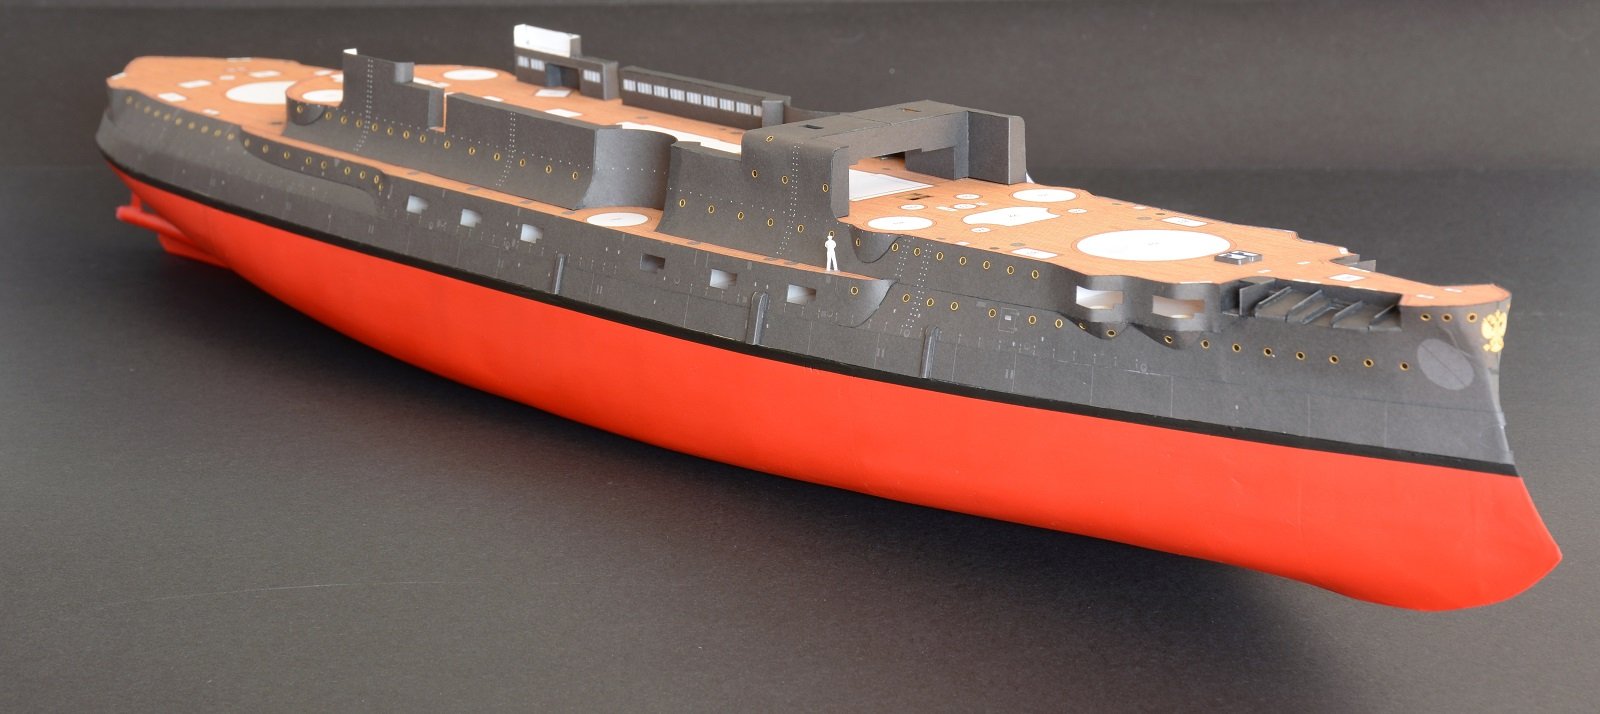
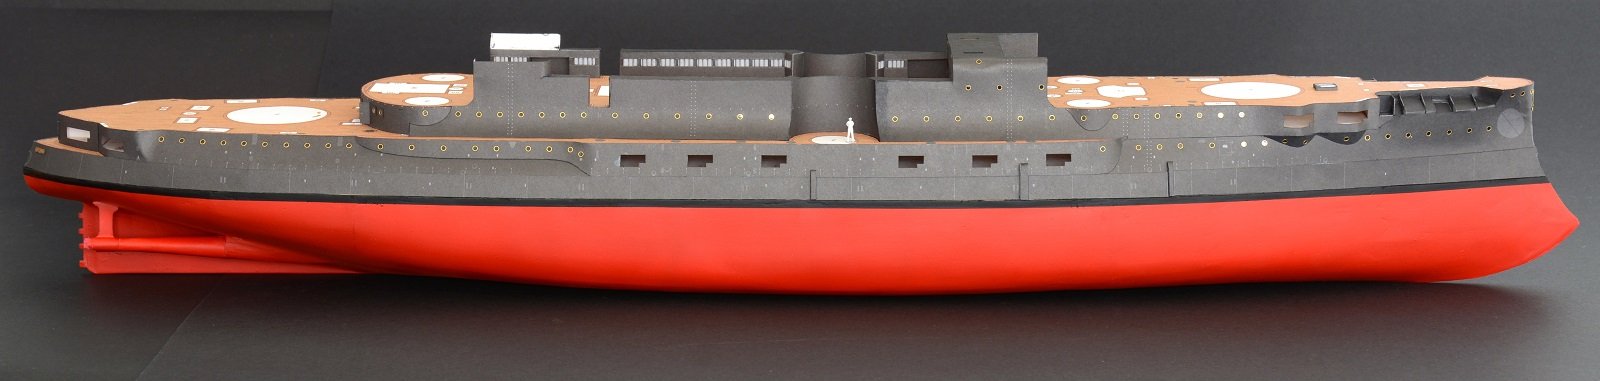
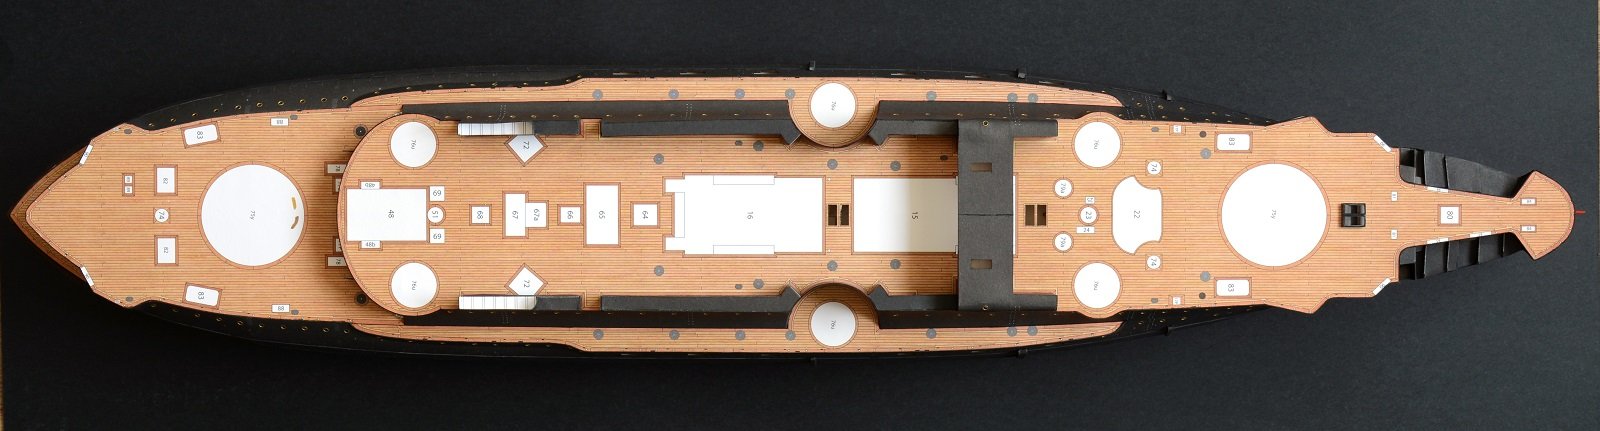
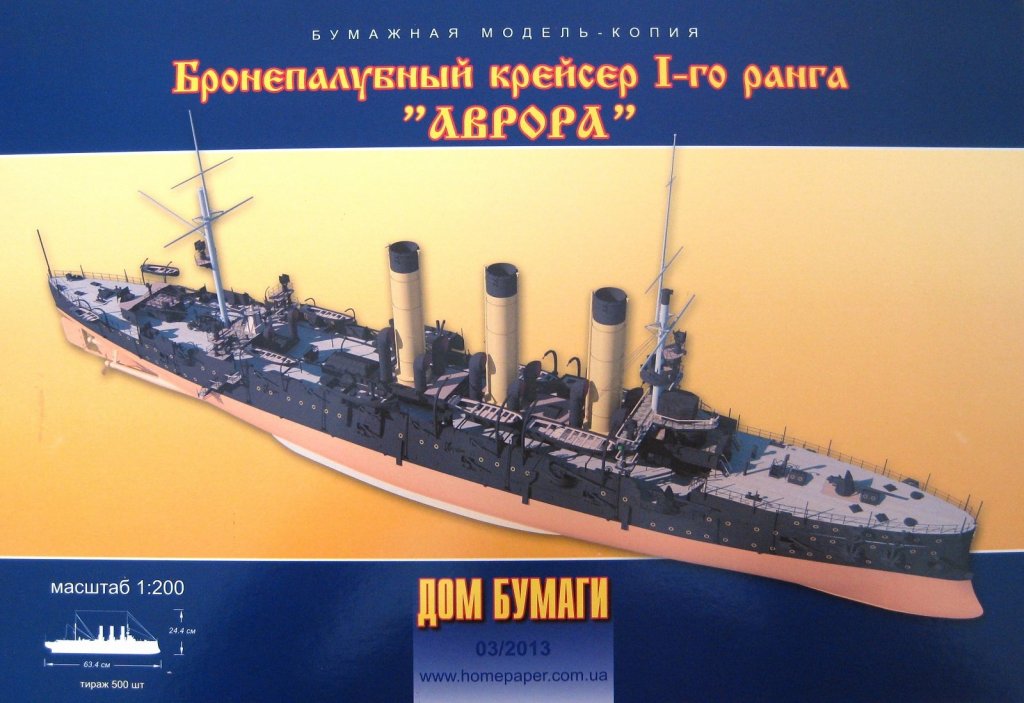
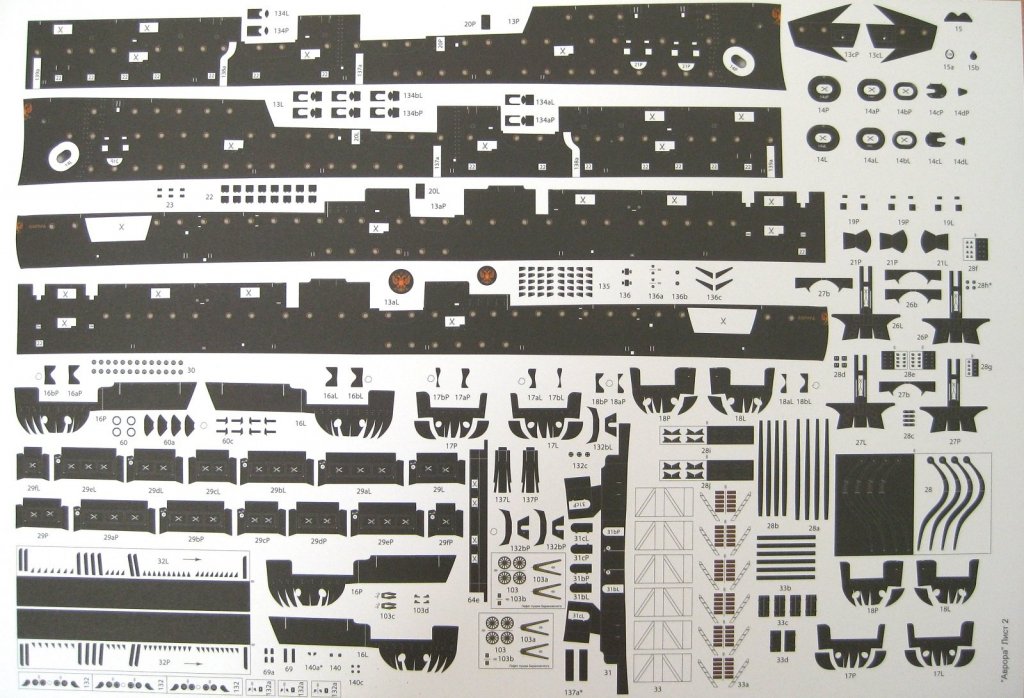
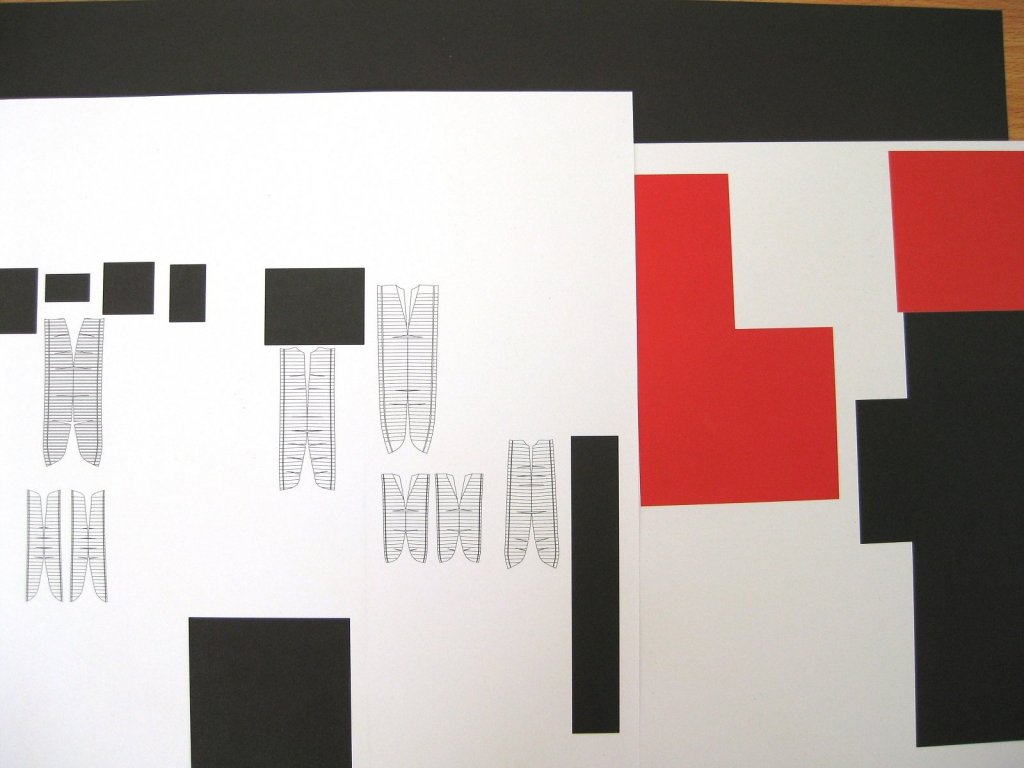
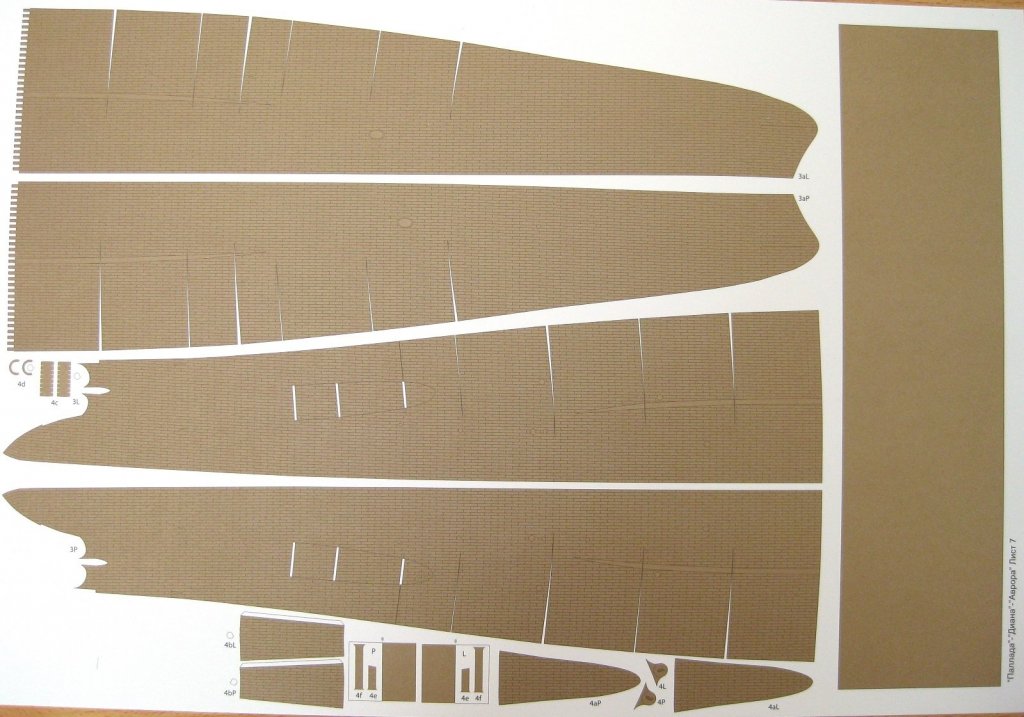
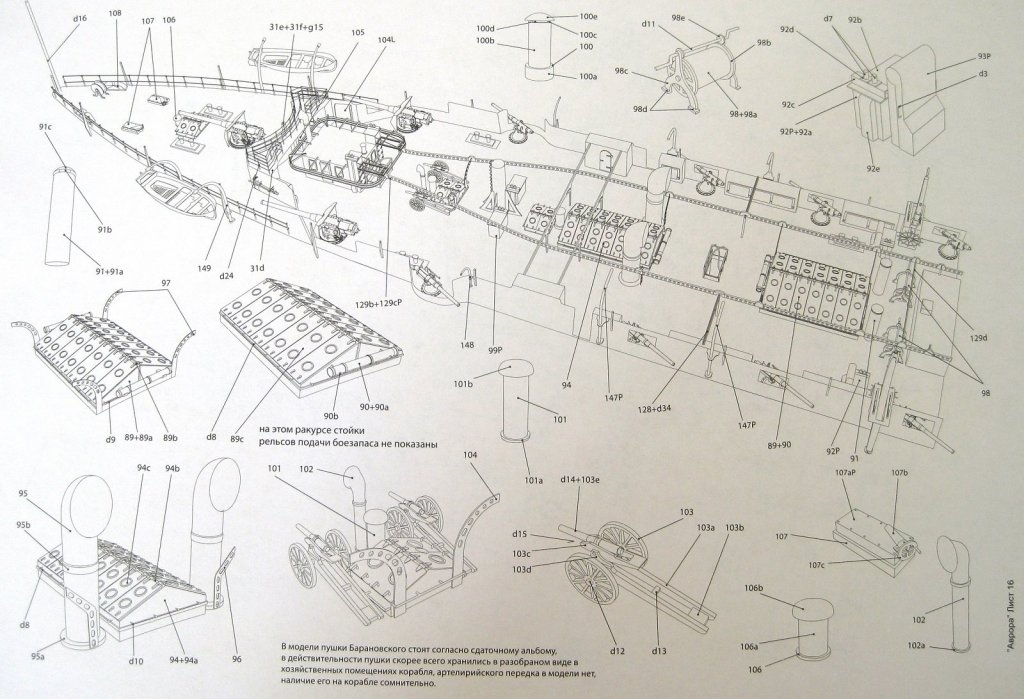
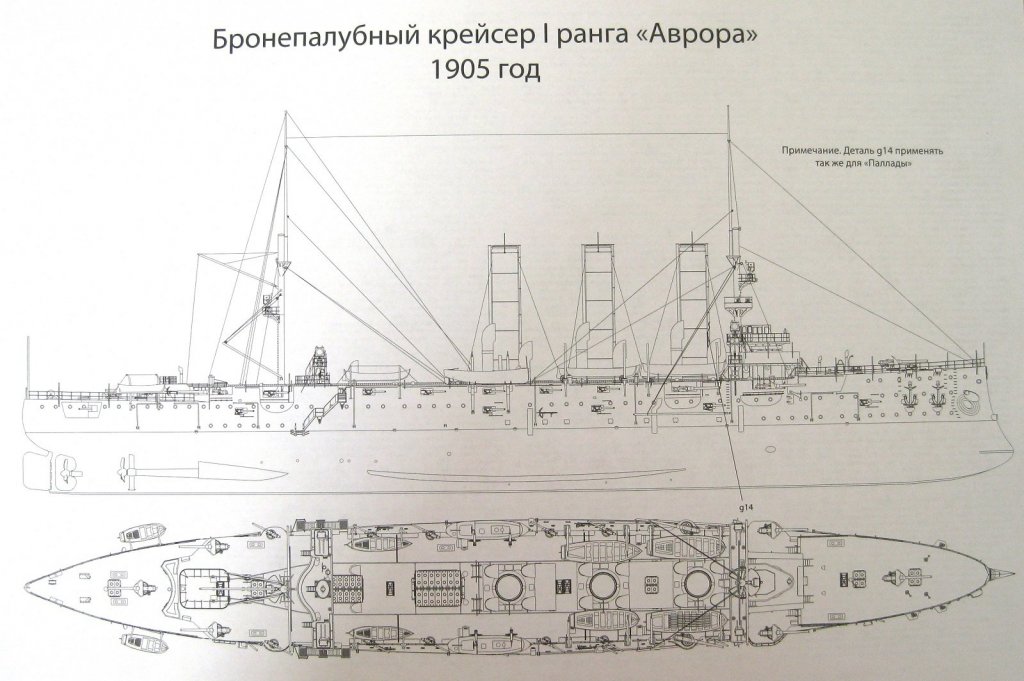
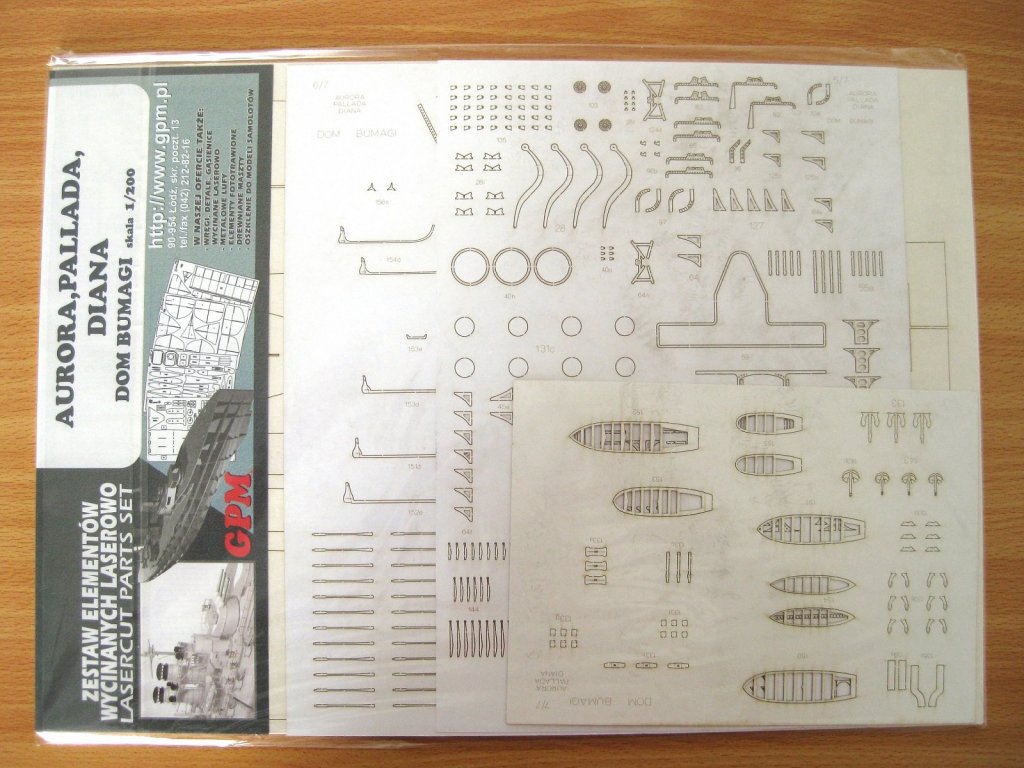
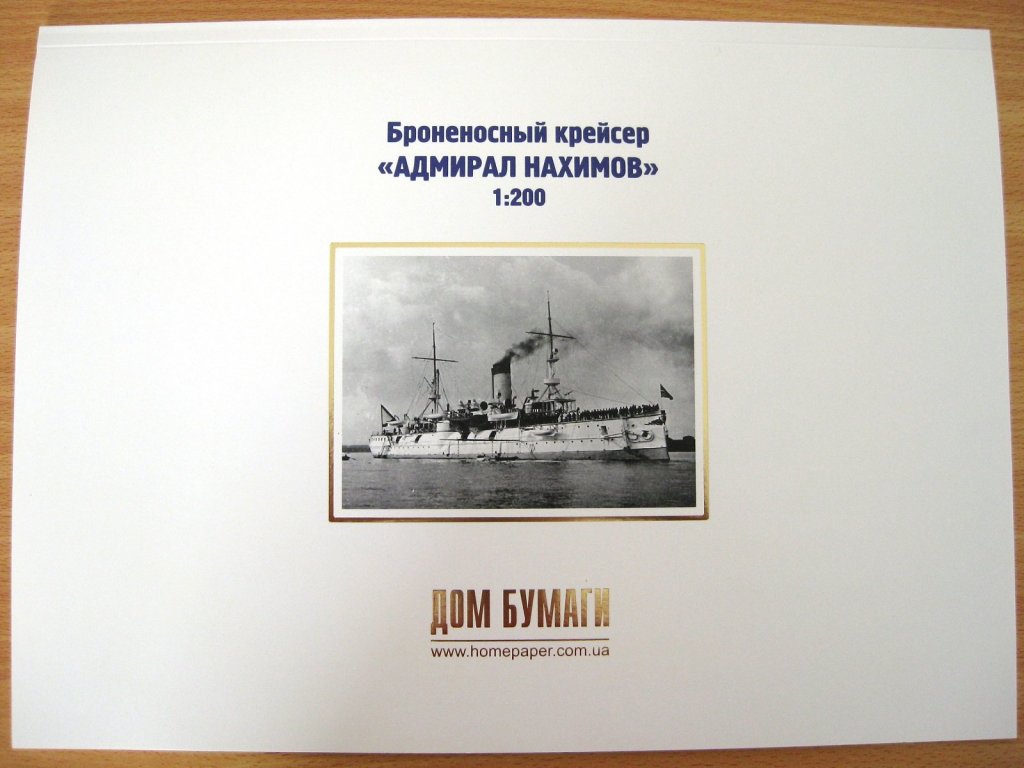
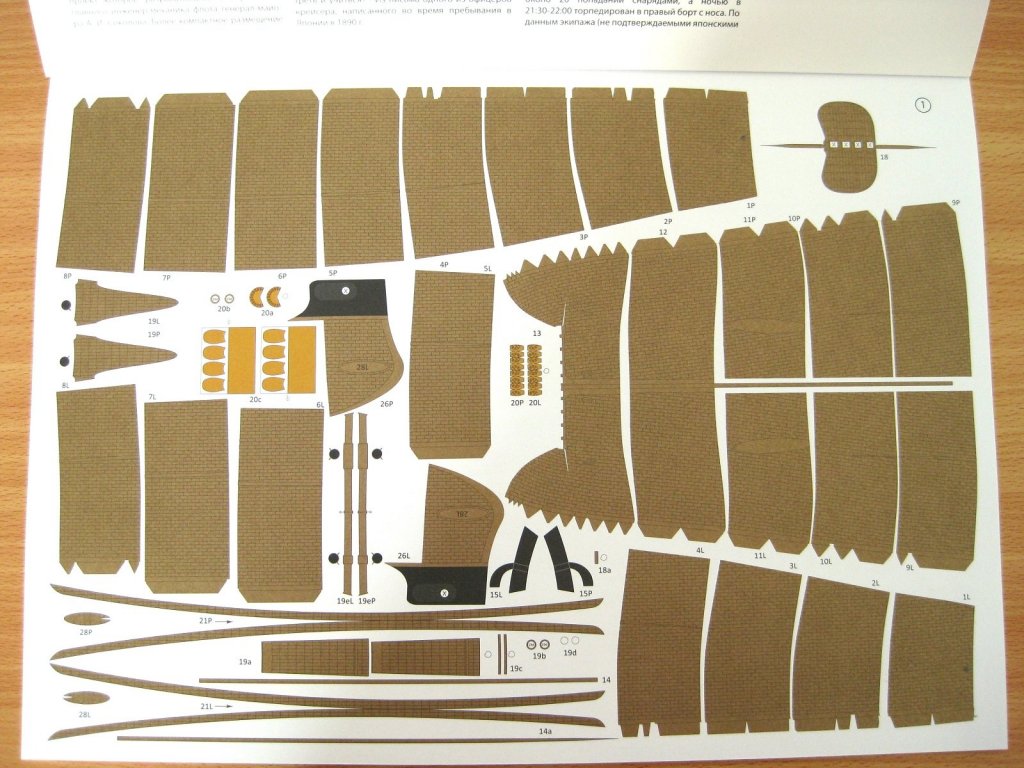
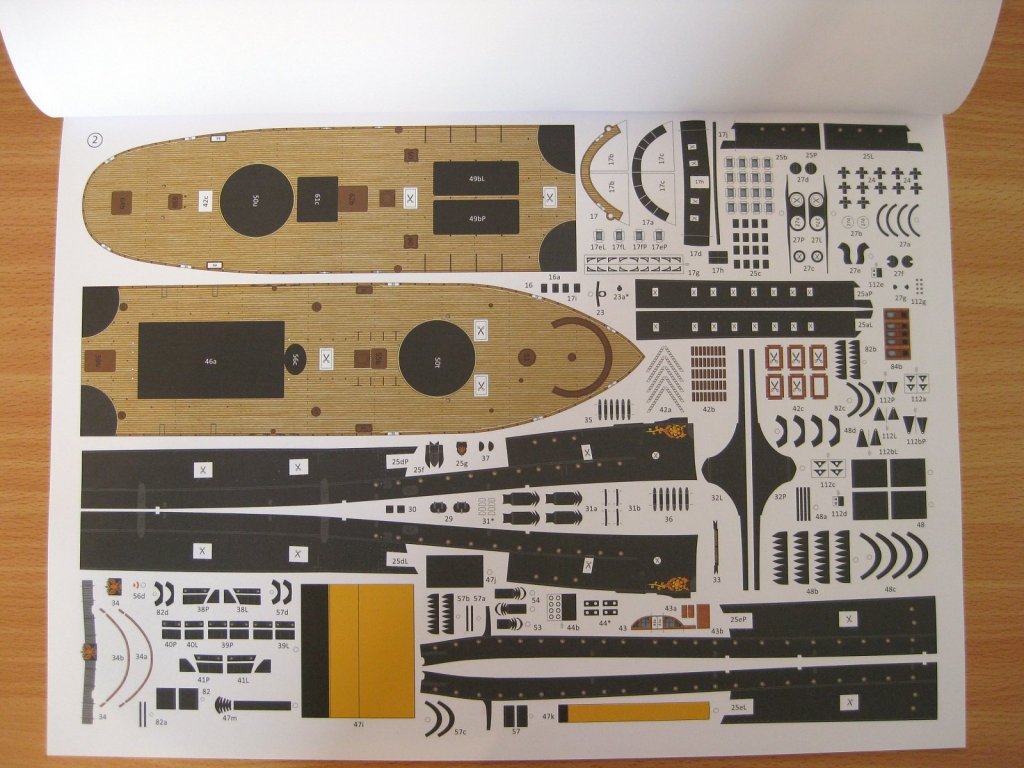
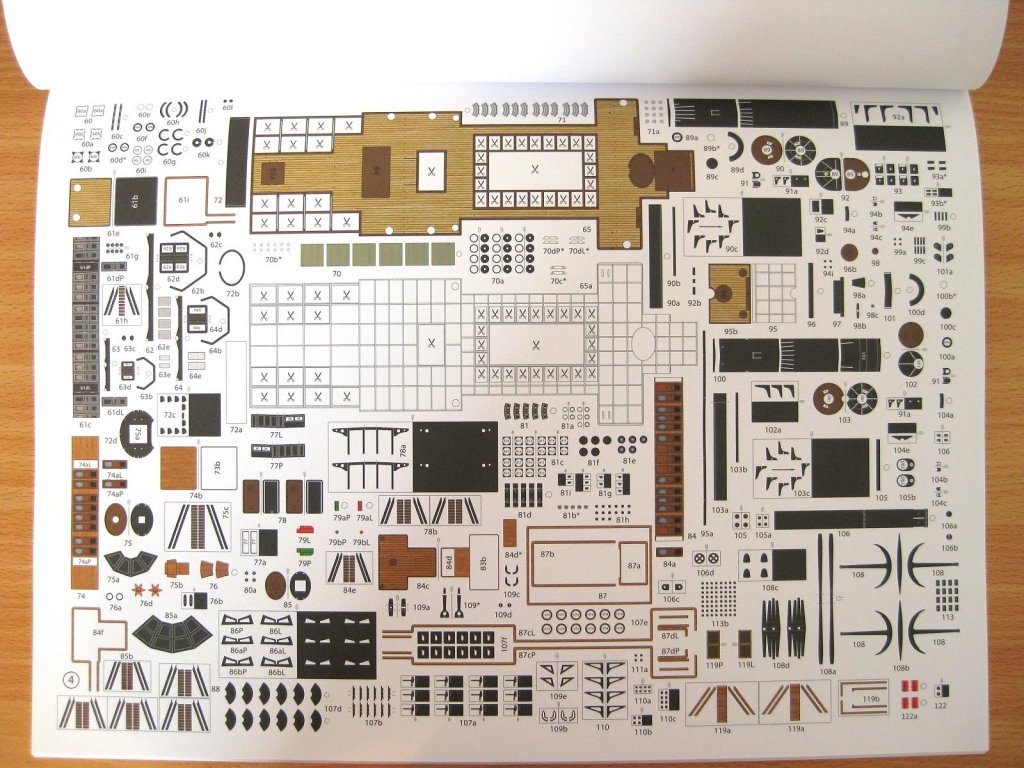
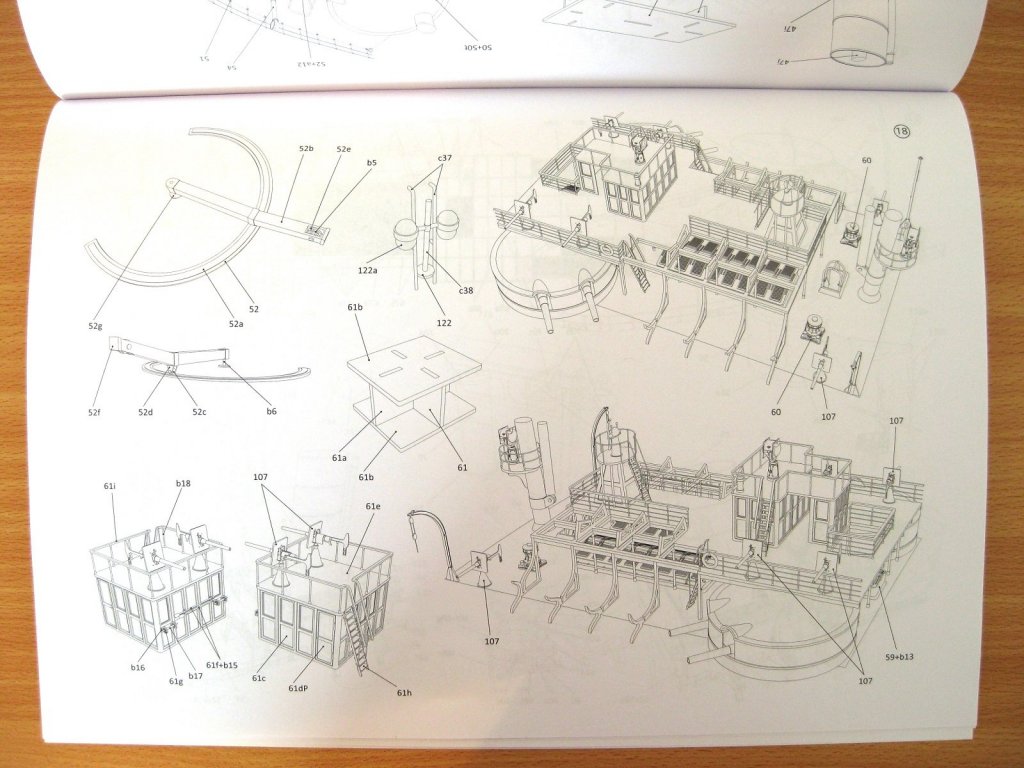
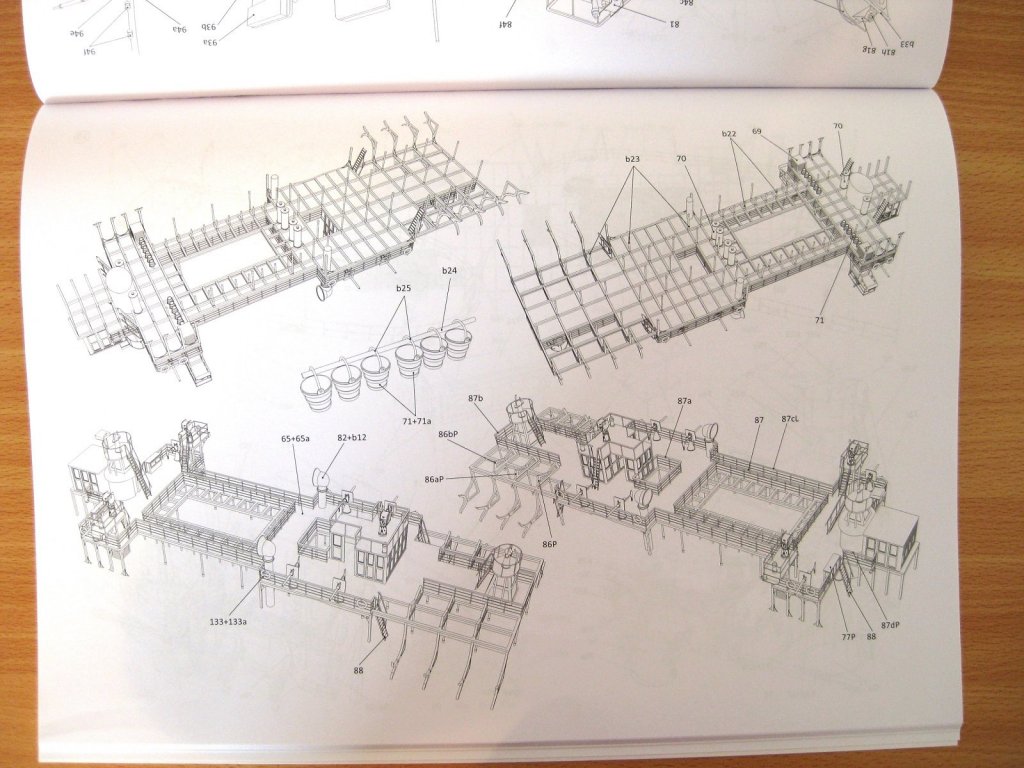
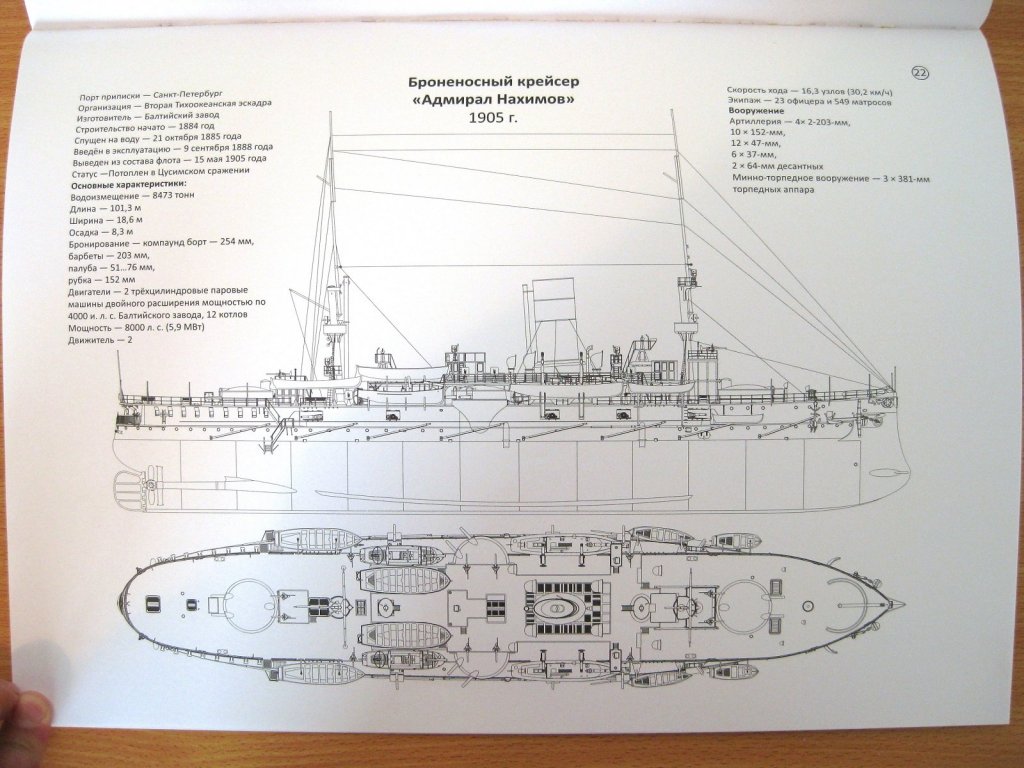
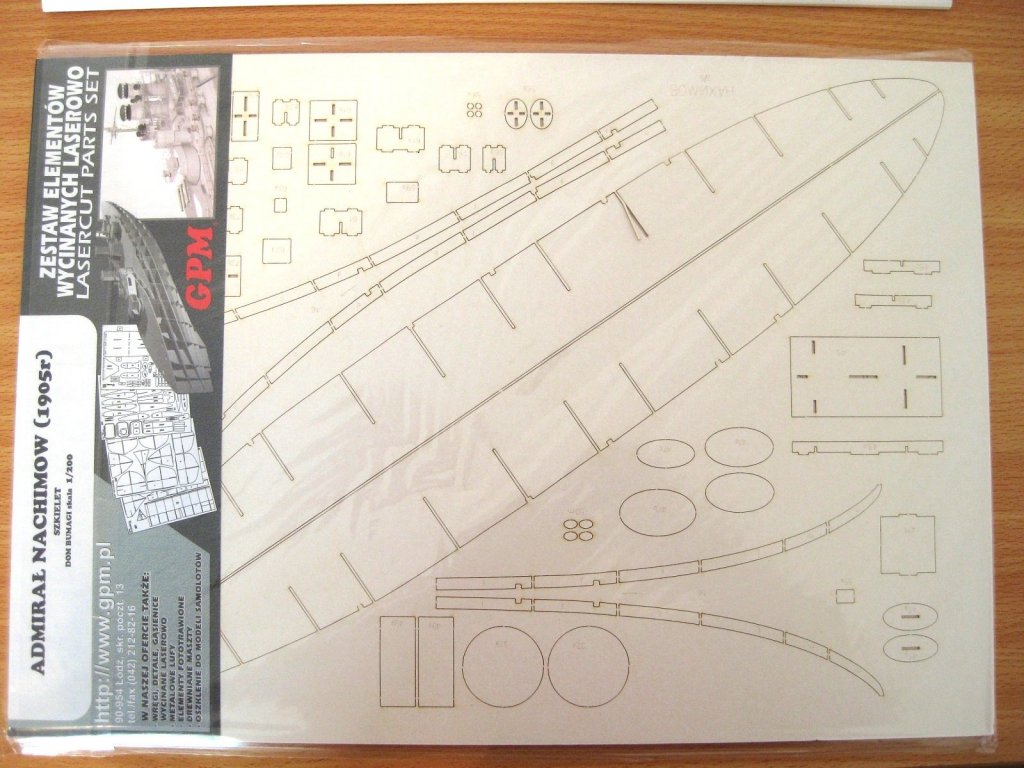
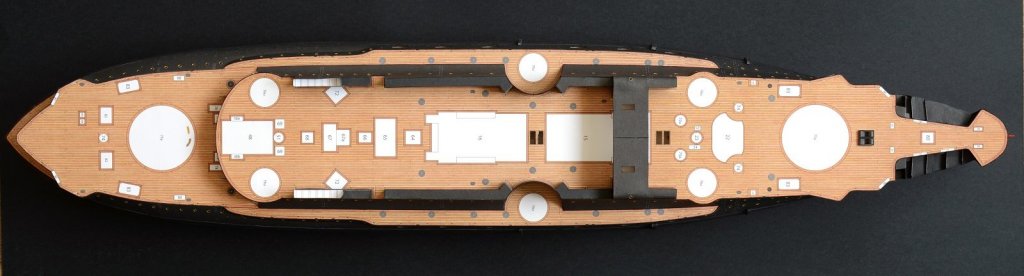
Hi All, Keeping in line with my interest in Imperial Russian ships I have purchased two more card models to add to my stash. It was partially by accident that I choose these particular ships, both being present at the Battle of Tsushima to go with Borodino, which I am currently building. I want to touch on a number of reasons why I choose these ships. The main reason was they are published by Dom Bumagi. If you have been following my Borodino build log you will know I have a few minor issues with my current build, particularly to do with overcrowding of parts on the pages (really just nit picking), lack of spare colour ‘swatches’, lack of fold lines for mirrored parts (annoying but not the end of the world) and the paper (which might just be my perception but nothing that can’t be overcome with some care for certain types of assemblies). So why go for more of their kits you ask? On the whole I am really impressed with Dom Bumagi’s Borodino and the benefits far outweigh the niggles above. Firstly the printing is very nice in my opinion and I think that Borodino’s decks are absolutely gorgeous. Other parts are richly coloured and on the whole very crisp. Secondly the parts fitment are perfect and so far have had no issues with Borodino in that regards and most importantly (for me) the amount of detail they provide for the builder to add. Some publishers only print the ‘detail’ on and provide no instruction/diagrams for the additional parts to add. I purchased both kits and their respective laser cut forms from GPM in Poland http://gpm.pl/en along with some photo etch generic railings, stairs etc. Surprisingly they didn’t list any brass gun barrel sets or photo etch detail sets for either ship. I have sourced a gun barrel set for Aurora in Australia from BNA https://www.bnamodelworld.com/ but waiting on stock. I also found a source for the photo-etch detail sets in Ukraine but the prices of these are excessively inflated compared to what similar sets from GPM cost. One set is US$60+ compared to approx. US$18 for a typical set from GPM. I will keep looking for the time being. On with the review; Aurora Aurora is one of three Pallada class protected cruisers (Pallada, Diana & Aurora) and is still afloat today, harbouring in St Petersburg. For those interested in the ship here is a link to the Wikipedia page. https://en.wikipedia.org/wiki/Russian_cruiser_Aurora Several publishers offer Aurora, Diana and Pallada kits and some stockists do discounted bundles of all three. Although seeing all three ships in on-line shops I always skipped over them until I came across a review of Dom Bumagi’s Diana and that closed the deal so to speak and of course I chose their Aurora kit for the reasons discussed above and due to its participation in the Battle of Tsushima. The kit is presented the same way as Borodino in that all the pages are loose leaf and stored in a plastic sleeve which surprised me when I first got the Borodino. I believe the Aurora is one of their earlier kits as the thick card front cover sheet follows the same design and layout as the Borodino. Aurora comes in the same A3 loose leaf format stored in a plastic sleeve and all the pages are numbered this time. The front cover shows a render of the ship and the reverse side is some history and the specifications (all in Russian) as well as some assembly diagrams of the ship’s boats. There are 7 A3 pages of parts, 2 of which are fully black on the reverse side as these have the upper hull components. Several of the other sheets also have reverse colour sections and which include inside printed planks for the ships boats. There are some plain colour swatches which is nice to see as this was one of things that annoyed me about Borodino. The lower hull skins have plates printed on and have a shiny(ish) metallic finish to them which is pretty nice (IMHO) There are 4 thin pages of templates for the underlying forms /skeleton which I won’t be using since I have the laser cut form set. Saying that I notice some of the templates have gold coloured sections for the lower hull so may need to use these even with the laser cut forms. There are 6 double sided pages of assembly diagrams and these are line drawings. I mentioned in the Borodino log how I liked that the assembly diagrams were renders but after using them for a while I think the line drawings may be clearer after all. Page 17 is another thin paper sheet with rollable parts like gun barrels etc and also contains all the ‘ironwork’ details for making yourself. The last 2 thin paper sheets are double sided, 3 of which are instructions; this is probably the most instructions I have seen on a card model so far. How useful they will be is yet to be seen. The last PAGE shows the ship in profile. The laser cut form set has 7 A3 sheets; 4 of which are thicker forms for the underlying hull and structures. There are 3 thinner smaller sheets for detail parts like davits, braces, supports etc. One thing of note is the Aurora hull shape is relatively simple but contains quite a large number of form work similar to Borodino. (Admiral Nakhimov has considerably less forms) First Thoughts: I am really impressed with this kit. The printing and colours (mostly) are really nice and particularly like the underwater hull colour and effect. The only thing I don’t like at the moment is the yellow colour for the funnels, which is a really bright primary yellow. Borodino’s yellow funnels look reserved in comparison! Admiral Nakhimov Admiral Nakhimov is an armoured cruiser which was sunk at the Battle of Tsushima and again for those interested in her here is a link to the Wikipedia page. https://en.wikipedia.org/wiki/Russian_armoured_cruiser_Admiral_Nakhimov Admiral Nakhimov was another of those kits which I hadn’t noticed before but again I came across a review and found her to be such an interesting shape and construction and after discovering her participation at the Battle of Tsushima was added to the stash. I believe this is one of Dom Bumagi’s newer kits as the front cover has changed design to show a smaller picture (in this case a real photo) surrounded by a large border. This is more conventionally presented as an A3 book, bound along the top long edge. There are 7 pages of parts and again some sheets have full reverse colour and others have selective reverse colouring. The lower hull has the same shiny metallic finish as Aurora but in a darker shade. There are a lot of nice parts and colours on this ship like the raised decks and different coloured cabins. There are 5 thin pages of templates for the underlying skeleton but also includes the main deck which appears to depict linoleum. Again there is a single thin sheet for all the ‘ironwork’ details as well as the rollable gun barrels etc. There are 7 double sided sheets of assembly diagrams and these again are line drawings as opposed to renders as I must admit I think these will be clearer to read than renders which I was excited about for Borodino. The last page shows a top and profile view of the ship and I think it looks very handsome from this side with a relatively deep hull. Again I obtained the laser cut forms but these supply only 5 sheets of the thicker underlying forms with no thin sheets for detail parts. I also note from the instructions that although similar hull shape to Aurora above there are considerably less formwork so particular care may be needed to keep everything lined up and square until skinned up. First Thoughts: I am really pleased I got this one. The shape, layout and particularly the colours should build into a really nice model. The bow crest colouring and several of the cabins and upper decks are all really nice. The single yellow funnel is a much more subdued yellow compared to Aurora above. Summary I’m really impressed with Dom Bumagi kits and from what I gather they have a reputation for the amount of detail they provide which I can attest to. Given the choice of publishers for the same subject, Dom Bumagi would most likely be my 1st choice. The plan is to finish Borodino before starting either of these but since I have finally got my shipyard set-up to a state I can work in I may start working on these in the background. Cheers Slog


-
Hi Craig, Glad to see you choose Mikasa for your next build. As you've probably gathered I will be following this one closely as it's in my stash to do...but that's way down the line. I already have the MK1 deluxe detail set but I am tempted to get the Pontos set as well and use the best bits of both. I wish I had waited for the Pontos set as that would have been my preference. Looking forward to more. Cheers Slog
- 467 replies
-
- 6
-
-
- mikasa
- wave models
- (and 1 more)
-
Hi Bob, All the kits I have came across will have a legend somewhere in the instructions which denotes the laminating thickness required. Typically * = 0.5mm, ** = 1mm, b = laminate to the same kit paper thickness and so on. Different publishers will have variations on the above; but all you need to do is find the symbols and if it's not clear type one or two words into google translate to confirm the thickness. Cheers Slog
-
Hi Craig, build looks fantastic, well done. I would have thought the decision for the next build would have been easy...MIKASA! of course I would expect a blow by blow build log so I'll have some reference for the future! Cheers Slog
- 151 replies
-
- 6
-
-
- duke of york
- tamiya
- (and 2 more)
-
Nice choice for your next masterpiece. Look forward to seeing what you come up with for this one. cheers Slog
-
Congratulations on your completion of another stunning build, I enjoyed following and look forward to your next. cheers Slog
-
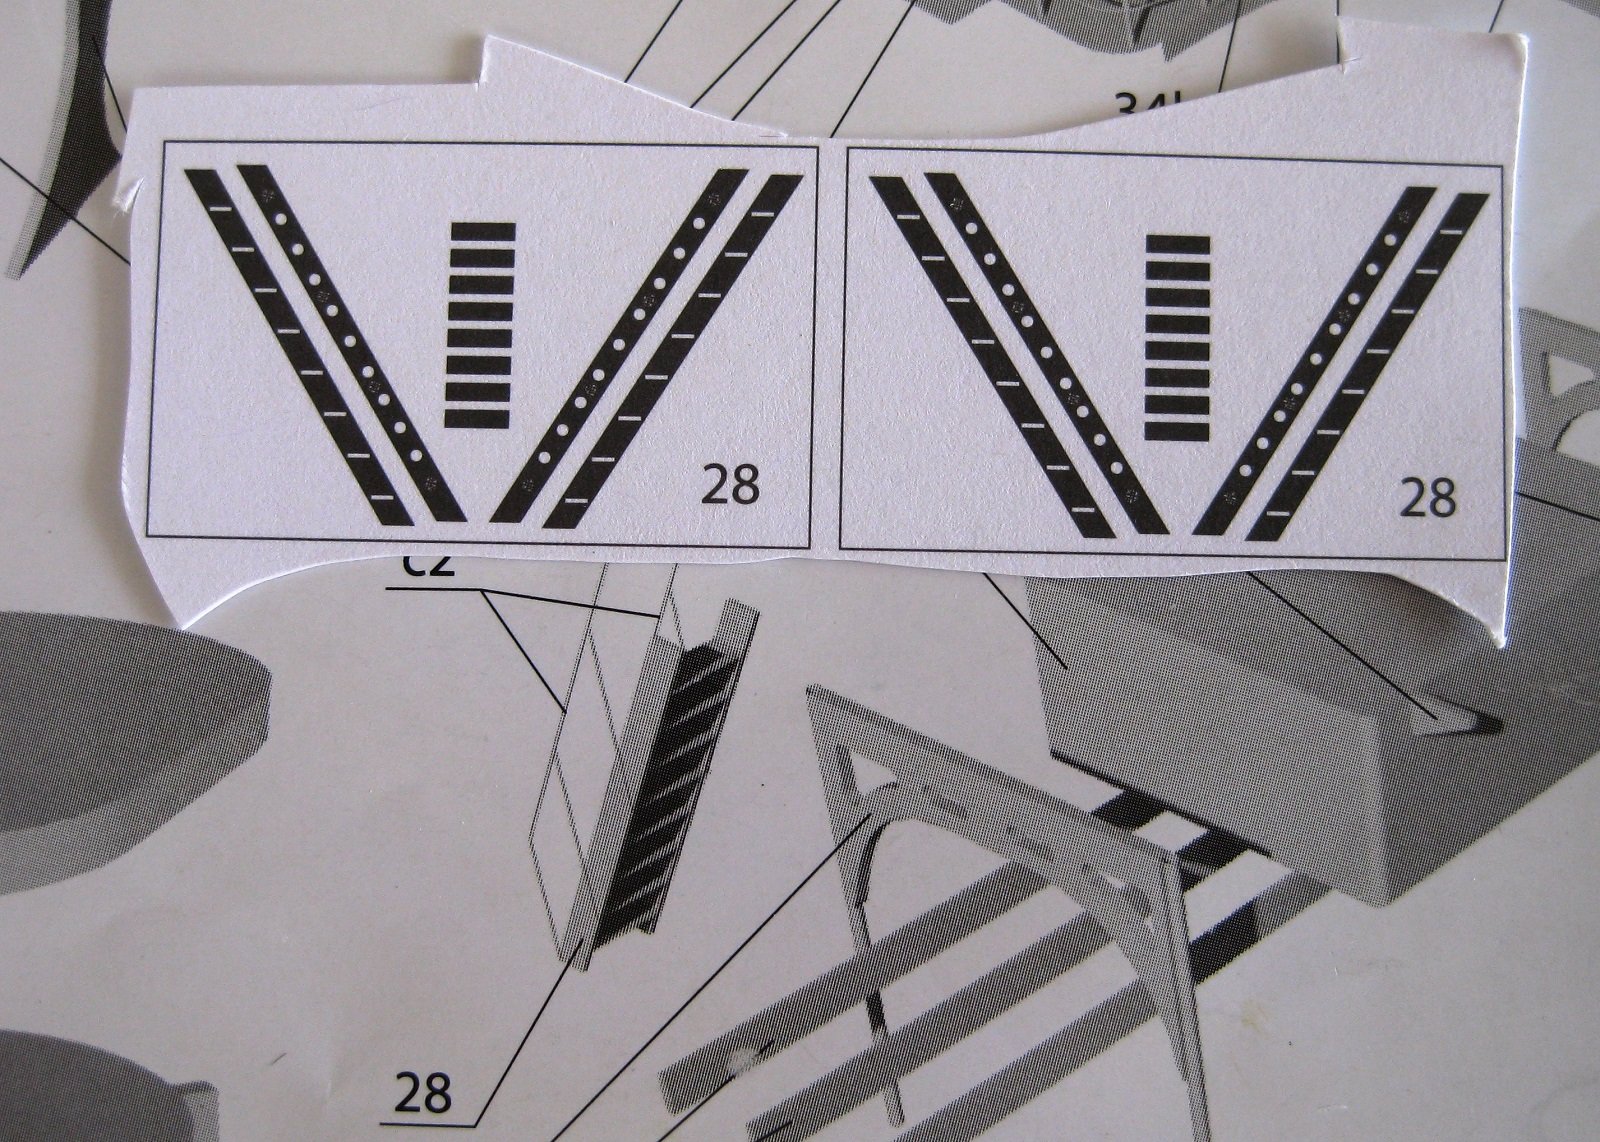
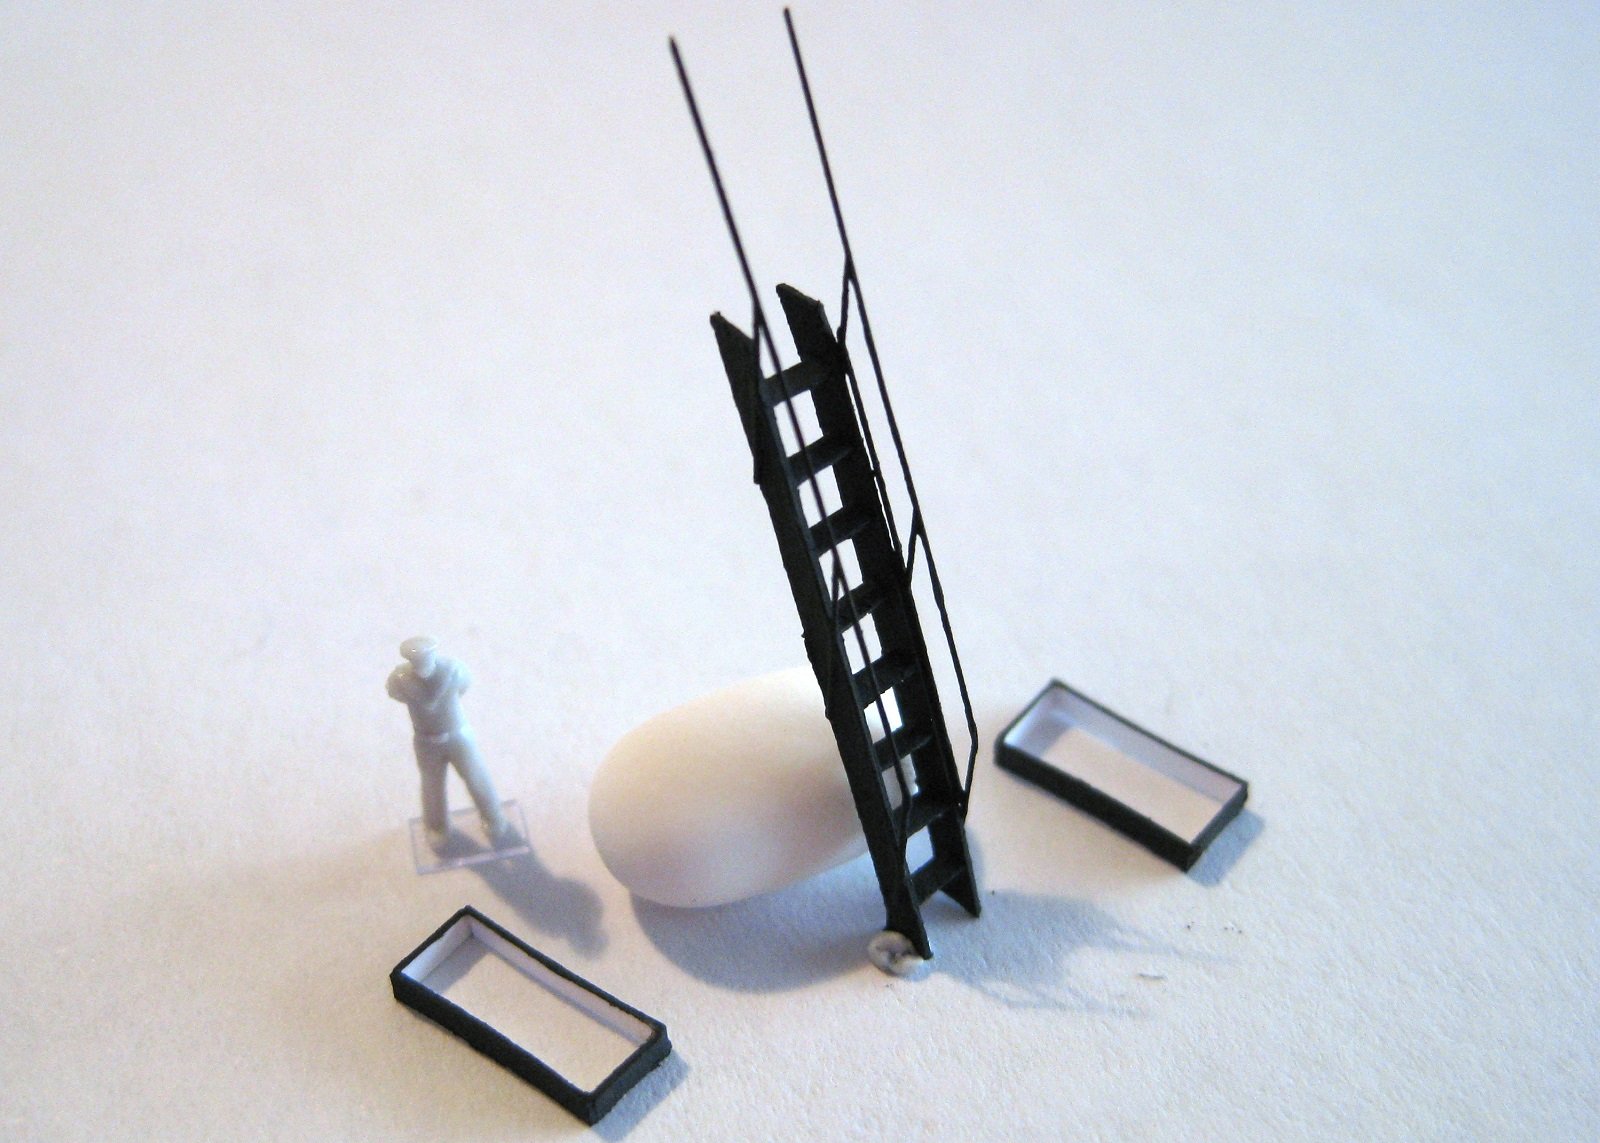
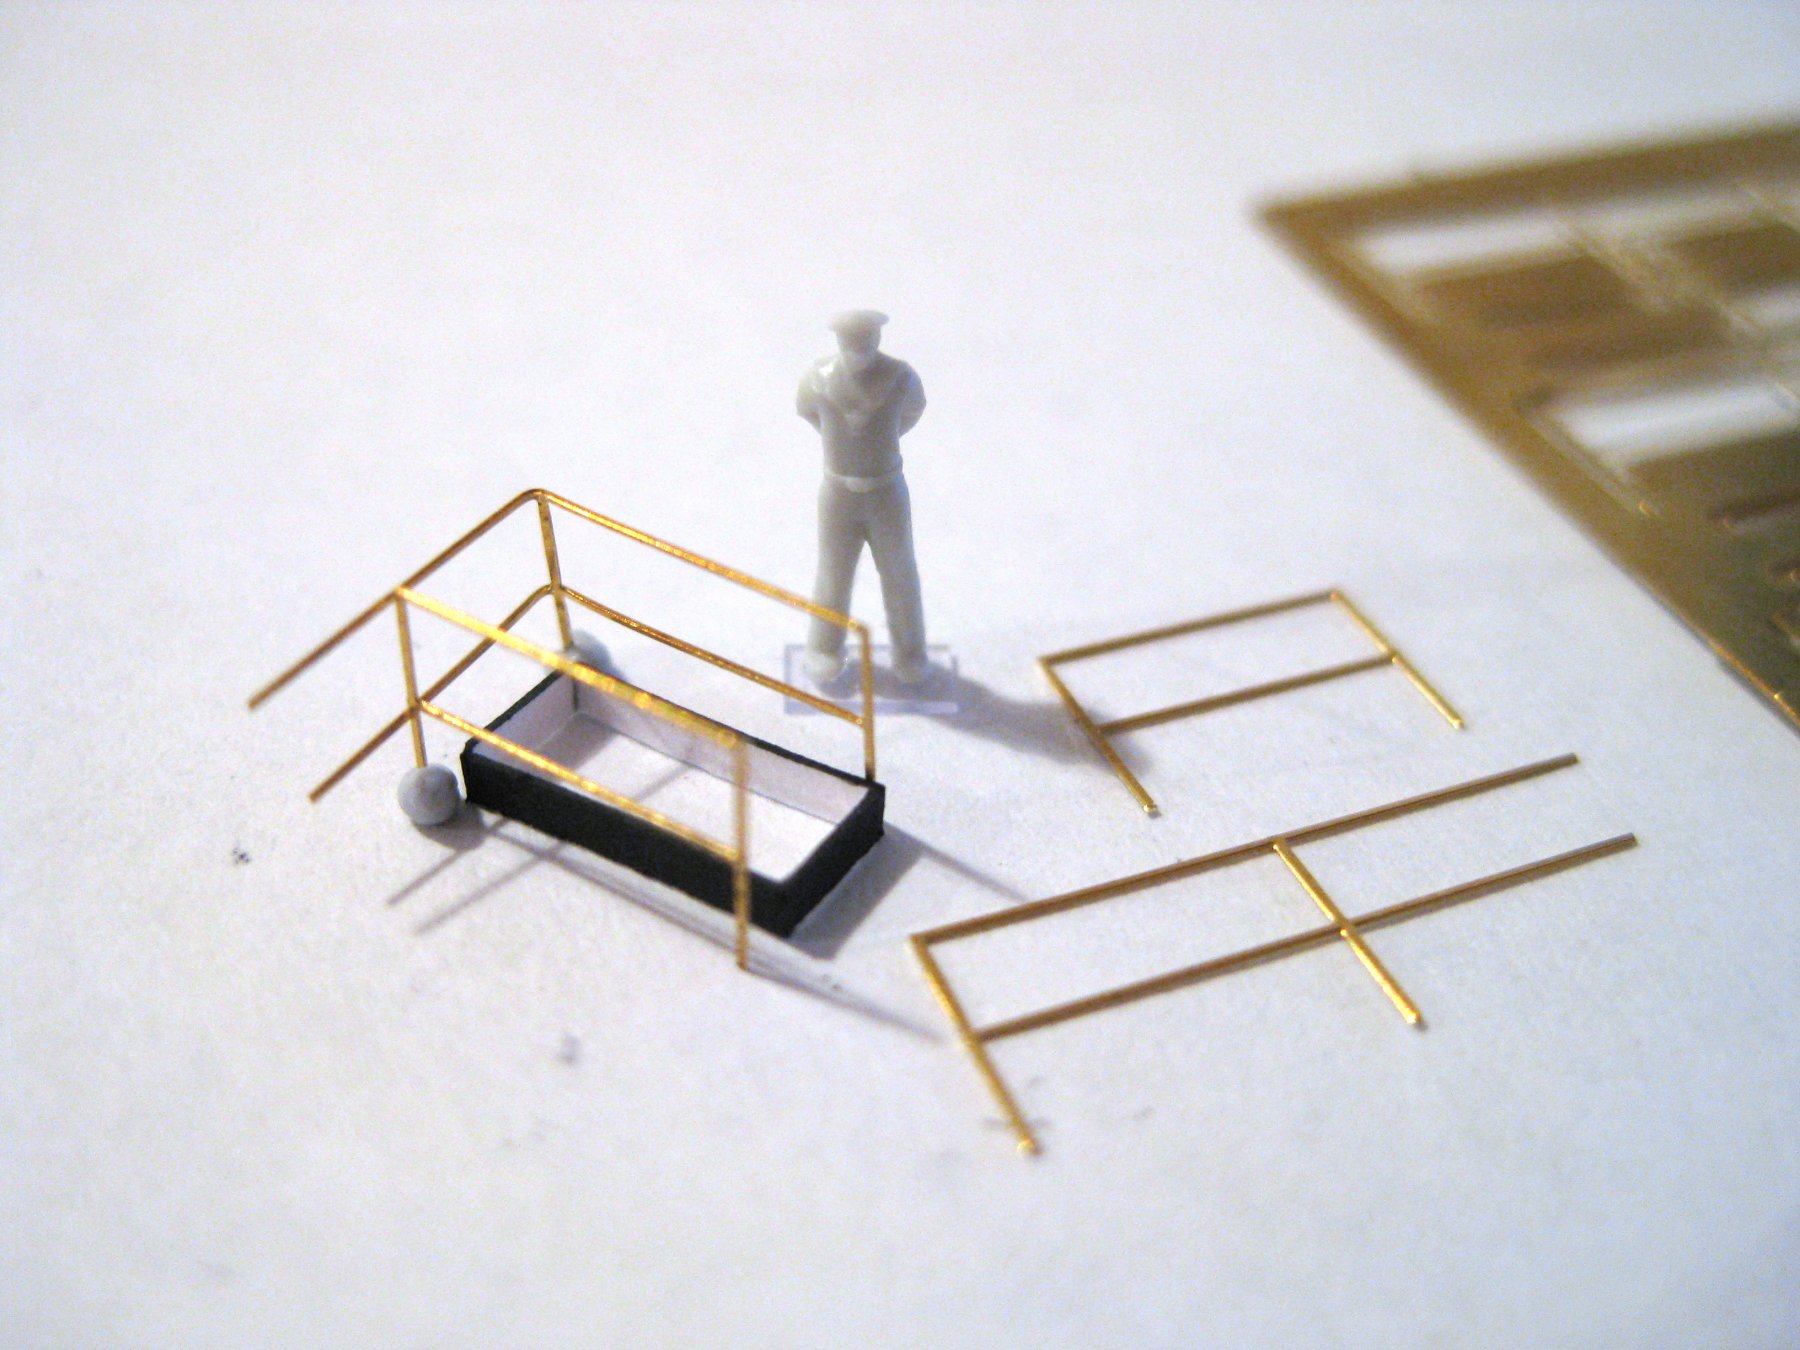
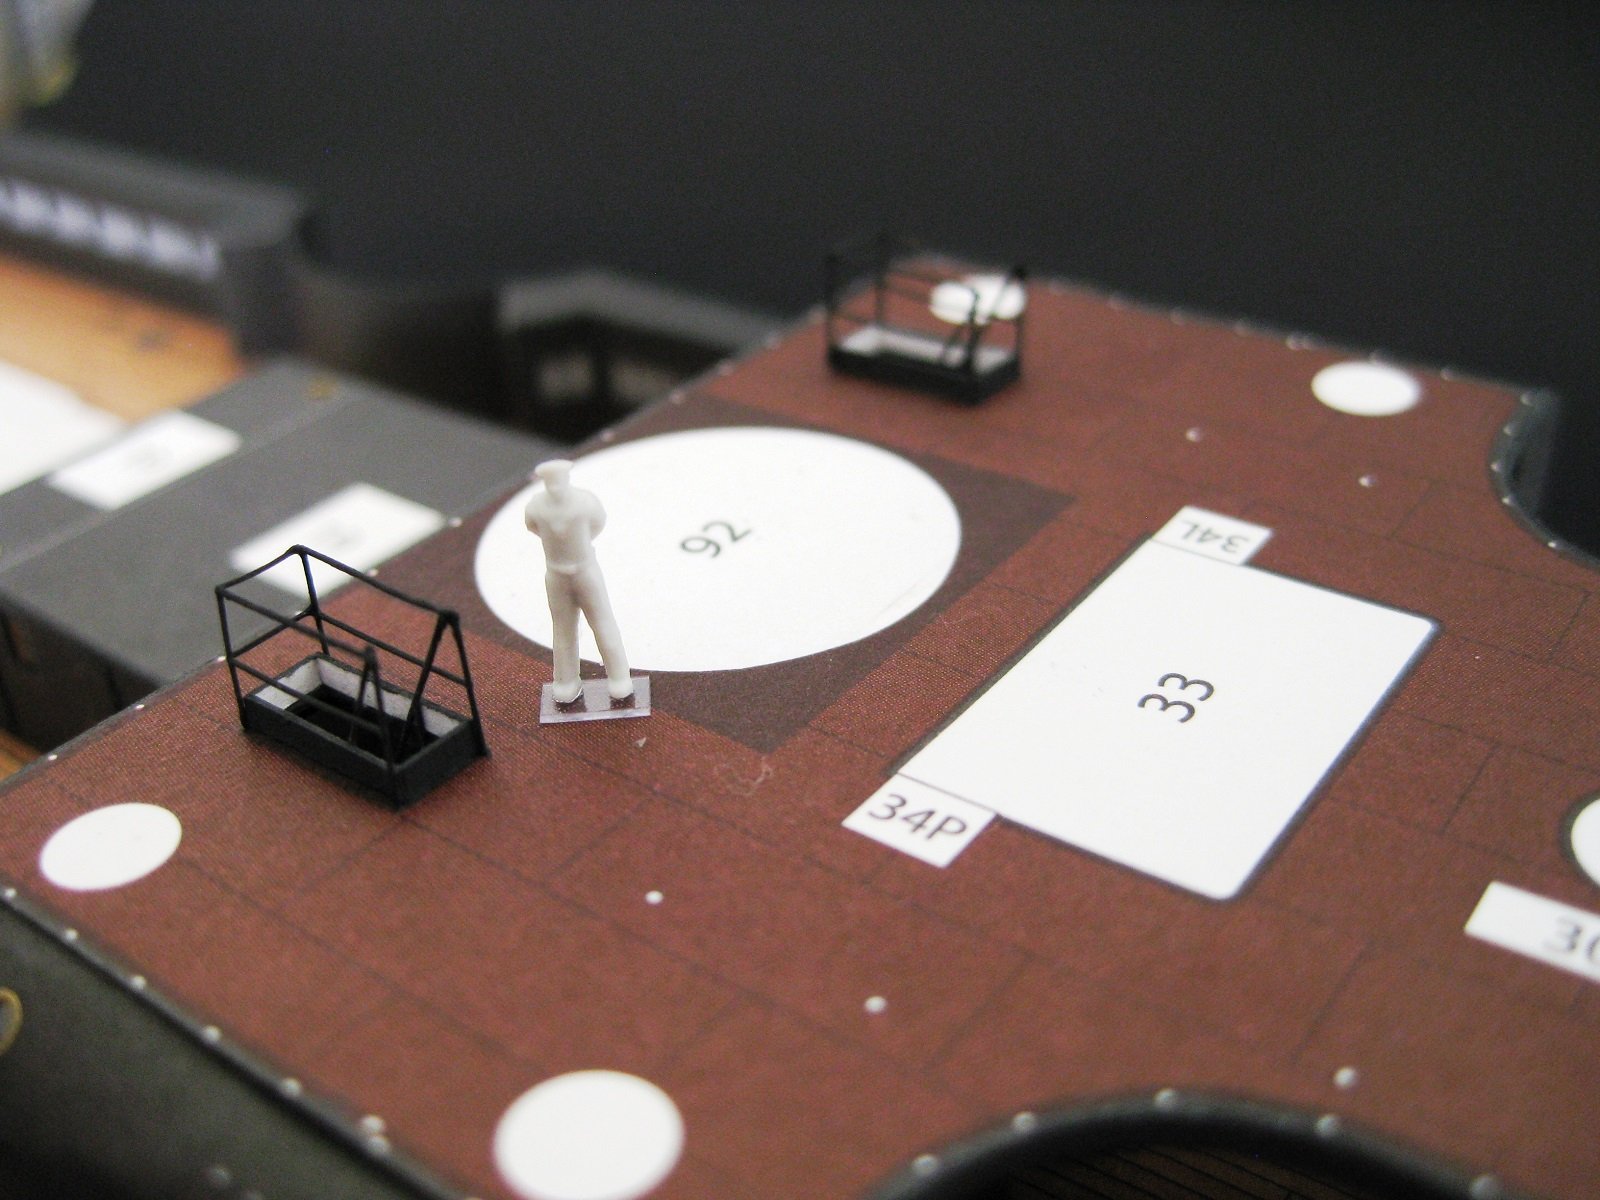
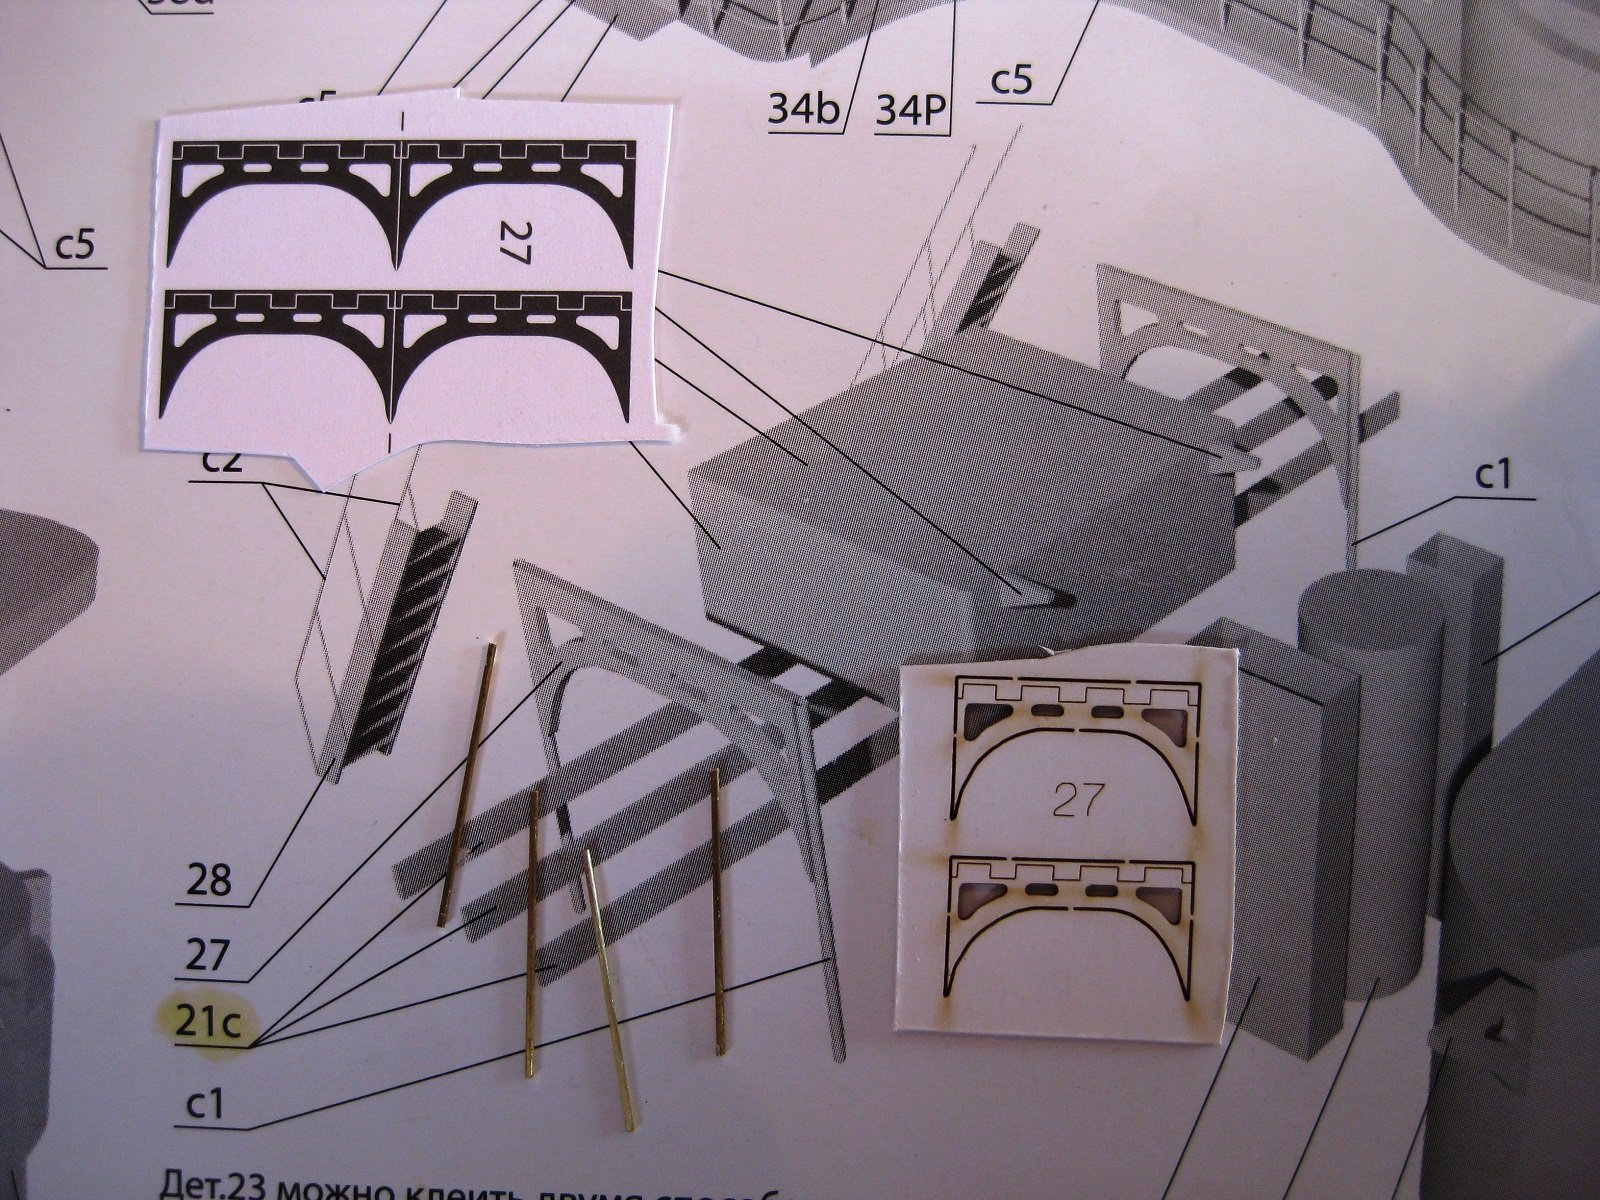
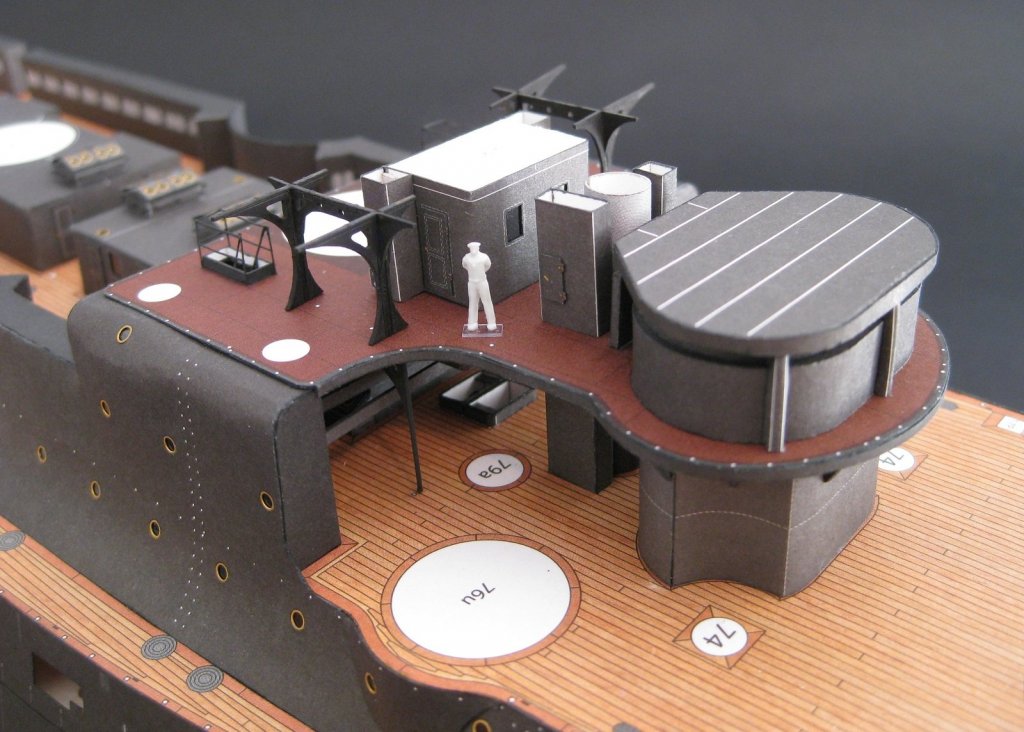
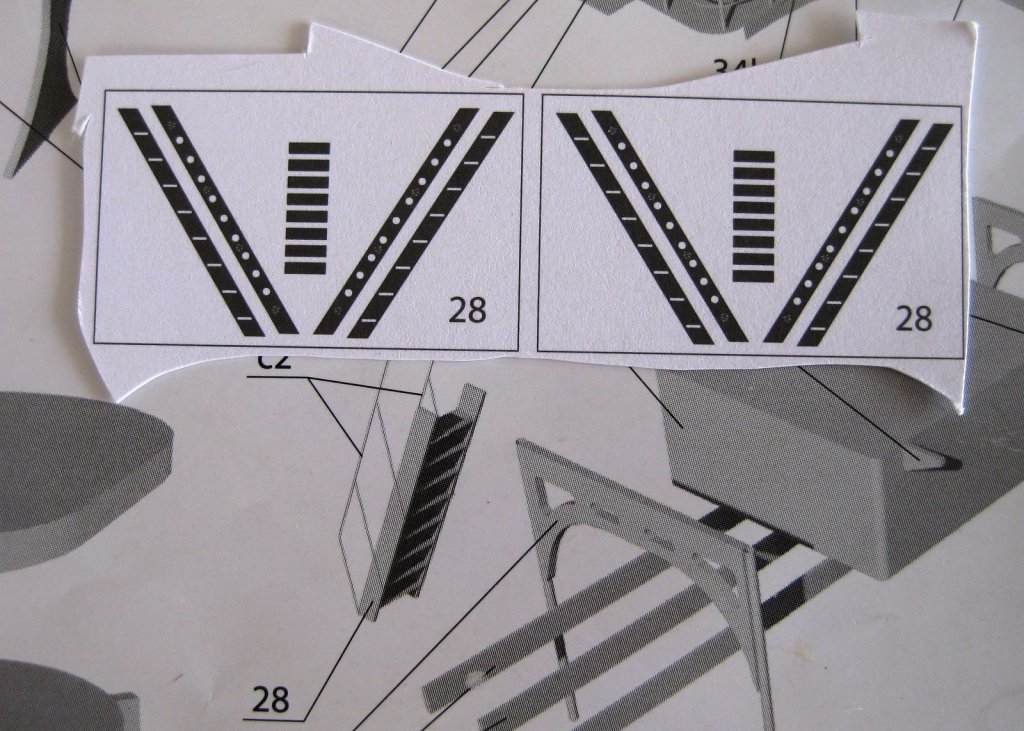
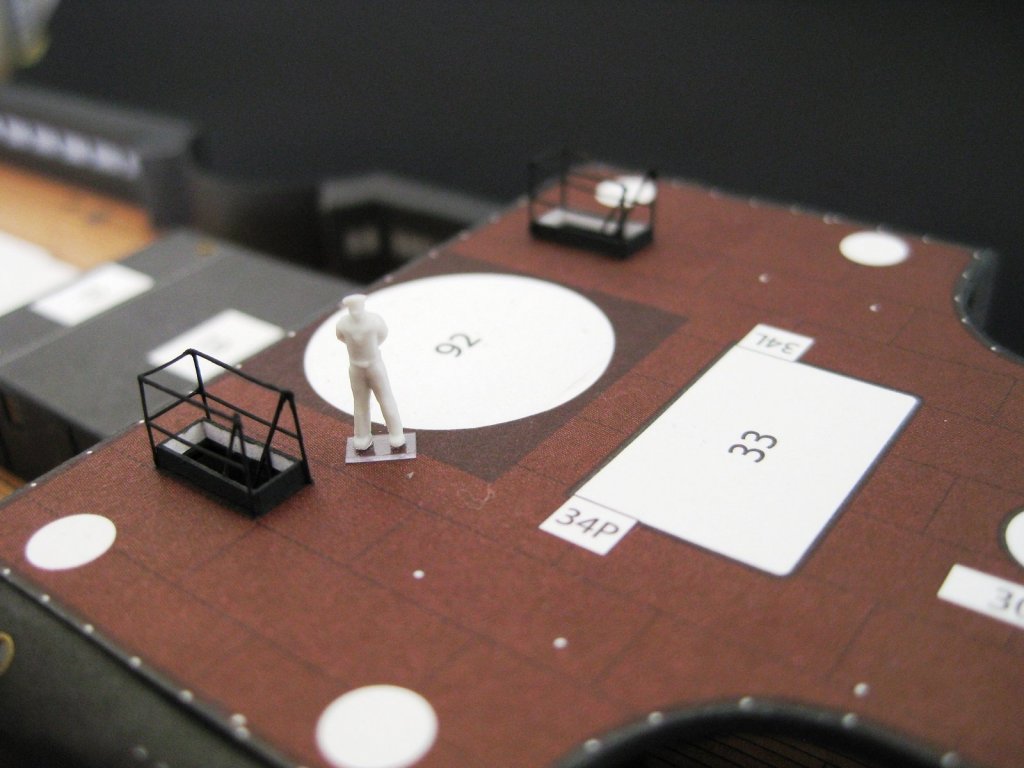
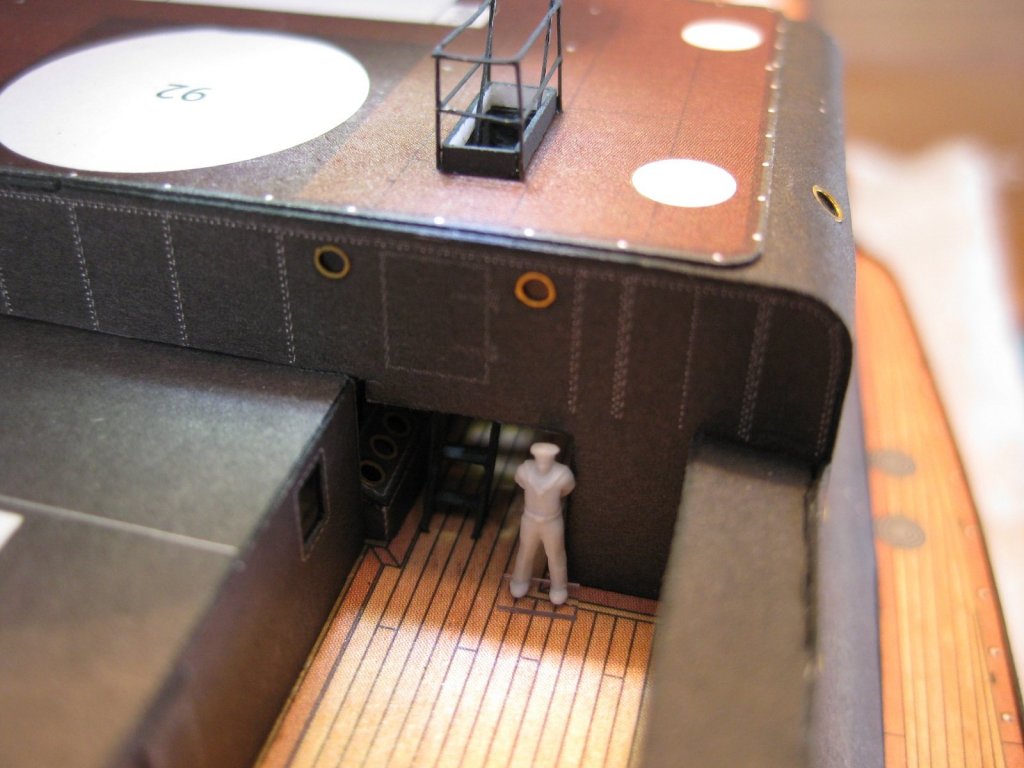
Hi All, Continuing with the assemblies on the con deck level. Assembly 28 is a pair of stairs which descend from the con deck, through the bridging structure down to deck level. As can be seen each stair side rail consists of an inner and outer part, stair treads and 0.2mm brass wire handrails. I have simplified the construction of the stairs slightly to allow them to fit the current stairwell with minimum modification. The width of the stairwells in the deck are only around 3mm whereas the stair treads alone are already 3mm. Then add the thickness of the side rails which would be 4 paper thicknesses adding another ~ 1mm it becomes obvious they won’t fit in the stairwell. I decided not to change the width of the stairwell and instead decided to leave off the outer sides of the stair rails and to trim the width of the treads slightly so the finished assembly can fit in the stairwell. Leaving off the outer sides means I will need to paint the outside of the inner stringers but as none of it will be seen once positioned this will be fine. The finished stairs ready for installation. The handrails were generic photo etch handrail rather than making them myself and glued to the side rails using roket card glue before painting the exposed surfaces with black watercolour. Funnily the watercolour didn’t take to the photo etch as easily as it does to my usual wire I use so had a hell of a time painting them. I left them overly long so I can fit and trim then to the deck handrail afterwards. I mentioned previously I couldn’t locate part 20 which are the coamings round the stairwells; well I still can’t find them so made them from the unused outer stair rail. The finished stairs are so so but virtually none of it will be seen so all good. I was lucky for the handrails round the stairwell in that the stanchion spacing matched the generic hand rail I have. The photo shows the 2 sections of handrail; the plan is to fit one long side first and then I can position the other side with over length rails for the rear and then trim to fit. I soaked the handrail in hydrochloric acid which took the watercolour paint a lot better than the stair handrails. Okay the stairs, coaming and handrails now fixed in place. I mentioned above that the stairs go right down to the deck. I didn’t know this until I was trial fitting the stairs and realised that I hadn’t made any opening in the bottom of the bridging structure for the stairs to pass through I had to perform some surgery using a knife and needle to come down through the top of the opening to make a hole in the underside. Thankfully I was able to open it up and since there is no way to get a look into the underside I managed to dodge that bullet! Photo shows the stairs from the con deck reaching down to the main deck. They do look a bit narrow since I had to trim the width but again won’t be visible once other bits and pieces are installed. There is still a considerable amount to do on this level before climbing up to the next bridge deck. Cheers Slog


- 244 replies
-
- 13
-
-
- borodino
- dom bumagi
- (and 1 more)
-
Hi Danny, You're making great progress. The Bridge structure turned out really nice. Cheers Slog
- 295 replies
-
- 4
-
-
- amatsukaze
- halinski
- (and 2 more)
-
Intro to Card Models Pt. IV: Tools & Other Supplies
Captain Slog replied to ccoyle's topic in Card and Paper Models
Hi Ron, Take your calipers into the kitchen and start measuring food packaging such as cereal boxes etc that should yield a good supply of card around the 0.5mm mark. You could then laminate these to make thicker stuff. In the early days I bought heaps of 1& 2 mm card from the card model suppliers but depending where you live can get expensive. Cheers Slog edit: I hope you start a build log -
Hi Danny, very nice work. Not that I'm an expert but you would never guess this was your first card model. Structure looks great, definitely the fun parts. Cheers Slog
- 295 replies
-
- 6
-
-
- amatsukaze
- halinski
- (and 2 more)
-
Hi Clare, There is a real insurgence of card models on MSW lately which is great. I also notice a lot more 'steel' ships appearing in both plastic and card which is also good to see. I look forward to following another card build log of yours. Cheers Slog
- 106 replies
-
- 6
-
-
- digital navy
- v108
- (and 3 more)
-
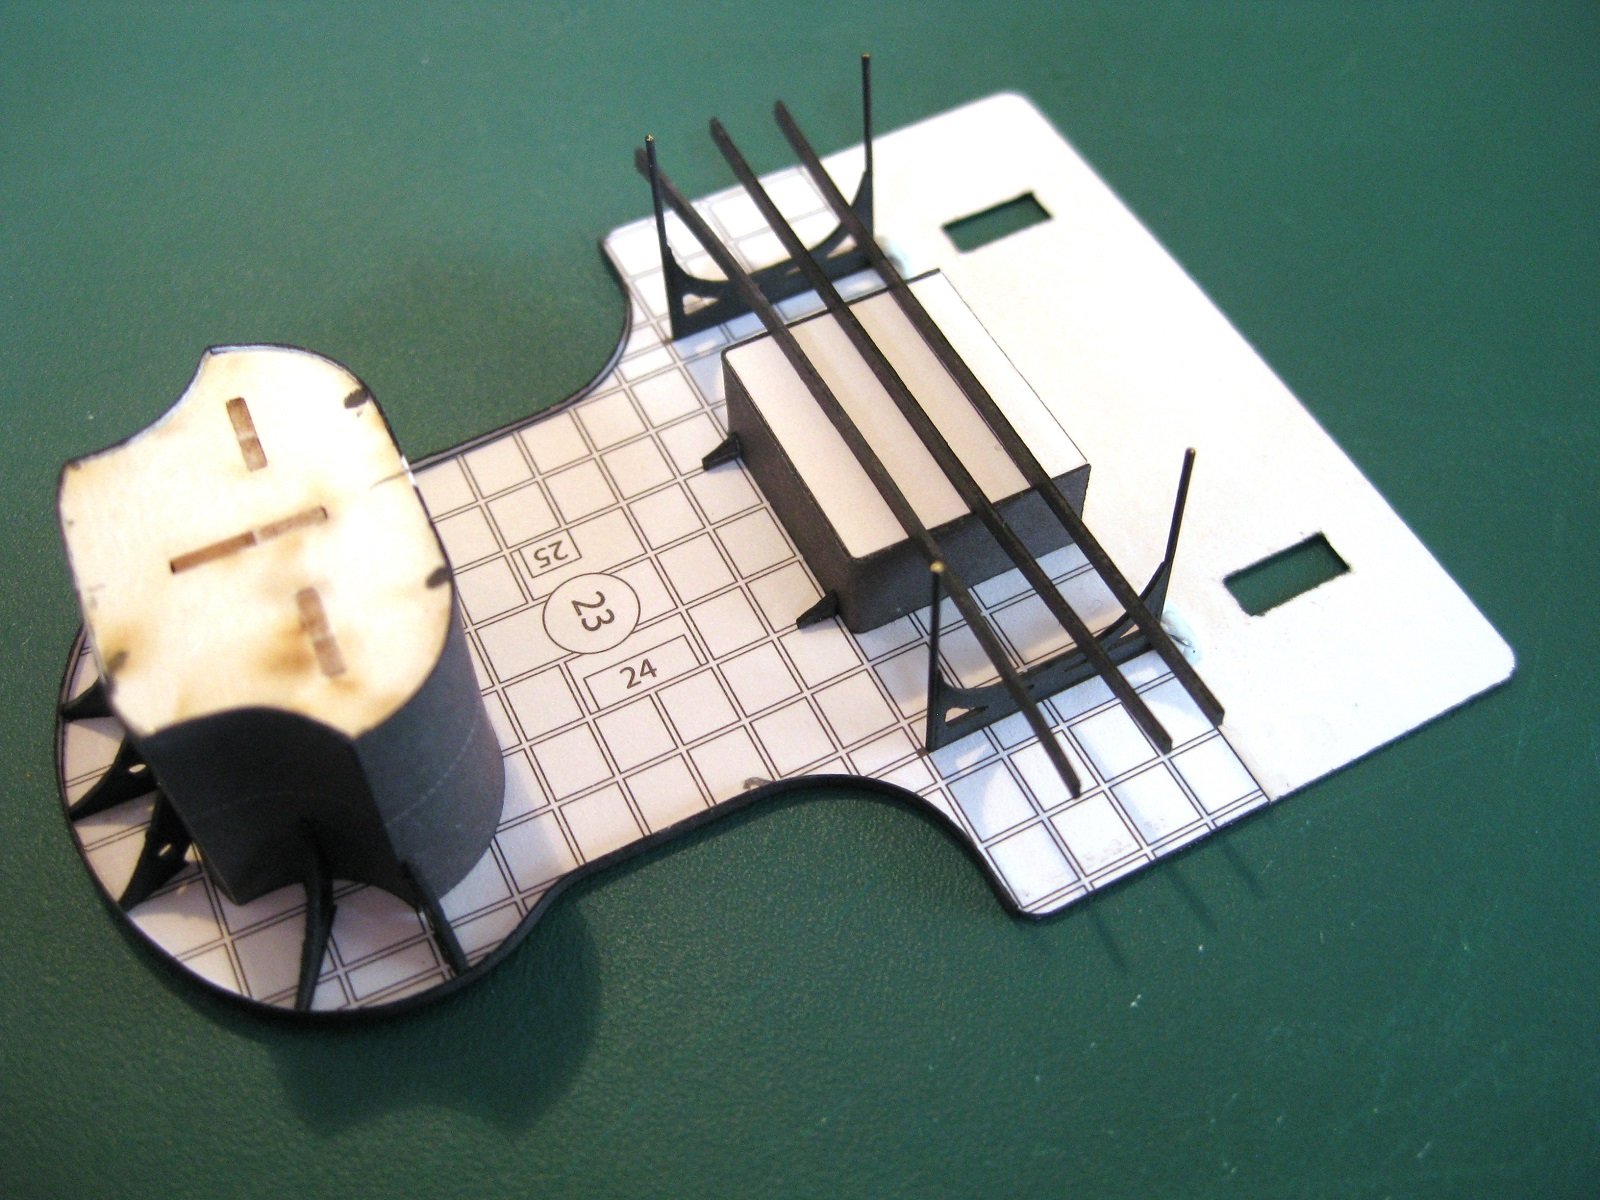
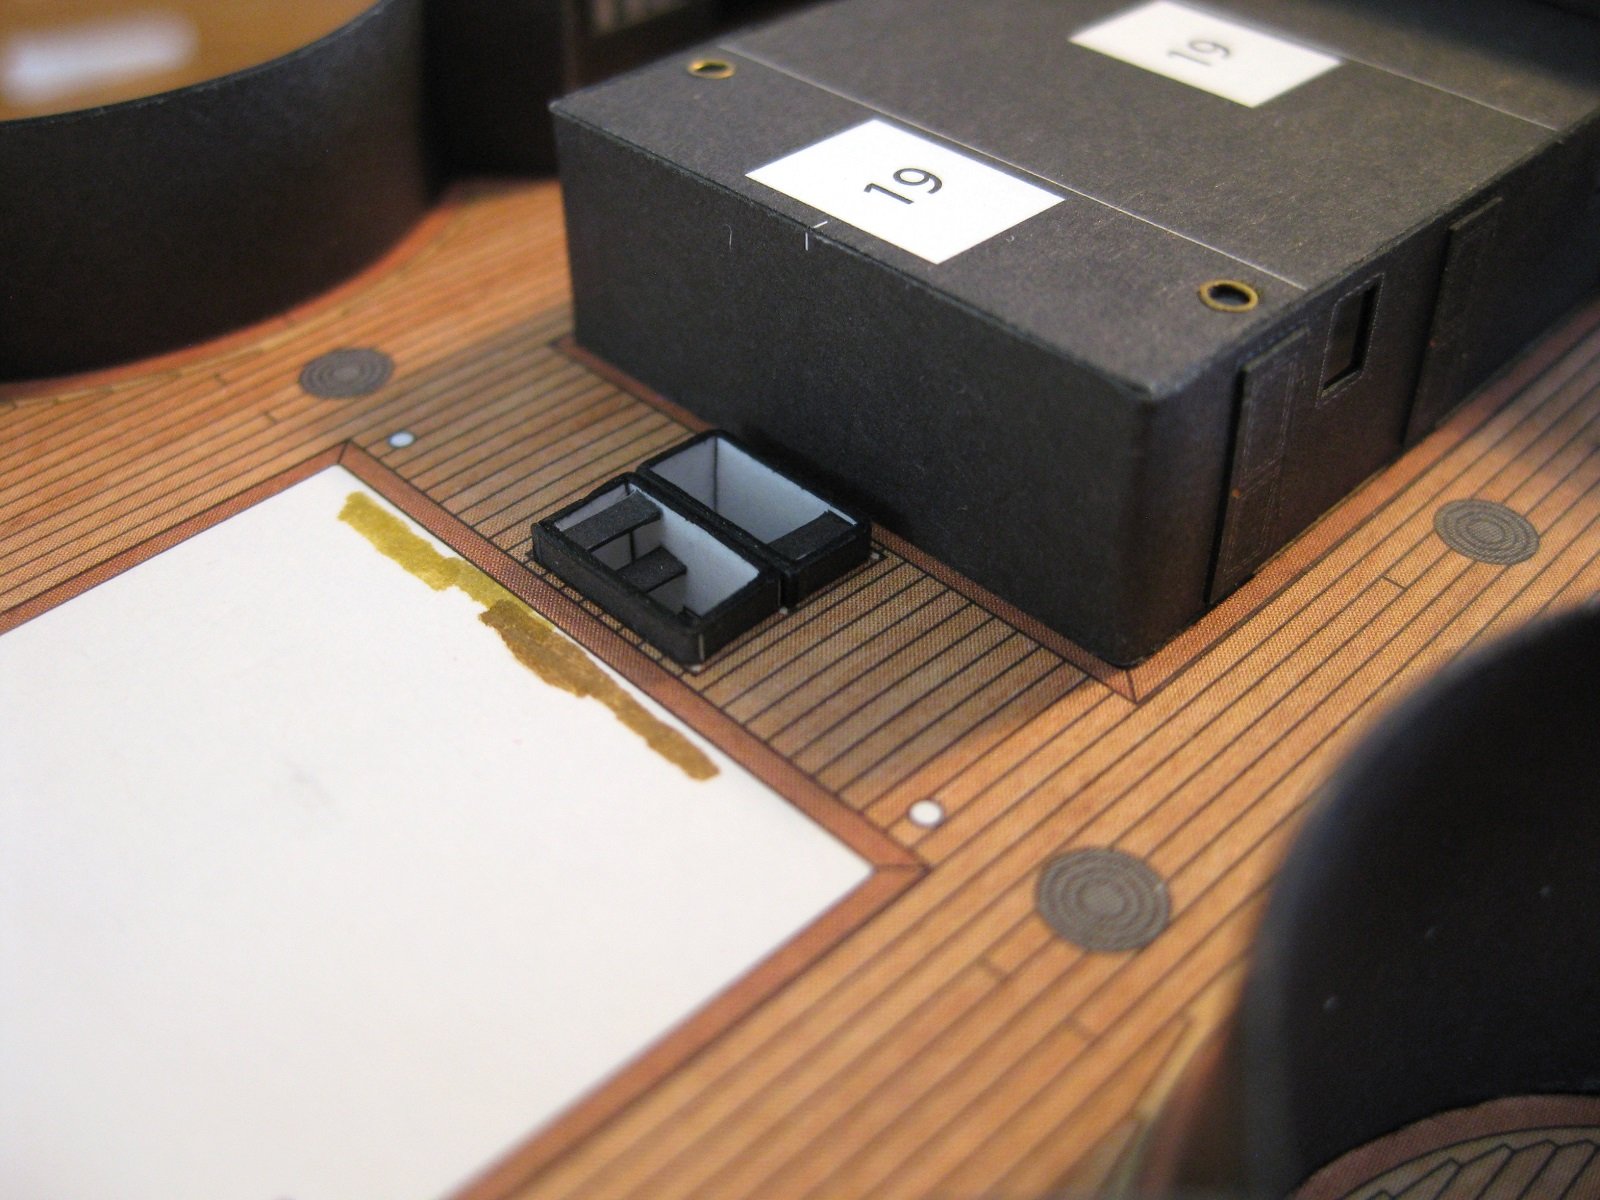
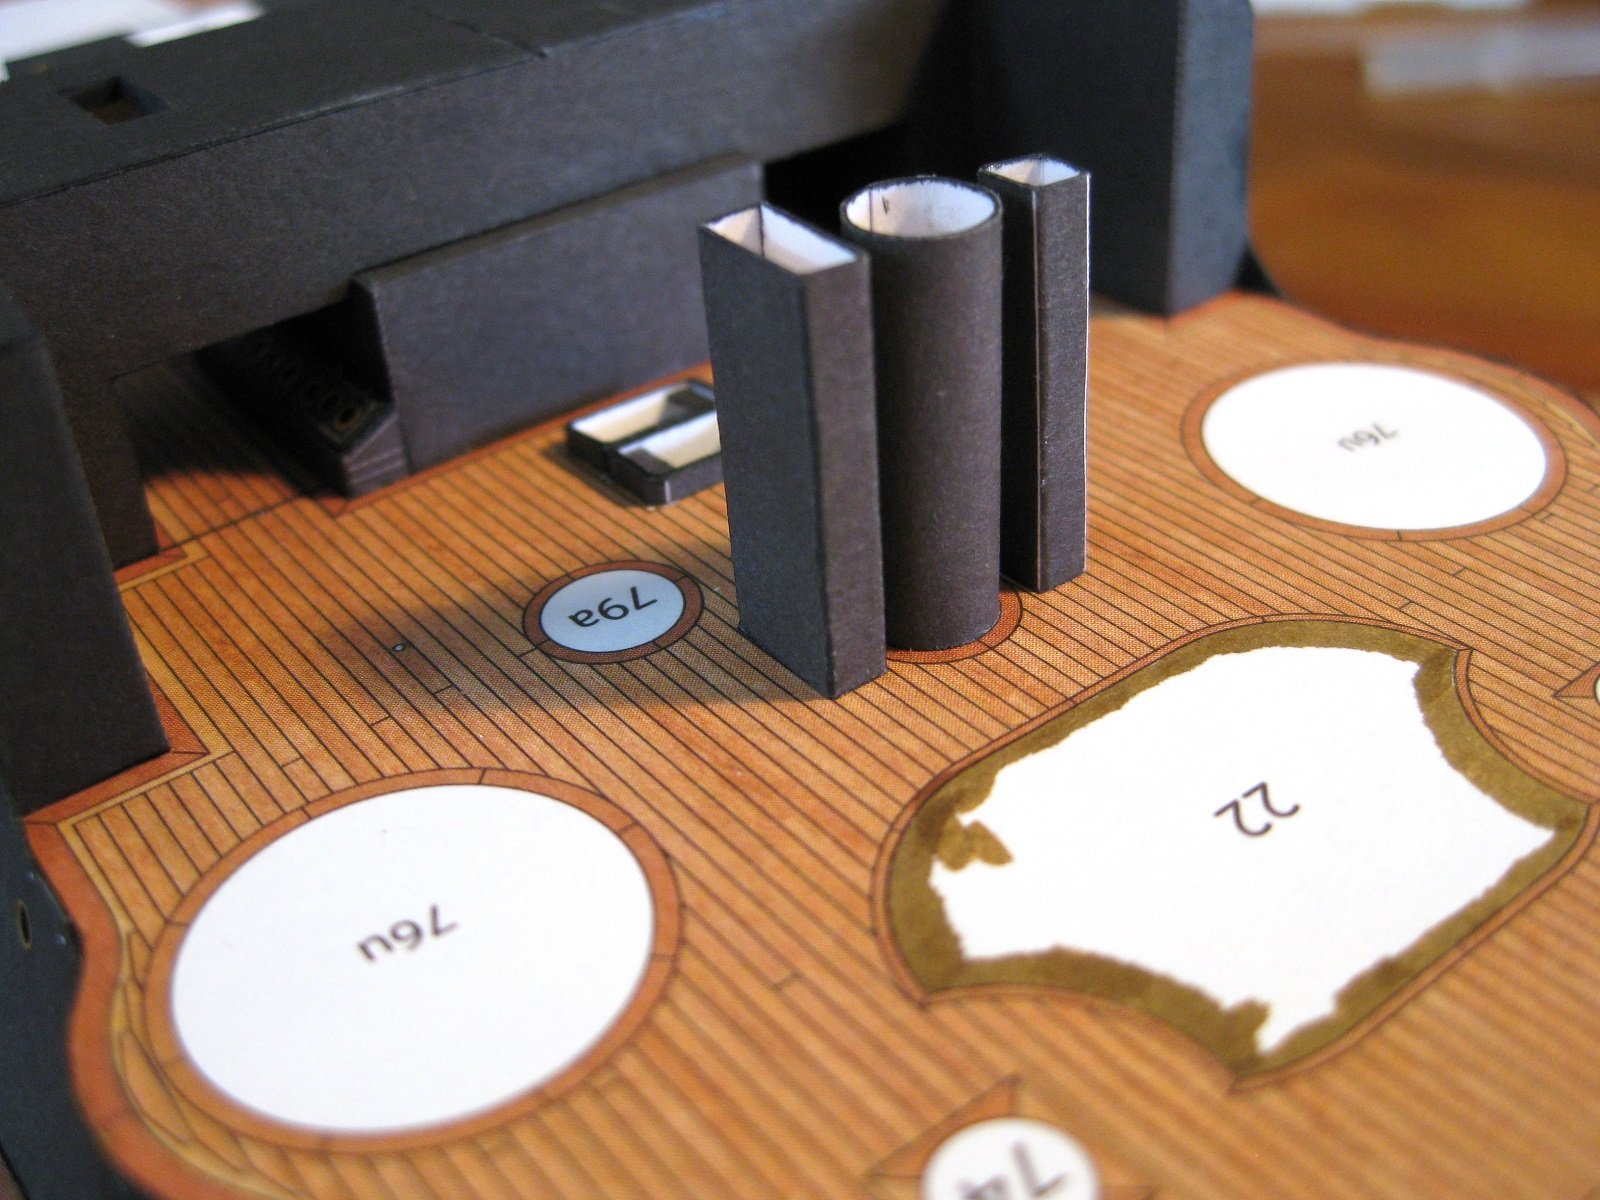
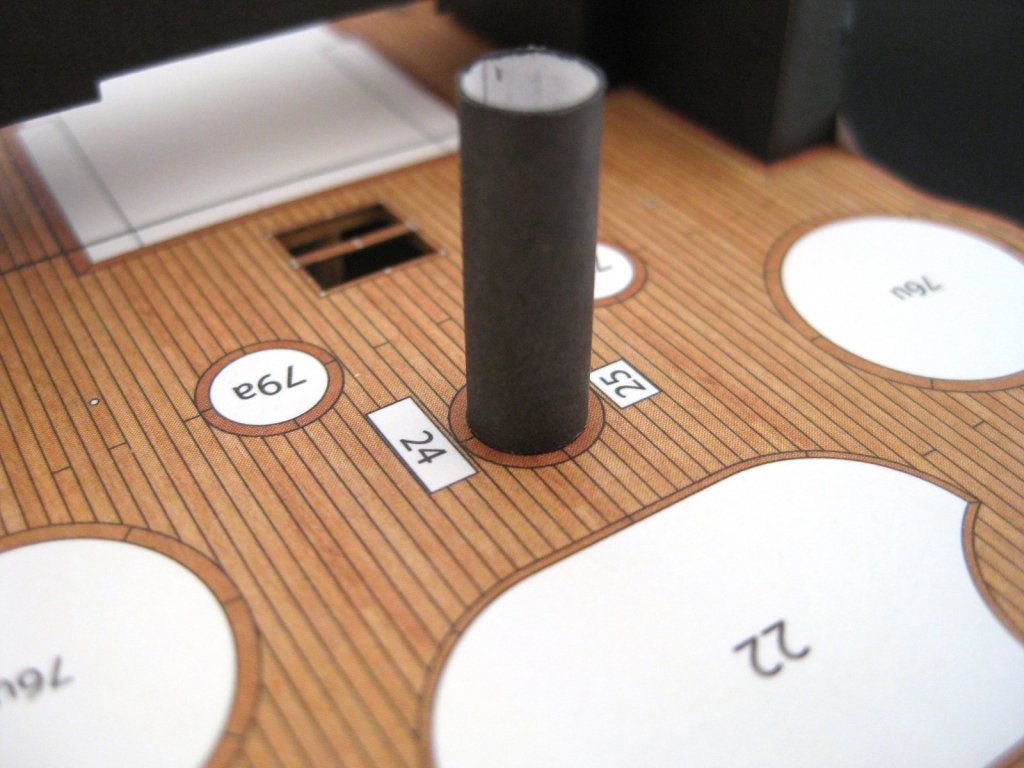
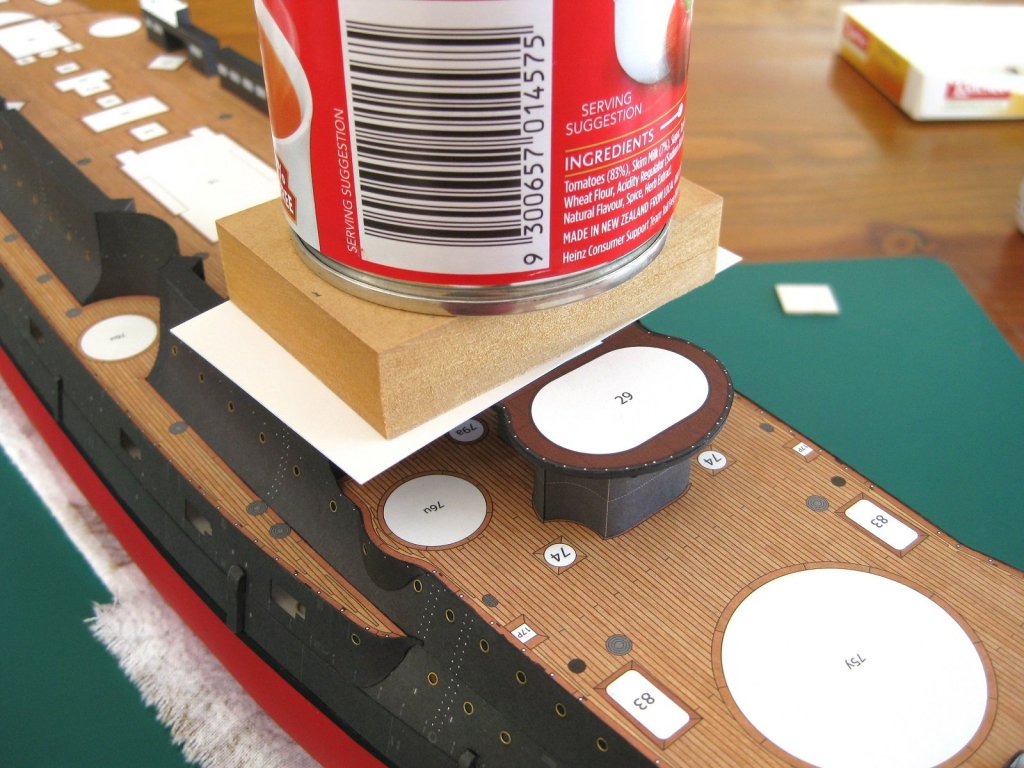
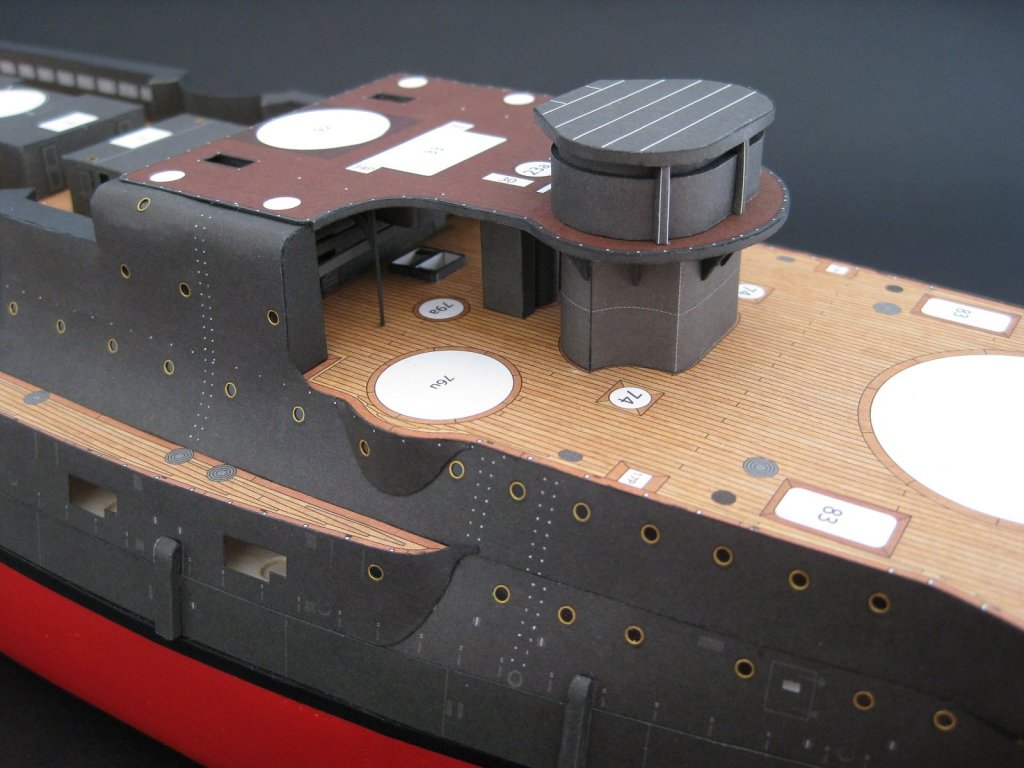
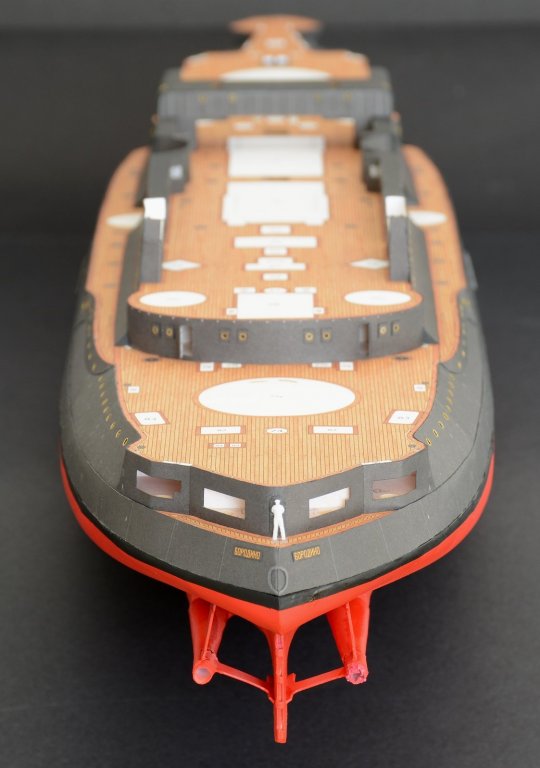
Thanks to all for the likes Hi Grant, you’re right; looking at the photos she does appear well fed…I would say tubby but curvaceous may be more flattering! Hi Danny, despite some of the issues and problems I am pretty pleased how it is turning out. You are right though, there is still a long way to go and these ships are generally quite cluttered so individual areas will get lost in the overall busyness or hidden etc. I keep reminding myself when something isn’t quite right and get annoyed to step back and look at the whole from normal viewing distance and feel much better about it. Thanks for the link, I am a member of that site but haven’t seen that particular build so will check it out. I have a couple of other kits winging their way to me, point being I will need all the help I can get as the patterns printed on their underwater hulls will leave no room for error so that should help greatly. Hi Clare, thanks for dropping by. I know what you mean, I had planned on doing a plastic kit next but just ordered a couple of other cards ships LOL Okay with the hull finished as previously shown above I can now fit the upper conning deck level; but before I can do that I need to finish off a few things first whilst I still have access. Firstly I forgot about some under deck bracing/supports which are shown below. These are similar to the previously shown braces where the printed part can be replaced with or supplemented with thin laser cut forms. Again I am going to go with the laser cut forms only and paint them with black water colour. The posts (C1) are from 0.5mm brass wire. The finished braces are not glued yet. Once the deck is right side up and in place, these braces will be virtually invisible. In a past post I showed the lower mast section tube which turned out to have too large a diameter when edge glued. To overcome this I sliced the glue joint apart and overlapped the 2 ends until the correct diameter was obtained and then I glued the lap together. This is acceptable to me in this case as I will turn the joint to the rear and its position makes it impossible to see anyway. Much better fit now. The deck structure (part 15) was slid into position and permanently fixed followed by the centre stair wells to the interior. These were made previously and I just needed to enlarge the holes in the deck for them to drop in to position. Also shown is the services trunking and mast fixed in position. Now that the above elements are done and fixed to the deck the upper deck can now be permanently fixed in position. First off was to glue the rear section of the deck and the tops of the services trunking. The front section was left unglued at this stage. I used some card to protect the printed surface then a piece of MDF to spread the load followed by some weight and left to dry. Once that was dry I lifted the front section and carefully applied glue to the underside and then pressed home on to the deck. I spent literally hours trimming and tweeking before the final glue up and there is a few bits and pieces not perfect but again happy how it is turning out. The con was only placed for the photo and is not fixed yet. I will probably need to do the front railing first as would be tricky after fixing the con in place now. Got lots of little bits and pieces to do now such as finishing off the stair wells with handrails, stairs and coaming. Then probably the perimeter handrail followed by the next load of deck structures. Fun times ahead LOL. That’s it for this swing, Cheers Slog


- 244 replies
-
- 12
-
-
- borodino
- dom bumagi
- (and 1 more)
-
Very nice clean work Danny. Your tubes are spot on. Cheers Slog
- 295 replies
-
- 4
-
-
- amatsukaze
- halinski
- (and 2 more)
-
Stunning workmanship! Really like the first and last photos in particular. Cheers Slog
-
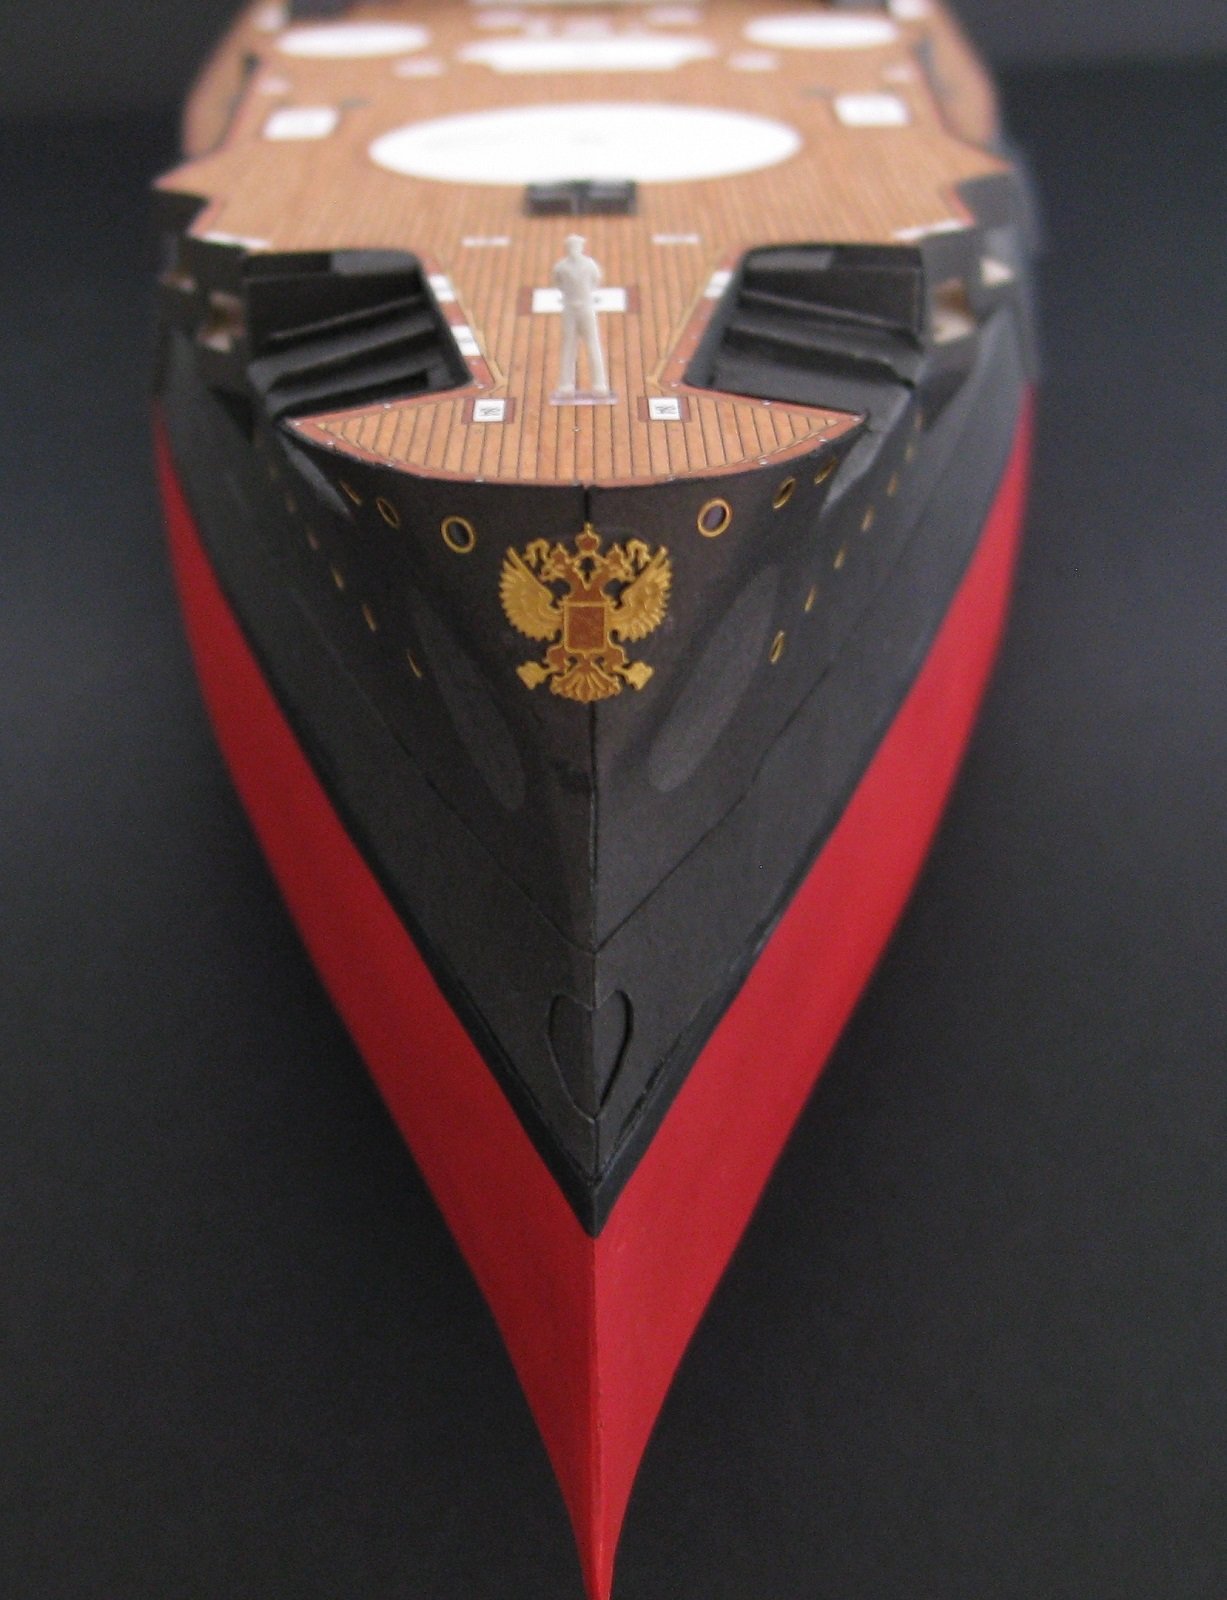
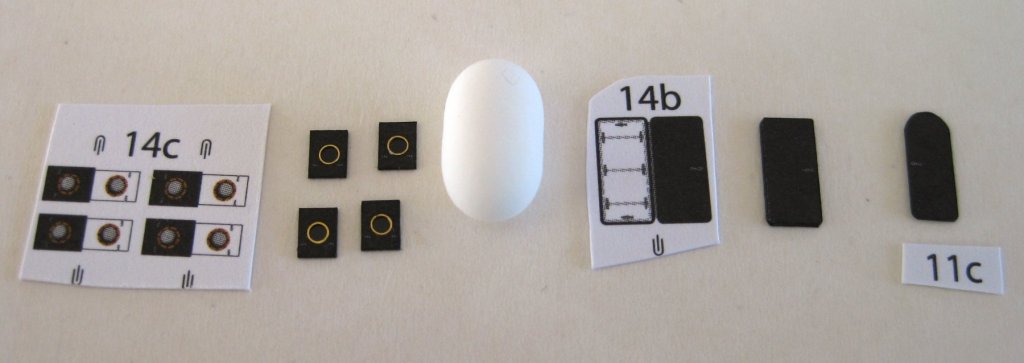
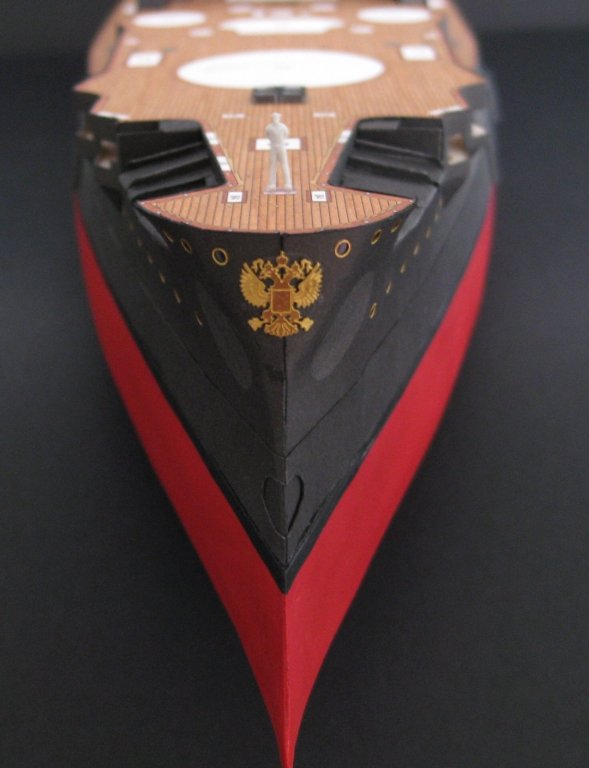
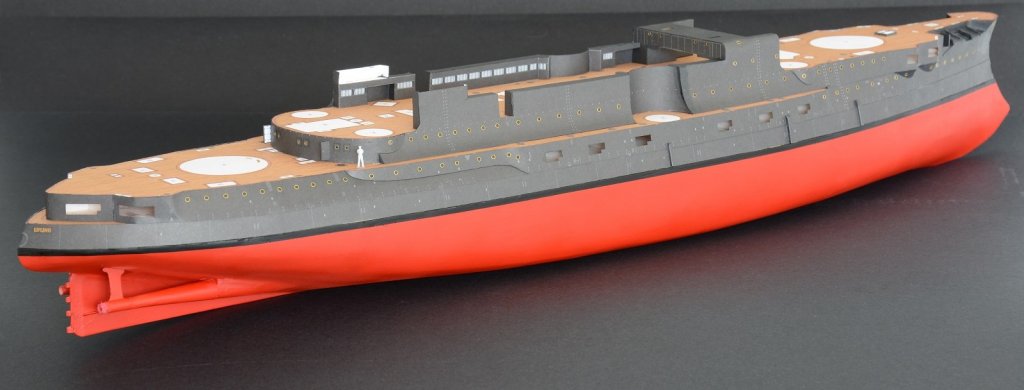
Hi Danny, never a truer word spoken! Skinning the hull is definitely my least favourite part of the build. Doing the ‘fun bits’ such as topside structures, details etc is, for me, the most enjoyable. Okay whilst I was at it I decided to do some of the rear bulkheads doors and hatches. There are 8 little hatches (14c) for the upper bulkhead and because these can be shown in the open position they have inner faces to be folded together. Since I decided early on to position them closed I removed the white inner part. I did the usual porthole treatment but with 1.6mm ones. 14b is the doors to the same area and again have white inner surface for the doors to be fixed in the open position. I decided to do this early on and had already opened the bulkhead as per a previous post. Door 11c is to the Captains Walk and is a simple single thickness component. Almost there; the front belts were done next using the same method as the rear ones. Then the 2 belts per side for the midships were placed between the front and rear ones and the 3 drain tubes placed to cover the joins. Photo below shows ‘starved cow’ effect on the port bow just below the anchor shelf. This is after some remedial repairs so you can imagine how bad it was beforehand. Hull Summary: As mentioned previously, probably multiple times, the hull is my least favourite construction activity. The laser cut forms and skins were all spot on with regards to size, shape and fitment and the multiple issues encountered were down to my lack of experience. Obviously there are so many things that could have been done better and given the lessons learned I would do a lot of it differently. Despite the many mess ups and fixes I am pretty happy with how it turned out. There are still literally hundreds of small and tiny details to be added but these, for obvious reasons will be done near the end of the build to protect them from damage. The next step is to start attaching all the previously made parts and looking forward, I can now attach new elements as they are made. Cheers Slog


- 244 replies
-
- 13
-
-
- borodino
- dom bumagi
- (and 1 more)
-
Hi Rick, I will pull up a chair also. Good to see more card models popping up here. Cheers Slog
-
Very impressive Danny, I've done a hull and a half now and nowhere near as good as your first attempt. I would be wary putting on modelling putty unless absolutely necessary, it is a lot harder than the surrounding paper which makes it difficult to sand without damaging the area round it further. (I tried crappy Humbrol filler though so the tamiya stuff may be better) If you don't mind me saying, with the Tamiya tape on the hull l would advise bending one end over a little bit and sticking it to itself to to form a tab to allow you go grab it with tweezers for removing. It reduces the chance of damaging the skin trying to pick away at the edge to get it lifted up. Also I found when removing it, it is best to pull it down back over itself rather than pulling directly away from the paper to reduce the chance of tearing the top surface off the firmly glued side but that's me, see what works for you. Cheers slog edit: I agree with you on the finish. Their Fuso has very subtle weathering/ colouration differences which looks really nice.
- 295 replies
-
- 7
-
-
- amatsukaze
- halinski
- (and 2 more)
-
Stunning finish Grant. She'll look dashing when she's free from the test tank and on full power! cheers Slog
- 339 replies
-
- 4
-
-
- dumas
- Chris-Craft
- (and 3 more)
-
Hi Danny, Thanks for the info. I did wonder about the locating pins restricting the size of the part but your right shouldn't be an issue. The main driver for me getting this is punching the series of progressively smaller holes on things like braces/supports on the underside of decks etc. which are pretty narrow anyway. Thanks for the link, I have used BNA many times and was going to get this and a few bits and pieces to get the order up to meet the free shipping requirements. What you've shown has convinced me I need this. They also do a larger set to continue on from the 2 mm up to 4mm if I remember correctly but your set is more useful for my needs. Cheers Slog
- 295 replies
-
- 4
-
-
- amatsukaze
- halinski
- (and 2 more)
-
Hi Danny, That punch set is on my list of tools to get for the same purpose you are using it for. How sharp and clean is the hole edge from the printed side? The sharpened brass tube I usually use gives nice clean cuts but doesn't have size range your new punch set has. A close up of the hole produced would be interesting to see. Cheers Slog
- 295 replies
-
- 3
-
-
- amatsukaze
- halinski
- (and 2 more)
-
Looking good Danny. Don't be so hard on yourself it is your first attempt at the most difficult parts of the build. With regards to order of placement of the skins, perhaps the part numbers would have indicated where to start. I notice you mentioned about edge painting; try and keep all colouring off the printed surface that way the edge colours don't need to be exact and still look okay. Cheers Slog
- 295 replies
-
- 6
-
-
- amatsukaze
- halinski
- (and 2 more)
-
And so you should be, you're off to a great start! cheers Slog
- 295 replies
-
- 6
-
-
- amatsukaze
- halinski
- (and 2 more)