


Keith Black
-
Posts
6,026 -
Joined
-
Last visited
Content Type
Profiles
Forums
Gallery
Events
Posts posted by Keith Black
-
-
2 hours ago, Cathead said:
I don't think there would have been a water tower here. But maybe they were piping it back up to Boonville proper, since the actual riverfront near the depot was still a steamboat landing even in the early 1900s. Or maybe it's to provide water to some entity up on the bluffs (though if it was a drinking water well I think you'd put it upriver of Boonville, not downriver).
Eric, it could have been a water source for nothing more than a track pan?
-
-
2 hours ago, Cathead said:
Keith, forgive me for a slight digression, but I'm betting you'll enjoy this. I was re-visiting a local museum here in central Missouri the other day, and noticed an image I hadn't thought much about before, but the last time I saw it was before your pile-driver build. Here's a small pile driver on the Missouri River at Boonville in central Missouri, undated but I can tell from the bridge in the background that it's between the 1890s and 1930s. For those following both this log and my model railroad one, that background bridge is the same rail line I'm modeling and will show up in a different scene down the road. But regardless, I thought this was a fun little comparison and worth sharing. Forgive all the light reflections.
Eric, no forgiveness necessary. If you've got pertaining historical photos, please, always feel free to post them.
I don't think it's a pile driver per se, I think it's some sort of floating well rig? Note the threaded pipe casing on deck. The pipe is in short sections (that's why the pile driver is so short), maybe 6, 8 feet at the most. Too short for oil or gas and you wouldn't be drilling for drinking water in the middle of the river, my guess is they were setting pipe to get water to the tracks.
Whatever its purpose it is a cute little bug, you need to put that in your train layout.
-
1 hour ago, Rick310 said:
Keith, is the blackening solution you use called Birchwood Casey Blue?
Rick
No, it's Birchwood Casey Brass Black. Birchwood Casey Blue is for a blue finish.
-
10 minutes ago, Paul Le Wol said:
That’s a good looking machine Keith. I’m still getting used to mine. Funny thing is that even if I’m using a repeater most times I still double check the measurement. Must have trust issues 😀
I like the RP a lot. The only issue it's limited for long lengths. If I was cutting long lengths I'd have to design a stop for doing so. I've used mine enough to trust it way more than me and a miter saw. Anymore I just blow and go.
-
51 minutes ago, kurtvd19 said:
That's exactly how I do it.
You mean, this is as good as it gets?

- FriedClams, Paul Le Wol, Ian_Grant and 2 others
-
 2
2
-
 3
3
-
I have a RP slicer and I think it's much more precise than a miter saw for repeated cuts requiring the same length, IMHO.

-
Jacques, rule of thumb, the higher up the smaller the block. The blocks you have will work out great because all blocks were not the same size. Bigger on the bottom and smaller at the top.
- Paul Le Wol, Glen McGuire, Bryan Woods and 3 others
-
5
-
 1
1
-
-
Nice work, Paul. Slicers are the only way to go, I can't believe how long it took me to see that lightbulb come on.
")
- FriedClams and Paul Le Wol
-
1
-
1
-
6 hours ago, KeithAug said:
Very nicely done - I would love to know your technique Keith?
Thank you, Keith.
I first drill my holes where the chain ends will attach. I start with a piece of chain that's a few links longer than the correct length. I then make the top eye at the end of the chain and trim the eye shank to match the top hole depth. I work from the top down when making the chain length that way I don't have to fight gravity. I run a piece of wire between the links (bending the two ends downward) where I think will be the bottom end link is. With the top eye in the top hole (unglued) I pull the chain as taunt as possible at the center of the bottom hole holding onto the wire I had run between the links. The chain is usually too long, I note how many links too long and run another piece of wire through those links cutting away the chain where the first piece of wire was run. I repeat this process till I have the correct chain length. I then make the eye in the bottom link, cut the eye shank to the correct length, pray, and test fit the chain. Occasionally I'll cut the chain too short and have to start over with the top eye but 95% of the time I can sneak up to the correct length by trimming away the bottom links.
I hope the above makes sense, I'd like to add photos but I can barely get this three handed job done with the two hands I have let alone take photos. As I said, it's a tedious process and I wish I knew a better way. If anyone has a better method I am all ears!
-
41 minutes ago, ferretmary1 said:
A couple of years ago, we had a member who ordered a flash drive from us. The member lives in North Carolina. I tracked the package heading east, but then it turned back and headed southwest. It got as far as Texas and sat there for a few days. I contacted the post office as soon as I saw it go off course. They finally corrected the direction and the member received it a few days later. Another member who lives in Indiana - less than 40 miles from here, had his order go to Puerto Rico and then come back. I could have driven it to the guy's house! The Post Office is crazy sometimes!
Funny but not funny if you're the one on the receiving end.
- ferretmary1, robert952, Ryland Craze and 2 others
-
2
-
 3
3
-
-
-
5 hours ago, kurtvd19 said:
Many chains have a clear coating that needs to be removed for decent blackening. I soak the brass chain in warm Sparex (I use a small crock pot for this - it's not used in the kitchen, only in the shop!) to remove the coating. A thorough rinse in water and after drying the chain can be blackened. I dip it in and remove it letting the excess drain off over the container. Two dips is usually adequate to blacken chain. I will try the use of a a small, cheap paintbrush to "paint" the Brass Black onto the chain the next time I have to blacken chain to see how it compares to dipping it. I use the paintbrush method for rods, ladders and other parts that are too large for my small containers I use for most blackening.
Kurt, I think oxygen plays as important part in the blackening process as the solution itself. Soaking pieces in the solution is too much and a paint brush maybe too much as well plus it's hard to rub with a paintbrush. I know rubbing with a Q-tip works like the bee's knees.
-
51 minutes ago, JacquesCousteau said:
Thanks, Keith! That might work, but the eyebolt shaft is in pretty deep and pretty tight--even if the superglue dissolves, I don't know if I can get it out
Removal might create a crater but could be easily filled with a sawdust and CA mixture. Until the eyebolt eye broke off it was a very nice clean looking piece and I know you hate messing about with it.
-
10 hours ago, Ian_Grant said:
I always get that flaky finish too! And I too dump the chains into the solution.
Ian, we're both of that "we don't need no stinkin' directions" school of thought.
I forgot to mention that I placed the parts to be blackened on a folded paper towel to absorb any excess blackening solution and once rinsed in water I buffed them with a clean paper towel before repeating the process. I hope it works as well for you as it did for me.
9 hours ago, wefalck said:Leaving a part too long in a blackening solution results in a buildup of several layers, which then can detach, i.e. flake. Using a ‚tampon‘ process means that the surface is exposed to a limited amount of blackening solution, reducing the risk of flaking.
Thank you, Eberhard. Oh, how very true!
- KeithAug, FriedClams, Glen McGuire and 2 others
-
5
-
Tom, I'd say natural because of the contact of the line with the sail.
- Ian_Grant, FriedClams, Knocklouder and 2 others
-
5
-
Jacques, you might try putting a very small amount of acetone at the base of the eyebolt shaft with a needle and see if you can tease the shaft out. It would be a lengthy process as acetone evaporates very quickly. Normally I'd use a Q-tip dipped in acetone but that maybe too much acetone for your working area?
-
5 minutes ago, Ian_Grant said:
The other thing about chains which drives ME batty is blackening them. I have had little success. 😞
Ian, until recently I would have agreed with you 100% but the last two times I've used Birchwood Casey I've had success amazingly enough. I blackened the chains for the derrick crane stays and the sidelight lanterns and they came out perfect. I'm somewhat shocked because in the past I've had a flakey/sooty finish which easily rubbed off.
The last two times I've soaked the pieces to be blackened in acetone and thoroughly rinsed in water as usual but instead of soaking the parts in the blackening solution I used a Q-tip soaked in BC and rubbed the pieces for 30 to 45 seconds and let sit for 15 seconds. I did this twice rinsing in water after each application and they came out great. I am ashamed to say that with the exception of using acetone instead of alcohol these are the exact directions on the bottle which after seven or eight years of frustration I finally read.

- clearway, Glen McGuire, MAGIC's Craig and 6 others
-
5
-
4
-
Thank you to everyone for your comments and likes
As I said, I'll be leaving Lula's light boards white. Side lights were recommended in 1858 and signed into law in1864 by President Lincoln. I can not find light board color requirements mentioned in the early regulations.
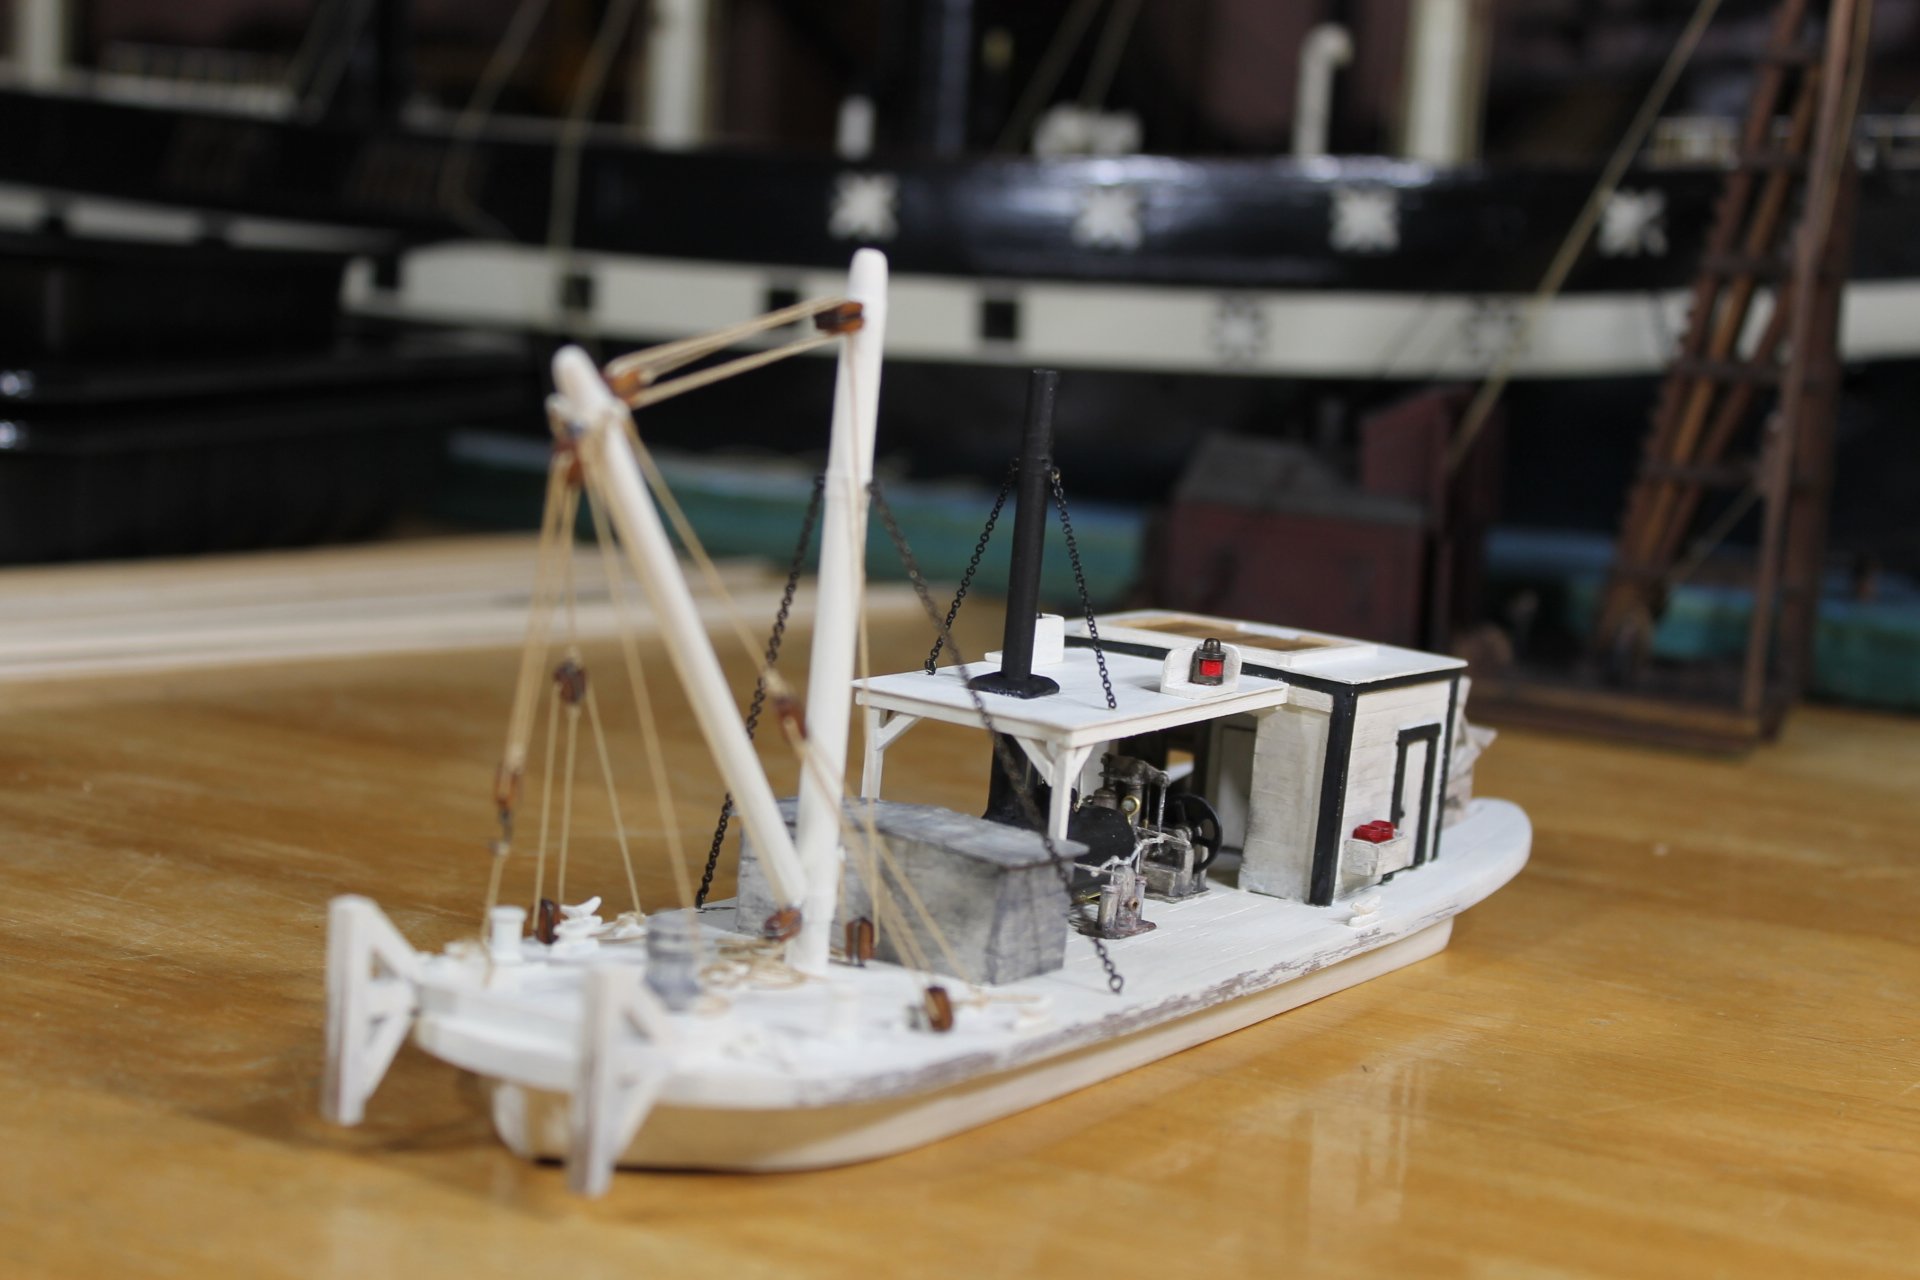
A brief update... I got the boiler stack chain stays attached which took the better part of a full workday. The chain size required wire no greater than 28 GA for making the eyes. To attach chain stays I have to sneak up on the correct link length by trial and error. It's a very tedious process and I wish I knew a faster/better means to accomplish this task. One link makes all the difference in the world and it drives me a bit batty getting the perfect length.
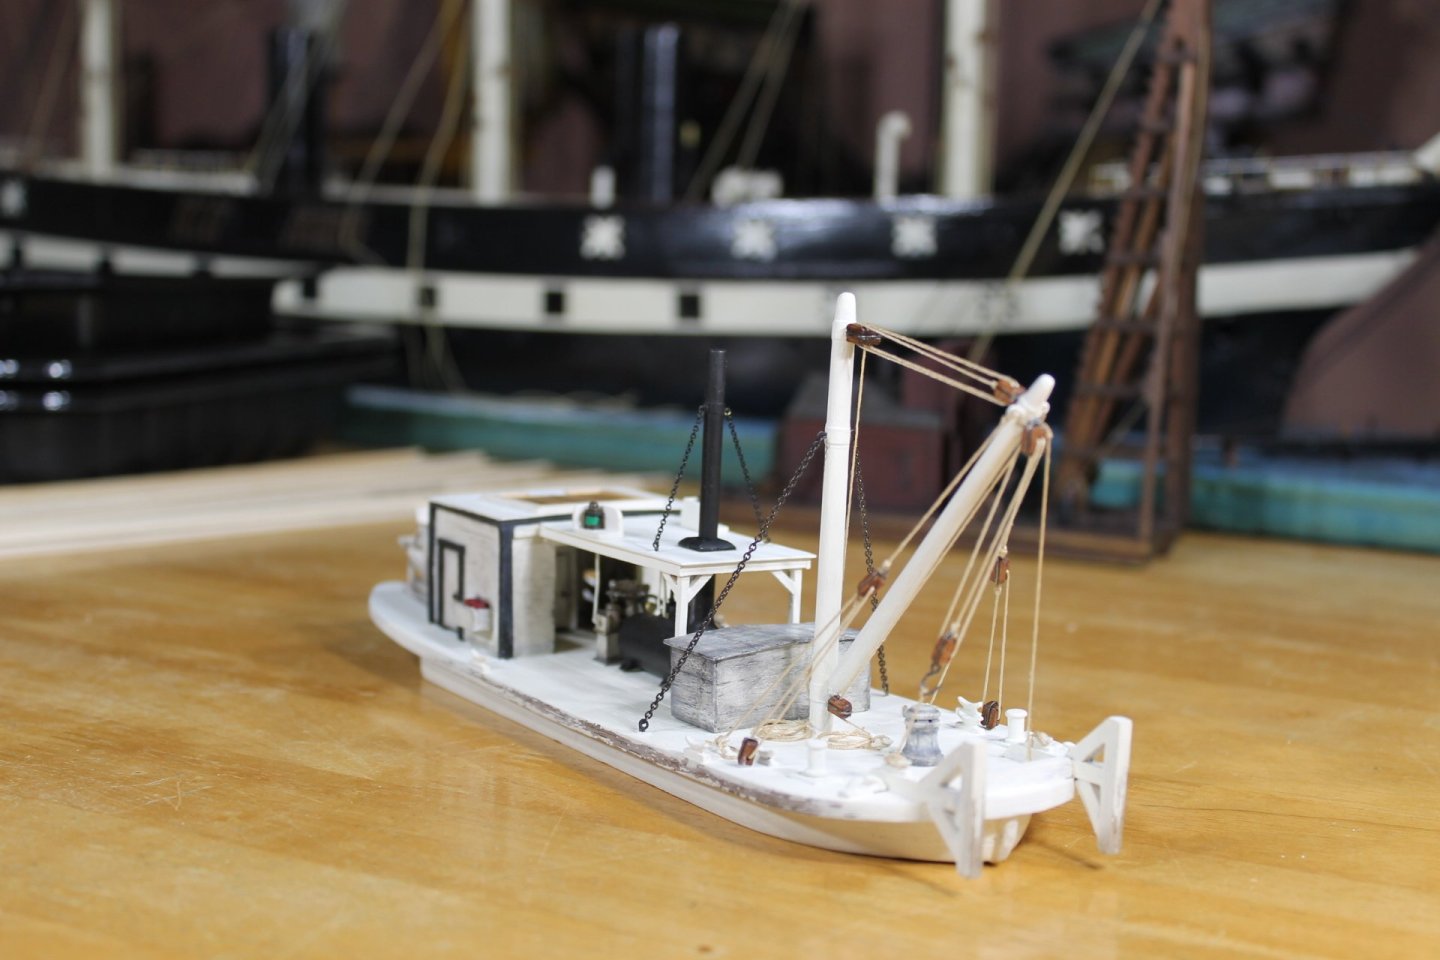
With the stack stays done next up is the pilothouse. It'll be three or four days before I have an opportunity to get back to work on Lula so it will be awhile before I'm able to post progress and photos.

Thank you for your support and for following along.
Keith
-
8 minutes ago, Rick310 said:
Keith, thank you so much for your input! I read your post and it never occurred to me to use annealed wire. Much stronger than copper and should be easier at my scale 1/96. Plus the advantage of using wire closer to the correct scale!
Rick, I use annealed wire for a couple of reasons, one it's black so I don't have to paint it and two, it's easy to work with. I work at 1:120 so I need all the advantages I can get.
-
Rick, I post the following trying to be of help and not trying to hijack your build log.
See page 12, post # 352 on how I wire strop blocks.
-


USS Constitution by Glen McGuire - FINISHED - BlueJacket Bicentennial Edition - 1/96 - Repair and Completion of Construction
in - Kit build logs for subjects built from 1751 - 1800
Posted
That last photo is a grand sight, it's the best angle from which to view a ship IMHO.