


rwiederrich
-
Posts
5,520 -
Joined
-
Last visited
Content Type
Profiles
Forums
Gallery
Events
Everything posted by rwiederrich
-
great update...….wonderful model...just wonderful. Rob
- 238 replies
-
- 2
-

-
- leviathan
- troop ship
- (and 2 more)
-
MONTAÑES by Amalio
rwiederrich replied to Amalio's topic in - Build logs for subjects built 1751 - 1800
I would only assume that you are using a small jig to accurately and consistently drill all these treenail holes symmetrically? If not...you have more time and patience then almost all of us marvelers combined. Rob -
Like much of the tedious jobs...I find a way to mass create them. My GR is a smaller scale 1/128th..so I was able to simply apply glue to the shrouds and press the ratlines into it and then twist the ratline to incorporate the glue. Then when dry, I go back and nip off the remnant line...leaving a clean, tidy row of ratlines. I follow up by applying black paint over the glue to hide any shininess. The ratlines tend to blend in or dissolve among the extent of other rigging. I tend to rig several yards at a time in this fashion. IMV, making the job fly by....if that word can even be applied here. Realizing that since I'm *cheating* on the majority of my building techniques and am using every media available to create my models....skipping thousands of clove hitches won't break the bank of authenticity. Not much of our model construction techniques or materials are *authentic* anyway. Love the job you're doing. Rob
- 356 replies
-
- 3
-
-
- red jacket
- finished
- (and 1 more)
-
Slowly returning to work on the GR...I(without images)..ran the mizzen upper topsail halyard purchase rigging....with its blocks resolving at the crab winch. I began to think about working on the main mast pennant rigging before I get to far with the braces and will find internal access a nightmare. So I made the first cap block with the internal sheave for the pennant line and I ran the silk line down to....what? I then decided to create...what seamed to me to be practical, a pennant rail, that rests along side the main cabin and the aft cabin(for the mizzen). It occurred to me that these pennant purchases needed to be of a single circular line so the sailor could raise and lower the pennant with ease. Installing the rails with their stanchions was a real trick...working deep within the miles of rigging and tackle..drilling deck holes and securing them. I still need to paint them and belay the pennant line to them....but everything is run. The line itself is extremely small silk....lending itself to scale and the purpose. the union Jack will fly at this mast. The house flag at the mizzen and the national flag at the gaff. Just to let everyone know...I will be off the net for a week or so....my father suffered a heart attack and is in need of a bypass...so I'm flying South to attend to him. See everyone in a couple of weeks. Rob
- 1,208 replies
-
- 4
-
-
- great republic
- clipper
- (and 1 more)
-
Sweet job...... I need to get back to work on the Great Republic...…. You're making me anxious. Rob
- 356 replies
-
- 1
-
-
- red jacket
- finished
- (and 1 more)
-
I eyeballed at first...but found the wire spacer worked very well for me...cuz I could then simply wrap the shroud around the deadeye, clip off with a mini alligator clip and then seize.
- 356 replies
-
- 7
-
-
- red jacket
- finished
- (and 1 more)
-
Nic....masterfully done. What tool are you using to keep all your deadeye lanyards the same height? Are you using a wire spacer or something? Rob
- 356 replies
-
- 1
-
-
- red jacket
- finished
- (and 1 more)
-
HMCSS Victoria 1855 by BANYAN - 1:72
rwiederrich replied to BANYAN's topic in - Build logs for subjects built 1851 - 1900
Amazing cannon work Pat. Rob- 1,021 replies
-
- 4
-
-
- gun dispatch vessel
- victoria
- (and 2 more)
-
Another fine lesson in historical accuracy...…..Bob. As you have described...I never build a model that doesn't depict some form of weathering...for the deck and nearly every aspect. I appreciate, how you outlined the realities of these weathering materials being *messy* and contributing to the dirty appearance of vessels as much as its protection. Just one trip *Round the Horn* left clippers as if they had been through a sand blaster. Freezing rain cracked newly applied paint and expansion and contraction literally broke caulked seals and chipped paint off like a wire brush. And poorly preserved iron ran red with rust streaks. I have a B/W image of Glory of the Seas just after one rounding of the Horn and she looks beat up. Many images can be found on line. My own version of her has her decks pretty dark. Rob
-
Bob...I would conclude that you are one, who I would say has first hand experience. I should have used the language, *Most of us are not first hand experts*. Still...you make my point very clearly..... The materials used to weather standing rigging and deadeys, blocks and hearts would tend to *blacken* these items...not lighten them as some would model. The reason why I said , *some, model, based on preference*, not from what actually would be reality. Tanning, taring, oiling, varnishing these members to preserve them will in fact gather dirt and all manner of debris (Not failing to mention that these preservatives themselves are dark)....discoloring them to dark brown or grimy black. Reason why I used the Constitution rebuild as an example. These smart restoring folks know what we are talking about...that is why they chose to represent the rebuild with black line and fittings. Your expertise is always welcome and appreciated....I can't speak highly enough of it. Rob
-
Since none of us are first hand experts, to weather blocks or deadeyes of period ships....(and generally any ship built between 1700~1900), were weathered brown or black based on the material supposedly used to preserve standing rigging at the time....is actually factual....we have to do a lot of guessing based on preferences.. Many paintings are virtually unclear. What is clear, is the practice of using a preservative on lanyards(blocks and deadeyes) was a factual reality, was it *Dark*, probably. How that application actually looked on a weathered(or new) vessel is simply speculative. I tend to follow the logic of the experts....since the Historian restorers and nautical architects determined the Frigate CONSTITUTION required black deadeyes and lanyards, I tend to replicate all my clippers with the same. Feeling confident I'm not far off from the truth. Rob
-
One redeaming fact about the Cutty Sark fire...is that all of her rigging, masts and deck furniture and houses and most details had already been removed. Rob
-
Catching up...very nice results......clean and crisp work. Rob
-
Amazing metal/wood work....such a pleasure to watch. Rob
-
MONTAÑES by Amalio
rwiederrich replied to Amalio's topic in - Build logs for subjects built 1751 - 1800
Just amazing...utterly amazing. Rob -
Affixing the blocks will seam like the longest job you will embark upon...cuz there are just so many. Especially if you are going to rig all your sheets/downhaul/lifts and buntlines. And so it begins...….. Good luck. Rob
-
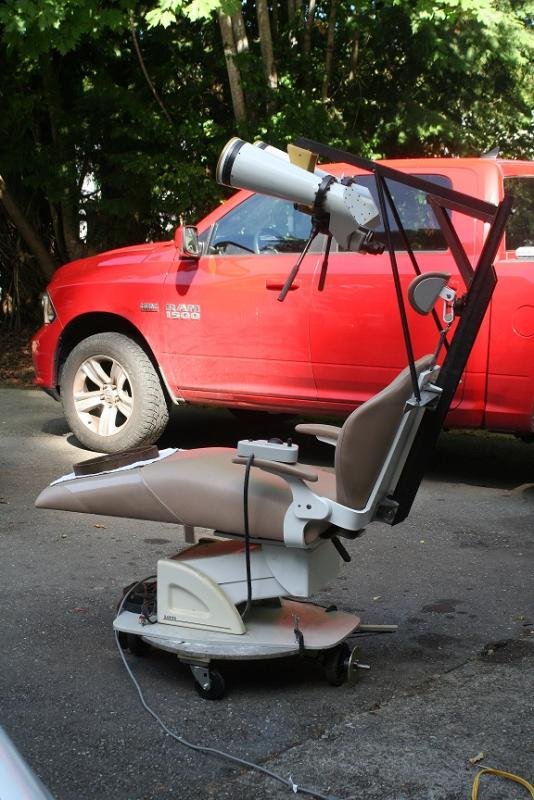
Astronomy. My father, with my help, built the 5" binos in 1974. I inherited them so I wanted to use them in a comfy reclining way...….. So I build a modified dental chair, that rotates and reclines. Rob
- 1,208 replies
-
- 5
-
-
- great republic
- clipper
- (and 1 more)
-
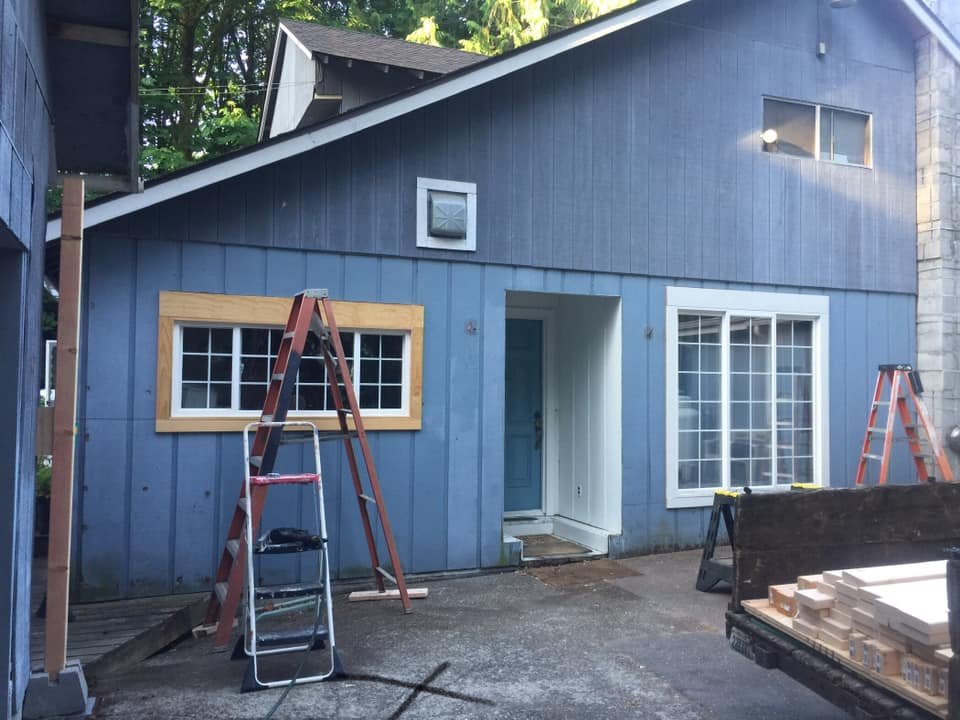
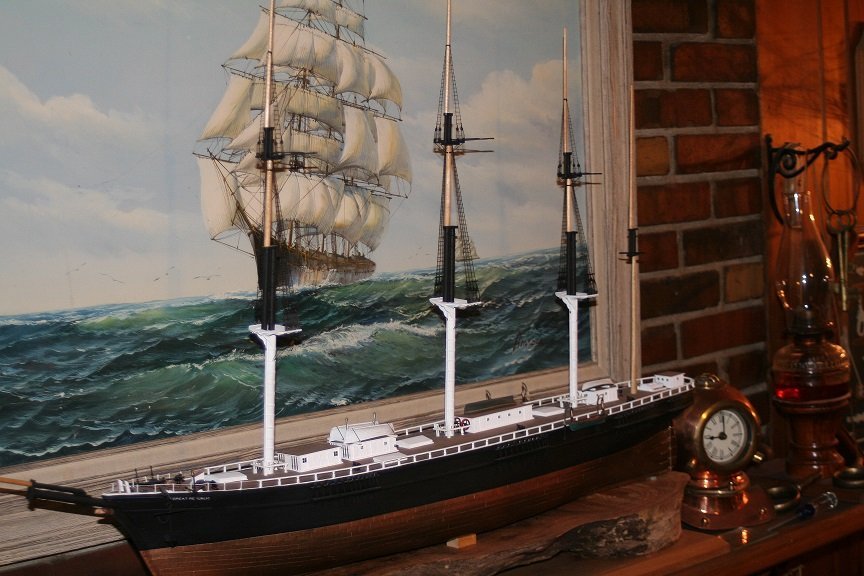
Admitting I'm a shipyard slacky is the easy part....trying to show work, where none has been done is a trick for a magician. I just wanted to let my model brethren know I wasn't just being lazy.... My wife inherited the house, and it needed lots of TLC and some serious upgrades. Here is a pic just after I installed new vinyl windows and removed the old nasty single pain aluminum windows.. No porch roof/veranda or French doors/roof. I the pic I just removed the old 5X6 single pain aluminum window, and replaced with a 6X6...and I removed the old laundry room 2X5 window and replaced with a 3X6. getting ready for the roof. It was just a big flat ugly wall with mismatched T1-11. Had to move electric and completely rebuild the underneath of the big window...lots of dry rot. Rob
- 1,208 replies
-
- 3
-
-
- great republic
- clipper
- (and 1 more)
-
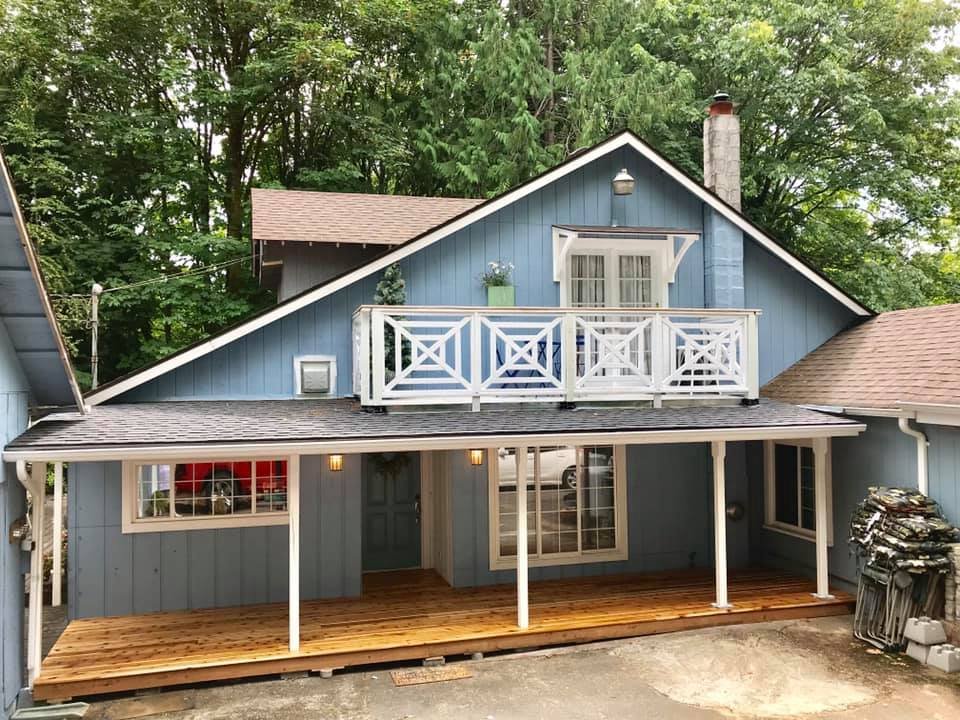
Just a few updates....Like I said earlier...I've been so preoccupied with so many home type jobs I have had no real time to work on the GR....I can only assume I will be back in the shipyard this fall. I do have a friend who I've asked to make the case for the GR. But for your entertainment here are a few pic of what I have been doing. I finished up the front porch and veranda/French door/roof for the front of the house...complete front overhaul and I just finished the cedar decking. I began by installing all the new windows and ended up with the deck. Next....I worked on my second hobby and converted one of my dental chairs into a binocular chair to hold my large 21X127 custom binoculars. I also built the rotating table the chair sits on. I, now have a couple of trees to fall and cut up...... I'm so exhausted. Rob
- 1,208 replies
-
- 10
-
-
- great republic
- clipper
- (and 1 more)
-
Paper works exceptionally well...and is very forgiving. Rob
-
I love clippers and I'm getting warn out on Cutty Sark examples. Your Redjacket is done well and is quite refreshing. Rob
-
Thanks Nic...I just thought it was easier to treat the shrouds/ratlines as part of the masts and them as one unit....so when I added the yards(Off model), everything would go together nicely and nearly complete. Your approach seams similar....your channel/chainplate work looks very nice too. Rob
- 356 replies
-
- 1
-
-
- red jacket
- finished
- (and 1 more)
-
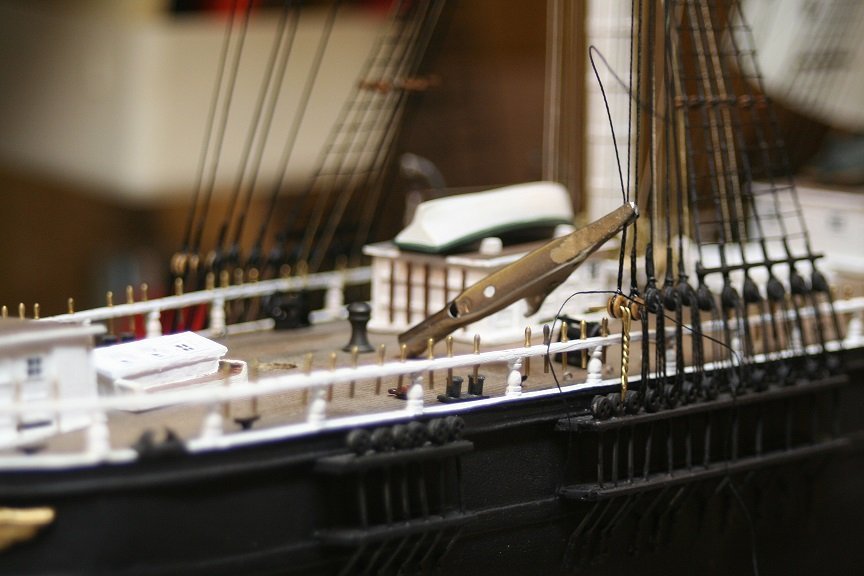
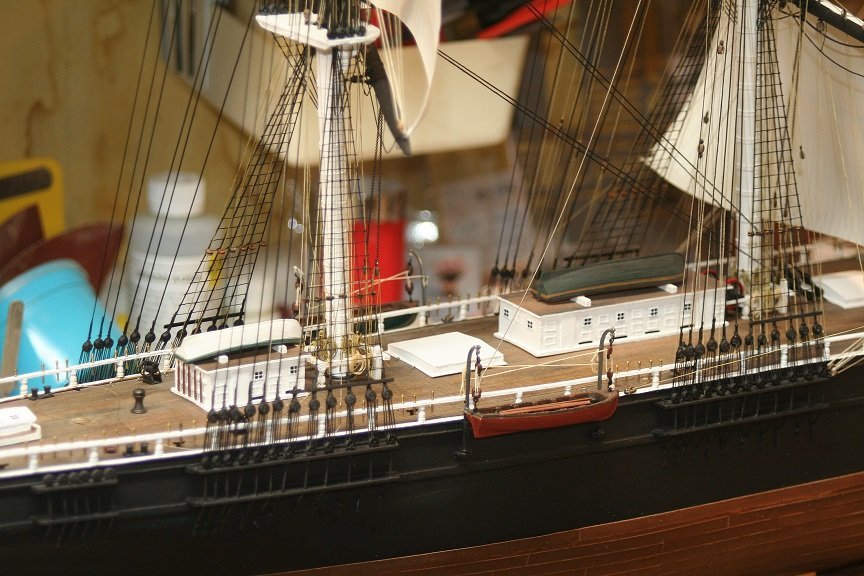
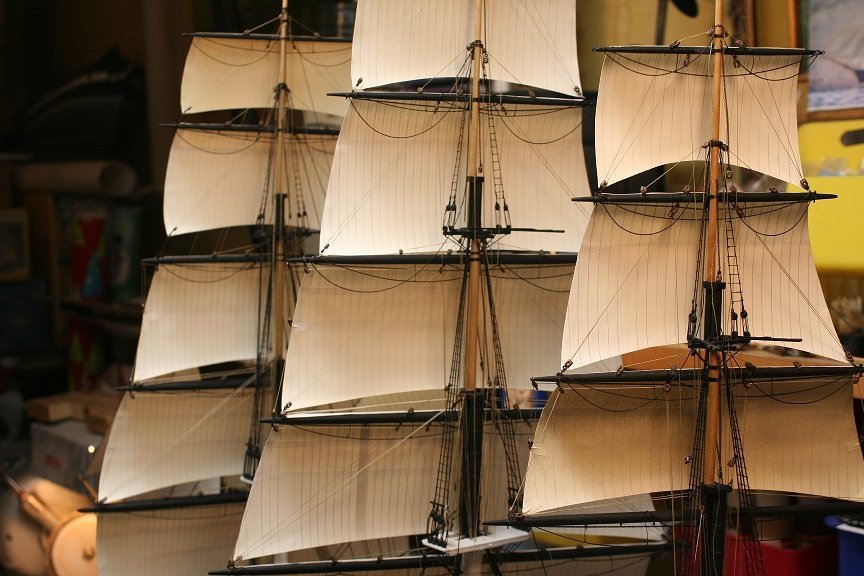
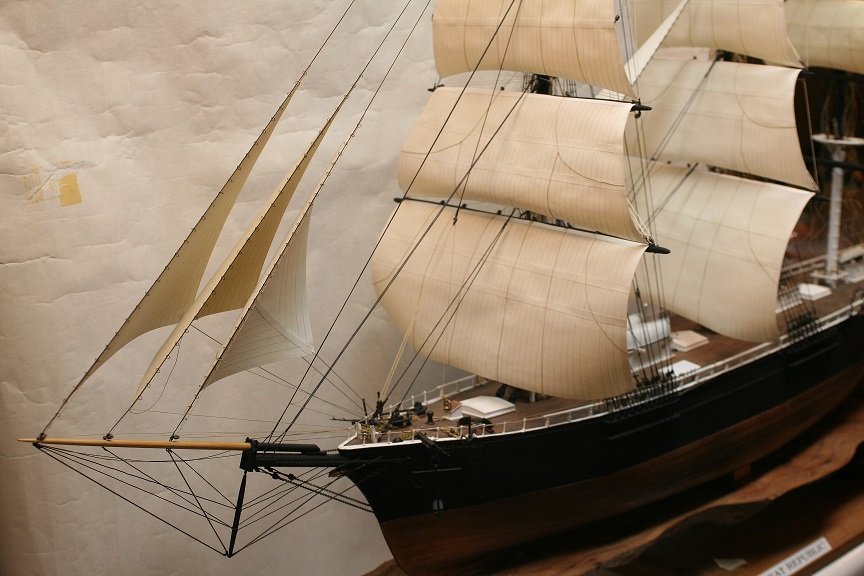
Great job on the offsets....I like the method described...seams very easy....short of turning your own masts with offsets within them. I also like building the masts and adding the ratlines for the top and topgallants off model. I found it far easier to rotate and do the miniature work in its own fice...giving far more access and ease of work. Then you can place the masts and add the main shrouds. Here's a pic of mine done this way before yards and sails. Rob
- 356 replies
-
- 5
-
-
- red jacket
- finished
- (and 1 more)
-
So good to see you back and at it hard. Several questions if I may? How did you apply your mast straps(what are they made from?) What is going on with the top mast at the doubling......It appears to be resting on a square post? Is this the simulated stepout the mast head would have to accommodate the lower shrouds? And does not the instructions call for double deadeyes and lanyards for the top shrouds? Some rigging diagrams call for simple bulleyes and stropping...much like what you created. I'm assuming the Redjacket had varnished masts and yards. Your work is wonderful and vary clean and tidy. Rob
-
Thanks Pat..I experimented quite a bit to get the lighter green seen below the white caps and then the darker water as the froth and foam clears. Its a plethora of depth and color that I struggled with. Thanks for the fine comment and compliment. I've been so busy with house projects(finishing up the front porch(7X30)), and making chicken coops and farm stuff...that I just don't have enough hours in the day to work on my ships. Not to mention that my ship modeling hobby has to compete with my telescope/astronomy hobby. I'm currently building a mount for my extremely large binoculars to ride on an old converted dental chair....for real good astro viewing. Anyway...again, thanks for your encouragement and comments. Rob(spread thinner than jam on day old bread)
