
HOLIDAY DONATION DRIVE - SUPPORT MSW - DO YOUR PART TO KEEP THIS GREAT FORUM GOING! (Only 20 donations so far - C'mon guys!)
×


lmagna
-
Posts
5,885 -
Joined
-
Last visited
Content Type
Profiles
Forums
Gallery
Events
Everything posted by lmagna
-
thought it was a little more like, "I'm not following you, you're LOST"! Love seeing your work and your diverse subjects. Makes me always wonder what is going to be next.
-
 Sorry I was a little late jct I located the decals in the recently closed listings not in the open listings. They had not sold so I contacted the seller to see if they were still available and he relisted them again just for you, (Well just for him as well if you had bought them!) That was why you were unable to find them on an eBay search earlier. I forgot how I found the resin body/decal version but it didn't come up in the normal search. CDW is VERY right about using Future, or now days Pledge Floor Shine. I also use it over the entire car after applying the decals, or after the car is finished even if decals were not used. it is FANTASTIC stuff. There are only problems if some part of the body needs to be a flat of satin finish. It pretty much makes everything shiny, even the clear parts. I never tried the sunshine treatment but when we get some five or six months from now I will be certain to give it a try! There are some advantages to living in Florida!
 -
Here is a little more expensive option. https://www.ebay.com/itm/New-65-GTO-AWB-1-25-Resin-Body-Brutus-Decals-from-Fremont-Racing-Specialties/323661786596?hash=item4b5bbeede4:g:wlcAAOSwOaBbS5k1:rk:1:pf:1&frcectupt=true
-
Will these work for you jct? It may be a little late now but I had to contact the guy and see if he still had them and wait for his reply. He just relisted them. https://www.ebay.com/itm/1-25-1-24-SLIXX-LEW-ARRINGTON-STEVE-KANUIKA-BRUTUS-FUNNY-CAR-LABFC-1976-DECAL/352581700254?hash=item521781ca9e:g:qwsAAOSws99b-4Fv:rk:1:pf:1&frcectupt=true Might save you the repaint job.
-
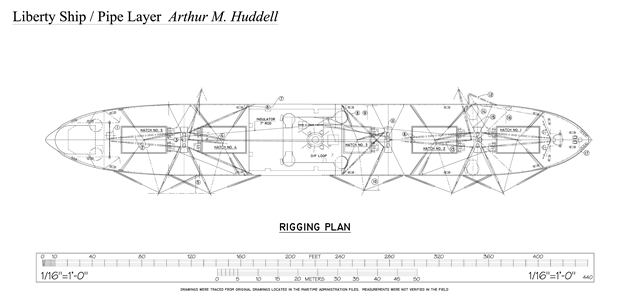
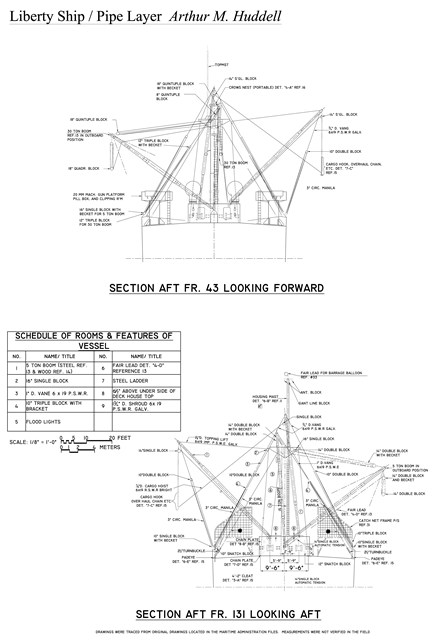
Would this work for you Jack? If that won't work for you, here is the original source and you can blow them up as much as you need to see or make large prints. http://www.themodelshipwright.com/high-resolution-ship-plans/cargo-ships/liberty-ship-arthur-m-huddell/

- 106 replies
-
- 8
-

-
- trumpeter
- john brown
- (and 2 more)
-
I had a pretty large box full of read once Marvel and DC comics when I left home in my teens. I don't know about the DC comics but many of the Marvels were #1 on in sets of several years. They included Fantastic Four, Xmen, Spiderman, Hulk, anyone remember Sub Mariner? The original Sgt. Fury and Nick Fury when he was white, and others My parents dumped the whole box at some point and I probably lost $100s of thousands of dollars if I had them now. Oh well I would have never been smart enough to think that any of my old stuff would become valuable so they would probably been gone long before anyway.
-
I wish I could follow and remember everything she is able to do. Truly a master of the art.
-
I think that Doris is using this stuff: https://pemi.cz/modelit-500-g-bily/p/123438?fc=3167 . I have no idea how it compares to what we call Sculpy but in her build log she clearly shows the process she uses to make the final fitting of her ship stands after doing the baking of the carved forms. https://modelshipworld.com/uploads/monthly_2019_01/9.jpg.7bfaee729aba62fdf82e7a97720aa8a6.jpg
-
HI Patrick I think I would have just plugged nthe old hold with a chunk of toothpick and made a new hole a few mm's lower on the stem. But thw way you did it still looks fine and you are definitely making progress. Nice work. Nice clamp mod as well.
- 449 replies
-
- 3
-
-
- sultana
- model shipways
- (and 2 more)
-
I like the contrast of the mossy floorboards against the weathered black of the rest of the boat. Nice work.
-
I hope you decide to go with the rigging Jack. It would add quite a lot to the model. there are plenty of pictures of Liberties for reference as well as the real thing not all that far from you.
- 106 replies
-
- 7
-
-
- trumpeter
- john brown
- (and 2 more)
-
Great work. I am not saying that you should do it but I think Doris has shown in her recent postings of her work with Sculpey clay that after you are done with the carving and baking that you can still make adjustments for fit while the clay is still hot by putting it into place and holding it while it cools. It would probably not make any difference with me anyway. Everything I try to carve ends up looking like an Owl.
-
This reminds me of the Mpc mcLaren MK 8 kit. Beautiful super detailed kit with EVERYTHING inside the car available for viewing. Only problem was that if you wanted to build it with the body fully installed................ Good luck! It was as if they wanted you do just leave the body panels off to view the full detailed interior! Is it possible that it is just the after bulkhead is too large and needs to be reduced to allow the gun cowling to sit lower? Great work.
-
Your work continues to amaze me Craig. Cars, ships or planes, it seems you have mastered them all. All that is left out at this point is Sci Fi. got anything planed in that venue?
-
Or at least stay in the cross walk so that the rest of us don't run you over!
-
Old model shipways USS essex (solid hull)
lmagna replied to Mike Esposito's topic in Wood ship model kits
I am not certain that any frigate would be considered a beginner's kit, but at that price I think it would be safe to say it is a good investment even if you hold it in reserve while you build a couple of other ships for practice if you want. Just a personal observation. Your skill level may be at a level that you can start with the Victory and make a nice model. Others have done it. -
If you have any left over from the Connie then he can take some more by making custom sails for your other builds. Send him a drawing with your needs and measurements, he will create a pattern and email it to you for checking and approval and when all is right will make the sails you need. That is what I will do when I get to that point in my Providence. There is no way I could duplicate his work. Here is a copy of the answer to my correspondence with Radimer. Below is standard way of sewing the sails per order. But now I can do it when my colleaque will health. Until then, we can determine the size a sails for sewing and programing it. Standard way sewing sails per order: Then I need known size of sails. I send to you the table for write a size of sails. When I will know size of sails, I will make program of sewing sails and find price of sewing. This price I send to you for confirm. And send a test sail sizes in PDF format. Paper exam of sails you must printing and try on the model or plan. After confirm that size of sails is OK I sewing sails. When will a sails prepared for shipping I send to you photos of sails and invoice. Payment is possibility via Bank transfer or Paypal. After payment I will send it. Complete process will take about 4-6 weeks, because much orders. I personally considered his method very nice. I though that there would at least be some cost up front to cover his time just in case.
- 209 replies
-
- 1
-
-
- constitution
- revell
- (and 1 more)
-
So you are coming in from the desert at last Per! Can't really call Shelton "The coast" but at least you will be on the livable side of the Cascades where it is possible for higher lifeforms than lizards to live in the summer! It seems you were smart enough though to stay hours away from my house though so that you wouldn't need to deal with pesky visits from the riff raff from Everett. At least not too often. I don't know about the economy settling down, but you might find the cost of living is a bit higher over here, even in Shelton. You cover a lot of ground Mike but I think the short answer is that for you there are no "optional" steps. The standing rigging is pretty much needed no matter what. The first part of the running rigging is really not an option either. I'm surprised that it is listed as such. It is used to handle the yards. Raising and lowering them and setting them for proper orientation to the wind when sailing or at anchor. If I understand the second "option" properly this is the running rigging that would be in place to manage the sails while underway. So since you are going to place ALL sails, including studding sails there will be no shortcuts or "Options" for you. In fact I would be highly surprised if the Revell instructions are complete. If you were to look hard enough you would probably find that there was even more rigging on the ship two hundred + years ago in her prime and that much of it has been simplified both on the real ship and the model.
-
Still a nice addition I suppose to brighten up an otherwise gray ship.
- 106 replies
-
- 6
-
-
- trumpeter
- john brown
- (and 2 more)
-
OUTSTANDING Jack! That alone makes her unique. I don't think I have ever seen "Nose art" on any ship before. Kind of makes me wonder if it is a museum add on. I am pretty sure the campaign ribbons on the bridge are.
- 106 replies
-
- 6
-
-
- trumpeter
- john brown
- (and 2 more)
-
If it does Steve then count me out! I have already done all the continuous portholes I ever want to do. Doing that many without a break to do something else is pure masochism at the very least, and about as exciting as watching grass grow. That is why I have not even taken any pictures as yet. Unfortunately there can be no shortcuts as the hull will be lit and they have to be right. A few more and some interior work and I will at last be able to move on to something actually resembling model building!
- 446 replies
-
- 3
-
-
- zebulon b vance
- deans marine
- (and 3 more)
-
Backstays are the first, (Black thread) lines run from the hull sides into the masts. They should be the first rigging lines listed in your instructions. The forestays are the remaining standing rigging lines that run back down either to the deck or to the next mast forward along the centerline of the ship In real life they are used to reinforce the masts against the stresses generated on them by the wind against the sails. That is why there are more backstays than there are forestays. All of the standing rigging can in addition be used to correct small out of alignment issues in the mast as all together they form a triangle that can draw the mast to the left or right or fore and aft before they are set. Others may differ and you must remember I am by no means any kind of expert by any stretch, but I would wait to install the yardarms until after I had done the standing rigging.
- 209 replies
-
- 2
-
-
- constitution
- revell
- (and 1 more)