HOLIDAY DONATION DRIVE - SUPPORT MSW - DO YOUR PART TO KEEP THIS GREAT FORUM GOING! (Only 69 donations so far out of 49,000 members - Can we at least get 100? C'mon guys!)
×

Zarkon
-
Posts
295 -
Joined
-
Last visited
Content Type
Profiles
Forums
Gallery
Events
Everything posted by Zarkon
-
G, that's a great idea! After I replace the stern frames, I will keep this in mind when I put the sills on again. Your model looks fantastic! Jeff
-
I was able to remove the outermost sills, but then realized the sills 2 and 4 were too low as well. Lastly, came to the realization that they all were a little too low and not positioned correctly. So I took them all out. After taking them out, I put in the spacers again and realized I over sanded the stern pieces (especially where the windows will be). If I keep the stern section pieces in, then the windows will look warped and jagged on the left and right sides of the window sills. Ugh! What a disaster! I might have to dissolve the glue on the stern pieces and replace them. Thats 2 weeks of work that I will have to redo. If anyone has ideas on how I might fix this, I would be very grateful. Jeff
-
Thank you Chuck, I definitely placed sills 1 and 5 too low. I will have to take them off and redo them. I did use the spacers but since the windows are too low, I will just need to start over with 1 and 5. I will need to check 2 and 4 as well after I take 1 and 5 off. Thanks for your help Chuck! Luckily, you provided another set of sill for just such an occasion. I wouldn't be surprised if this will be the first of many boo boos I make! Haha! Jeff
-
Thank you very much! This is exactly what I was looking for! Jeff
-
Lastly, forgot to mention, I do not have a small table saw to make my own strips. But the past 5 months, I have been talking it over with the Admiral, and she agreed that I can order a Byrnes table saw next month! I am very excited about it! Will I also need a planer as well? I think Chuck made a guide on how to make planks but I can't seem to find it. Thanks! Jeff
-
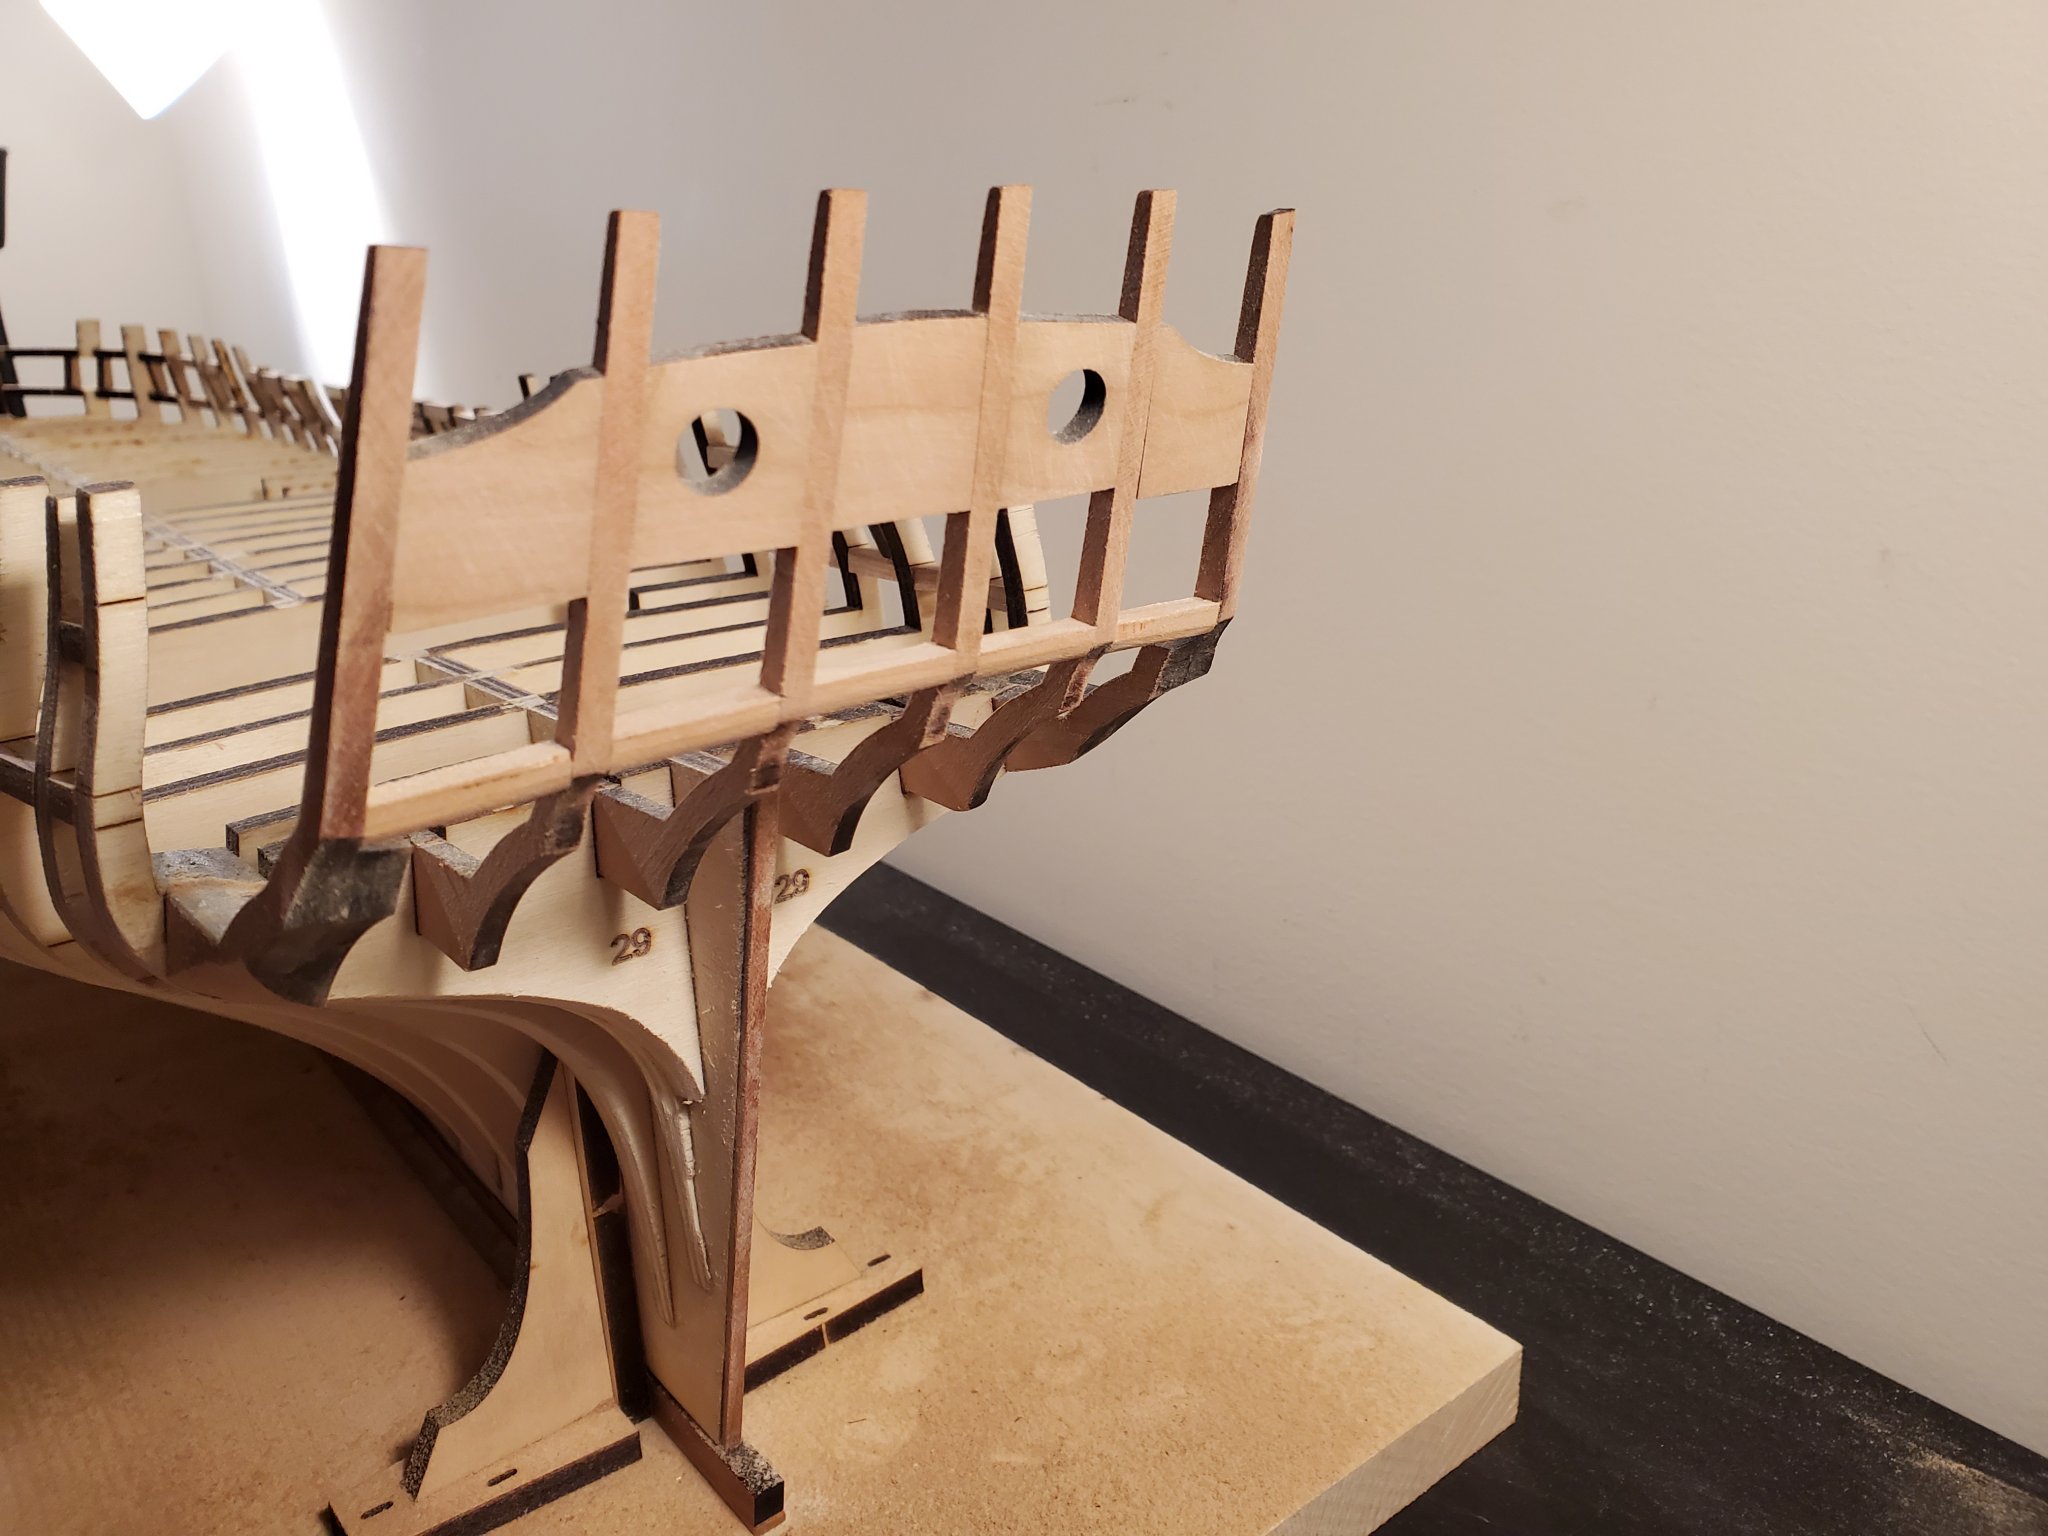
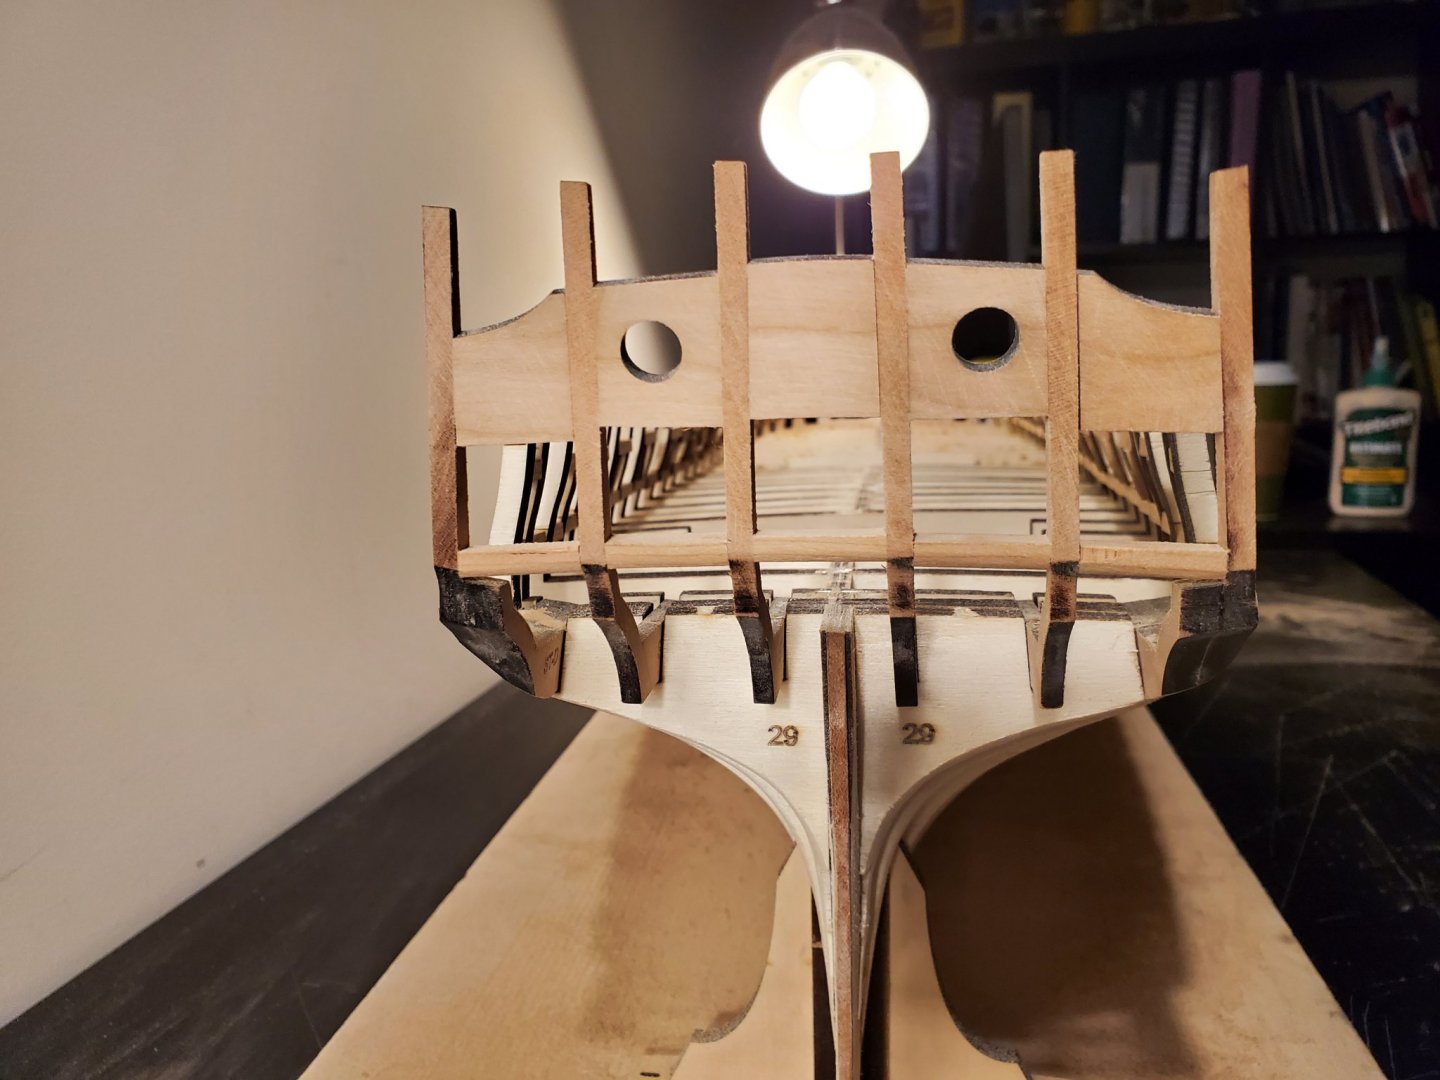
Thanks Chuck and everyone for the likes! I have glued and sanded the stern window sills. I have also sanded the fore and aft sides as well. I also sanded "bulkhead" 29 to match the the other frames and placed a plank against it to check the curve if the hull. And I sanded down the sides of the stern frames as described on the plans. Wow. Thats a lot of sanding! I saw in Chuck's log that it's important to make sure that the tops of the sills are about 3/32" thick. I was able achieve 3.5/32". I hope thats good enough. I do have a question about the laser cut stern frames. Do I need to remove ALL the char from these pieces? Or just the char that's next to the window sills? I know I didn't sand the tops of the sills, nor all the char below the window sills. Lastly, inboard, do I need to sand off all the char from the stern laser cut pieces as well? Thanks all! I hope all of you are safe and healthy! Jeff


-
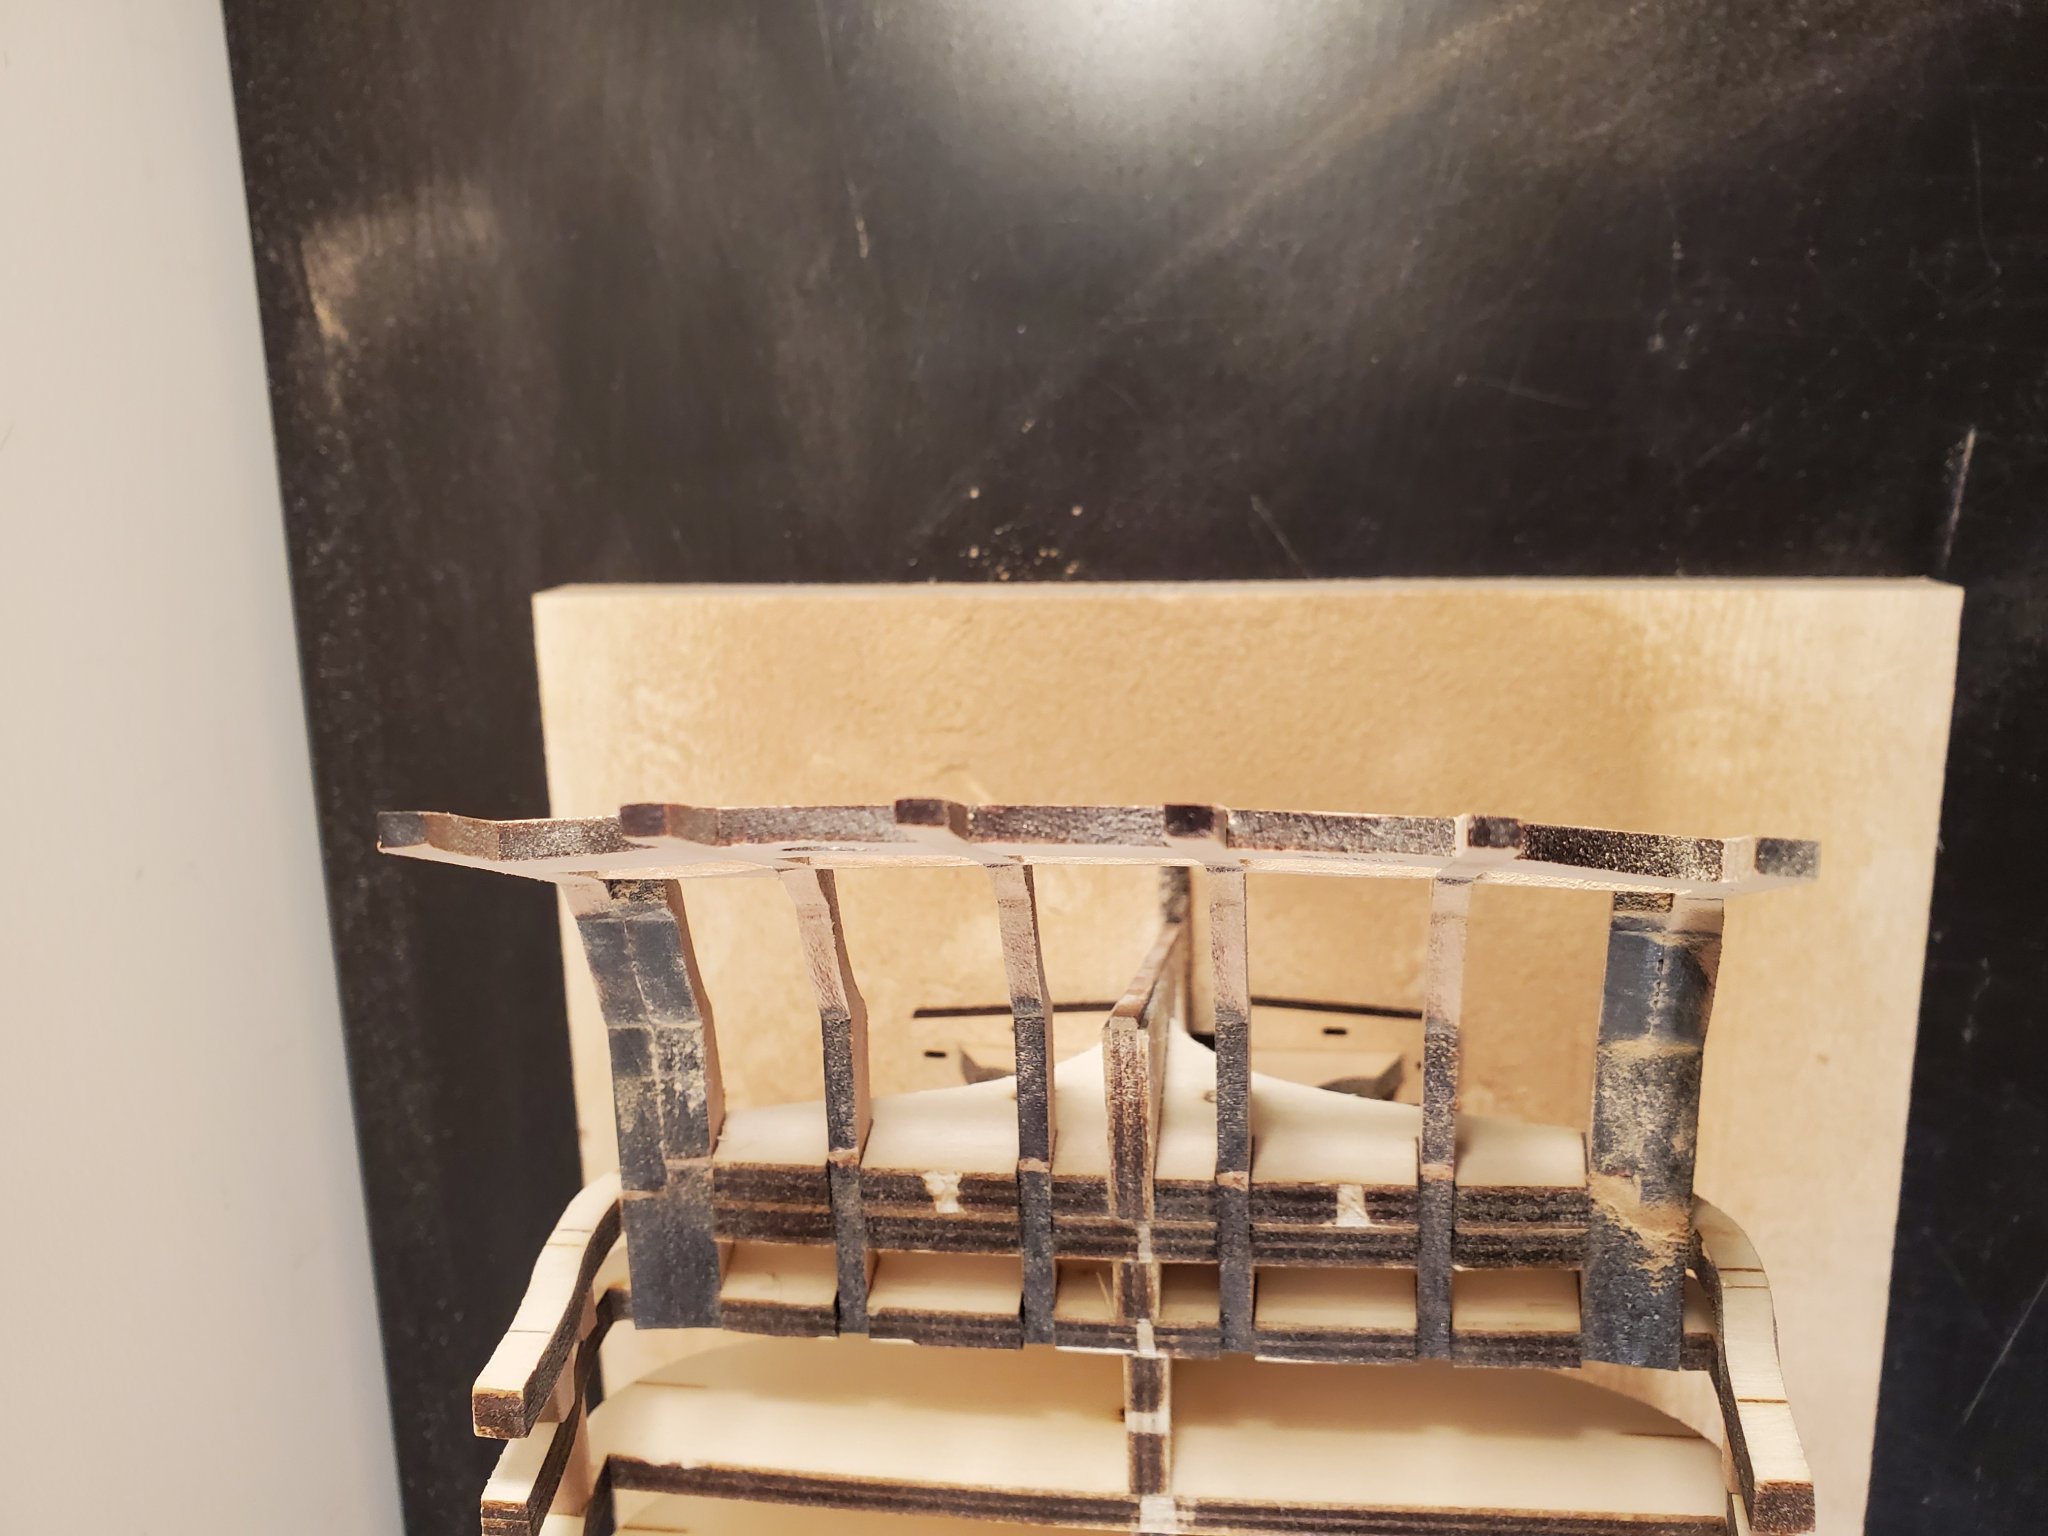
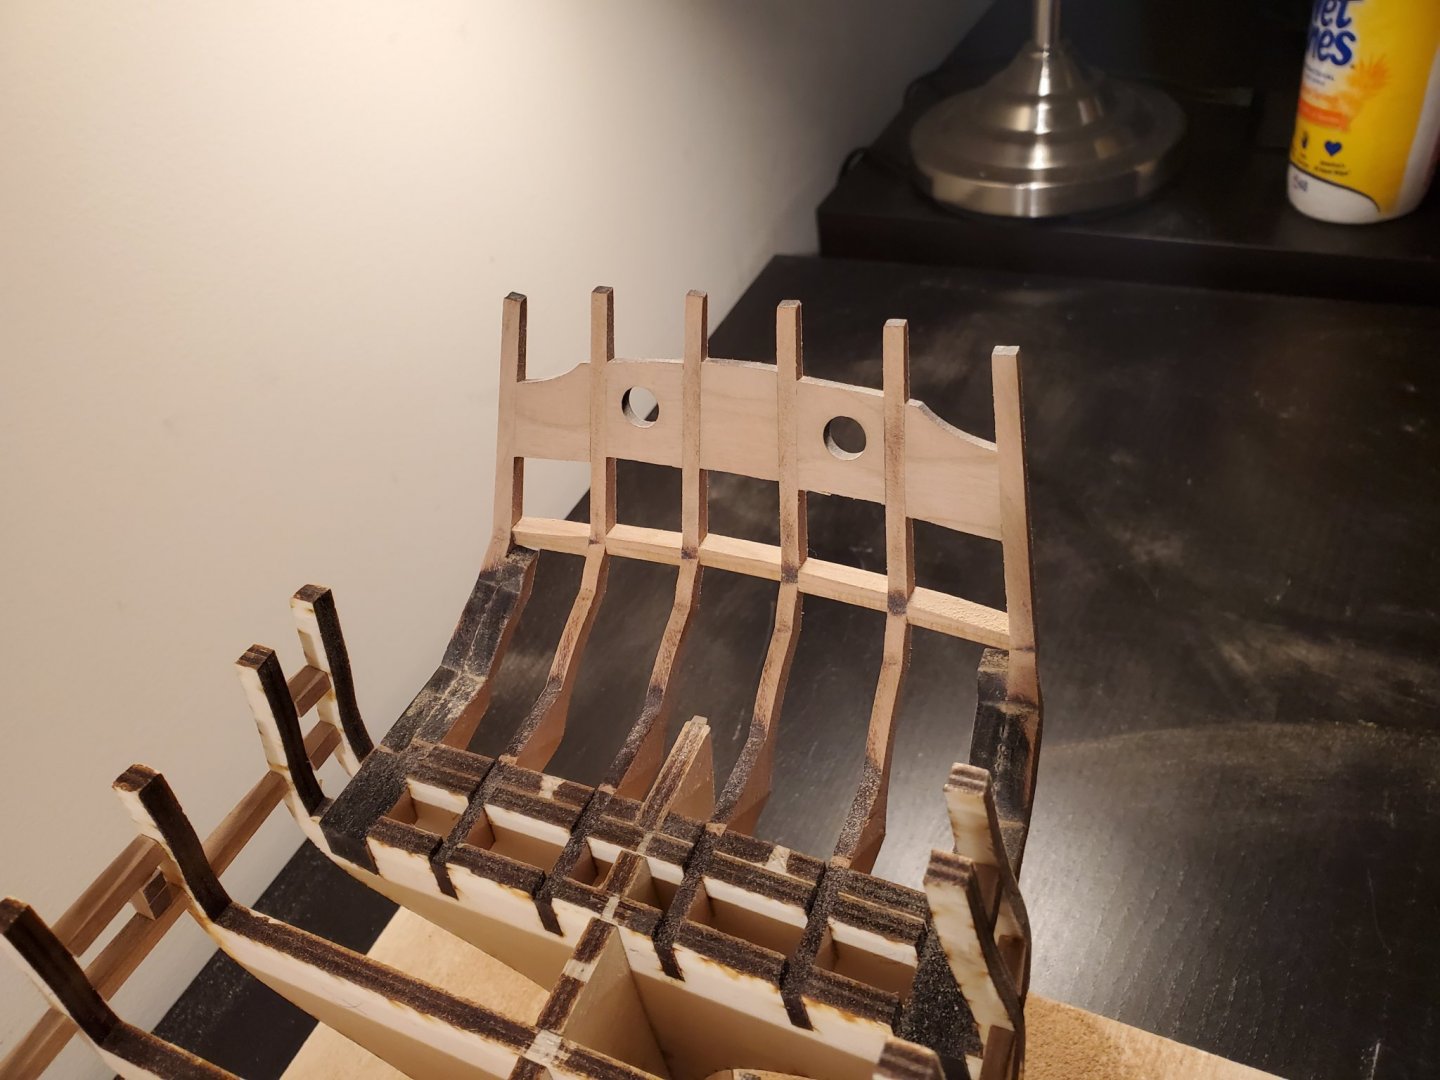
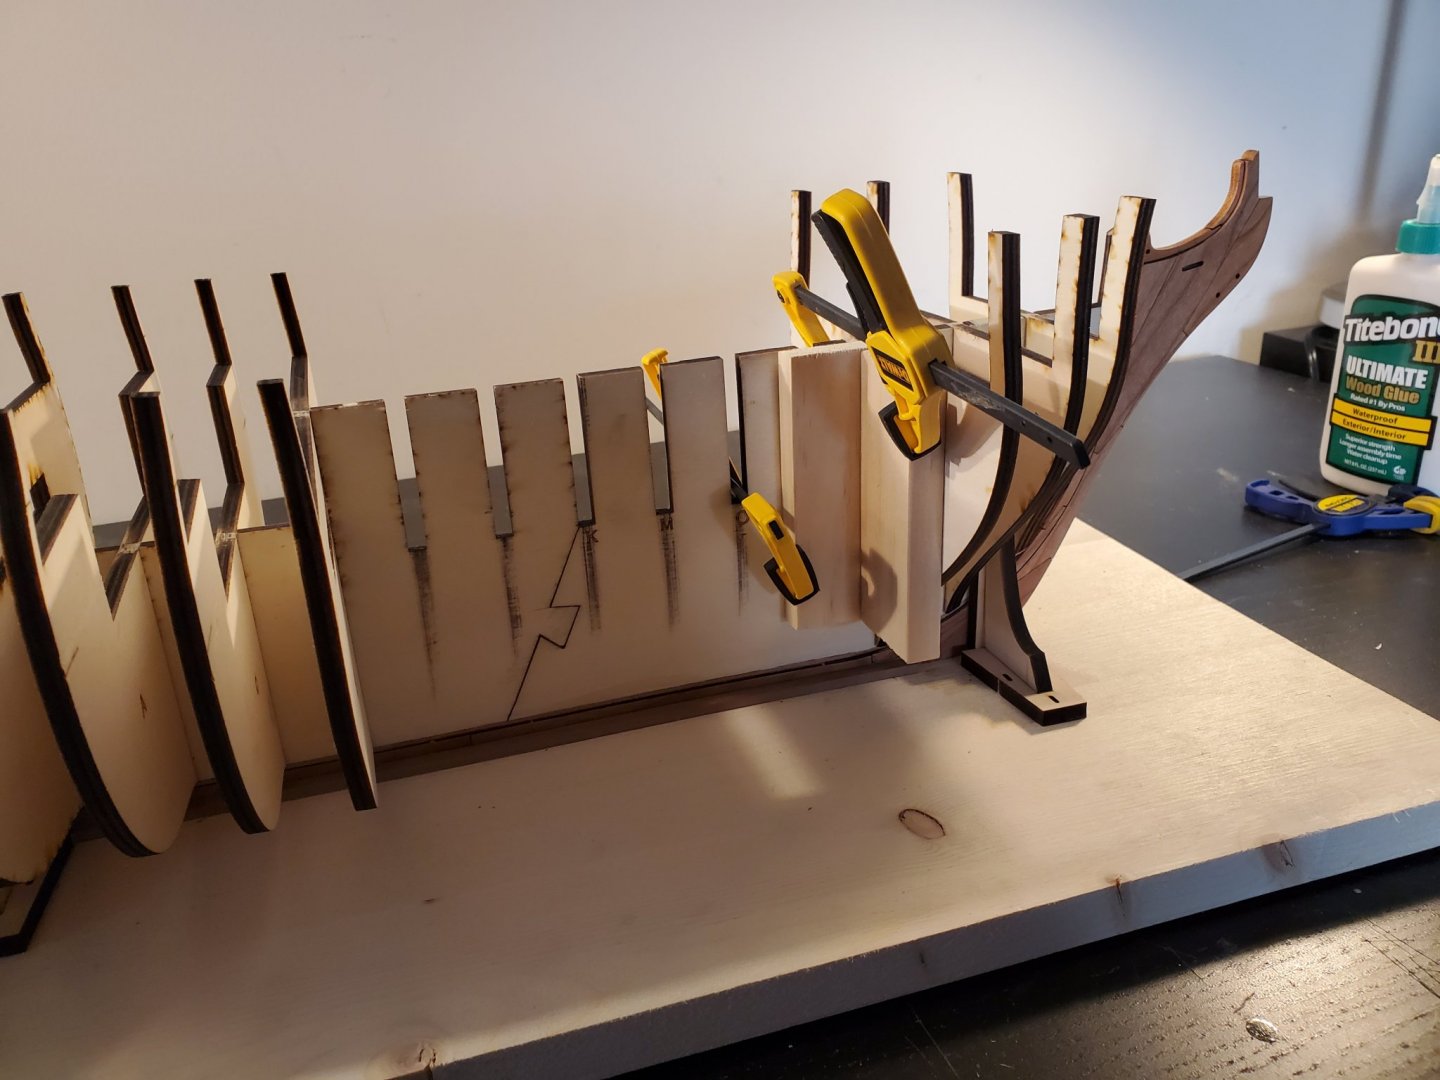
Hy all! Finally an update! My family and I are all at home, so I have little time to work on her. But, I was able to finish the gun port sills as well as finish sanding them. Lastly, I glued the stern frames. I hope the lines look alright for the gun ports. Thanks everyone! Wow. I need to clean up the sawdust! Jeff


-
Sorry about that. I ment Titebond. I use either Titebond II or Titebond III. Whatever I can find at the store. 3 takes longer to dry than 2. Both are great wood glues and you wouldn't have any problems using either. Jeff
-
Hiya! I do not know where to get the instructions online. I looked too and couldn't find them. As for tools, I would suggest a mini manual miter saw set and get a saw for it with a high tooth count. Like this: https://www.amazon.com/dp/B001G9NP7O/ref=cm_sw_r_other_apa_i_CylIEbQYRE5BK Also, different grits if sand paper 80, 100, 220, 400. Also get some sanding blocks. I have small and medium sized ones. Also what I found very helpful was http://www.fourmostproducts.com/our-products/construction-tools/ look for the miter sander. I use this for precise angle sanding. I use adhesive sandpaper for this so it's easier to change. I would not recommend their miter saw from this site because it can cause wood to crack along the edges. Use the Amazon link above for a miter saw. I use Titanbond wood glue for most of the glueing. Lastly, get some hobby knifes and heavy duty blades. Light and medium blades might break and that would be bad. This is just a basic list and I might be leaving something out. As for building the kit, i would highly recommend building a build board to hold your model while you are working in it. There are many references to how to build one on this site. I hope you enjoy your model and have fun!!! Jeff
-
Looking great!
-
Hey Chuck, it was hard for me to figure out how to ask! But after mulling it over in my head i figured it out. Sometimes it just takes a nights sleep to clear the head! Jeff
-
Whew! Finally an update! I finished placing all the lower gun ports sills and have started working on the top sills. I realized that the first pre cut sill at the bow was a little too short. So I added some small cherry wood to extend it. I followed what Chuck said about placing the bottom sills between each bulkhead. I realized this wasn't really a recommendation as it was mandatory. At least for my ship. Since my bulkheads were somewhat warped, I had to add the sills in between each to square them off. I made sure to start at the bow and move to the stern. This made sure the bulkheads were as square as they could get. I am happy with the result! I will continue to place the top port sills this week. I do have a question though. For in between a few of the ports, there is a spacer that is taller than the port sills. Is this made by putting 2 or so of the port sill strips together (from the chapter 1 package)? Thanks everyone!! Jeff


-
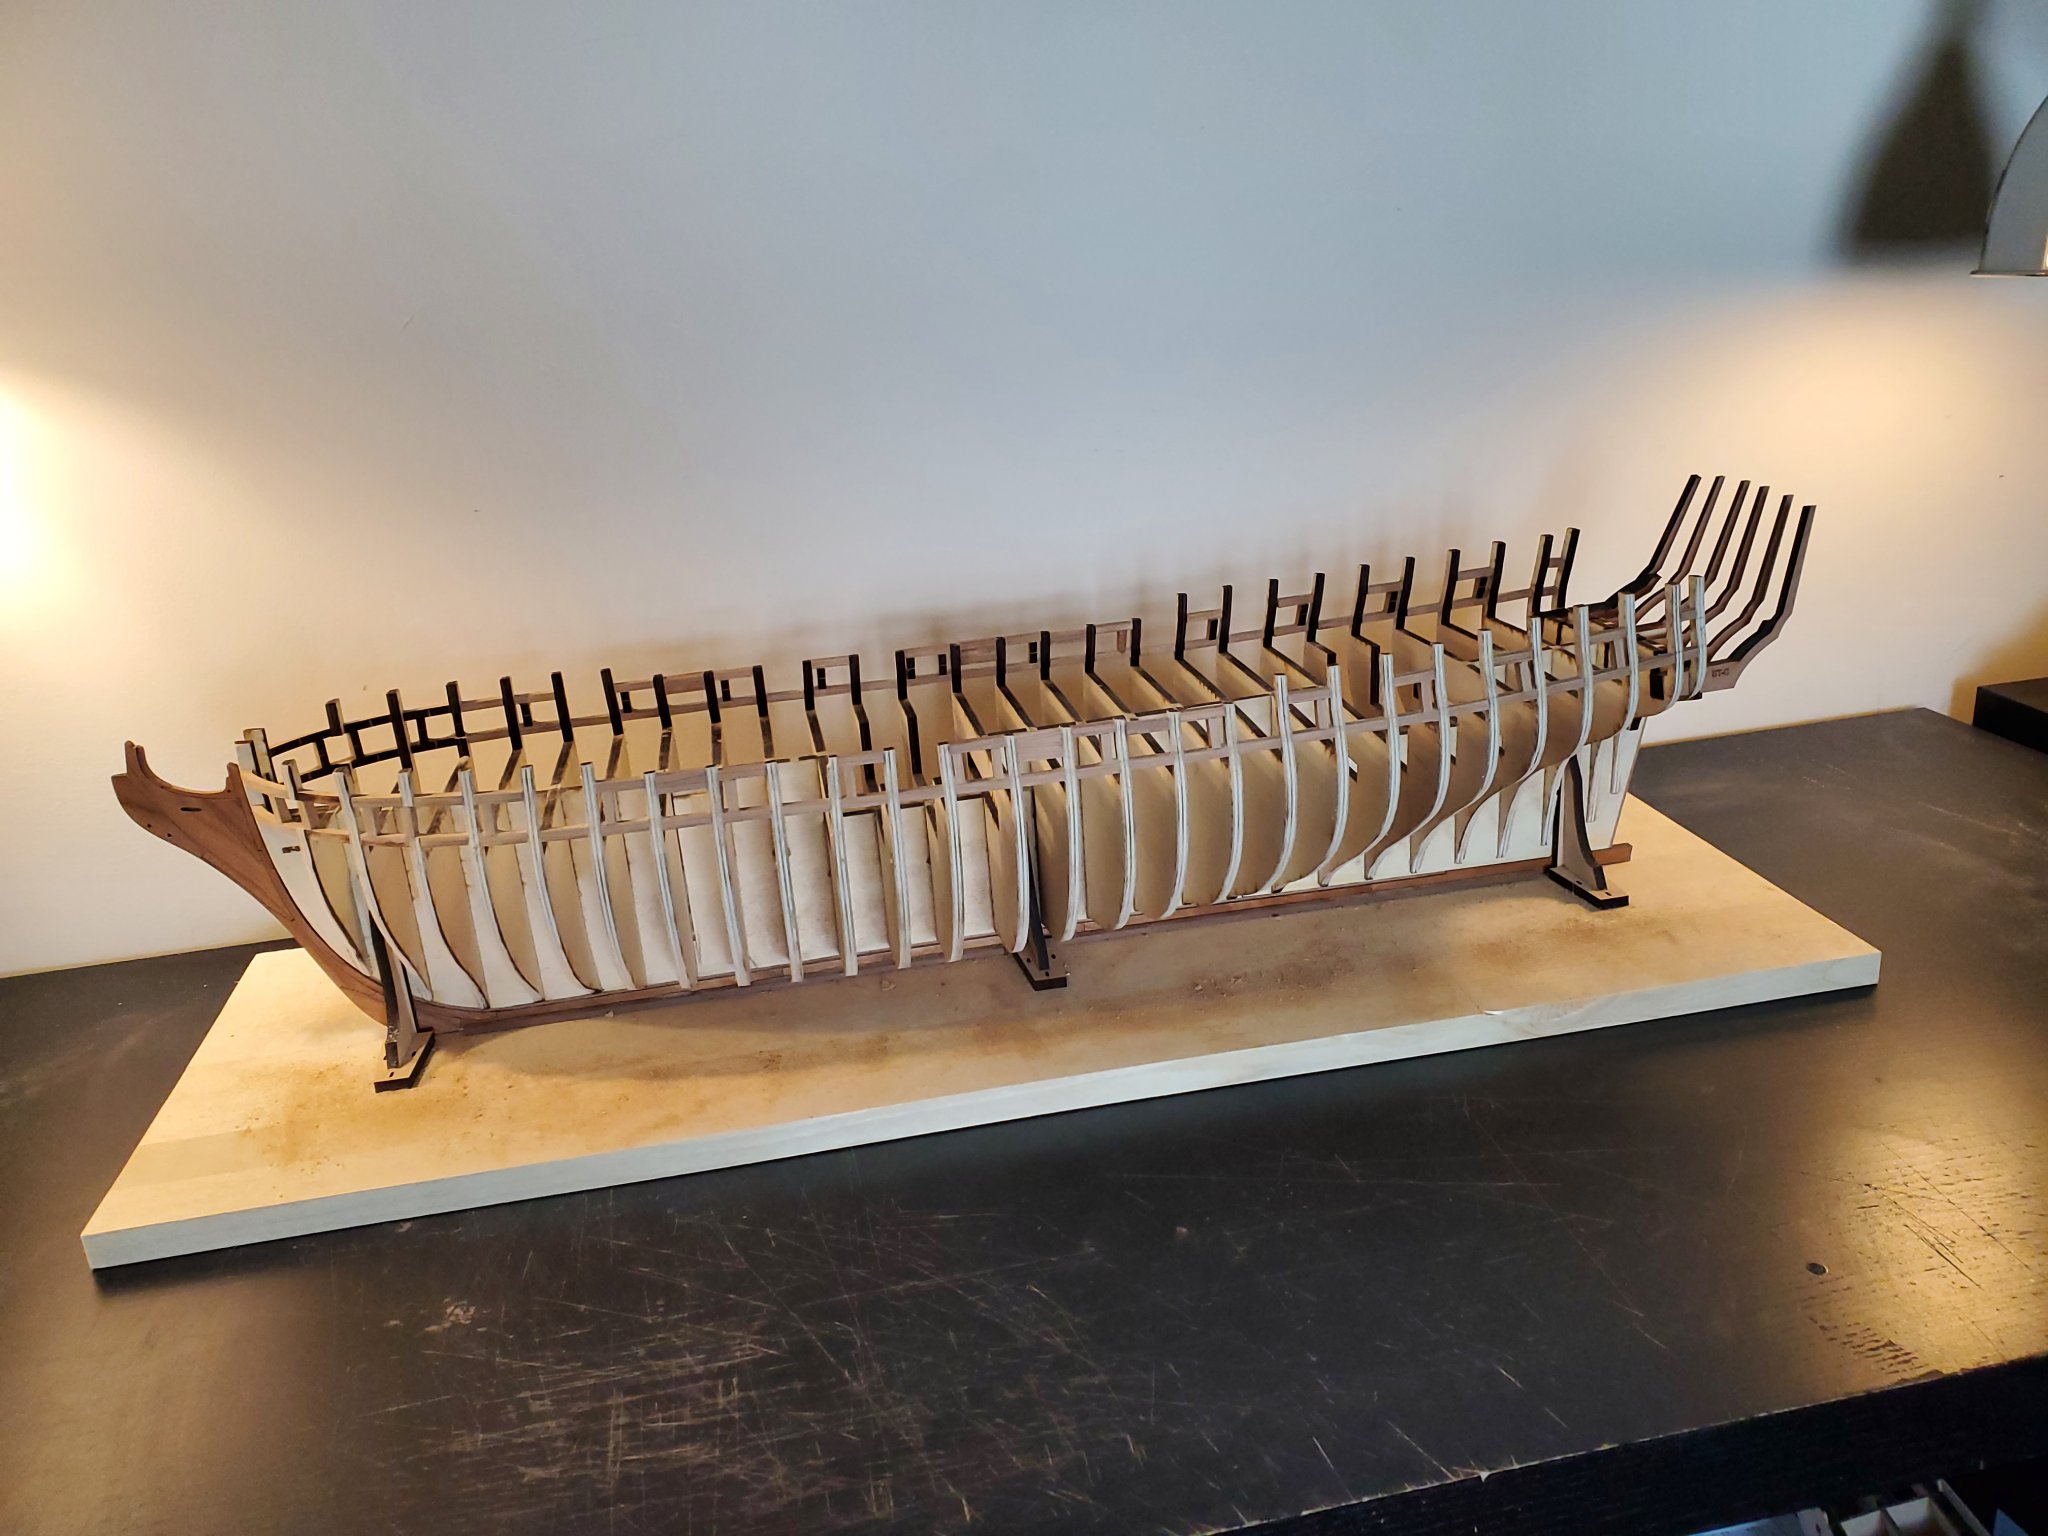
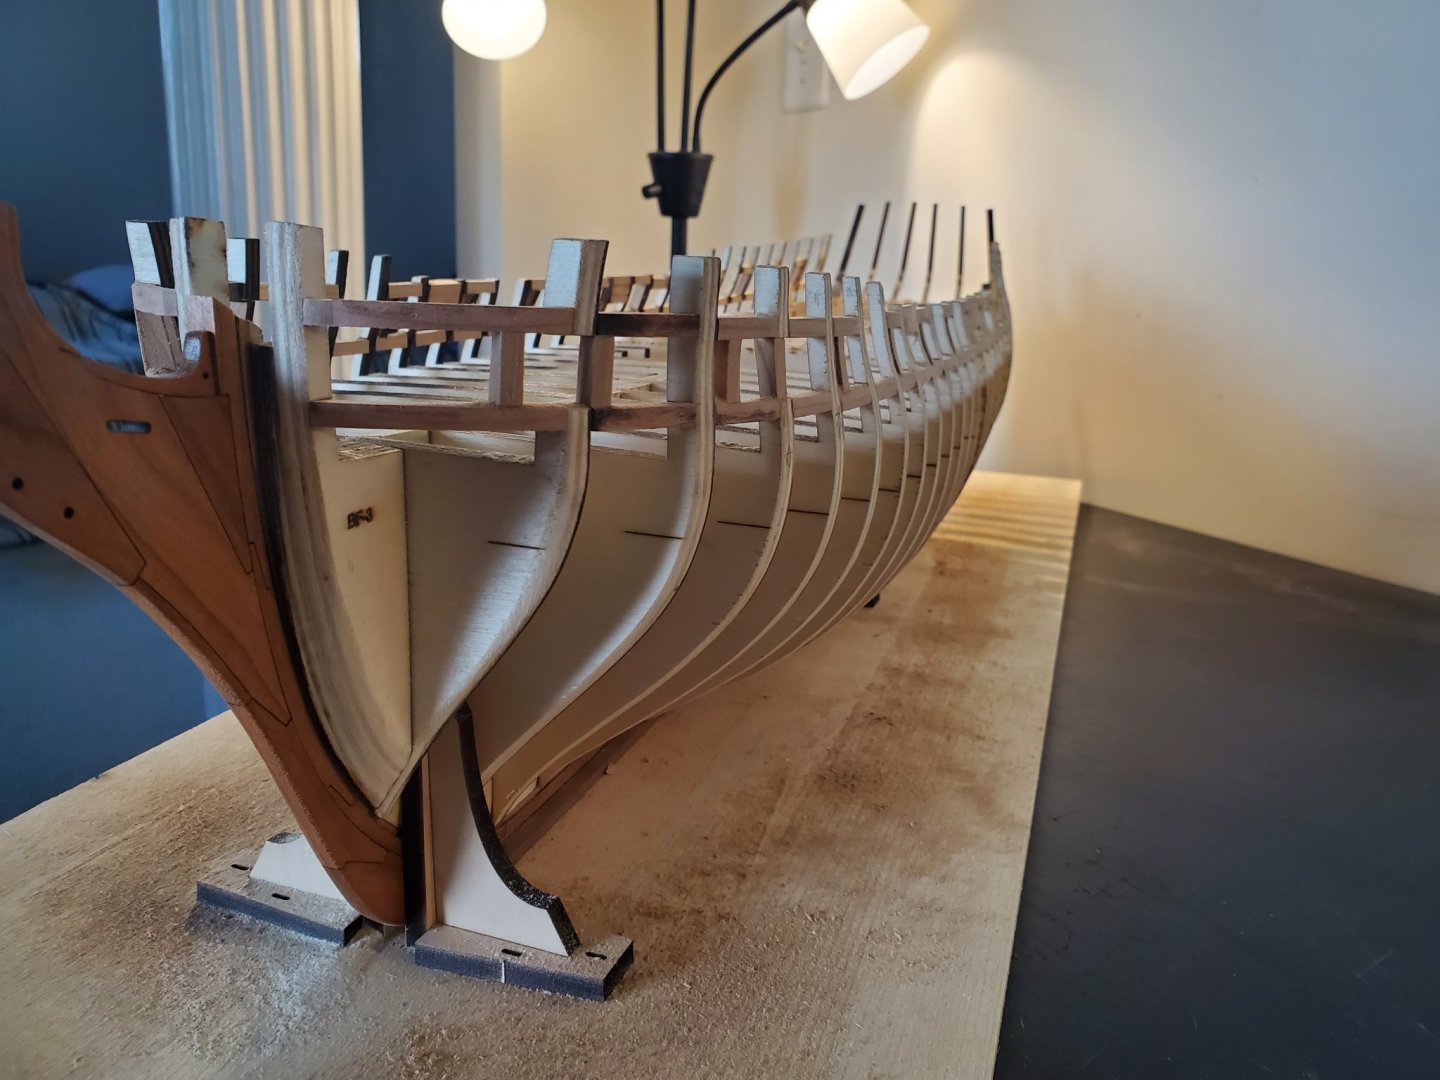
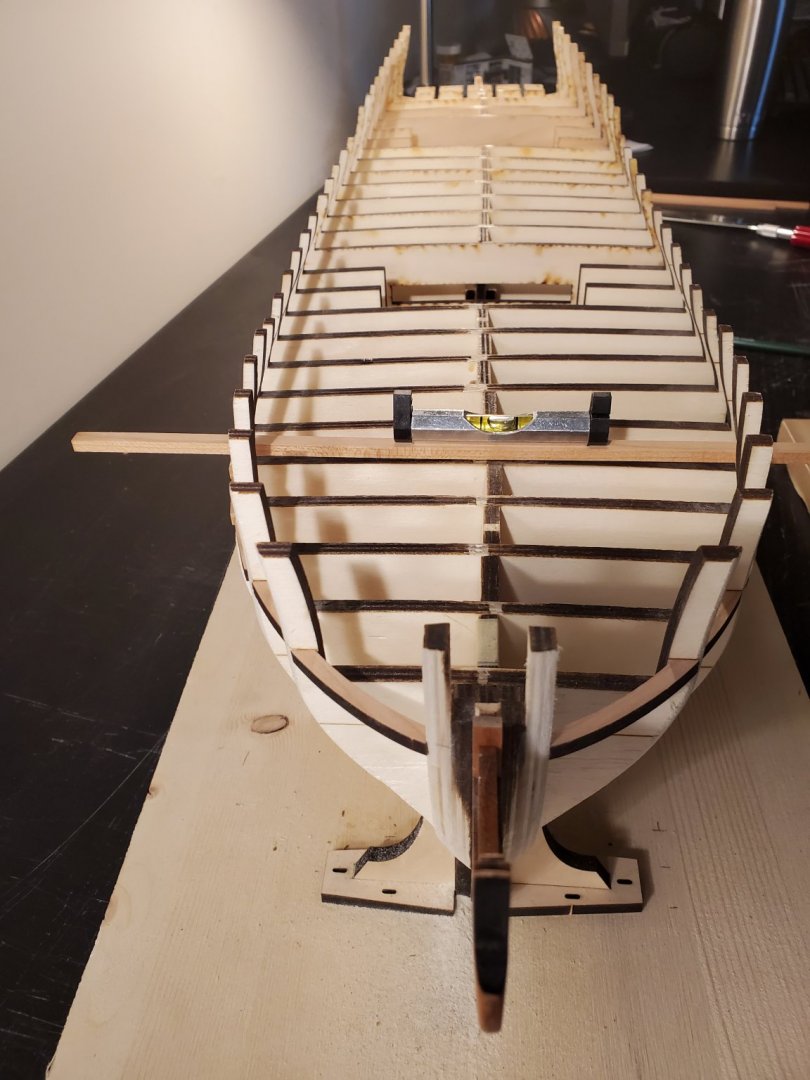
Its sure taken me a while, but I finally finished fairing the hull! I started cutting and gluing on the bottom gun ports. I agree with Chuck that you really need to put supports between every bulkhead. It has started to straighten them out! Thanks everyone for the likes! Jeff

-
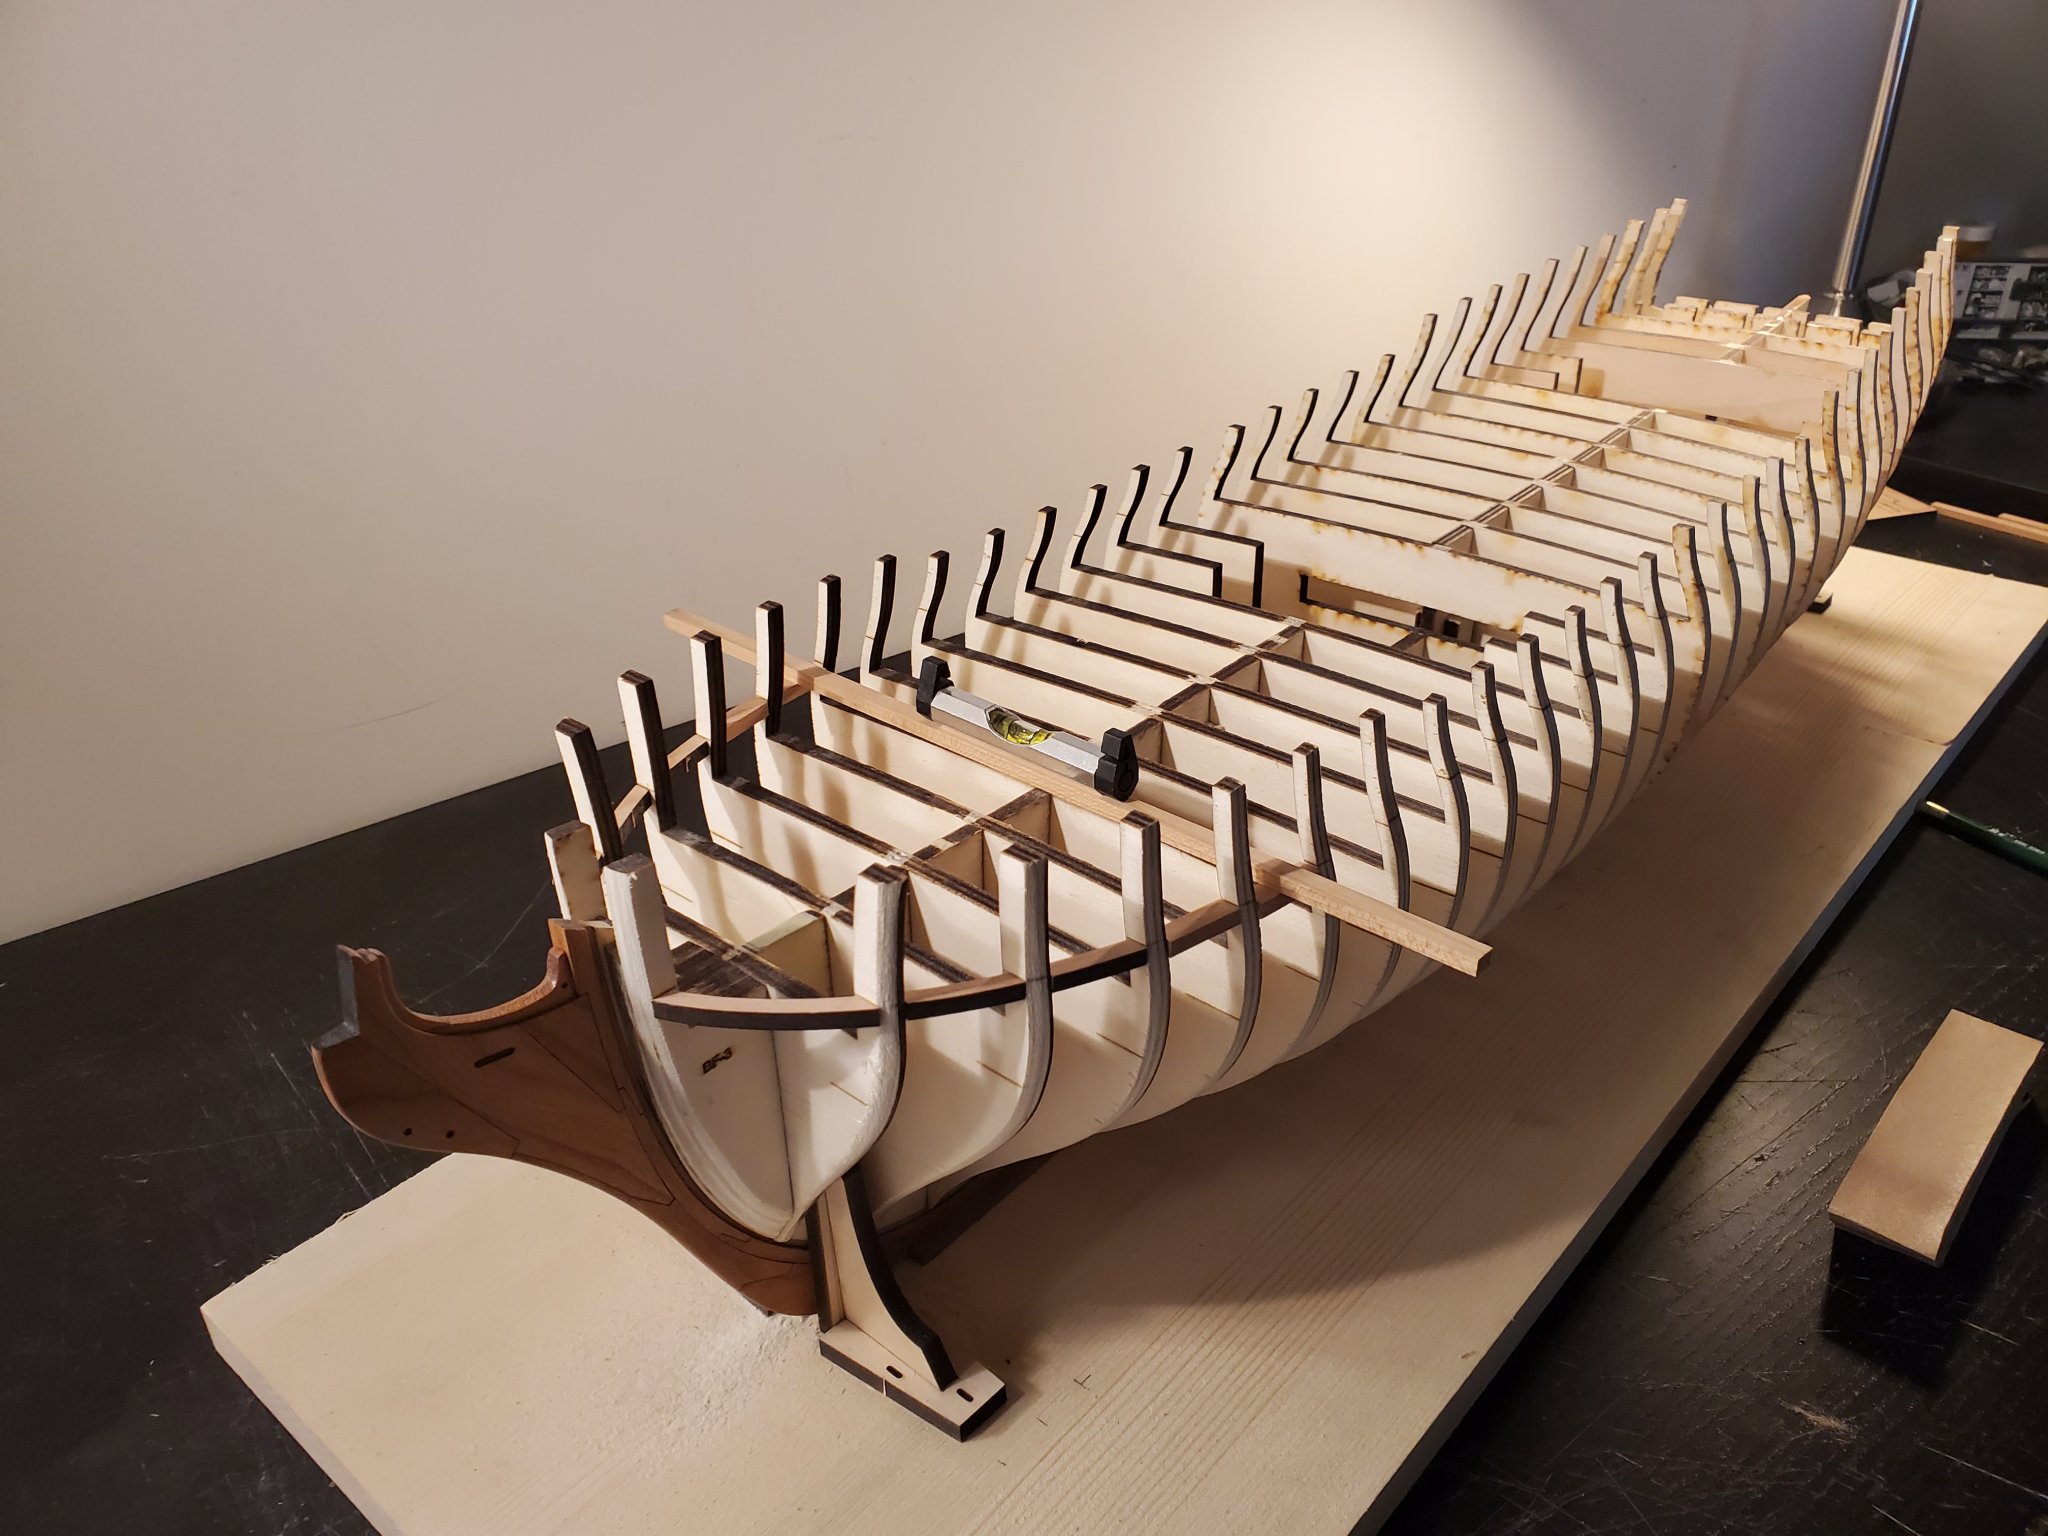
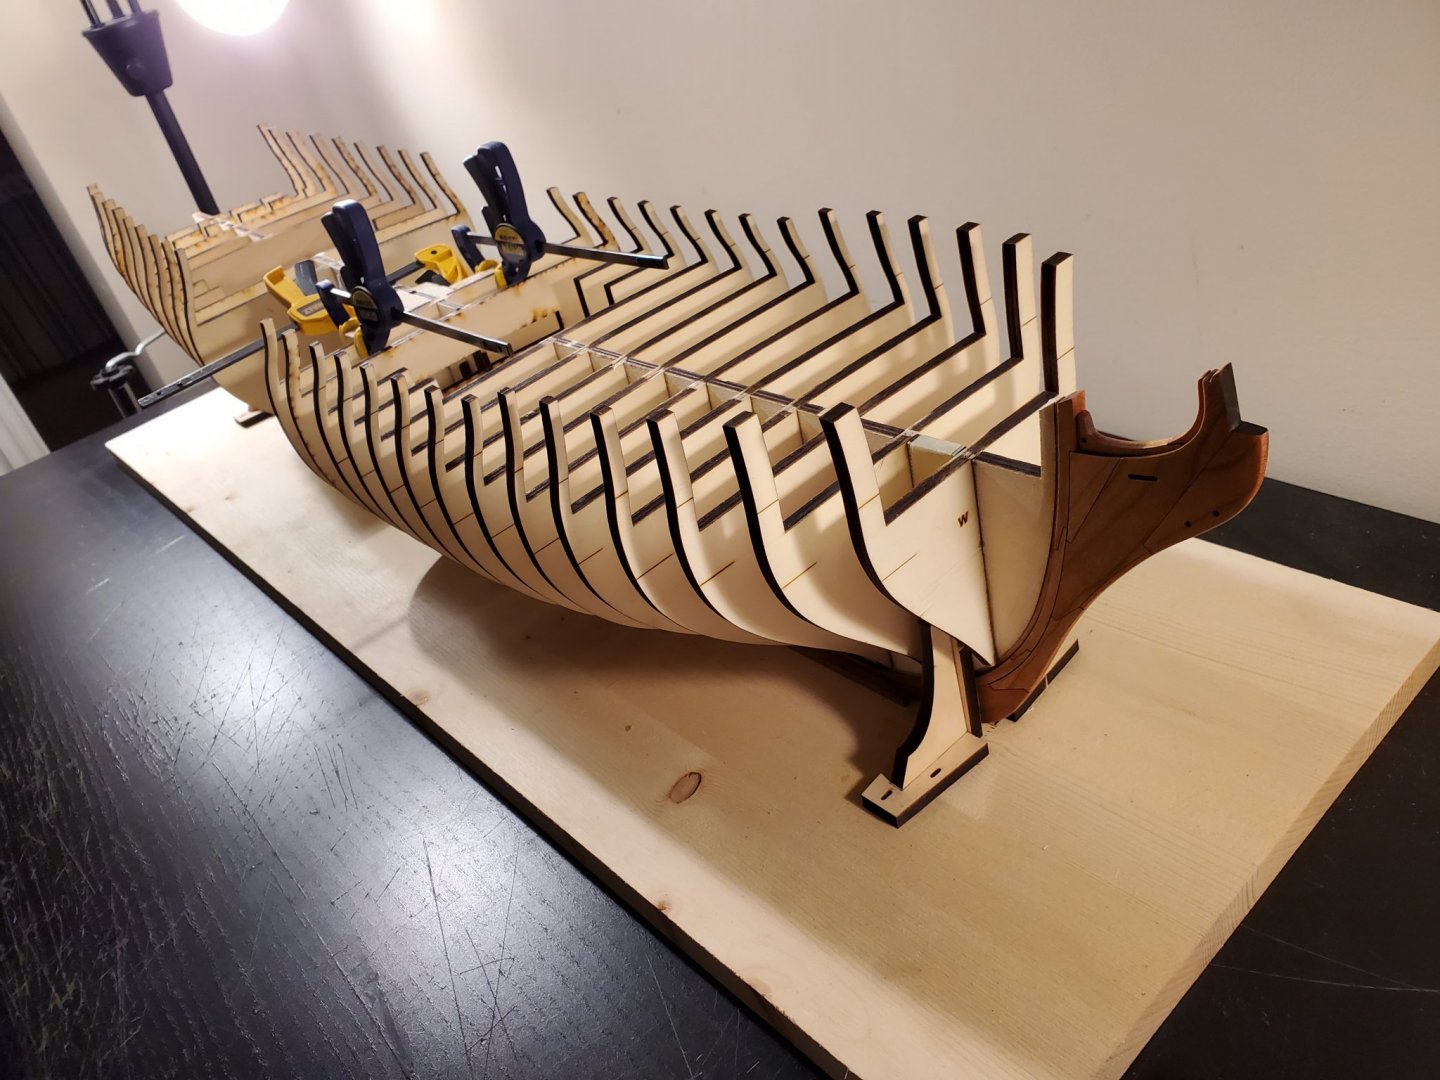
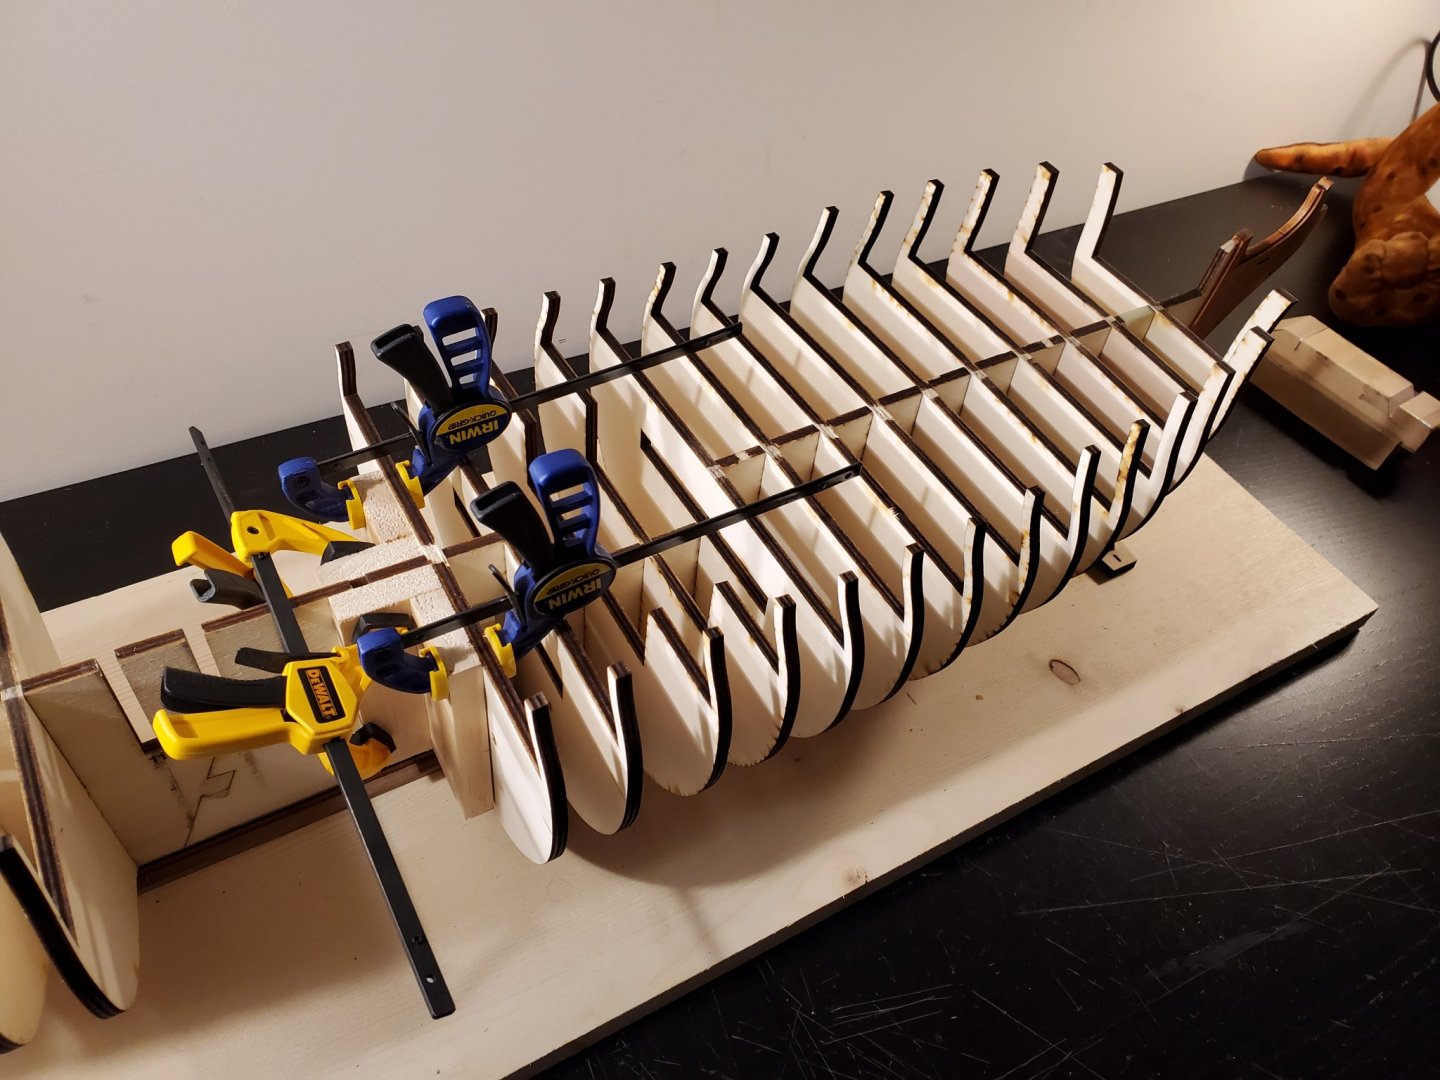
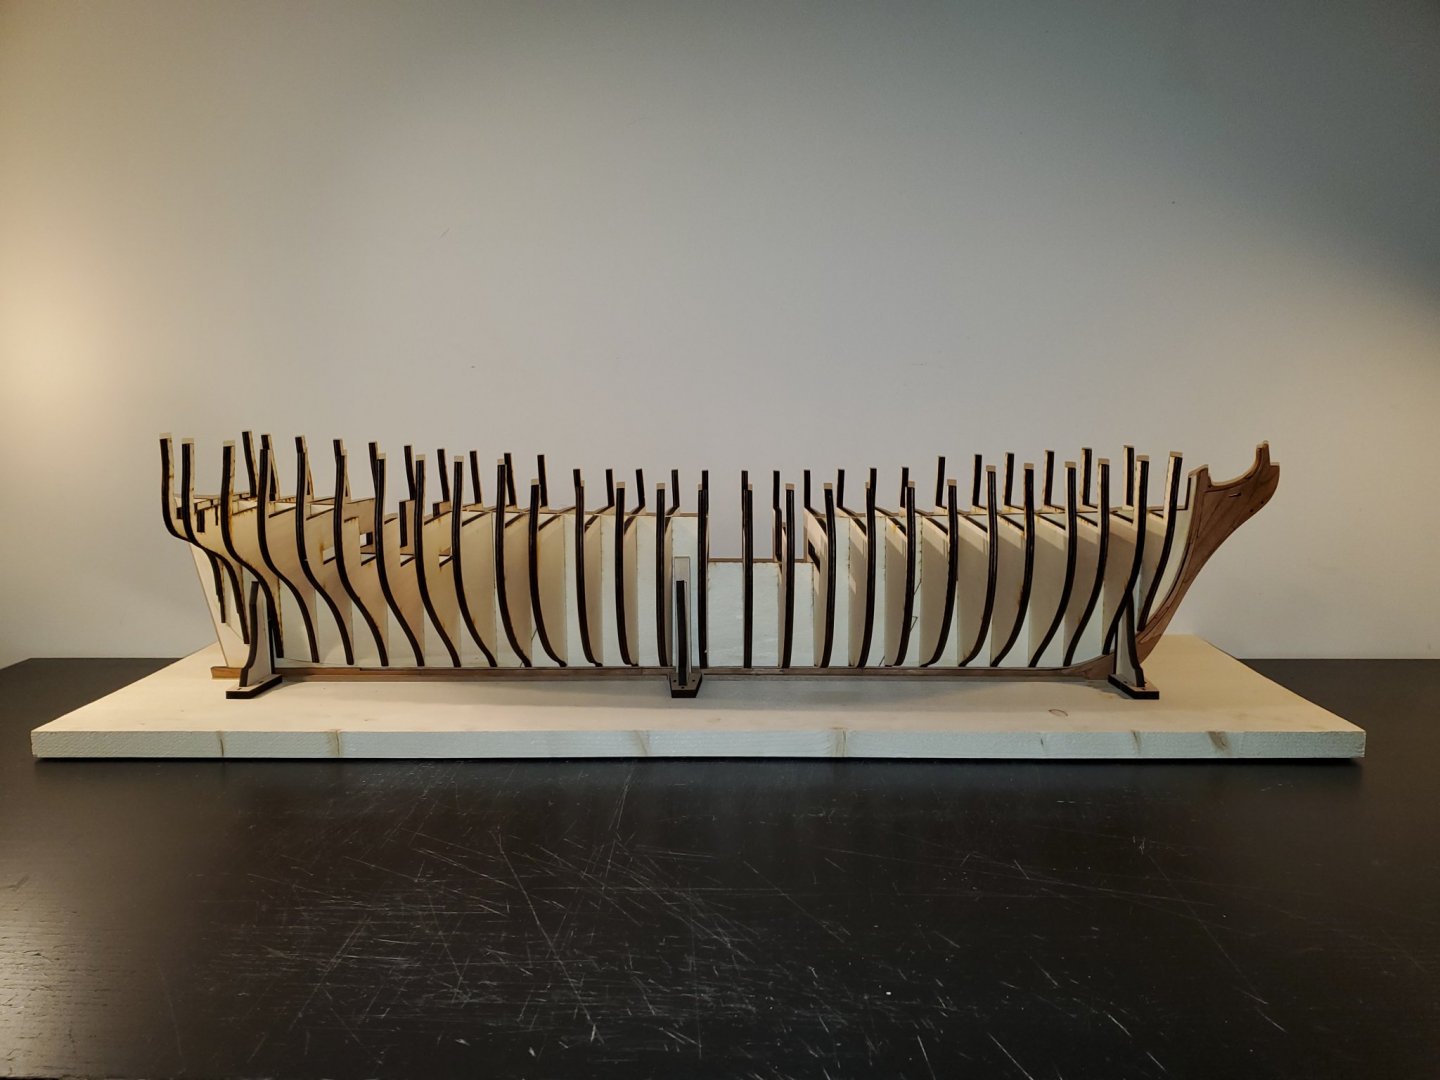
Thank you everyone for the likes!! Well some good news bad news. The bad news is, I'm sick with a virus so I had to stay home today. The good news, is I was feeling well "enough" to fair more of the hull. I was able to complete more today than in the past few weeks! So I am close to finishing the first side and I was able to complete most of the other. The last section not done yet is the bow. I hope to get to it later this week when I'm feeling better. This hull is huge! And does require a lot of removing material. I feel that if I can fair a hull this size and this number of bulkheads, it is an accomplishment in and of itself! Its tedious, but super important to get right. The many bulkheads actually make for a great guide to how much to fair. My round sanding blocks really do help, and are just long enough to span 3 bulkheads at once to help form the shape correctly. Jeff
-
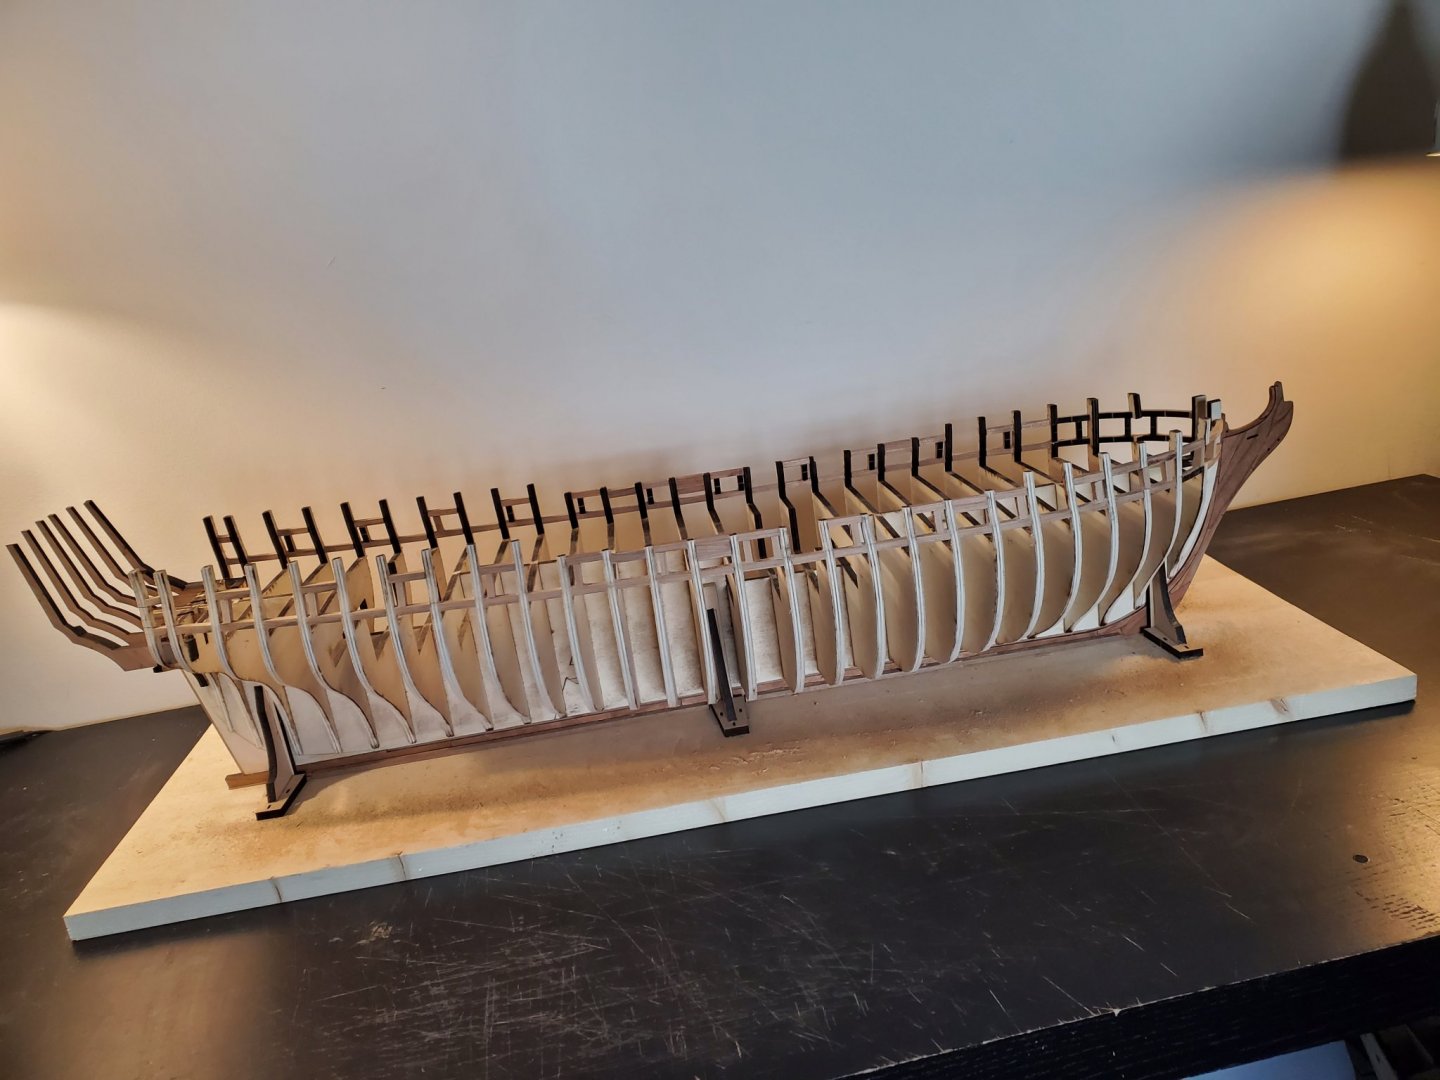
Its been a while, but it's time for an update! I am currently fairing the hull. This hull is huge!!! I don't have too much time right now to do this work, but slow and steady. I am about 80% done with one side. Then only one more side to go! I noticed that the glued frame sections were starting to give too much and almost break. So I added supports on both sides to strengthen the joint. I hope to get some time this weekend to do some more fairing, but my soon to be 5 year old demands a lot of attention!! Jeff
-
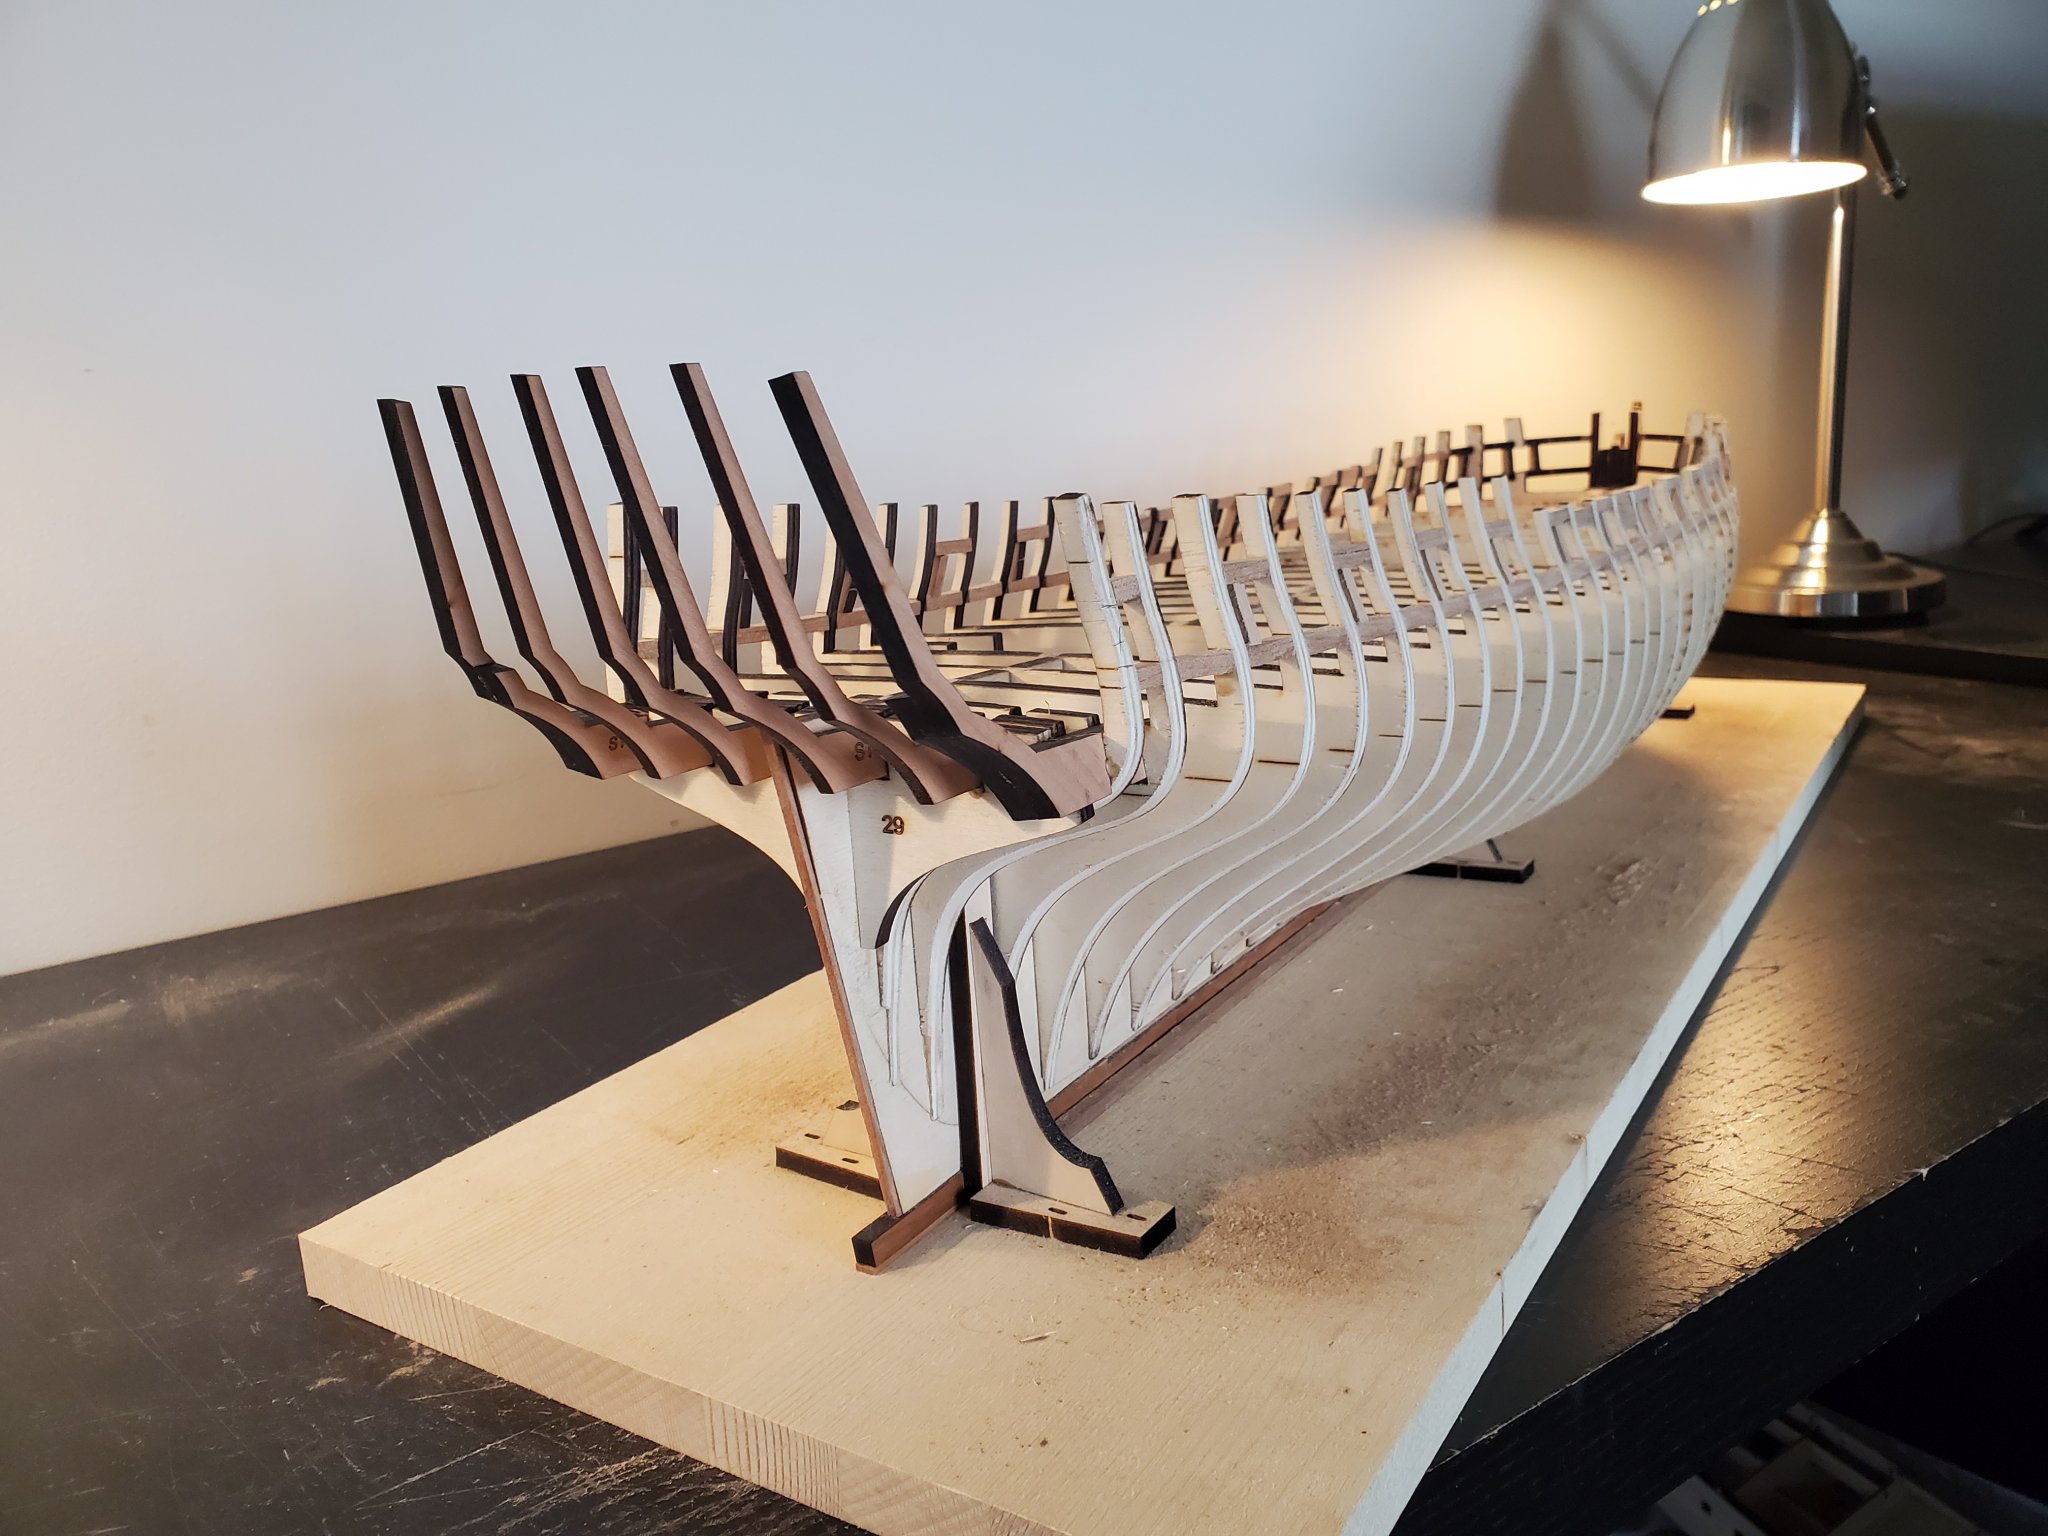
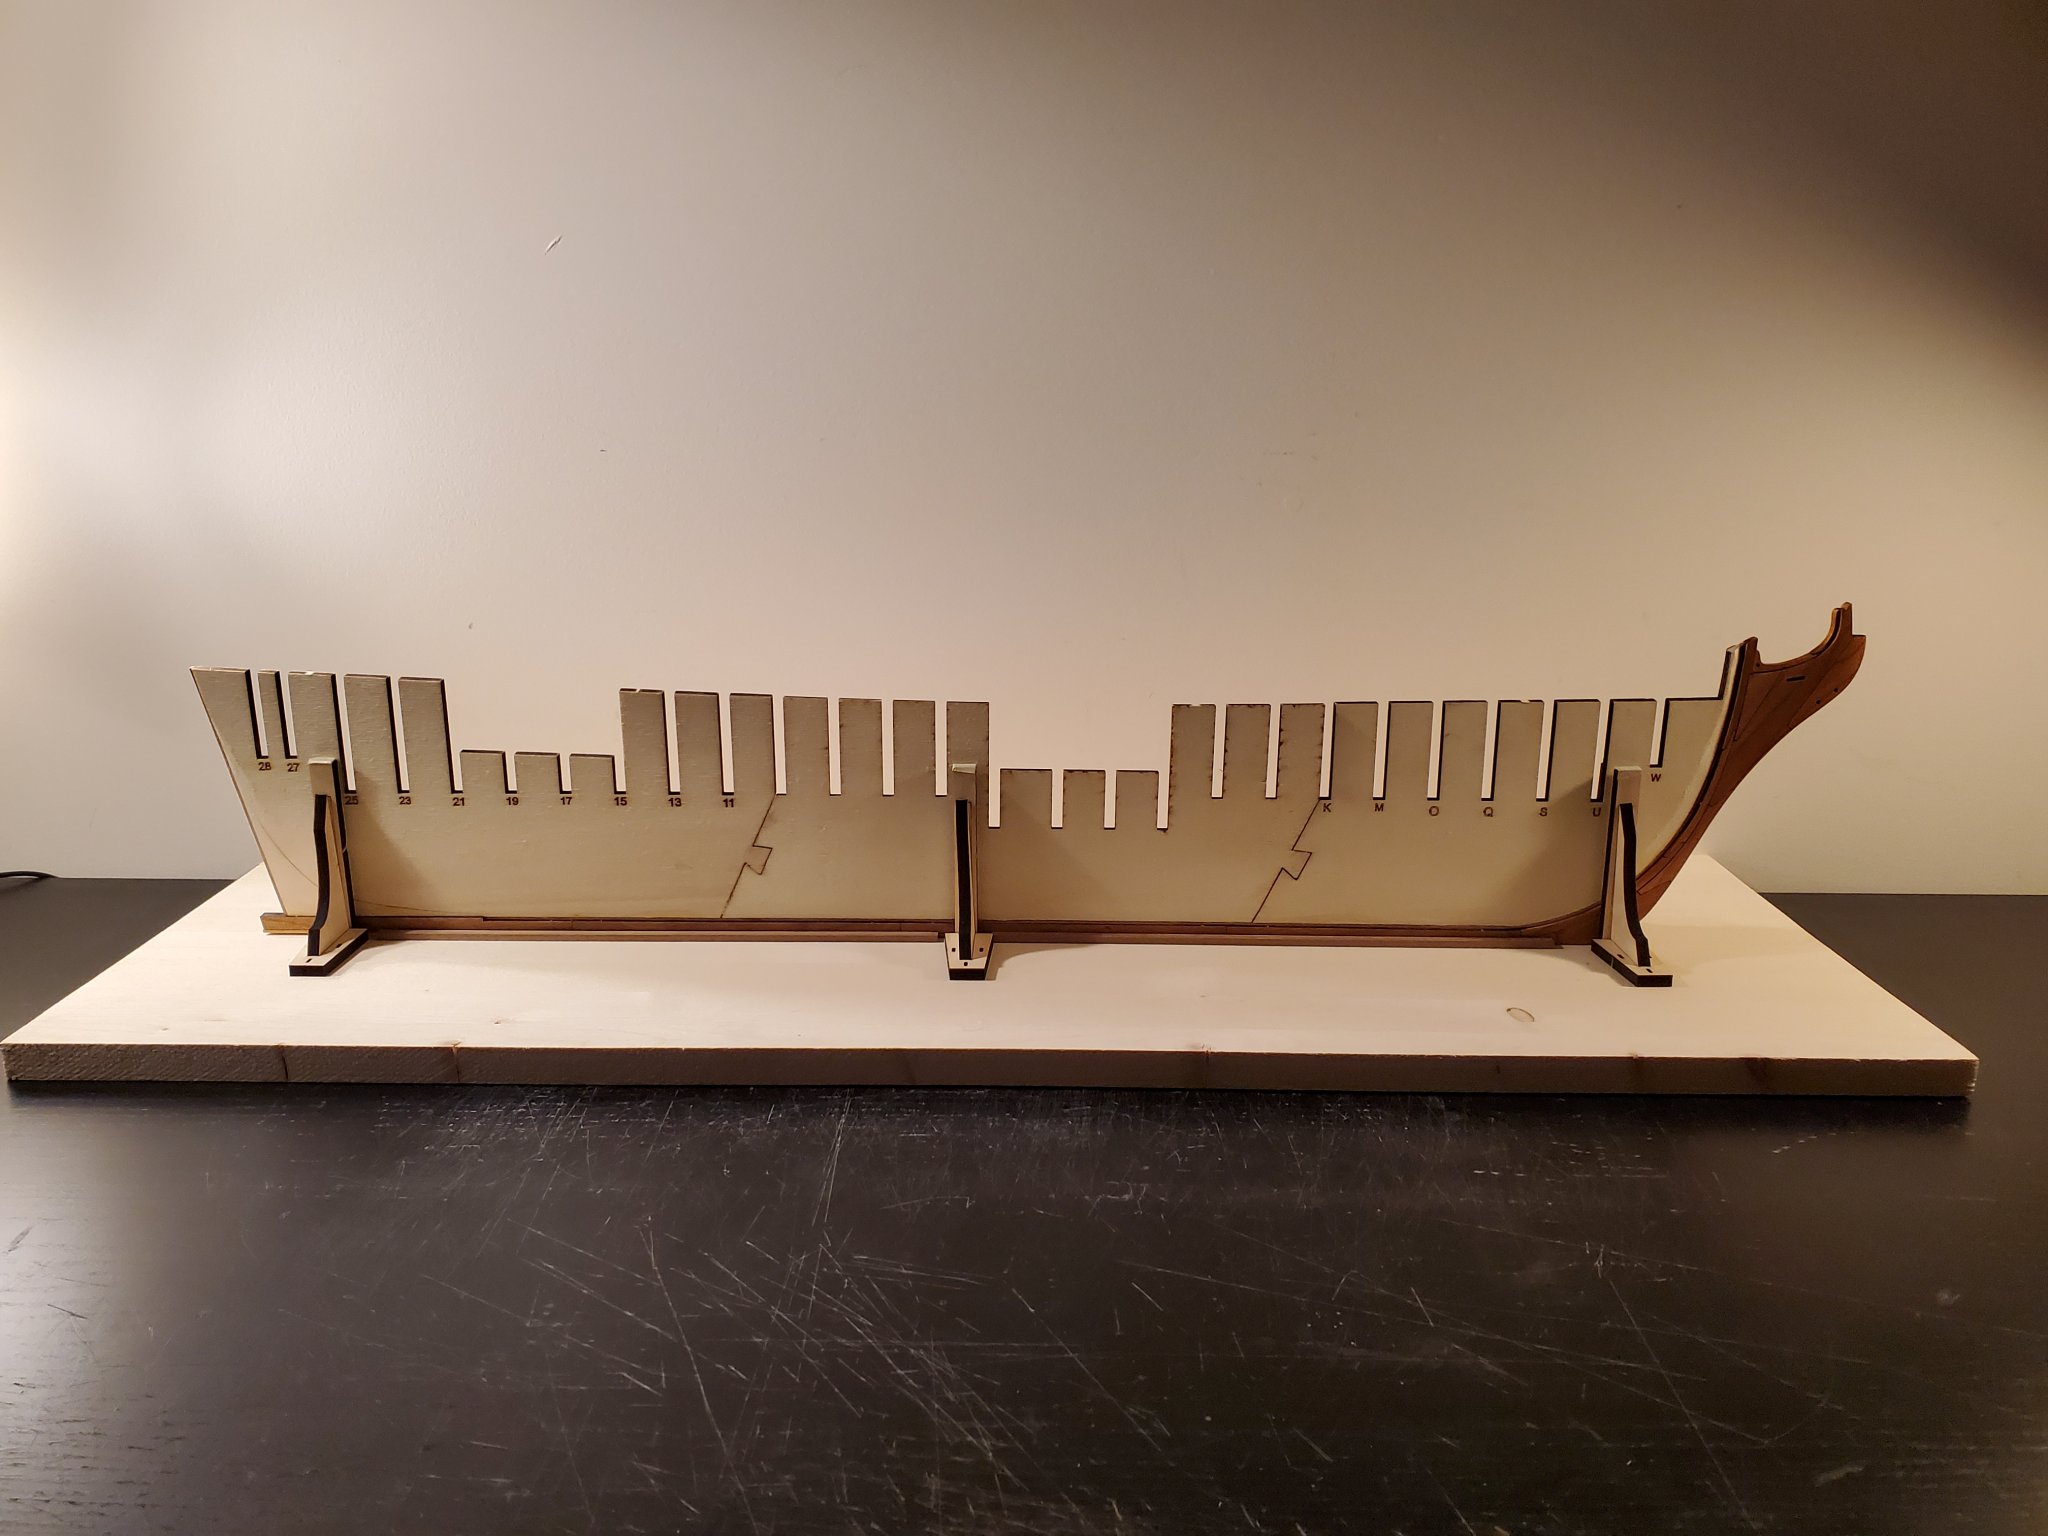
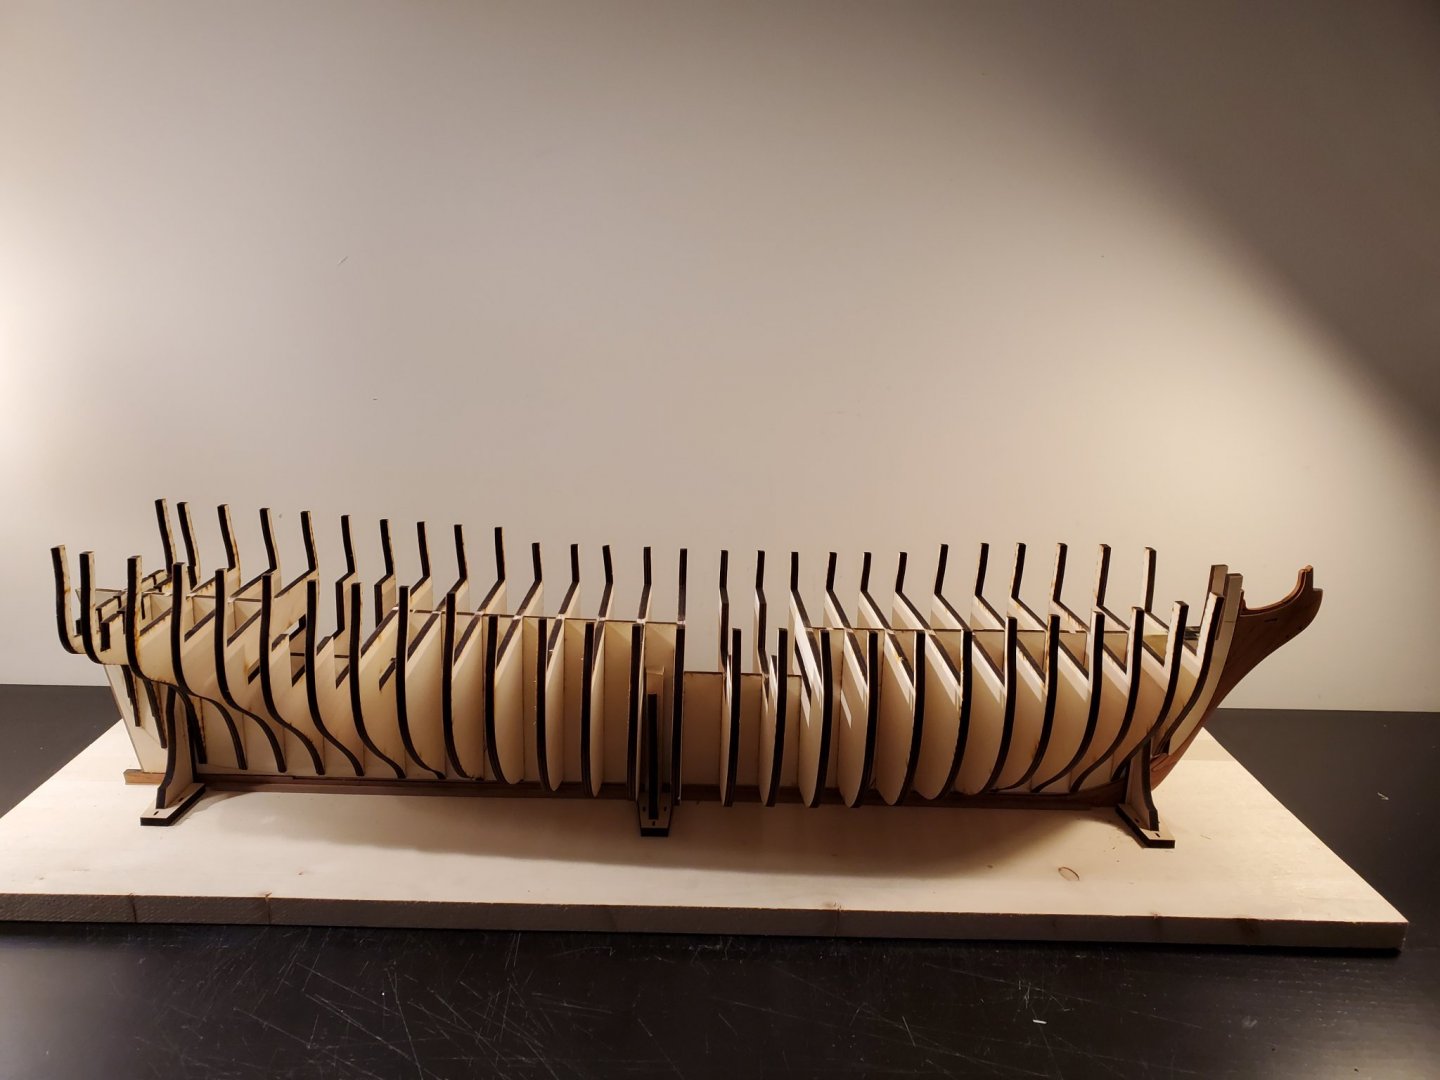
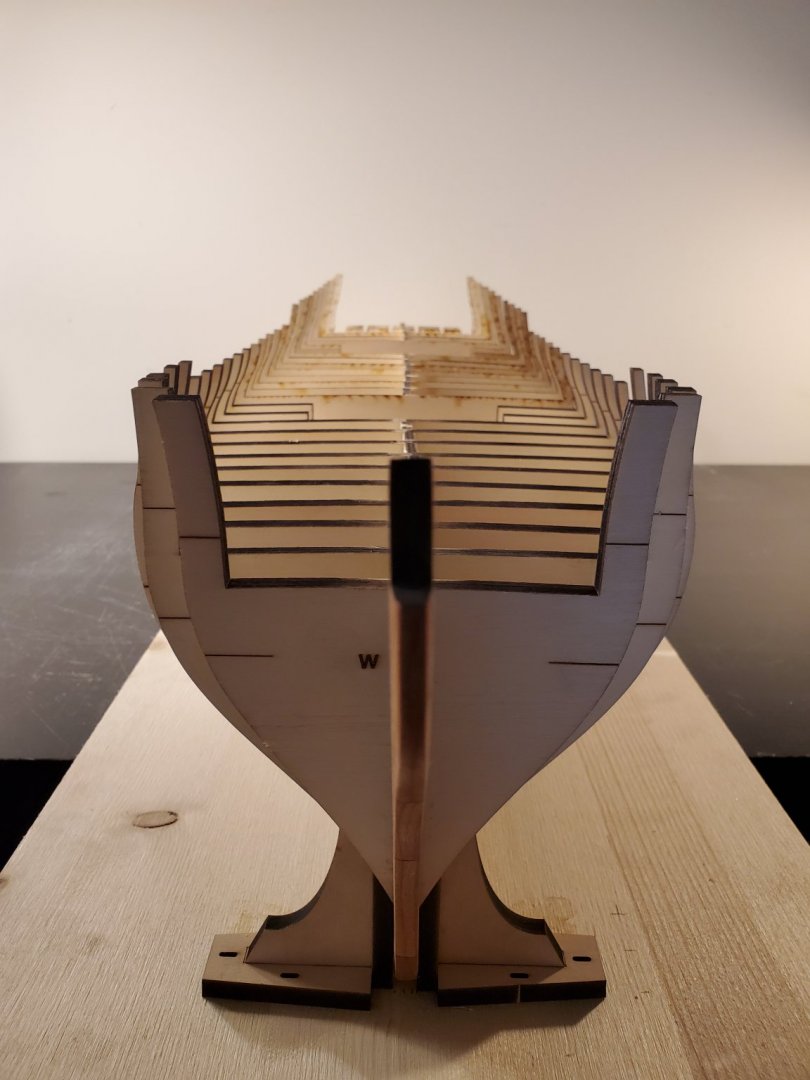
Thank you everyone for the likes! Today, I finally finished gluing on the bulkheads! For the filler pieces at the stem, two of them were pretty warped. So I had to douse them with water and clamp them to my building table to straighten them out. After they dried, I glued them on one at a time. Only unclamping each piece when I was ready to glue them on. That seemed to work and the filler blocks are now glued into position! I did my best to straighten the tops of the frames. They are somewhat better positioned, but not perfect. That's okay though, because the bulkheads themselves are straight. You will see what I mean with the pictures. As you can see though, on the last pic, the back part of the frame is twisted. I will do what I can to straighten it out before the end of chapter 1. Onto fairing the hull! After looking through other logs here ar MSW, I know this will take a while. But its VERY important to get right or planking the hull will get more difficult. I hope to start fairing this weekend!! Thanks all! Jeff
-
Thanks all for the likes! Slowly but surely, I am adding the bulkheads. This is a small update, but I can't just quickly add and glue the bulkheads or the bulkheads will be way out of alignment. The bulkheads themselves are slightly warped, but they are a small enough warp to fix when adding the supports later in chapter one. The bulkheads are off by 0.5 - 1mm. Little over half way done!! It is fun though. I have never seen a 1/48th scale so this is exciting! Thanks!!!! Jeff
-
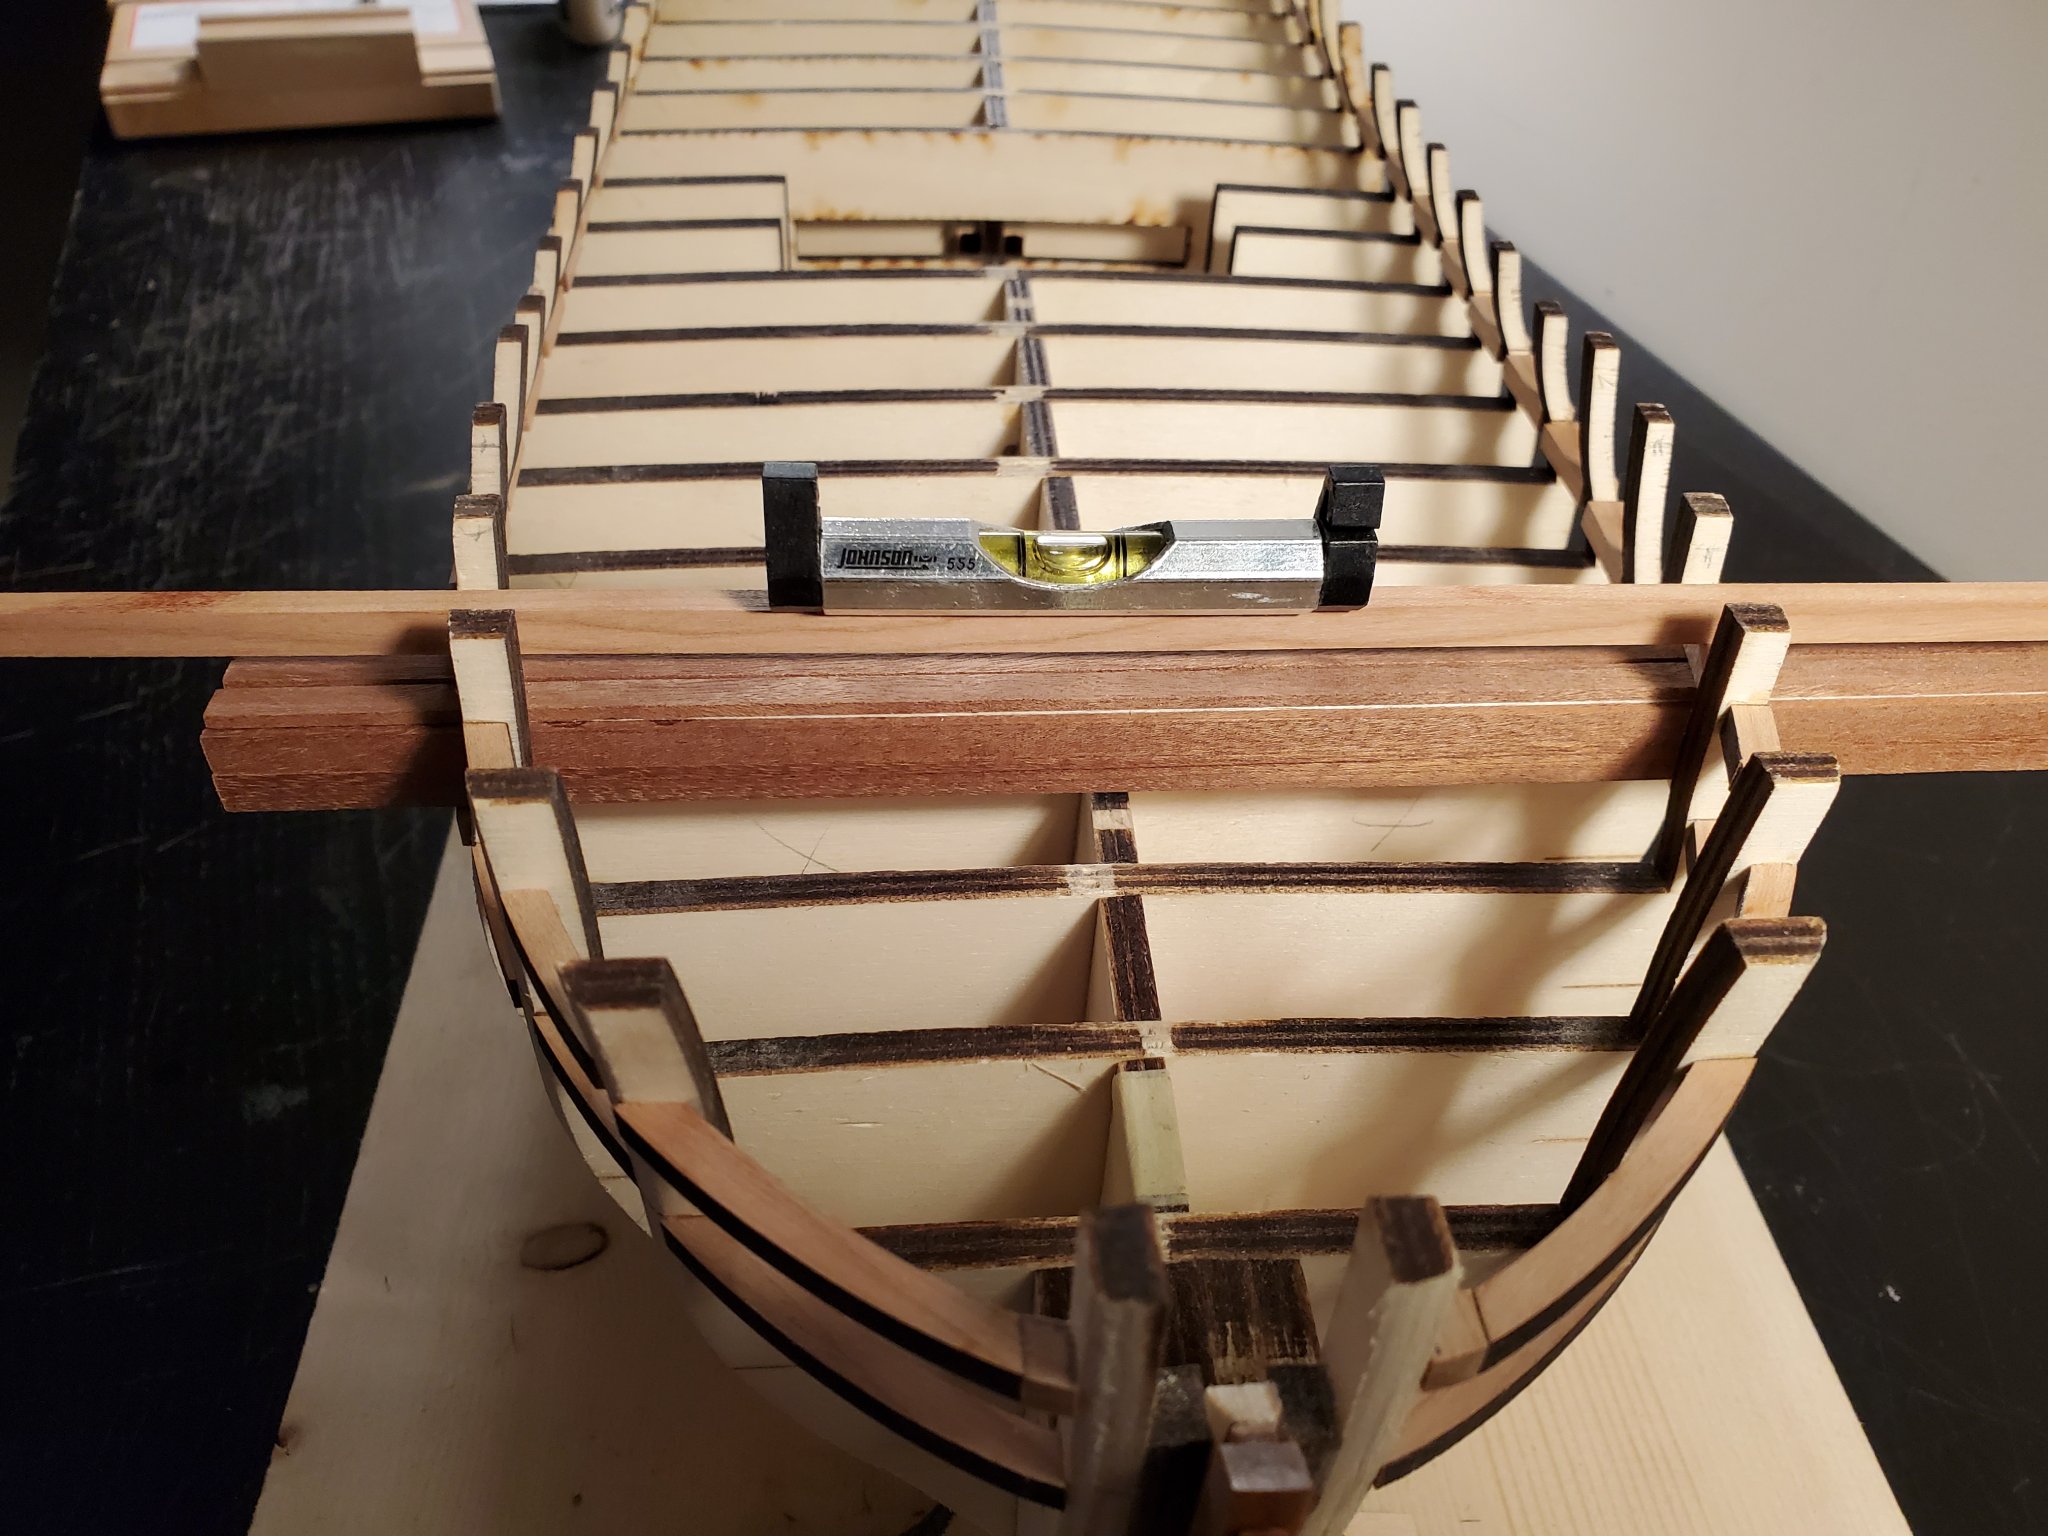
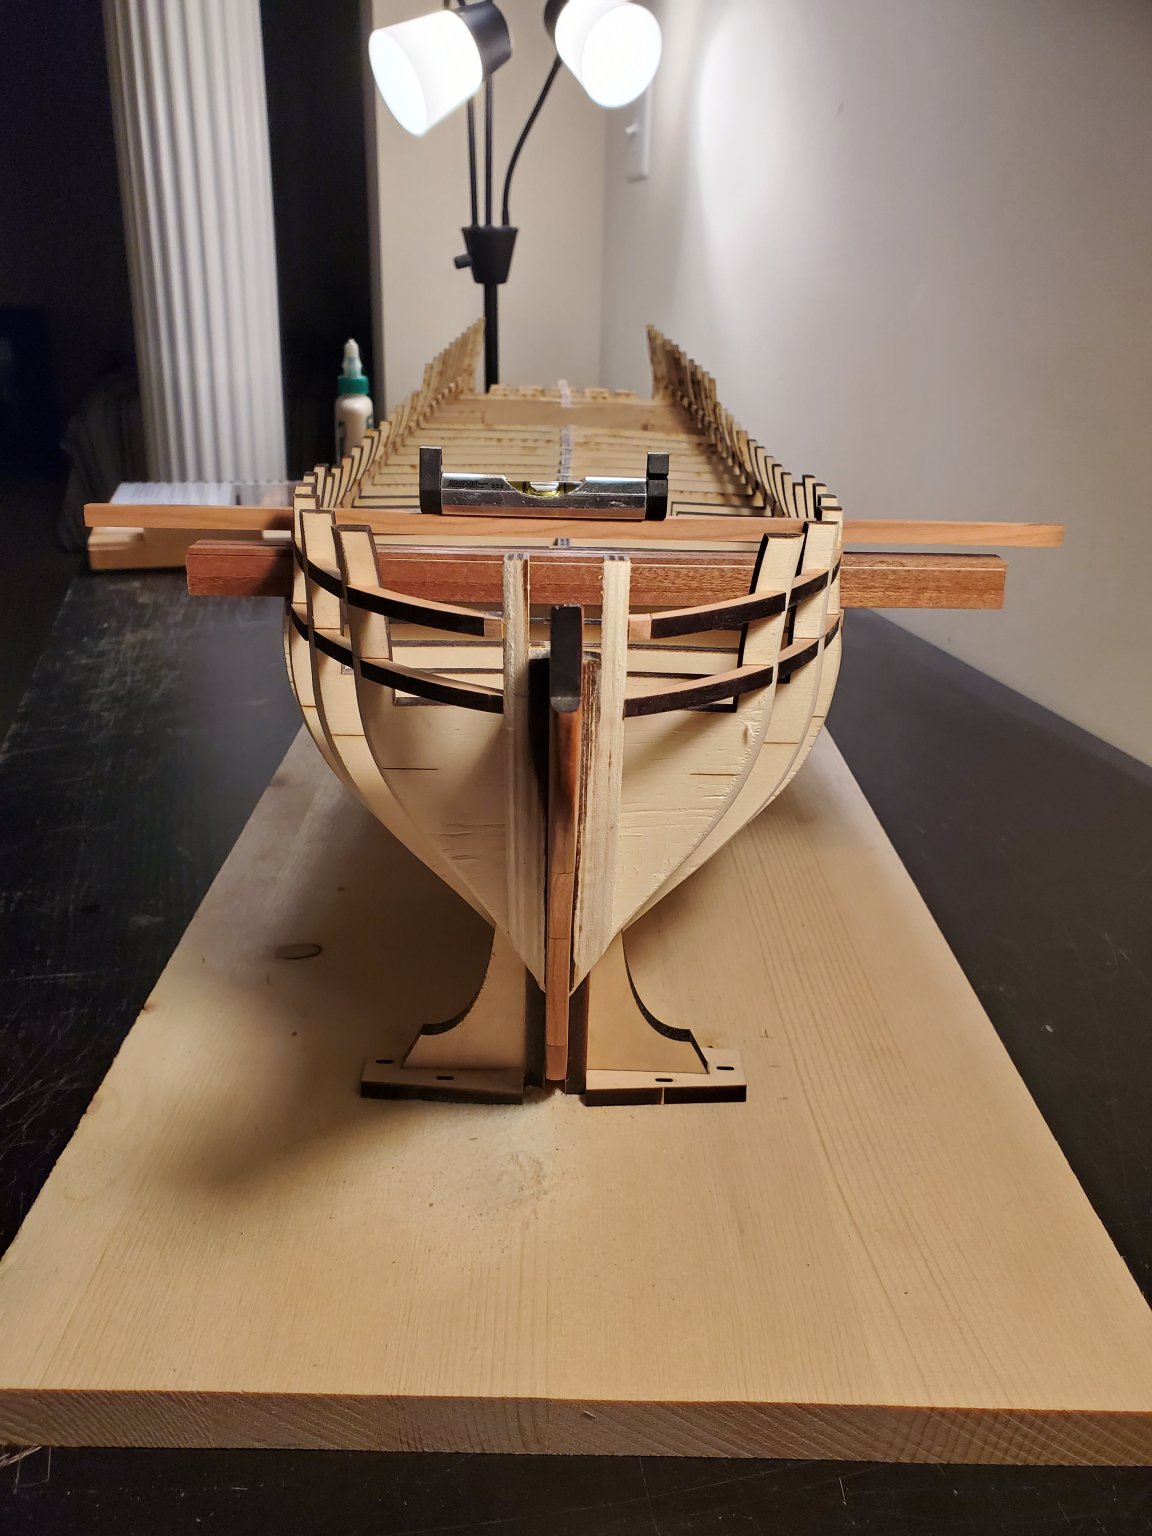
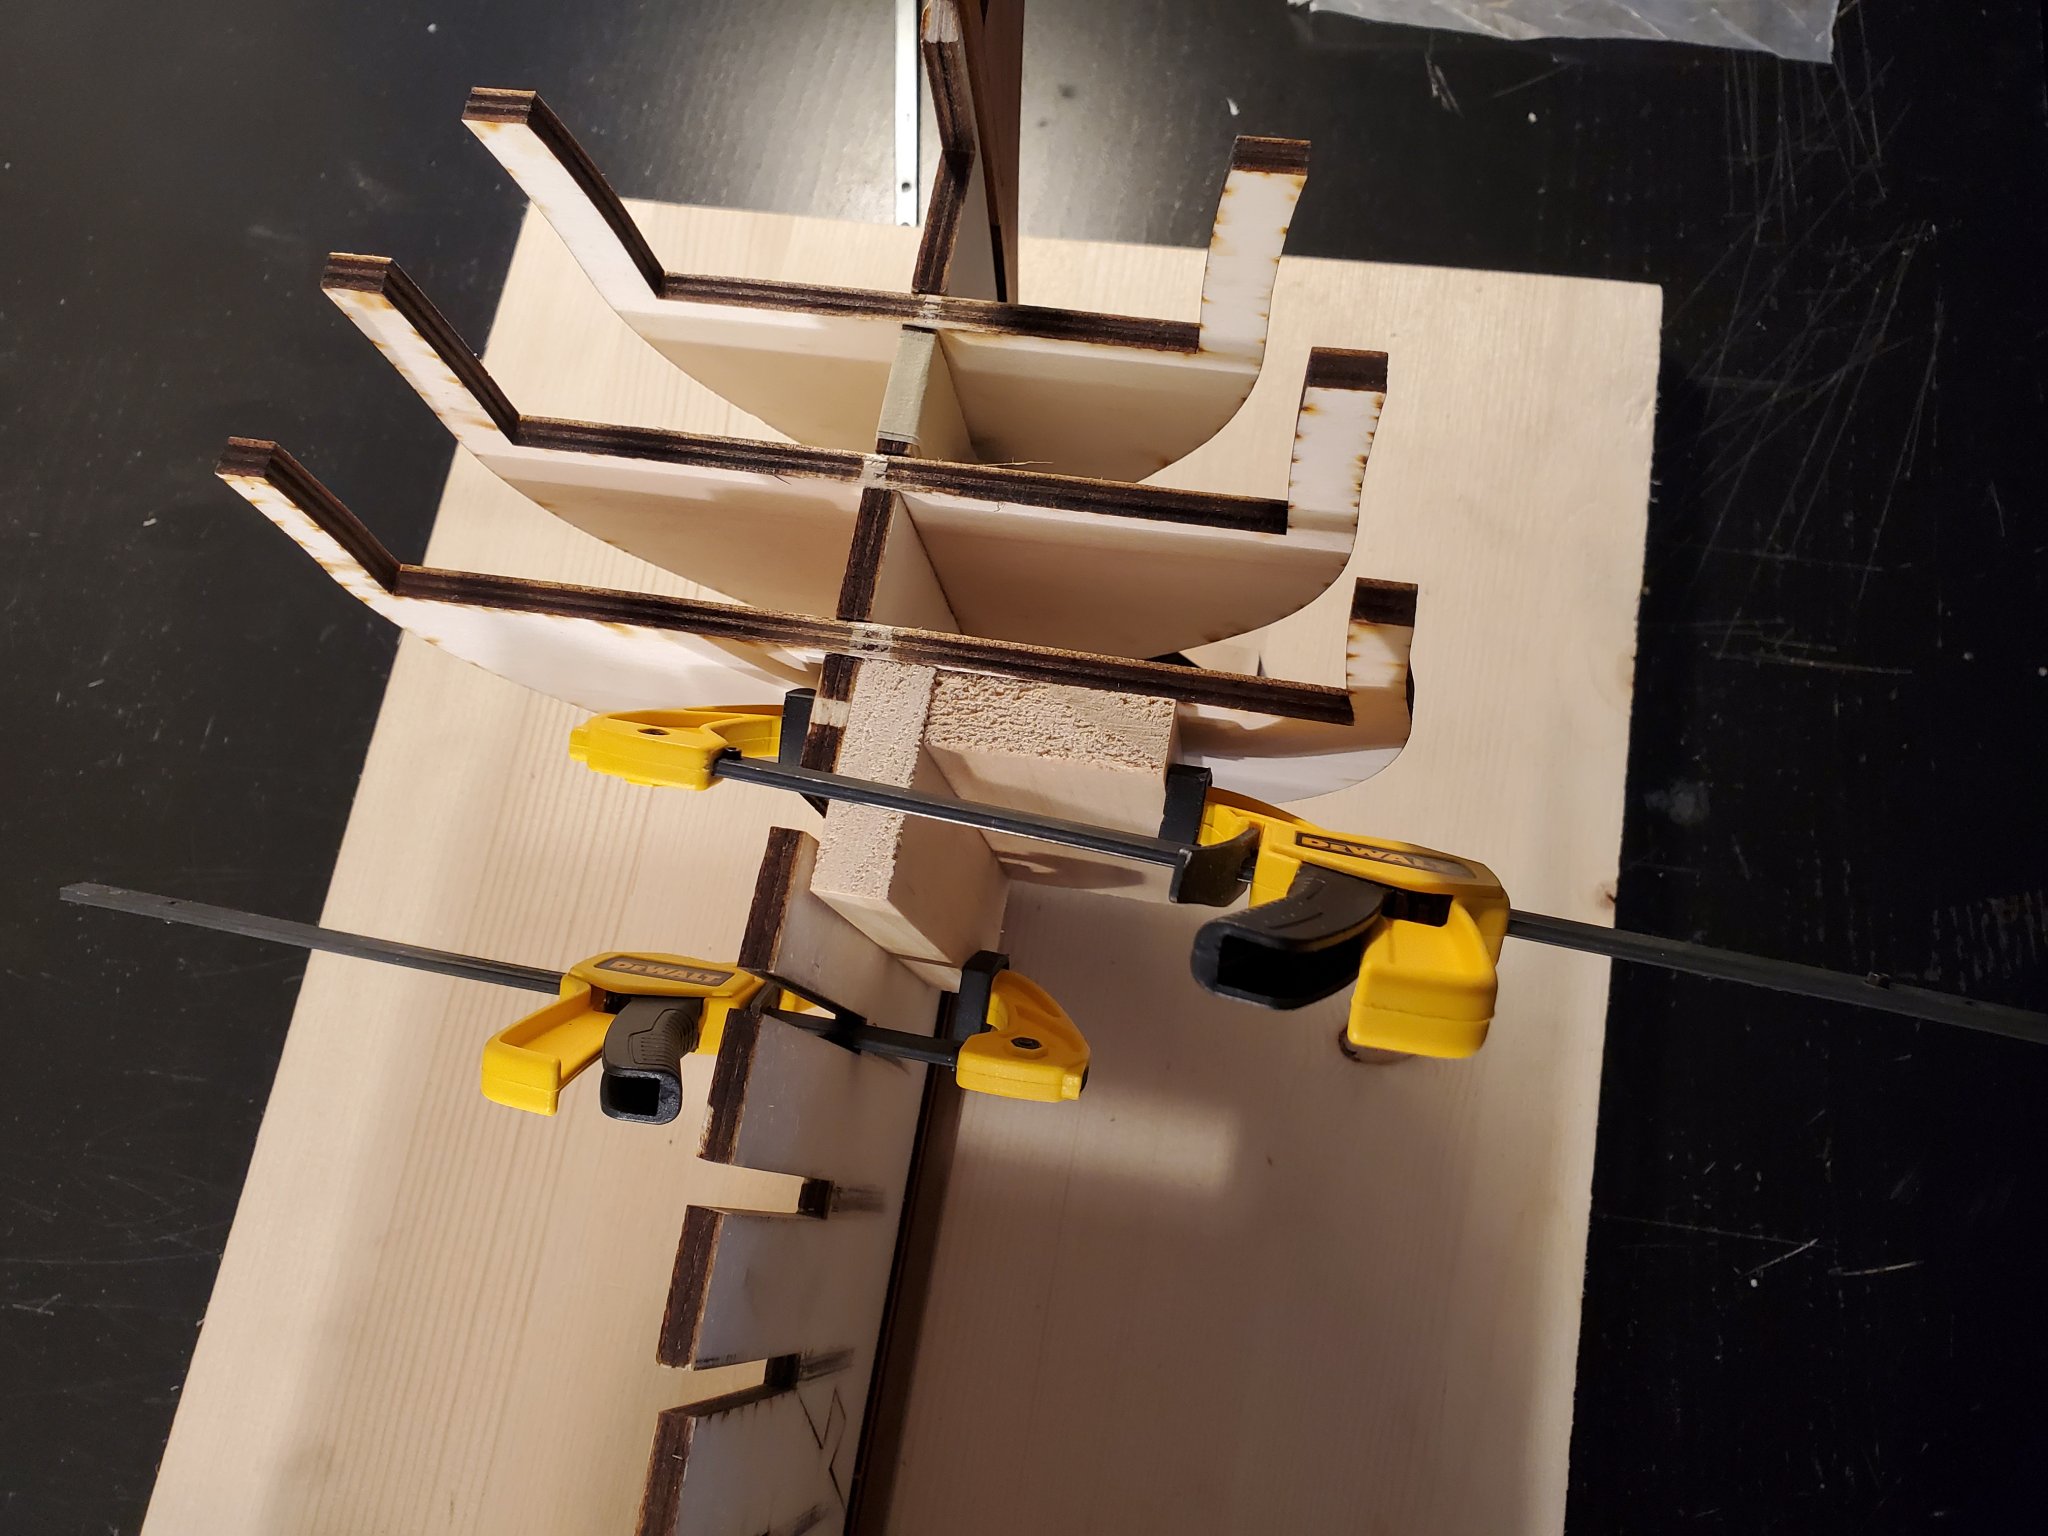
Great idea Chuck! It was pretty warped at the top, so to help make sure that each bulkhead is perpendicular, I created some right angle blocks and used clamps to help position them back to where it needs to be. The pictures are a better explanation. I am noticing that it is helping. So this will be a slower process, but I know that this step is very important to minimize bumps and valleys from bulkhead to bulkhead when it comes time to both fare the hull and for planking. Lastly, the first 2 bulkheads needed to be sanded a little at the bottom so their bottoms didn't hit the stem pieces. Doing this now is a lot safer that trying to take off the this access after it's glued into position. Thanks everyone!! Jeff


-
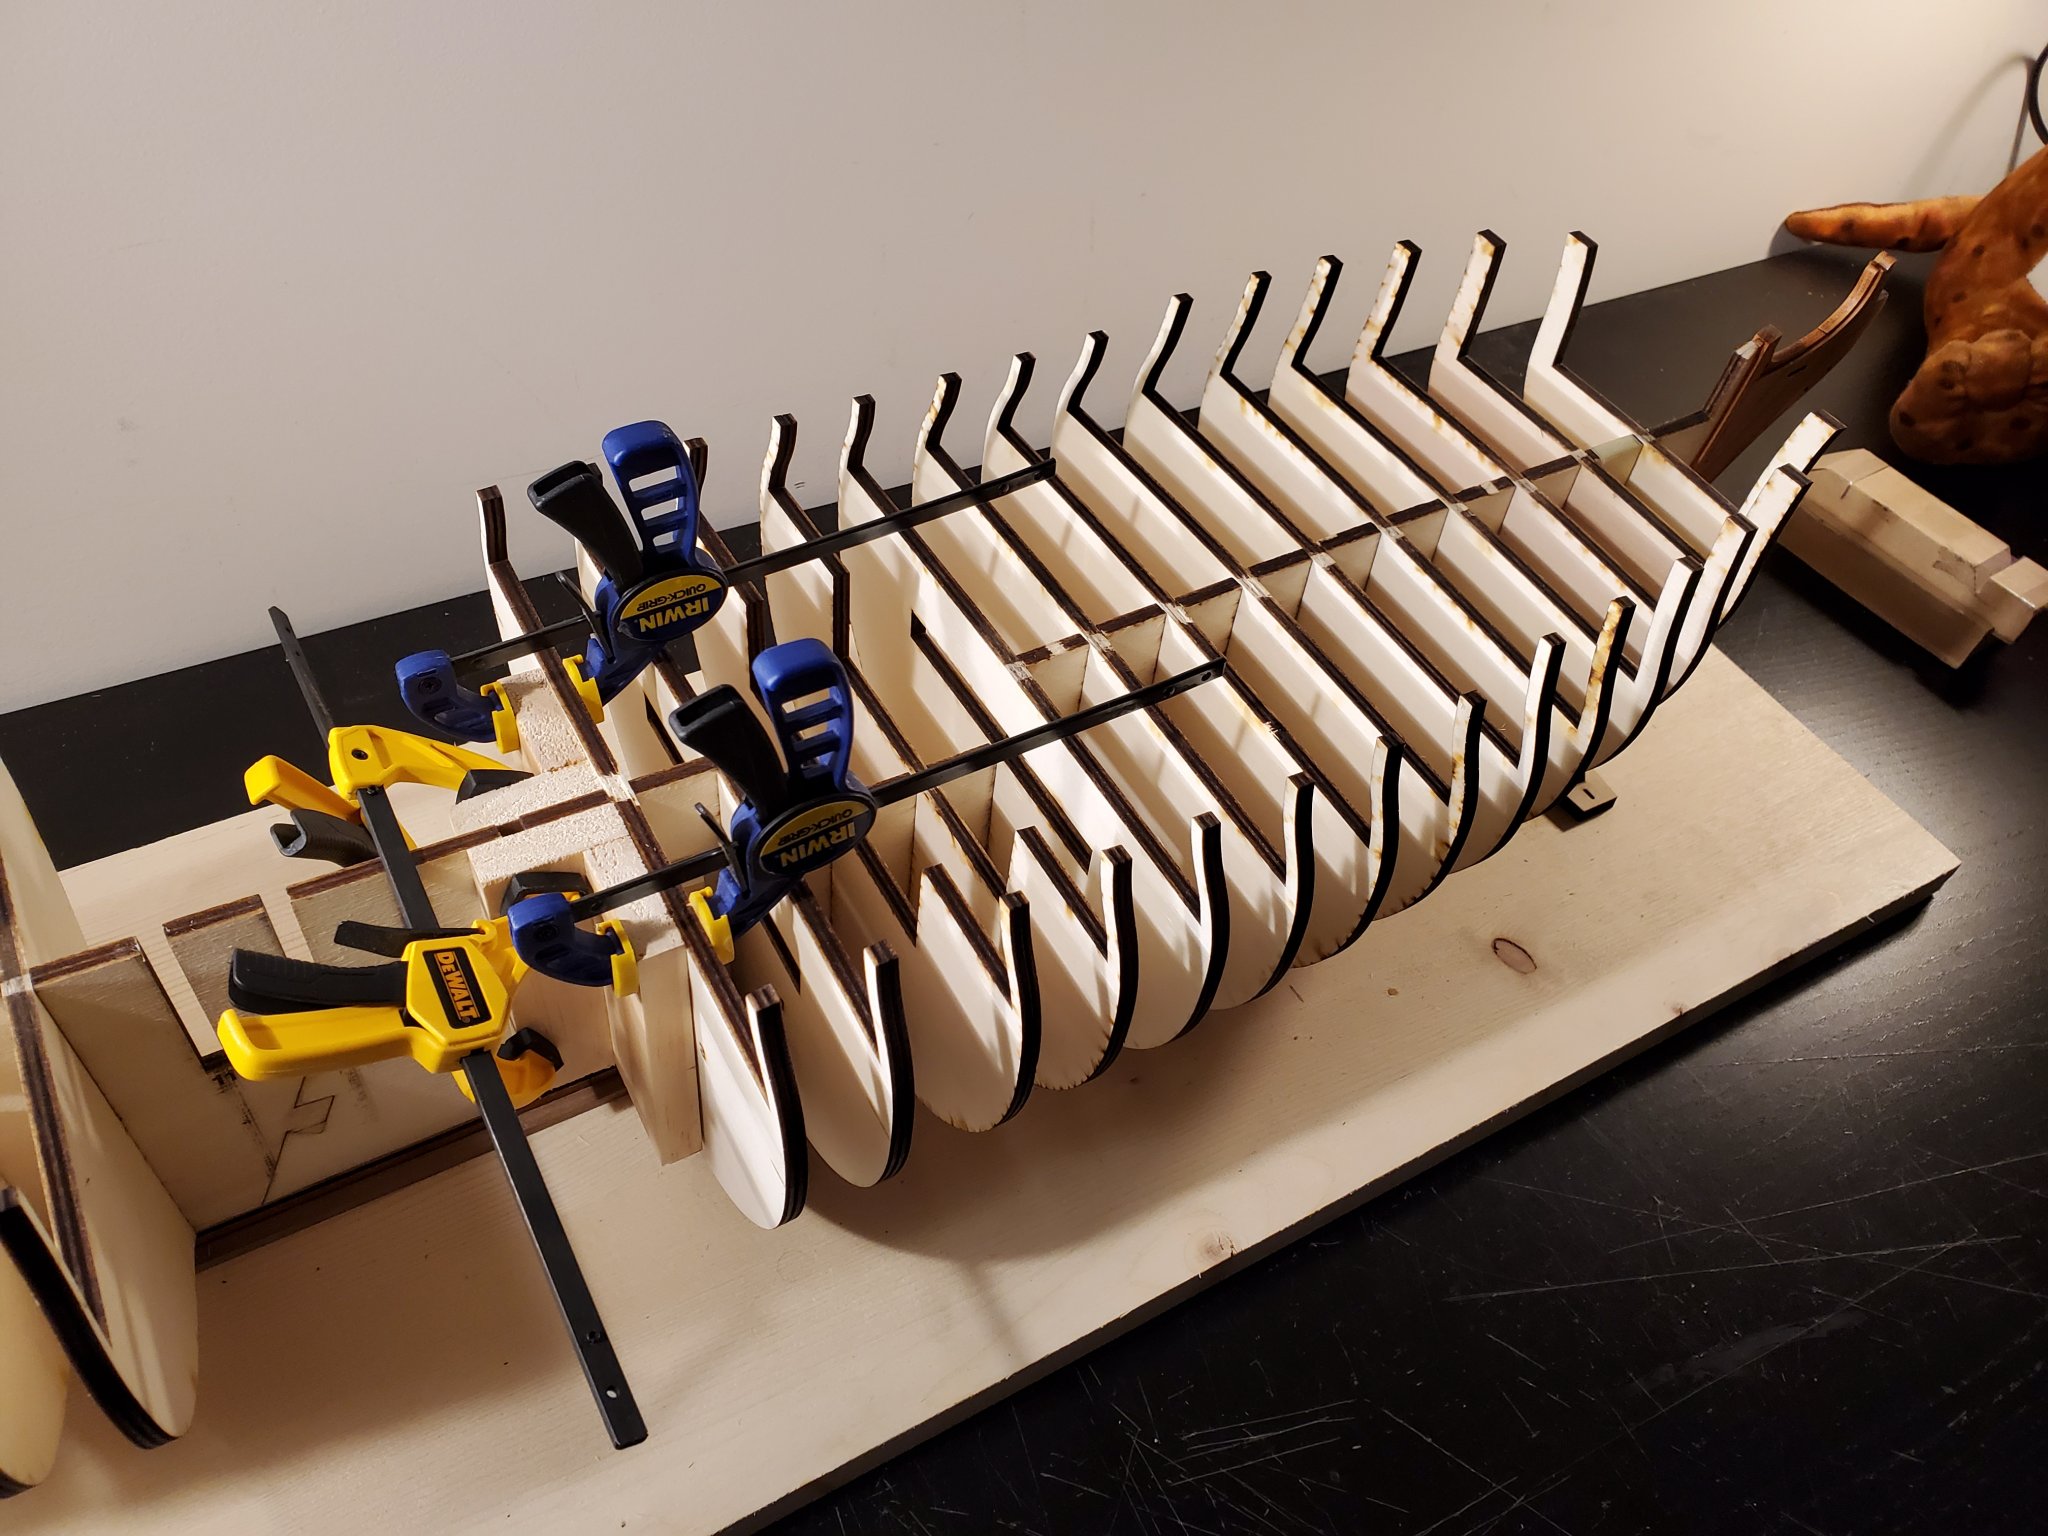
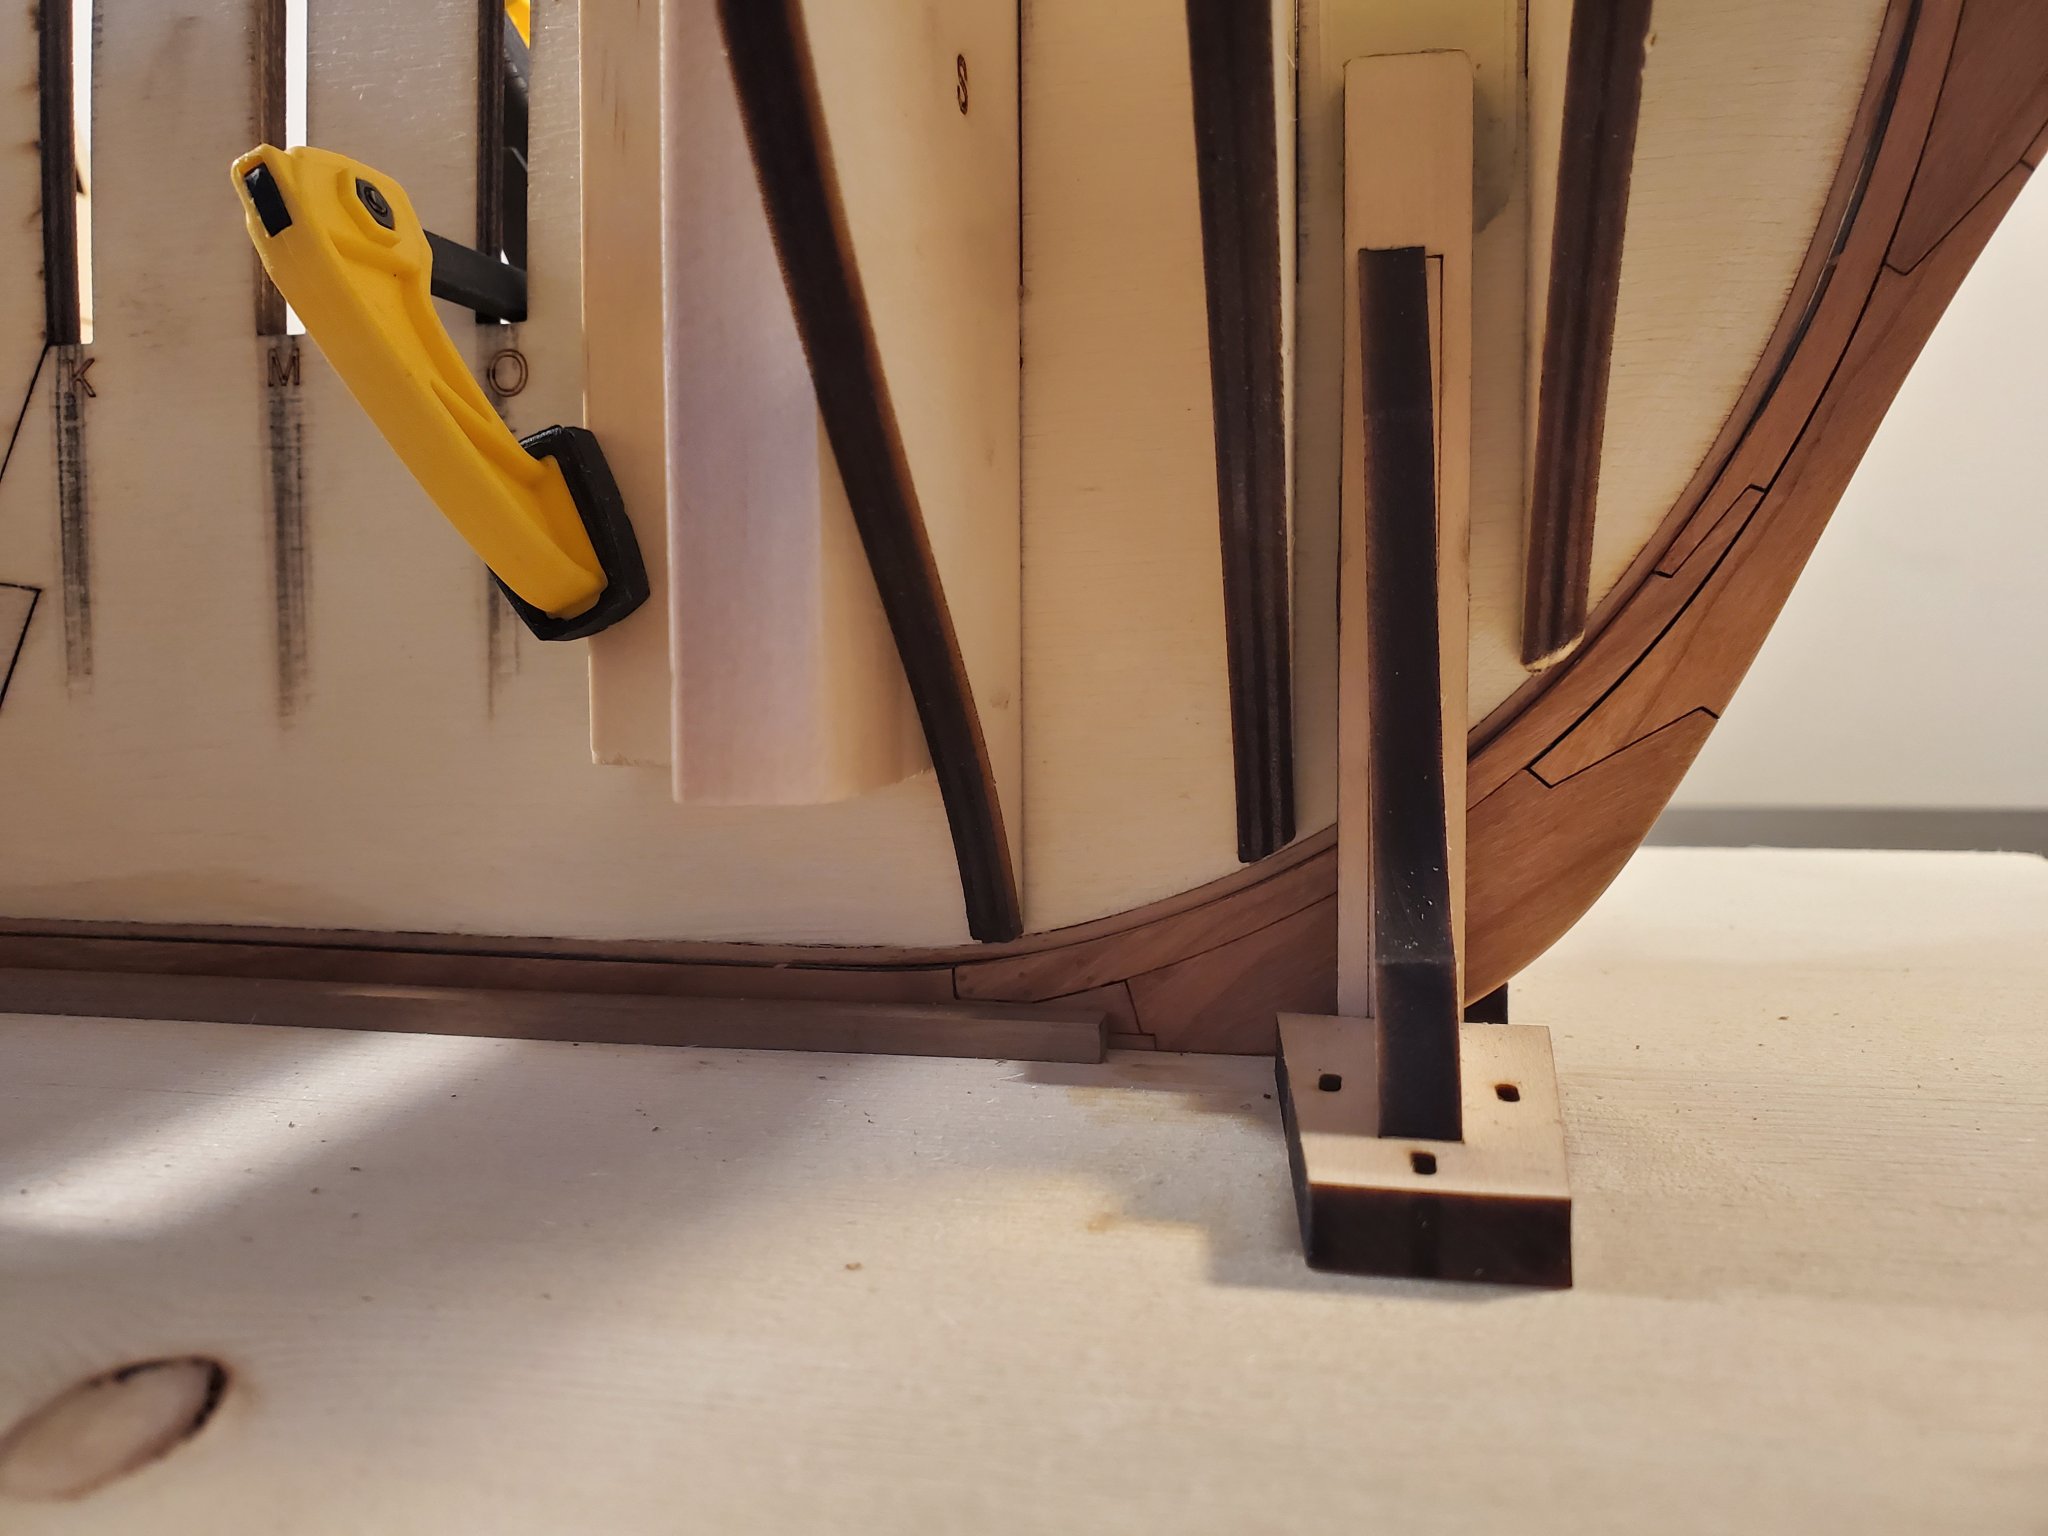
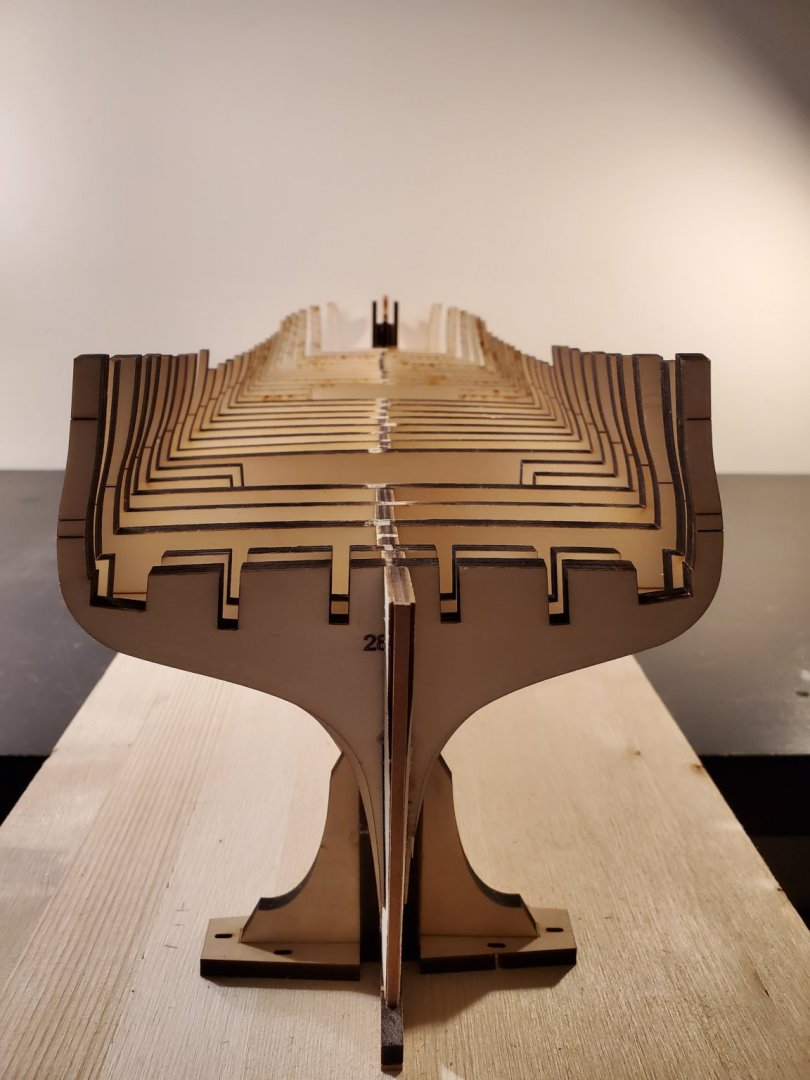
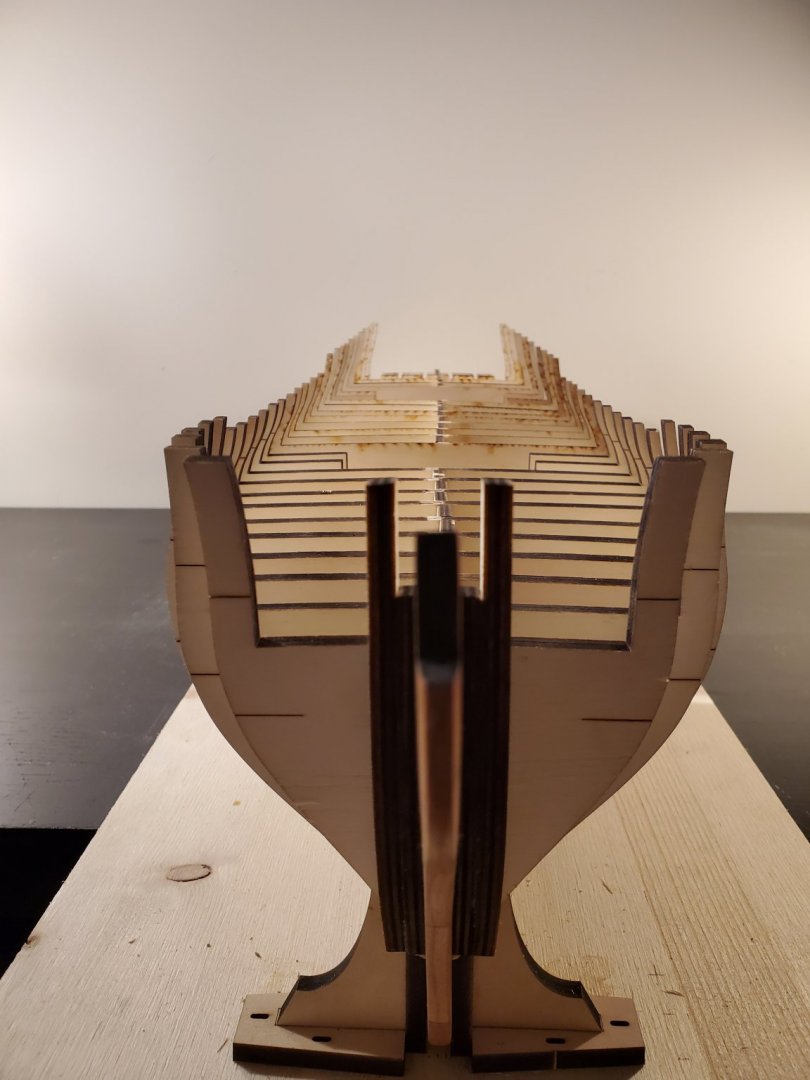
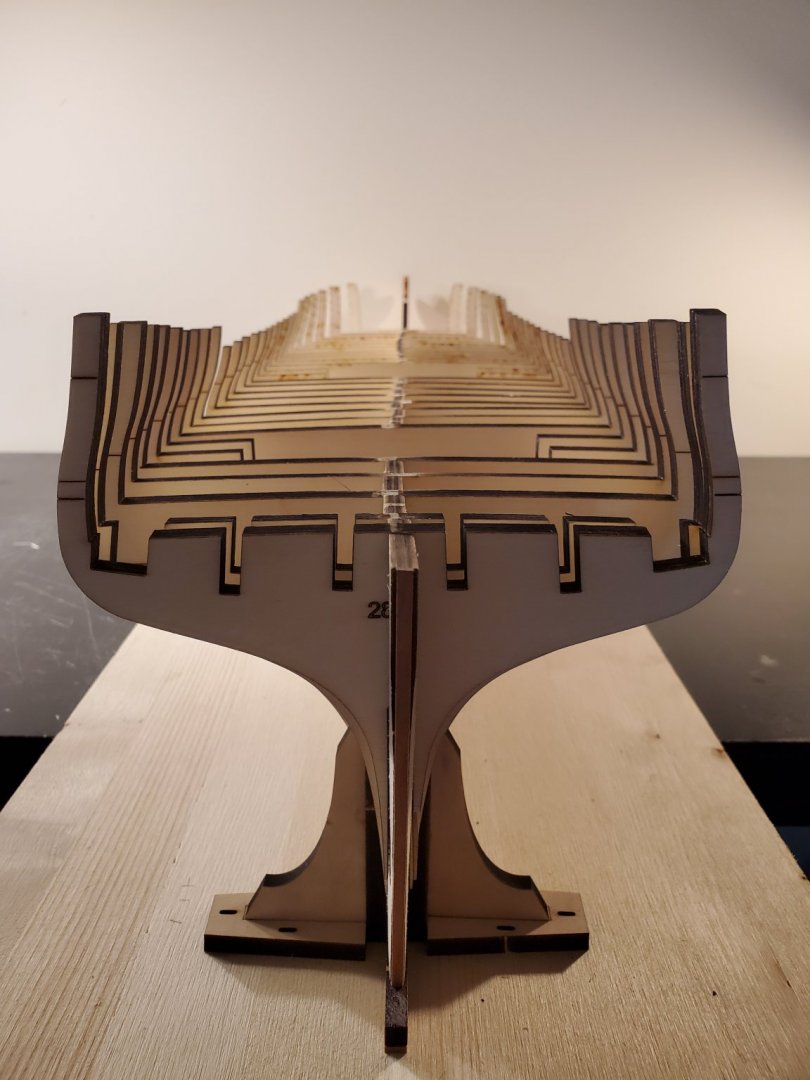
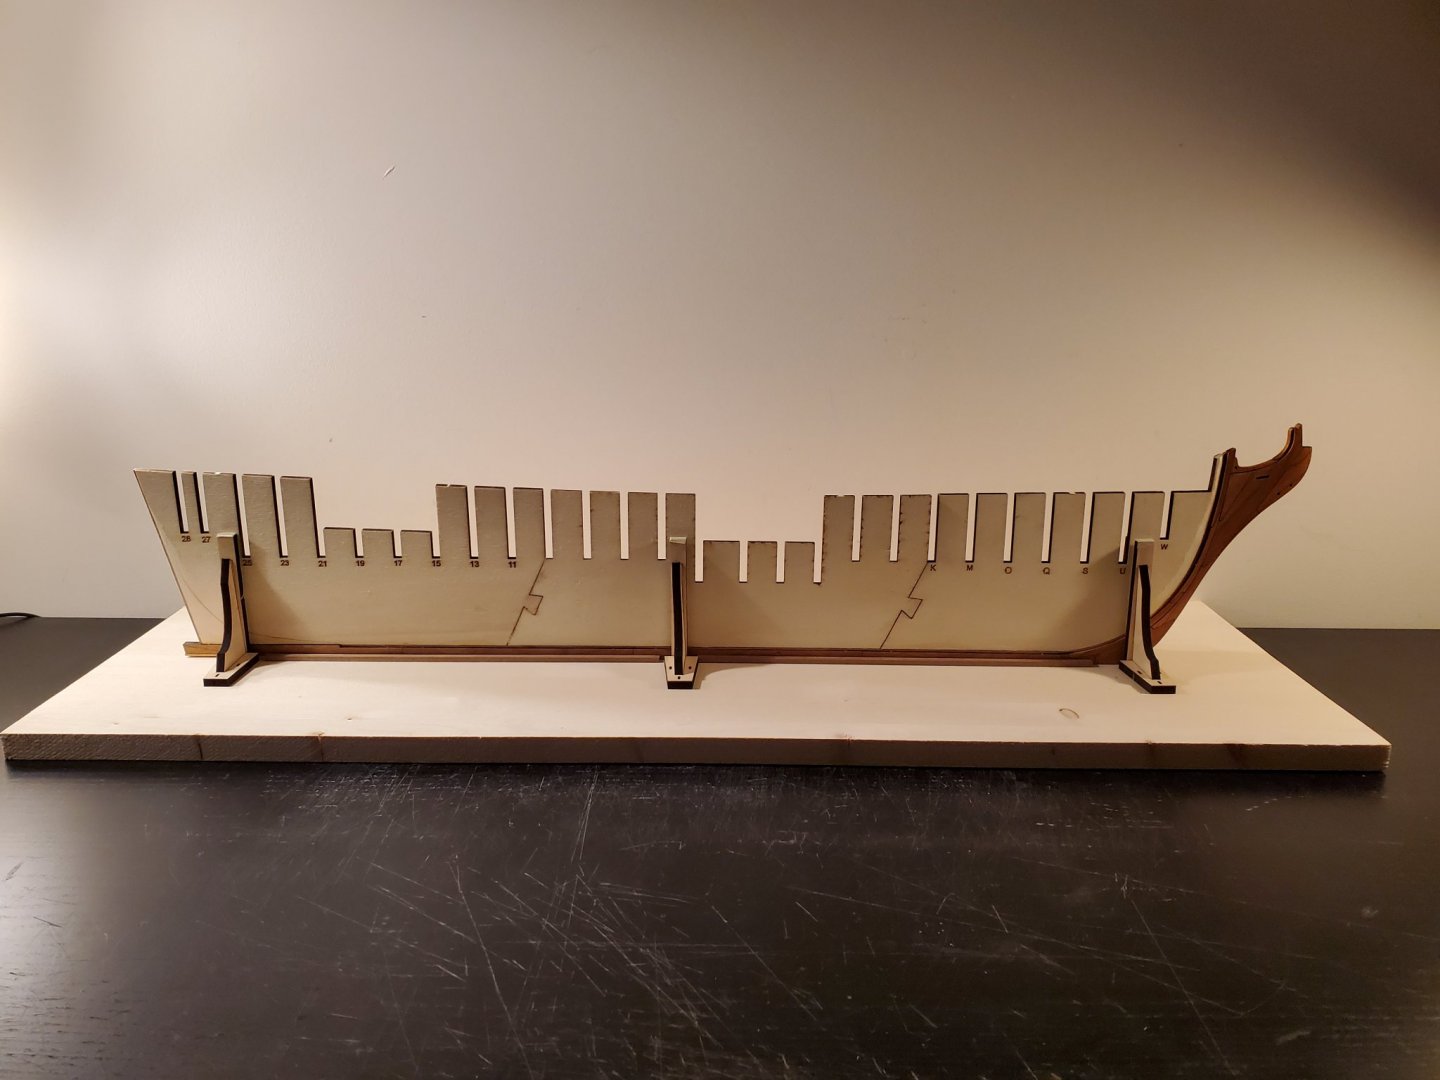
Thanks everyone for the likes! Today since it snowed, I had some time to remove the bulkheads and dry fit them into their slots. First thing I noticed was how big this ship is! It will be very impressive when it is completed!!! Here are some pics of the dry fitting. All but 2 pieces went into place nice and snug. I had to sand those 2 to allow them to slide down nicely. There are a few that need to be sanded in a different way because they do not sit perpendicular to the frame. Just some slight slot modifications. It looks like its leaning to the right in the middle picture, but its really not. It is just my bad picture taking! Haha! My building board is straight and holds the frame very snuggly. The tops of the slots on the frames are warped. This causes the top of the frame to look out of alignment. The bottom where the false keel lies is straight, so the bulkheads actually are positioned straight on the frame. I will double and triple check the bulkhead alignments and make any modifications before I will do any gluing. I find these pictures fun because there are so many bulkheads! Jeff
-
I came in late to the build, but you have done an excellent job on making a wonderful model! Very impressive!!!!! Jeff
-
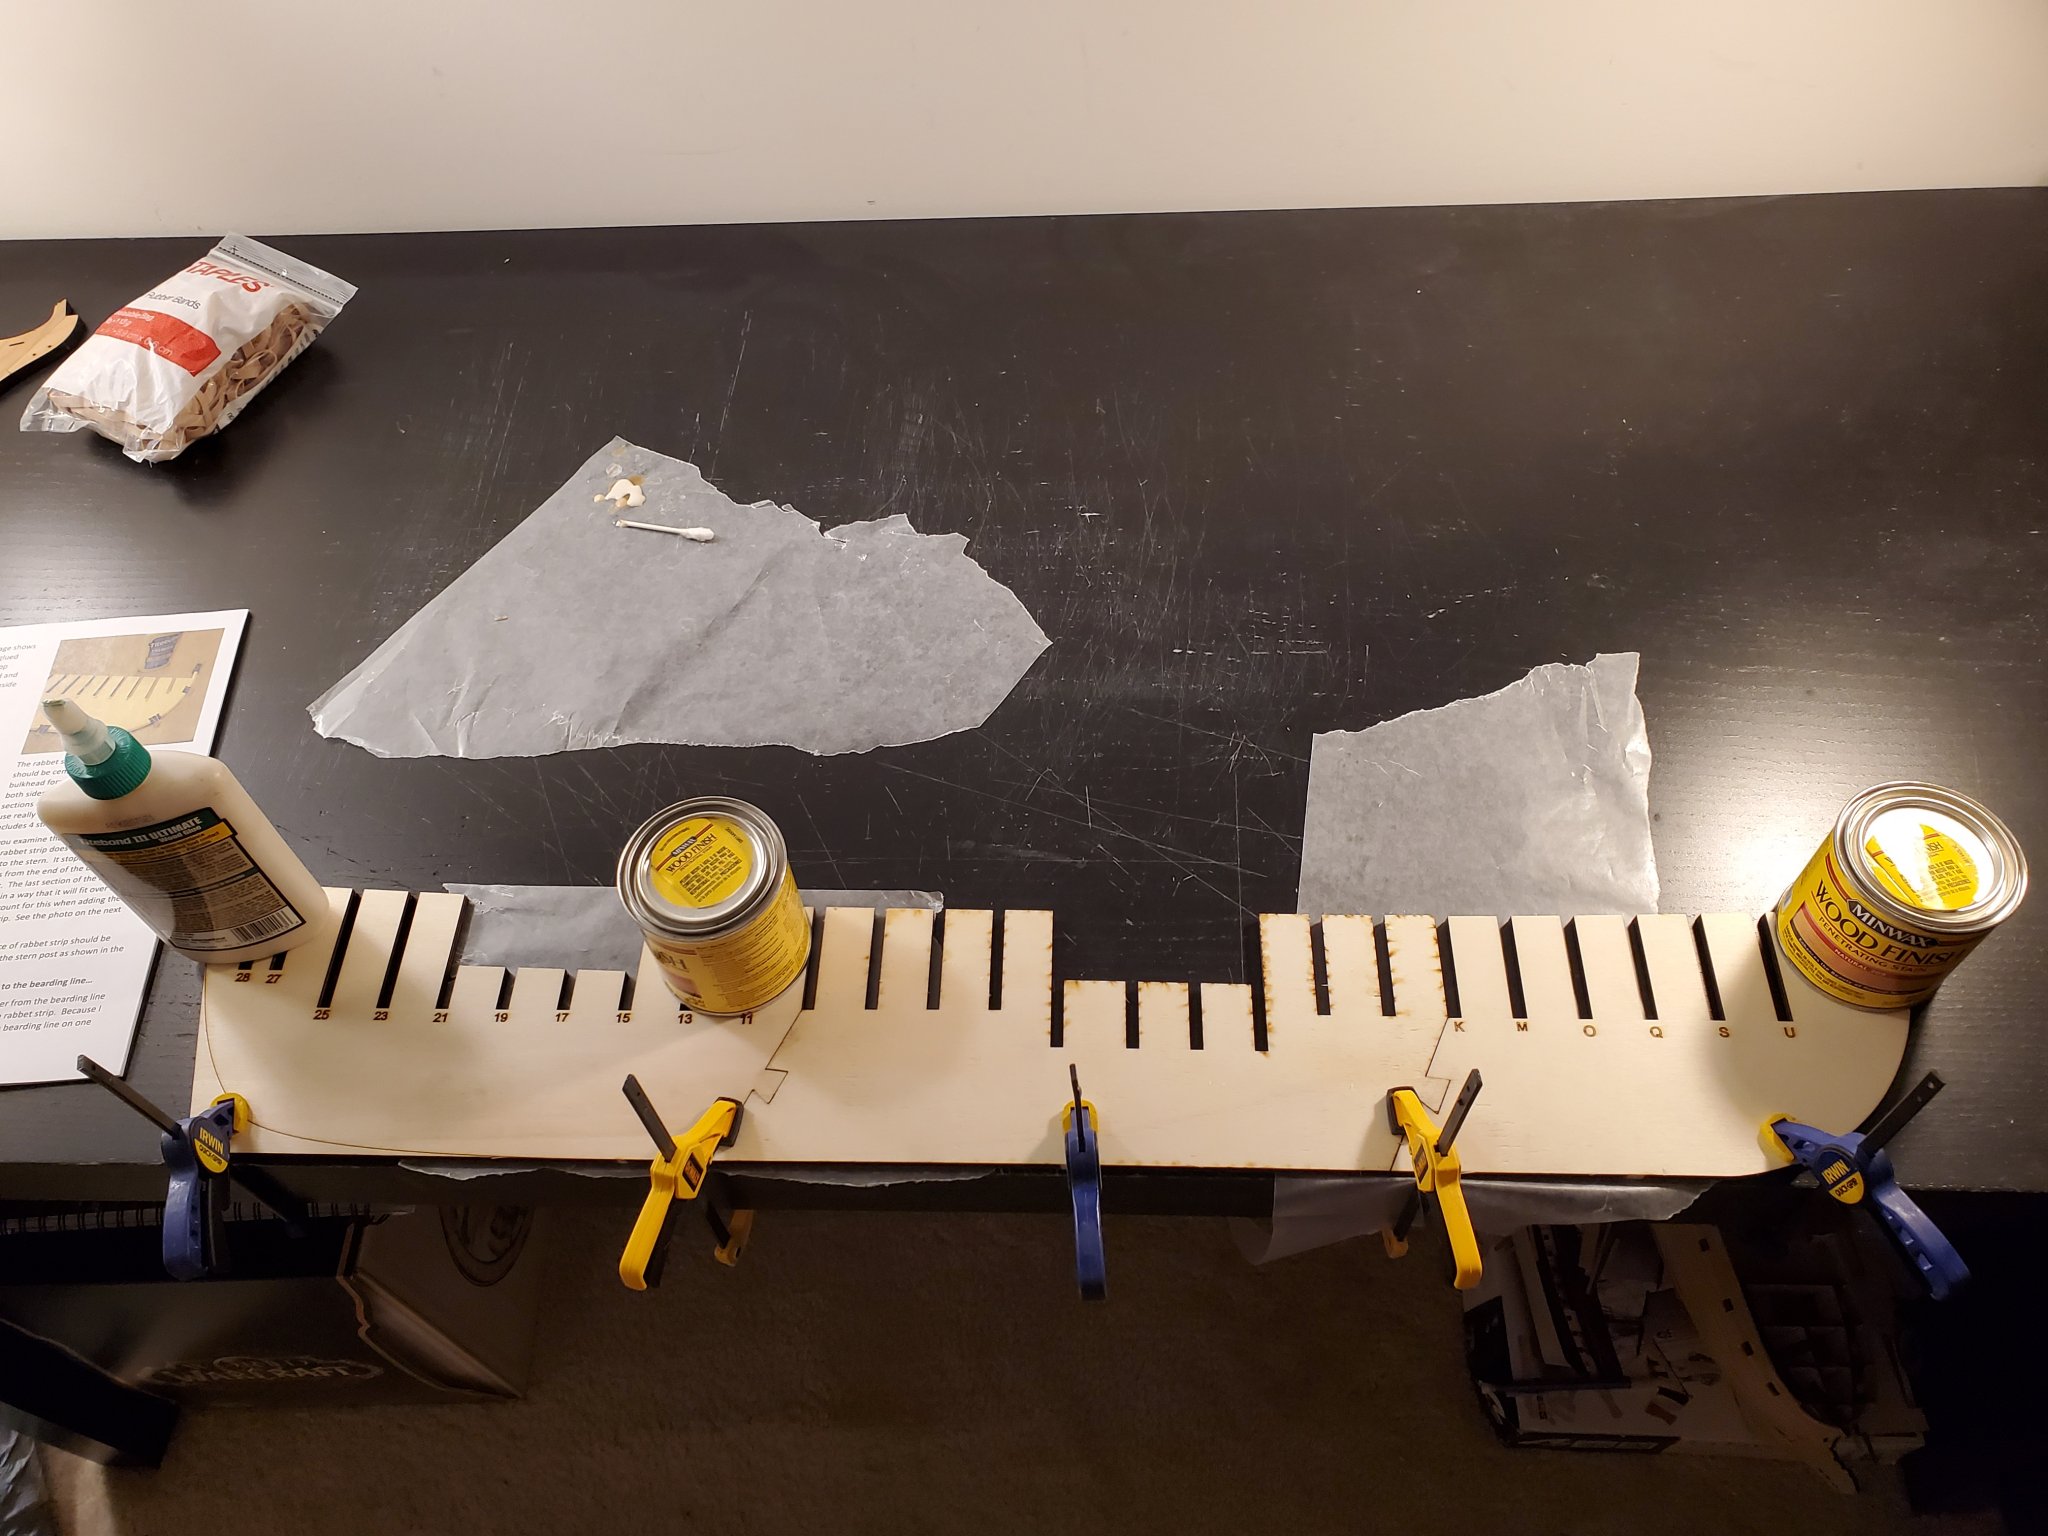
I am almost done making my building board. I just need to fasten the brackets to the board, then I am ready to cut out and fit the bulkheads! It took a few days because I forgot to order the brackets from Syren on my original order! The pic above is a test fitting of the ship on the build board. Like what Chuck said earlier, the frames were somewhat bent, but after test fitting it into the building board, it looks like it will straighten out just fine! Jeff
-
About the figurehead, I plan to try out the fruit wood gel stain and see how that goes. If needed I can also apply some wet wash to accentuate the crevases of the figurehead. Lastly, I can dry brush the top layers for more depth. But it's really a subjective thing as to how much painting will he needed. Jeff
-
Thank you everyone for the compliments! To answer your question Jack, I did not use a layer of wax. I followed Chuck's instructions: First I sanded with 220 sandpaper. I then sanded with 400 grit. I dont have 300 grit right now. I made sure not to touch the wood I was varnishing with my hands so no oils got on it. I then took a soft painter's brush and brushed off the sawdust. Lastly, applied 1 coat of wipe on poly with a foam brush. Waited 1 min, then wiped the access off with a lint free towel. I noticed that it was important to do the last step because that helped to eliminate brush strokes. I realized it really doesn't take much wipe on poly to cover what I was varnishing. Chuck's instructions are the best I have seen, and his tips make all the difference! I hope to complete my building board this week so I can start placing the bulkheads Jeff
-
Thank you everyone for the likes!!! Thank you Chuck, I won't worry about the warping and will straighten it out on the build board. A small update, I glued thr stem and false keel on the ply, and also put 1 application of the wipe on poly and described in chapter one. I also added the nails as well. I REALLY like how the wipe on poly looks on the cherry! I am ready to build the building board! I will give an update once its built. Happy new years!!! Jeff

-
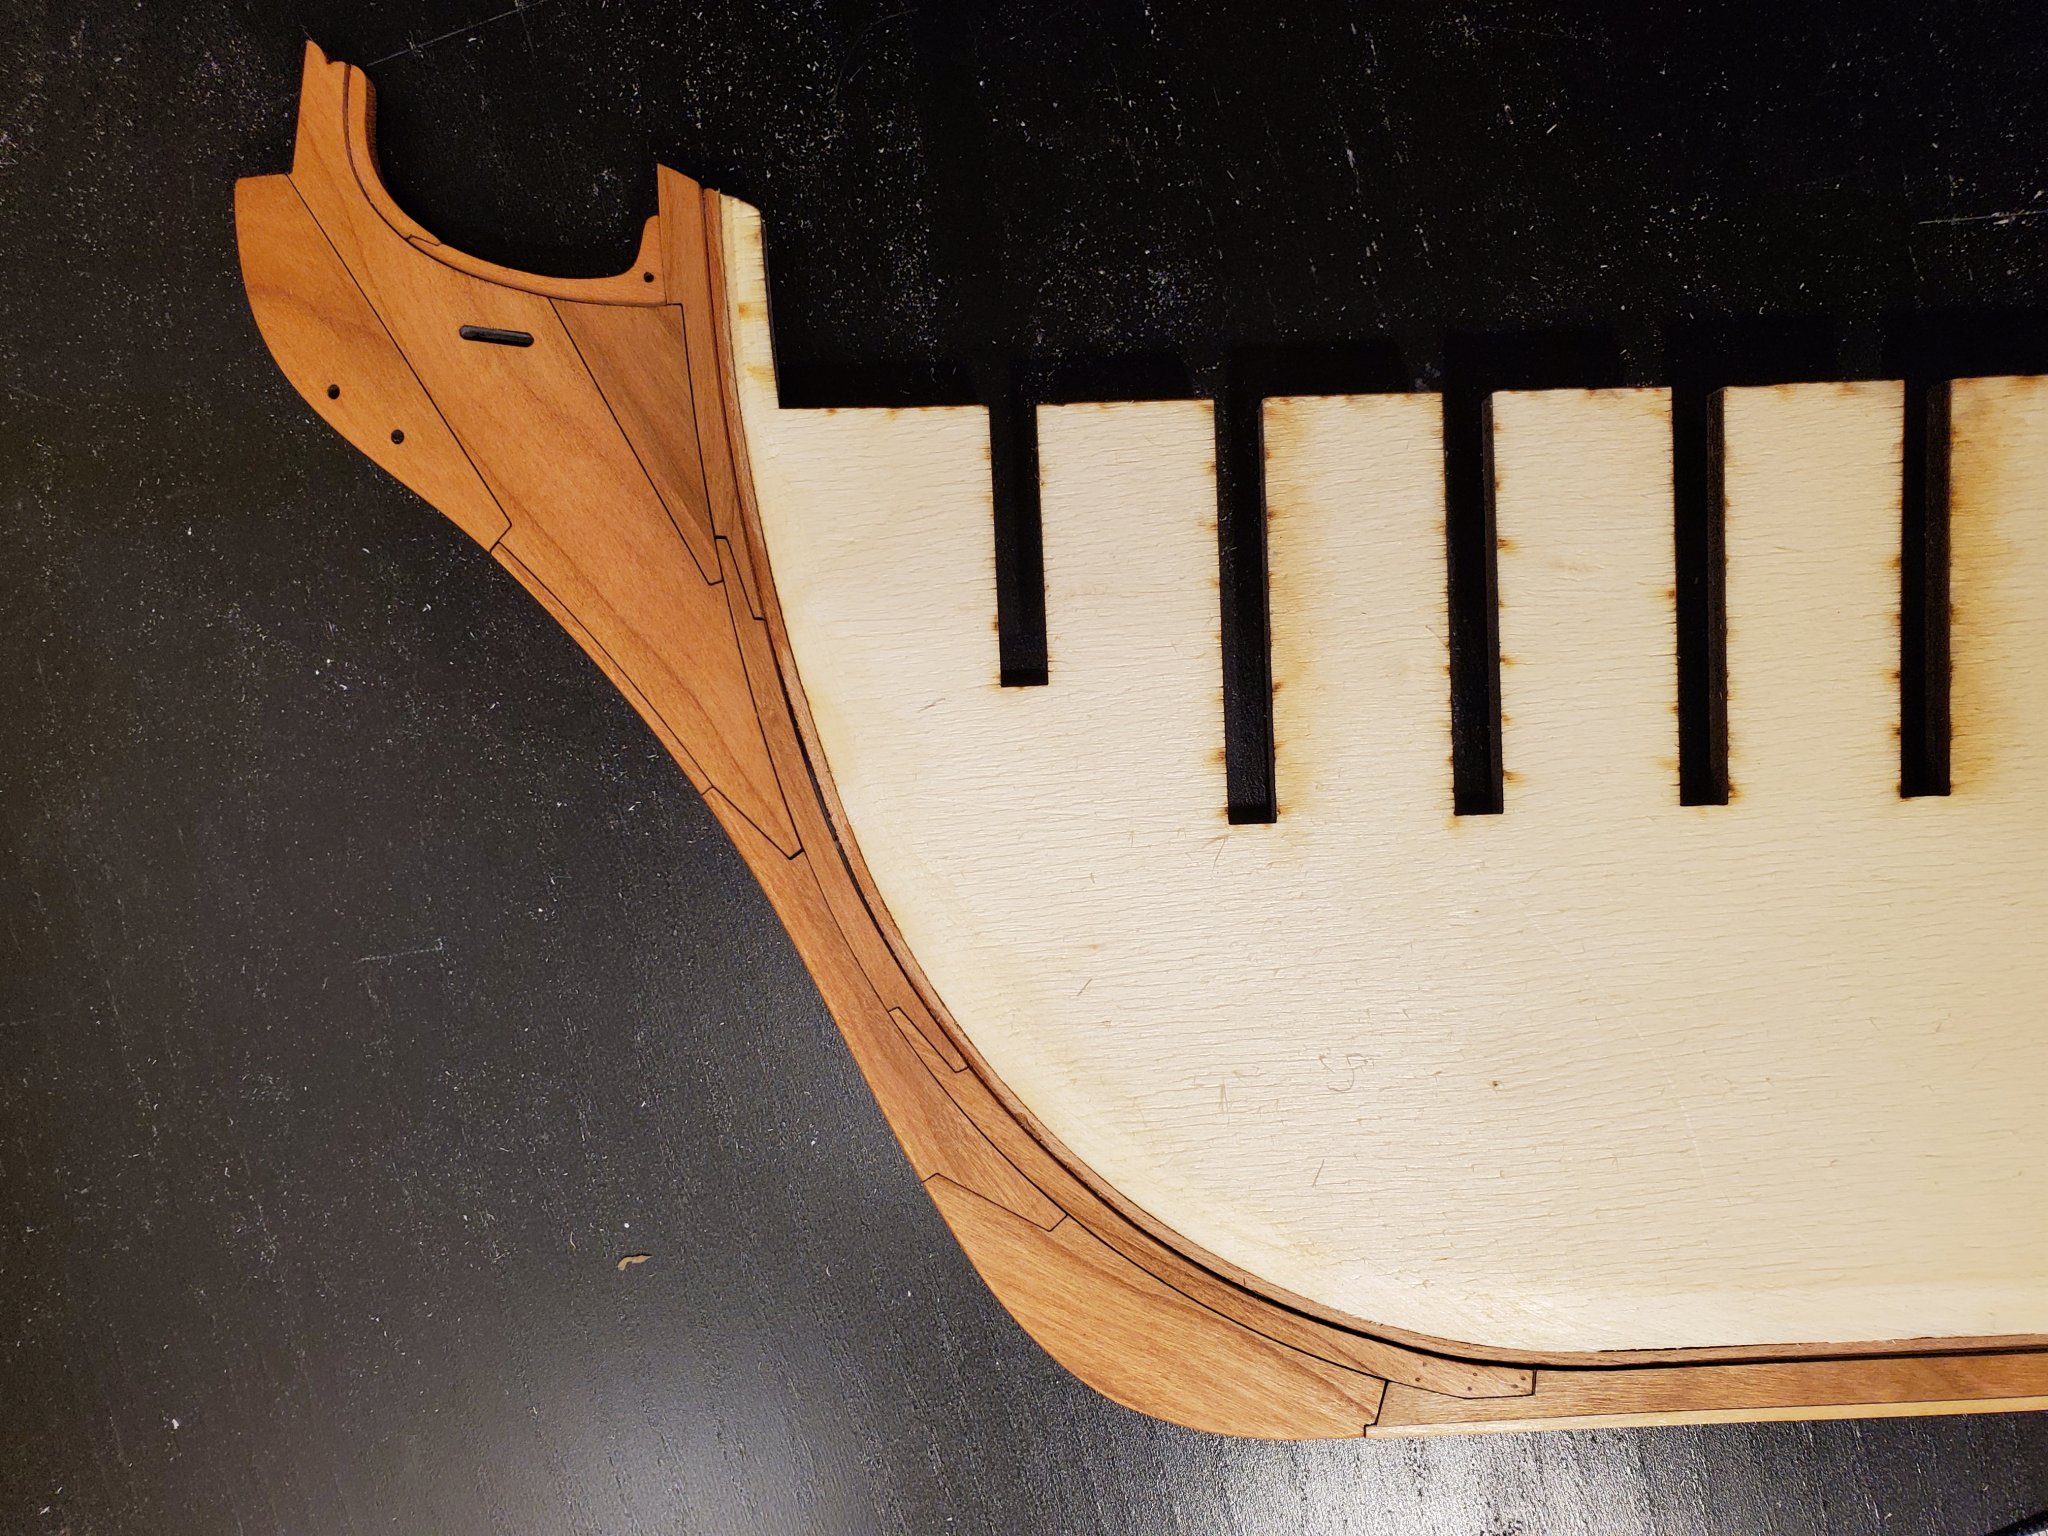
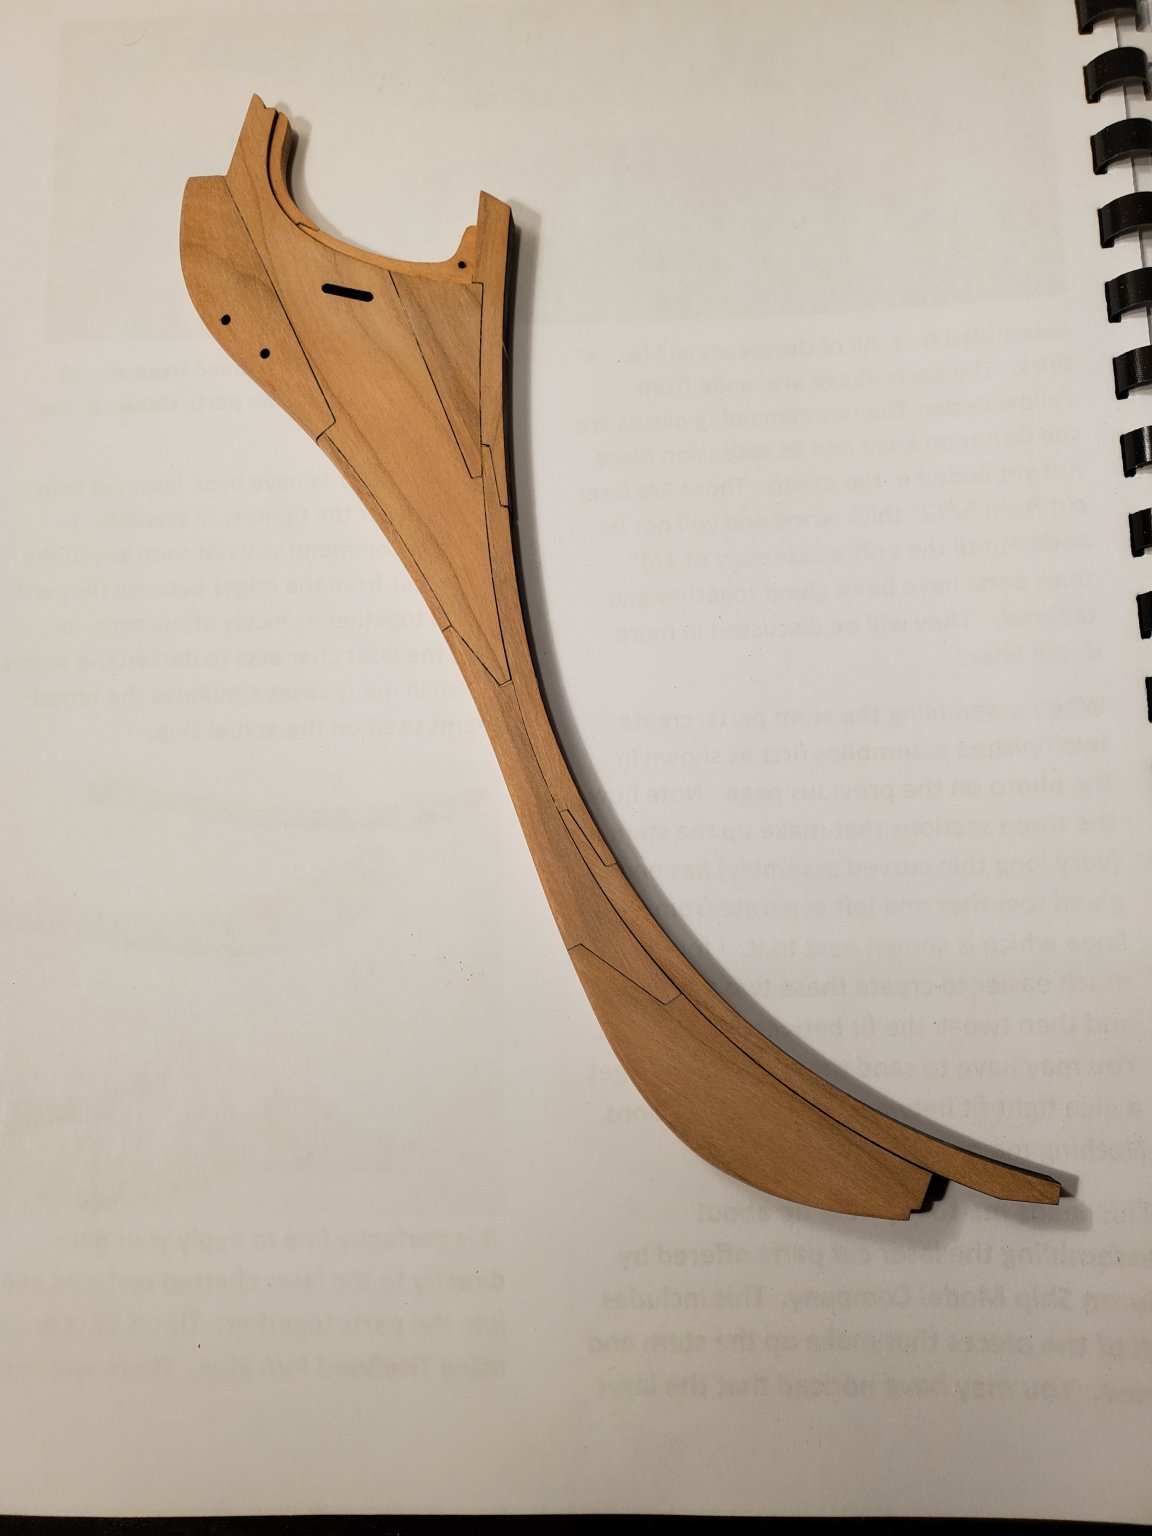
Hey all! After seeing so many wonderful build logs of this ship, and also following along with Chuck's log, I couldnt resist and had to start a build of my own. I don't have as much time as I would like, so I decided to order the bulkheads, chapter 1, and chapter 2 from Syren. I ordered it on dec 22nd as a Christmas present, and I was very surprised I received it on the 26th! With the holidays, I was sure it wouldn't come in until after new years. Thank you Chuck! You never stop impressing me! From what I have done so far, I have completed the stem except for adding the wipe on poly. It is amazing how well the laser cut parts fit together! It really required very minimal sanding. The Chery is very beautiful and I am very happy with the result. It was great that Chuck included a few extra cuts of the smaller pieces in case any of them got damaged while sanding or trying to fit the part. That did come in handy for me. I then looked at the bulkheads and false keel pieces. I noticed that quite a few of the plywood boards were warped some. So this will need to be corrected. I glued all 3 pieces of the false keel together on my desk. Since 2 out of 3 pieces were somewhat warped, I took a wet towel and dabbed it over the curved sections and put weights on those places to straighten it out. Once I have my building. Board made, I will move the false keel to the building board to make sure it's as true as I can get it. I am surprised at how big the ship is! It will be very impressive to look at through out the entire build. I did talk to my wife and got the approval to get a nice table saw to mill the wood I will need. I will be ordering it in January. Jeff