.jpg.d84ec4dad1d7791e855dca06210ab6f3.jpg.40b7a0ea2cc62bf0a3ec2a716005383a.jpg)
hollowneck
-
Posts
1,511 -
Joined
-
Last visited
Content Type
Profiles
Forums
Gallery
Events
Everything posted by hollowneck
-
.jpg.d84ec4dad1d7791e855dca06210ab6f3.thumb.jpg.f45209242e851d4409eca1a09293165b.jpg) Richard, Just sent you a Private Message. Apologies. My inbox was full!! I hate it when that happens. I sent you my email which is the best way for us to communicate. Thanks, Ron
Richard, Just sent you a Private Message. Apologies. My inbox was full!! I hate it when that happens. I sent you my email which is the best way for us to communicate. Thanks, Ron -
All right, guys. $325 for the package. If no takers in the next few days....then FleaBay for the same price. Make me smile. Make yourself smile too! Ron
-
Eagerly awaiting....The Rogers Collection of Dockyard Models...Third rates, Volume Two. Dilly. Dilly. Ron
-
Jim, Yes, three. Also a set of 6 collets (3jaw). I’ve used only one cutter on boxwood. No metal machining. If you’d like I can measure the cutters and get back to you. They are the 3 three that came with the mill. Ron
-
Proxxon MF70 Mill with accessory set of V-blocks and precision machining vice (PM40) - all in excellent condition. Approx 2 total hours of use. Original boxes for all. Great power tool, just don't need it for my model work now. $375 for all. I'll pack and ship to anywhere in U.S. I'll calculate total package shipping weight on serious inquiry. Paypal preferred. I have pics but you can also check this link: https://www.proxxon.com/us/micromot/37110.php PM me, if interested. Ron
-
kit review 1:64 Revenge 1577 – Amati/Victory Models
hollowneck replied to James H's topic in REVIEWS: Model kits
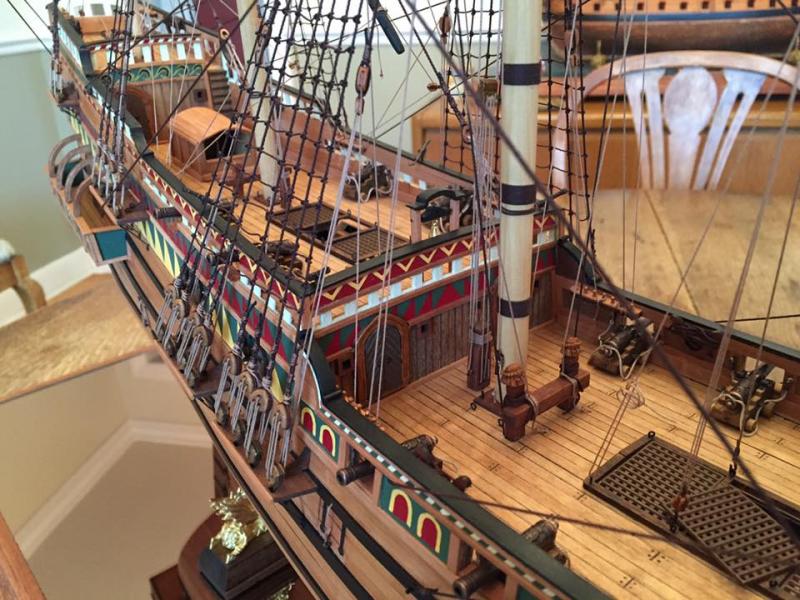
James, You are welcome. No masking, I just used the supplied printed pieces to refer to when hand painting. I should also add that the plans and instructions were excellent, typical for every Amati/Victory models build I've done (4). I've attached a better close-up to show the decorative aspects. Cheers! Ron
- 8 replies
-
- 13
-

-

-
- victory models
- amati
- (and 1 more)
-
kit review 1:64 Revenge 1577 – Amati/Victory Models
hollowneck replied to James H's topic in REVIEWS: Model kits
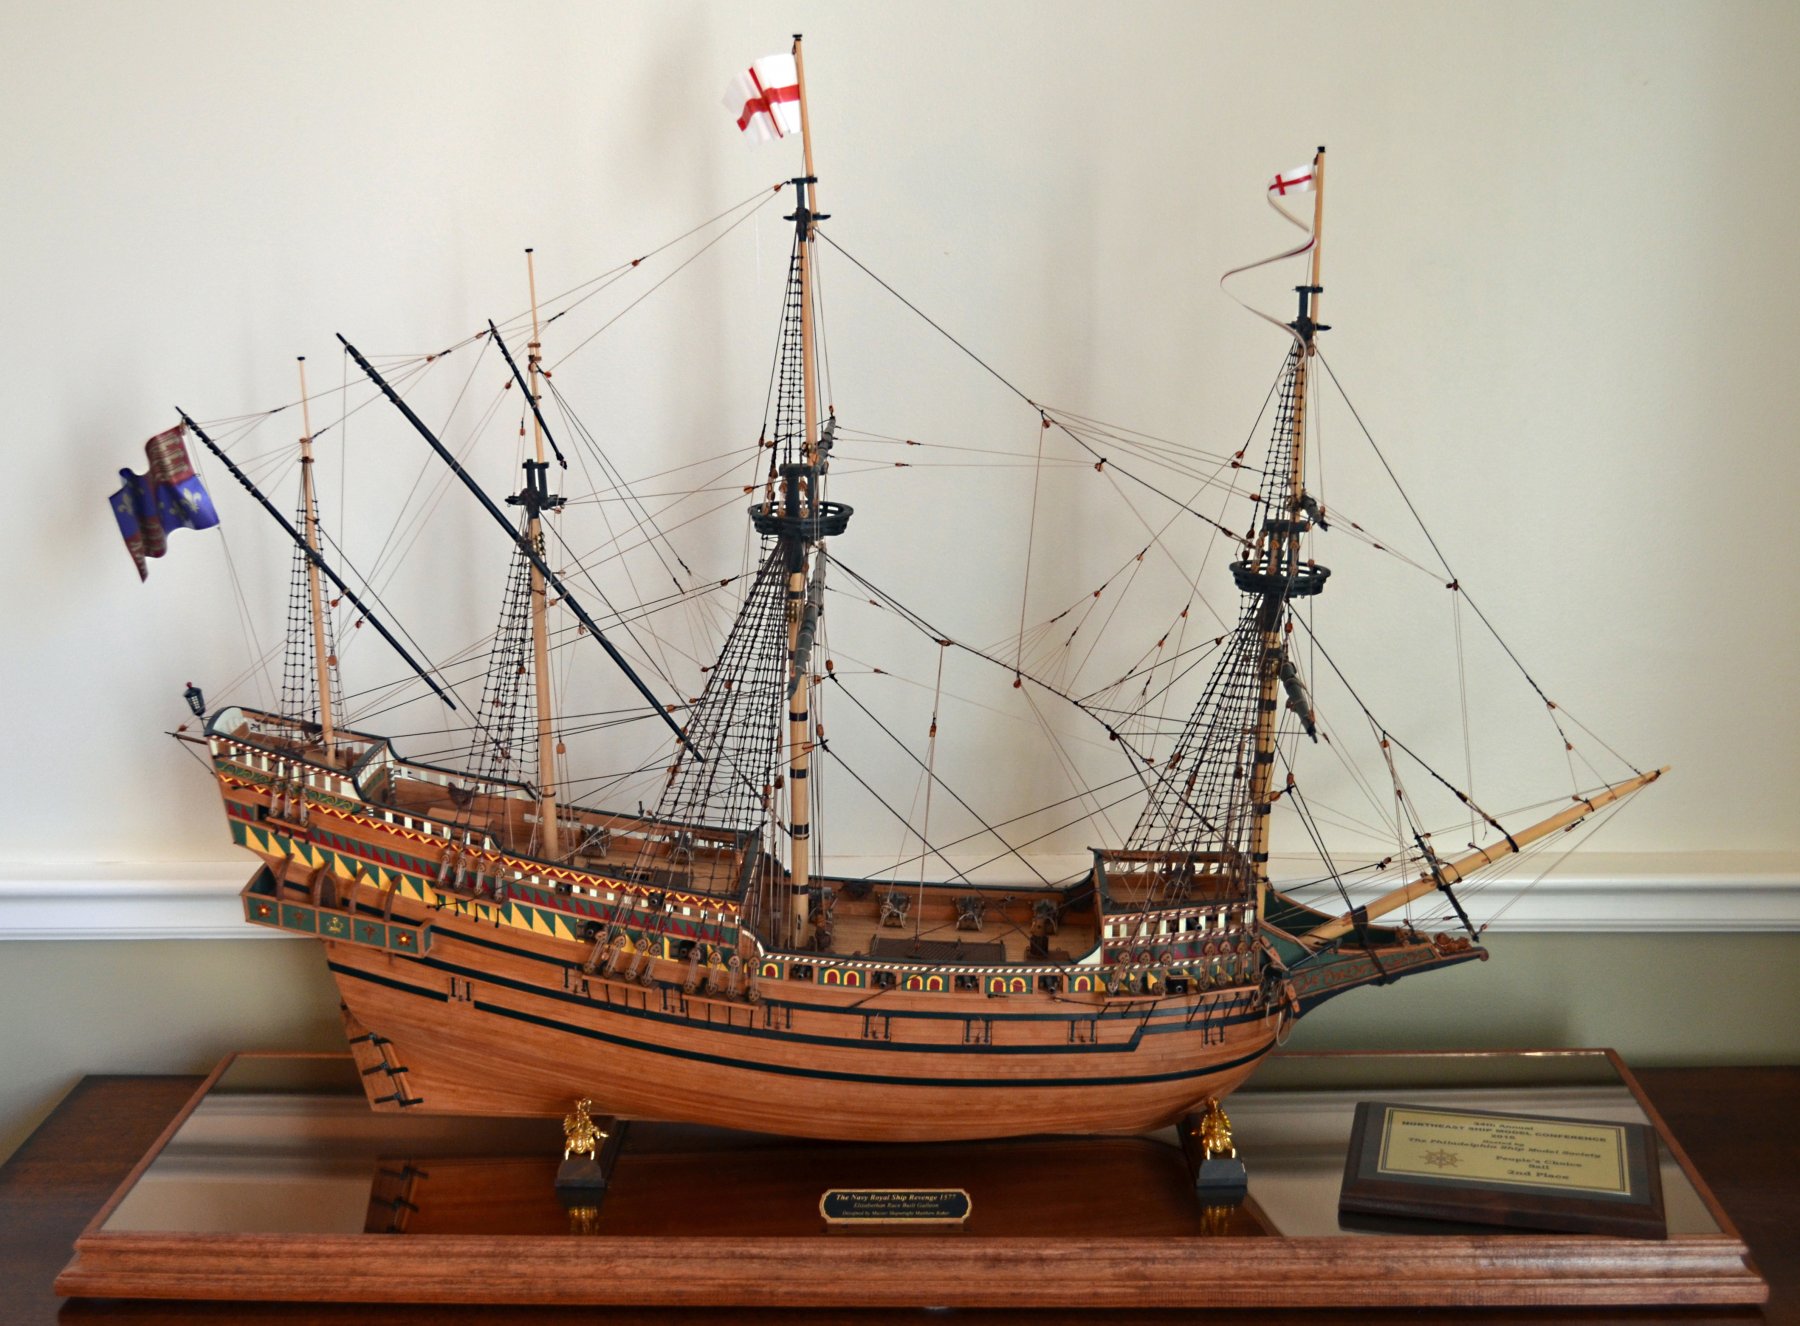
I found this kit to be generally excellent. I modify all my kit builds extensively (including this one), but a significant amount of this kit's components didn't need replacing. I did NOT use the Kit's glue-on decorative (and very distinctive) printed paper patterns; instead, I chose to hand-paint them with much better results. For more accurate rigging, much higher-quality rope and blocks from Syren "upped the game" considerably. Englishman, Chris Watton, is a first-rate kit designer. Amati is a first-rate kit manufacturer. Despite not using the planking, decking and masting wood supplied by Amati, IMHO the Revenge is still a worthwhile investment for builders not enamored with "scratch." My Revenge now sits in a dining room and generates "high fives" - even from friends and visitors who know nothing about what goes into our fascinating hobby. I've attached a hi-res pic to see some detail on what I did to modify this excellent kit and how I've chosen to display her. Ron
- 8 replies
-
- 12
-
-
-
- victory models
- amati
- (and 1 more)
-
Thanks! Good News for all of us. Looks like he's got his business up n' running again.
-
Is Jason back in business? I've noted that his ad on the forum disappeared not long ago. His milled wood was quite good and he delivered within a reasonable time frame. Does he have a new web site? Thanks for any info. Ron
-
Cornwall is my "go-to" supplier for many of my modeling needs. Excellent service, reasonable prices.
-
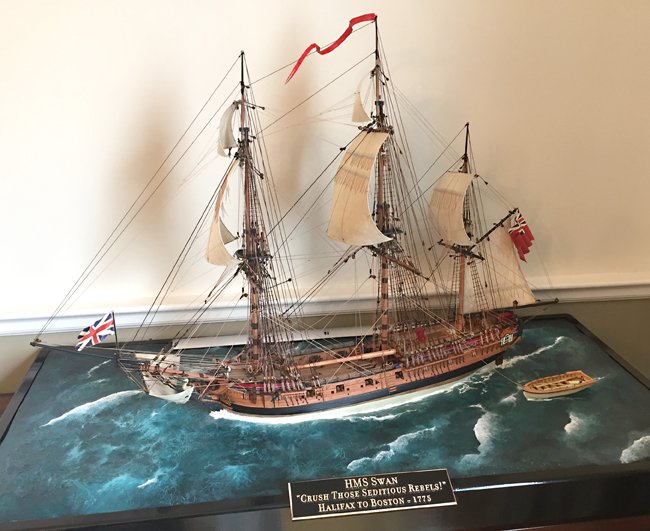
Thanks Tasmanian! When I decided to build a Swan Class sloop I also decided to make realistic set sails and...convincing H2o. HMS Swan is now berthed in my dining room, having chased a few Yankee privateers away from the Maine coast. This a kit model, extensively modified; the basic POB lines of the skeleton (keelformer, bulkheads) were excellent. Ditto all of the plans (17 sheets I recall). The kit is the HMS Pegasus from Victory Models (Amati's "high end"). It comes with extensive photo etch components including tiered decorations. I initially thought I was going to paint all the frieze work (along the bulwarks), but later decided that it looked better to turn the P/E elements into "carved wood" in order to match the stern and stem. All hull planking and much of the scratched top hamper is Swiss Pear that replaced the kit's wood. This photo you can see how I started the water base in the background below (layered 1" solid insulation foam, carved "swells")
-
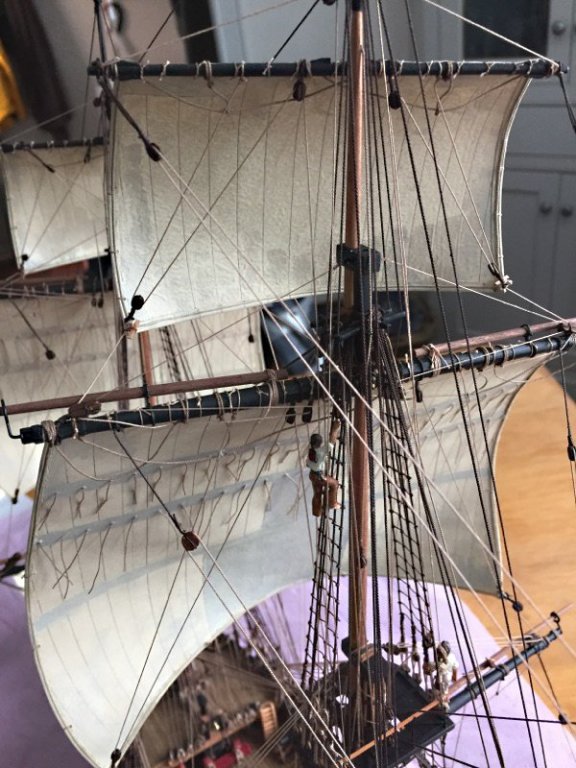
I used silkspan (actually the "modelspan" material from Bluejacket, Inc.) for my sails on my HMS Swan diorama model. It worked well but I did combine it with 20 lb. bond paper in an original lamination technique to make set sails look more realistic...
-
Chuck - Dave: Muchos Gracias to you both! Great timely follow-up. Chuck – when my order with Roman comes through (this was just a quickie web test post- conversation about supplier web sites), hopefully I'll then have a working phone number (and/or email) so I can ask some specific questions on a custom order. Dave — If I hit a dead end here, I'll head to Germany for my Birnbaum - many thanks for this additional contact! Fantastisch! Ron
-
I also hope that nothing serious has happened, my fellow MSWer's. I've tried recently to contact and place an order for various milled pear pieces from Jason (Crown Timberyard); after no reply for more than 2 weeks, I tried Project Wood Source and, unfortunately, also no reply. I even placed an online order with Project Wood Source using their online e-commerce "shopping basket" PayPal link. Nada. Zip. No workee. PayPal is even asking ME: What's Up (with this order)? Neither Jason nor Roman list a phone # (not even on business cards)... I'm now contemplating ordering from Arkowood in Deutschland. Pain in the you-know-what, but I speak German. The shipping will be the killer but the milled sheet prices are reasonable and I expect the wood quality and milling finish will be high. I'll give this curious situation another week or two, then I'm moving on... Are their others who are reading this that would like to become my new precision milled pear and box supplier? I have resisted purchasing a Byrnes saw for several years ($600ish - including relevant accessories - can buy a LOT of wood). However, this situation may eventually lead me to heed Lord Vader's admonition: Resistance Is Futile. Ron CMMS
-
Mystery Model - Question for Moderators
hollowneck replied to David Lester's topic in Wood ship model kits
Good decision, David. Ron -
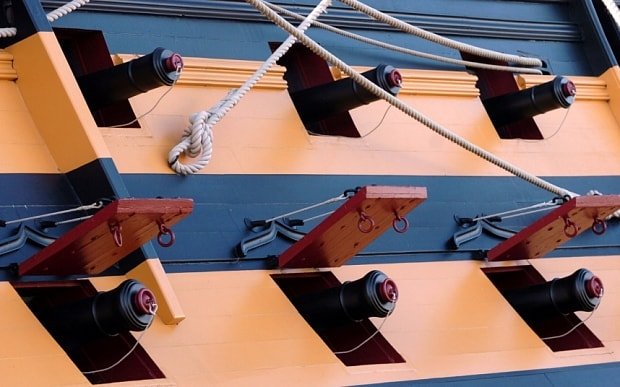
Oops. I forgot to add that the close-up photo (showing six cannon) is the color I saw 3 years ago, in-person. The other two pics are the new color. Ron
-
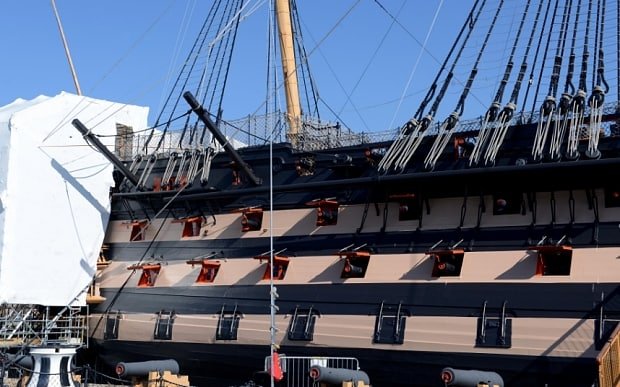
An update, Mates. See photos here, from Victory web site (in Portsmouth). Indeed, the new color for the Victory is a weird hue of "pink." Actually, it's more a Caucasian flesh tone, or is even described by early visitors as " smoked trout!" I think it looks very "beige." Apparently, the perception of the color depends on the weather; if the sun is shining it's very fleshy looking and when overcast, it looks like Norwegian Gravlax! There is even an online question on the site asking for an opinion of the new color. 56% don't like it. I've voted similarly. This quote also: "Andrew Baines, the head of historic ships at the museum, said: "We are calling it Victory Hull Ochre. It varies in different light, but I believe it is close to a pale terracotta colour." According to the latest findings of marine archaeologists, this new color is more accurate to what Admiral Nelson's ship looked like. I'm not convinced it's wholly accurate. Pale terra cotta? Smoked trout? Norwegian Gravlax? Let's have our own online vote, eh? Comments? Ron PS I'll be at the museum later this June and I'll get a first-hand impression (and bring back some original pics for my Model Club's Newsletter).

-
Andrew, P.S. My MSW avatar shown here is, indeed, a stern light from the Victory that I took a couple years ago. I wonder if the light is now illuminated with pink candles too? Ron
-
Andrew, Pink? Huh? Do you have any more information on this - a pic? This news must either be a cynical and late April's Fool's joke - or, the UK is sailing off the edge of the world, post-Brexit. I'm visiting the UK in a couple weeks and I'd love to take photos of a pink Vic in Portsmouth for my model club! I wasn't planning on going there, but confirmation of this could change my plans! I'd love to make the cover of my club's September Newsletter issue a photo of a pink-hued icon. Thanks for the additional info (from the restoration boss); it's clear that the principal decorative colors of the period were a creamy yellowish color. The particular hue of "yellow" was in fact, closer to what we'd today call, "ochre" - a pale yellowish color. Ochre was the substance that was used to make the paint (whether used by painters of bulwarks or artist Turner). Today's (bright) yellow is made from chemicals that are substantively different and considerably higher in gamma (spectral content intensity). Cheers! Ron
-
You are taking this good kit to a much higher level and it's looking great! Your craftsmanship "upgrades" are garnering a lot of well-deserved kudos, including mine. Ron
-
Jason, Excellent work, clean. I'm bringing my bashed Diana (2013) to the upcoming Northeast Ship Modeler's Conference and Show in New London this April 29th. The Diana was my third ship model and is still one of my favorites. Fully-rigged now, but I'm contemplating adding furled sails - job I think I can accomplish by the end of April. See you there? Ron
-
Interesting. I'm looking forward to seeing what they look like after painting. What did you pay for this set? Ron
-
Don, Thank you. No, I didn't do a Build Log. I have a handful of photos I will post in the Gallery in the next day or so. The model is truly unique looking, very colorful and has lots of interesting geometry, especially with full rigging (the mizzen and bonaventure masts with lateen yards). From her cozy spot in my dining room, my Revenge garners quite a few comments - and questions! I'm also a history buff (like many others here) and my answers can result in mini-lectures about the defeat of the Spanish Armada! Some feel sorry they asked... Zamuel, Thanks also...I guessed at the deck planking pattern. On locations for plank ends, I envisioned where I would have placed beams in the real ship and then carefully measured out from a datum point which I believe I referenced to the forecastle bulkhead. I use a product called "Minwax" stain. It's petroleum-based and comes in several wood "colors." (natural, oak, cherry walnut, etc.). I mostly use the Minwax natural stain since I prefer my models to present a look of the modeling woods I use - boxwood and pear, predominantly. I replaced all the wood in the kit (with the exception of the decking) with pear or boxwood. Once dried, I hand rub a clear satin polyurethane to most stained wood surfaces. This coat has a subtle reflectance and provides a practical sealing moisture barrier. This kit is definitely an advanced one, and I assume you have some experience. The instruction book is reasonably well done for the hull components - however, you're on your own when it comes to the rigging sequence. Fortunately, the excellent set of plans provide a decent guide. You've chosen a great ship model kit to build. Ron
-
Greetings Zamuel, I used the included deck planking in the kit and cut lengths to approximately 20 feet. I've attached a close-up of my completed Revenge which you may find helpful. I use a "Sharpie" black marker (felt tipped pen) and run it (carefully) along ONLY one edge of adjacent planks to simulate caulking. I then use an awl for simulated planking trunnels. After the awl "pokes," I use a darker oak stain applied by brush over the holes. This stain is darker than the natural that I use for the actual deck planking. Remember that the butt ends of the deck planking should terminate where beams would be located. This was a wonderful and fun project. I'm certain you'll experience the same. Good Luck. Ron