

LEGION 12
-
Posts
162 -
Joined
-
Last visited
Content Type
Profiles
Forums
Gallery
Events
Posts posted by LEGION 12
-
-
-
On 4/9/2021 at 9:34 PM, popeye the sailor said:
today is the big day........just waiting for the temp to warm up out there. both windows are open now........got some positive flow through
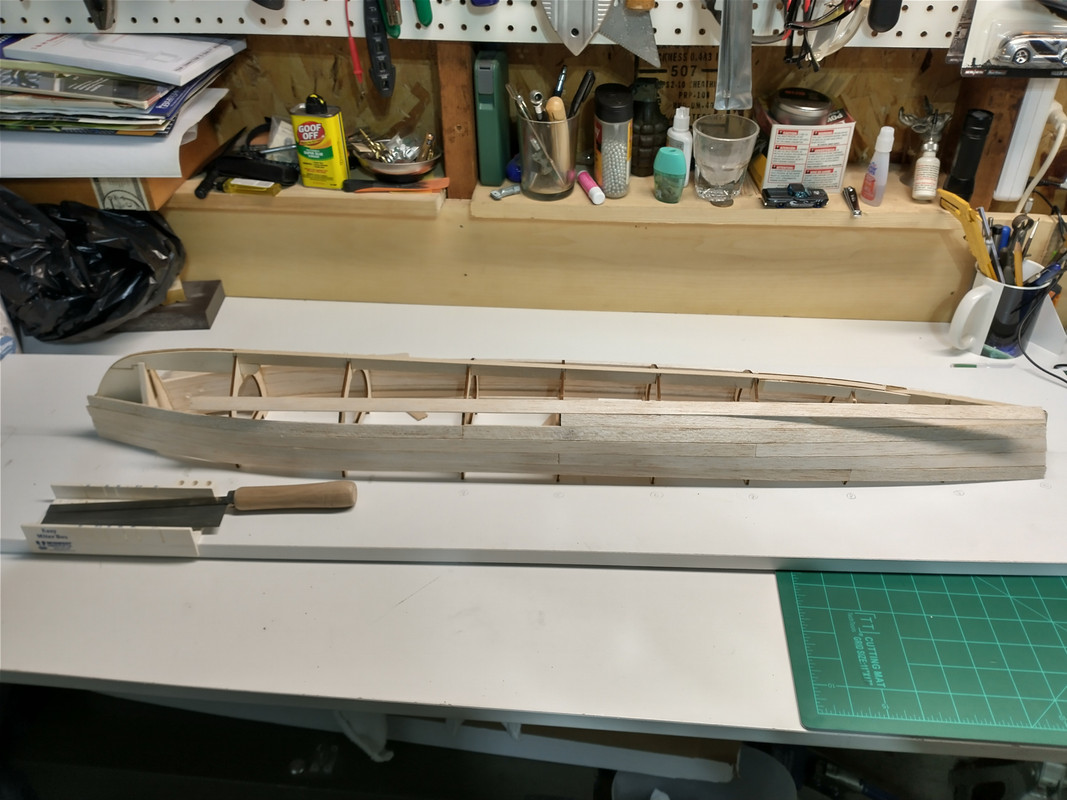
") after wiping her down with a clean cloth, she got her first coat of resin
after wiping her down with a clean cloth, she got her first coat of resin ")
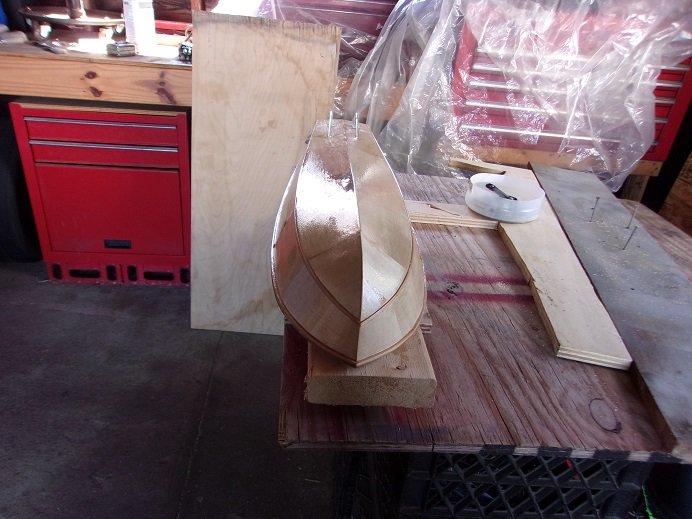
she is still wet.......gonna be really shiny

applied with a brush in loooong strokes
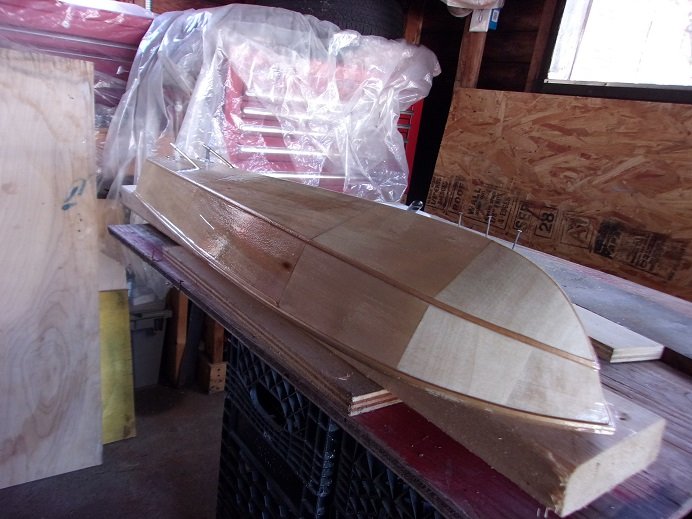
WHOA!!!!! what is that..........it seems a brush hair is ruining the first coat. I got a pick and removed it........went back over the offended area. my tool boxes are covered over because the roof leaks. told the landlord, but he hasn't done anything about it.

better without the hair
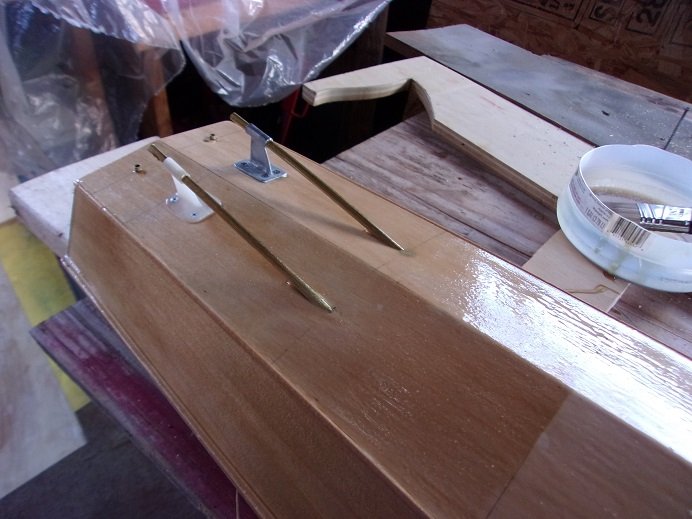
so as this cures, it should smooth out some. it will also perk up the wood hairs, so a light sanding will be in order. I like the way it filled in around the tubes. just as well....it's errand time anyway
 ........it will have plenty of time to dry.
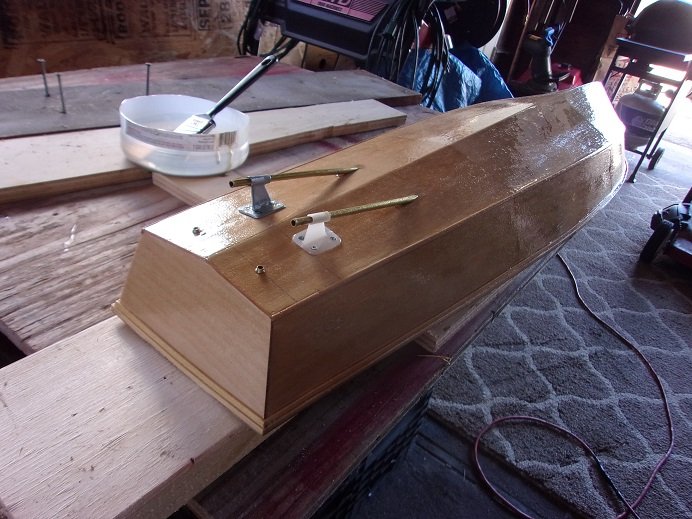
......early evening----> I'm grill'in supper, so I brought her in the house. don't want her to take on a smoky barbeque flavor. I did take a quick look at the deck platform, and there is very little on it. I tried not to. I took these a short time ago.......as I was posting this batch of updates. she is slightly tacky to the touch, only in certain areas. she'll have four days to fully cure before I will do anything more to her.

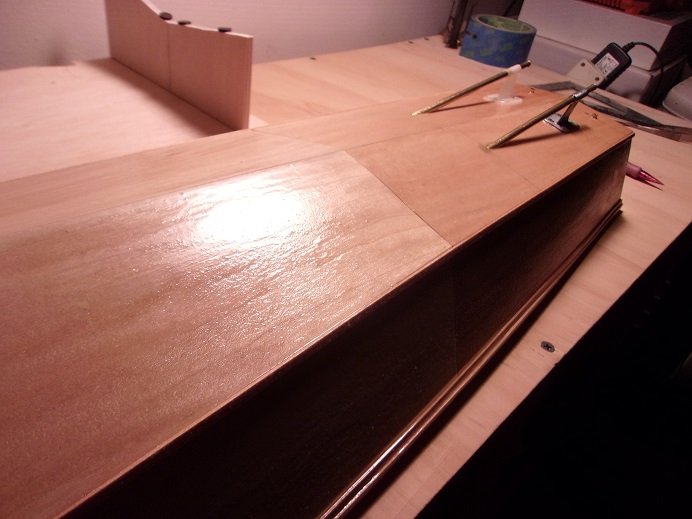
the small gaps along the gunwale filled in nicely....the finish is a little rough.

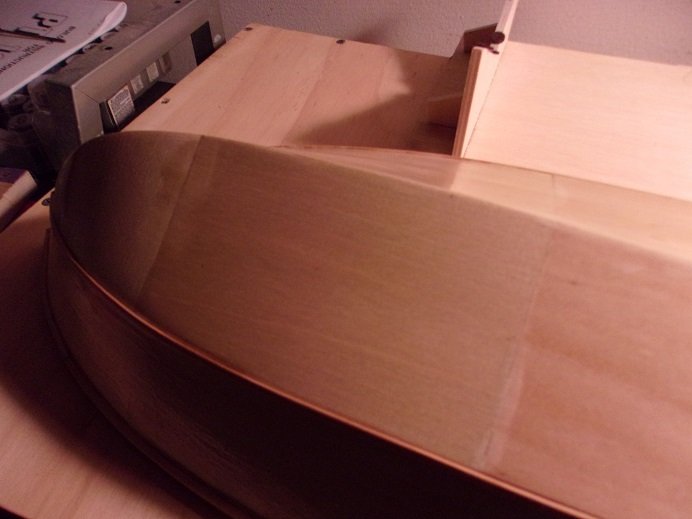
the panel joints look good.......I'll know for sure when I can get some paint on her
Awesome !
-
1 hour ago, Lt. Biggles said:
Thanks mate, she is quite a nice looking ship. All those slopes and shelves on the hull really give her some character! You did a great job of yours! Looks quite nice in water!
Your paint job and weathering put mine to shame , what are you doing with the decks , painting or wood ?
-
Love this model yours looks like it's coming along wonderfully , built this one a few years back .

- Egilman, Lt. Biggles, lmagna and 3 others
-
 6
6
-
It's warmed up enough that my glue won't freeze .
-
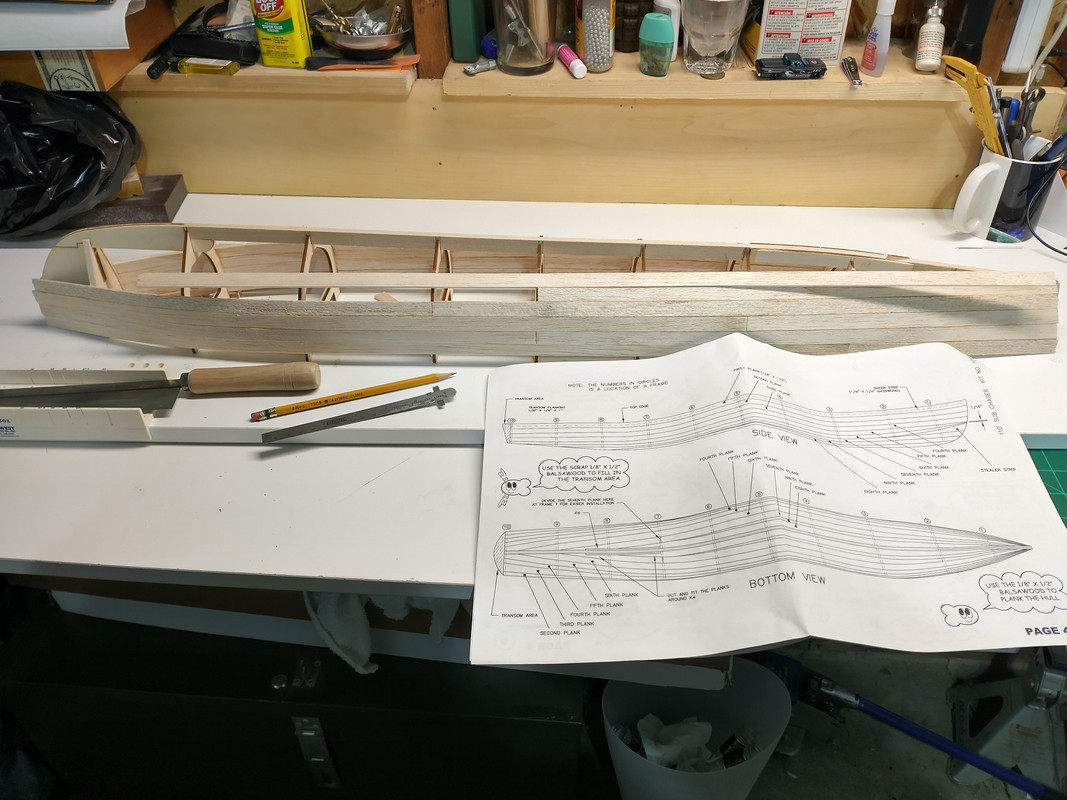
Hi all hope everyone is well . Haven't posted in awhile , but I have managed to get some work done . I didn't use the basswood sheets , was getting frustrated and decided to use the balsa planks that came with the kit . The results came out better than I hoped , no major gaps or issues I did have to shim a couple of the bulwarks .
-
-
12 hours ago, popeye the sailor said:
that's why I did it in sections. the plastic sheeting supplied in the PT kit are quite long, roughly half the length of the hull. I chose to sheet it two sections at a time. working on the port side first...... your first cut will be along the edge you will lay at the keel.......line the edge to the left to the transom bulkhead, but give it a tiny bit extra for sanding purposes. I notice that the plank you have along the gunwale is slotted to fit there, so you can use it as the line to trim the bottom. wrapping the piece around the bulkheads, you can mark that line to trim off, and get a sense of where the third bulkhead is.
the number plan might not be that way......I may be backwards, but I don't have the plans in front of me. if using that gunwale plank is a bother, you can always remove it and replace it later when the hull is sheeted. all this will depend on you gluing it back on the board though......I hope you did that. you can do two sections at a time until the hull begins to narrow to the bow......then you may need to cover only one section at a time, until the last section........you might be able to do two sections then. there is a picture of the plastic sheeting in the PT log.......using it would have meant a lot of extra work. it will take some measuring and fitting, but it can be done
Thanks guys the plank along the gunwale is a stringer , after I sand that and the bulkheads flush I will glue it back on the building board , a step I didn't do before and wouldn't of even noticed it if not for removing the planks . I bought more basswood sheets than I will need just in case . I will give it a shot dry fitting everything first before committing to gluing . One more question what did you use to cut the basswood I am assuming a sharp knife should do the trick .
- lmagna, Egilman and popeye the sailor
-
3
-
Hey all managed to get very little done this week , works been busy . A question if I may I have gone thru Popeyes PT build and it's helped a lot also checked out the scratch build PBR Mark 1 by Thistle , both are using the Basswood sheets for there builds instead of planks . My question I have are there any builds using this method with a hull shape similar to what I am attempting to build ? Trying to get a better idea of how to attack this . Thanks Rich .
-
19 hours ago, lmagna said:
If you are going to RC this ship then you need not plank or sheet the hull at all. You can fill in the areas you presently have between the existing bulkheads with expanded Styrofoam. You can source this in a number of forms and it is both easy to work with and can even be free if you look around. Then all you need to do after filling in the spaces is to sand the hull to shape using the present bulkheads as guides. When properly shaped use some spackle for a final smooth hull shape and correct errors, also sanded down to as thin a coating as you can. Then use some fiberglass cloth and resin, (Epoxy unless you left a relatively thick layer of plaster) and coat the entire exterior. This can be repeated if you wish to make the hull thicker and stronger. Then remove the excess foam from the interior and you have a waterproof hull.
A number of years ago I did essentially the same thing with the hull of an ocean going WWII tug in 1/48th scale and when finished just poured gasoline into the hull and the foam disappeared. Not necessarily recommended as the fumes are HORRIBLE! But I was young and in a hurry, and it was quick!
 😝 Probably a bit stupid as well and I had to leave it outside for a couple of days to rid it of the fumes. Ended up with an almost completely open 48" hull that never had a single leak in over five years of running in almost all conditions. Even went winter icebreaking with it a couple of times. THAT was a little hard on the bow so didn't really follow up on that idea.
Although it has not been run in probably twenty plus years the hull is still as solid as it was back in the day. The superstructure could use some work as it has fallen from the shelf a couple of times over the years but the hull was not affected.
Even if you do use planking or sheeting it would still be a good idea to coat over it with fiberglass cloth and resin though. You need not make it as heavy in that case though as the wood will give the hull all of the strength it will need.
My shop walls are covered in expanded foam . 😀

-
15 minutes ago, lmagna said:
If you are going to RC this ship then you need not plank or sheet the hull at all. You can fill in the areas you presently have between the existing bulkheads with expanded Styrofoam. You can source this in a number of forms and it is both easy to work with and can even be free if you look around. Then all you need to do after filling in the spaces is to sand the hull to shape using the present bulkheads as guides. When properly shaped use some spackle for a final smooth hull shape and correct errors, also sanded down to as thin a coating as you can. Then use some fiberglass cloth and resin, (Epoxy unless you left a relatively thick layer of plaster) and coat the entire exterior. This can be repeated if you wish to make the hull thicker and stronger. Then remove the excess foam from the interior and you have a waterproof hull.
A number of years ago I did essentially the same thing with the hull of an ocean going WWII tug in 1/48th scale and when finished just poured gasoline into the hull and the foam disappeared. Not necessarily recommended as the fumes are HORRIBLE! But I was young and in a hurry, and it was quick!
😝 Probably a bit stupid as well and I had to leave it outside for a couple of days to rid it of the fumes. Ended up with an almost completely open 48" hull that never had a single leak in over five years of running in almost all conditions. Even went winter icebreaking with it a couple of times. THAT was a little hard on the bow so didn't really follow up on that idea.
Although it has not been run in probably twenty plus years the hull is still as solid as it was back in the day. The superstructure could use some work as it has fallen from the shelf a couple of times over the years but the hull was not affected.
Even if you do use planking or sheeting it would still be a good idea to coat over it with fiberglass cloth and resin though. You need not make it as heavy in that case though as the wood will give the hull all of the strength it will need.
I would love to see how that's done ! Plans call for fiberglassing the hull with 2 oz cloth once it's planked and sanded .
-
19 hours ago, popeye the sailor said:
another point to make here is that the bulkheads are too far apart........there should be more of them to decrease the spacing. you can get Obechi wood from Billings.......it's thinner and a lot more flexible. I've never been a fan of Balsa, mainly due to the fact that it dings real easy. now if you don't feel like going that route, you can resort to basswood sheet, covering the hull frame in sections. you will need to anchor the frame back onto the board though, to insure that the hull will be warp free and straight. I just did this to a Dumas PT boat. they supply plastic sheets to cover the hull frame, but I thought that cutting the plastic to shape would be a lot of work. so I went with basswood sheet. I used 1/16 so that I could get good contour of the frame. I have a log going on this so you can see how I did it.
Do you think these will work work with the hull shape I'm working with ?

-
10 minutes ago, popeye the sailor said:
another point to make here is that the bulkheads are too far apart........there should be more of them to decrease the spacing. you can get Obechi wood from Billings.......it's thinner and a lot more flexible. I've never been a fan of Balsa, mainly due to the fact that it dings real easy. now if you don't feel like going that route, you can resort to basswood sheet, covering the hull frame in sections. you will need to anchor the frame back onto the board though, to insure that the hull will be warp free and straight. I just did this to a Dumas PT boat. they supply plastic sheets to cover the hull frame, but I thought that cutting the plastic to shape would be a lot of work. so I went with basswood sheet. I used 1/16 so that I could get good contour of the frame. I have a log going on this so you can see how I did it.
Great to see you post here been watching your PT build and others for awhile with envey . If I added more bulkheads it would cause problems later with the mounting running gear , of course I could be wrong .
- mtaylor, Egilman, popeye the sailor and 1 other
-
4
-
Planks are off just have to clean up the stringers a little . Going to see if I can find the correct length planks next .

-
2 planks off 2 more to go no damage to the bulwarks but don't think the planks are going to make it . I at least know how to remove parts now .

-
Started to slowly remove the planks , taking my time .

- Egilman, Cathead, popeye the sailor and 6 others
-
9
-
 Looks like removing a couple planks is the solution I have CA debonder and alcohol . Going to think over , took a couple more pictures in what daylight was left .
-
6 minutes ago, lmagna said:
It's up to you really. It can be done either way, but after building a number of long narrow hulls over the years, (For RC use) I prefer to keep them attached to the building board for as long as possible. It is disappointing to go through the building of a hull for a destroyer or gunboat, or in this case a sub chaser and find the hull has taken the shape of a pretzel or banana. For some reason it does not seem to be as big an issue with wide beam shorter vessels like fishing boats or tugs.
Makes sense to me once I figure out what to do with the planking I will glue it back on .
-
9 minutes ago, lmagna said:
Interesting build Legion. I have always liked the 110 foot sub chasers.
Not only would I also recommend backing up and properly fairing the frames like VTHokiEE said, but I would also get a building board to mount the frame on while planking or sheeting or whatever you want to call it. This vessel has a long narrow hull that is very easy to warp or twist while building and of course you want to avoid that. After you get the entire hull covered you can cut it off of the building board and work with it in the normal way.
I really appreciate you all trying to help me out , really should started a build log here before I even started . I had it glued on a building board but the instructions specified I remove it before planking as you can see . Can always glue it back on I suppose .

-
16 minutes ago, VTHokiEE said:
Did you glue them with wood glue/PVA? If so I’d recommend using isopropyl alcohol and removing the planks and then fairing the frames. I can point you to a link if needed on fairing.
It is frustrating, but you’ll be happier in the long run doing it.
I used Gorilla wood glue on the edges of the planks and Ca glue to glue the planks to the bulkheads , there are only 4 planks installed 2 on each side . The first plank is attached to the stringers so there is nothing to be faired as far as I know .
-
2 minutes ago, VTHokiEE said:
Looks like a very interesting build.
Regarding your planking issues, did you fully fair the frames? I can't fully tell from the pictures, but there seems to be a good bit of laser char on the frames which may indicate that you need to fair the bulkheads more to get a better run for your planks.
In hindsight I should have but the instructions made no mention of doing so . Also the plans calls for 36 inch planks and I was supplied with 30 inch planks so I had to splice 2 together to get the correct length .
-
1 hour ago, Cathead said:
Interesting. Those aren't the most helpful instructions I've ever seen. They say nothing about tapering, though my instinct is that it would help (though without actually handling the model I don't really know).
I think I'd start by pre-bending the planks and see if they sit right (as that can be undone, unlike tapering). Some people soak them and clamp them in place to let them dry, others apply dry heat with a planking iron or other source, then clamp them in place, or even both (soaking followed by heat application). Either way, again, the idea is to get the plank to hold the shape you want before glue is used. If it won't sit right on its own, it'll put too much tension on the glue joint, especially with so few frames providing support. If you're wondering how to do the clamping, there are really good photos and examples of different methods in the tutorials (my favorite is to use simply office-supply binder clips).
The good news here is that all you're going for is a solid surface; the planking doesn't have to "look" good as it gets an overlay, so you have a lot of leeway. Unlike, say, if this was a wooden sailing vessel hull where accurate planking runs are a core part of the appearance. Try bending a few planks and let us know how it goes!
Edit: Meant to say, if/when you start a build log for this, let us know here so we can follow you over. Otherwise it can be easy to miss a log being posted in all the activity on MSW.
Hi I went ahead and started a build log , the planks seem to be bending fine only the 2 rear ones aren't contacting the bulkheads .
-
The planks aren't contacting the 2 rear bulkheads still trying to figure out why .

-


Edmund Fitzgerald by SomethingIsFishy - FINISHED - Lake Freighter Minis - approx. 1:550 - CARD
in - Kit build logs for subjects built from 1901 - Present Day
Posted
That's really cool I've been looking for a model of that ship , never built a paper model .