
HOLIDAY DONATION DRIVE - SUPPORT MSW - DO YOUR PART TO KEEP THIS GREAT FORUM GOING! (89 donations so far out of 49,000 members - C'mon guys!)
×


Henke
-
Posts
190 -
Joined
-
Last visited
Content Type
Profiles
Forums
Gallery
Events
Everything posted by Henke
-
 Welcome to MSW, Woodartist. This a very friendly forum where questions can be asked and advice will come quickly. At this early stage be vigilant for any warping and try to correct before continuing. It could be my eyes, but on your last picture it looks as if there is some kind of warping, but maybe that picture was taken before you relieved the pressure from the flooring. By the way, it looks as if you have borrowed my mitre box whilst I was asleep tonight. This arrangement is probably OK since you are living with 8 h time zone behind me but I want it back now because I plan to spend the day at my shipyard today 🙂. Kind regards Henrik
 -
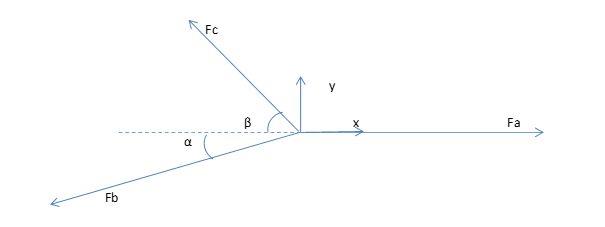
I think the bow/arc is caused by too much tension in the crowsfeet in relation to the tension in forestay preventer attaching to the fore mast. Maybe it is difficult release tension in crowsfeet but when the main top mast stay is in place it will pull the foremast backwards. What if you pull the foremast back below the trestle tree? Does the bow/arc improve? We want a nice tension in the crowsfeet without any sagging but the angle/bend of the forestay preventer should be small compared to the angle between crowsfeet and forestay preventer. If we look at this as a mechanic problem there are three forces which act on the point where the crowsfeet connect to the forestay preventer. Fa is the force in the forestay preventer towards the bowsprit, Fb the force in the upper part of the forestay preventer stay connecting to the foremast and Fc which is the force in the crowsfeet. What we want is an angle alpha much smaller than the angle beta. The only forces which act in the y-direction are Fb and Fc. Applying Newton's first law one can prove that Fc/Fb=sin (alpha)/sin (beta) I would try to increase Fb (tension in the forestay preventer attaching to the foremast). I hope I have not been too long-winded. The NRG motto is "Advancing Ship Modeling Through Research" 🙂. Thanks Ian for posting. This will help me when I eventually reach rigging of my Agamemnon. Regards Henrik
-
Hi Ian, This looks really good. Could you please post a close-up picture of the fixing of the crowsfeet the fore preventer stay? In Allan Sandercott's build log http://www.sandercott.ca/modelships/agamemnon/agamemnon_build_page7.php there is a picture of the crowsfeet attachment to the preventer stay. Is it possible to create a little bit more tension in the preventer stay by applying a bit more pulling force from the upper end of the preventer stay? The "arc/bow" is created too little force taken by the preventer stay above where the crowsfeet are attached too the preventer stay compared to what is taken through the crowsfeet. If you can achieve this the tensile force elongation in the upper part of the preventer stay above the the crowsfeet attachment will take off force from the crowsfeet. This was difficult to explain. I will try make an illustration. I will come back on this. I have to go to work now ☹️. Regards Henrik
-
Jörgen, you have a fantastic attention for details. It is really inspiring to see! Regards Henrik
-
Thanks for the information Robert. 1:48 may explain my question about the tapering of planks towards the stern. May I suggest, and this is sounding as if I am a moderator of this forum, which I am not 🙂, that you to your title of the log add manufacturer and scale (although it is not mandatory) according to: How to Name your build log? We have a "Build Log Naming Convention" to enable the Search Engine to sort them Alphabetically by "Ship's Name" and/or "Builder's Name". We urge you to follow the guidelines below to make this work properly. If you don't, a Moderator will do it for you anyway - so you may as well get it right first time and save us the trouble. To Edit your Build Log Title - simply go to the FIRST post of your Build Log and click on the Edit button in the bottom-right corner. The Title Box is at the top in the Edit Box. This is how your Build Log Title must be set up for Static Wooden Ship Kits : HMS Victory by Fred Bloggs - Caldercraft - Scale 1:75 - 1805 as she appeared after Trafalgar - First wooden ship build The first section in RED is MANDATORY and must be done EXACTLY as shown to enable correct Sorting by the Search facility. Use your Username exactly as it is registered. Note there are SPACES either side of the dash following your Username. I am now a follower of your log (don't feel the pressure). Remember that we are very friendly and positive at MSW. Questions can be asked and advice will be given. Hang on now Robert! Kind regards Henrik
-
Welcome to MSW Robert1377. What is the scale and which manufacturer has done the model? Regards Henrik
-
Well done and thanks for posting such nice pictures. This will be interesting! Once again I notice that first planking can be done in different ways and work fine anyhow. I am building Caldercraft´s Agamemnon which is slightly bigger boat than Bounty. Instruction stated that planking should start from main deck and downwards, an instruction which I followed. When planking turned around onto the underside of the transom planks had to tapered quite severely, one thing which also drawings pointed out. Looking at the last picture from your latest post you do not seem to have done any tapering of the planks in towards the stern. Could it be because you started from below and worked yourself upwards? When my downwards planking reached the upper end of the stern post I started planking from the keel and then closed up the hull. What does your the instructions say? Anyhow, it looks very good. I think you did a good job with bow also although I think filler blocks at least in front the first bulkhead would have helped. Regards Henrik
-
Samuel, I use matt polyurethane varnish. And Samuel, remember that you can use your build log to ask for advice as you just did. MSW is a very friendly forum. Regards Henrik
- 13 replies
-
- 2
-

-
- constructo
- bounty
- (and 1 more)
-
Hi Christian, Thanks for the comment regarding ruler or coin but I then need a long ruler or big coins 🙂 (at least in her present stage). Aggy's hull is about 90-95 cm equivalent of the average length of a three year old child 👩🚀. Then to the question about reference literature and drawings. I actually spent some time this very weekend searching the internet looking for reference literature but I did not find anything particular on Agamemnon. I found books about HMS Victory (of course) but also HMS Diana but nothing on Aggy. I therefore raise the question if there are any knowledgeable people on MSW who could suggest suitable reference literature for my Agamemnon build? Aggy with reference object (1 liter) Kind regards Henrik
-
Just a short posting from captain Slow 🙂. The shipyard activity has been low the last couple of weeks due to summer vacation with my family. First planking on on port side is almost finished and starboard (not show on this picture) is done 2/3. Regards Henrik
-
How could I miss your build log? Such beautiful planking! My eyes get wet when I see your planking 🙂. Is it a single or double planking hull? Now you have another follower. Kind regards Henrik
-
Hi David, Thanks for sharing. It gives ideas for the future coppering of my Agamemnon, which in my slow building tempo probably will not take place in a year's time. From the pictures, I agree that the coppering side starting from waterline looks better but perhaps it is because your coppering skills has improved after practicing many hundreds of plates later? What if you had started the second band earlier on the first side you did (5-8 rows of copper plates closer to the keel than you did)? This approach may have required a third band but the passage between the bands would perhaps be more harmonic. I do not know which method is the most accurate to Cutty Sark's actual or original coppering but maybe someone else at MSW knows? Anyhow, your model looks great and I follow your build with great interest. Thanks once again for sharing, David! Regards Henrik
- 133 replies
-
- 1
-
-
- cutty sark
- mantua
- (and 3 more)
-
This will be interesting Vince. I will take a seat and watch with interest. Good luck and let's hope it will be a happy ship. Regards Henrik
-
Hi Eric, Thanks for the tip regarding second planking with rather short strips. I will try that and I hope your medical issue with your hands will be better so that I can follow the progress of your build. From your pictures it looks as if you are a year ahead of me (at least). Regards Henrik
-
No coppering for me yet ETNZ but hopefully I can start second planking soon. I am a slow builder but my summer holiday starts on Friday. Unfortunately the Admiral has ordered me to do some holiday travelling with her and the navy cadets so dry dock activity will probably be low for the coming weeks. Regards Henrik
- 44 replies
-
- 1
-
-
- agamemnon
- caldercraft
- (and 1 more)
-
It looks great and far more exiting than watching paint dry . Well done! Regards Henrik
-
Thanks for the encouragement ETNZ. Caldercraft's Agamemnon is such a nice model and I will enjoy this kit for a long time. My target is 2025. That is what I call value for money 🙂. Regards Henrik
-
Time runs and it is now two weeks since I last did a post. First planking is still going on and will so for another couple of weeks. Some parts of the build result I am very happy about and others not. In general planking towards the aft looks a lot better than at the bow. The bow can be saved by filler and sanding but before that I will not show any pictures of the bow. That would be too embarrassing 😐. Instead I would like share some thoughts which came up yesterday about this problem. Planking of the a hull of the size of Agamemnon has its challenges but also advantages. One row of planks stretches for about 850 mm. My apologies for not translating into imperial units 🙂. I have not got a clue. I have divided this length into typically three strips of alternating lengths. A 200-300 mm long strip is easy to handle and can be shaped and bent in practical way. Yesterday I started thinking why do the bow look so crappy when aft looks so good? My explanation is that I have started planking from bow to aft. When I come to the aft I tend to better see how each individual strip should be tapered taking into account the natural curves of the hull. The first strip in a new planking "row" starting in the bow is difficult to get in a correct shape with correct tapering and stealers put in where they should be. I have therefore started planking from midships and going from there aft and towards the bow. The result after that change in planking approach is much better! In the meantime I will consider stripping off the worst part of the bow and as you can see on the second picture planking is closing in on the rudder post Ouhhhh! Kind regards Henrik
-
I also vote for B and I agree with Tony's view on tree nailing. A tree nail as in Tony's picture above is probably 15-20 mm in diameter. In 1:64 scale that is 0.2-0.3 mm. As a comparison the diameter of a modelling pin is typically 0.5 mm. We modelers do tree nails in our decks because we know it should be there but if we did it in scale most of us, at least we who has passed the age of 40, would not see them without a looking glass. In my latest build I have just lightly indicated the deck tree trails with a sharp pencil (soft). My intention is not to offend any tree nail purists 🙂 just saying that tree nails which are flush with the surface in most cases would barely be visible in 1.64 or 1:90 scale. Regards Henrik
- 84 replies
-
- 3
-
-
- sherbourne
- caldercraft
- (and 2 more)
-
If it is the best method I do not know but I use a pen with a long and pointed tip. I find it a bit less messy than pencil. The downside is that the appearance can be a bit "over the top". It also depends on the scale. 1:64 is in the middle. In scale 1:90 or something like that I would seek for a more toned down appearance. I suggest that you try both methods gluing a couple of deck planks on a piece of scrap wood to see how it look like. Then I suggest you kindly post a picture in your build log and we can have a vote 🙂. Another way of toning it down is to "caulk" only on one edge of each plank. And congratulations to a nice build! Regards Henrik
- 84 replies
-
- 3
-
-
- sherbourne
- caldercraft
- (and 2 more)
-
Hi all, Just a short update as first planking progresses. I have now done about 20 planks from deck and down on both sides. I expect it to be another 15-20 from the keel and up. The sides look good, planking of the bow will need some filler before it will look OK and the last planks to the aft bending around the underside of the transom went very well. I have abounded the Amati "Form-a-strip" for my "flame torch" method, see above. I first make the correct bend to the plank and when I am happy with that I once again re-heat the plank to give it the correct twist. Within minutes I have a plank which can be glued without applying any force 🙂. It is now 10 weeks into the build and I have put in about 80 hours. It has been a pleasure so far! It is a very good model. Regards Henrik
-
Made a first try with the first plank coming from "underside" of the transom. I am not entirely happy with the result but I will wait until glue has set. Maybe I will take it away but a bit of sanding and filler may do for the moment. For the bending I used a combination of my own plank bending method and and the Amati "Form-a-strip". The Amati tool sort of chews on the wooden strip thus creating a bend which can be quite sharp or steep. I do not know if I liked it. I need to to practice more I think. Instead I will explain to you my own method. And yes, I know there are many many methods.... Mine is probably a bit brutal and comes with a warning. You can burn your fingers unless you are careful but with a bit of practice it works fine. On the first picture there is a LPG (liquid propane gas) bottle with an attachment which I saved when my brother and I cleared our parents house. My parents were keen cross country skiers and the attachment to the propane bottle is for melting ski wax but I use it to bend wooden strips. I first soak the strip in water for a couple of minutes. I then light the gas at lowest possible power. I move the strip over the front edge of the attachment forth and back until warm and soft. I then start bending while still heating the strip. With a bit of practice the plank is bent and dry in minutes. The trick is to heat the wood as much as possible without over heating the surface in contact with the heated metal. Pyrolysis of wood starts around 250 degrees C. The wood turns dark or black and fumes. What I look for is 100 degree C or a little bit more. The dry substance of wood consists of cellulose, hemi-cellulose and lignin. The lignin acts as glue holding the cellulose fiber bundles together. The theory is to heat the wood so that ligin softens but without over heating. Enough of wood chemistry! My method can probably be derived from some kind of mental occupational injury from working in pulp and paper industry during most of my career 🙂. Anyhow I am sure my parents would smile in their heaven if they could see how I use their ski waxing tool. By the way, yesterday at the dinner table my wife complained saying that I nowadays spend more time with Aggy than I do paying attention to her. I did not know what to answer.... Regards Henrik
-
Hi David, I have one stupid question. The deck planking on the Mantua/Sergal model of yours, is it printed on the plywood sheet or...? I try to see from your pictures but I am not sure. And your build looks very nice. 👍 Regards Henrik
- 133 replies
-
- 1
-
-
- cutty sark
- mantua
- (and 3 more)
-
Mike (aka Kusawa 2000): I have missed your Aggy build log but I will follow it from now on. You have a very nice build ongoing. My intention although is to build her "out of the box" but if you can give me some hints about any inaccuracies as my build progresses I would be more than happy. This is what MSW is for. I have done about 60 h so you are 1940 h ahead of me 🙂. Ian (aka VicNelson) Thanks for nice words and encouragement. I hope I will get some more time at the ship yard this weekend. Regards Henrik
-
Planking continues. I do one row of planks on one side and then repeat on the the other side in order to get at symmetrical look (and do the same mistakes on both sides 🙂). I guess I have done about 1/3 of the first planking on both sides. I am getting close to the point when planking turns onto the underside of what will be the transom, one or to planks more. I am a little bit nervous about that..... Regards Henrik
