


ObviousNewbie
-
Posts
211 -
Joined
-
Last visited
Content Type
Profiles
Forums
Gallery
Events
Posts posted by ObviousNewbie
-
-
8 hours ago, Casi said:
Good job, this scale is not easy.
😃
Thnx!
-
David, thank you so much for this. I usually follow the simple rule: "ropes do not touch", so that's how I got to my idea. Thnx for sharing your links and knowledge, I will visit both sites extensively! I'm a bit ahead of you indeed, and if you need any tips from someone who's not on your level of detailing or experience, I'm happy to help.
-
18 minutes ago, Kyak said:
Hi,
Really nice progress on your model. A question, what did you use to color the masts? I really like it.
Gr.
Thnx! I used Occre’s Sapelli dye. I was in doubt for a while to use walnut dye but after testing that came out a bit too dark for my taste. Hope this helps!
-
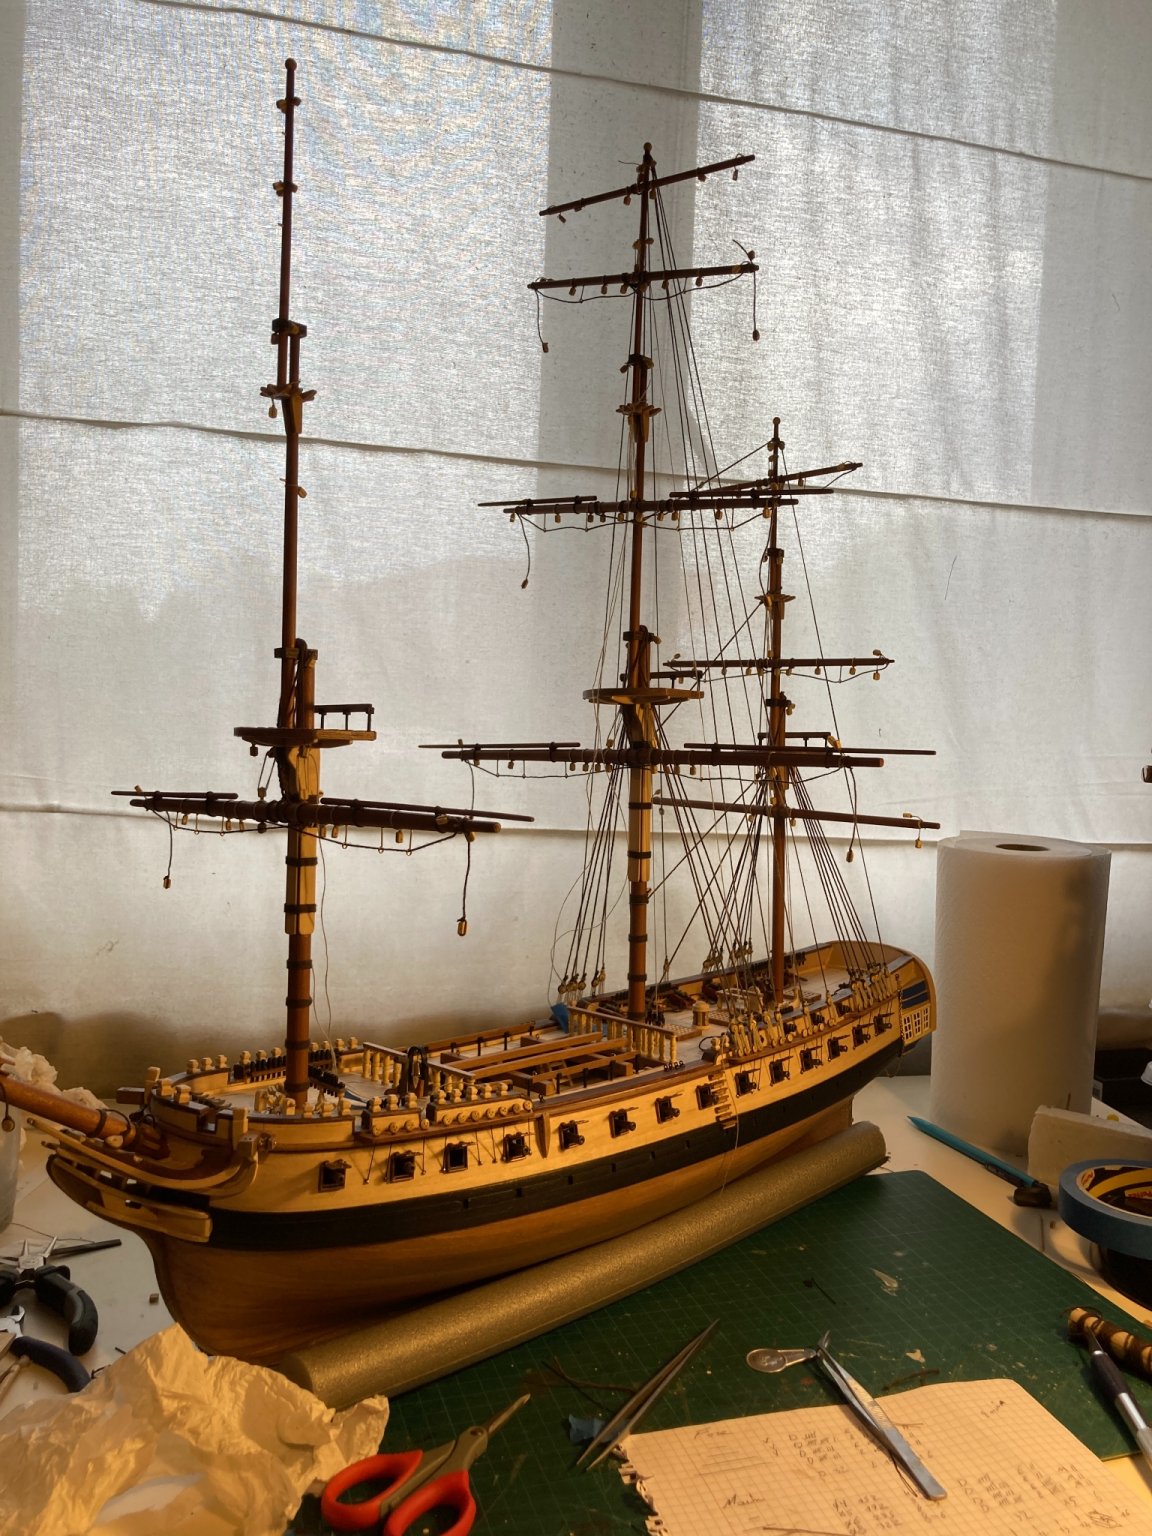
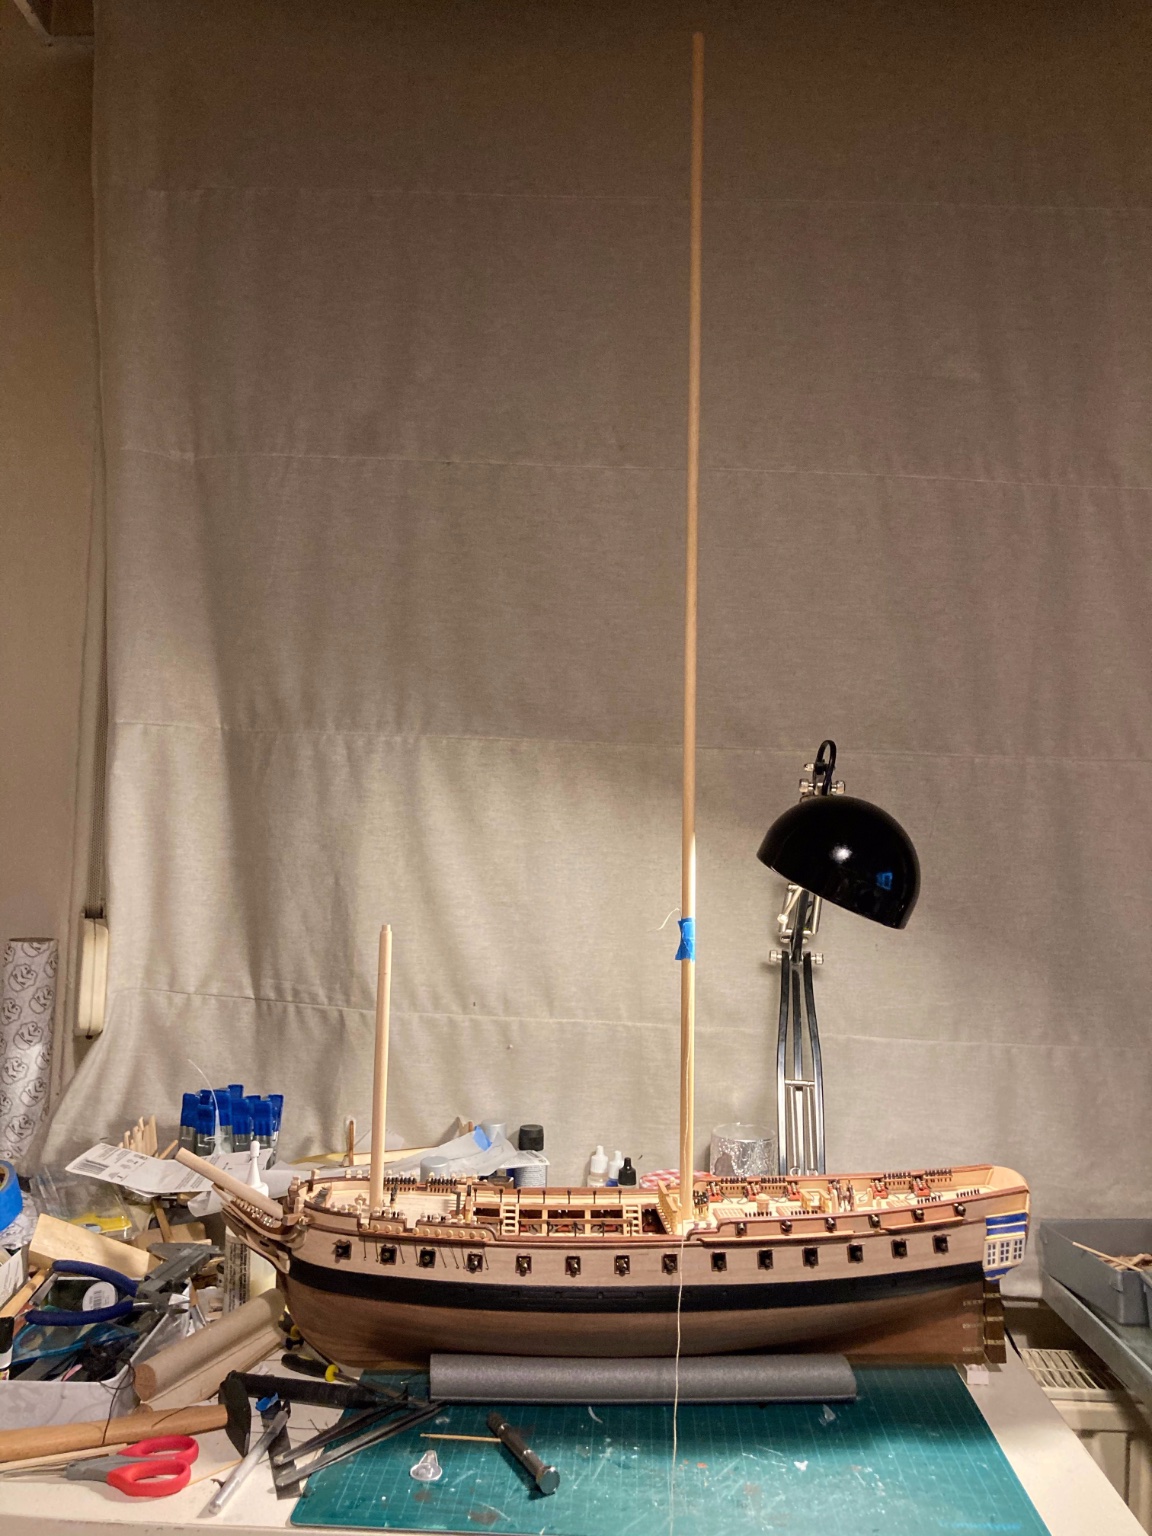
Hi all, thnx for checking in. Rigging continues unabated:
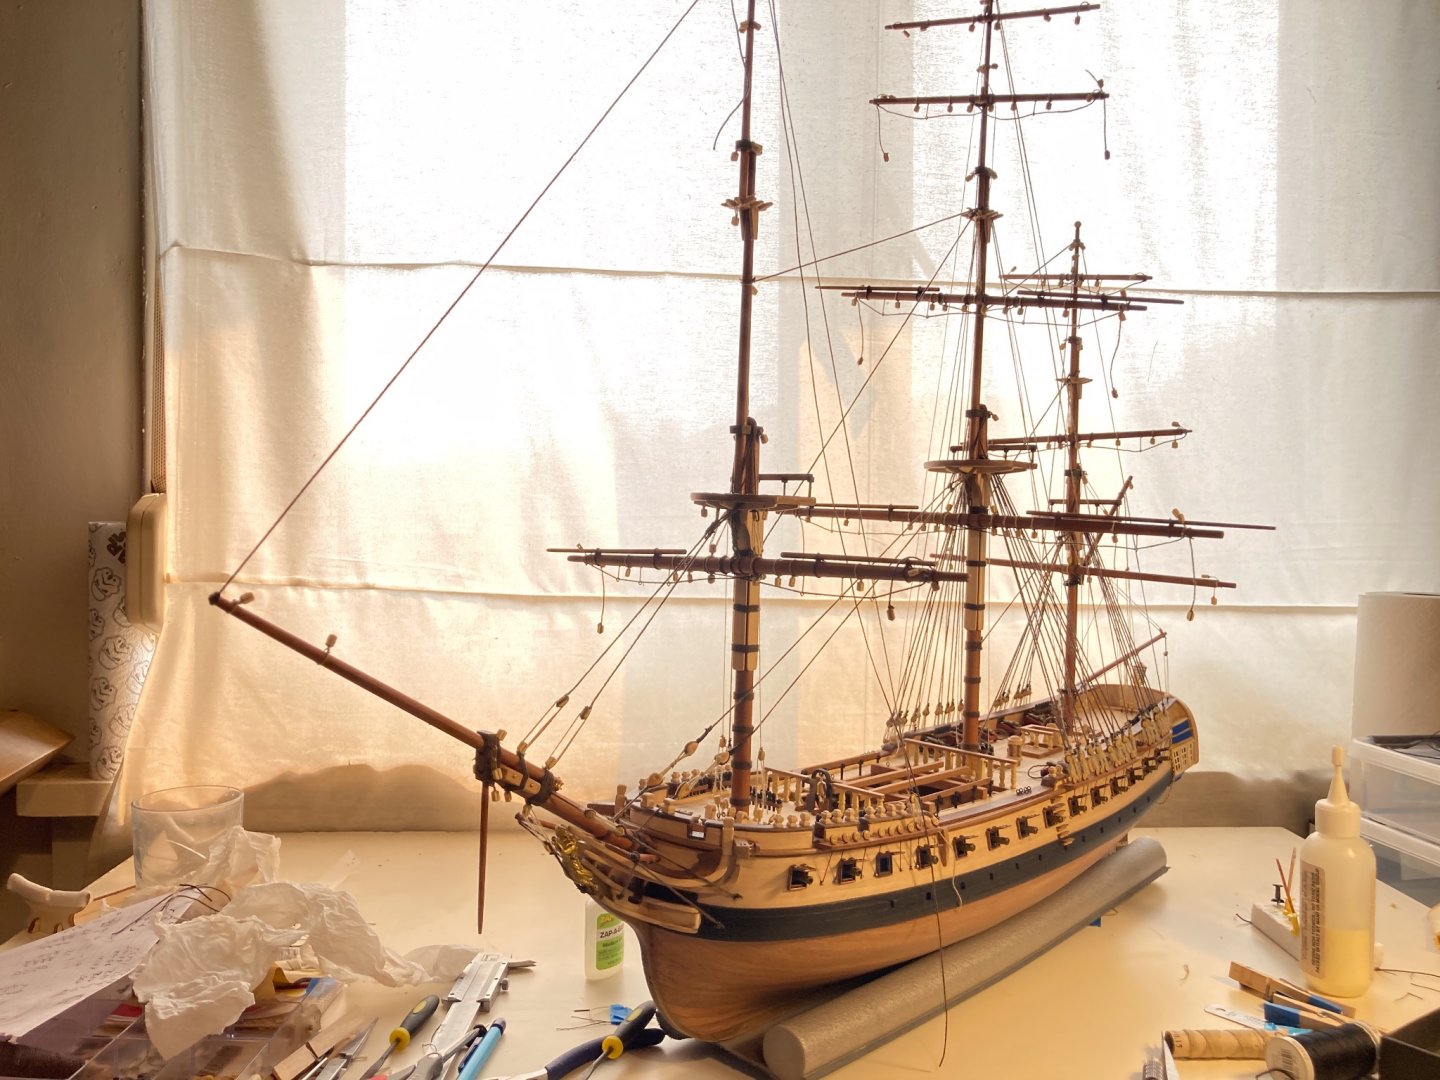
As I'm not following Occr's instructions, it's a bit chaotic rigging lines while keeping an eye n the tension, but that' part of the fun I guess. Installed the gaff already, as my previous experience with Terror taught me doing these things last is a major hassle:
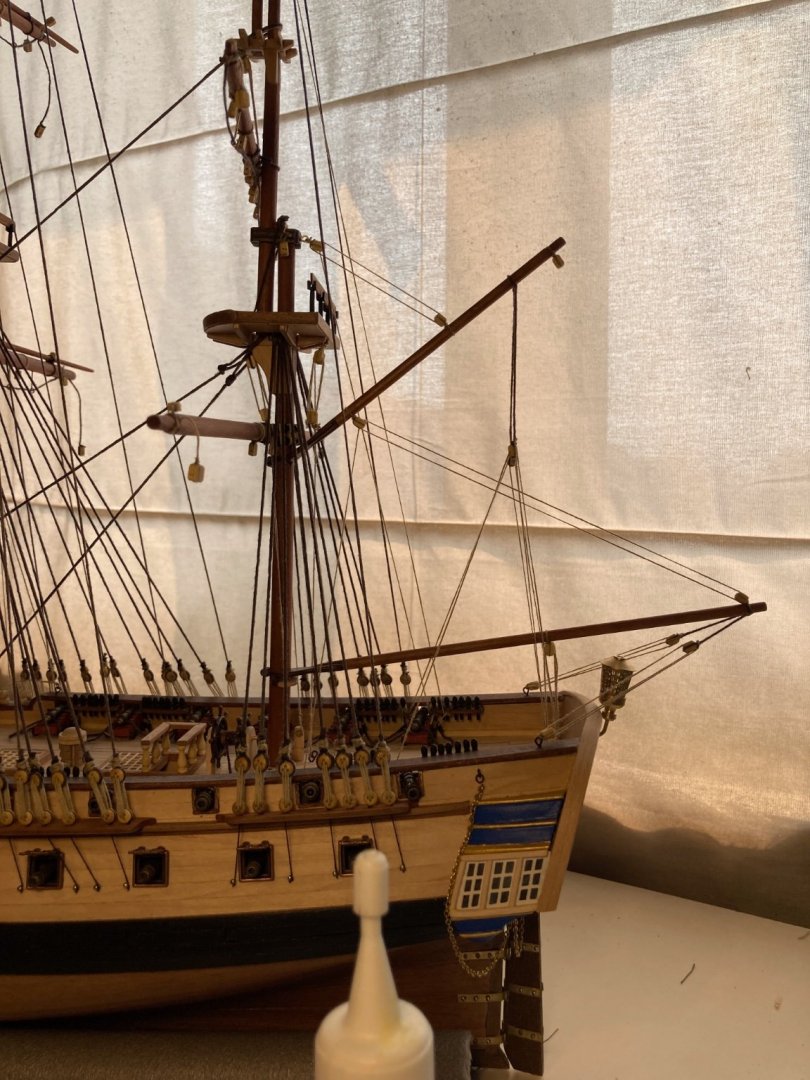
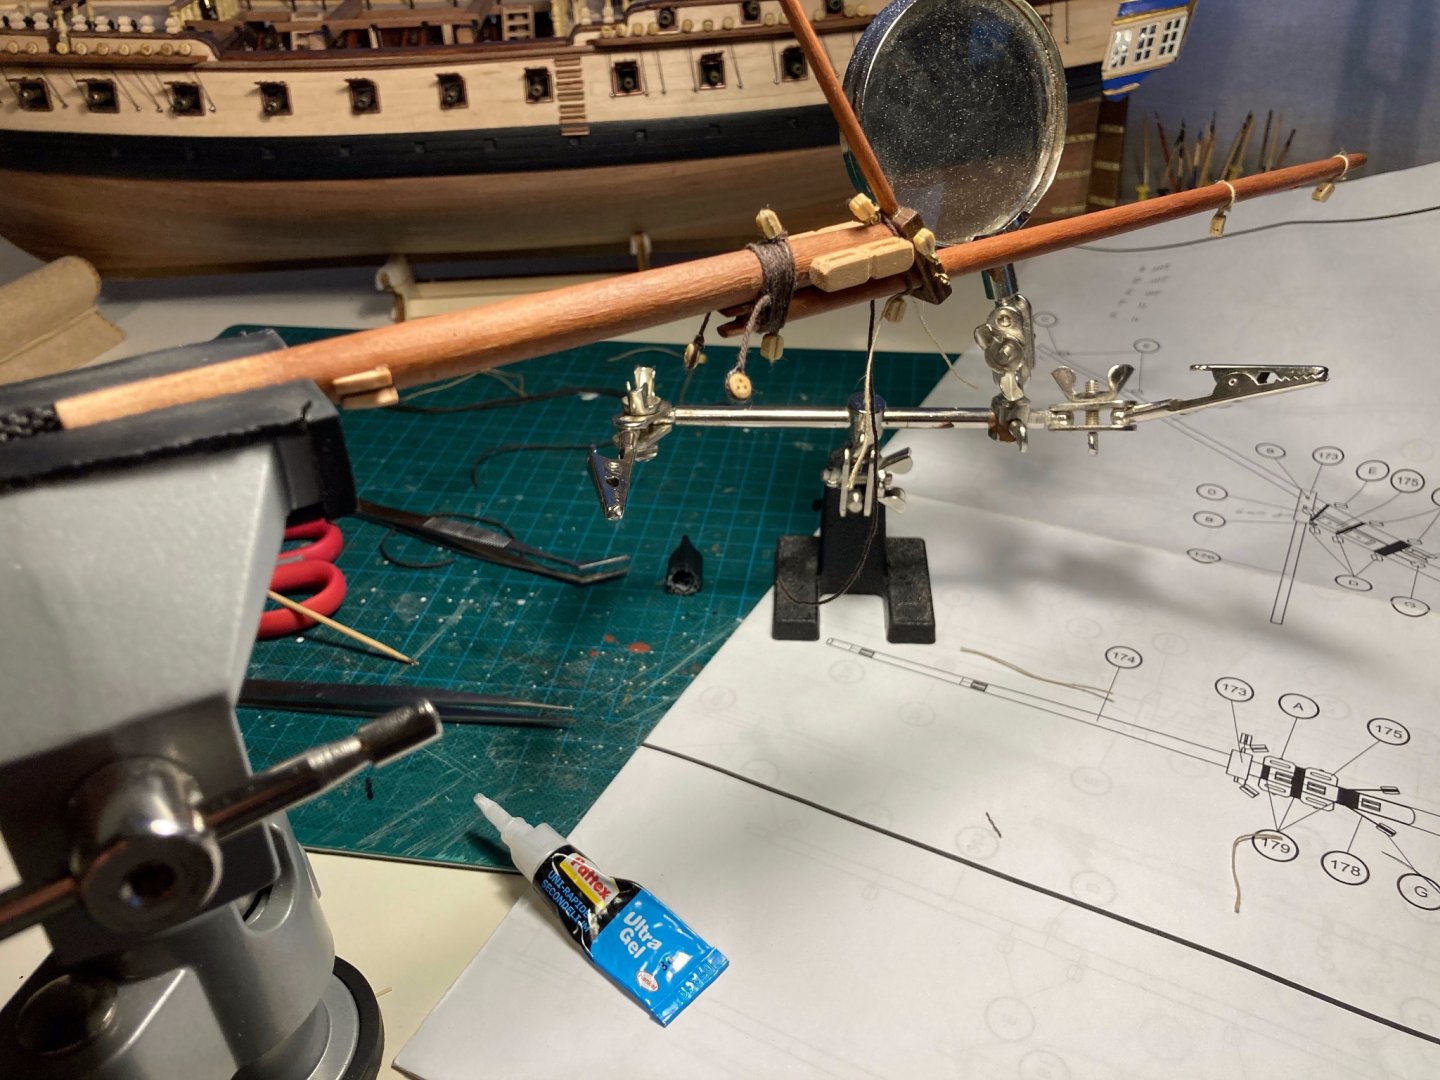
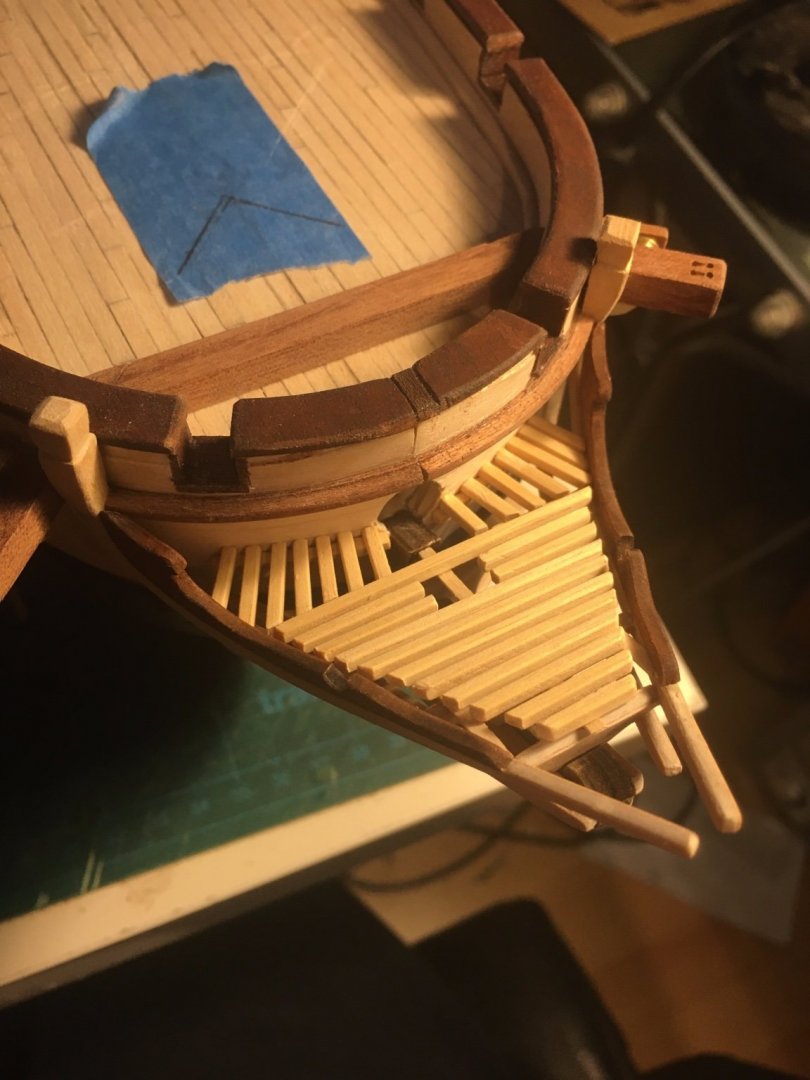
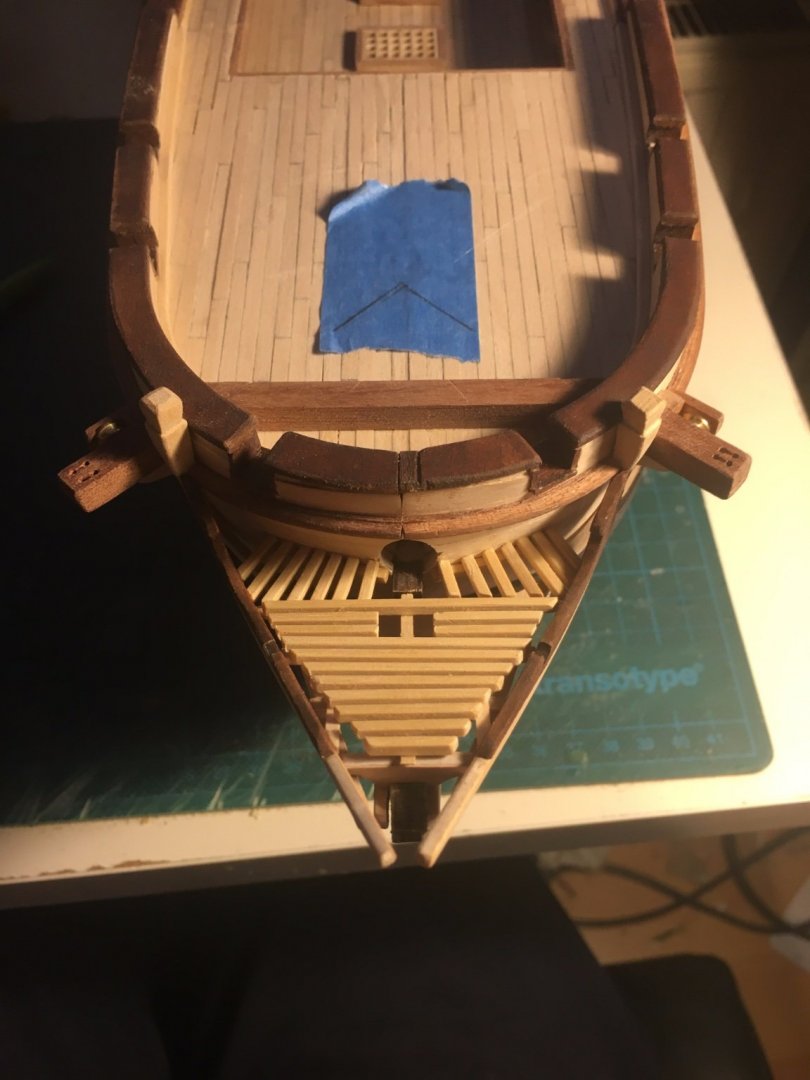
On to the bowsprit, where Occre's instructions are unclear (contrary to their other rigging schemes). Had to improvise and make some creative decisions, but here we are now:
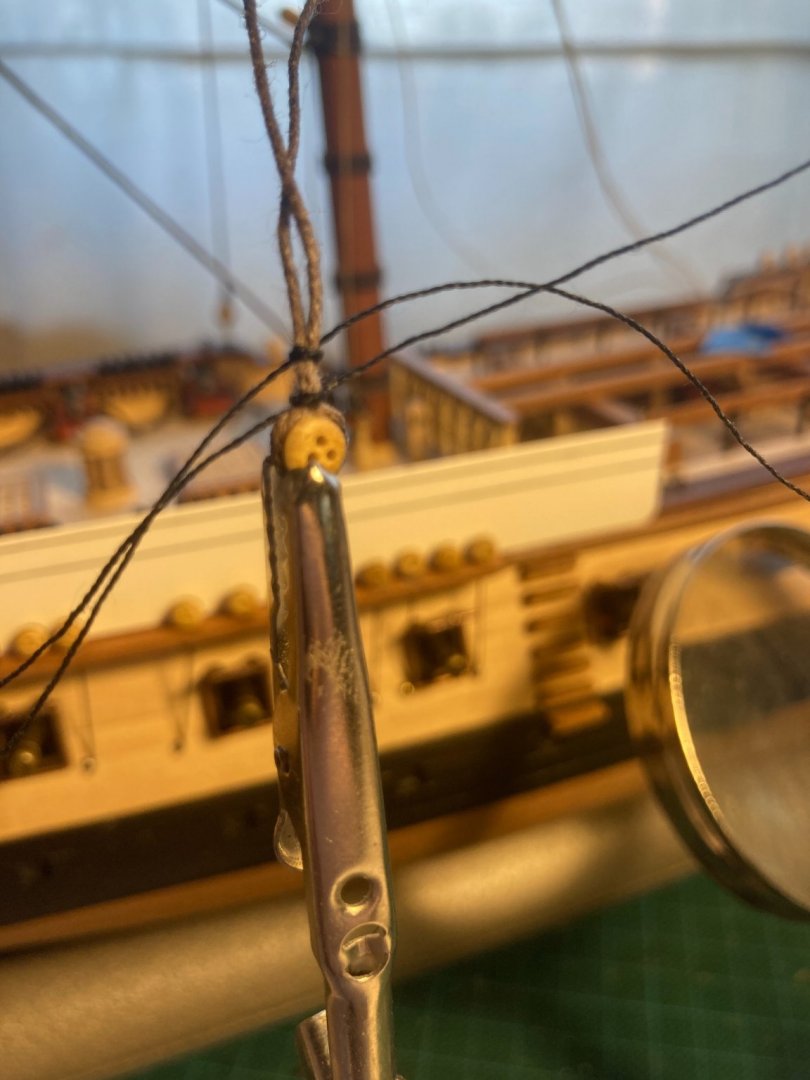
One thing remains a mystery: the lines tying the dolphin striker to the main hull. Occre shows them as dissappreaing into the openings on the top of the stem, but doesn't mention where exactly they need to be tied to. The cleats on the deck are for other lines according to the scheme, so I'm left wondering. thinking about tying the two lines to the points next to the cathead. Any ideas?
As always, thnx for your help.
-
-
Hi all, thnx for checking in. Small update, rigging is in full swing:
Approached the deadeyes in a different way this time, as the results on Terror were not too accurate: too high, too low...
With "varying degrees of success":
I'm still learning, but the result is better than my first attempt 🙂
Stay healthy!
-
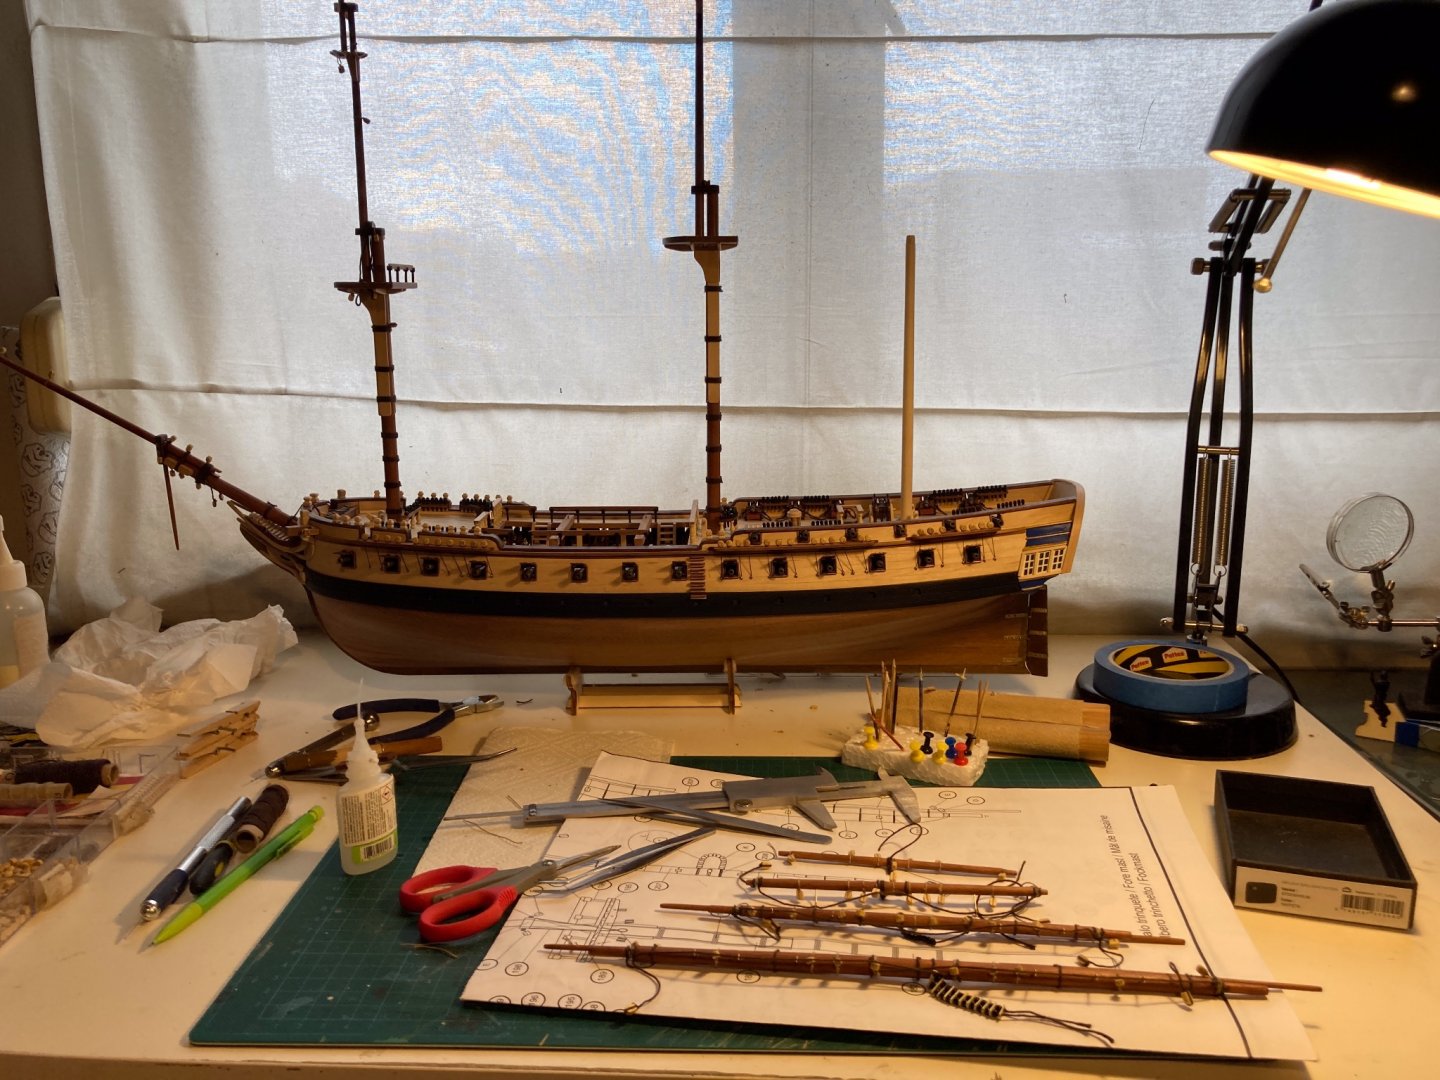
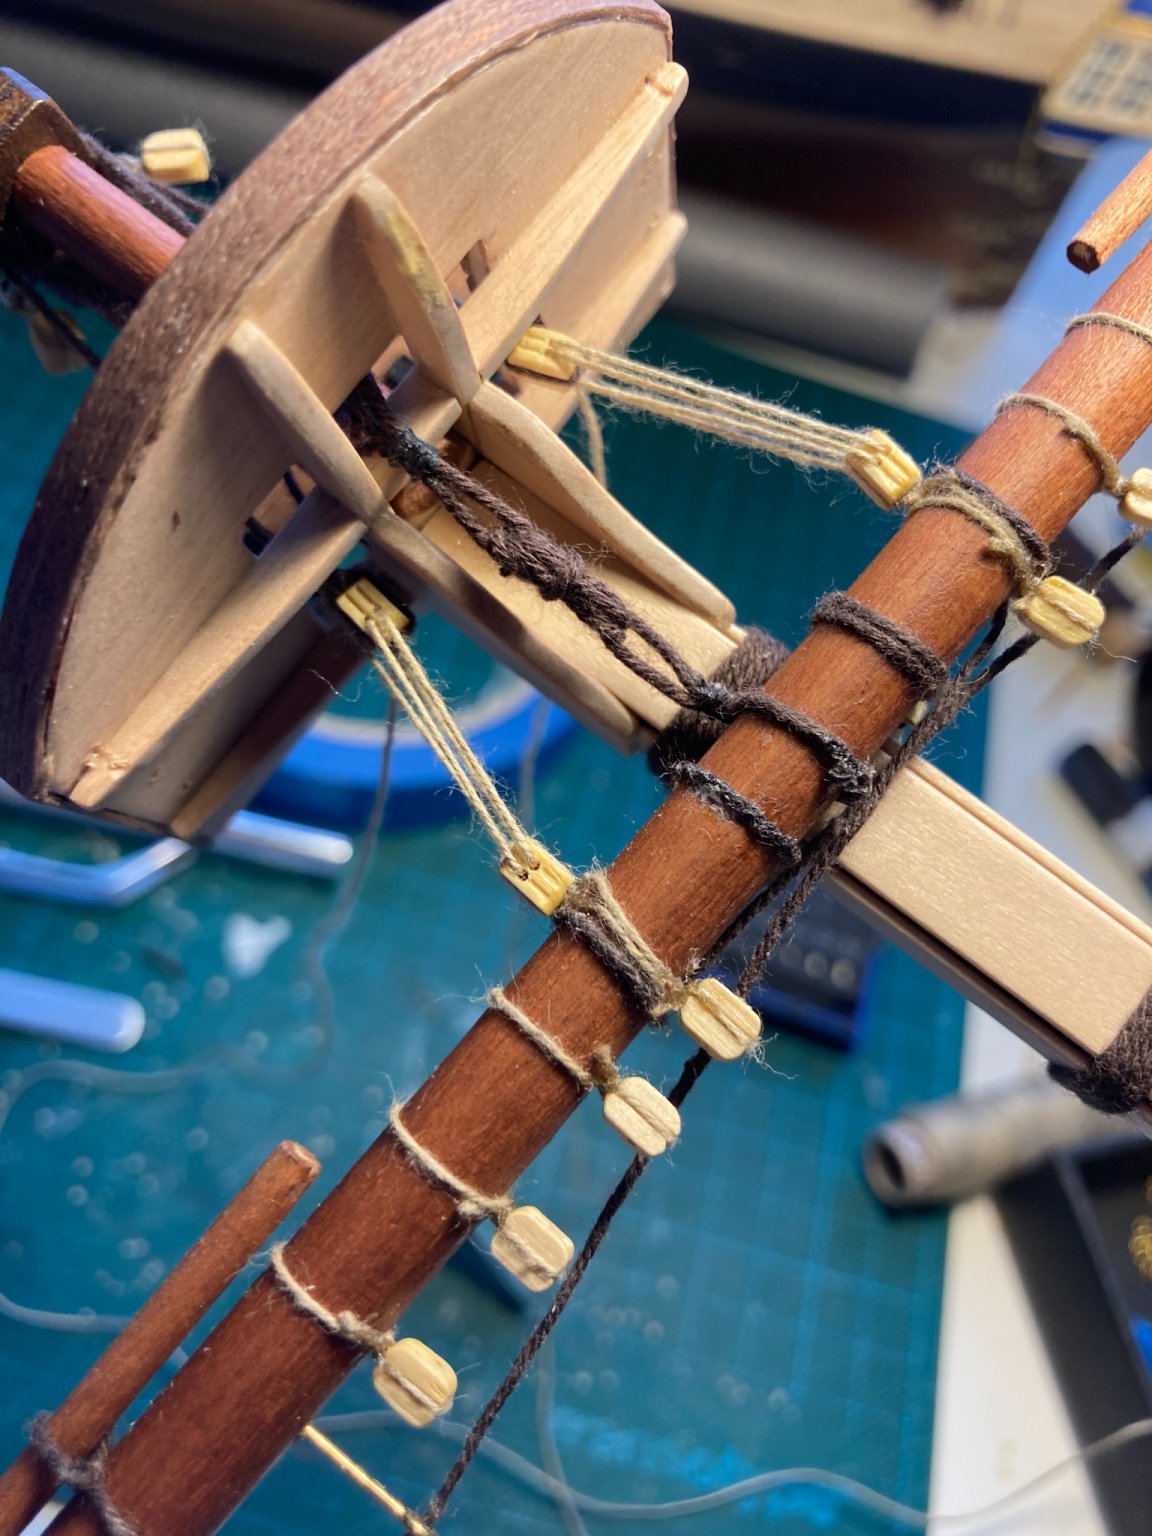
Quick update, decided to rig the halyards and the slings before securing he masts, as I remembered I had a lot of issues with this on Terror. Noted the reference number of the rope onto some blue paper tape, so I know where to attach it to 🙂

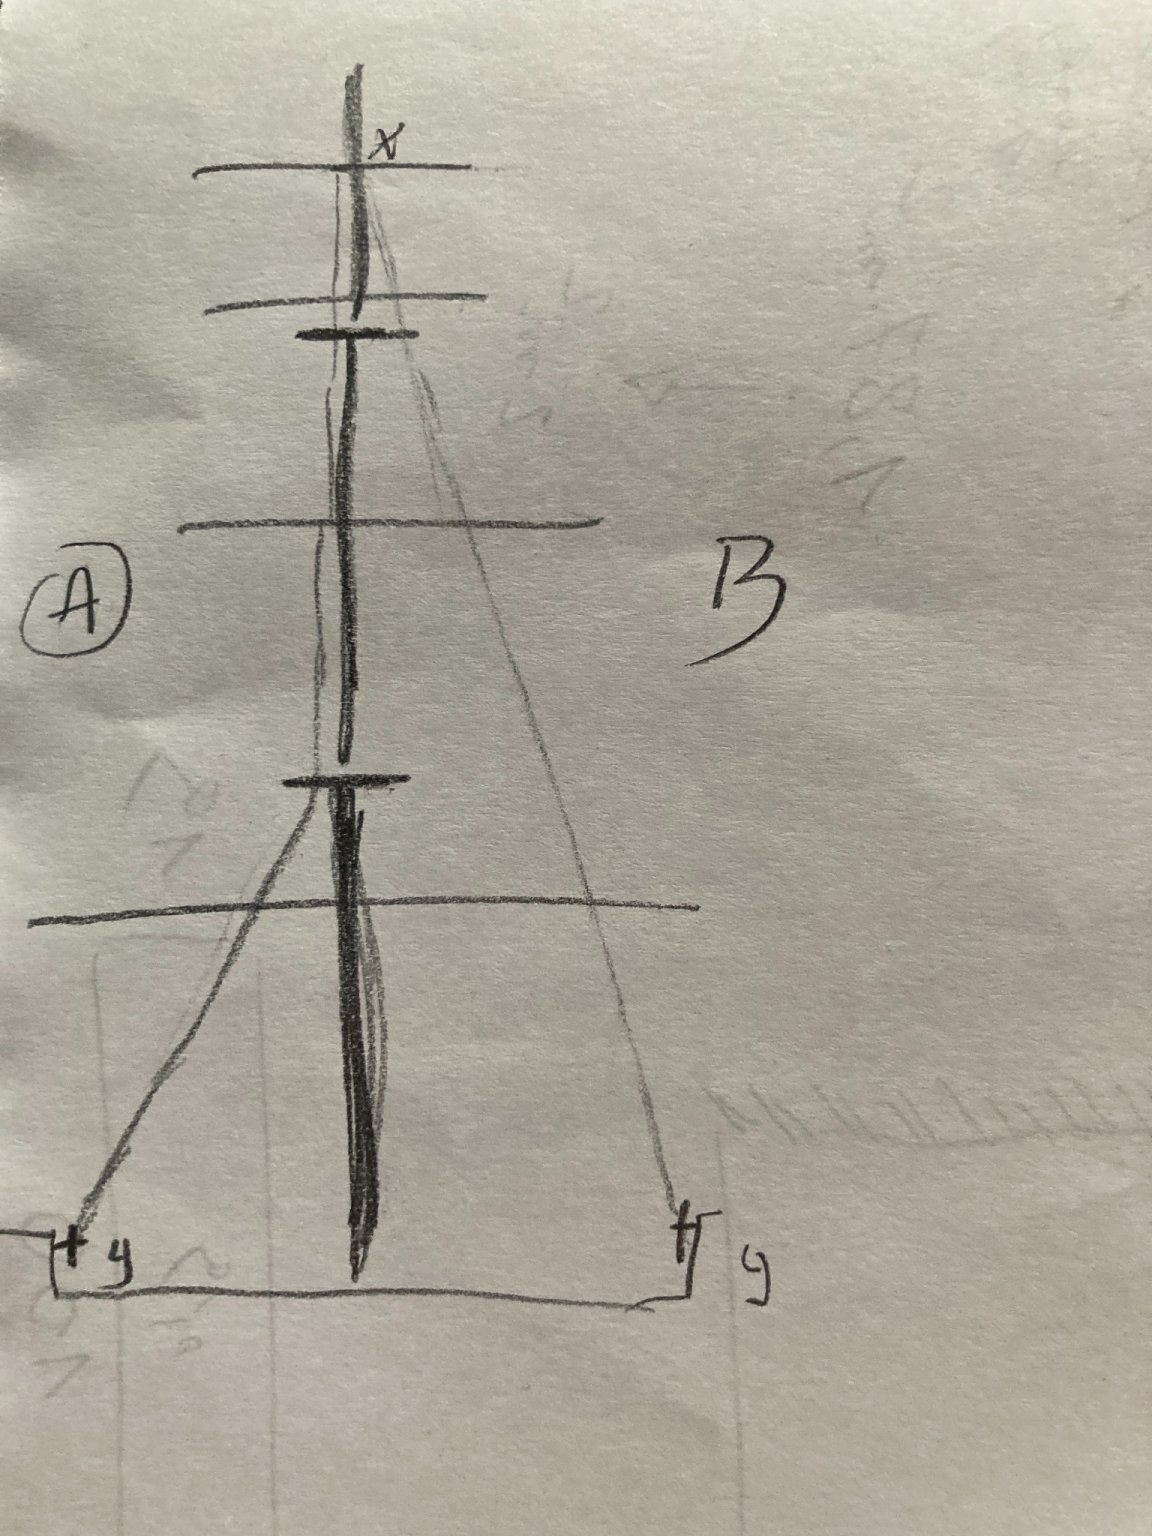
Attached the masts, prepped the backstay for the mizzen mast, when it occurred to me I might as well do the other halyards of the mizzen mast as well. Here's my question: halyards for the mizzen main sails and the mizzen topsail run parallel with the mast, but the mizzen topgalant halyard runs to a belaying pin on starboard. So does this line run in parallel with the mast as well until the lower platform (option A in the very sketchy drawing), or does it go straight to the pinrack (option B)?

Thnx for clarifying this for me. Personally, I think option B makes more sense, as there are no friction points possibly damaging the rope.
Stay healthy, stay safe.
-
-
14 minutes ago, Backer said:
Well
I'm just getting started on rigging, but this is how I'm planning to do it
1 Schrouds mizzen mast
2 forestay mizzen mast3 Backstays main mast
4 schrouds main mast
5 forestay main mast
6 Backstays fore mast
7 schrouds fore mast
8 forestay fore mast
This is on a 16th century ship, but I think the general order is about the same with your ship
-
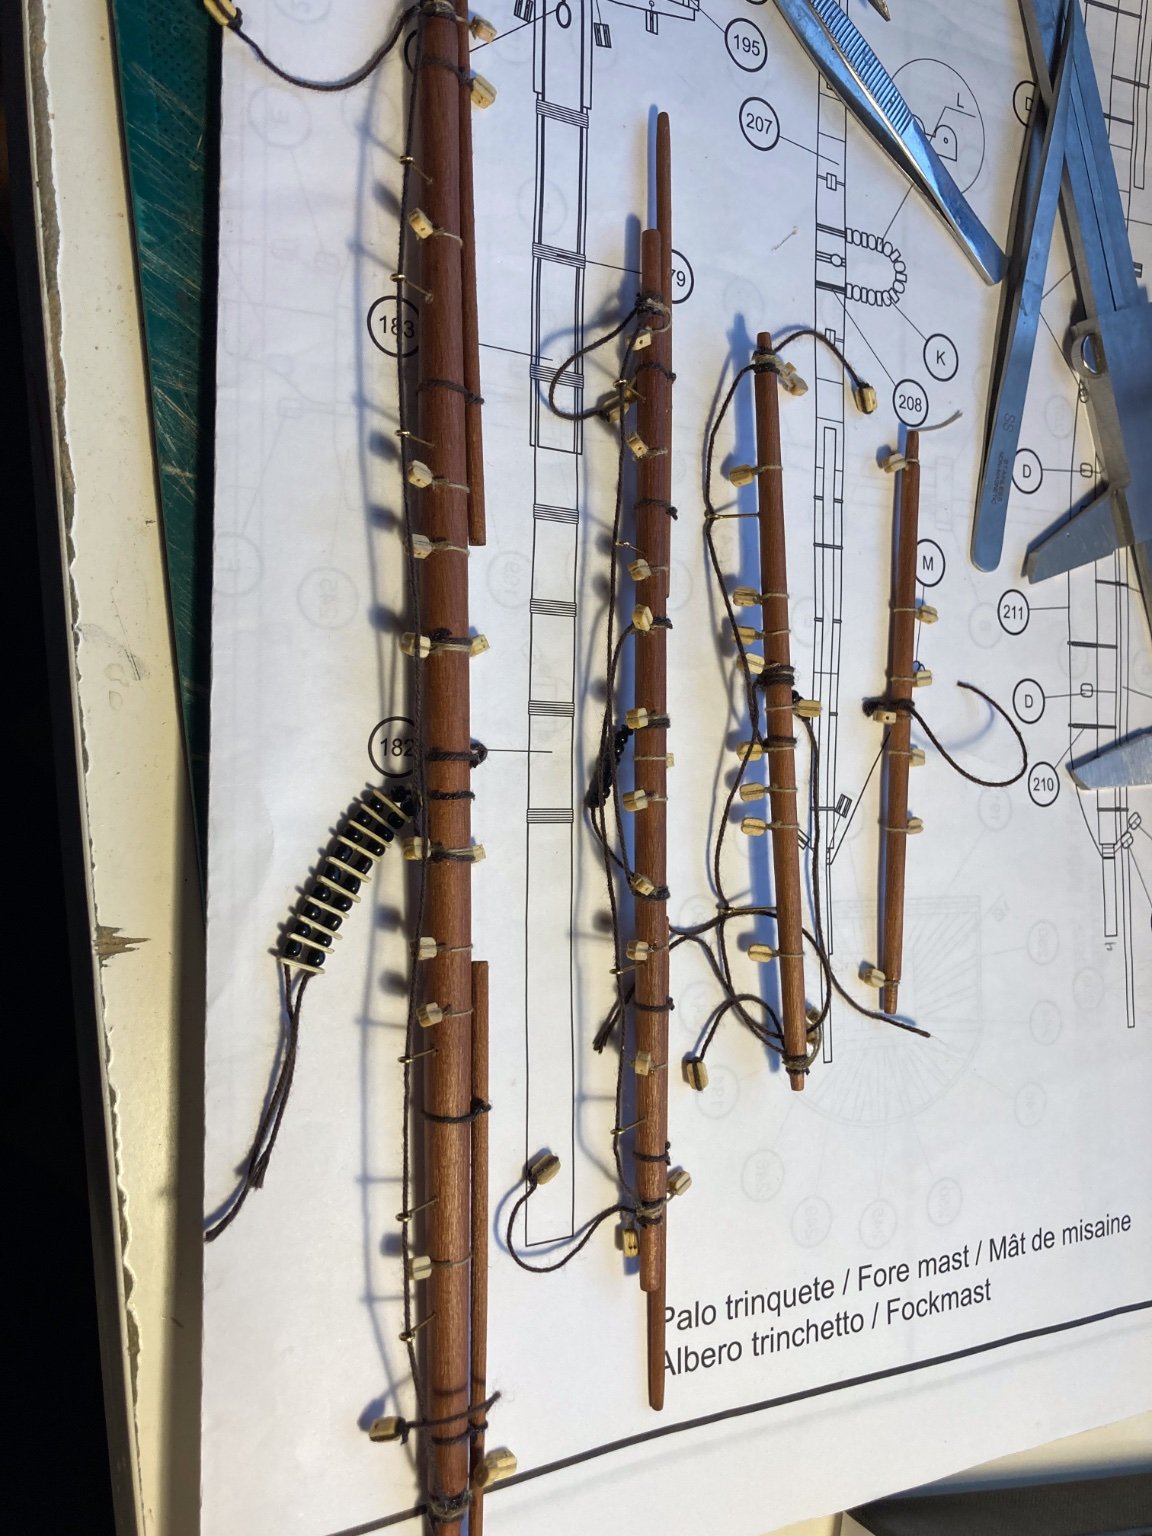
Hi all, thnx for checking in. Busy times at work, work progressed slowly, but the ads are now finished 🙂 Dryfitted them on the masts, using a small messing pin:
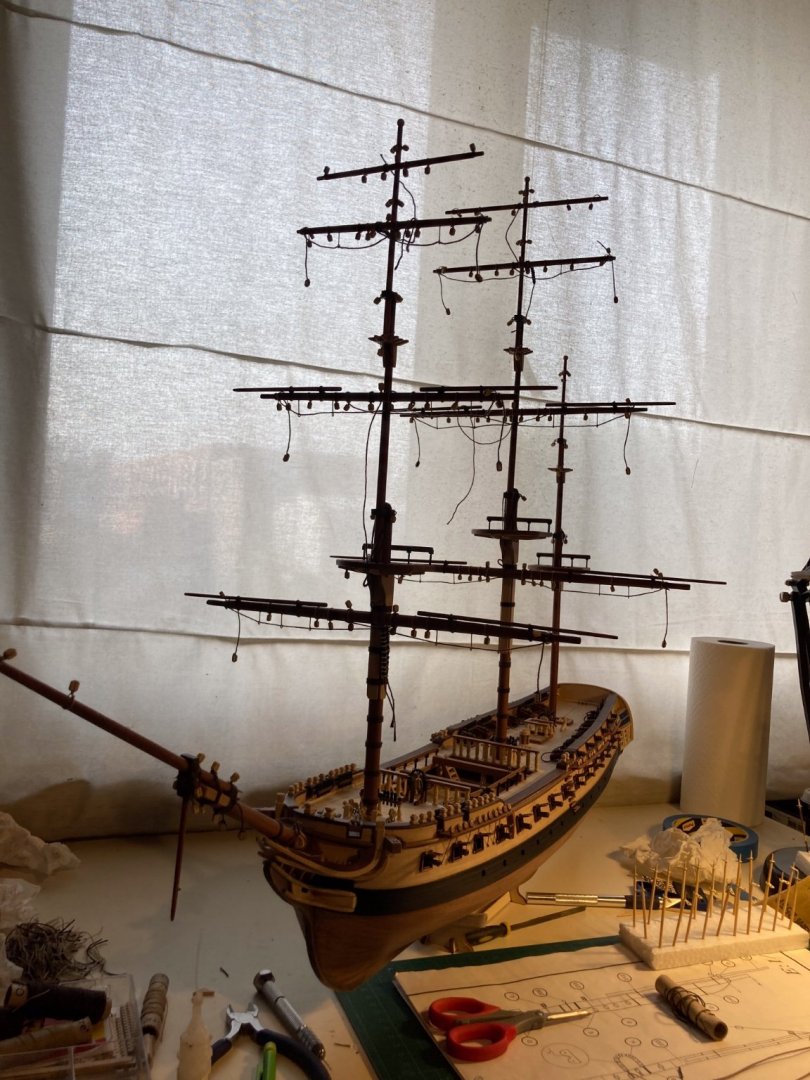
Next step, securing the masts and bowsprit, and then rigging begins in earnest..
Question about rigging: Occre's rigging sequence starts with the shrouds and ratlines, and then moving on to stays. Somehow tension-wise that doesn't make sense. Thinking about making the stays, and then proceeding with the shrouds. Also, tension-wise I saw a number of build logs where the stays move forward, starting from the mizzen mast. That makes sense a swell. Any thoughts/comments on this?
-
Hi all,
I'm currently building Occre's Frigate Diana (Build Log on MSW). Having finished off the hull and both Fore and Main mast, and the foremast yardarms, I find myself struggling with attaching the yardarms to the mast. Tried using a clove hitch, but that doesn't seem to work. Thinking about inserting a small brass rod in the mast and connecting the yardarm to that, but that seems too fragile. Any handy tips/comments/pictures are much appreciated, thnx!
-
Hi all, many thanks for your kind words. Fully recovered now, so I was able to continue to work on Di, job permitting. Small update and a question:
Finished the yardarms for the foremast. A lot of new things learned here, and again, patience is a big asset when you're building. But then again, the focus on a block positioning can be quite soothing 🙂

Finished the main mast as well:
Question: what is the best way to connect the yardarms to the masts? I've been fiddling with this on Terror, with varying results, but I'd like to improve on this, so I 'd be happy to learn how you tackle this job. Been experimenting with clove hitches, but that doesn't seem to work (or I'm doing it wrong).
As always, thnx for the help!
Stay safe!
-
Hi all, apologies for the delay in updating, but a couple of days after posting the last update, I was taken to hospital with a critical pancreas condition. It took me a while to fully recuperate, but last weekend was the first time I could sit up and stay focussed enough to pick up the work on Diana.
Nothing too much though, working on the yardarms of the foremast:
Hopefully my condition will improve so I can get more work done, for now it's still a bit of an exercise...
Stay healthy and safe.
-
-
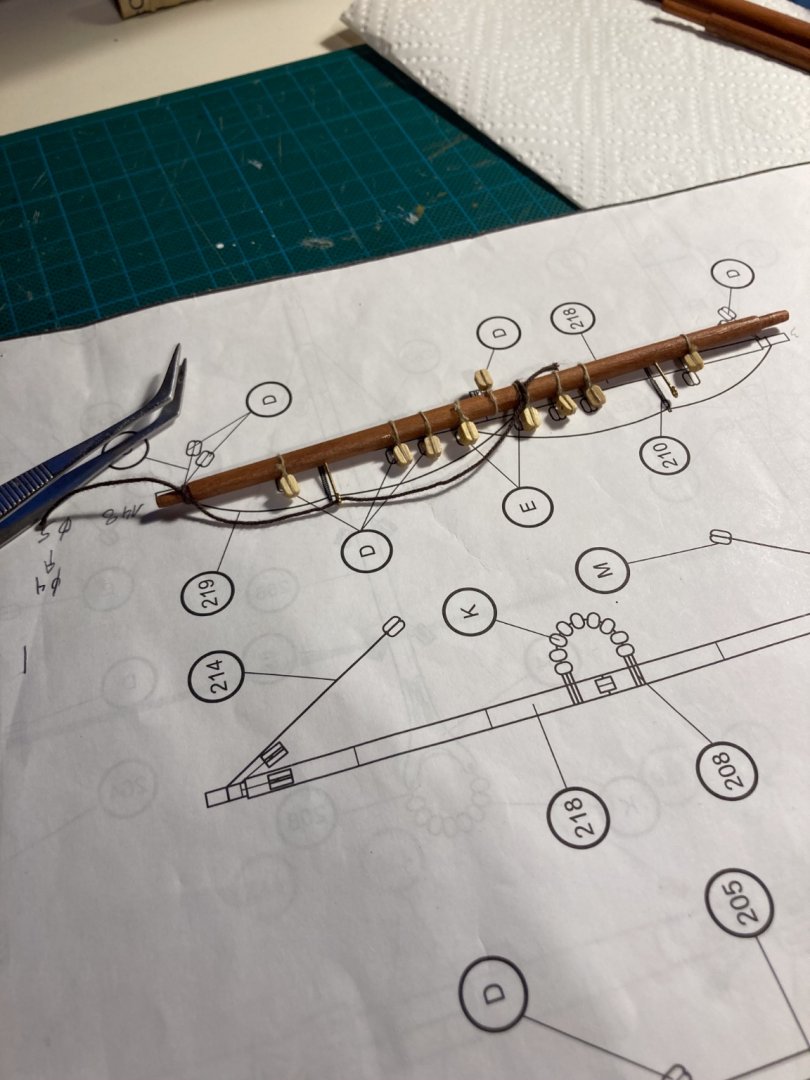
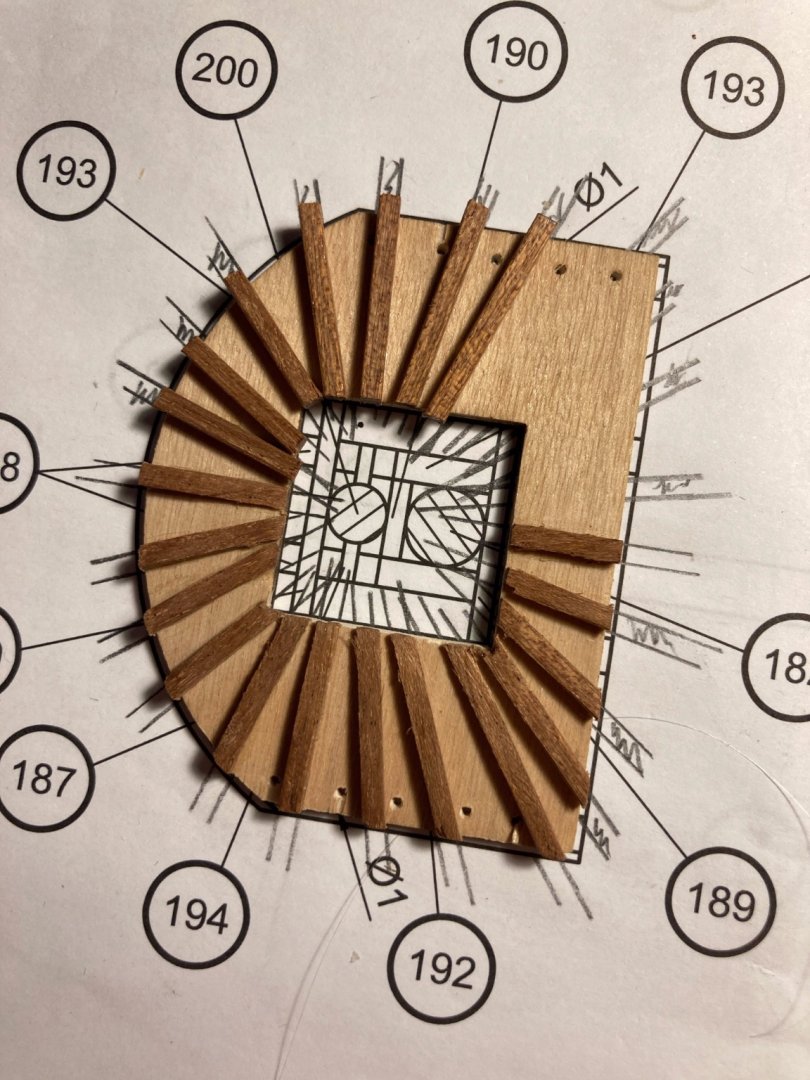
Hi all,
I'm currently working on Occre's Frigate Diana, my second build (build log here). Hull is as good as finished, and I'm working on the foremast now. In the plans, there's two items on the mast I have not seen in my first build (Occre HMS Terror, build log here)
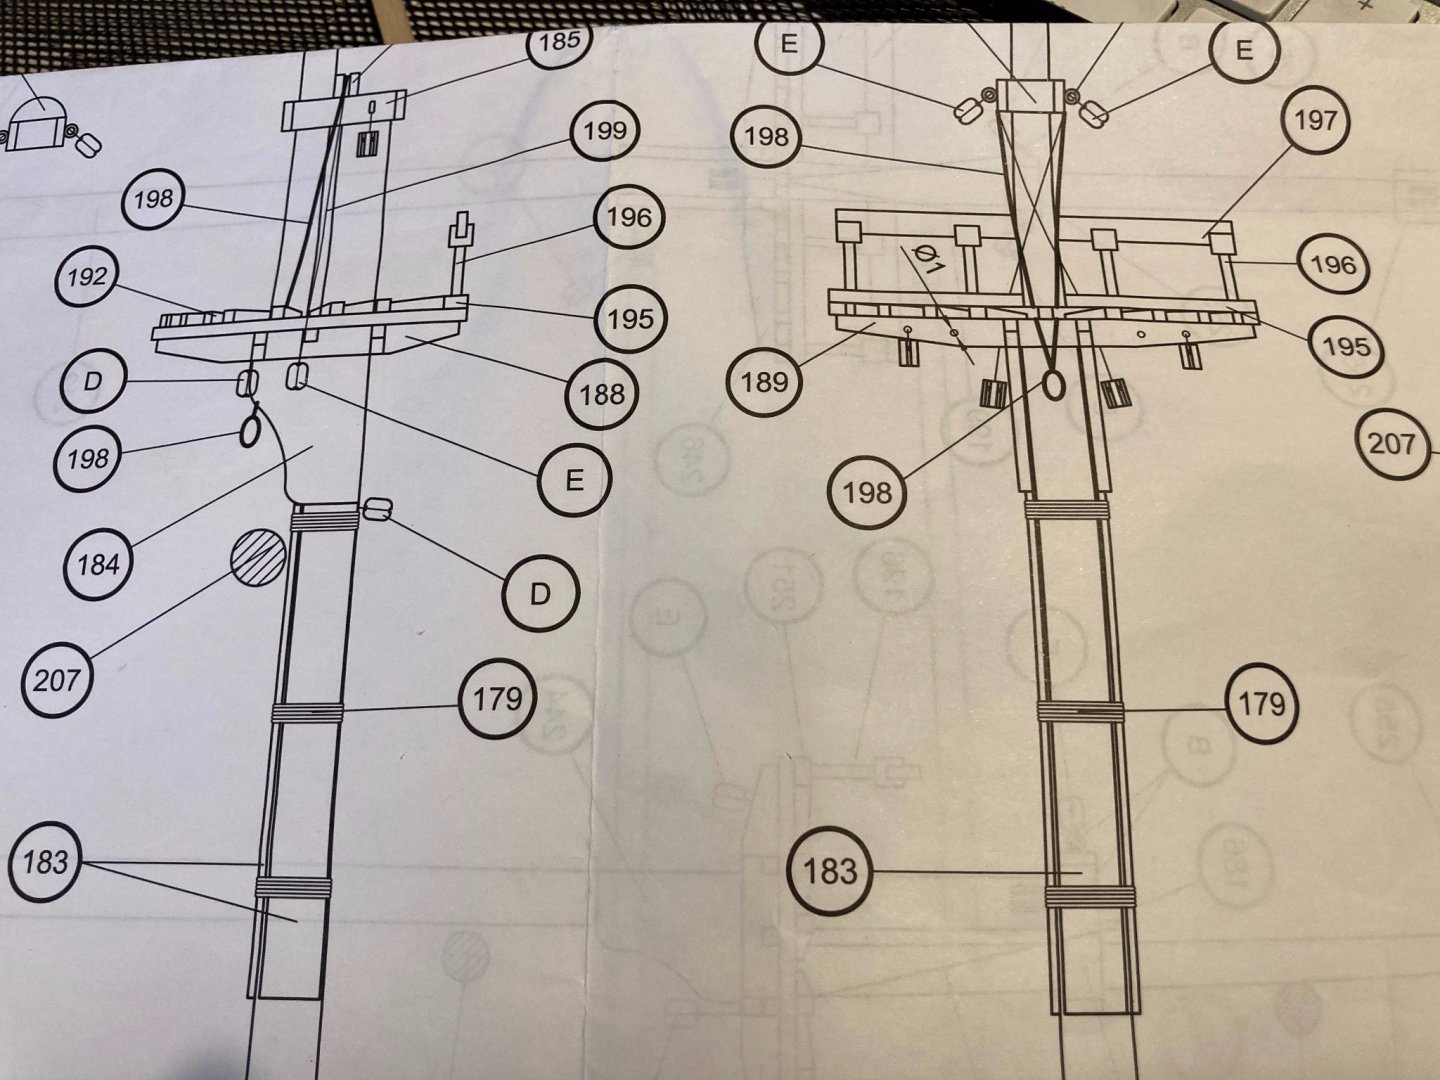
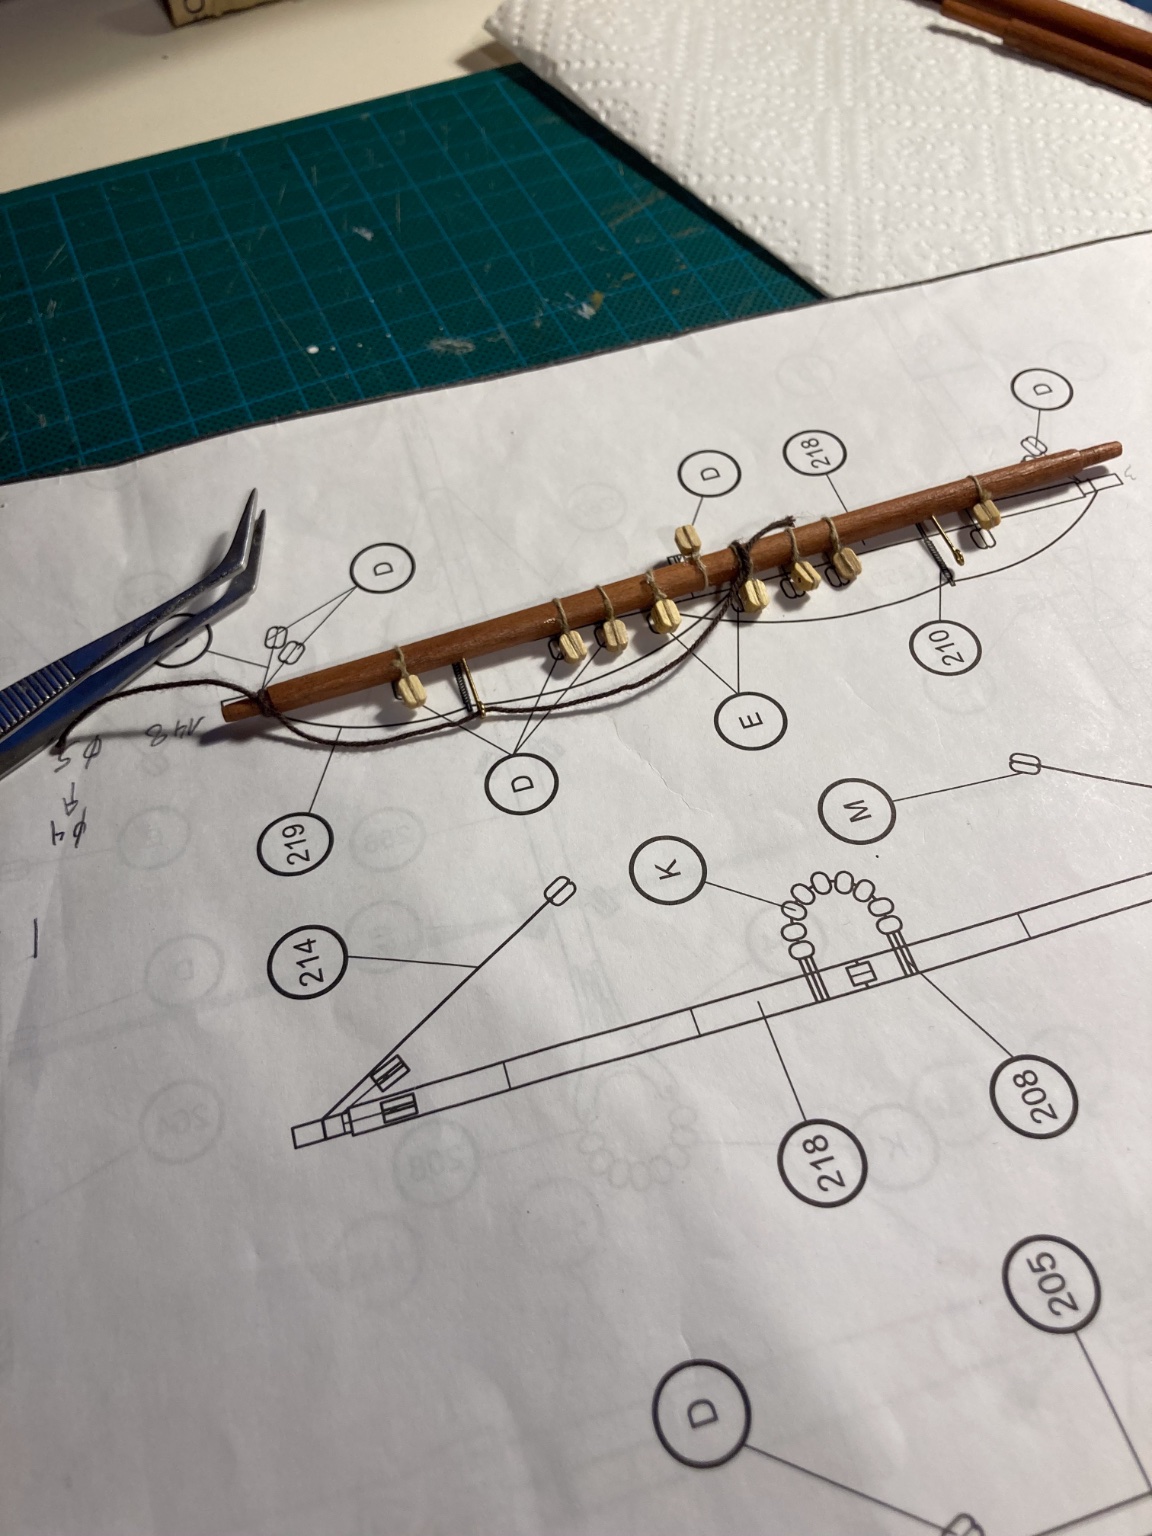
First one is part 198, a little loop that runs over a semicircle. Where does this attach to, or more to the point, what attaches to this?
Second question is about two blocks (E) also running from the semicircular thingy on top ending up next to the cheeks. Same question here, what is their purpose and what is attached to them?
IF there are any similar set-ups in other build logs, I'd really appreciate some kind of visual aid to make me understand.
Thnx in advance!
-
Hi all, thnx for checking in. It's been a while, lots of (remote) working and trainings, house DIY, but we managed to progress a bit.
Access steps were relatively easy, used an inordinate amount of tape to ensure alignment:
After that, work on the mirror started, a first for me, as Terror was nowhere near as ornate as Di's. Ended up taking a bit of creative license and continuing the gold/blue pattern on the galleries:
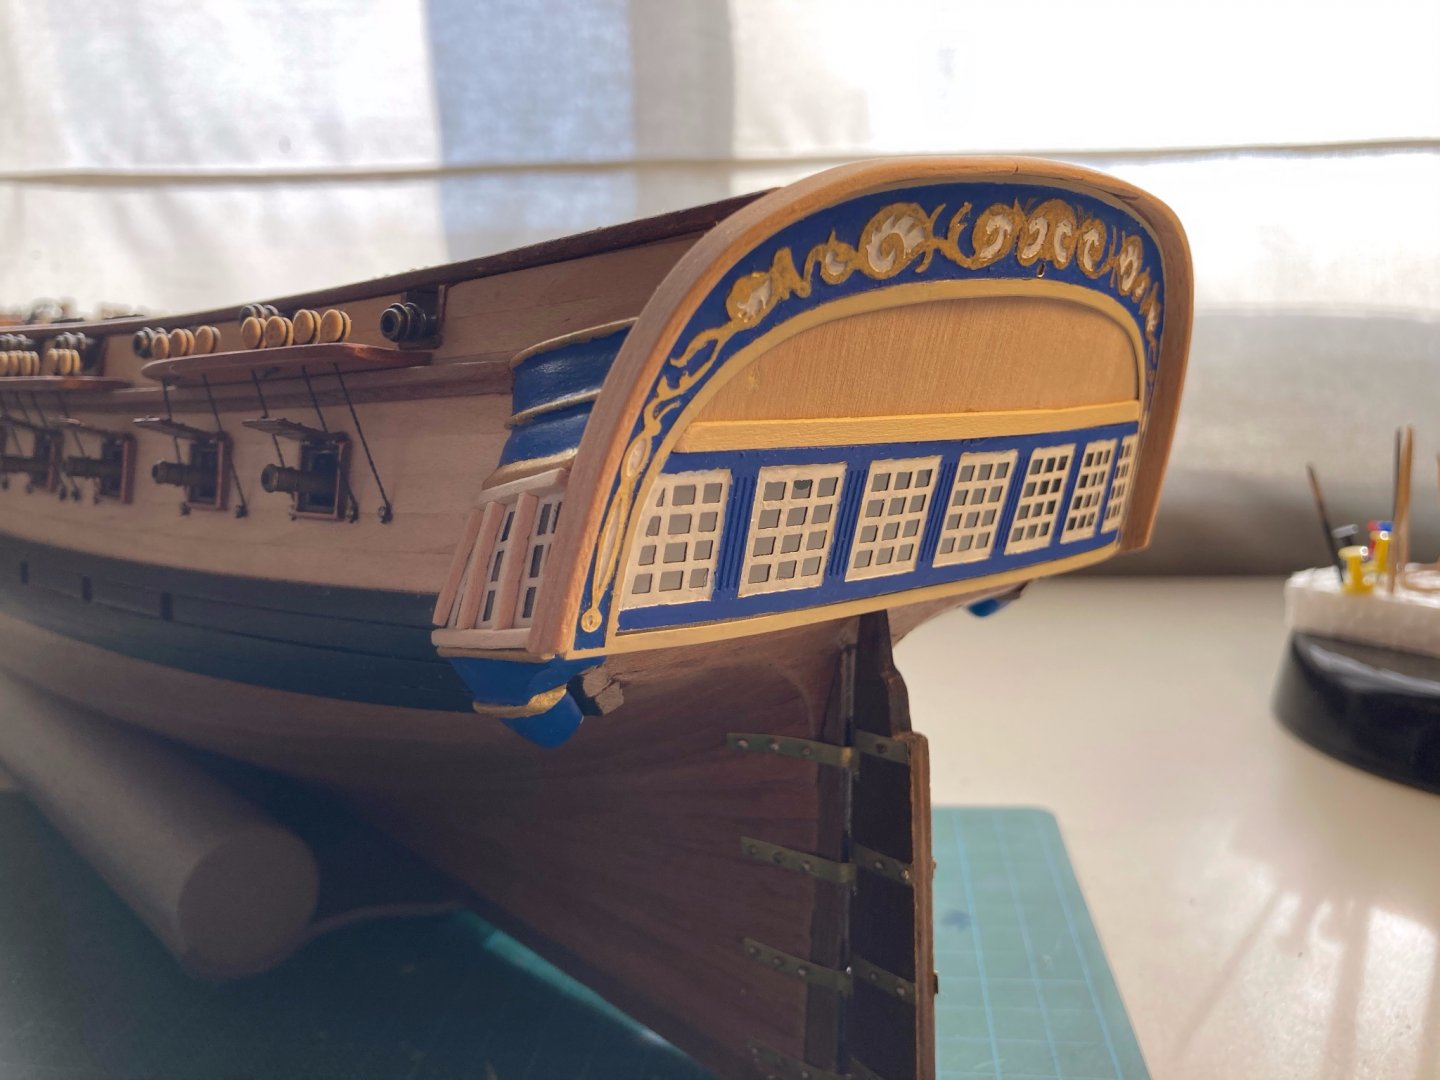
Added a small strip on top of the windows to line them up more nicely. I realise this is not according to plan, but looks wise I think it works. Detailed painting took me the better part of weeks though, with virtual prototypes being made and edited in Photoshop.
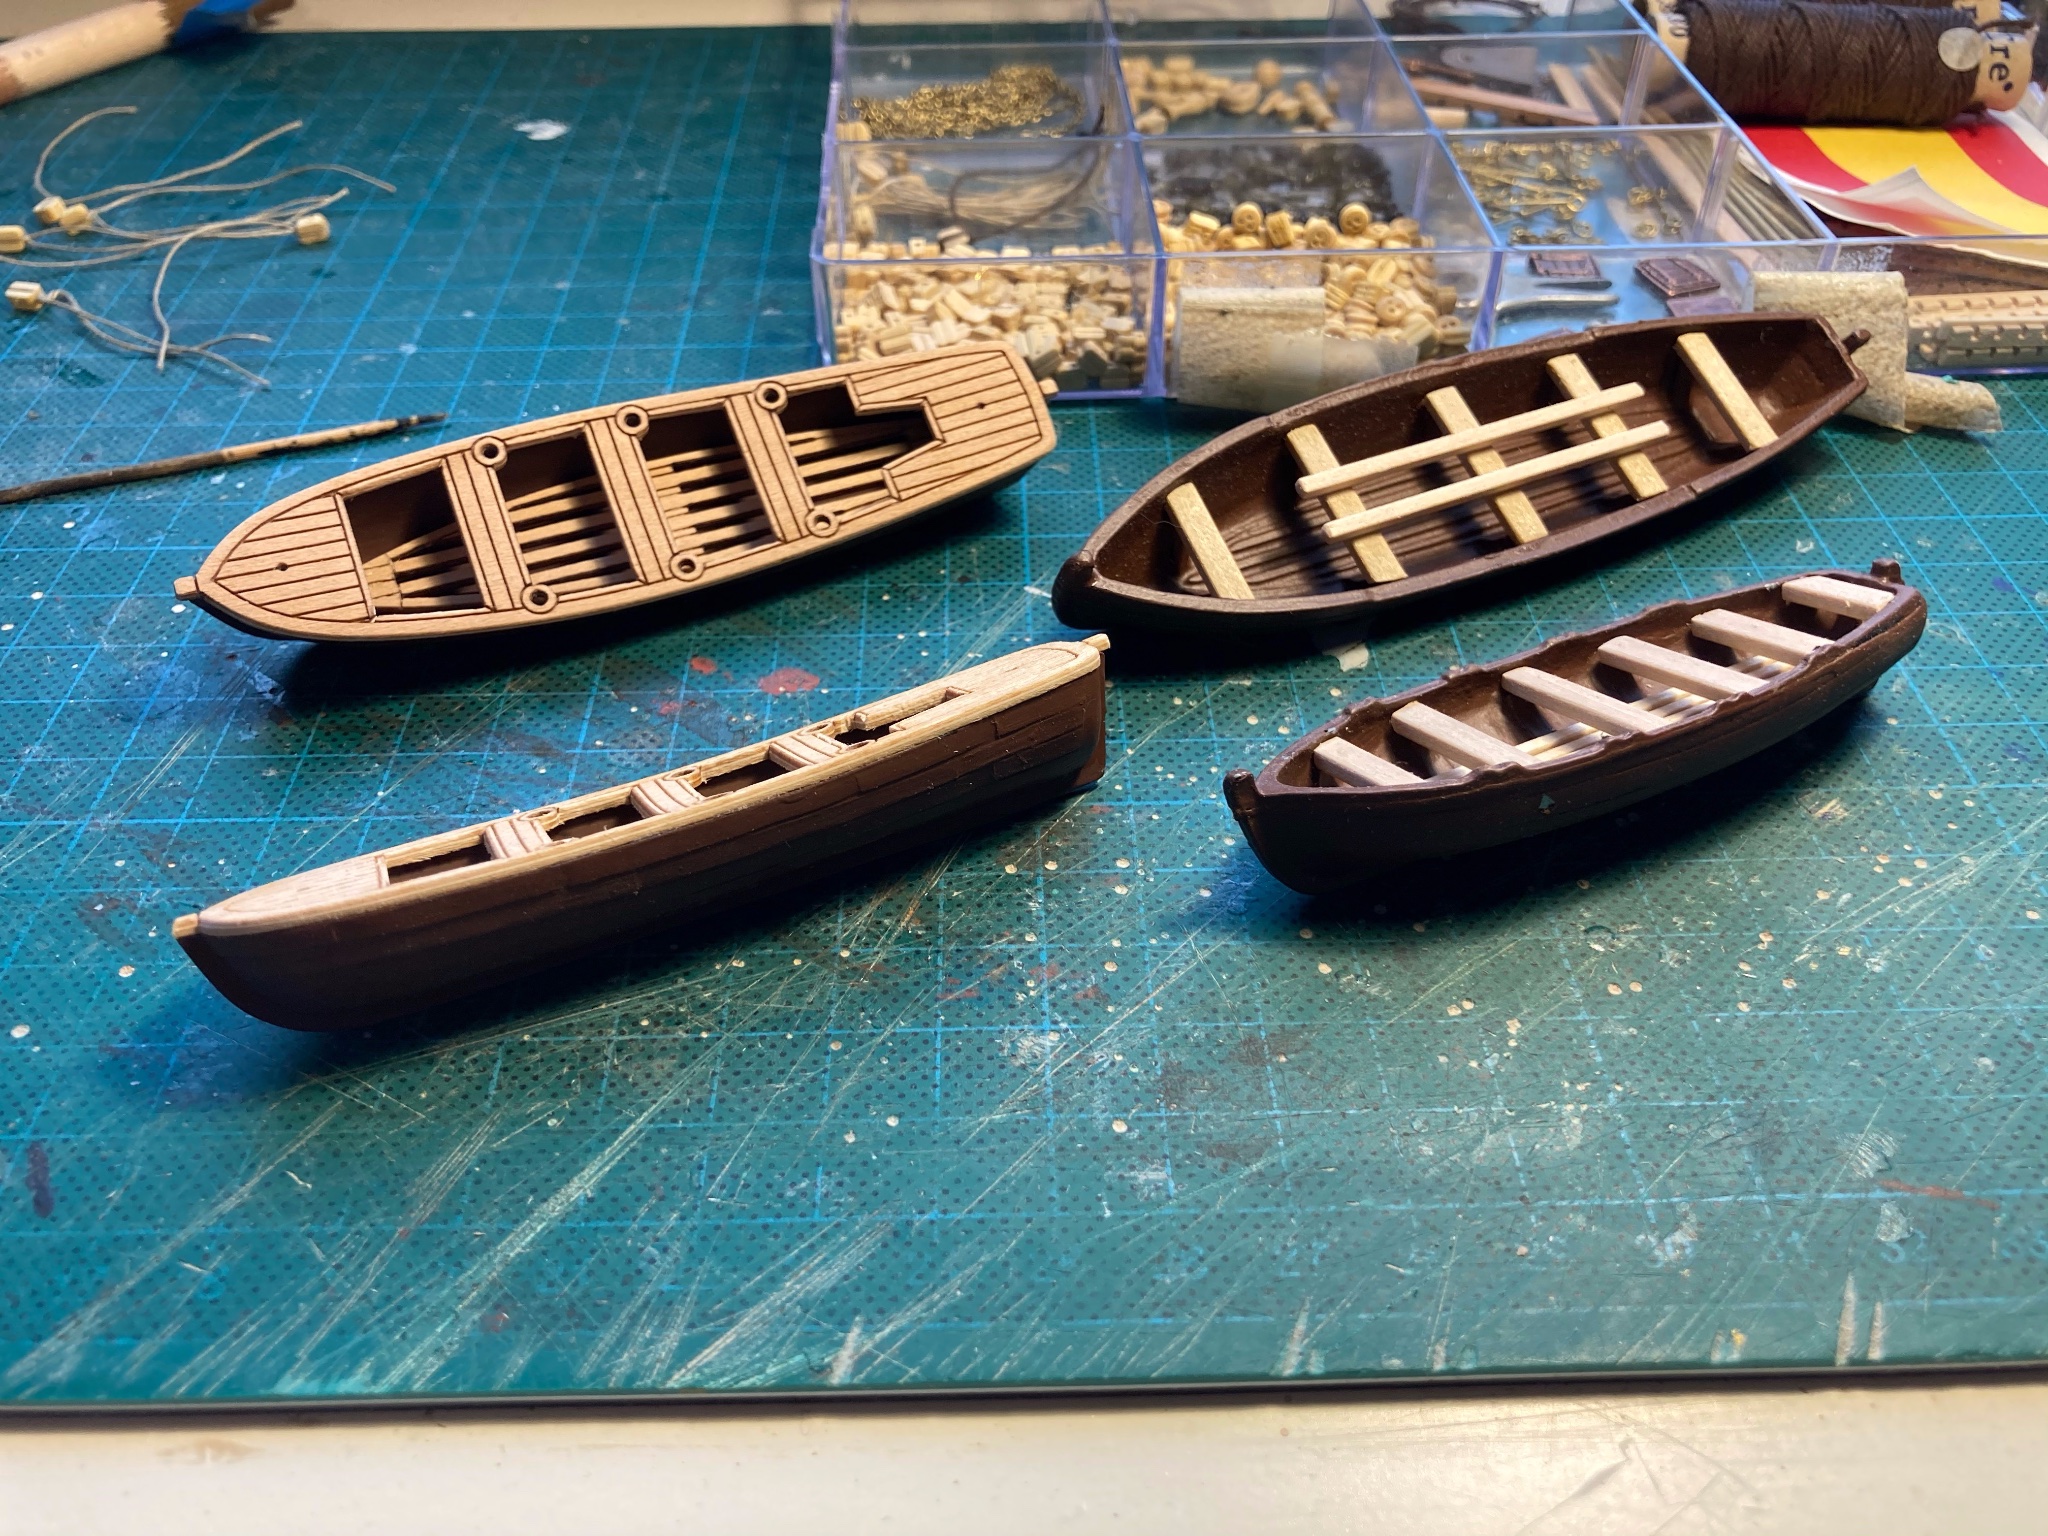
After that, I had a look at the lifeboats. The ones provided by Occre are metal, with not a lot of detail. Found an alternative in the shop, here's the two versions side by side:

Still not sure about which one to use, although I like the detailing of the new version.
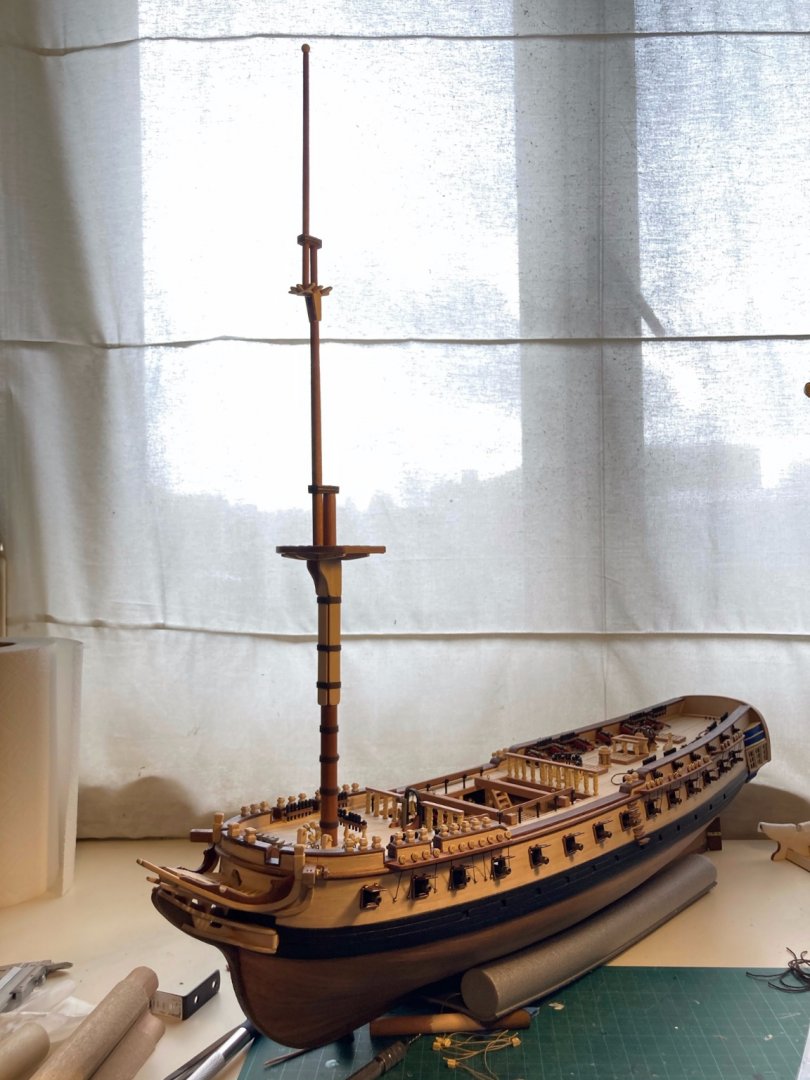
After that, the bowsprit was finished:
Had to get back into the whole rigging groove 🙂
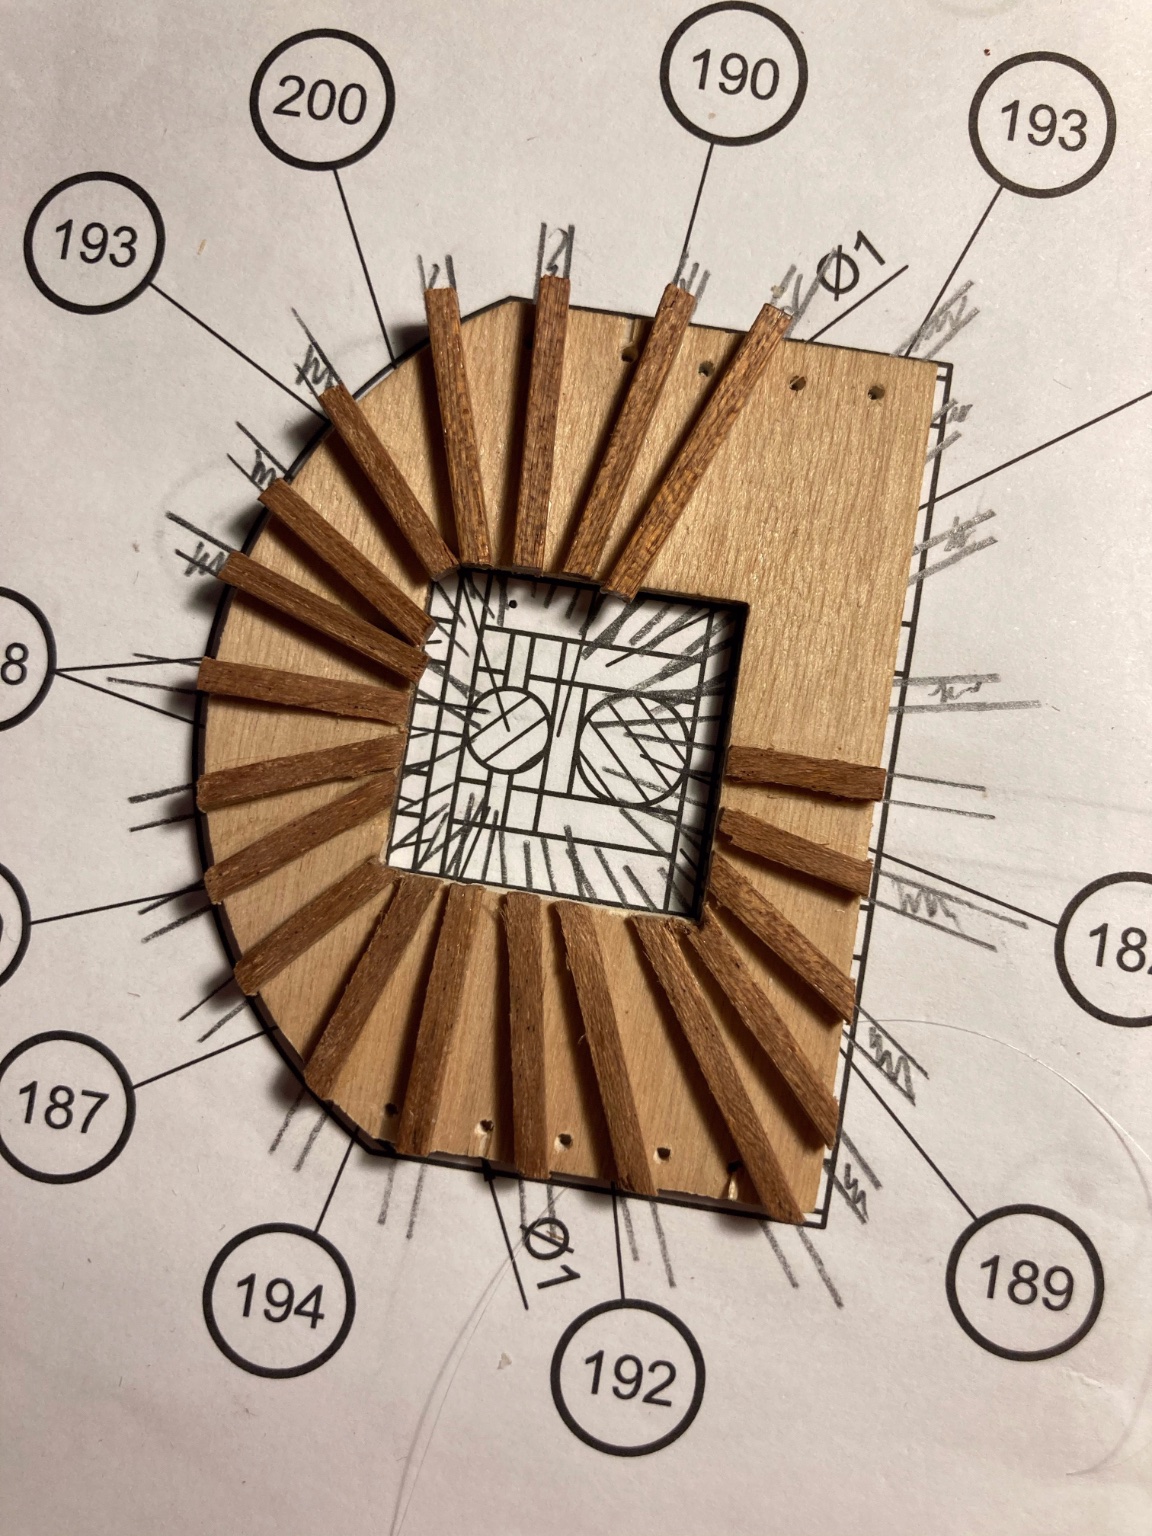
After that, the foremast was up. For the platform (also a first), the plans were extended a bit so I could get the angles correct:
And the result:

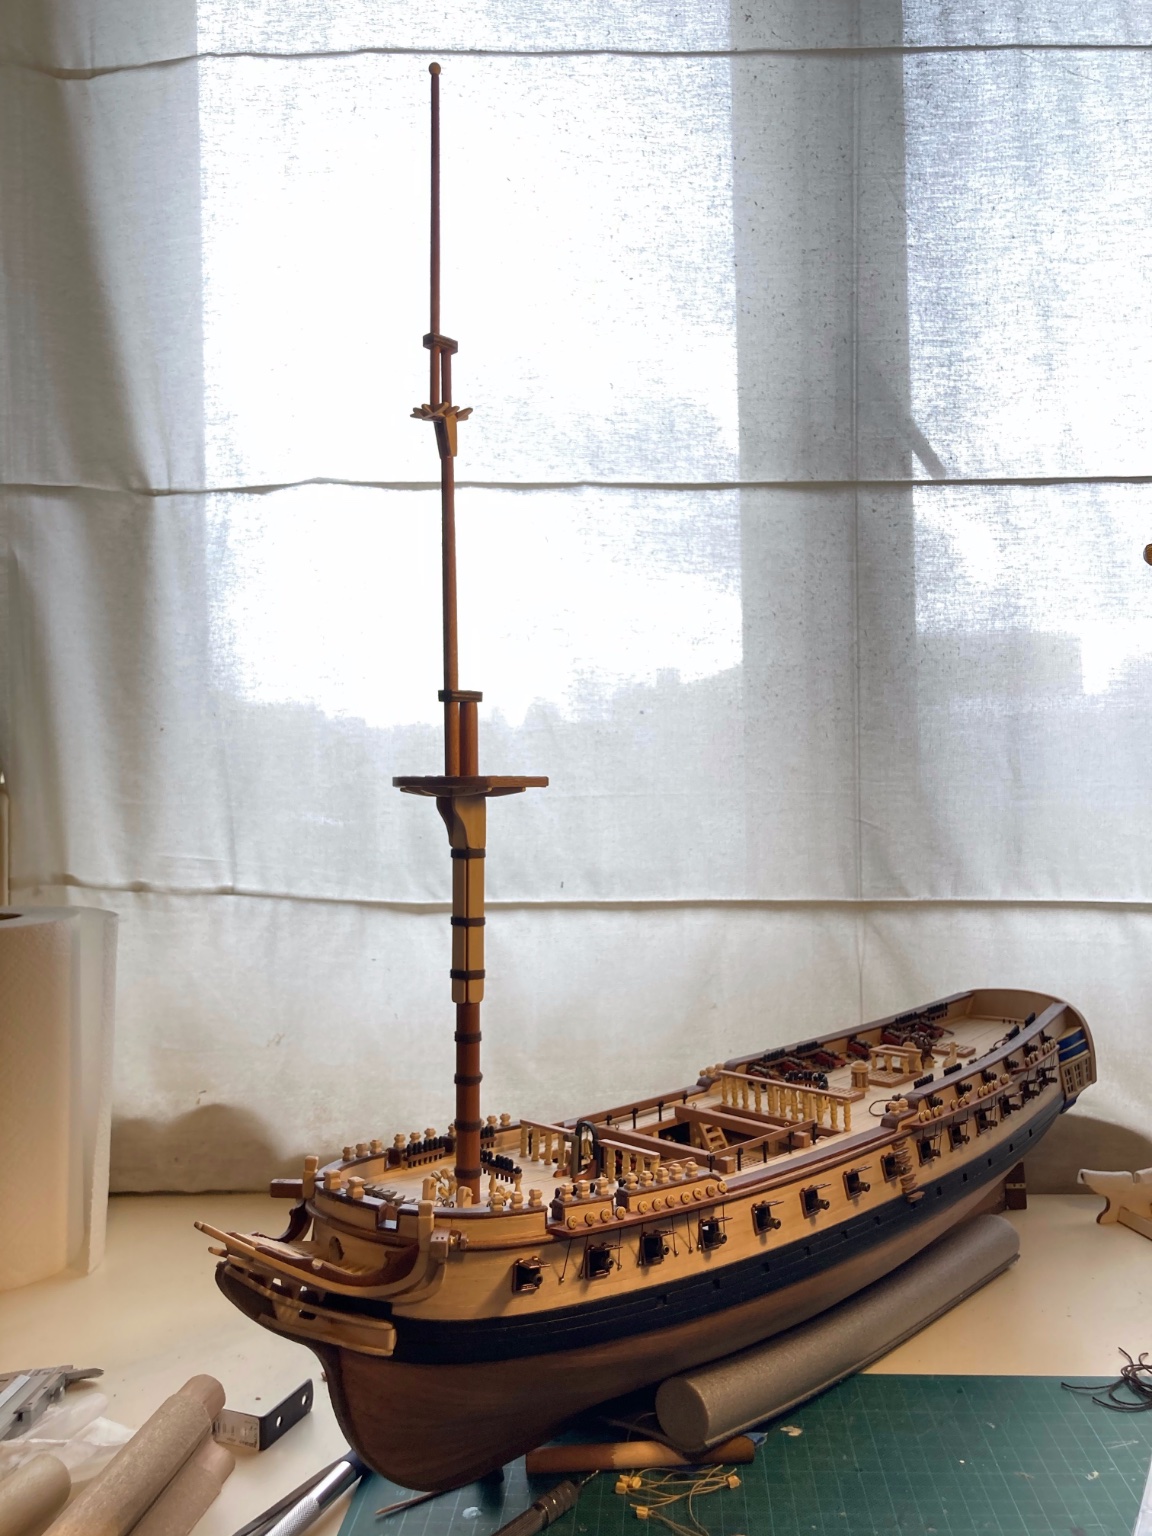
After the varnish dried, dry fitted the mast elements together, and this is what she looks like today:
Work is going slower, but I find myself trying and experimenting more, and learning a lot along the way. Mastini's book, always helpful, had a very good technique to make the wooldings, something I wanted to improve upon after Terror.
Stay safe!
-
Welcome to the shipyards! Thanks to these wonderful people, my first build went like a dream. Enjoy!
-
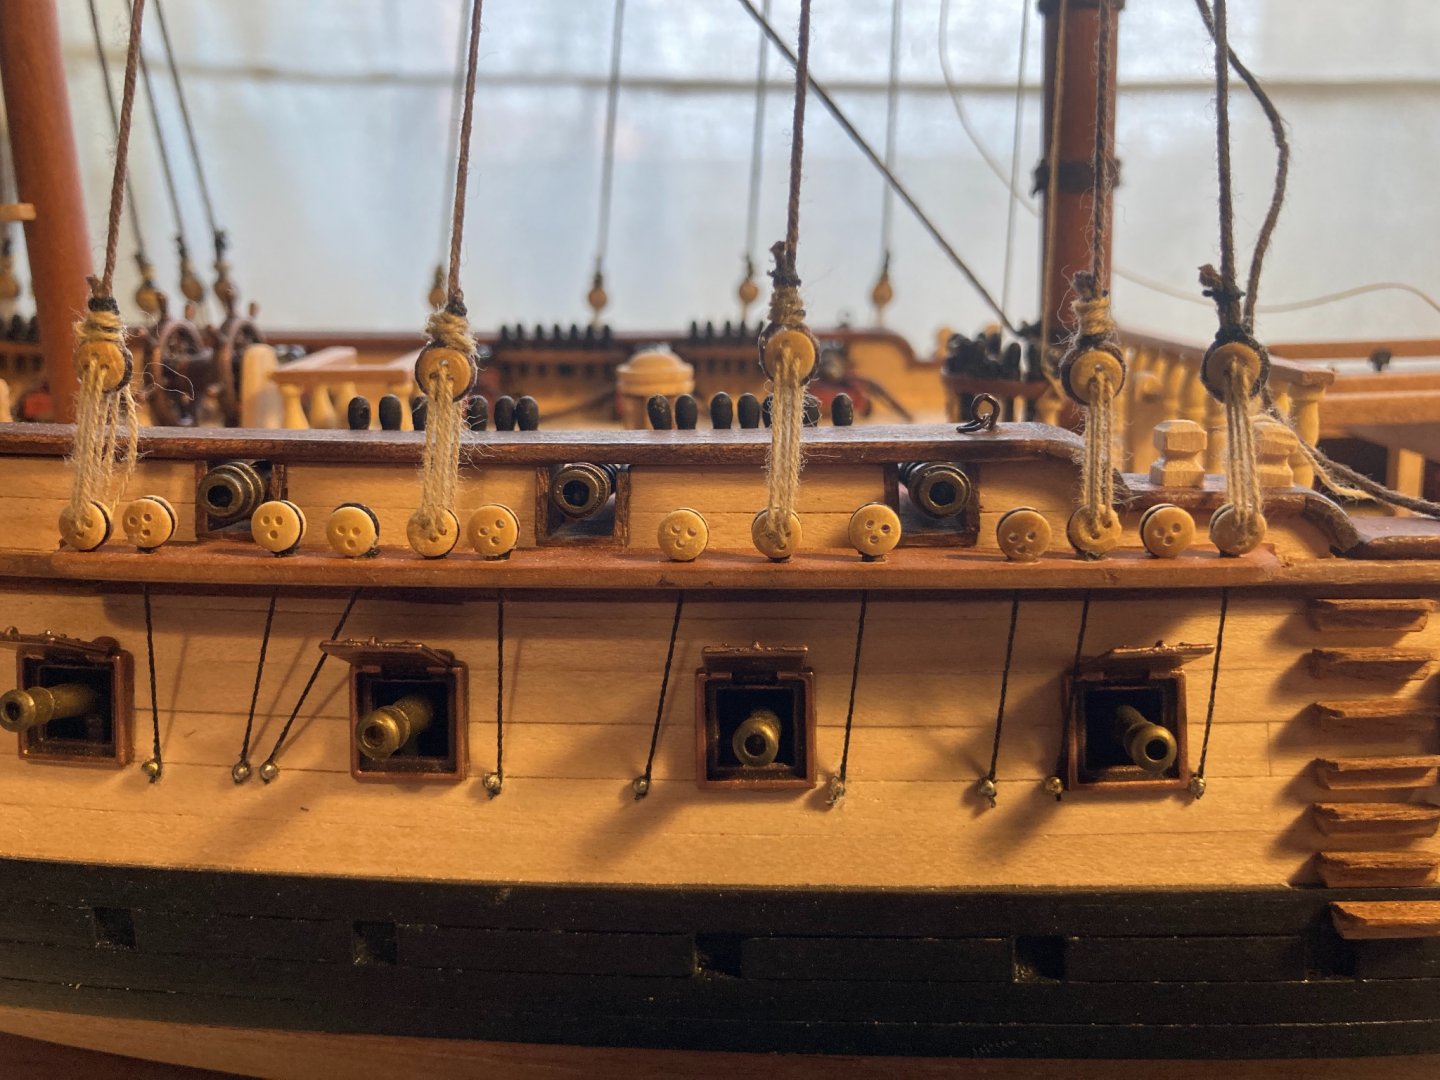
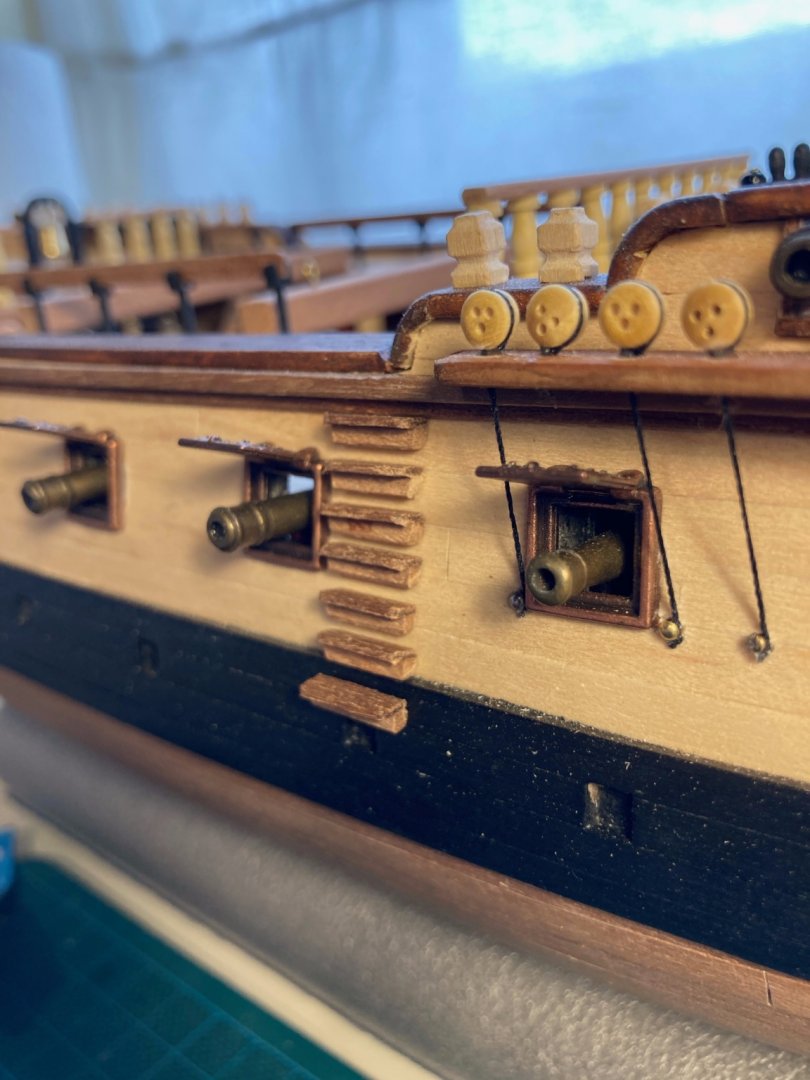
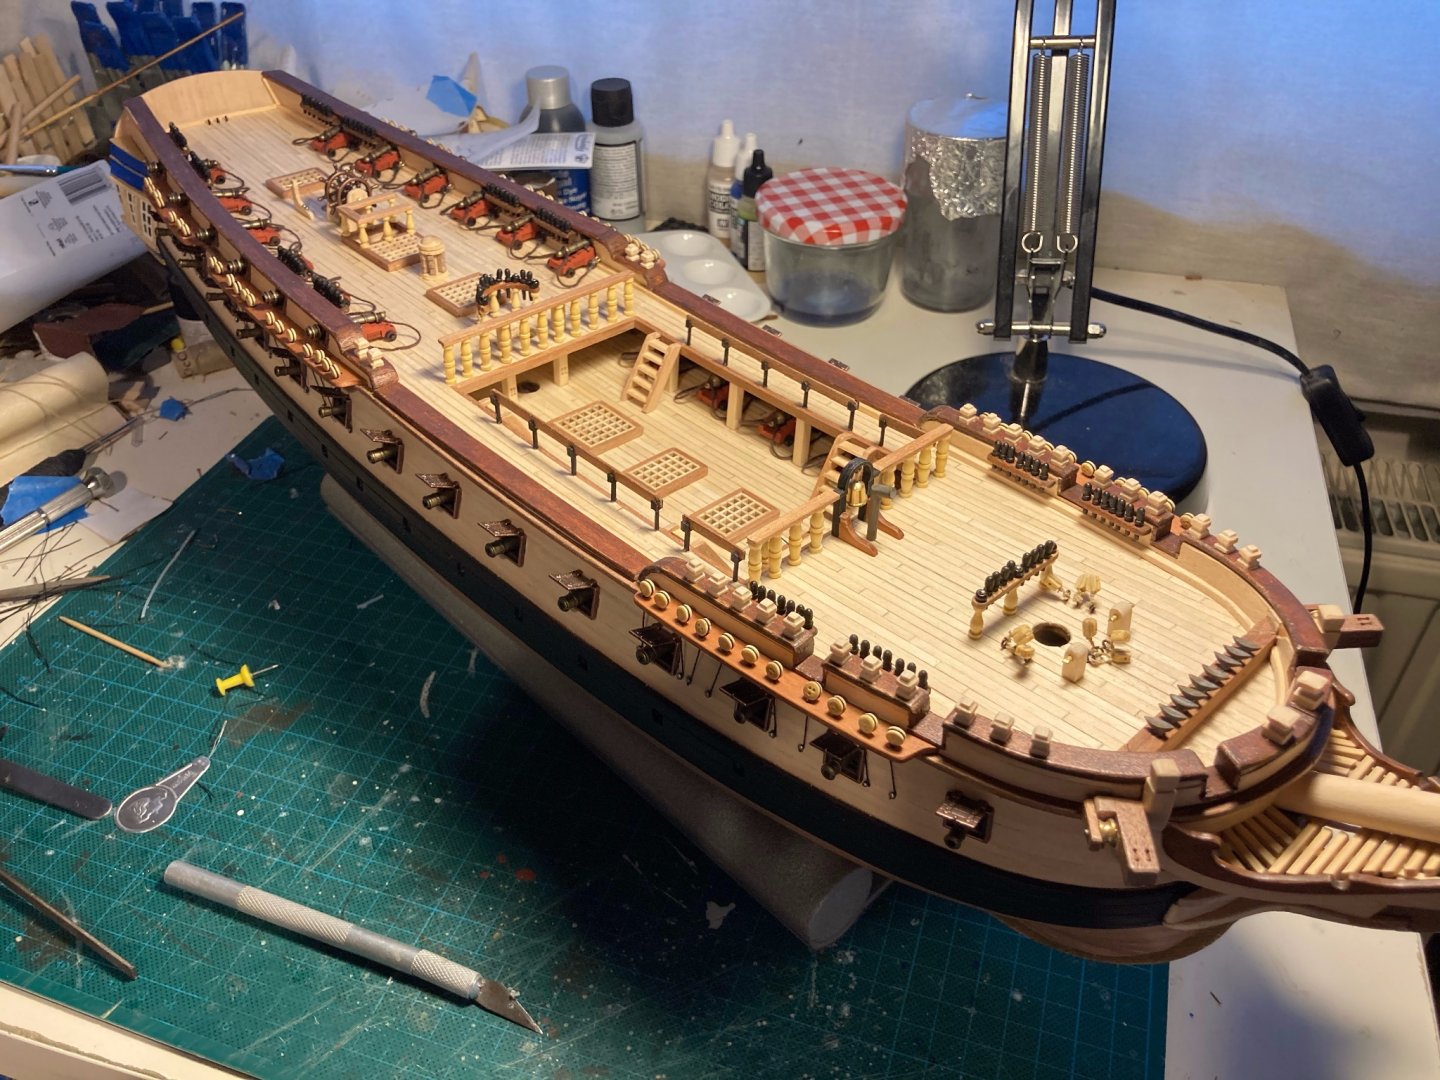
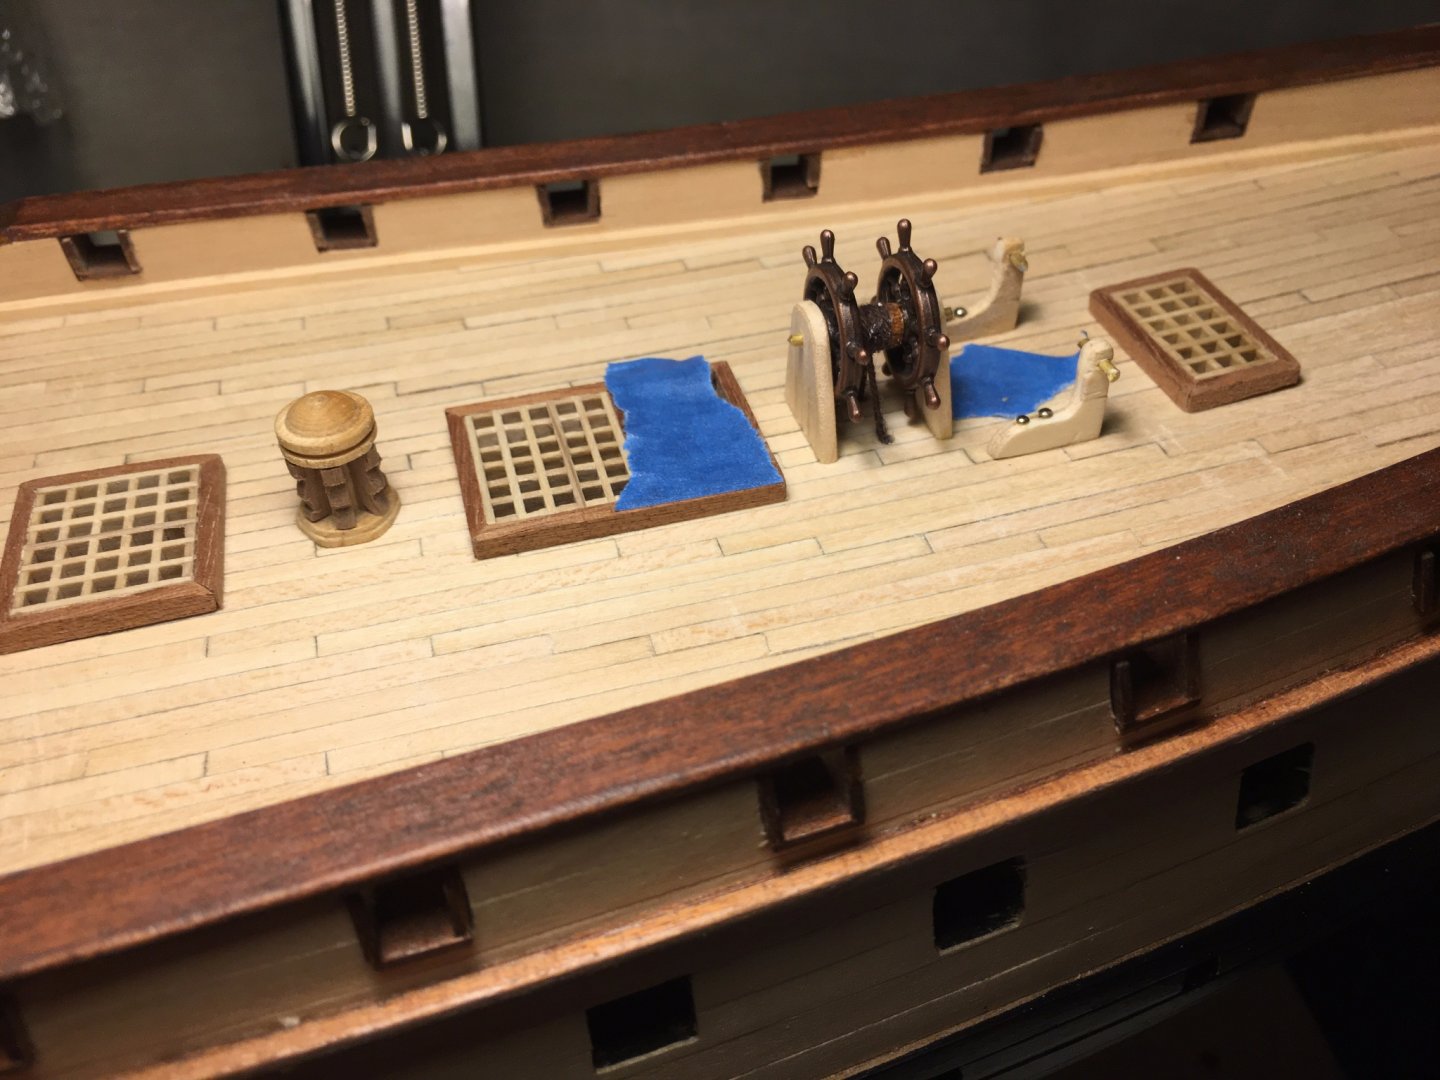
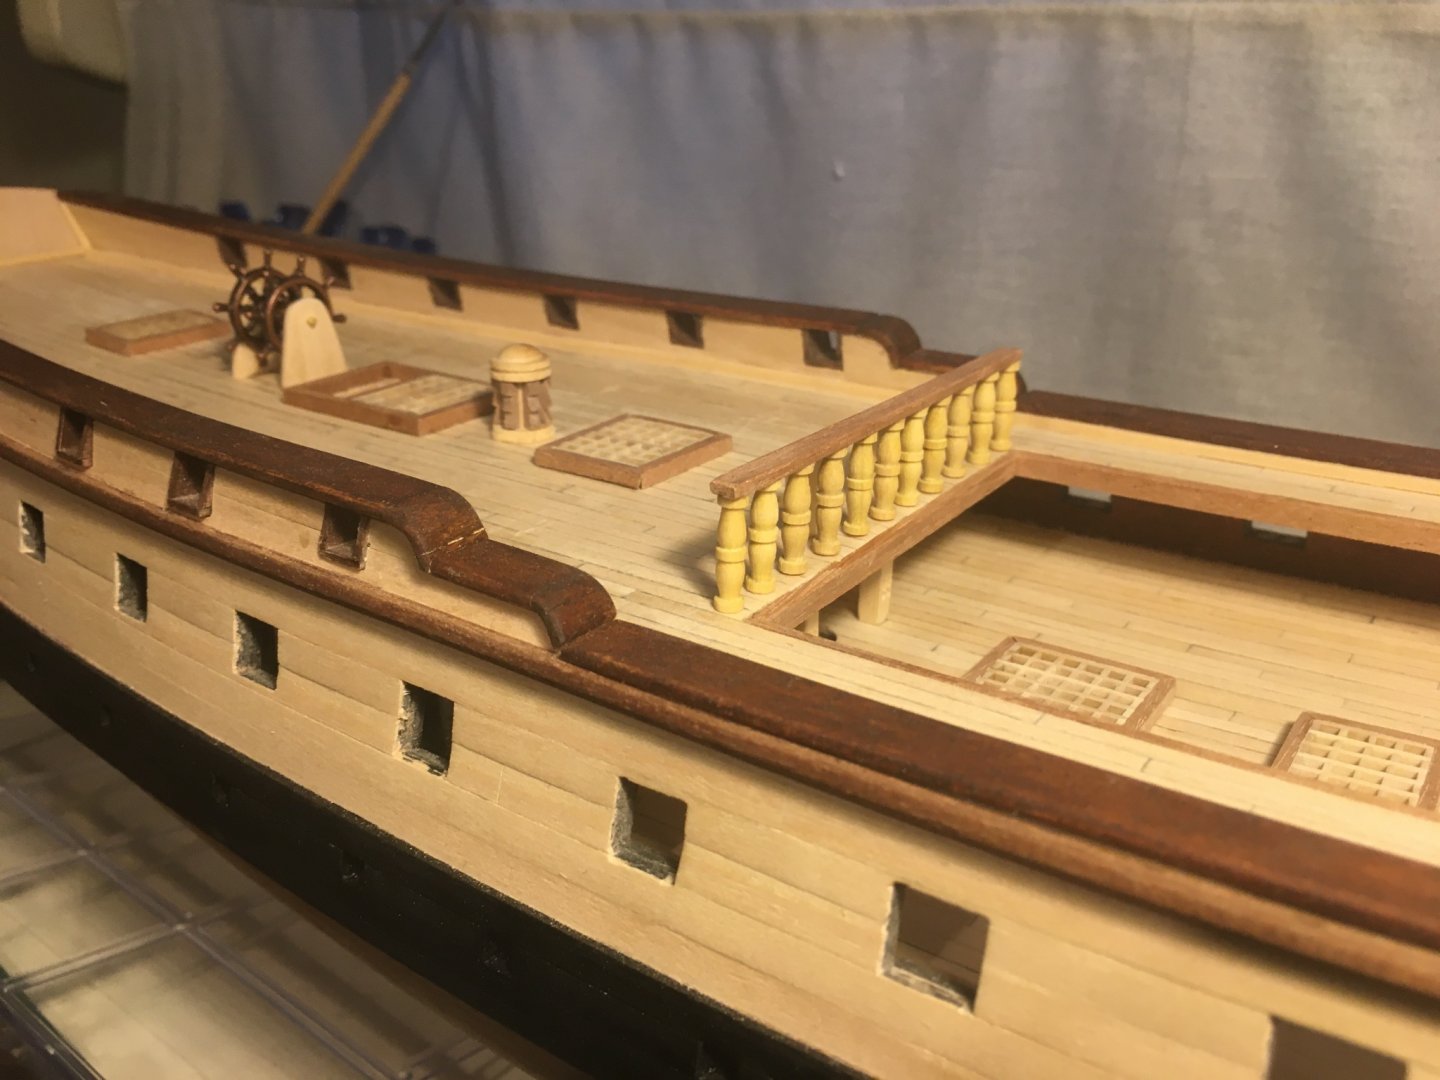
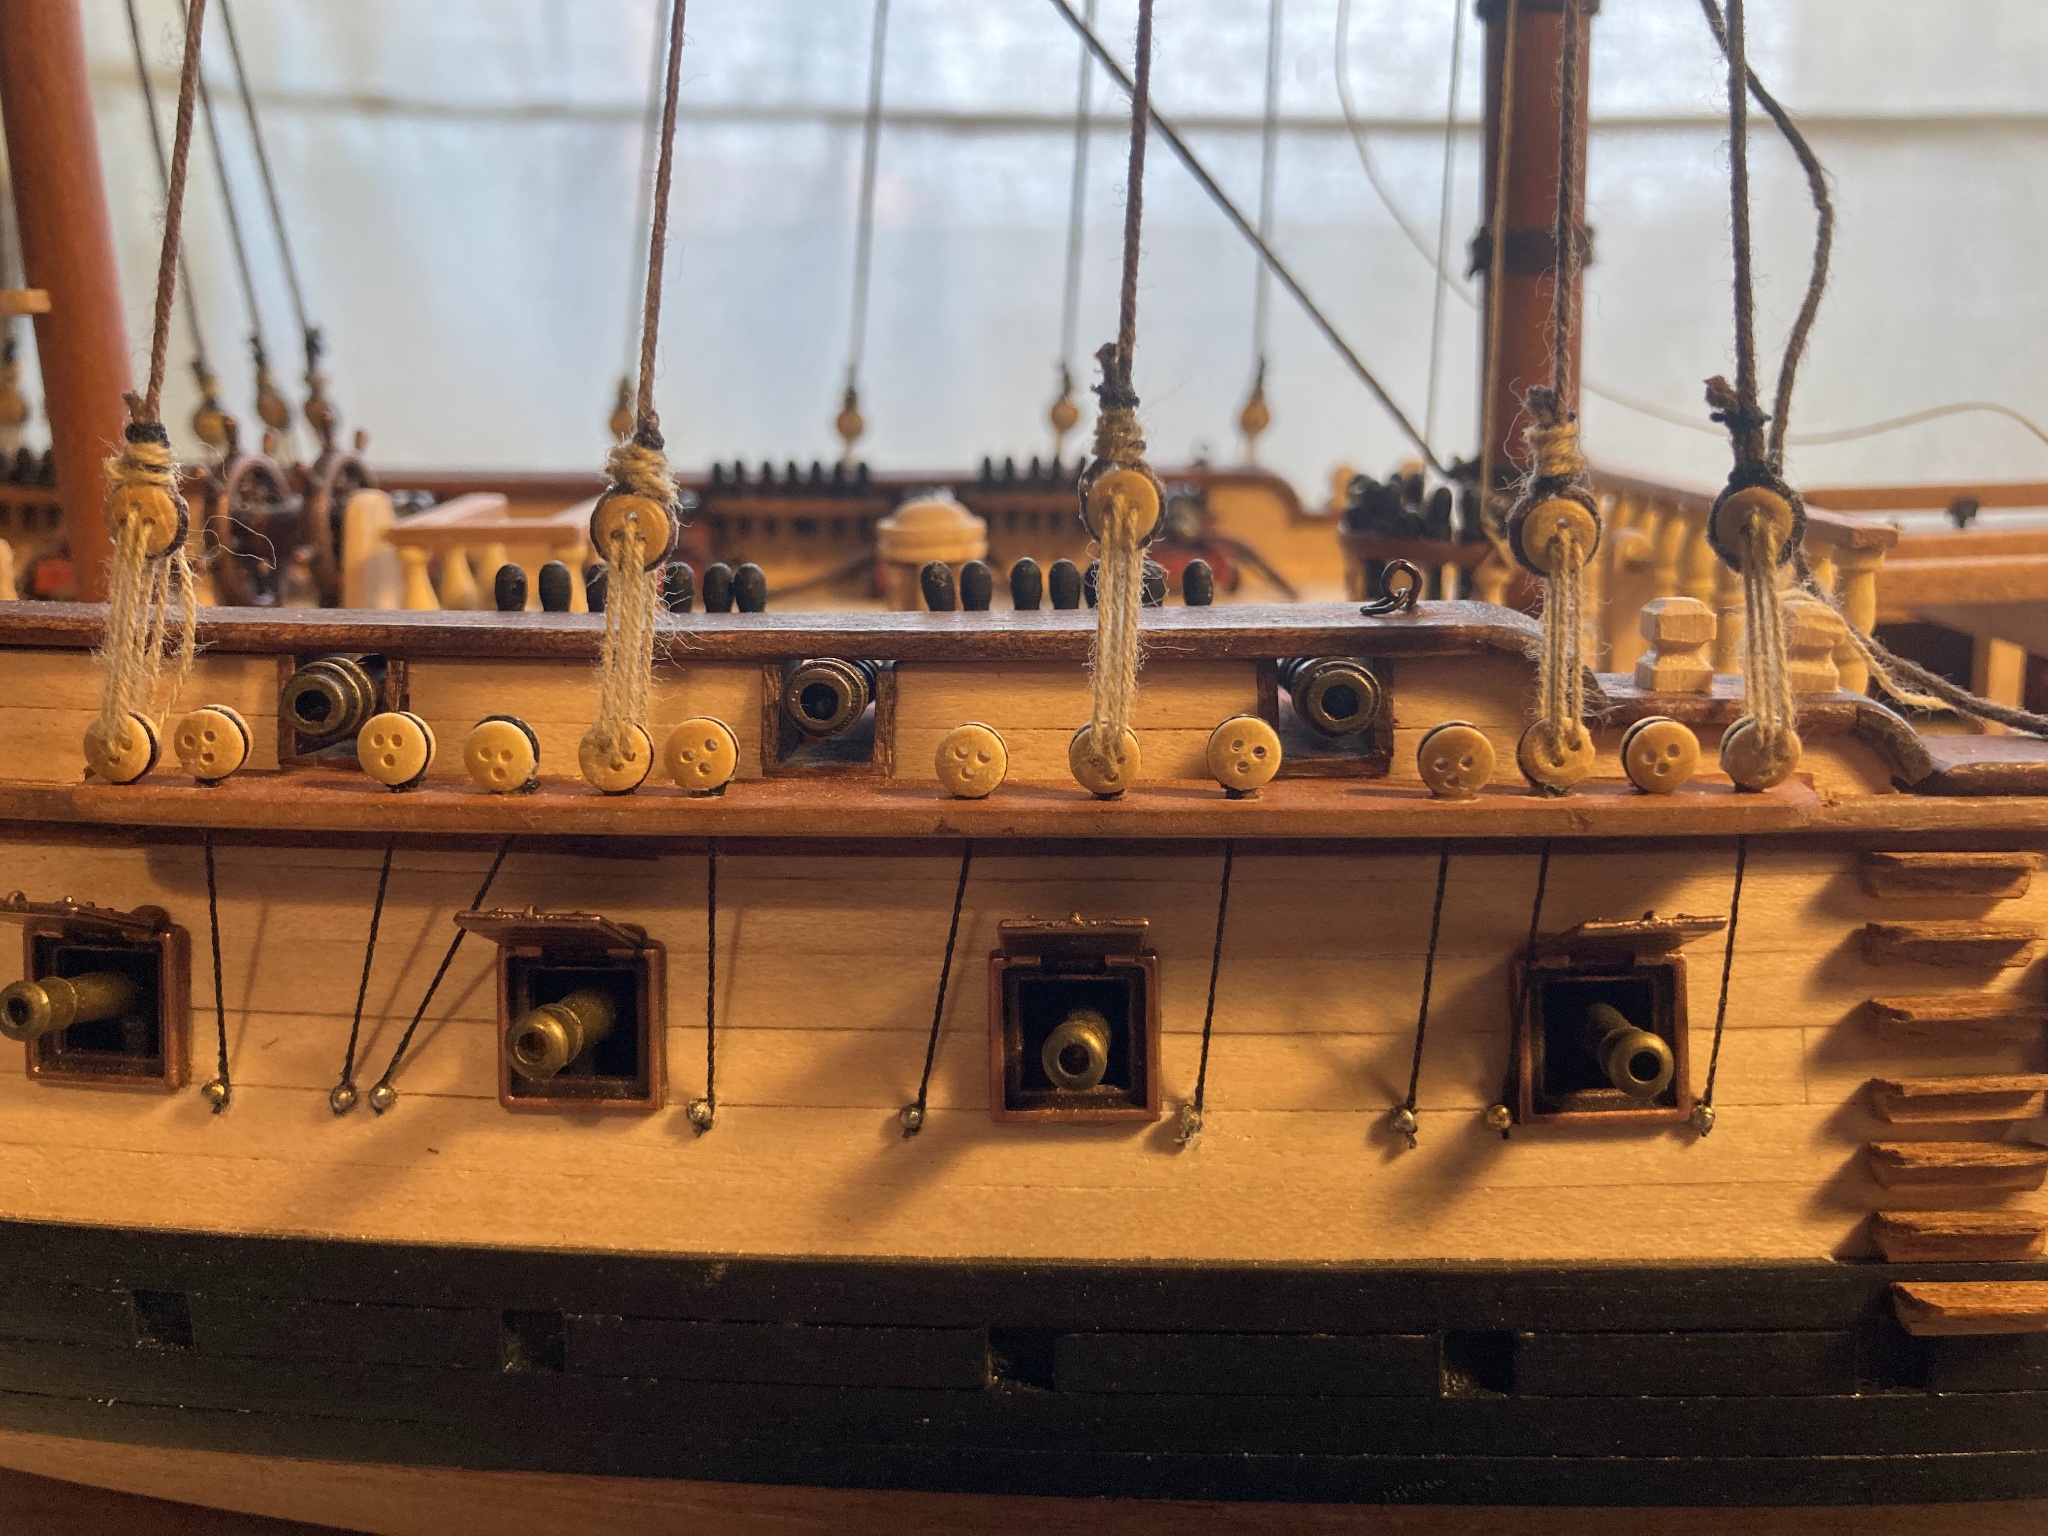
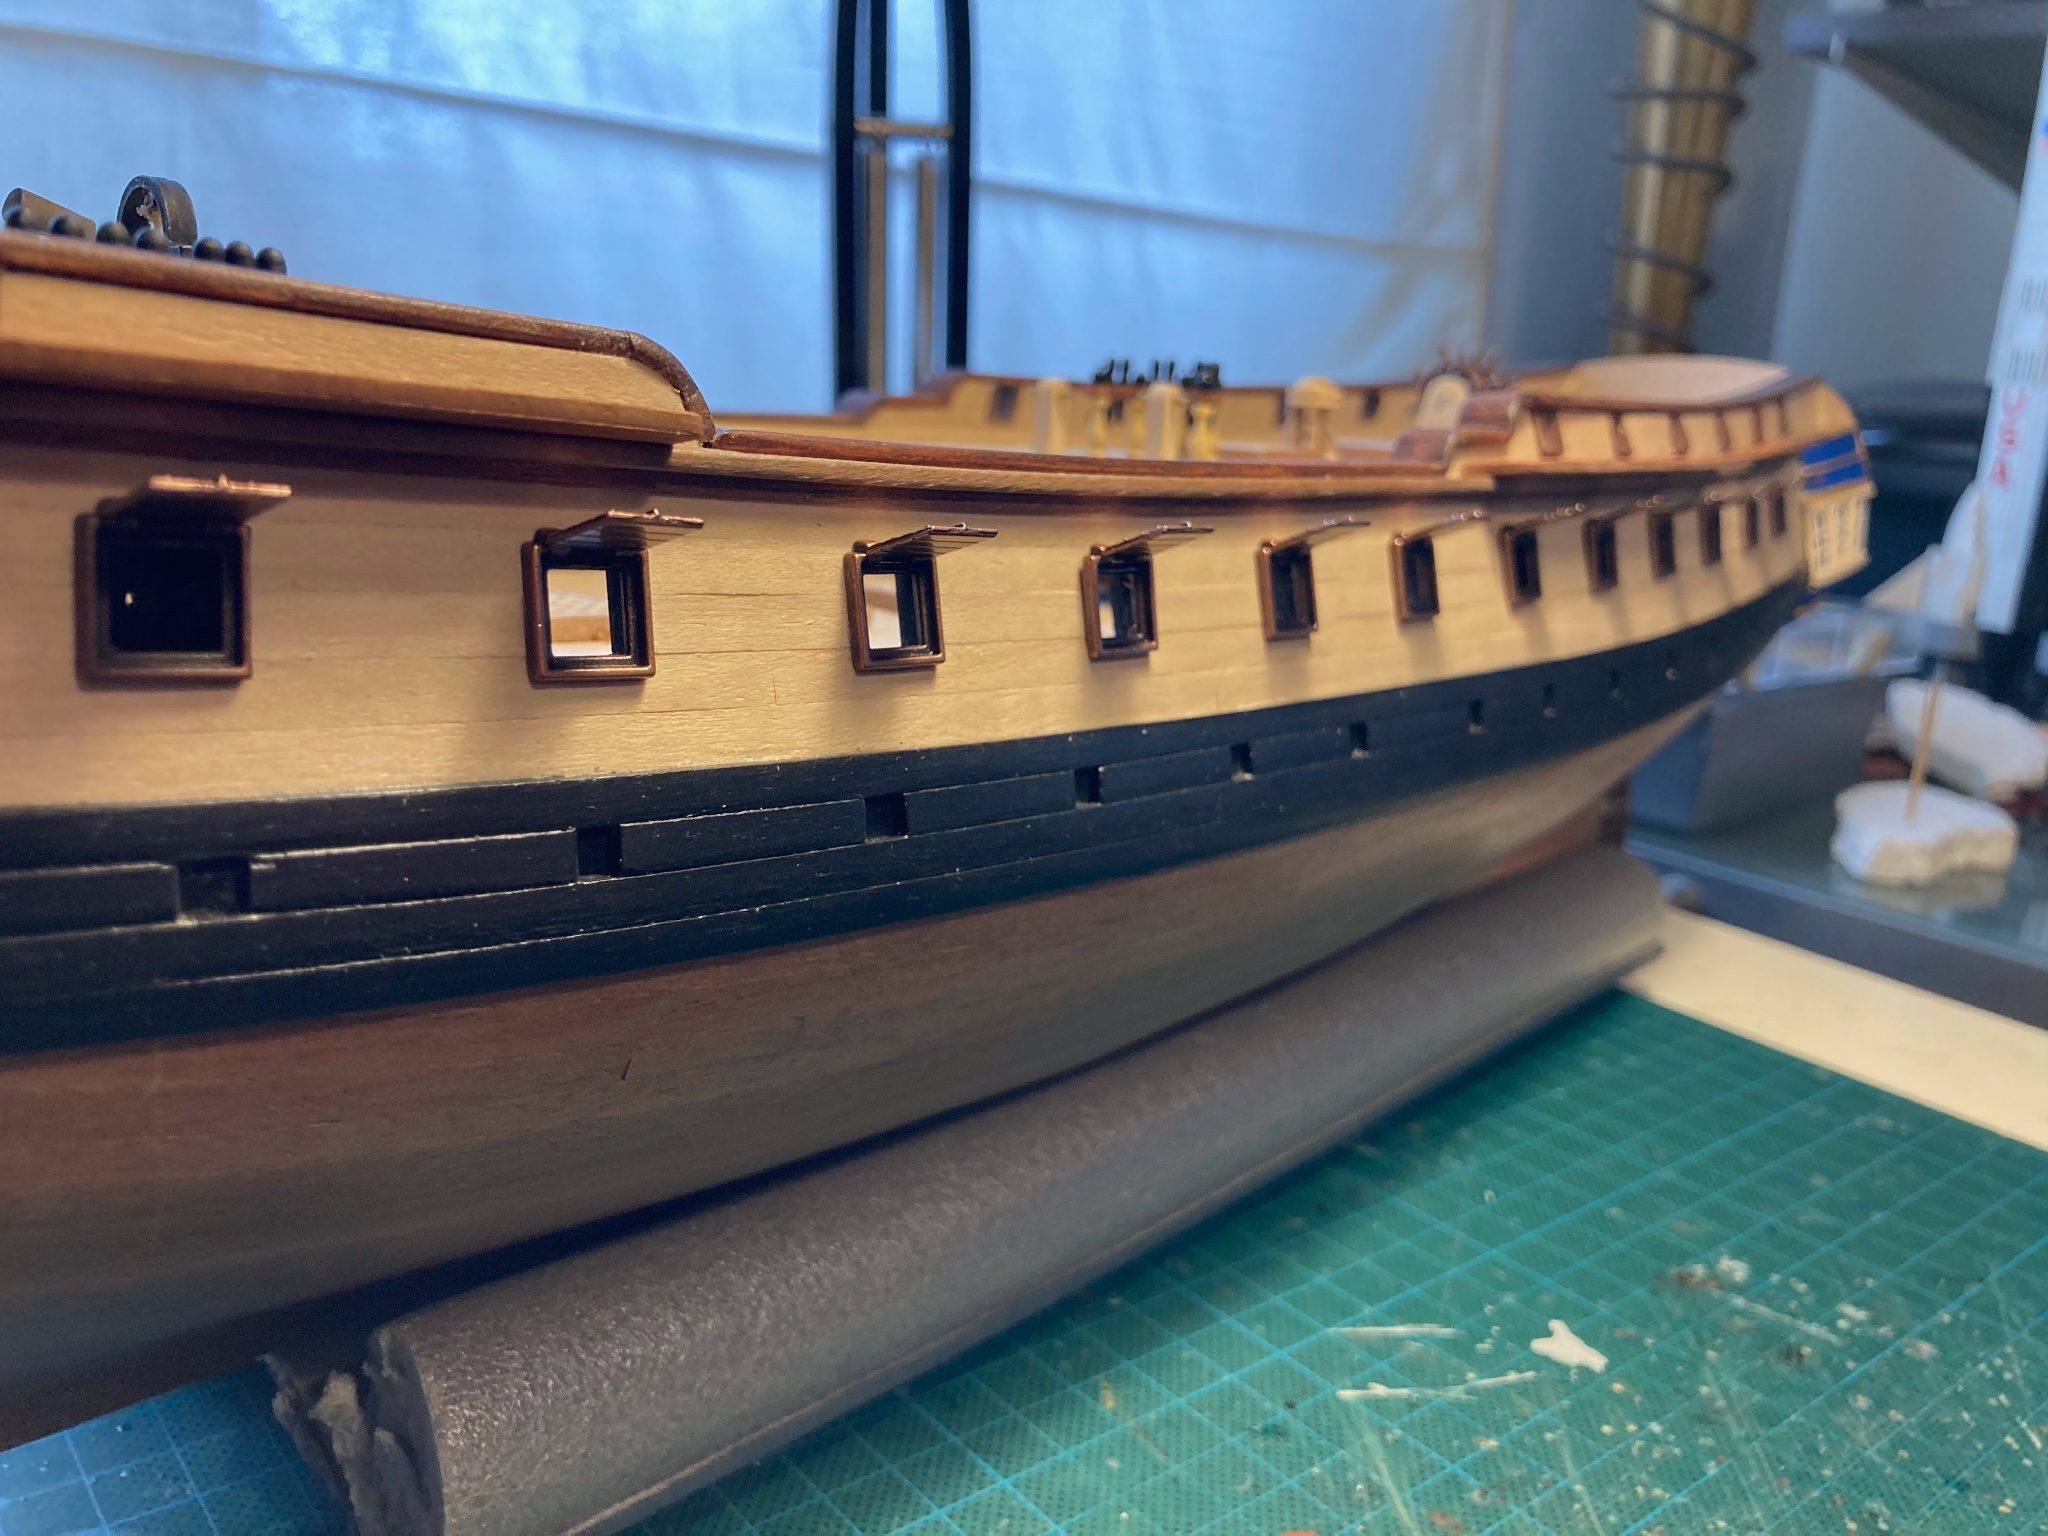
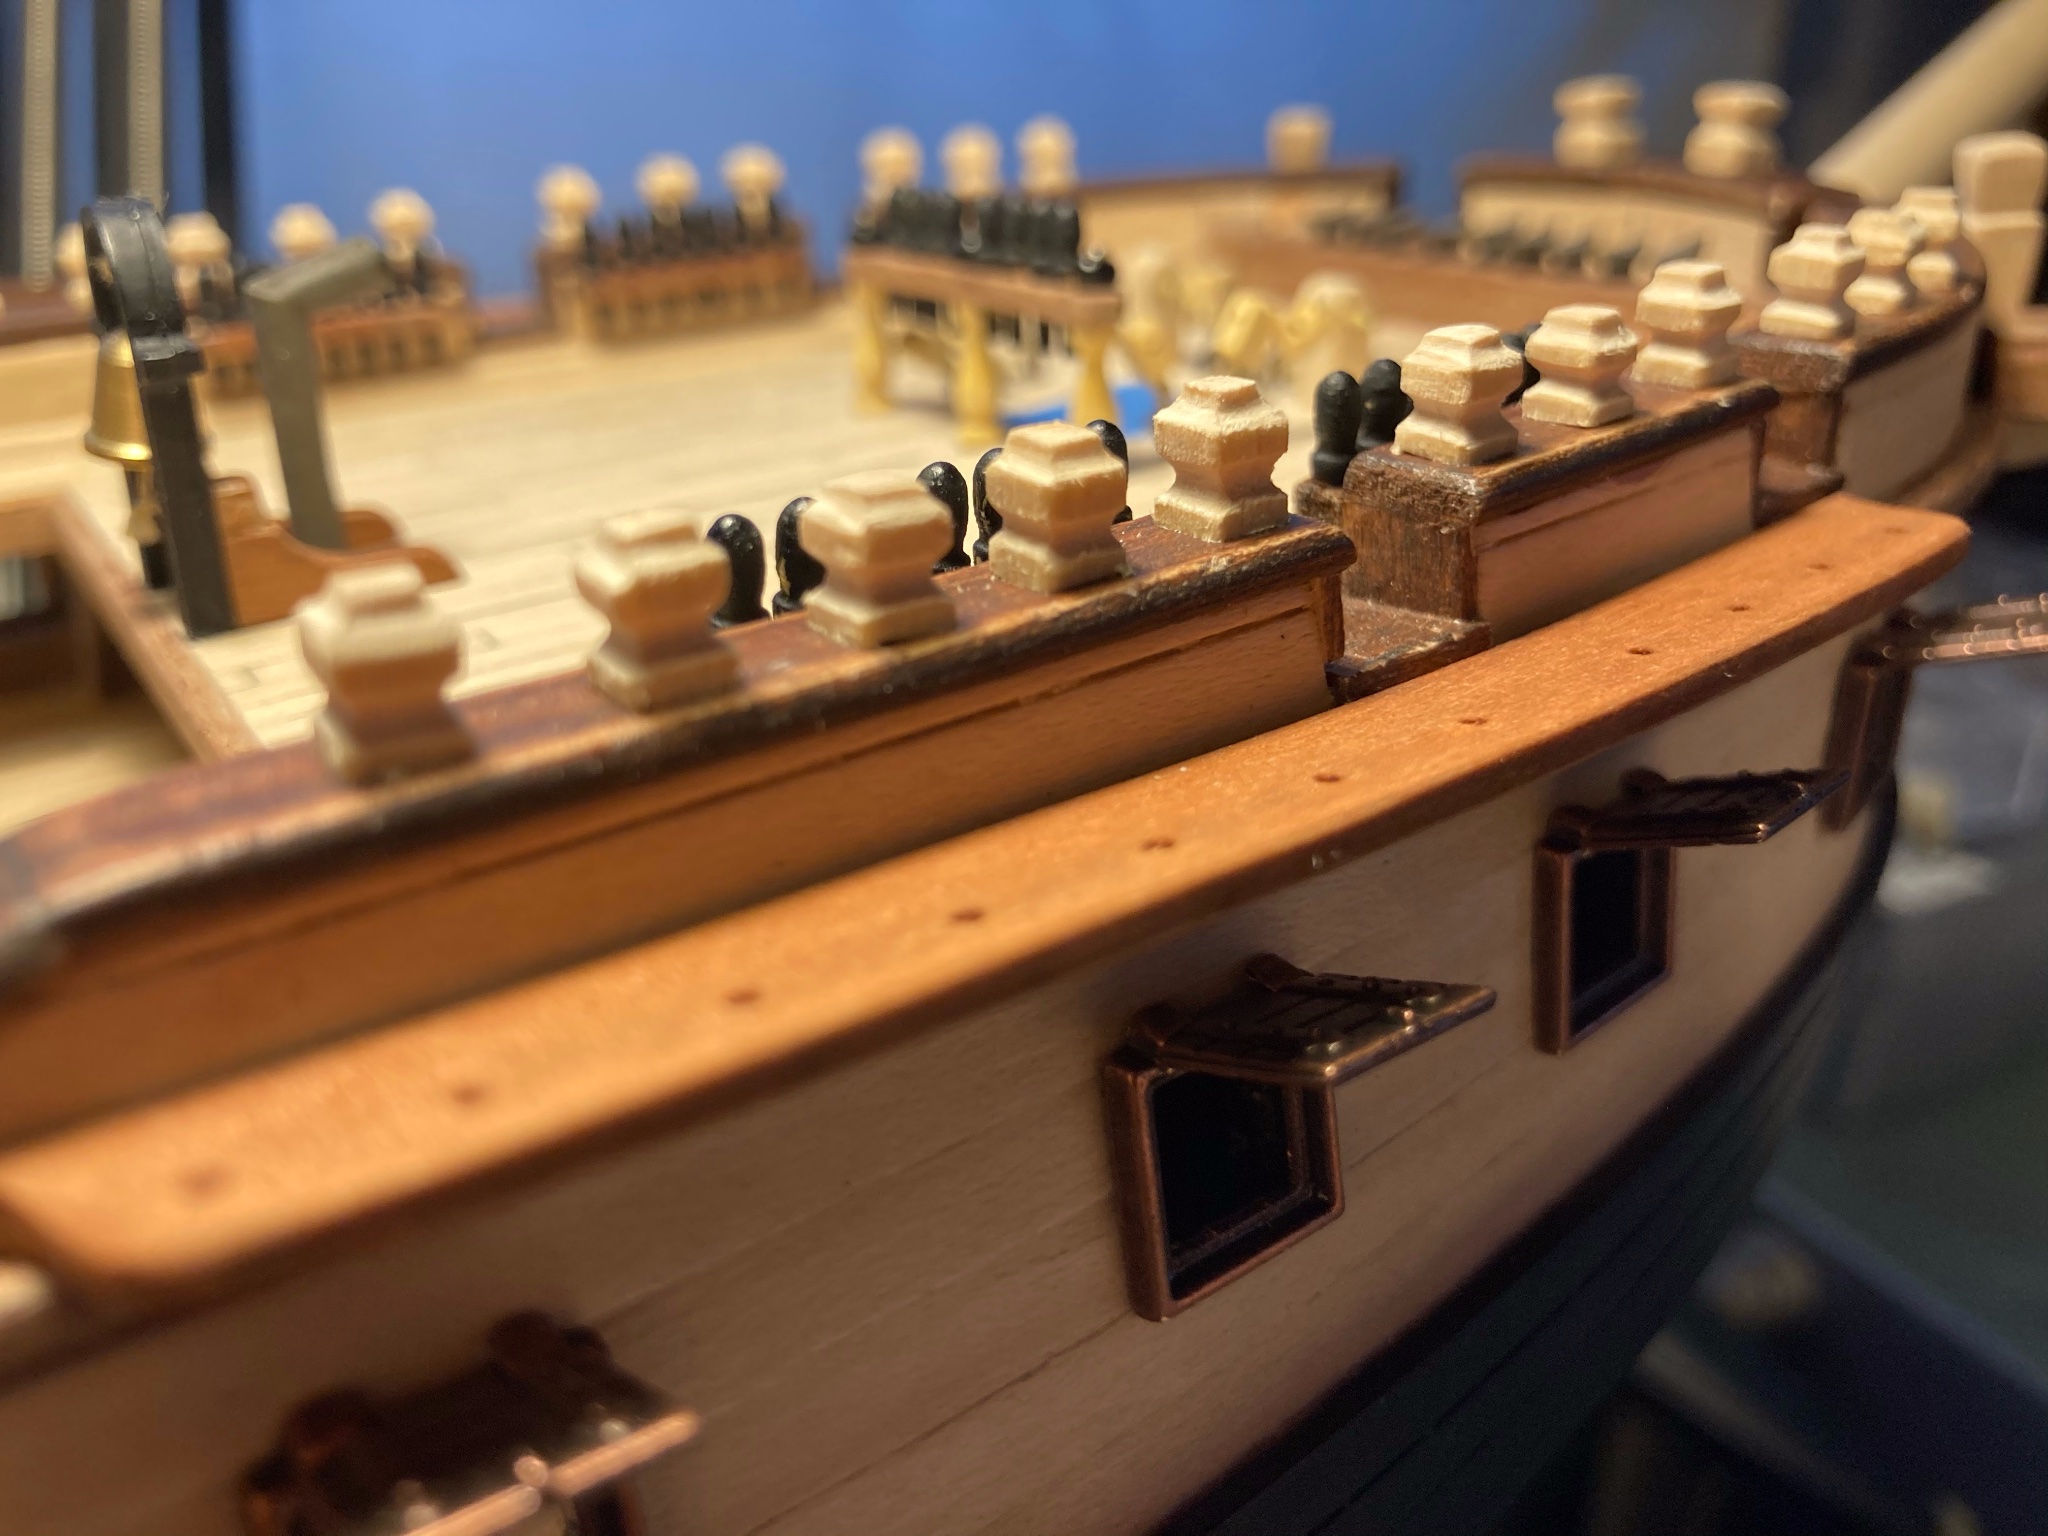
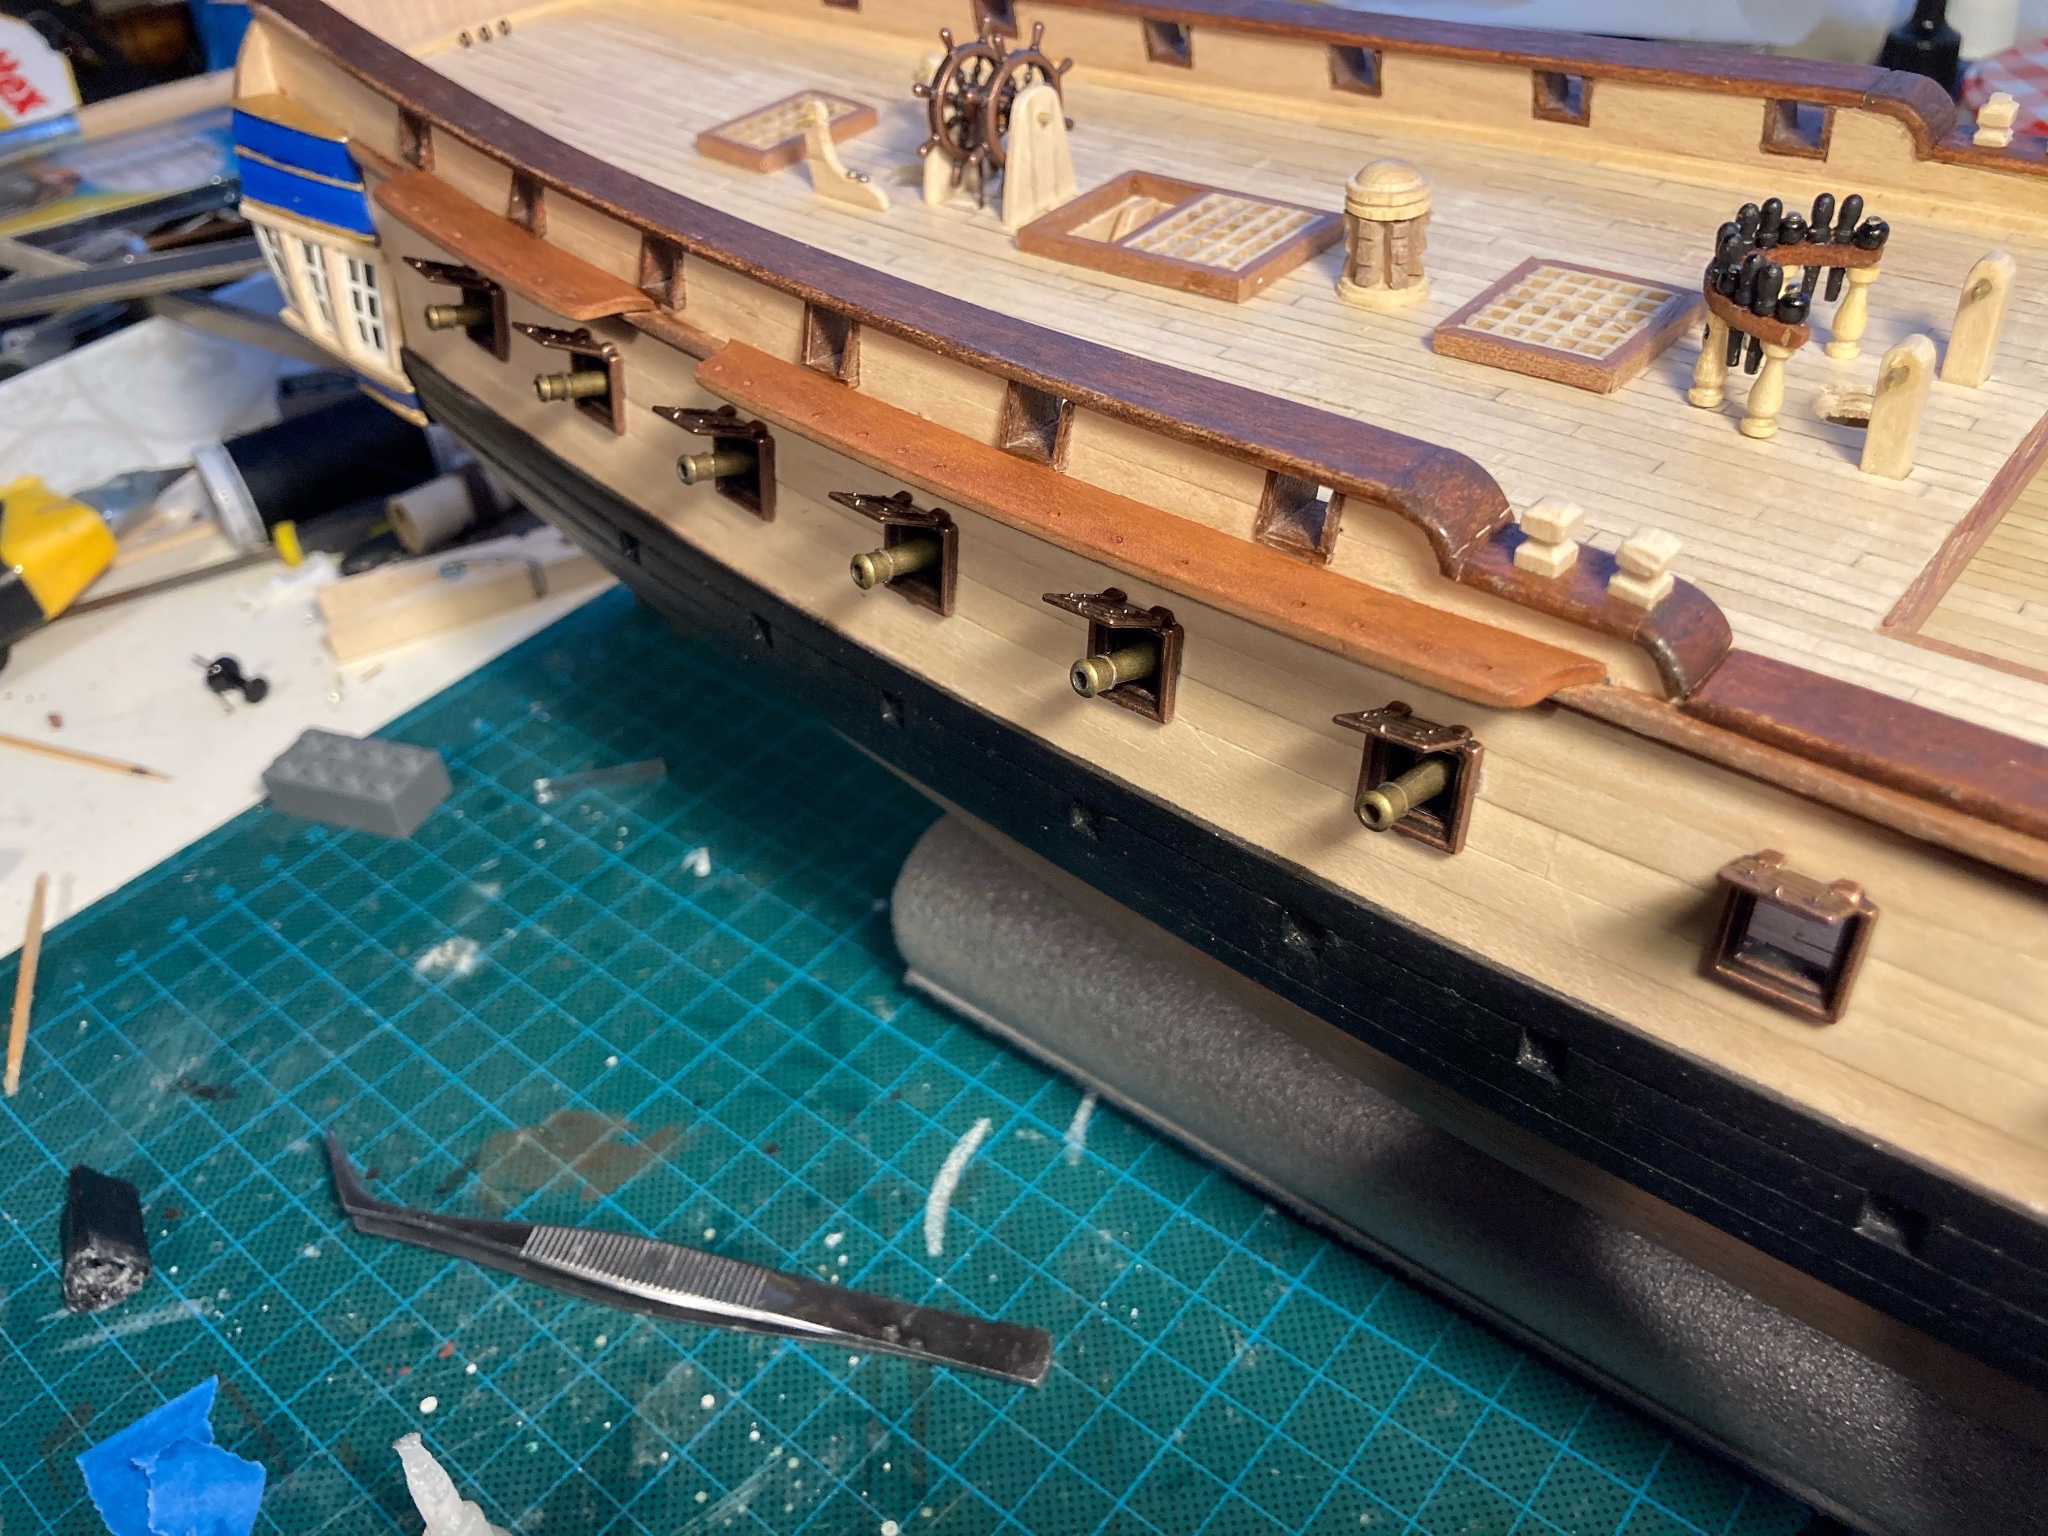
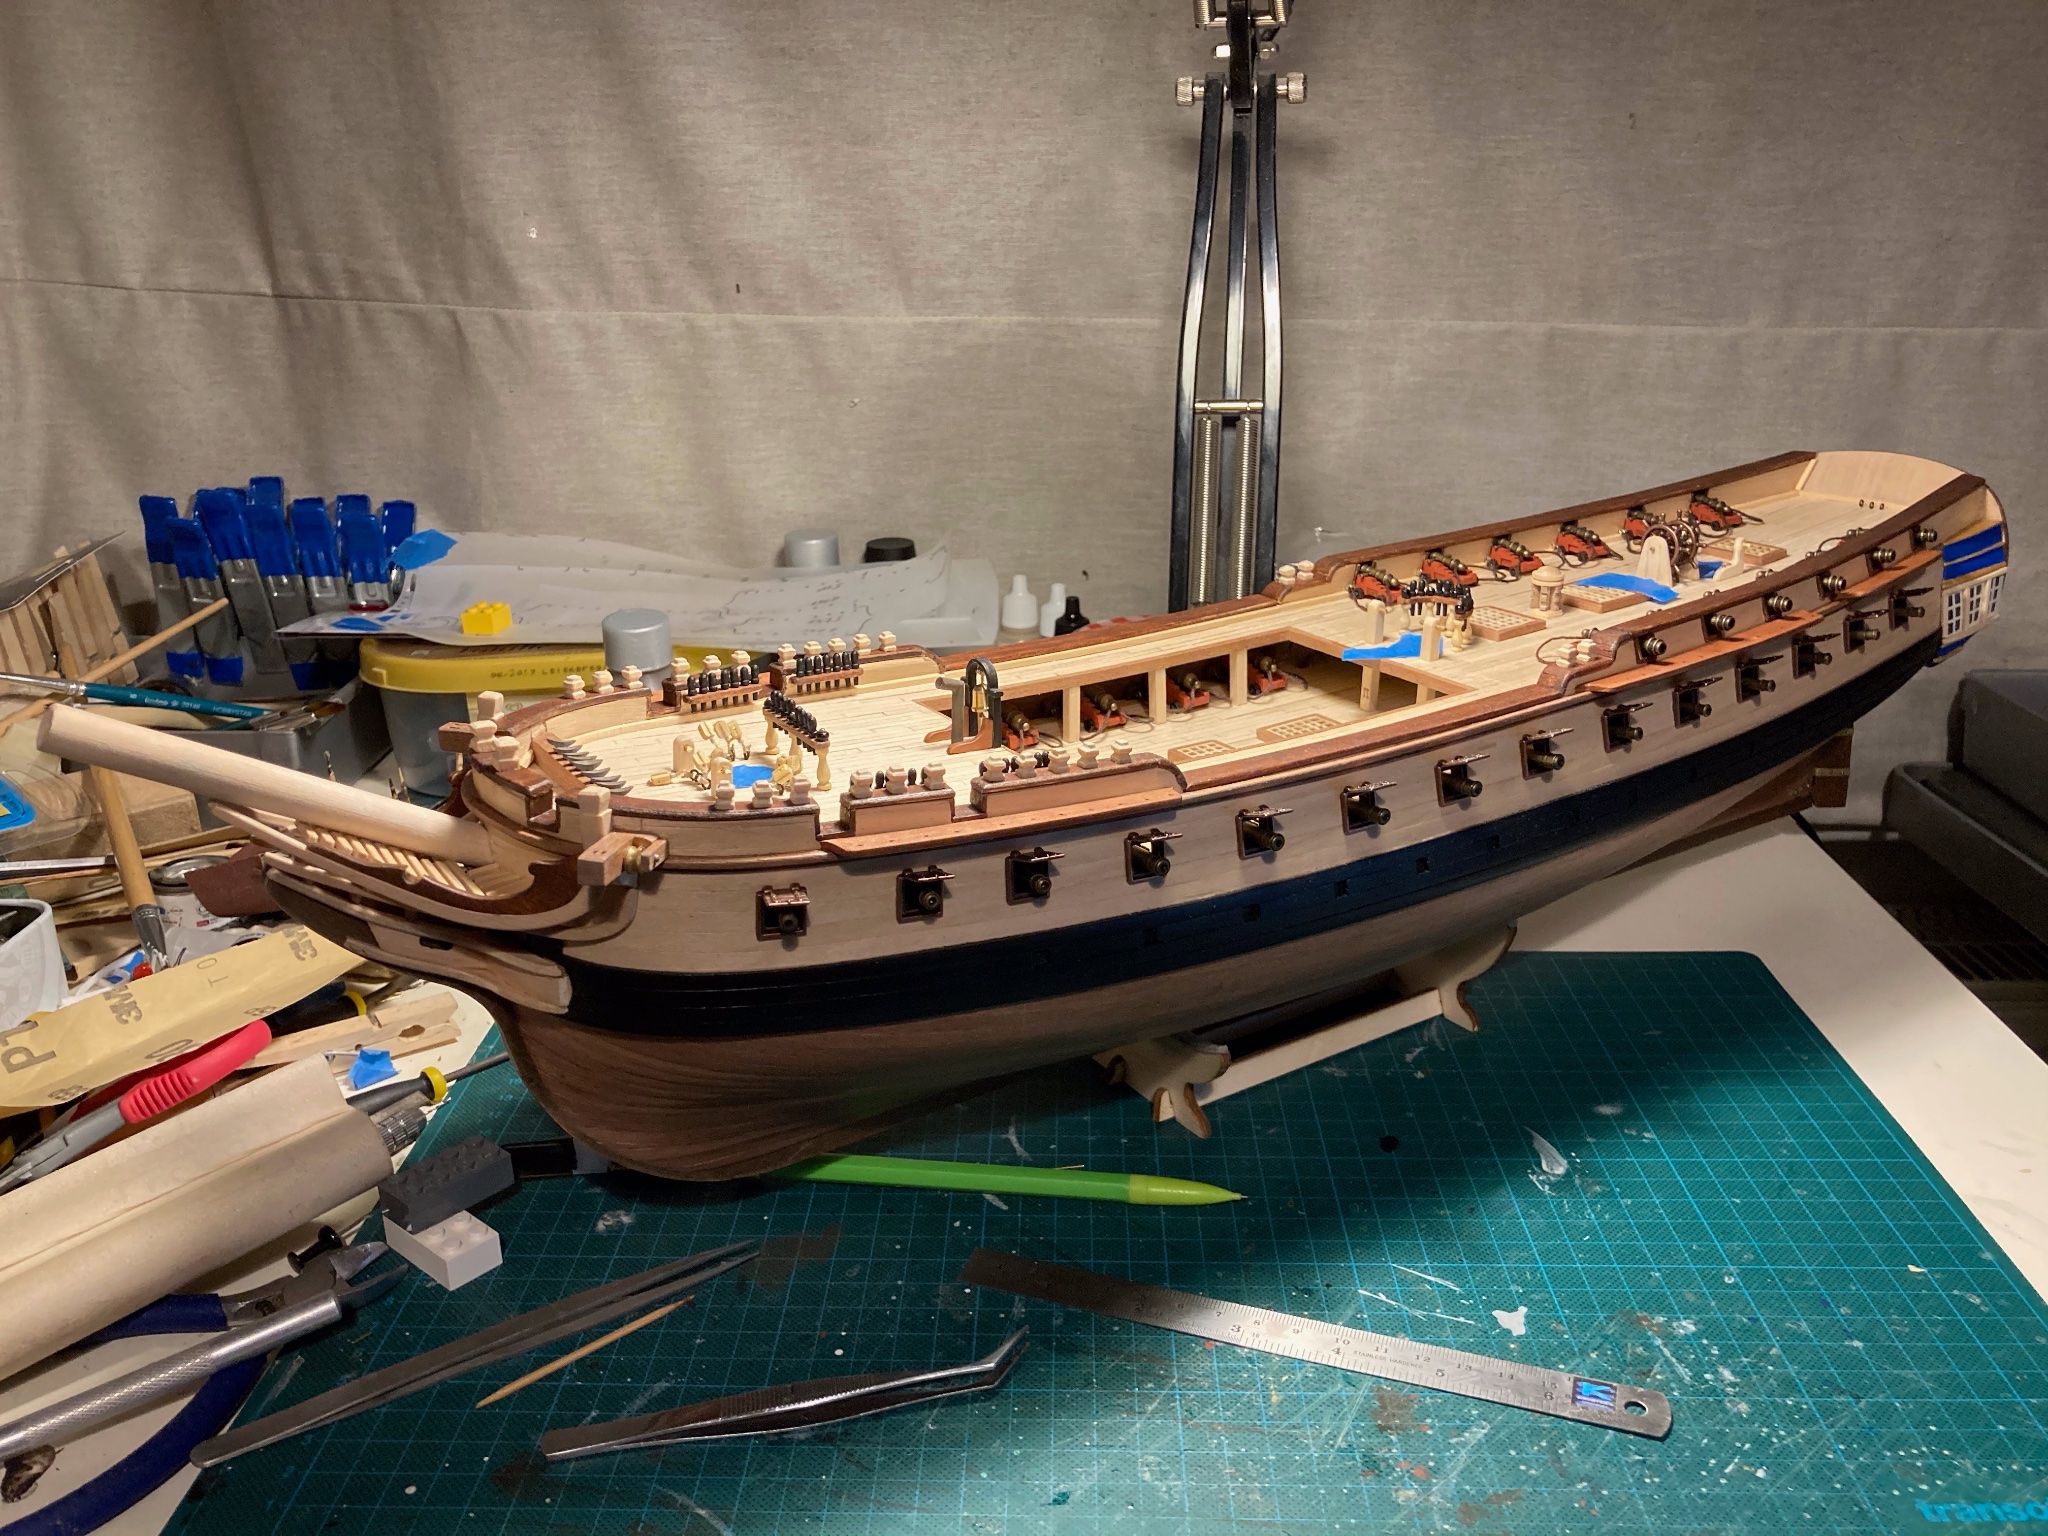
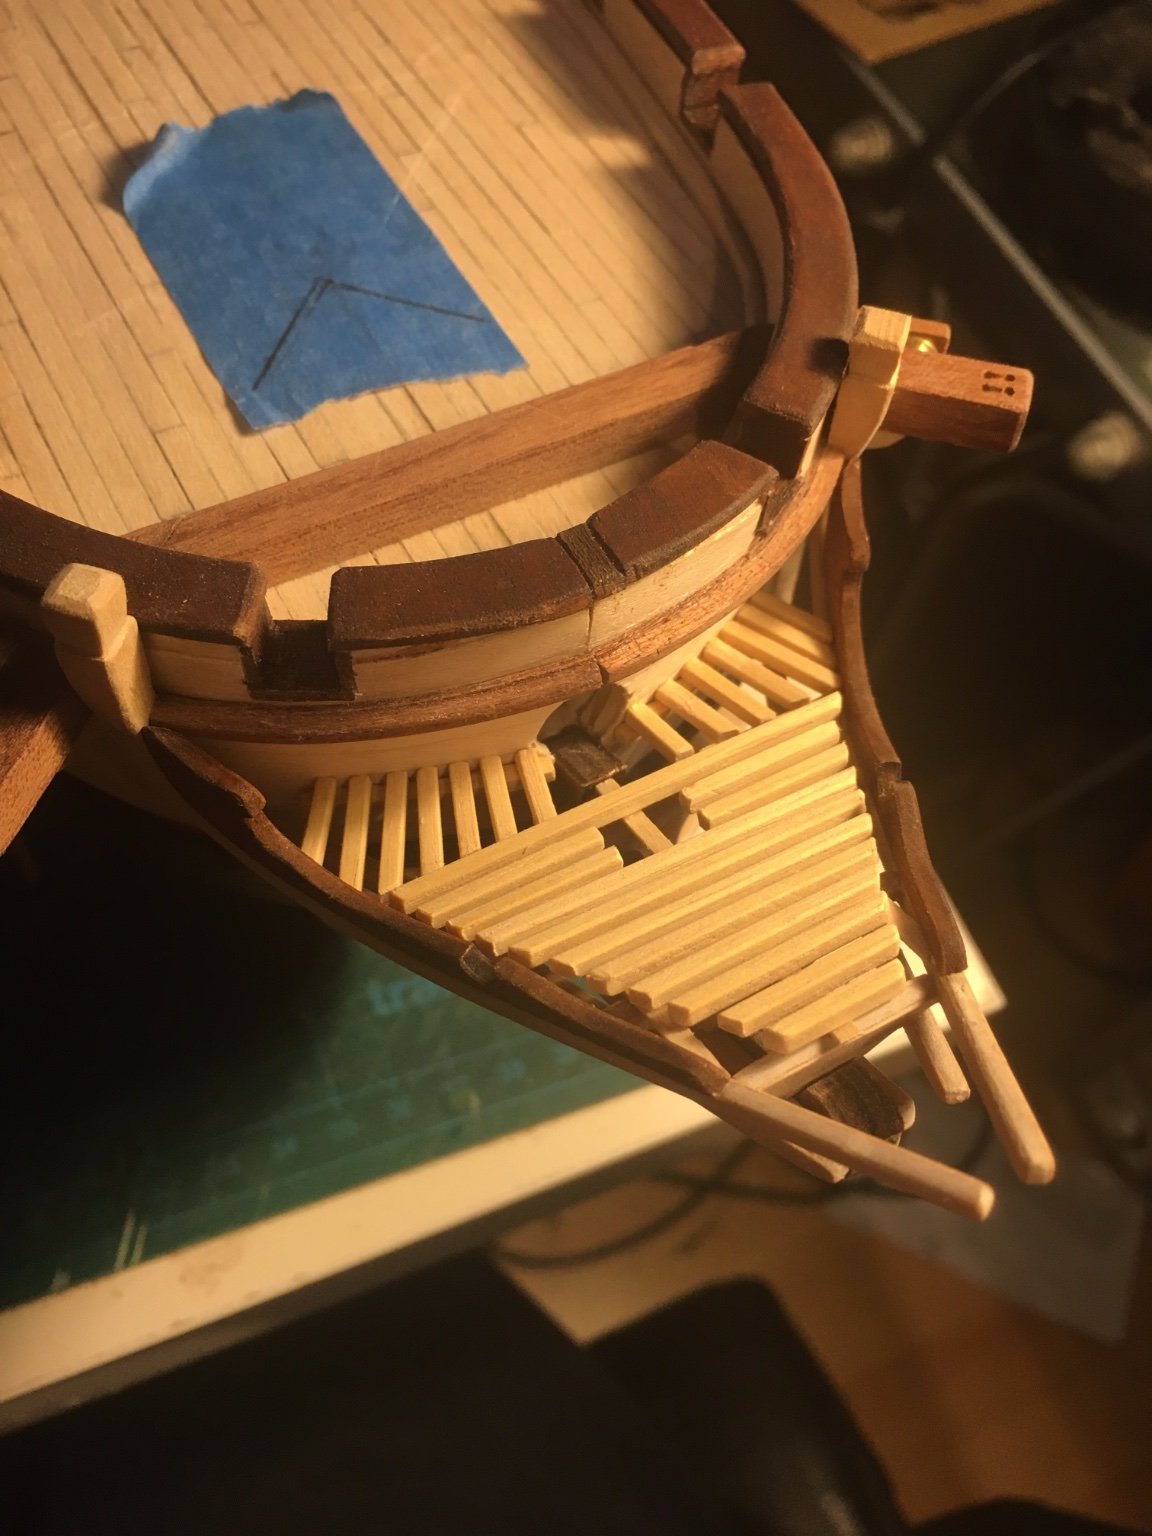
Hi all, quick update: finished the gun deck:
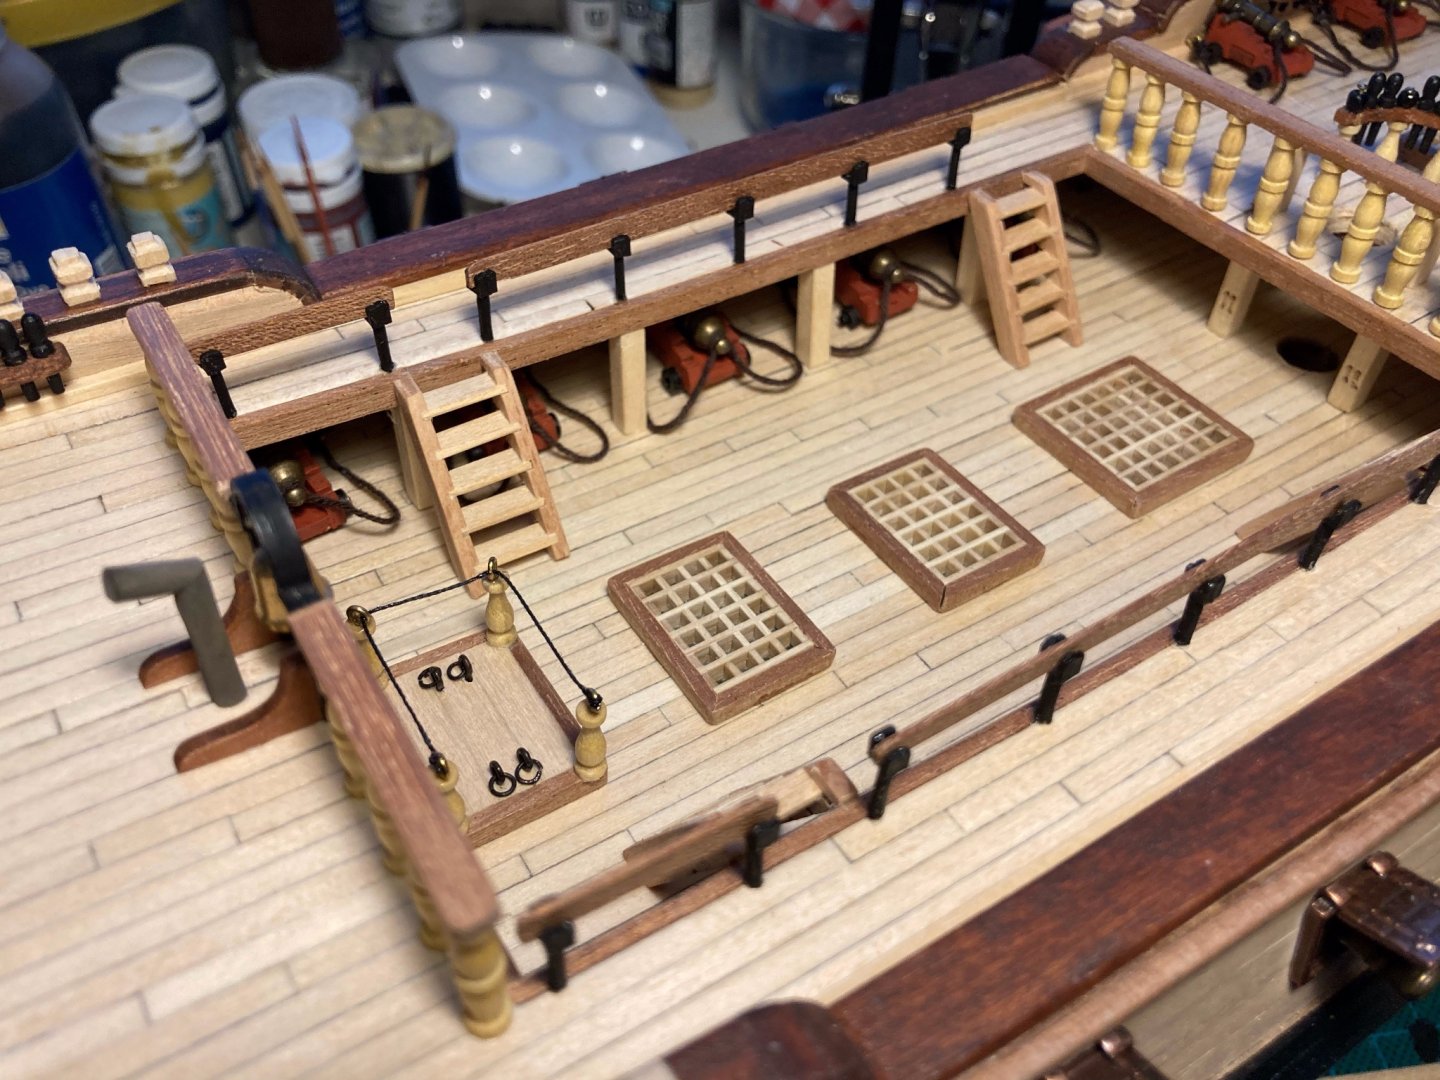
Added railings, supports, etc. Top tip: do NOT install the outer railings before finishing off all other work on the hull. Wen the ornaments and guns are installed, this is almost the only way to safely hold on to her.
Started on the deadeyes next, got myself a 1m dowel to make sure I'd get the angles for the stays correct:

On second thought, I might have overdone this a bit 🙂 But the result looks good:
Next up, access ladders and the mirror..
Take care and stay safe!
-
Happy New Year everyone! Wishing you all good health and happy modelling, preferably without being confined to your home...
Big update as I had two weeks off, filled with setting up the house for Christmas and continuing on Di.
First, the gunport went up. Decided to keep the copper look that's out of the box, mainly because I like it (same for the cannons, which are a weathered brass colour). Some fine filing needed to be done, and I had to discover the best way of glueing them

After that, deck ornaments, filed while waiting for the different layers of paint on the quarter galleries dried (see previous post):

Installing the channels then. As this was my first experience with this type, reinforced them with 1mm brass wire which fit into the hull (more drilling in the hull, yay..)

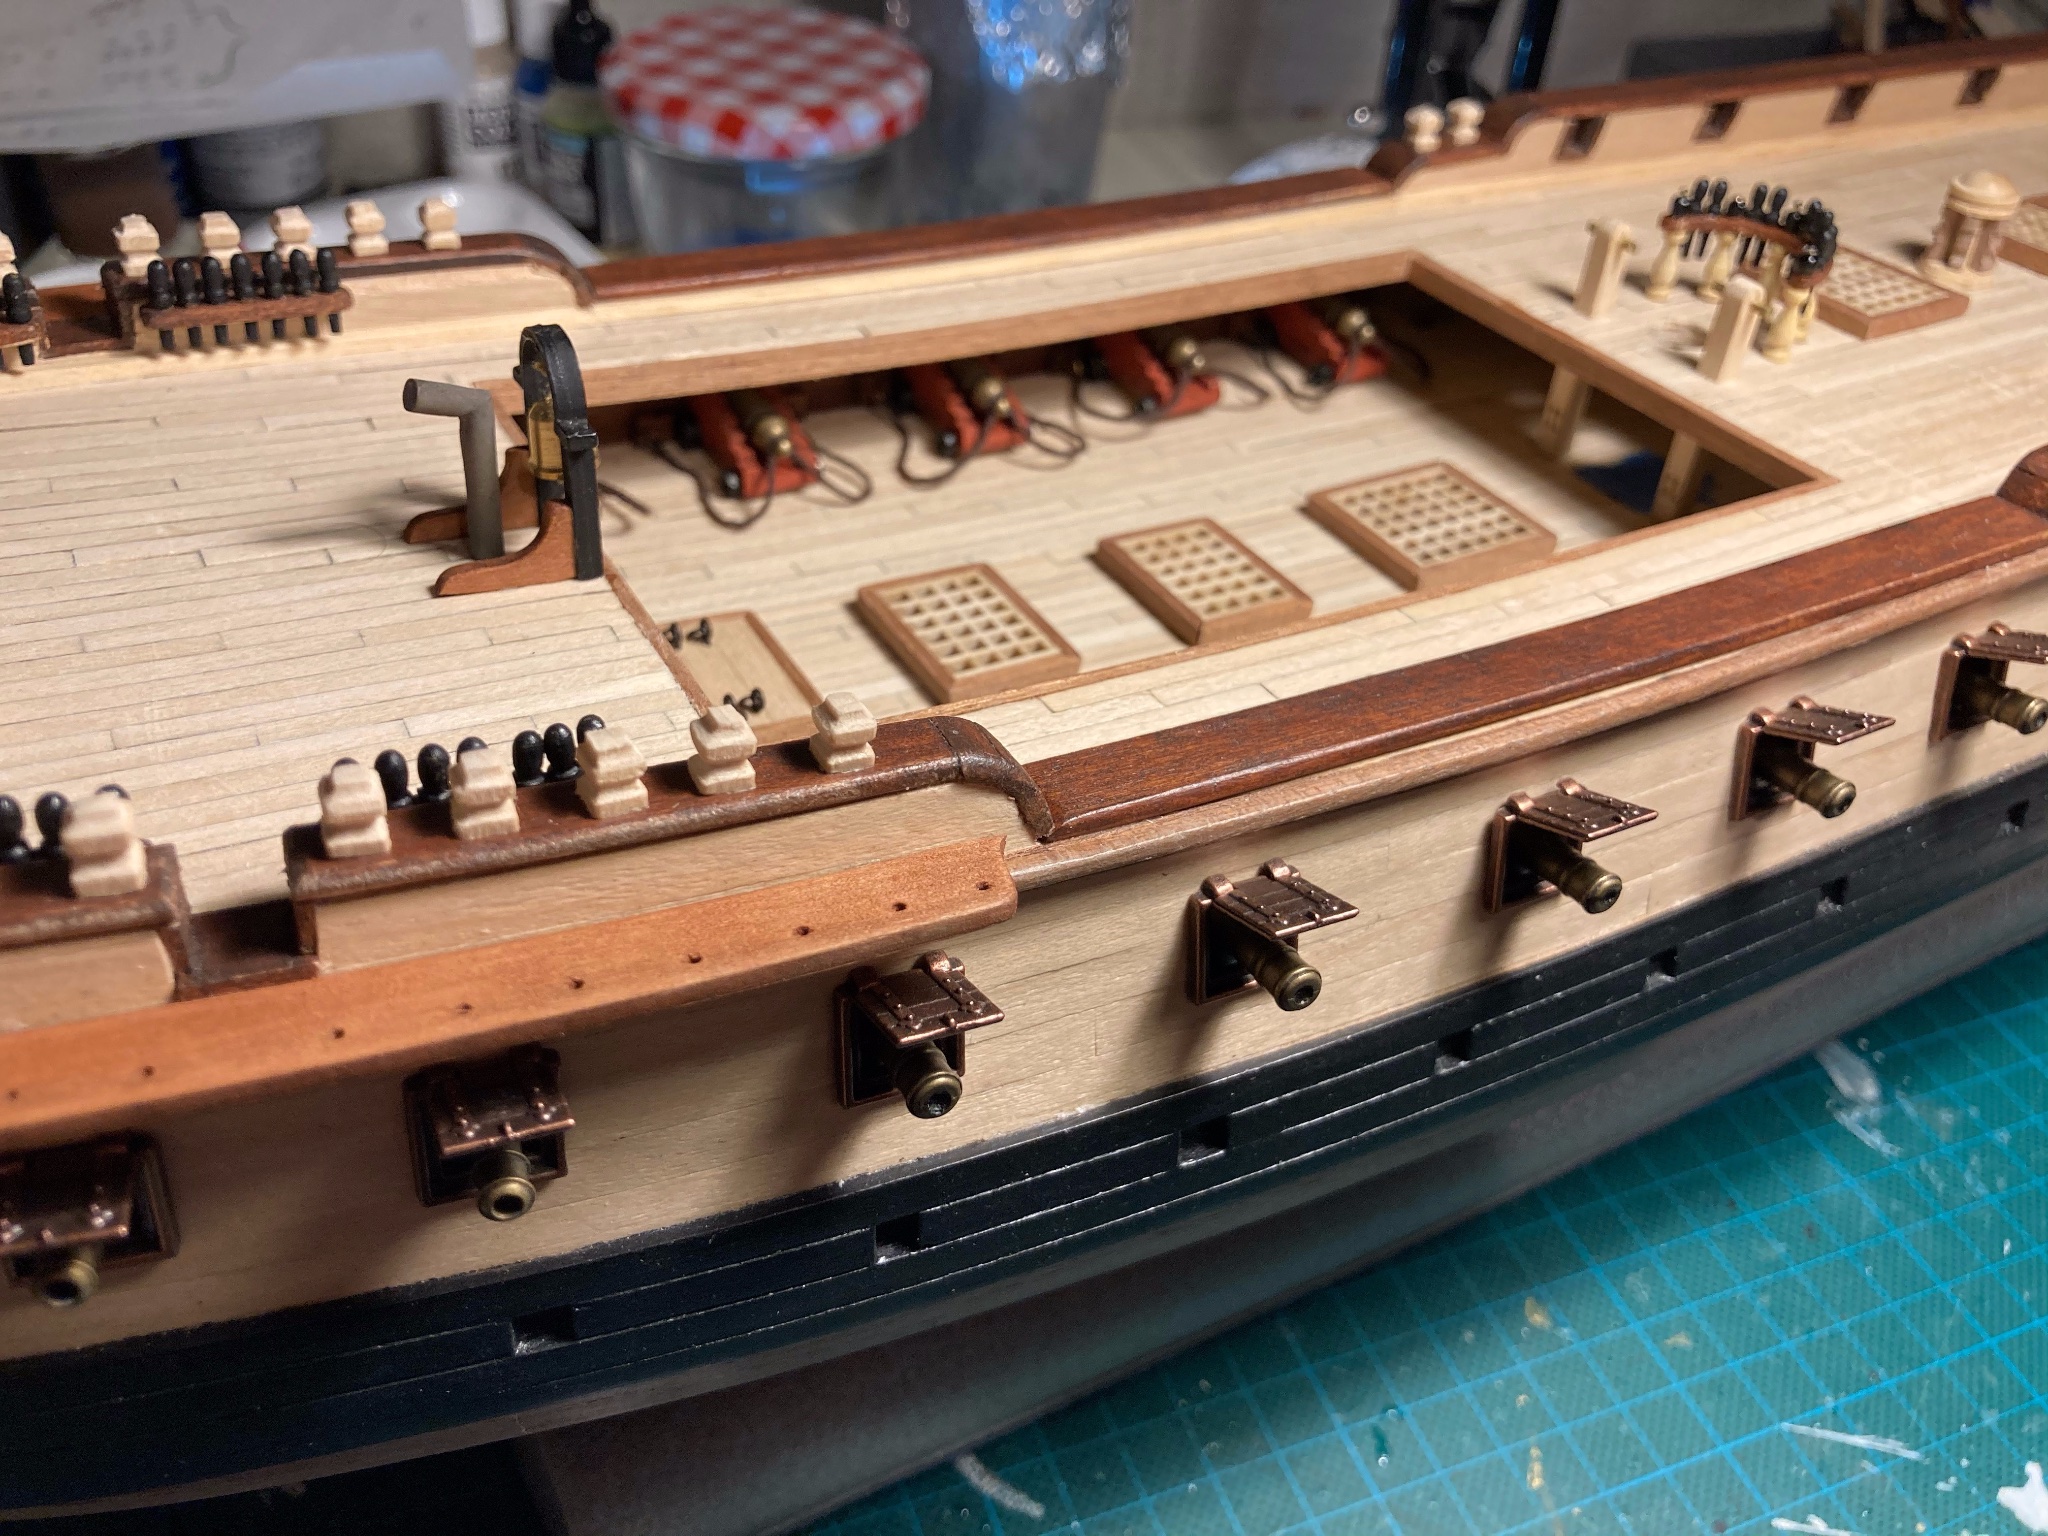
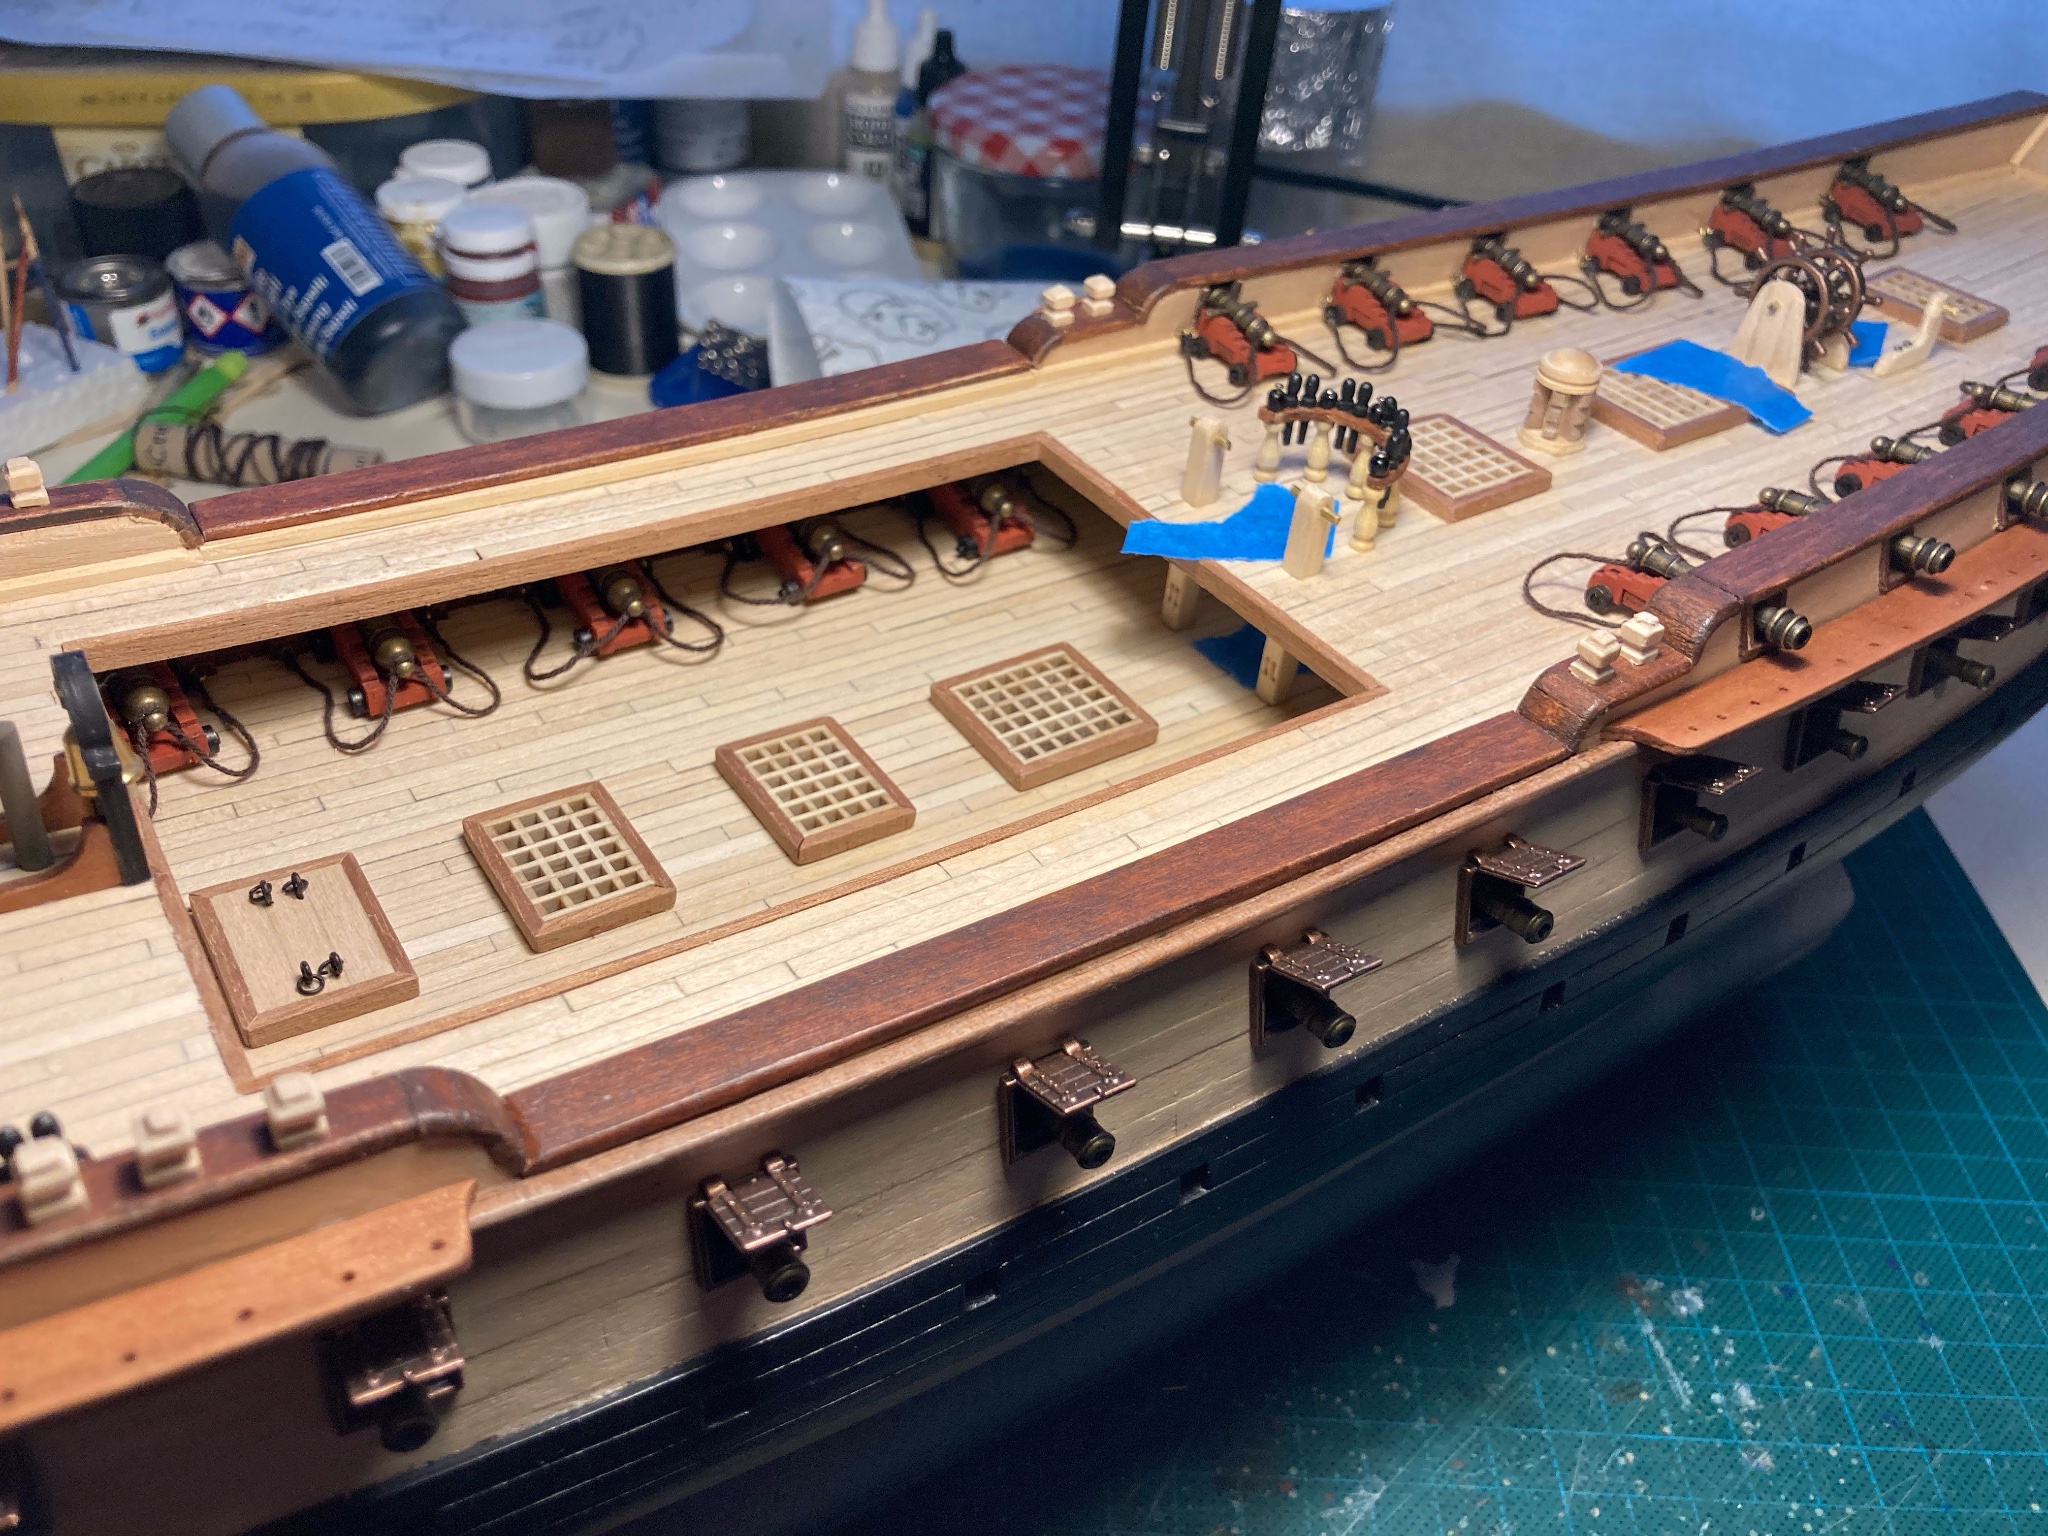
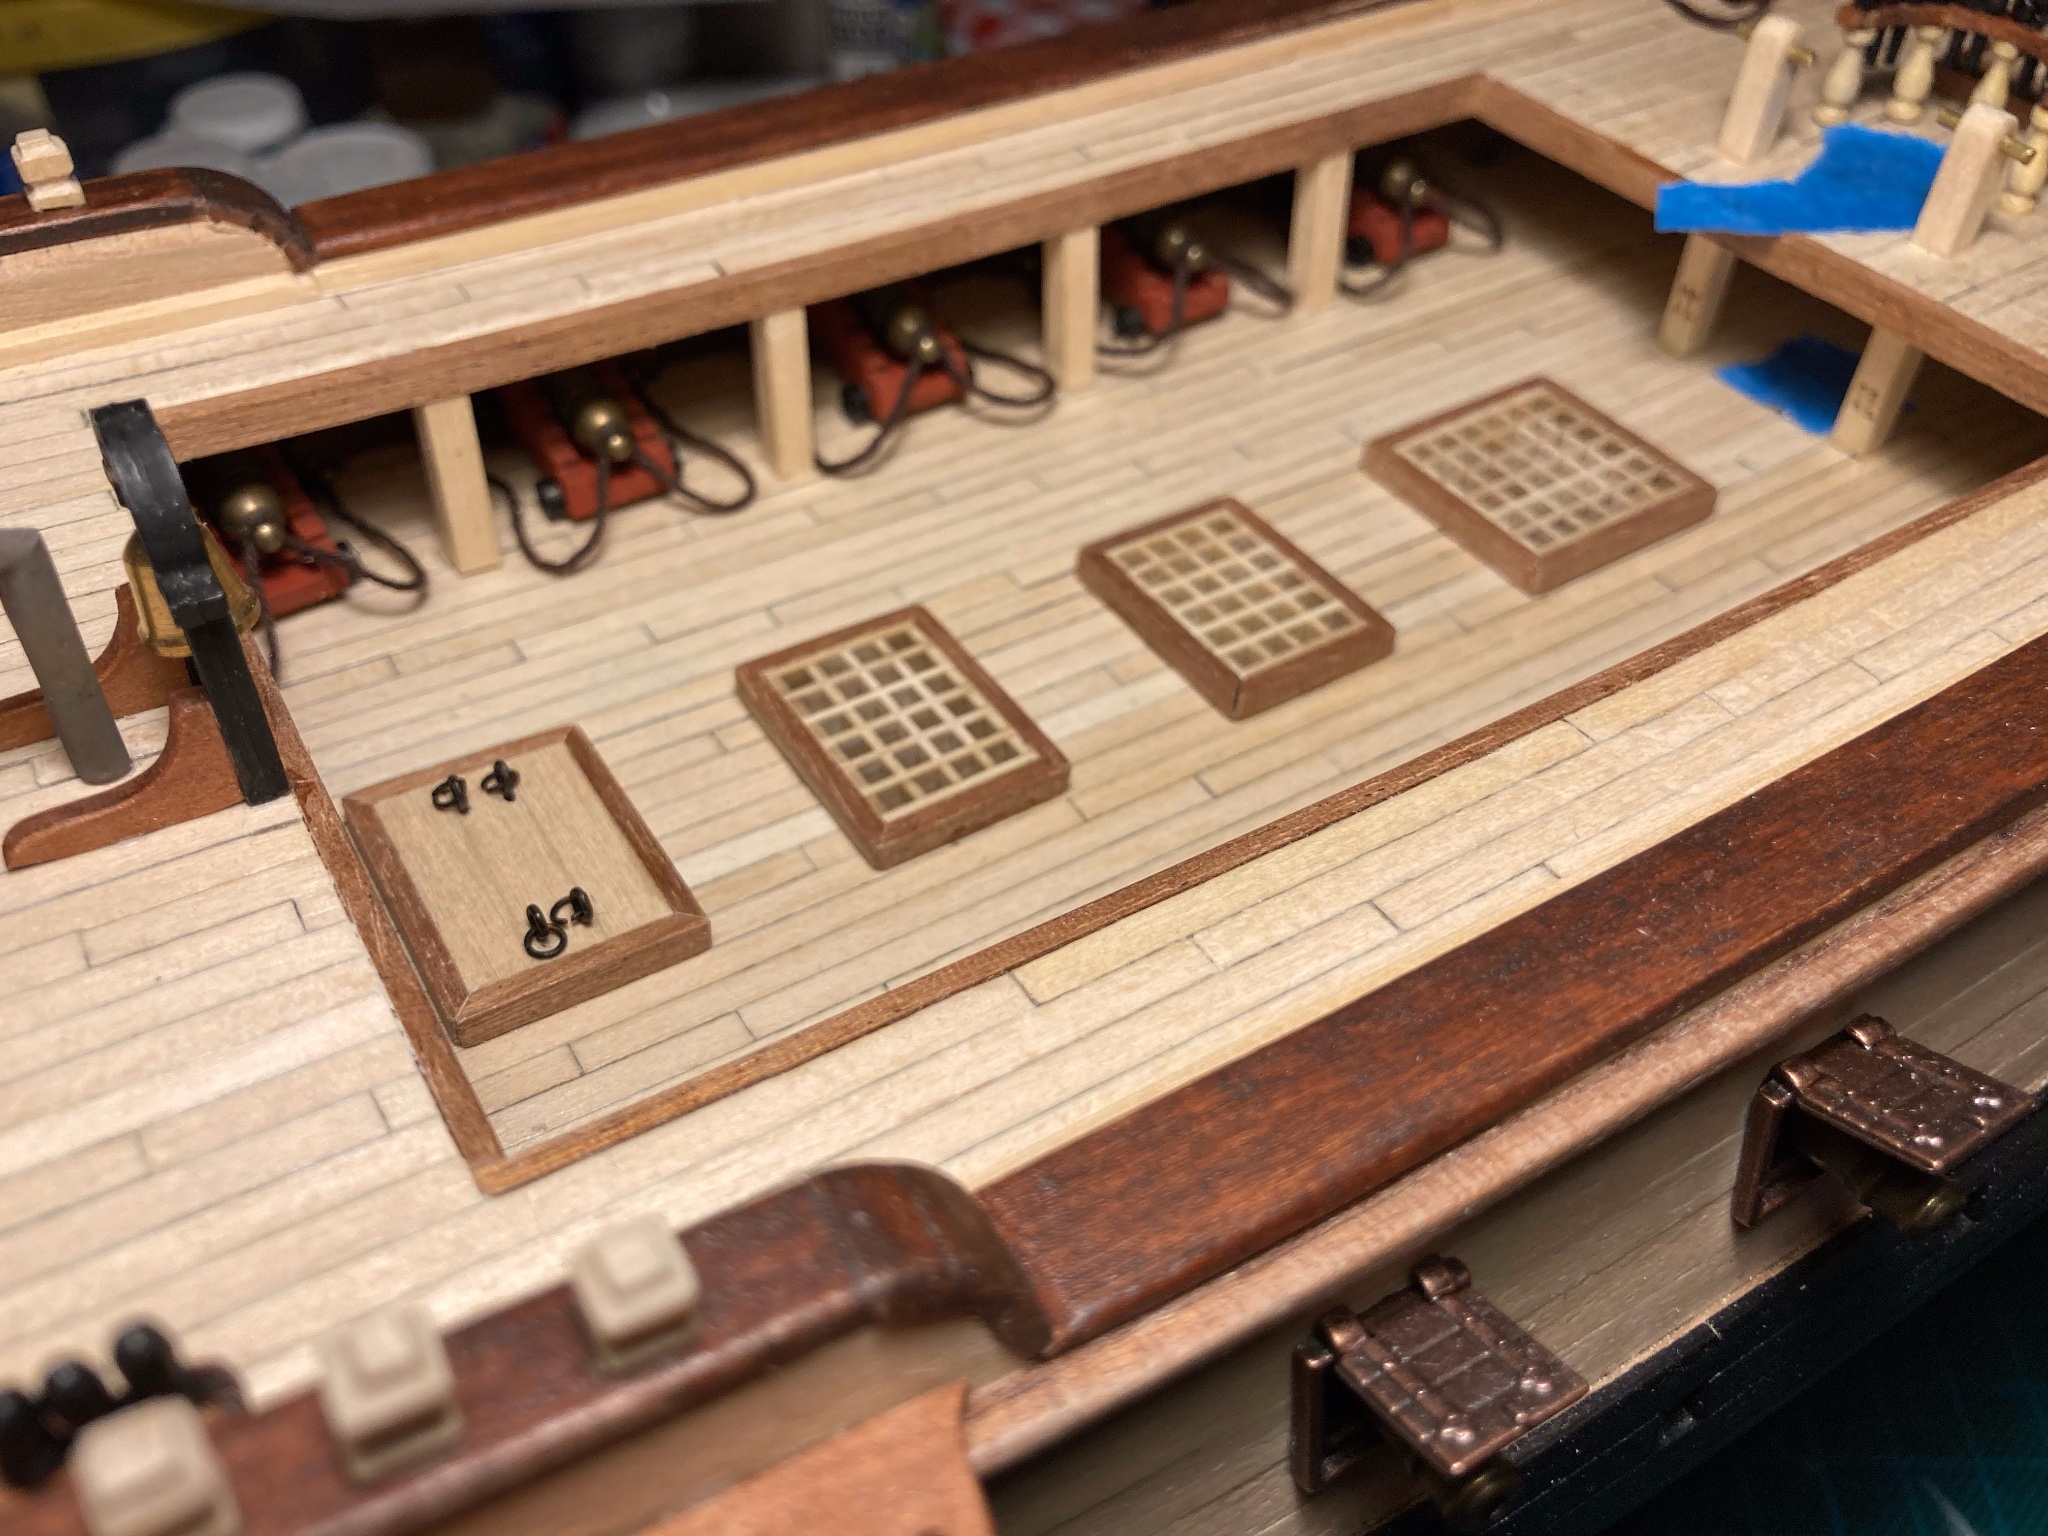
Then the guns, something completely new. measured up the correct place to drill the hoes for the side cannons and installed them:

Then the tricky bit, installing the guns on the gun deck. Happy to say my little trick worked:
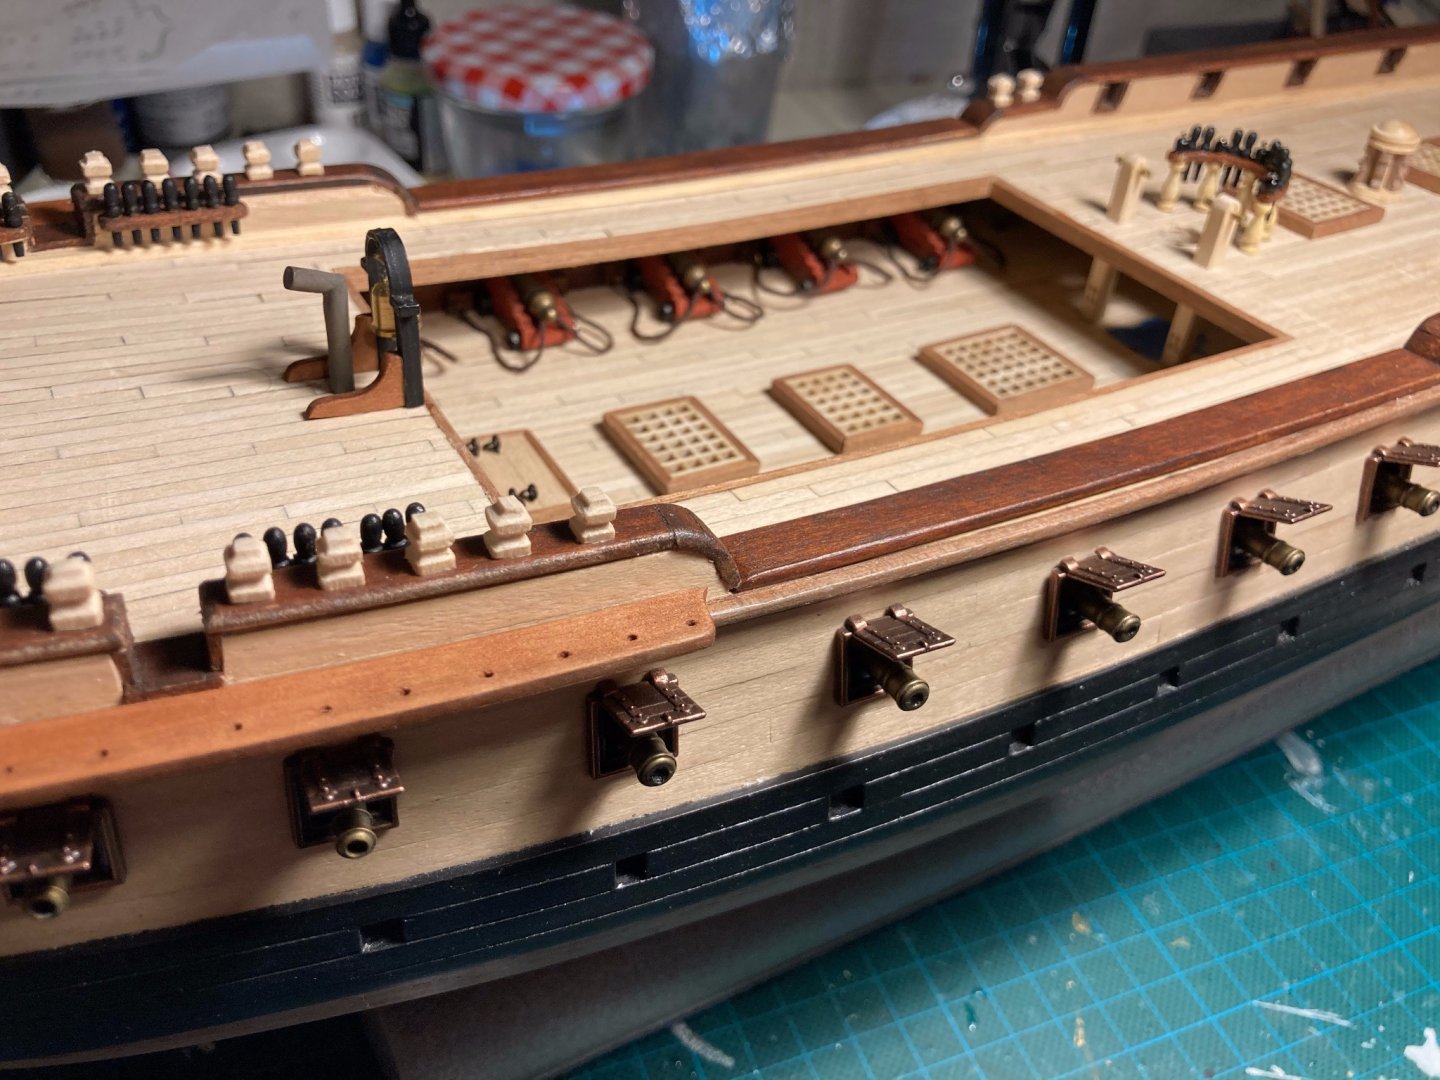
After that, the top deck guns were placed, and I'm currently working on finalising the gun deck:


A lot of work, lots of new experiences, but she's starting to look the part:

Take care and stay safe!
-
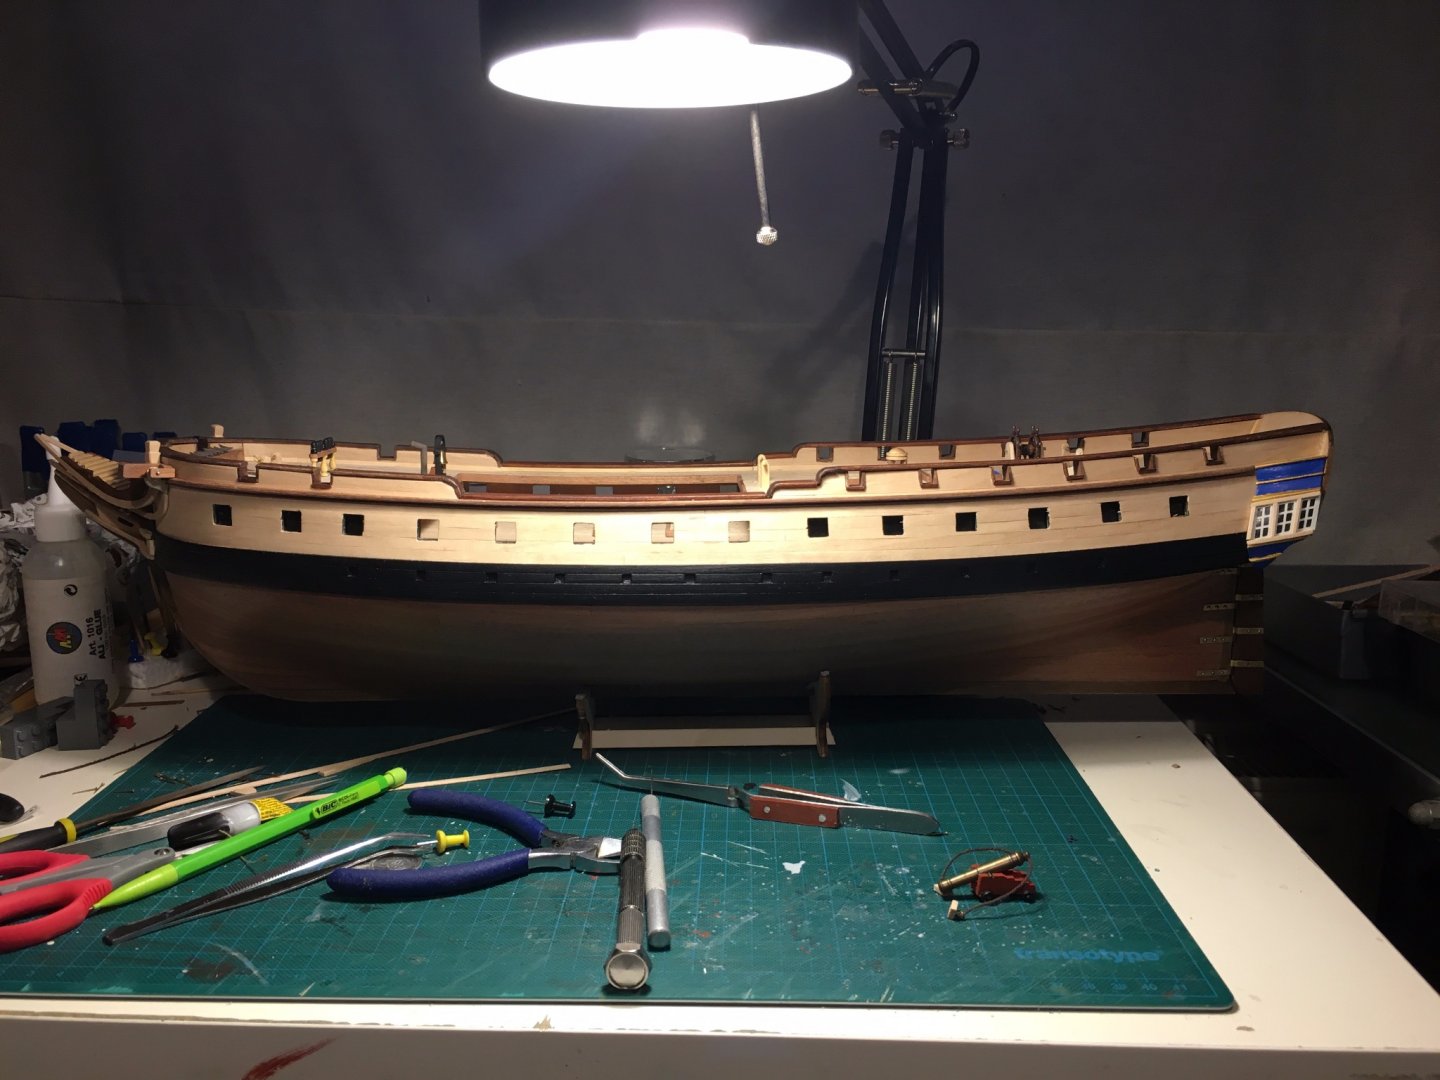
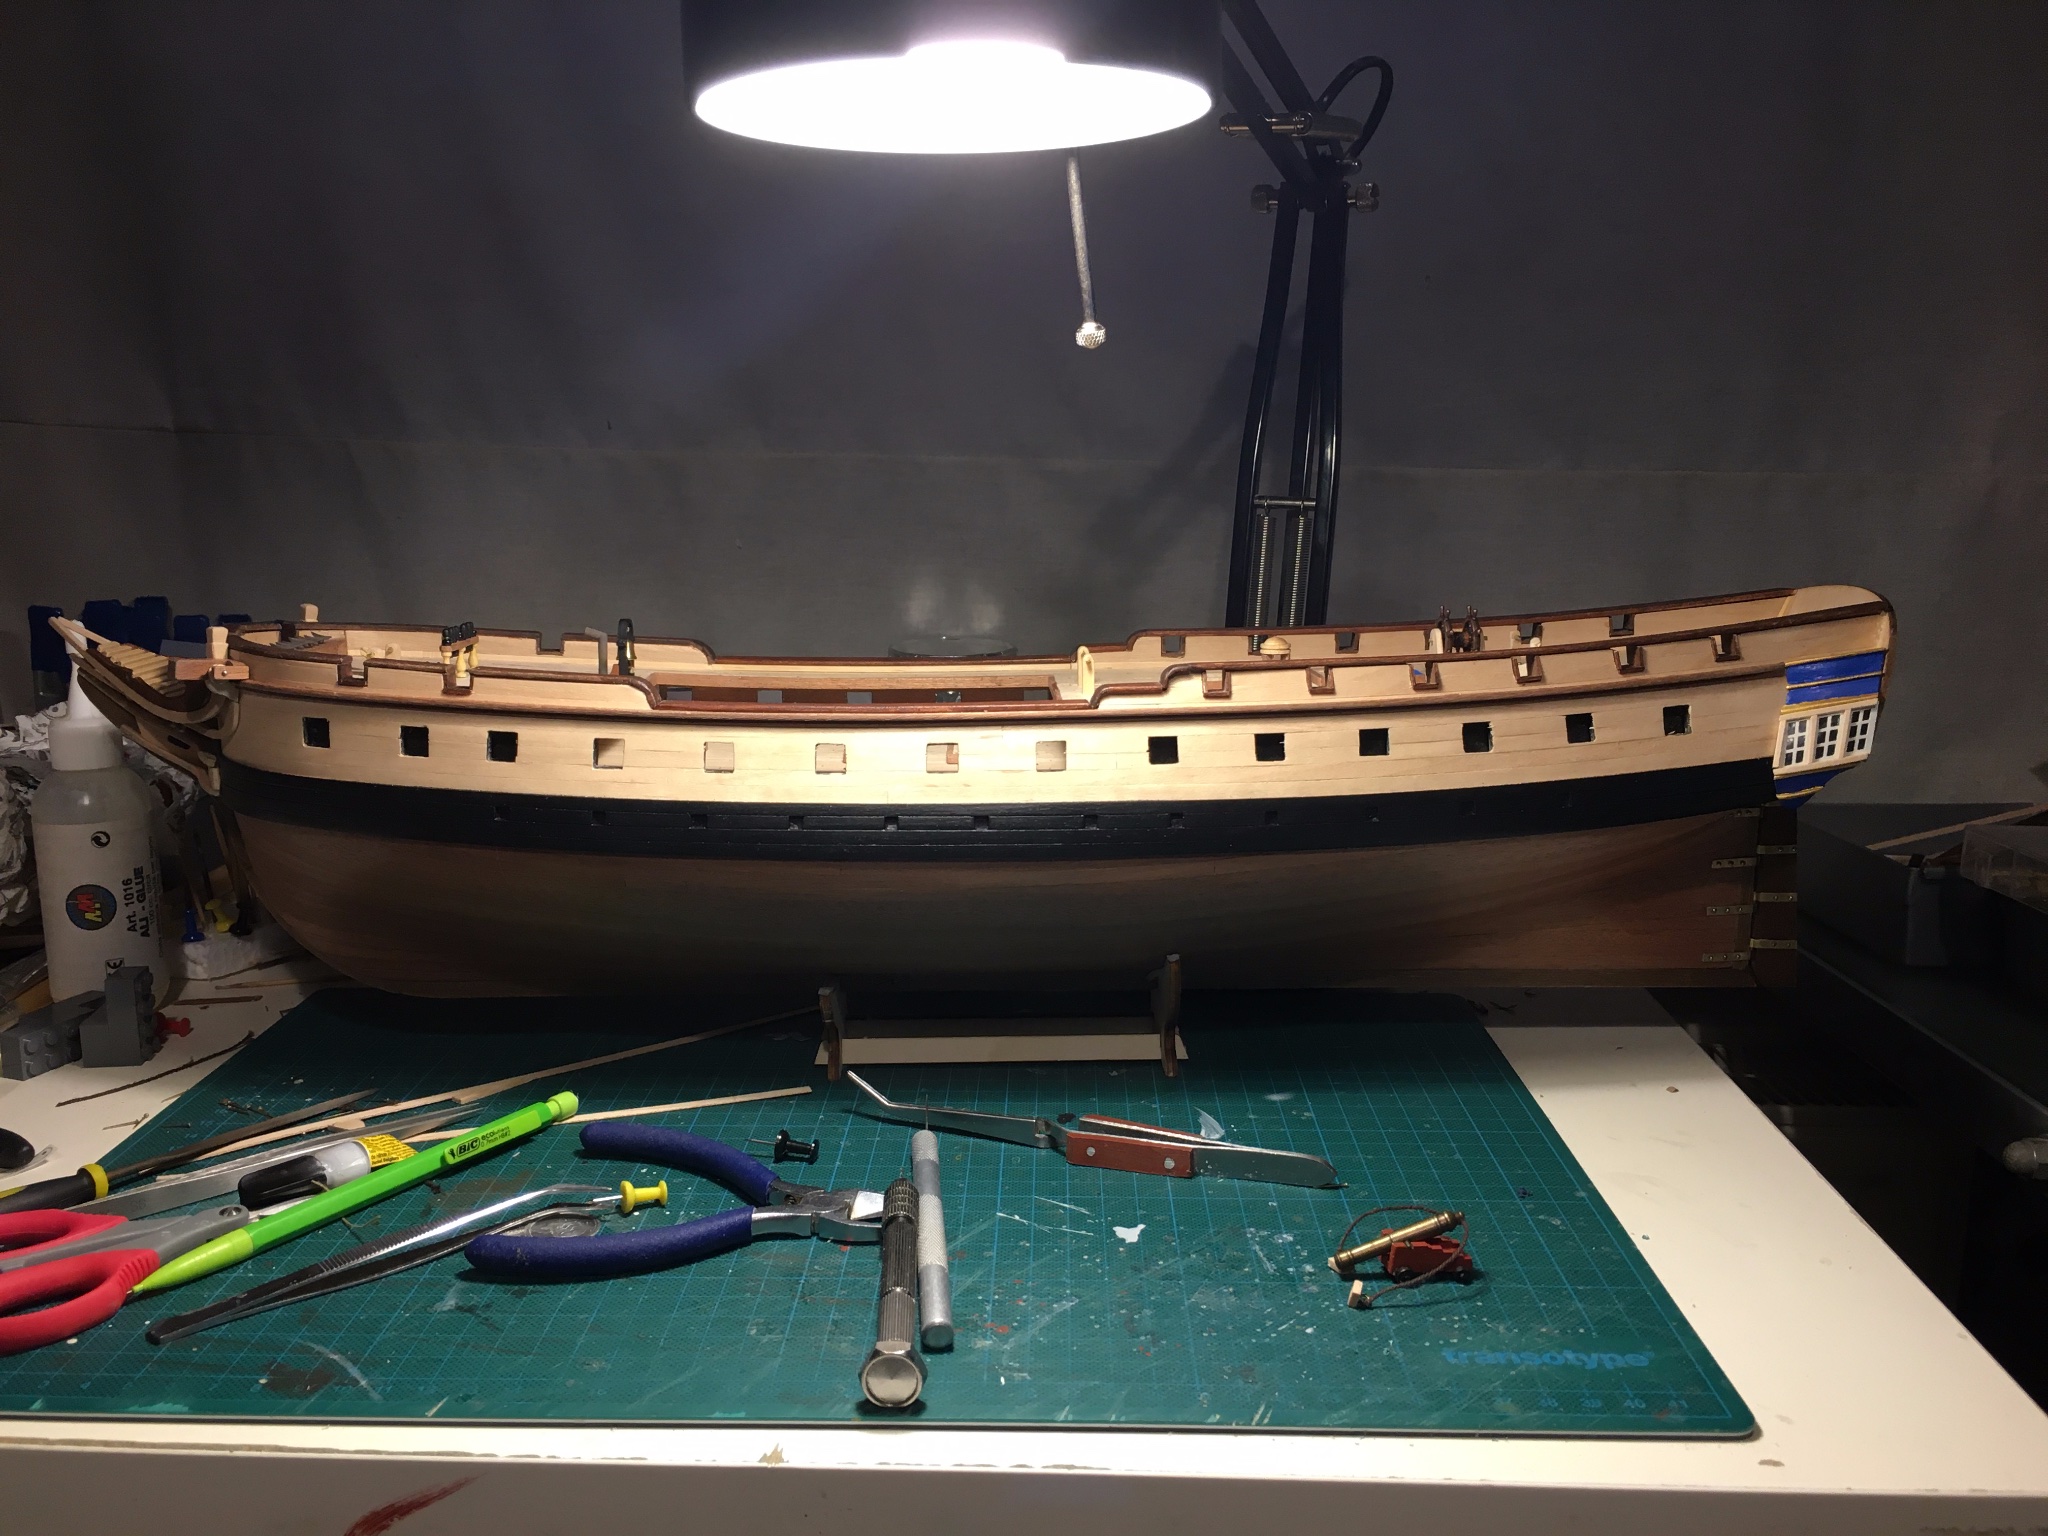
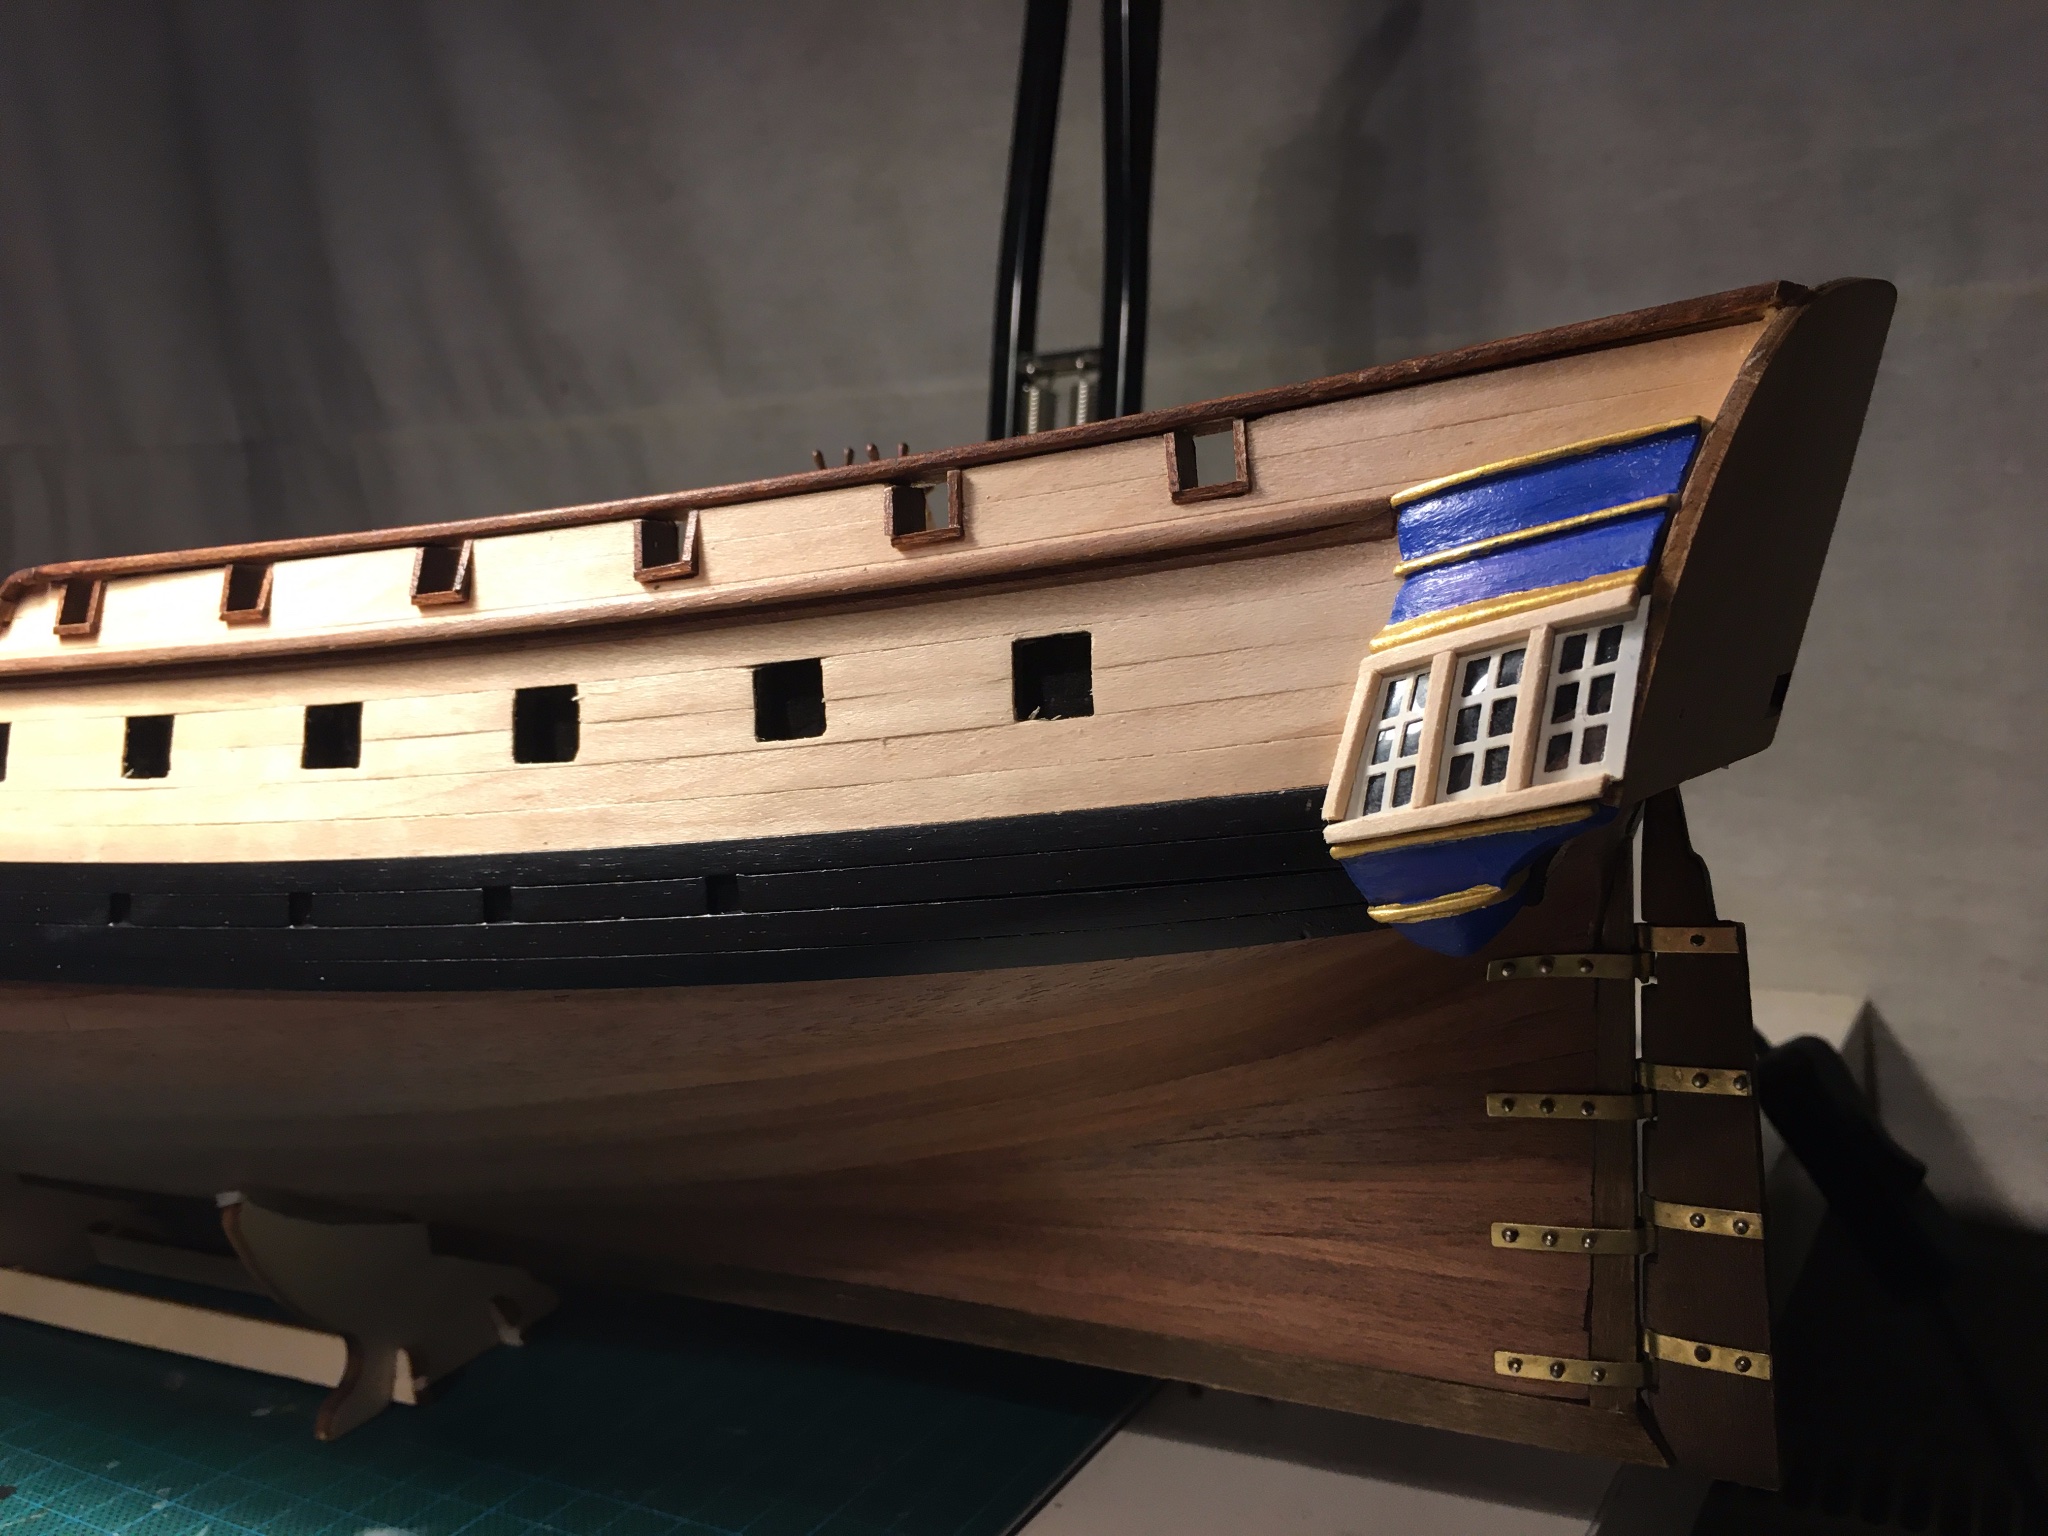
Hi all, thnx for checking in. another milestone passed earlier this week, although not quite how i imagined it: finalised and varnished the hull:
If you read my previous entry, I bit the bullet and went for the install of the quarter galleries as is. I got some sound advice from Keith, studied it, but frankly I didn't have enough confidence in my abilities to pursue a scratch build of this magnitude. Hope you don't take offence, Keith, I value your input and respect your work tremendously, I just didn't feel up to it.
A closer look, with some painting details still to be optimised:

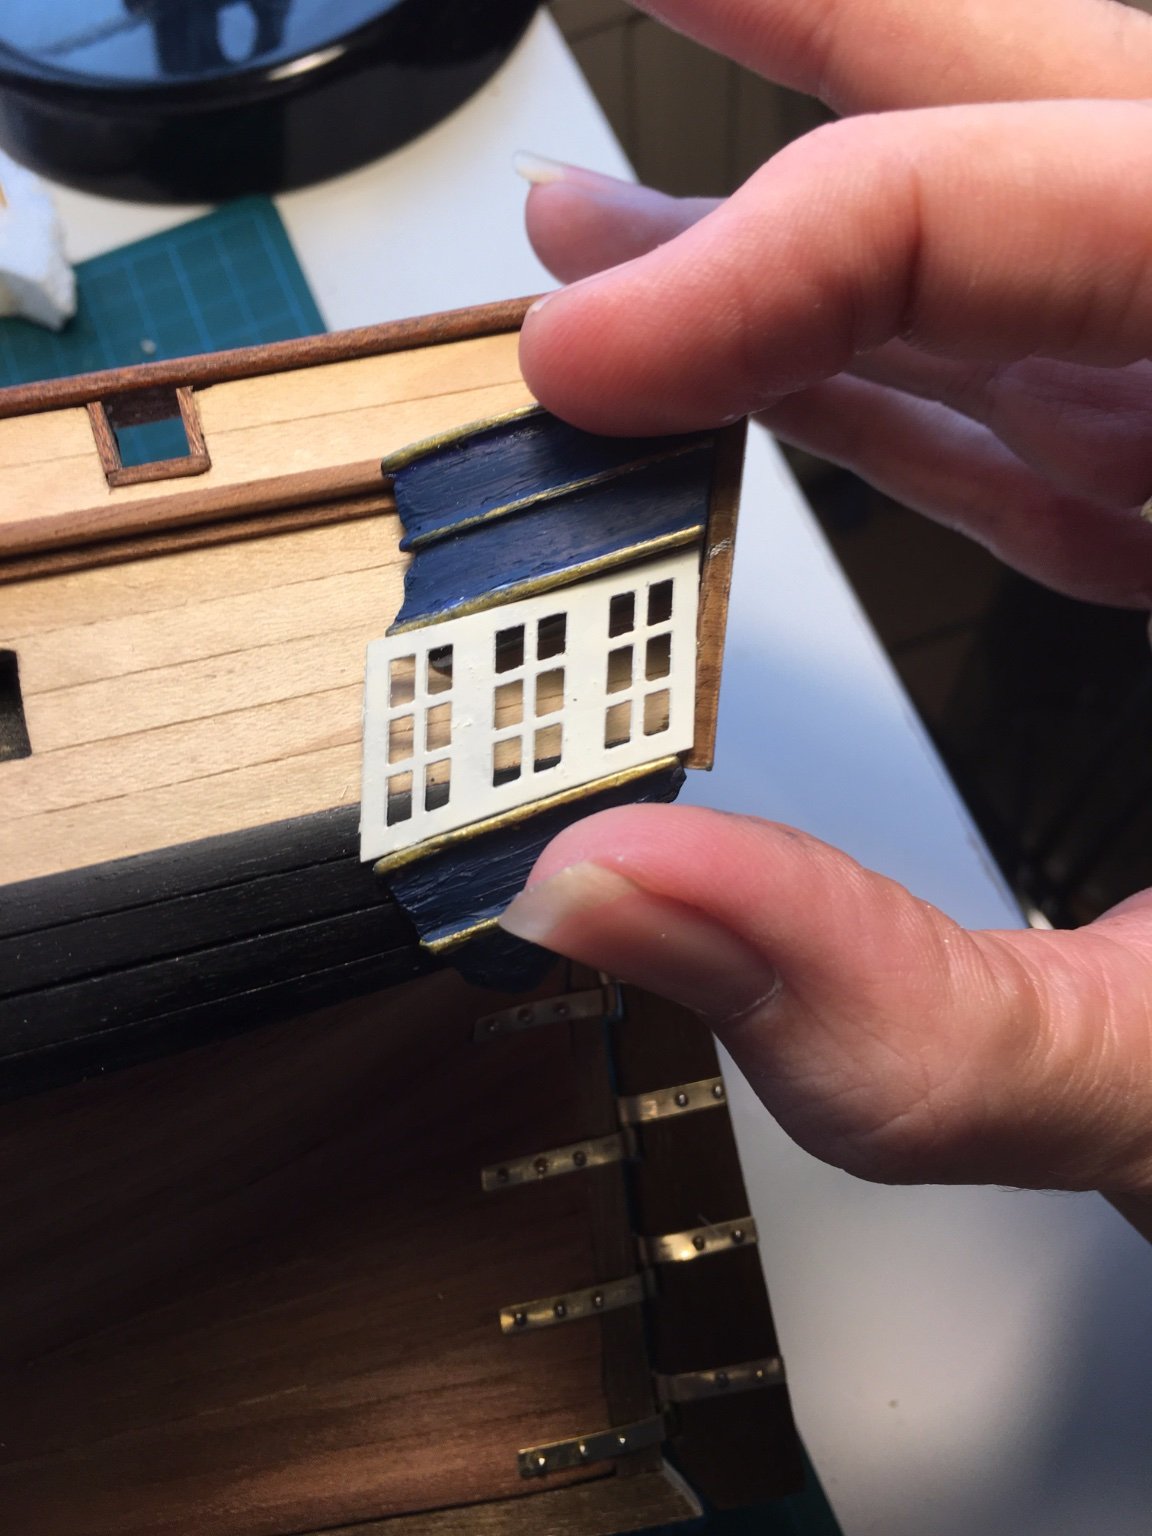
Bought the Admiral some flowers, so I had some clear plastic to use as glass for the windows 🙂 Didn't paint the inside, but put a piece of an old floppy disc behind the plastic.
On to the deck fittings, still a work in progress:
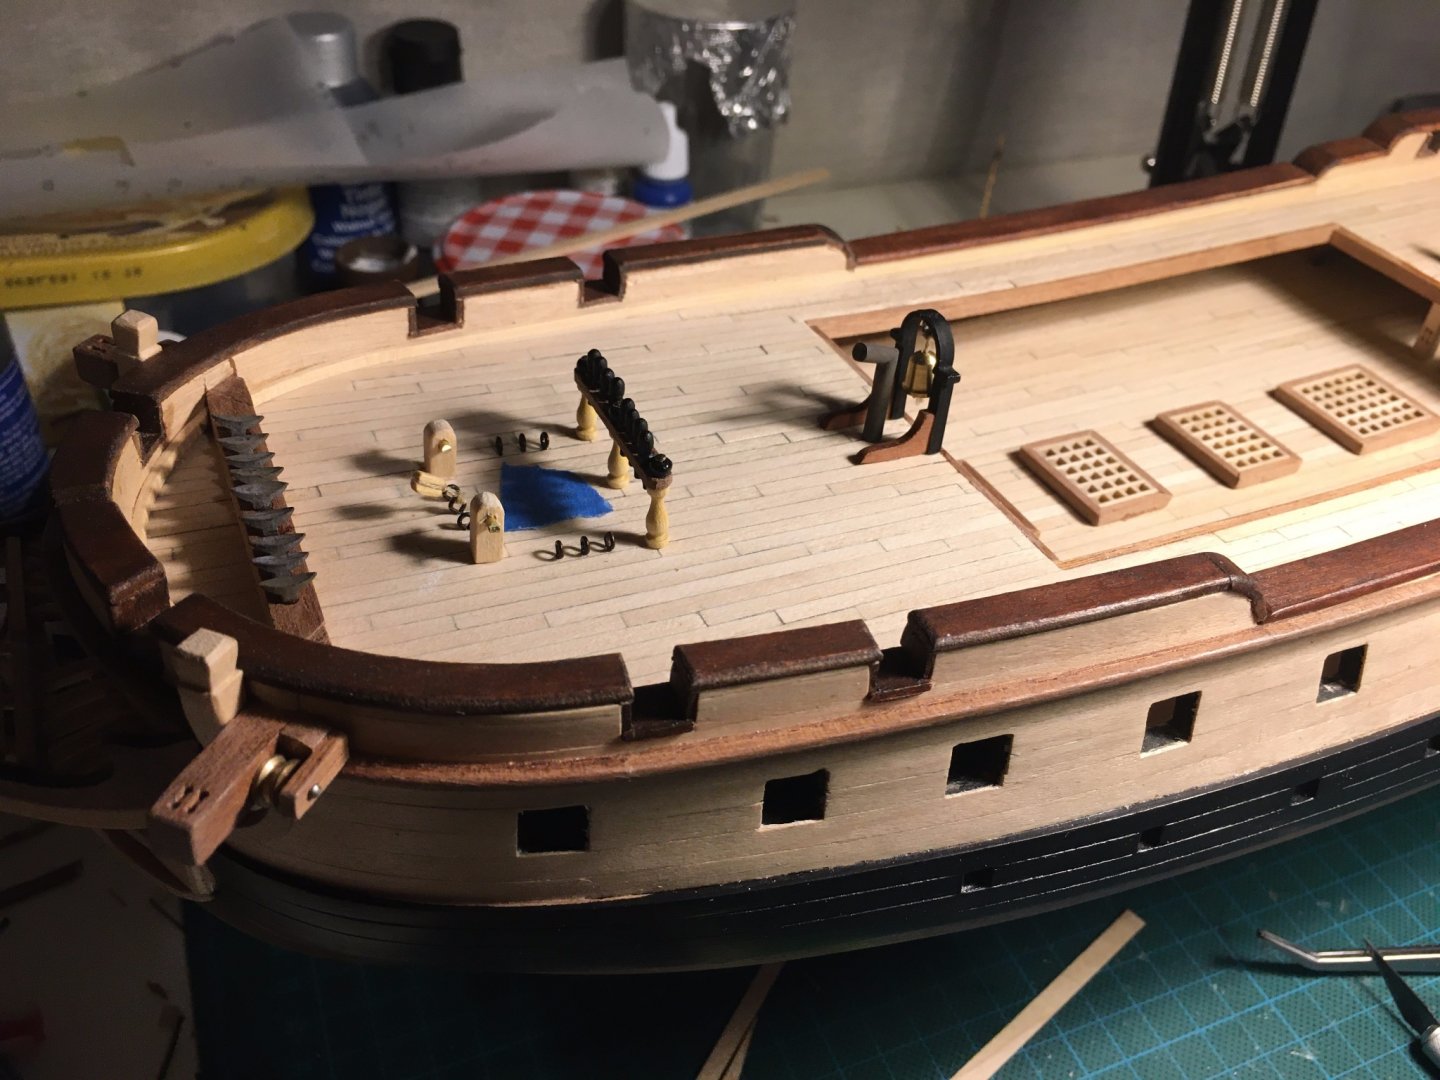
You'll notice the blue tape over the mast holes, which were put there AFTER I lost one of the structures behind the rudder... Another scratchbuild then on starboard side.
As all the deck fittings have been assembled off boat, took some time to look at the next step, and a first time for me: the guns. Mastini's book has some very valuable info on this, but what surprised me most was the different approach in Occre's plans: the smaller guns on the top deck have a breeching rope, while the heavier guns on the lower deck do not. In fact, according to the plan, they don't have any ropes attached at all! Must make for some interesting sailing in rough seas 🙂
I'm not knowledgeable enough to go for historic accuracy, but I decided that the heavy guns needed a breeching rope as well. Going full option with side and train tackles seemed undoable in the lower recesses of the deck, but something I'd like to try in the future.
Still, that left me with the question on how to attach the breeching ropes to the lower bulwarks, as I can't reach with my drill. Decided to add 2 small blocks to the eyebolts and glue these in place, I can just about reach with my long tweezers:
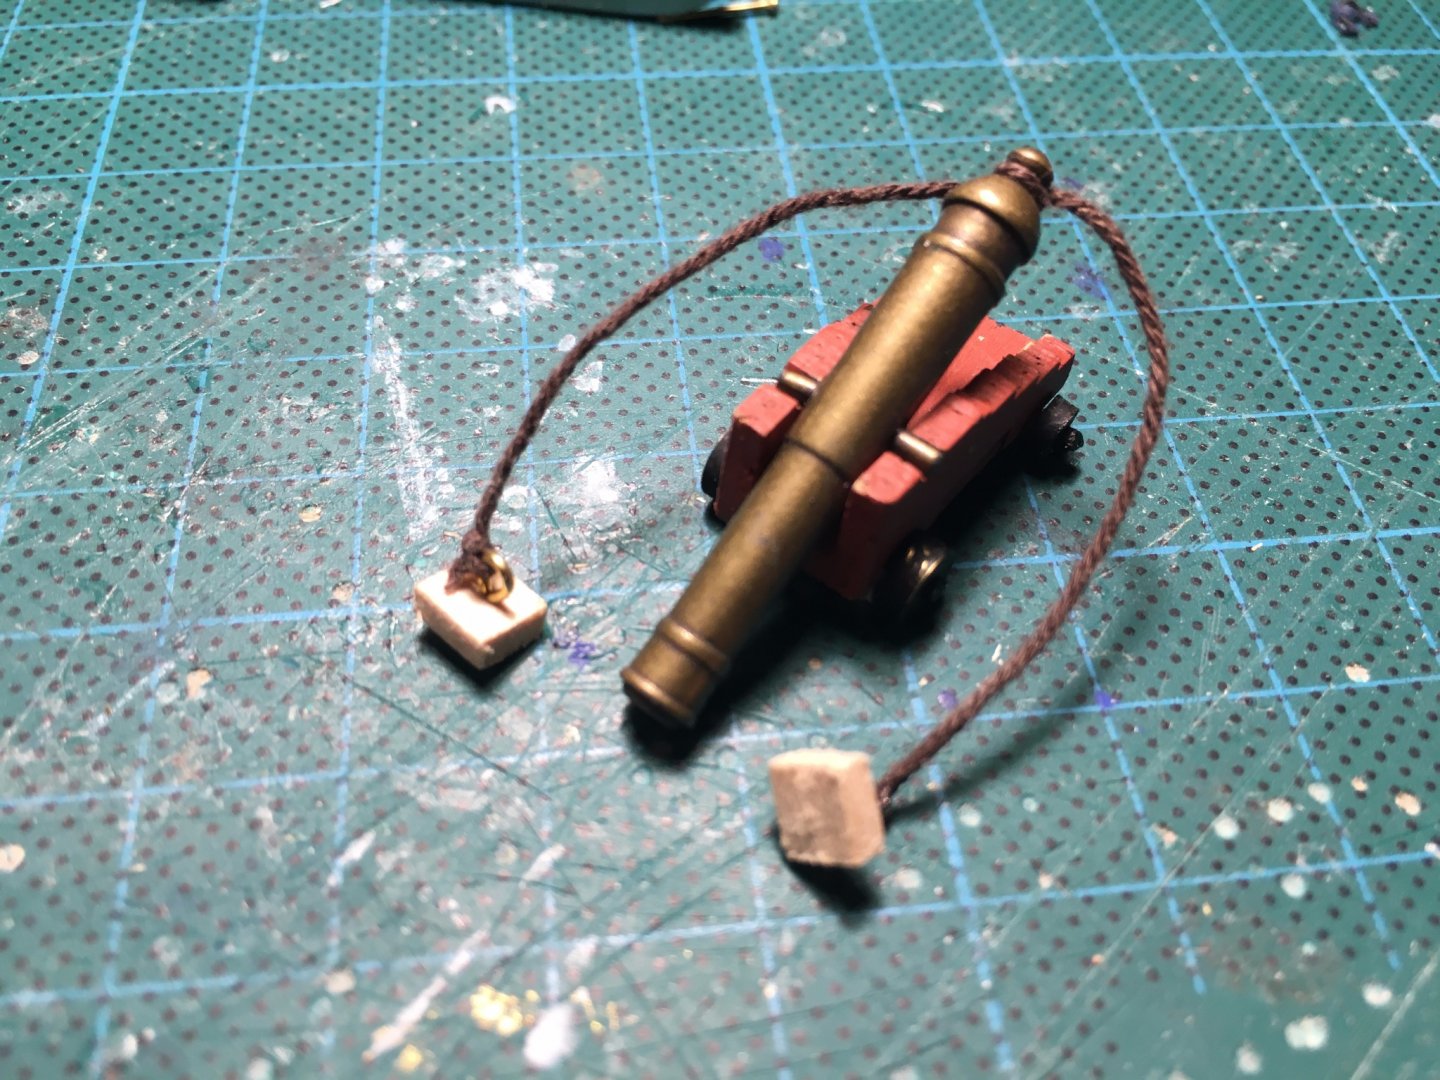
Blocks in the picture above still need to be painted in the same colour as the bulwarks, but you get the idea. Got the info from other topics here the breeching rope should be 3 times the length of the barrel, hope that's correct...
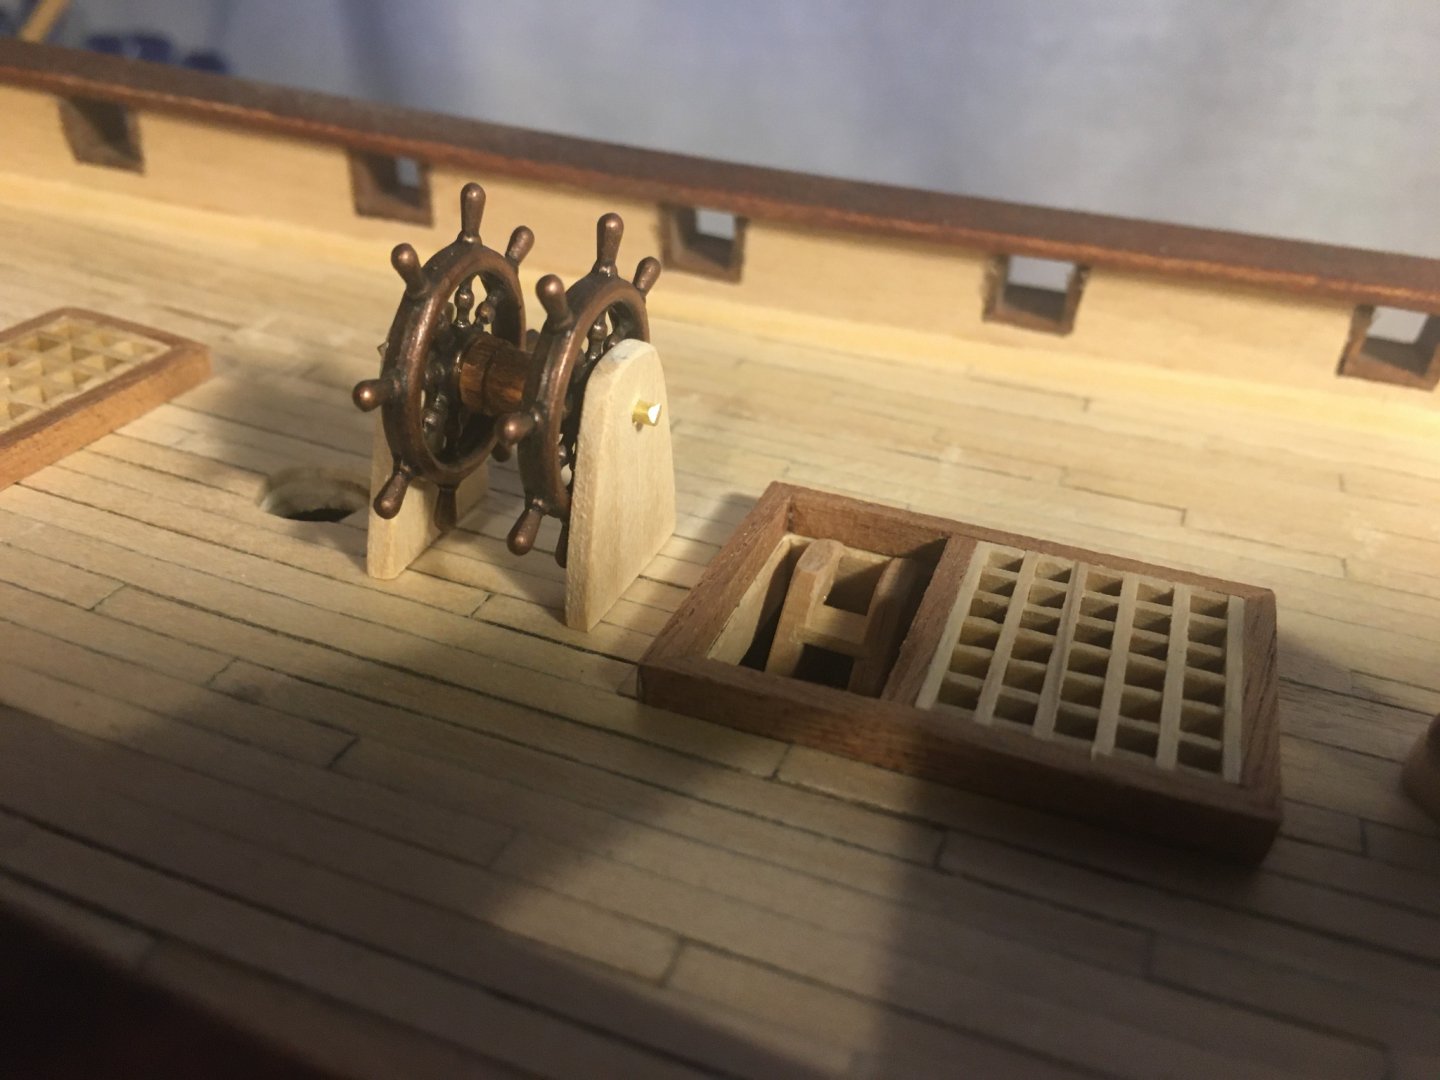
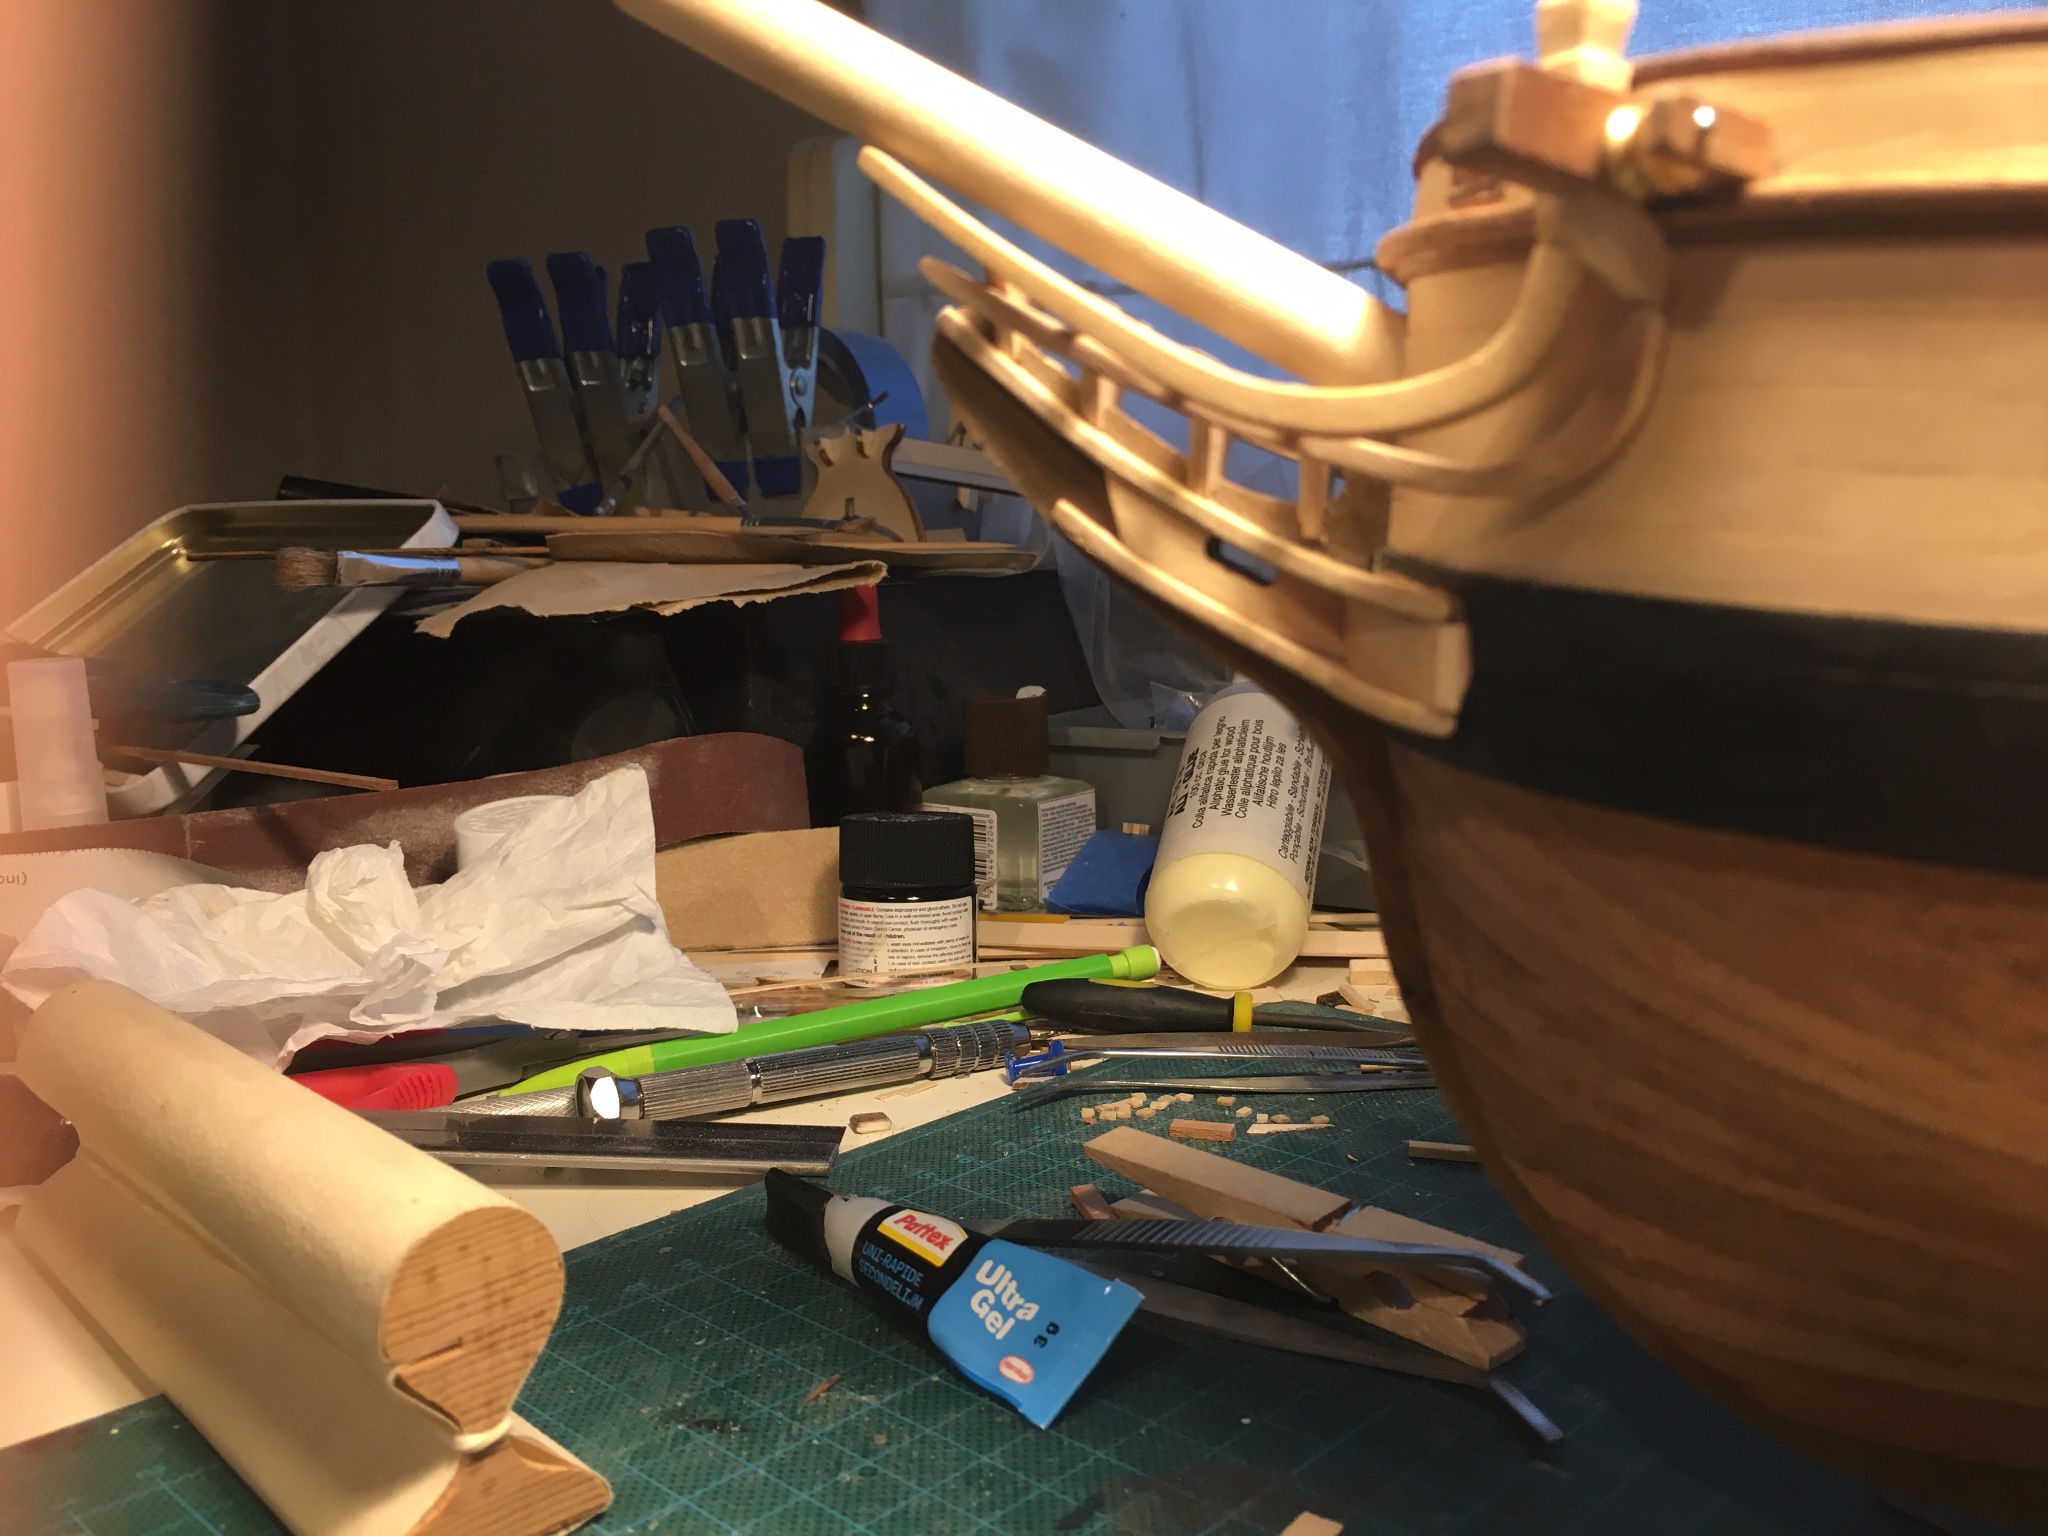
Also, is anyone using this particular product for blackening eyebolts and such:
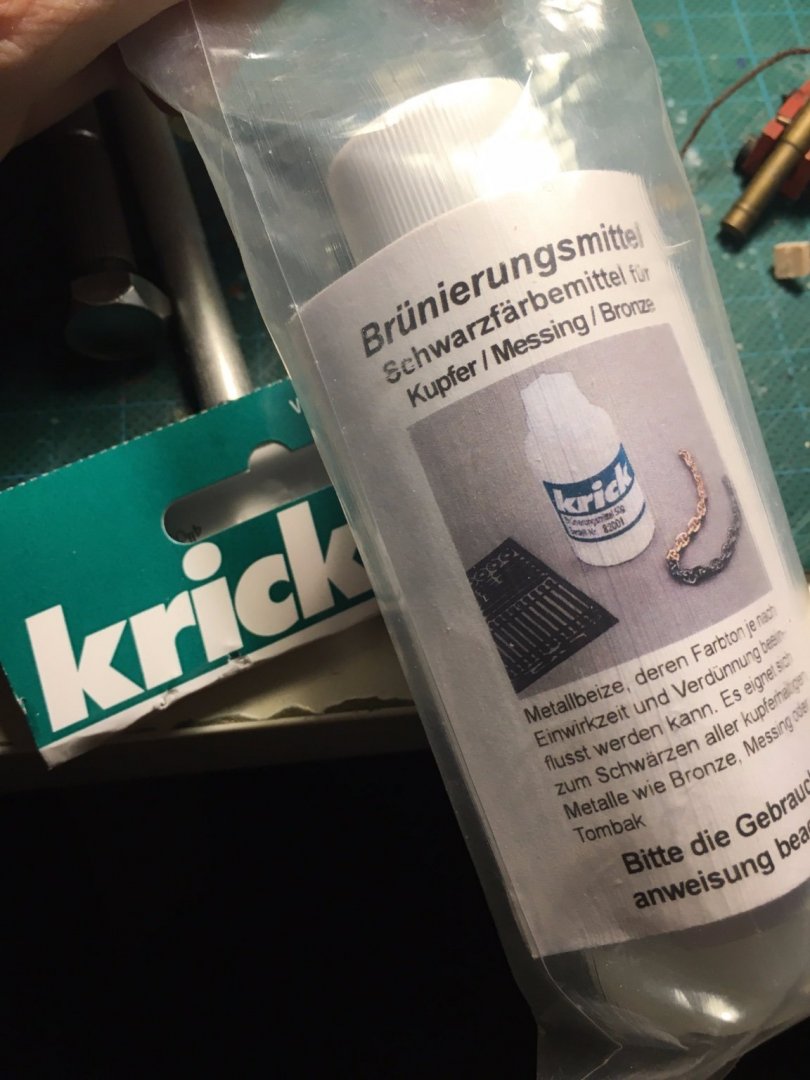
Does this type of product also exist for blackening white metal? Occre provides cleats in this metal and they obviously don't respond to this liquid.
As always, thnx for the help and the feedback. Stay safe!
-
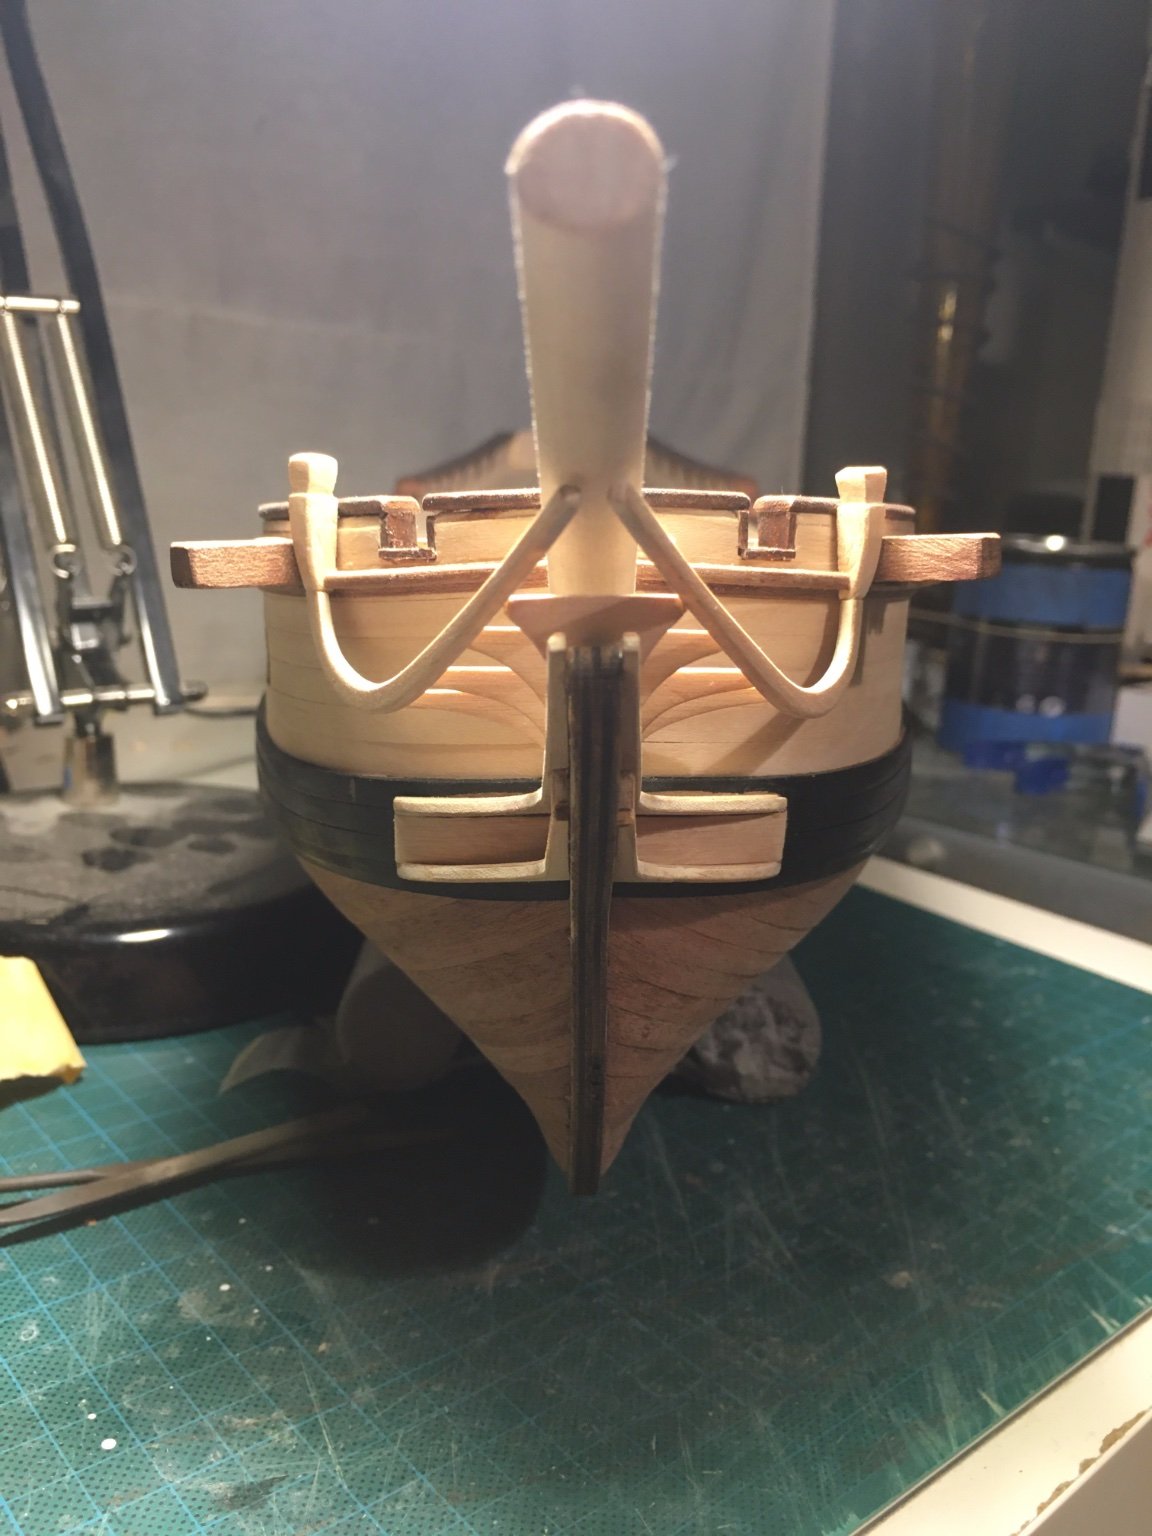
Hi all, quick update: frustration continues 😞
The shipment from the UK finally arrived, so dyed the rudder and attached it. Found a new way to handle the rivets, and the nightmare I had with riveting Terror's rudder was no more (hint: better tooling, aka fine tweezers).
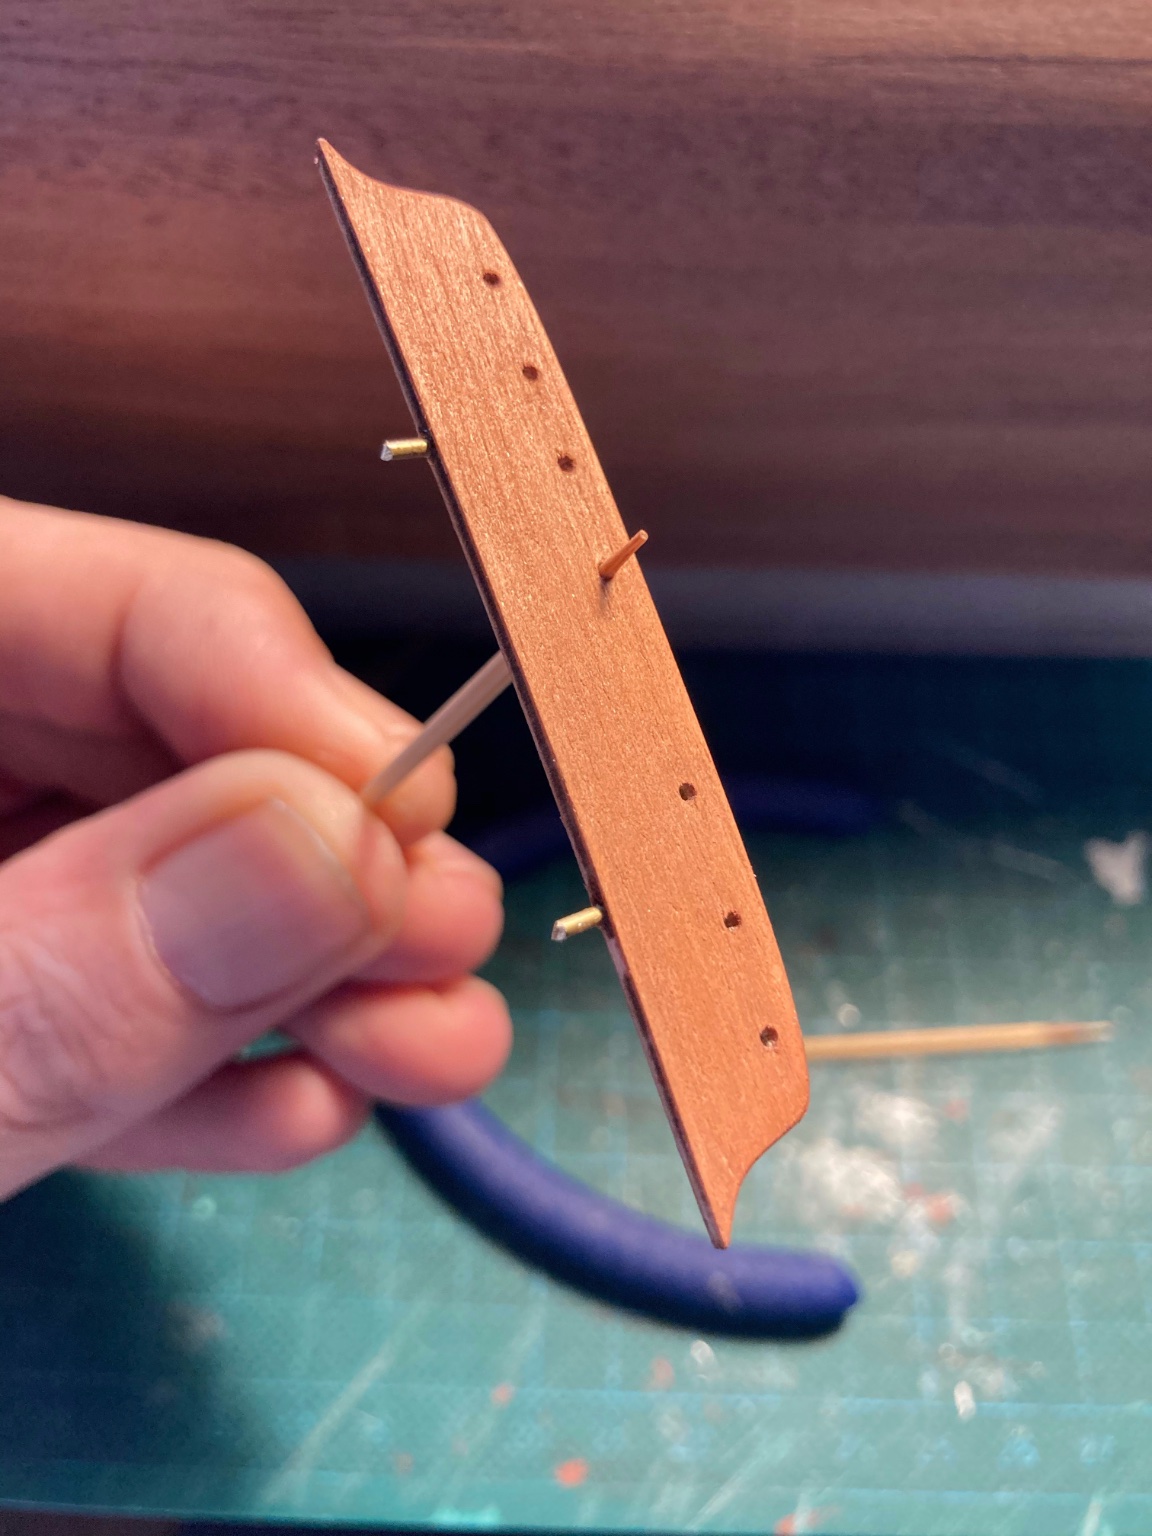
Started working on the quarter galleries over a week ago, and still in prep phase. The pieces just don't line up as described in the plans or the pictures.

Normally the bottom metal piece should align with the top of the rubbing strake, but that doesn't work. Checked the other build logs, and indeed this seems to be an issue as some other modellers built it as shown in the previous picture.
Also, I'm sure I'm doing something wrong with the metal itself, after two coats of metal primer, neither enamel or acrylic paint stuck. Eventually got so desperate I started using poster paint to get some results, but that just looked horrific.
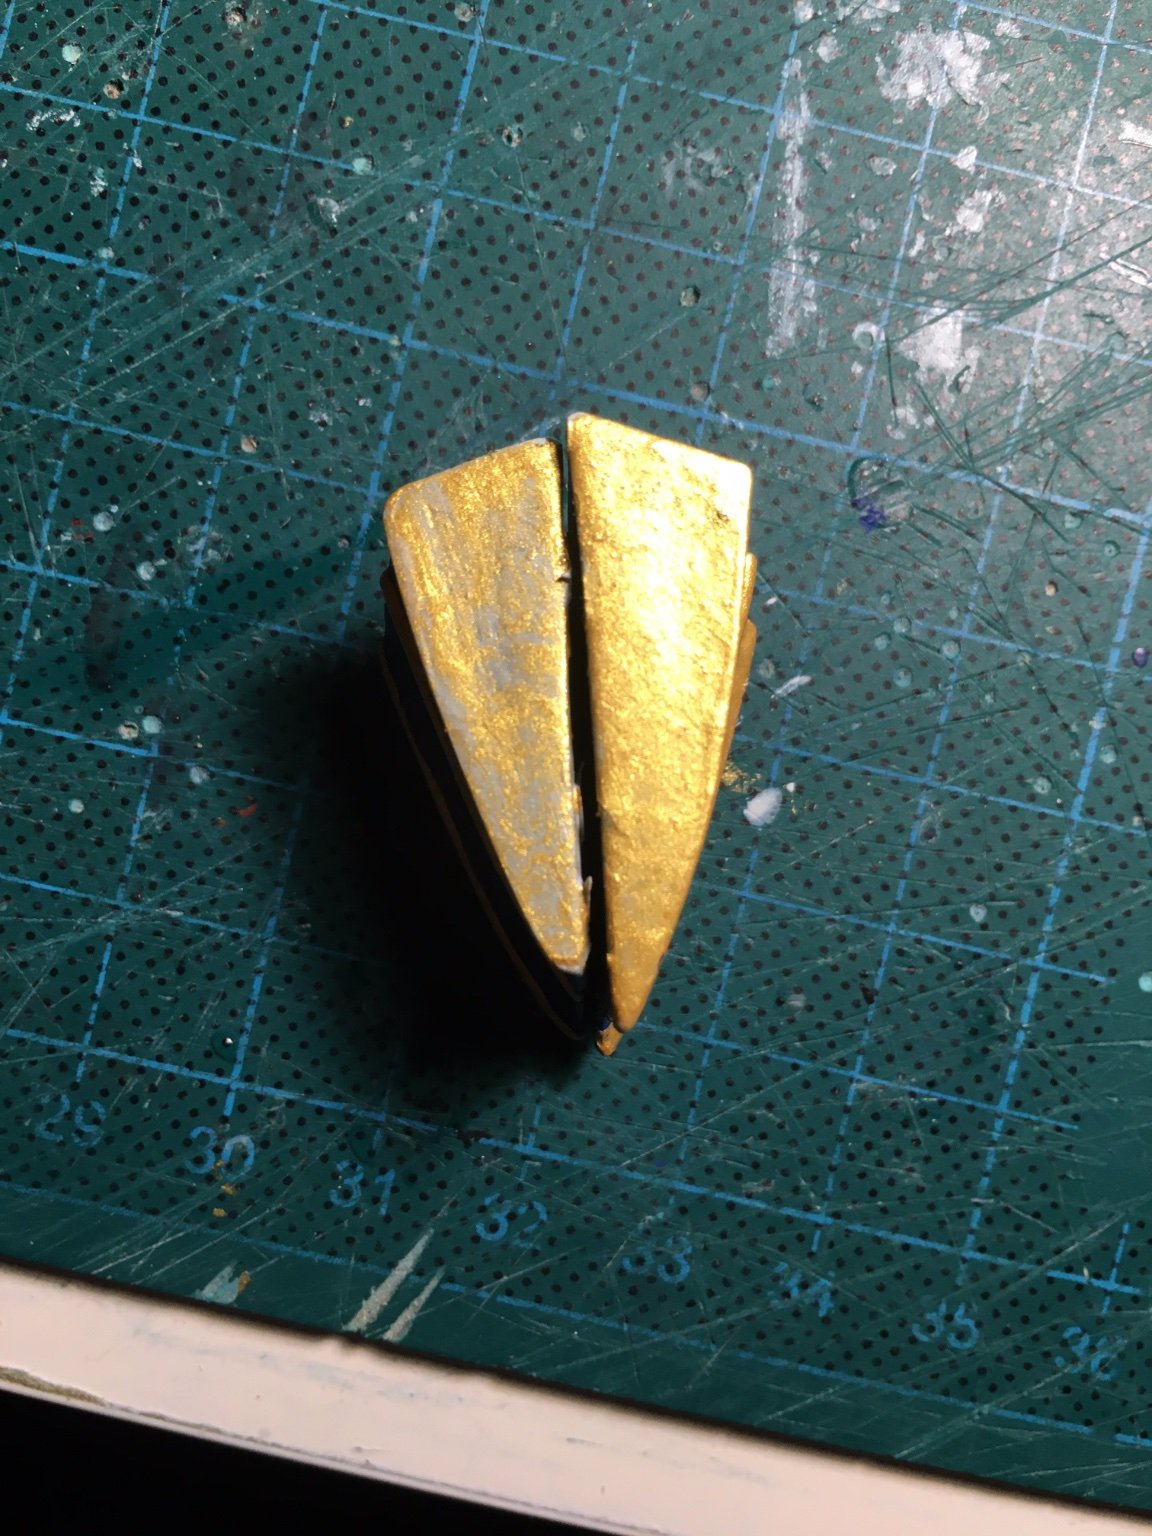
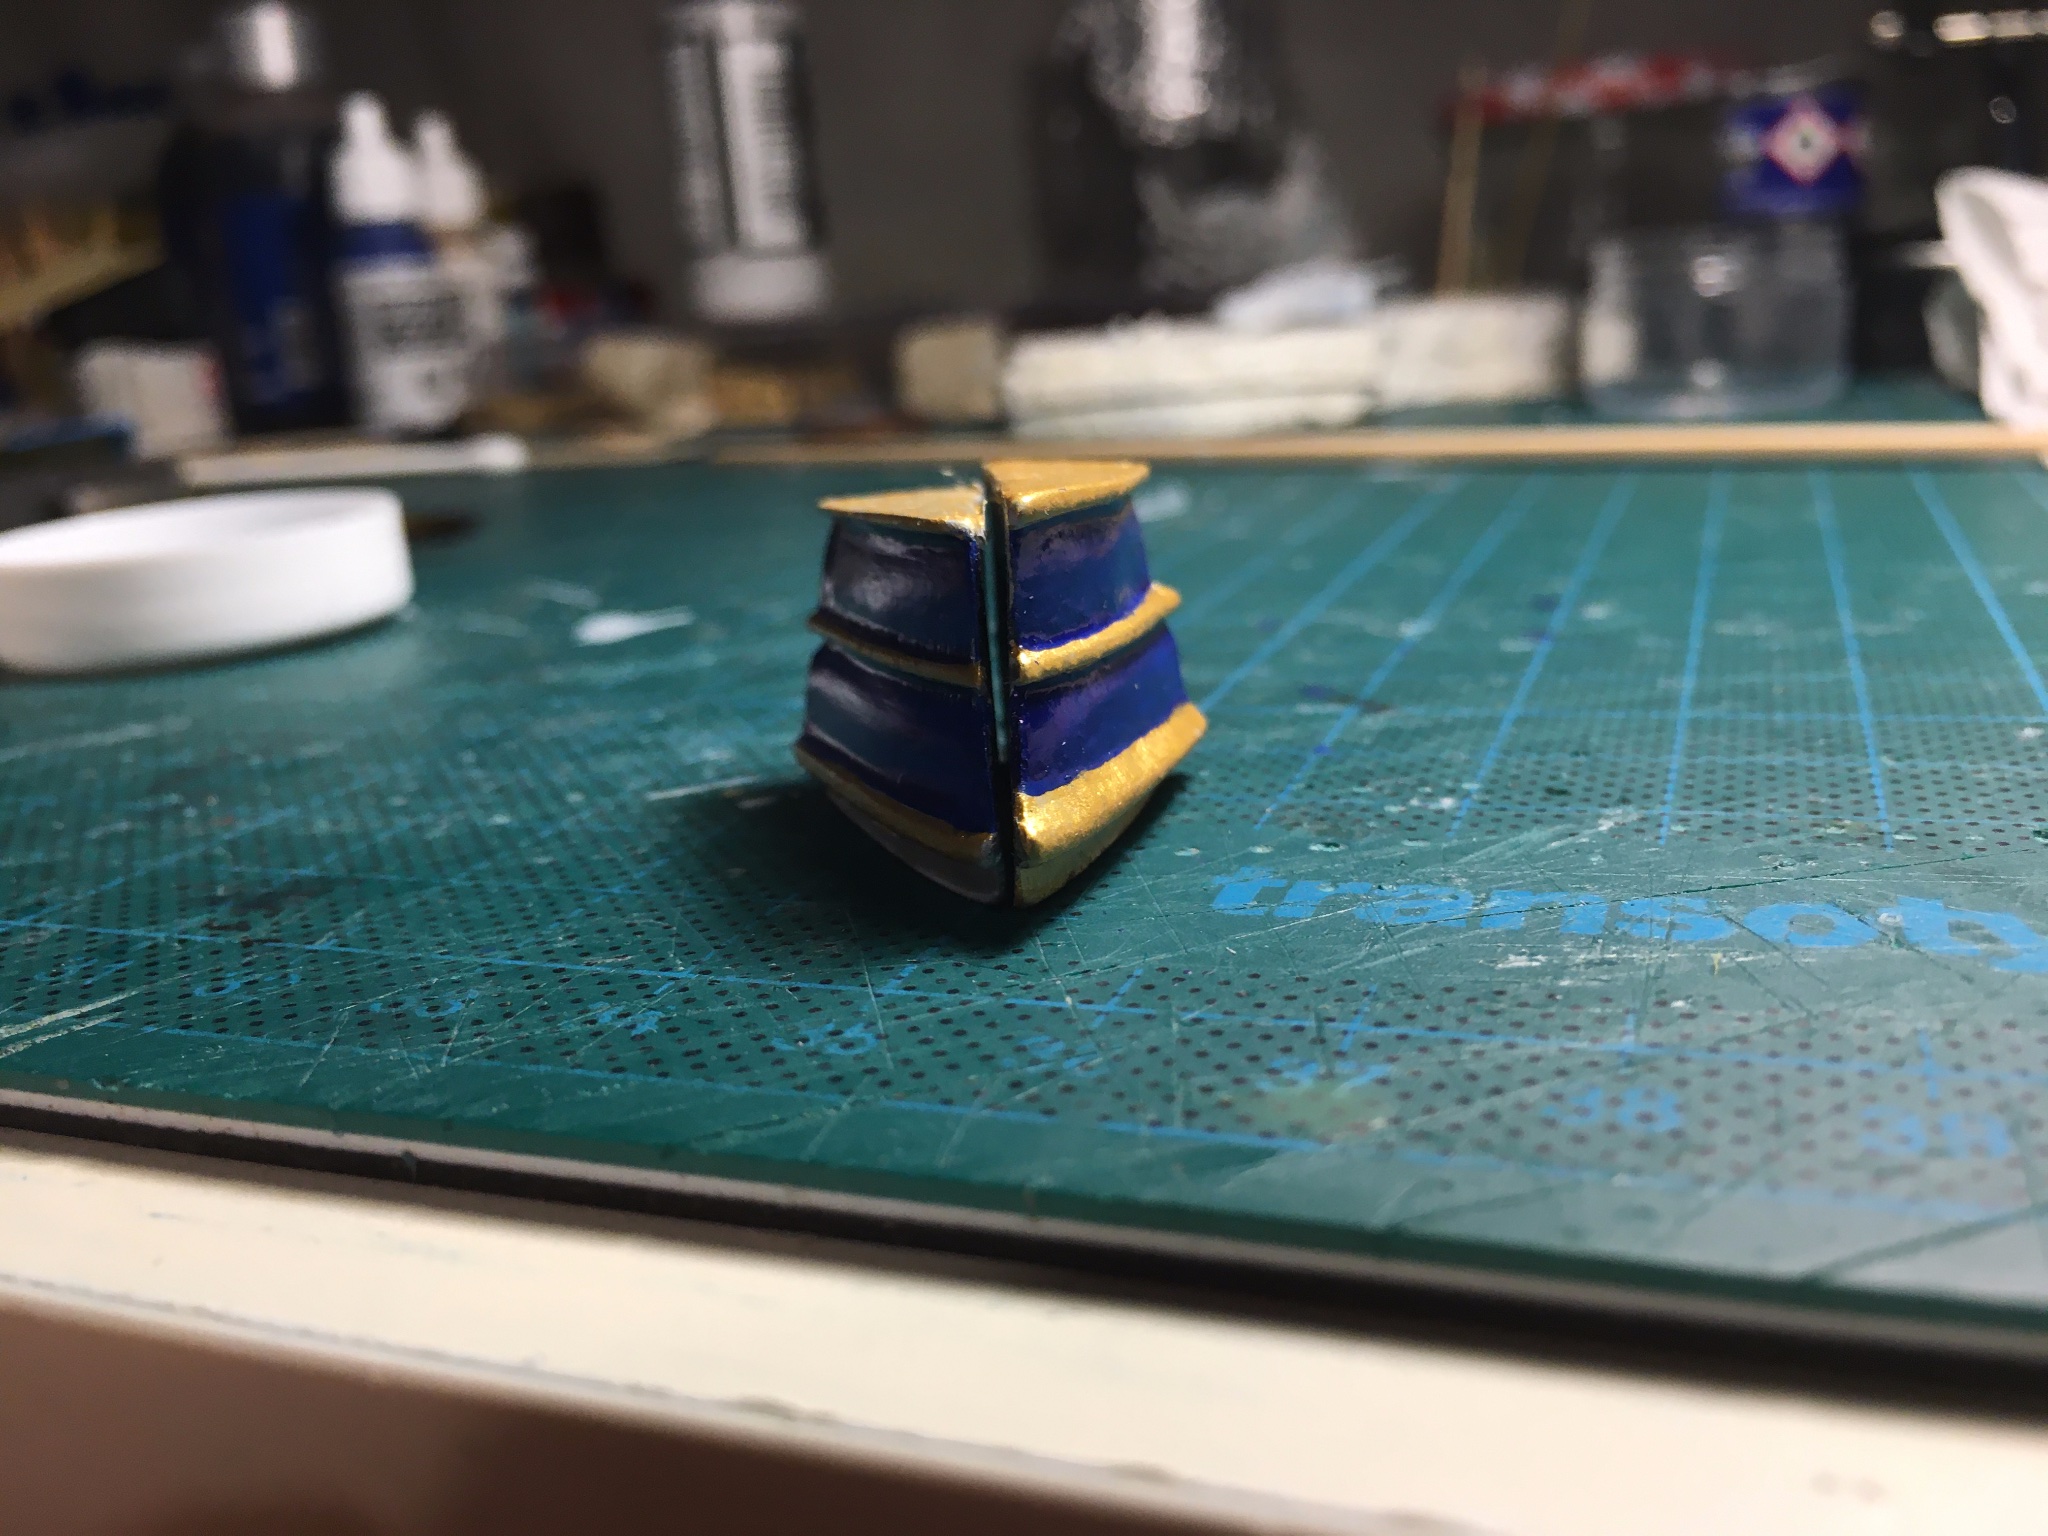
Called a good friend who specialises in car modelling, got some advice on Vallejo paints and primers. Managed to get my hands on some primer, gold and blue. Then scrubbed ALL the players of paint off and started anew, this tim with some better results:
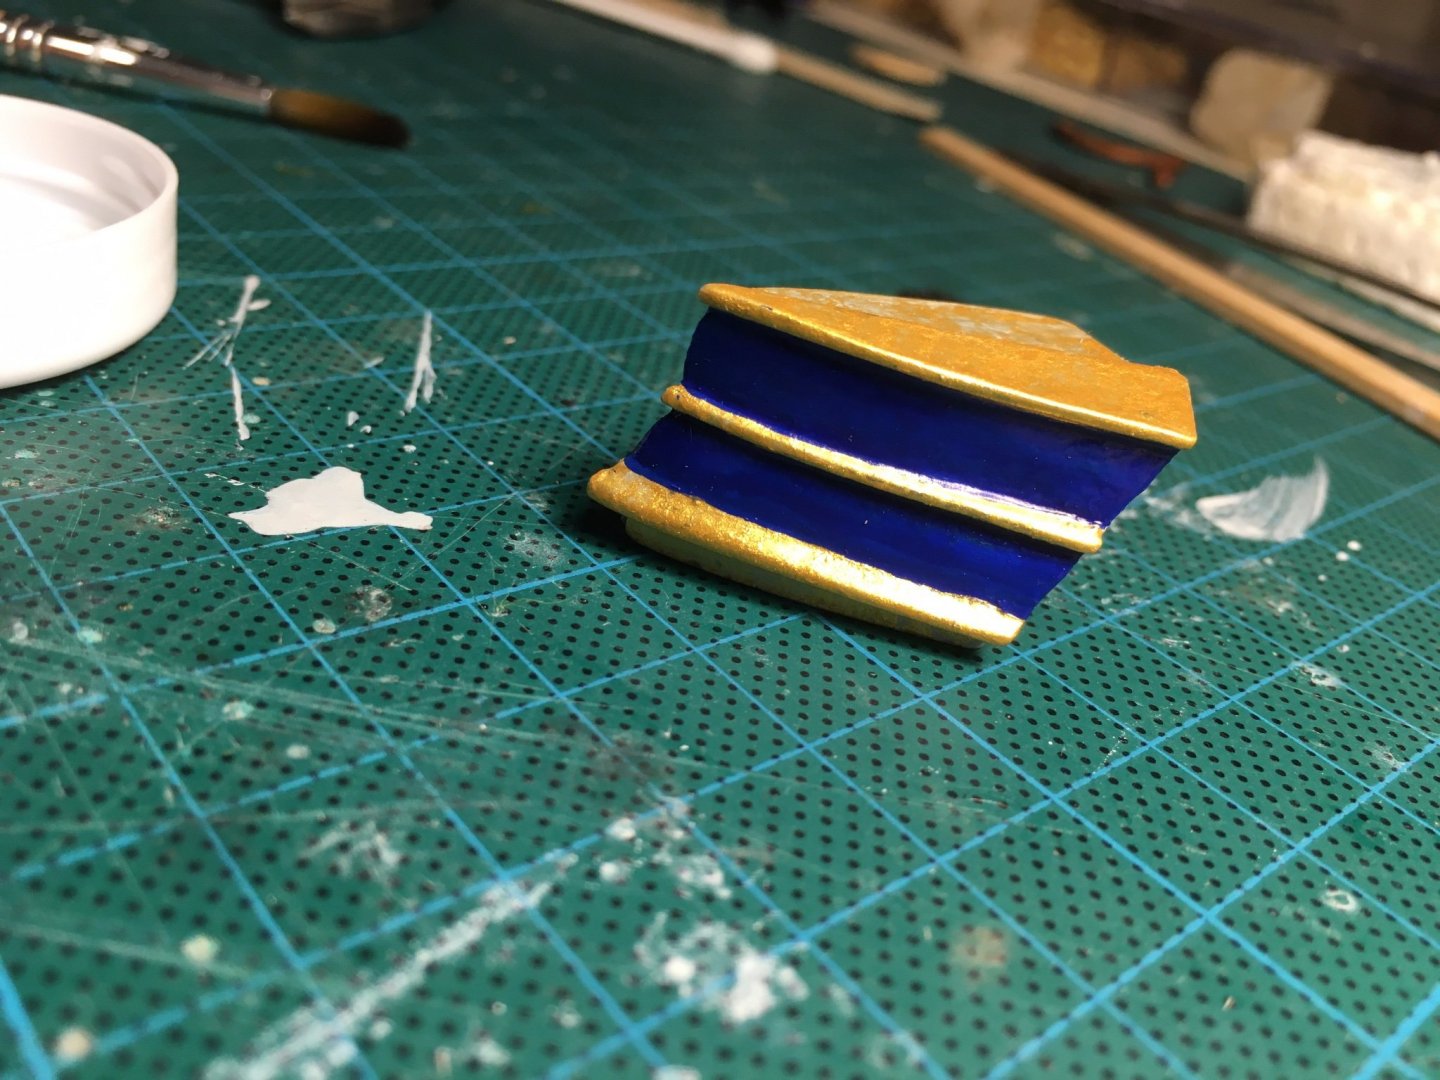
But then, as I put the two pieces next to each other:
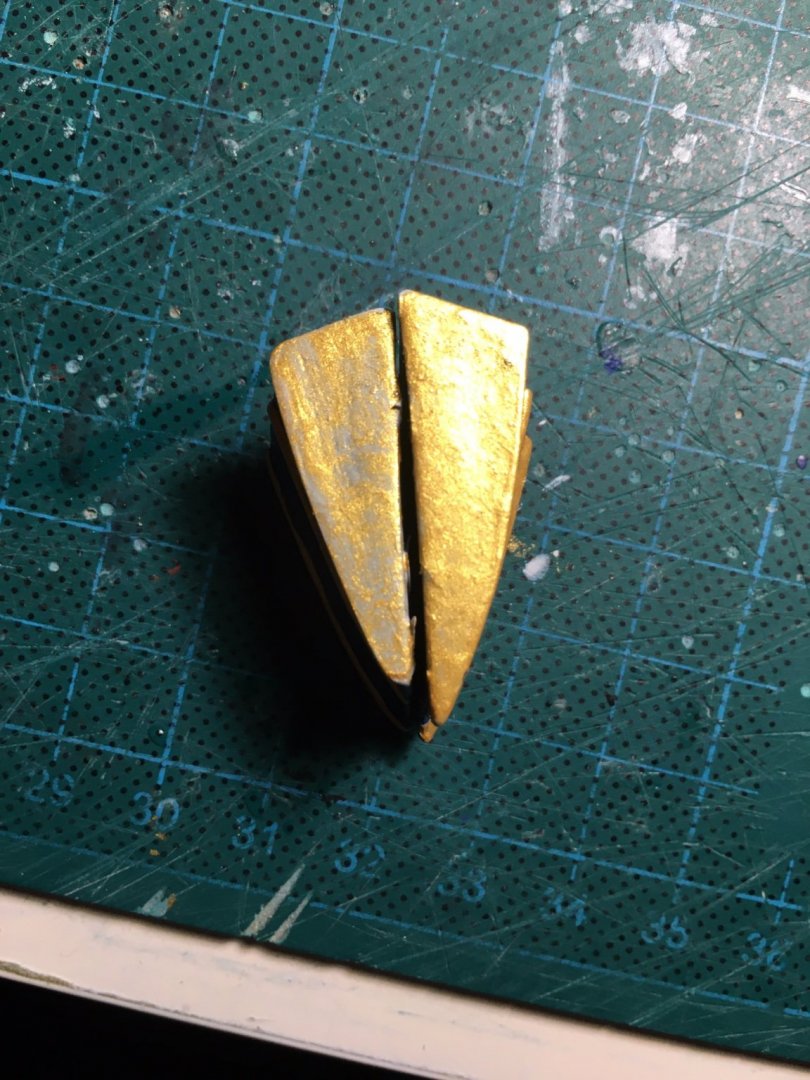

Correct me if I'm wrong, but these pieces should be the same size, no? And of course I only saw this after painting... (Left piece only has one layer of gold paint, right one has two).
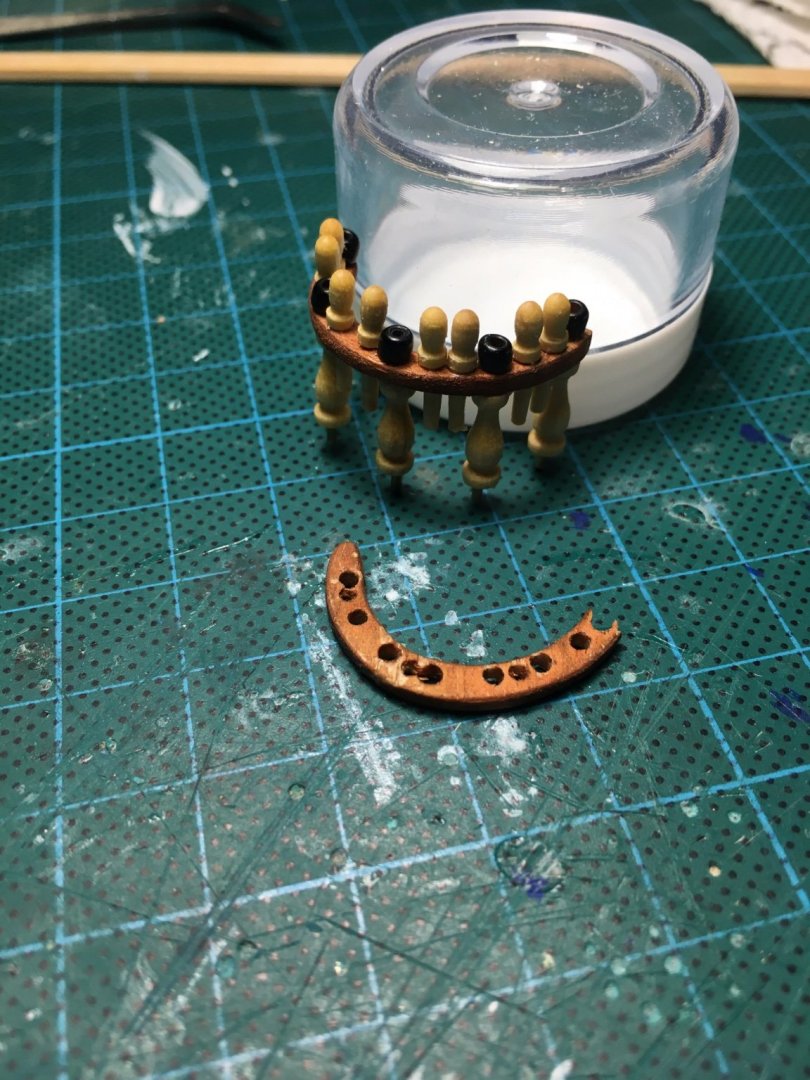
Central pin rack was also a challenge, as it's semi circular and pre shaped on a thin piece of plywood, which of course split and cracked a soon as I put my drill to it. Second lesson: next time, get belaying pins that are the correct size, not the ones provided.
Got all my courage and my spare wood together, and tried to construct it myself. Here's my version and the official one:
Sorry for the rant, I've been staring at these quarter galleries too long. All deck fittings are finalised, so as soon as the galleries go on and hull varnishing is done, I've got a lot of installation to do. Meanwhile though... Not sure anymore how to handle the galleries, I seriously underestimated the complexity of them.
Any tips would be welcome, thnx!
-
Hi all, thnx for checking in. It's been a frustrating week at the shipyard, as the dyes and paints I ordered from Cornwall are still on their way 😞 . The Belgian Postal Service (often compared favourably to a carrier pigeon with no sense of direction), is apparently still trying to determine what to do with such a bulky volume (4 dye bottles and 3 little paint cans).
Thing is, I need the dye for the rudder, the paint for the quarter galleries. Only then can I varnish the hull, and only then can I install the deck fittings (as I don't want to turn the hull upside down for varnishing with the fittings installed).
Decided to already start on the fittings off boat and install them later. So on with the pin racks:

Then my first try at a railing:
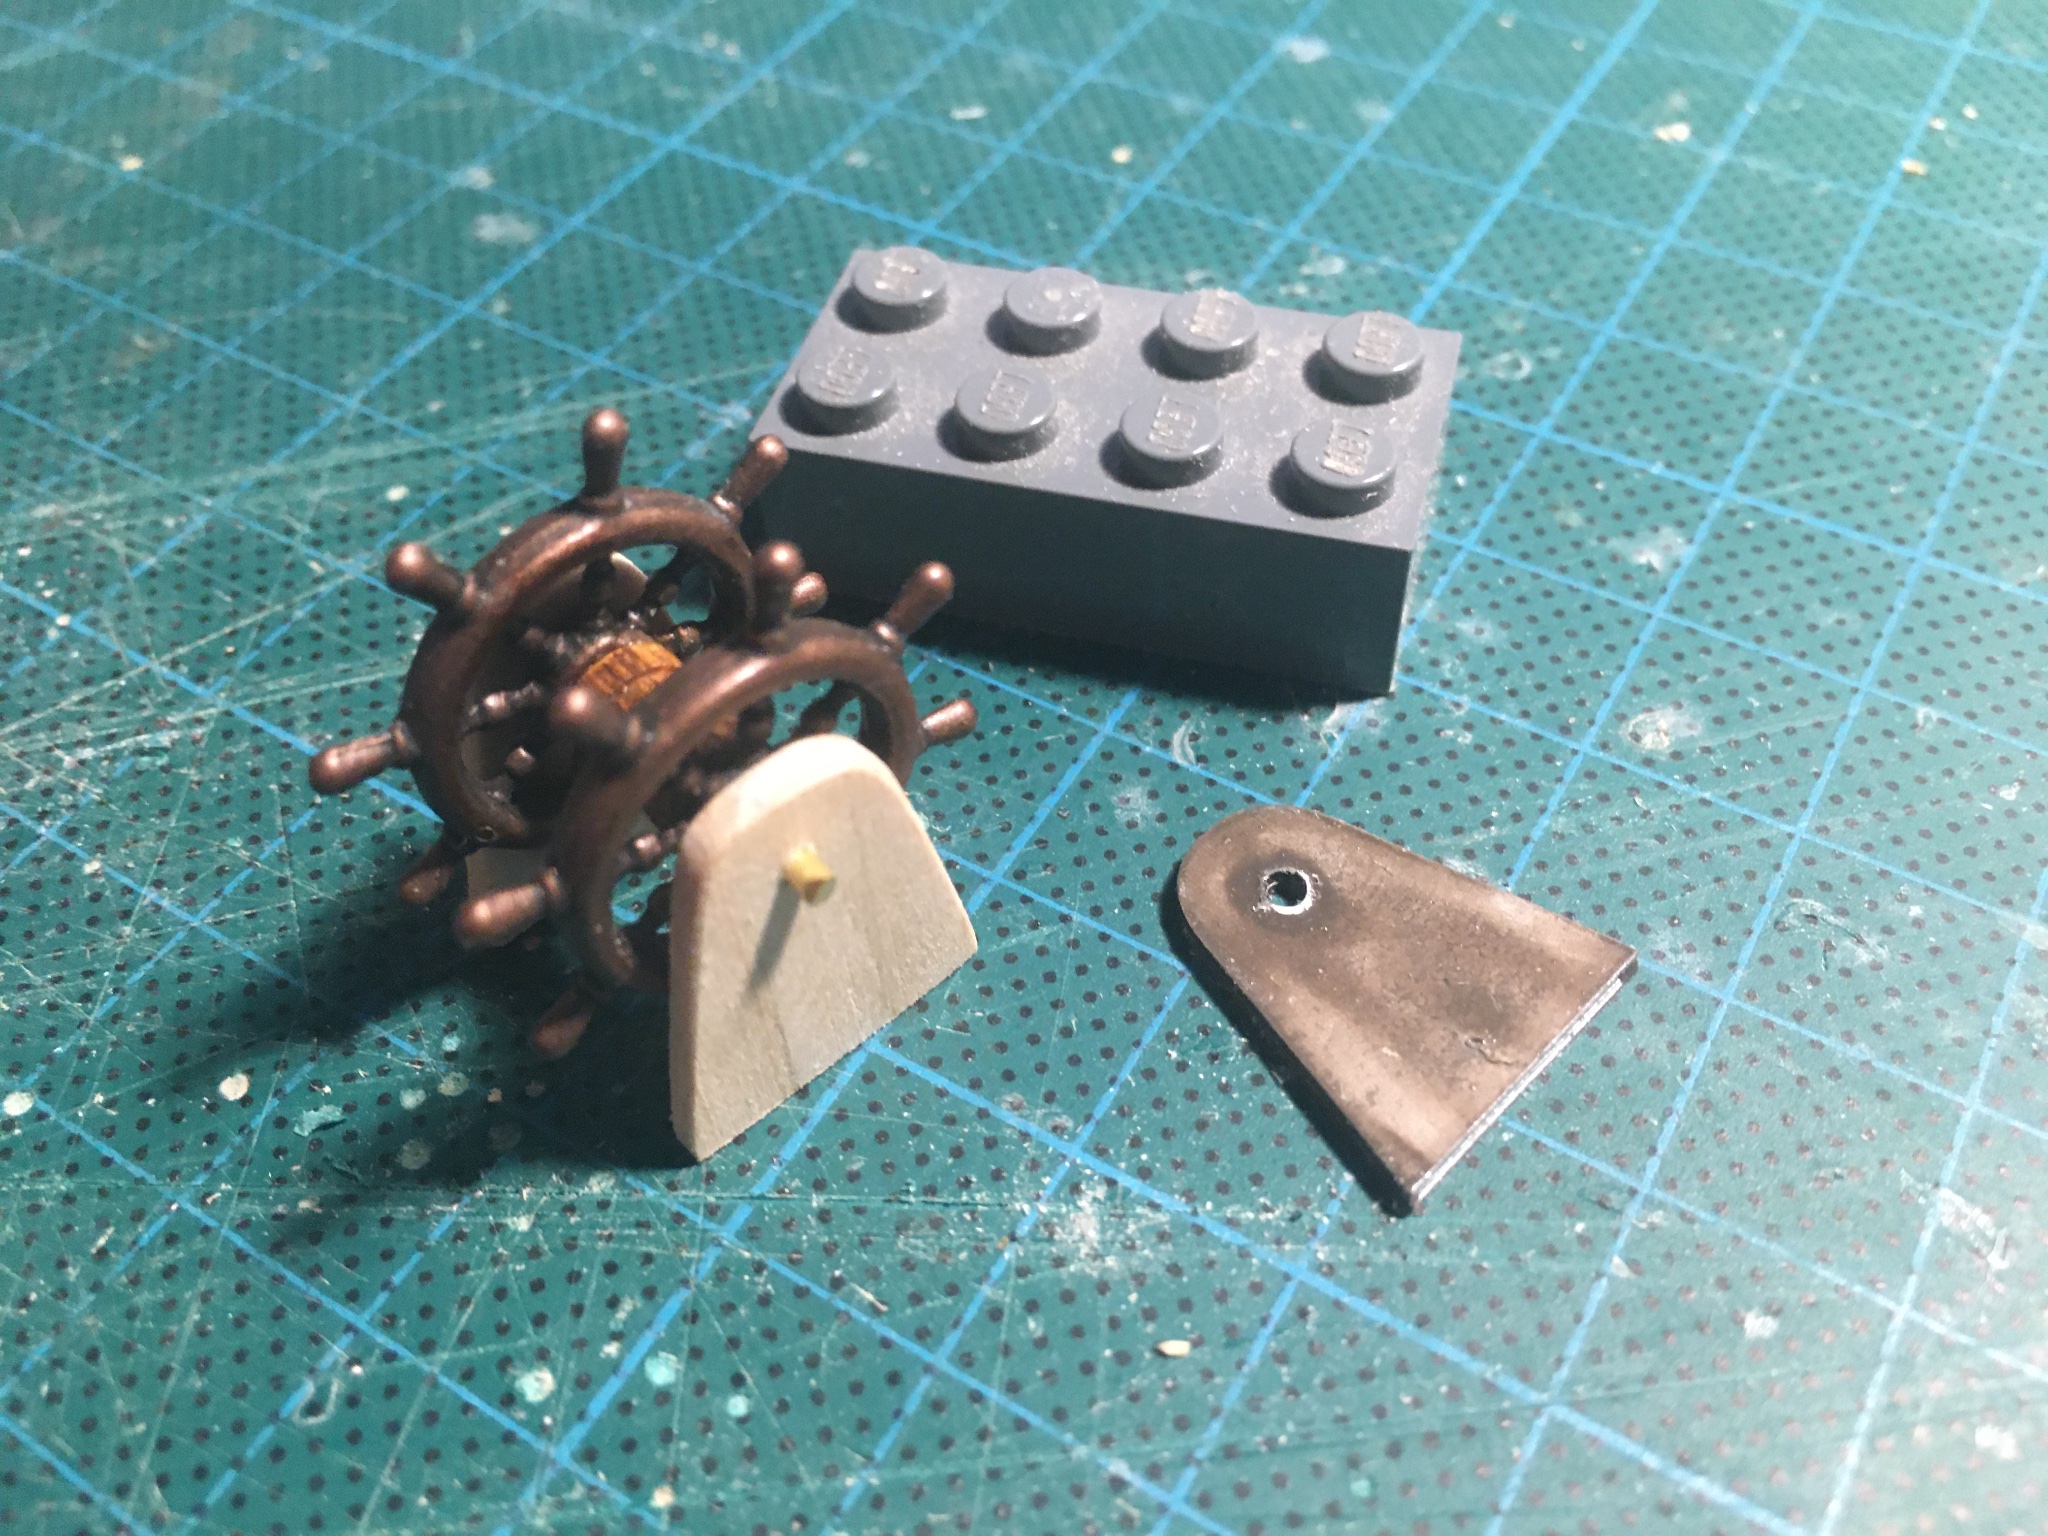
Went for the rudder as well. Occre provides metal rudder supports which are not the best looking, so decided to make my own:

And dry fitted on the deck:
Is this how it starts? First you remake individual parts and finally you end up building a ManO'War from surplus wood and a vague plan? 🙂
Stay safe!
-
Hi all, thnx for checking in. Small update and a question (see below).
Finalised the bow ornaments today, that only took me about a week 🙂 Started with the top sweeps:

I kept the bowsprit dry fitted as long as I could, to make sure the alignment would not go off.
Dropped the lower sweeps, but I made a mistake I only saw later, as the bend was too far away so the lines mess up a bit. Decided to continue regardless.

Then the final details:
Hull is almost finished now, just attaching the rudder.
Question: I'm about to start on the side windows (sorry, correct term escapes me), and Occre provide these as metal pieces. Gave them a double Tamiya Metal Primer treatment, but which paint to use? The store I shop with tells me not to use acrylics on metal, even when primered, only use enamels. But checking other stores for Caldercraft paint, they only exist as acrylics.. Any suggestions/experiences?
Thnx for your feedback 🙂
-


Frigate Diana by ObviousNewbie - FINISHED - OcCre - Scale 1:82 - Second wooden ship build
in - Kit build logs for subjects built from 1751 - 1800
Posted
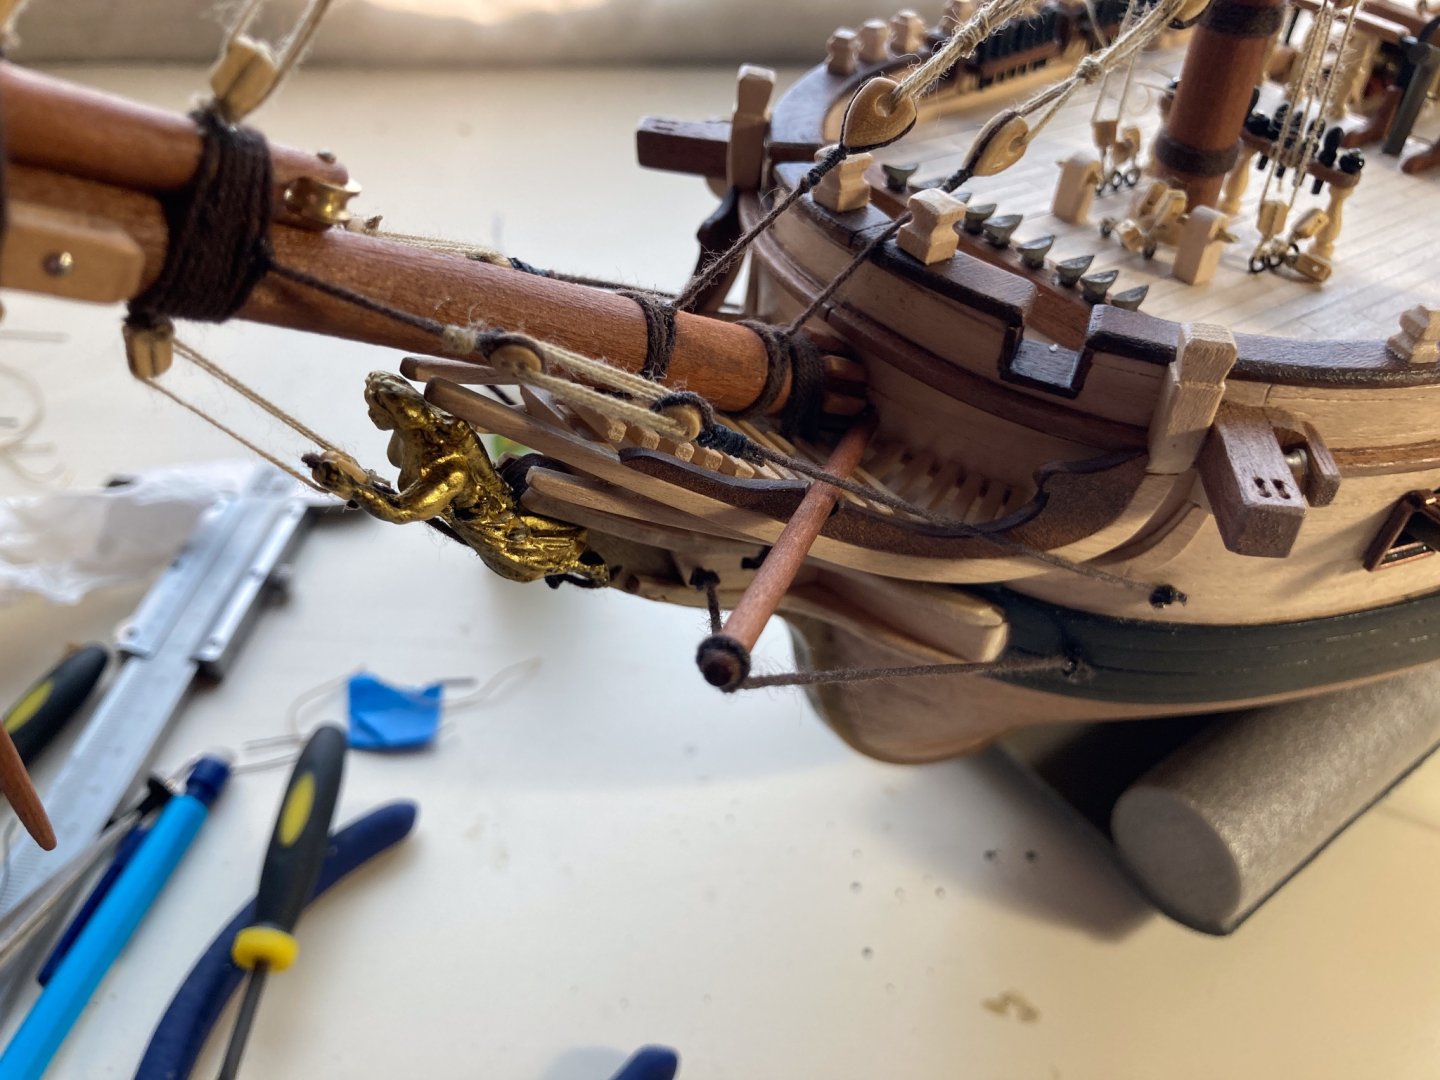
Hi al, it’s been a while, but I’ve been busy 😊. Thnaks to DavidG, the Martingale mystery was solved:
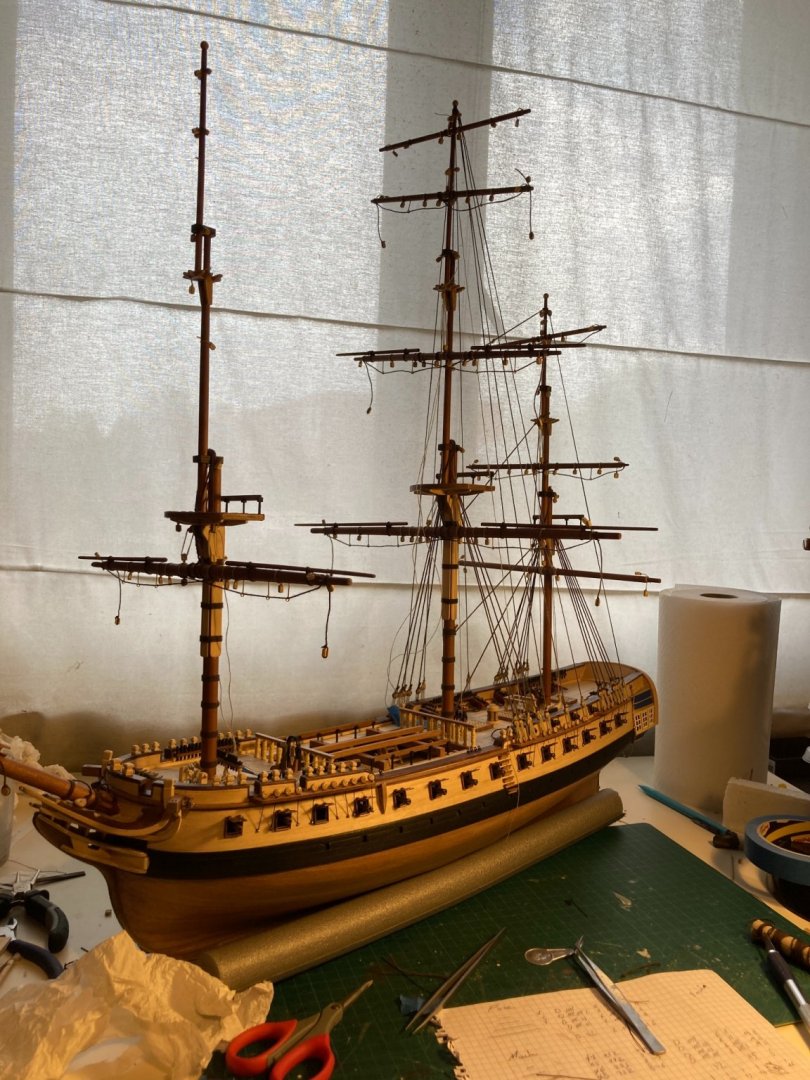
After that, rigging continued with finishing off the shrouds and attacking the ratlines. Complicated as the stays were already in place, so had to work slowly and very carefully. Eventually all lines were up:
Then I got to work on the upper shrouds and ratlines:
And after that process, the standing rigging was in place, so on to the running rigging:
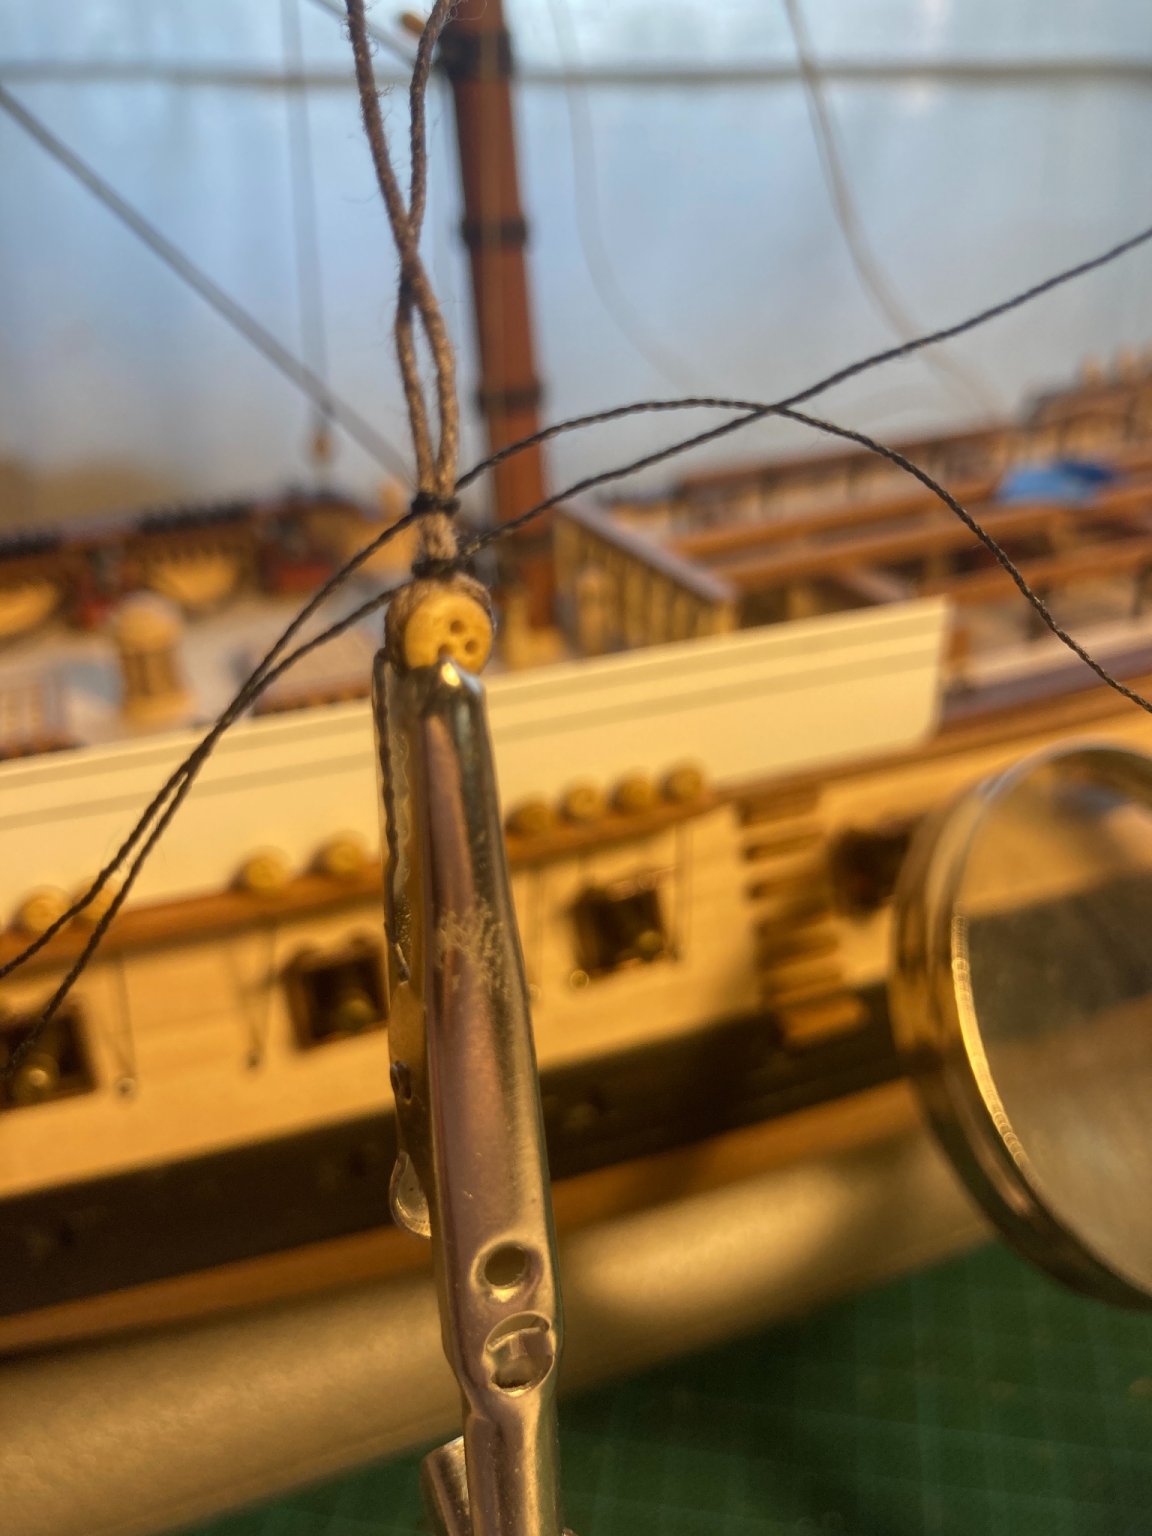
Moving mast by mast, this is my favorite part of the rigging process, as you see the whole ship gain it’s final shape. Following the build logs I use as inspiration, I experimented with some extra details:
Not sure why the rope is so fuzzy in the closeup, as these lines are waxed before they’re installed.
Diana is shaping up, the final lines and then deciding which lifeboats to use. Then it will be time to solve the biggest problem: where to put her!😁