Kevin-the-lubber
-
Posts
1,215 -
Joined
-
Last visited
Content Type
Profiles
Forums
Gallery
Events
Everything posted by Kevin-the-lubber
-
 Mark, you haven’t mentioned having these fretworks 3D printed and I don’t know if that’s a deliberate omission or not. But as you don’t seem completely averse to plastic that is another option. Or, going down the lost resin (lost wax in old money) casting route. In either instance the printing would probably be very straightforward and there would be no stress of the parts when glued in place. The hard part is creating the 3D designs in CAD. However, if you have clear dimensions to work from it may not be so difficult. Alternatively, you could probably apply the thin boxwood approach to styrene sheet. Marc (Hubac’s historian) has done some amazing styrene carving on his Soleil Royale.
 -
CAD file 3D printing question
Kevin-the-lubber replied to CPDDET's topic in CAD and 3D Modelling/Drafting Plans with Software
Have you tried getting quotes from CraftCloud, searching ebay for "3d printing service", or asking on here for the same? I can see offers of about $5 + postage for the lower wheel on craftcloud, which seems pretty reasonable. If you only want a few bits for the model this may be the most cost effective way of doing it. You'll need these wheels printed in resin, the quality would be quite poor using filament. Personally, wherever possible I would always scale in the design software. In fact I never really scale, I replicate to the scale I want. This is a bit more work than scaling but not nearly as much as doing the initial design. I do this because I typically have a 0.15mm - 0.2mm clearance between parts that fit together, which applies to the majority of things I make. If I simply scaled down, the clearance would be too tight, scaling up would make it too gappy. Reworking maintains the correct clearance. With very small parts it also allows me to adjust the sectional dimensions while maintaining the overall part size (more or less) i.e. I would bump up the 0.8mm cross section on that upper wheel to 1.0mm, making it 25% stronger but without really affecting the optics. Anyway, as you've decided to go with 1/18 the parts will be fairly robust. -
CAD file 3D printing question
Kevin-the-lubber replied to CPDDET's topic in CAD and 3D Modelling/Drafting Plans with Software
As Pat has made this freely available you should be free to use the STL's. Attached are the wheels, scaled down to 1:24 & 1:27. It's a little hard to say for sure how small you could go without first knowing the thickness of the thinnest part, but a quick run through suggests he used 1/16" as a typical diameter and thickness for thin rods, planks and boards. If you go to 1:24 all of that will be 0.8mm which is slightly on the thin side but fine for a static model, possibly even okay for an RC once it's all assembled. If you scale down any further then it'll start to become a little fragile, especially for an RC. wheels.zip -
CAD file 3D printing question
Kevin-the-lubber replied to CPDDET's topic in CAD and 3D Modelling/Drafting Plans with Software
I thought I recognised this - the Patrick Matthews build, yes? The photo you showed, from Patrick's build log, is almost certainly of resin cast parts but these can just as easily be printed. As you're in FreeCad, find them and export them as STL's and they'll be good to print. The upper steering wheel is going to be pretty skinny at 1:24, about 1mm sectional diameter. But still perfectly printable. -
CAD file 3D printing question
Kevin-the-lubber replied to CPDDET's topic in CAD and 3D Modelling/Drafting Plans with Software
What you've got here is a very nice 3D model of the whole boat at 36 inches long, give or take a bit. There are 579 different parts, which I'm attaching in the zip. On my PC, I have a preview pane in my file explorer, which would allow you to go through the unpacked zip more quickly. I have to dash now but will follow up later. Pilar v291 Bodies.zip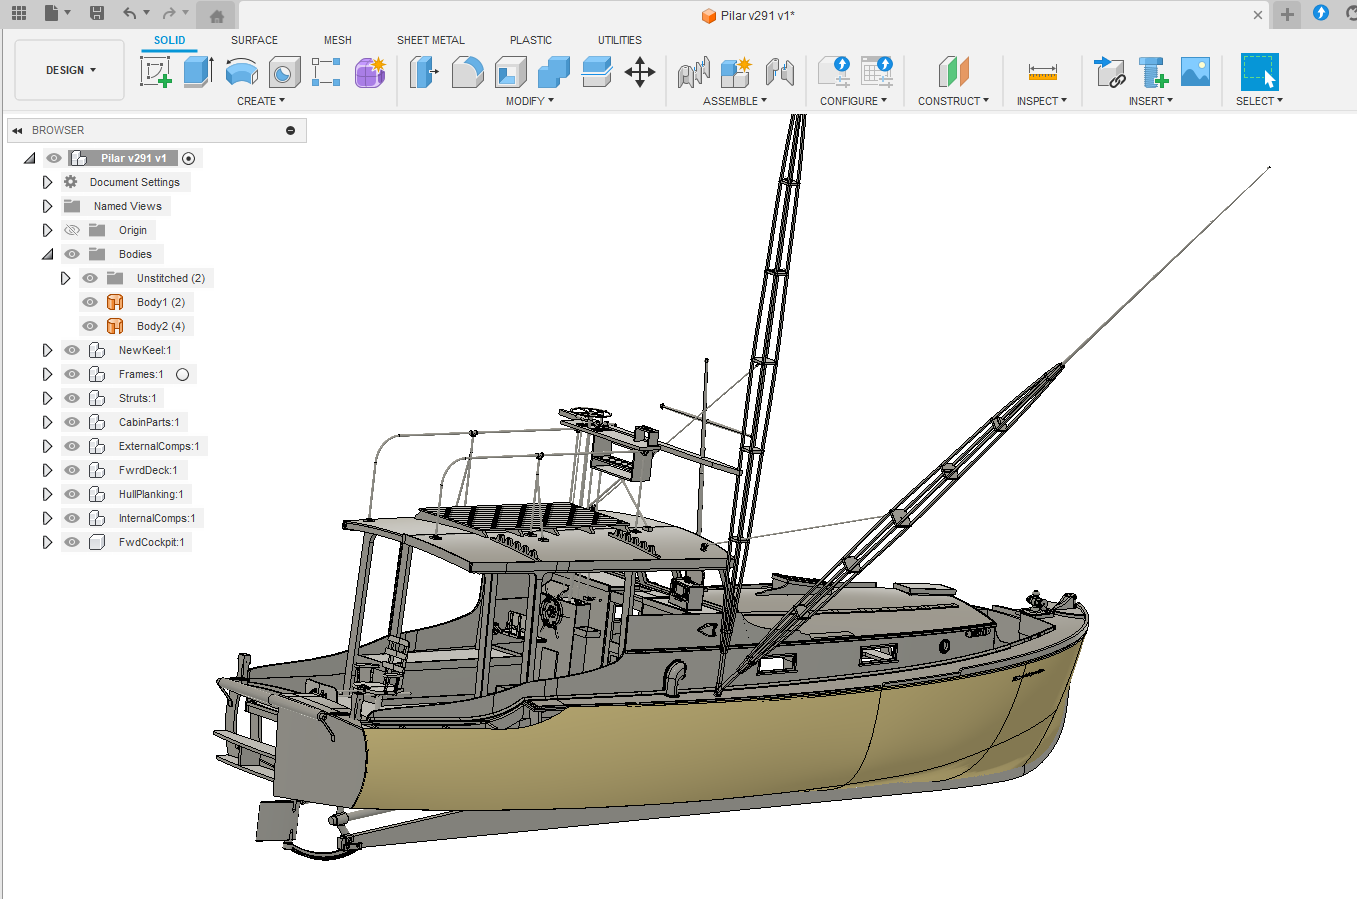
-
CAD file 3D printing question
Kevin-the-lubber replied to CPDDET's topic in CAD and 3D Modelling/Drafting Plans with Software
Dave, I don't mind doing that for you. At the least, I'll convert it into STL format and you can then open that in TinkerCad https://www.tinkercad.com/login which is probably the easiest form of CAD for a beginner, and have a look for yourself. Just send it via messaging or attach it here. -
CAD file 3D printing question
Kevin-the-lubber replied to CPDDET's topic in CAD and 3D Modelling/Drafting Plans with Software
That doesn’t look like a ready-to-print object, there are nowhere near enough supports. It looks more like a resin casting. Not that this would make too much difference, the model can be cleaned up a bit before printing if necessary. This will be easier if you have the actual CAD file but is still do-able if it’s the print file (usually called an STL). In terms of getting the printing done, I have no first hand knowledge of printing companies in the states, but All3DP gives a rundown of the top companies, on their site. They may have a vested interest of course. You might find it worth asking here, via a new topic, as there’s a growing army of people with printers, or have a look on eBay. Here in the uk there are a few people that offer a service via eBay, probably much cheaper than the big names. -
I think your wife is on the money here, Bill. Even zooming in, this is really hard to spot and even harder for a viewer to realise it's a small mistake rather than a natural artifact.
-
Good point. It reminds me that I need to shift my FDM printer into the garage alongside the resin printers, as I plan on doing a lot more FDM this year and I doubt the fumes from even PLA or PETG are totally harmless.
-
Is your printer enclosed? If so, it might be worth giving ABS a go, as I believe you can smooth the surface with a bit of acetone. I haven’t tried this myself, keep meaning to make an enclosure and try ABS again, previously I couldn’t get it to stay on the plate.
-
I hadn’t realised Discovery now is so different. I guess that’s the story with most ships though, they are constantly modified. There is a tiered walkway inside the victory scaffolding that allows an up close view of parts of the framing and what they are doing restoration-wise. Also, chances are it will be very quiet at this time of year - but also, pretty cold. Good luck with the interviews. I’m so glad that stuff is now behind me!
-
Perversely, you have both made me feel much better! I caught something a couple of weeks back and can't believe how quickly it burrowed down into the pit of my lungs. I thought it was just me but it sounds like this virus is everywhere, and a nasty, vicious one to boot. I started antibiotics yesterday and am already feeling a whole lot better. I'm looking forward to seeing what you come up with Marc. Even though I haven't really experimented with rope coils other than the odd bit of messing around, I think they are one of the things that can bring the ship alive and make the model convincing, especially if they drape or lie like real rope. Sails are much the same, and every so often I have a brainwave and try another experiment. Sadly none, so far, have proved successful.
- 2,667 replies
-
- 4
-

-

-
- heller
- soleil royal
- (and 9 more)
-
The Victory inside makes for a very interesting visit but be aware the ship is almost entirely enclosed in scaffolding and wrapping right now, with all the outer planking, masts and rigging removed. The stern and quarter galleries are still intact and viewable. I made a mental note that when I next return, to focus more on the Warrior, as I always seem to leave too little time for a really good walkthrough of this ship, which I have vague ideas of modelling one day. You didn’t mention the Cutty Sark in London so I guess you’ve either seen it or aren’t interested. Have you thought of a day trip to Dundee, to see the Discovery in person? It’s very do-able, Stansted (nearish to Cambridge) to Edinburgh return flight, 1 hr drive in a rental. Probably not much different cost-wise to visiting Portsmouth.
-
Most of the stuff I've printed in filament has been for outdoors and unpainted: all of it is still doing fine 4 or 5 years on, having had constant exposure to sun, wind, rain, snow, bird poo, squirrel warfare etc. Originally I used PLA, tried ABS as I wanted the flexibility, but couldn't get it to stick so switched to PETG which is fine for just about everything I make. I am starting to see PLA products being sold in shops now and recently read an article on a factory that runs something like 2000 FDM's churning out kids toys, so personally I don't have any real concerns about the longevity of filament prints. In fact I'd be happy to hear that it does start to crumble after 20 or 30 years as my one reservation about 3D is that I'm adding to the plastics mountain. Not by very much, but it all adds up, doesn't it. Resin is a different kettle of fish. While here again I've got some extremely finely detailed prints that have sat unpainted on my windowsill for 3 or 4 years without any apparent decay, for end product I would always paint them as this acts as a UV barrier (or so I read). That even extends to tiny blocks, where a holy grail seems to be to make them so they look good enough without paint (perfectly do-able, but a different discussion). I'll still paint. I'm not sure anyone knows, or if they do, is willing to say, how long resin objects will remain as good as new. My view is that anything I print in resin is going to end up on a model of some sort, which if it's worth keeping, will probably be kept in a case, out of the sun, and get very, very little post-assembly exposure to UV. While this is not at all scientific, I'd be surprised if it didn't last decades. It would be nice to leave a legacy, but nicer still if that had a relatively short lifespan, for the same reasons as above.
-
I agree, the machines are tools, same as lasers and CNC routers & mills, and so on. But 3D production can easily become the principal method, as is the case with my stuff. I guess it's down to the individual to decide how far they want to go, but my own experience is that it sucks you in. Not that I regret that, I willingly jumped in with both feet and would do the same again. While writing I just wanted to add something - when I first got into 3D I assumed it would be a huge time saver, that I'd be able to knock parts together in a jiffy that would take hours or days by hand. There's a grain of truth in this, you do get far faster as your CAD and printing skills develop, but my experience has been that it often takes considerably longer than making by hand if you're designing the thing from the ground up.
-
I don't think either of you need feel too envious - having seen the work you each do, I'd swap my printers (well, some of them anyway) for your abilities any day. 3D is brilliant, but probably not quite as fulfilling as doing it all by hand.
-
I'd certainly agree with that statement! Gary, you're quite right that it's a rare opportunity to see the framework of a ship like this, which is probably invaluable for people like yourself and Dan. Me, I'm a bit shallow, I like shiny, pretty things and would rather have all the nice bits back where they belong 🙂. It grieves me that I probably won't ever see the ship with the rigging back in place, but I do enjoy wandering around the inside on a quiet day, so will probably go back down later this month while all the kids are back at school.
-
The differences tend to be fairly small but there are quite a few of them. I'm only noticing it as I'm reworking this area at the moment and was having moments where I thought I was going mad, through seeing things on some photos that are different to what I thought I saw earlier (because they are on different sides)! But as you say, all those refits/repairs would explain it. Poor old lady - she's once more looking a bit like that McGowan photo. I still have a 'free' visit to take, as tickets are good for repeat visits within a year, but there's hardly anything left of the exterior right now. All in a good cause though.
-
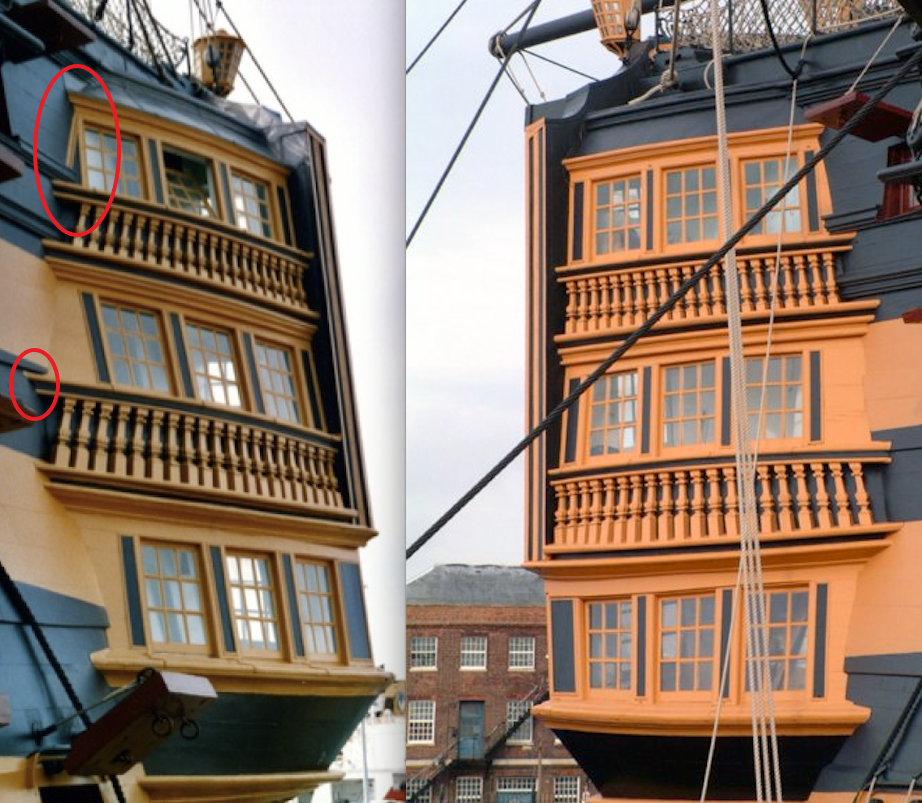
Dan, I'm sure you'll know the answer to this: was the port side quarter gallery rebuilt during that renovation? It is slightly different to the starboard side. I love what you're doing here, the ship does look a little sad and mistreated.
-
If anyone asks, just say, in a tone that brooks no argument, that sailors were extremely small back then and didn't need large windows. And then send the ship shooting across the lake 🙂
-
How interesting! The same 'problem' is present on the Victory, but not the solution, and you're right, it's absence does detract a little from an otherwise very elegant bit of architecture.
-
It's worth giving the 0.4 a whirl as well, as you're unlikely to be wanting narrower line widths and you can set the layer height to superfine. The smaller the nozzle, the more likelihood of blockages and first layer adhesion problems. The 0.4 seems to be the sweet spot, which I guess is why every printer under the sun comes with that as standard.
-
Oh yes, of course you did. You should be able to print some pretty small, finely detailed items even with the 0.4mm standard nozzle and finer still with a 0.2mm. I printed my original Victory side entrance steps on my filament machine.
-
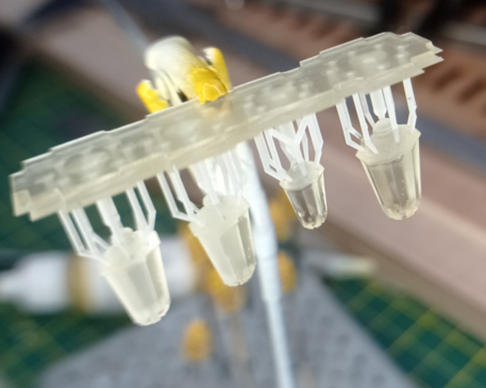
How about filling them near enough with a clear epoxy glue, or anything else that sets more or less clear, leaving a very slight recess. Then put a little dob of clear enamel in the recess. This photo shows, on the left, objects printed with transparent resin (the layer lines cause opacity) and on the right, the same but after I brushed on a little clear enamel. As I needed the enamel to be watery thin, I just sprayed some from a rattle can into a little receptacle. How are you getting on with the Mingda?