.jpg.2c2c29e54623bd7b752bc2cdab599665.jpg)
Danstream
-
Posts
755 -
Joined
-
Last visited
Content Type
Profiles
Forums
Gallery
Events
Everything posted by Danstream
-
.thumb.jpg.c459ce4140b54c12eddb8eedfd446df3.jpg) However, please note that Homer repeatedly refers to Greek ships as 'black-bellied', 'black benched', or simply having a 'black hull'. Clearly, Homeric ships are from an older age than the 480 B.C. quoted for this model, but perhaps the black color was an allusion to pitch being used to coat the bottoms of ships for water-tightness (there are discussions on this subject on the web with quoted references). At the same time, when Homer describes the method followed by Ulysses in building his ship to flee from Calypso, he basically describes the technique presented above by you in your intervention "... He bored all the pieces and fit them one to another, and then with pegs and lacings he joined it together ...". Hence, perhaps, the method of 'tenons and mortices' and the use of pitch (tar) to make the ship watertight could coexist at the same time. Best regards, Dan.
However, please note that Homer repeatedly refers to Greek ships as 'black-bellied', 'black benched', or simply having a 'black hull'. Clearly, Homeric ships are from an older age than the 480 B.C. quoted for this model, but perhaps the black color was an allusion to pitch being used to coat the bottoms of ships for water-tightness (there are discussions on this subject on the web with quoted references). At the same time, when Homer describes the method followed by Ulysses in building his ship to flee from Calypso, he basically describes the technique presented above by you in your intervention "... He bored all the pieces and fit them one to another, and then with pegs and lacings he joined it together ...". Hence, perhaps, the method of 'tenons and mortices' and the use of pitch (tar) to make the ship watertight could coexist at the same time. Best regards, Dan.- 62 replies
-
- 3
-

-
- amati
- greek bireme
- (and 1 more)
-
Been a while far from this forum and found the great progresses on your build and the great videos that I will keep as a reference. Waiting for your next instalment, Dan.
- 156 replies
-
- 1
-
-
- marisstella
- marisstella model ship kits
- (and 4 more)
-
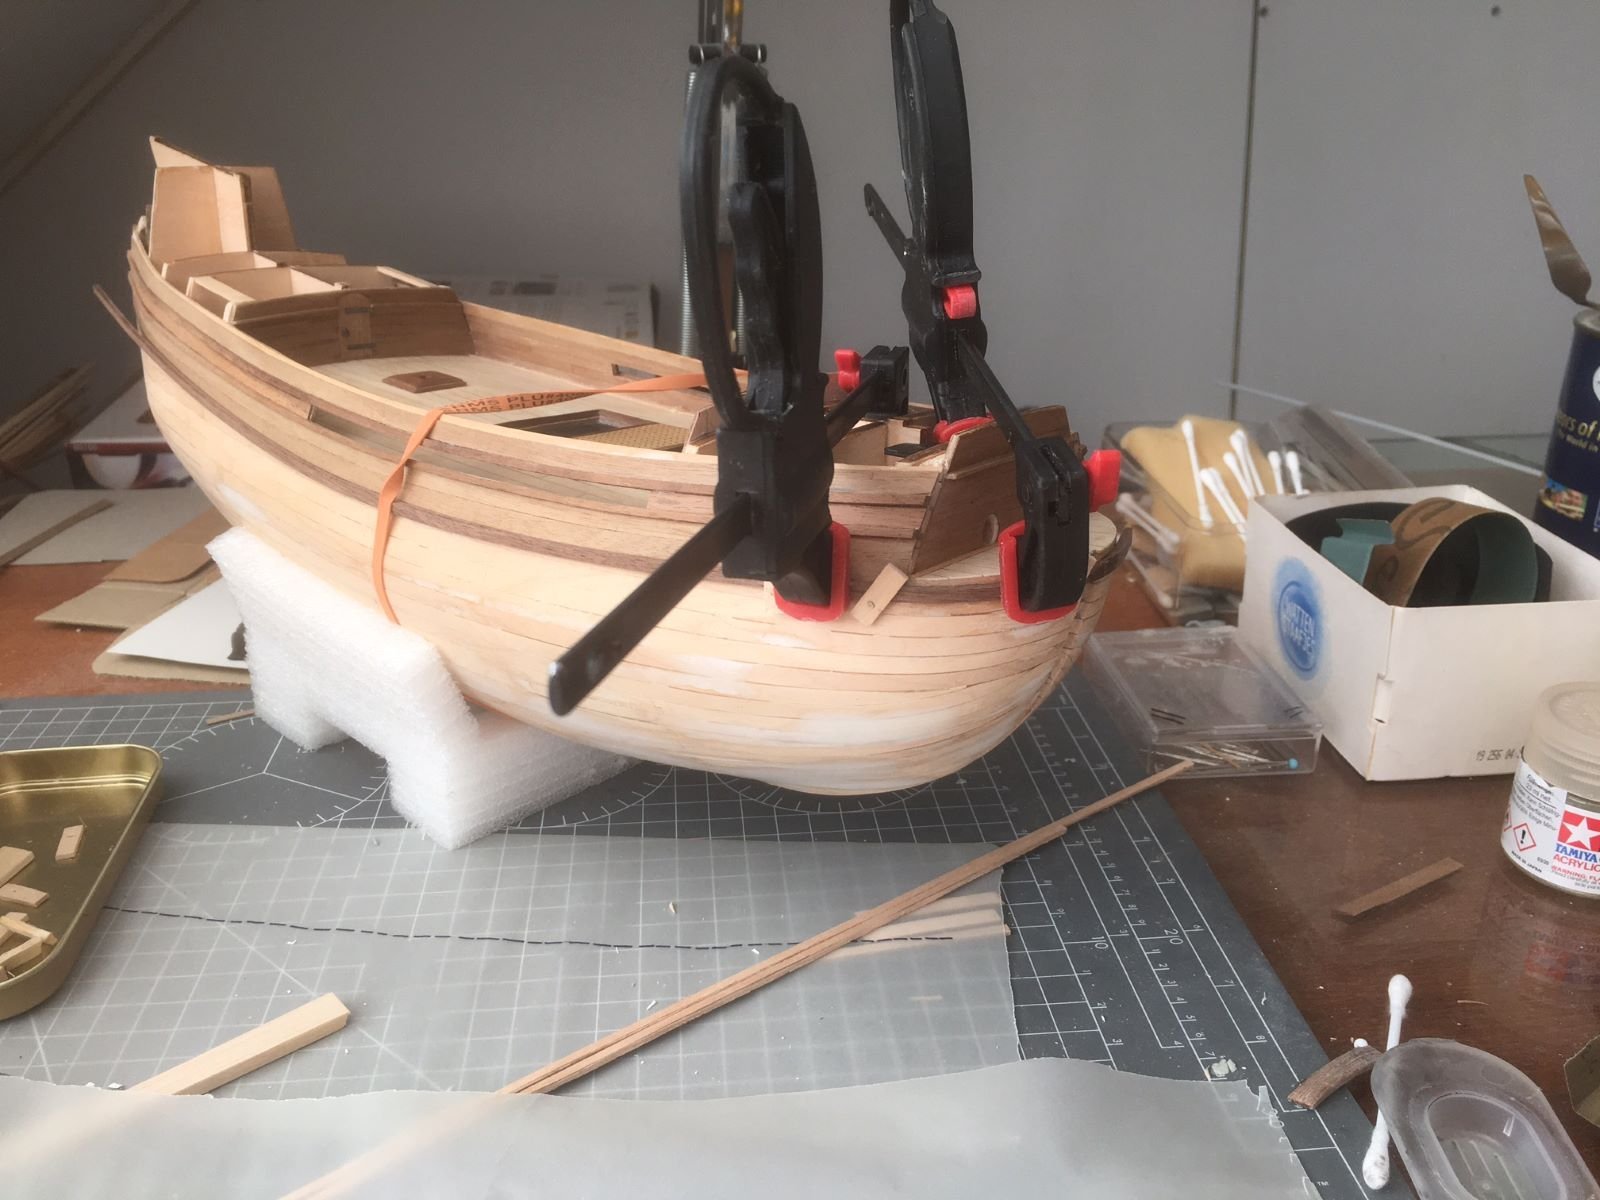
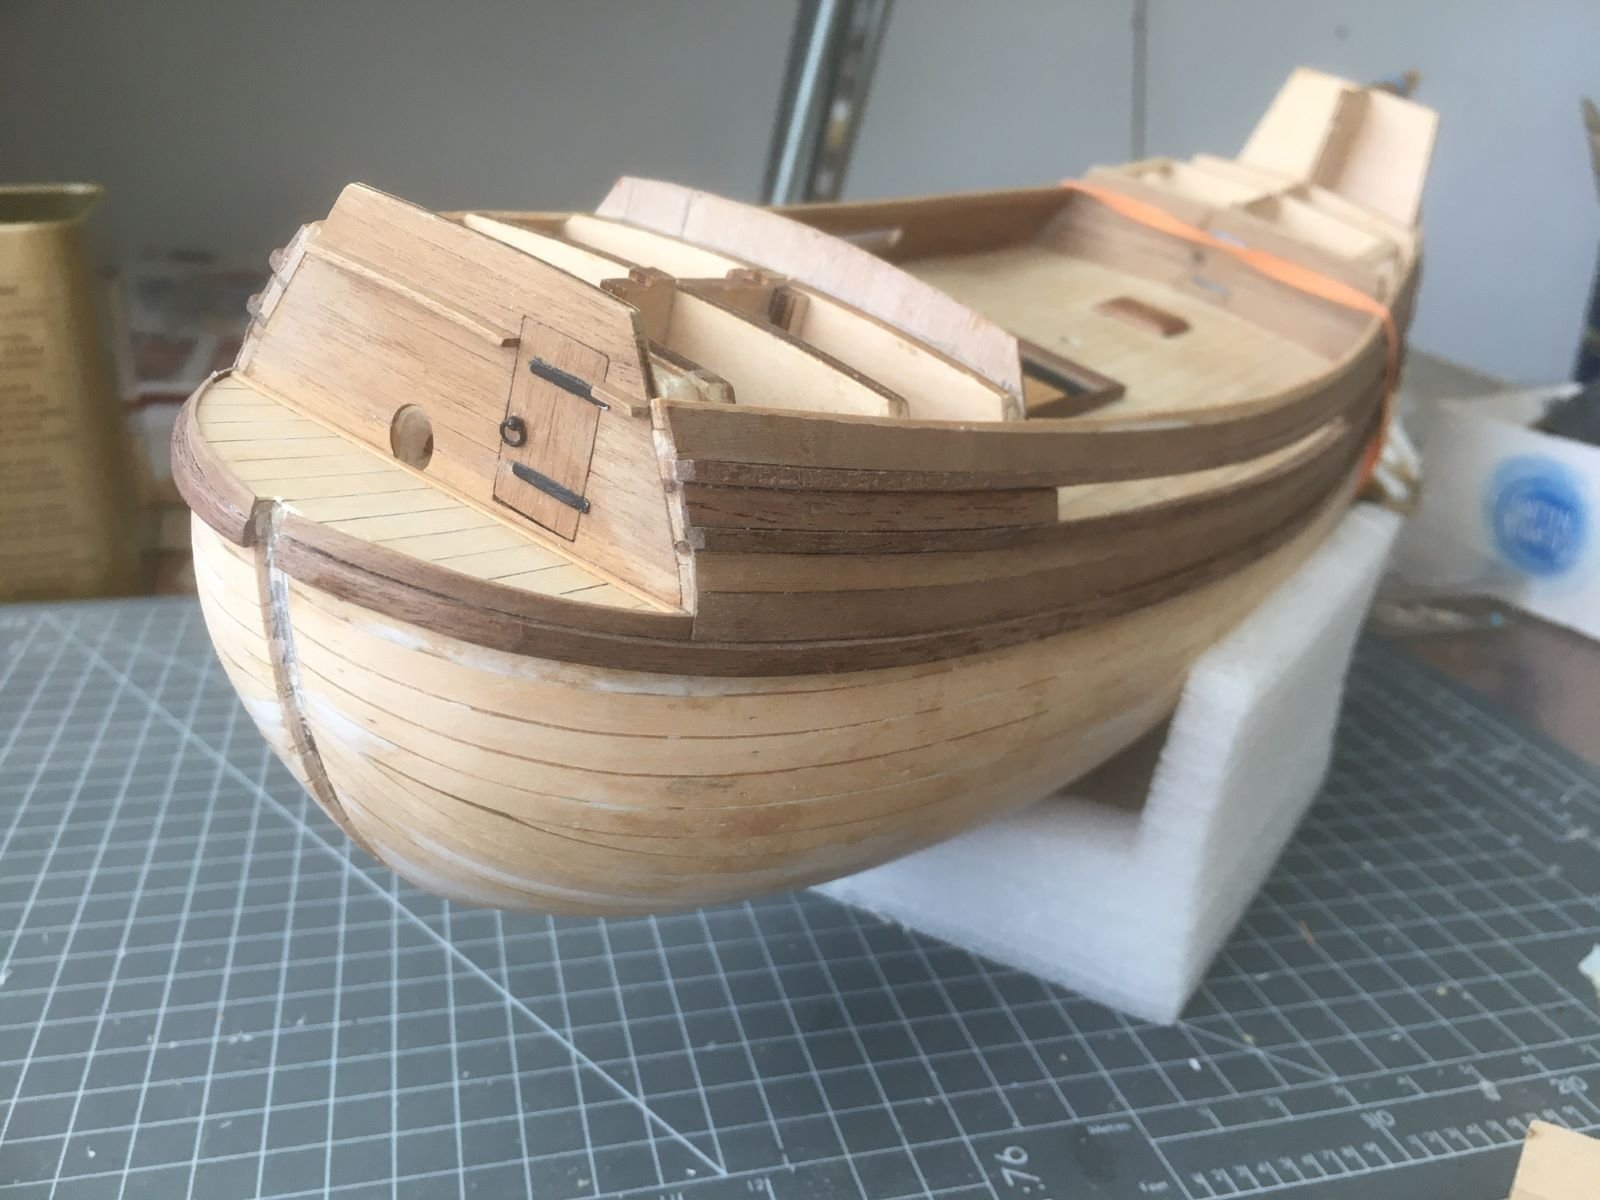
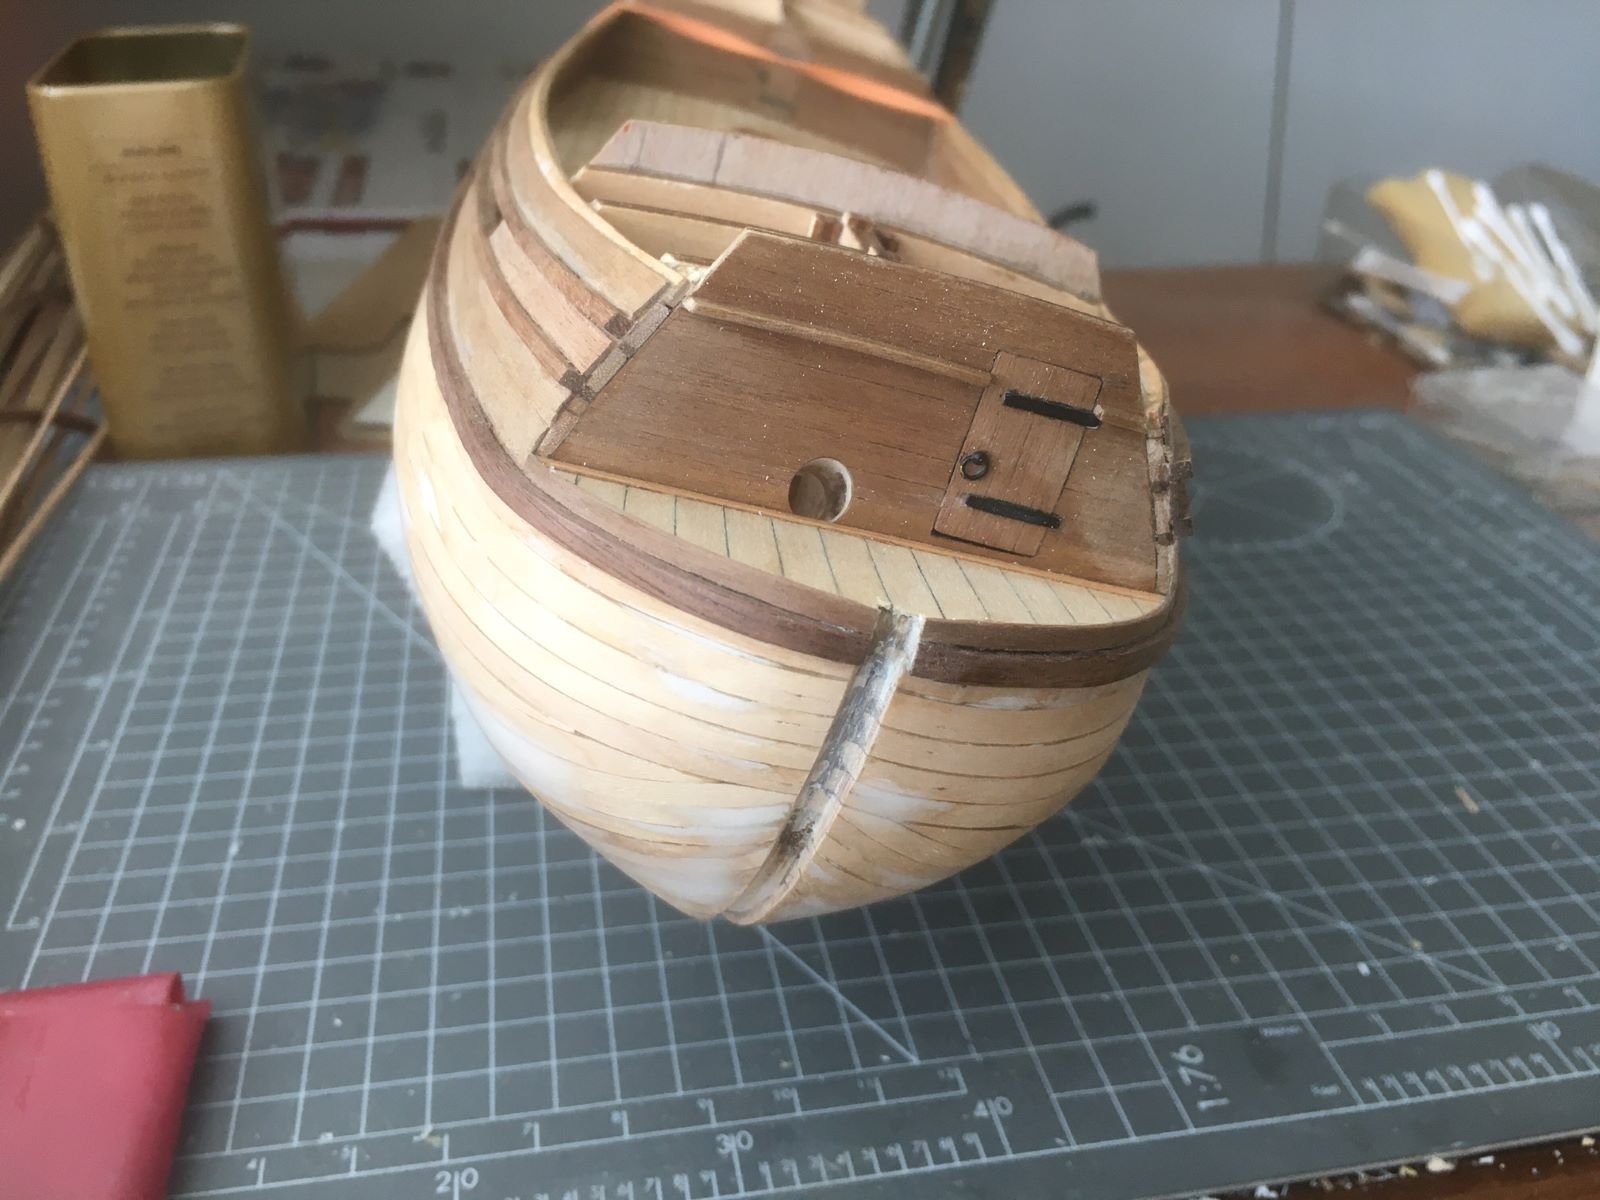
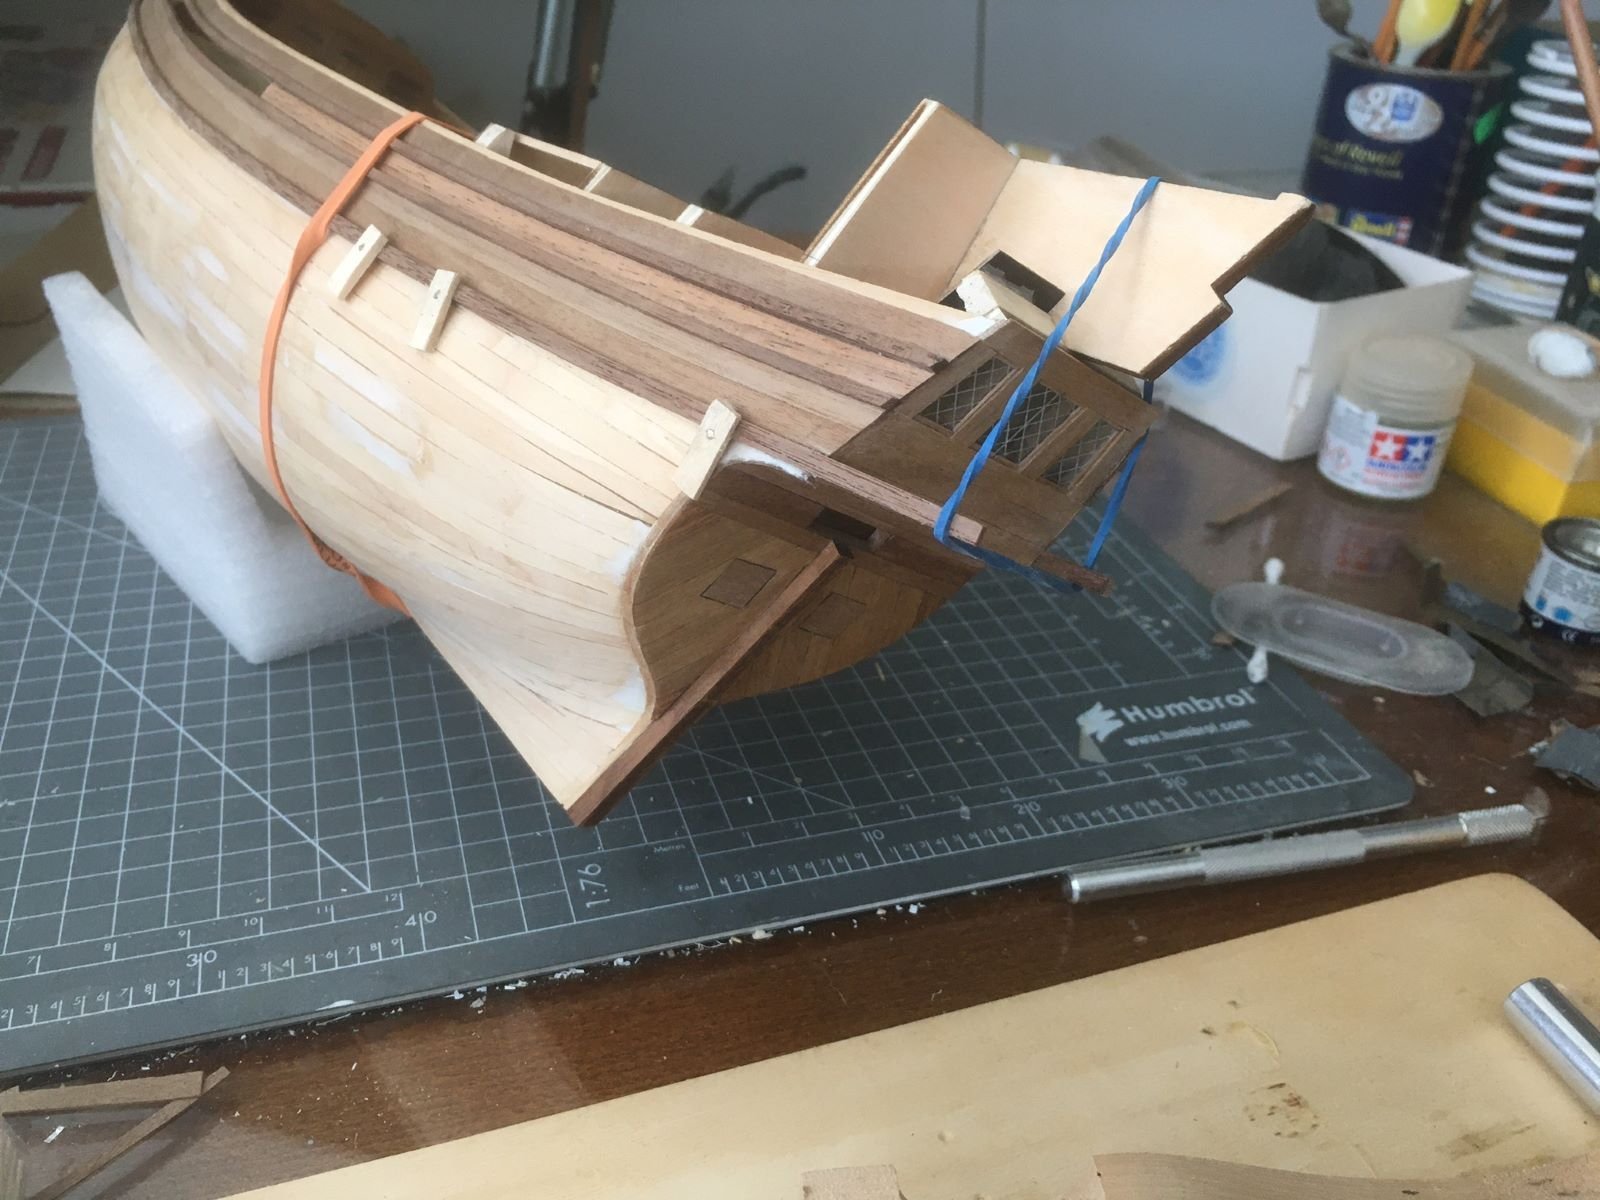
Hi all, after long time while I worked on other modeling projects, I am coming back to my Mayflower. I installed the upper wales and it took me several attempts to shape them satisfactorily. I pre-shaped them edgewise and out of their plane, as shown in one of the Chuck's tutorials. To follow the course of the other strakes, the wales had to be carefully bent in all planes using a hot iron. Then, I continued with the thin strakes that I also had to bend edgewise. After several strakes, another pair of wales will have to be prepared and glued on. I am considerably deviating from the original A.L. design, but I like this way better. Once the second wales will be on, portholes for the guns will be located in between. I realize that these are not terrific progresses, but as I said, because of my inexperience, it took me quite some time to shape the wales and the strakes correctly. That is all for now, best regards, Dan.


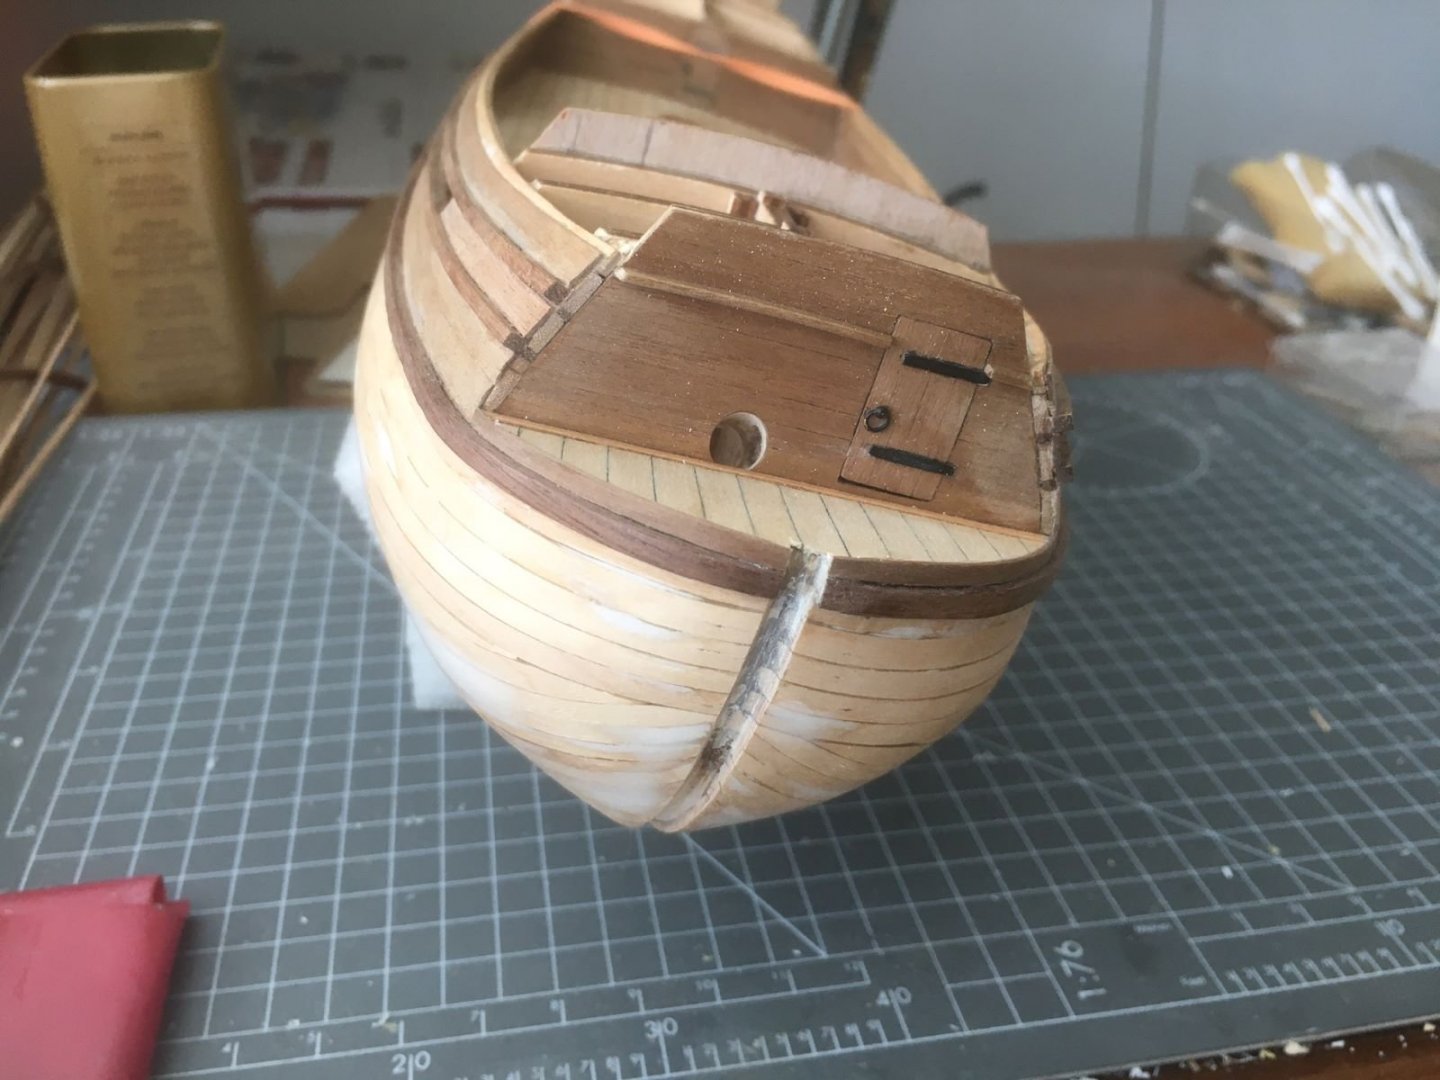
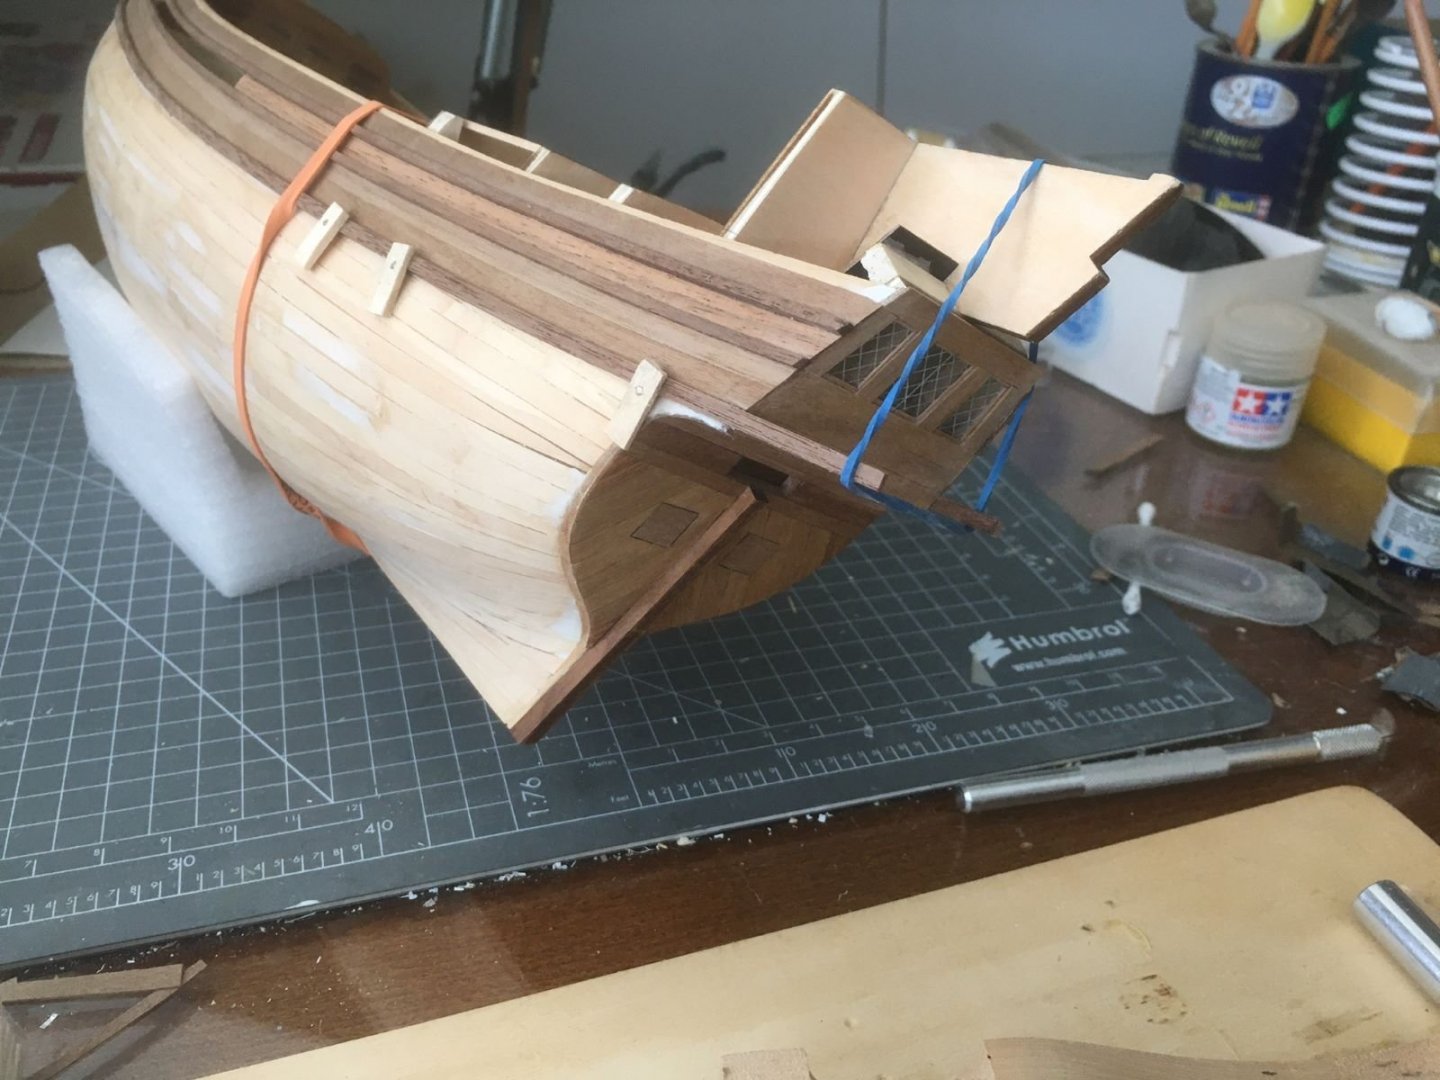
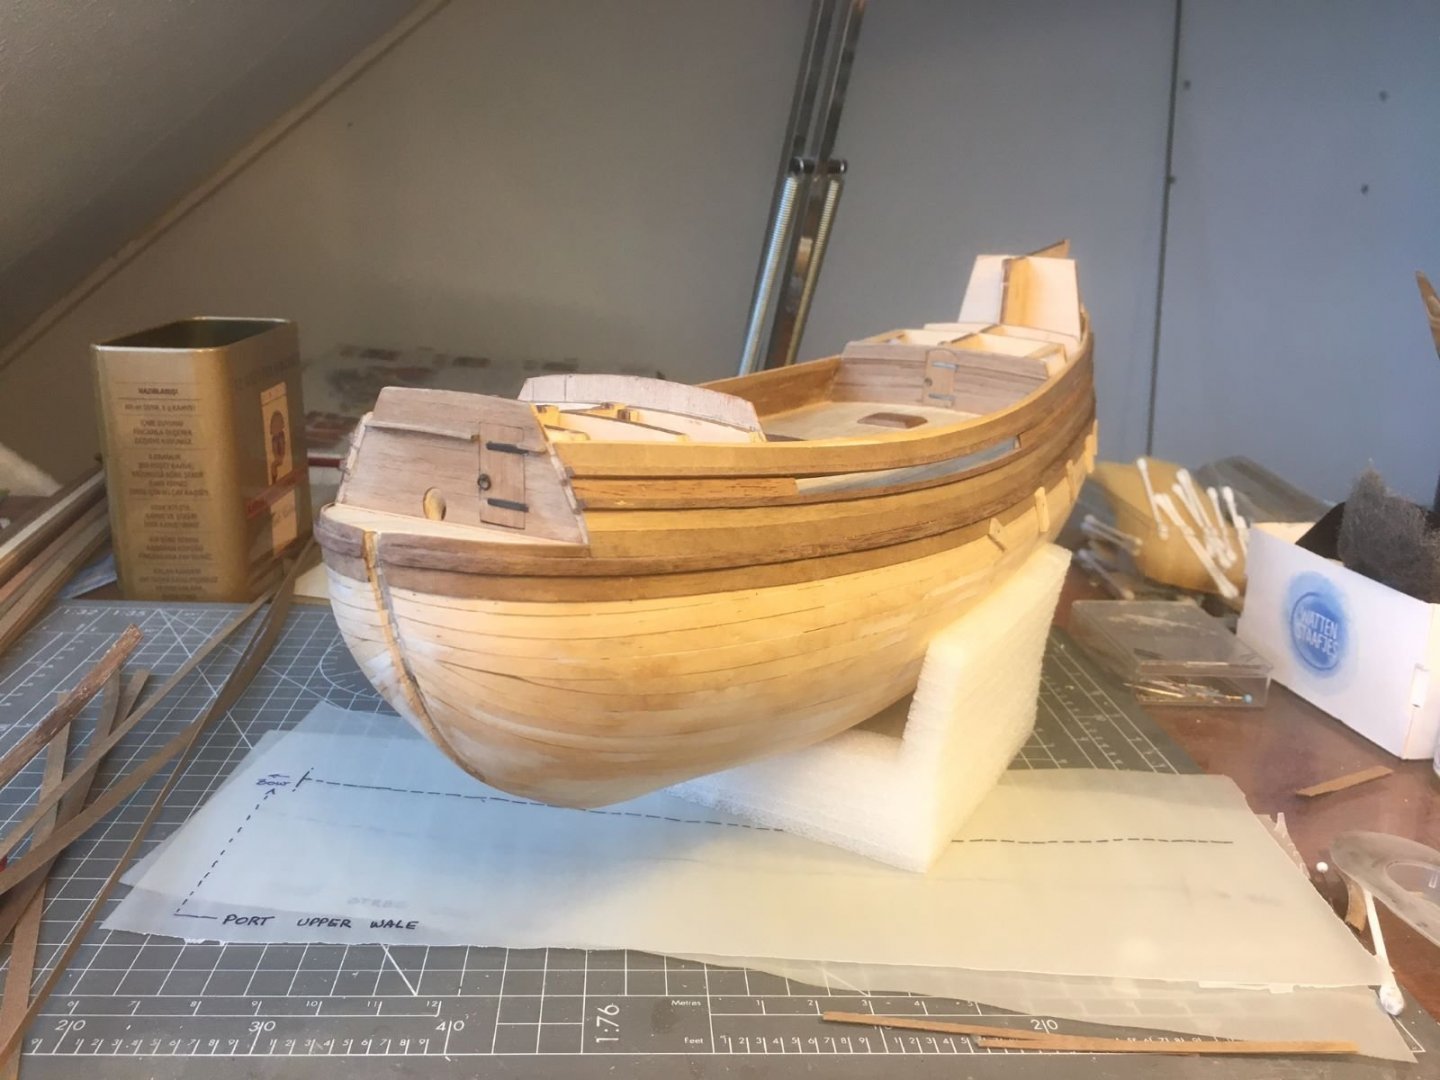
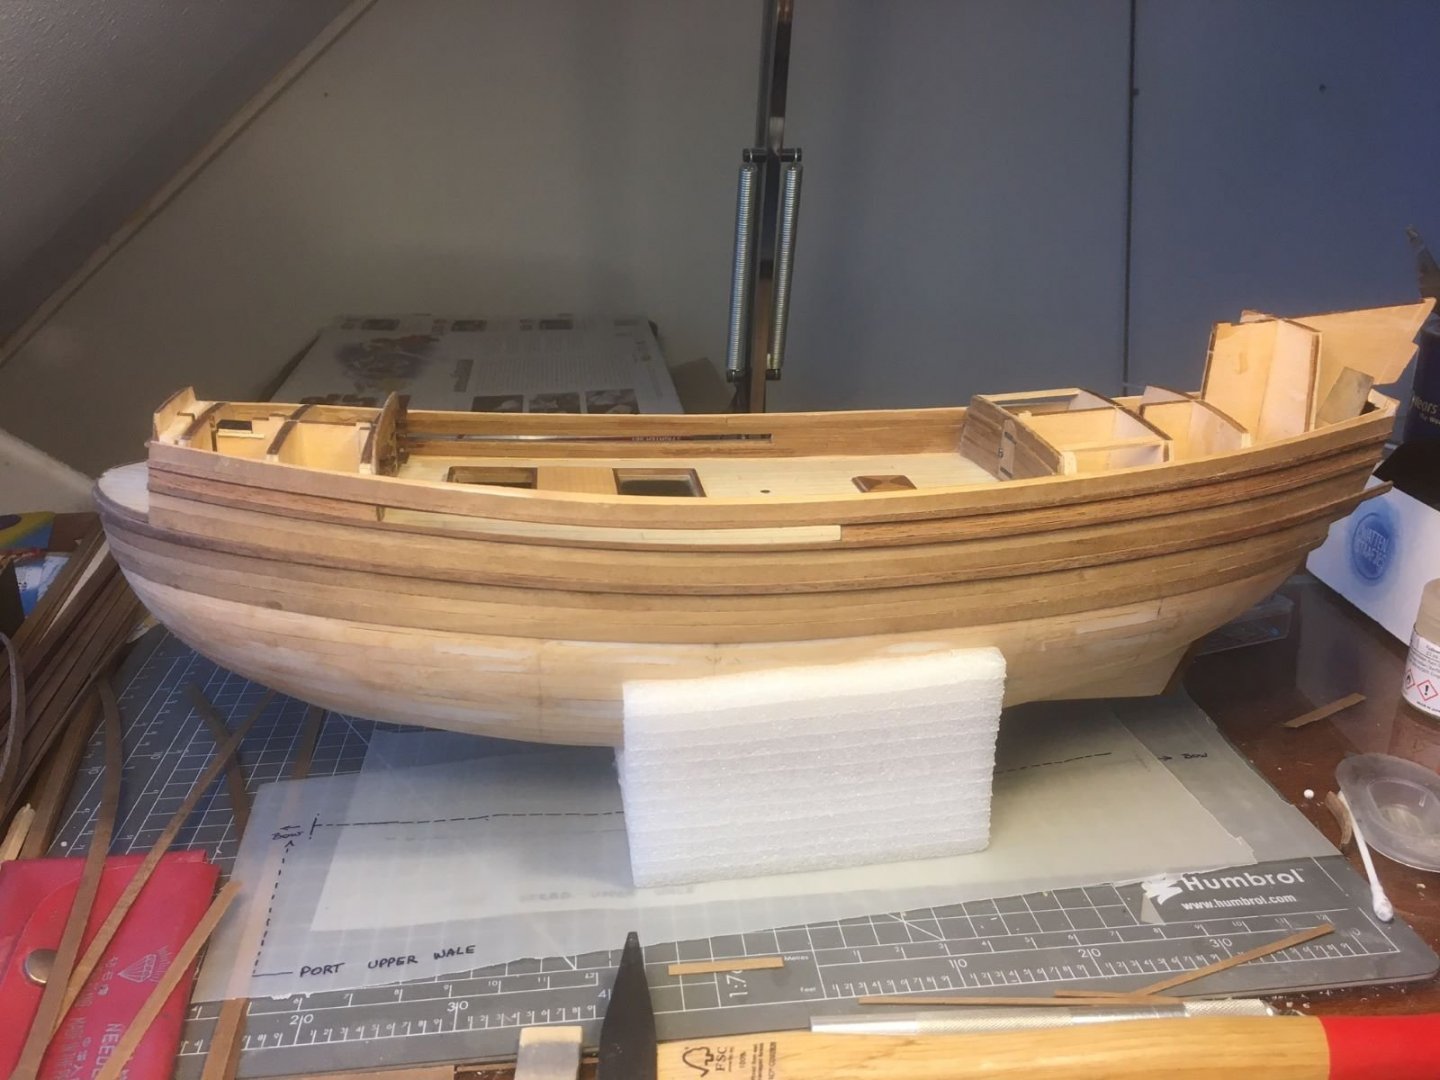
- 42 replies
-
- 3
-
-
- first build
- artesania latina
- (and 1 more)
-
They are little beauties! Difficult to believe that they are made of paper. You did an outstanding job in assembling them from flat foils and shaping them into a truly 3D model! Indeed, they are also very graceful airplanes. Are they sealed with some sort of coating once finished? Congrats, Dan
-
@Egilman this is a truly impressive model! Assemblying and finishing look first class! Congrats, Dan.
-
It looks as quite an impressive model. Best regards, Dan.
-
Your B-24 looks very nice, with a good paintwork, as others have already said. I am also intrigued by your Flyer model. Is it a wood framework and fabric type? Giving the right sagging to the wings might be a challenge. Are you planning to start it in the next future? Greetings, Dan.
-
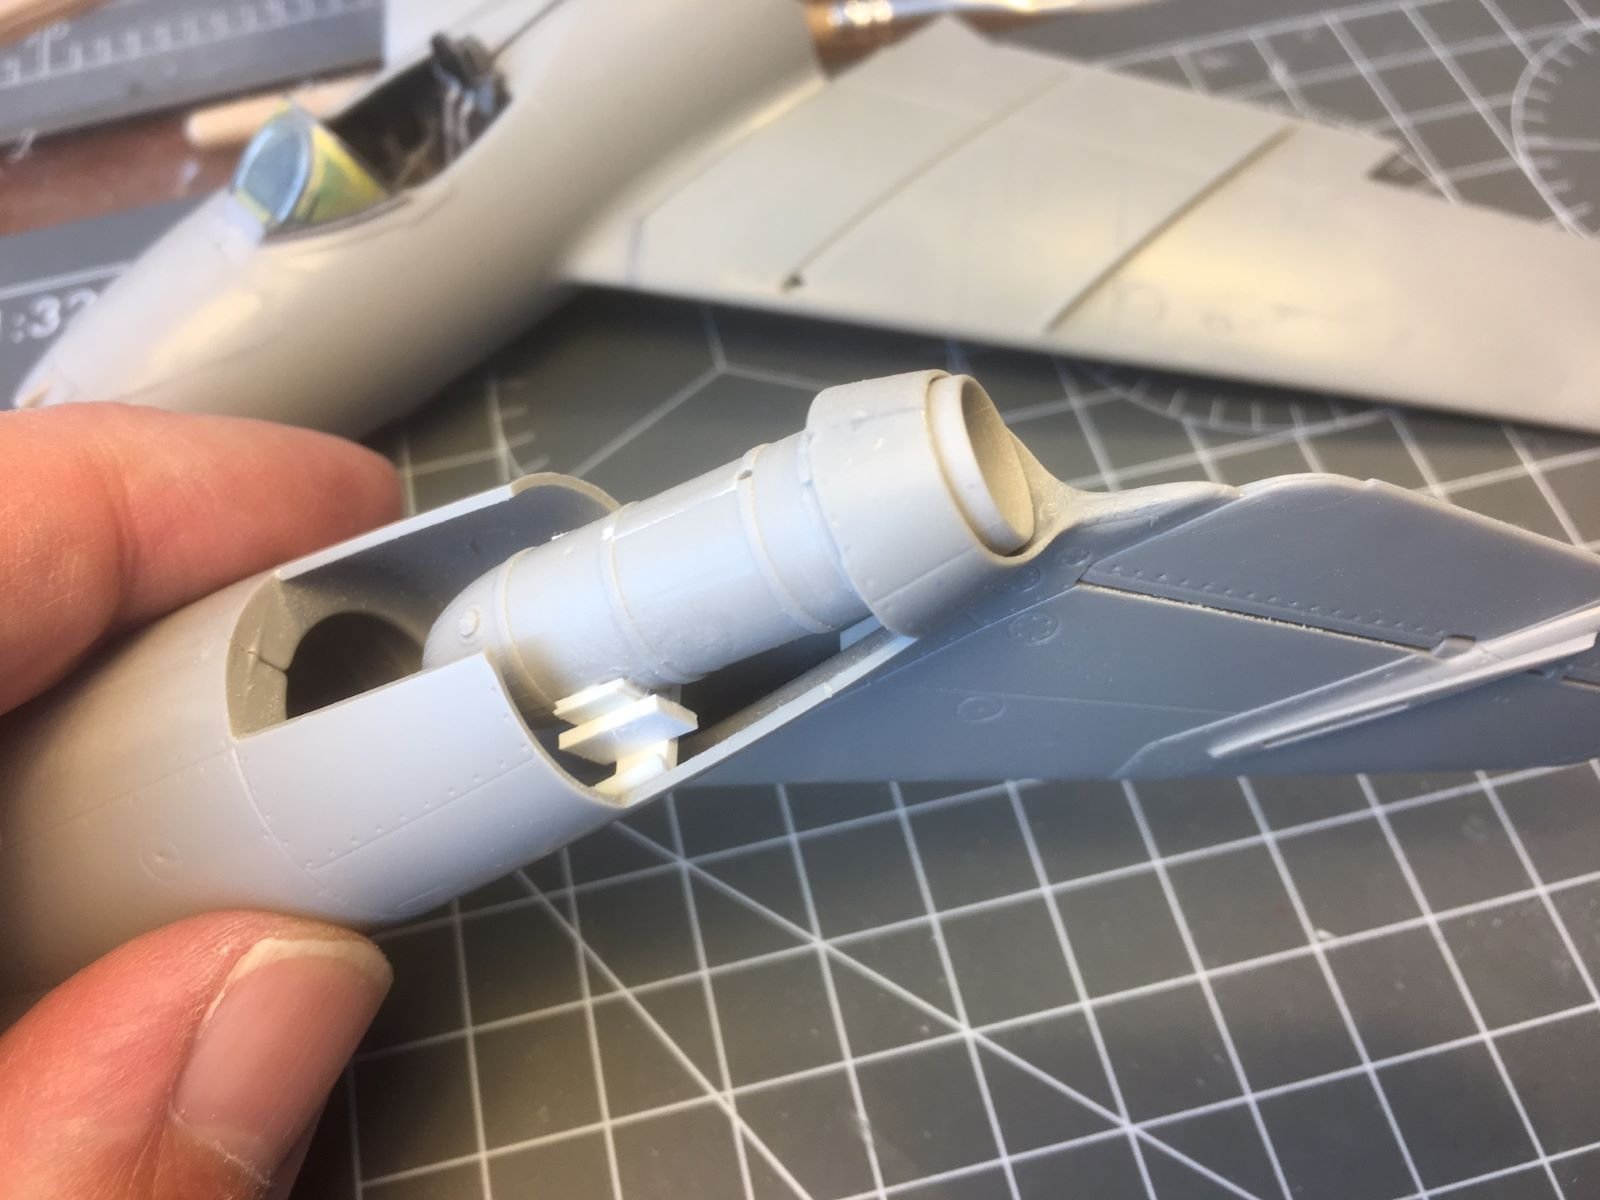
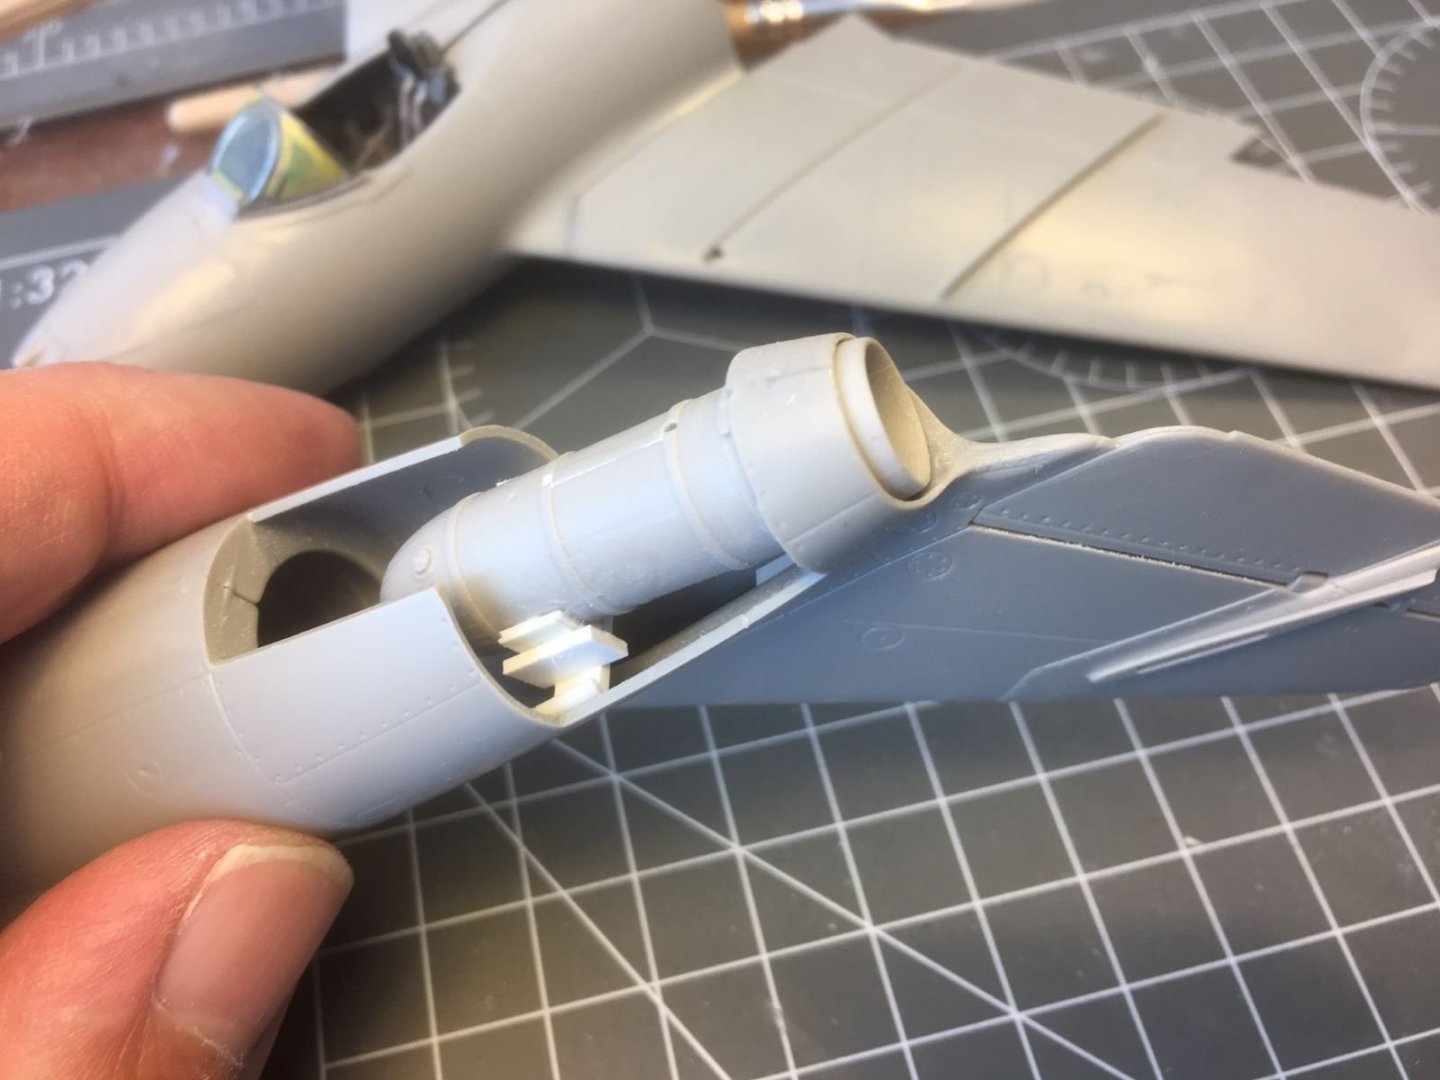
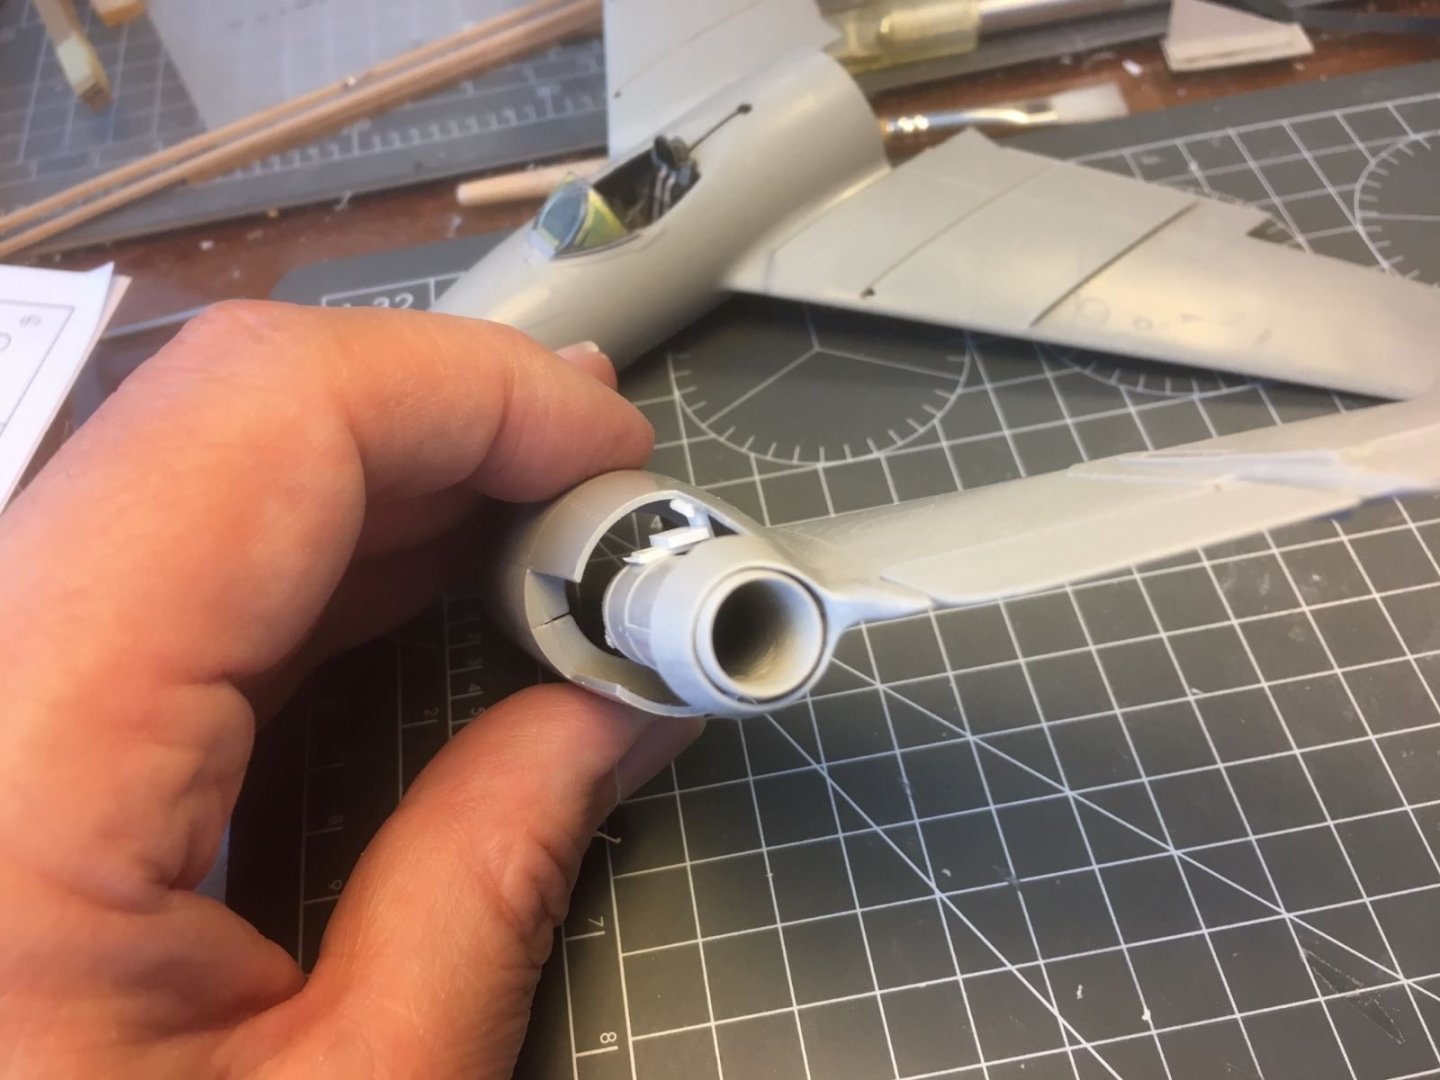
Hi all, some more important steps on assembling the airframe. The fuselage with wings and a tail (not glued yet). The fit of the wing roots is OK on the upper side but a bit disappointing on the other side: I resorted to fill the gaps with stretched sprue from the kit for a minimal disruption of the surface details: The P-51 drop tank in the background of the picture is waiting to become the new jet pipe to be installed inside the airframe, as anticipated in a post above. The tank was cut at the tapered end and its walls were sanded down to a suitable thickness. Supporting bracketry was improvised from styrene card: An annular gap was left between the pipe and the airframe as was seen in pictures: I also built some fictional tubing into the wheel bays for added detailing: Next, the main parts will be glued together and paintwork can begin. That's all for now, I need to restart working on my ship, so I am afraid that updates will be even slower if possible. Best regards, Dan.

- 109 replies
-
- 16
-
-
Amazing and exquisite work on this diorama! The scale consistency is so good that I couldn't guess the real dimensions until when you put some real life object into the picture. And then, I discover how small is the size! Fine miniature, congrats, Dan.
- 189 replies
-
- 10
-
-

-
Thanks for your comments. Looking at pictures (and at the parts of the model) the protruding part of the exhaust pipe is 2 inches maximum (in full scale), but, clearly, I will include it, just need to find a plastic tube of the right size, probably I will recycle a sectioned drop tank from the spare box. Cheers, Dan
-
Hi Ian, let you be tempted, but do not resist much. I find that building aircraft kits is very cool and relaxing (when things go right). Although, one modeller wrote once that building aircraft kits mainly consists in managing unexpected problems. 🙂 Anyhow, if it is the Mig 15 that attracts you, I suggest you make an informed choice between Trumpeter and Tamiya kits. And do not forget that lately also Bronco put on the market a kit of the same scale which seems very promising. Best regards, Dan.
-
Sopwith Camel by hornet - Artesania Latina
Danstream replied to hornet's topic in Completed non-ship models
I love this. I hope the A.L. kit lives up to expectations. Following with interest, regards, Dan -
Quite a story behind each character. Not my field, but I am following and I am more and more curious. Nice work on the building. Kind regards, Dan.
-
Thanks @Ian B and @yvesvidal for your suggestions that were well appreciated! Indeed, I am considering some of the points you both have suggested and trying to write a common answer to you (that is serving also to clarify my ideas). Basically, I have three options: a) Having the configuration of the kit, i.e., engine installed on the fore half fuselage and the rear half dry mounted with the possibility of removing it any time as I wish to show the engine. b) Having the engine installed on the fore half fuselage and the rear half fuselage permanently posed on a scratch build trolley. c) Having fore and aft fuselage halves permanently assembled and posing the jet engine on a scratch build trolley. Option a), which would be perhaps the better one, looks to be difficult for the reasons I exposed above, i.e. the aft fuselage does not slide easily over the jet pipe and there is the risk of marring the paintwork of the engine. I will do some more tries, but I expect to likely be obliged to drop this option. Option b), suggested by Yves (thanks for the picture), might look quite cool, but in this case, the aft fuselage would need some improvements of its internal structure. Also the bulkhead of the fore fuselage which supports the engine would need improvements and the parts used to keep the fuselage halves together are really very obvious (square tabs into square slots) to be permanently in view. Lot of work would be needed and I am very slow a builder ... Option c), seems to me the most straightforward and a good compromise for finishing the build within a reasonable time. In addition, I would get a complete airframe showing the unbroken shape of the aircraft. Basically, in this case, I will end up with two separate models (the aircraft and its engine) and, to answer Ian, yes, I am thinking to add some tubing to make the compressor area appear 'busier' from few feet a distance. I will ponder the options a bit longer, but I am afraid that c) will be the most likely winner. Kind regards, Dan.
-
Your paper planes look amazing. I know, others have already said that, but this is just what it is. Best regards, Dan.
-
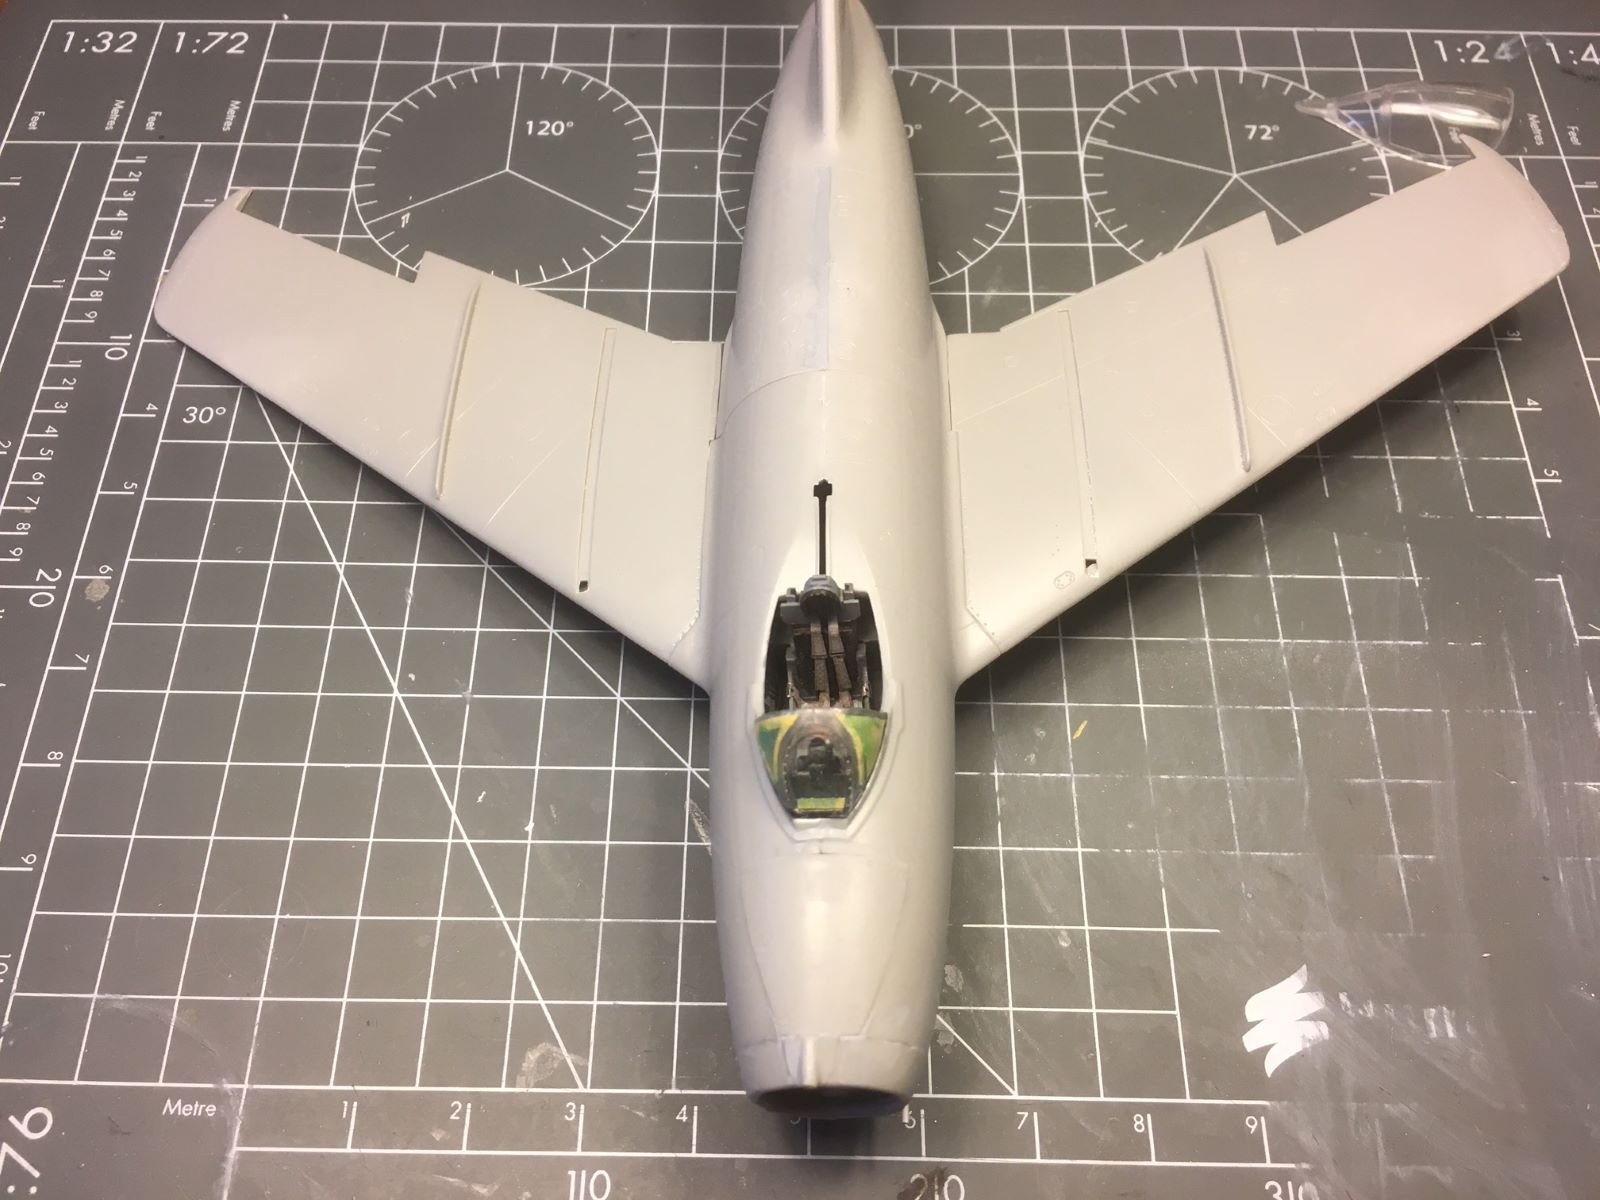
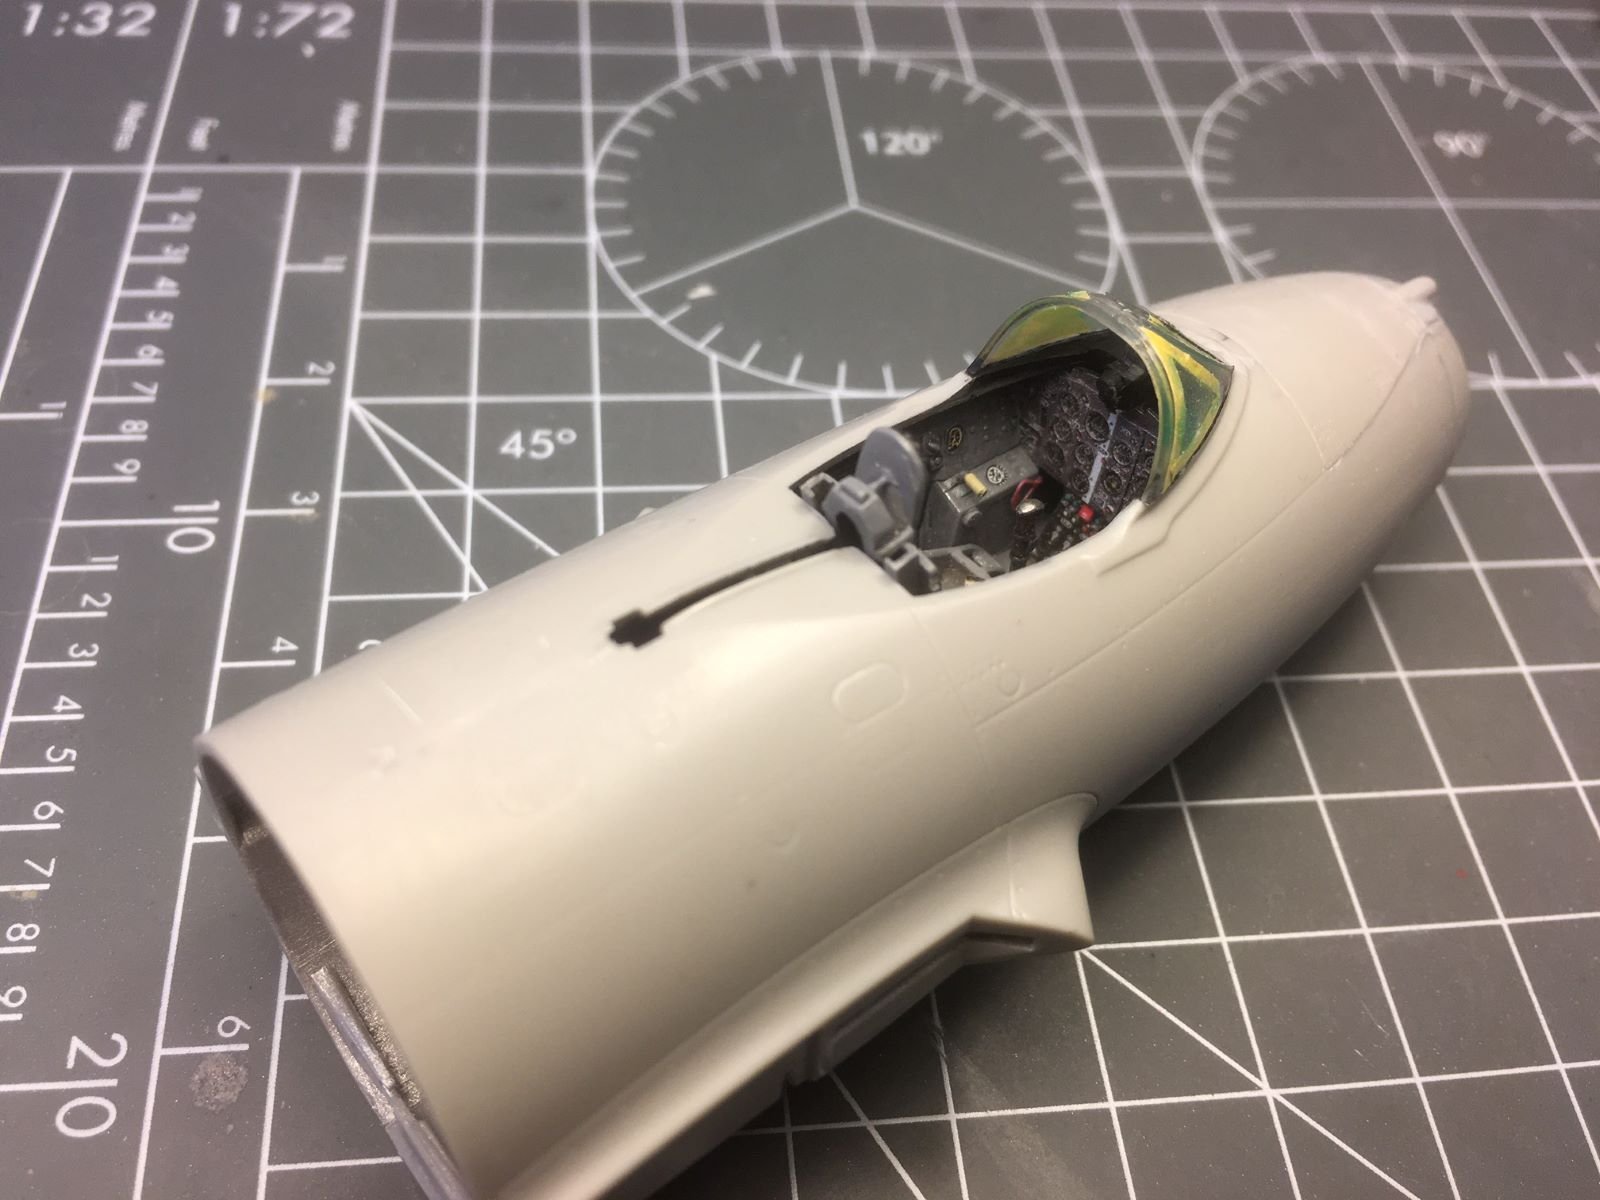
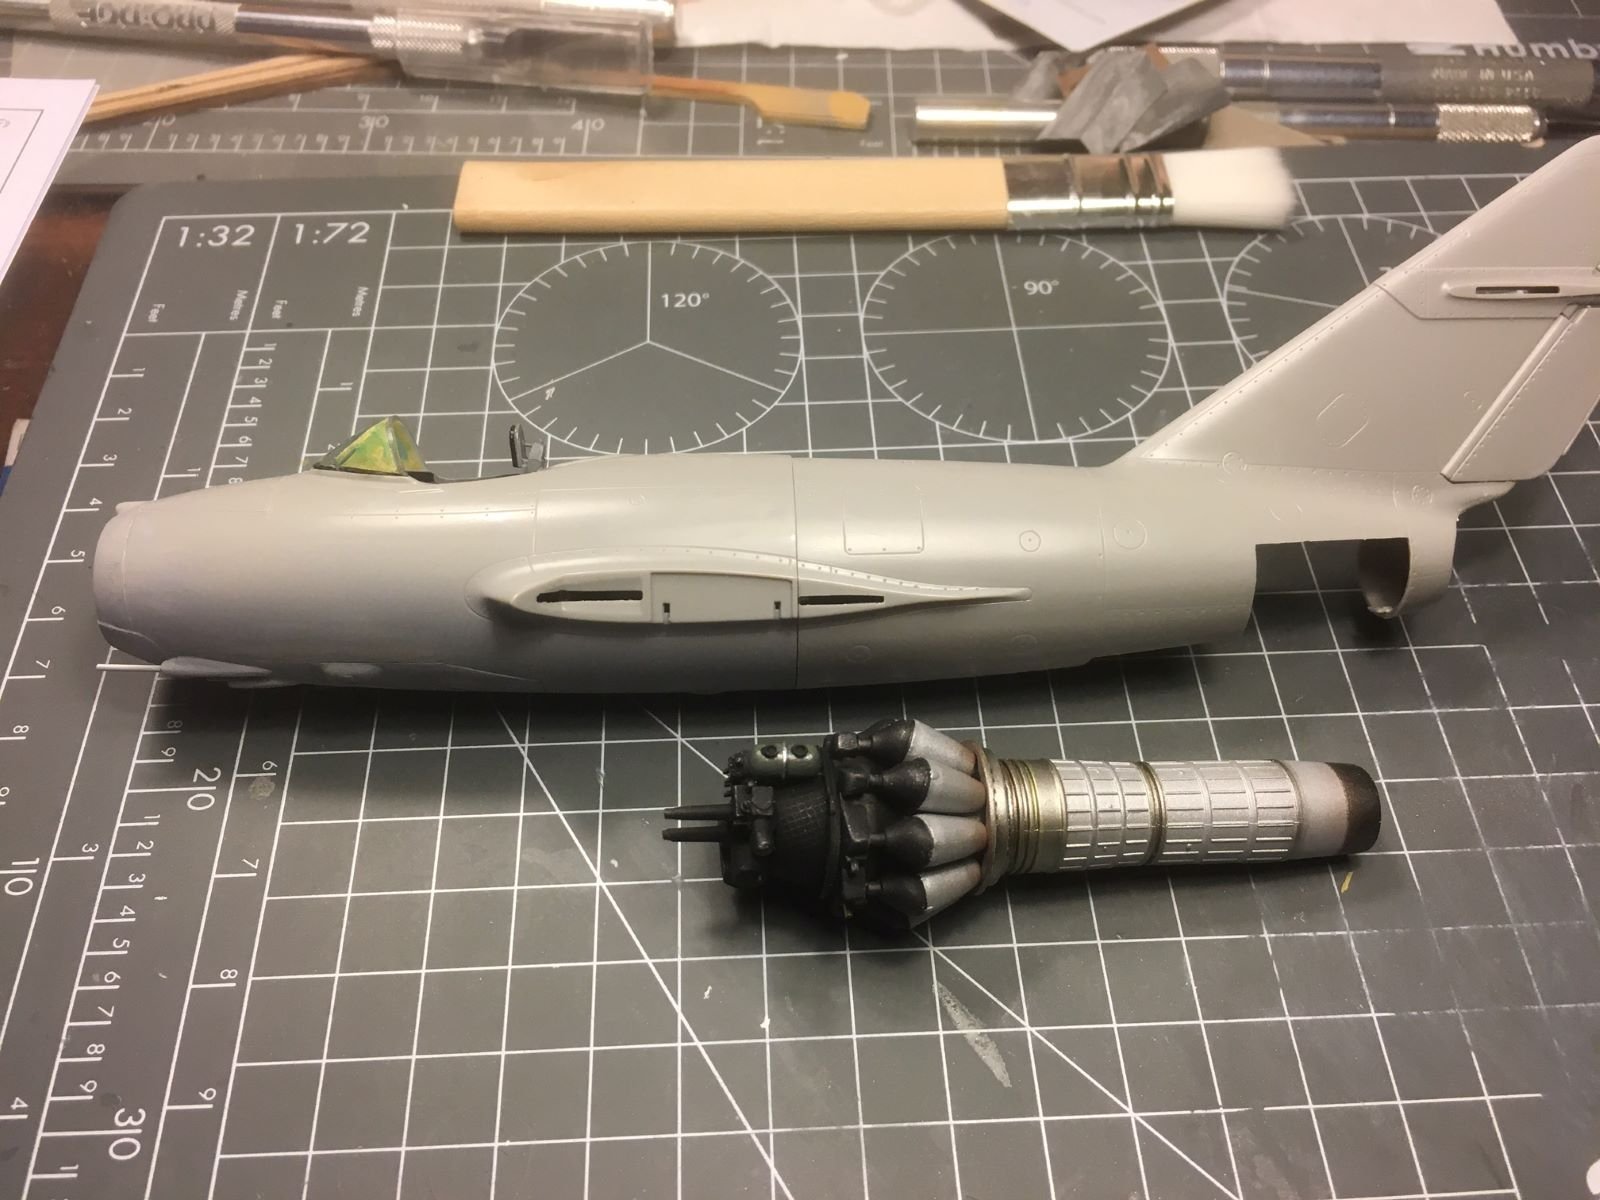
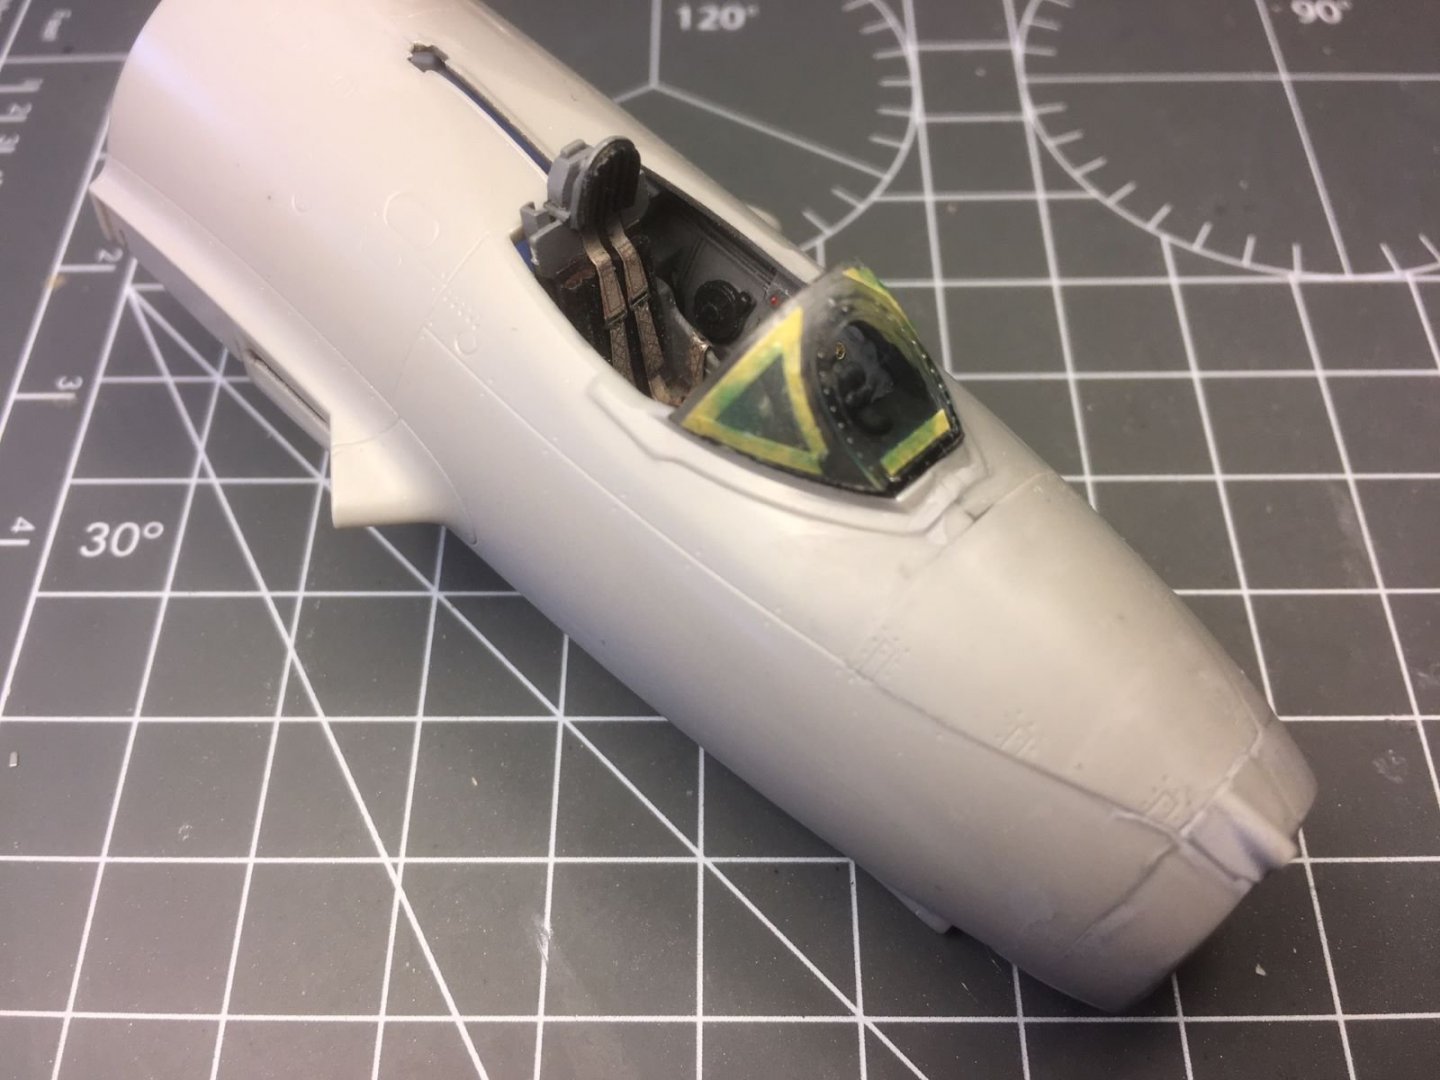
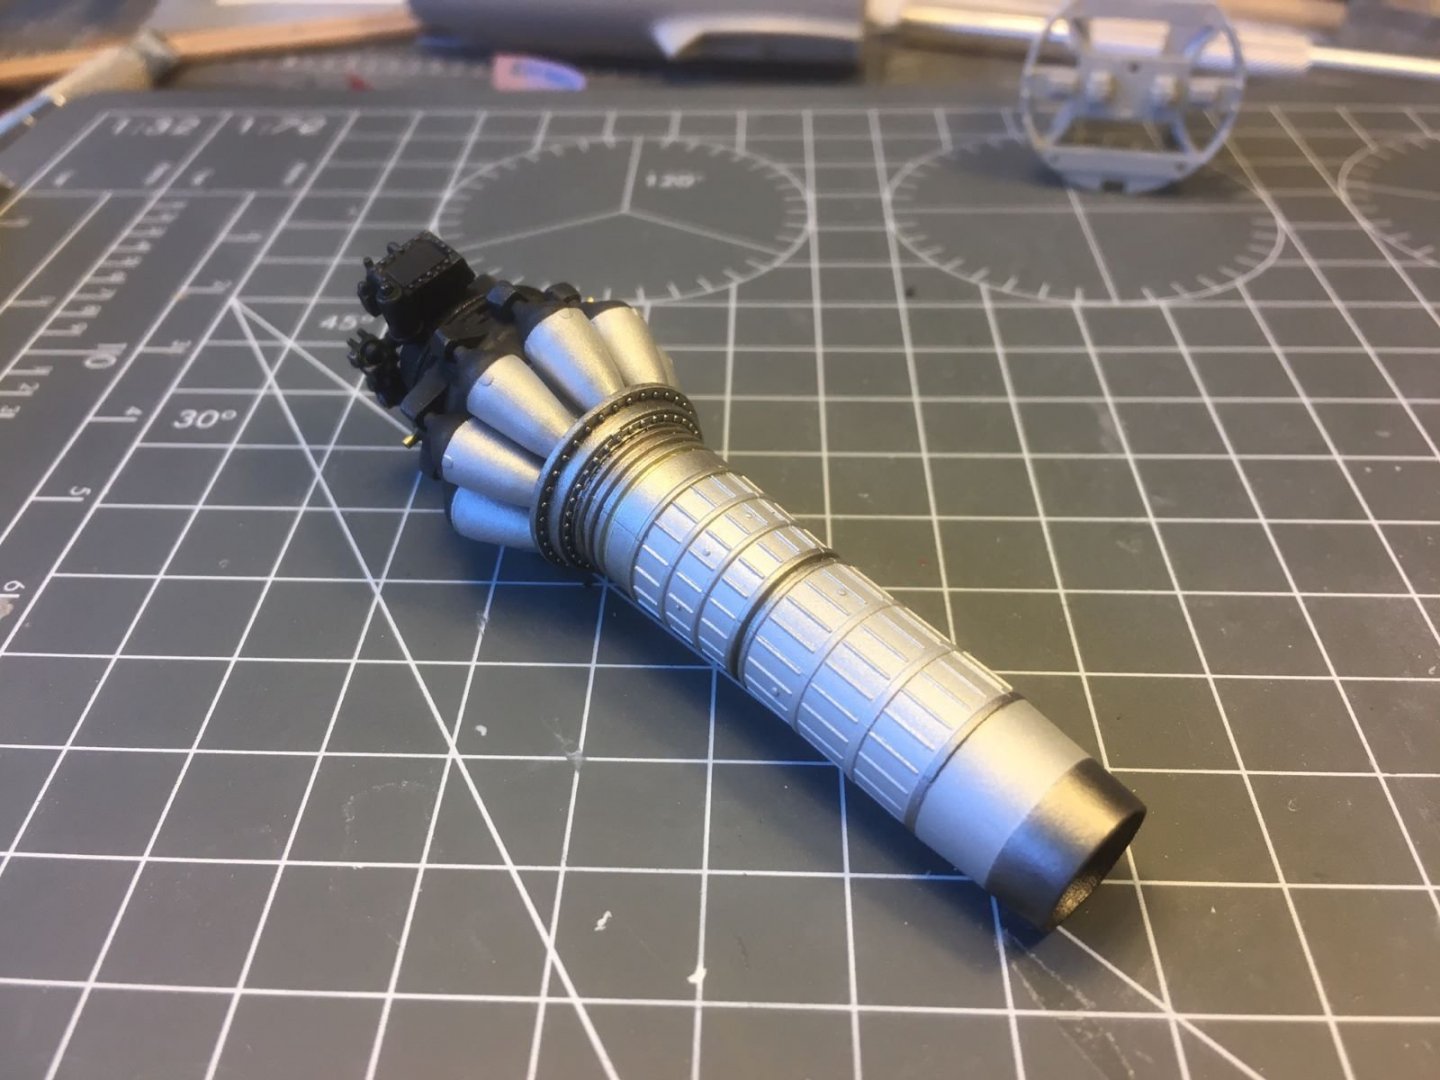
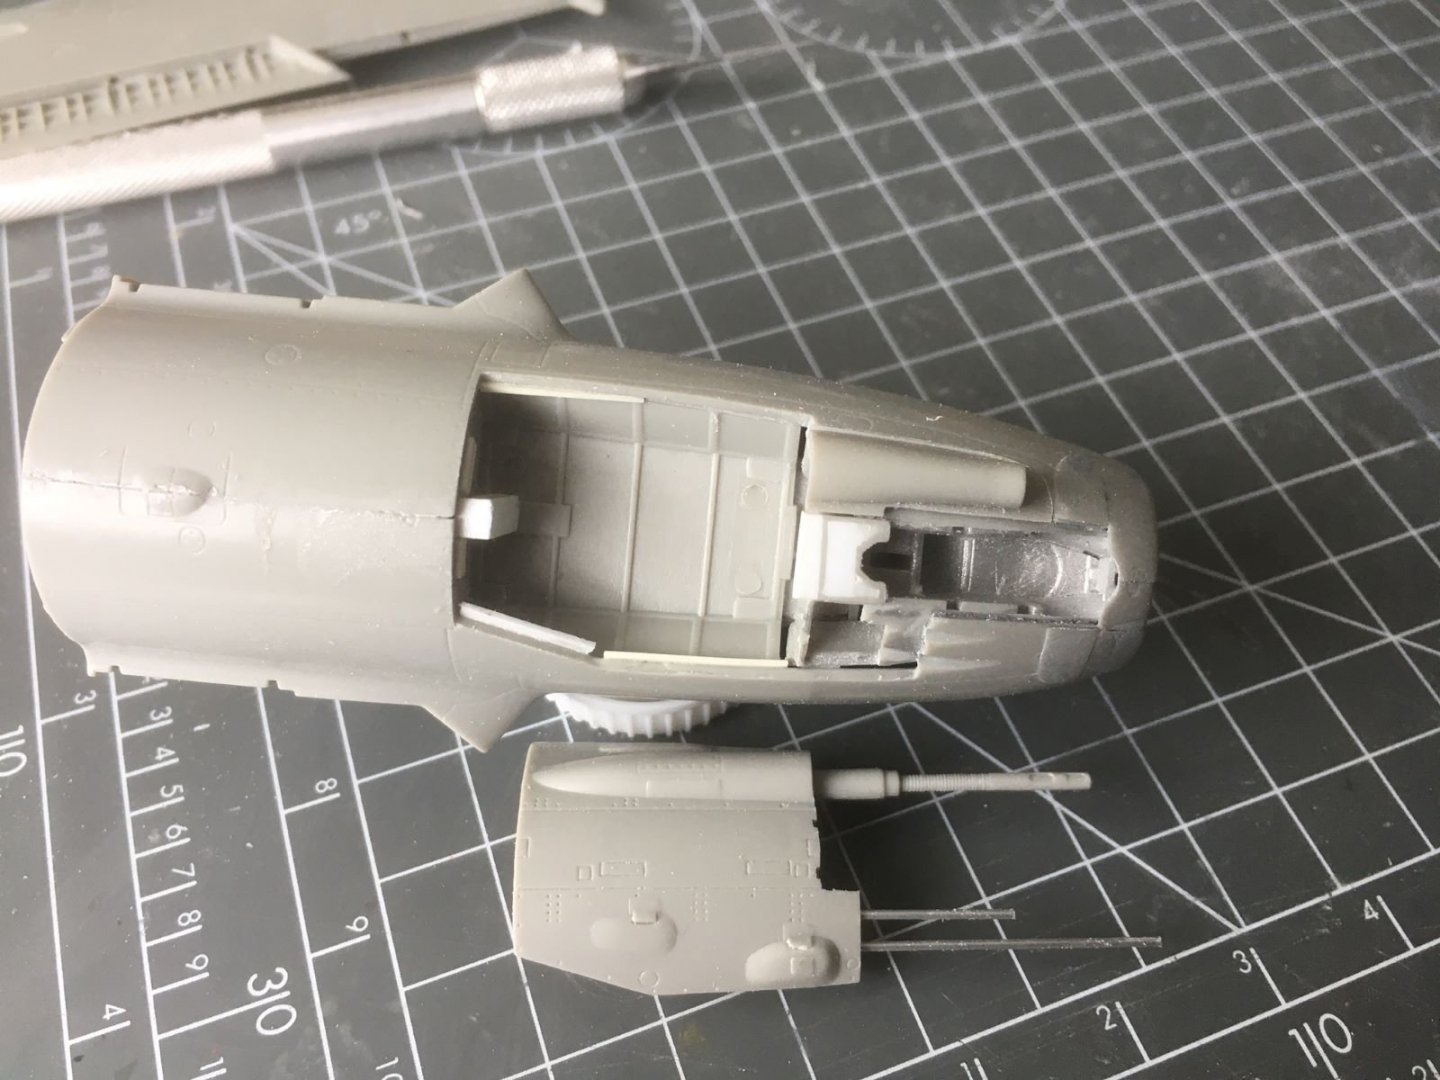
Dear all, I completed the front office with the gunsight and glued the windscreen on. The windscreen part was masked with a combination of masking tape and masking liquid. I will see later how to fill the remaining gaps between the transparent and the fuselage. Probably, I will try to have several applications of diluted writhe glue. This is how the cockpit looks like now: At the end, what is visible of the front cockpit doesn't look too bad. The characteristic vertical white strip, which is a trademark of Soviet fighters, is well noticeable. Then, I had fun adding some weathering to the jet engine. As I anticipated above, I tried to reproduce the discoloration due to the heat by selectively spraying a very diluted red brown. This is the rear fuselage dry fitted with the front part. Finally, it starts to look as an airplane and not just as bullet. The unmistakable lines of the Mig 15 can be seen. Its short fuselage and the huge swept backward tail surface can be noticed resembling to some extent the configuration of the Focke Wulf 183. I posed the engine next to it because now I have to decide what to do with it. Once fitted inside, the installation of the rear fuselage becomes a bit problematic. The fuselage seems not to fit well the engine and a lot of force is needed with the risk of scratching the paint of the engine. A solution could be to glue the fuselage and scratch build a trolley for the engine so to pose it next to the aircraft. That's it for now, best regards, Dan.


- 109 replies
-
- 15
-
-
Hi Denis, if the engine and airframe turn out good enough, I will have the possibility of removing the aft half of the fuselage to leave the engine exposed. Unfortunately, there is not a trolley for the half fuselage supplied in the kit. I will see when I will be there. Kind regards, Dan
-
You have to be commended for your perseverance and aptitude to stay focused on the building these old kits. 👏 I am following even if I am not commenting much. Kind regards, Dan
-
Lot of work on the camo. Just one comment about the feathered edge camo. RAF used rubber mats that once laid on the aircraft surfaces were used to delineate the areas to be sprayed. Hence, the resulting edges were more likely sharp than soft. At any rate, your model looks good whatever the the look of the edges will be. Good luck and best regards, Dan.
-
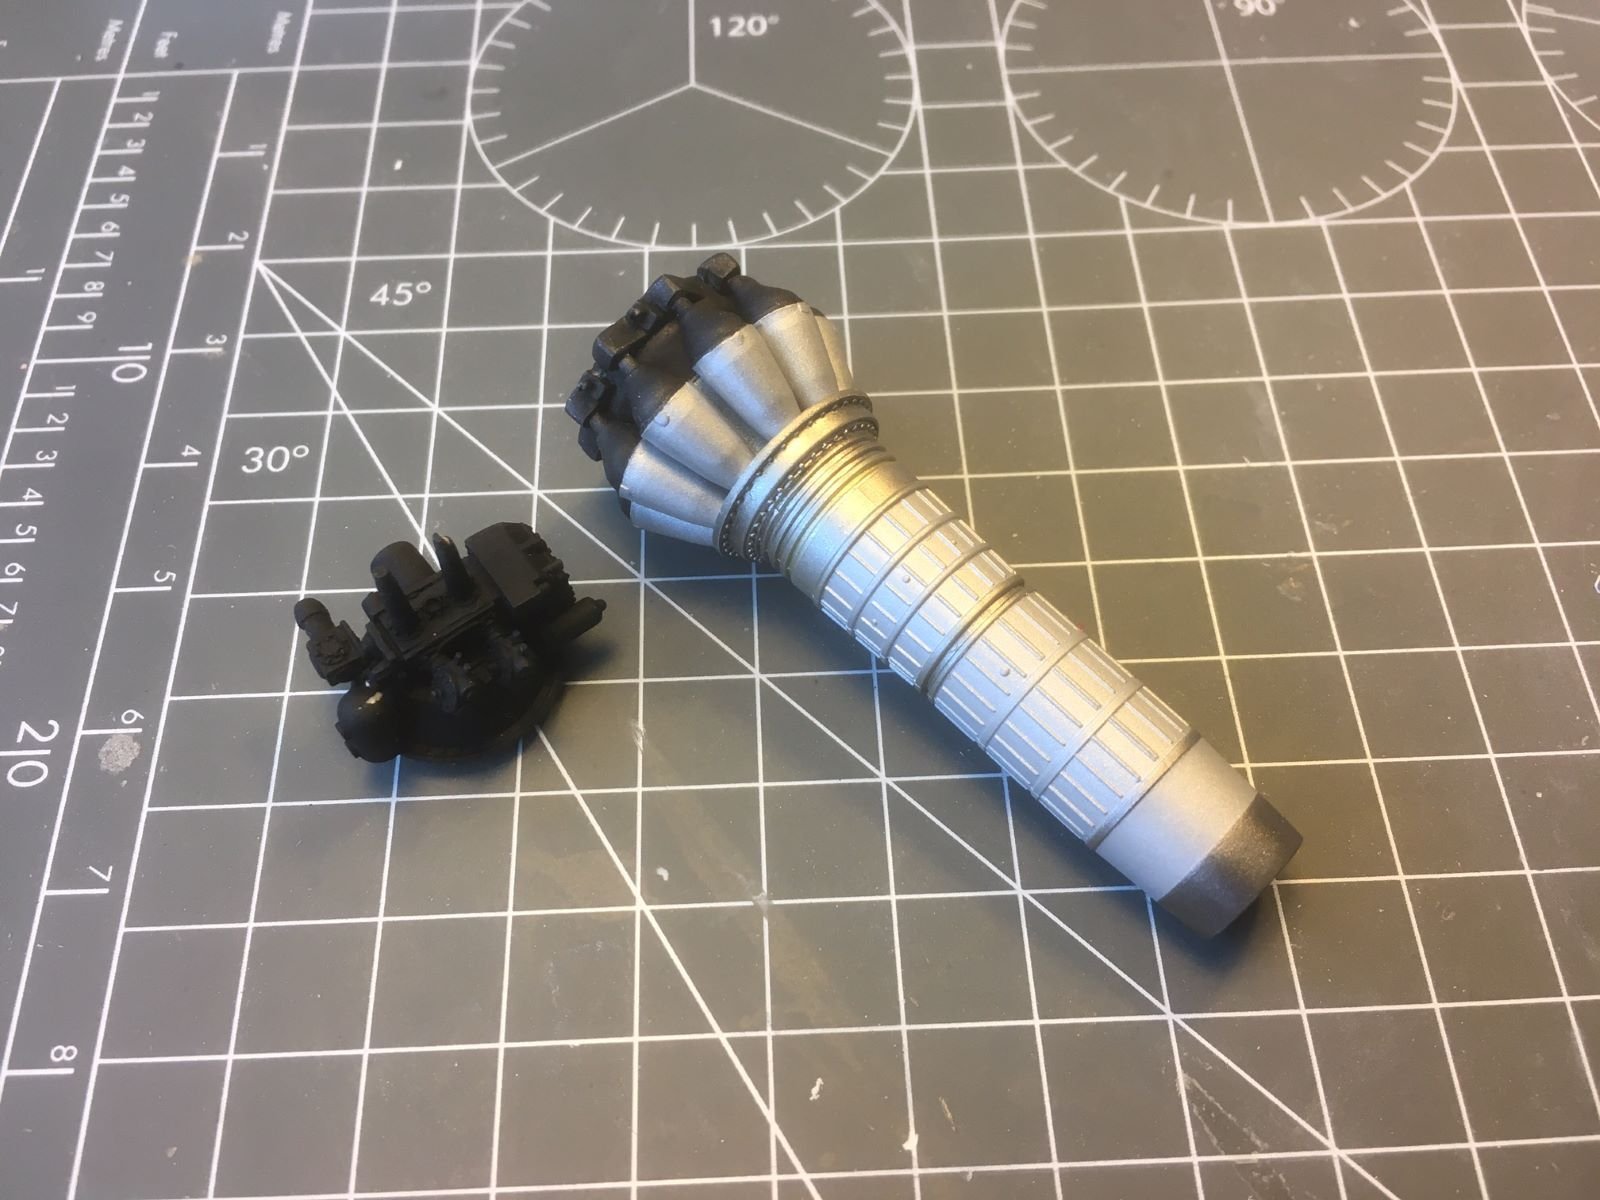
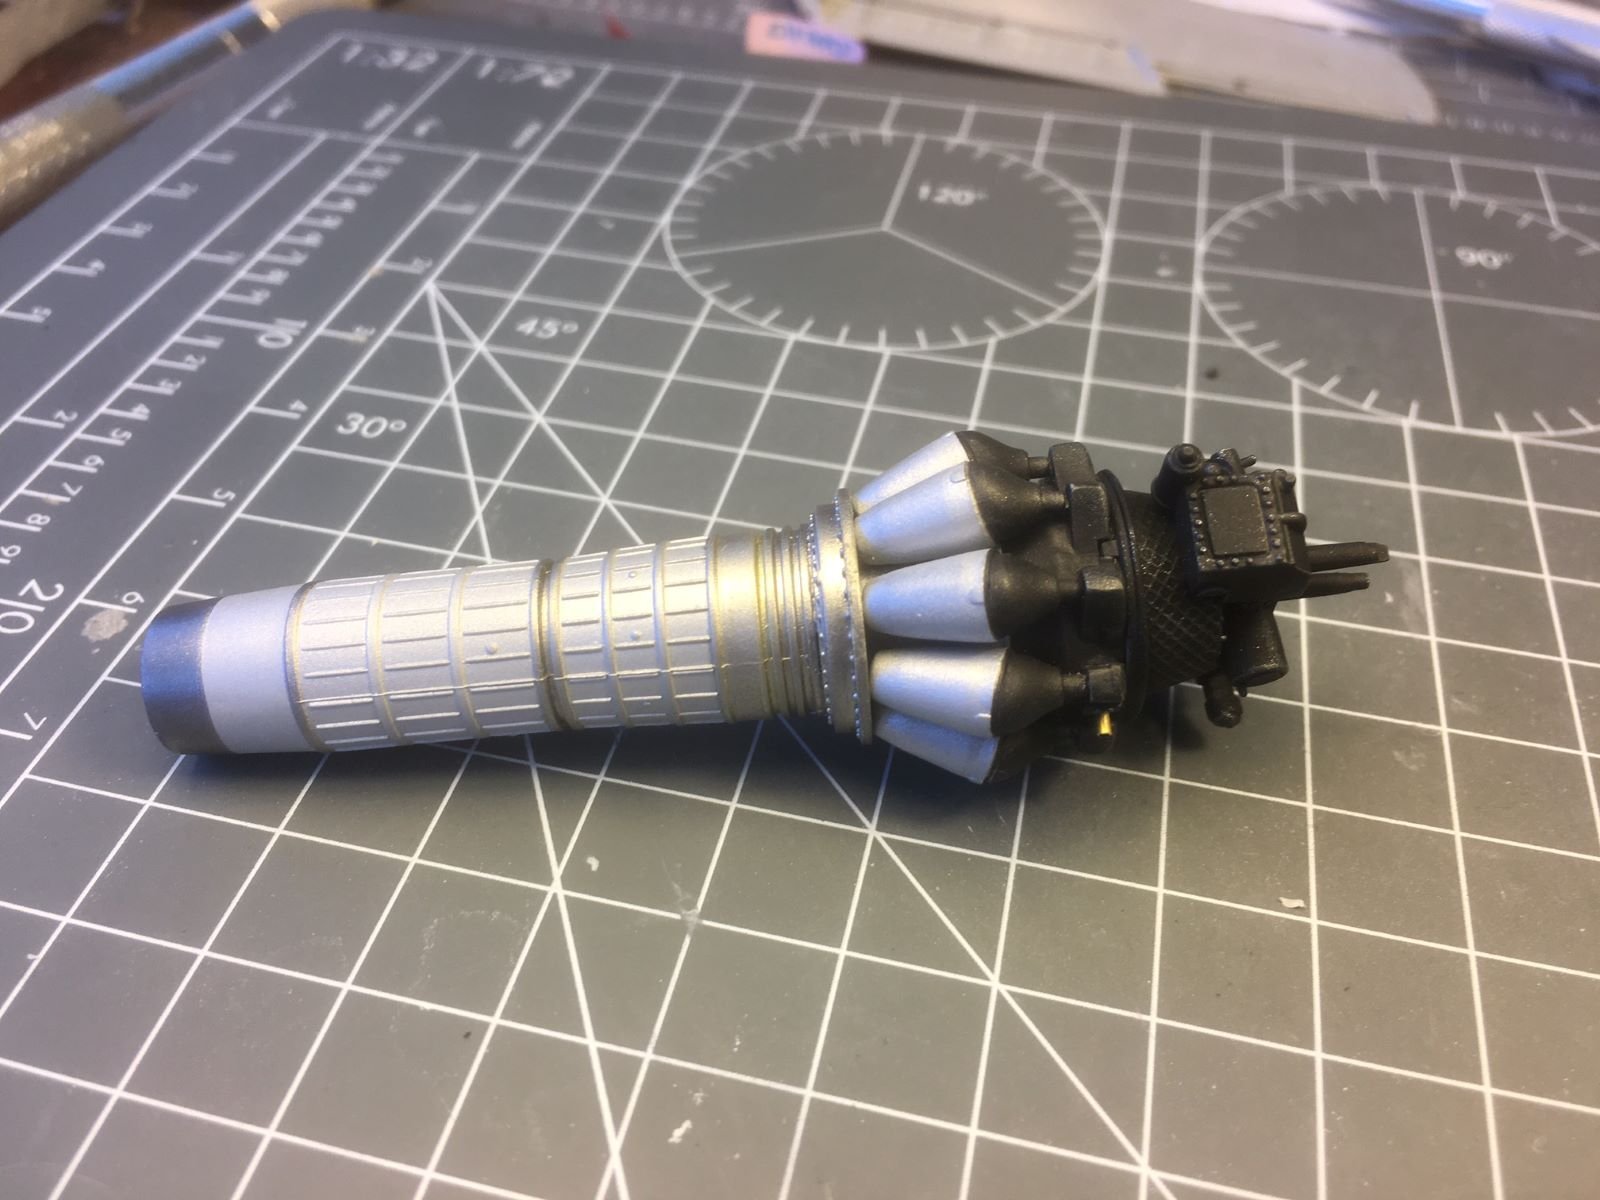
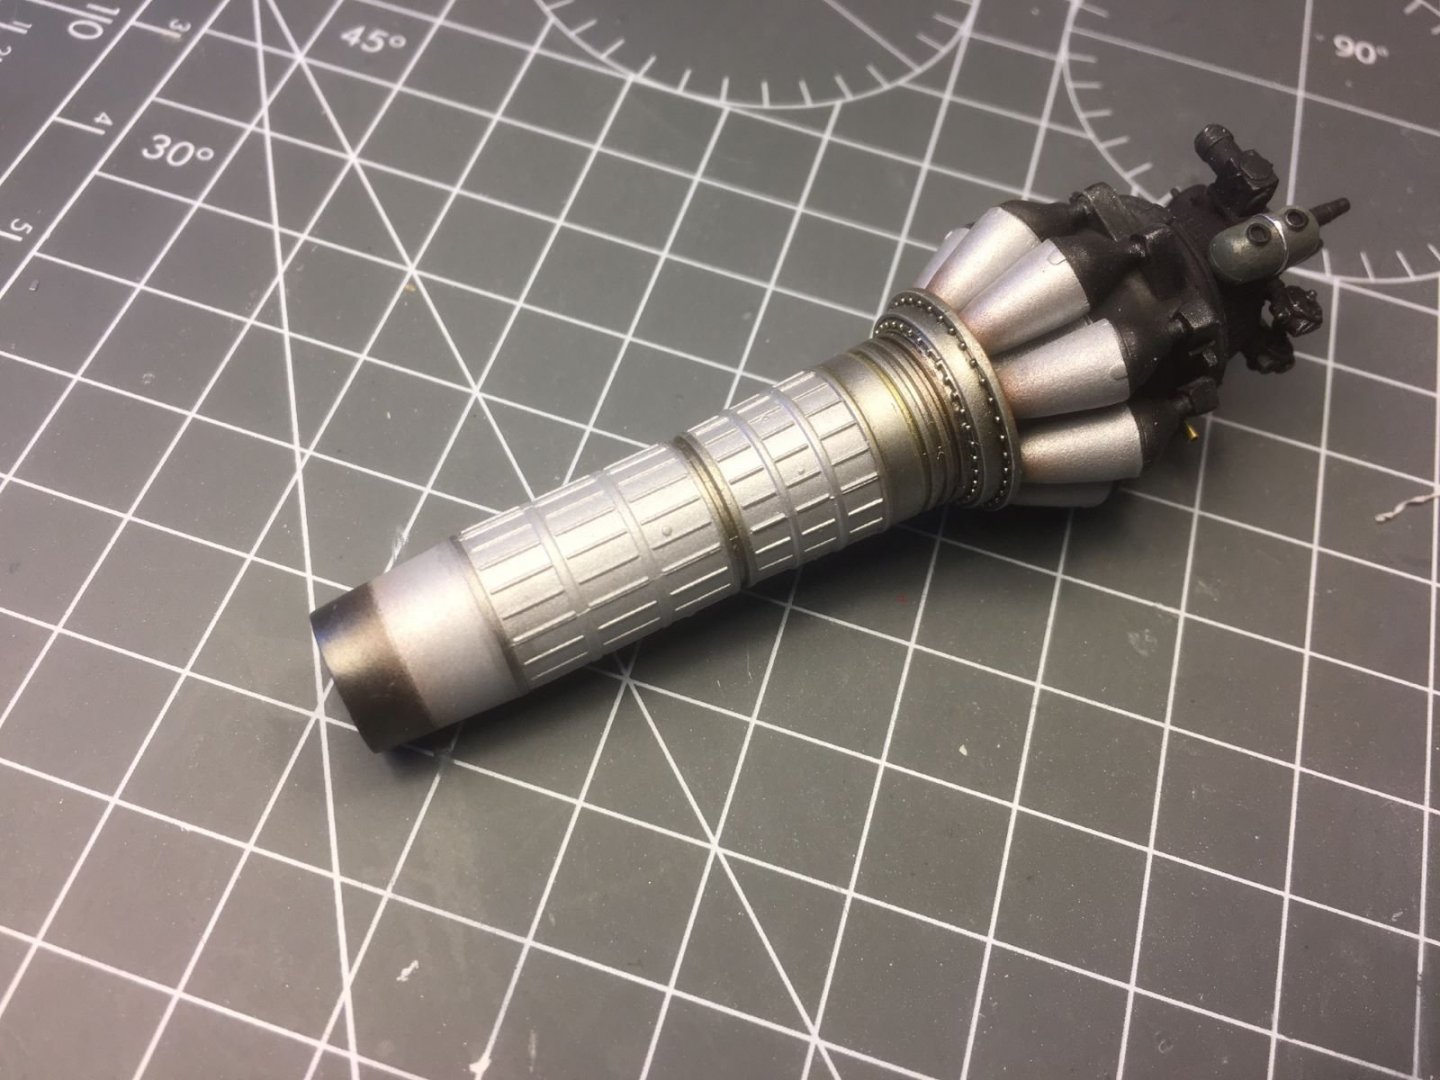
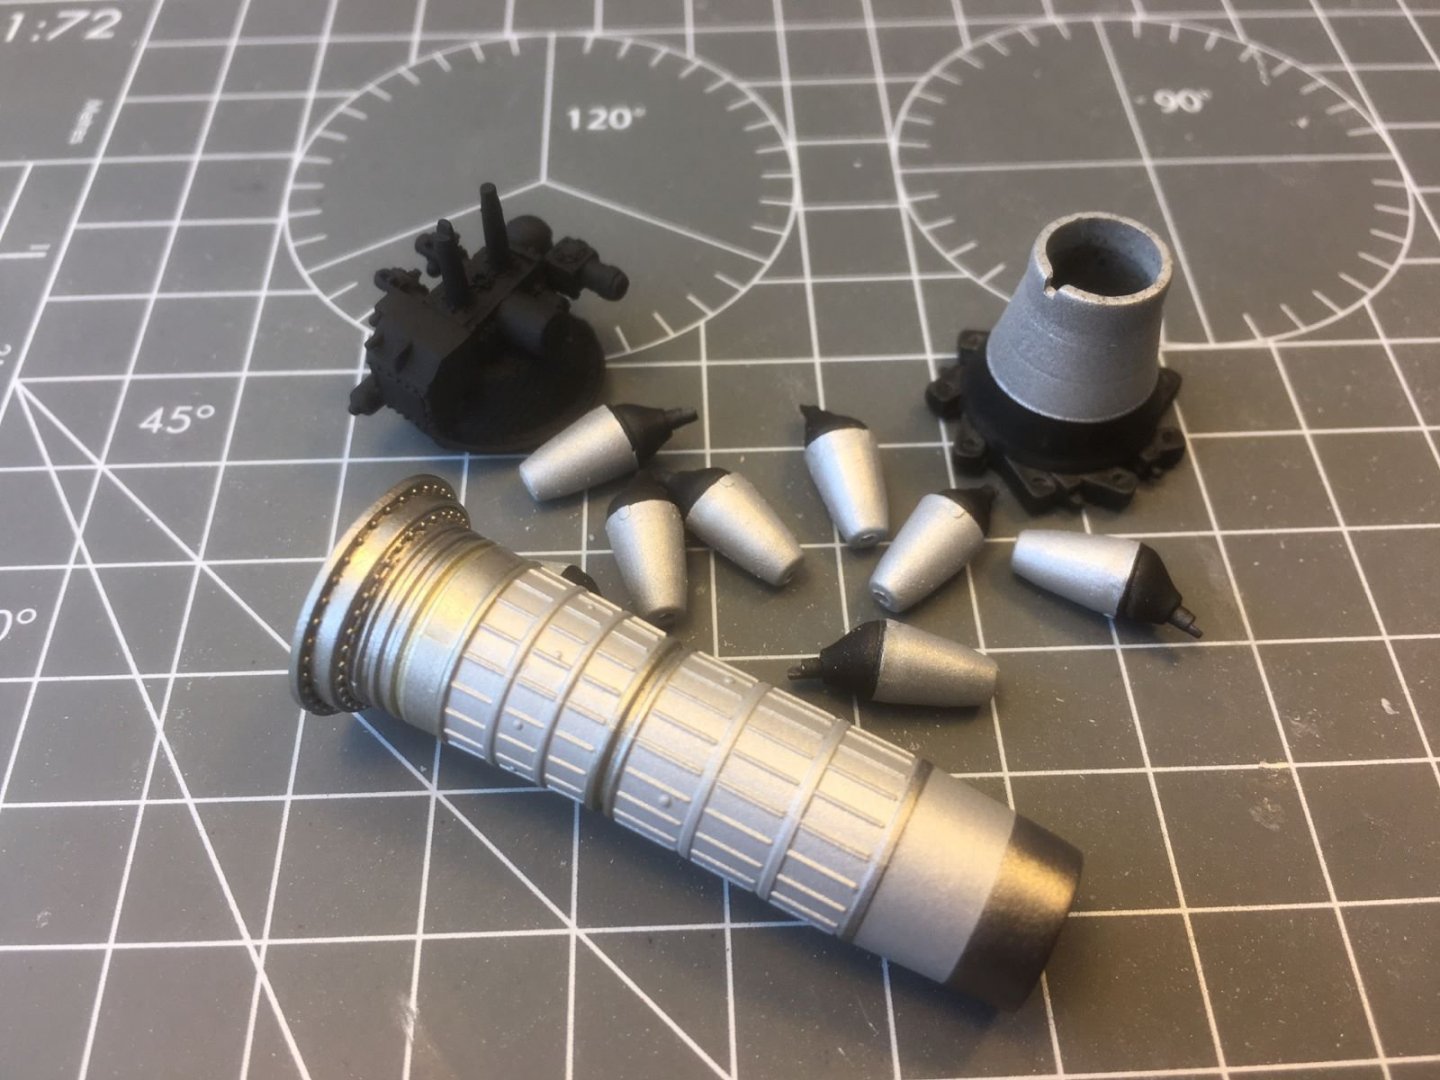
Hi all, while working on addressing all the fit problems of the fuselage, for a change, I started working on the Klimov-vk1, the Russian version of the RR Nene jet engine. These are the various components just painted. I searched on the web for pictures of this engine to find which colors were more likely to be used for it. I painted the matt parts of the jet pipe with a mix of Tamiya matt aluminium and matt white, while for the shiner parts I used various shades of Vallejo metallic colors. The black parts are painted with Tamiya flat black mixed with few drops of Tamiya clear. I replaced the pins used to suspend the engine with brass tubes for added strength. Then I dry brushed the black parts with Humbrol gun metal to highlight some details and finally I used the Tamiya black and brown panel liners on the metallic parts to hint to some weathering. Next, I will spray some light shades of brown to simulate the heat scorched parts of the engine. That's all for now, best regards, Dan

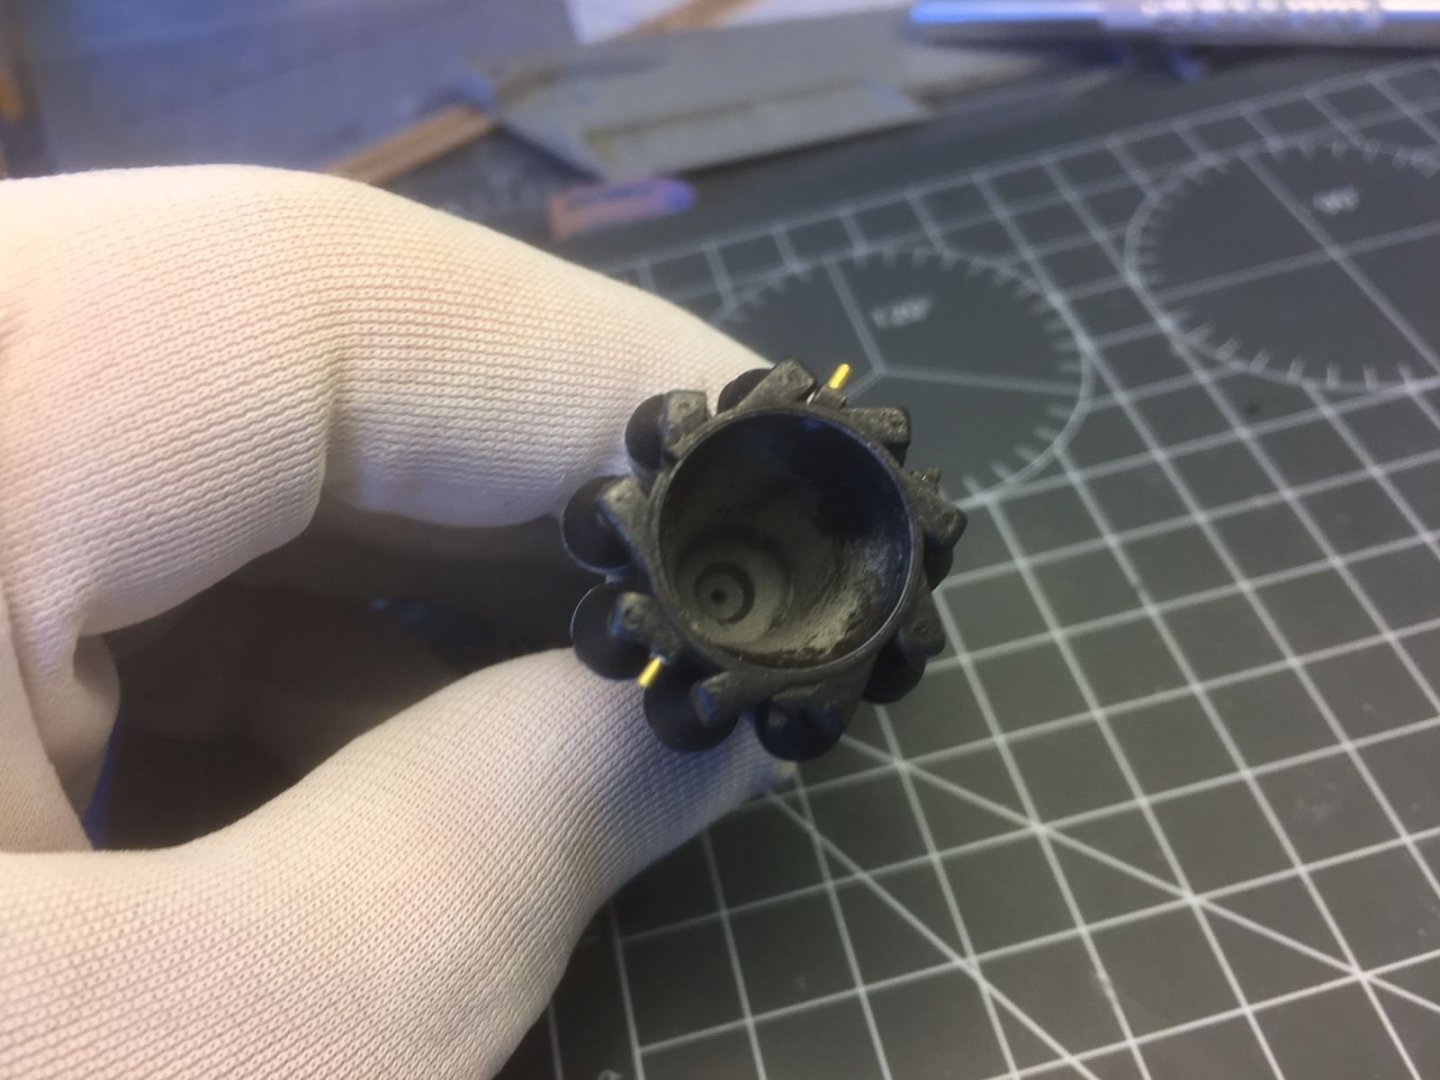
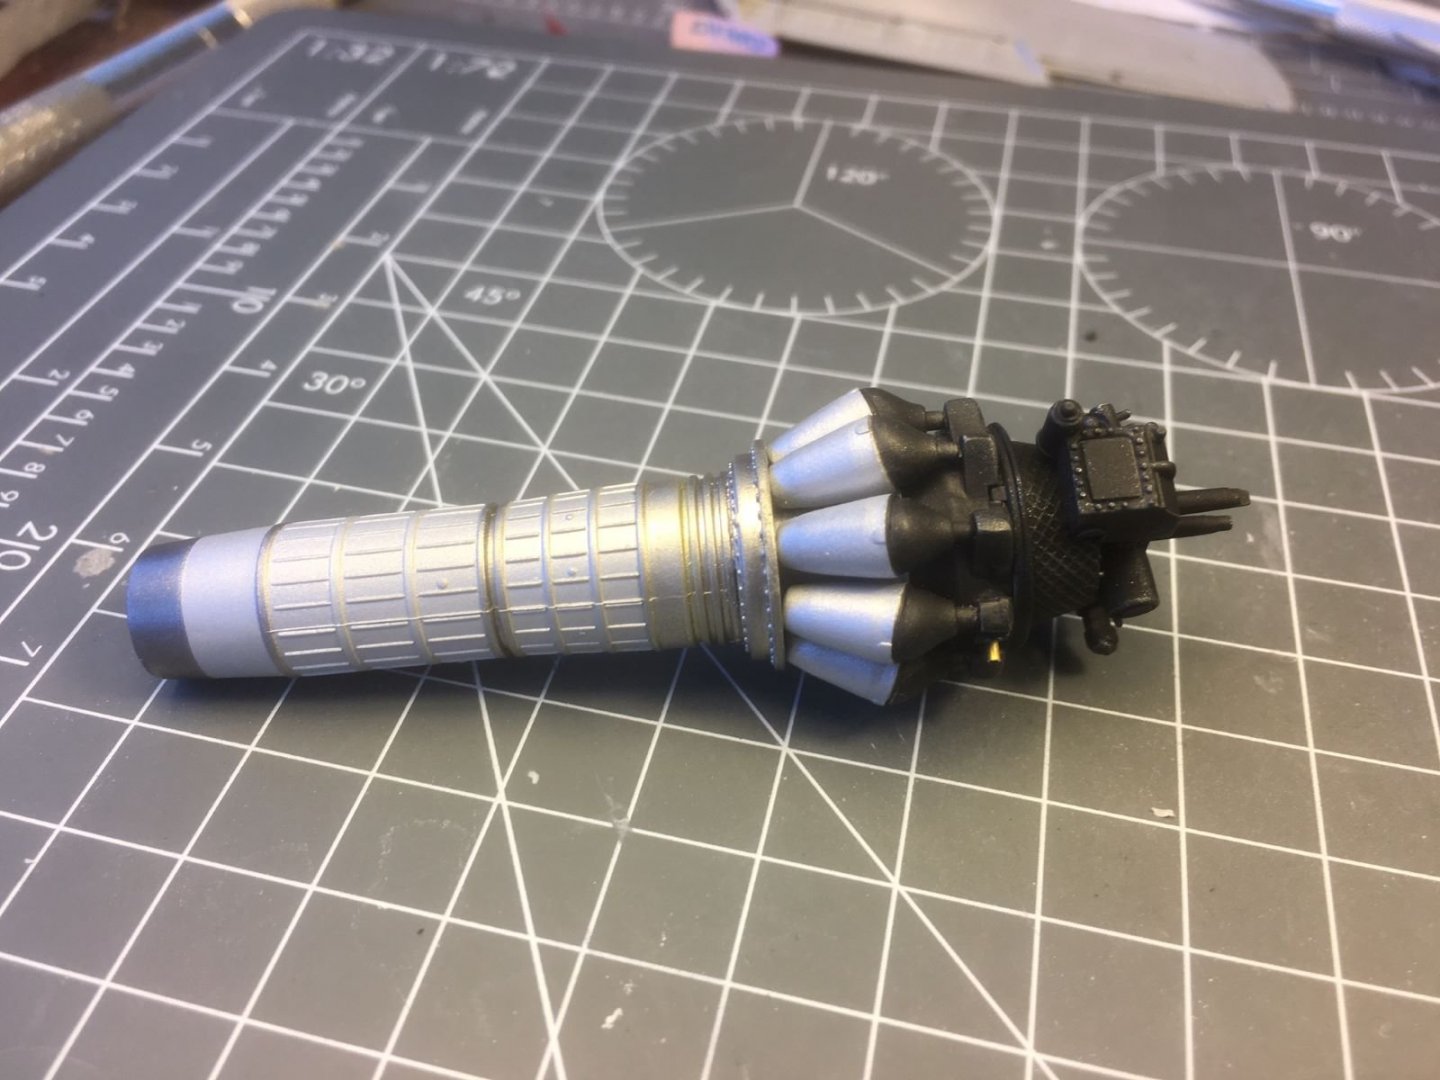
- 109 replies
-
- 16
-
-
Very nice and sharp build. The decals really finish it off. You are on the home stretch now, Best regards, Dan
-
It looks rather spiffy in its camouflage. Very good job. Regards, Dan
-
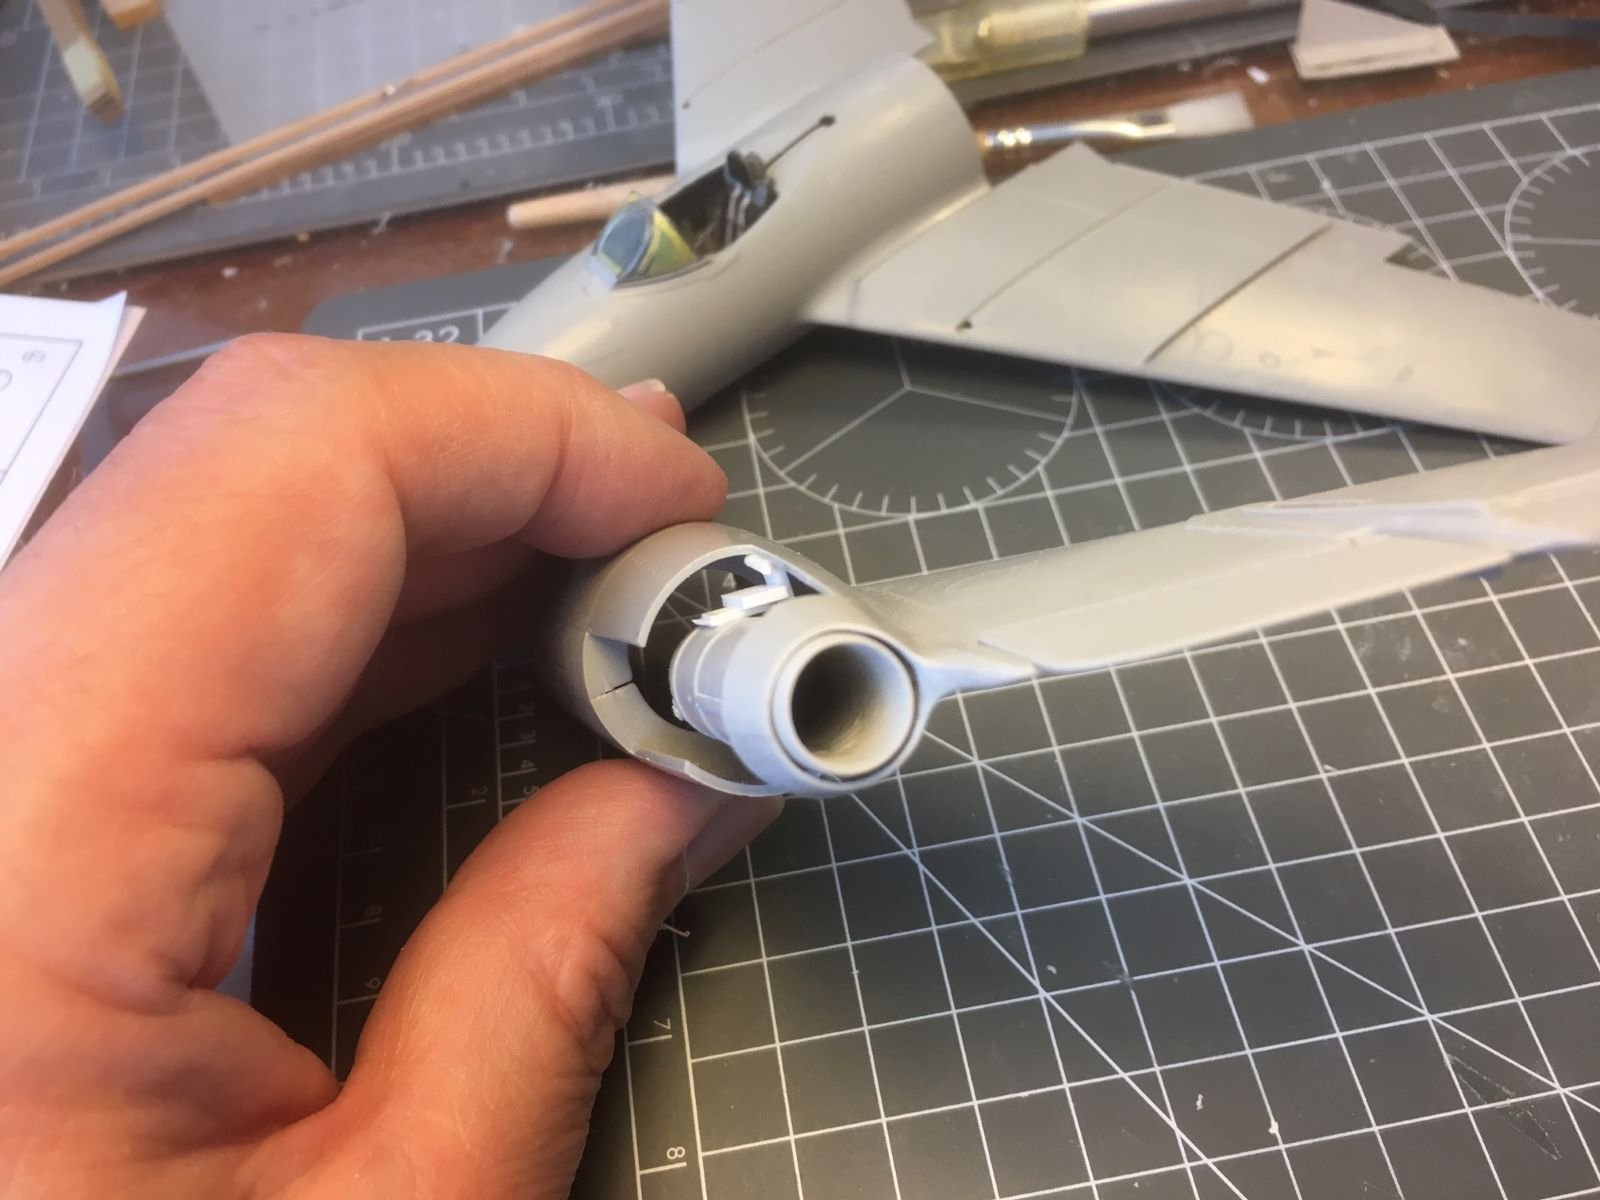
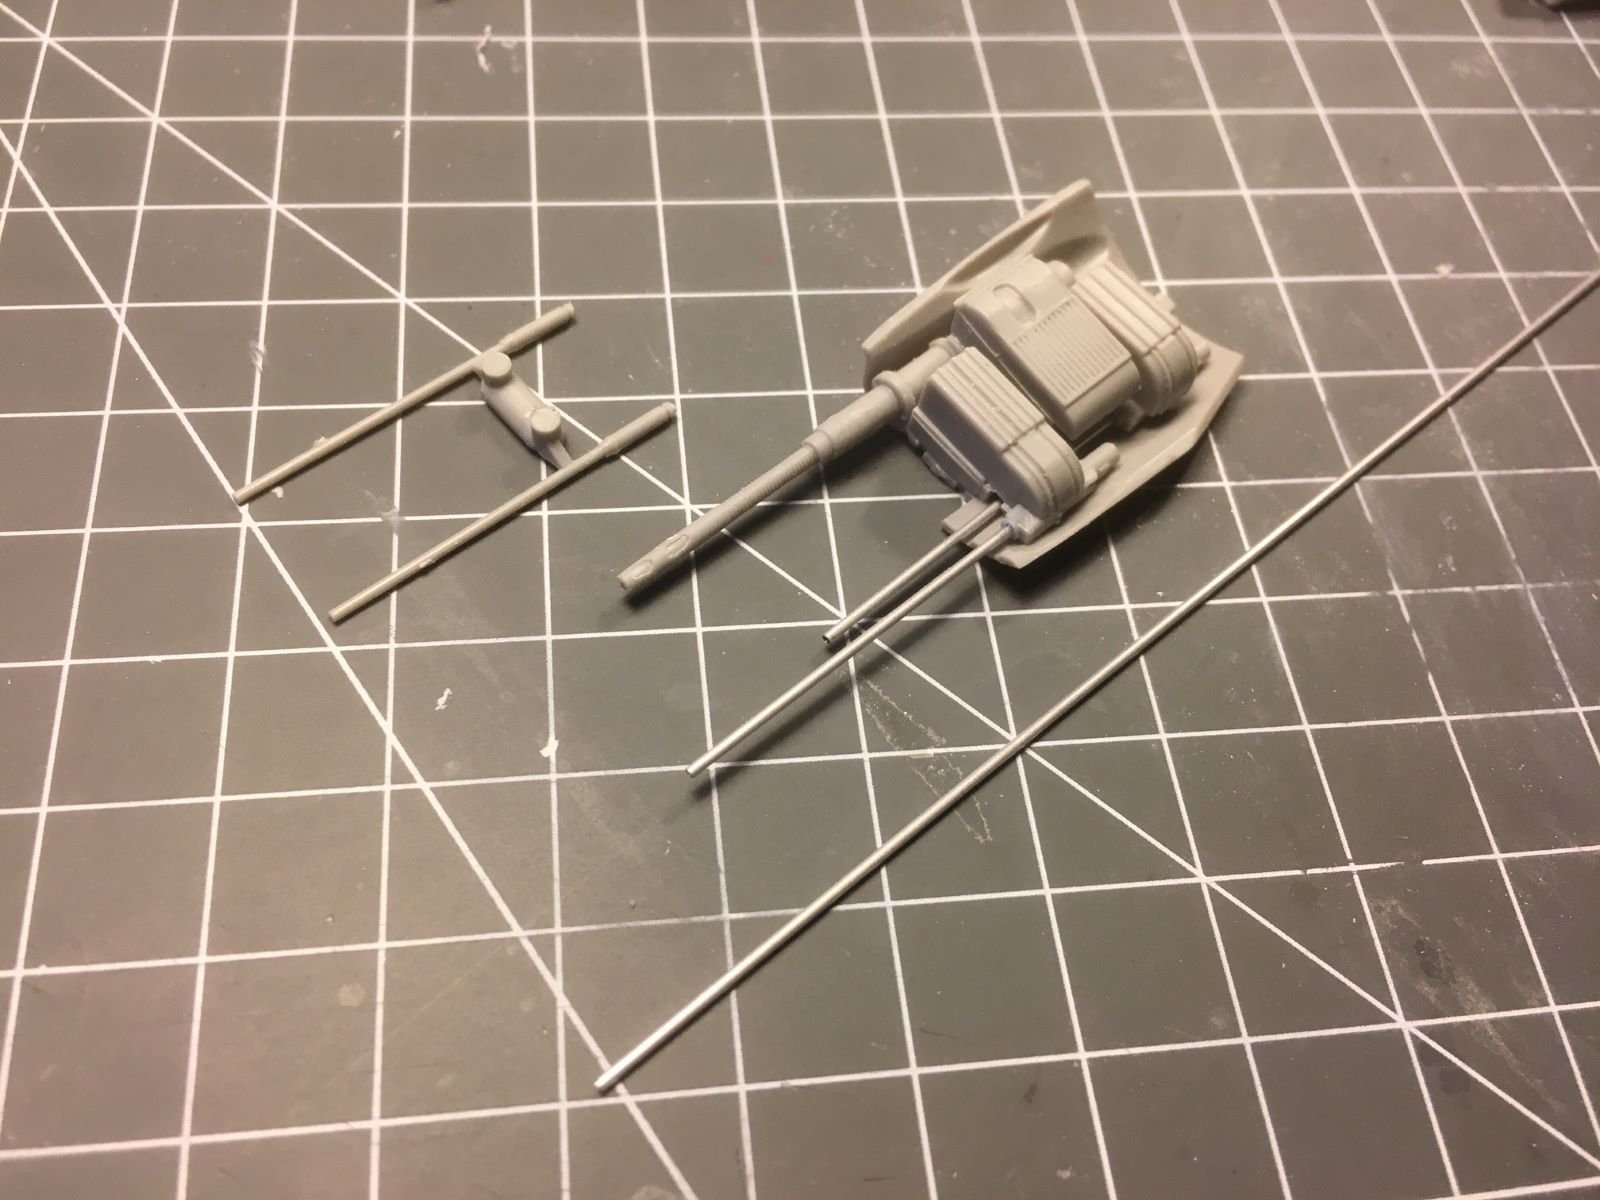
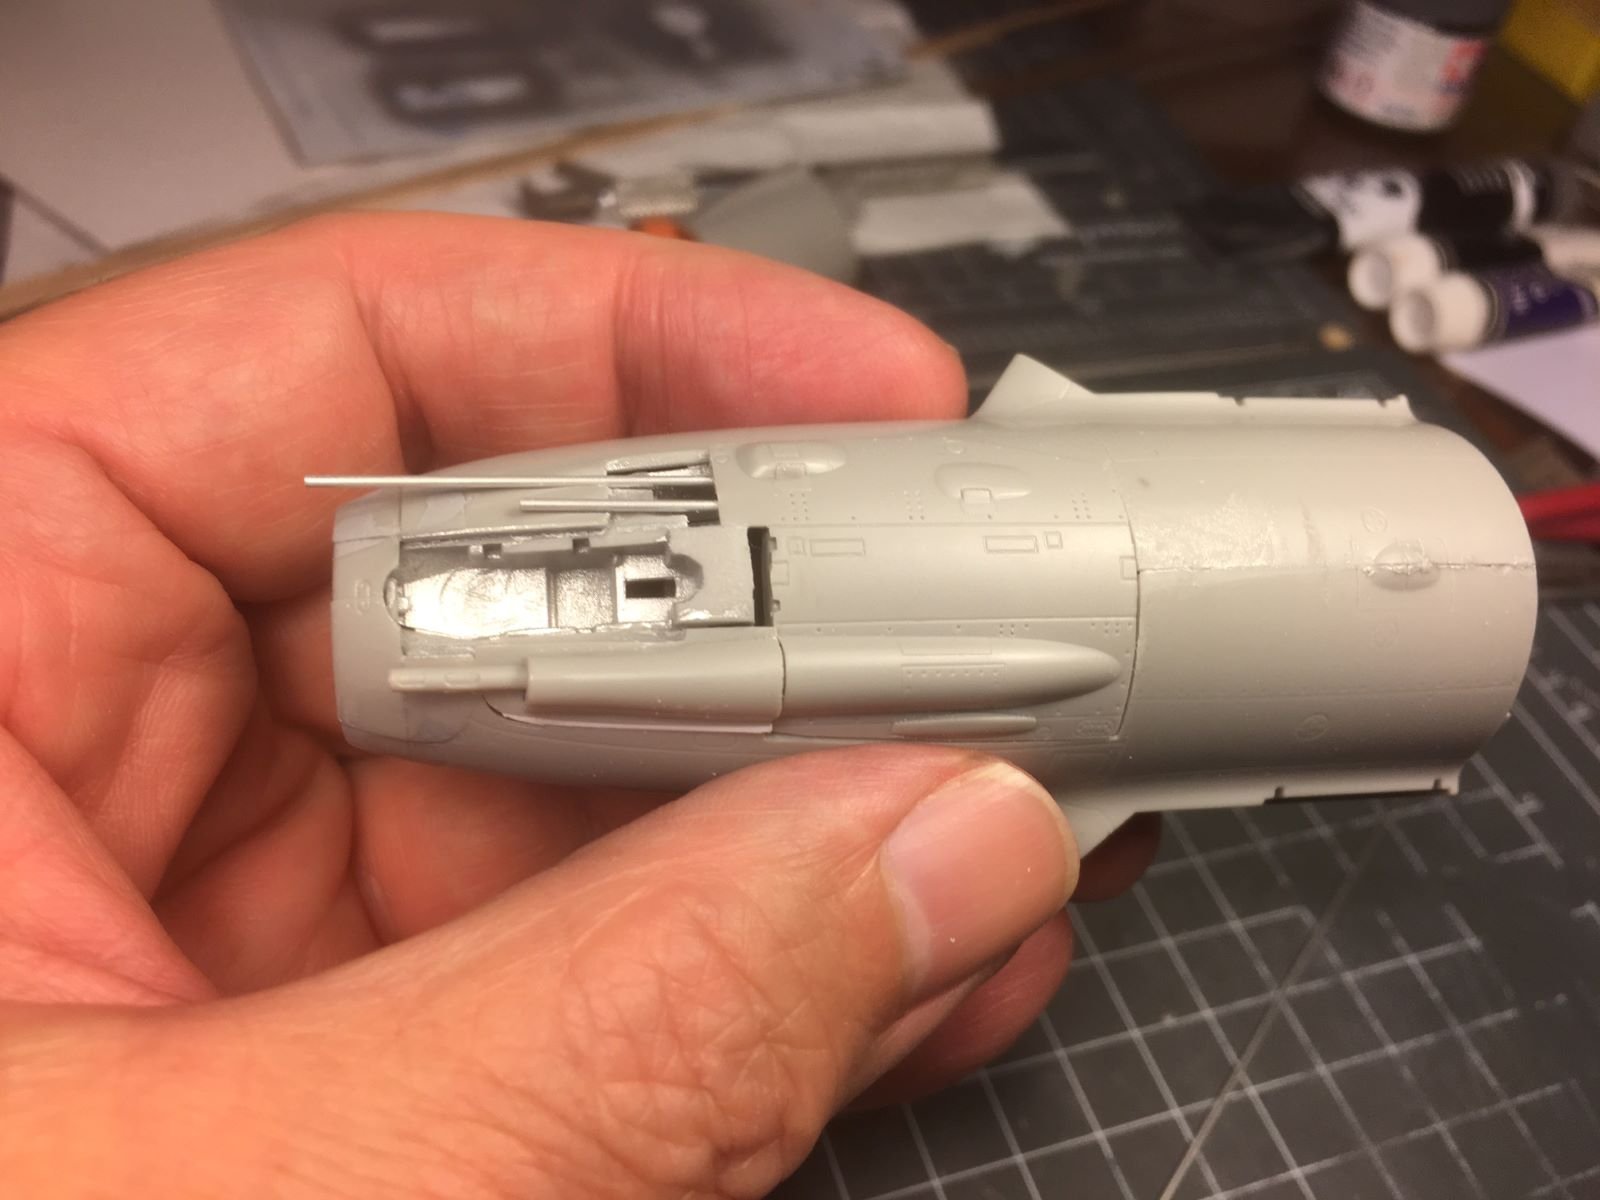
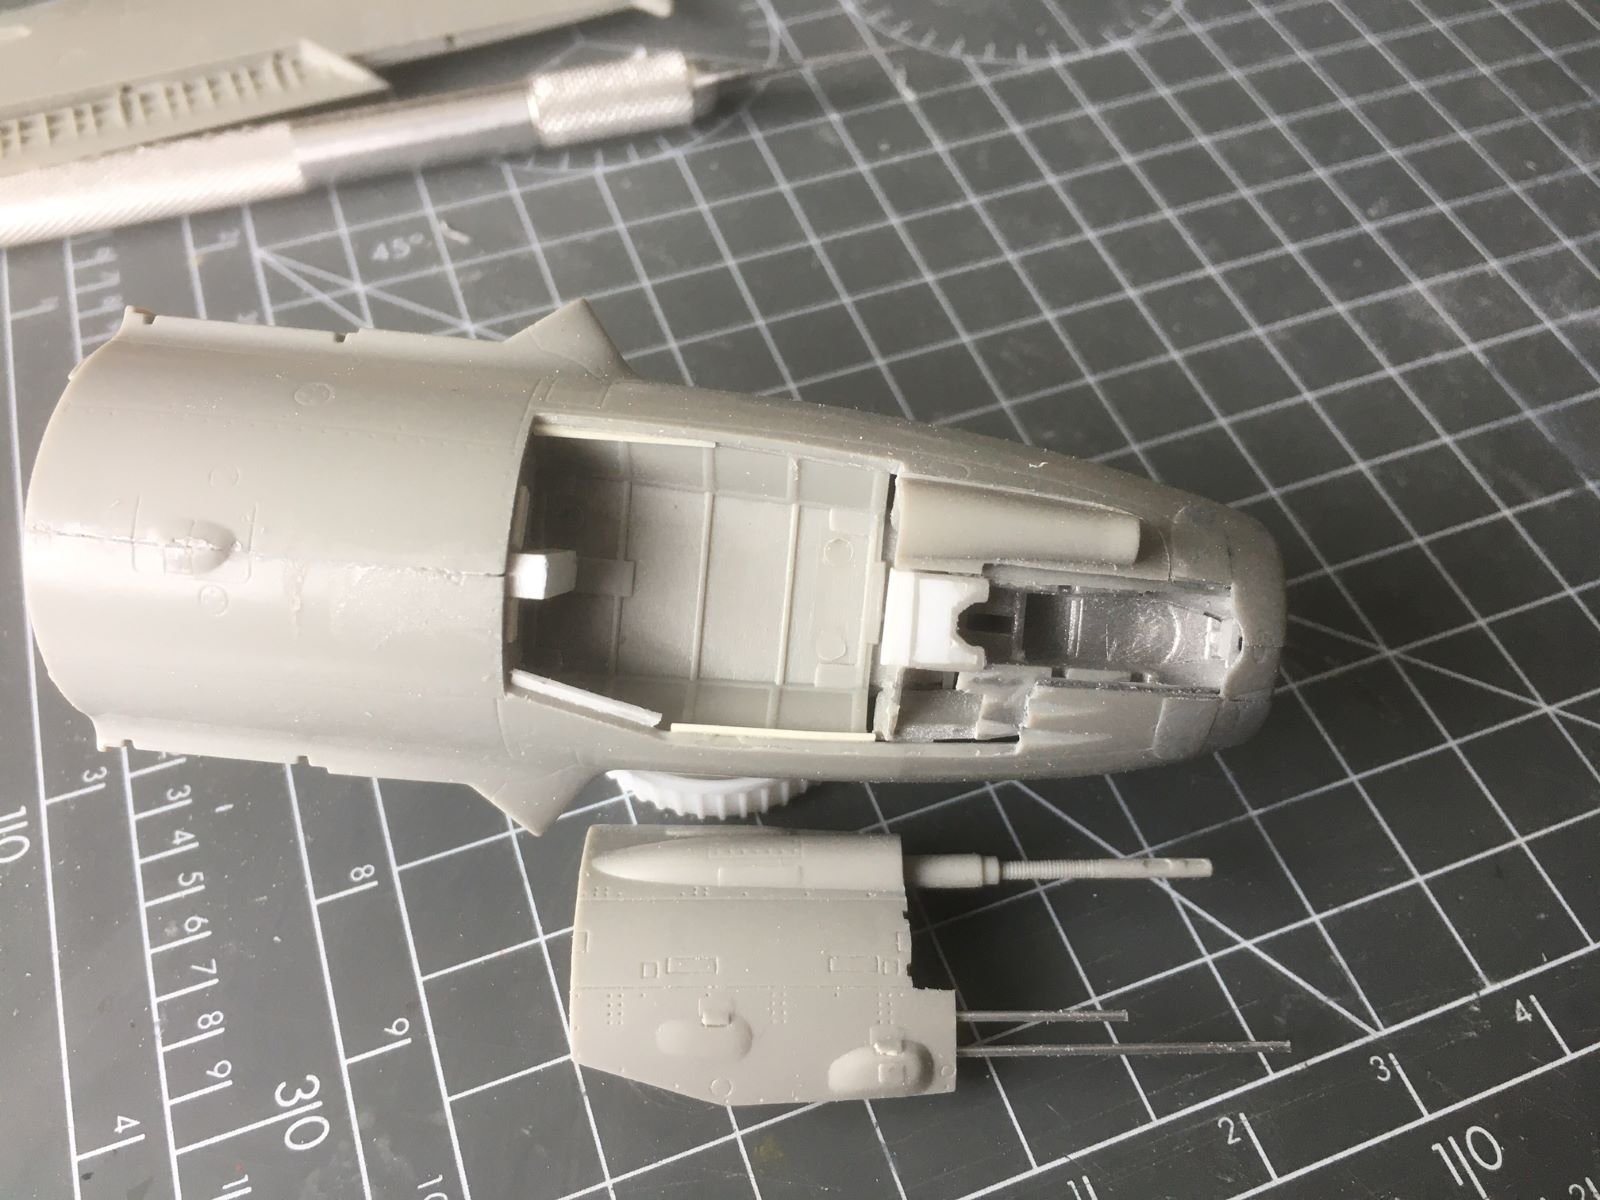
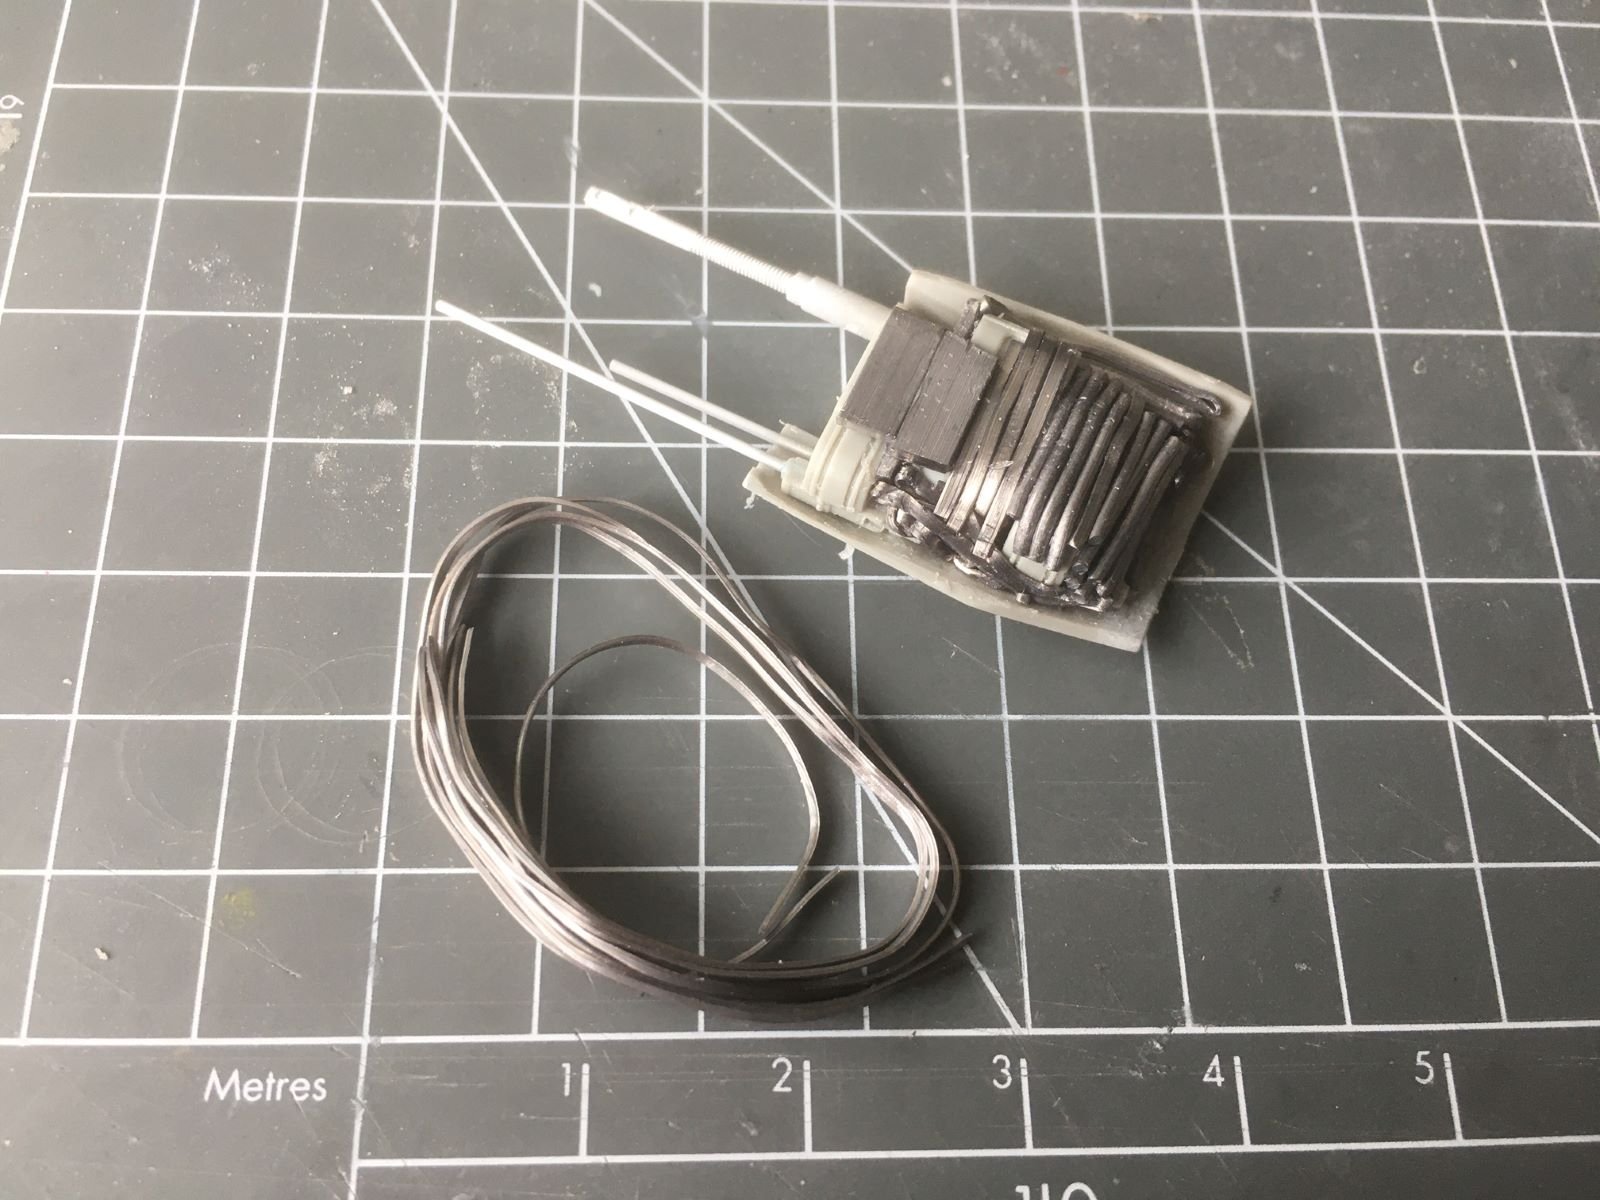
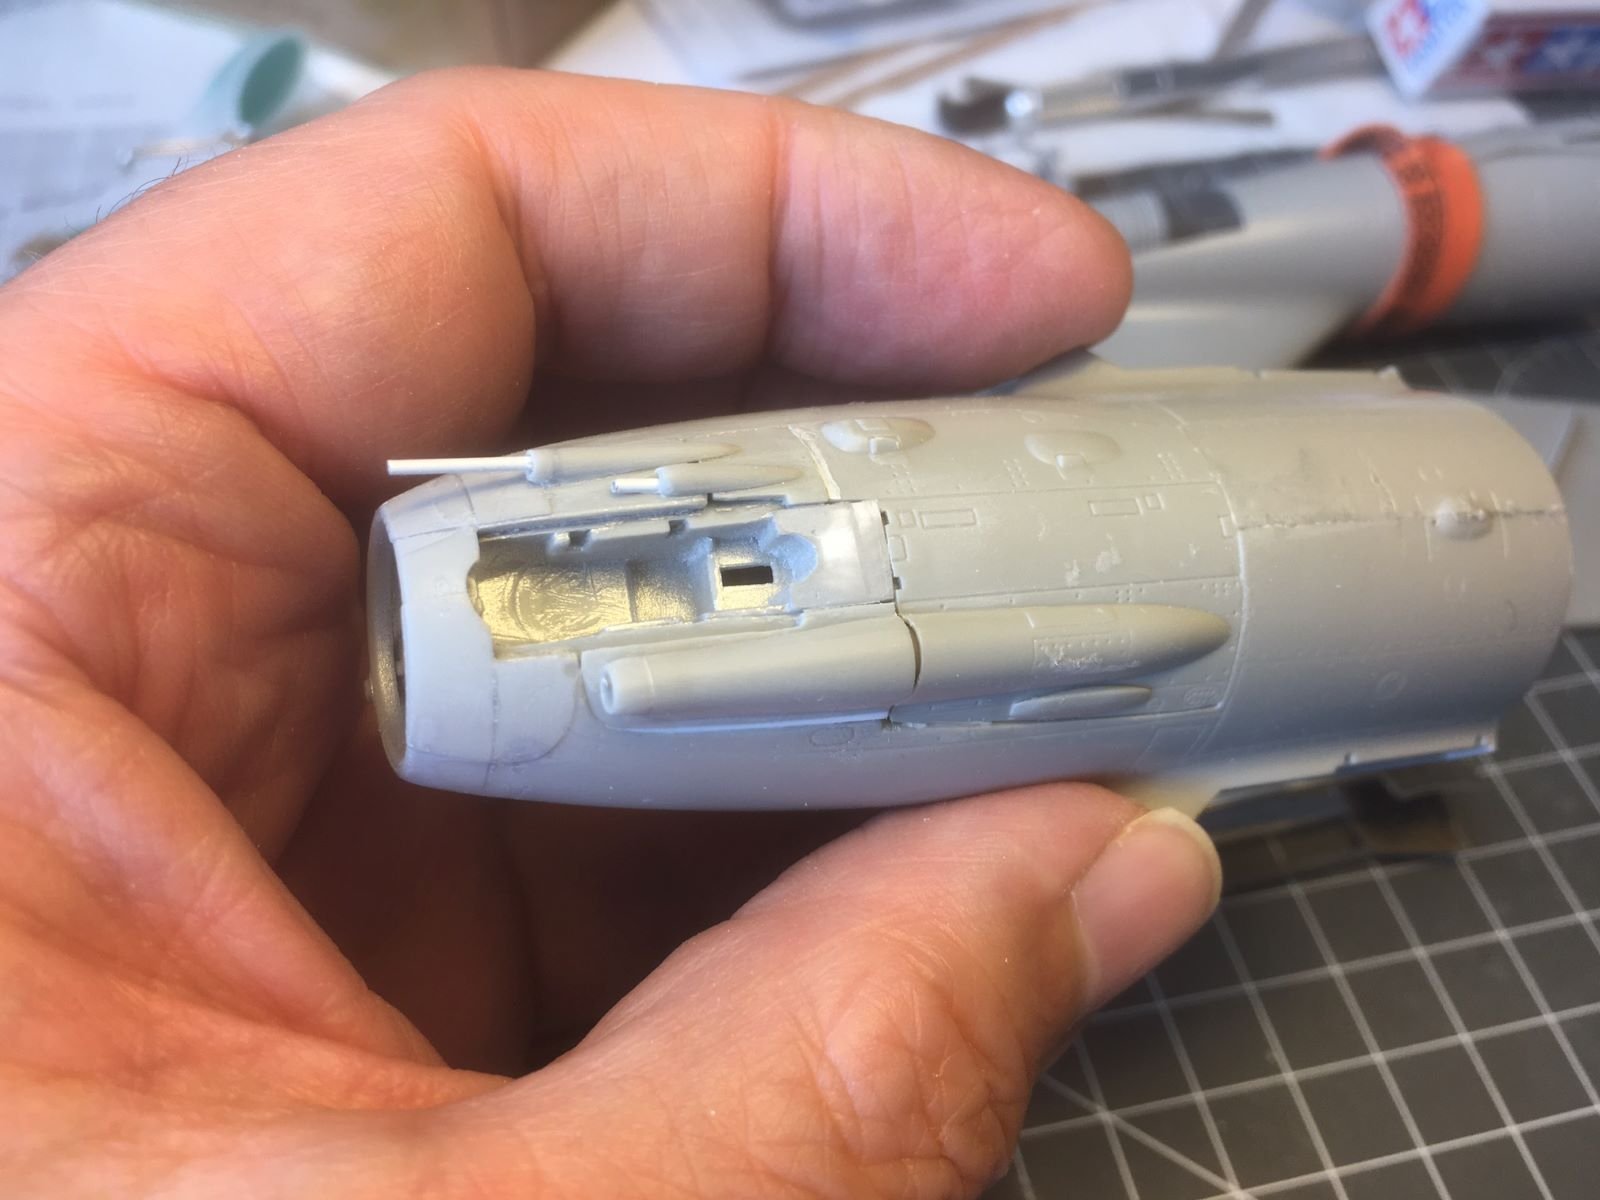
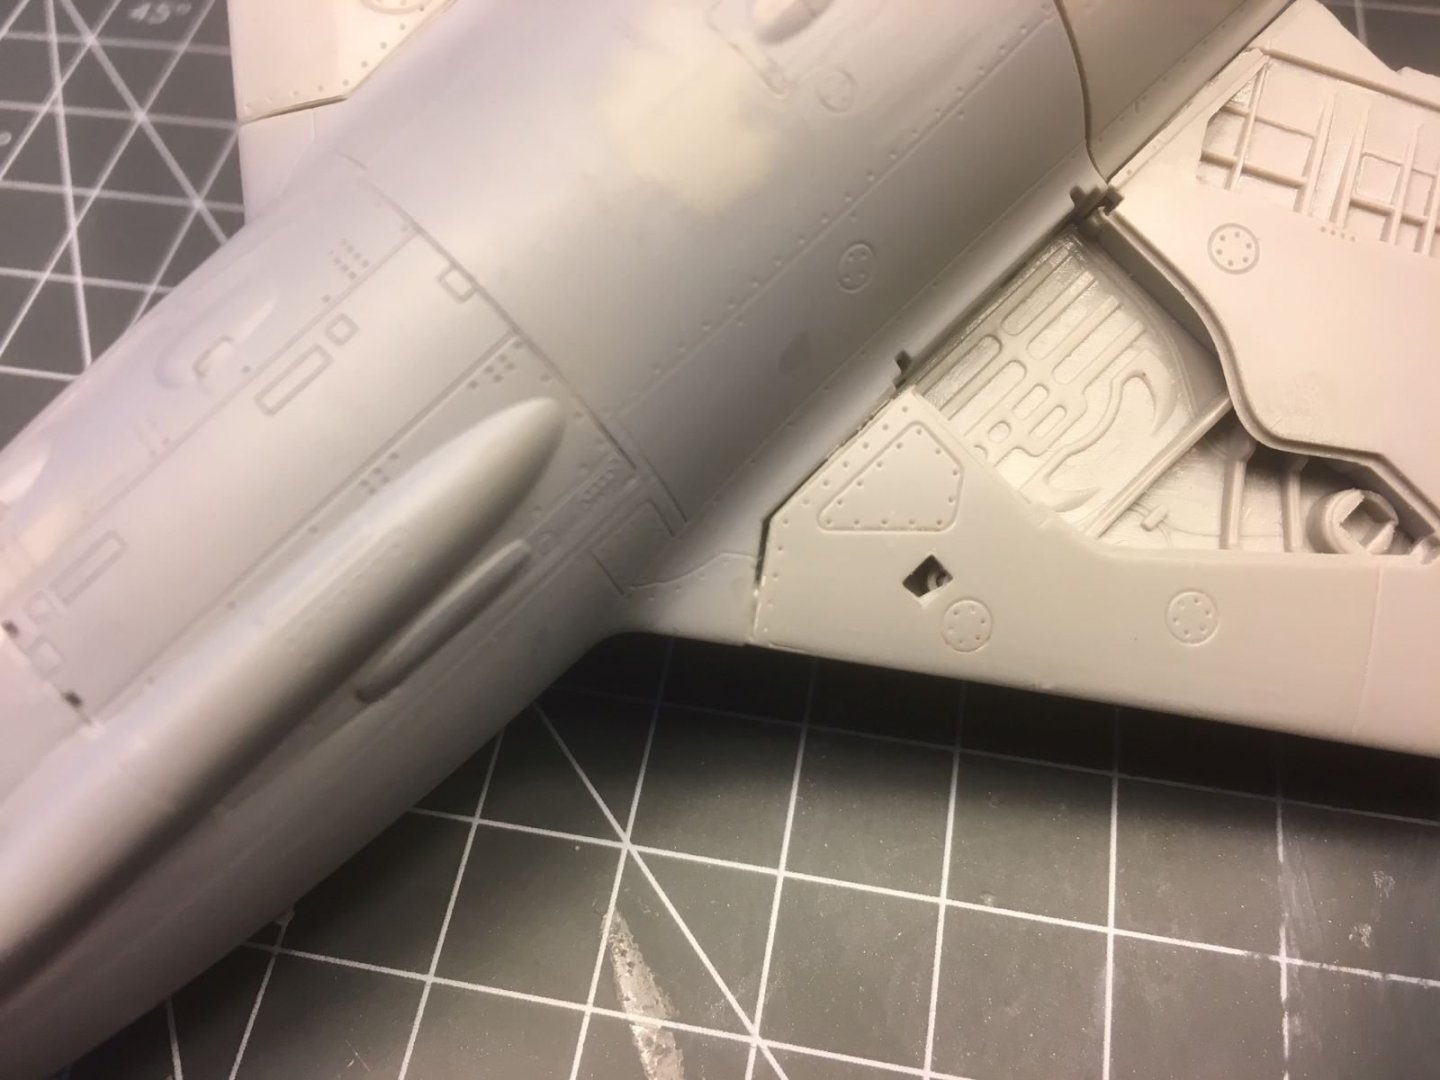
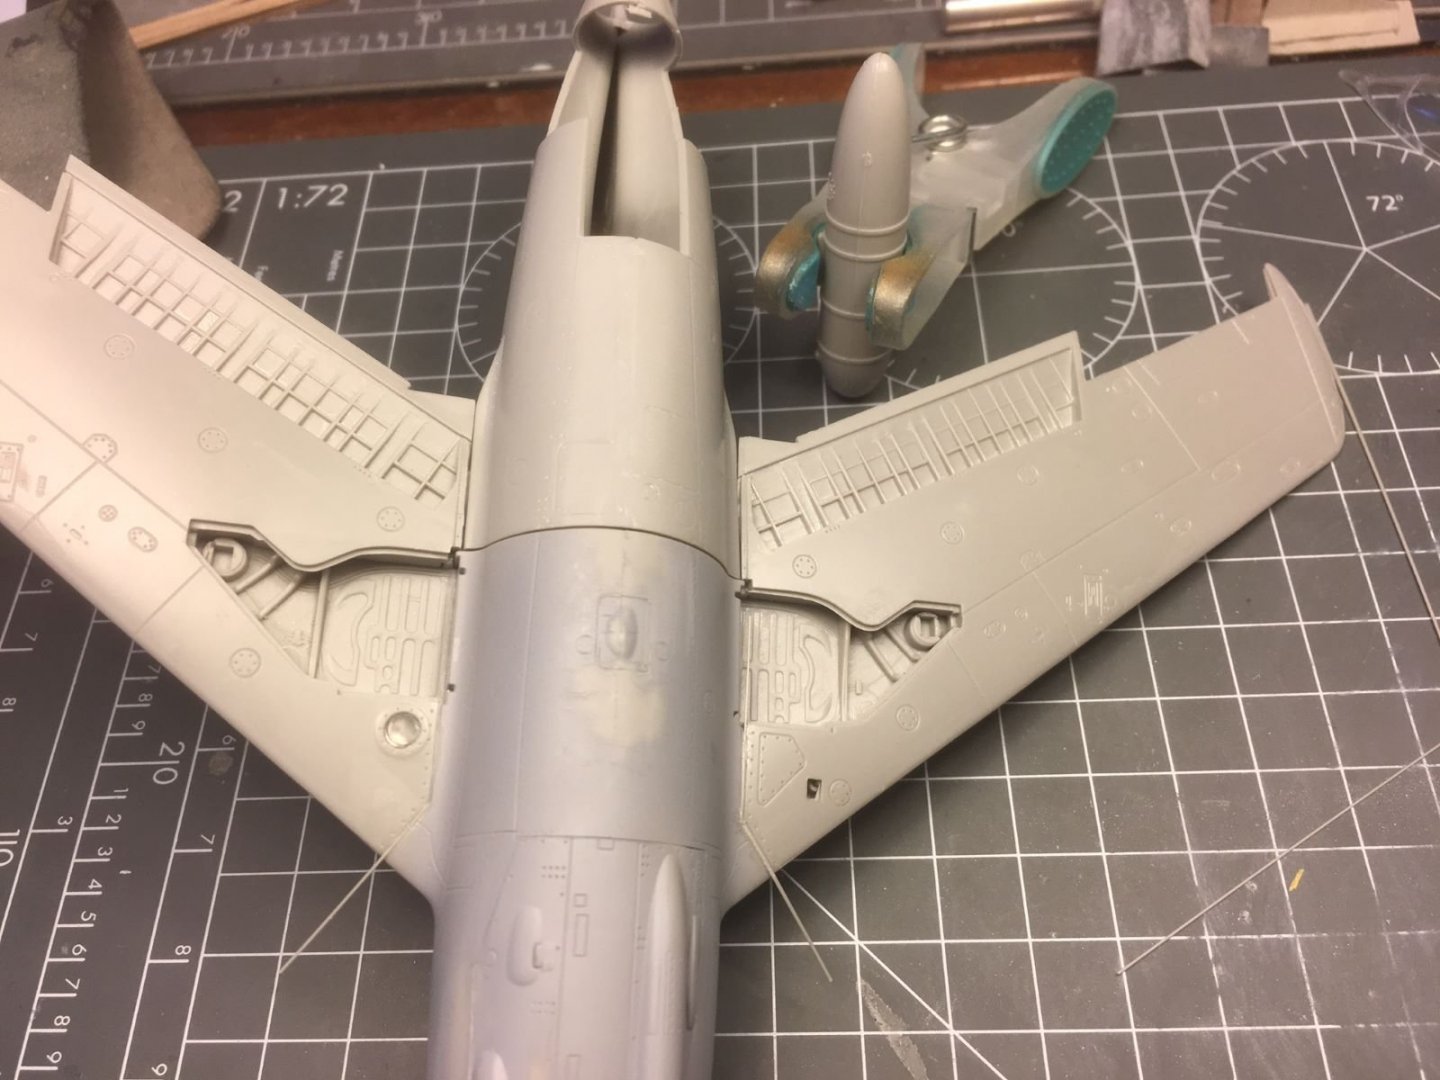
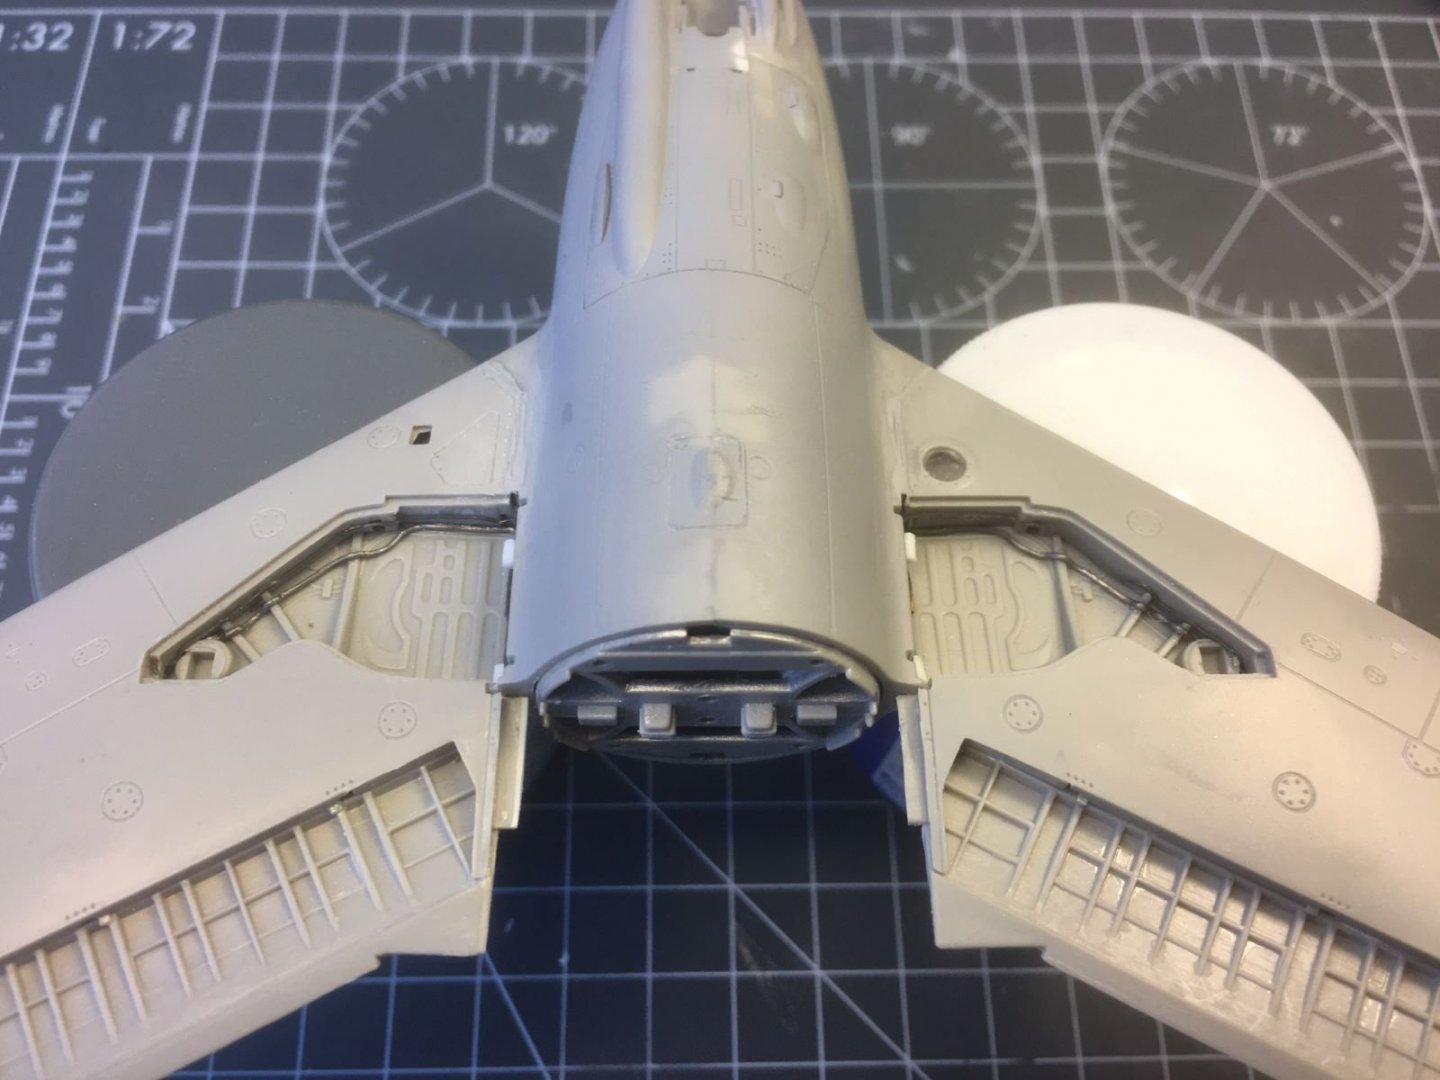
Hi all, some small progress on this build that I thought to be an easy out-of-the box one, but instead is requiring a lot of interventions beacause of the very poor fit of some of its parts. This is the ammunition compartment where I replaced the plastic barrels of the two 23 mm guns with aluminium tubes. They look white because I primed them with a Tamiya white primer. The kit box advertises the possibility to leave this compartment exposed, but I am not interested in that and I wanted to mount it closed to better reveal the lines of the fuselage. This was the begininning of some fit problems because the lid and the guns seem not to designed for that. When I tried to put the parts together, unexpected awfully wide gaps appeared everywhere. In addiotion, lot of filing was required to persuade the gun barrels to fit into their slots. Perhaps it was my fault, but I am really surprised by such bad fitting in a modern kit. To fill the gaps, I started to contour the parts with strips of styrene card (the white parts visible in the photos). Before committing the lid into place, I stuffed the weapon compartment with pieces of lead wire: The lid was glued into place and the tip of the 32 mm barrel was removed to be replaced later with an Eduard part. I completed the final filling of the gaps with pieces of styrene cards and stretched sprue. I also dry test fitted the Eduard muzzle into its fairing: Now sanding and further filling will follow, trying not to obliterate too much the surface details. Clearly not an exciting job, but I am afraid one that I cannot escape. See you soon, Dan.


- 109 replies
-
- 13
-
-
Are the white sprays to check the junctions?
-
Nice work on the cockpit and the closed model looks cleanly done. Waiting for seeing more, best regards, Dan.