

GGibson
-
Posts
940 -
Joined
-
Last visited
Content Type
Profiles
Forums
Gallery
Events
Posts posted by GGibson
-
-
Very sharp, Bob! Looking great!
-
Good job, Bob. Thanks for sharing. You are doing well on the Harriet! I'm to the blocks/deadeyes/shrouds point on my Ballahoo, and really concerned on how well I will do. What are you using for your backdrop for lining up the shrouds and ratlines? Looks to be a bit "sturdier" than the paper and cardboard I have seen in some other build logs. Appreciate your updates! Congrats on your success1
Gregg
-
On 7/15/2022 at 4:00 PM, druxey said:
Well done, Bob. Those home-made eyebolts look fine.
Impressed with the small eyebolts, as well! What size did you make these?
-
Hi Bob - Your Harriet Lane looks really great. Nice job! I am sure you have checked all the resources and I don't know what size you are needing, but I was able to purchase a supply of eyebolts from MicroMark the first part of June and they shipped promptly. Of course, that was a month ago and inventories change...
Continuing to watch your build log with interest.
Gregg
-
Thanks for all of the feedback/info, fellas! This shows a bit of my naivete in the model ship building world yet, but I guess I was thinking the seizing was used primarily for deadeyes, and some type of knot was used for things like the eyebolts. I have done seizings on some deadeyes already, so will continue that practice. And, yes, I am using diluted PVA to finish.
Thanks again!
Gregg
-
My current Ballahoo build has a lot more knot tying than my previous boats. I am to the point now where the ropes for the carronades and all the rigging are my main focus. What knots are appropriate, for example, when tying simple knots to eyebolts? Should the knots used be similar to what would have actually been used on the ships?
In doing some of the initial knots on the eyebolts for the carronades, I've just done some simple double overhand knots and hit them with diluted glue. Would using, perhaps, a halyard hitch be a more accurate knot for tying on rings and eyebolts? Granted, some of these knots would be a bit more challenging at our scale level, using tweezers and magnifying glasses to assist with the line feeds, than on actual ships.
Appreciate the advice and education.
Gregg
- thibaultron and robert952
-
 2
2
-
Hi Paul! Following this build log with great interest. I purchased the Occre 1:300 Titanic several months ago, and it is waiting for shipyard clearance among others. Not sure how soon I will tackle it, but am quite interested in following your progress!
Frustrating to see your bulkhead issues, but looks like you are managing it well. Good work! Thanks for letting me peek in...
Gregg
- Canute and Old Collingwood
-
2
-
On 6/5/2022 at 10:01 PM, BenD said:
I'm fairly sure the plans are showing the full length. The cleats would be far to high otherwise, The crew would be around 26-28mm in height to scale, they couldn't reach 44mm to belay.
I've been building a Caldercraft kit and had wondered this myself when going over the mast and yard lengths. You can check against the other rigging plans in your kit and measure the mast on them, you should get the definitive answer there.
Not sure what possessed me to type "Dan"... Thanks, Ben!
Sorry!
Gregg
-
Thanks for your input, Phil! Interesting to learn more terms as I progress. And, yes, it would be the "measured length" that I was referring to. according to the drawing.
Thanks for the great grate discussion, allanyed. Definitely not nitpicking, but provides awesome factual info for how future builds should look. As I think I mentioned in that post, my supply of grates without some missing teeth was a bit limited, so worked with what I had. I thought about requesting/ordering more grate pieces, but decided to use what I had. And, I had no idea about how the coamings and head ledges are placed. Appreciate the education!
-
-
Thanks again to those who occasionally peek in and give me likes and constructive experienced comments. Much appreciated!
Been on and off a bit working in the shipyard, as I had cataract surgery in late April, have had to wear some funky UV glasses practically the whole month of May, and finally getting back to where I can see 1mm and smaller pieces clearly with BOTH eyes! Ha!
Anyways, I did work through completing the channels, deadeyes and strops on both sides of the ship. This was definitely a challenge for me. Had wanted to make the strops from 0.5mm wire, but learned I am NOT good at soldering, so went back to the kit-supplied strops. Although I struggled with getting them all done, I was able to get the channels secured. Port side channels did not come out as well, so I guess we now know what side will be facing OUT when it gets placed on the mantle.
Also placed a bunch of eyepins and cleats in the appropriate locations around the ship. For some reason, I seem to have run out of eyepins or have misplaced them. If I don't find them before ready to place eyepins on the masts, bowspirit, etc., I'll make some out of 0.5mm wire.
OK, so now I have a question or two and need some clarification from the experts. And, as we usually say, this is a silly question, but here goes...
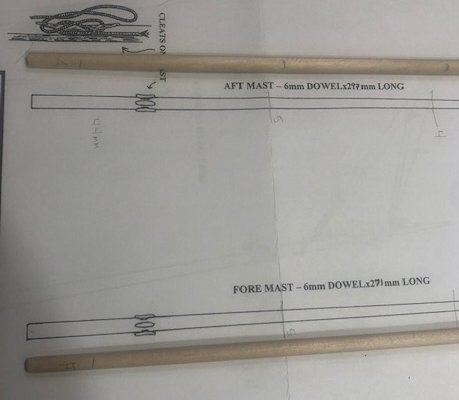
The plans state that the aft mast is 297mm in length, and the fore mast is 271mm in length. Do those lengths include the 20-23mm that is inserted into the respective holes in the deck? Or are those the lengths that should be "exposed" after the masts are inserted and secured? According to the plans shown in the picture above, the cleats at the base of each mast appear to be about 44mm from the bottom. Again, is that 44mm from the deck once the masts are fitted in their locations?
Sorry again for the silly questions. I'm off to do more planing and shaping!
Gregg
-
Rigging looks great, Dan! Congrats on finishing. A model to definitely be proud of!
Next!
-
-
Hi Bob - Looking great! Yeah, I've been struggling, as well, with the "perfect process" in blackening brass eyelets and other shiny parts, with attempts using combinations of acetone, vinegar, pickling juices, blackening solution and paint.
Someone once mentioned to me that these little imperfections that you notice may not be noticeable at all to the casual admirer. As you suggested, adapt the best you can, live with it, take the pressure off yourself, and let others enjoy your hard work.
Congrats on your work to-date!
Gregg
- thibaultron and druxey
-
2
-
Jib sail looks good, Dan! Yeah, I have seen the "interior" labeled bottle of Elmer's around, but didn't like the look of the pour spout (I know, sounds like a silly reason), so I've been sticking with (pun intended) the more conventional bottle in the middle of your picture. I have not heard about the Mod Podge, so will have to look for it next time I need to restock.
You are getting close to the end! Congrats!
Gregg
-
Love the color scheme! Sharp!
-
Hi Eric! Gret start on the Sailing Pran! This was my first build! In looking at my mast, it is "almost" vertical to the waterline, if not just slightly tilted toward the stern. Regarding your mast step holes being too large or too small, I'd give you a Goldilocks answer and say "make it just right". I know, lousy answer... As I recall, I shaped my mast a bit too much on the Sailing Pran, and had to do some fill. Rather than a drill at this point, I'd use some round files to fine-tune the diameter of the hole so your mast fits snuggly. The fore stay and back stays will help secure more firmly once you get to that point, but a nice firm base will certainly help. And, as I recall, and I glanced at my finished Pran again, it appears my mast is sitting against the hull. I don't recall seeing a bottom 2nd piece. Hmmm...
-
Looks really, really good, Dan! Yeah, I did as much of the mast and sail rigging work horizontally on the table, and waited until about this point to place the mast on the boat. And I had binder clips and clothes pins all over the rigging! Your standing rigging is nice! The jib sail should be much easier... or at least that's what I kept telling myself! Sweet!
Gregg
-
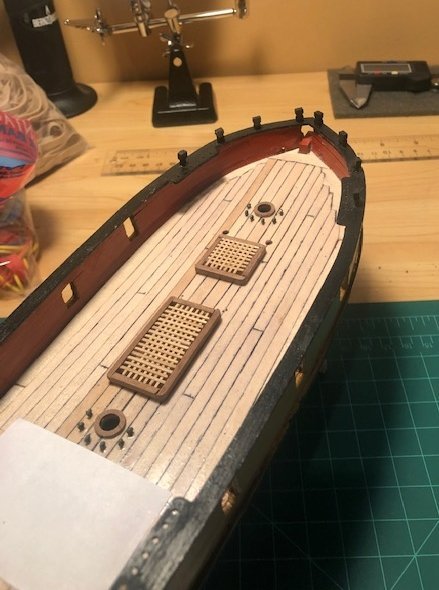
Thanks for the likes, and I appreciate the comment, George, regarding the pump locations. I can certainly understand now that, with their present location, the holds would take on quite a bit of water. As I have already drilled the 1mm holes in the deck for the pump placements, I will leave them here for the casual admirer, and will have to ask the purists for a pass on this one. Another lesson learned, however! Review as many of the actual documents, drawings and pictures as I can on these ships, and not just "settle" on the manufacturer's rendering.
Gregg
-
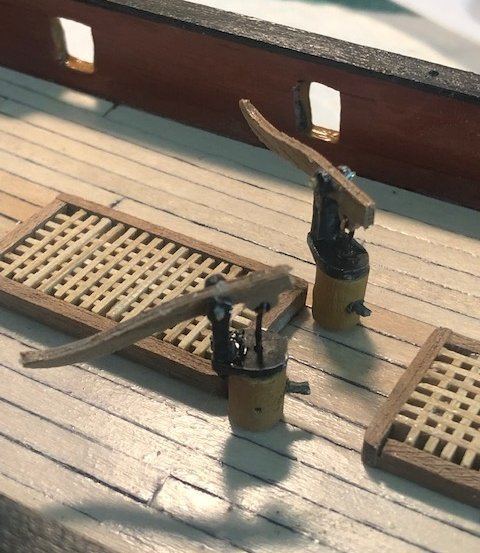
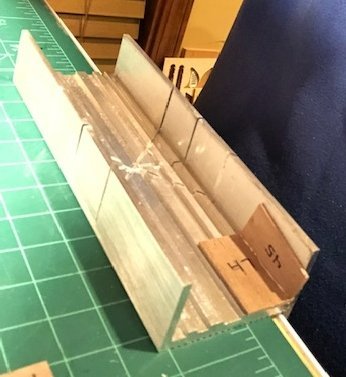
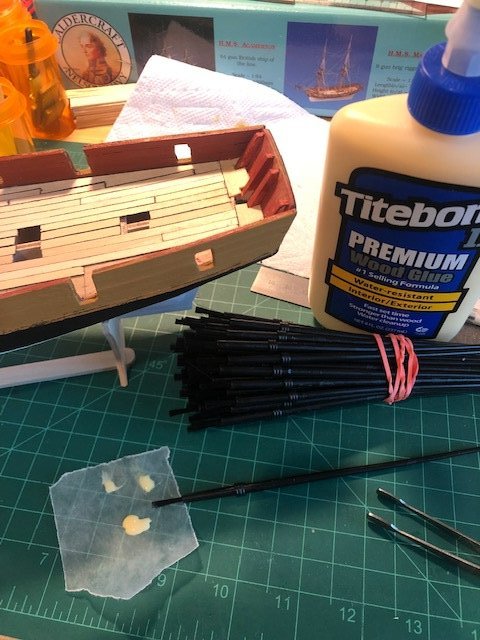
A quick update on some small yet necessary stuff I finished. Worked on the pump assemblies. I recall in jim_smits' Ballahoo build log, he called this part "a bit of a faff". Admittedly, I had never heard that term before, so had to look it up. Looks like it is more of a Brit term for something that is awkward or time-consuming. Can't argue with that, Jim! Indeed, these pump assemblies were both. Think they came out ok, though. The picture has them shown in place, but I have not secured them as, like the companionway, I would most assuredly hit them with something and damage or break. So, they are being set aside until towards the completion. Also, took the time now to drill the holes and place the deck eyelets around the mast holes and along the stern. Thinking there are more eyelets to place, but I'll come across those as I move forward.
Also, placed the timberheads in their spots. Really didn't see how they were going to fit well in the holes provided on the capping rails. But, thanks to both egkb and jim_smits, they assured me that, after a bit of sanding and tapering, the timberheads would come close. Yep, after all that, and a touch of CA, they feel pretty secure. And, yes, that is a piece of paper I have taped to the deck temporarily where the companionway will sit. Sure as heck, I would drop something down the hole. So, this will help if I get clumsy
OK, I've put it off long enough. Time to work on the channels, deadeyes and strops. A bit unsure how I will do on them, but I will trudge forward... slowly. Actually, I am waiting on some more brass wire to be delivered the first of this week, which I will use instead of the kit-supplied strops. Lots of model shipbuilding education in my future!
Appreciate the likes, comments, advice and criticisms. Enjoy your week! It's almost tomato planting time in Kansas!
Gregg
- GrandpaPhil, bruce d, Dave_E and 2 others
-
5
-
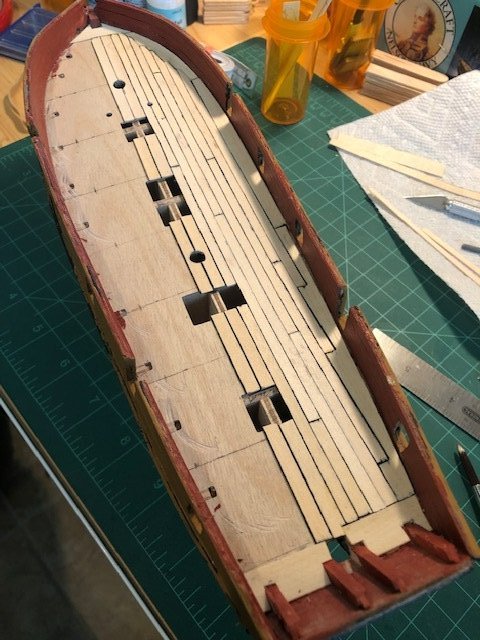
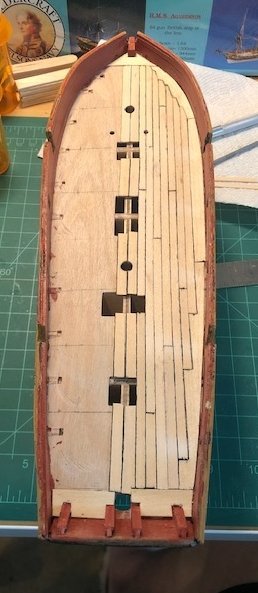
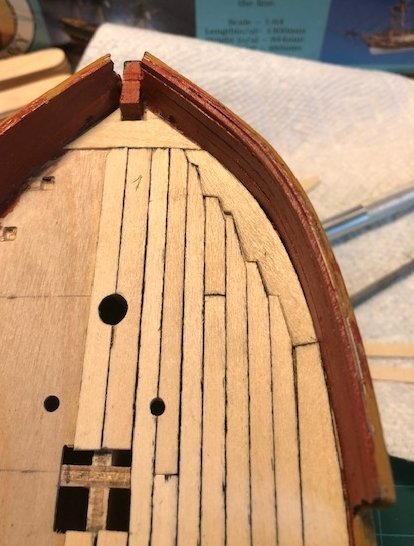
A brief update - Finished with the deck planking! I believe the port side (the 2nd side I worked on) came out much better in regard to the margin planking width, the nibbing, etc. than starboard. Learned a lot in that process! After completing the planking, I sanded with 240 grit, then 320 grit, to a nice smooth texture. Place four (4) coats of satin varnish on the planks and they came out looking very nice. Moving on...!
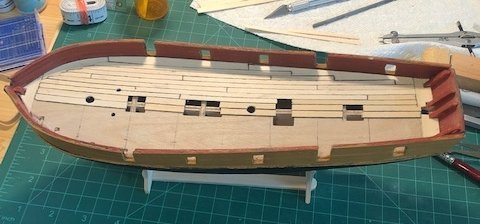
Almost had a severe casualty as I was placing the bulwark capping rail. First of al, I decided to paint the rail prior to placement, as I figured it would be much less trouble than afterwards with taping, etc. As I was gluing the starboard-side rail on up towards the bow, my finger slipped and... snap... the rail broke. Crap! Long story short (maybe too late for that), it was a fairly "clean" break and I was able to glue back together (sounds like Humpty Dumpty now, huh?). Looks pretty well sitting on top of the bulwark. I have some concerns about fitting the timberheads in the small spots provided on the rail, but both Eammon and jim_smits assured me from their past builds that, with some work, they can fit securely.
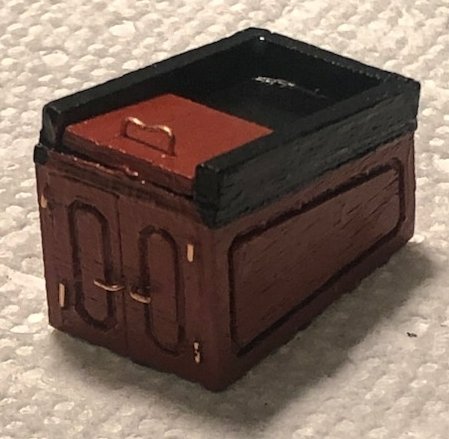
Thought I would work on the companionway next. Wasn't sure quite how to approach building a secure box with such small pieces. I thought I would use my mini-miter box as a guide to assist me in making sure the sides were at 90 degrees to the top. Worked out well, actually. I also placed a small piece of square walnut at each corner for stability. It seemed to work out well. I think the one picture shows what seems to be an excess amount of glue. When I pushed the piece of walnut into the corner, it squeezed a bit of the excess out. Since it's all underneath, no harm, but it did dry fine.
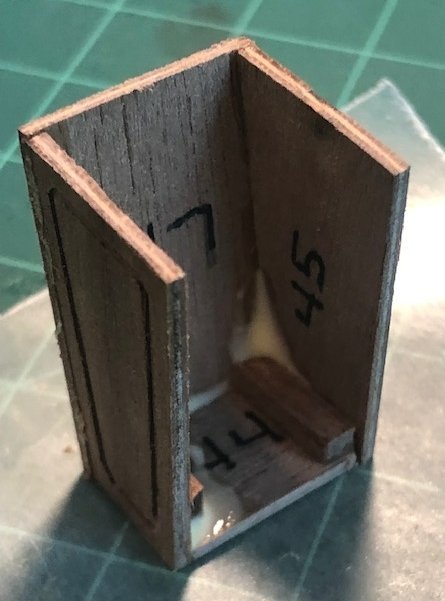
I decided to paint the companionway in a similar color scheme as the bulwark inner planking and the top capping rail. Was even fairly successful in adding handles, knobs and hinges. Once painted and all of the hardware was attached, I gave it a few coats of satin finish, as well. Pleased with the way that came out.
So, here is how the Ballahoo is sitting now...
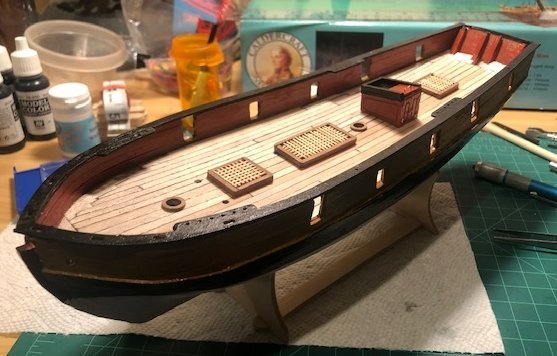
I secured the gratings in their proper locations and glued the two (2) mast bases at their points. Although I set the companionway in its spot for this photo op, I have not yet secured it, as I thought I would be easier to work on some other deck fittings without it in the way. Same with the carronades, which I worked on a week or so ago, but will wait for placement.
On to the next challenge, which will include the channels, deadeyes and strops. Oh boy... As always, appreciate all the likes, comments, criticisms and recommendations for improvement. Happy weekend to all! It's already going to be May!
Gregg
-
Also, forgot to mention yesterday the success I am having in gluing the deck planks to the false deck, with hardly any mess or cleanup. I am sure this has been discussed in other MSW forums, which is where I probably picked it up.
In order to avoid having to constantly clean decent paint brushes with glue, I purchased a bag of small inexpensive "disposable" brushes... only about 6" long, and as I recall less than $1.00/bag of 25. I place a bit of my Titebond on a piece of wax paper used as a palette, and brush on a nice thin layer of glue for the plank I am securing. Cleanup is a breeze.
Progressing well on the port side deck planking. Appreciate the comments and criticisms.
It's a cool yet sunny Sunday in Kansas City, so heading outside this afternoon for some yard work. Thanks...
Gregg
-
I have completed the starboard side of the deck planking. My original intent was to dry-fit everything before I glued planks to the false decking, but as I began to cut, fit and place deck strips, and work on how I was going to do the nibbing along the margin planks, it was difficult to keep everything in place as I measured, etc., so I decided to secure the planks, from bow to stern, working from the inside out, which allowed for a bit better placement.
I used 4mm wide strips from the centerline out and used 10mm wide strips for the three margin planks, cutting, nibbing, shaping and trimming them to proper widths where necessary to fit. In looking at other build logs, this appears to be pretty consistent and in line with what others did, so I feel ok with how it came out.
Overall, I am satisfied with how this side of the deck planking came out. I made mirror duplicates of the three completed margin plank shapes, so hopefully the port side deck planking will go well, if not even a bit better.
As always, appreciate the comments, recommendations for improvement and criticisms. I am definitely learning a ton of modeling knowledge in this 3rd build.
Gregg
-
You've gone nuts, Bob! (You knew someone had to say it...) Looks really good!
- thibaultron, jct and tlee01
-
2
-
 1
1
RMS Titanic by Titanicphile - OcCre - 1/300
in - Kit build logs for subjects built from 1901 - Present Day
Posted
Hello sir! Will be following your progress on this classic, as I purchased the OcCre model a few months back when MS had it "on sale". So, it's in the shipyard waiting for build clearance. It may be awhile before it's turn, but definitely interested in watching how you do.
I noticed in your pictures above, you display Peter Davies-Garner's RMS Titanic: A Modelmaker's Manual. Has it been helpful? Looks like you have the paperback version. Any thoughts on paperback vs. hardcover? I also ordered the electronic version of the book for only $2.99 from B&N. I am sure you have seen the 34-part YouTube videos on construction of this 1:300 model, as well. They make it look so easy! Ha!
Curious if you heard anything back from Tom's Modelworks on a 1:300 version of the PE set?
Thanks for allowing me to peek in!
Gregg