


GGibson
-
Posts
940 -
Joined
-
Last visited
Content Type
Profiles
Forums
Gallery
Events
Posts posted by GGibson
-
-
Nice work, Tim! It's all looking sharp!
-
Well, I finally got to the rudder assembly on my Bluenose. I had actually worked on shaping and painting the rudder several weeks ago in some down time, in between one of the projects for which I was probably waiting on more parts delivery! So now, it was time to complete the pintles and gudgeons construction and get the rudder attached to the hull.
In reading and studying many of the completed build logs for the Bluenose, such as those done by David Lester, Ed Kutay, Bob Hermann and others, also including current builds, I continue to look back especially to genericDave's Bluenose log and detailed descriptions, both here on MSW, as well as his Suburban Ship Modeler website. I decided to attempt Dave's approach to completing the pintles and gudgeons for the rudder assembly.
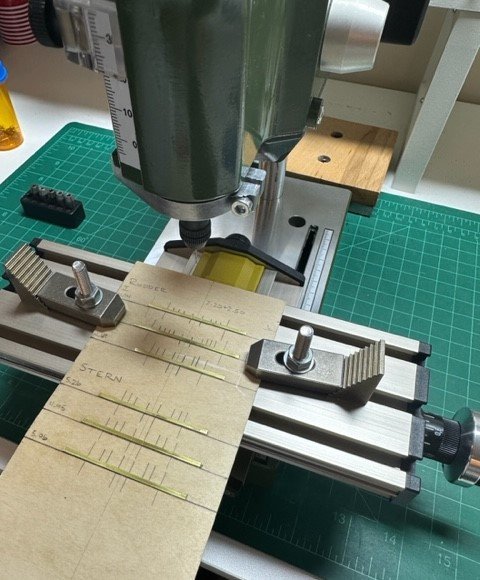
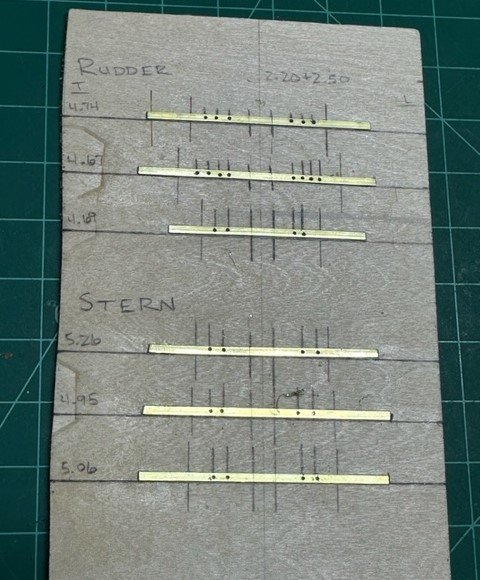
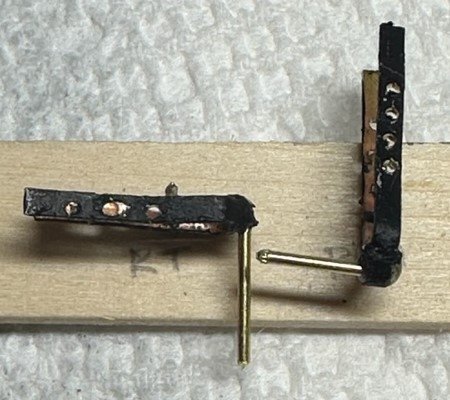
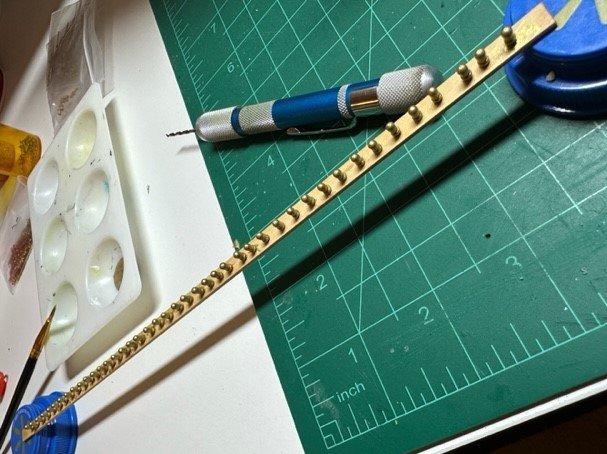
My first task, then, was to make a building board like he did so that I could determine where to drill holes in the supplied 1/16" brass strips. Using a scrap piece of board, I marked on it where I would drill the holes on the three (3) sets of strips. I decided the pintles would have 3, 4 & 2 pinholes top to bottom, spaced 2.2mm apart, and the gudgeons would all have just 2 pinholes on all three, spaced 2.5mm apart.
Determining the thickness of the rudder and the sternpost at each contact point, I then made lines on the building board (and marks on the strips using an Xacto blade for where each of the strips would be bent in order to wrap around the rudder and sternpost/hull.
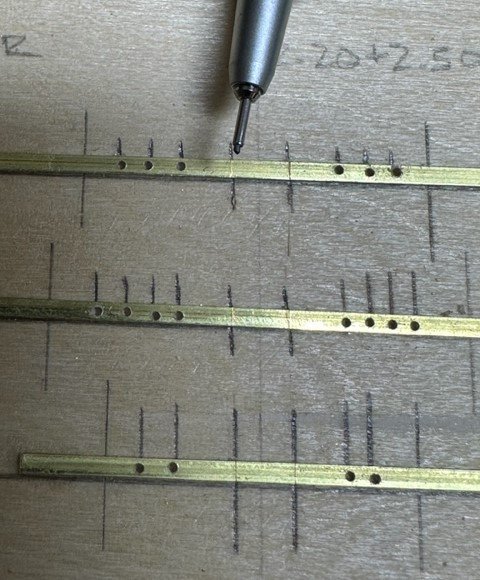
This work gave me the opportunity to purchase a new tool for the shipyard! In order to assist in making these super-small holes just millimeters apart from each other, I purchased a Proxxon Micro Bench Drill Press (Model #TBM115) and a Proxxon Micro Compound X/Y Table (Model #KT70). I glued the outside edges of the strips (parts that would ultimately get cut off) to the board to keep them secure while drilling, using a #66 sized micro bit. Although they weren't "perfect", the holes looked pretty darn good after drilling.
It was now time to solder tubes to all of the strips so that a pin could be placed in each of the pintles to create the hinge. My past experiences with soldering did not go well. What to do this time? After some research, I decided to go the resistance soldering route and, once again, time for a shipyard purchase. I got the MicroMark RSU unit. After several practice rounds using scrap brass tubing and strips, I got comfortable enough to solder the 1/16" OD tubing to the pintle and gudgeon strips. Using the Dremel, I then cut the excess tubing and, after a bit of reaming where necessary, confirmed that the pins would still go through the tubes.
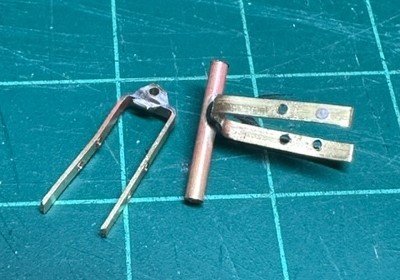
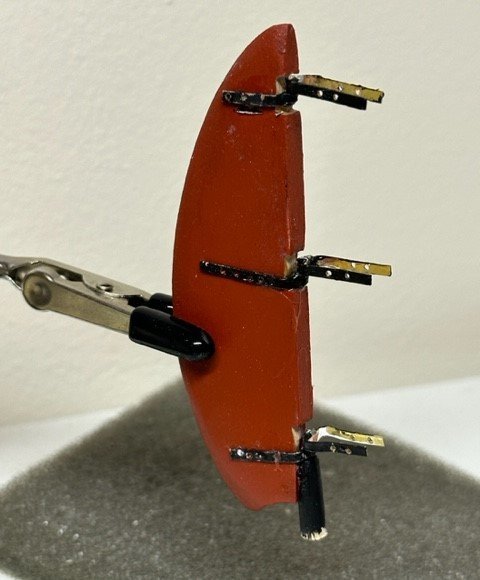
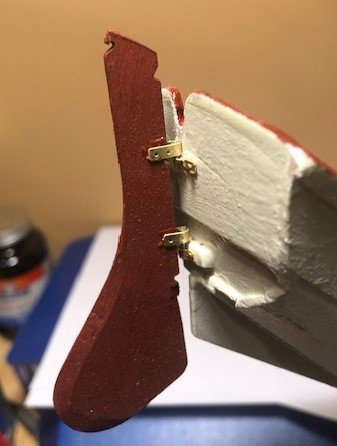
I decided against using the Brass Black in order to darken the pieces, and instead cleaned them up with some white distilled vinegar and then primed and painted them with the same Liquitex Basics Acrylic Mars Black paint that I used on the hull. I then secured each of the pins in the tubes with a spot of CA glue and cut the pins to their appropriate length to insert properly into their respective gudgeon. Time to get these on the wood!
I first attached each of the pintles to the rudder using some J-B Weld ClearWeld Epoxy. I set them in their locations on the rudder, wrapped them in wax paper (so the clamps wouldn't stick on any epoxy seepage) and clamped them for 24 hours. I then drilled small shallow holes in the wood to match the holes in the strips, cut some brass nails with heads to a very short length, dipped them in CA glue, and inserted them to resemble the bolts.
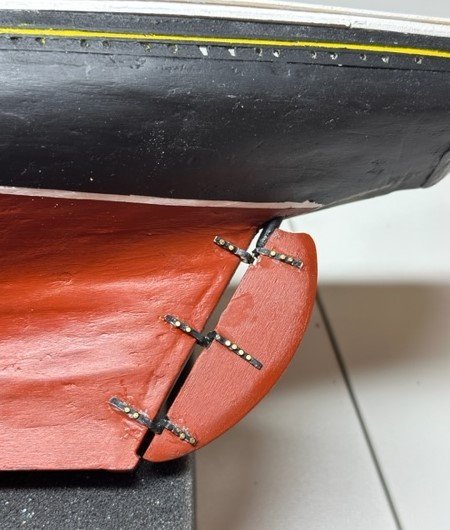
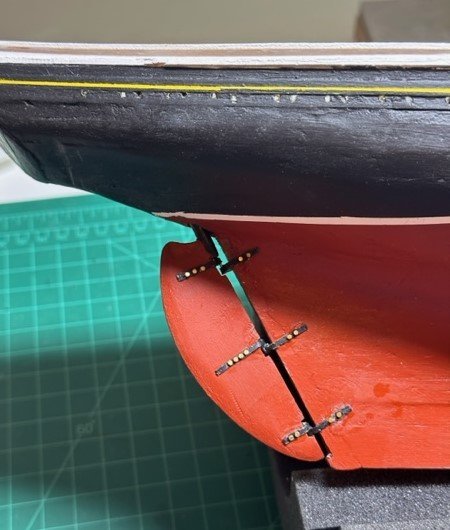
With the ship upside down and resting on the foam cradle I have, I then fit the gudgeons onto the sternpost and hull in their appropriate spots, again using the J-B Weld epoxy to secure. Once that dried, I then repeated the brass nail process on the gudgeon holes. All-in-all, things came out pretty well. One of those, from a natural viewing point, it looks good, but as the modeler and inspecting closely, I made a few oopsies. Things to remember on my next ship's rudder installation.
Hopefully, I will be able to complete the nameplate and scrollwork in the coming days. I've had several "re-do's" on that process, but may have an acceptable solution done soon. Once that is done, I will do some touch-up work wherever need on the hull and then get it sealed and finished. I've already started on some of the deck buildings in between some of these delays I've experienced on the bottom side, so progress has been slow but fairly steady.
Appreciate the peek-ins, comments and criticisms, and advice on anything that may be heading my way on the top side. Thanks...
-
Duhhh, never thought about looking that date up in naval history! <doh> Thanks, Keith!
- Keith Black, Canute and mtaylor
-
 3
3
-
Noticed on OcCre's website that their home page has a "Save the Date - 10/21/2023 - Limited and Numbered Edition" announcement.
Hmmm... Anyone have any inside info... or wild guesses... on what it might be?!? Curiosity killed the cat...
- Keith Black and mtaylor
-
2
-
Very interesting read! Another example of how language has evolved over time! Fascinating!
But, have to admit, for those of us who are BOTH ship modelers and backyard BBQr's, seeing the "...Ground Toes" topic title caught my BBQ radar attention immediately! We'll put almost anything on our smokers! 🤣
-
Hi Jon! I've spent the last 27 pages catching up on your Constitution build-to-date. Great job!
I have been seriously considering putting the Constitution in the shipyard for a future build and, if I do, no doubt your log will be referred to often!
I'm hitting the follow button. Awesome work, sir. Carry on.
-
Nice cabin work, John! I need to remember to put the ringbolts on the forward-side of my cabin, as well, before permanently placing!
- John Ruy and Glen McGuire
-
1
-
 1
1
-
Thanks for the pictures, Chuck! Our son is a 2004 USNA graduate, and we loved our trips to Annapolis.
- thibaultron, Nirvana, Canute and 3 others
-
6
-
Ahhh, my apologies. I believe I understand Commodore's concern now. Yes, my transom was cut a bit higher than where the line was drawn, as well.
I pulled up some of my pictures I had taken and zoomed in a bit on my transom area. Sorry if some are a bit blurred due to the zooming. But you can see on mine, once the inwales and the quarter knees were in place, the stern transom piece (as well as the bow transom) was cut slightly higher than where their line was drawn, and it had no effect on ultimately how the rudder was placed. From my recollection on my NSP, you will be fine. Hope that helps.
-
-
Hey Commodore! It all looks really nice! If I am understanding your concern, I think you will be good. Whatever little sanding you need to do, plus your hull painting, will cover whatever small inconsistencies you see as the builder. Your local admirers won't notice after it's completed. Looking sharp. Getting ahead of where you are at now, but you'll be there in no time... thoughts on how you are going to finish the topside/interior?
-
-
Following up on the recent question regarding adding links to signatures, I thought I would add another question, but start a new topic so as to not clutter the great info in the "adding links" thread. And perhaps this question has been asked and answered previously. If so, I apologize for not searching properly and asking what may be a stupid question again...
Does the signature content of users get updated on all of the posts that someone has previously commented on, or just on posts subsequent to their signature updates? Many of us use our signature section to list current builds, completed builds, etc. For example, if I am looking back on an interesting topic thread from, say, 2016, and I see that John Doe's signature shows that he is "currently building" the USS Constitution, is that 2016-dated post just showing what his signature page depicted at the time of his post in 2016, or is that an updated reflection of what Mr. Doe is now working on (from whenever he last updated his signature)?
Thanks!
-
Working on the original 1921 Bluenose! Just posted an update on my progress. And, yes, I certainly understand there are some subtle differences between the two ships, but enjoy seeing the pictures of all of them! Appreciate you sharing!
- Glen McGuire and John Ruy
-
2
-
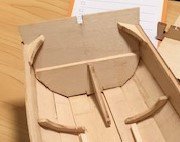
Well, I keep delaying the work on finishing the rudder assembly, waiting on another tool addition to the shipyard, so... thought I would begin work on the cabin.
This is certainly one of the biggest deck structures for the Bluenose, and was challenging, yet fun, to build. Started with 1/2" x 1/16" strips cut to size. Used 1/4" support in corners and beams. Probably used excessive support beams, but wanted to make the planking easier, with plenty of underneath support and gluing contact. Also, rather than using small strips for the moulding, I thought I would use a full 1/16" stock piece as the base. Also, cut pieces for the companionway and the skylight walls from 1/16" stock.
For the cabin rooftop, I used the same 1/8" x 1/16" planks that I used for the decking. The planking was tapered bow to stern as needed in order to fit well. The two outside planks on the port and starboard sides were a bit wider and were cut and sanded to shape for the edge overhang. I should have used wider planks on all four sides, as a border, if I had it to do all over again.
The cabin rooftop was stained with the Minwax Red Mahogany stain that I decided to use for all of the deck structures. I wanted the deck structures to be a bit darker than the cherry stain that the deck will be shaded. It may be a bit darker than I had anticipated on this larger structure, but should be good once placed on the deck with everything else. We shall see... With the base stained and glued to the rest of the cabin structure, I then placed a piece of sandpaper on the Bluenose deck and sanded the cabin structure to match the deck camber.
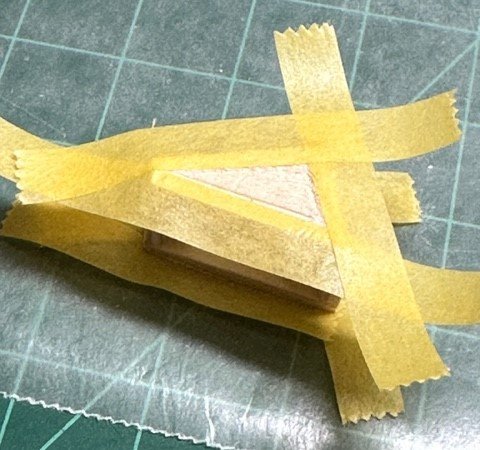
For the compass cover, I used a spare block of wood, cut it and shaped it. A 1/16" x 3/16" strip was then wetted, steamed, shaped and wrapped around the top for the cover.
For the skylight, I hemmed and hawed on how I was going to complete it, and was impressed with how others had completed their skylights in their build logs. I used 3/64" x 3/8" strips cut for each of the skylight frames. A small sheet, painted black, was then placed behind each of the frames. Using both some PVA and CA glue, I was then able to cut some 22 Ga. copper wire to form bars, and glued the wire bars to the black backing. It worked out pretty well, but I probably used a bit too much CA glue. Some cleanup, though, helped the appearance. I may still do some touchup changes on this cabin before its final placement on the deck, after seeing John Ruy's pictures of the Bluenose II on his build log.
I still need to add the smoke pipe/vent, but will need to do some solder work for that. I also need to do the soldering in order to complete the pintles & gudgeons on the rudder assembly, as well, so... guess that's next on the list!
- bhermann, John Ruy, JacquesCousteau and 1 other
-
4
-
Continued nice work, John! And appreciate the Bluenose II pictures! I have been working on the cabin, and now I want to make a bit of an alteration on my Bluenose after seeing your pictures!
- Glen McGuire and John Ruy
-
1
-
1
-
9 hours ago, MrBlueJacket said:
Did you actually fit out all 8, only to cover up 6 of them? Awesome!
Nic
6 hours ago, John Ruy said:Only the two on top have been fitted inboard. I’m not that crazy. 😜 I do still have Sixteen pairs of oars to carve out and stow in the top of the Dories.
John
Oh wow. Actually, didn't think about that! 😄 Save me some work when I get to that point! 👍🤣🤣
- Cathead, John Ruy and Glen McGuire
-
3
-
Nice work, John! Not too tedious, huh? 🤣
- John Ruy and Glen McGuire
-
1
-
 1
1
-
2 hours ago, dvm27 said:
Treat the Fiebings dye with great care as splatters can never be removed from the surrounding area!
The Fiebings dye method that both Druxey & Greg mentioned sounded really good.... until Greg's warning about the splatters. Even if it happened in the shipyard, the Mrs would probably have me removed! <shrug>
I know Chuck is simply promoting his quality product and does not mean for this to get into a MS bashing thread, but there IS a quality difference. Keep up the great work, Chuck!
EDIT: Made the picture bigger so you can see the details better.

- thibaultron, scrubbyj427, mtaylor and 9 others
-
10
-
 2
2
-
-
Back from a HOT Florida visiting two of our granddaughters... ok, and their parents, as well... and jumping back to the shipyard to continue my Bluenose journey!
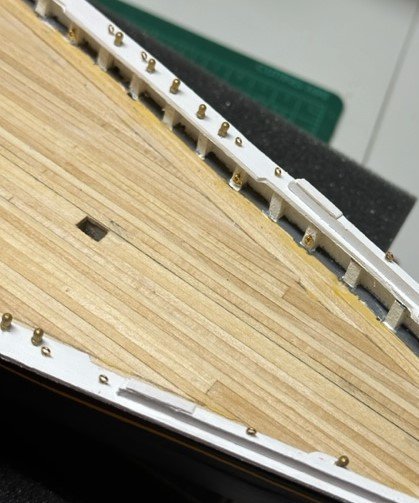
Placed an order for some items needed, and while I am waiting, I decided to knock out some of the eyebolt, ringbolt and belaying pin placements around the rails and bulwarks while the deck was empty and those are easier to place. The supply of eyebolts and rings in the kit were nice, shiny brass, which I thought would look sharp around the deck, so went with the brass. The belaying pins provided, though, needed to be painted brass in order to match and look nice along the rails. I wanted to prepare and paint as many of the pins as I needed as effectively as I could, so I took a spare wood strip and drilled the necessary 1/16" holes to hold all of the belaying pins while I painted them. To match the brass eyebolts and ringbolts, I used DecoArt Extreme Sheen Vintage Brass Metallic Paint, and the process worked pretty well. I drilled the holes in the appropriate locations along the rails, and also drilled holes for the eyebolts using a pin vise with a #71 micro drill bit.
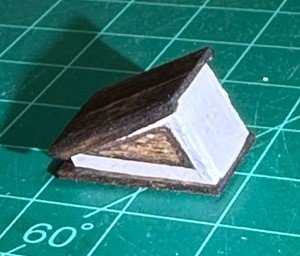
Wheel Box
Still waiting on that other item, so let's begin working on some of the deck structures! Seems like, in reviewing other build logs, everyone starts with the wheel box, so I will, too! I measured each of the four wall sides from the plans, and using an available 1/16" thick basswood sheet, I cut out each of the sides using an X-acto blade. Once cut, I sanded the port and starboard sides together so they matched, and started fitting all of them together so they made a nice box, and glued them using some PVA glue. I placed some spare pieces of 1/8" square rail on the inside corners to make them even more solid.
For the base, I glued together a 3/8" x 3/64" strip and a 1/4" x 3/64" strip, in order to make the base slightly wider than the box width, and cut to the proper depth, again slightly longer than the depth of the box. I rounded the top edges of the completed base, then, so it appeared to mimick a cove baseboard moulding. Pretty small. but I think the effect was there!
For the wheel box roof top, I glued together two (2) 3/8" x 3/64" and placed a 3/32" sq strip on each side to simulate an overhang. Once these were glued and set, I sanded each side, though, a lot in order to narrow the roof top to a nice fitting size.
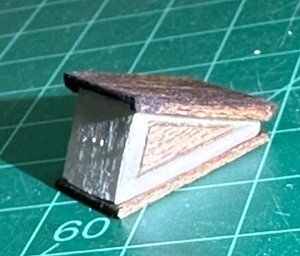
For the wheel box sides, I used a compass with a sharp point (same as I used to score the inside edges of the main rails when I cut them by hand) in order to create the grooves in the side panels. That worked out pretty well. Once all the pieces (the box, the roof and the base) all dry-fit properly and looked good, it was time to paint/stain.
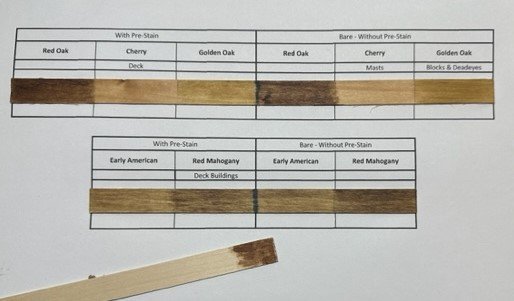
So, I needed to decide if I was going to stain or paint many of the deck structures. The plans call for using a Burnt Umber color paint, but many other modelers have been staining instead. This is, then, an appropriate time to analyze and decide what I am going to do for various parts, such as the deck floor itself, the deck structures, masts, and blocks and deadeyes. I had several stain variations on my shelf, so I tested them all on a spare piece of basswood, both with and without a pre-stain. Red Oak, Cherry, Golden Oak, Early American and Red Mahogany. My chart below may be hard to read and see the color variations clearly, but I decided to stain the deck at the appropriate time with Cherry. The deck structures, like the Wheel Box I am currently working on, will be a slightly darker color, using the Red Mahogany stain. I will use pre-stain on all of these. The masts will be stained with Cherry and the blocks and deadeyes will be dipped in a Golden Oak stain. The Burnt Umber paint is sampled on the small board under the chart. Very similar to the Red Mahogany stain, but I'll stick with the stain applications.
The staining and painting progressed well, and once all pieces were completed, it was time to glue them all up!
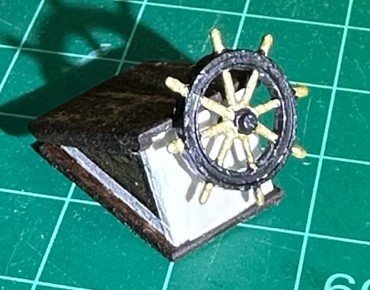
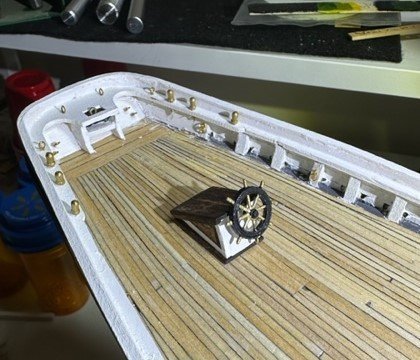
The kit-provided steering wheel was in good shape, nothing broken or bent. I dipped the Britannia casting in a bath of white distilled vinegar for about 10 minutes to clean it. After it dried, I gave it a coat of white primer, followed by the DecoArt Extreme Sheen Vintage Brass Metallic Paint on the spokes and Liquitex Basics Acrylic Mars Black paint on the circle. Once the paint dried, i drilled a hole in the front of the wheel box using the pin vise and a #55 micro drill bit, dabbed a little CA glue on the pin on the back side of the wheel, inserted, and... done. All in all, came out looking pretty decent. Had to set it on the deck to just see how it looked. But it is now going in a safe place until it is time to permanently install!
Still needing to work on completing the rudder assembly with the pintles and gudgeons. Got a new tool for the shipyard, a Proxxon Micro Bench Drill Press, which I should be able to use right away with this rudder assembly. I've got a large Delta 8" drill press out on the workbench in the garage, but thought this Proxxon would be best for these small pieces. Ehhh, we will see!
Also, need to decide how I want to mount this Bluenose, as I discussed in my previous update. Appreciate any advice/suggestions, and I always am thankful for the comments, criticisms, and likes. I learn so much from others! Thanks!
- JacquesCousteau, Jond, Fubarelf and 1 other
-
4
-
Nice work, Ted! You are absolutely correct... a sewing machine is a demonic device! Ever since I started my Bluenose, I've been torn on whether to include full sails, furled sails, or no sails at all. Think you've convinced me, mine will probably be naked! <shrug>
-
Eric - Great job on the decking. From a rough beginning to a nice sanded finish! I'm enjoying following your progress.
And a great story regarding your canoe journeys down the Might Mo (and Amtrak and the Katy Trail)! Some thirty years ago +/-, we biked with our young children for about 10 of those Katy Trail miles (20 back and forth) just outside Kansas City. Always said we'd like to do more of the trail, but we got older! Great that you and Mrs Cathead are enjoying it all!
- mbp521, Canute, FriedClams and 4 others
-
7
-
On 9/21/2023 at 12:36 PM, Chuck said:
Less than 24 hours after placing thousands (seriously thousands) of rigging blocks for sale on my site....
Yupp, you guessed it.
Nearly sold out...
Wow! I am one of the lucky ones! Placed my order on Thursday. And, received a shipment notice on Friday! Great product followed up with great customer service! Thanks, Chuck!
- Canute, thibaultron, Chuck and 1 other
-
4

Bluenose 1921 by GGibson - FINISHED - Model Shipways - 1:64
in - Kit build logs for subjects built from 1901 - Present Day
Posted · Edited by GGibson
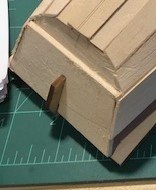
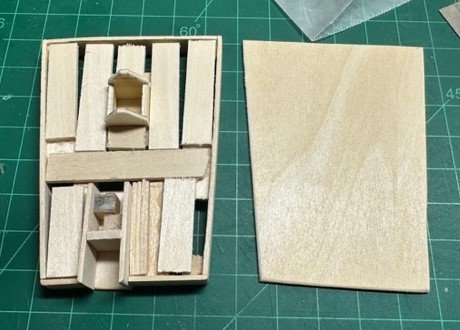
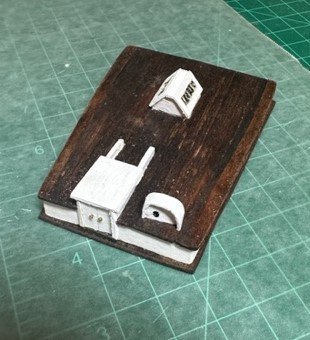
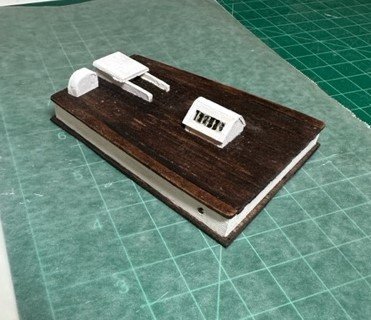
Waiting on an Amazon delivery in order to hopefully finish the Bluenose scrollwork and nameplate project. In the meantime, let's knock out the unidentified object and the hatches, shall we? Two (well, technically three) pretty straight-forward simple builds...
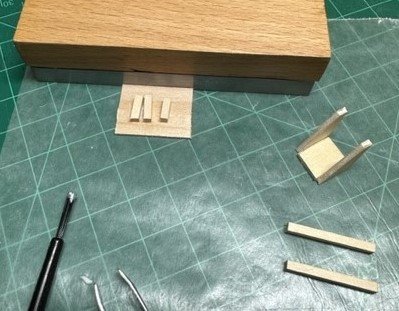
For the unidentified object, I used a 7/16" OD dowel. Before cutting it down to size, I first created the lid seam, as it was easier to do this in the mini-miter box with a longer dowel to hang onto. Created the circle with the miter saw, and widened it slightly all around with an xacto knife. Then cut the dowel at about a 4mm height. Placed a small brass rod in the bottom, which made it easier to hold while staining/painting, and I can use it when I mount and glue this on the deck for additional adhesion/support. Stained the lower part with red mahogany stain I am using for all of the deck buildings and painted the lid white.
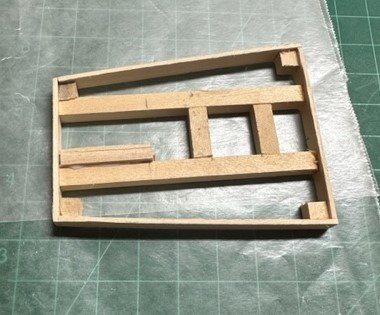
For the hatches, since they are virtually the same, just slightly longer for the one being placed on the fore deck, I did a lot of the cutting, gluing and staining at the same time. My measurements were 24x24mm and 24x36mm. For the outside frame, I used 1/4" x 1/8" wood stock and used a 3/16" x 3/16" wood stock for inner support and something for the 1/16" panel sheet to sit on. On both of the sheets, I made a groove down the center of the panel to simulate the door halves. I stained the frames in the red mahogany again, and stained the hatch covers in a lighter cherry, which is what I will also stain the deck in a bit, as well as the masts.
I will glue the covers inside the frame inserts and drill the appropriate holes on the covers and on the frame sides for the ringbolts. I will also sand on the bottoms to match the deck curvature before permanently placing. The attached picture is obviously before these guys were fully completed.
Alright, I hope to get the nameplate issues I've been having resolved soon! Thanks again for peeking in, along with the likes, comments, criticisms and recommendations.