DocBlake
-
Posts
1,811 -
Joined
-
Last visited
Content Type
Profiles
Forums
Gallery
Events
Everything posted by DocBlake
-
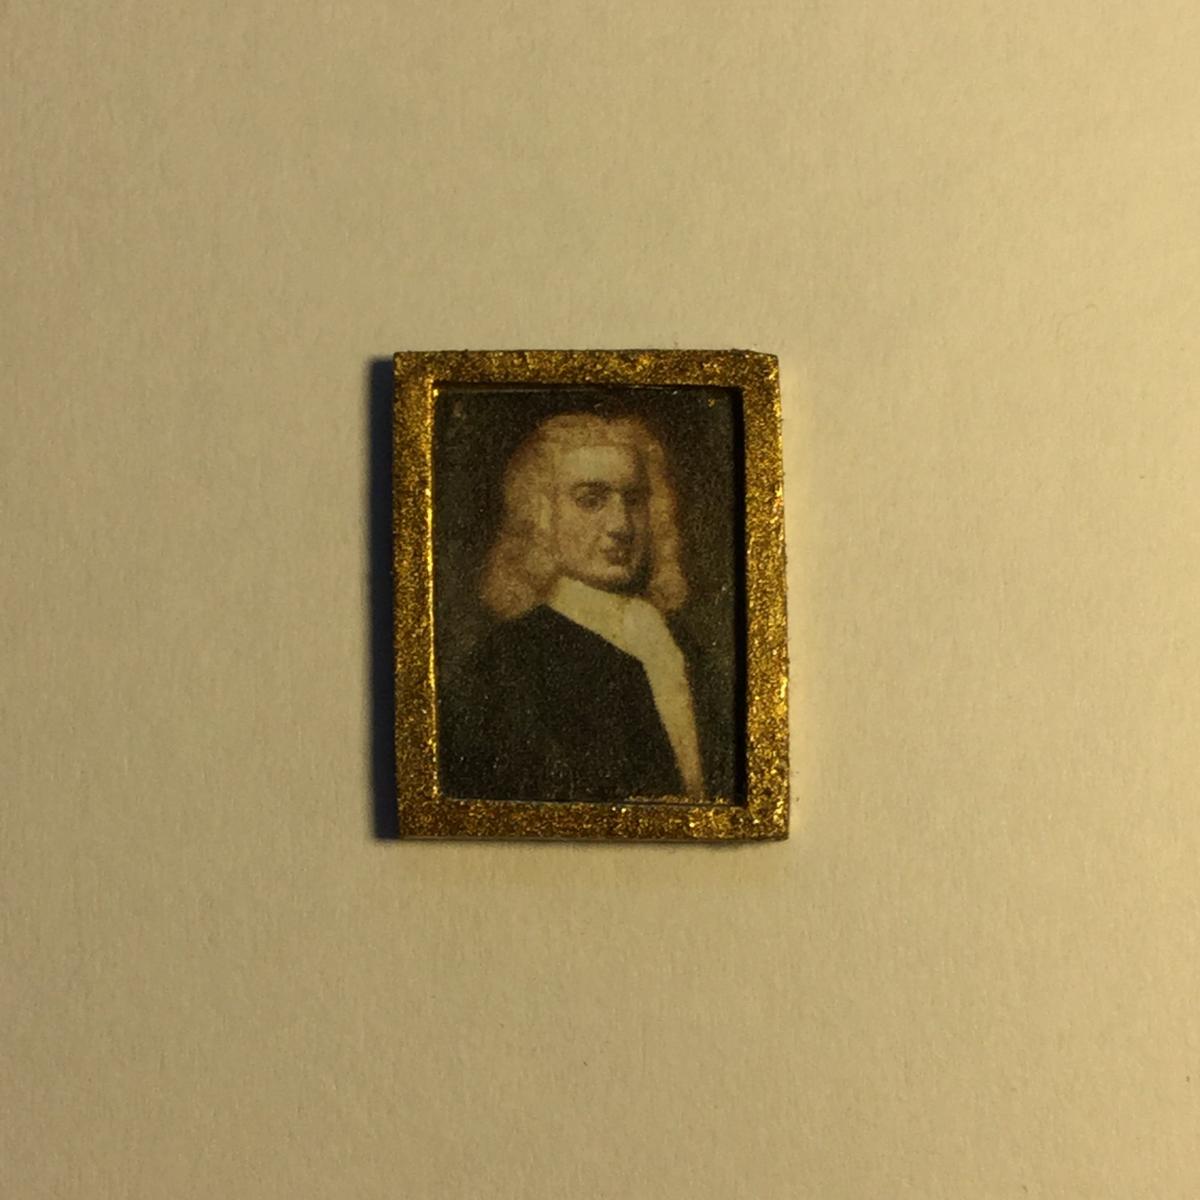
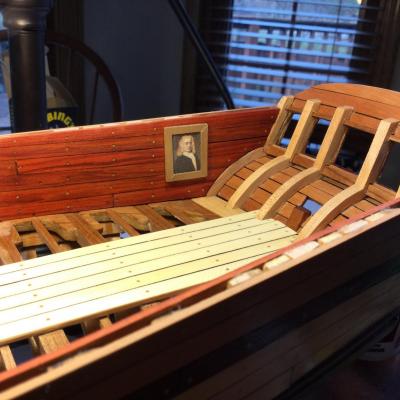
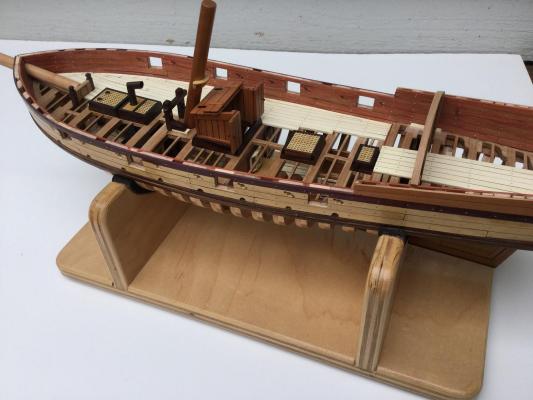
 I thought the picture frame on the portrait is too wide, so I cut in down and repainted it. Does anyone recognize who is depicted in the portrait? Zoran: The hull, counter and transom framing is hard maple. The counter planking is swiss pear. The inboard bulwark planking is red heart. The deck framing is cherry and the deck planking is holly.
- 306 replies
-
- 6
-

-
- armed virginia sloop
- Patrick Henry
- (and 2 more)
-
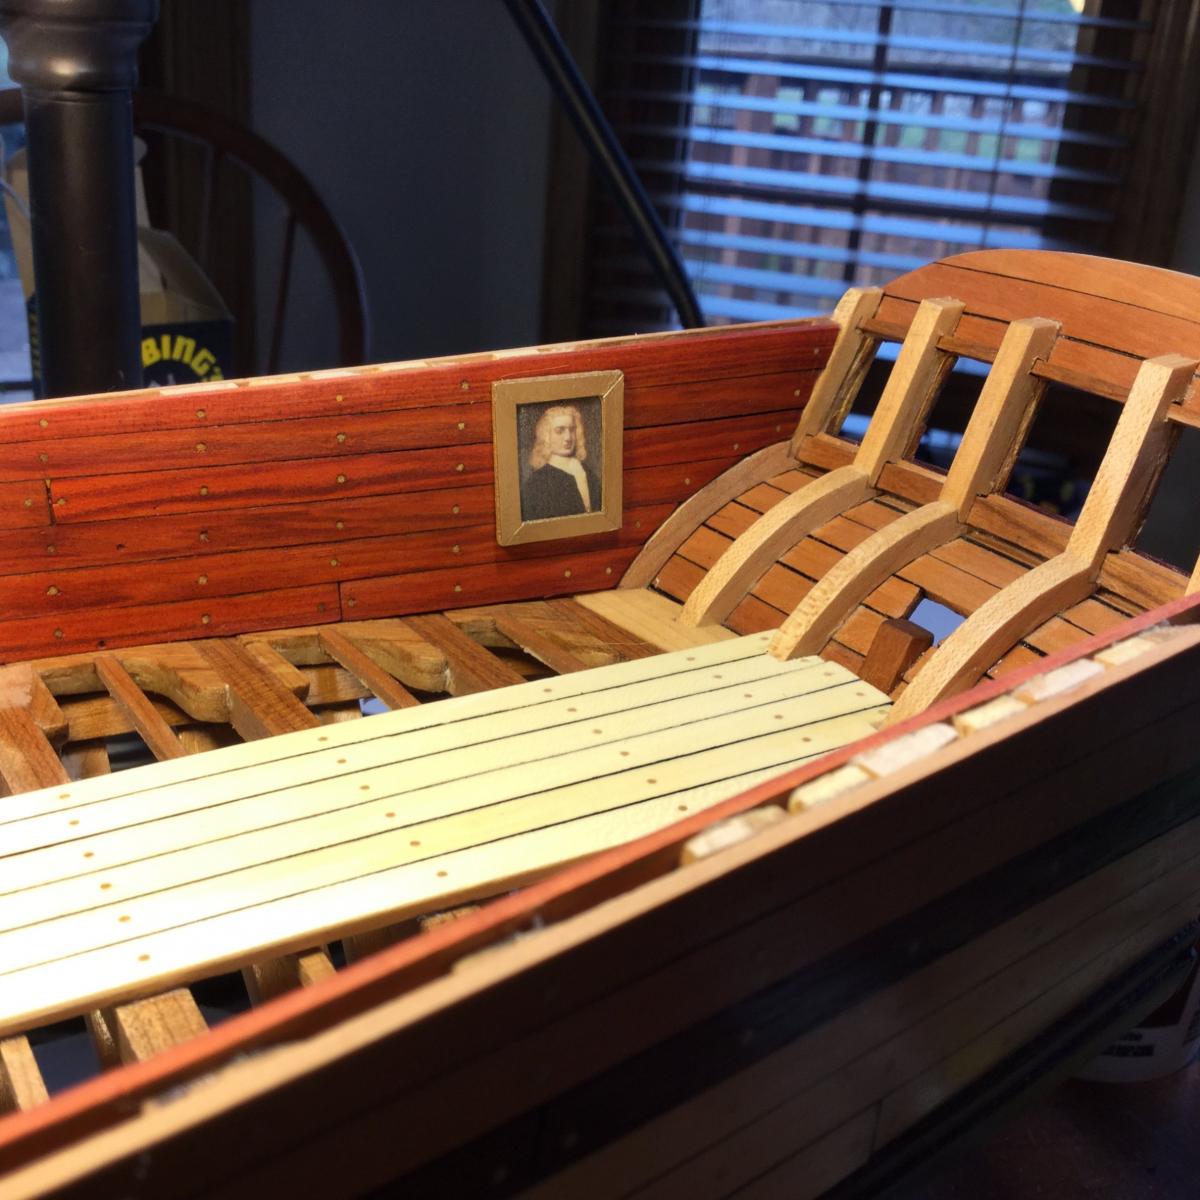
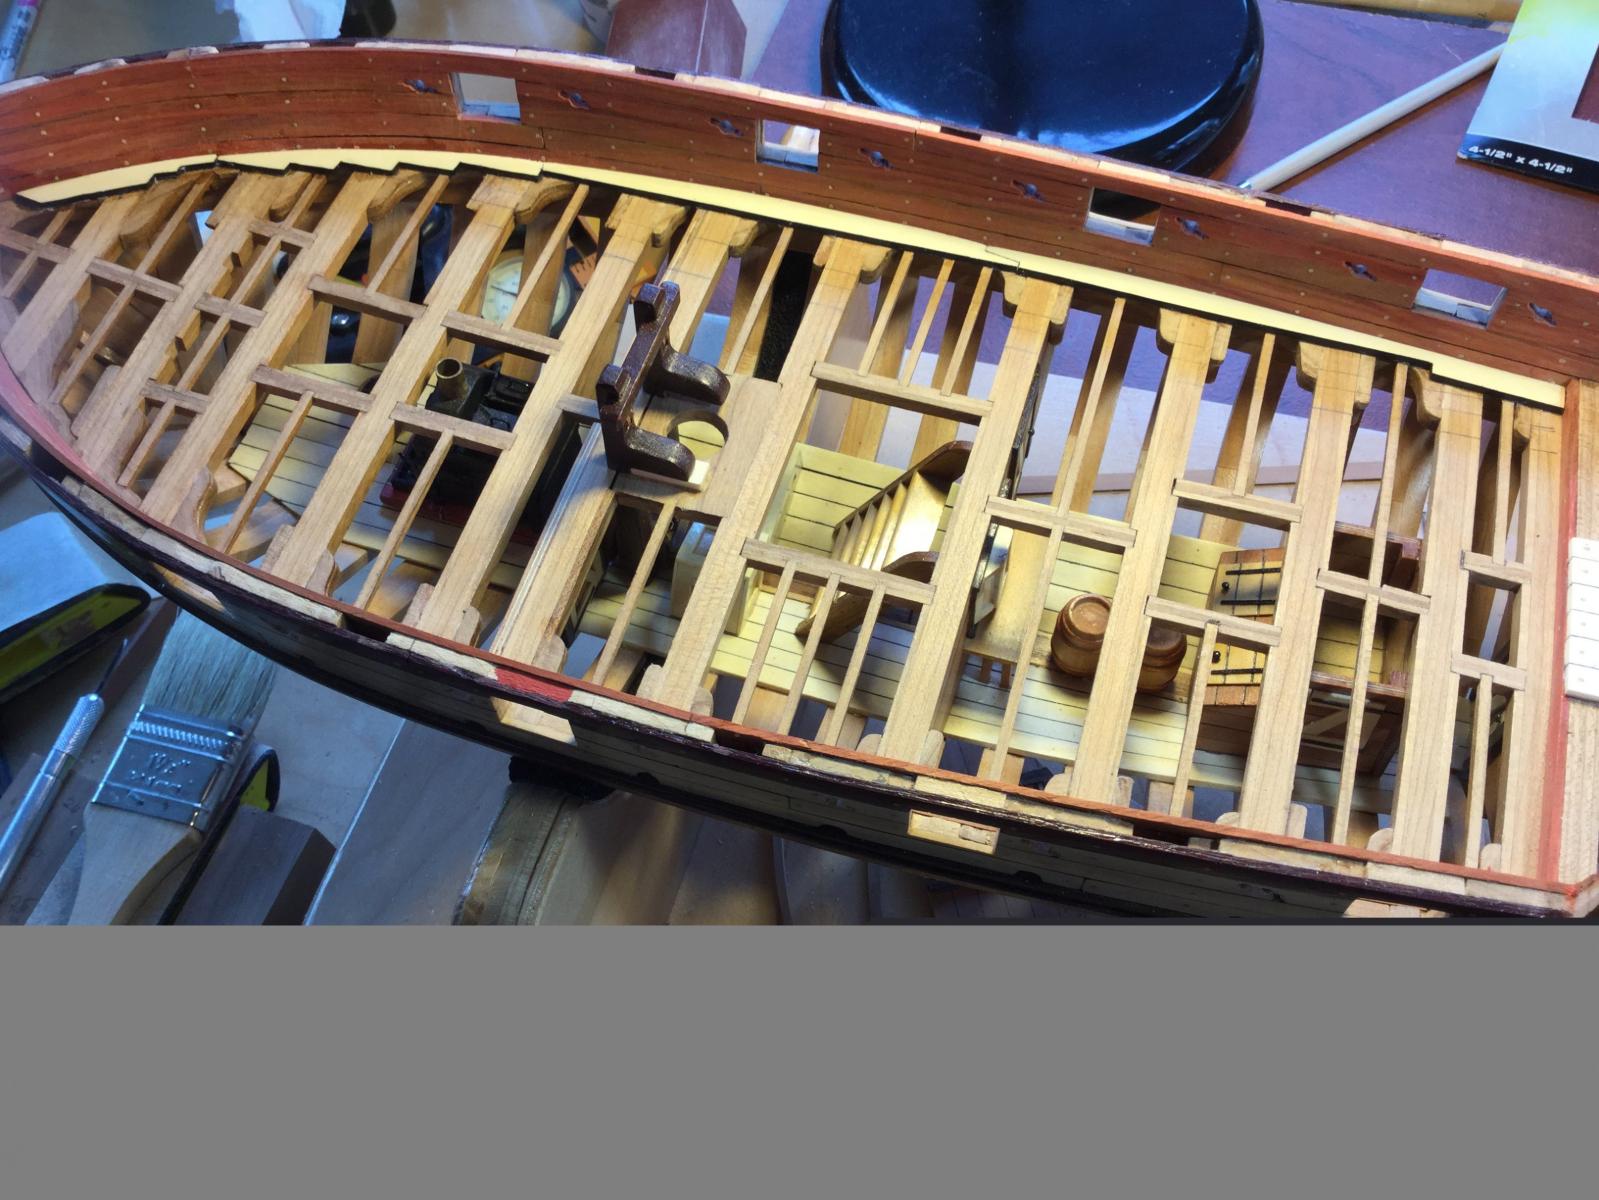
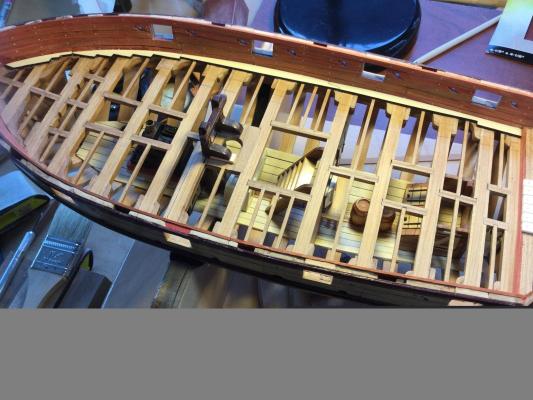
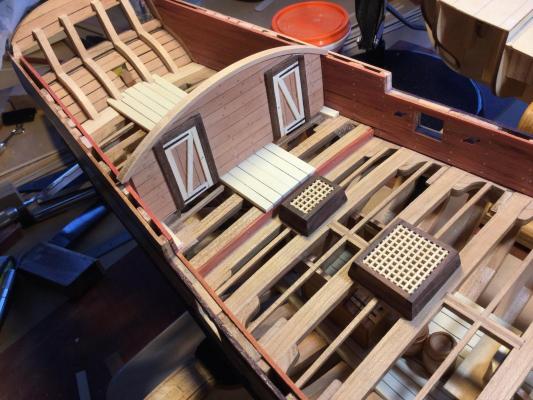
I added the reinforcing bands to the pumps. I'm playing around with adding some furniture and a couple of paintings on the wall of the great cabin. The portrait is stuck up there with double sided tape for the photo.
- 306 replies
-
- 13
-
-
- armed virginia sloop
- Patrick Henry
- (and 2 more)
-
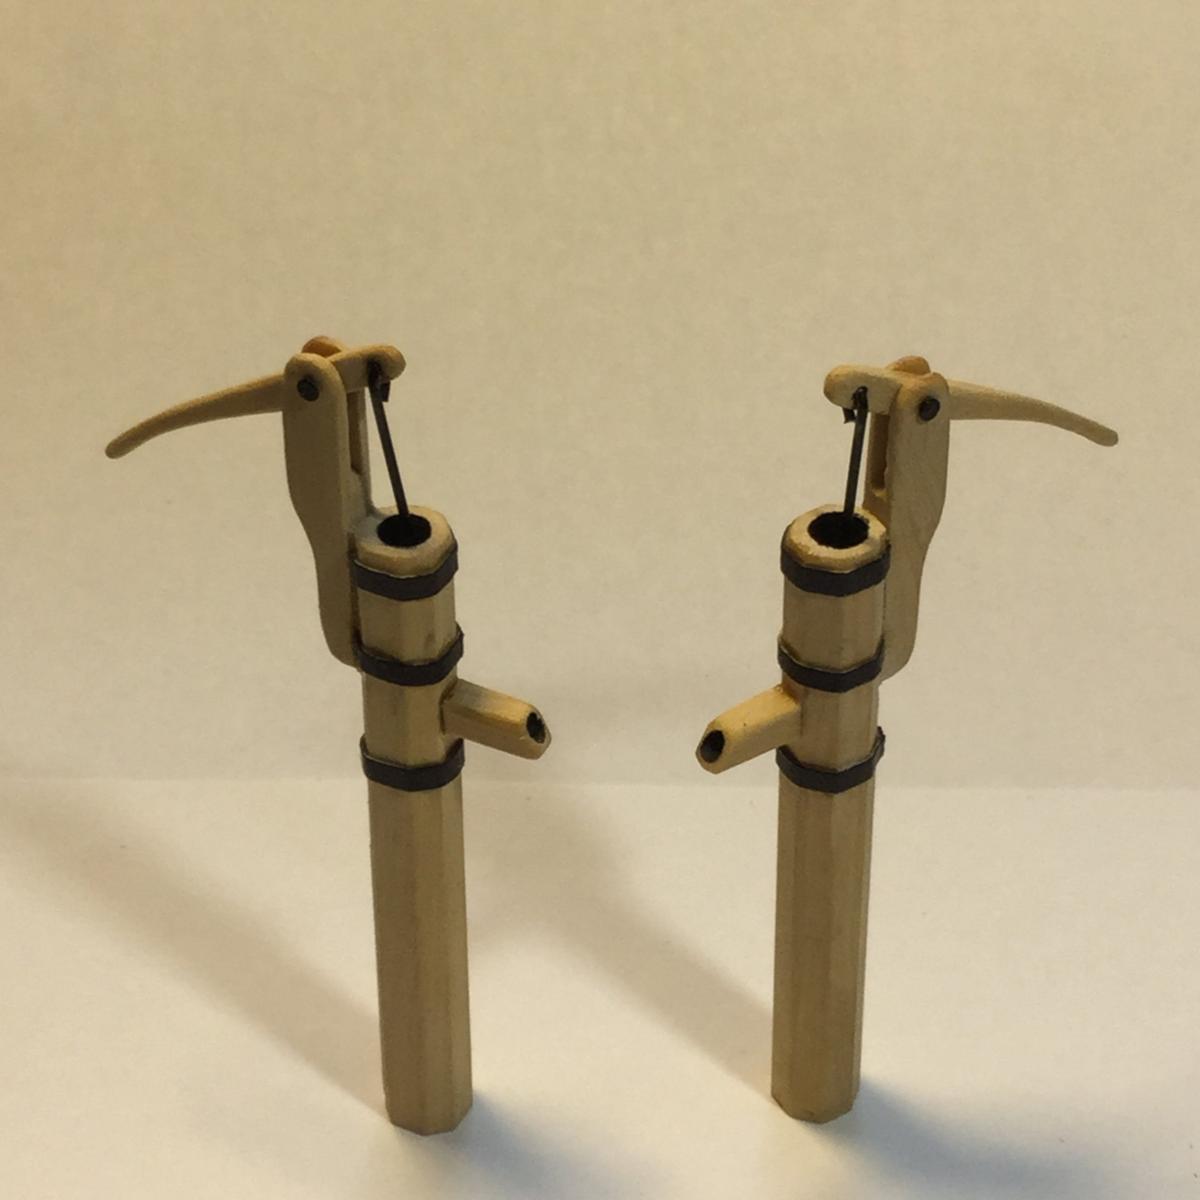
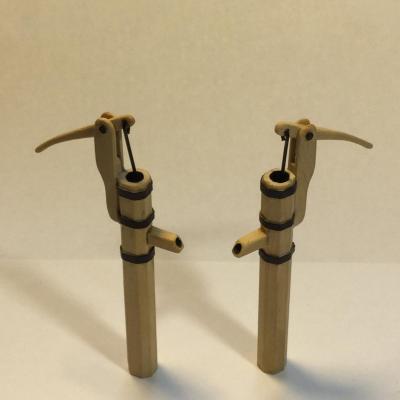
Thanks for the kind words and the "likes". I think the bands might be necessary. I don't think they were used to attach the support for the pump handle to the pump body: that was probably just bolted on. I think the reinforcing bands were there to prevent the top of the hollowed out log that forms the pump body from splitting along it's length (with the grain). Using elm, with it's interlocking grain, helps prevent this, but the constant racking stress from the pumping action at the top of the log would definitely lead to splits in the log without reinforcement. If the log were circular I'd use brass, but since it's octagonal, it'll have to be card stock.
- 306 replies
-
- 3
-
-
- armed virginia sloop
- Patrick Henry
- (and 2 more)
-
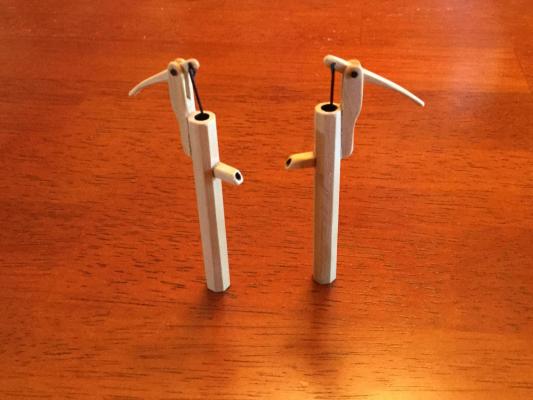
Thanks, Guys! I decided to build the elm tree pumps out of boxwood. A milled the wood to an octagon shape and cut the pumps to length. The supports and spouts were glued on and the handles were installed. Last came the metal work. I drilled out the tops of the pump body and painted the insides black to simulate hollowed out logs. Same with the spigots. I toyed with the idea of adding black reinforcing bands to the pump bodies, but maybe "less is more" and the pumps look cleaner without the bands. What do you all think?
- 306 replies
-
- 8
-
-
- armed virginia sloop
- Patrick Henry
- (and 2 more)
-
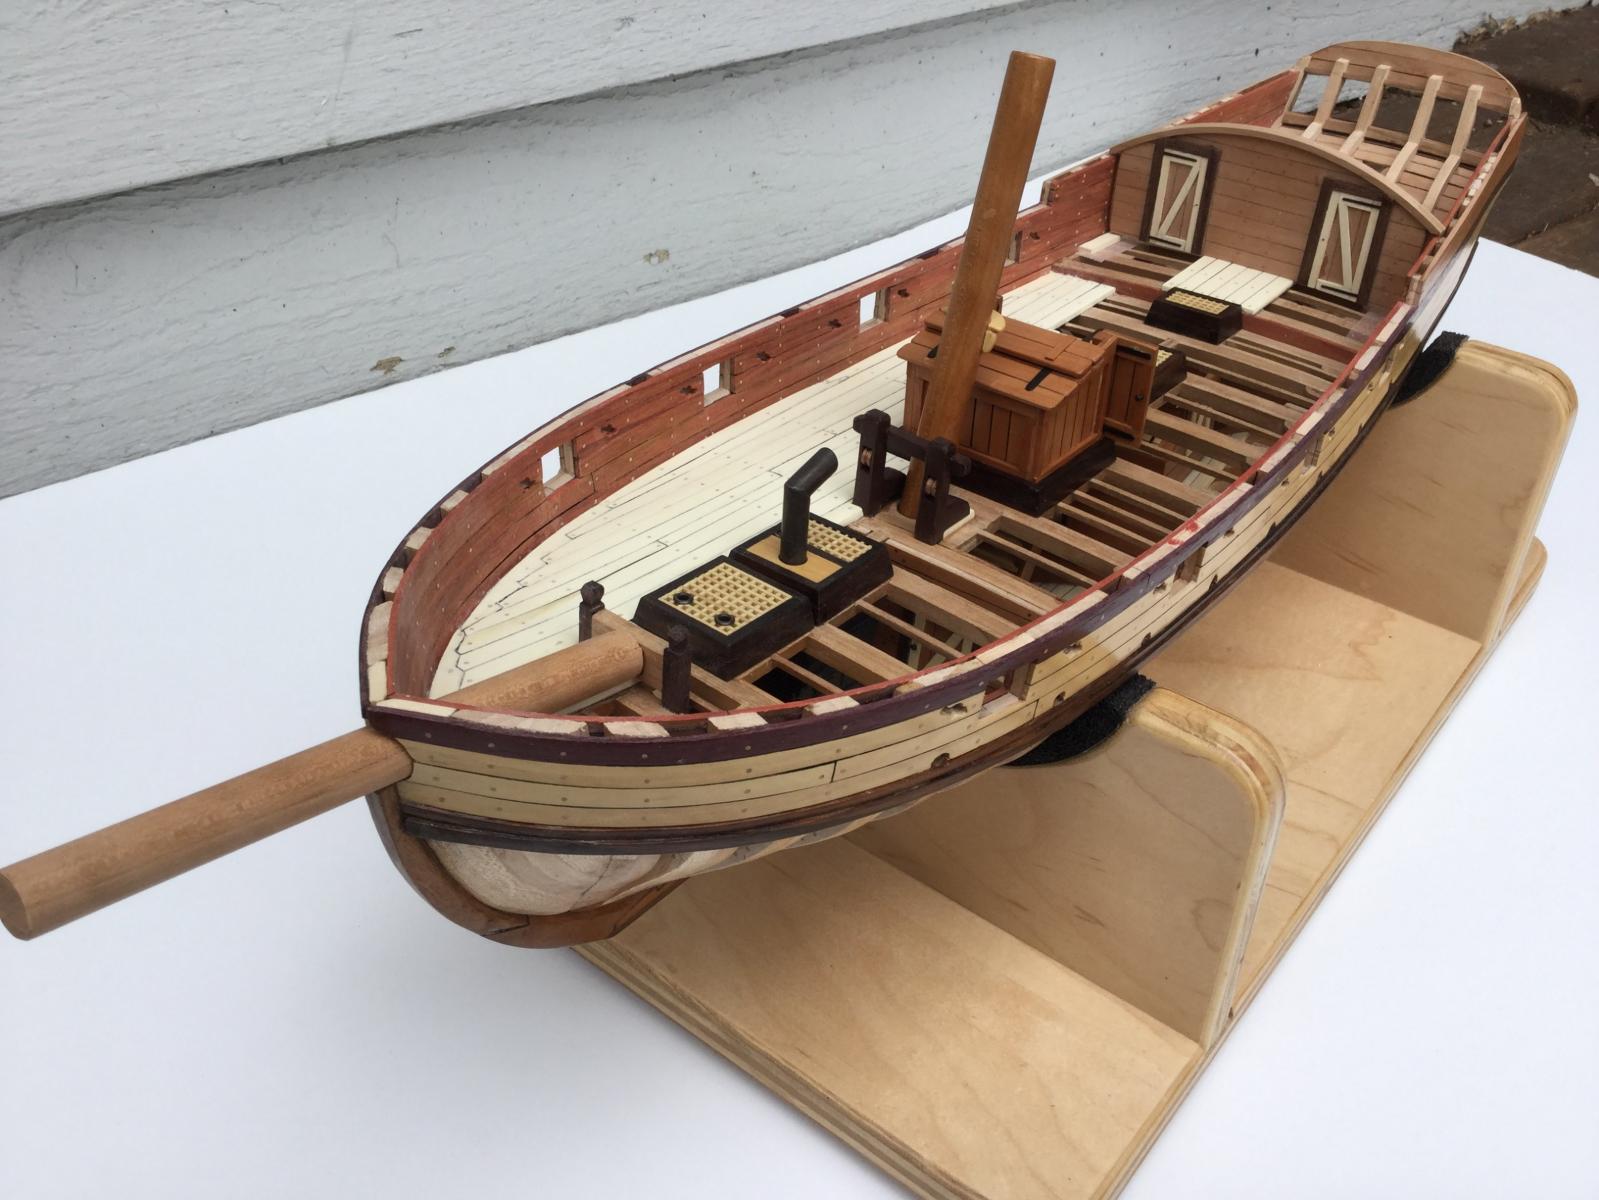
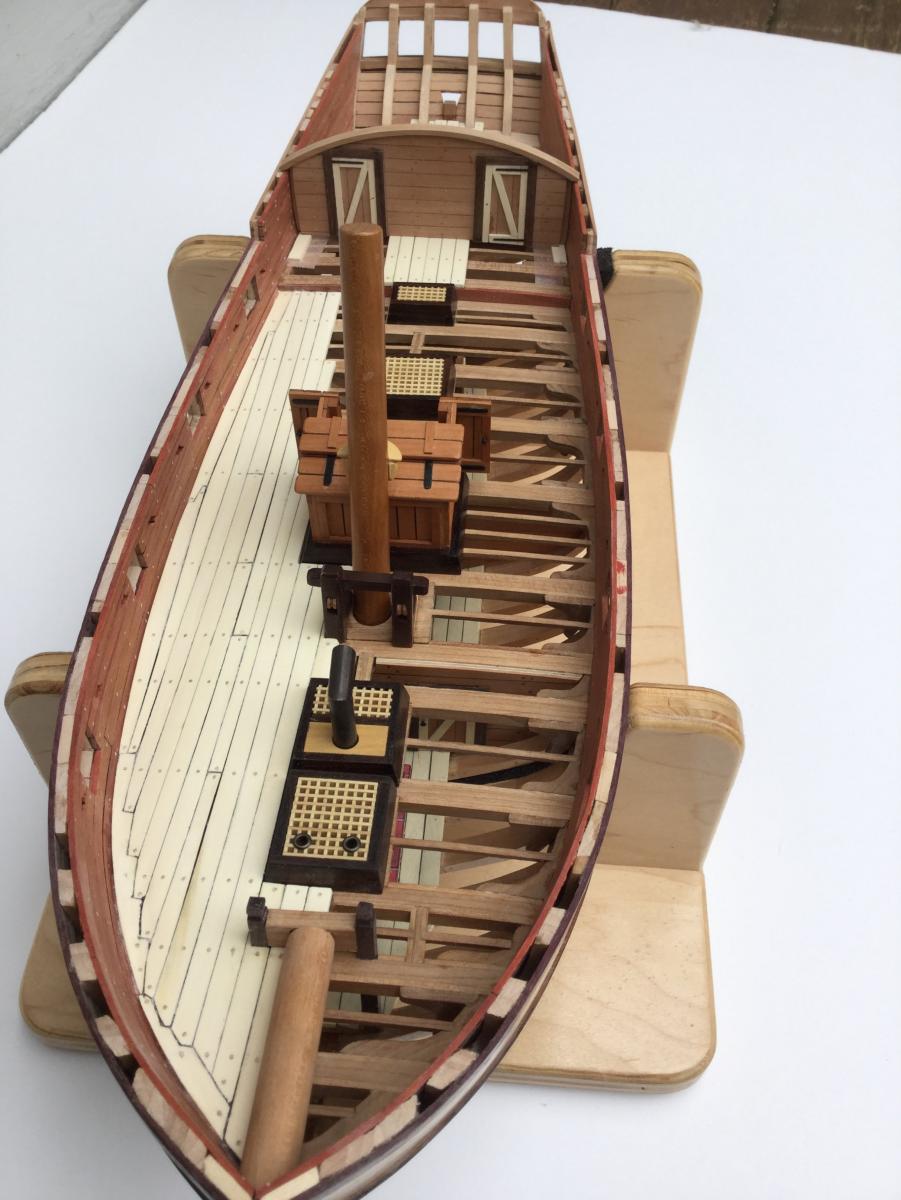
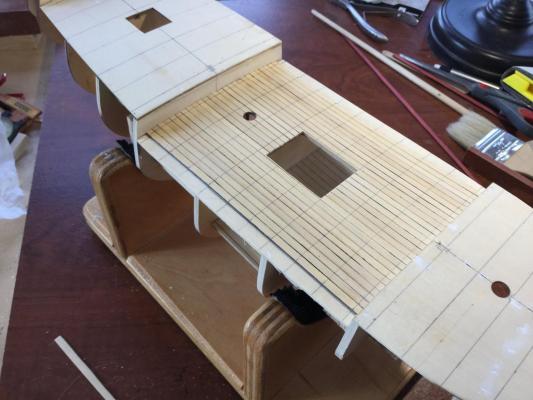
I finished the decking and treenailing. I also fitted the bowsprit bit and the sprit itself. No poly on the sprit, inboard bulwarks or deck. The sprit needs some stop chocks for the forestay and the footrope stirrups. I still need to frame the great cabin roof, install the rails and build the binnacle, great cabin lights, elmtree pumps, and windlass. Still a lot to do!


- 306 replies
-
- 8
-
-
- armed virginia sloop
- Patrick Henry
- (and 2 more)
-
Denis: You have to sand the planks once installed so the deck, hull or bulwarks are smooth. The advantage to the acrylic is that you don't get the "gray dust" that you get with graphite or charcoal is used to simulate caulking. That stuff gets sanded into the pores of the wood, discoloring it. Not as big a problem with holly or maple as with softer woods like aspen or basswood, but still a mess. Scrape the acrylic with an X-Acto blade, install the plank and sand away! No "gray dust".
-
Great progress, Greg! You did a very nice job fairing the hull. It's a critical step and worth doing right. Keep going!
-
Here's another technique for replacing metal decorative castings. The explanation starts at 2:30 on the video:
- 481 replies
-
- 4
-
-
- rattlesnake
- model shipways
- (and 1 more)
-
Very nice job on the copper plates, David! Doesn't working on the fiddly jobs like the gun port lids drive you nuts? It does me, and it's one of the reasons I try two have two projects going at once: So I can switch gears in the middle of the tedium. My Independence will need treenails for the deck planks soon, but I'll still have the AVS to work on when the hole drilling and treenail placement gets to me.
- 117 replies
-
- 2
-
-
- constitution
- model shipways
- (and 1 more)
-
Very nice job on the carvings, Ken. A challenging part of the build, no doubt. Keep up the great work.
- 481 replies
-
- 1
-
-
- rattlesnake
- model shipways
- (and 1 more)
-
For simulated caulking I've started using black acrylic paint. Gang the planks together and hold them with clamps and paint the edges. There will be a little bleed through on to the surface of the plank that is easily scraped away with the edge of an X-Acto blade. No sanding mess, no "gray" planks from pigment getting into the planks surface.
-
Nice progress, John. The kit looks to be really high quality...something I may consider in the future, once I clear the decks of the multiple projects ahead of it in the queue! Keep up the great work. BTW: What's in the glass? Bordeaux? A Tuscan red?
-
Looks great, Greg! The bulkheads turned out fine and you made the necessary adjustments with the fit at the bearding line to allow the planking to go on easily. You are making great progress!
-
The kit provides a .pdf template of the nibbing strake. the four pieces are cut out, rubber cemented to some holly stock and then cut out with a scroll saw. I then glued them in place.
- 306 replies
-
- 12
-
-
- armed virginia sloop
- Patrick Henry
- (and 2 more)
-
I chose boxwood for the deck planking. The planks are 5/32" wide, 6 scale inches. I need to fit the margin planks, add the treenails and then plank the exposed bulwark areas separating the decks with red heart.
-
I've just pulled up a chair, John. My problem is that many (most?) notifications of posts to logs I'm following never make it to my mailbox. I'll make it a point to look for yours regularly.
-
I completed the quarterdeck and cabin planking. I've yet to place the treenails, though. I completed bulkhead 5 and the picture shows me in the process of fitting it in place. Lots of contour sanding to get the side edges of the bulkhead flush against the bulwark planking as well as in the right place on the deck. No poly on the bulkhead yet, and the doorknobs have to be added. Next I'll install the margin plank on the main deck and begin main deck planking.
- 306 replies
-
- 12
-
-
- armed virginia sloop
- Patrick Henry
- (and 2 more)
-
Greg: There's an ongoing controversy about PVA glues vs. cyano ("super") glue for model work. Bob Hunt likes cyano a lot. I use it, but in select applications only. For structural stuff, Weldbond is really good because it has a little "flex" to it, so when humidity causes wood movement, you don't break a brittle glue bond (cyano is brittle). One trick is to combine the two glues. Lets say your gluing planking to bulkheads. You could use Weldbond and then clamp the plank at each bulkhead location and wait at least an hour for the Weldbond to set before moving on. What I do is put some Weldbond on each bulkhead, but also add a tiny drop of CA glue to each one. Lightly moisten the back of the plank with water to help activate the CA when the plank touches the glue and put the plank in place. Work quickly. The CA will grab instantly and act as a "liquid clamp", holding the plank in place until the Weldbond cures. You can move on to the next plank immediately. Even if there is some wood movement, if the CA fails, the Weldbond at each bulkhead will hold.
-
Greg: What type of glue are you using for the bulkheads and center keel? I used Weldbond which can be debonded with denatured alcohol fairly easily by dabbing at the joints with a moistened paintbrush. Thanks for the kind words about my POF AVS. More posts coming soon.
-
You can dilute the acrylic and apply thin coats to avoid obscuring details. It's not much of an issue when you're painting bulwarks, though. In my case I plan to use the paint on the inside surfaces of the gun ports, sweep ports and scuppers. No details to obscure!
- 306 replies
-
- 4
-
-
- armed virginia sloop
- Patrick Henry
- (and 2 more)
-
Hi David! When I first started to build my MS Armed Virginia sloop I thought I would paint the model so I started looking around for paint colors that would look authentic. Many models end up with the inner bulwarks painted 'fire engine red' and I didn't want that. I was looking for something more subdued - like you might find in the mid 18th century. I found a small 2 oz. sample of Benjamin Moore acrylic interior paint in the perfect color: a muted red called "Tucson Red". I never did paint the AVS but I found that the paint is almost a perfect match for red heart finished with polyurethane.
- 306 replies
-
- 5
-
-
- armed virginia sloop
- Patrick Henry
- (and 2 more)
-
Hi Greg! Good to see another AVS starting up! I'll be following along. Just a tip: The part you broke is the part of the center keel that separates a bulkhead from the mast mortise. When it's time to step the mast, you'll be asked to shape the foot of the mast to fit that mortise. You won't be able to see it, because the planking covers the mortise completely. You can rely on the plans, but I didn't trust them. What I did was trace the profile of the mortise onto cardstock BEFORE I covered over the mortise (now would be a good time), and I used that to lay out the tenon on the bottom of the real mast when the time came. You can make a little mockup of the mast foot out of dowel to test the fit also. PS: I used the Lauck Street practicum for my AVS build also.
-
I've used Amati and for commercially produced line it's not too bad. Compared to Model Ship Ways junk it's spun gold, but it's not close to Chuck's Syren line. Considering the time spent on building a model, don't skimp on line.