DONATION DRIVE - SUPPORT MSW - DO YOUR PART TO KEEP THIS GREAT FORUM GOING! (91 donations so far out of 49,000 members - C'mon guys!)
×


Glen McGuire
-
Posts
1,963 -
Joined
-
Last visited
Content Type
Profiles
Forums
Gallery
Events
Everything posted by Glen McGuire
-
 Beautiful work, Steve.
 -
I'm afraid you are right, Keith. This hole I've been digging for myself keeps getting deeper! 😛
- 156 replies
-
- 5
-

-

-
- Queen Annes Revenge
- bottle
- (and 1 more)
-
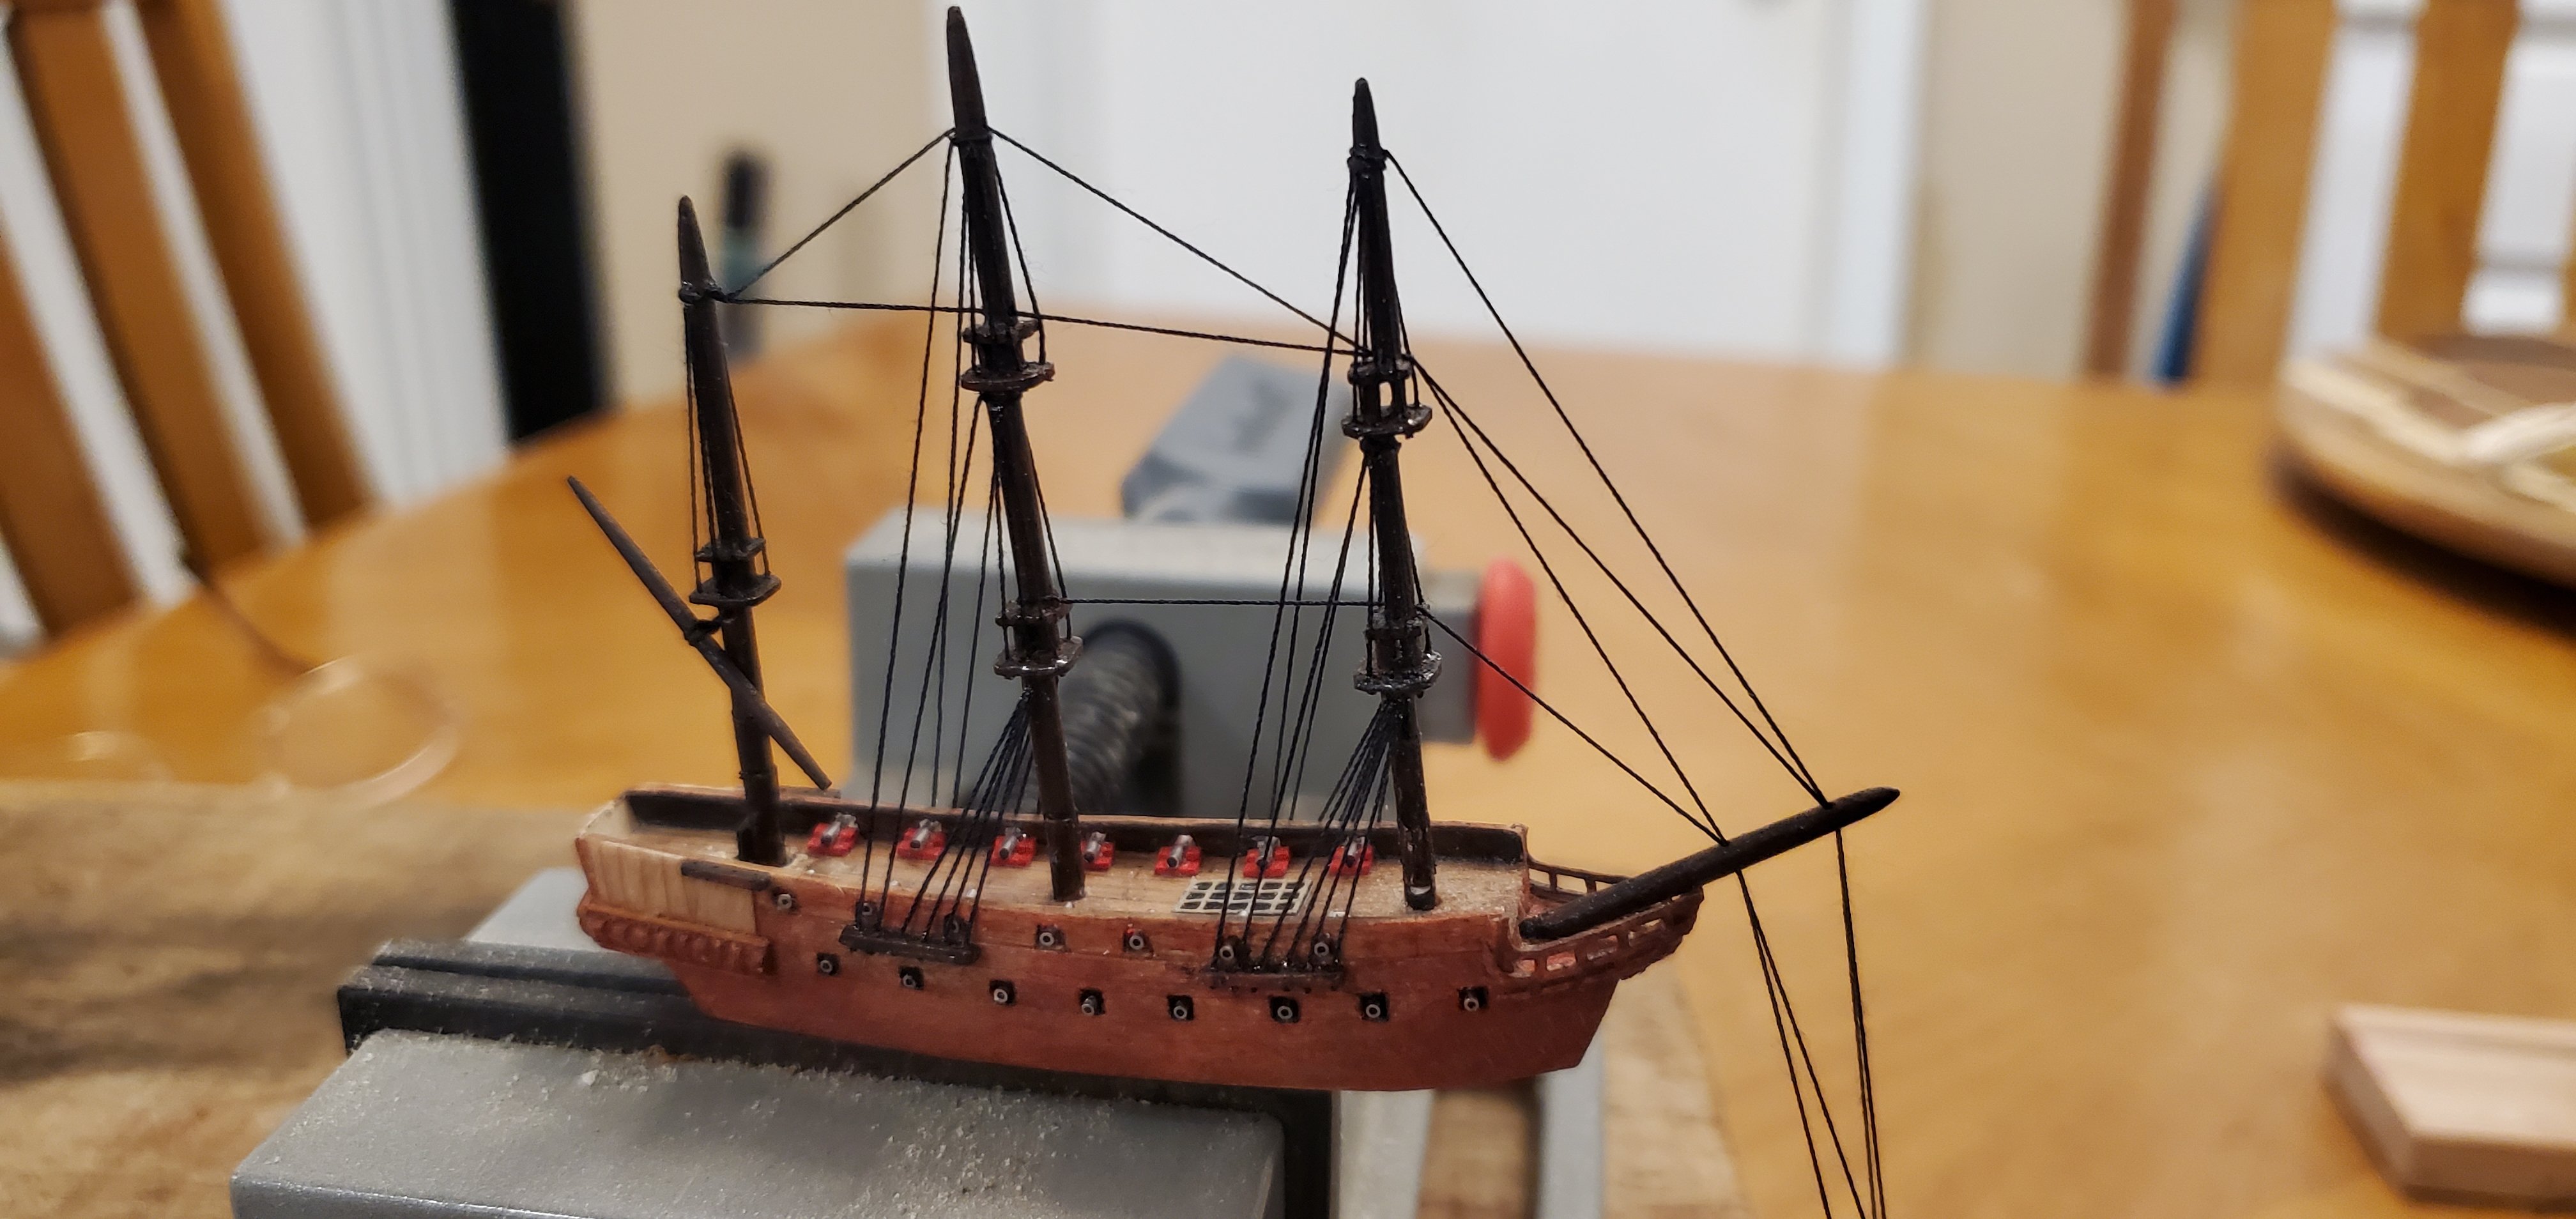
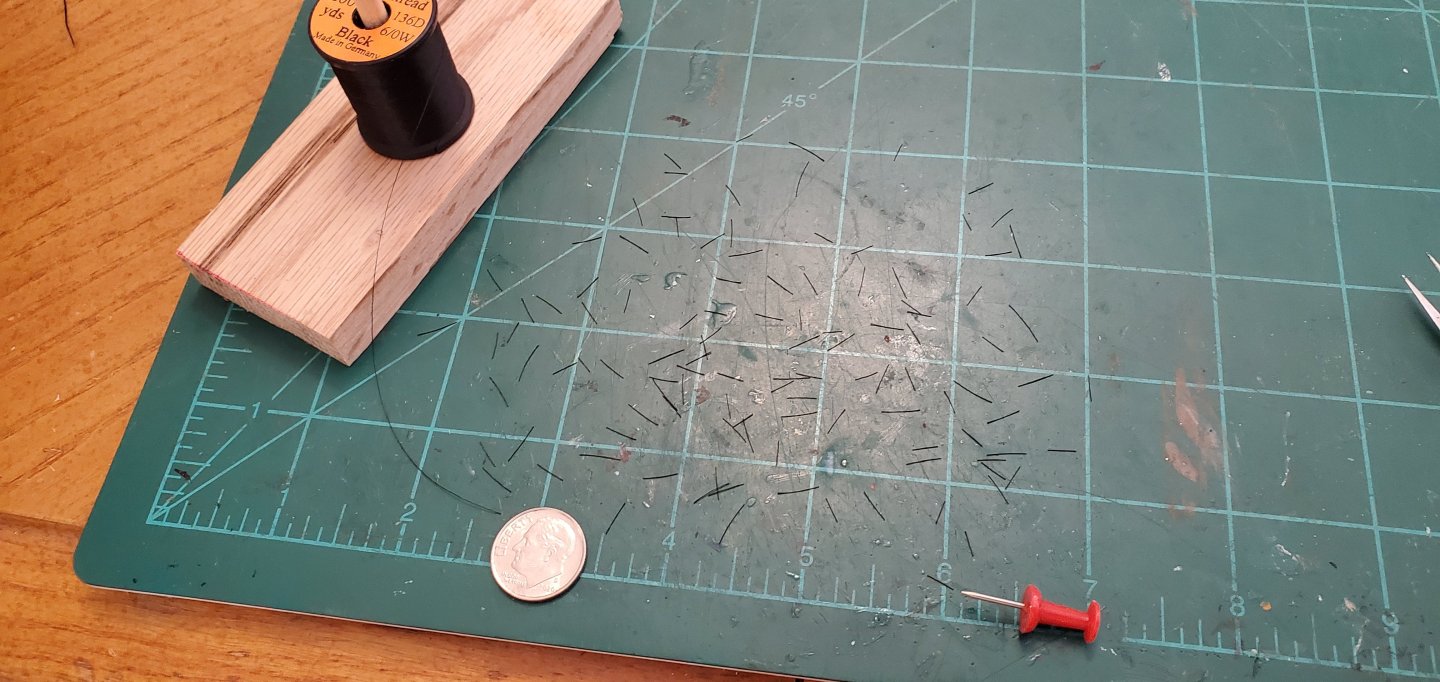
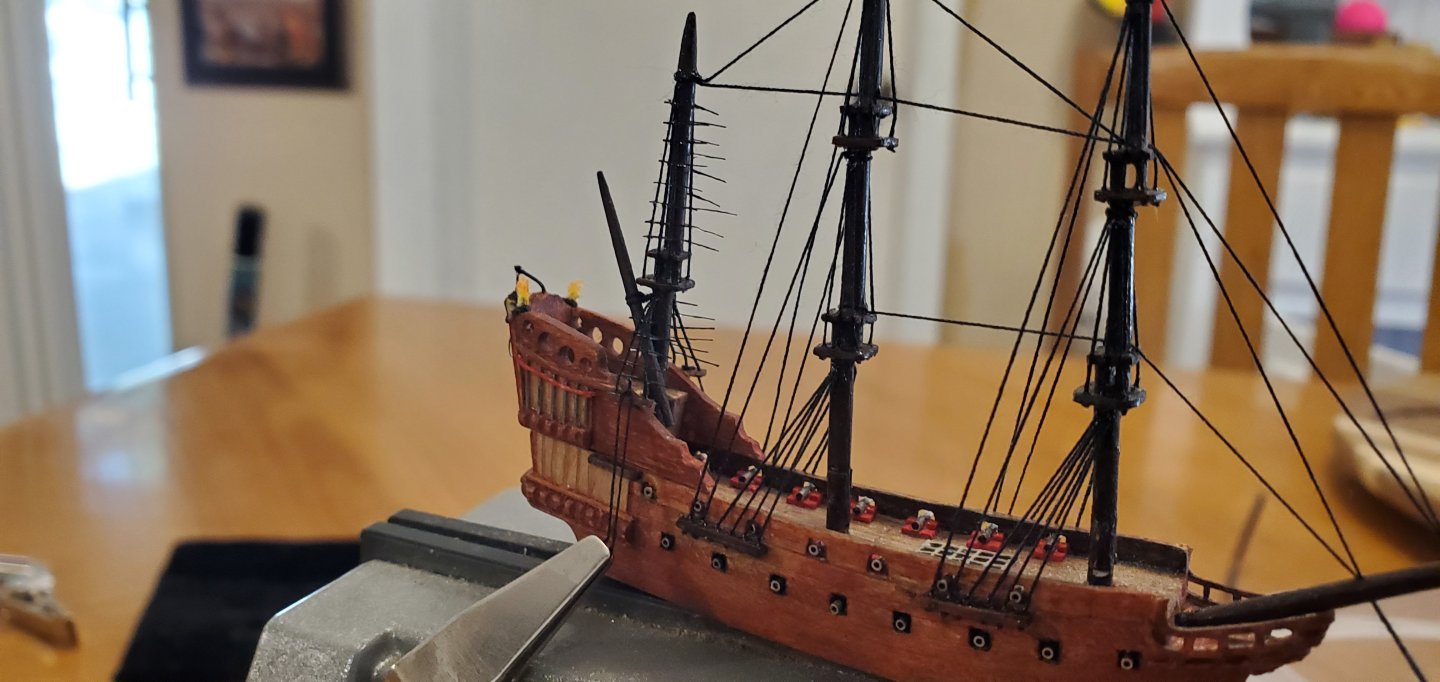
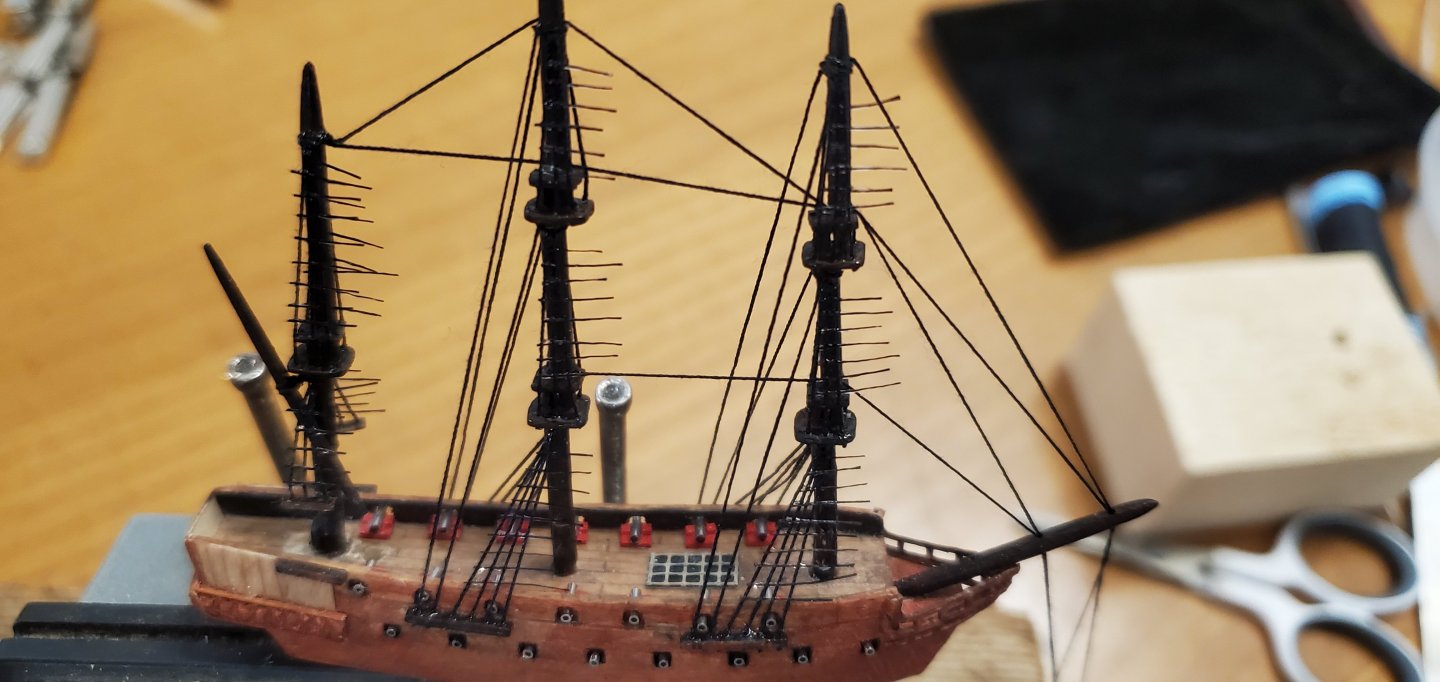
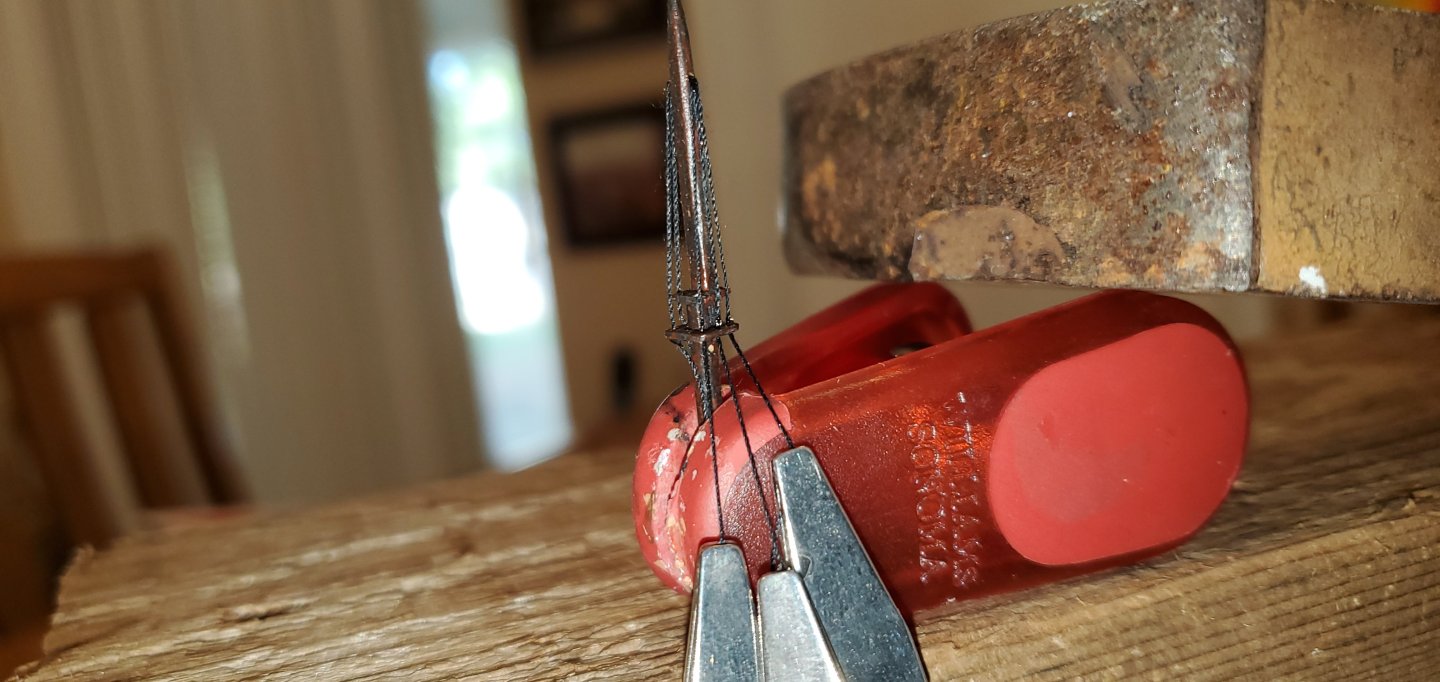
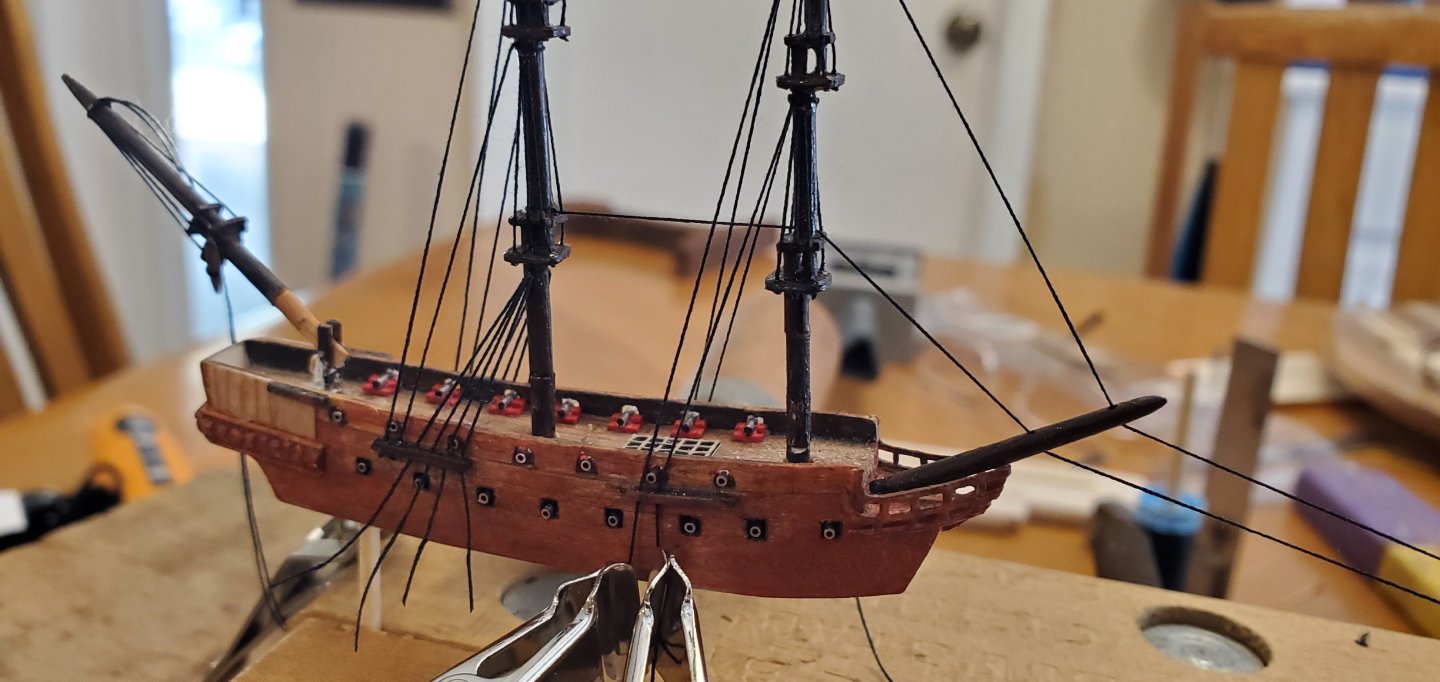
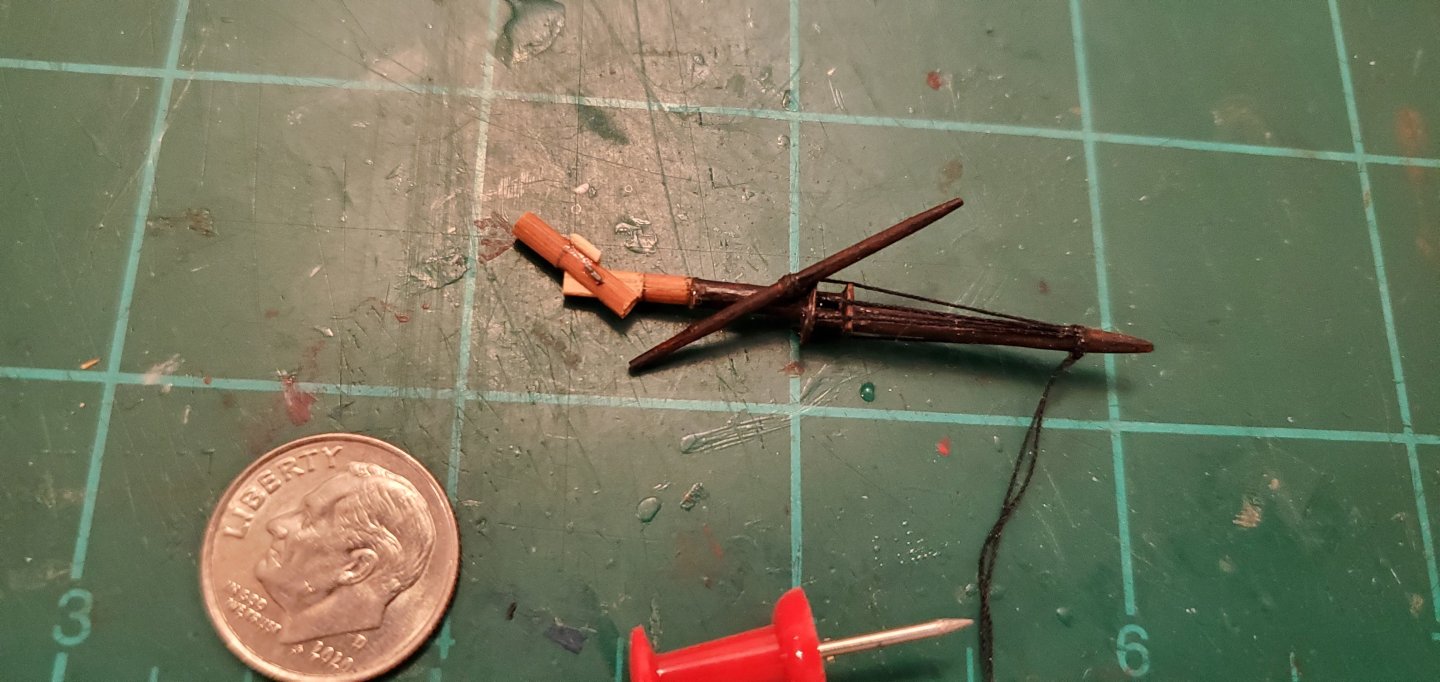
My build logs are never complete without penguins and boobies! With the shrouds hung, next up are the ratlines. Soooooo much easier and quicker than real ratlines on a full-size ship model. I have not discovered a better technique than fly tying thread and fabric glue so I continue to stick with it. First I cut the fly tying thread into random pieces ranging in length from 1/4" to 3/8". Then I grab each one with my finest point tweezers, drag it thru fabric glue, and place it across the shrouds. Rinse and repeat all the way up each set of shrouds. After the glue dries, I snip off the overhanging ends with cuticle trimmers. What takes a couple of weeks for regular ship models takes only a few hours here. I do have one small variation in the process for this particular ship - another challenge caused by the high-rising stern structure. The channels for the mizzen lower shrouds attach near the top of the stern structure. Because the stern structure will be added after the ship is in the bottle, I cannot secure the channels yet. So they will dangle loosely and I will have to attach them to the stern structure inside the bottle. I'm not exactly sure how (or if) I can pull that off, but I'll worry about it later. To add the ratlines to the dangling shrouds, I looped a thread around the middle shroud and weighted it with a small clamp. That provided enough tension to get the ratlines in place. Here's how she looks before getting her whiskers trimmed. While waiting for the glue to dry, I went ahead and made the yards. I use a cow hitch knot around the center of each yard to secure it to the mast. The cow hitch allows the yard to be twisted around in different directions. This is necessary when I lay the masts down and wad everything up to get it in the bottle. The Revenge also has a sprit topmast which I've never had to deal with before. Of course with the angle of the bowsprit and the height of the little mast, it won't fit thru the bottle opening. Sigh. One more thing to add after the ship is in the bottle. To help facilitate the installation, I figured I'd drill a small hole in the end of the bowsprit and have a small wire protruding from the bottom of the sprit topmast. The only problem was that my thinnest music wire and thinnest brass wire was too thick. Hmmmm...walk around garage and house looking for ideas...hmmmm...AHA! The high G string on my 5-string banjo looked very thin! I clipped off a small piece from the end that wound around the tuning key and measured it. A tenth of a millimeter. Perfect!! So I drilled a tiny hole into the end of the mast, inserted the wire and bent to the correct angle. The sprit top mast and yard fit nicely. Now I just have to be able to do it inside the bottle!


- 156 replies
-
- 13
-

-
-
- Queen Annes Revenge
- bottle
- (and 1 more)
-
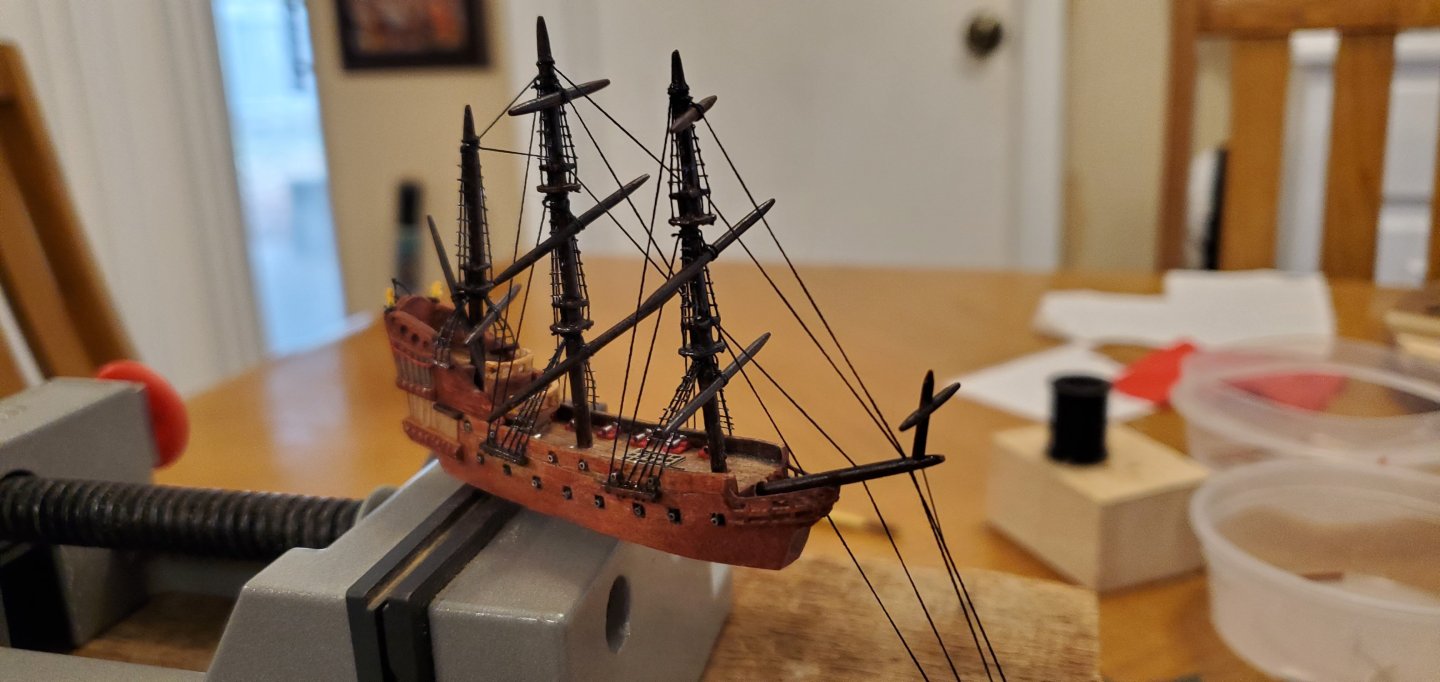
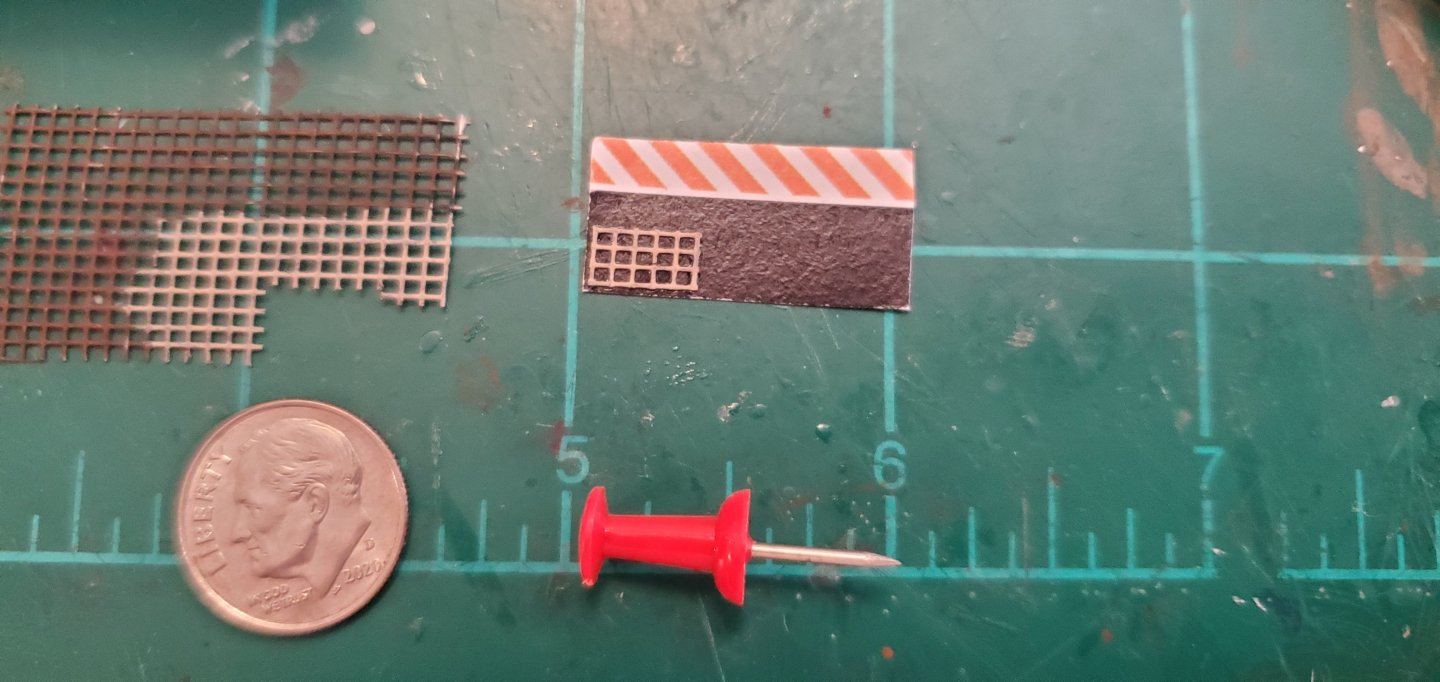
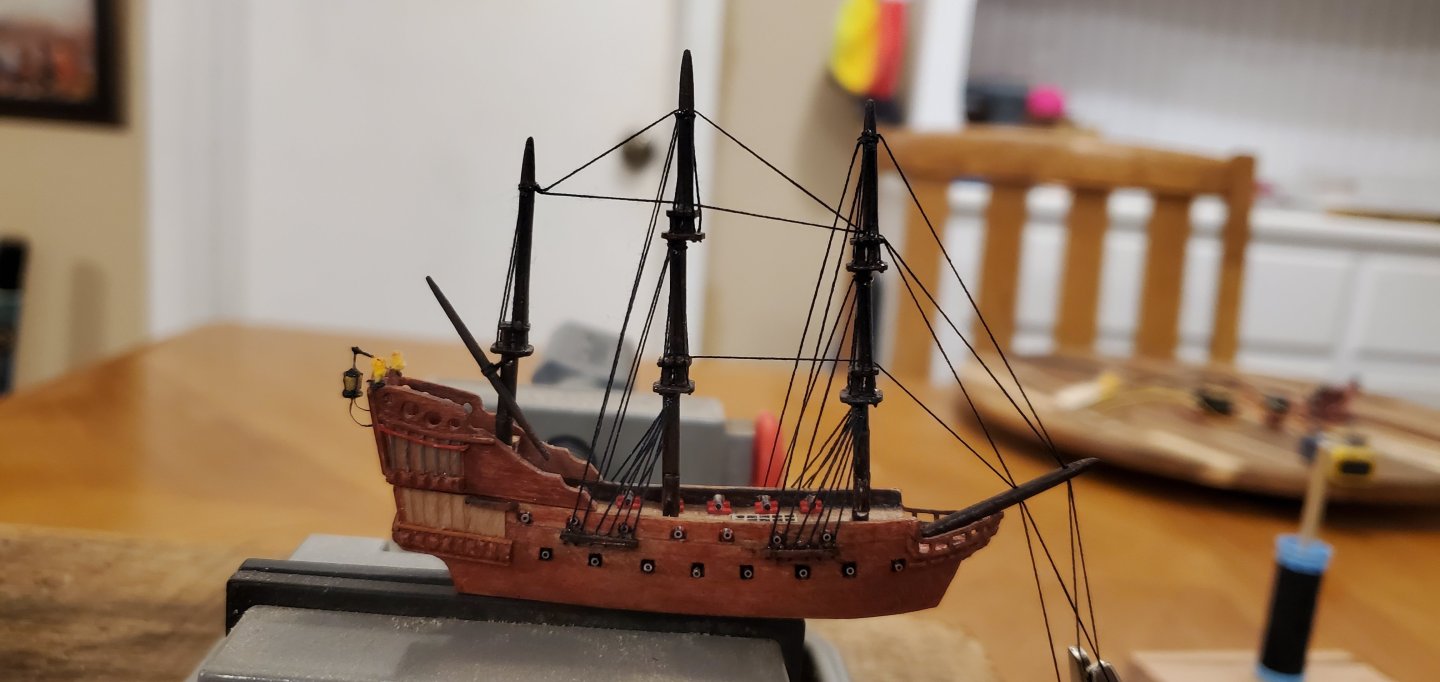
Crazy weekend in the shipyard. It started out nice and calm with making a grate for the ship's deck. For the grate I cut a small piece of a window screen, painted it, then glued it to a piece of black paper for depth. It is certainly out of scale, but I think it gives the right impression. After that, it was time to start on the rigging. First, the upper shrouds. Then the backstays. And that's where things got crazy. As you can see in the pic below, there's a mess going on with the mizzen mast (I think @Keith Black would call it a dog's lunch). I channeled my inner @Knocklouder and somehow broke off the mizzen mast while handling the ship. I know Bob specializes in doing that to bowsprits, so I thought I'd one-up him. After fixing the break, I somehow managed to do it again!! 🤬🤬🤬 So this time, I decided to replace the hinge completely and splice the mast above the hinge. I did NOT want to have to rebuild and paint the entire mast. I also reinforced the splice with a stiff piece of music wire as a dowel. Here's how the mizzen mast looks after a few hours of friendly-fire rework. And with the stern structure dry-fit in place.


- 156 replies
-
- 18
-
-
-
- Queen Annes Revenge
- bottle
- (and 1 more)
-
That is the coolest way to make mast rings I've ever seen. Ingenious, Gary!
- 90 replies
-
- 3
-

-
-
- Friendship Sloop
- bluejacket shipcrafters
- (and 1 more)
-
Thanks, Kenny! If you want to try an SIB, you might consider Amati's Hannah SIB kit. It's how I got started making SIBs 4 years ago. @Landlubber Mike has a great build log for the kit, which helped me tremendously.
- 156 replies
-
- 6
-
-
- Queen Annes Revenge
- bottle
- (and 1 more)
-
Glad to hear you are on the mend, Bob. That's a beautiful display case. A fitting place for all your wonderful work.
- 258 replies
-
- 6
-
-
-
- Victory Models
- Pegasus
- (and 3 more)
-
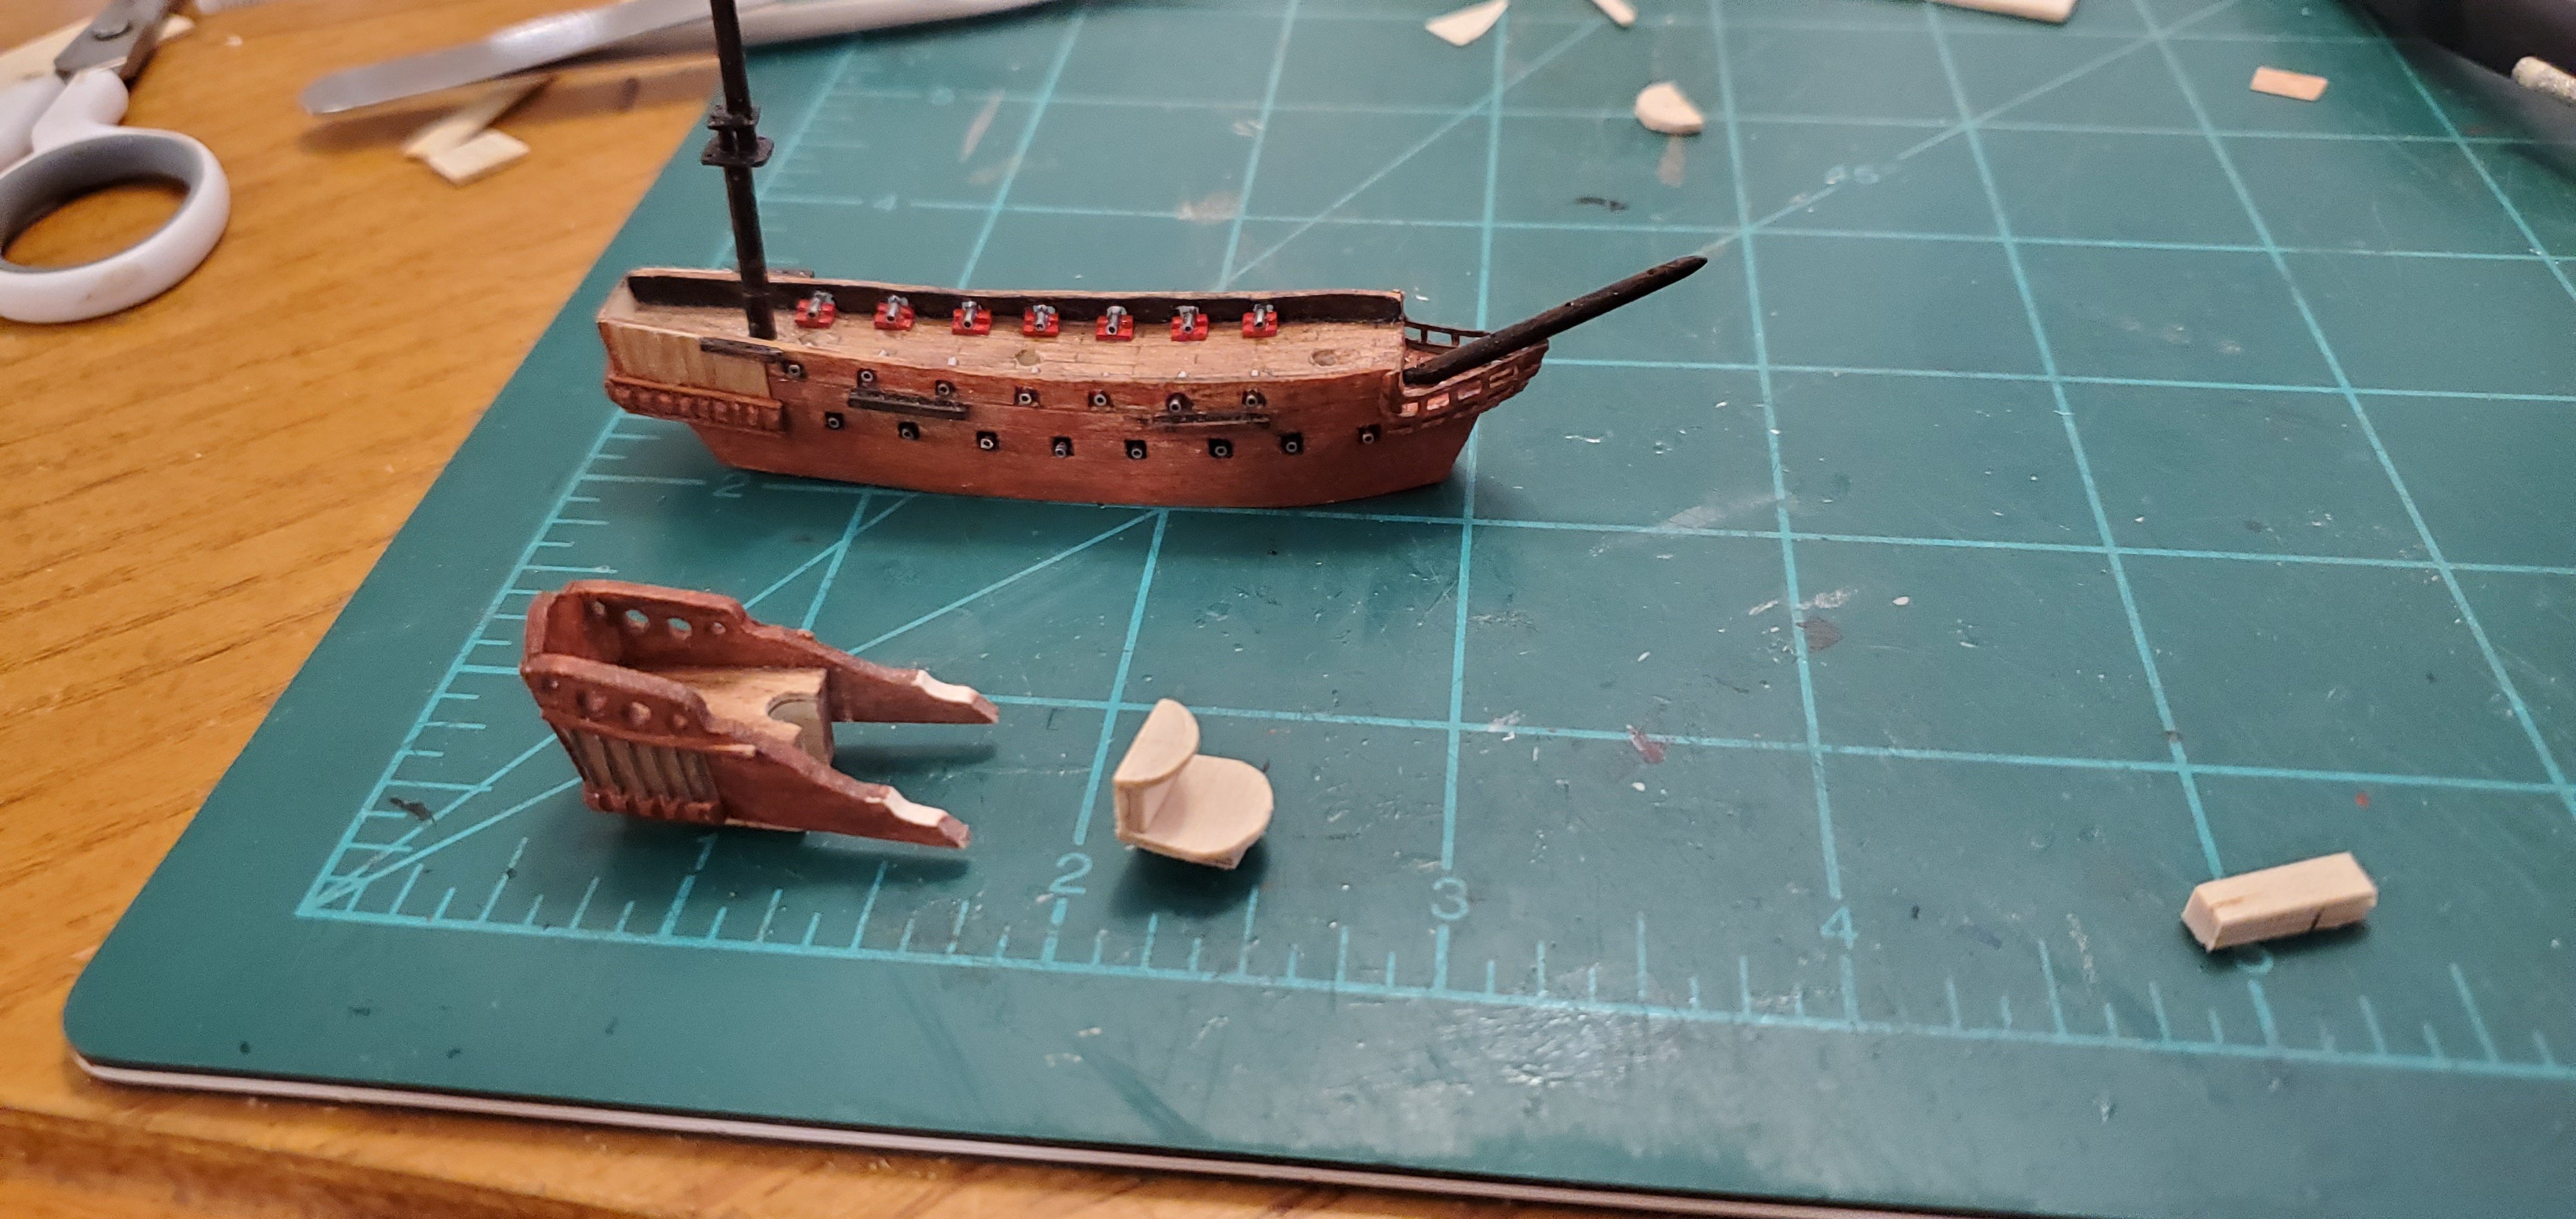
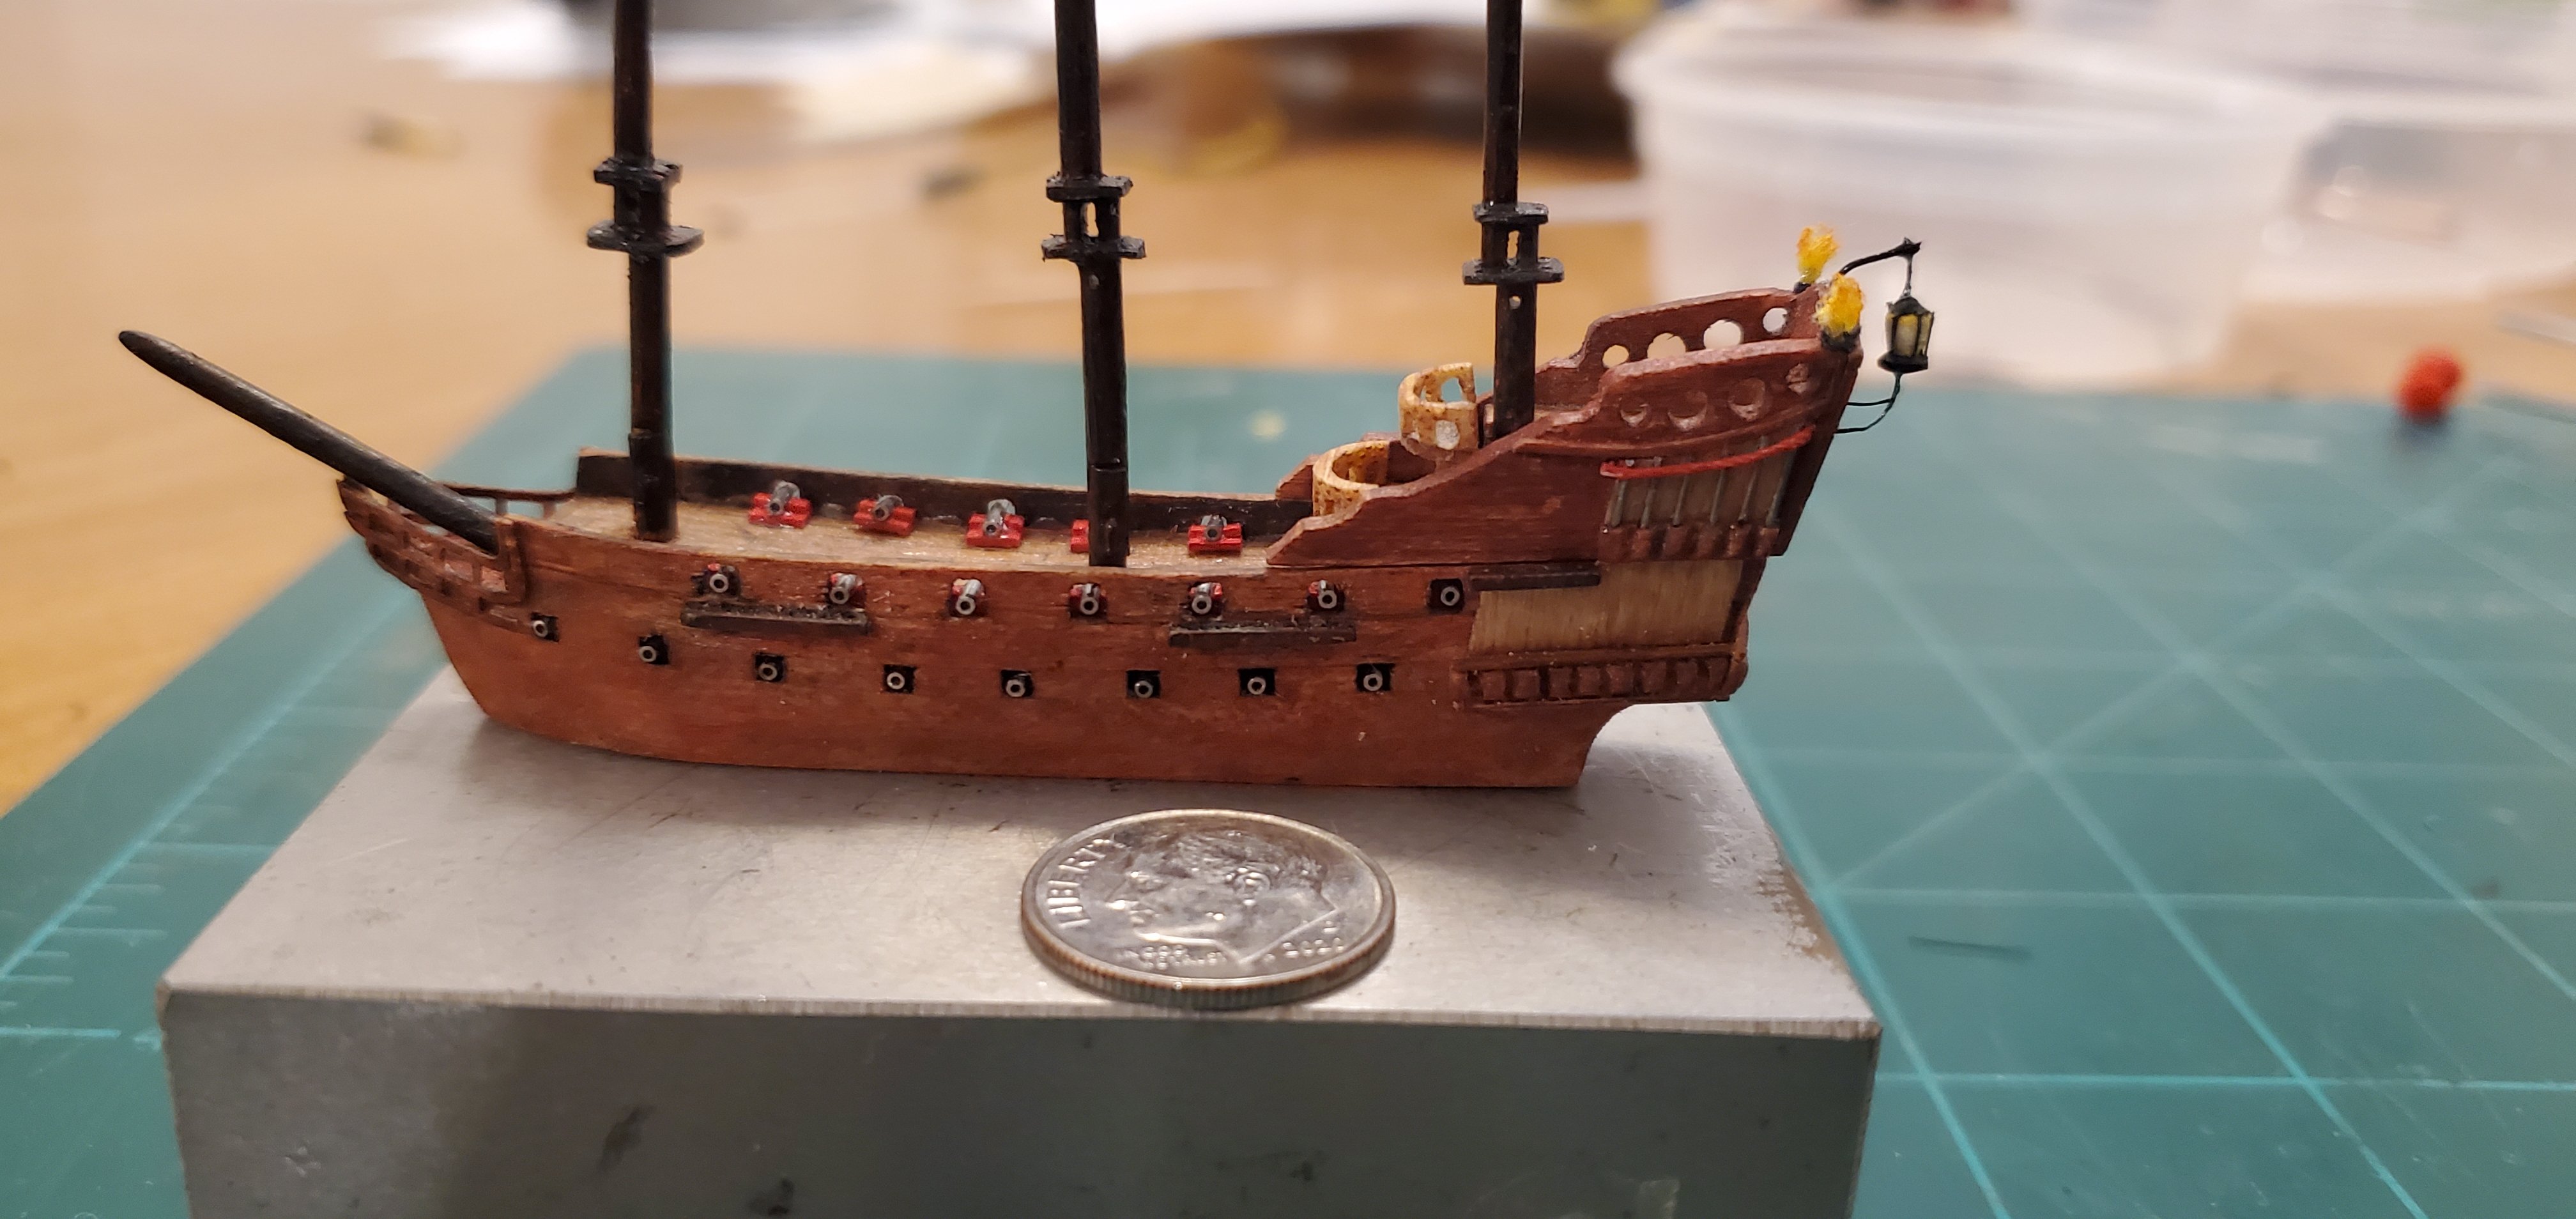
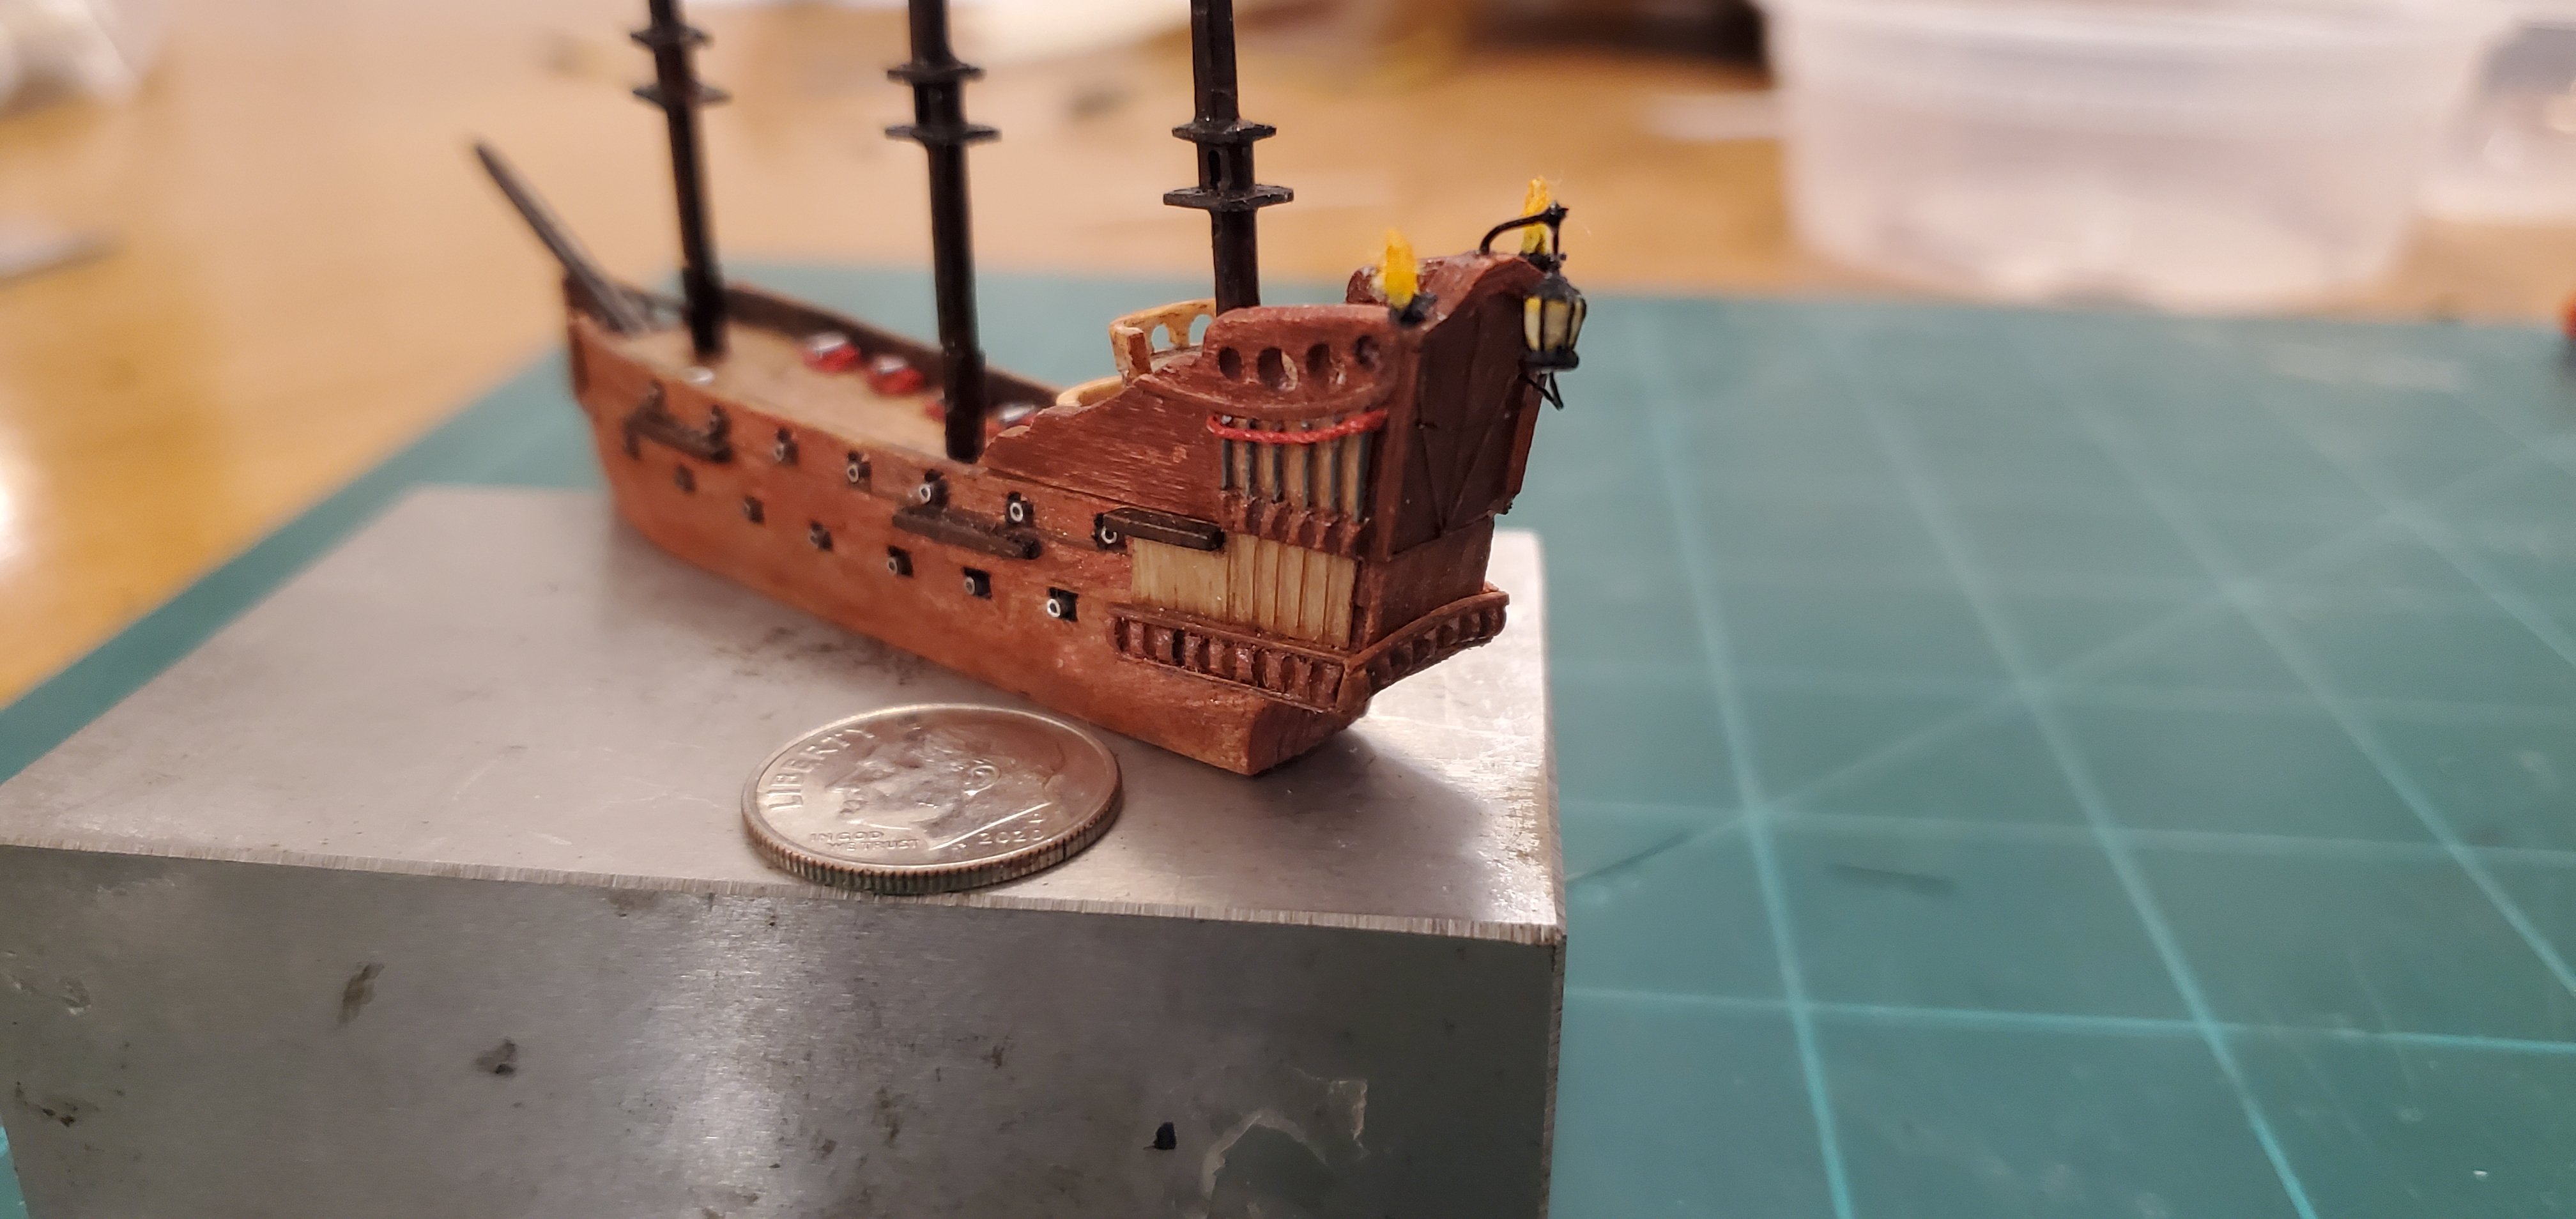
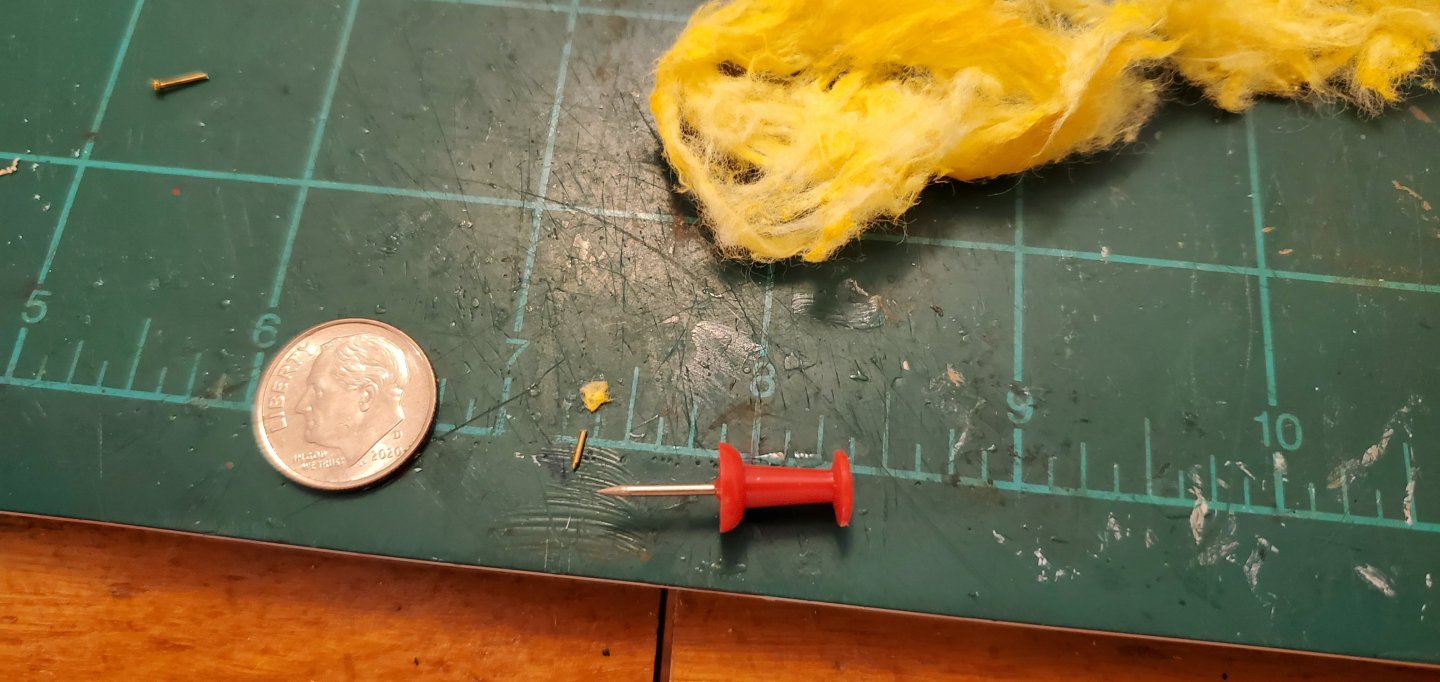
Thanks, Keith! But it wasn't quite finished. Still a few things to add. Before I finished up that stern piece, however, I decided to make the balconies that protrude forward of the mizzen mast. I finished assembling and painting the balconies, but didn't take a pic, so moving on to finishing up the stern. Obviously, I can't recreate all the detail of such an elaborate piece of work at this scale. I just try to add as many elements as I can to try and make it look recognizable. The hanging stern lantern and the 2 other corner lanterns grabbed my eye so I did my best to add them. Except with the corner lanterns, I decided to make torches. While the picture of the model in the previous post shows lanterns in both corners of the stern, the movie ship looks like it has torches. For the hanging lantern, I used the head of a small belaying pin. For the torches, I took some of the yellow-painted cotton I had made earlier for my test fireball, glued it to part of a small brass nail, put a piece of thread around it for a base, and inserted it into a hole in each corner of the stern rail. I also added a small bit of red thread to mimic the drapery shown in the pic. Here's how the hunka hunka burning love looks with all those pieces in place. I hope the hanging lantern and torches survive the fitting process inside the bottle!


- 156 replies
-
- 16
-
-
-
- Queen Annes Revenge
- bottle
- (and 1 more)
-
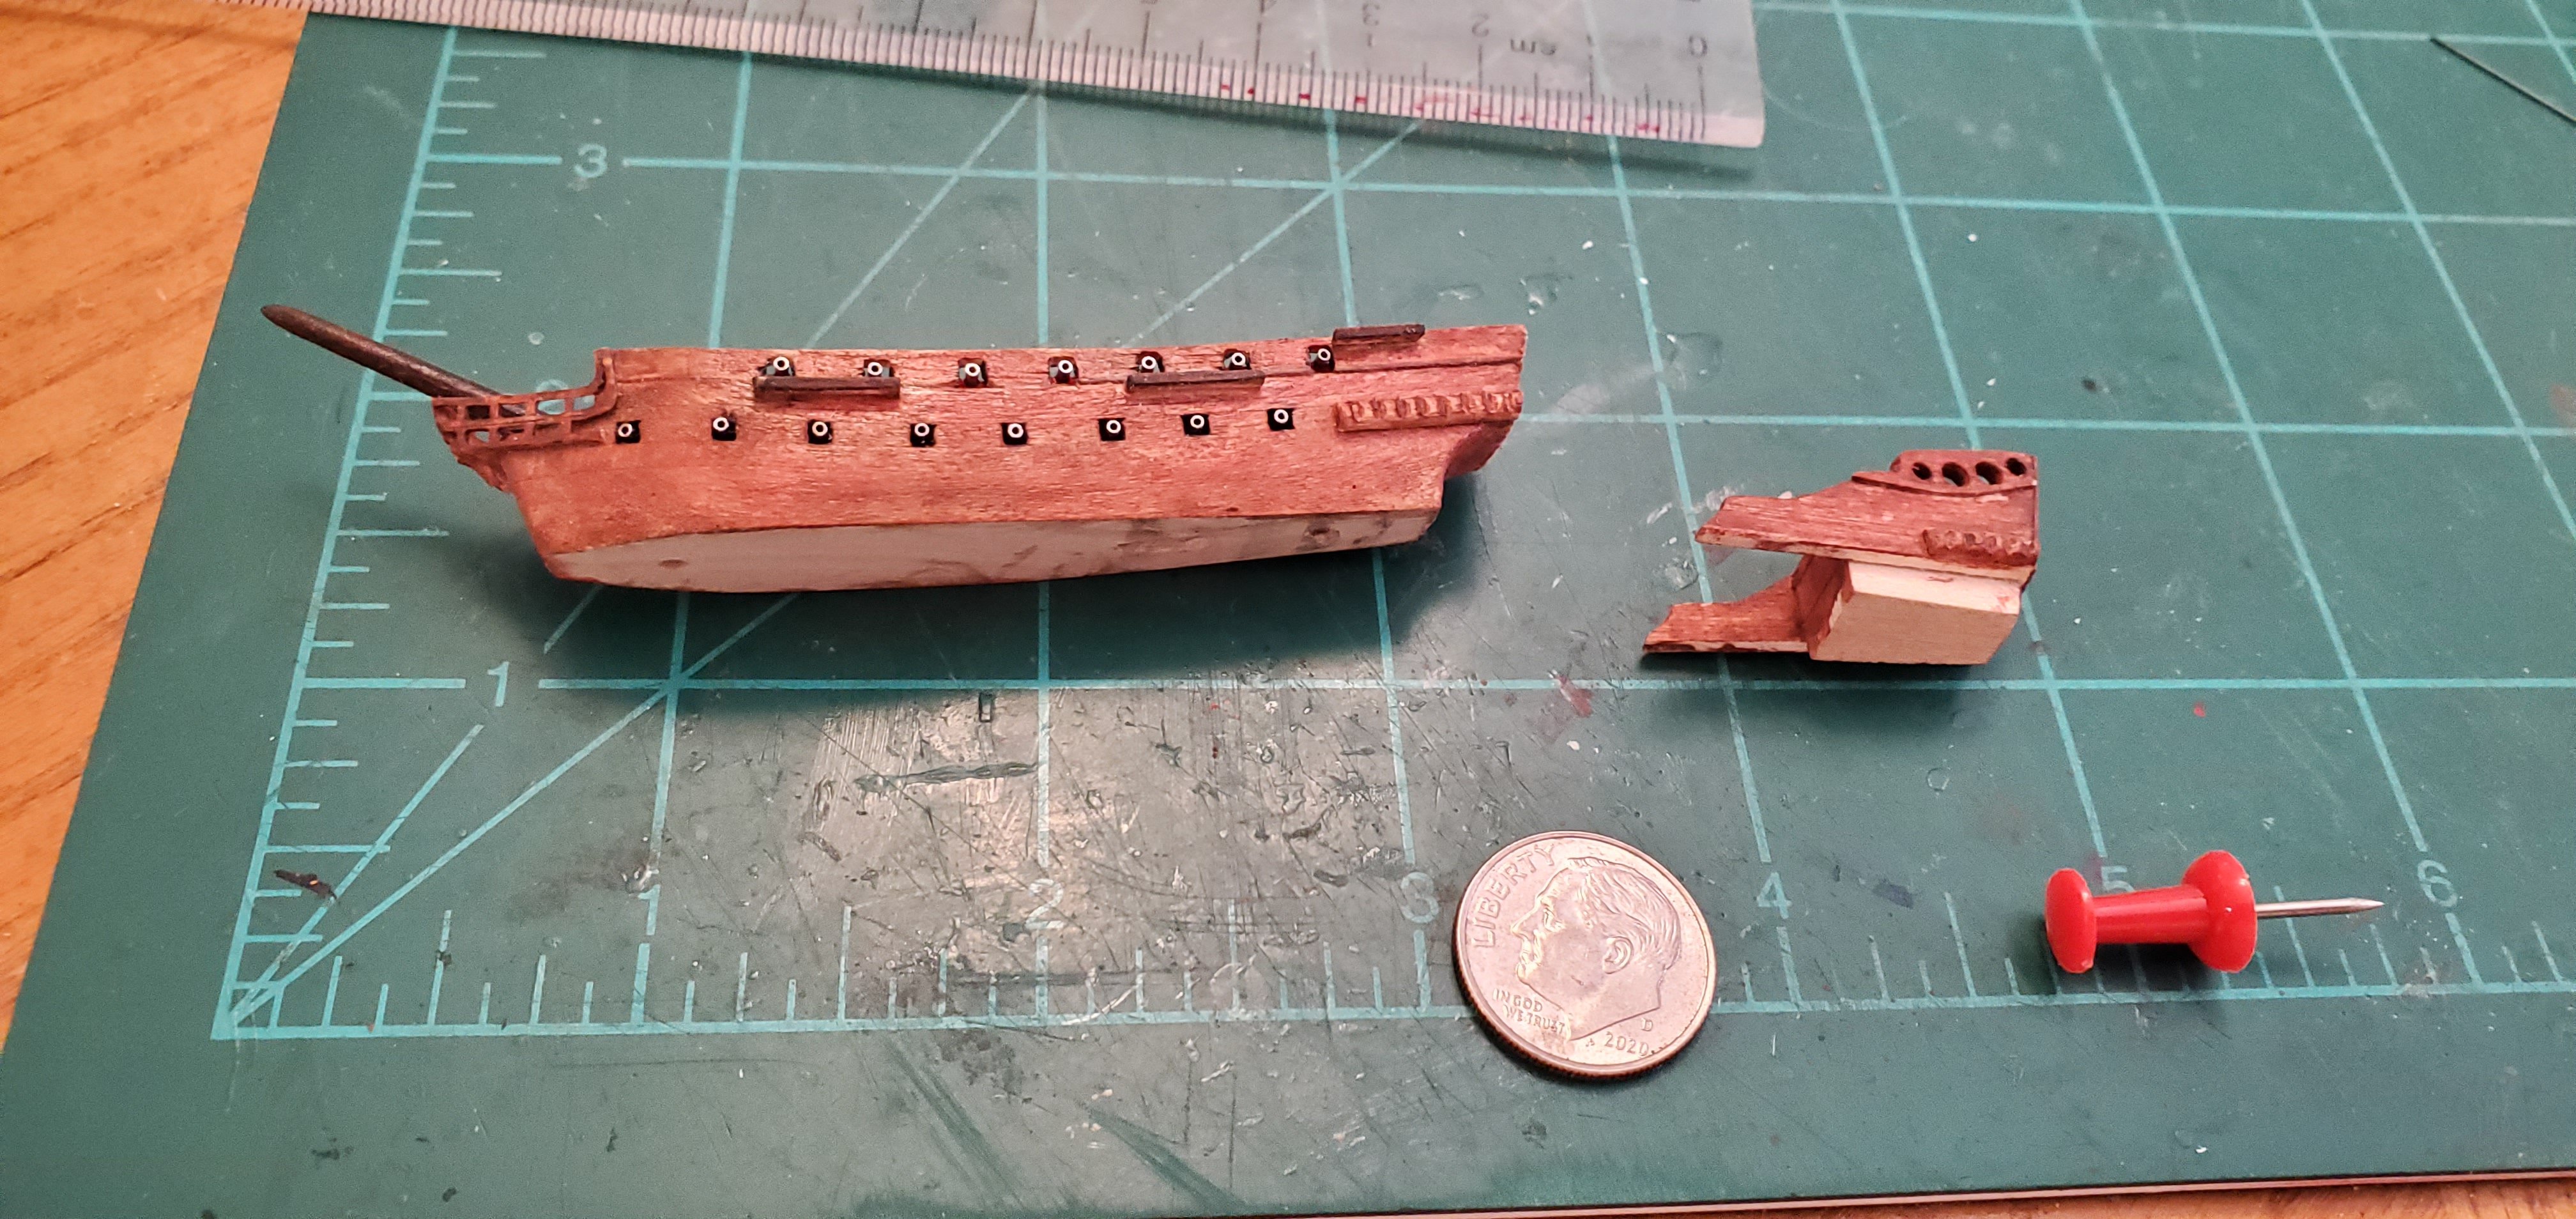
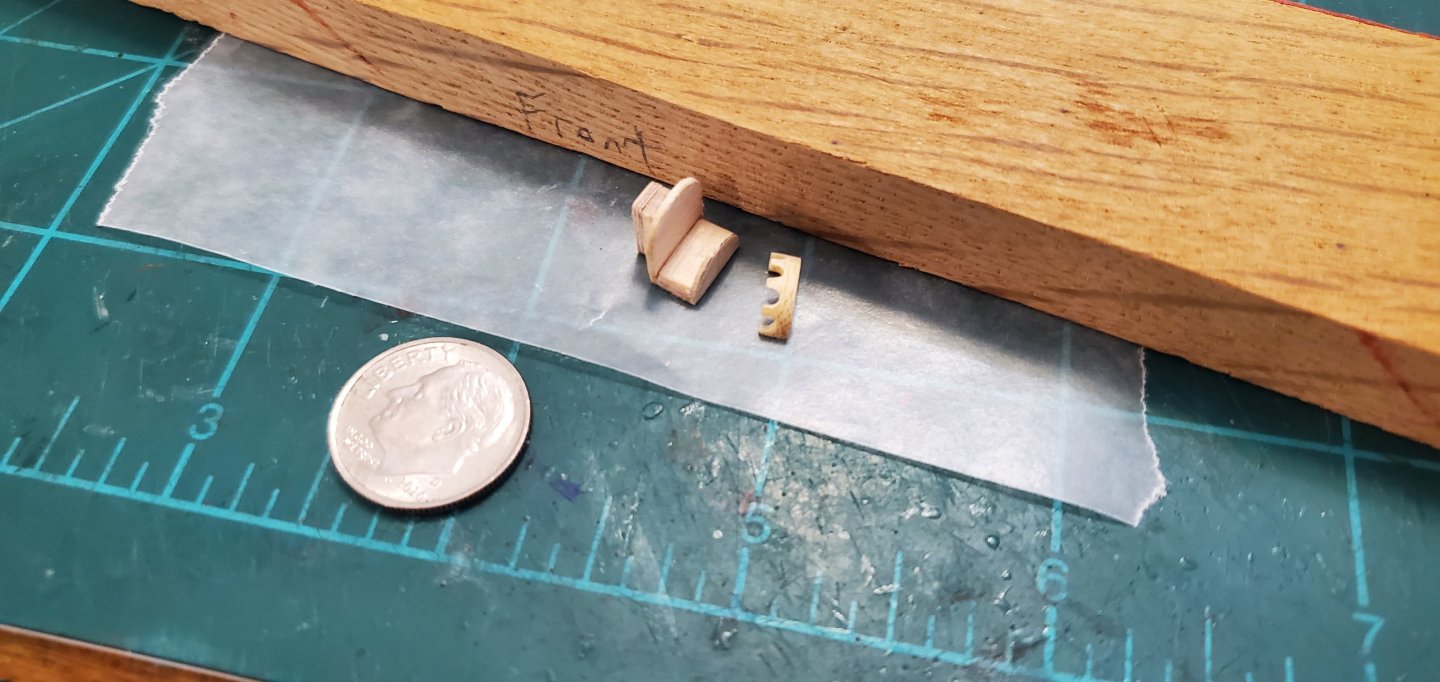
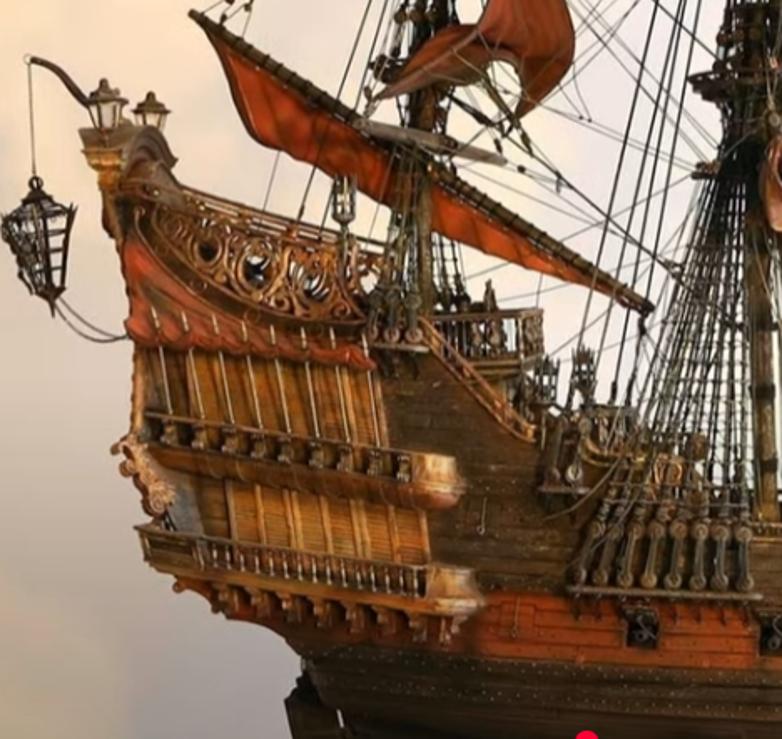
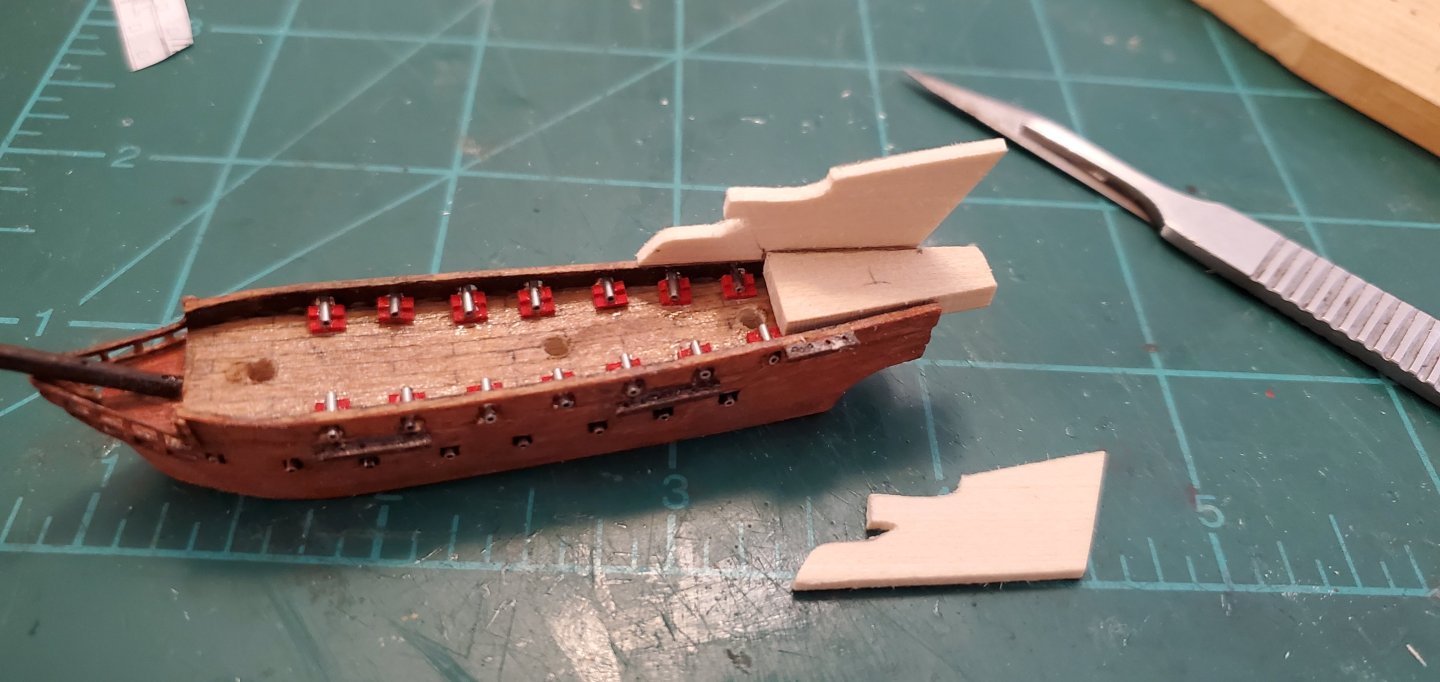
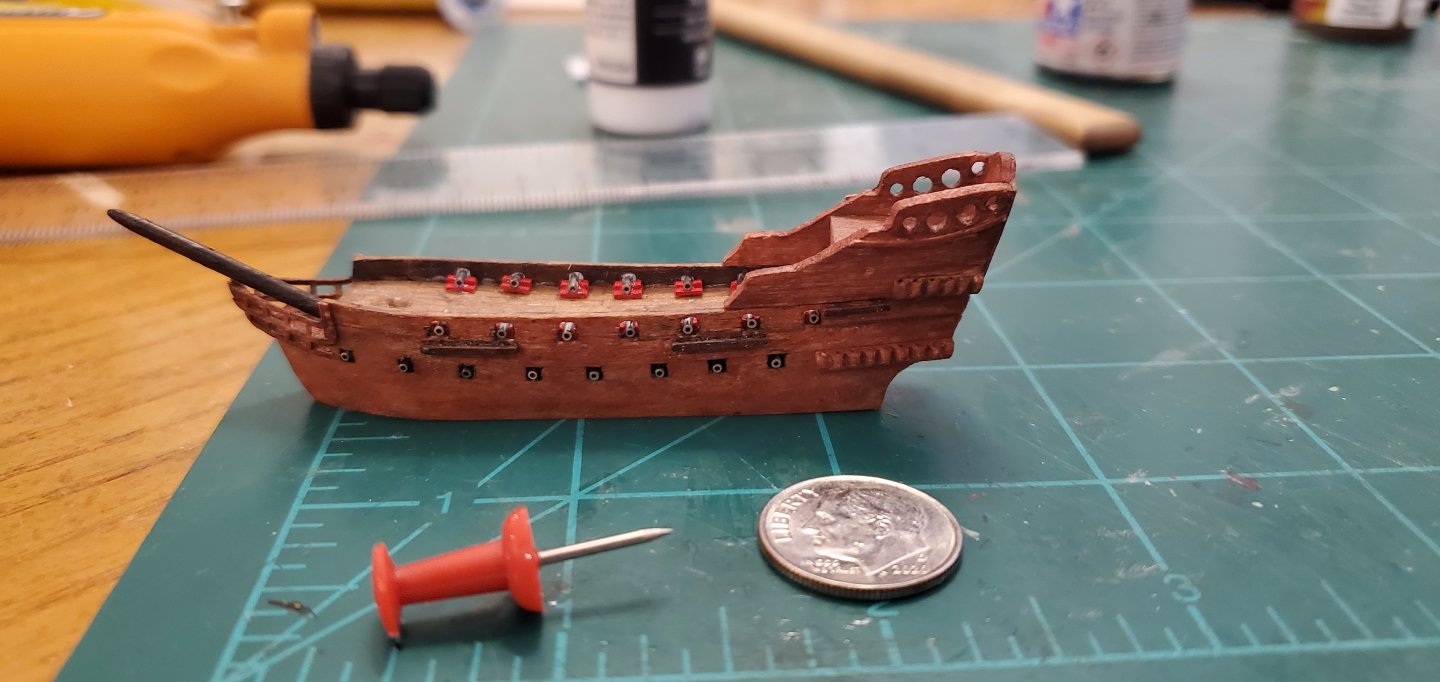
Next up is the very elaborate and high-rising stern structure. The goal is to have something that in some way resembles this: The structure causes the stern to be way too tall to fit thru the bottle's neck, so it will be built as a sub-assembly and installed after the ship is in the bottle. In fact, it will actually be 2 separately built sub-assemblies. The first will contain the sidewalls and stern wall as well as the deck behind the mizzen mast. The second will be the 2 balconies and their decking that protrude in front of the mizzen mast. The 2nd sub-assembly must also be added after insertion because it would get in the way of the main mast when it is folded to stern. Nothing complicated about the build process - just carving and sanding a number of tiny pieces and fitting them together. Test fit of the first piece. Once I was happy with the fit, I added the side railings, curved stern railing, and some other things to give a hint of the stern area decorative elements from the real thing. Also, you can see that I did a bit more carving to the descending side wall to make it look more like the real thing.

- 156 replies
-
- 18
-
-
-
- Queen Annes Revenge
- bottle
- (and 1 more)
-
That's a reasonable suggestion, Keith. However, I spent such a ridiculous amount of time getting the hull color the way I wanted, there's no way I would paint over it. Plus, the railing is so small I figured that if I could get a fairly close match to the hull color, it would not be noticeable. Hmmm. If I agreed to put a penguin on the build, it must have been the Bundy rum talking. I am not responsible for any typing done under the influence of @BANYAN's Aussie firewater.
- 156 replies
-
- 9
-
-
-
- Queen Annes Revenge
- bottle
- (and 1 more)
-
Such a unique subject and very well executed. Congratulations, Keith!
- 457 replies
-
- 4
-
-
-
- sternwheeler
- Hard Coal Navy
- (and 1 more)
-
She's my hunka hunka burning love, Keith! The next task is to try and create something that resembles the railing on the bow. I went to a dear friend's wedding in Philly last summer and they were handing out little fans because the temps were a bit warm. The 90 degree weather felt like a nice fall afternoon for me but I took a fan anyway. Then I noticed the ribs were made of super-thin bamboo, so I kept it knowing I'd find a good use for it. The ribs are 0.4mm in thickness which I thought might work well for the railing. For the 2 curved portions of the railing, it's way too small and frail to try and bend, so I took a diamond crusted grinding bit and gently carved it to shape. It's shaved down to about 0.5mm in the 2nd pic below. The vertical sections of the railing were pretty much specks that were difficult to pick up and put in place even with my finest point tweezers. Here's the railing in place.. It's here where I realized I should not have painted the hull yet. It was a varying mix of 4 different colors plus some thinner to get the look I wanted, but now I needed to match it and unfortunately, I didn't pay much attention to how I mixed things earlier. So I did my best to get a match. I will have the same problem when I build the tall, rising back end of the ship.


- 156 replies
-
- 18
-
-
-
- Queen Annes Revenge
- bottle
- (and 1 more)
-
I'd say the blind hog found a 5 gallon bucker full of acorns. The whole build is fantastic. Well done, Keith!
- 457 replies
-
- 5
-
-
-
- sternwheeler
- Hard Coal Navy
- (and 1 more)
-
That's hard to believe that it's your first big planking job, Kenny. Looks like the work of a seasoned pro.
-
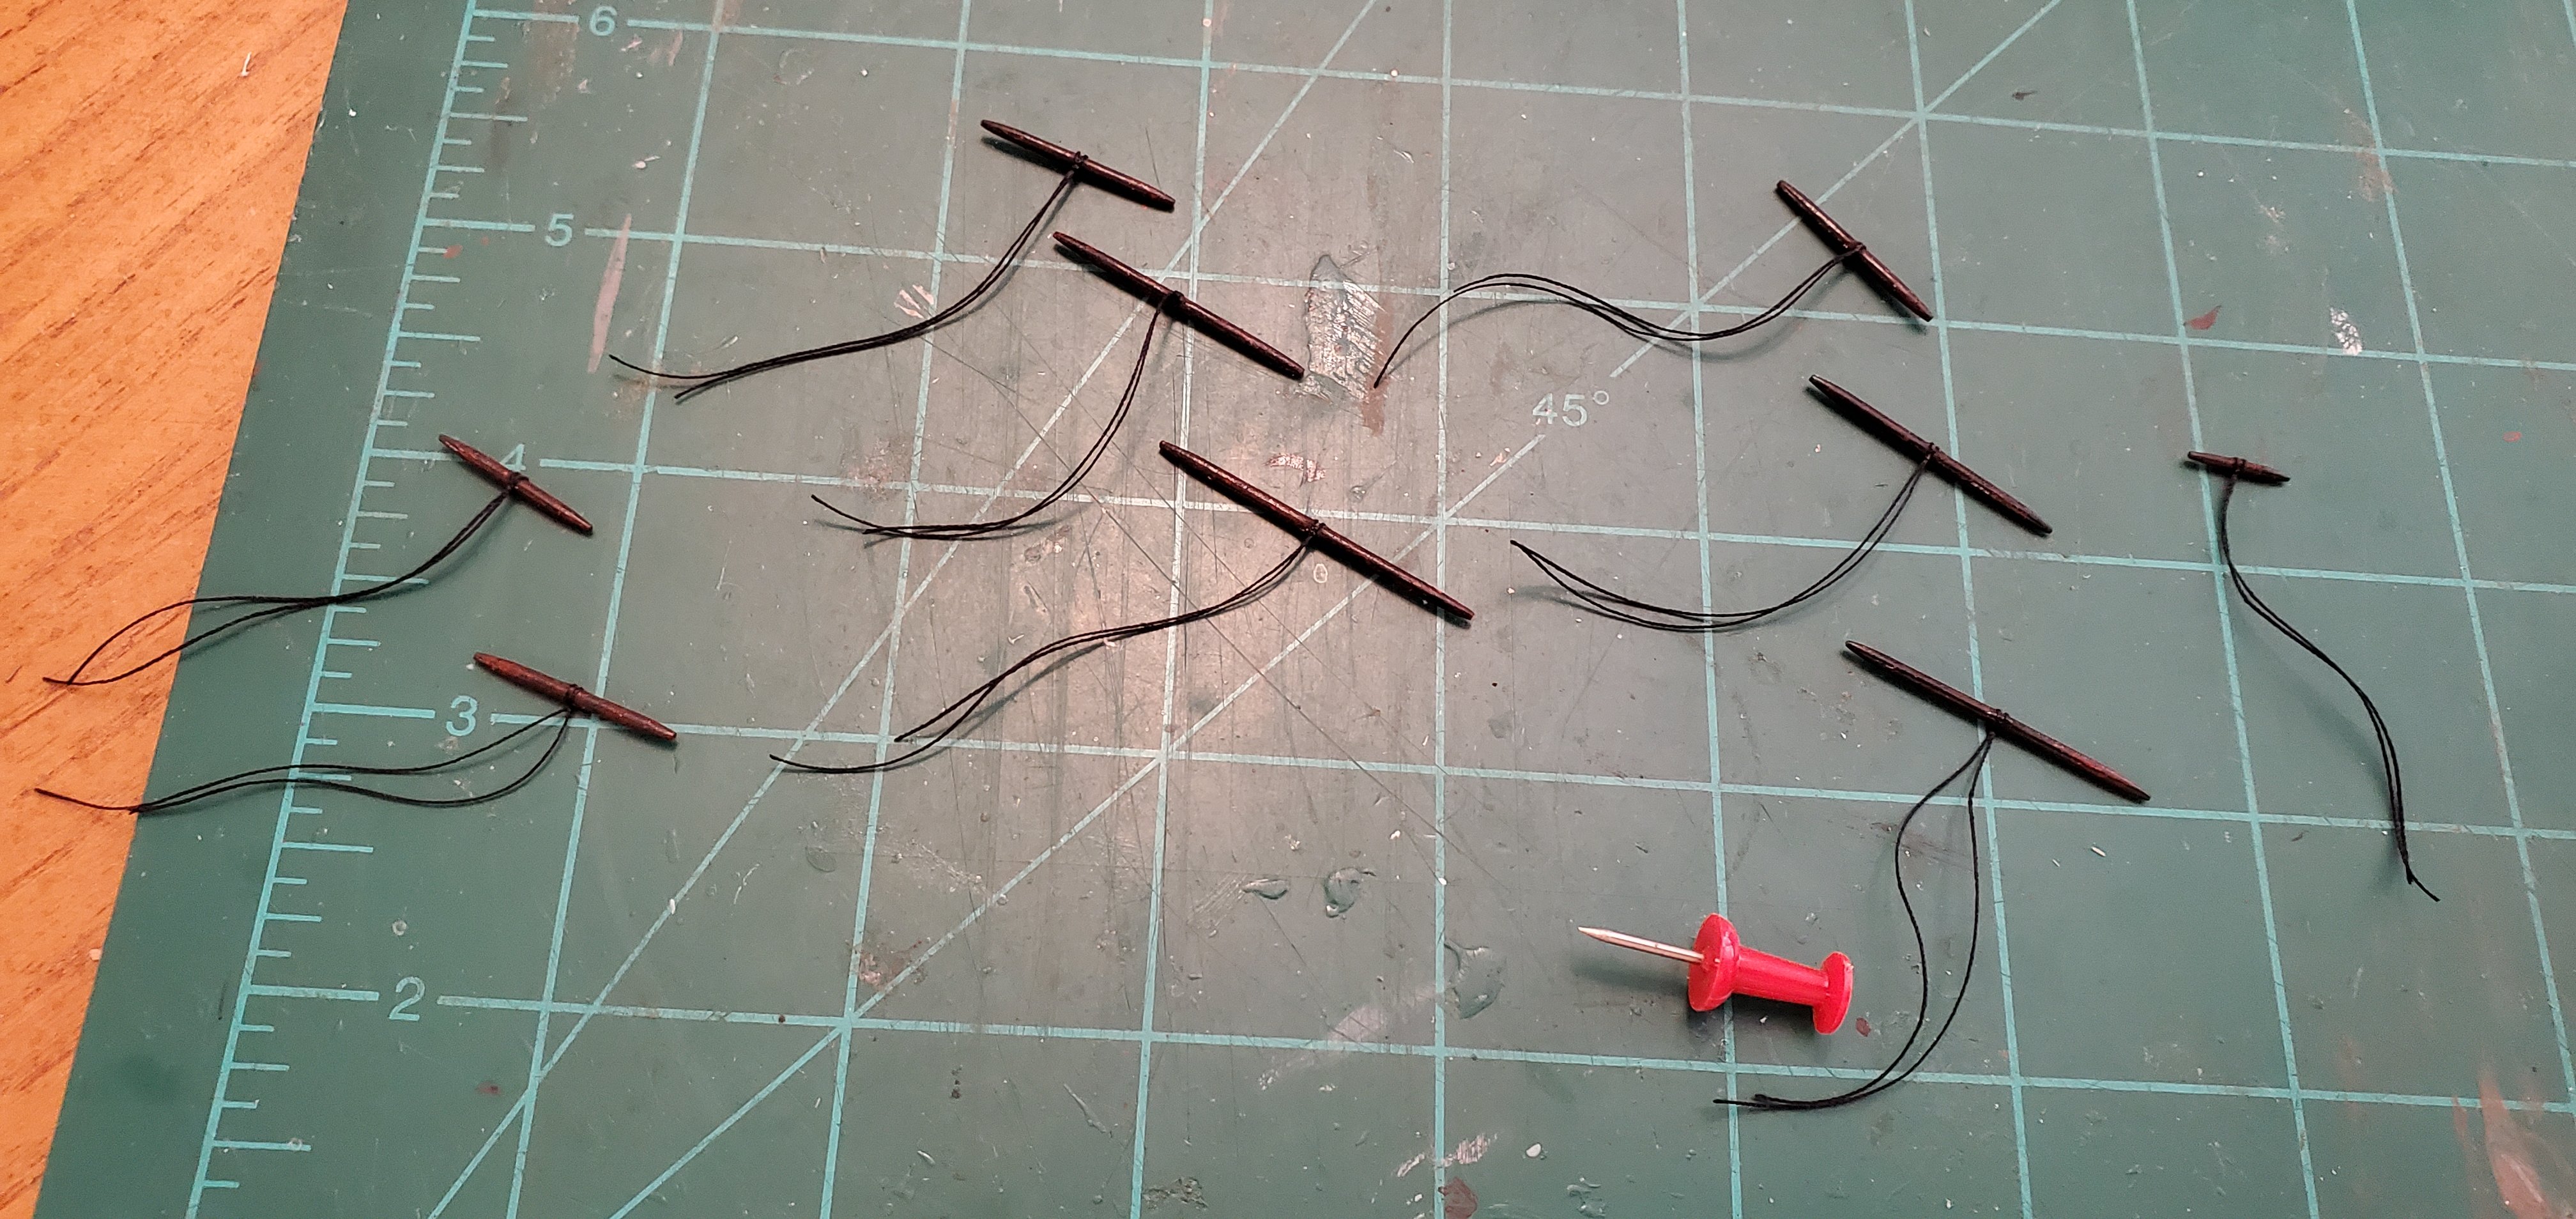
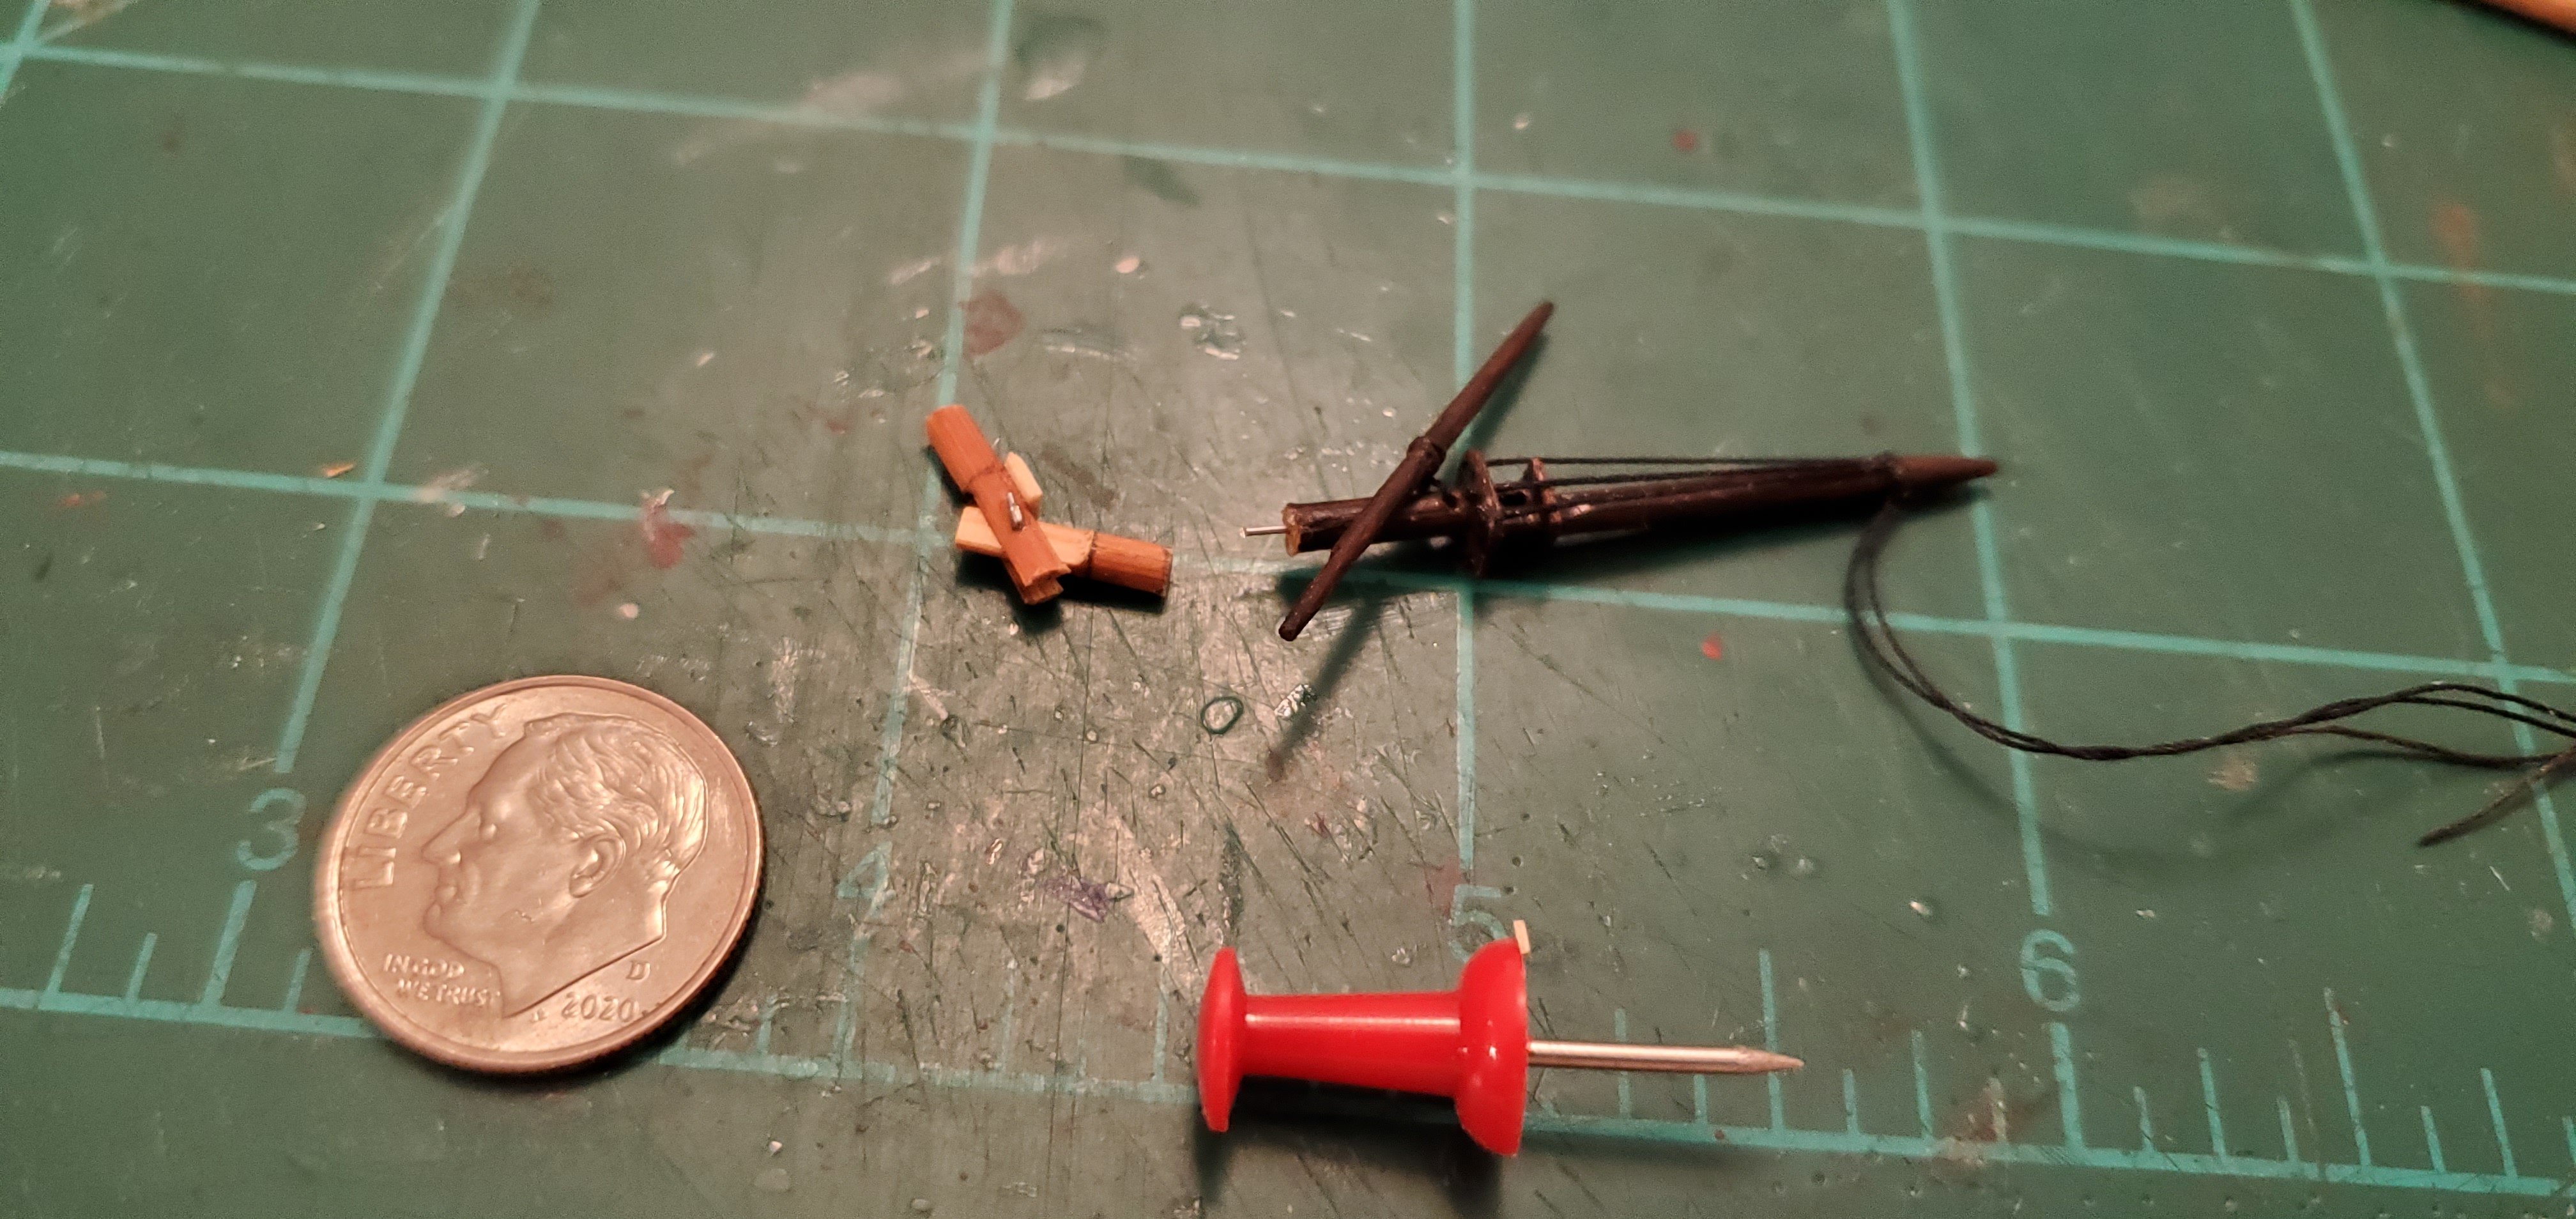
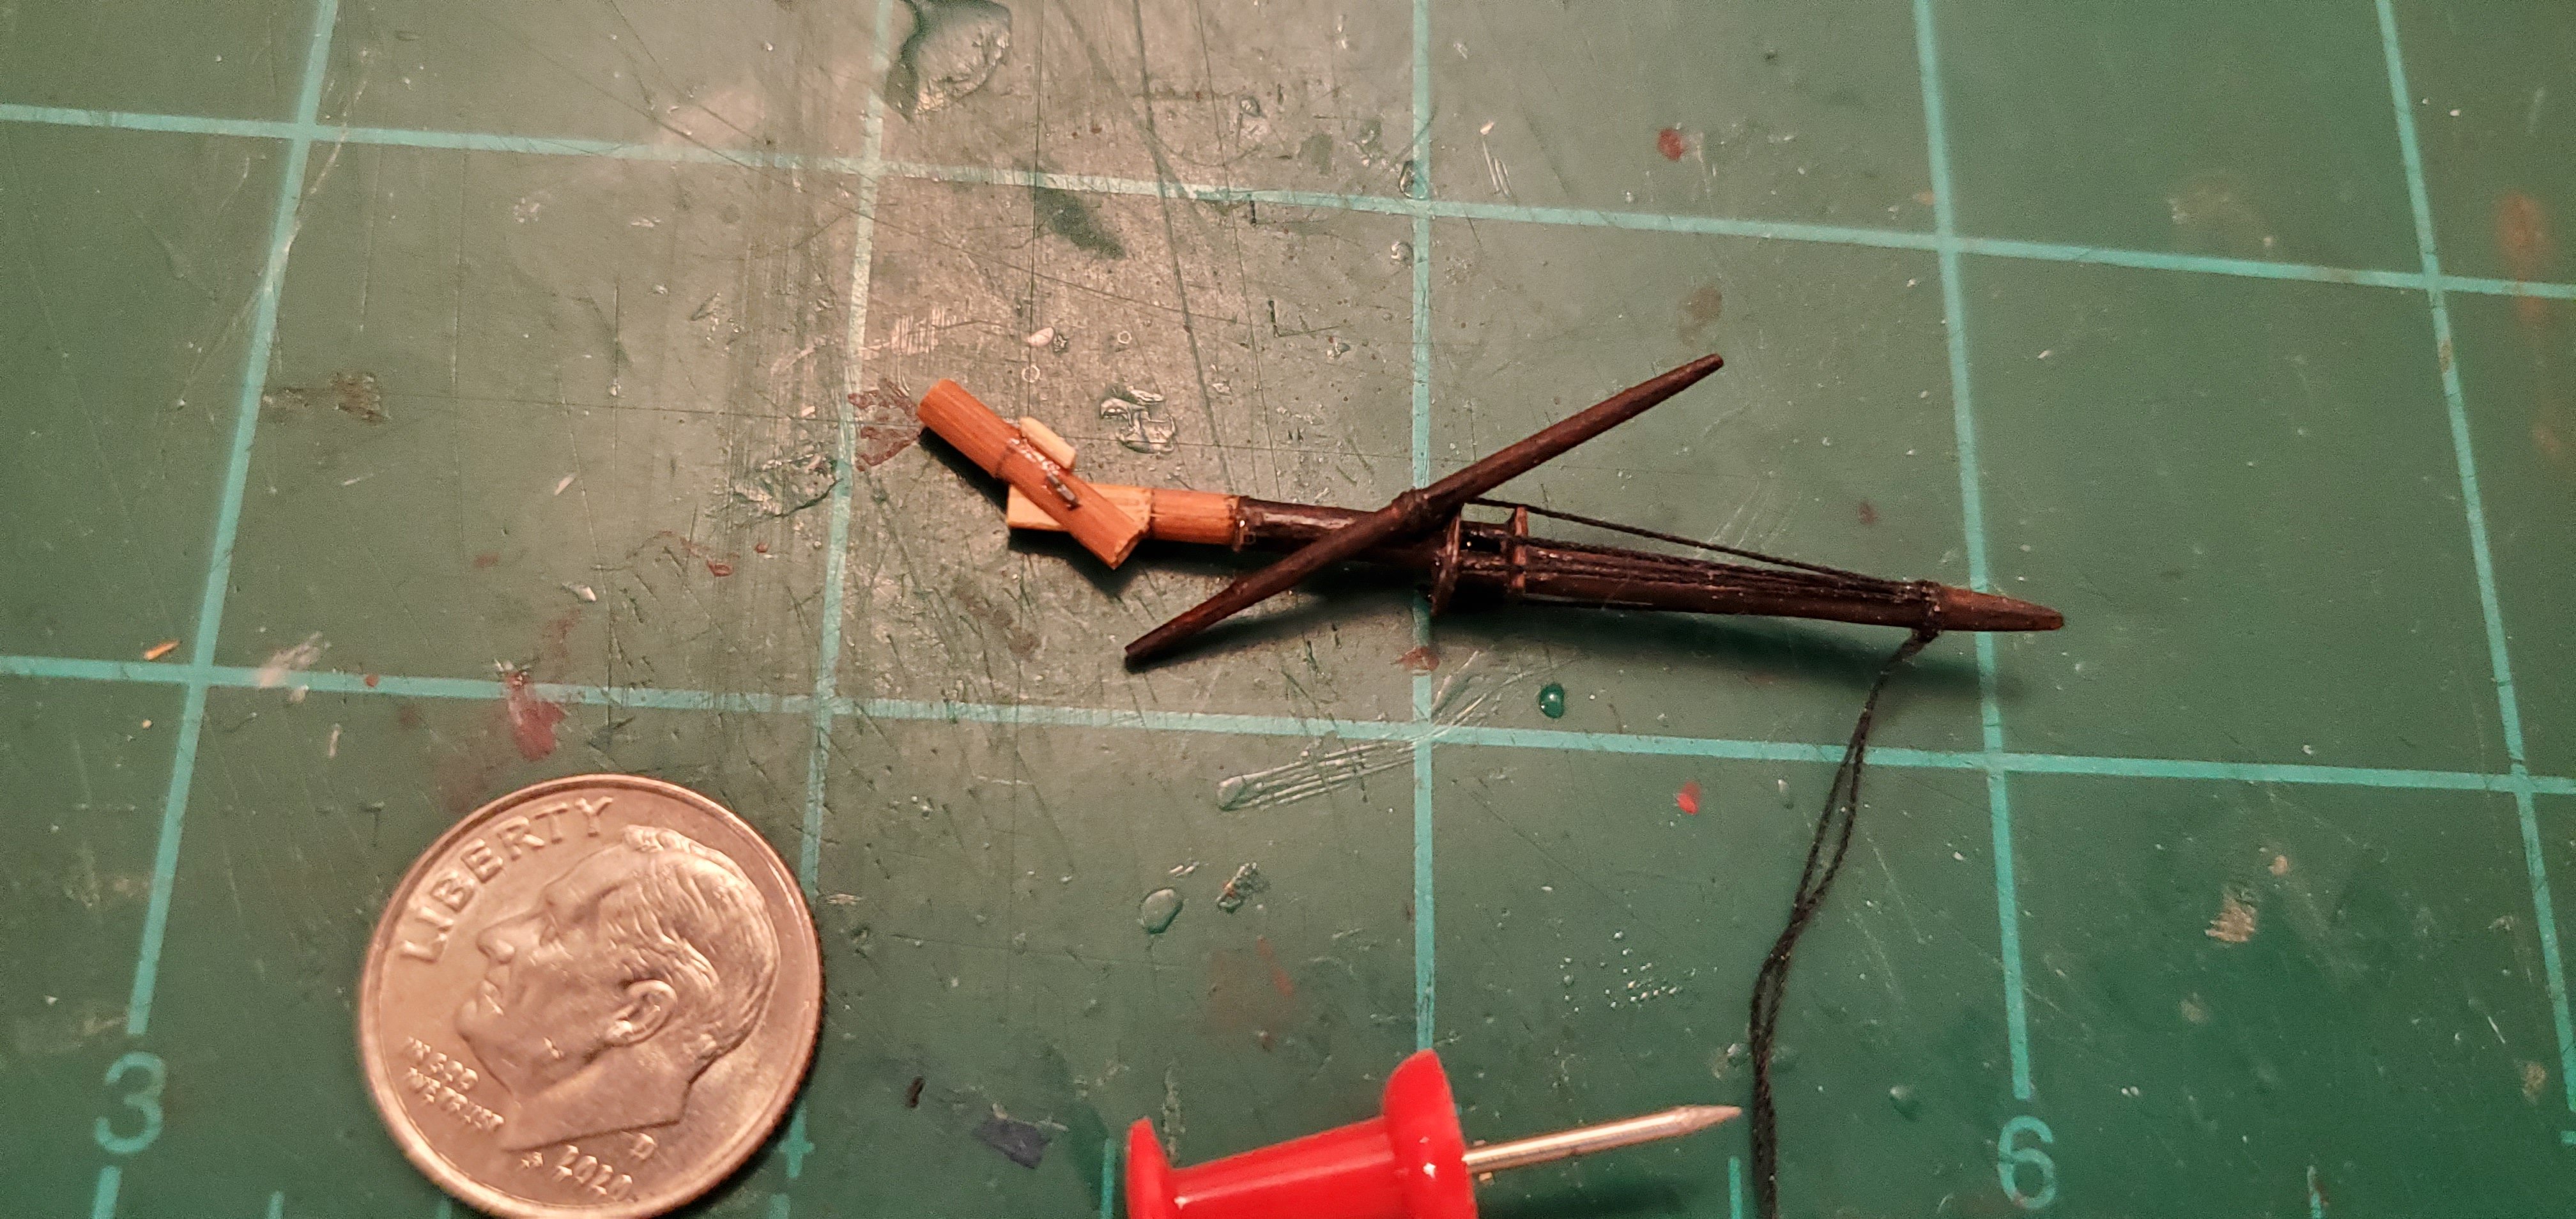
On to the mast and yards. Again I start with bamboo toothpicks since I have to drill small holes for the pull threads and the shrouds. Here are the mast sections. I already hinged the lower masts using a crude version of the hidden hinge method that I borrowed from @John Fox III. I've covered that in several previous build logs so I won't go into detail here. For the mast tops, I take another bamboo stir stick and shave it down to about .5 mm and square off the sides. Then I carve out a hole in the middle, drill tiny holes for the upper shrouds, and cut them to shape. Here are the masts fully assembled.


- 156 replies
-
- 18
-
-
-
- Queen Annes Revenge
- bottle
- (and 1 more)
-
Your cabins are looking sharp, Paul. Nice work. Also, what is this thing you are using as a weight?
-
Another ingenious use of Lego blocks! Hadn't seen that one before.
-
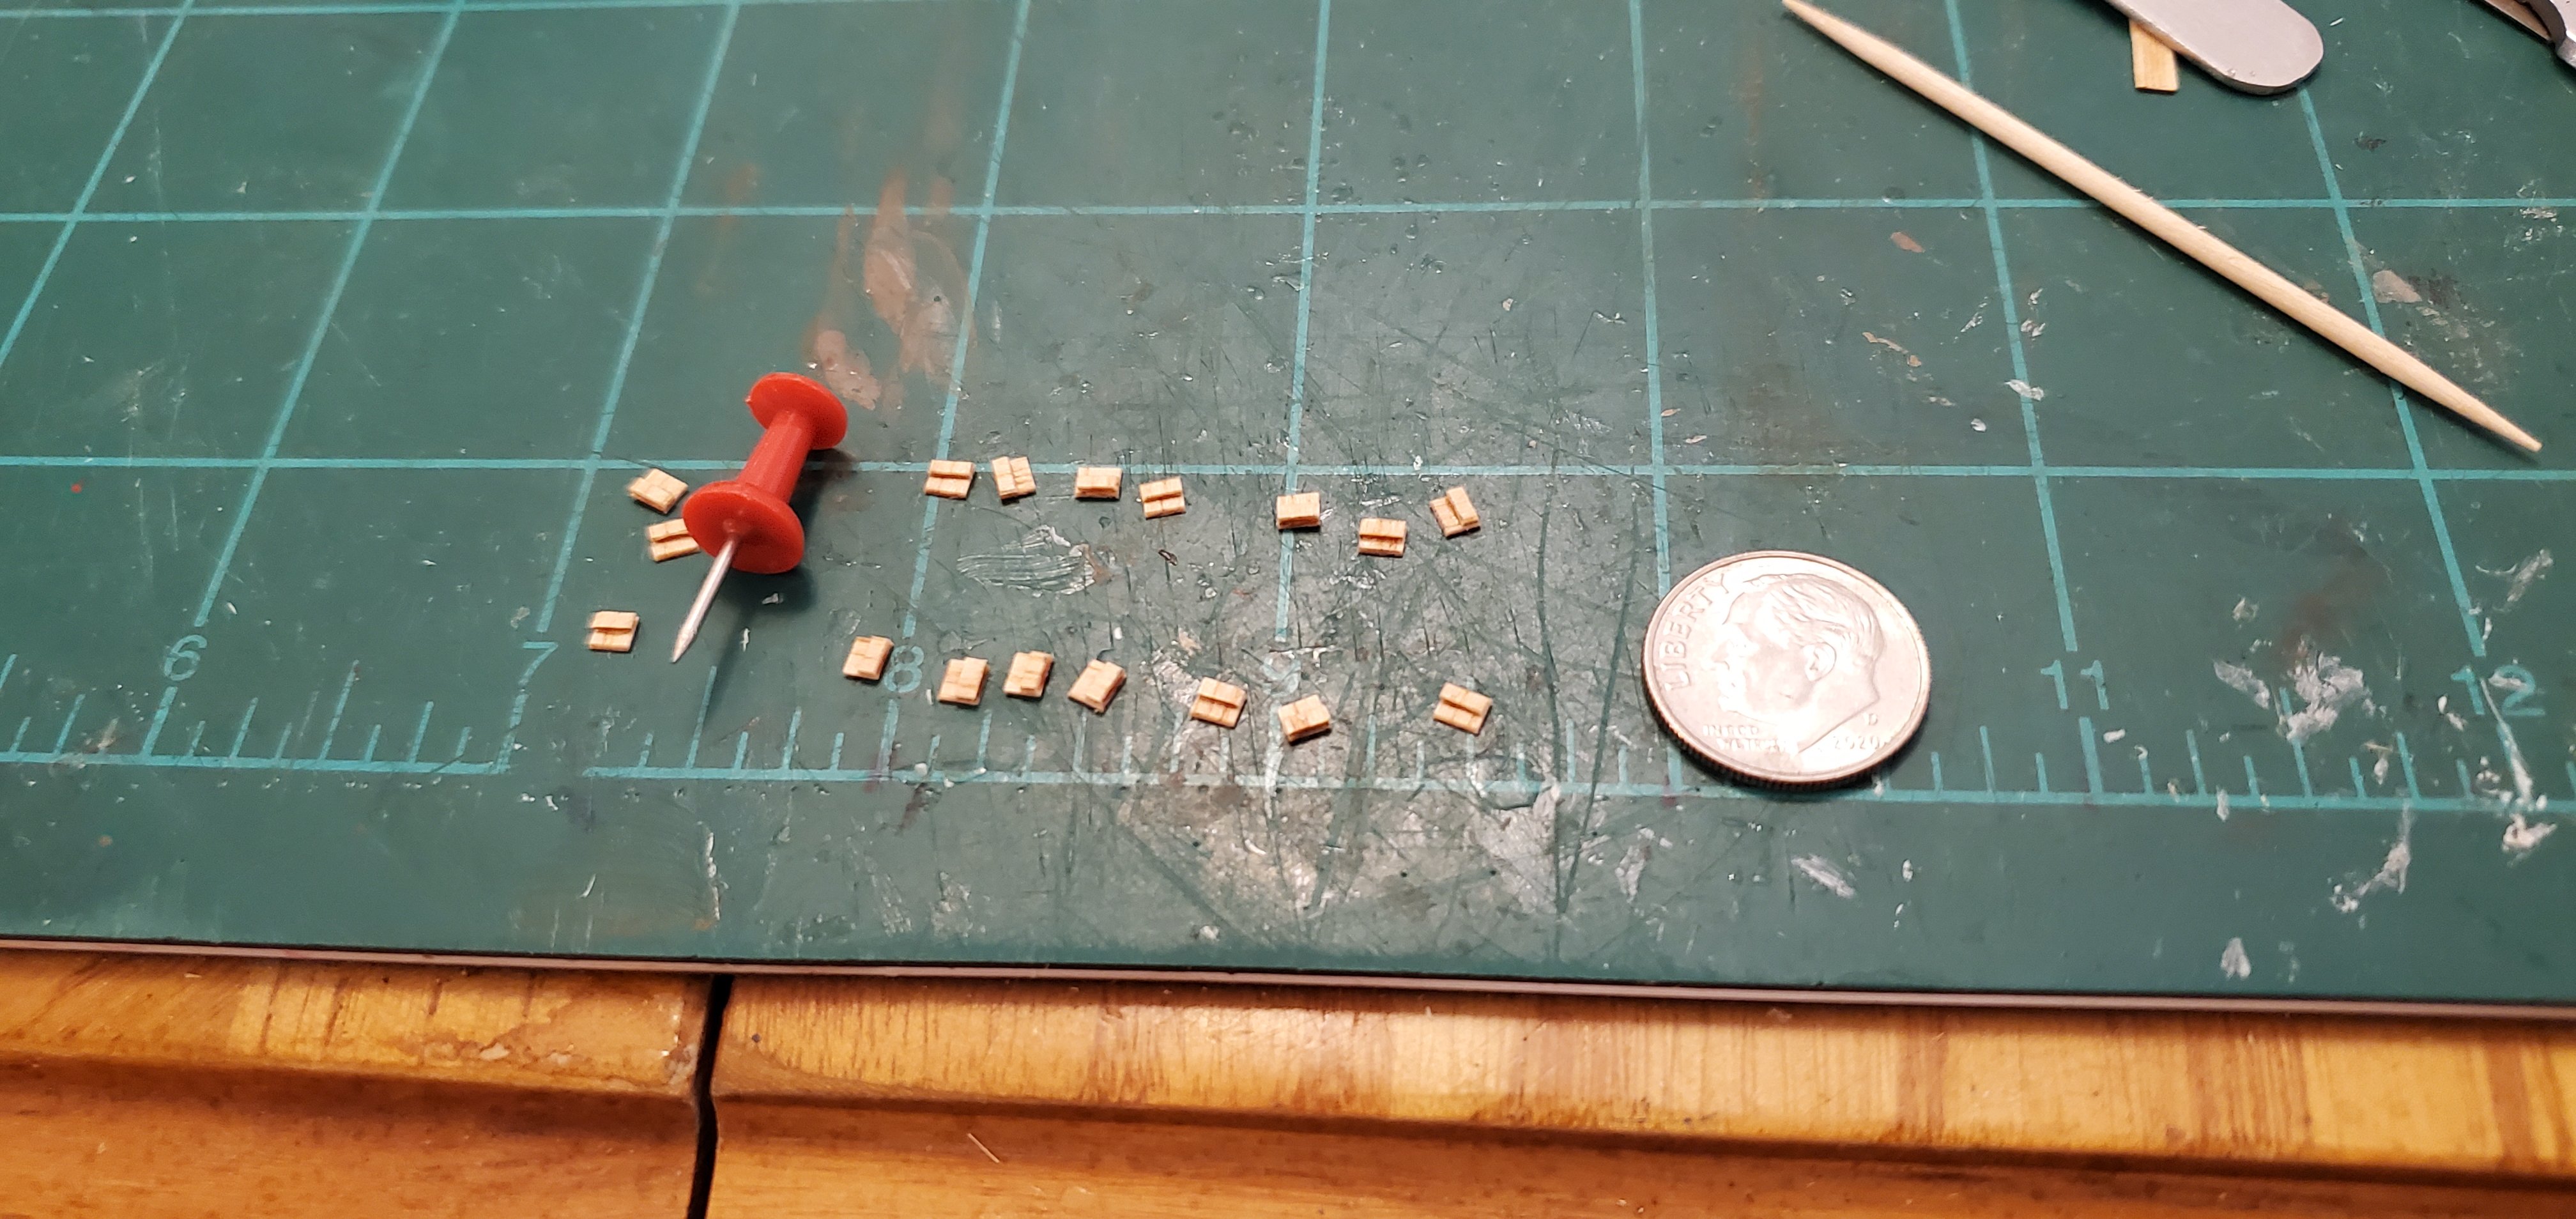
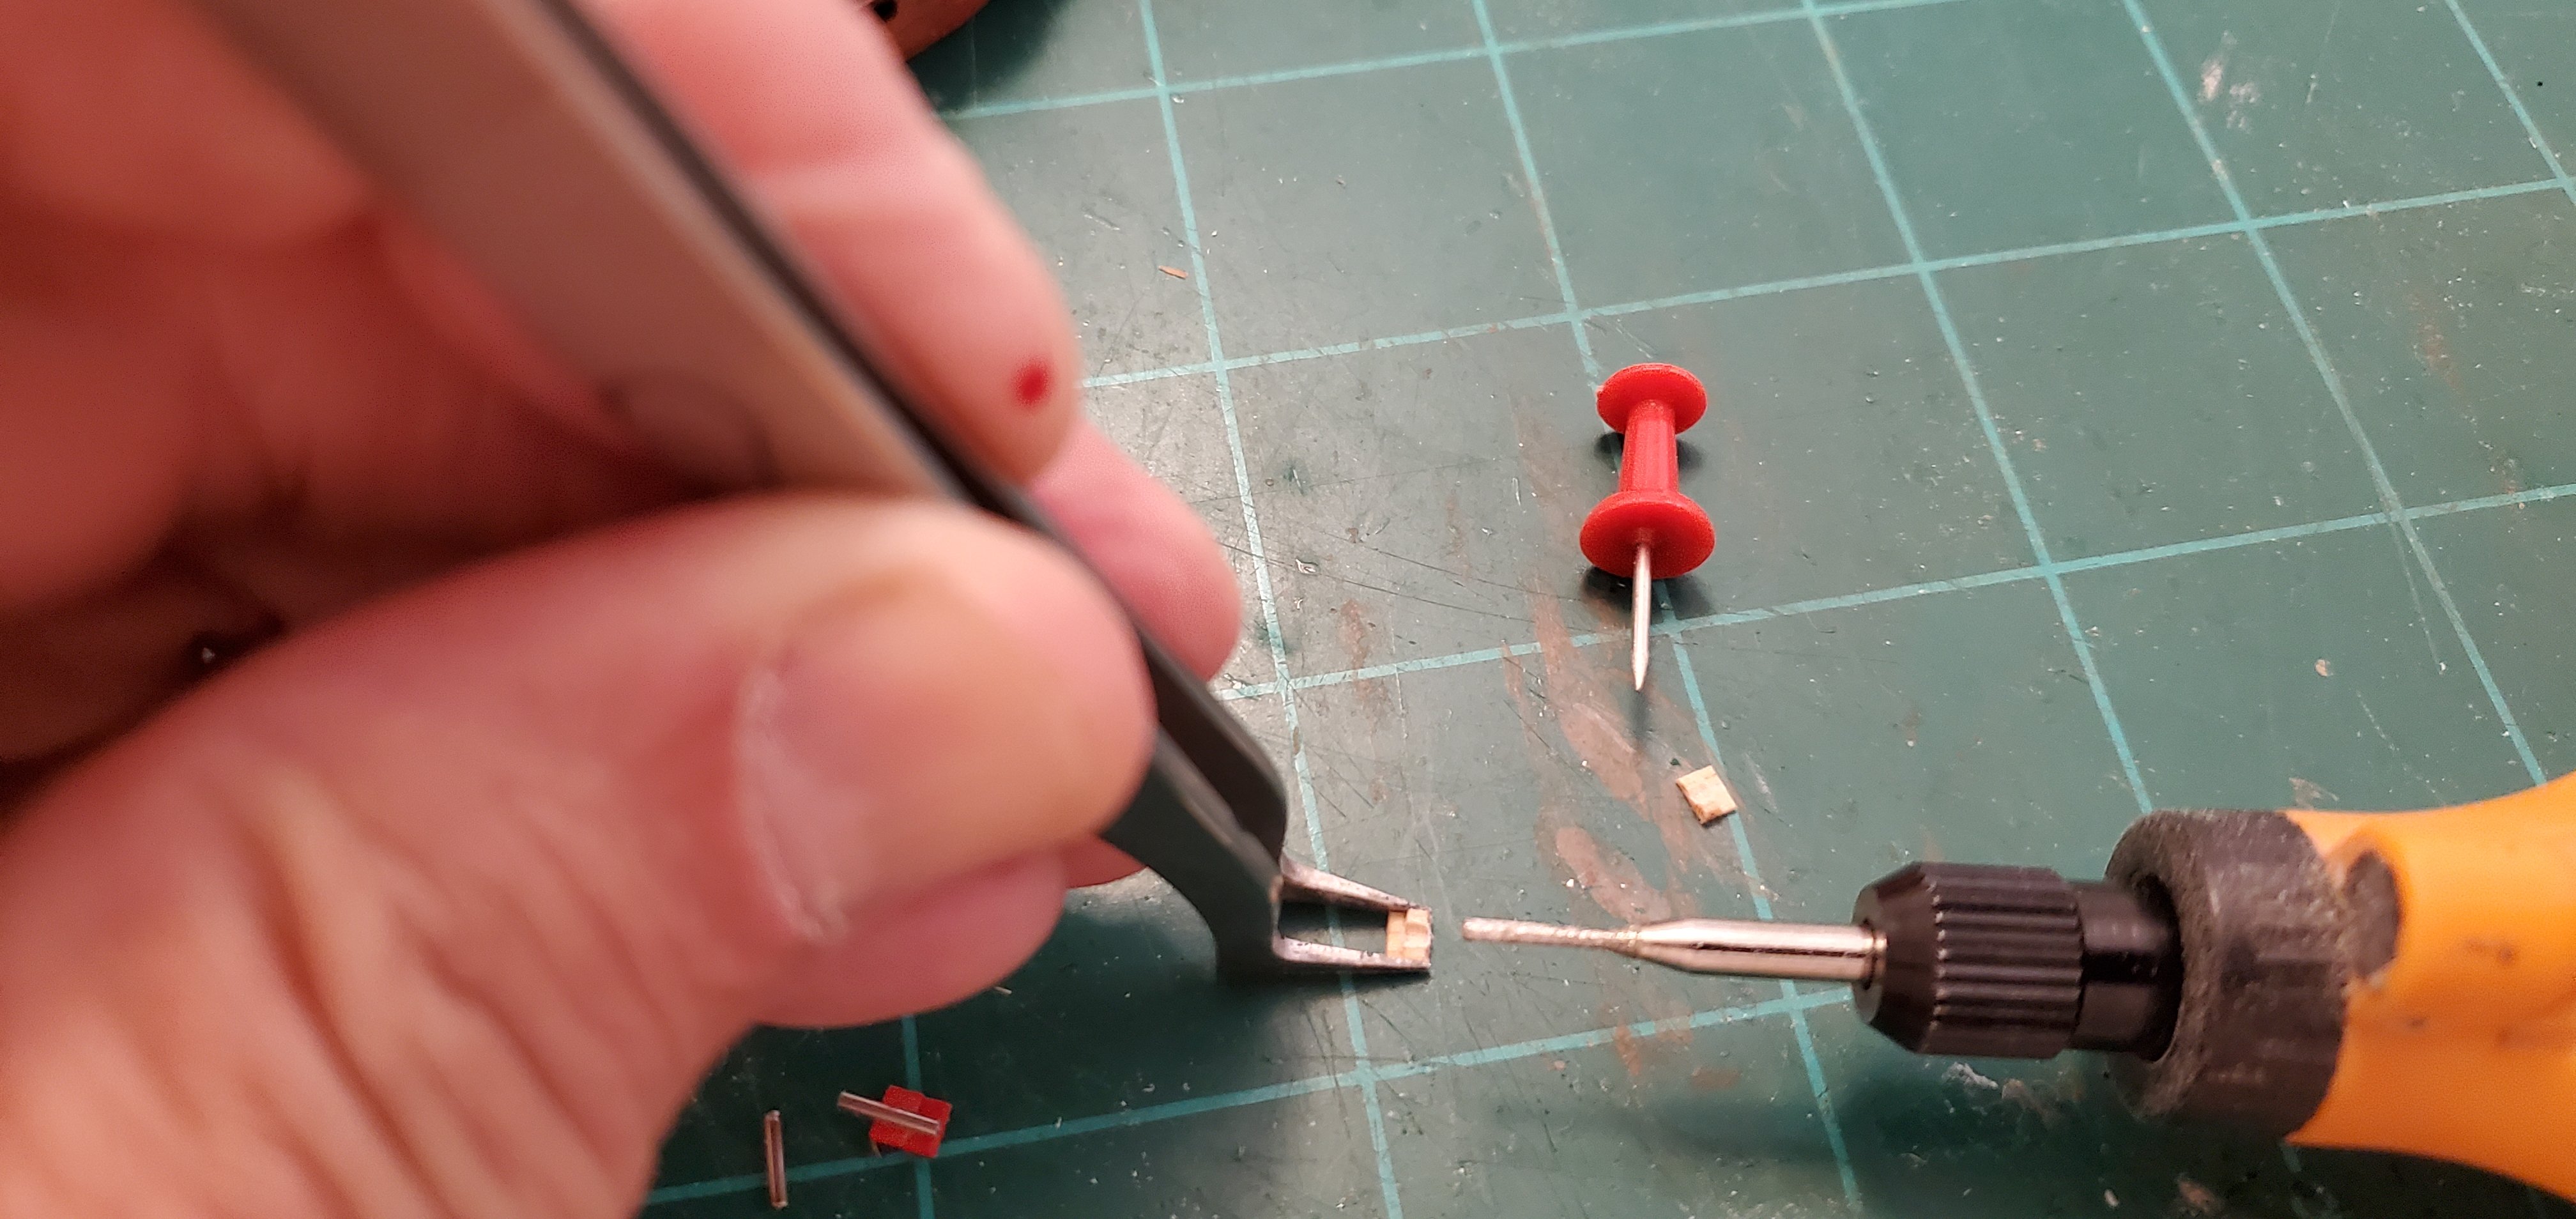
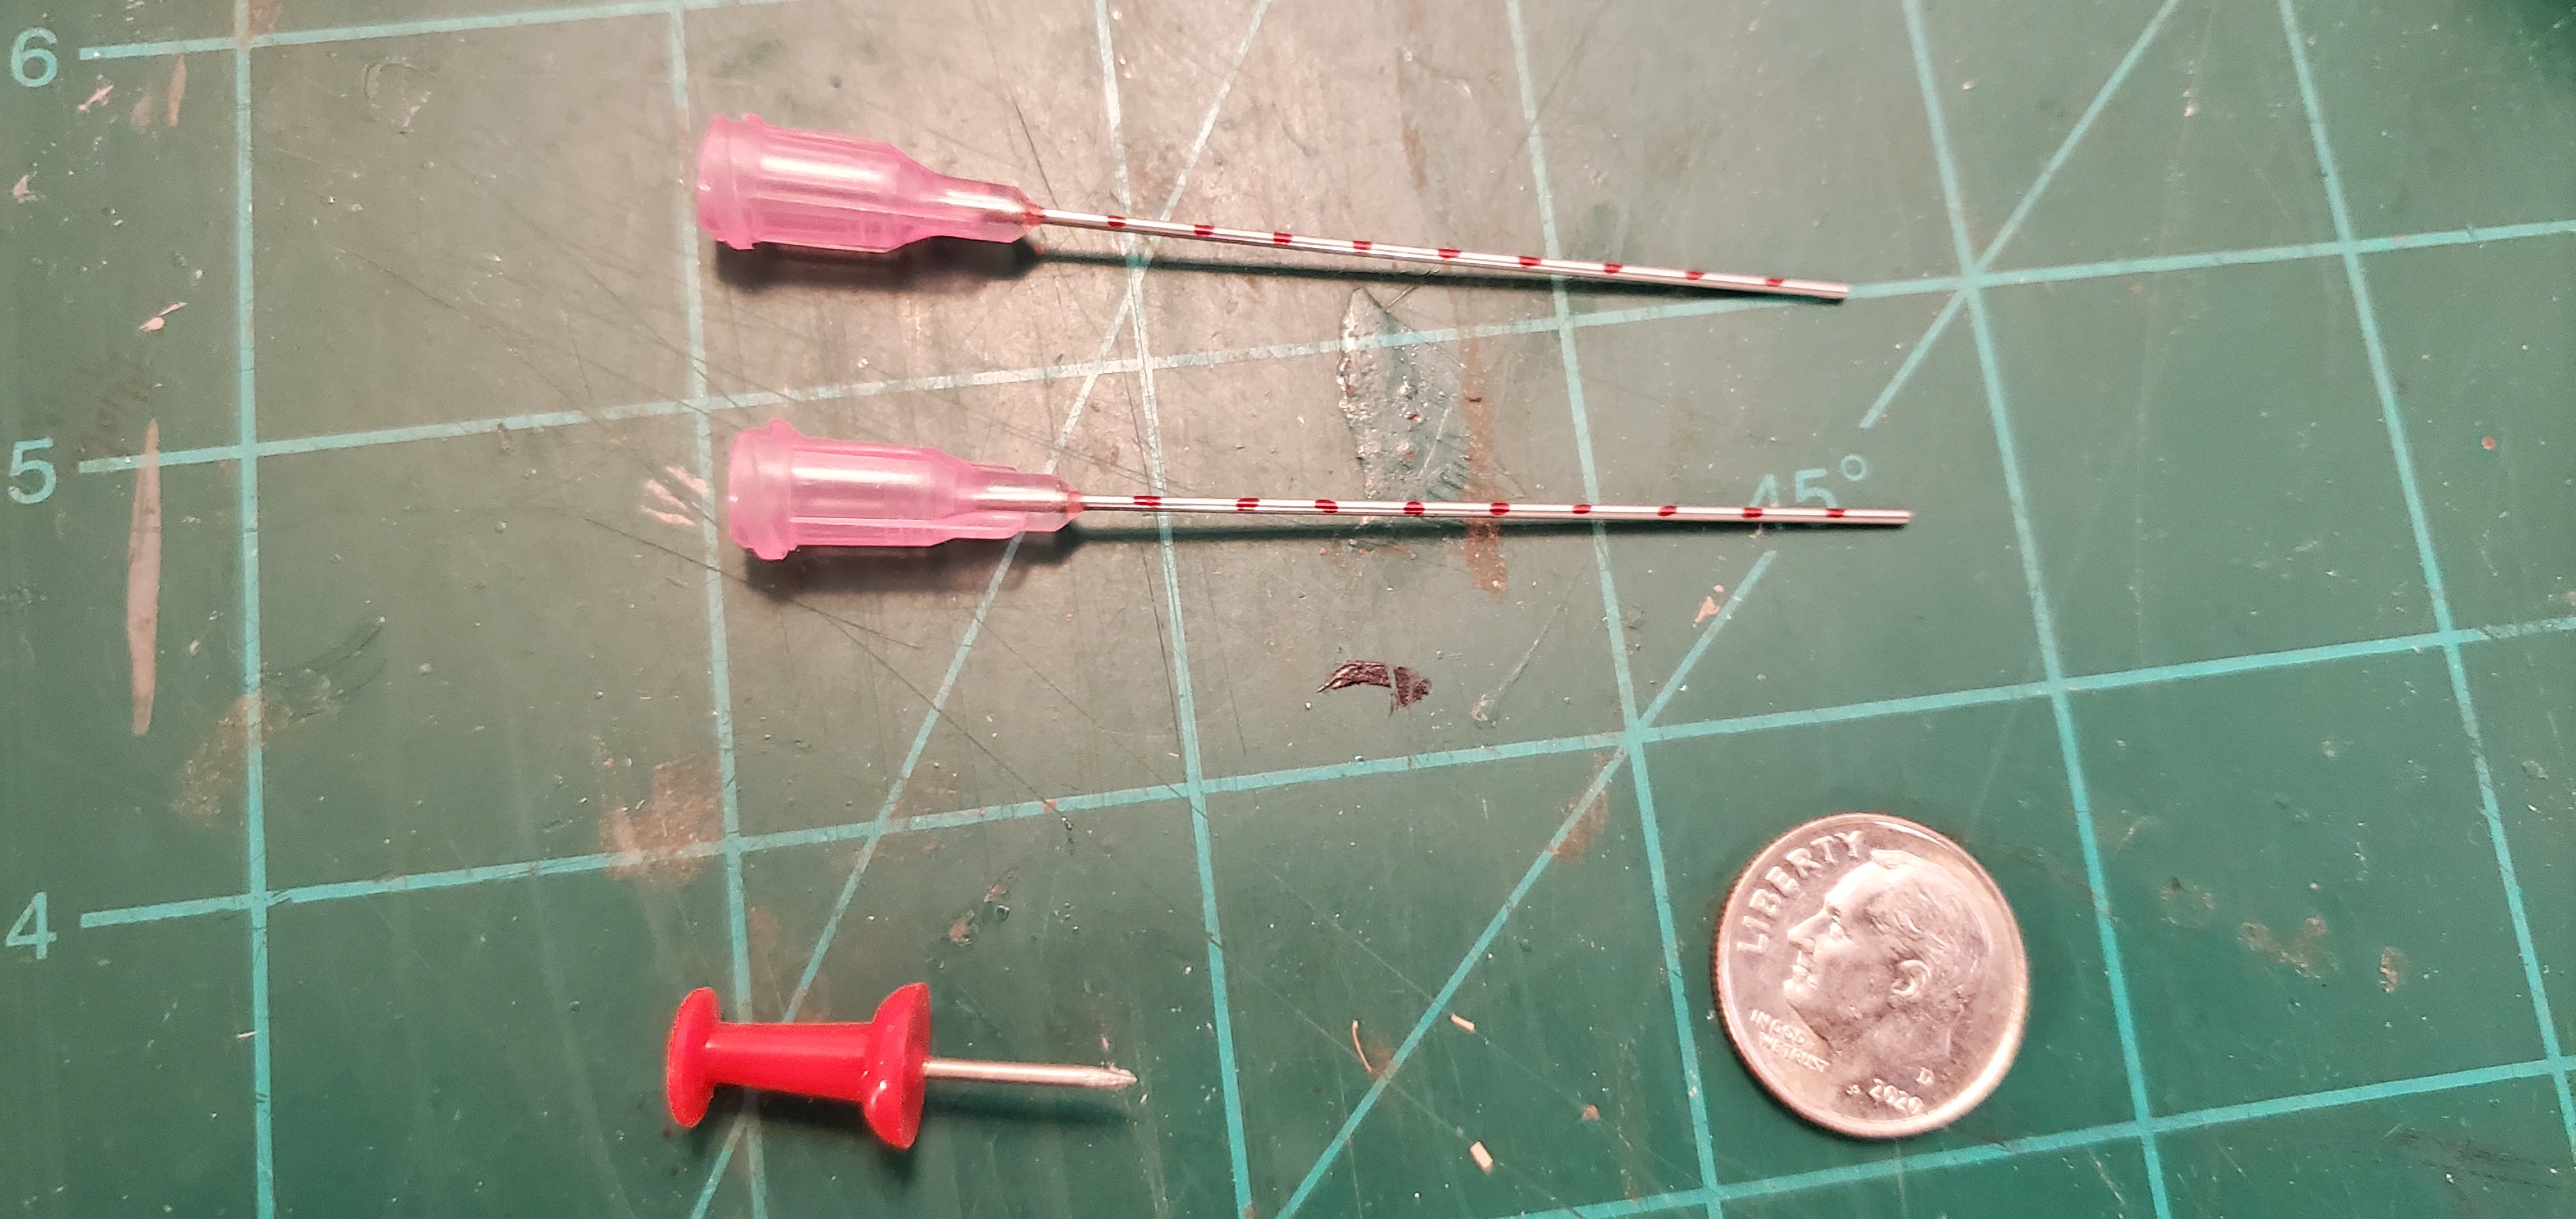
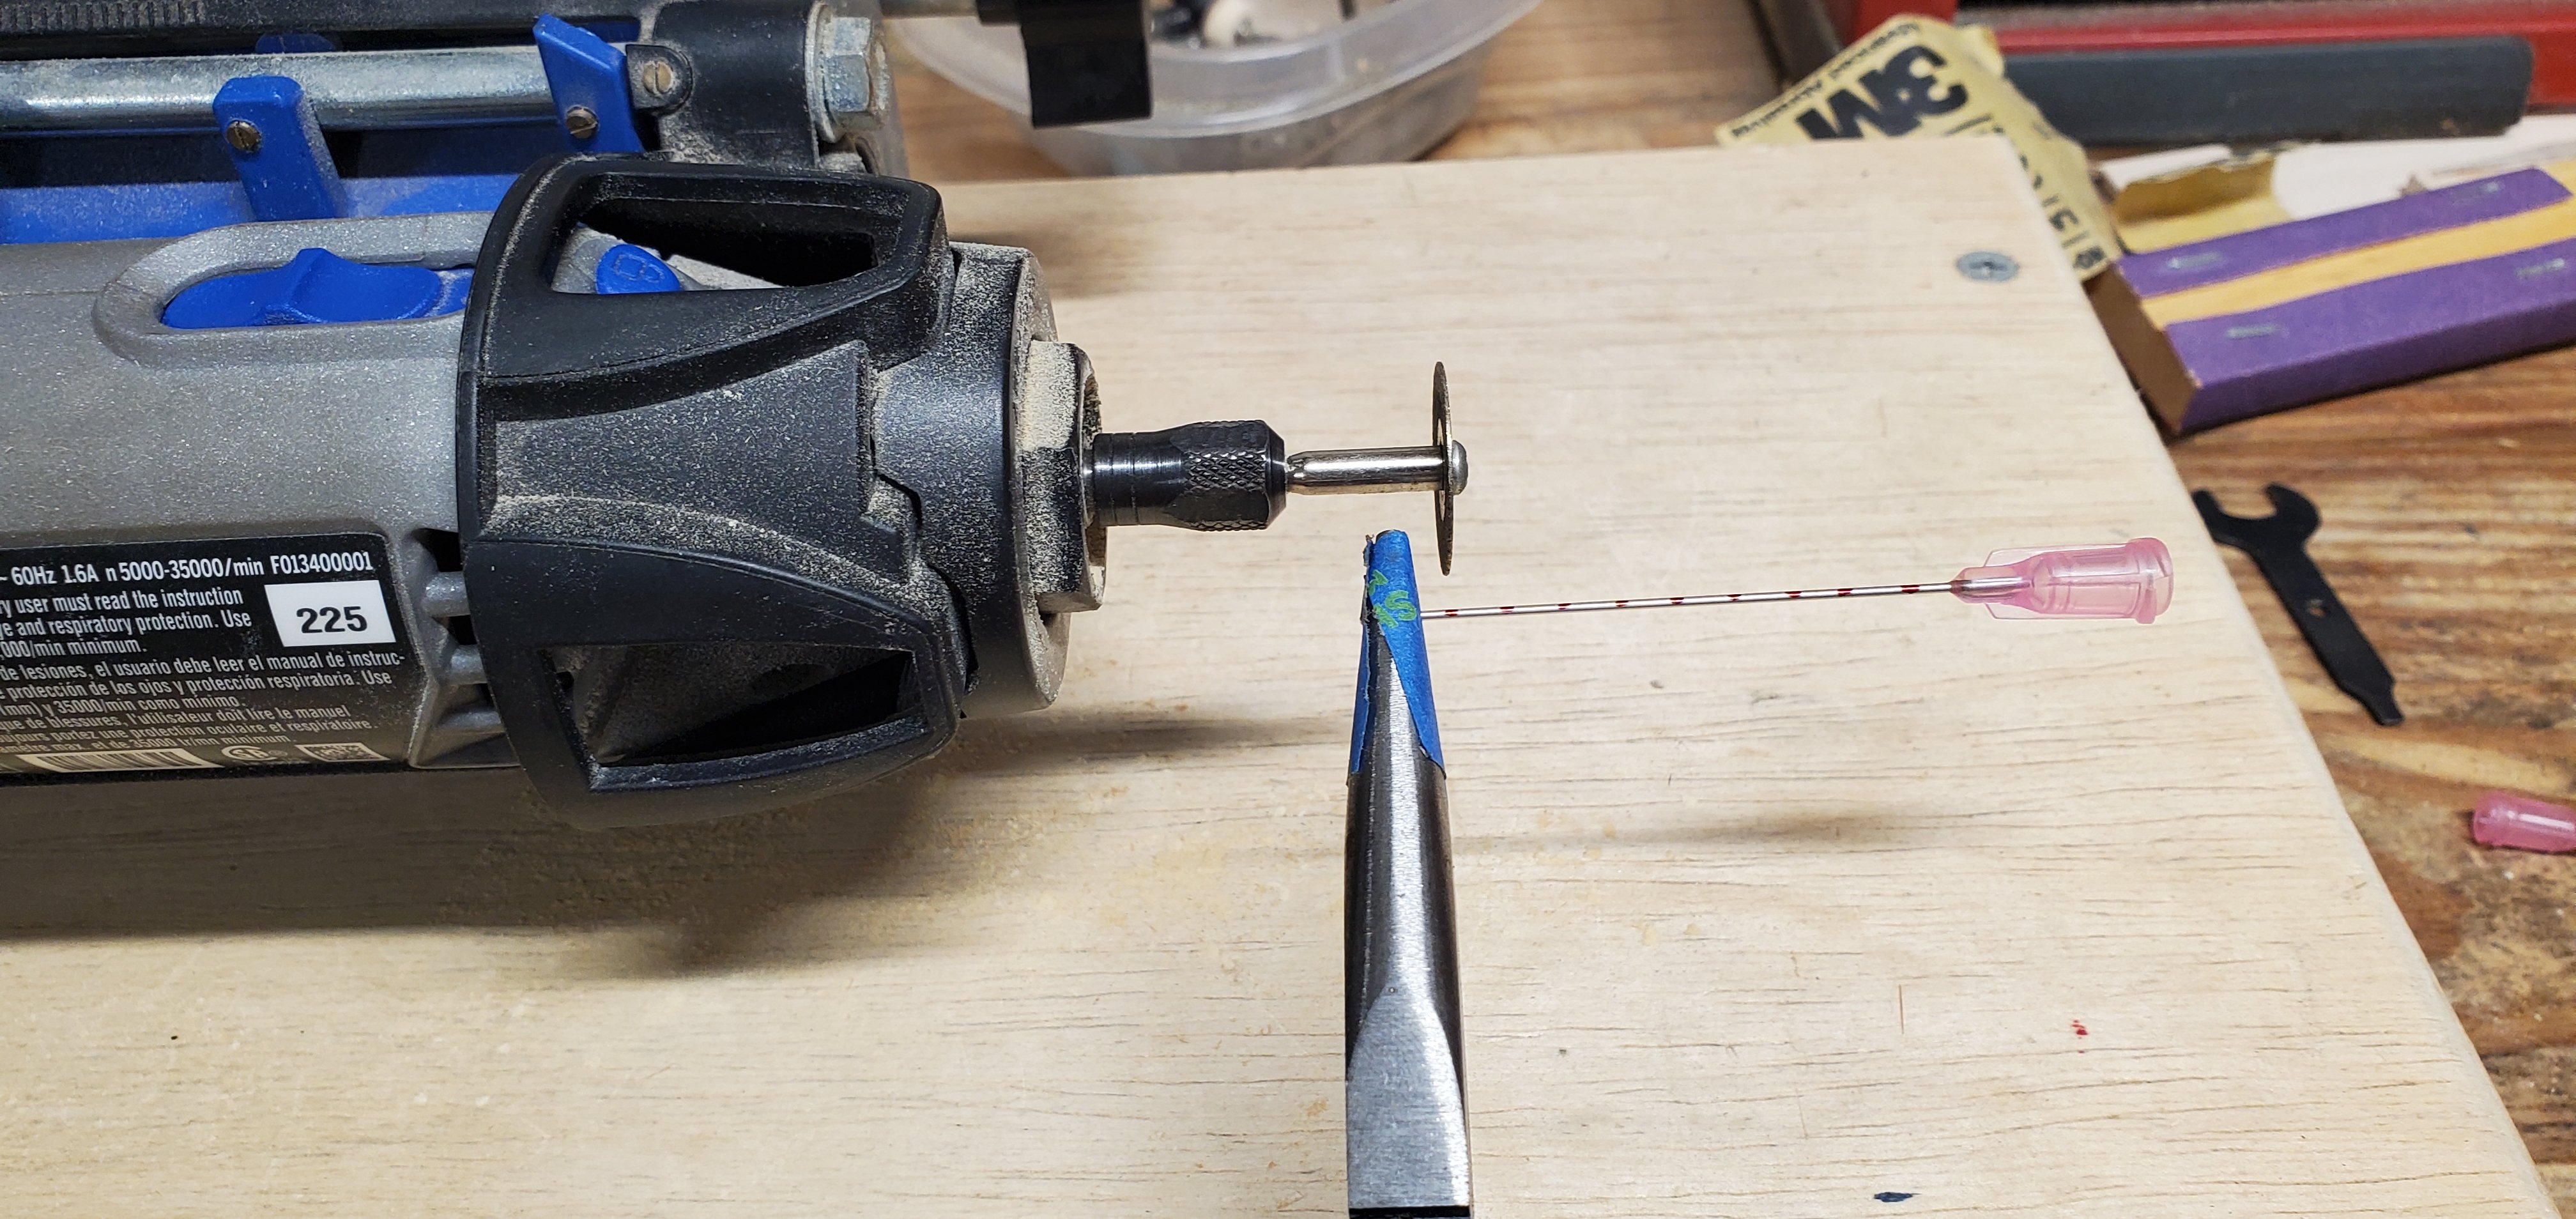
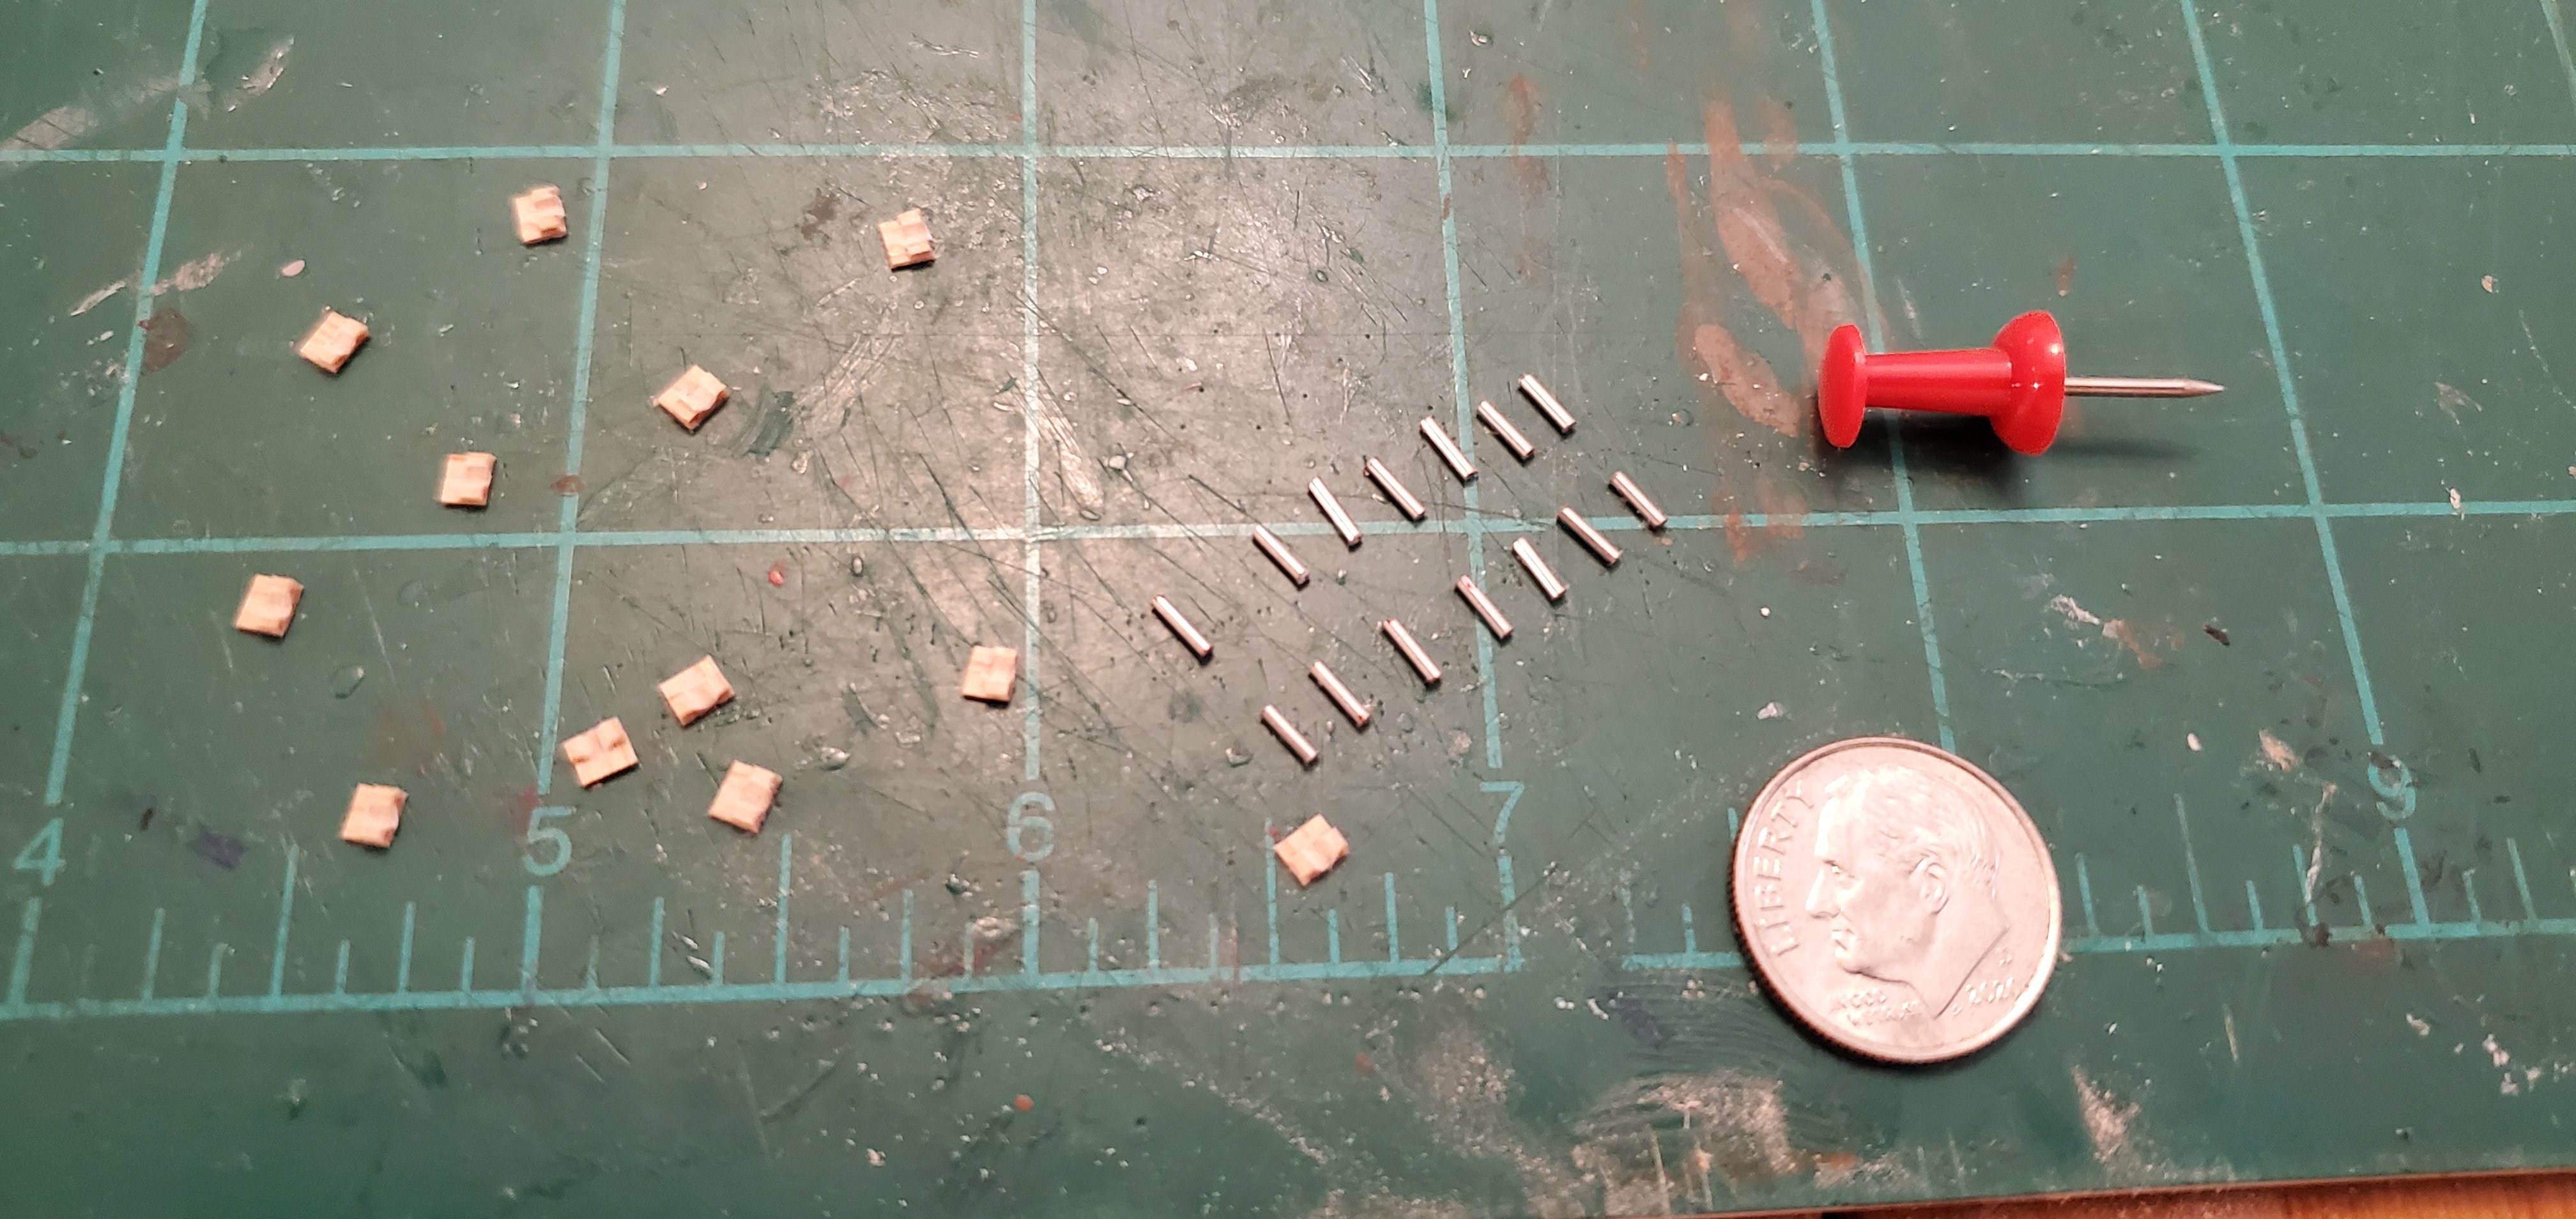
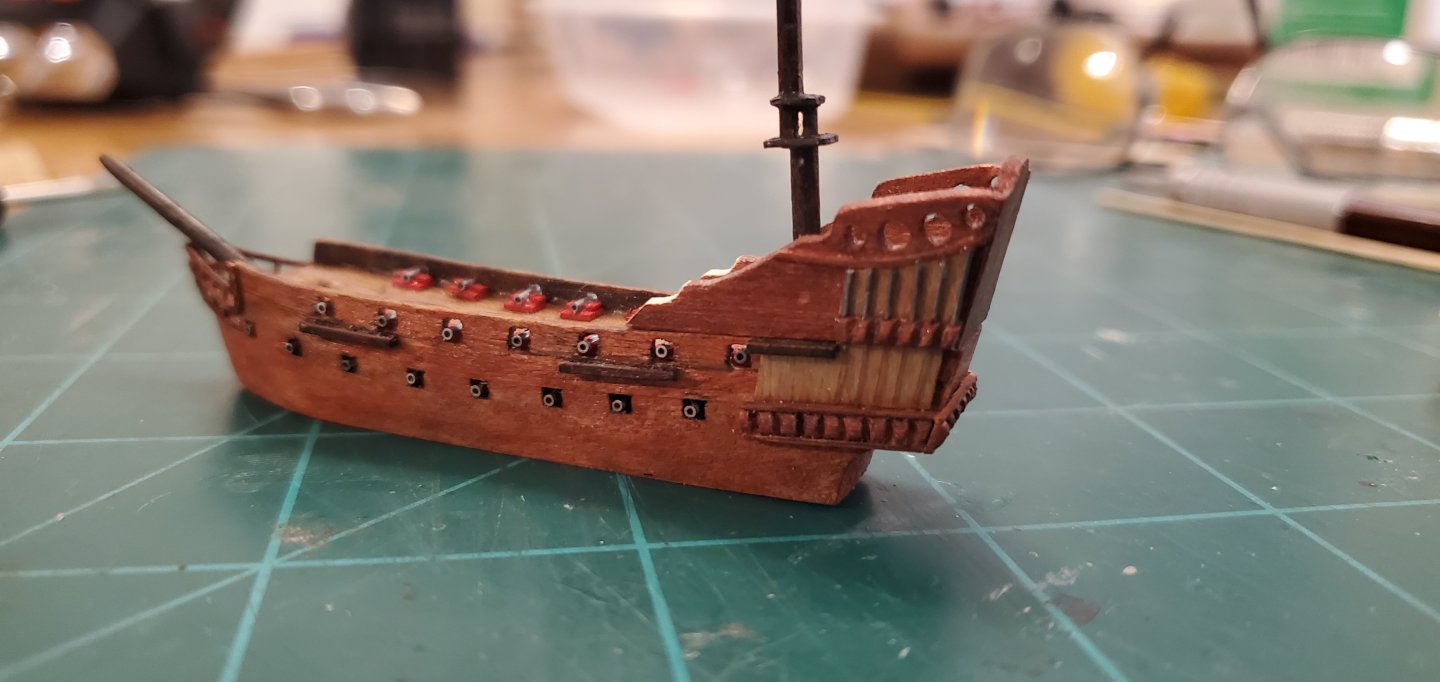
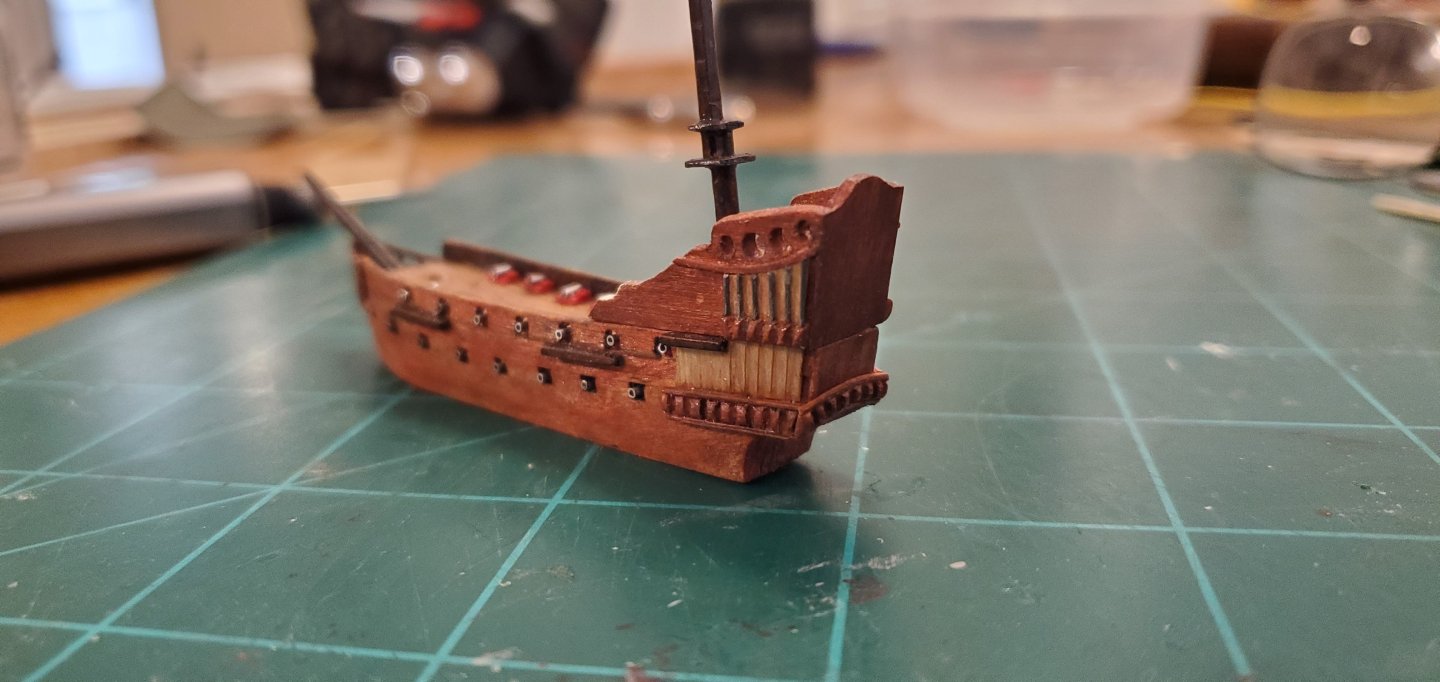
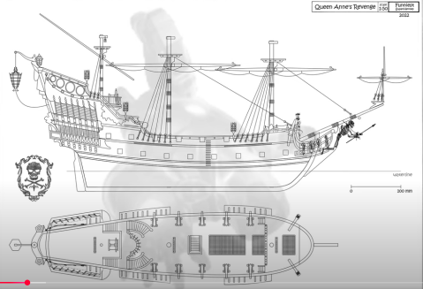
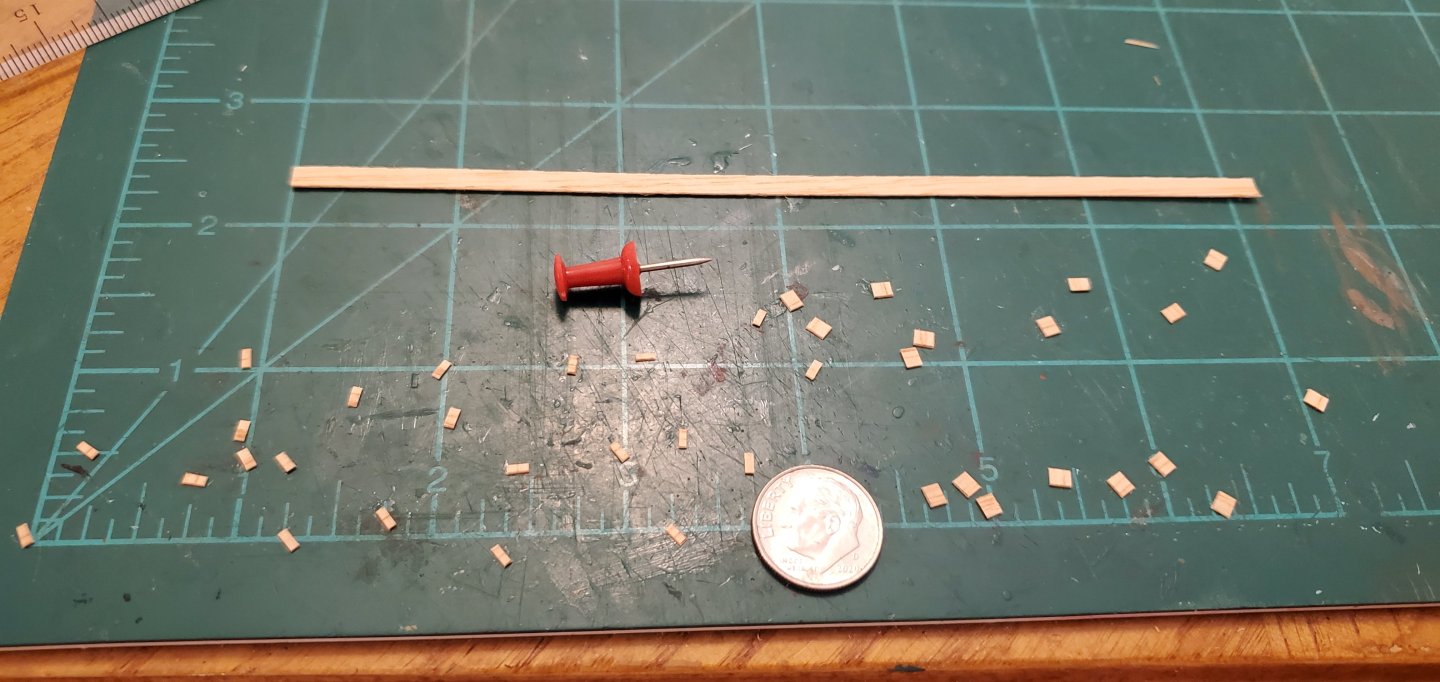
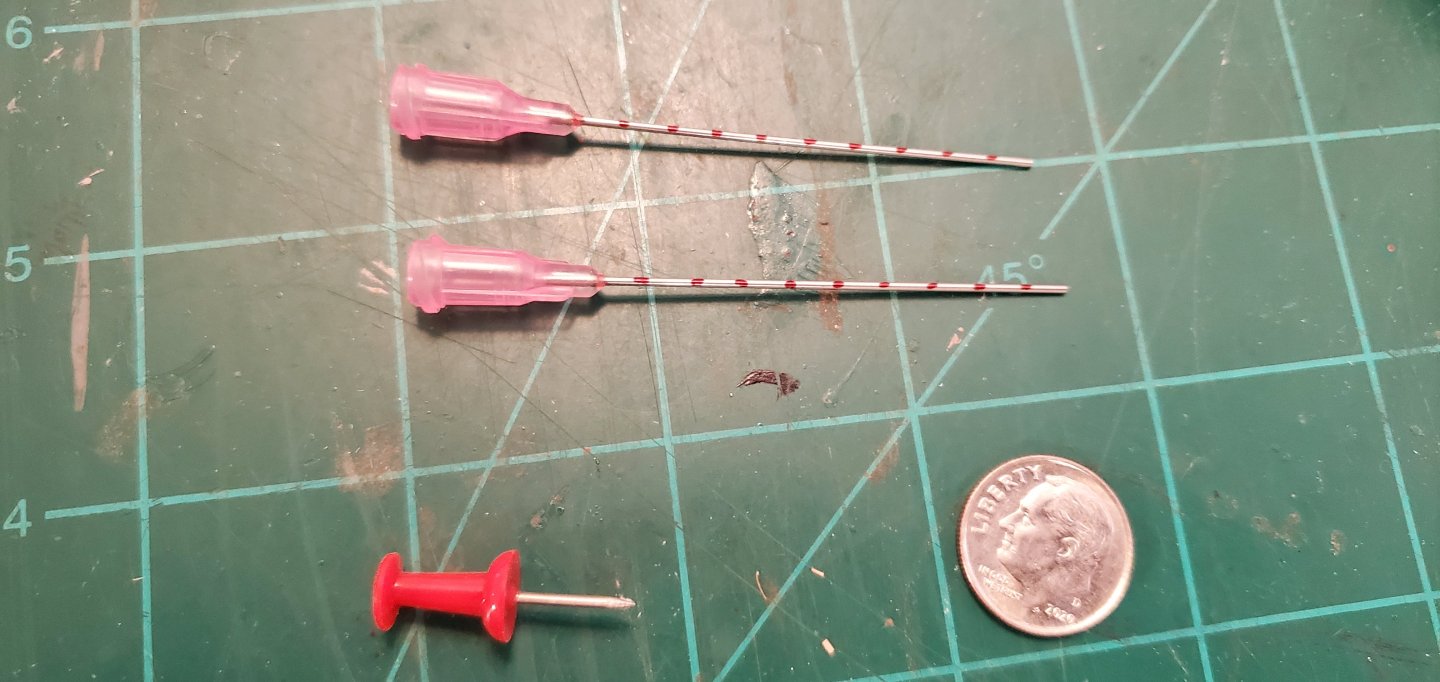
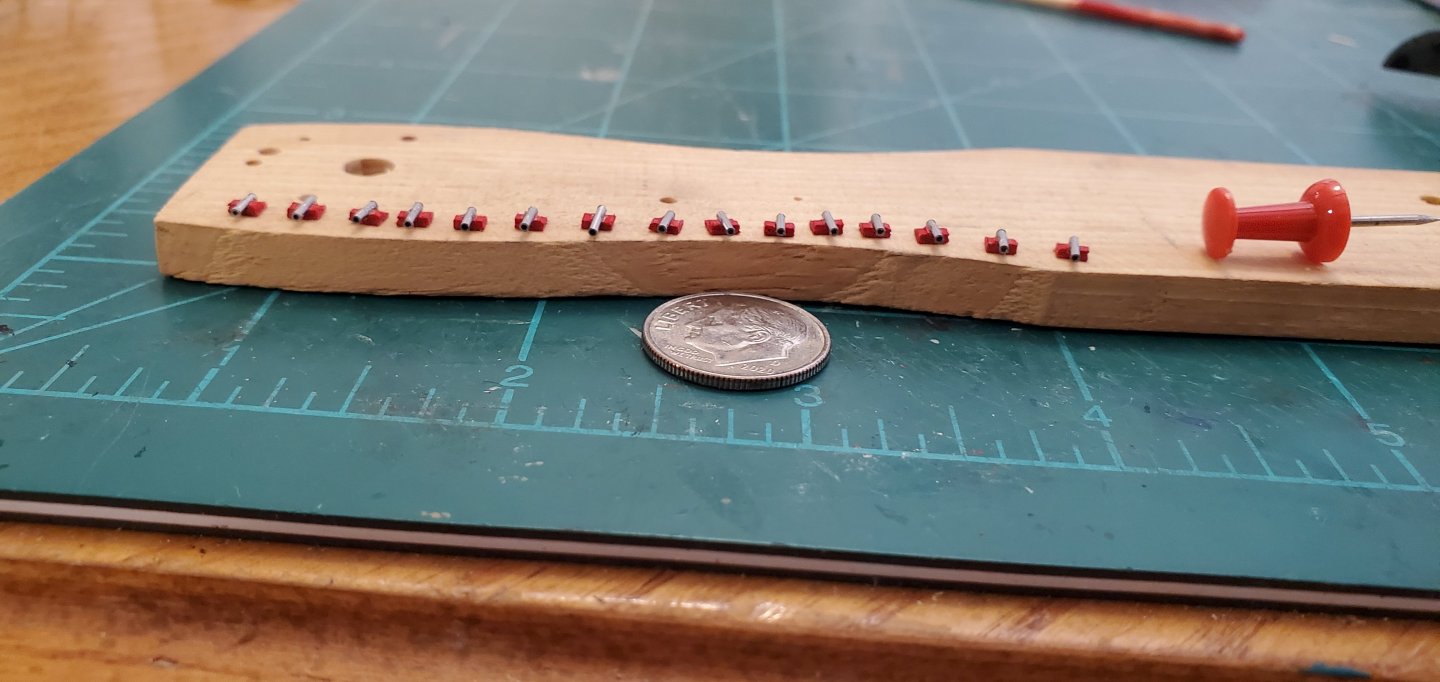
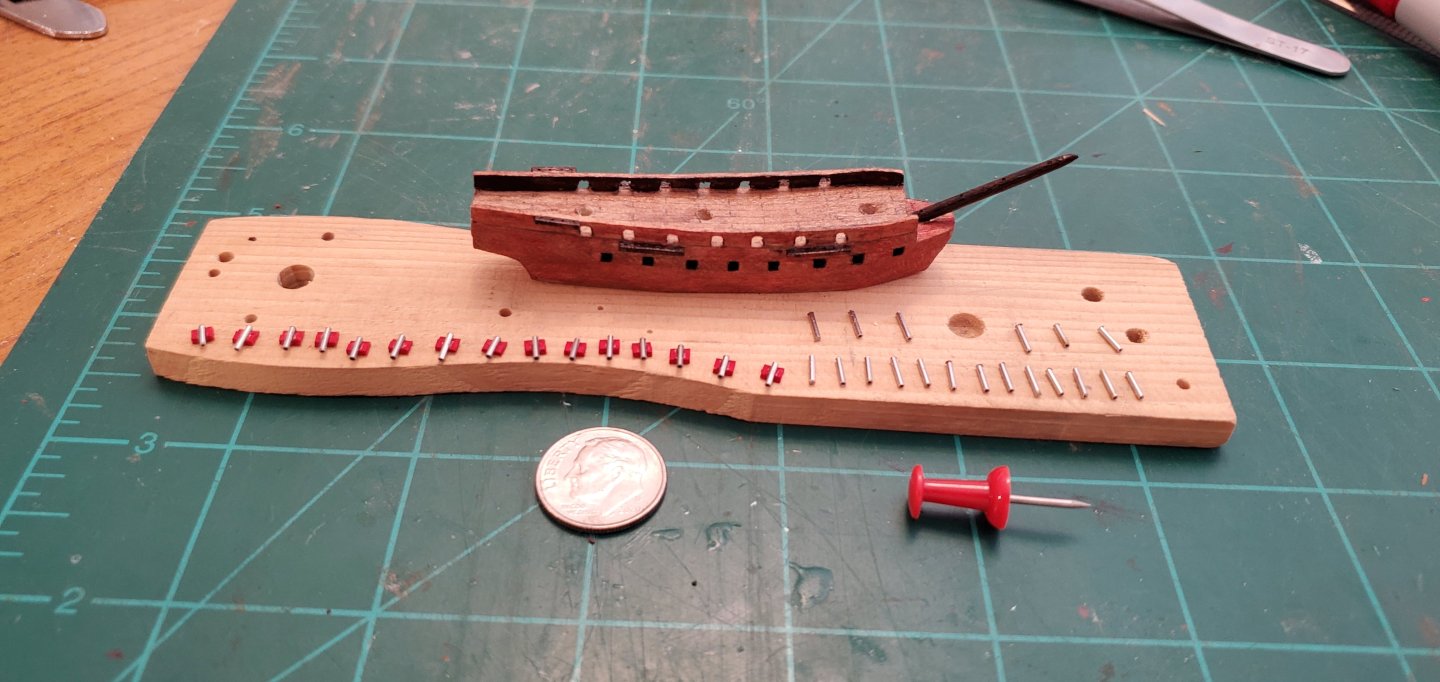
Penguins aside, it's time to work on the Queen's armament. I'm using the diagram below as a guide. It shows 7 gun ports on the main deck bulwark and 8 gun ports on the gun deck, so I'll make cannons to fit that configuration. I start with the 14 carriages needed for the main deck guns. Taking a thin (0.4 mm) piece of planking from my Constellation kit, I narrow it to 3mm wide. Then I cut a bunch of pieces 1/8" long and an equal bunch of pieces 1/16" long. Next, I glue the 1/16" pieces on top of the 1/8" pieces to give each carriage the semblance of the stairstep look you see from the side of carriages. Next I take a small diamond grinding bit in my cordless rotary tool and hollow out a cradle for the cannon barrel. The next step is making the cannon barrels. I start with 20 gauge veterinary needles that are 0.8mm in diameter. I like using vet needles because they are hollow like a real cannon barrel. It's hard to see inside the bottle, but when you look at them close enough they look much better than the solid wire cannon barrels I used in my first SIB efforts. I mark them off in 4mm lengths, then use a thin cutting wheel on my Dremel drill press to cut them into pieces. The last steps are gluing the barrels into the carriage cradles and painting. The gun deck cannons are much simpler since I don't build carriages for them. I just cut slightly longer cannon barrels from the needles. When the time comes, I will drill holes into the ports on the gun deck and insert these cannon barrels. Here's the full armament ready to equip the Queen.


- 156 replies
-
- 15
-
-
-
- Queen Annes Revenge
- bottle
- (and 1 more)
-
We made it dang near 2 pages before penguins got mentioned, which I think is a record! Maybe instead of the ship's cook getting roasted by the Greek Fire, I'll put a couple of penguins in the long boat. Y'all would call that penguins on the barbie, right Pat? 😄
- 156 replies
-
- 7
-
-
-
- Queen Annes Revenge
- bottle
- (and 1 more)
-
You are right on both counts, Ken. They work great in my Dremel drill press and are also very brittle. If I drop one from more than an inch above my workbench it breaks. Or if I do anything more than push it exactly straight in and straight out, it breaks. But with careful use they work great.
- 156 replies
-
- 3
-
-
- Queen Annes Revenge
- bottle
- (and 1 more)
-
Just noticed the link to this build in your signature. I'm on board. Looks like another AWESOME project! But I couldn't help but think of poor ol' neglected Tennessee...

-
Hey Kenny! Thanks for the kind words and I very much appreciate you following along. I've still got a long ways to go here but so far so good!
- 156 replies
-
- 3
-
-
- Queen Annes Revenge
- bottle
- (and 1 more)