MORE HANDBOOKS ARE ON THEIR WAY! We will let you know when they get here.
×


Glen McGuire
-
Posts
1,912 -
Joined
-
Last visited
Content Type
Profiles
Forums
Gallery
Events
Everything posted by Glen McGuire
-
 I promise you they will be there, Ian. But they will be so small you won't be able to see them until you've had a few tots of @BANYAN's Bundy rum! 🍹🍹🍹
- 301 replies
-
- 6
-

-

-
- Constitution
- Bluejacket Shipcrafters
- (and 1 more)
-
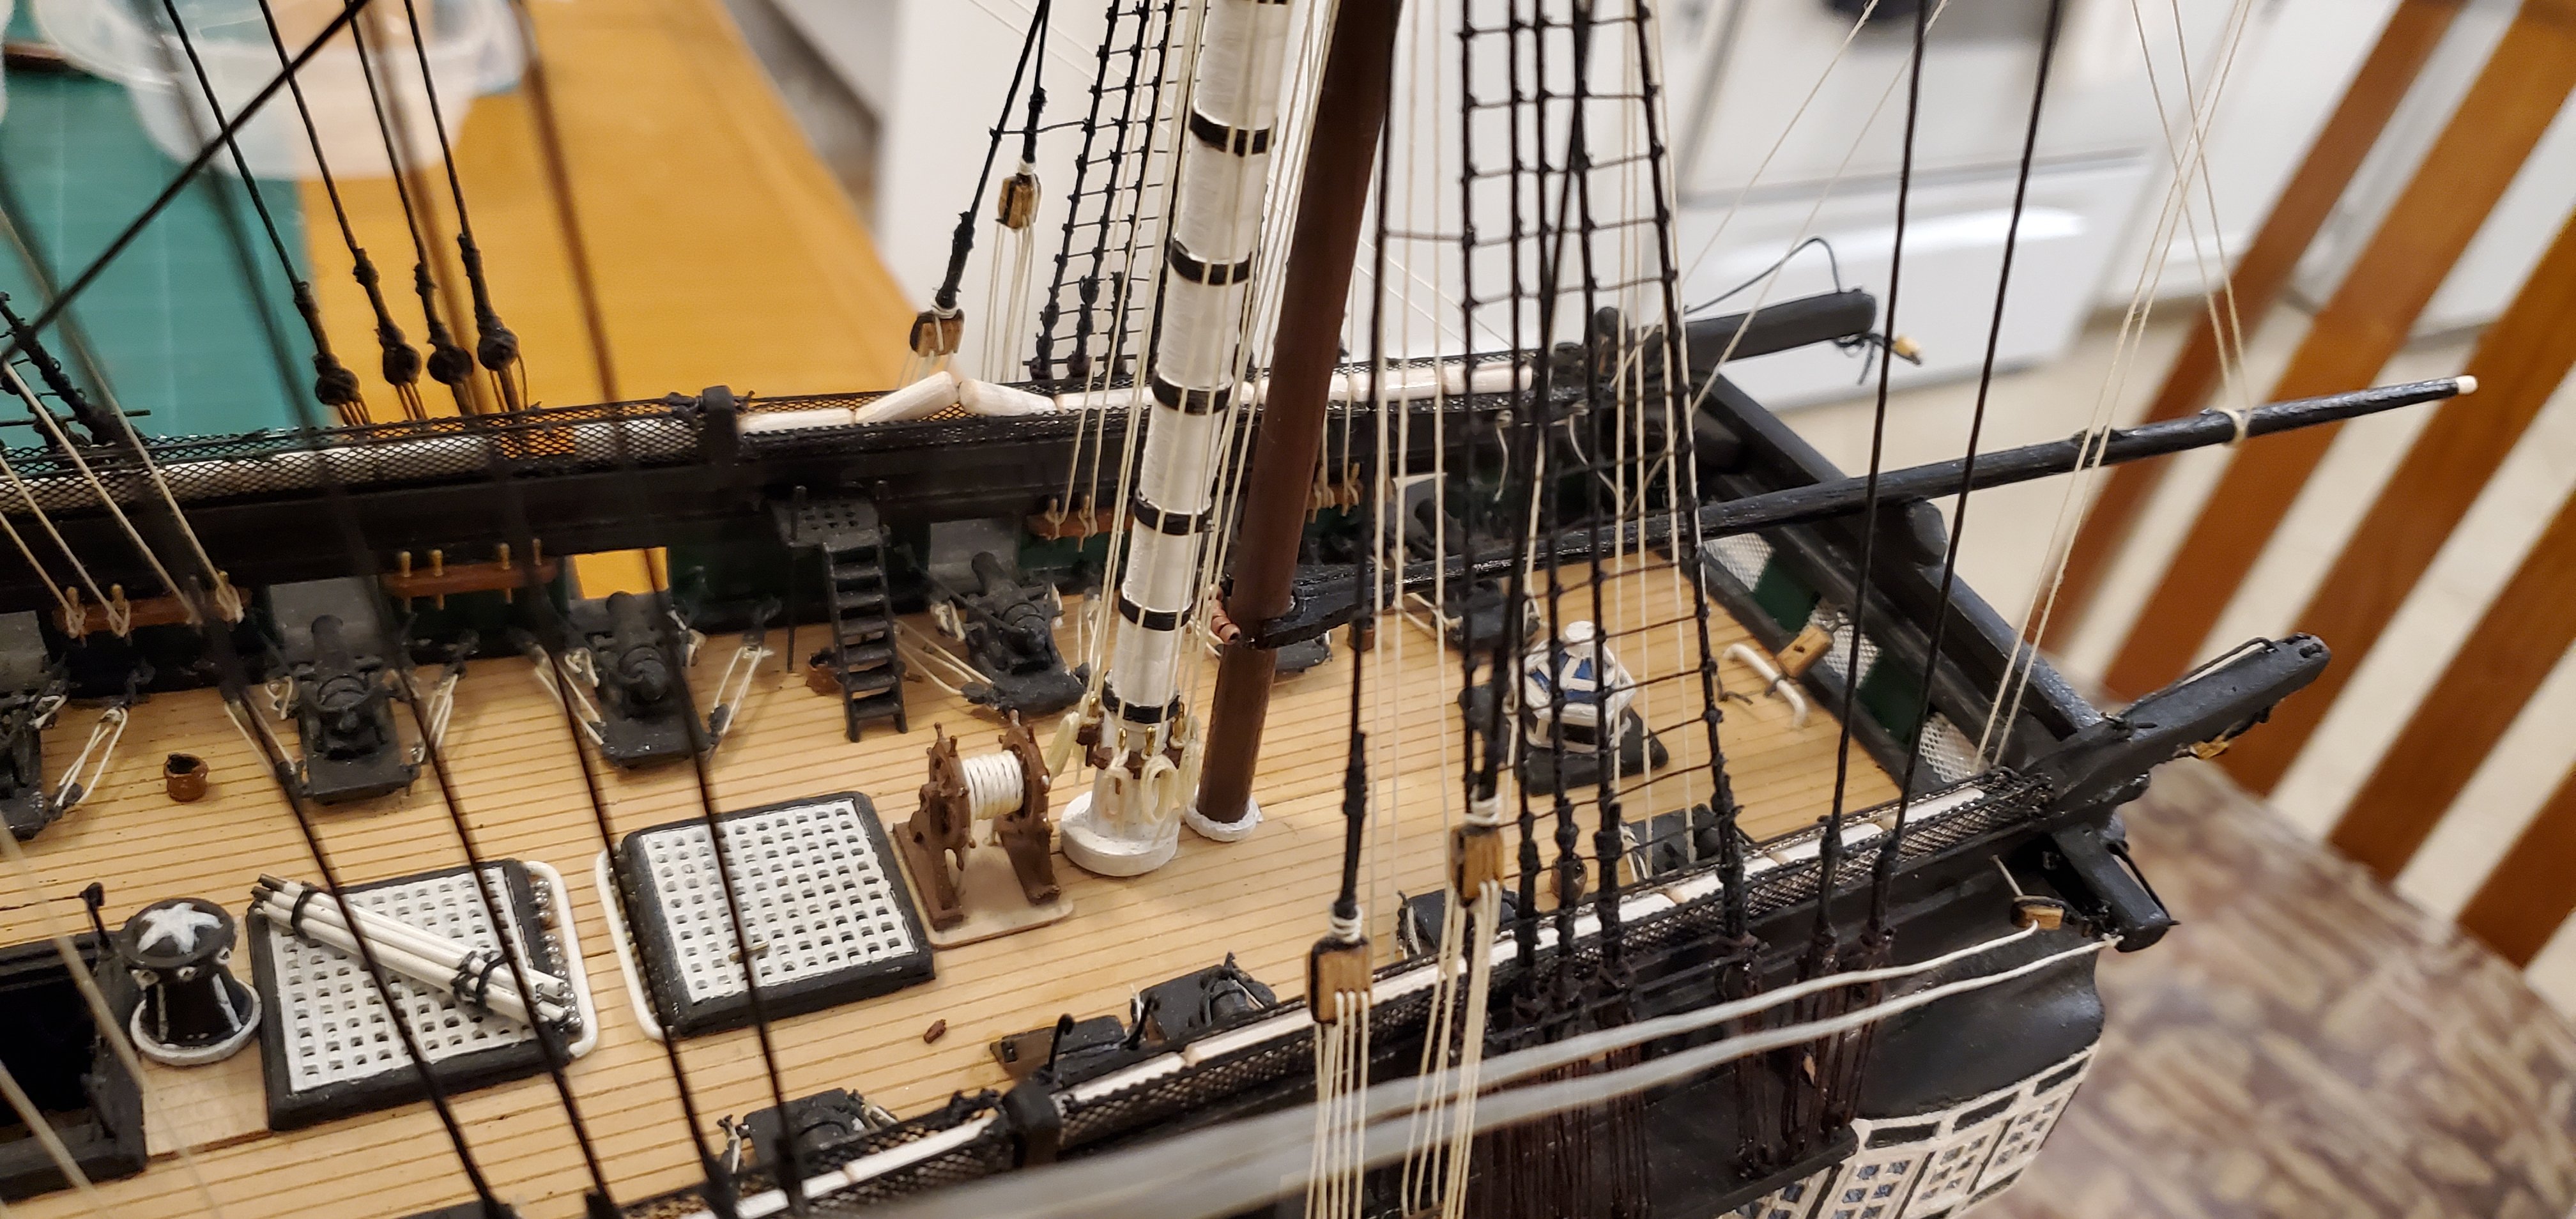
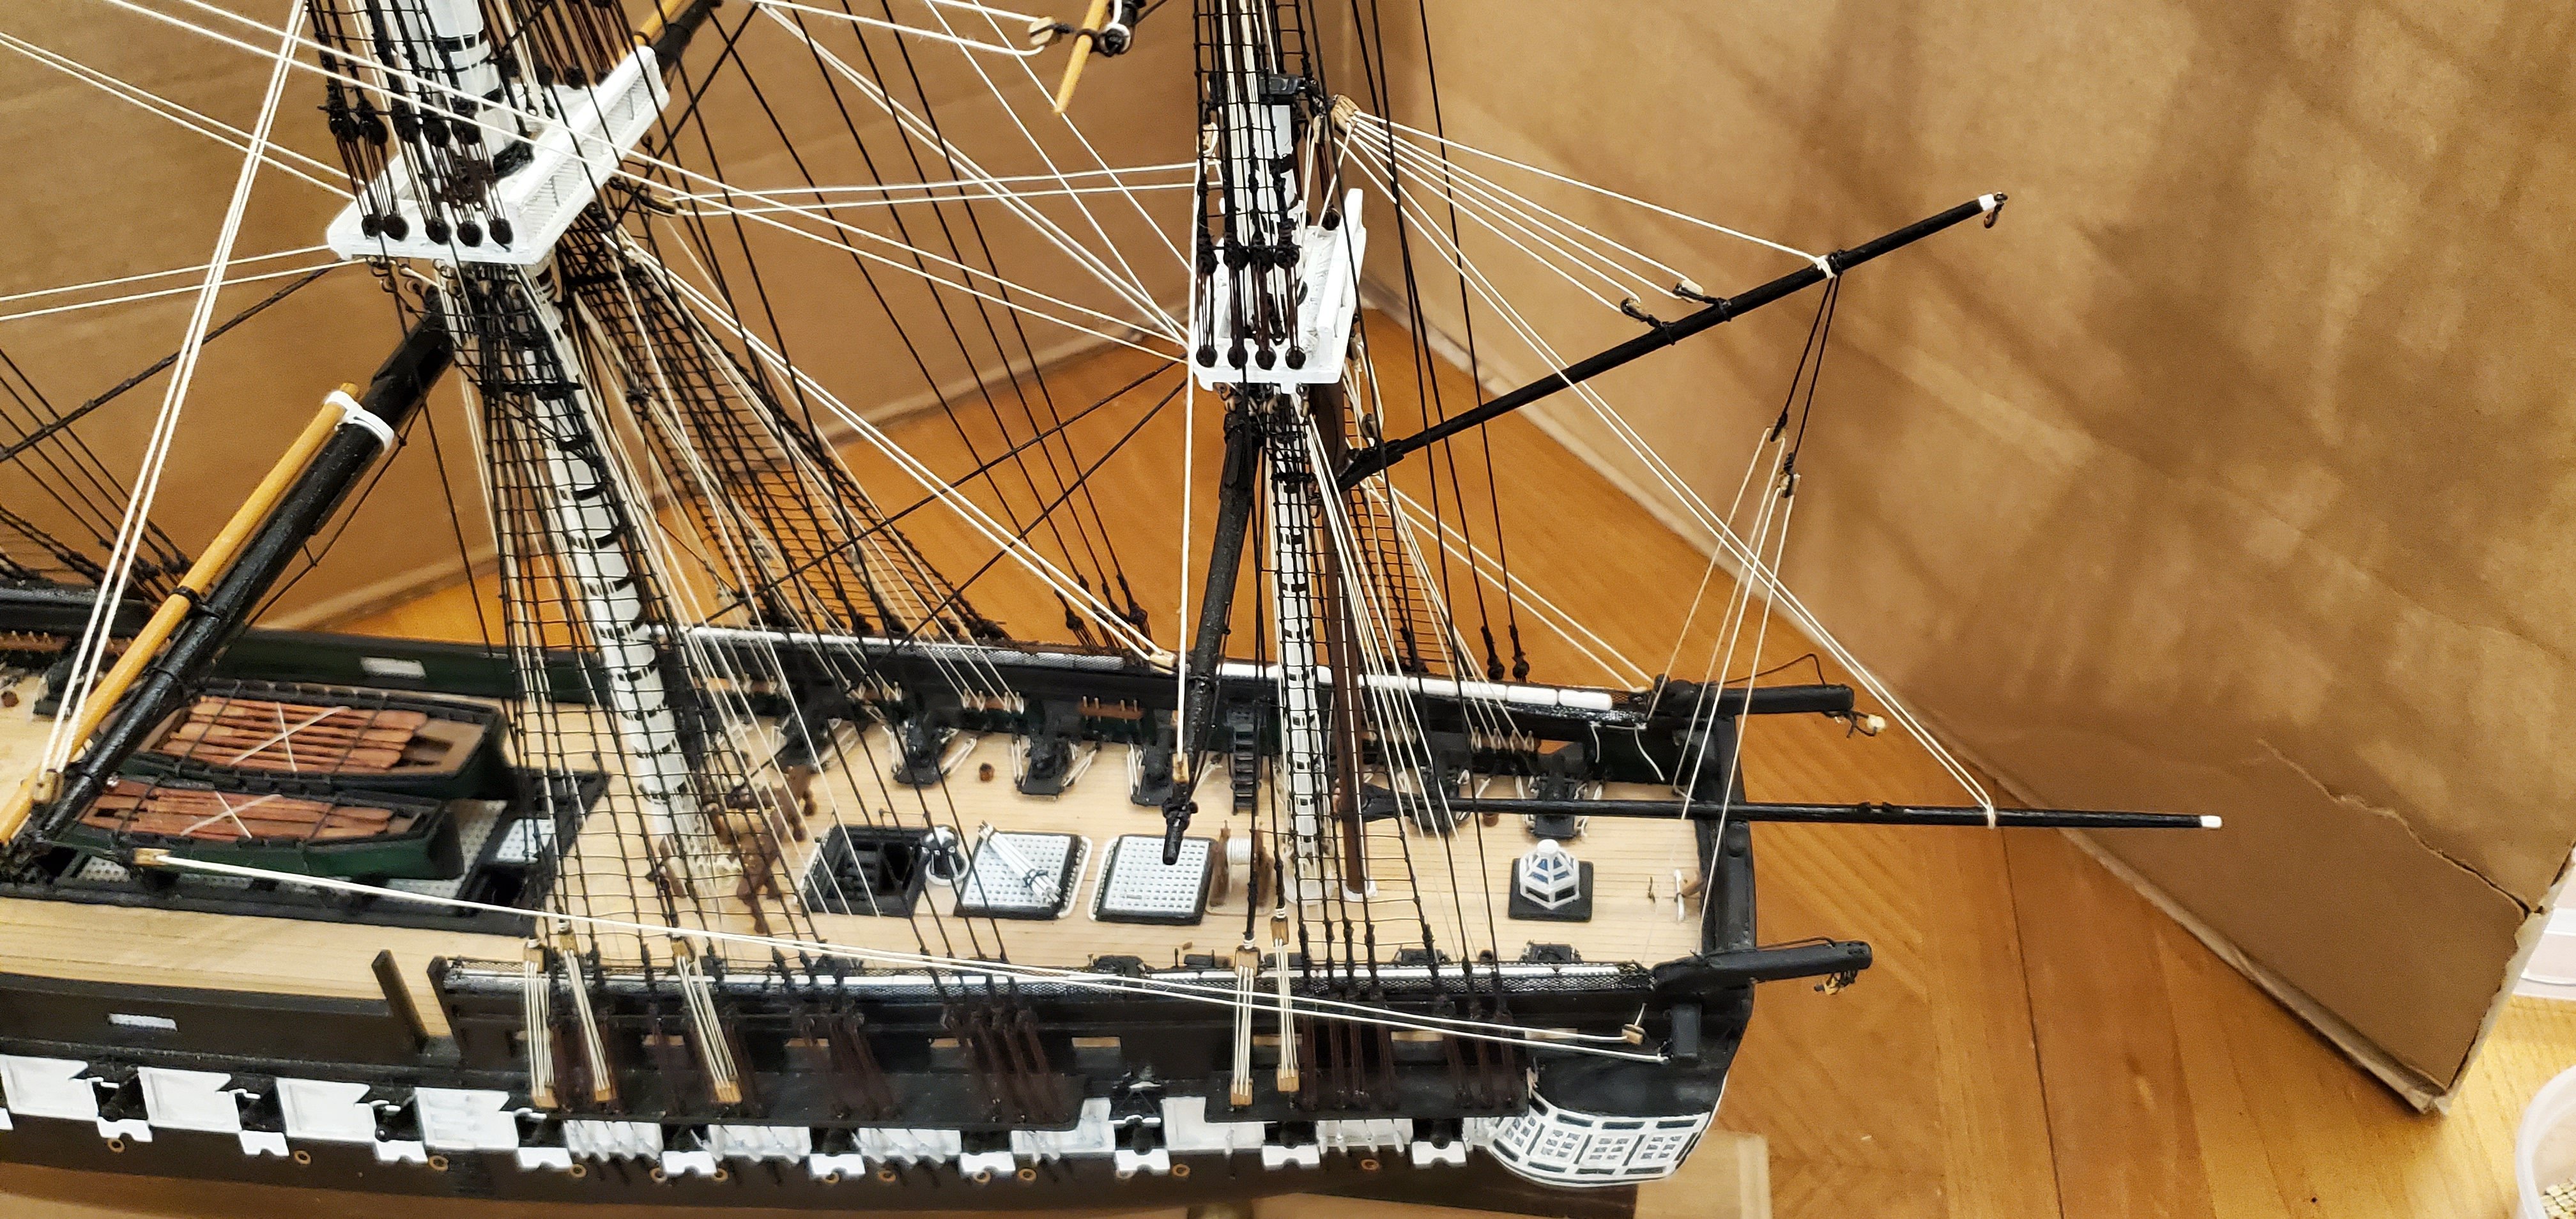
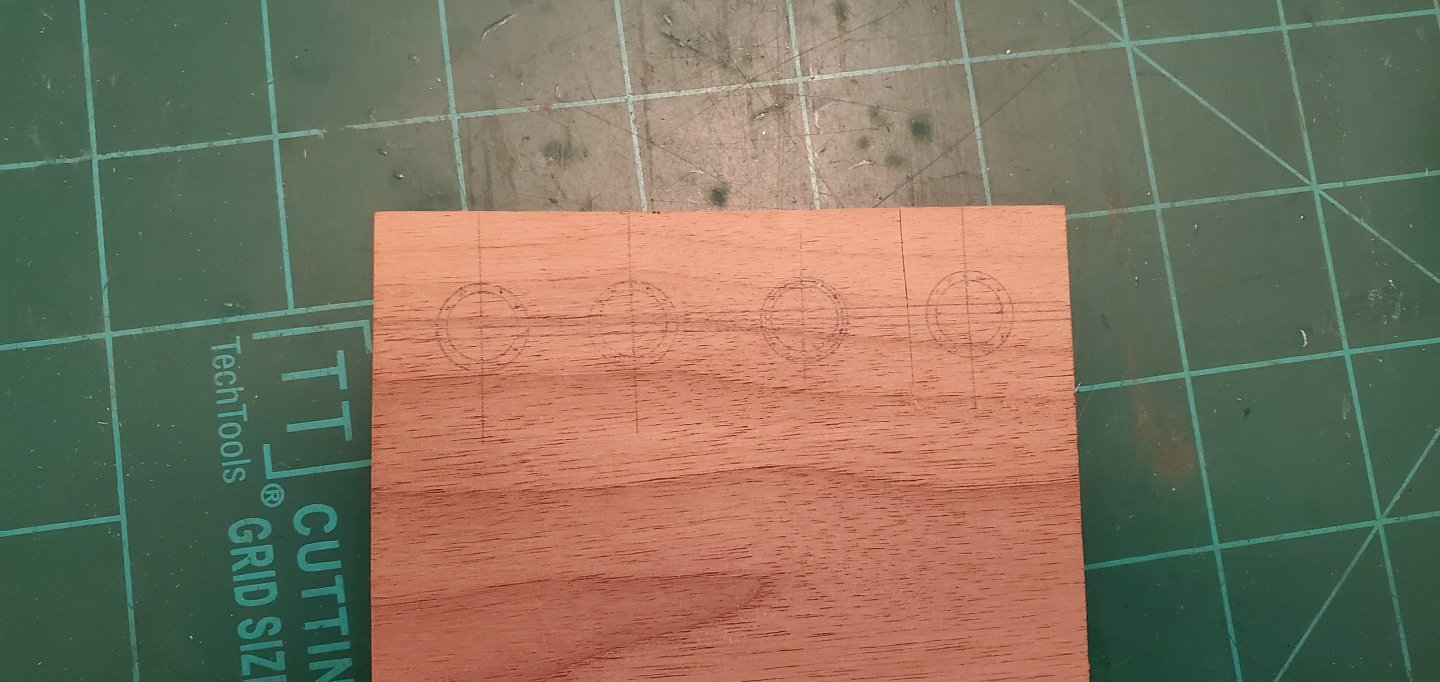
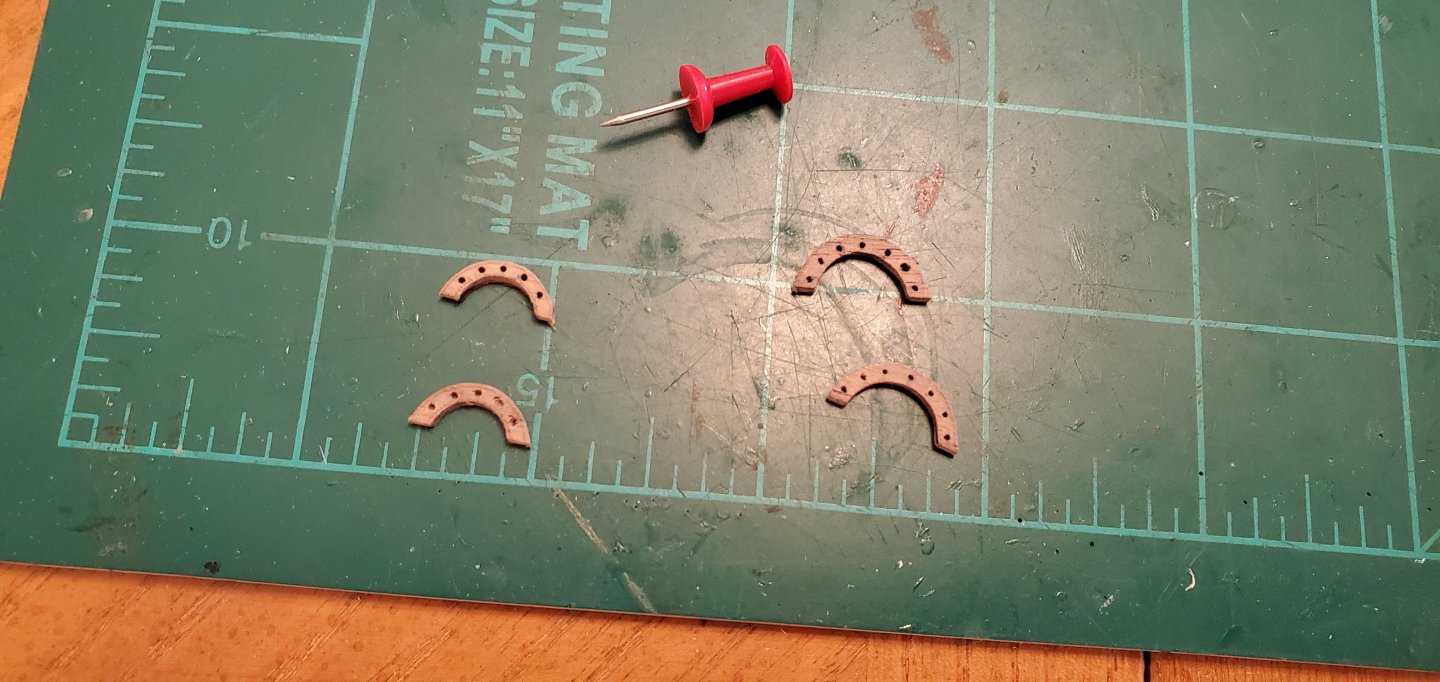
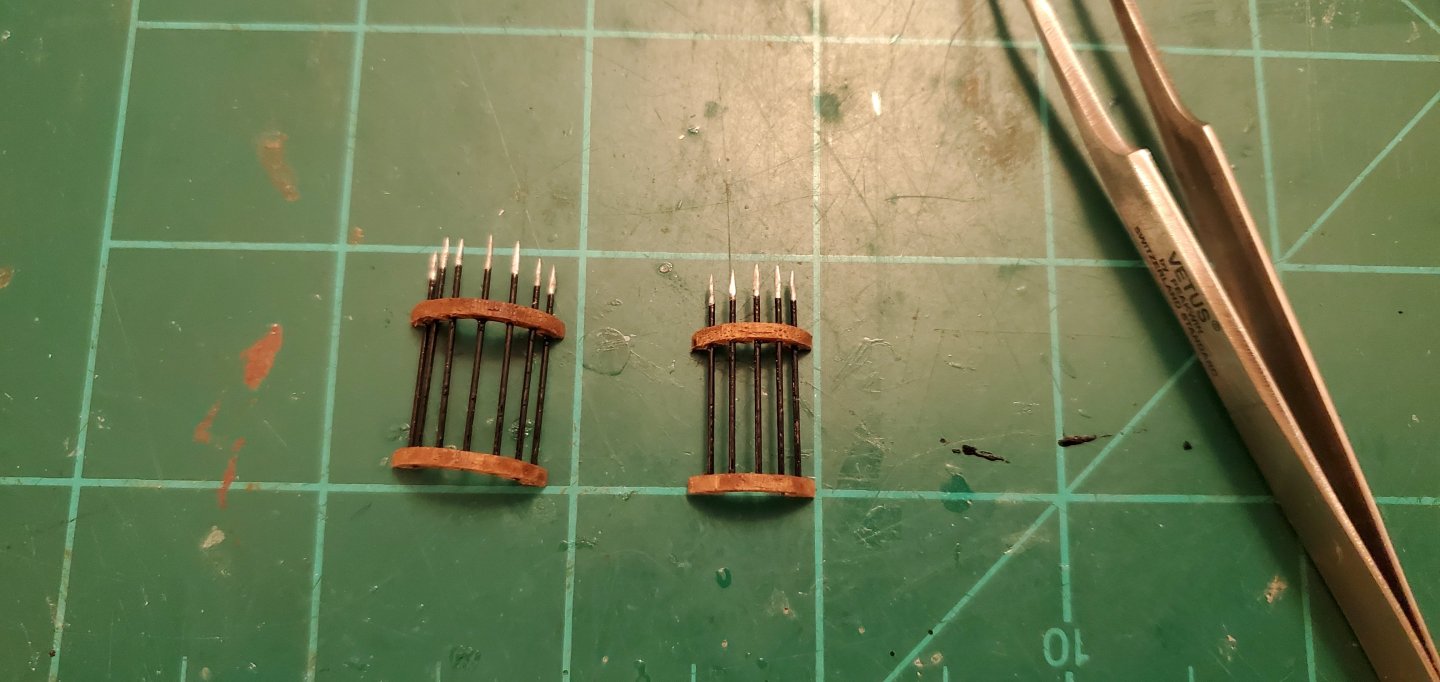
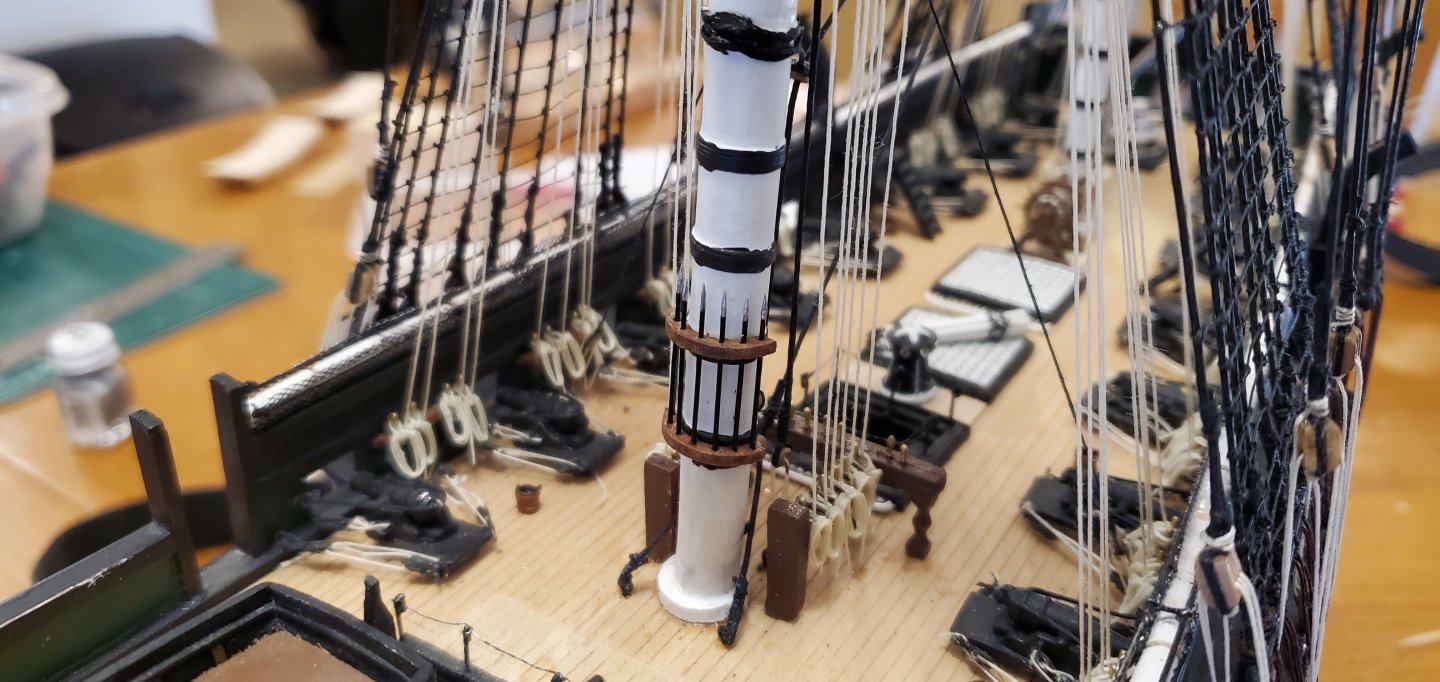
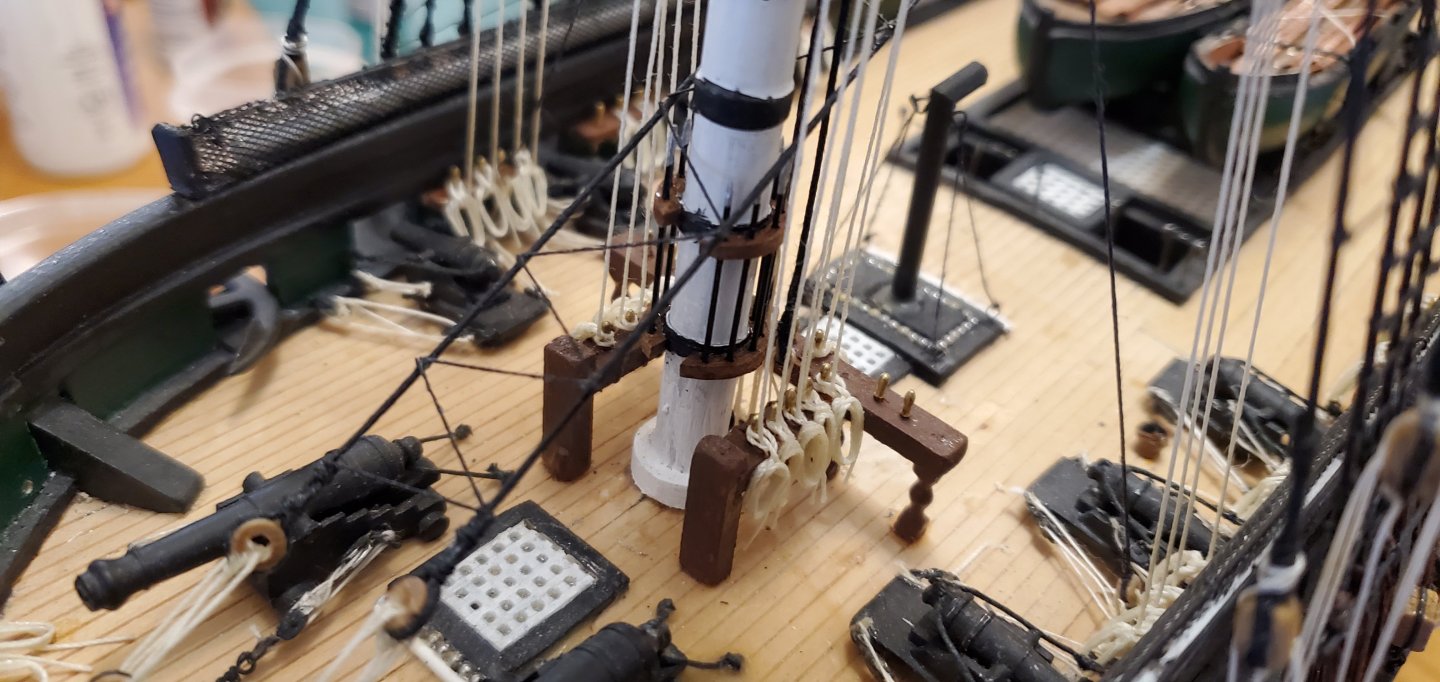
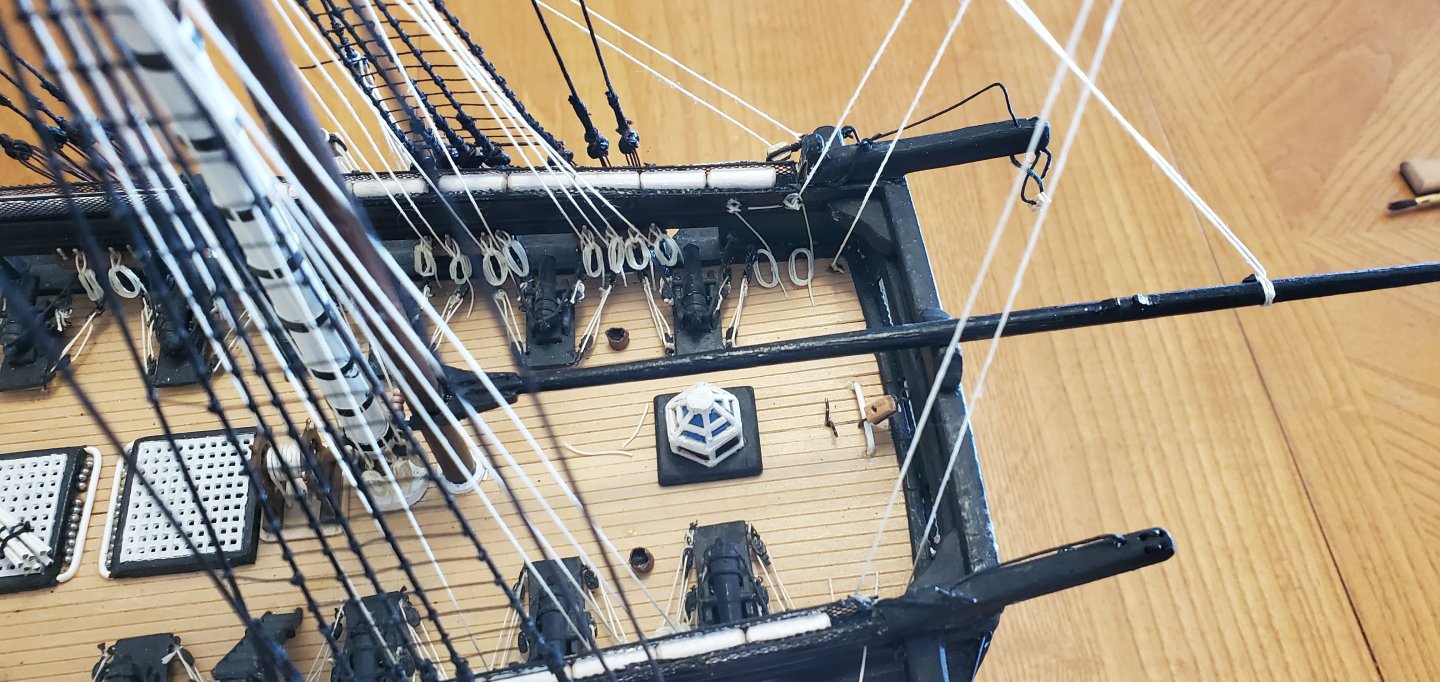
I did get started on a new SIB project, but while waiting for wood and glue to dry I had some time to flip back over here and get some more work done on the Constitution. While the BlueJacket instructions don't mention boarding pikes, pretty much every model of the Constitution I see has them. I think they are a really cool detail, so I decided to add them to the build. The pikes are made from .02" diameter music wire. I cut them to length, mashed the tip in a vice, then filed to a sharp point. It certainly would have been easier if I'd decided to make these before I did all the running rigging as it was a pain to worm them into place against the fore and main masts. But I managed to install them without ripping down any of the lines.

- 301 replies
-
- 18
-

-
-
- Constitution
- Bluejacket Shipcrafters
- (and 1 more)
-
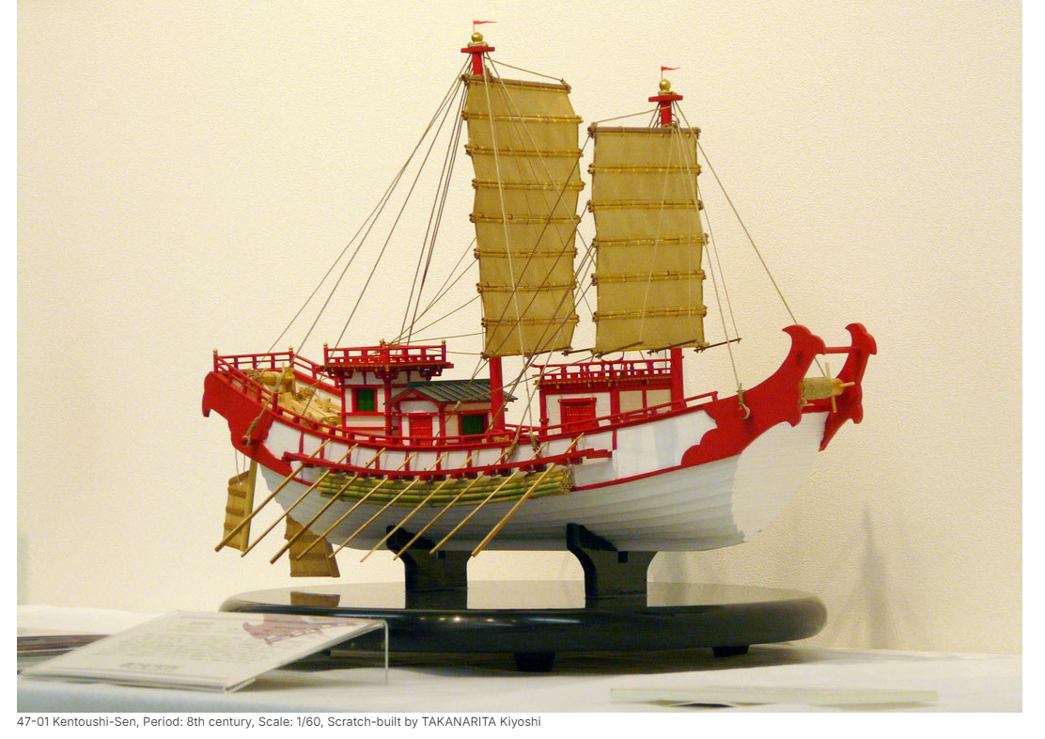
I’m starting off with my preferred laminated hull. The Kentoshi-sen has a prominent upsweep at the bow and stern. To get the desired shape, I boiled the layers of the hull in water for 10 minutes, then put them in my high tech press. Afterwards, I glued them together and clamped.

- 106 replies
-
- 11
-
-
- Kentoshi-Sen
- bottle
- (and 1 more)
-
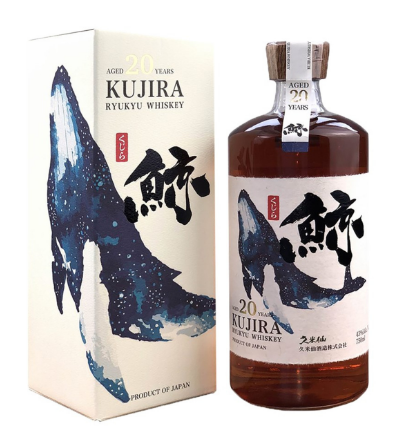
Time for a new SIB project. And this one has a deadline. But I’ve got plenty of time since I just have to finish it before July. About a year and a half ago, I reconnected with an old college friend and roommate that I had not seen since the late 80s. He found out about my SIB work and asked me if I would make one that he could give to his wife for her birthday in July (hence the deadline). We got to talking about what the subject of the project should be and he asked if I could do one with a Japanese theme. He and his family lived in Japan for several years and loved the artwork and culture. So he thought his wife would like something reminding her of their time in Japan. I began digging around for historical Japanese ships that looked interesting or had a compelling story. Surprisingly, I didn’t find a whole lot to choose from. I’m fond of warships, but I thought one of those might not be the best thing for his wife’s birthday present. I finally came across a ship that caught my eye. It did not have the most compelling story behind it, but it had some really cool features and was very representative of Japan’s non-military nautical history. The picture labeled the ship “Kentoshi-Sen”. With further reading, I learned that Kentoshi is not the name of a particular ship. It translates roughly to “ambassadors dispatched to Tang”. So it’s actually the name of the nautical expeditions carried out by Japan in the 7th century and the picture is representative of the types of ships used in the expeditions. The purpose of the expeditions was cultural exchange with neighboring China. During the Japanese Nara period and the Chinese Tang Dynasty of the 7th century, Kentoshi-sen ships ferried Imperial Japanese Envoys to China. The Japanese envoys included scholars, engineers, diplomats, monks, court officials and merchants. They would return from China with new ideas surrounding engineering, architecture, and vocabulary which had a significant influence on Japanese culture. They also brought back items such as glass, musical instruments, textiles, scroll writings, and many other exotic curiosities. The cross-cultural exchanges began with 5 missions between 600 and 614 followed by 18 or 19 missions from 630 to 894. The last mission was in 838, thus ending the period of active diplomatic relations between Japan and China until the 15th century. Current pictures of Kentoshi-sen ships (as well as a full replica built in 2010) are based on drawings from the Toseiden emaki scrolls dating back to the 7th century. There’s also a Lego version of the Kentoshi-sen available, so the subject is not as obscure as one might think! My goal for the project is to make the subject, bottle, and presentation authentic Japanese. So for the bottle, I wanted some type of Japanese adult beverage bottle. I searched all the stores around Austin but could not find anything suitable in my price range. The cheap stuff all had frosted or opaque glass and the clear bottles were way too expensive. Then I had an epiphany – eBay! I did a search for empty Japanese liquor bottles on eBay and found one I liked for $20. It was an empty bottle of Kujira RyuKyu Whiskey, single grain aged 20 years. Out of curiosity, I did a quick search to see what a new (full) bottle would cost. An eye-popping $400 - $700 depending on the store! So an empty bottle from eBay it is!! I was telling my son about the bottle and I mentioned that it had a cool picture of a blue whale on the label as well as the box the bottle came in. He said, “Duh Dad. Kujira is the Japanese word for whale.” Oh.

- 106 replies
-
- 12
-
-
- Kentoshi-Sen
- bottle
- (and 1 more)
-
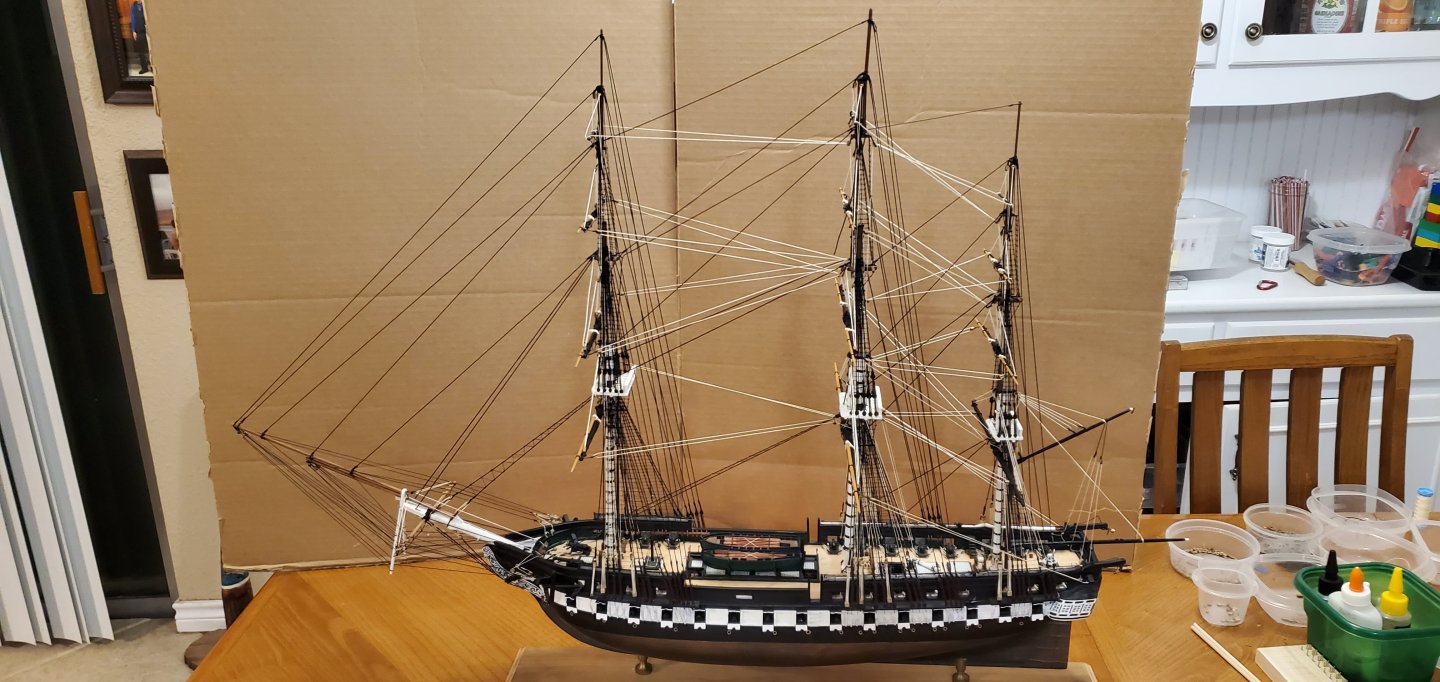
Minor but rather time-consuming progress made this week - adding all the hanging rope coils for the running rigging. A little over 100 of them. They makes me miss ratlines. Just kidding, Bob! I think we're getting fairly close here, at least inside the 20 yard line. Maybe? I believe the biggest obstacle remaining is the davits and davit rigging for the ship's boats. There's not a lot of detail on those in the instructions, so I've got some build log studying to do. However, I need to hit the pause button on the Constitution for a couple of weeks so I can get another SIB going.


- 301 replies
-
- 14
-
-
-
- Constitution
- Bluejacket Shipcrafters
- (and 1 more)
-
Linus Napoleonic shipyard
Glen McGuire replied to Linus Spjutsberg's topic in New member Introductions
Welcome aboard, Linus! Your 1/700 scale models are exceptional!! -
If I gotta choose between the rum keg and the chart table, I'll take my chances with blind navigation! Exceptional work, Keith! Such a cool project and so well done!
- 732 replies
-
- 5
-
-

-
- Lula
- sternwheeler
- (and 1 more)
-
As far as I know, my cows are strictly vegan. We've got a healthy number of rattlers around and they seem to steer (ahem) clear of them. I'll let them know that they are considered dietary supplements in your parts! 😃
- 301 replies
-
- 5
-
-
- Constitution
- Bluejacket Shipcrafters
- (and 1 more)
-
That is the only "B" word allowed to be said around my longhorns, Ron! Others like Burgers, Barbecue, Brisket, Beefsteak, etc really upset them!
- 301 replies
-
- 6
-
-
- Constitution
- Bluejacket Shipcrafters
- (and 1 more)
-
That's the best place to discover them, Ian!! That's hilarious! Remind me not to sit near you at dinner, Henry! 😃 Was that before or after the fall on the ice? I think you're gonna need a 55 gallon swear drum before all this is over! NO NO NO!! They have all been well behaved of late. Don't give them any ideas or encouragement, Keith! 😃 I have not tried those, Carson. I bet they are a lot better than Ol' Sailor Jerry's spiced rum!! 🤮 Thanks, Phil!! Thanks, Pat! I think. I'm going to assume that is an Aussie compliment! Speaking of Australia and cows, a friend sent me this. Can you explain this, Pat?

- 301 replies
-
- 8
-
-
-
- Constitution
- Bluejacket Shipcrafters
- (and 1 more)
-
Ice and ratlines! Dang, Bob. That sounds like quite a fall. Glad you are still in one piece. I guess that last picture answers my question about the snow.
-
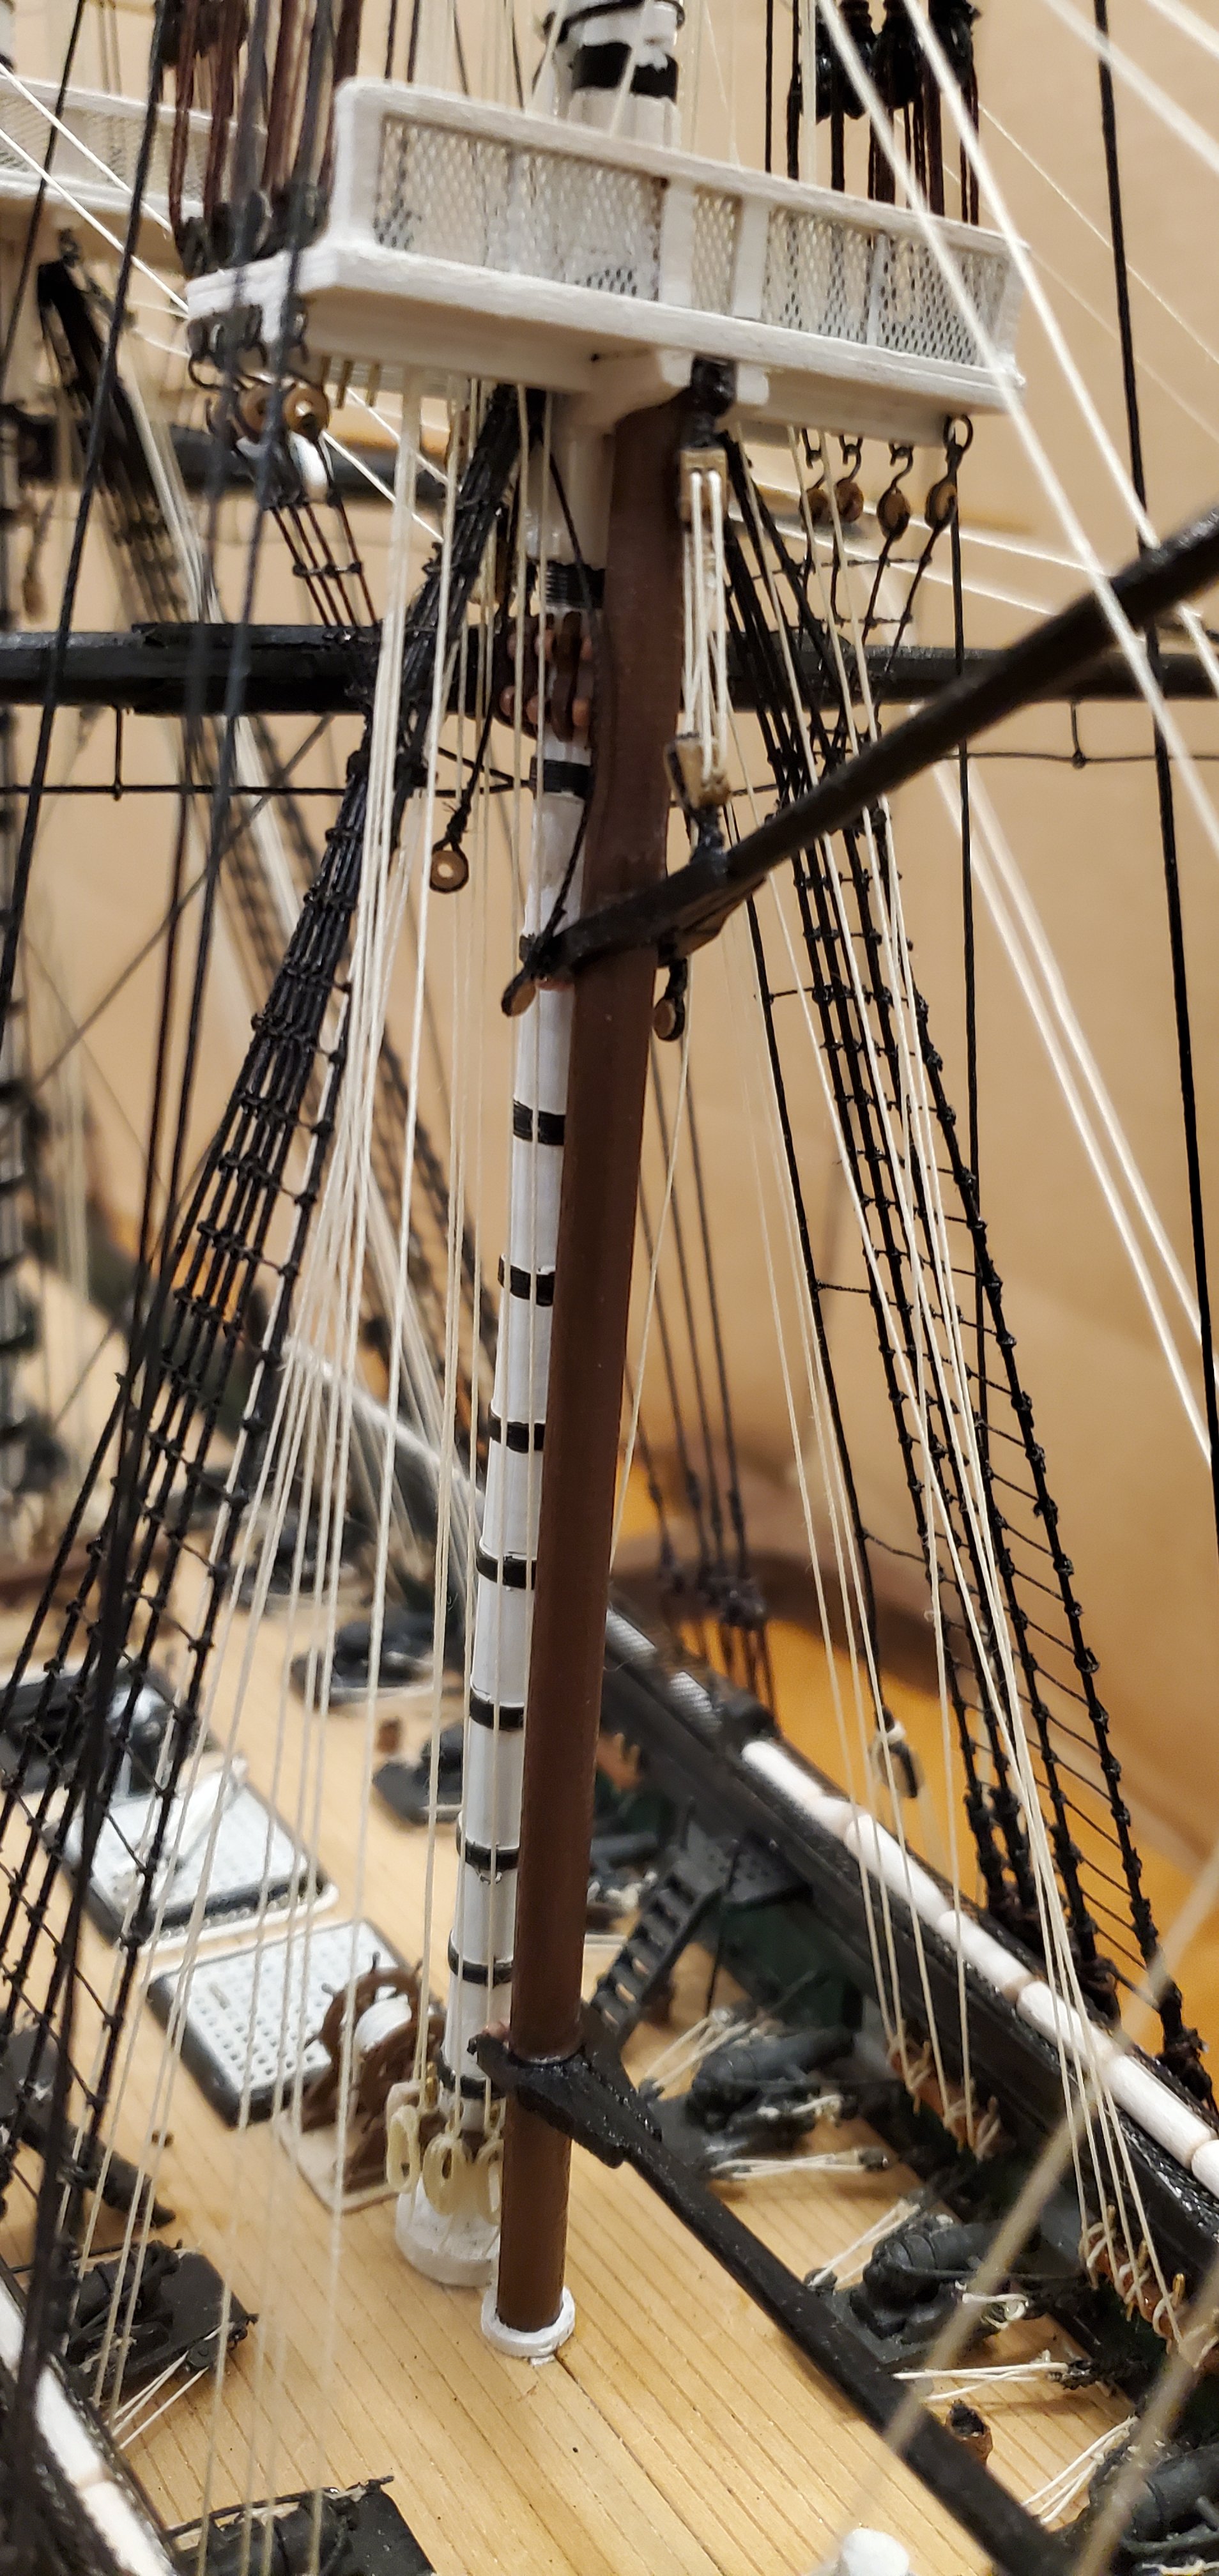
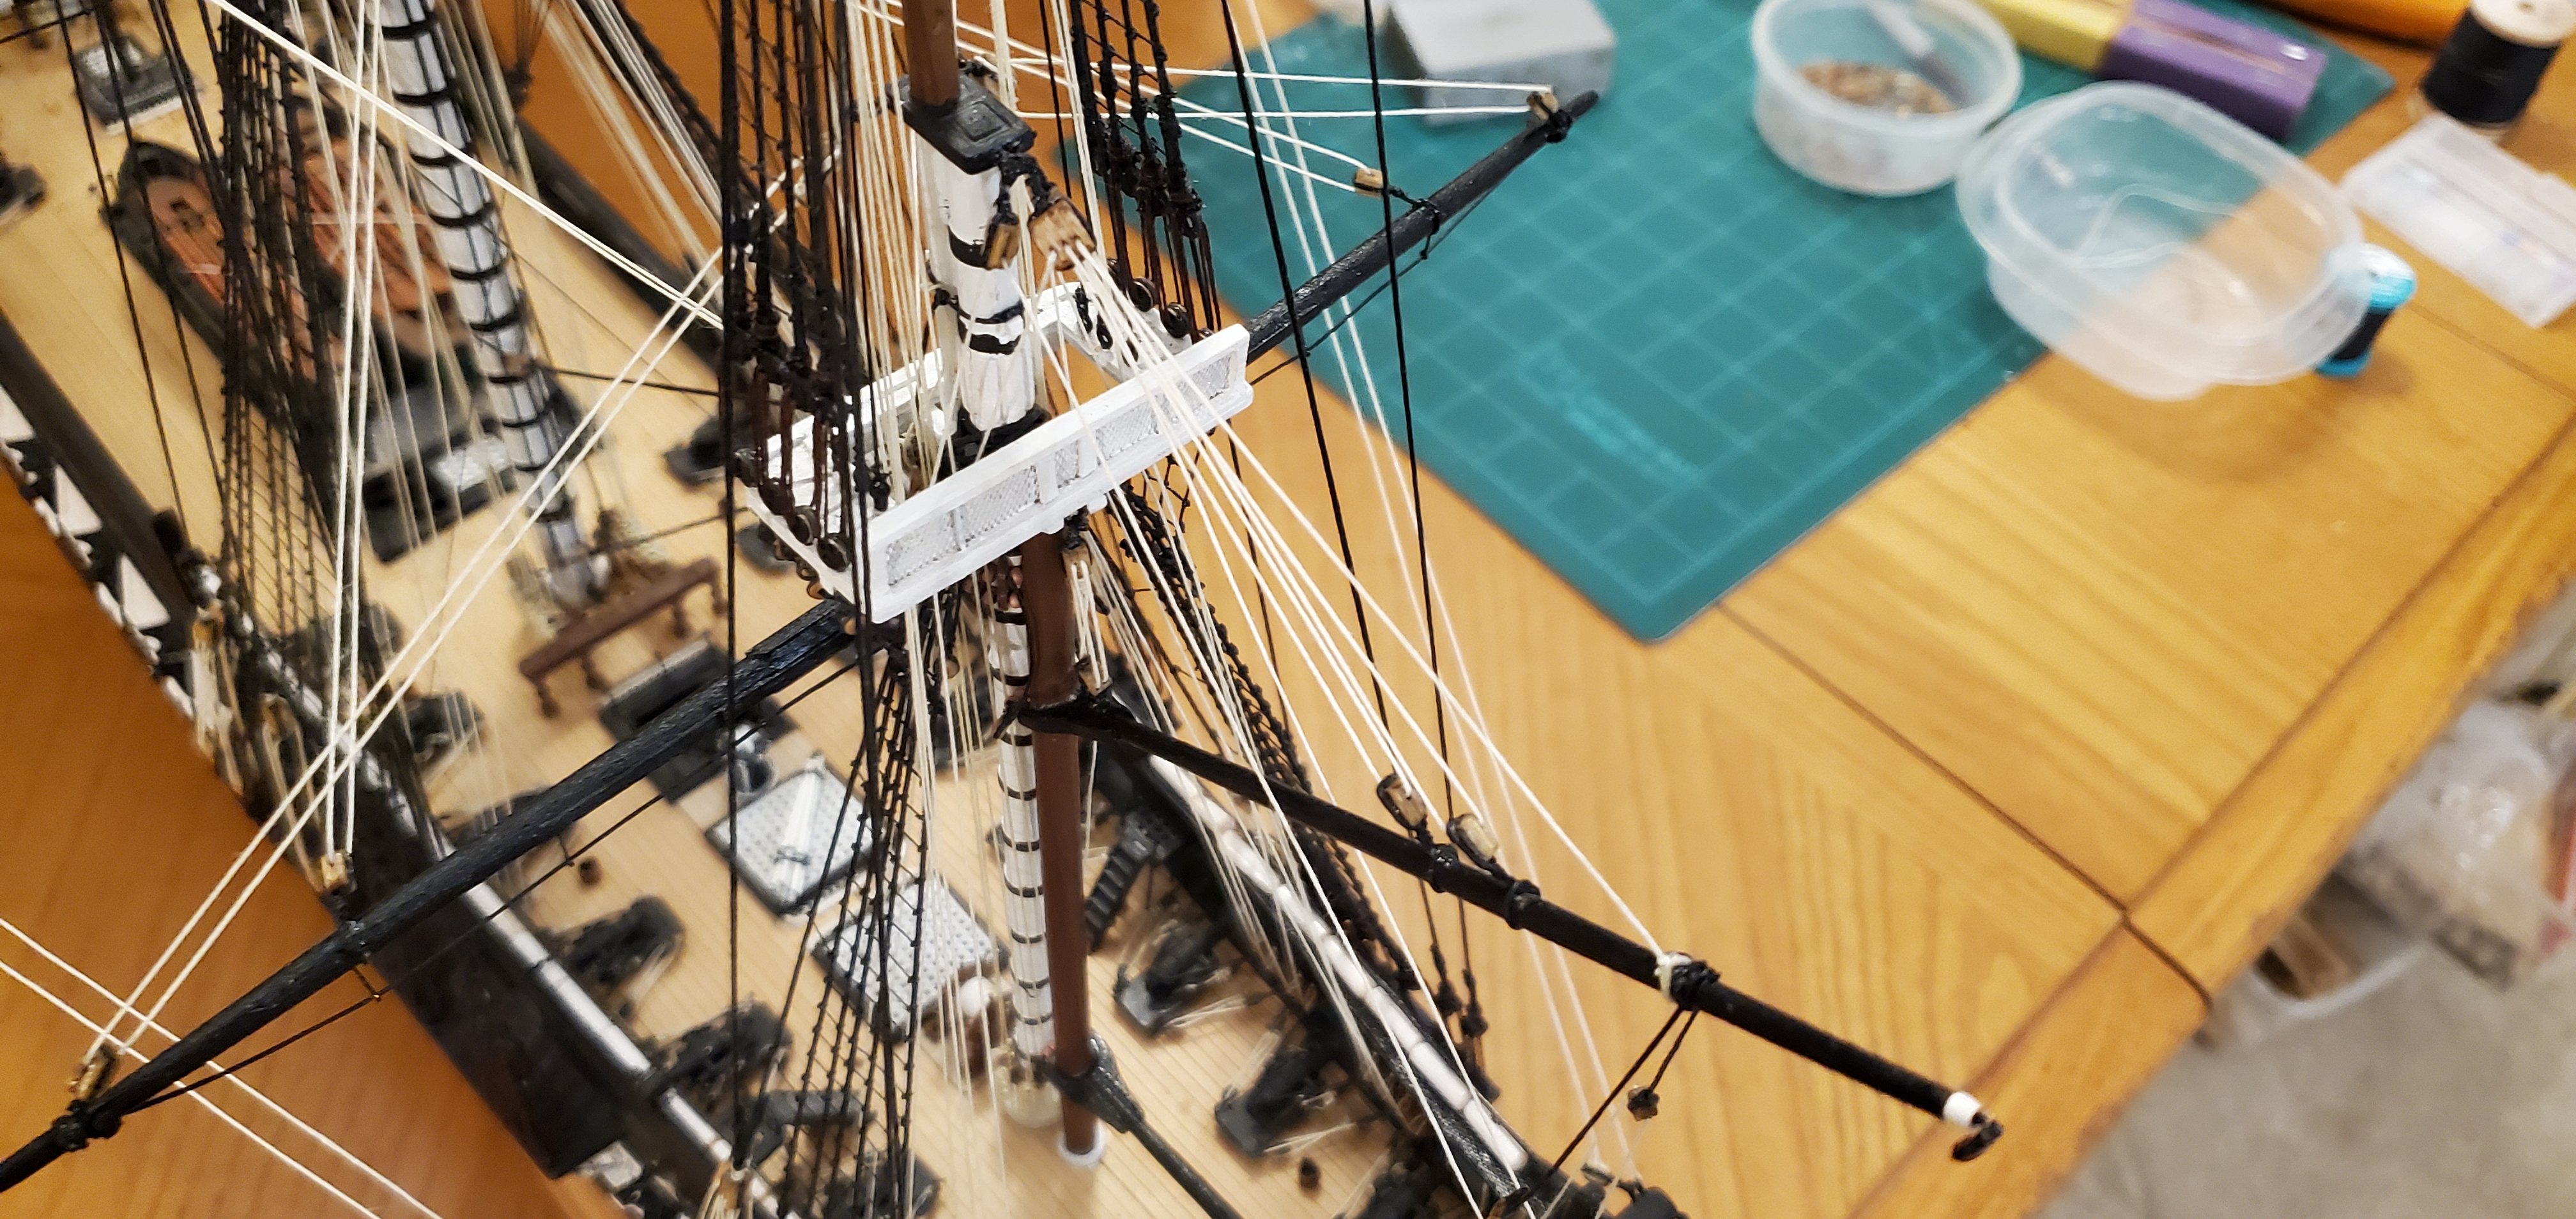
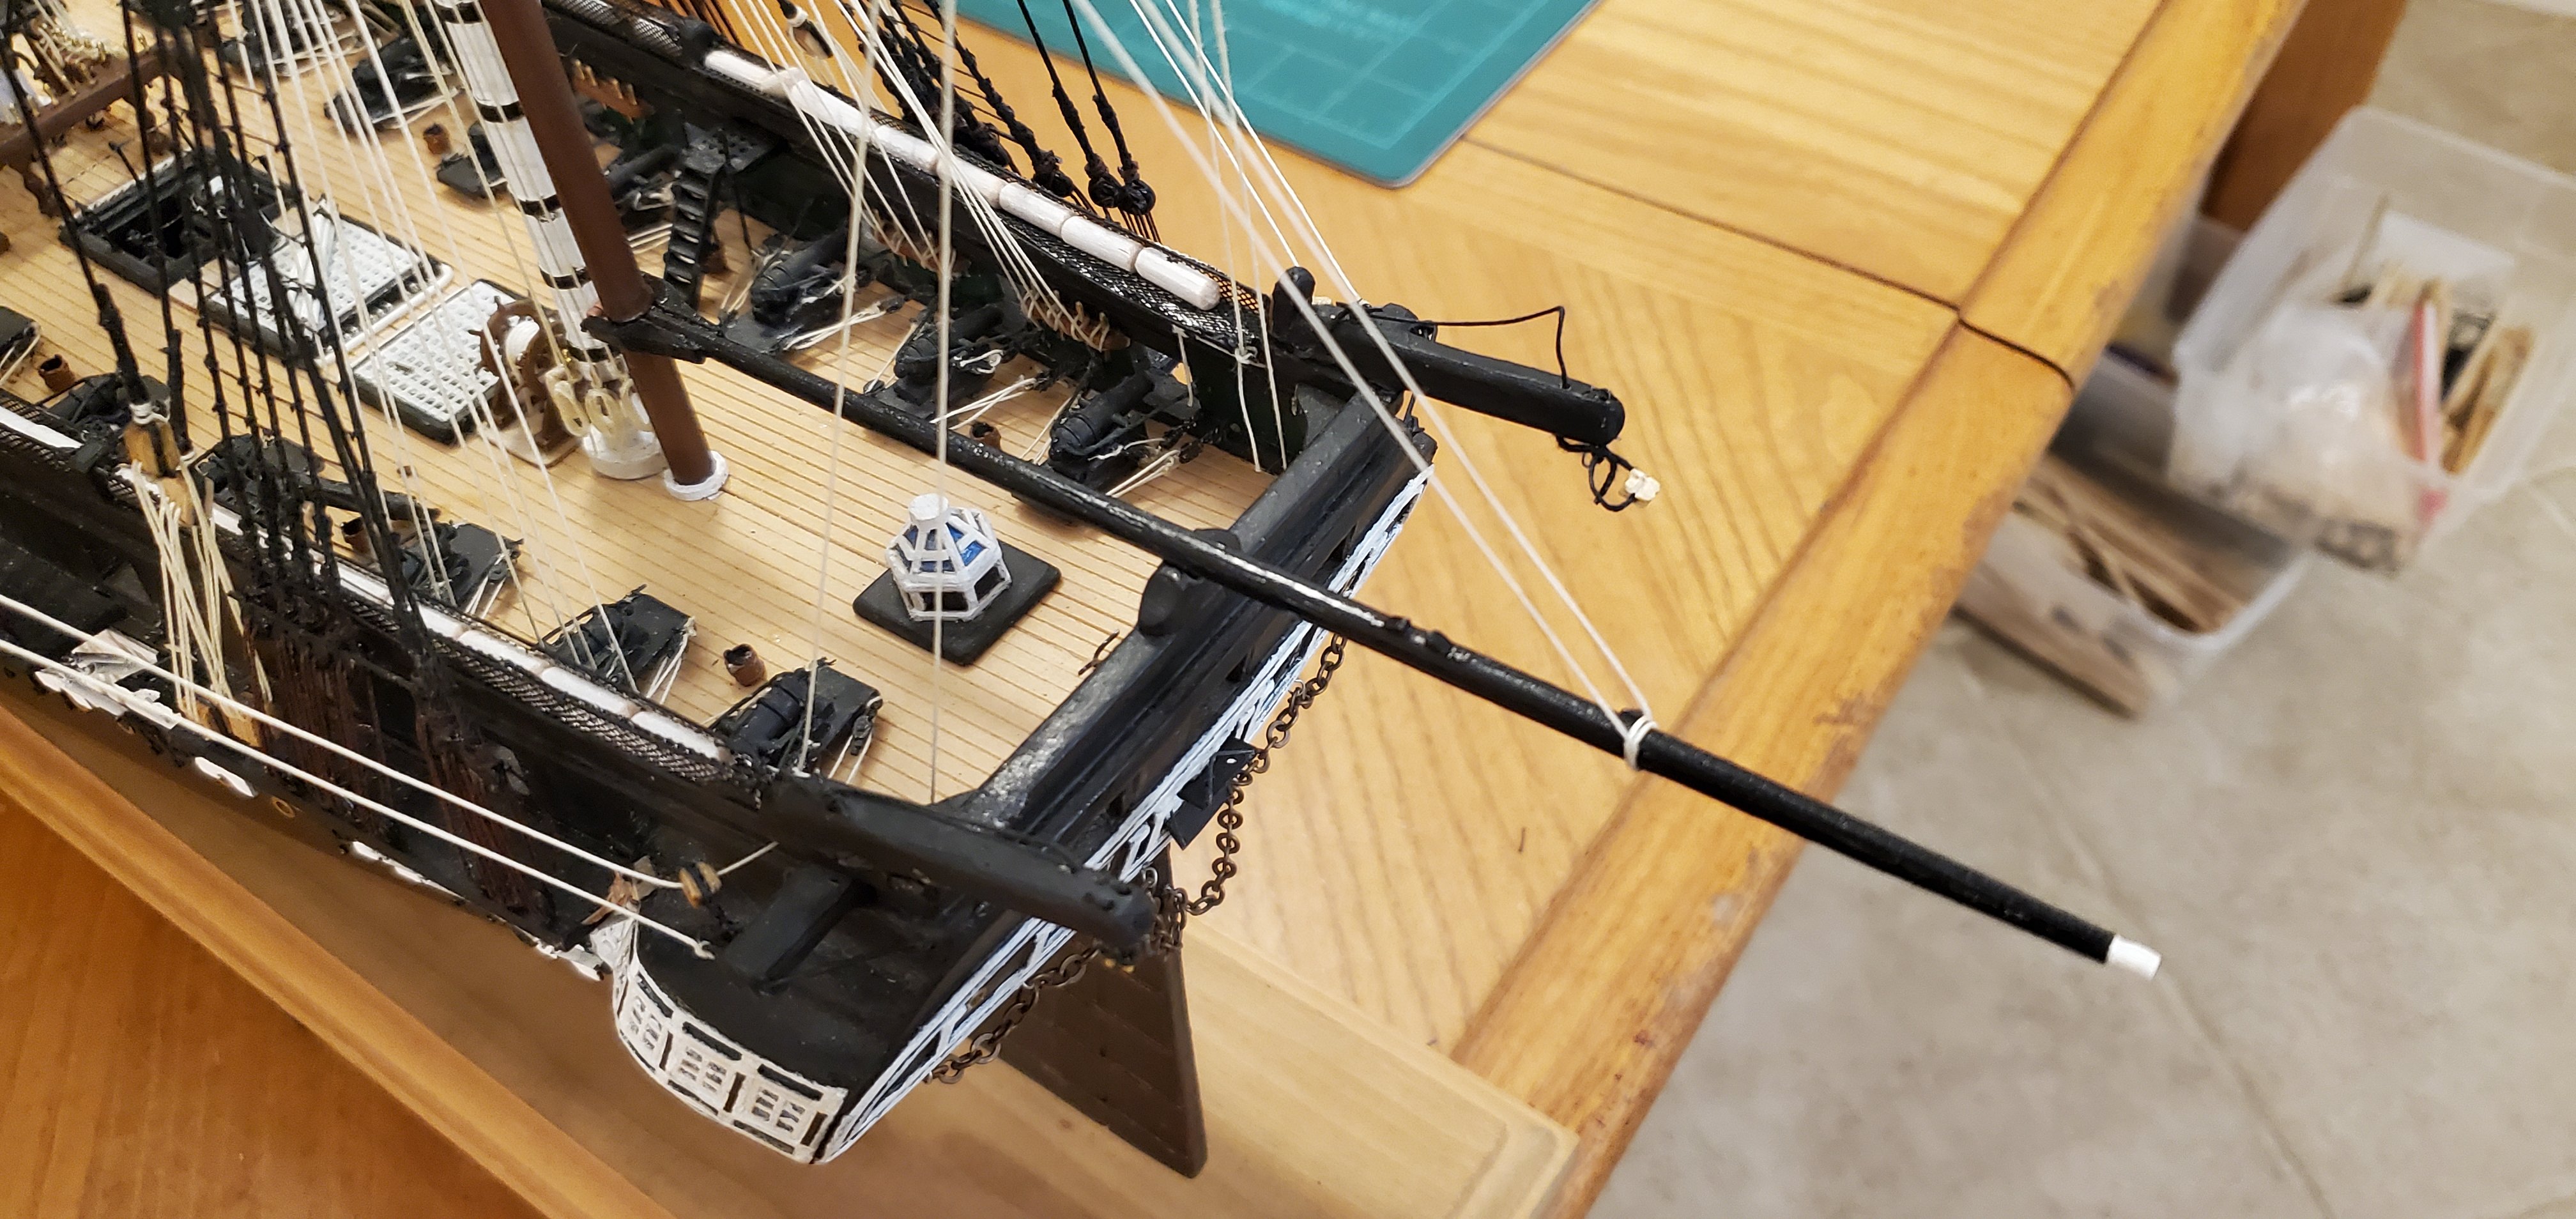
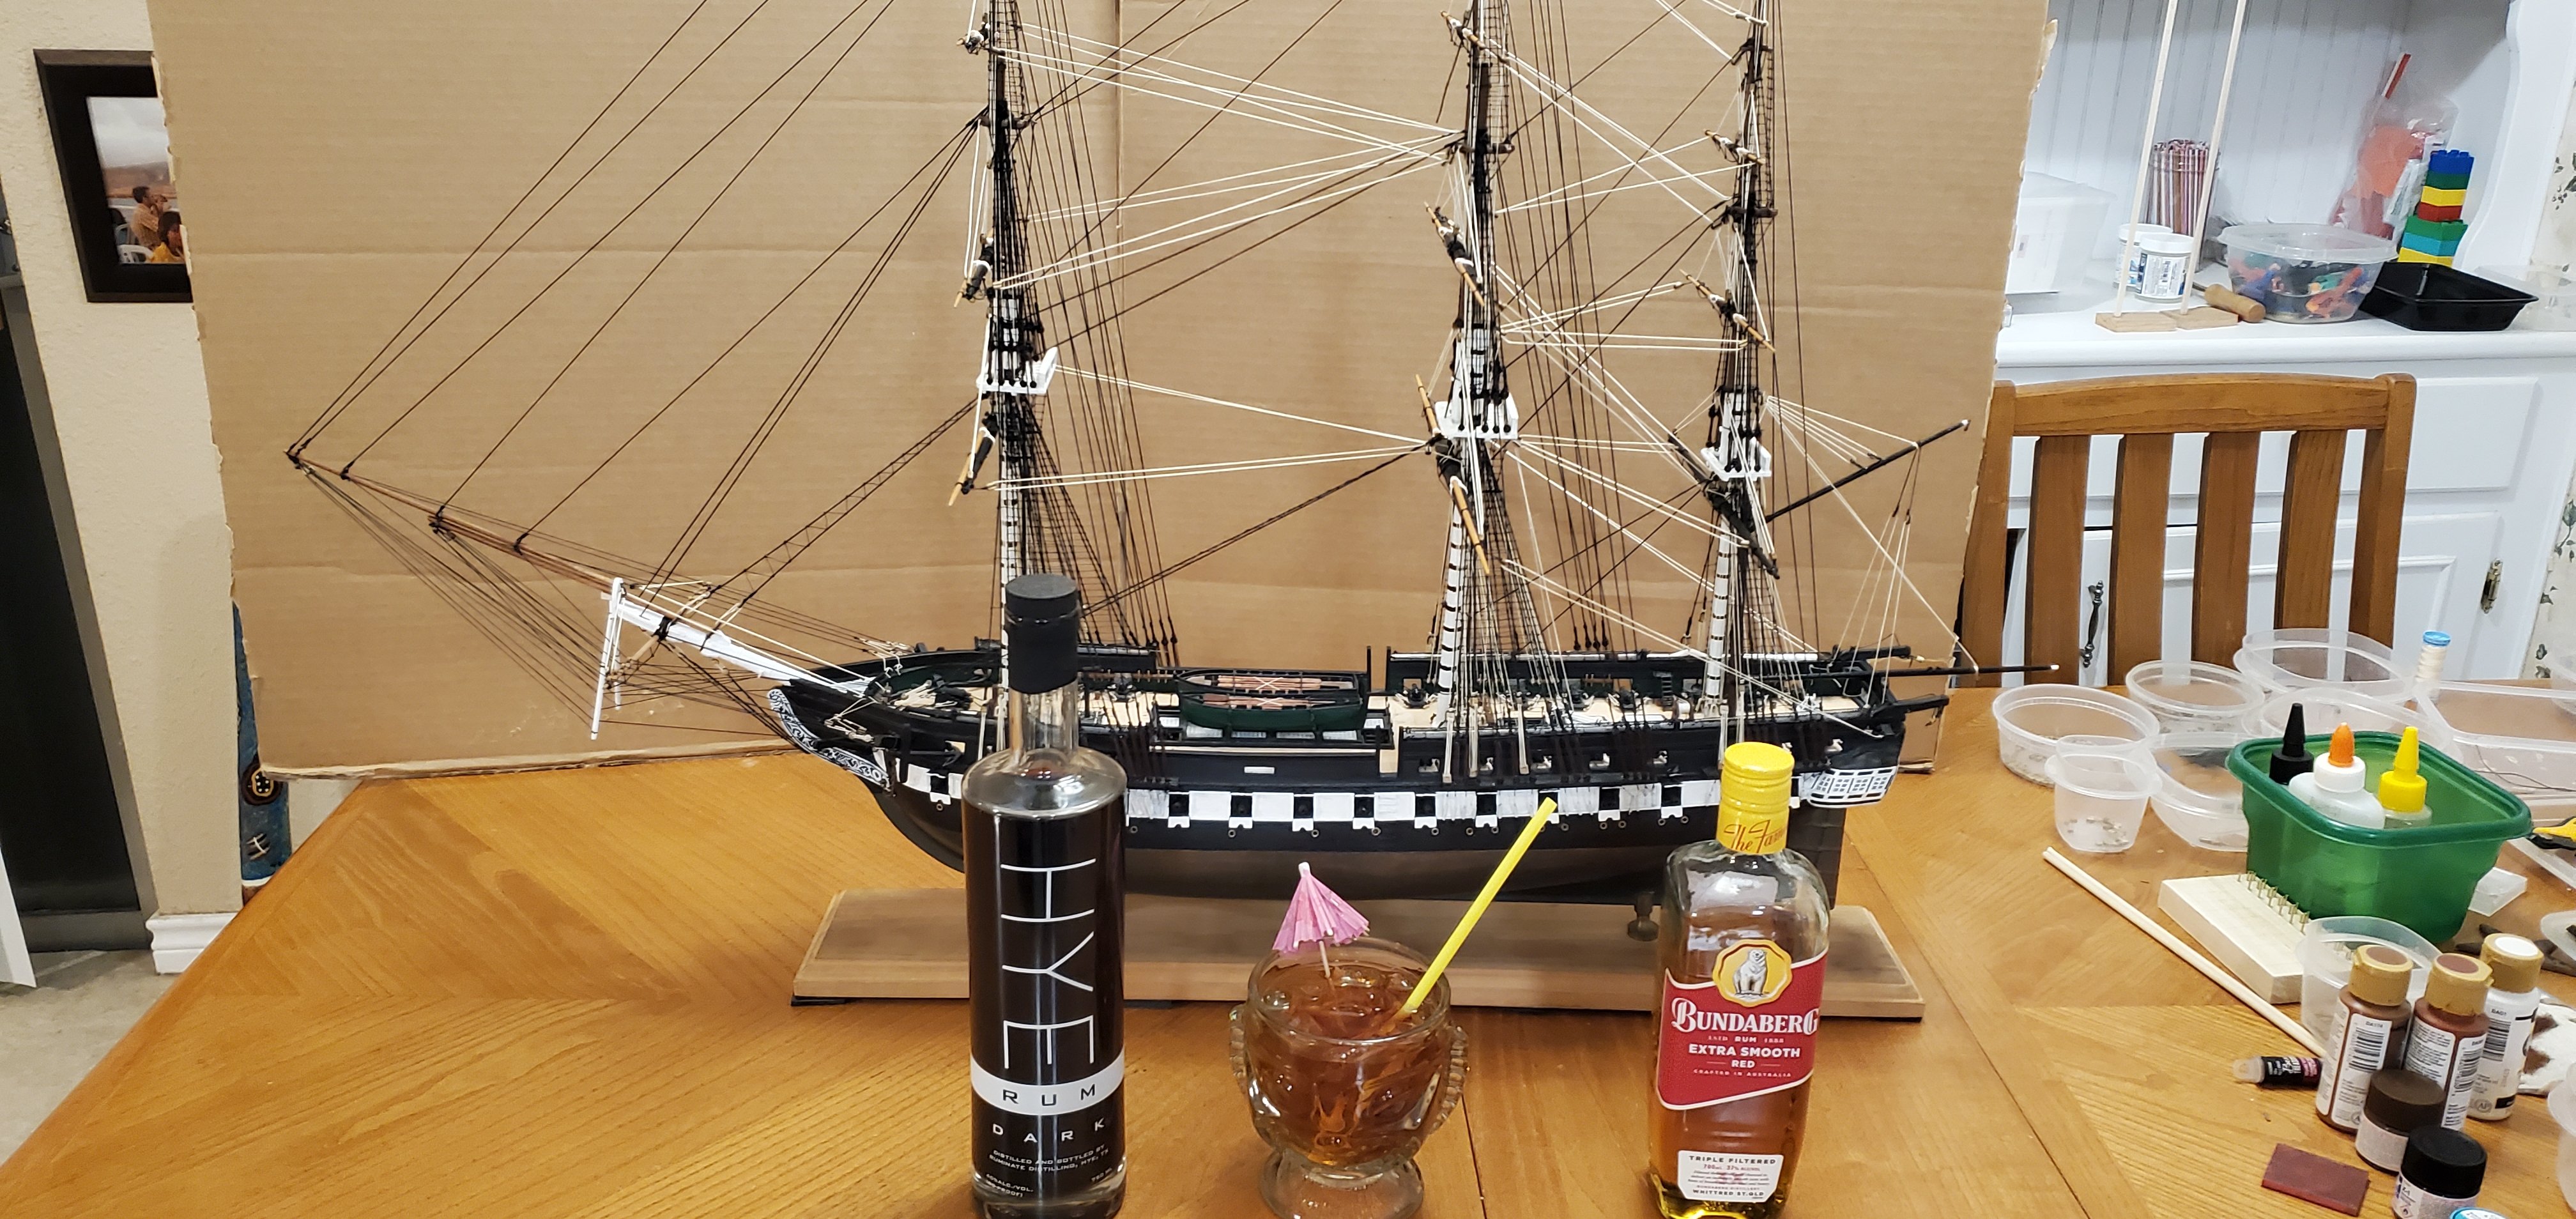
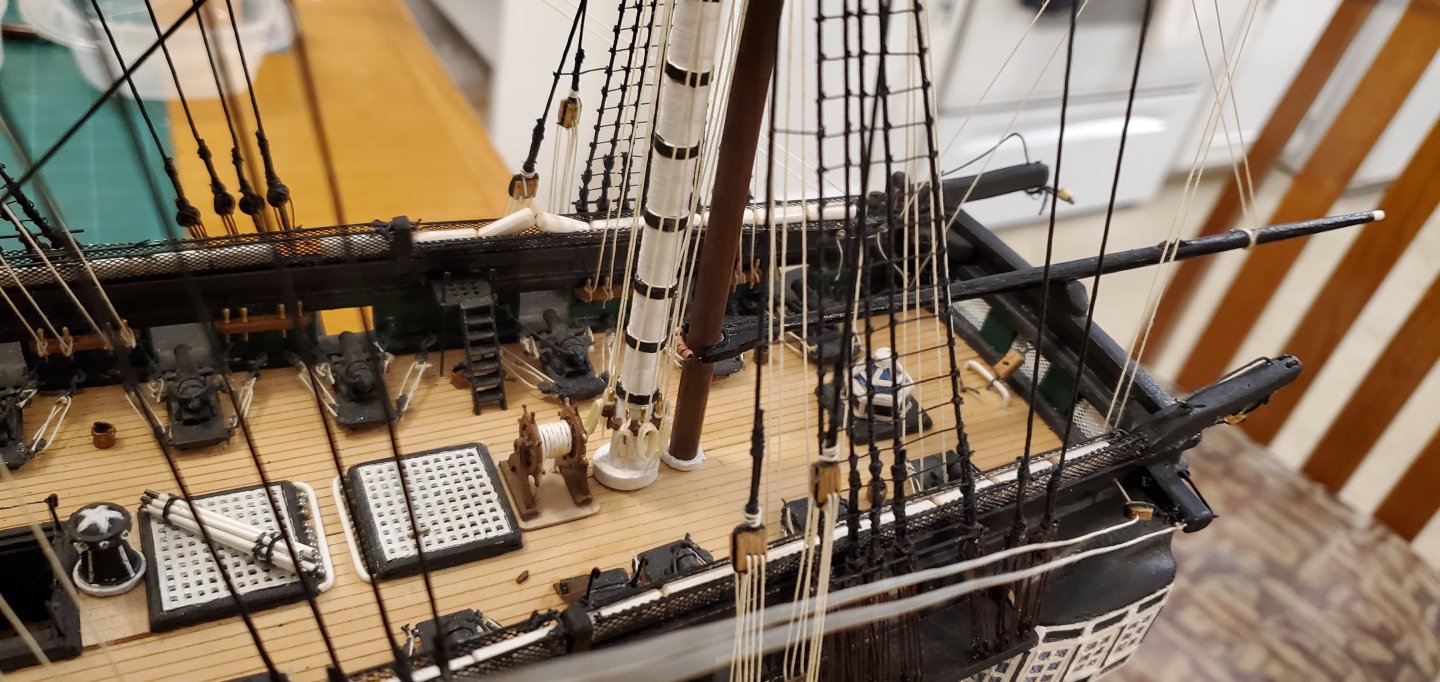
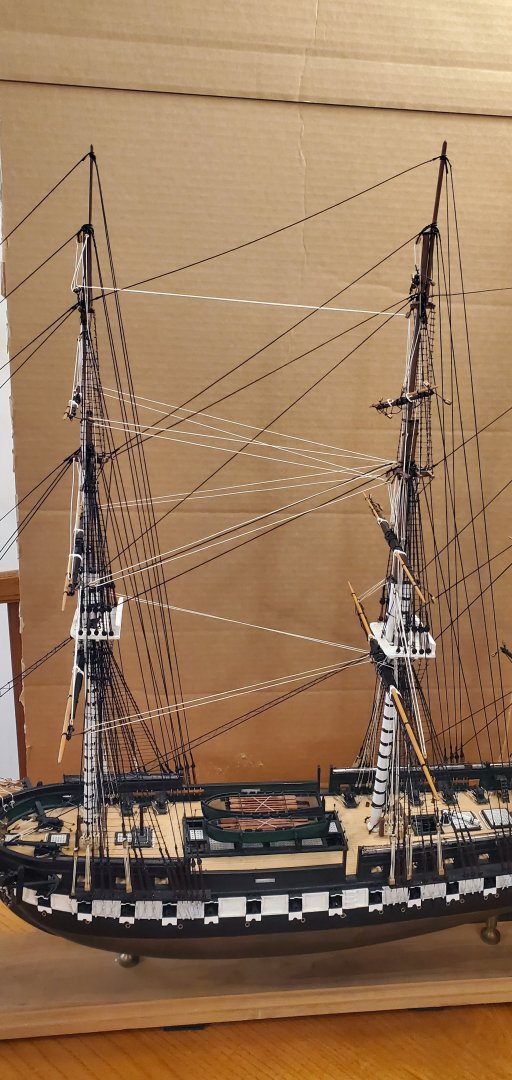
Thank you to all for the nice comments and the likes. I greatly appreciate your help and support. I have a question for Bob (a.k.a @Knocklouder). Do you have a Venmo for your swear jar? If so, I need to send you a large contribution. If you don’t have Venmo, then run a tab for me. Why? Well, a couple of days ago I was tooling along with the last part of the running rigging – the gaff and spanker boom. I got the gaff in place with its full rigging and a nice parrel securing it to the mizzen mast. I started working on the spanker boom and ran into a problem. When I put the yoke up against the mizzen mast, a bunch of the lines tied to the mizzen spider ring interfered with the boom’s yoke. I knew something was wrong but I was pretty sure I’d done the spider ring correctly. So I went back to the instructions and found this bit of info I’d somehow overlooked. “The gaff and spanker boom swing on the trysail mast.” The trysail mast? What the heck is a trysail mast? So I checked a my reference pictures from other build logs and there it was – a mast just aft of the mizzen mast with the gaff and boom clearly attached to it. And that’s when the debt to Bob’s swear jar started piling up. Ugh. I could not think of any way out of the jam except ripping the gaff out and all the gaff rigging I’d locked into place, followed by making a trysail mast and squeezing it into position. There was no reasonable way to drill a hole in the deck to step it properly, so it would just have to be glued into place. That whole exercise pretty much consumed yesterday. I picked a dowel just slightly smaller than the mizzen mast, but large enough where I did not need to remake the jaws on the ends of the gaff and boom. I put a notch on the top of the dowel to fit between the 2 center ribs underneath the mizzen mast top. I glued the bottom of the dowel to a larger diameter disk to look like the collar around the base of the other masts. I painted the mast brown to match what I saw in my reference pictures. It slipped into place quite nicely and I got the gaff reinstalled and rigging in place. Huge sigh of relief, but not real happy with myself for the careless oversight costing me a day of work. I did not take any pics of the gaff before I had to rip it out. Here's a pic of the new trysail mast in place along with some other shots of the gaff and spanker boom and their rigging. Gaff rigging below. You can see the halyard attached to the gaff at 3 points (2 of them via single blocks), running thru a triple block before heading below to the deck. Here's the spanker boom which bisects the vangs coming down from the gaff. Another shot of the boom showing the parrel wrapped around the trysail mast. A wider shot of both. You can also see the main lower yard brace in place now. One end is tied to an eyebolt on the boomkin just above the quarter gallery. It runs to a single block on the yard arm then back to a single block also tied to the boomkin. Then it runs thru a sheave in the bulwark and is tied off to a cleat on the inside of the bulwark. And with that, I dare say that the running rigging is complete!! WOOHOO!!! Another major milestone, albeit not without some difficulties along the way! When I got all the standing rigging finished a while back, I made a comment in jest that Pat (a.k.a. @BANYAN) needed to send me some of that Australian Bundy rum that I'd heard so much about, so I could celebrate the milestone. Well lo and behold, he took me seriously and being the kind and gracious man that he is, Pat actually sent me a bottle of Bundy rum which I just got. He timed his generosity to perfection! So this time, I was able to celebrate the completion of a huge milestone with a mix of Aussie and Texan flair! I made my favorite rum drink (mai tai) using Bundy rum for the spiced rum and dark rum from a distillery in Hye, Texas just to the west of Austin. The cultural combination was perfecto!!! So a huge thanks to Pat for his generosity and to everyone else for your support in helping me get this far in the journey! I hope none of your chooks turn into emus!


- 301 replies
-
- 16
-
-
-
- Constitution
- Bluejacket Shipcrafters
- (and 1 more)
-
LOL! Who else but Knocklouder would say that!
-
I am fashionably late to the party but caught up on all the previous posts. What a unique and interesting subject you have chosen for your scratch build, Paul. Very impressive work so far. I look forward to watching your creation unfold!
-
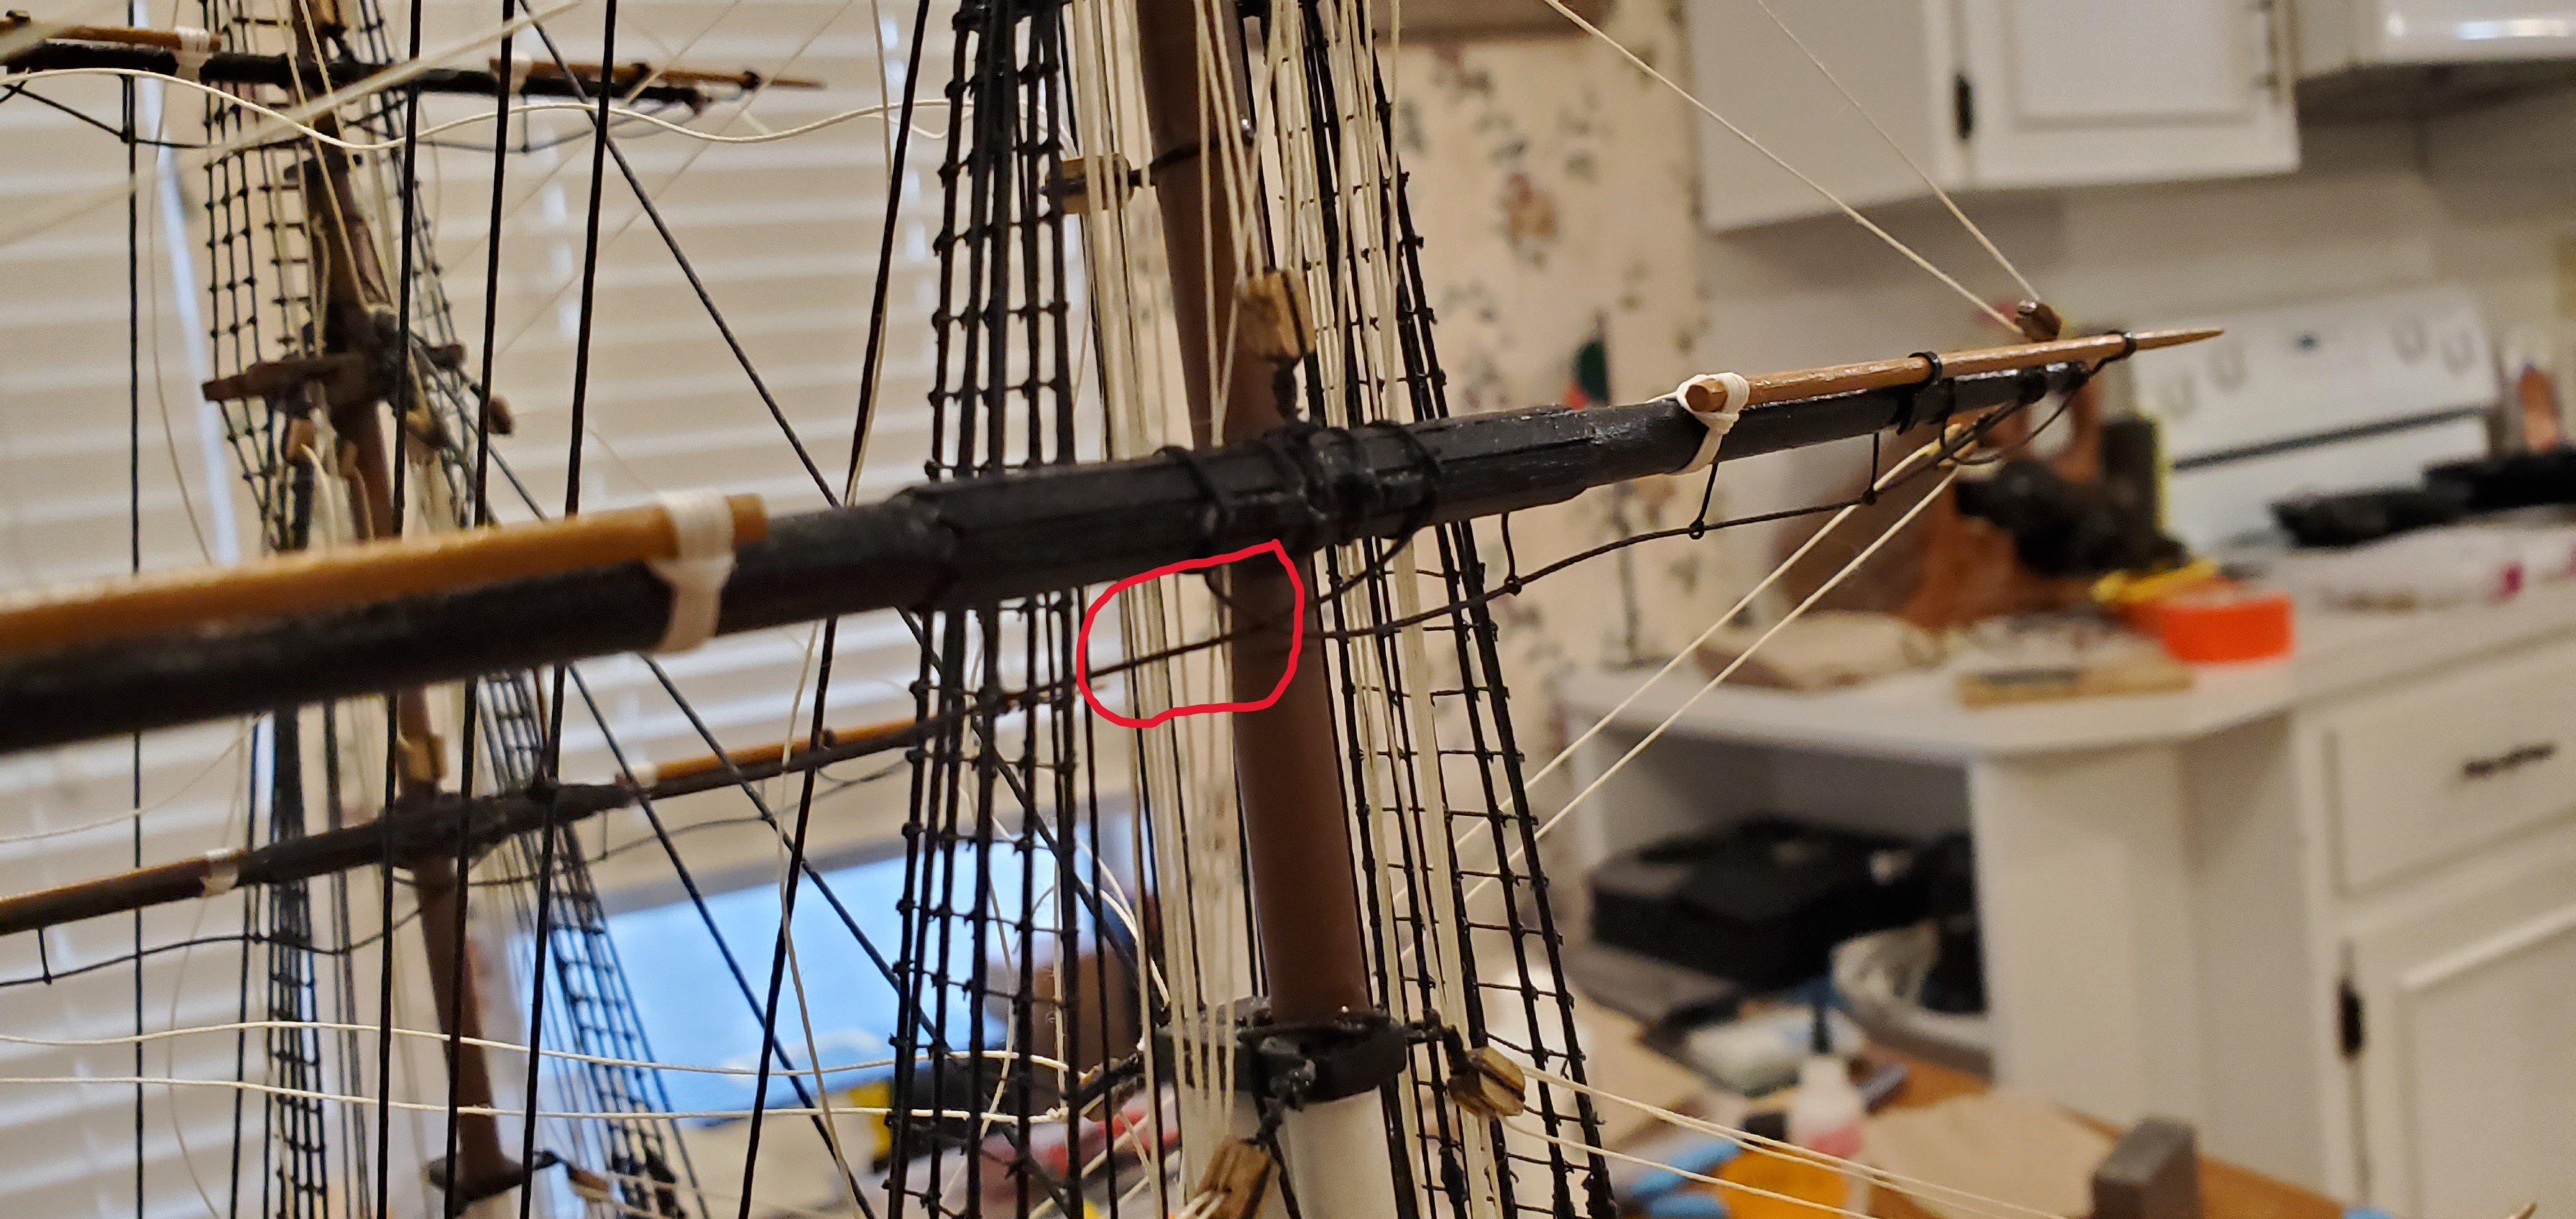
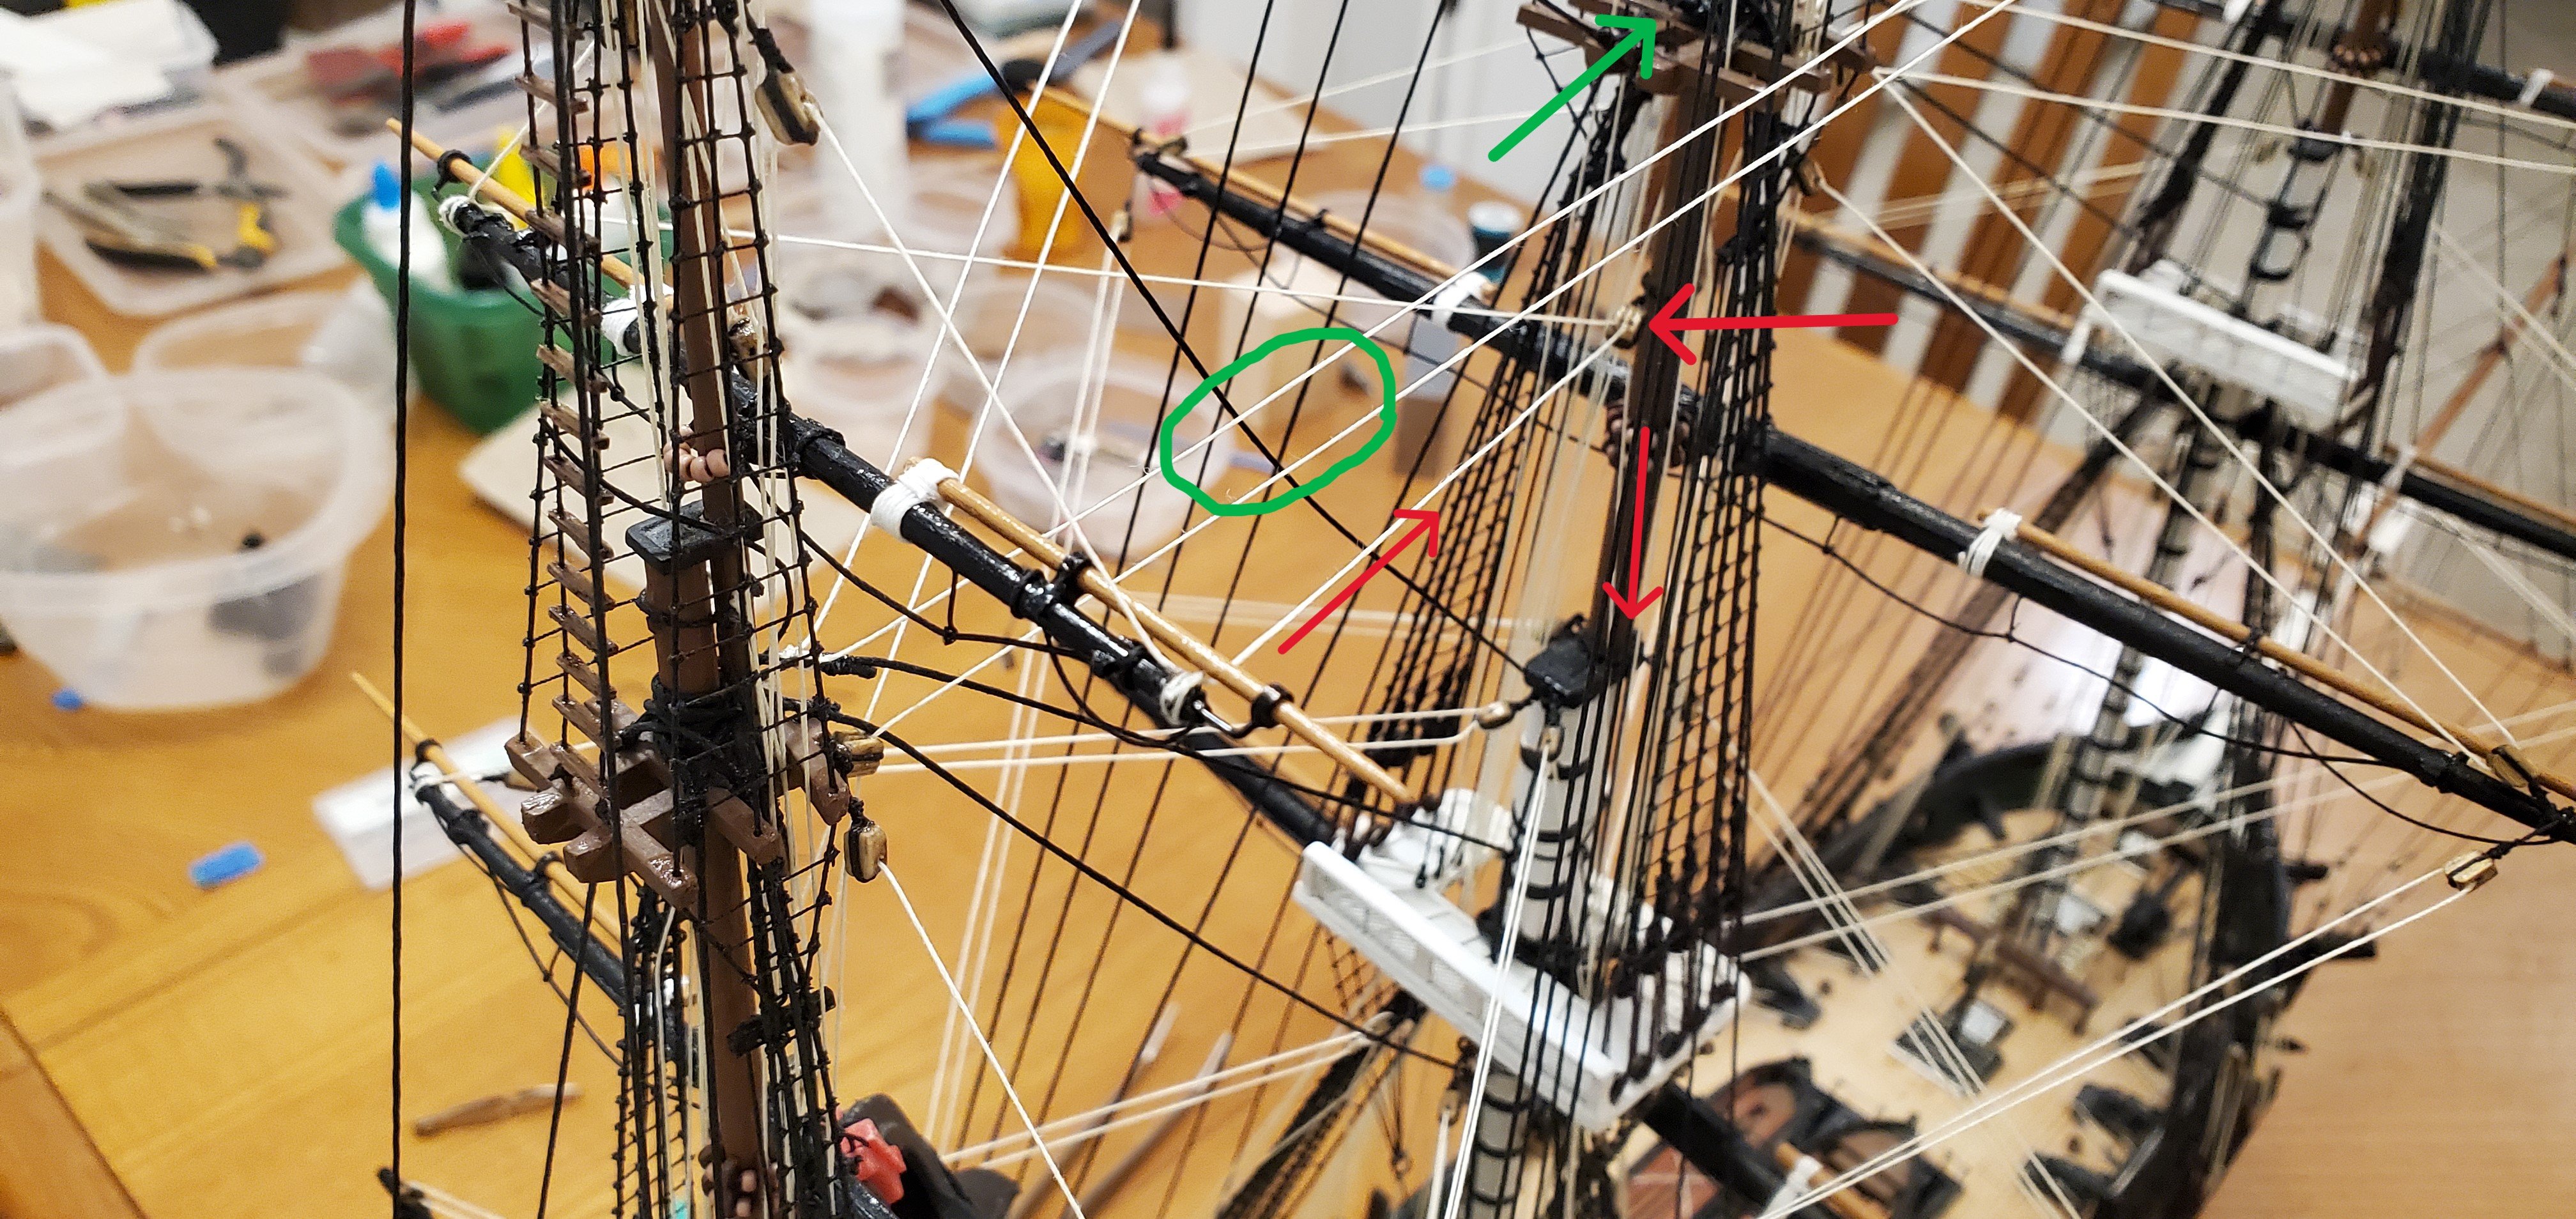
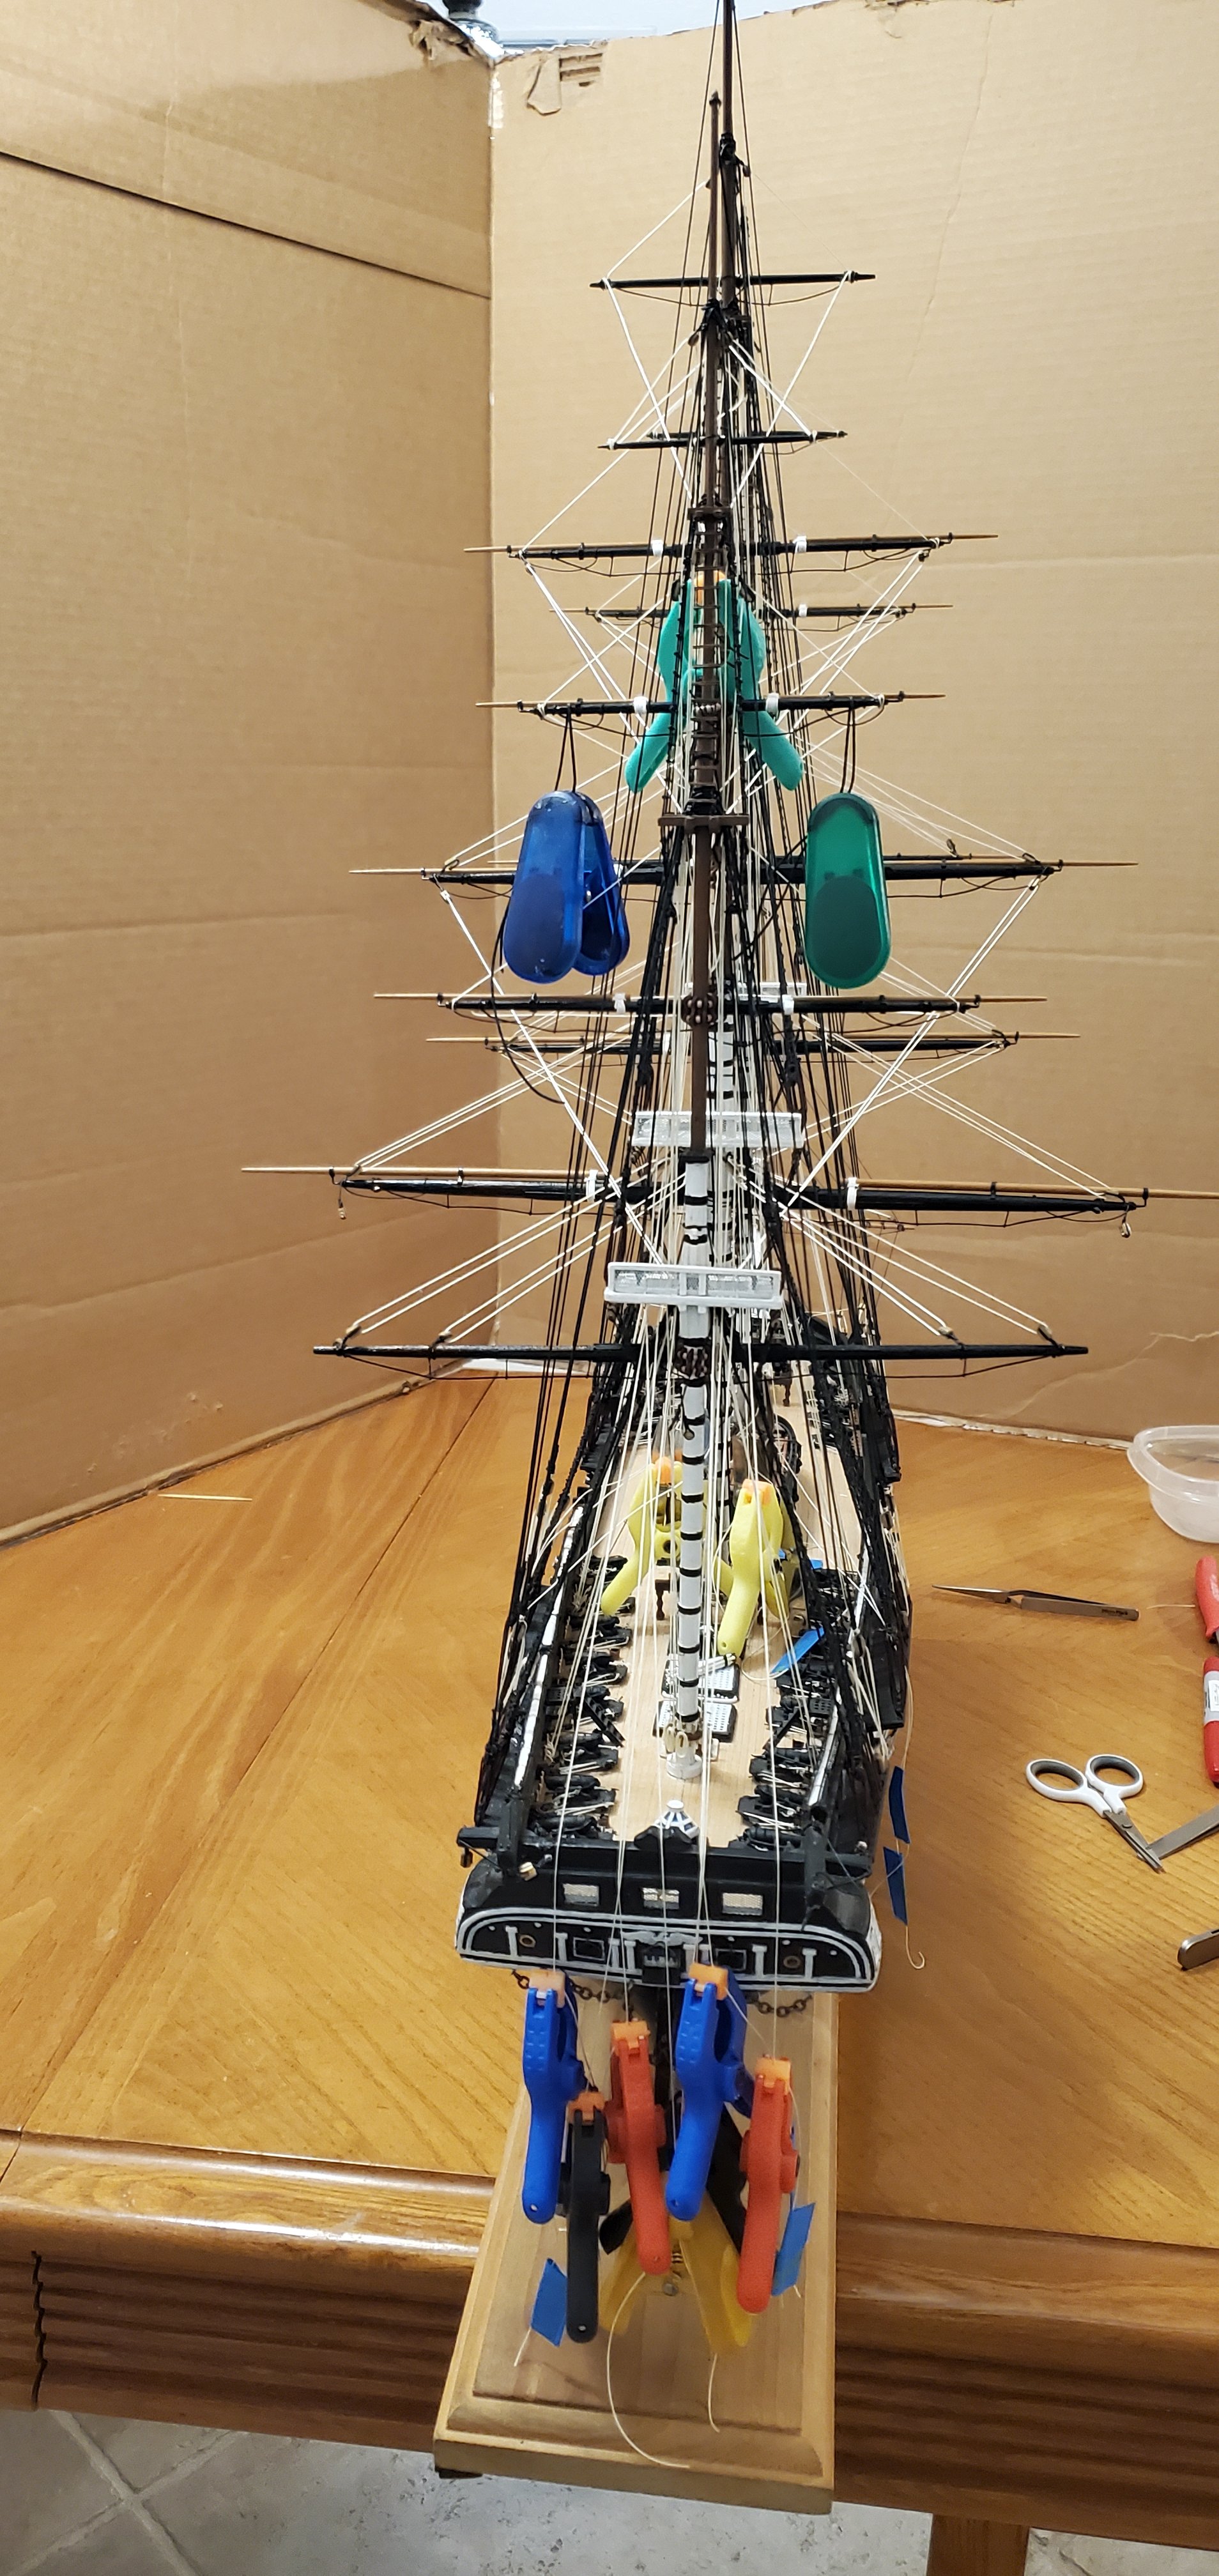
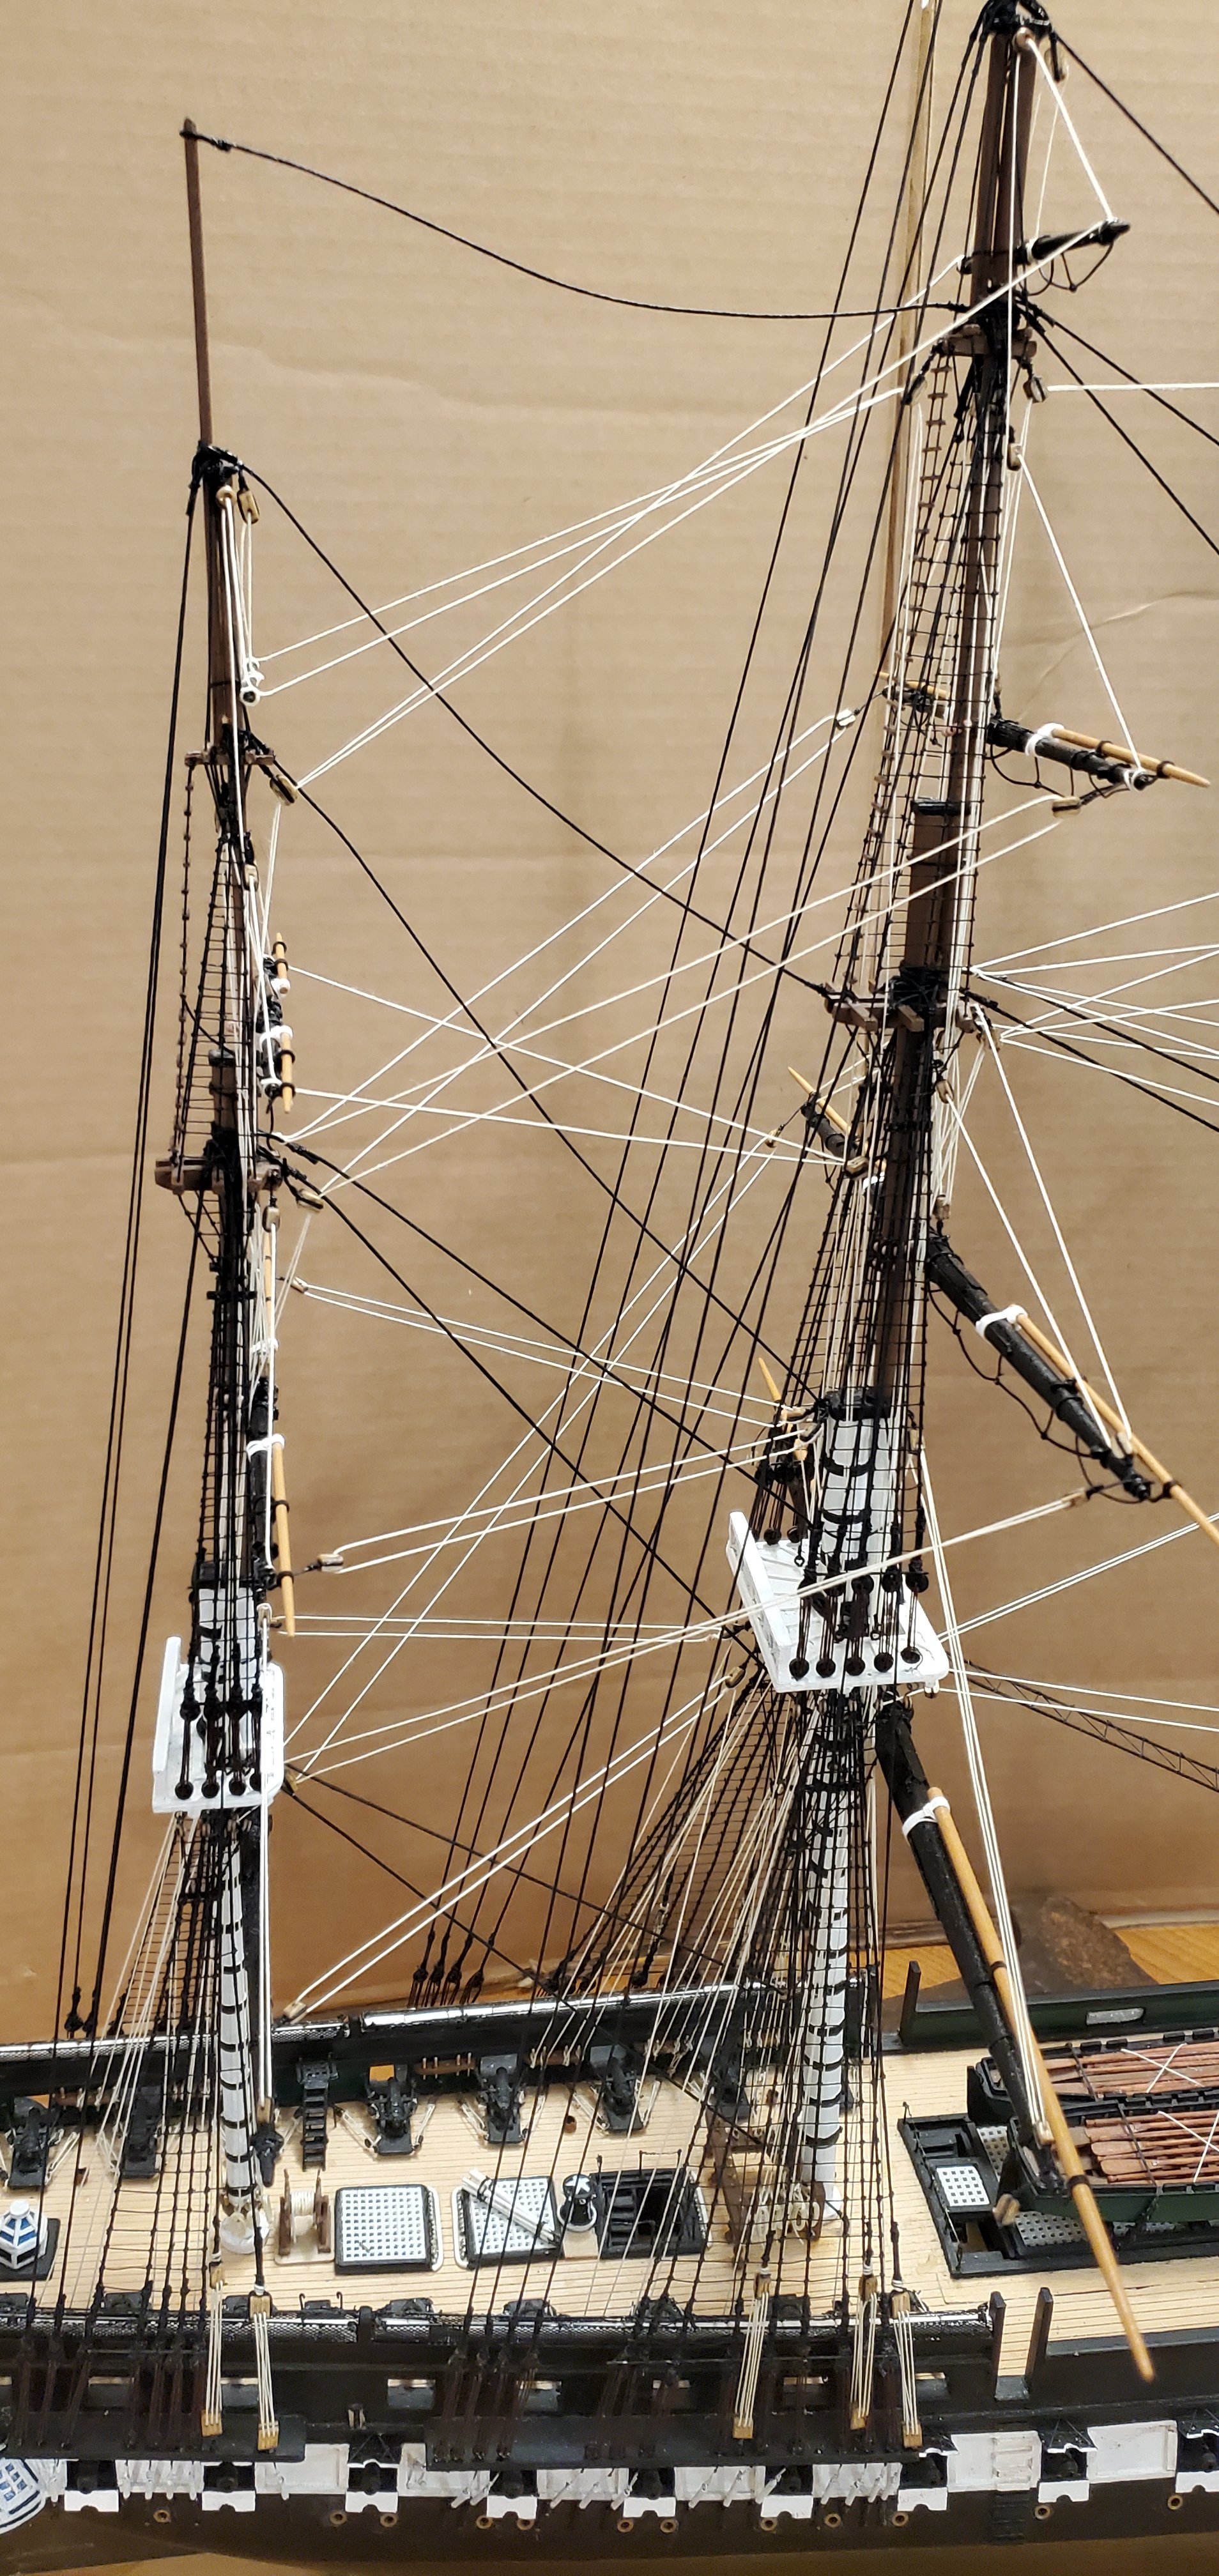
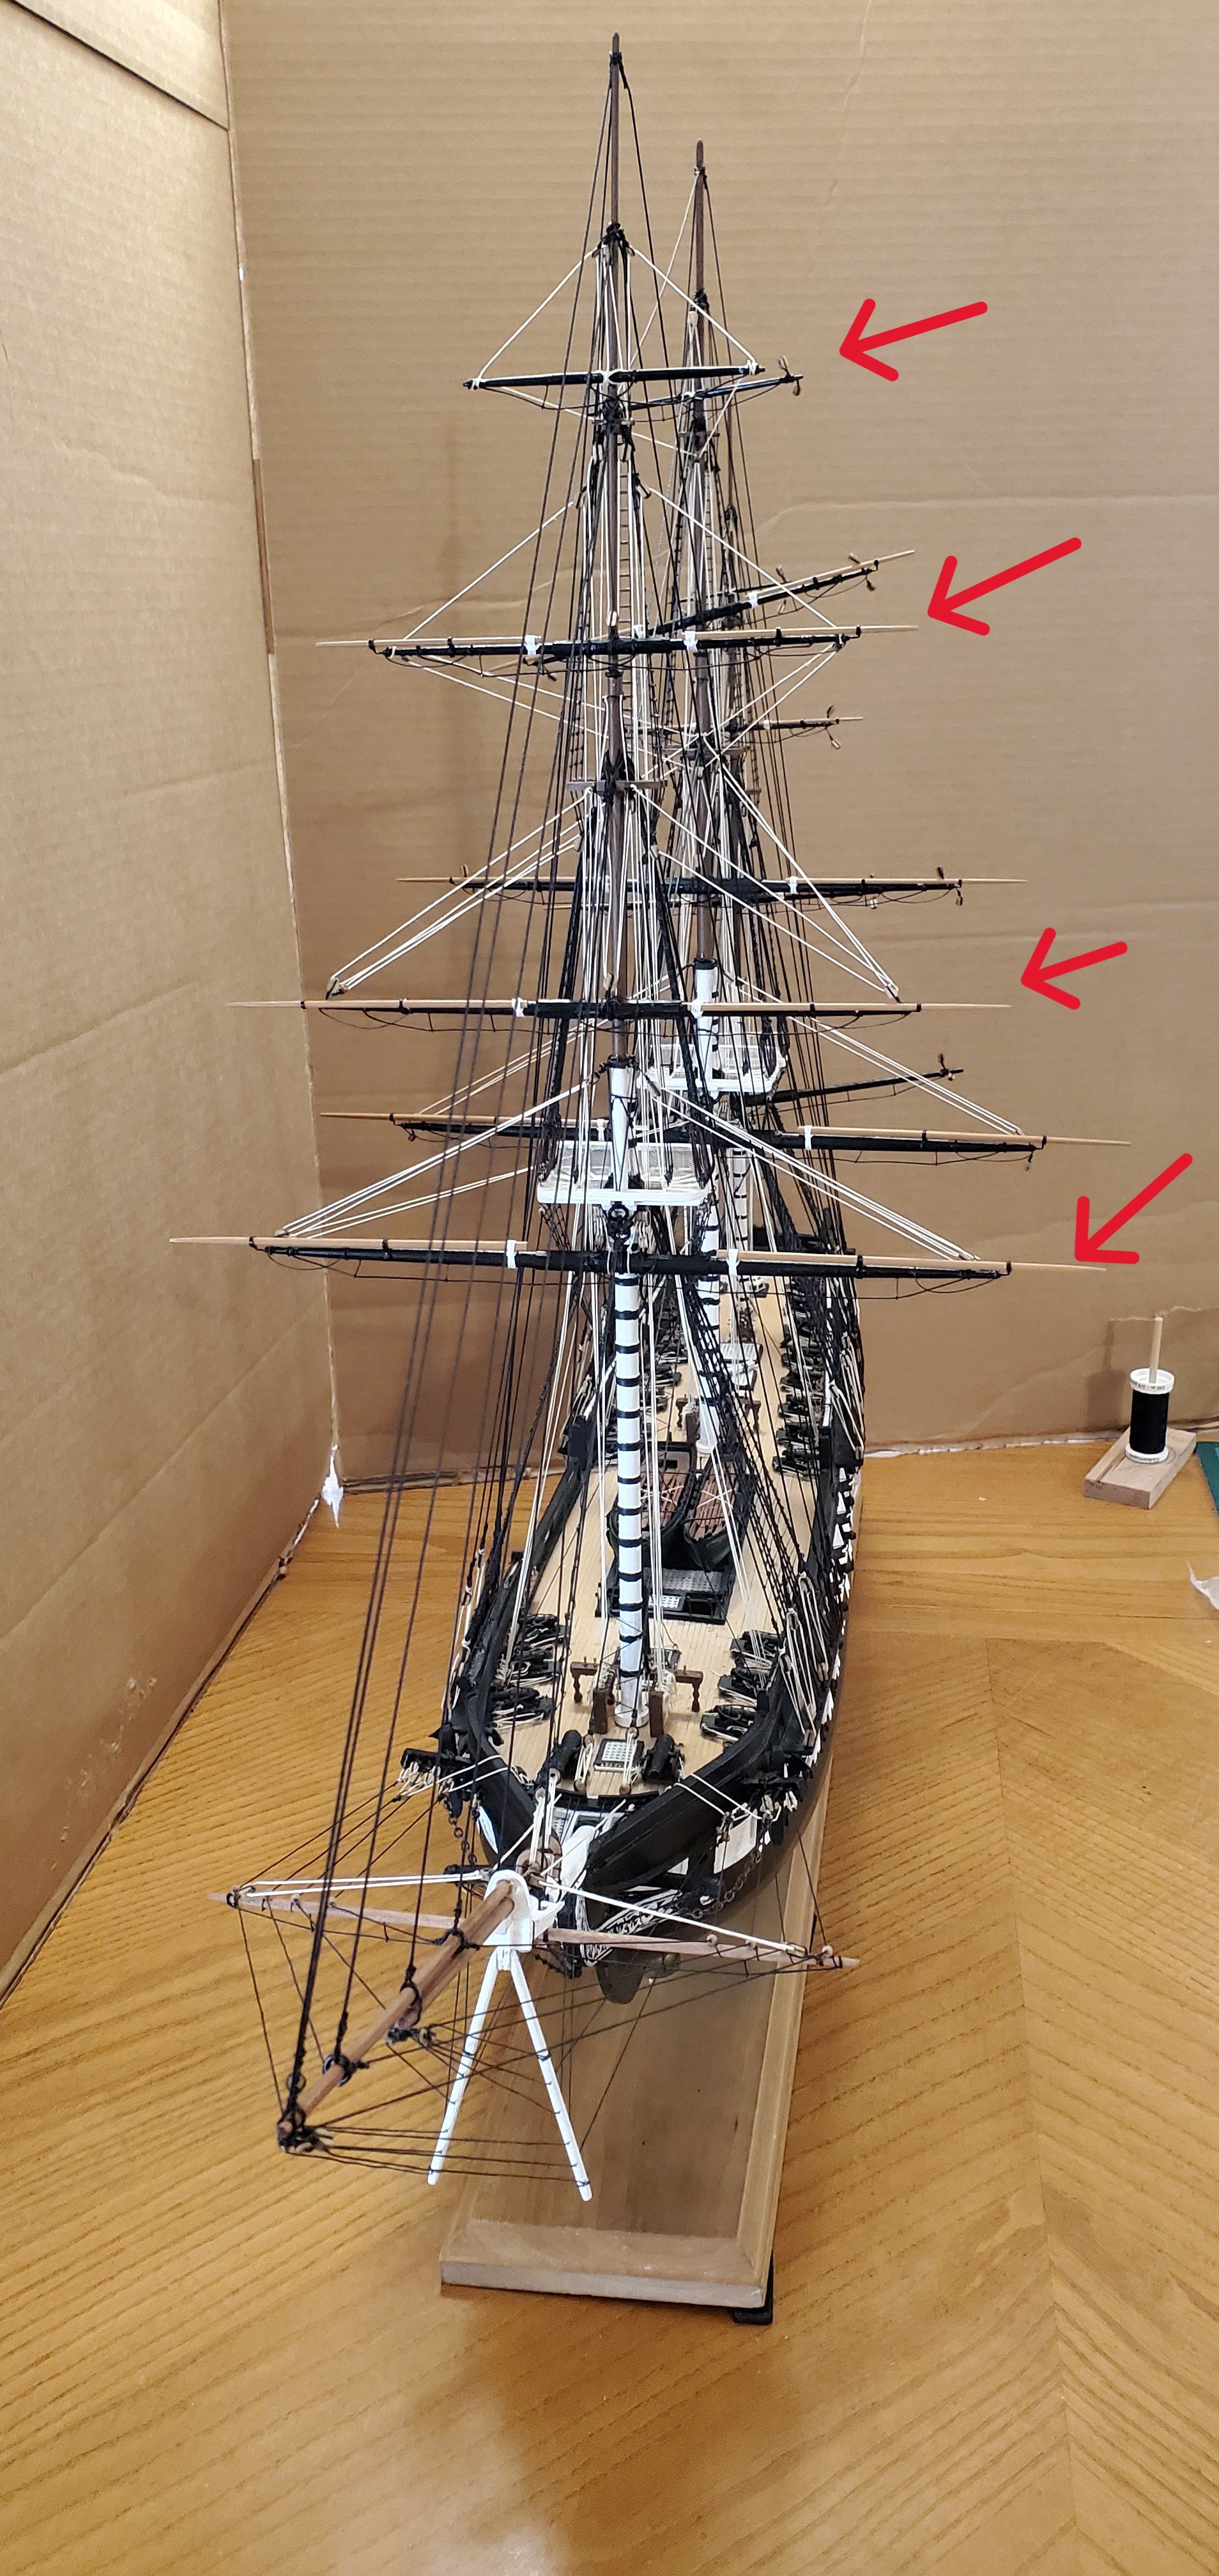
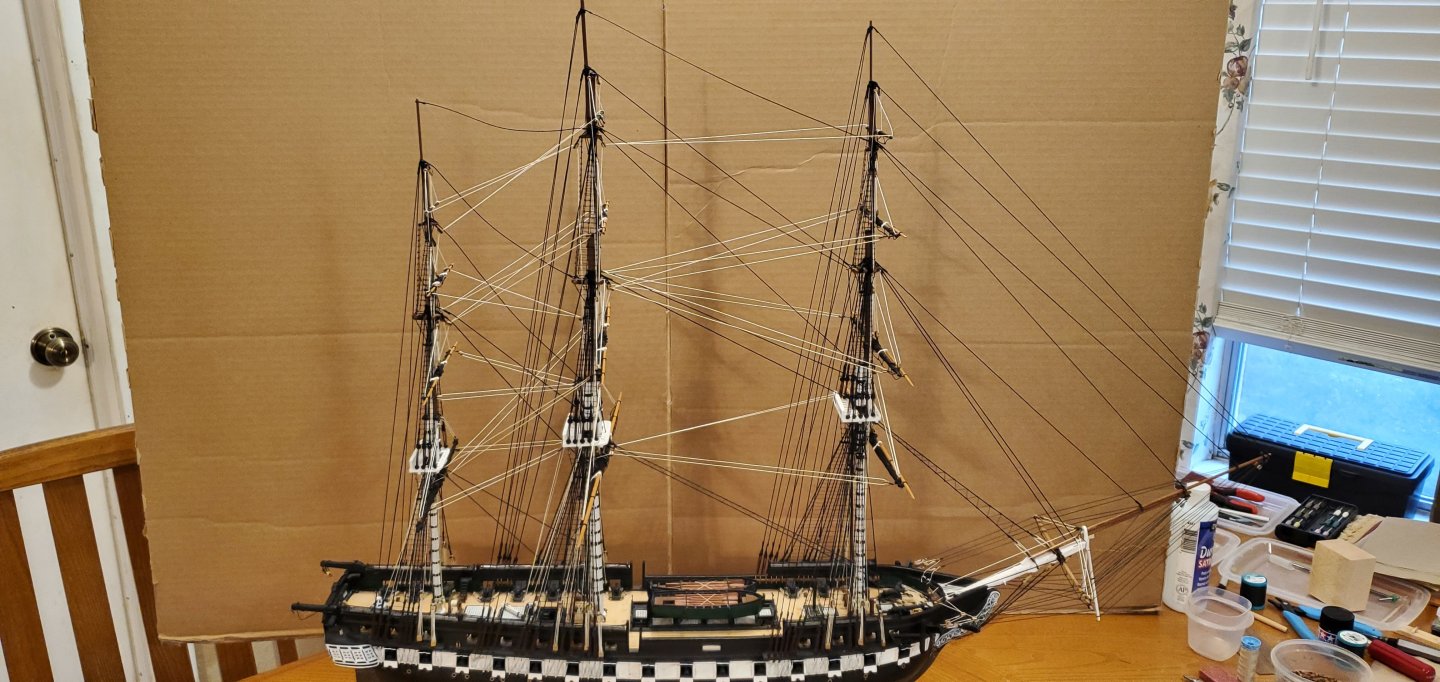
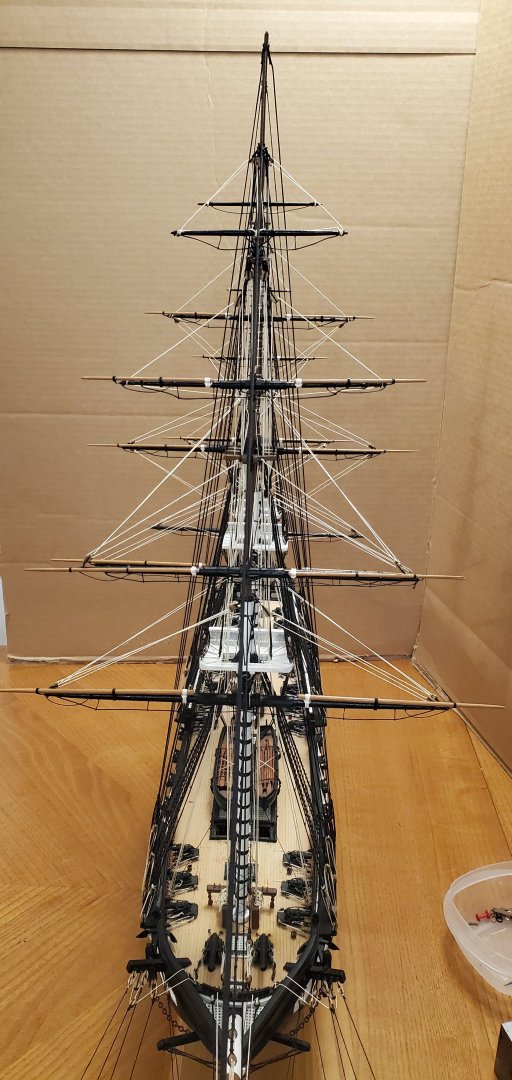
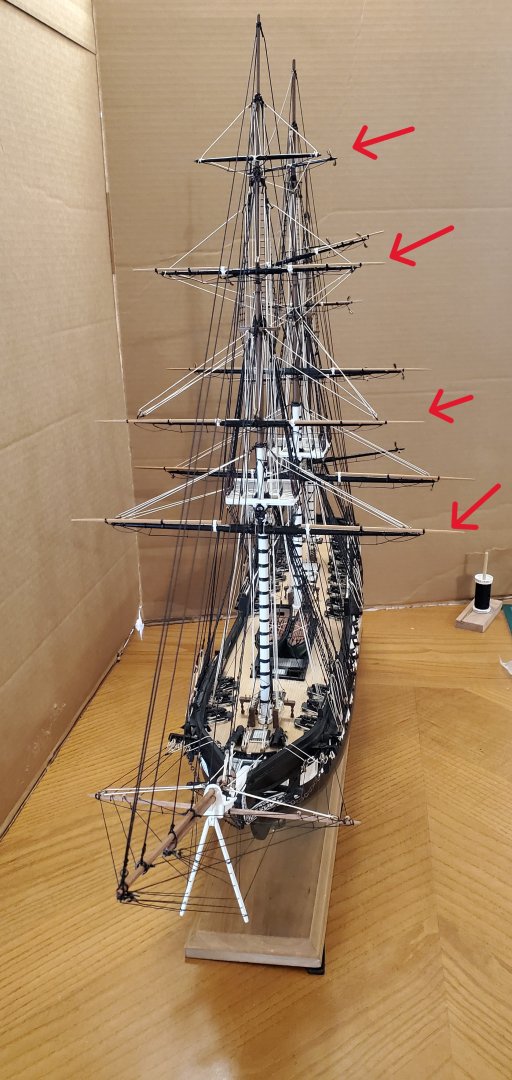
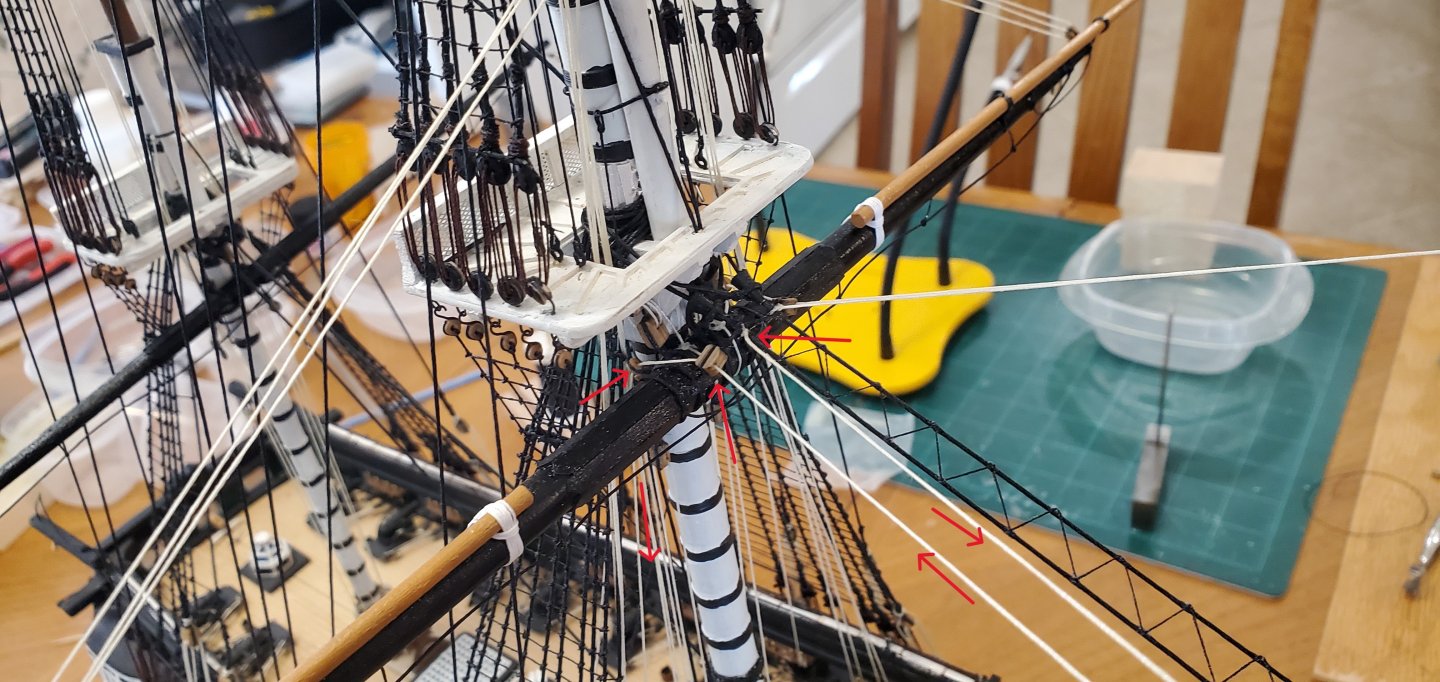
Work continues on the running rigging for the main and mizzen yards. I was thinking about ratlines while struggling to get all the running rigging in place. With ratlines, I kind of get in a rhythm and the more I do, the easier it gets. I find the opposite true here. The more running rigging I do, the more lines are in close quarters and the harder it becomes to route them correctly and avoid tangles and interference with other lines. Two examples. First, on the lift lines for the main mast yards, I did not notice until after I had tied them off to their belay pins that I had routed a couple of them through the foot ropes on the top sail yard. I also managed to do this same clever thing on the top gallant yard. Ugh! So I had to remove and replace the foot ropes for both of those yards. Here's the corrected main top sail yard. Second example. With braces form the main mast yards routing to the stern and braces from the mizzen mast yards routing forward, some things got a bit messy and adjustments had to me made. In the pic below, the red arrows follow the mizzen top gallant yard brace running from the yard arm to a double block secured to the main top mast and then down to the deck. According to the instructions, the double block should be attached to the main mast top head where the green arrow points to. However, when I put the double block up that high, it caused the forward running brace from the mizzen top gallant to interfere with the rearward brace from the main mast top gallant yard (green circle). So I had to move the double block low enough to keep the braces clear of each other. There were a few more similar complications, but those were the easiest to illustrate. After I got all that sorted out, I grabbed pretty much all the clips I own and fixed them to the ends of all the lift and brace lines. This put everything under tension so I could make adjustments and get all the yards parallel with each other on both the longitudinal and vertical axis. Here's a side view with all the lifts and braces tied off. All of them except one! The brace for the main lower yard extends rearward and is supposed to be tied off to a boomkin protruding outside the ship at the stern. I kept whacking it with fingers, arms, tweezers, snips, etc, so I decided to leave it off till I get the gaff and spanker boom in place. That is why the main lower yard in the pic below is a little off kilter. You will also notice that my mizzen upper stays got sad and droopy on me. But that will be an east fix after the gaff and spanker boom are done. I love this perspective from the bow showing off the symmetry and interplay of the running rigging.


- 301 replies
-
- 20
-
-
-
- Constitution
- Bluejacket Shipcrafters
- (and 1 more)
-
Your eyebolt fix is very well done, JC. With rigging tied to the eyebolt and sails attached, a slightly off center eyebolt is something nobody will ever notice (except you!).
- 312 replies
-
- 6
-
-
-
- Chile
- Latin America
- (and 6 more)
-
NEVER throw anything away, right Bryan? I love those oarlocks. Very well done!
-
Looking very nice, Harvey!
-
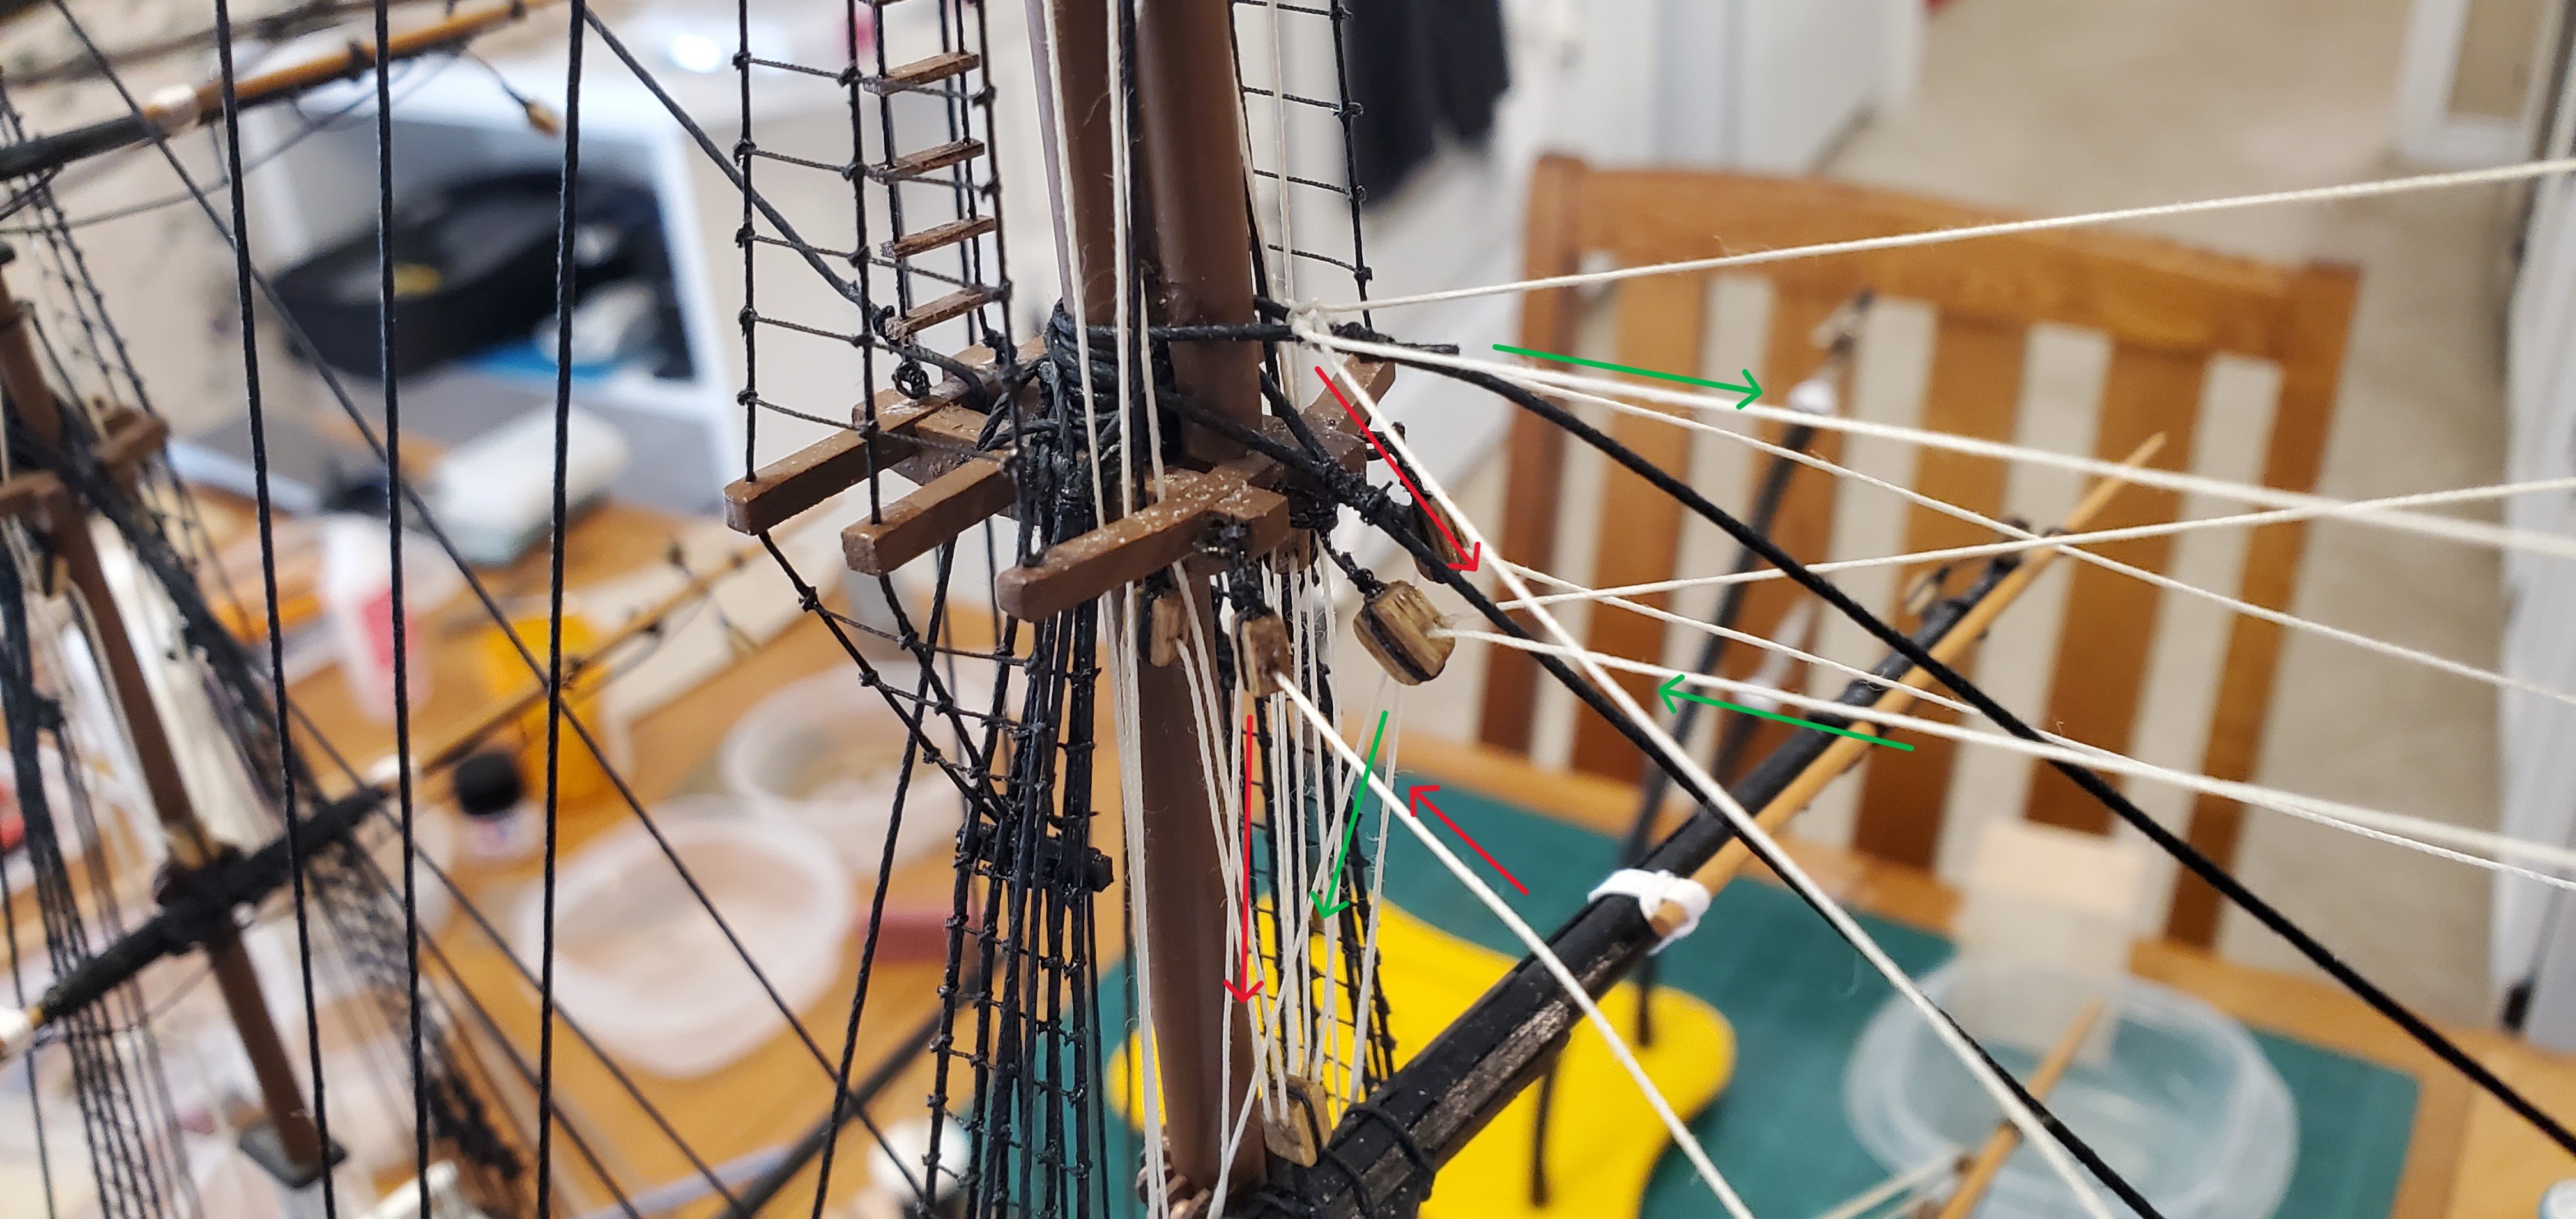
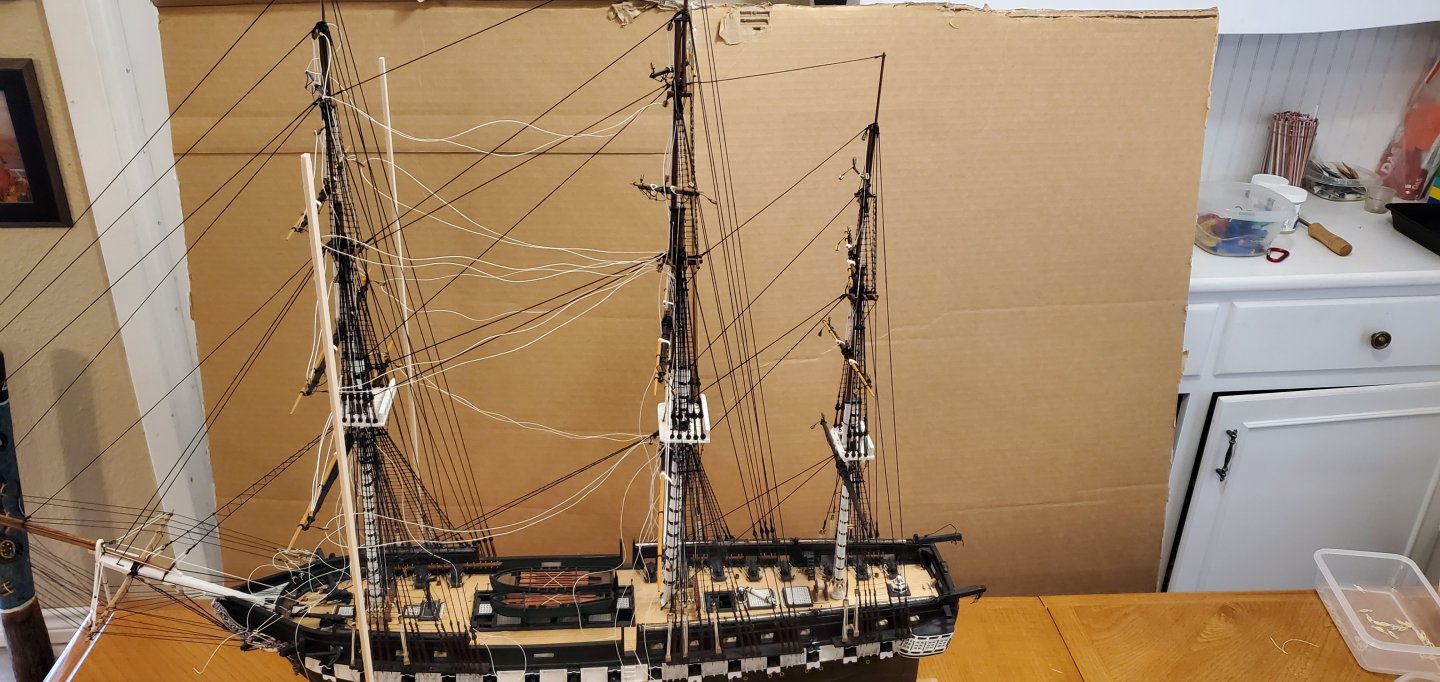
I was going to do lifts and braces for the all the lower yards, then top sail yards and work my way up. But I changed my mind and decided to do it mast by mast and complete the fore mast yards first. Here's the fore mast lifts and braces threaded but not tied off. And here they are all tied off. Here's a shot from the front showing all the fore mast yards nice and parallel with each other. I highlighted the fore mast yards as it's kind of hard to tell which yards belong to which mast from this perspective. I find the rigging of the fore mast yard braces on the main mast interesting so I thought I'd show some close-ups of how I did it. The red arrows point to the fore lower yard brace line as it's tied off at the main stay, runs to a block on the yard arm, back to a single block also seized to the main stay, then thru a bullseye seized to the shroud (at least I can't rig a bullseye upside down 😃), and down to the deck. Here's the fore top sail yard brace and the fore top gallant yard brace as they are rigged at the main mast. The arrows follow the starboard side braces. The red arrows follow the fore top sail yard brace and the green arrows follow the fore top gallant yard brace.

- 301 replies
-
- 13
-
-
-
- Constitution
- Bluejacket Shipcrafters
- (and 1 more)
-
Wait a minute! I thought a ship in bottle with penguins was next on your list!?!? And I know just the guy that can carve you some awesome penguins. Check out what @gsdpic did. See post #18. https://modelshipworld.com/topic/37836-friendship-sloop-by-gsdpic-bluejacket-shipcrafters-112/#comment-1091805 And your Lula is really coming together nicely. Wonderful work, Keith!
- 732 replies
-
- 4
-
-
-
- Lula
- sternwheeler
- (and 1 more)
-
Gunboat Philadelphia 1776 by tmj
Glen McGuire replied to tmj's topic in - Build logs for subjects built 1751 - 1800
Very interesting process. Thanks for walking us through it. -
Well dang! You are absolutely right, Henry. And I agree that it's too late for this build. I think it's better to be consistent, even if it's wrong, than to have some blocks done one way and others differently. So I will continue down my errant path.
- 301 replies
-
- 6
-
-
- Constitution
- Bluejacket Shipcrafters
- (and 1 more)
-
Totally agree with Keith. Like I said in a post on my build log, Bob works at warp speed! Amazing indeed!!
-
Welcome to MSW! I hope you will start a build log for your project so we can follow your work.