MORE HANDBOOKS ARE ON THEIR WAY! We will let you know when they get here.
×


Glen McGuire
-
Posts
1,912 -
Joined
-
Last visited
Content Type
Profiles
Forums
Gallery
Events
Everything posted by Glen McGuire
-
 Thanks for the comment, Roel. That's an interesting idea to do a vertical Z-cut. I may play around with that before my next split-hull SIB. I've always used tapered locating pins (toothpicks) to help guide things in place when joining the hull inside the bottle. That Yi Soon Shin series looks like it would be worth watching. Thanks for reminding me why I live in Texas, Bob! Good analogy, Keith! And on that note, I'm going to jump out of this Kentoshi-sen airplane for a few weeks. I'm heading up to New London, CT for the Northeast Ship Modelers Show and when I get back, I'm going to dive back into the Constitution and see if I can finish her up.
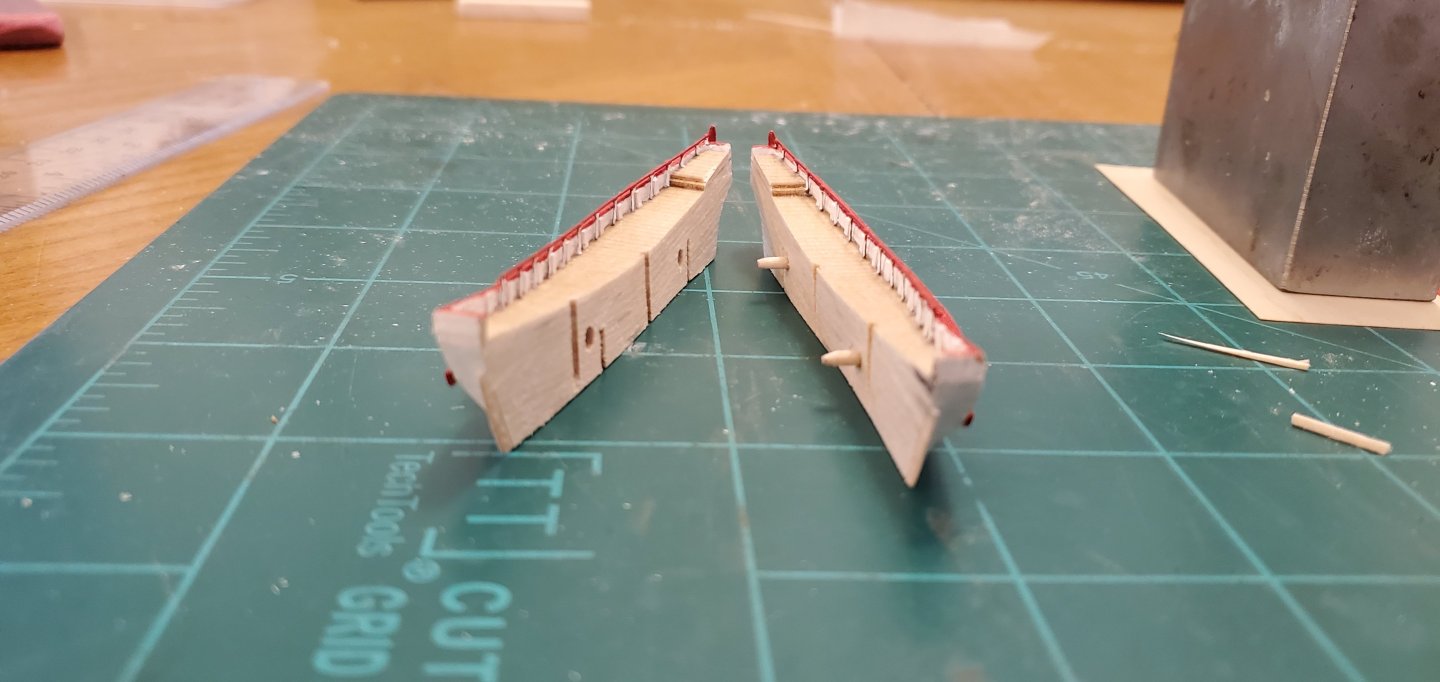
- 106 replies
-
- 10
-

-
- Kentoshi-Sen
- bottle
- (and 1 more)
-
For the first coat of primer, I think she looks great, Gary. Nice work. Can't wait to see tomorrow's post! 😃
-
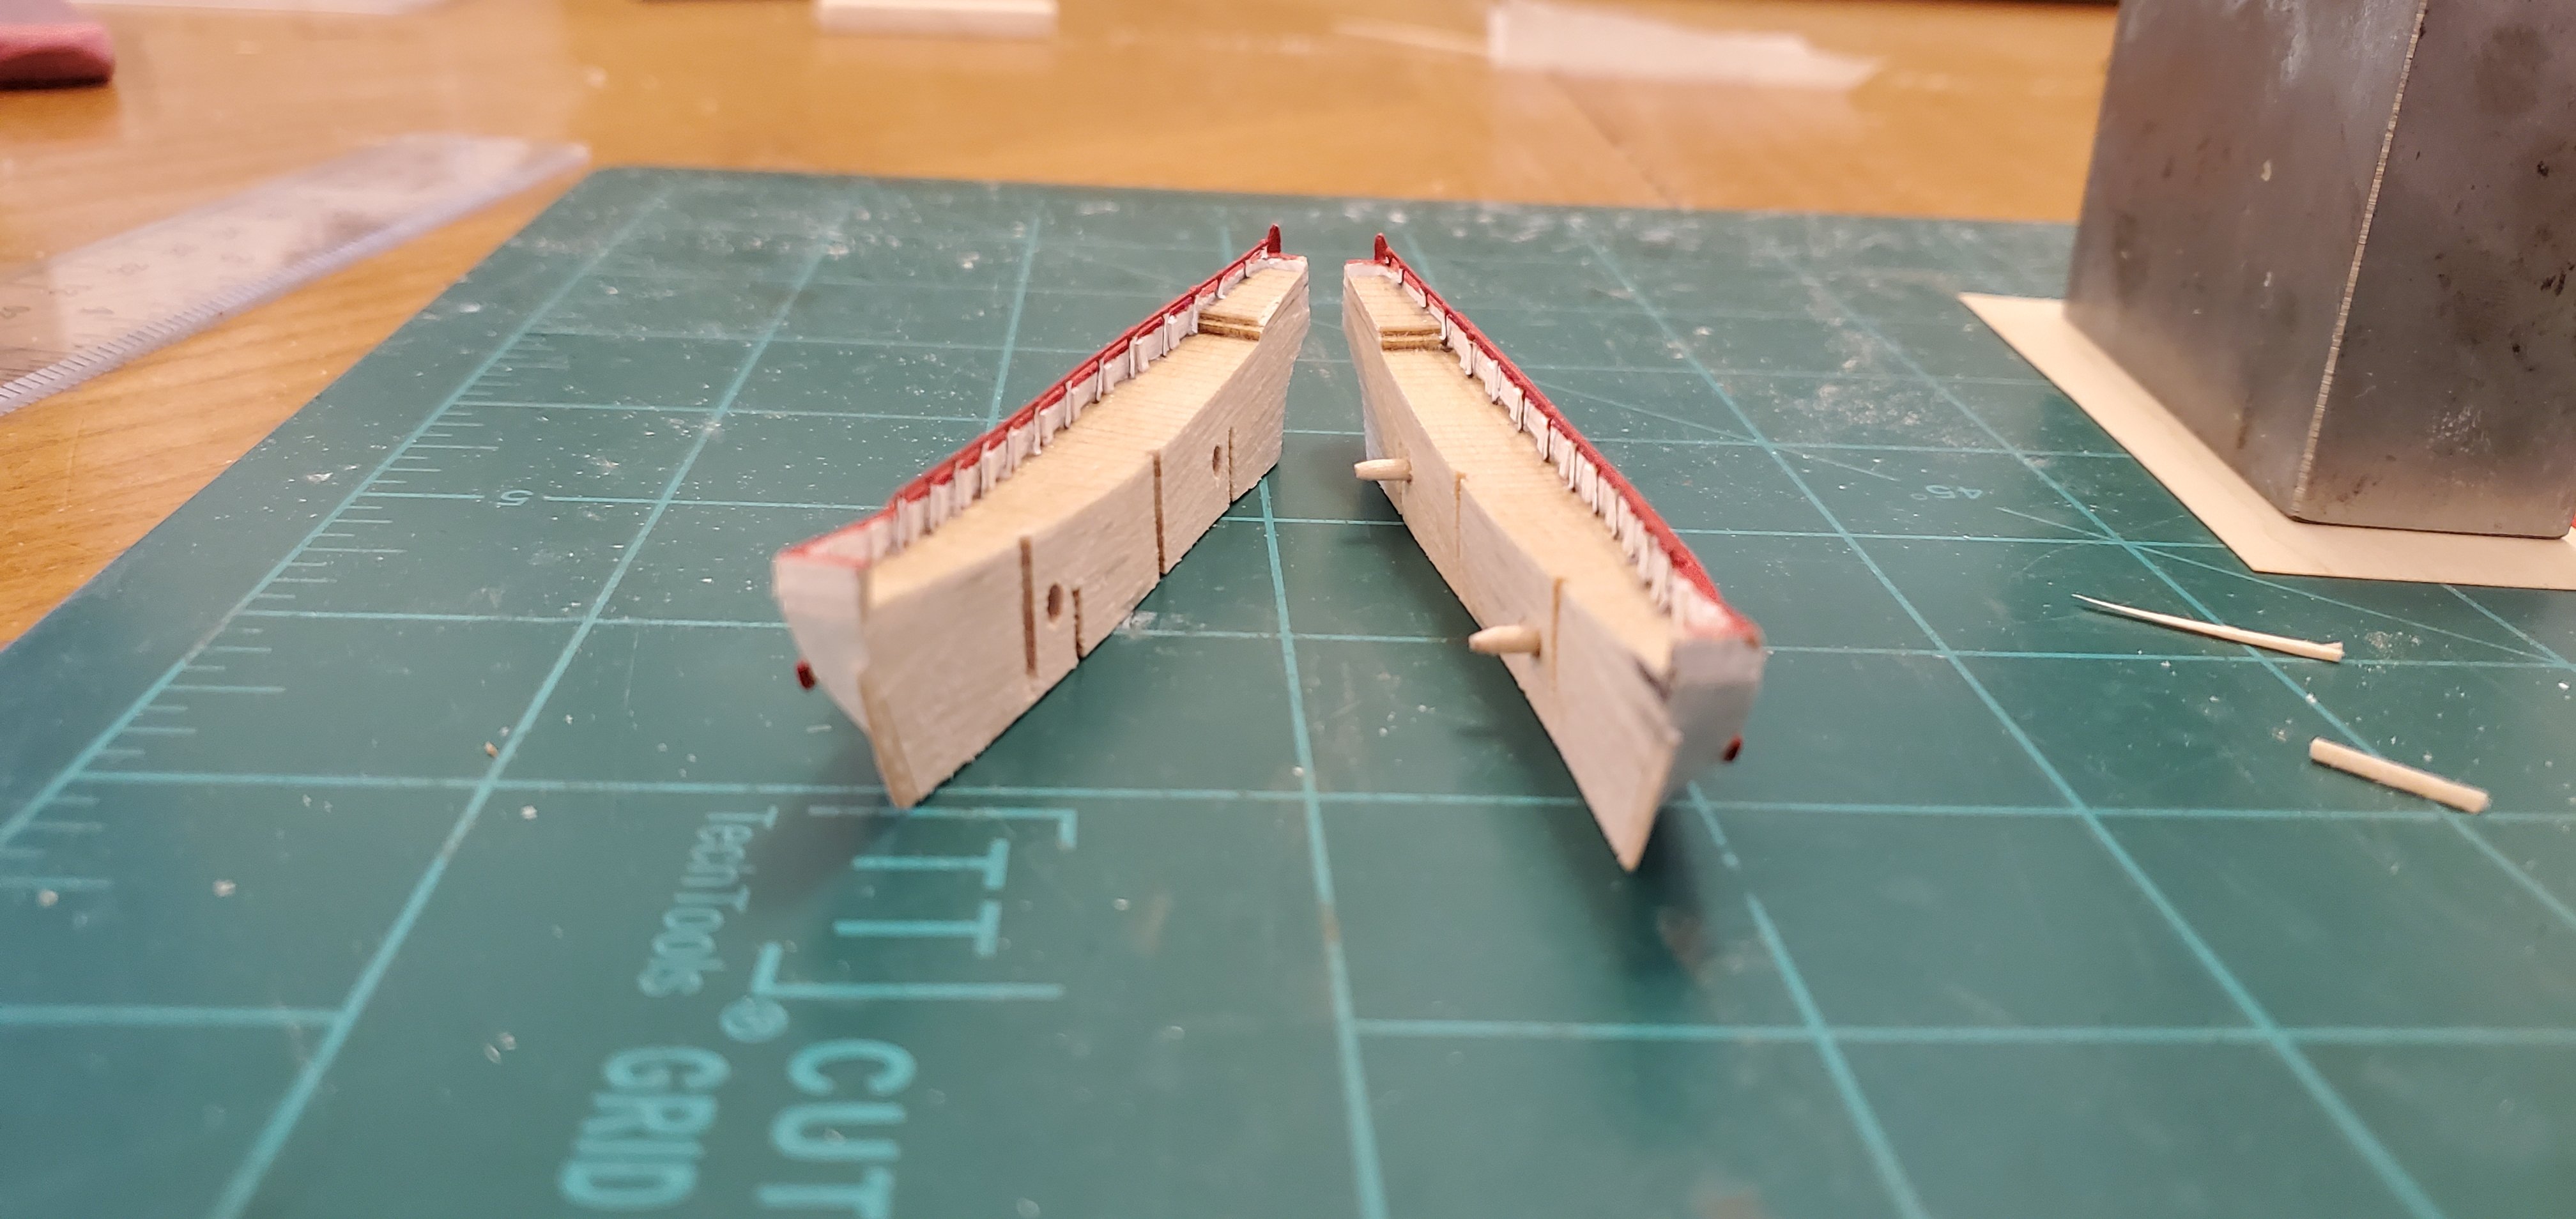
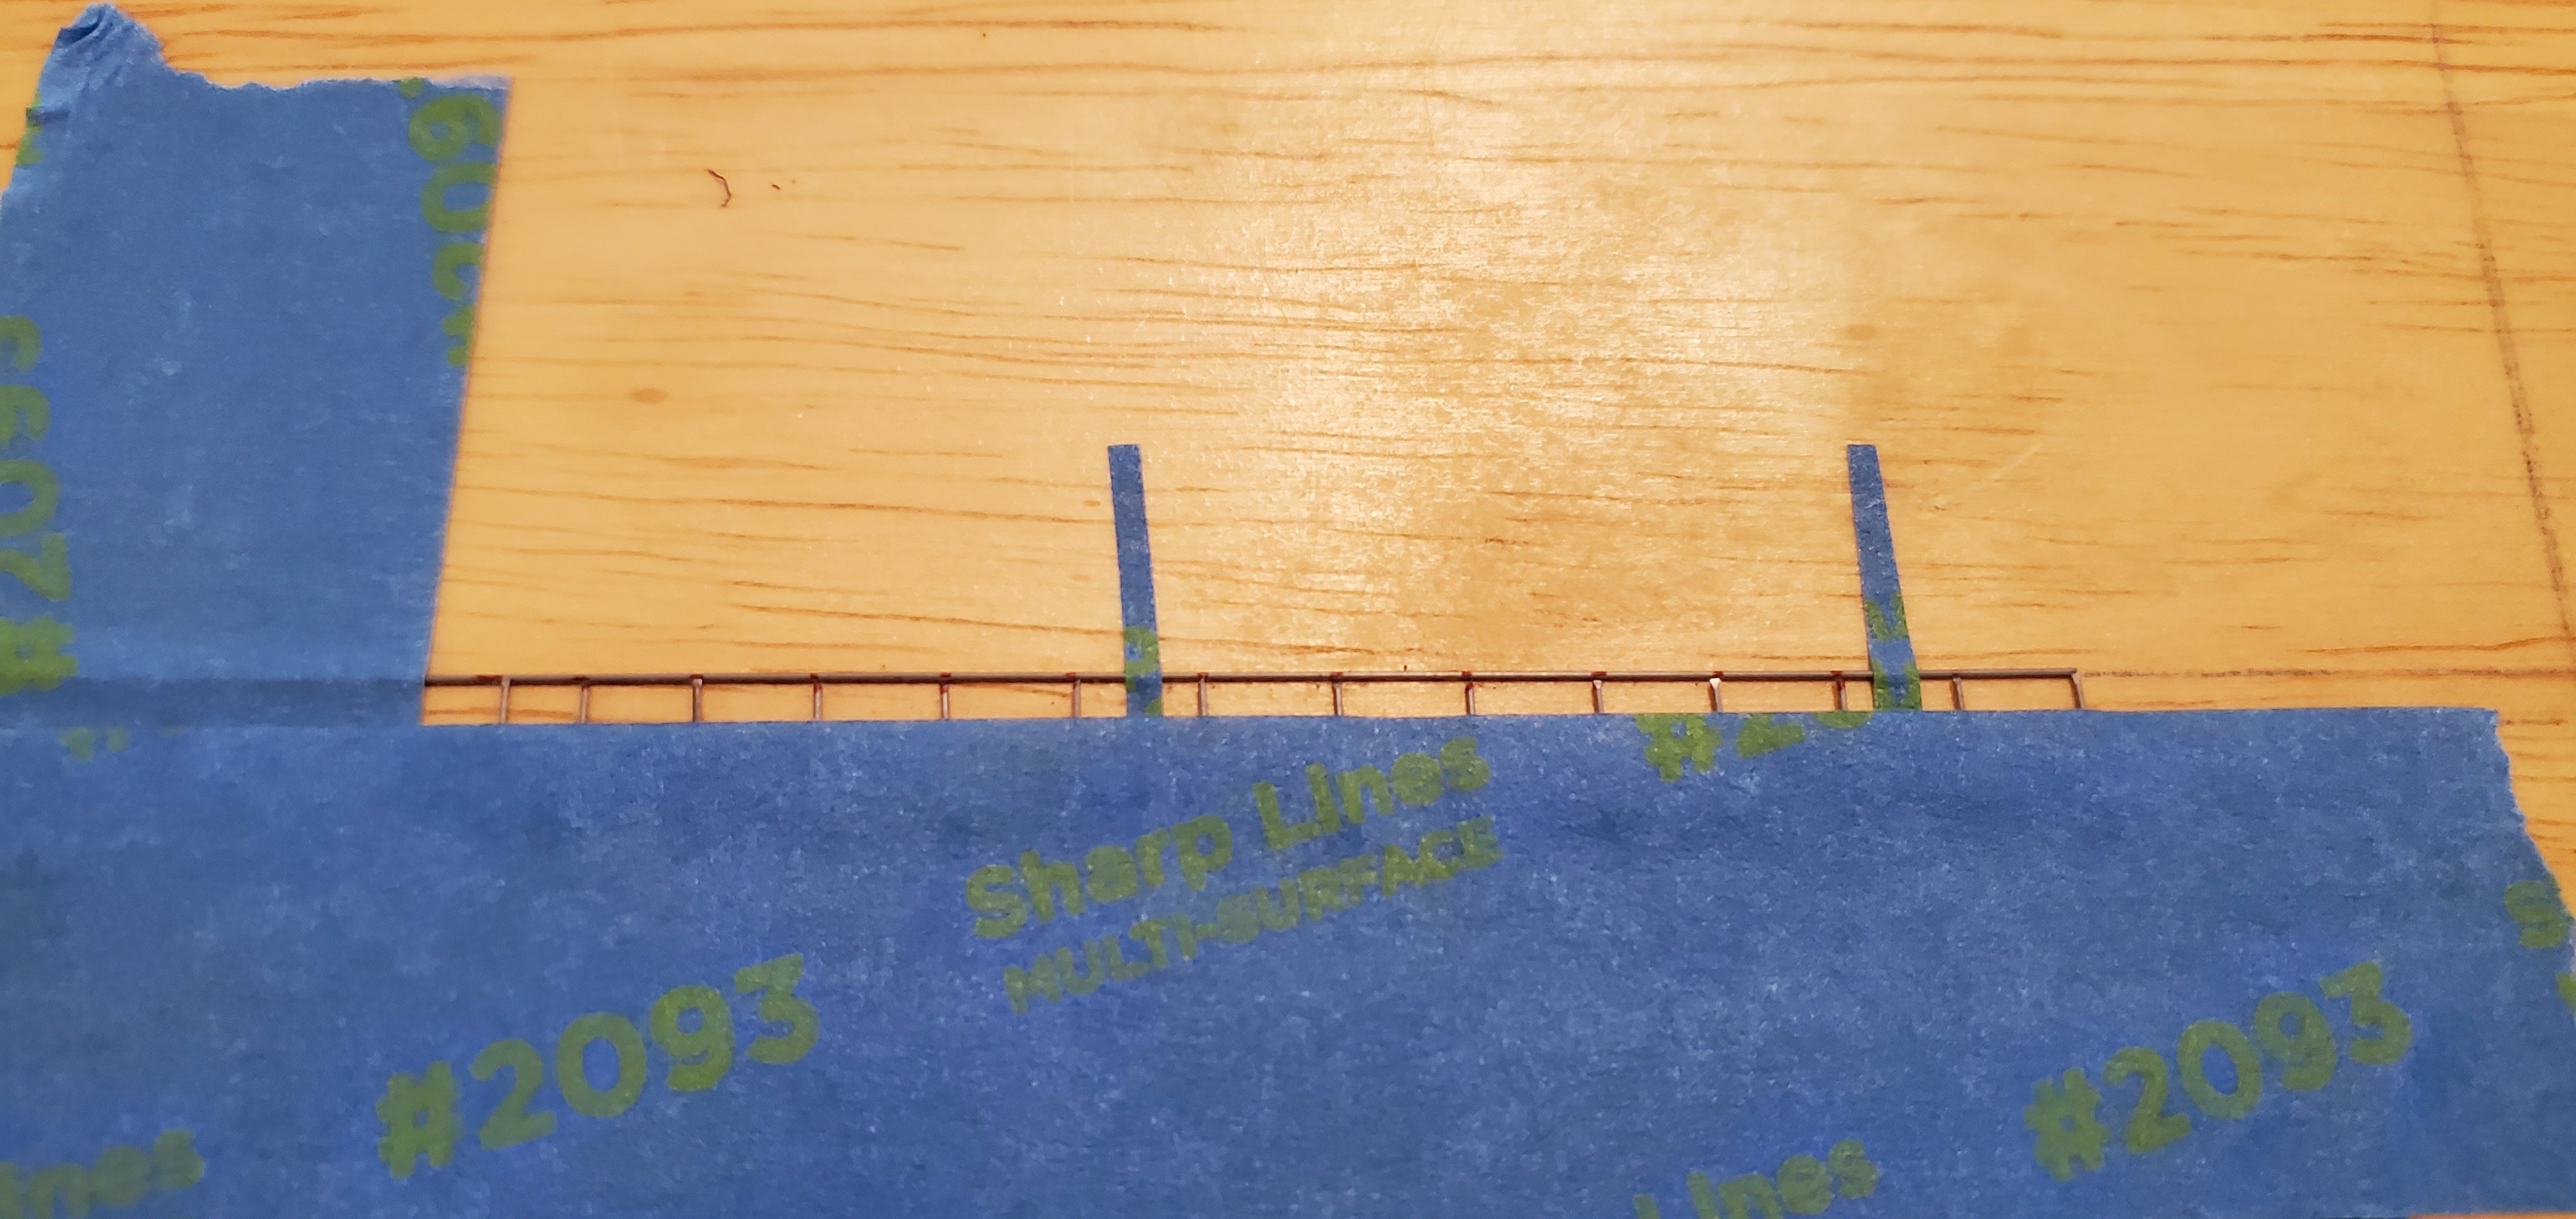
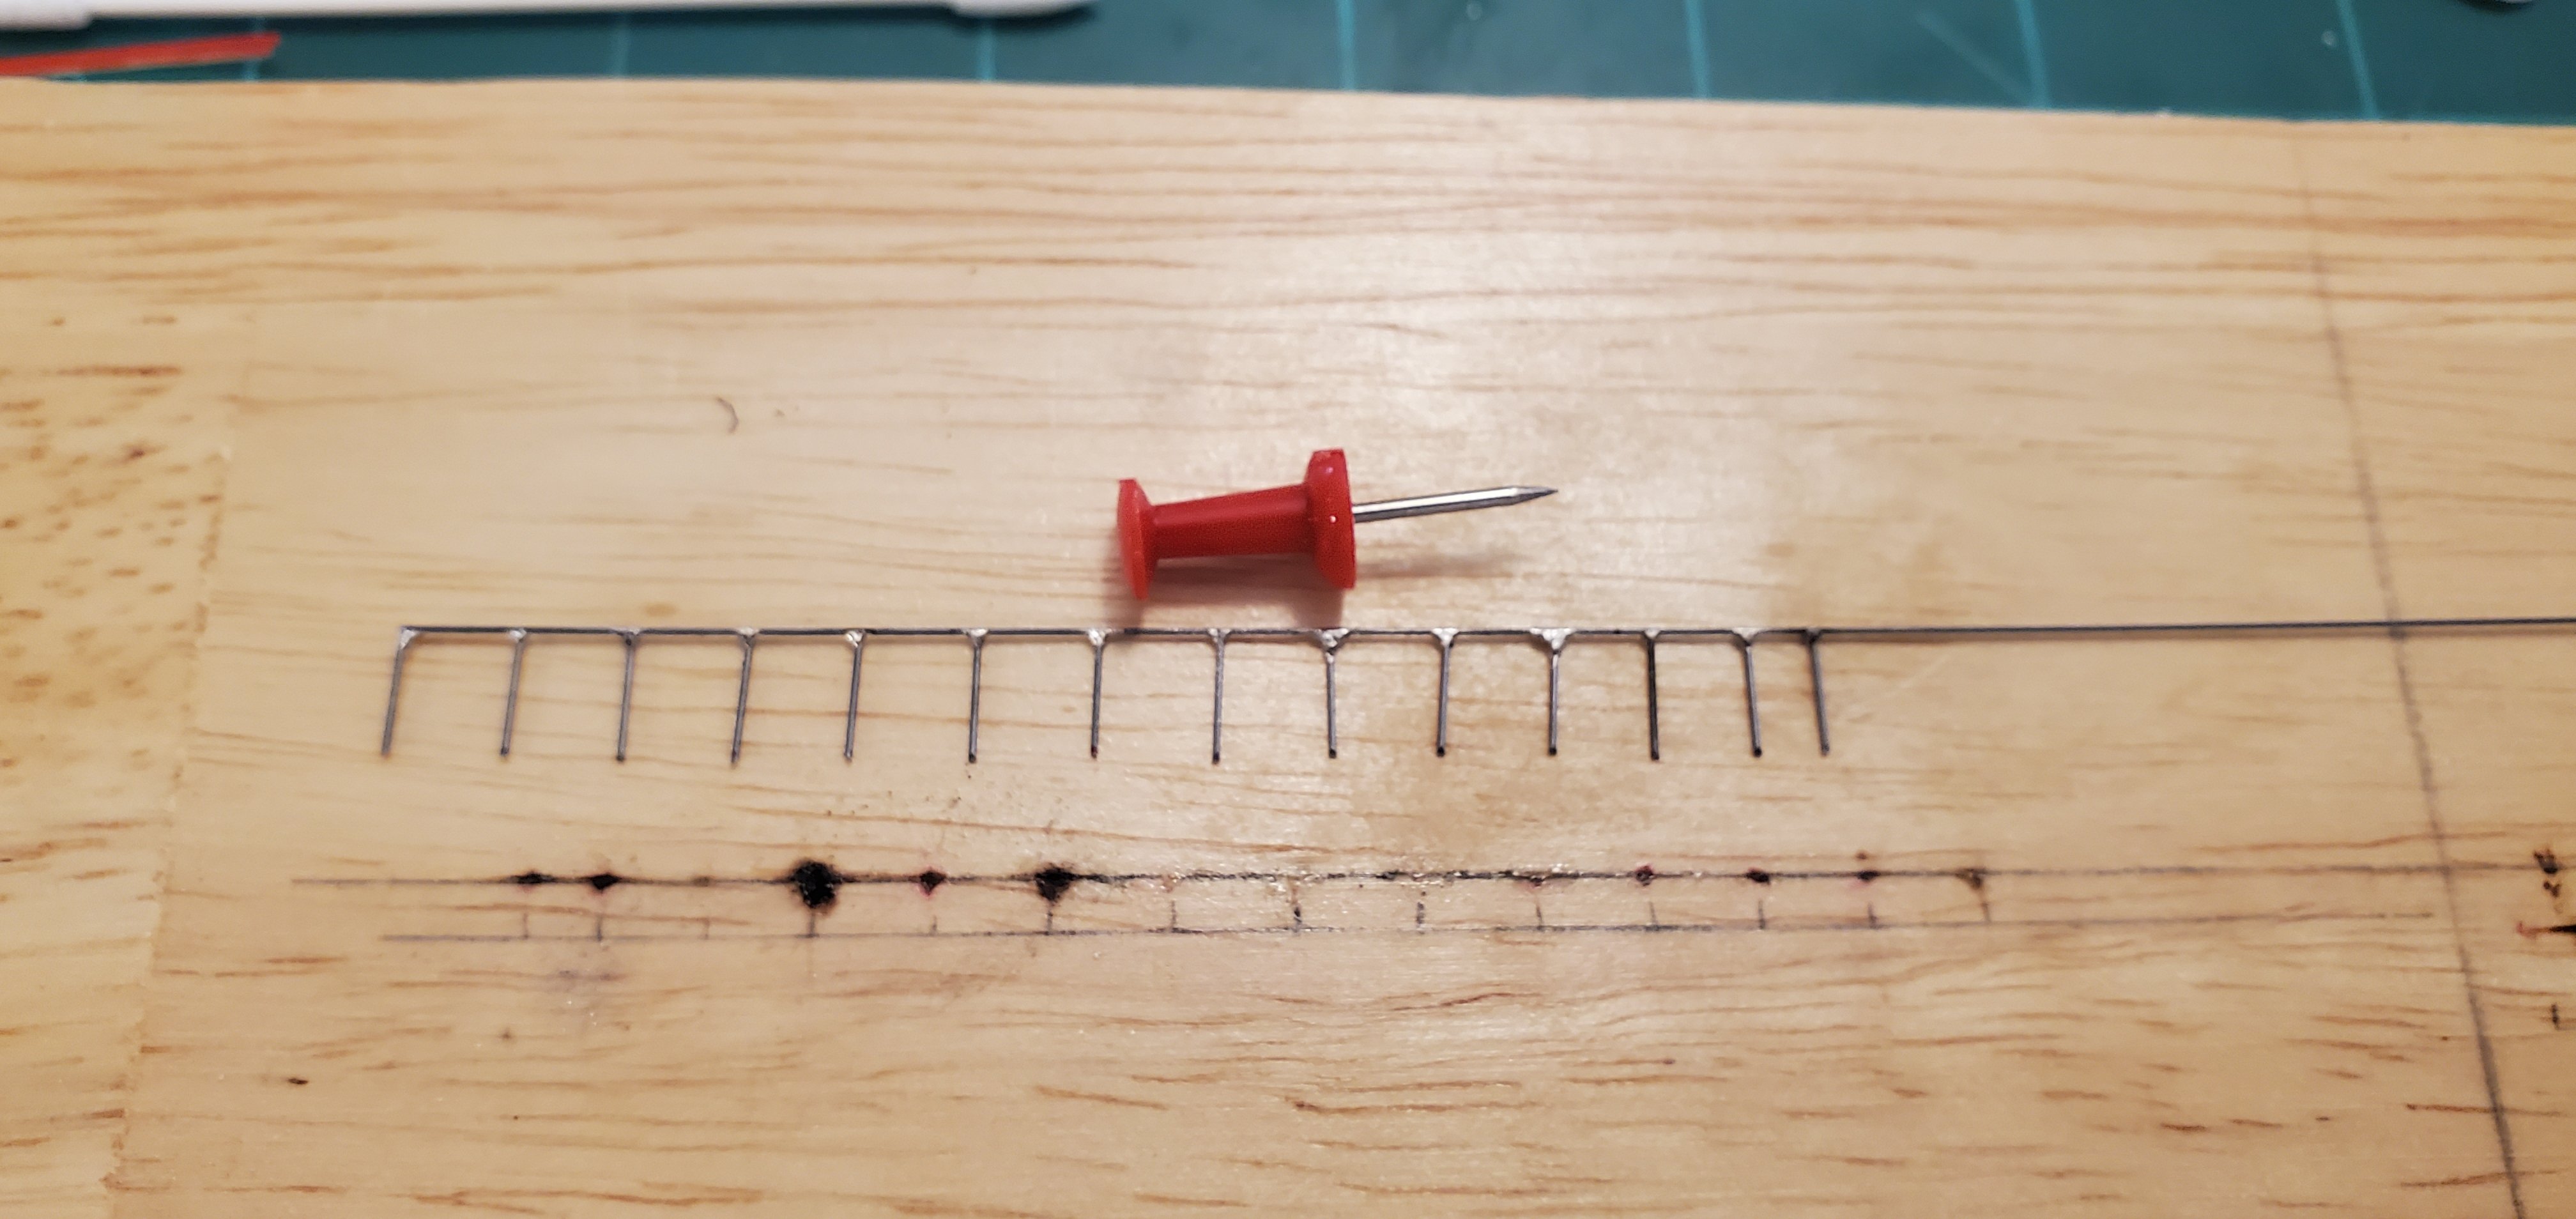
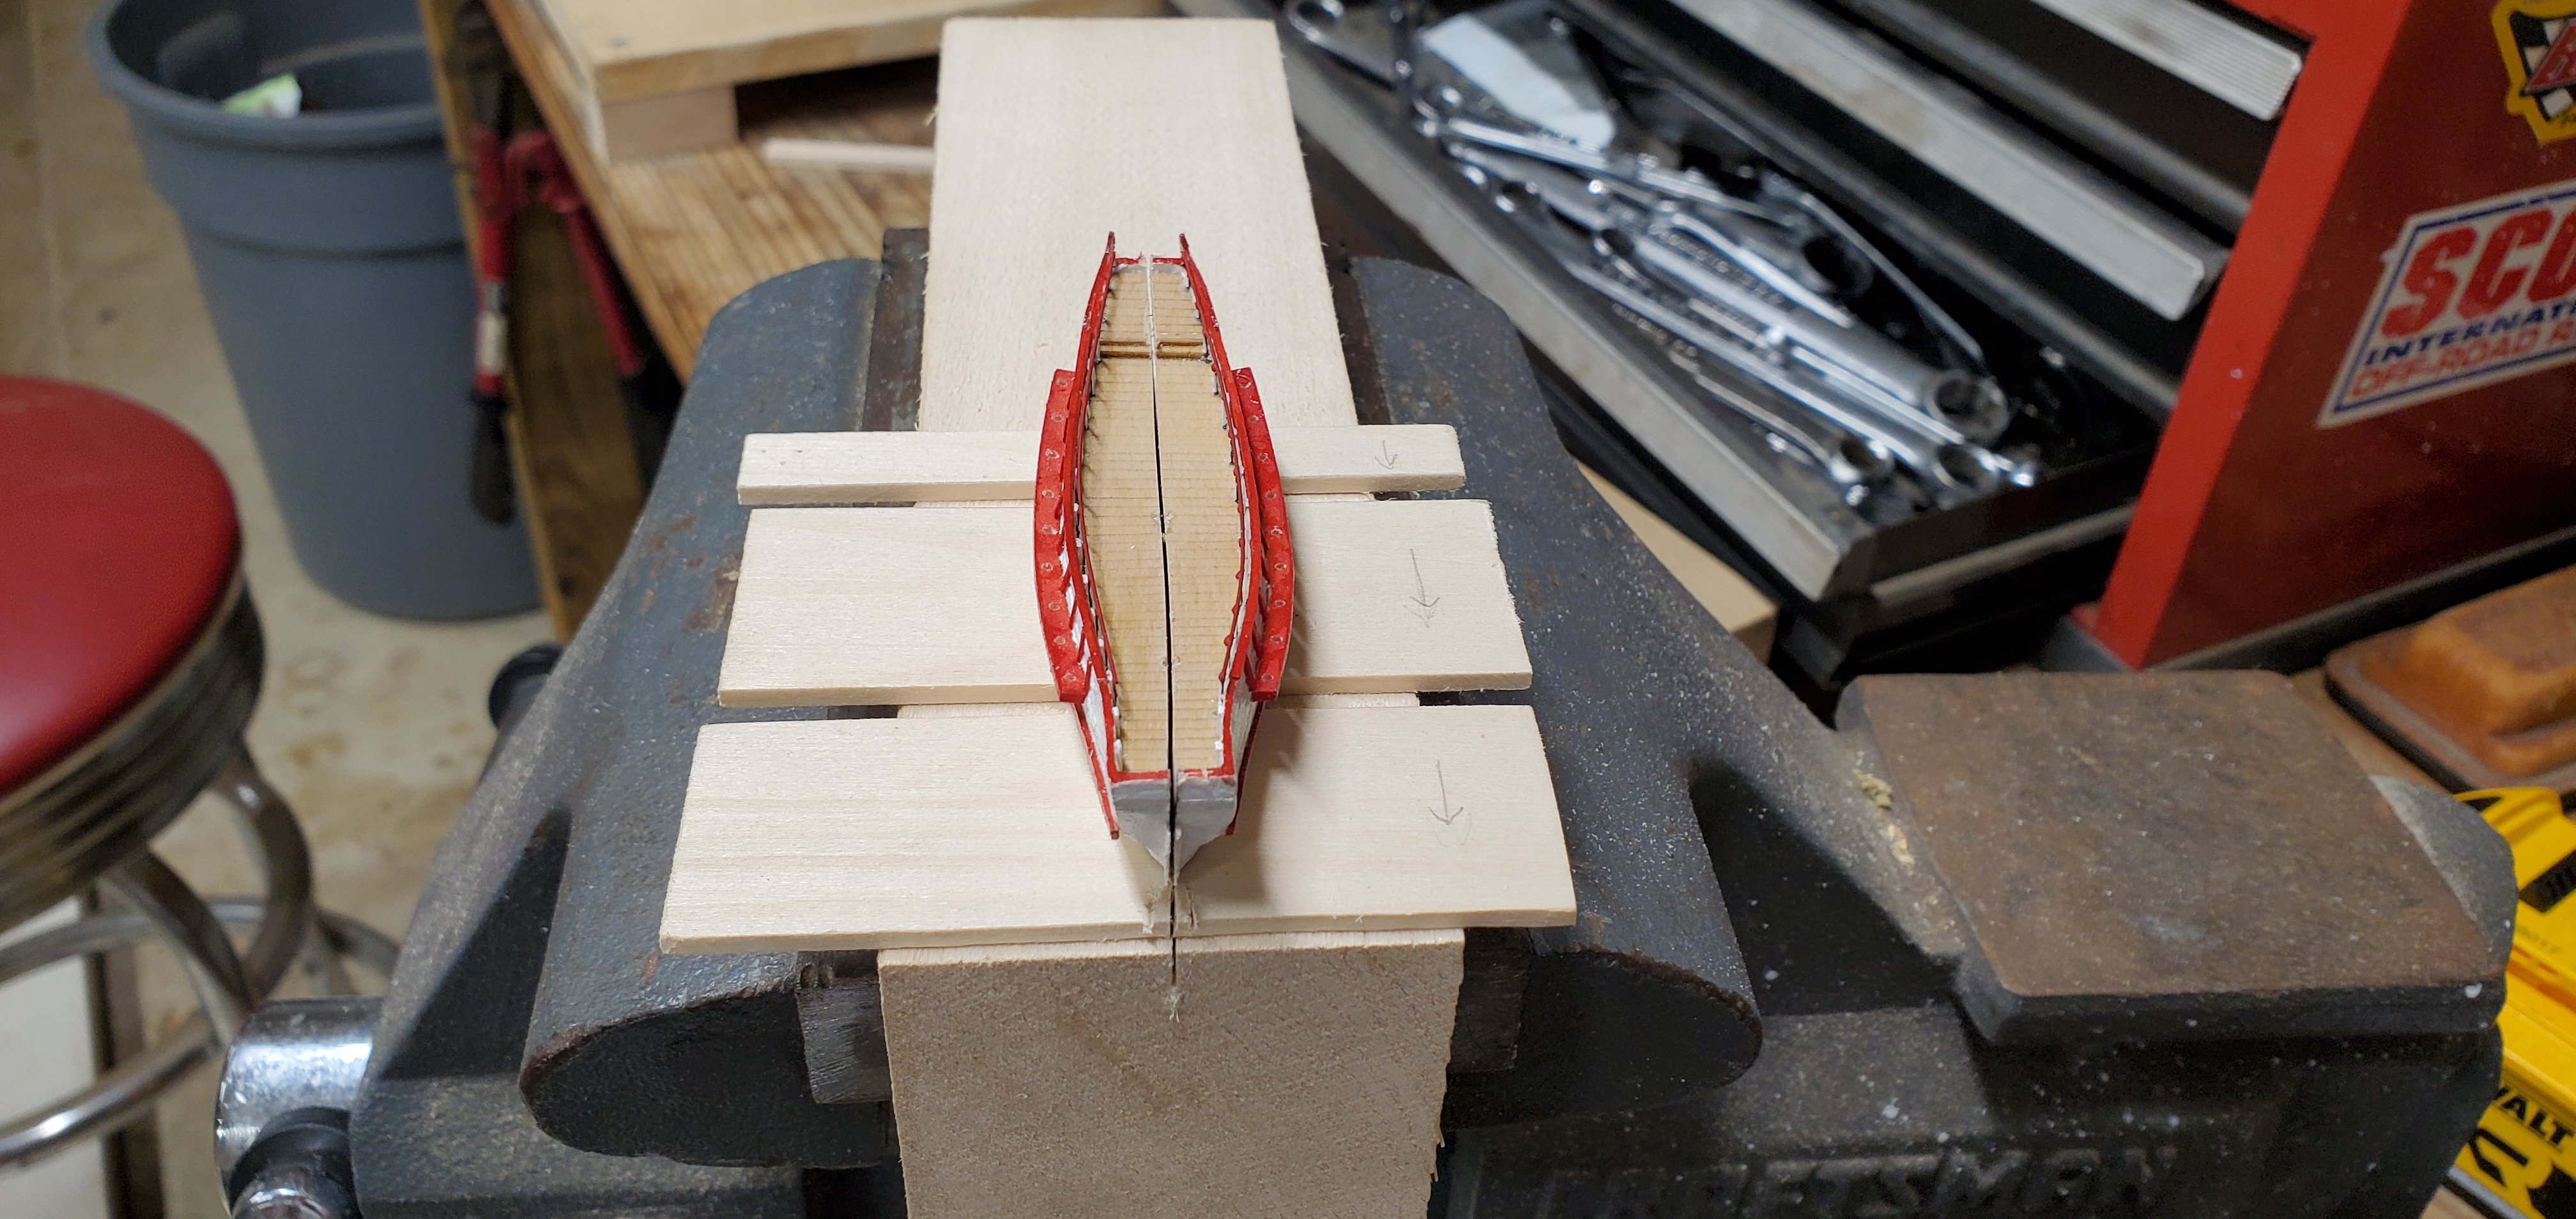
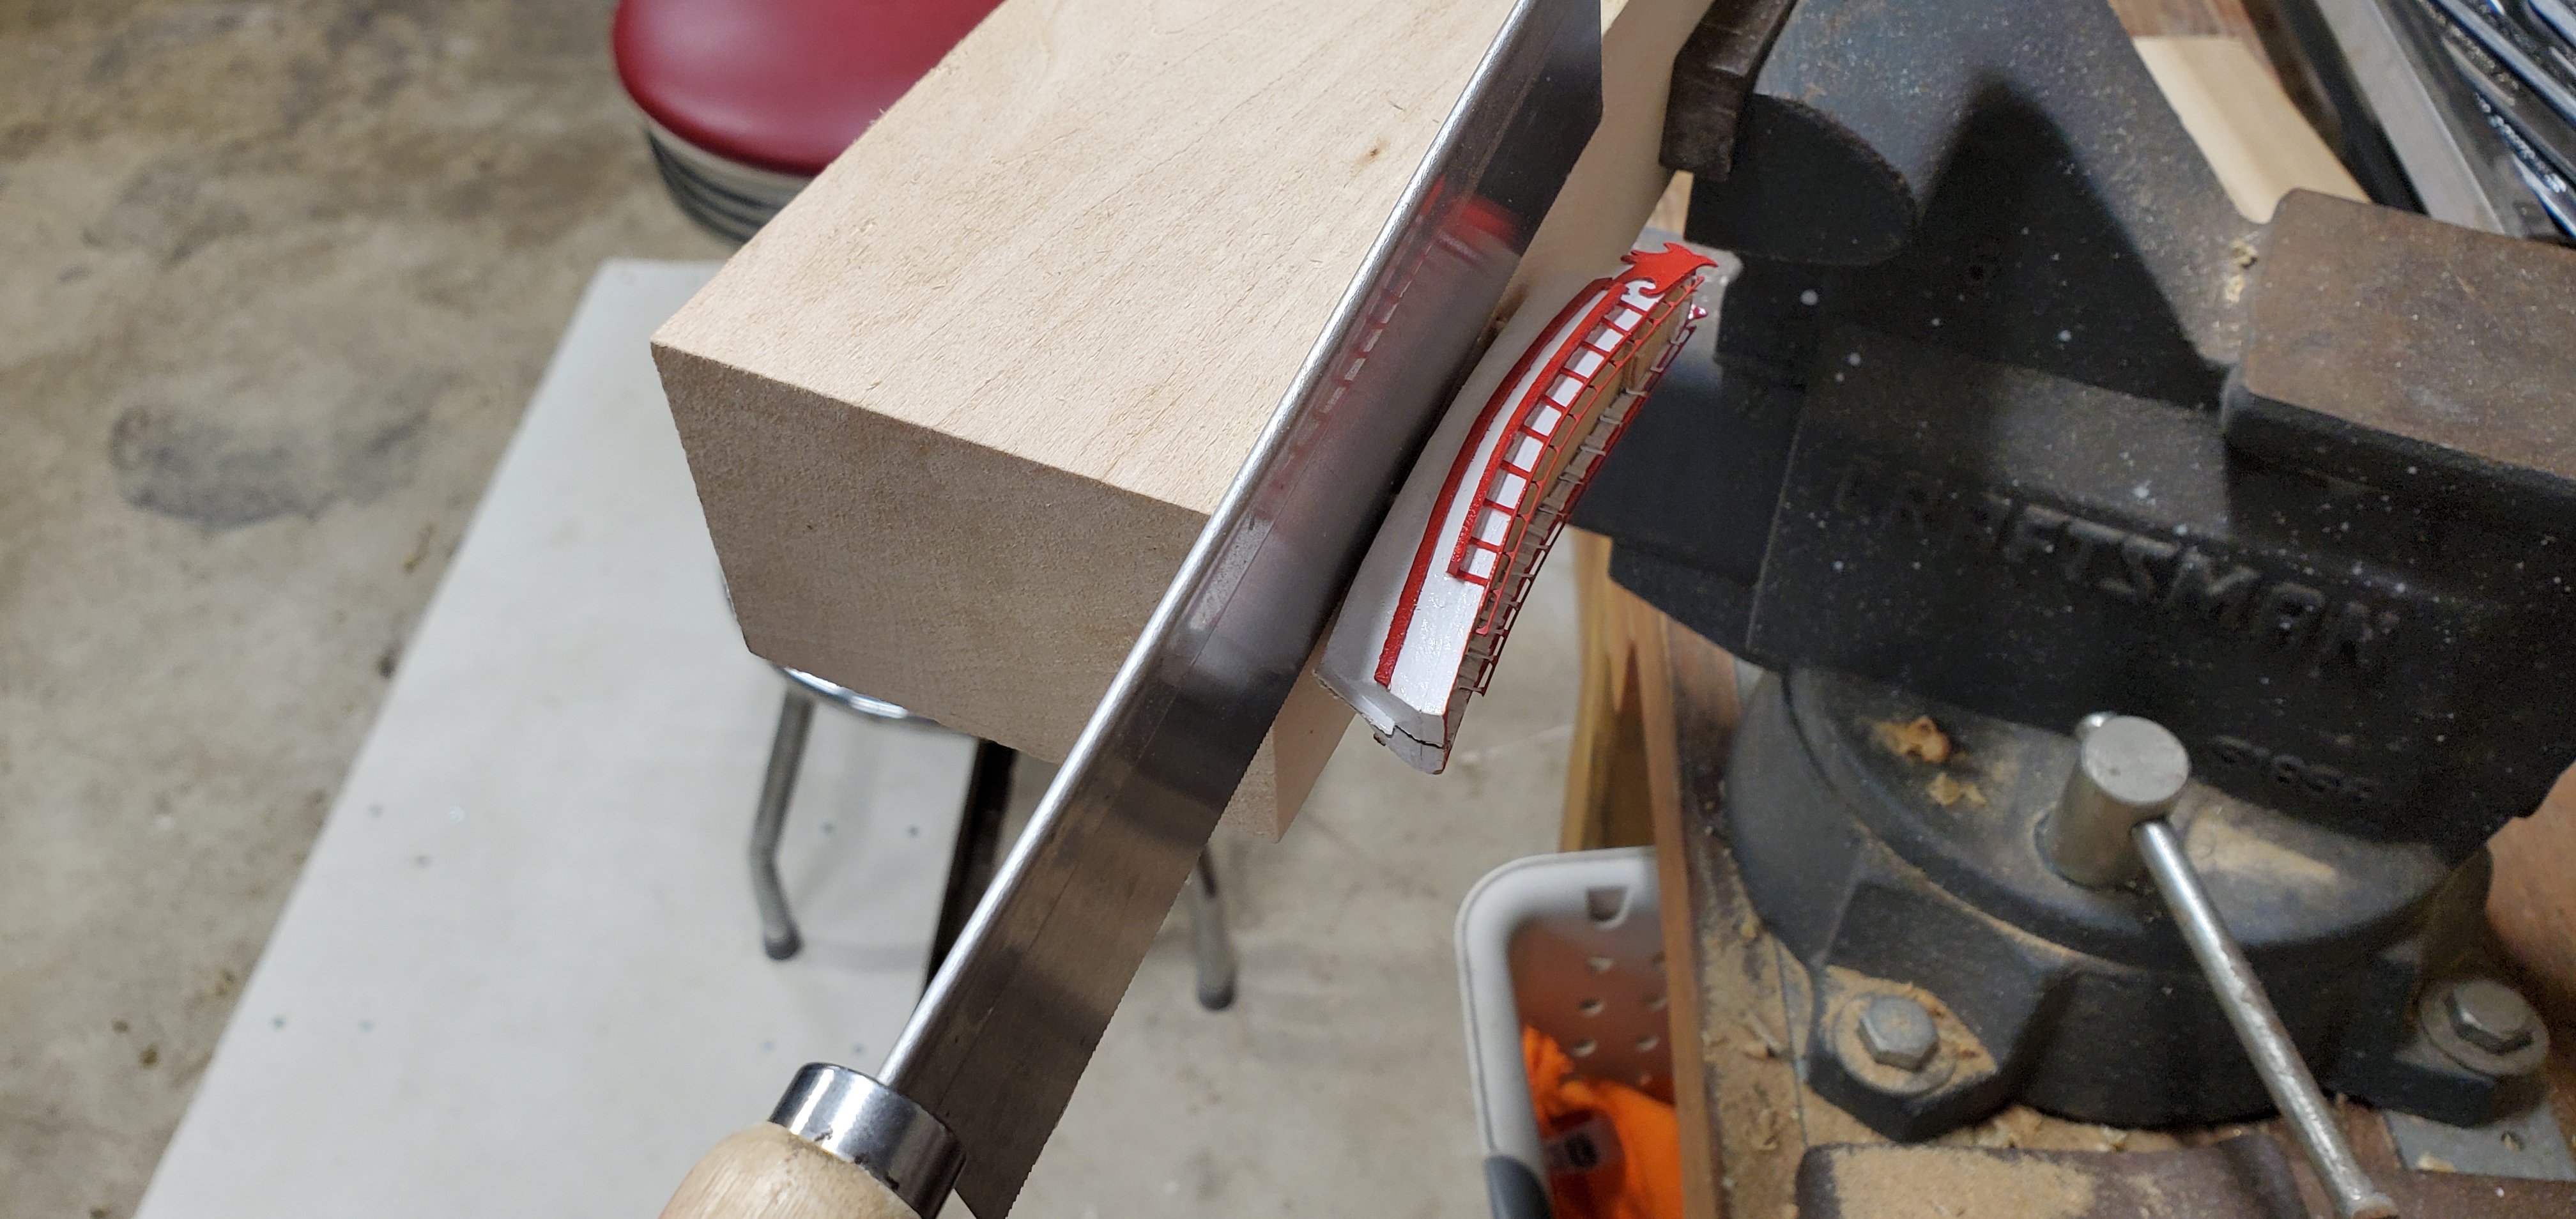
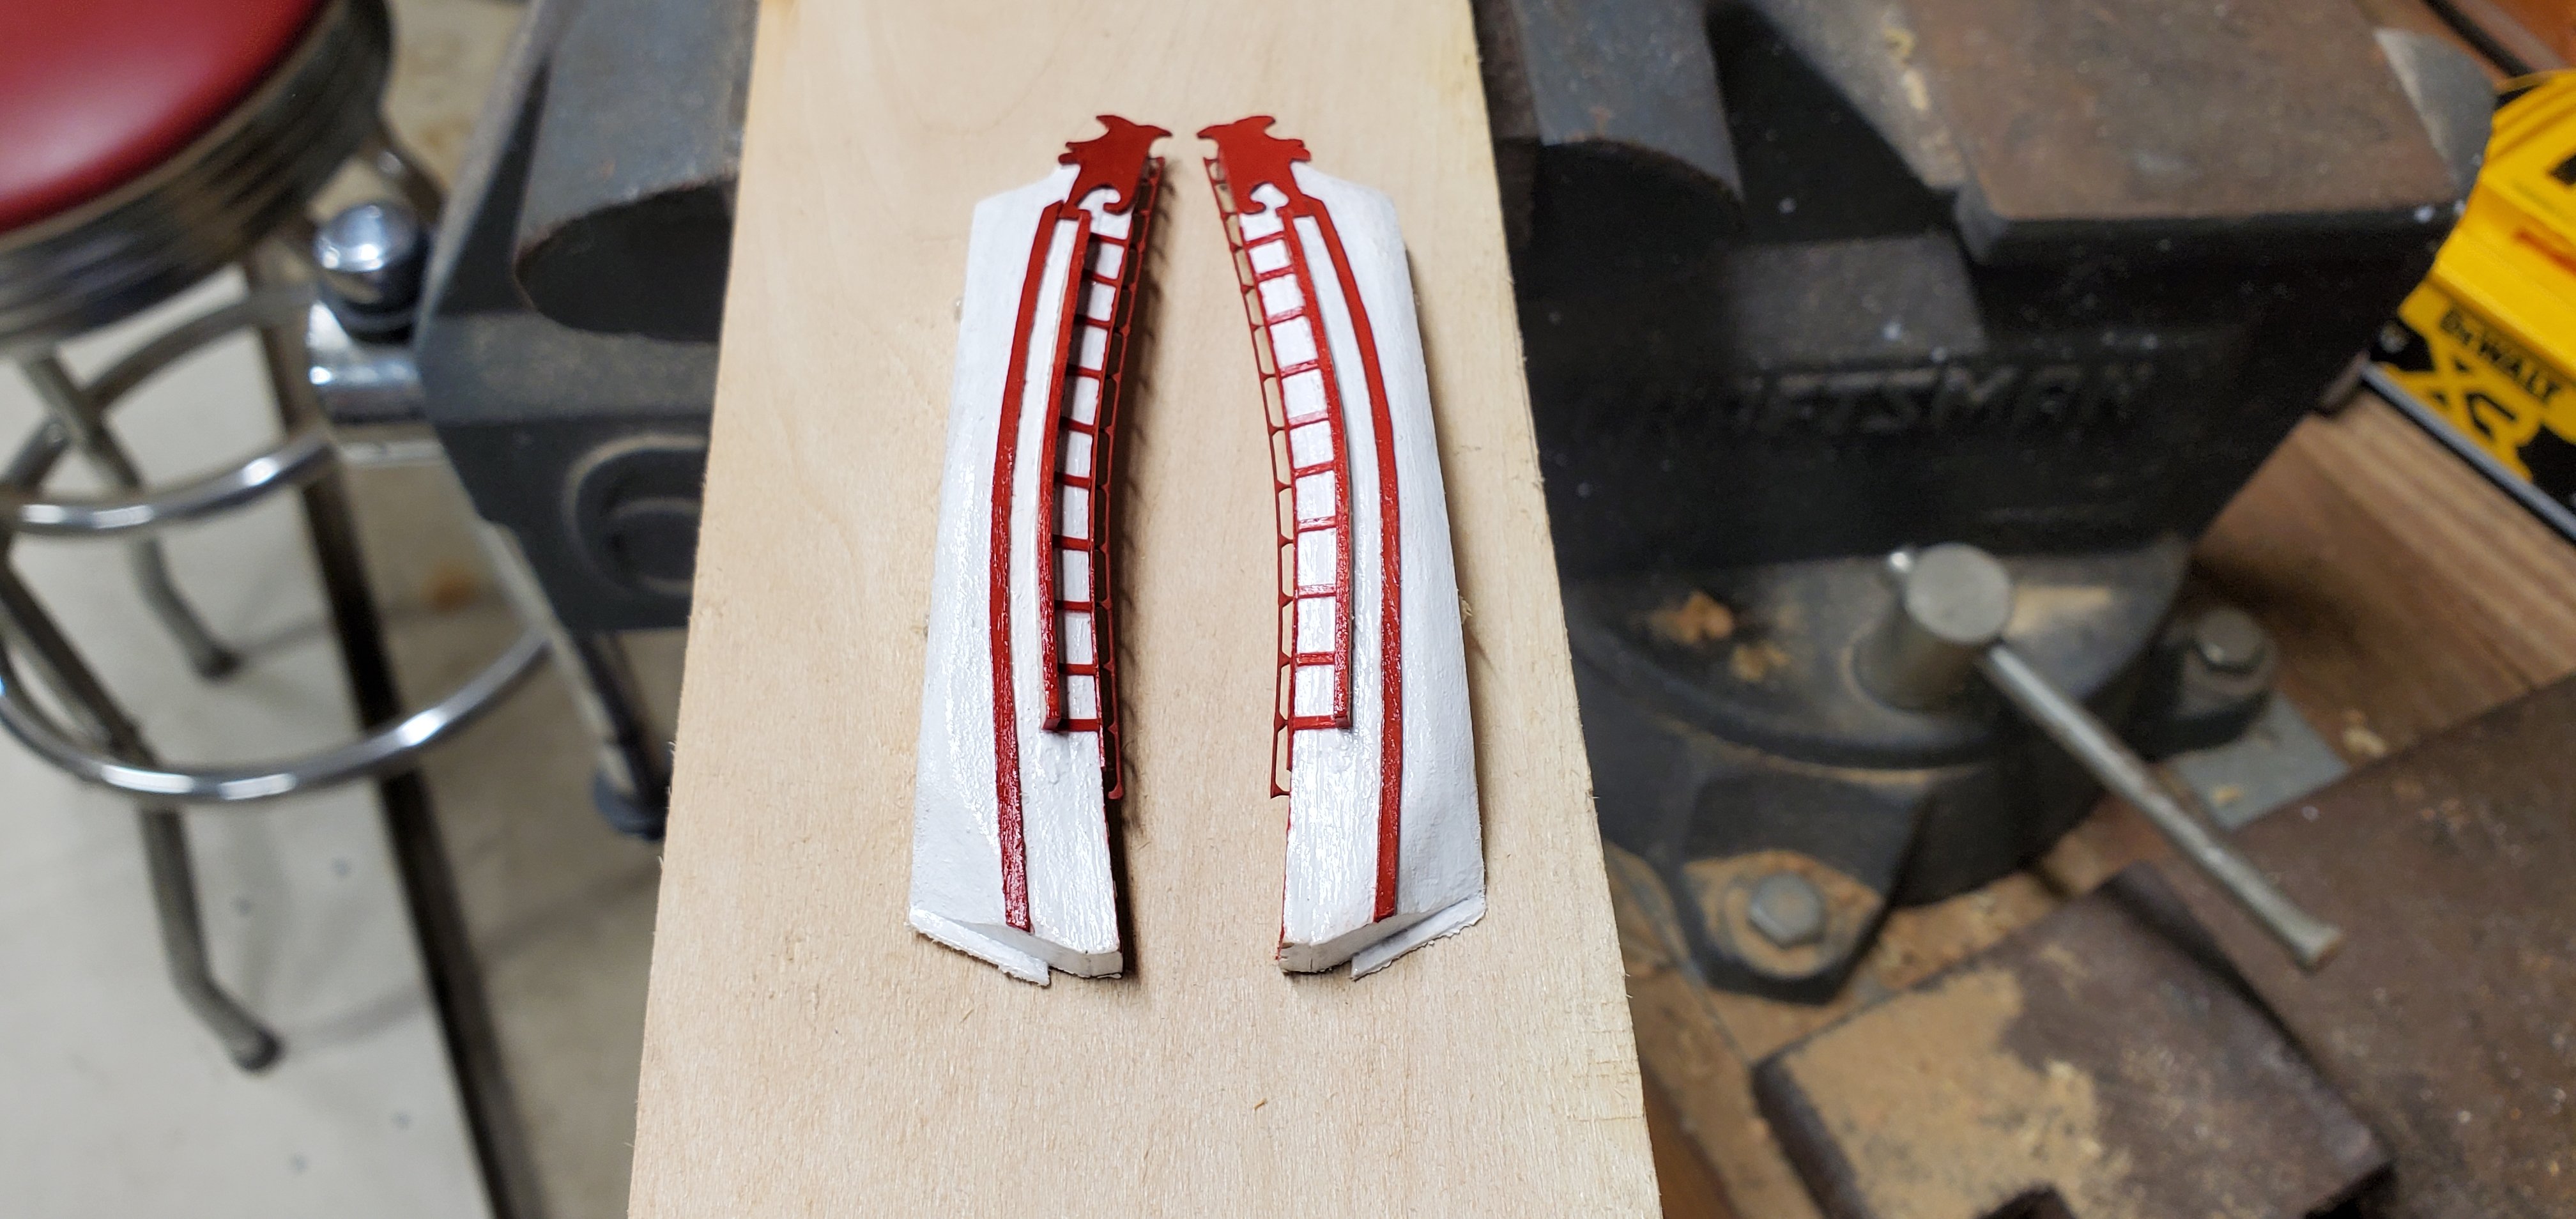
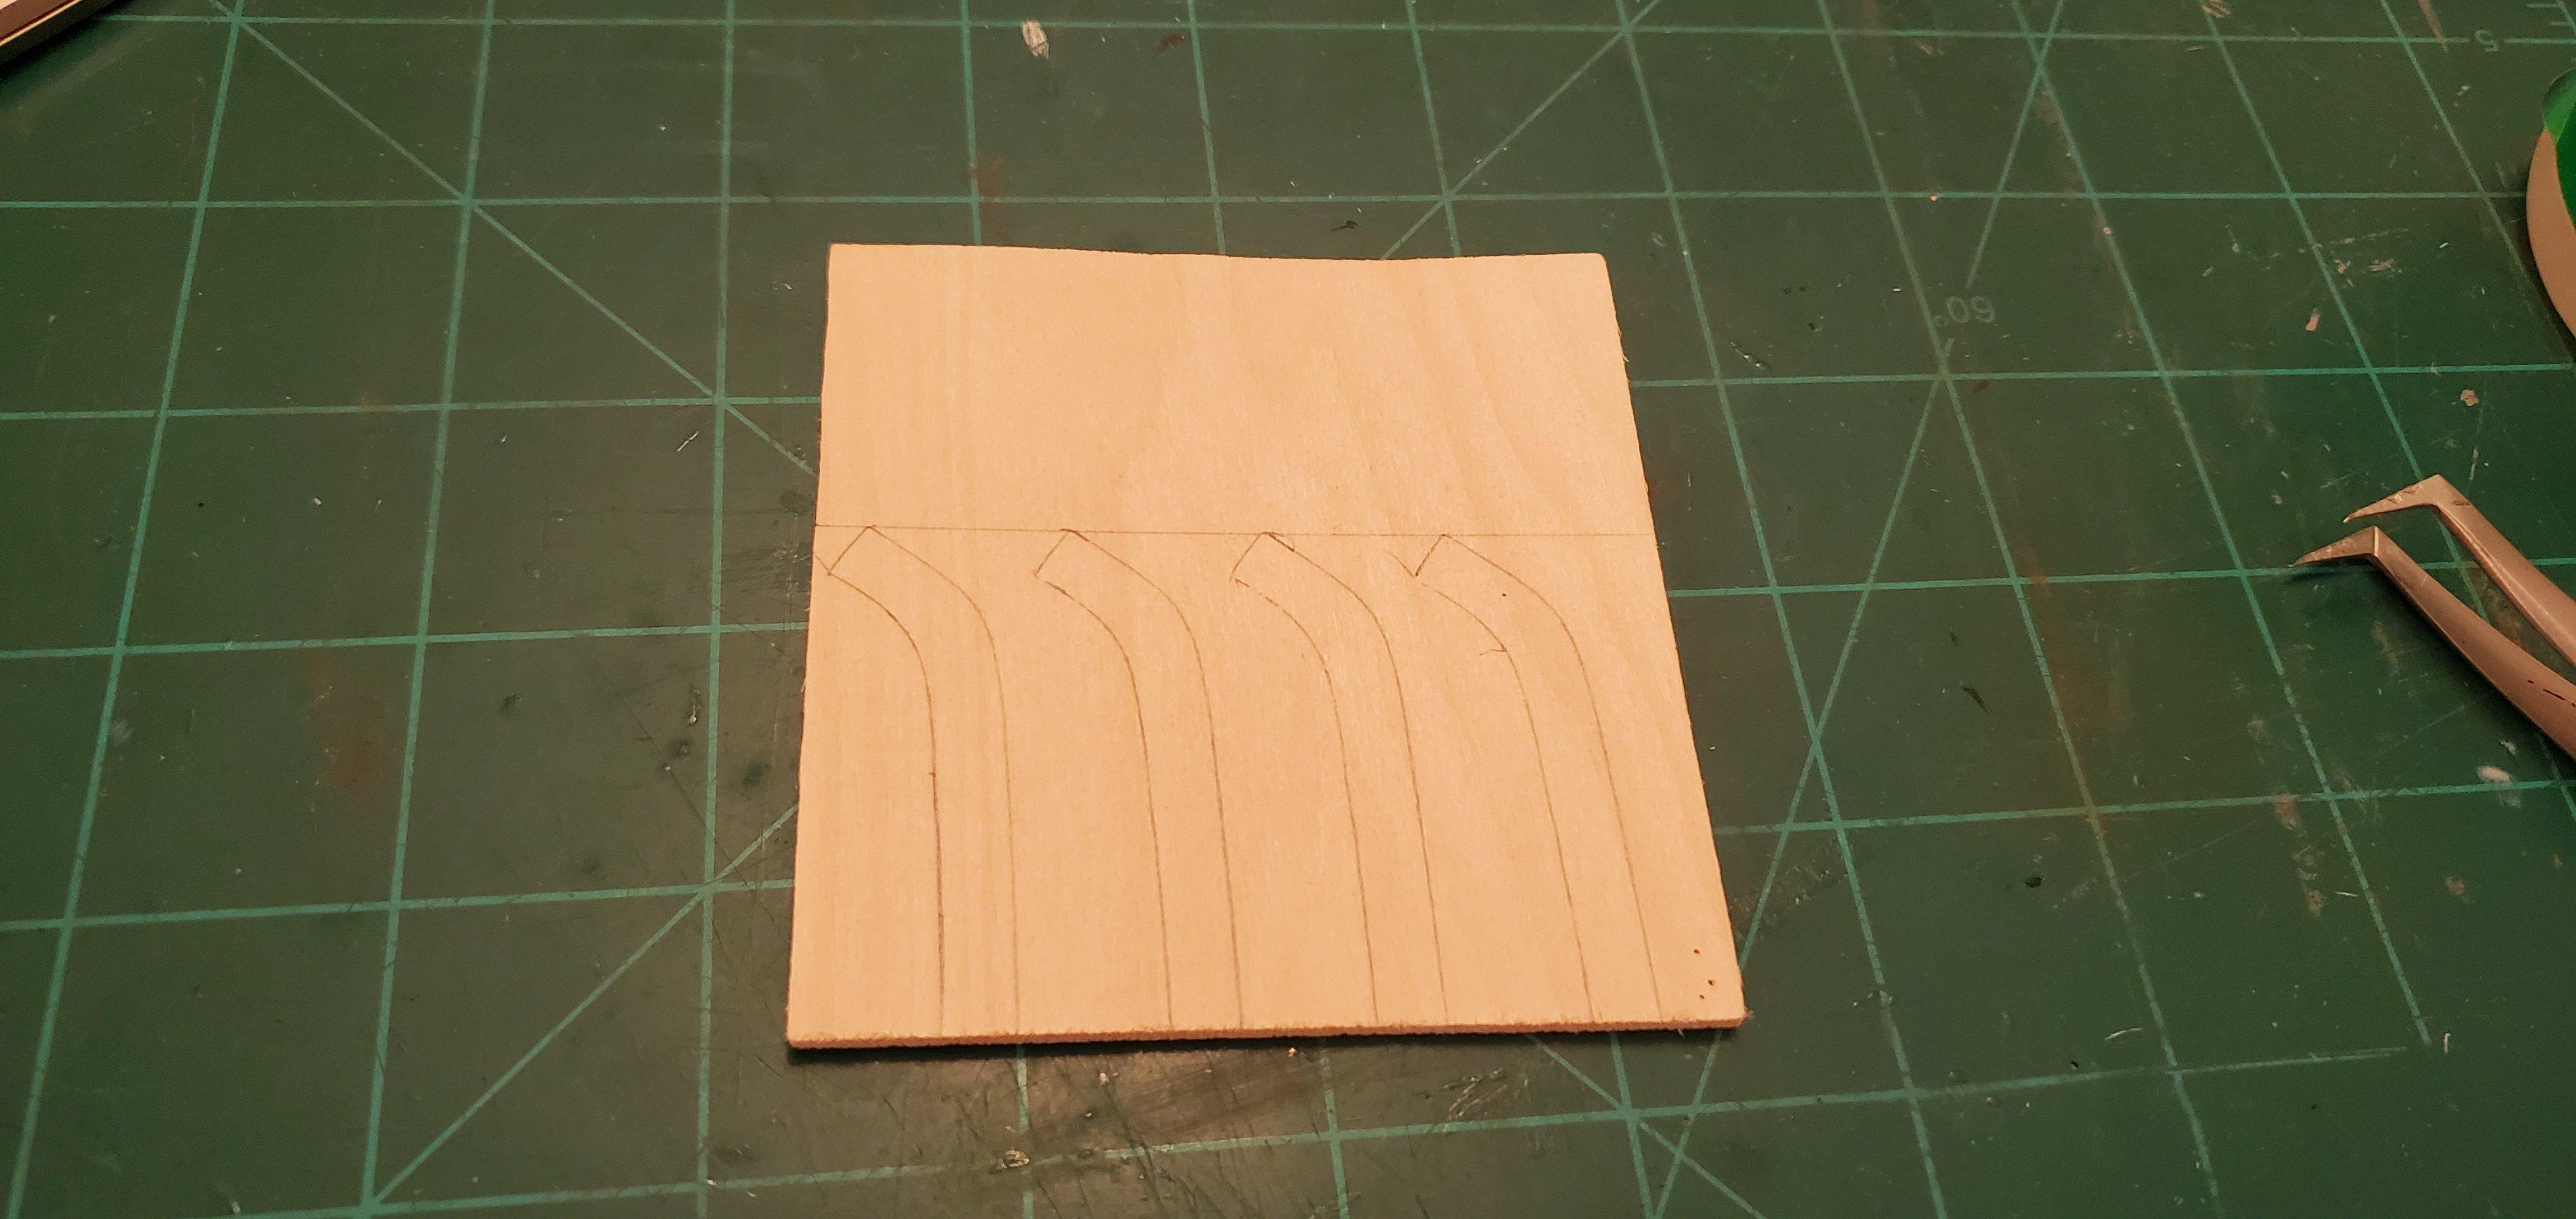
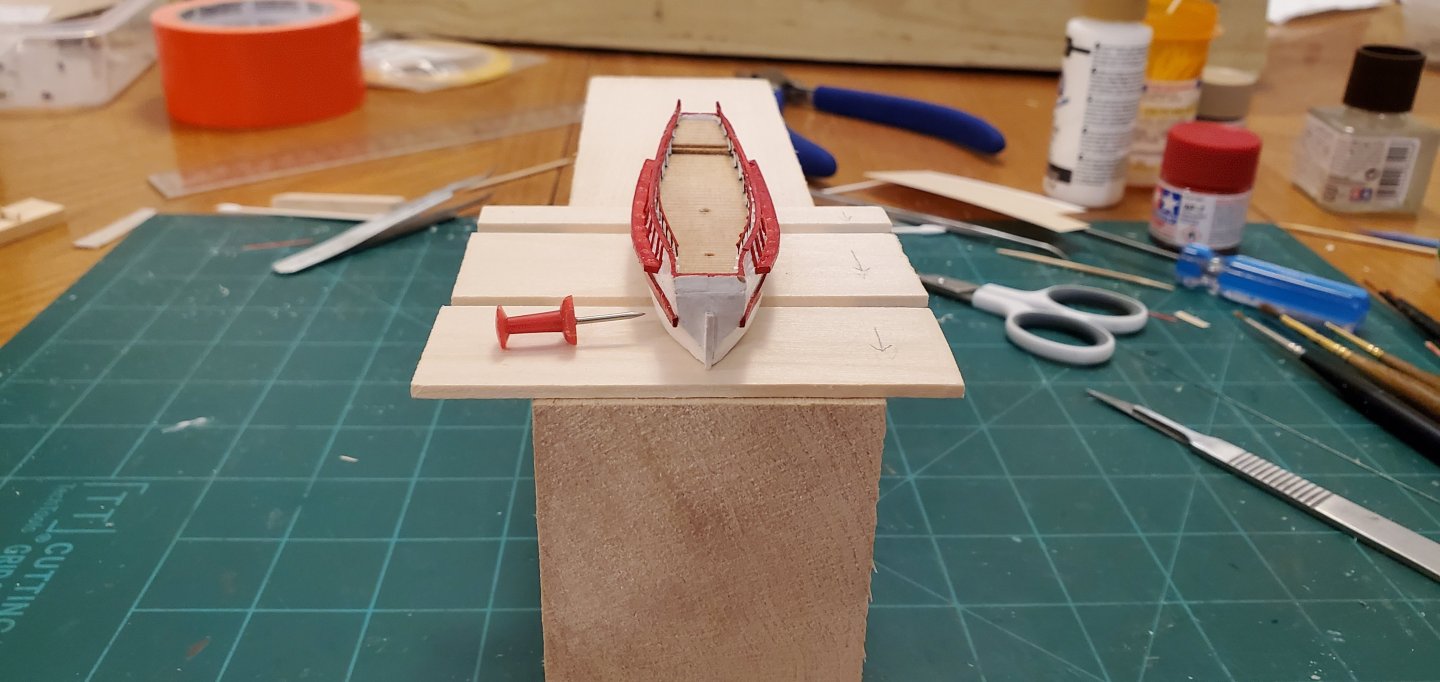
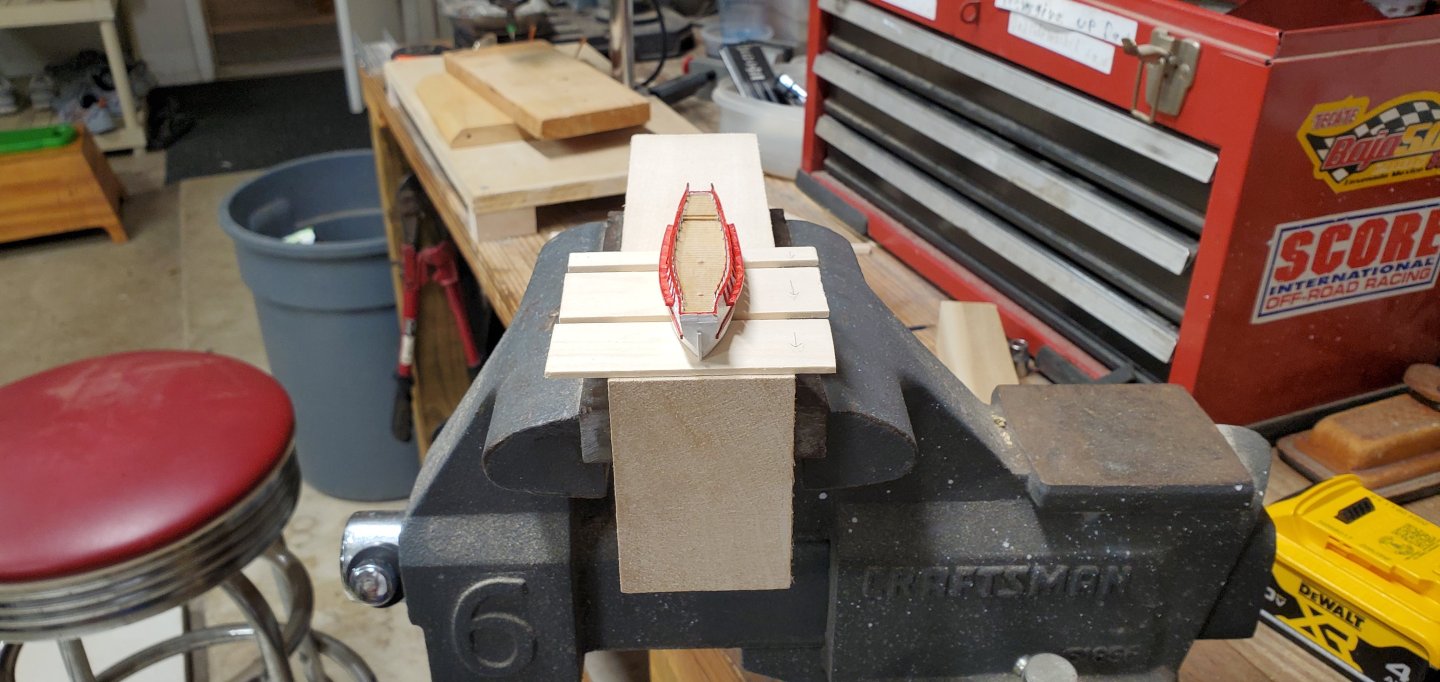
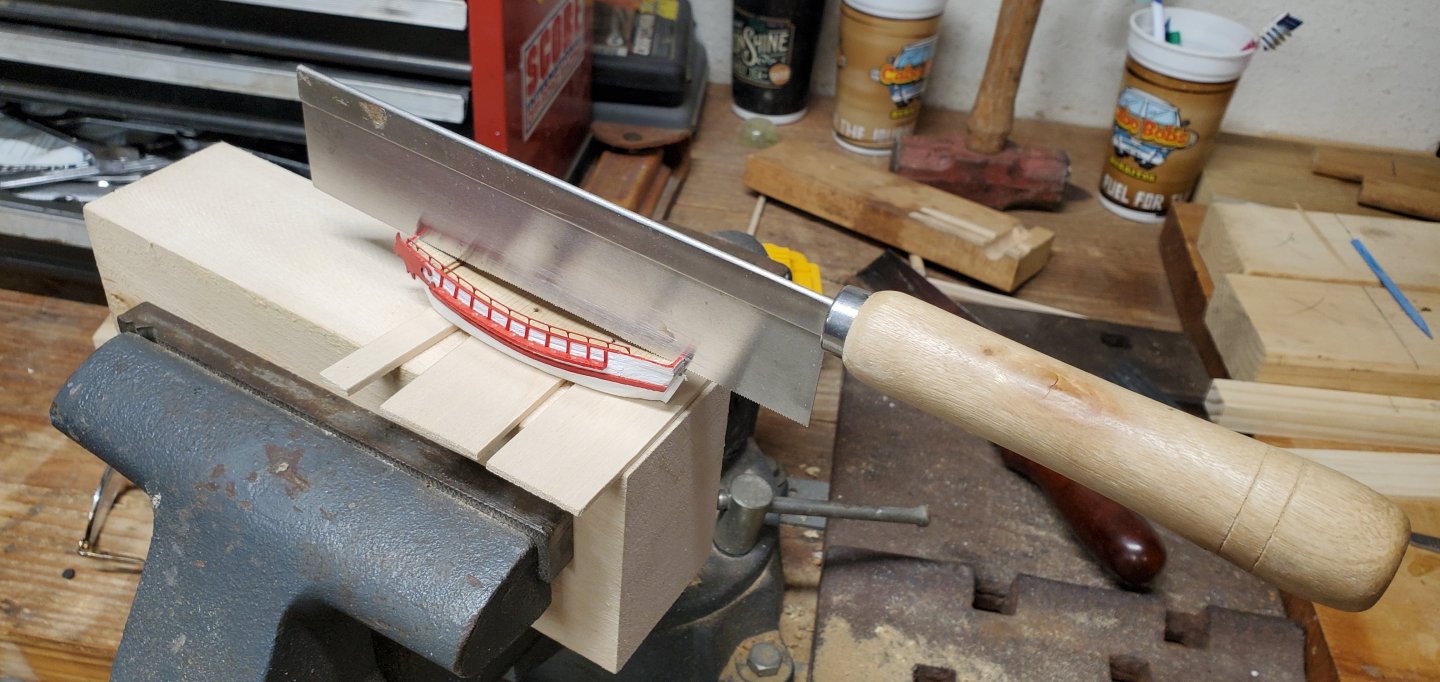
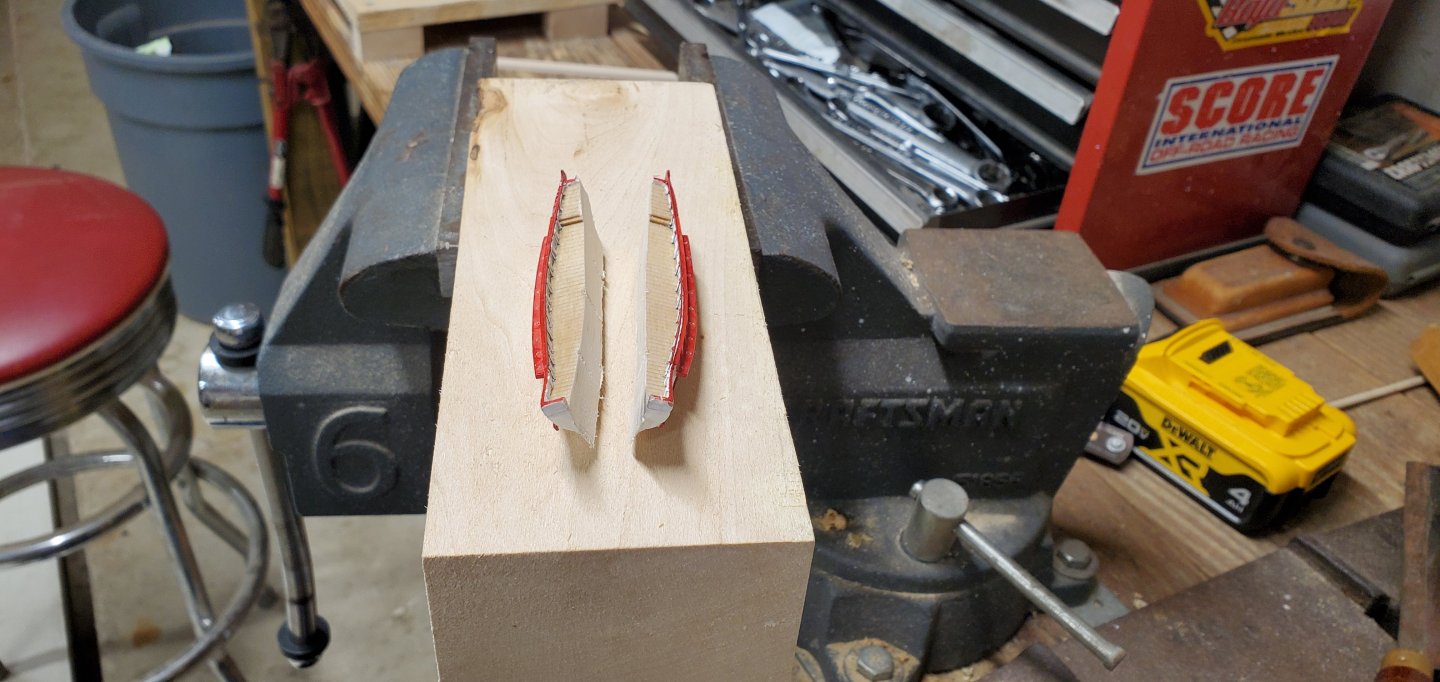
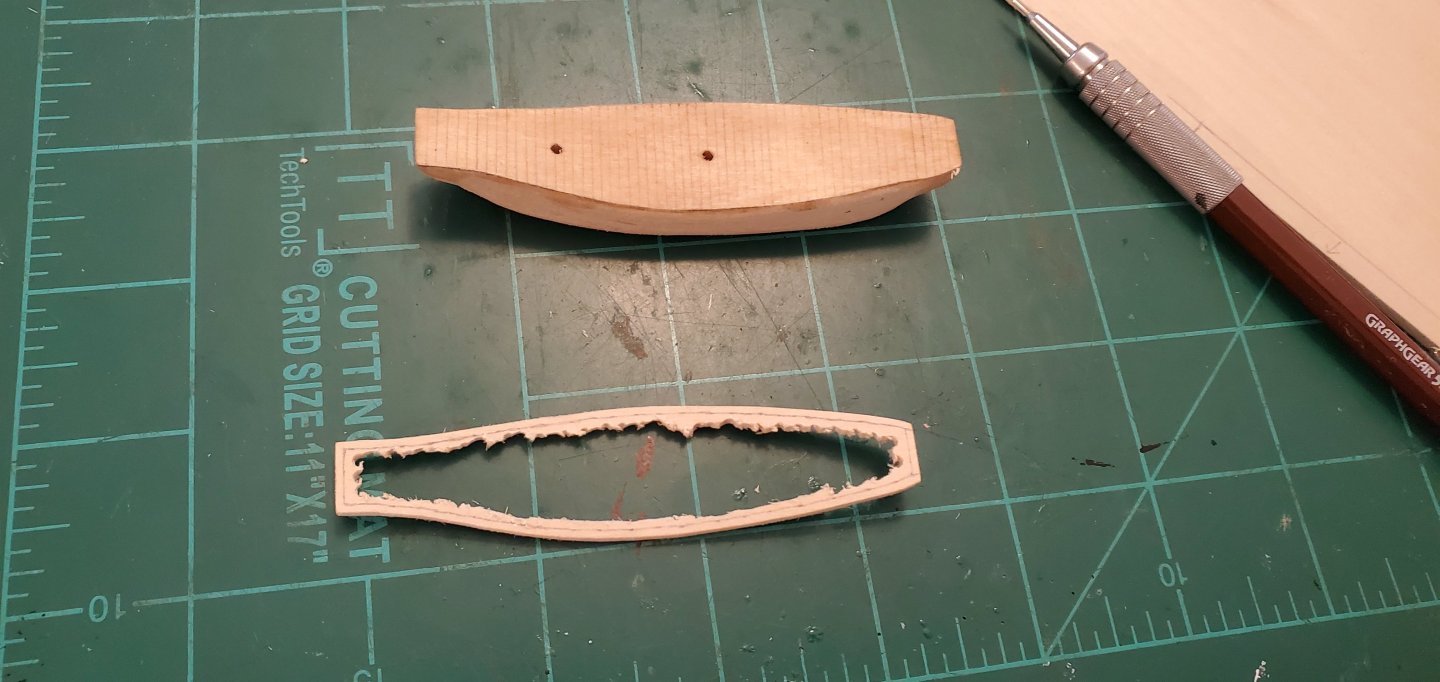
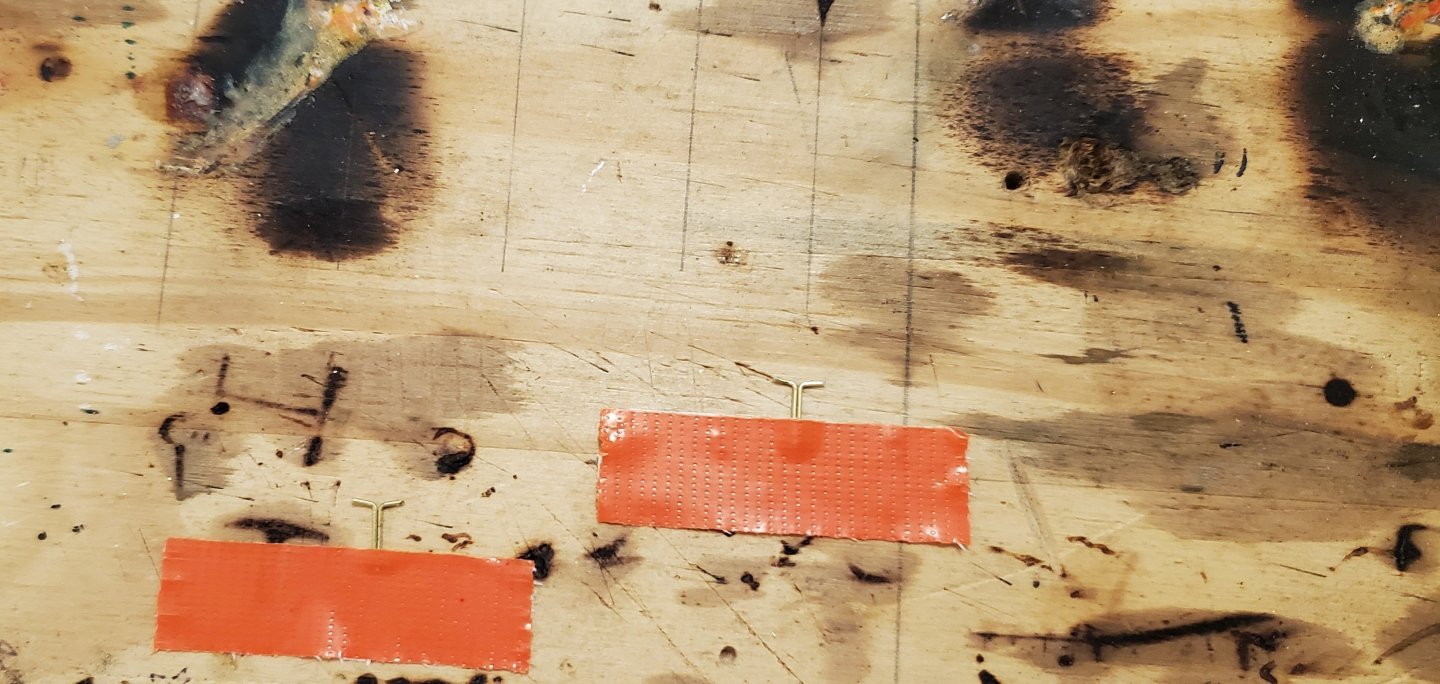
Happy Easter to everyone! An early update from the shipyard here before the day's real activities get going. Yesterday's chore was to make the ship's railings. I used 1/64" (.3mm) music wire for scale and also because it needed to be flexible enough to bend with the upward sweep of the bow and stern. The stanchions would be silver soldered in place. The challenge for me with soldering tiny right angle connections like that is holding everything in place because the slightest move will kill the 90 degree angle. For soldering, I use a technique I found watching an Olga Batcherov video. I cut the silver solder into tiny flecks, use a small paint brush and apply flux to the joint, grab a fleck of solder with the sharp tip of the iron, and then lightly touch it to the joint. I'm not great at the technique, but it's passable work. After installing the railing, it was time to split the hull. Ugh. I really don't like the idea of taking a saw and hacking on this thing I've invested so many hours in! It makes me nervous. I've done a few split hulls before and always struggled with making a clean cut right down the centerline. Kind of like the soldering above, the challenge is holding the hull stable while making the cut. I came up with a new idea that I thought might work. I drilled holes halfway thru the bottom on the ship and inserted 4 toothpick dowels, 2 on each side of the centerline. I drilled matching holes in the block of wood, inserted glue, and dropped the ship in place. I didn't drop it all the way down though. I inserted 3 planks of 2mm thick wood between the bottom of the ship and the block of wood but did not glue the small planks in place. The idea was to remove the planks after cutting the hull. The gap from the removed planks would allow me to use the saw to cut the hull from the block. Right after I took the picture below, I thought, "why did you put that keel on the bow when you knew you were going to cut the hull down the middle??" So much for my improved thinking things thru and planning things in advance. And yes, Keith, It has stopped snowing now. But actually, having the keel in place helped line things up visually and also gave me a challenge. My fine-kerf saw is just barely thinner than the 1mm wide keel. If I was good enough with the saw, I should be able to split the keel with the saw, right? Challenge accepted! I put the block of wood in my workbench vise and hit it with the fine-kerf saw. Here's how she came out.


- 106 replies
-
- 15
-

-
-
- Kentoshi-Sen
- bottle
- (and 1 more)
-
You are quite the matchmaker, Keith! I'm sure it was love at first sight! A masterful job on both Lula and the pile driver. I will miss your updates, but I pray that the scan results are favorable and you are back to finish up Lula and the Tennessee very soon.
- 732 replies
-
- 3
-

-
-
- Lula
- sternwheeler
- (and 1 more)
-
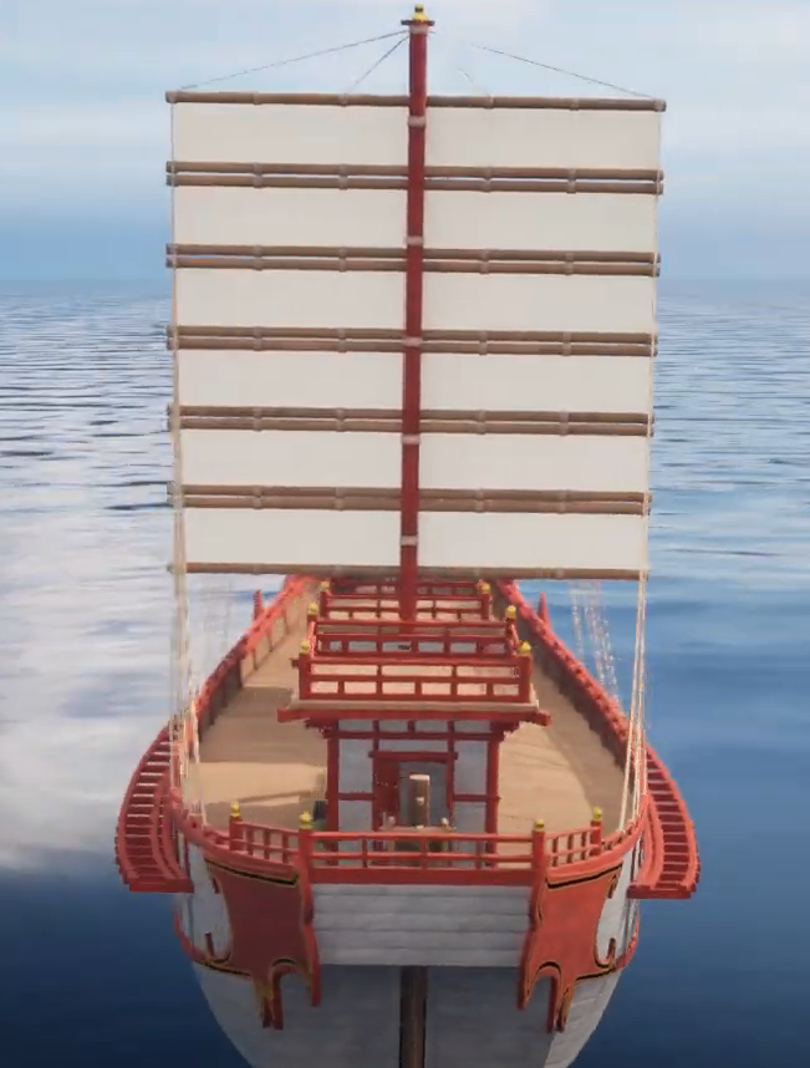
Thanks for posting these, Clare. That ship is remarkably similar to my Kentoshi-sen. The upsweeps on the bow and stern are more pronounced than mine, but your ship looks like it's got the same footprint and it certainly has the same deck for oarsmen. The 3 deck houses are almost identical and even oriented the same way. There are some differences, like the onboard windlass vs mine where it's suspended beyond the bow. Very intriguing! Thanks again for sharing.
- 106 replies
-
- 4
-
-
- Kentoshi-Sen
- bottle
- (and 1 more)
-
I'm right there with you, Gary!
-
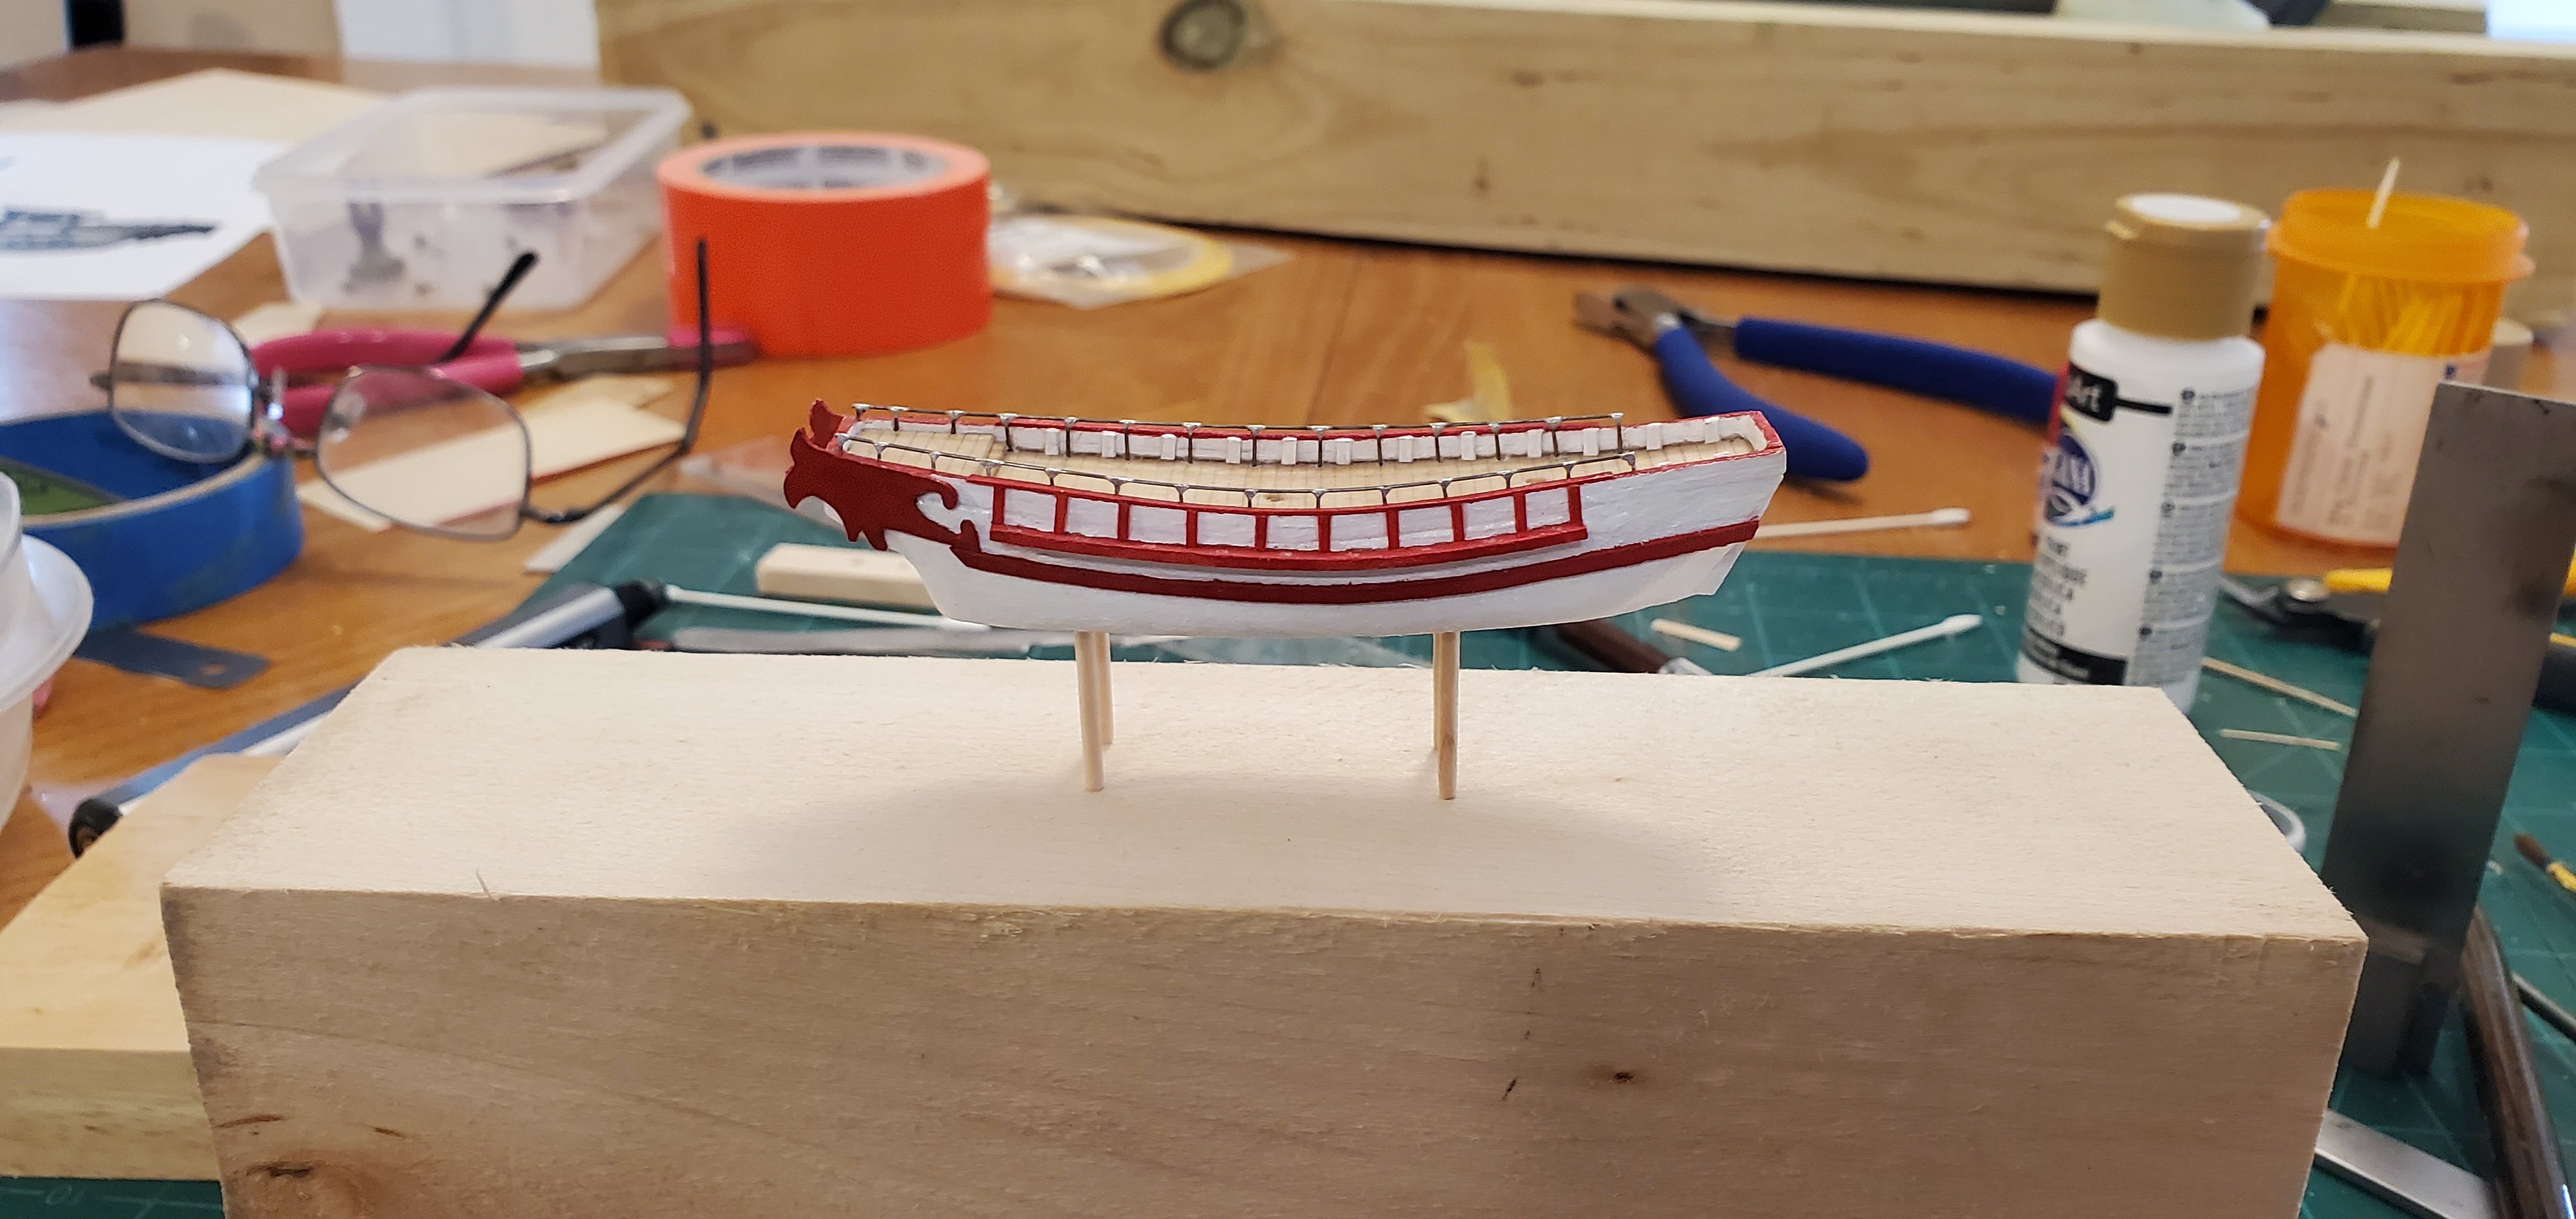
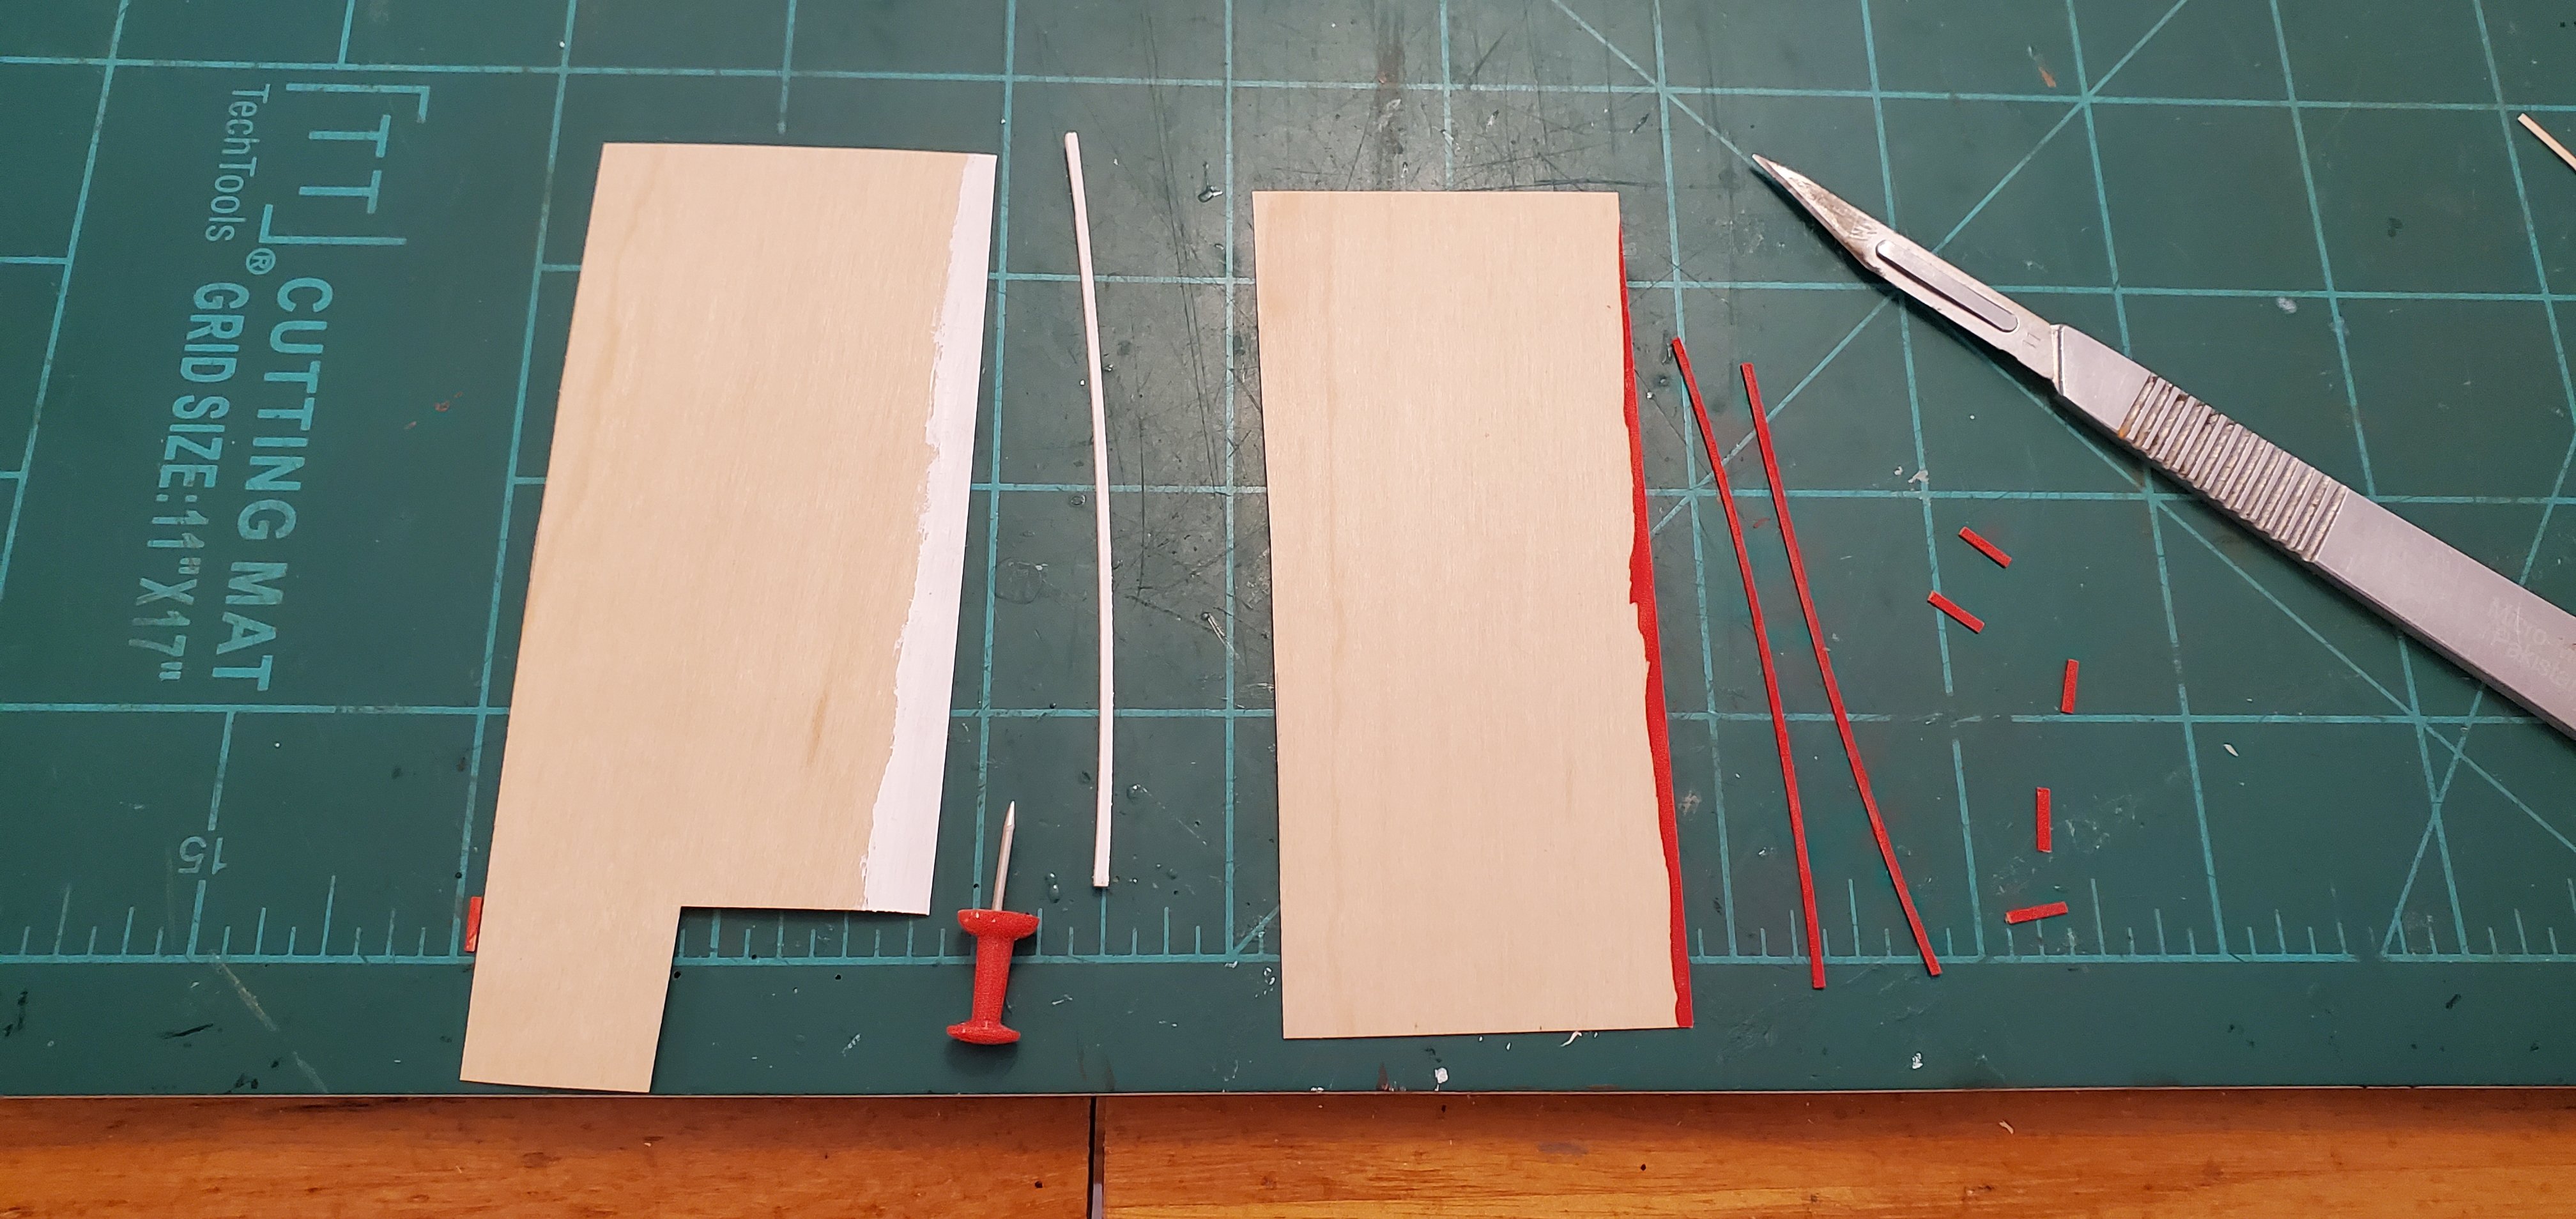
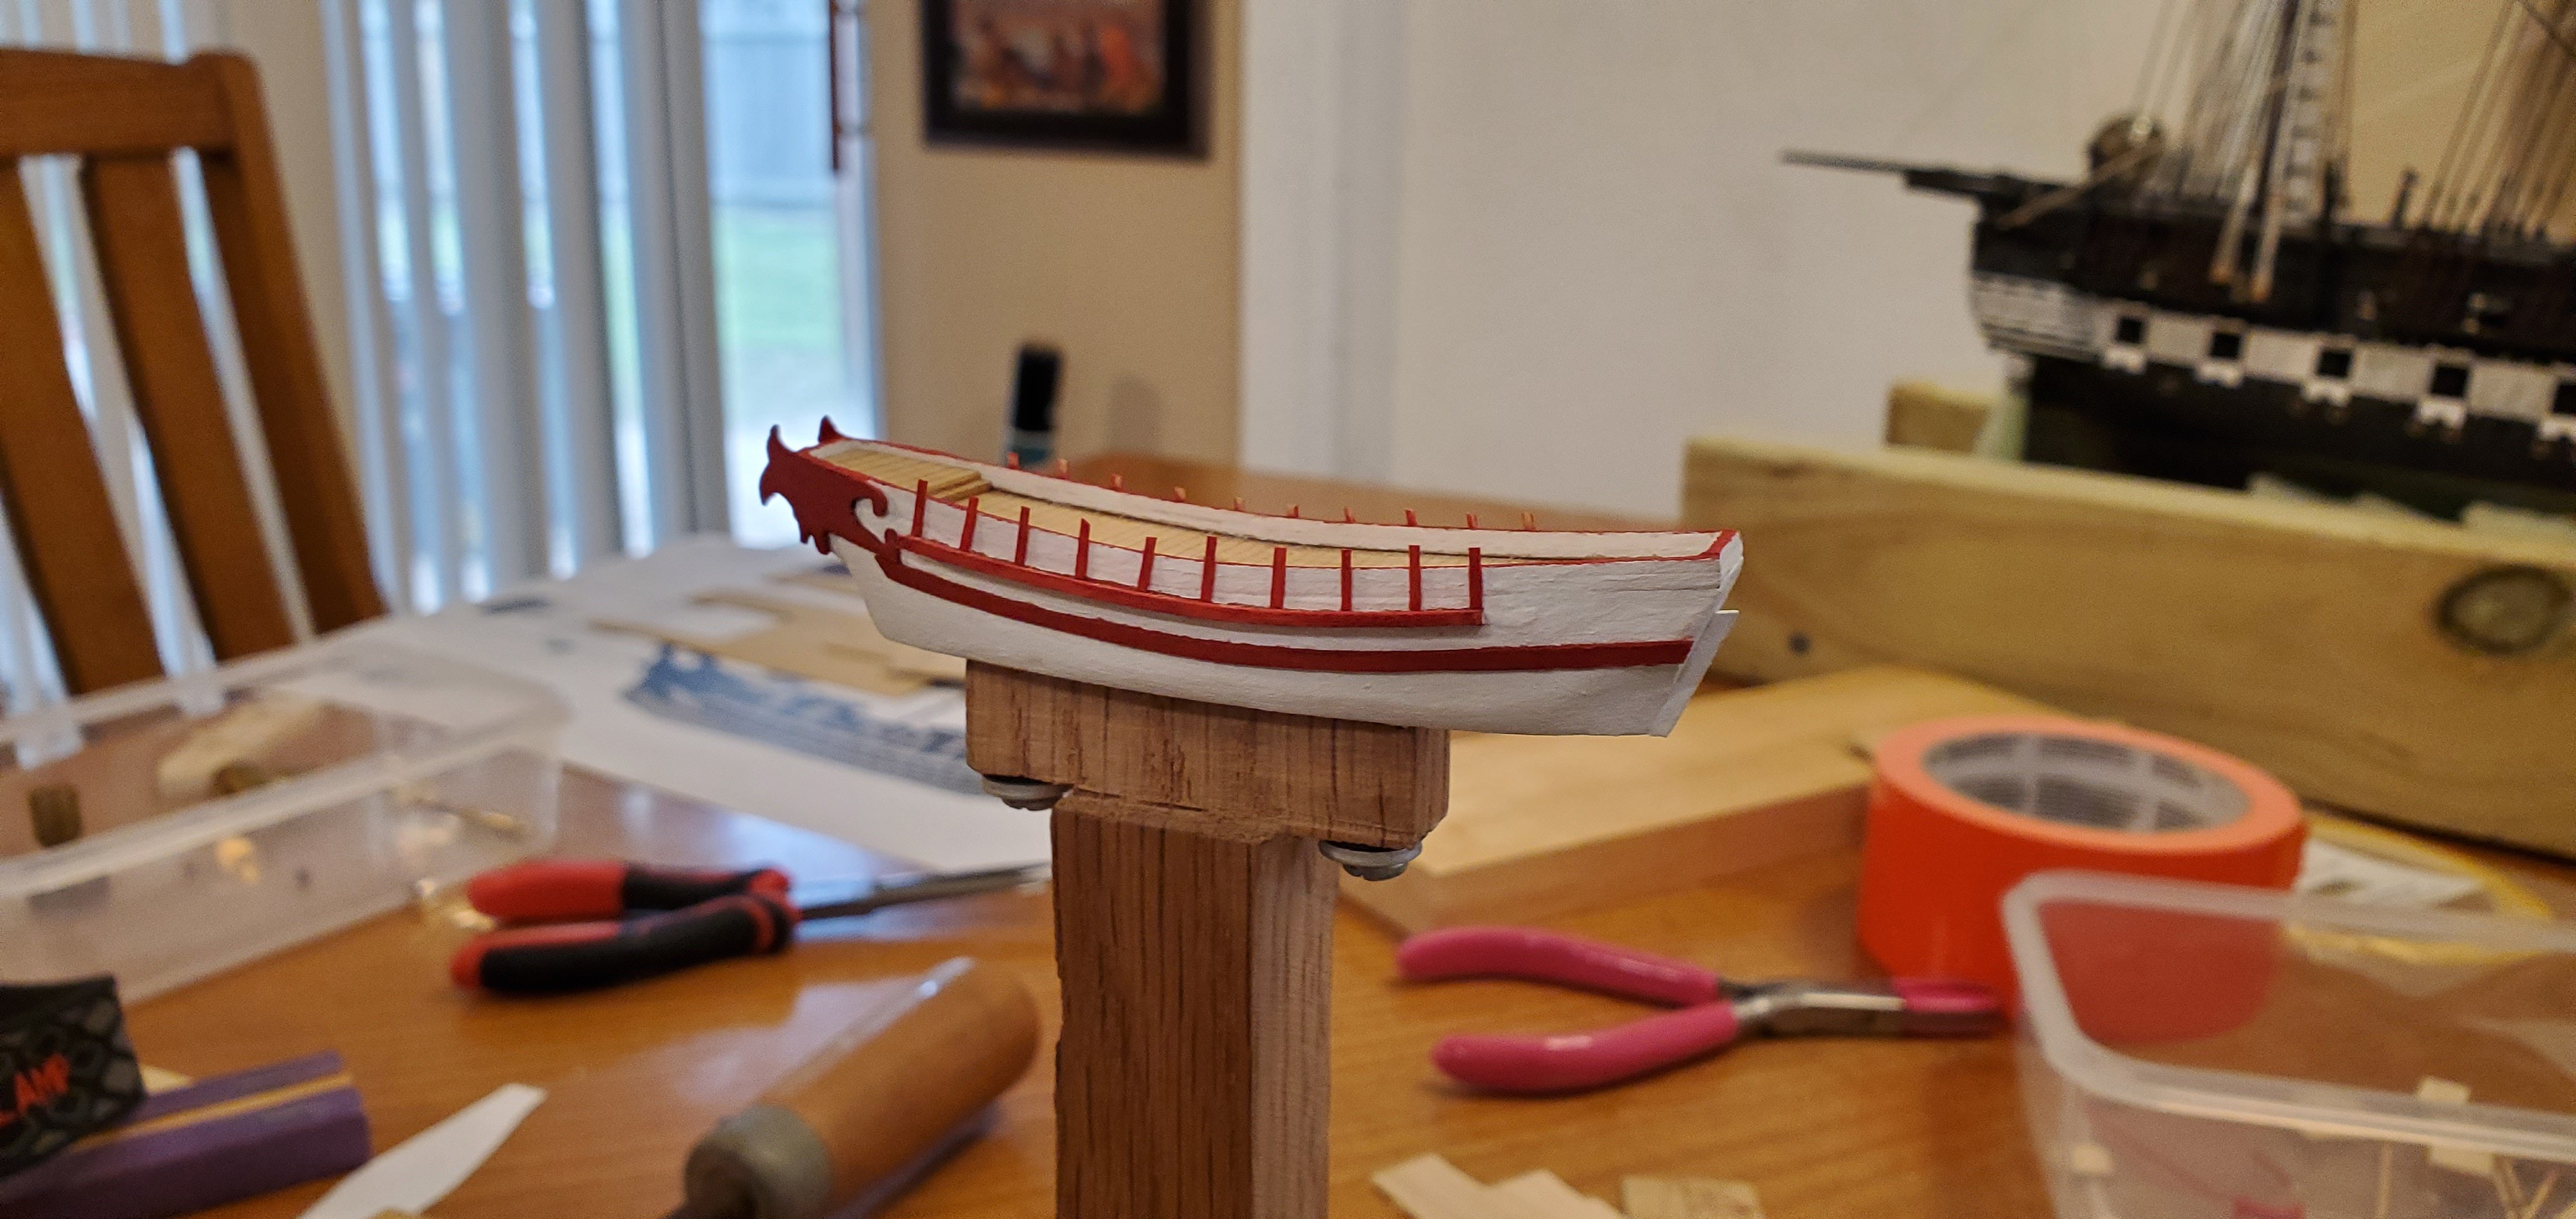
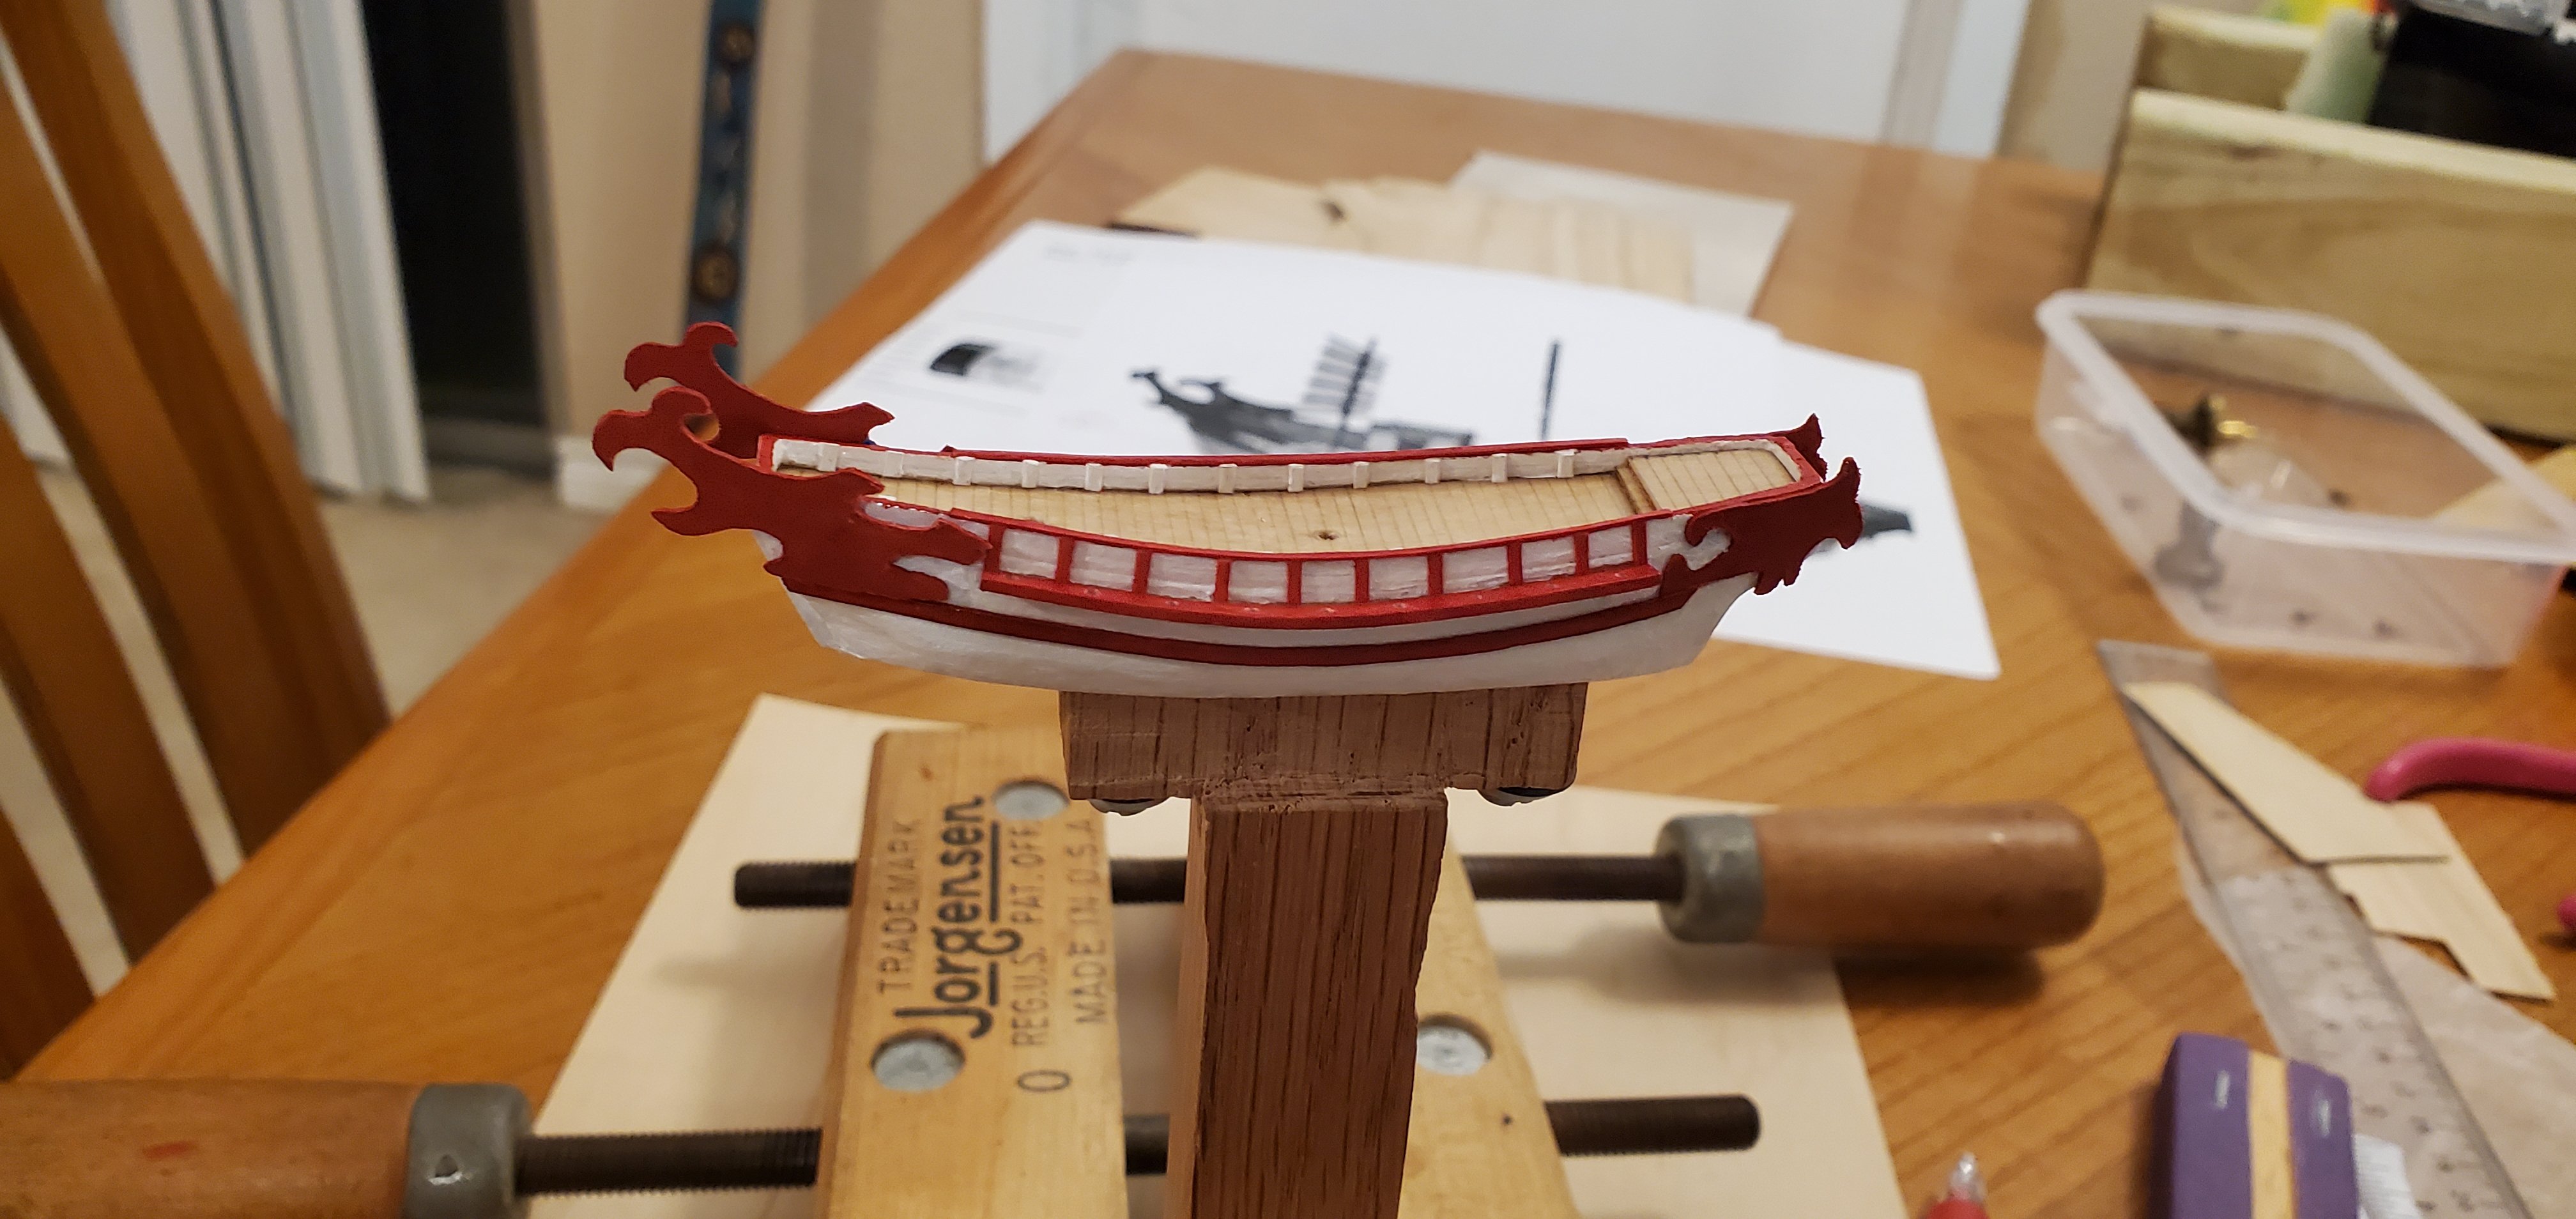
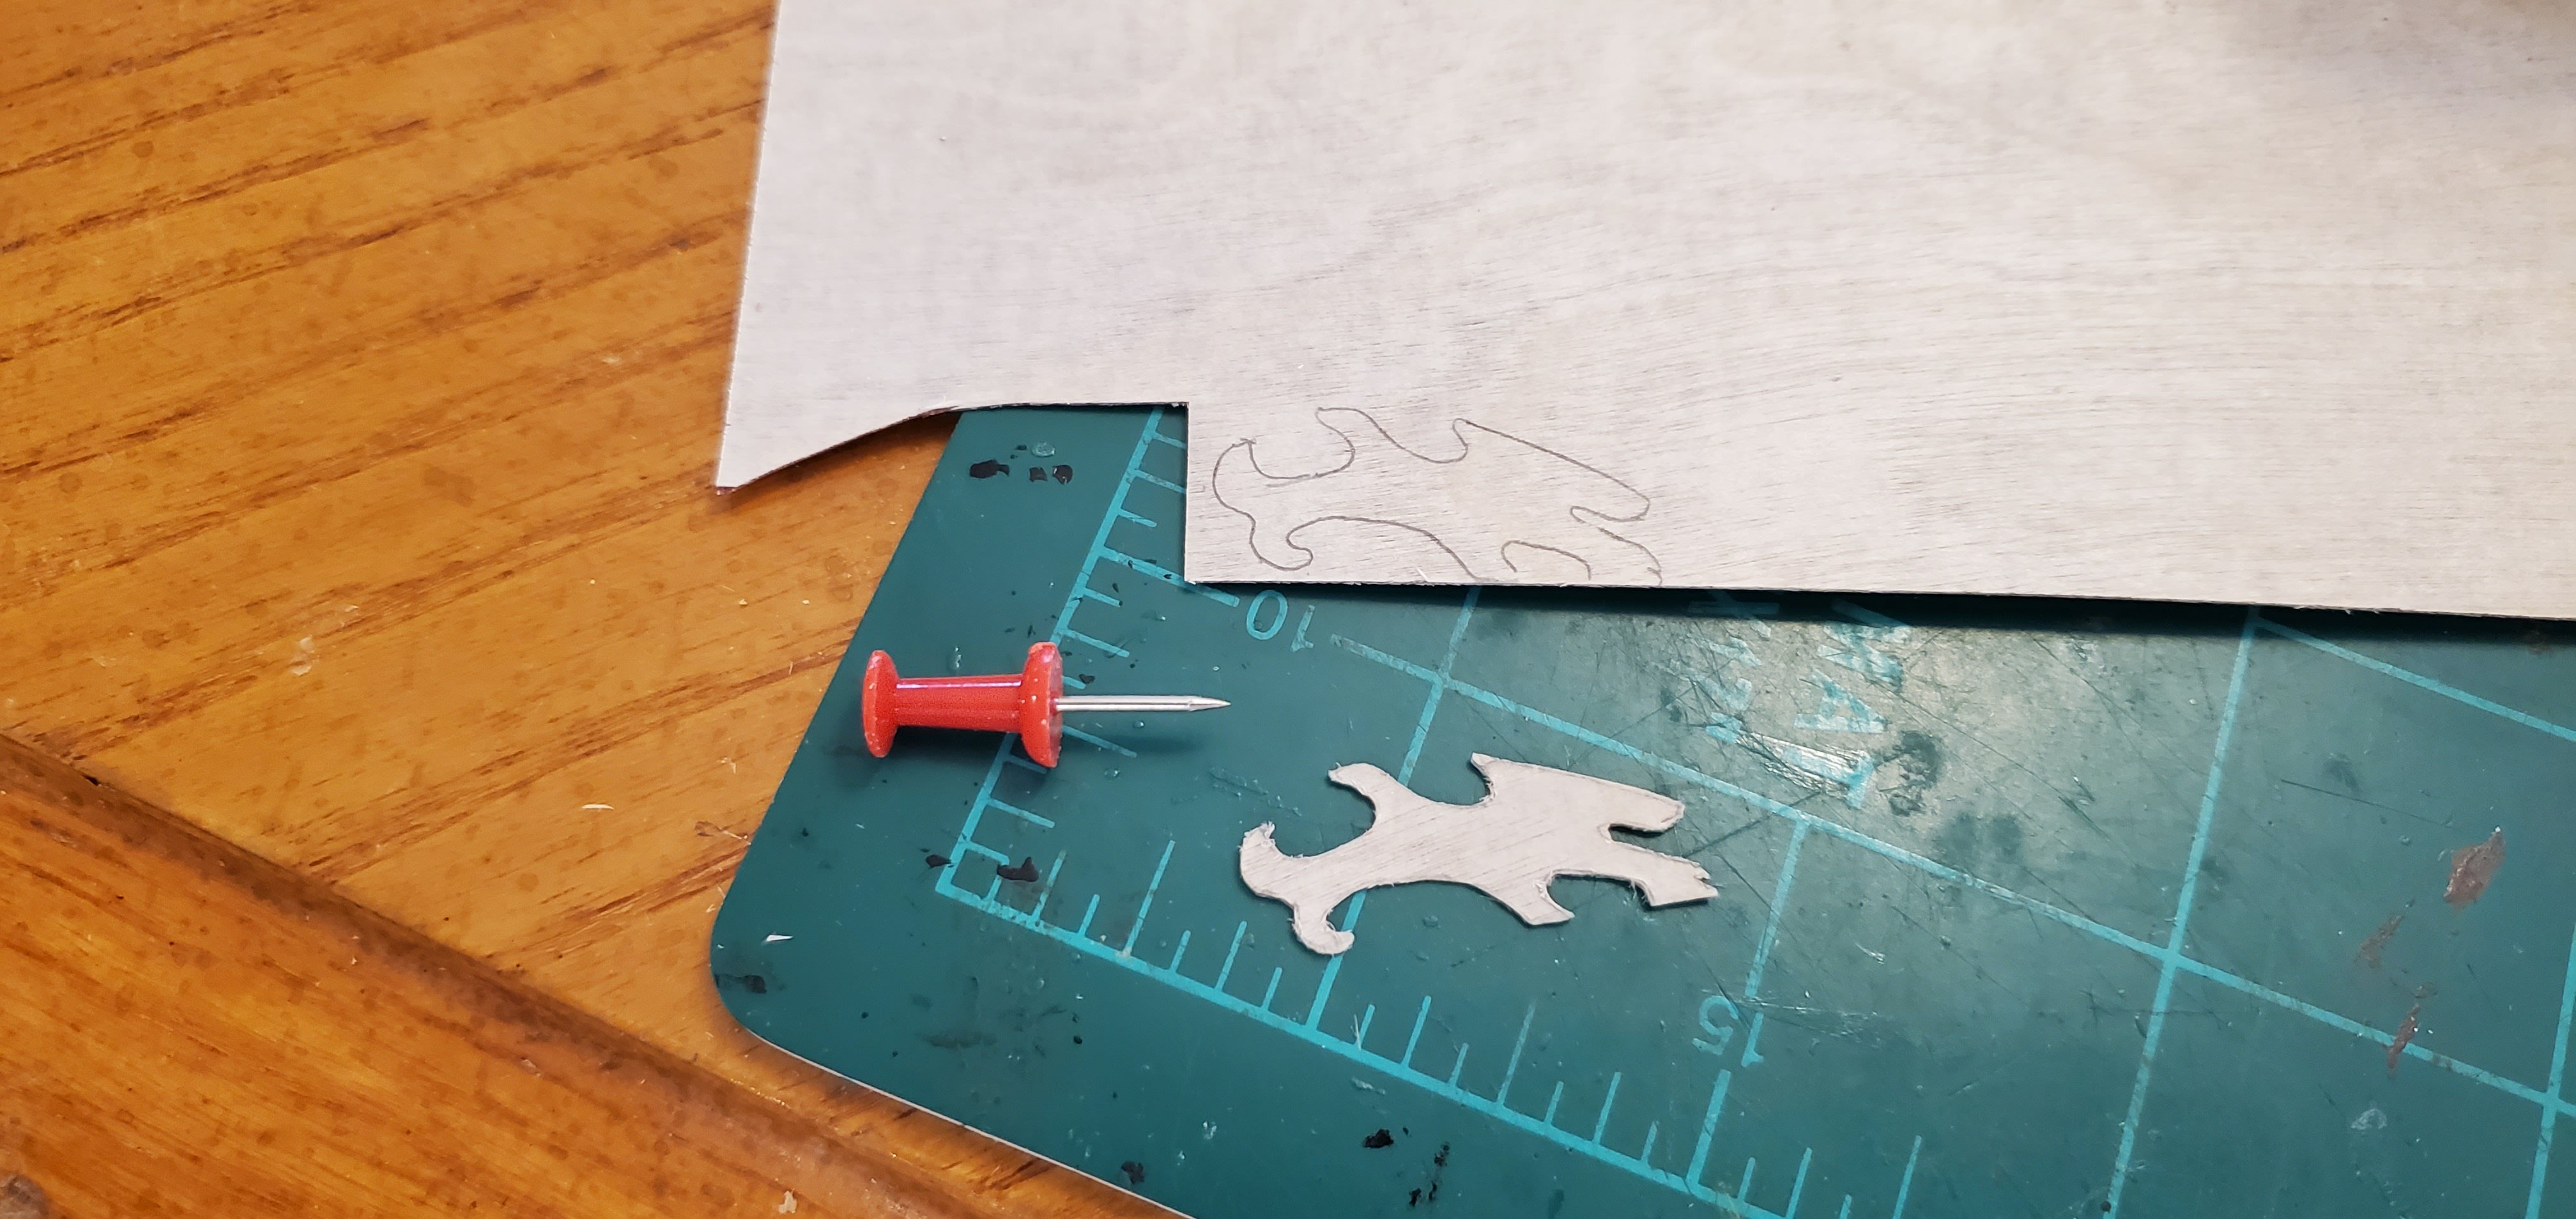
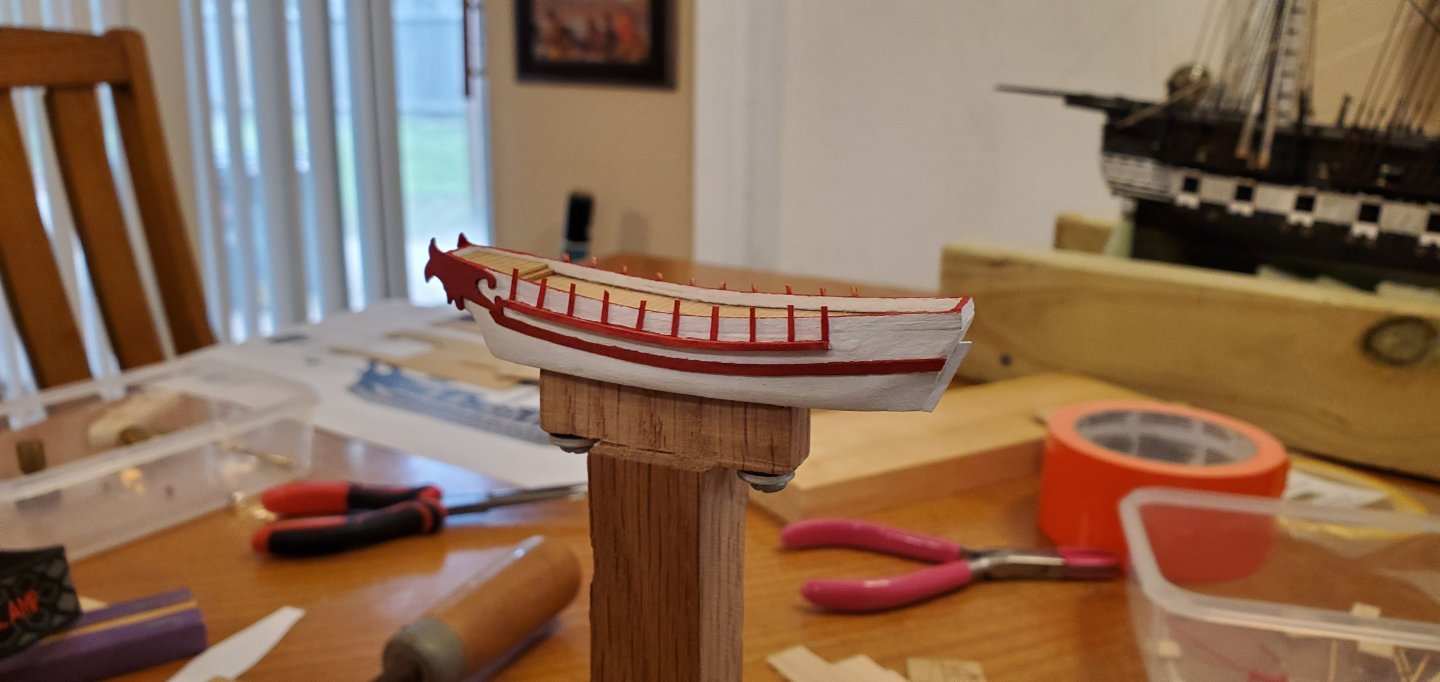
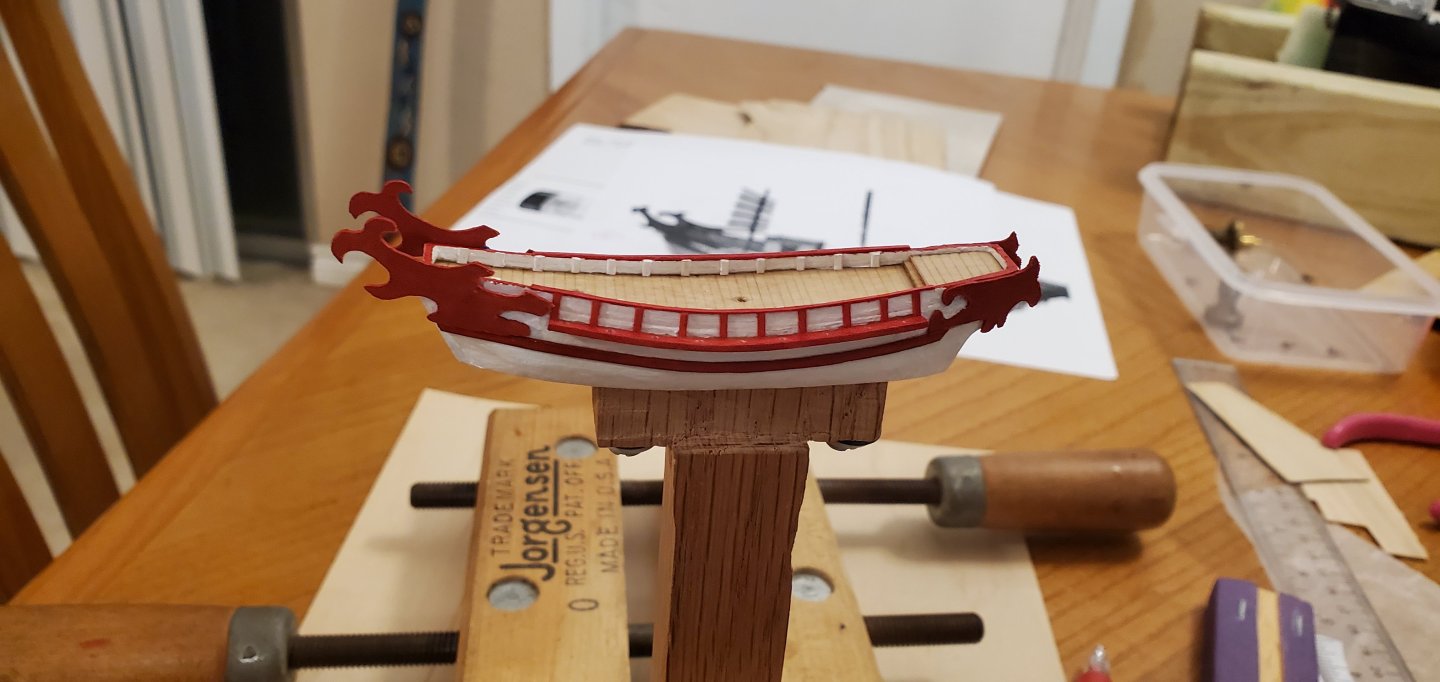
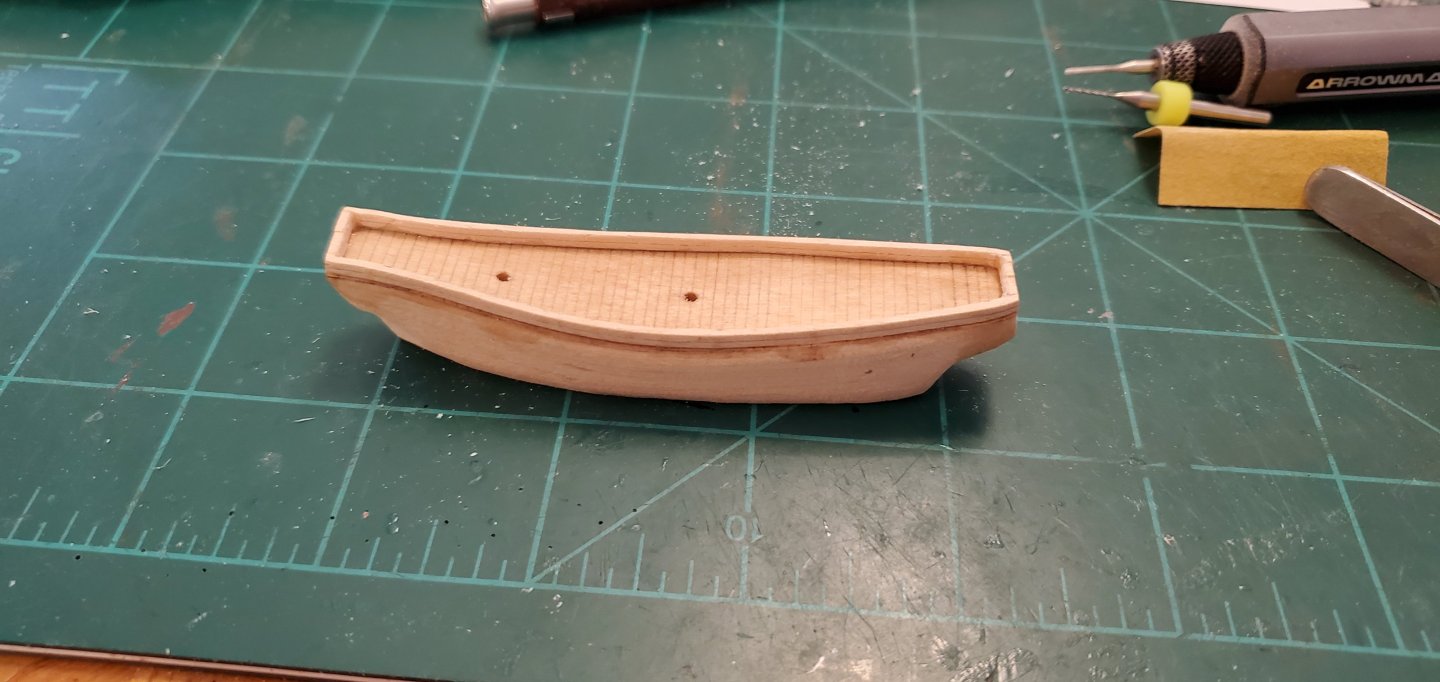
Time to put some lipstick and perfume on this pig! There's a lot of narrow, red trim on the outside of the hull as well as some thin, perpendicular slats that support the inside of the bulwarks (I'm making those white). For the long piece of trim that travels underneath the oarsmen plank, I used the 1/64" birch plywood and cut a 1mm wide sliver. For the red trim above the oarsmen plank, I cut < 1mm slivers of super thin maple veneer that's measure 1/128" in thickness. Here's an in process pic with the stern carving painted and in place as well as the trim beneath the oarsmen plank. The vertical trim pieces above the plank are glued in place but not yet cut down to size. You can see the keel in place on the square bow. It looks a bit strange to me, but that's what the picture shows (at least one of them anyway)! I also added a two-step poop deck. Here she is with all the trim in place. The large, ornamental carving at the bow is only taped on for the photo shoot.

- 106 replies
-
- 13
-
-
-
- Kentoshi-Sen
- bottle
- (and 1 more)
-
I thought it was always hockey season up there in Canada! Who knew that the ancient Japanese had an influence on Canadian hockey?
- 106 replies
-
- 2
-
-
- Kentoshi-Sen
- bottle
- (and 1 more)
-
Thanks for the comment, Clare. I agree that there is not a lot of info about Japanese ocean going vessels for the earlier periods. When I started this project, I had a difficult time finding a historical Japanese sailing ship that was of interest. I just went thru your Kitamaebune build log. Very impressive work on an equally interesting ship! Yes, please attach the pics of the model from the Sea Folk museum. I would love to see them.
- 106 replies
-
- 4
-
-
- Kentoshi-Sen
- bottle
- (and 1 more)
-
Thanks, Pat! But I'm thinking it might be time for a visit to the ol' eye doctor! 😃
- 301 replies
-
- 4
-

-

-
- Constitution
- Bluejacket Shipcrafters
- (and 1 more)
-
Hey Mark! I'm late to the party, but got here just in time to read about your injury. You have made very nice progress so far on this build and I look forward to seeing you back in action! Get well soon!
-
Creative way to bend the stern planks to shape. Nice, clean work with the whole planking, Paul. She is looking good!
-
As if the rest of the piping was simple! Incredible work, Roel. I'm in awe every time I look at the pictures of your progress.
-
If that's a lion, I'm a Tom Cruise look-a-like!
-
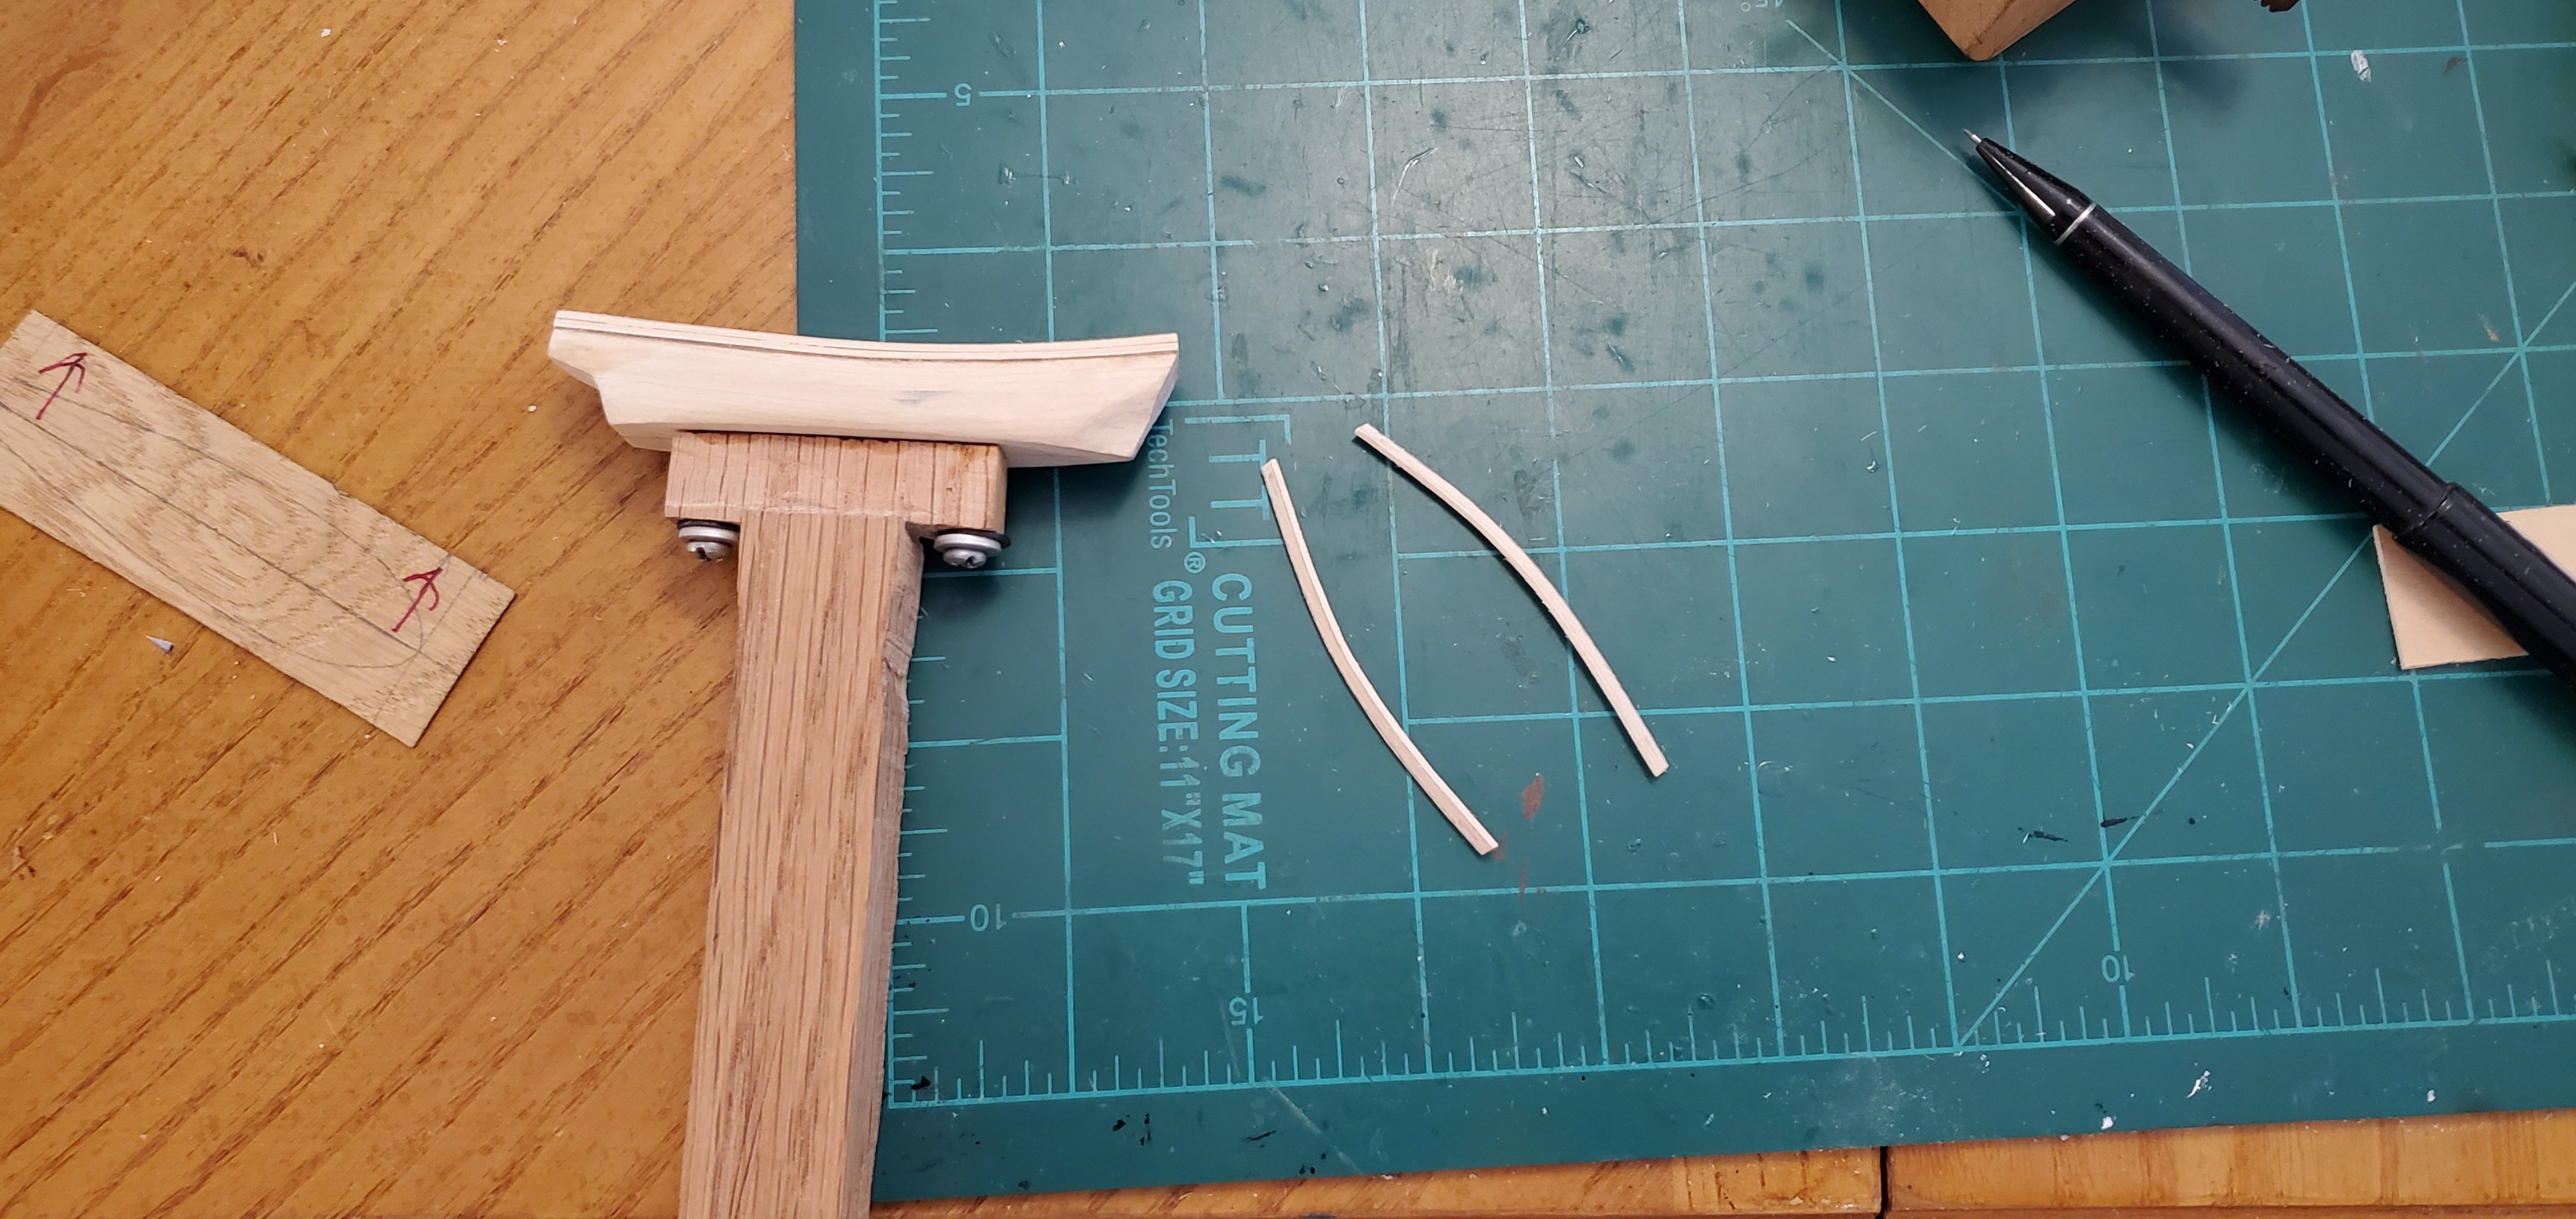
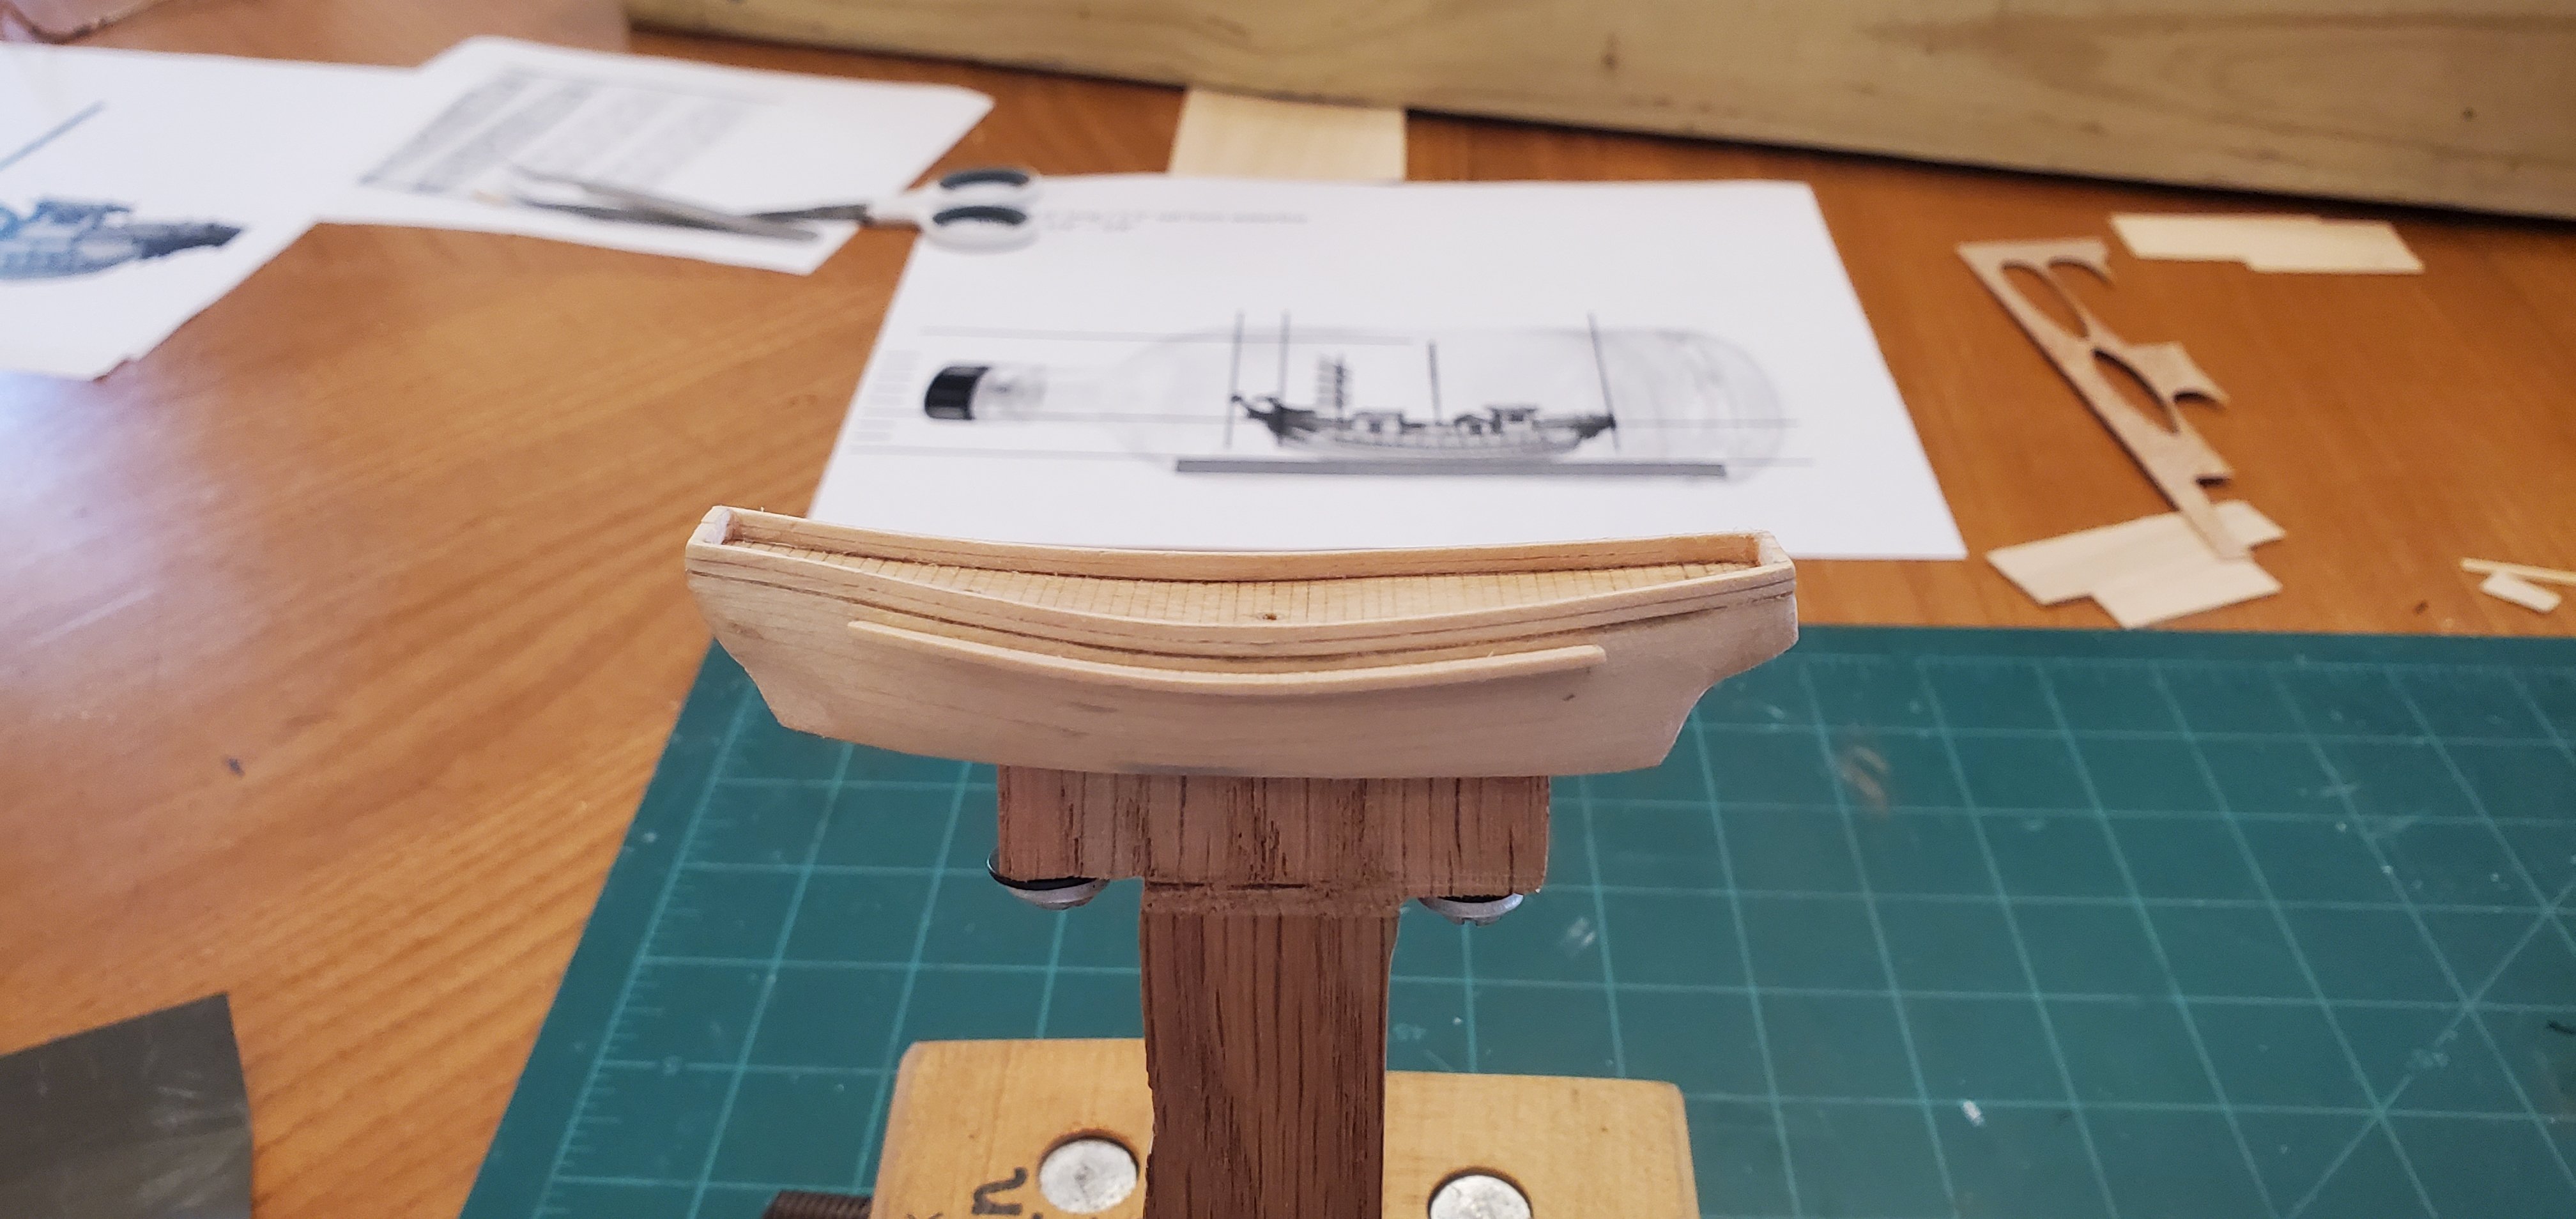
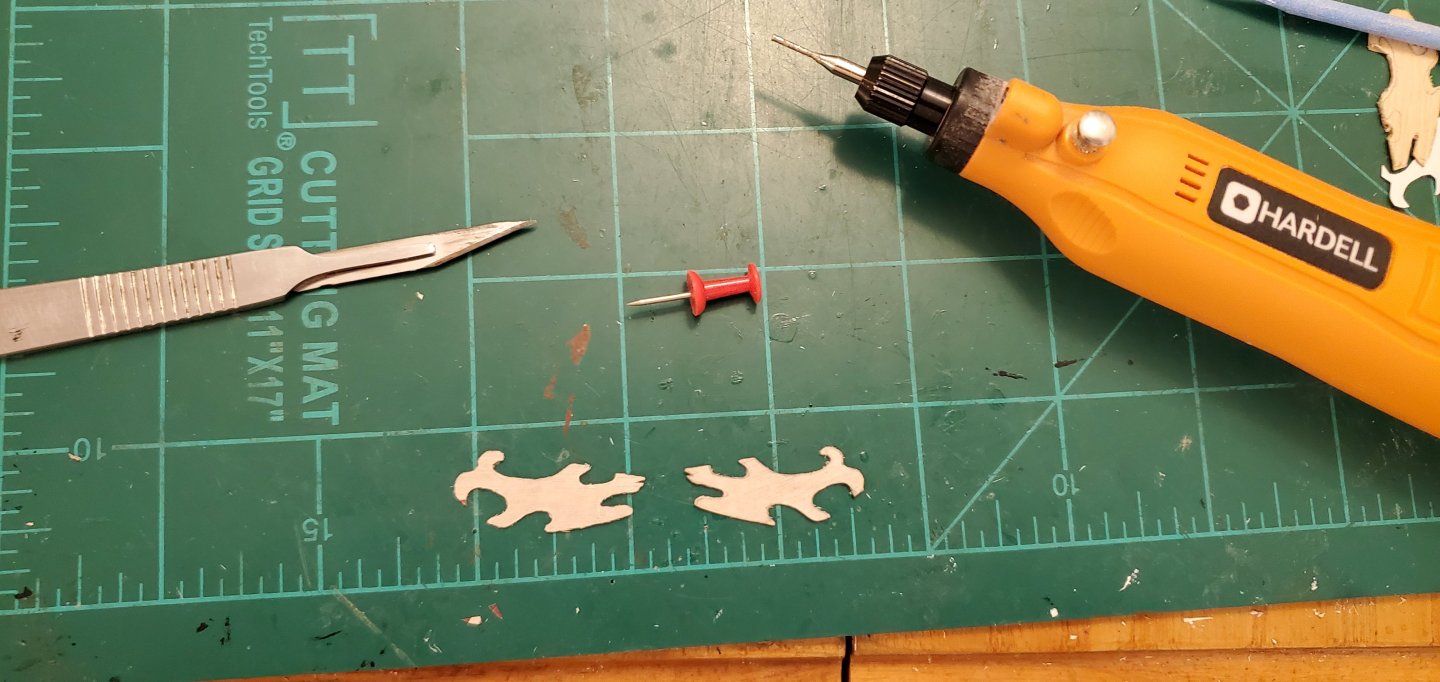
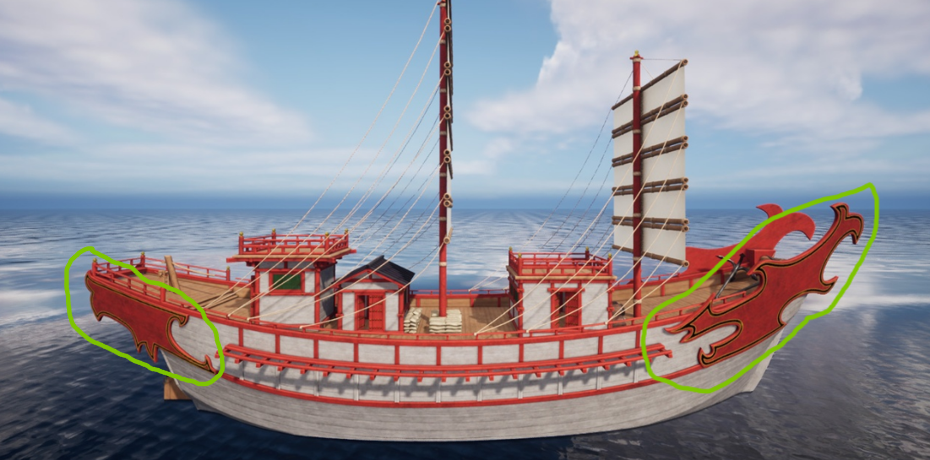
It's probably fixing to start snowing here in central Texas because I actually thought a couple of steps in advance on this project. When I was bending layers for the hull, I realized I would need a matching bend for the bulwark and the oarsmen platform on each side of the ship. So I bent some extra layers along with all the ones I needed for the hull. Snow and me thinking in advance don't happen very often around here. Here's the bulwark in work. I took one of my bent extra hull layers, drew the outline for the bulwark, sanded the outside to shape, cut out the inside, and smoothed everything out. You may also notice the odd deck planks that run perpendicular to the centerline of the ship. Next was the oarsmen platforms. Trying to decide what to do next, I figured I'd take on a real challenge (for me anyway) - making the ornamental bow and stern shapes. I'm not sure what you would call them. The one on the bow is not exactly a figurehead. So if anyone knows the proper terms, please educate us. For the bow and stern ornamental things, I needed some very thin wood. On @Keith Black's Lula log, he used some 1/64" birch plywood from Midwest Products for some of his tiny furniture. I thought that might be just what I needed so I ordered a sheet. It got here yesterday and I found it to be a really good product. I decided to start with the harder of the 2 shapes - the bow. I drew out the shape on the plywood and used scissors to cut off a squarish piece around the outline. Then I used a cordless handheld Dremel-like tool to carve the intricacies. It was very delicate work because the plywood is so thin, but it did not splinter or delaminate. The only downside I found was it created a lot of fuzz on the edges. But I can deal with that. I'm happy with the plywood product and how the bow pieces turned out. These pieces make the hull structure way too tall to fit into the bottle's opening, so they will have to be affixed to the ship inside the bottle. There is also a windlass of sorts that fits between the 2 pieces. So I'll probably use it to connect the 2 pieces first, then install as a single sub-assembly. Uh oh. I think it's starting to snow again outside.


- 106 replies
-
- 13
-
-
- Kentoshi-Sen
- bottle
- (and 1 more)
-
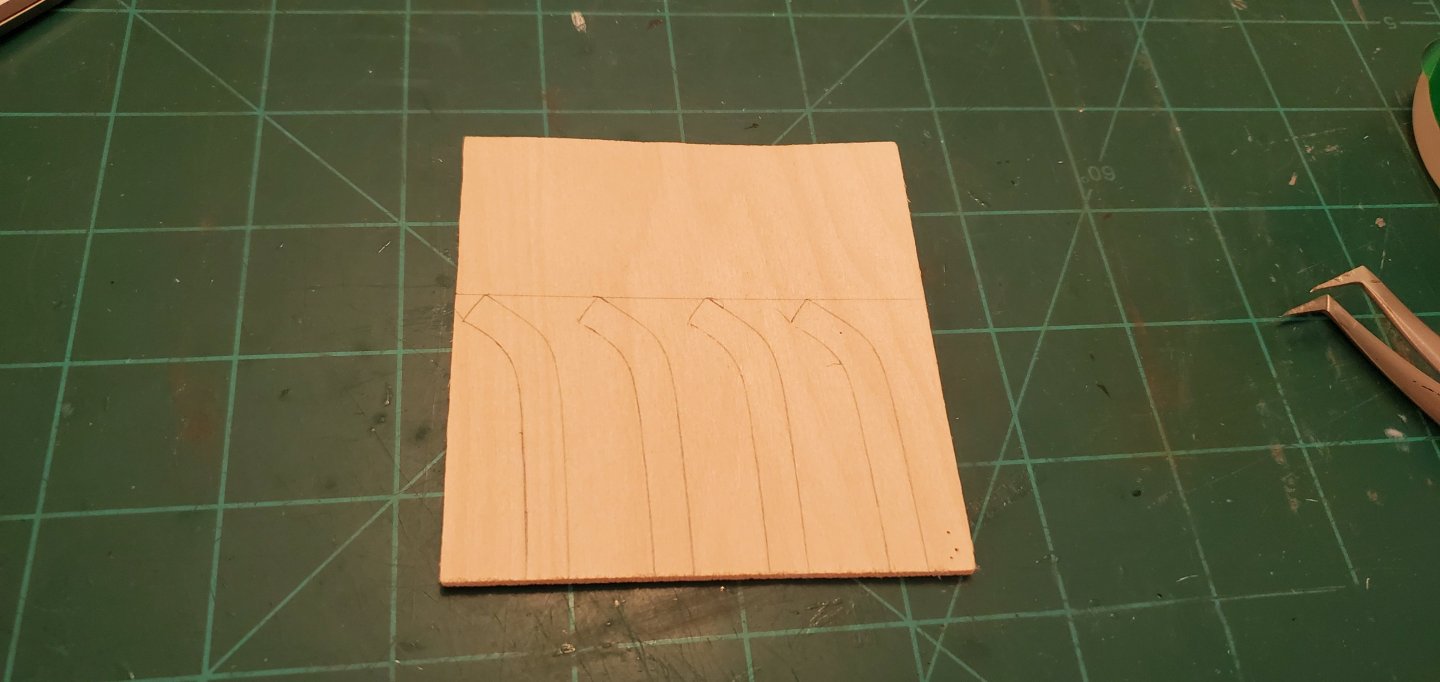
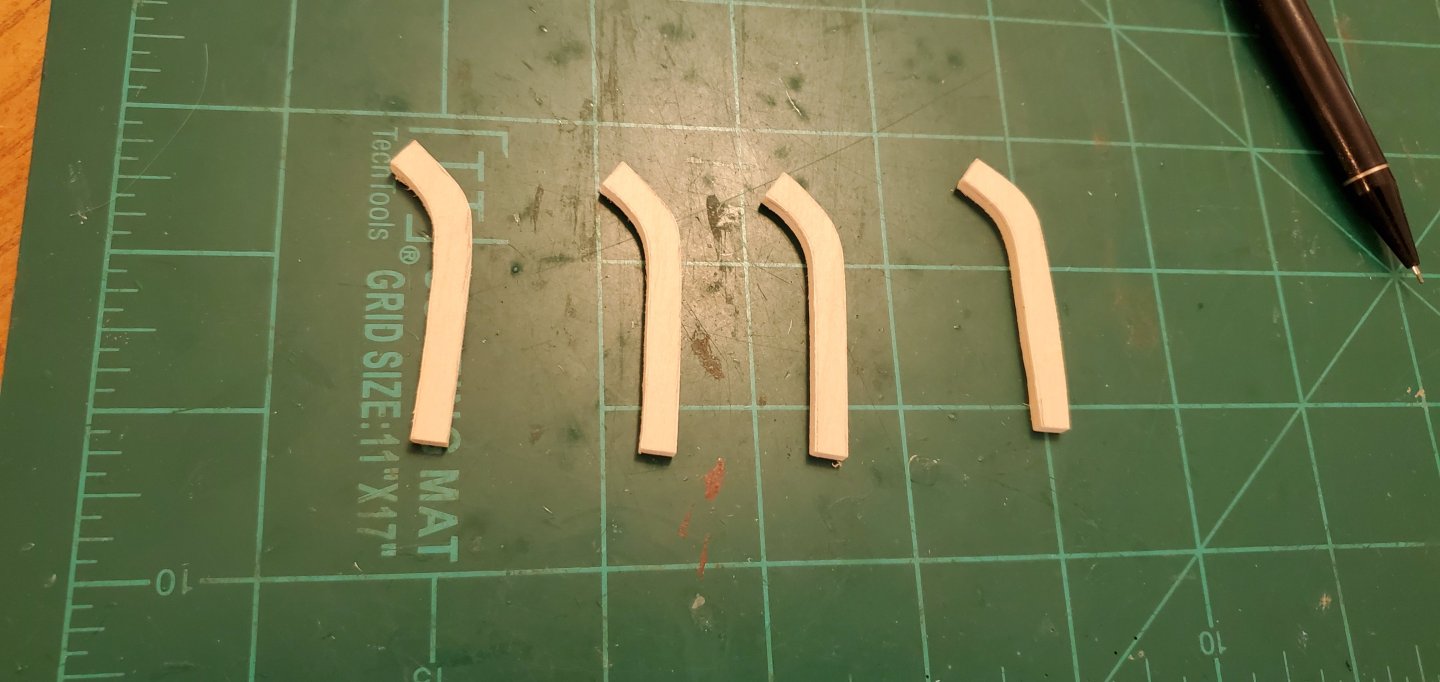
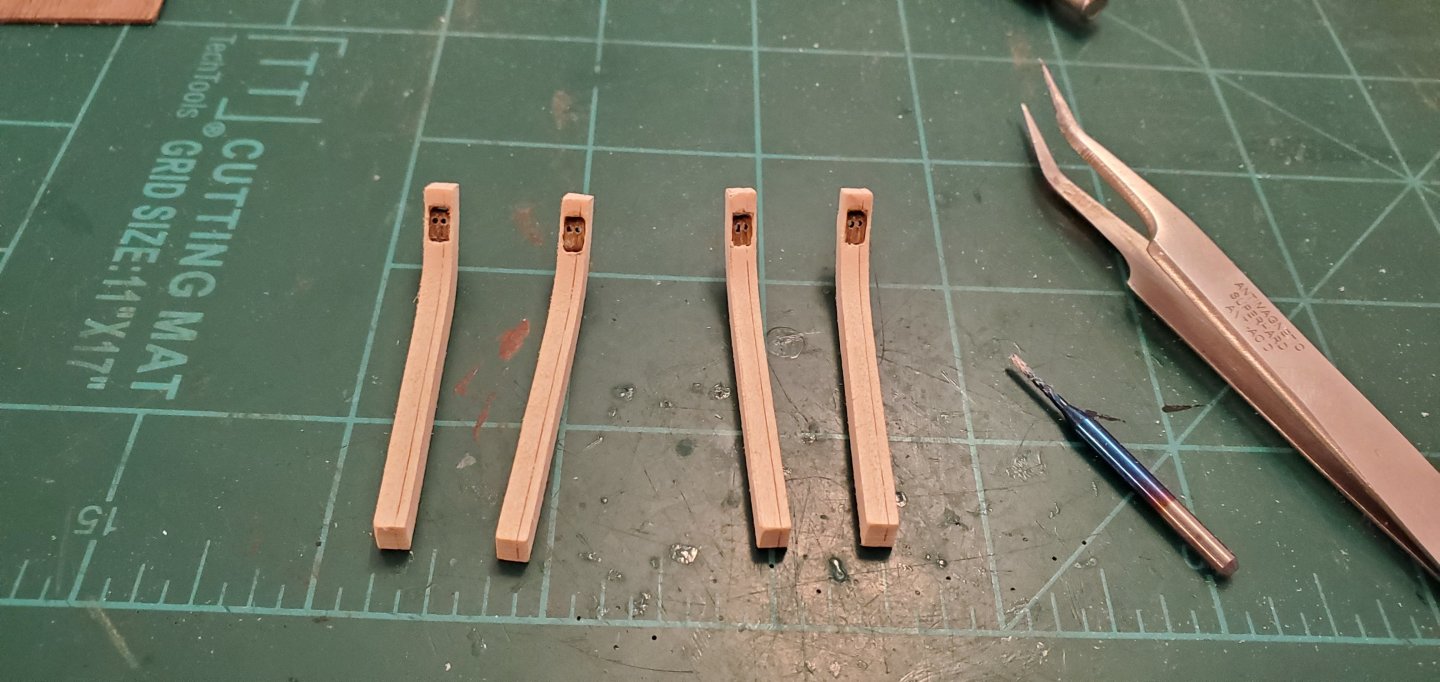
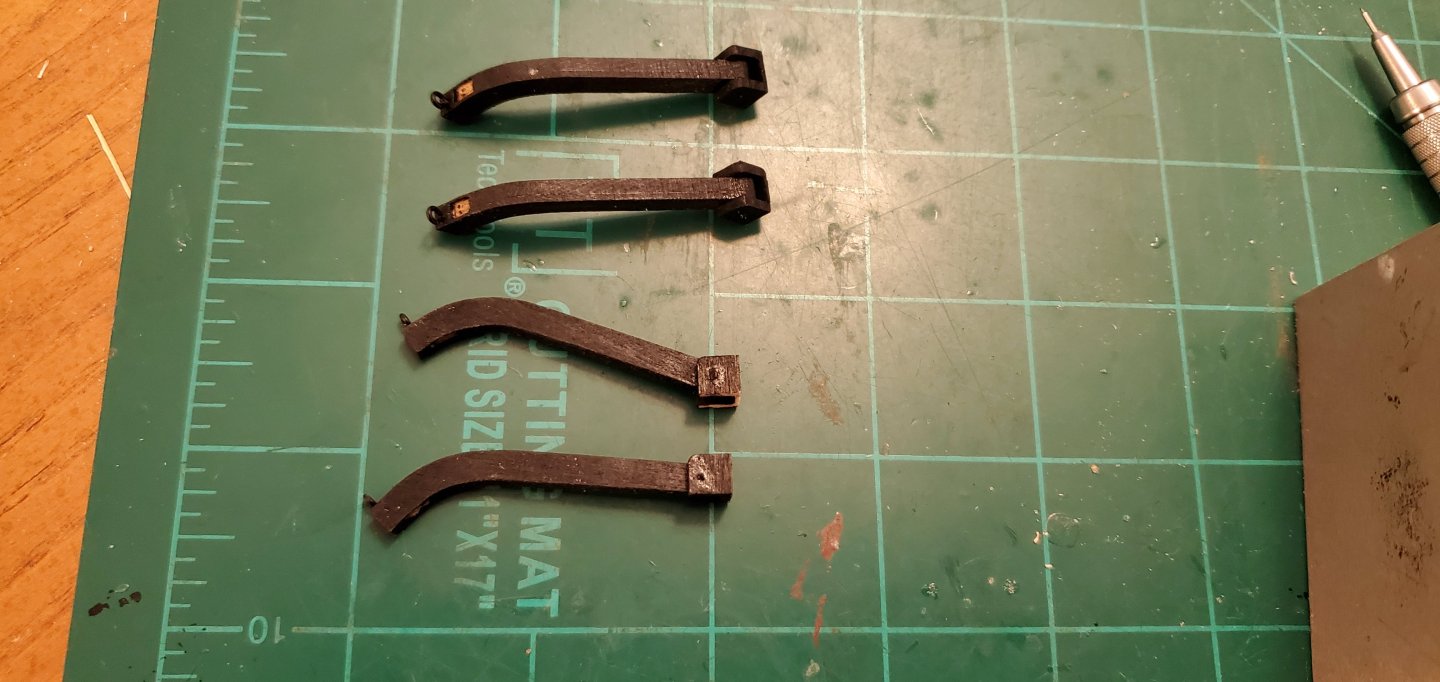
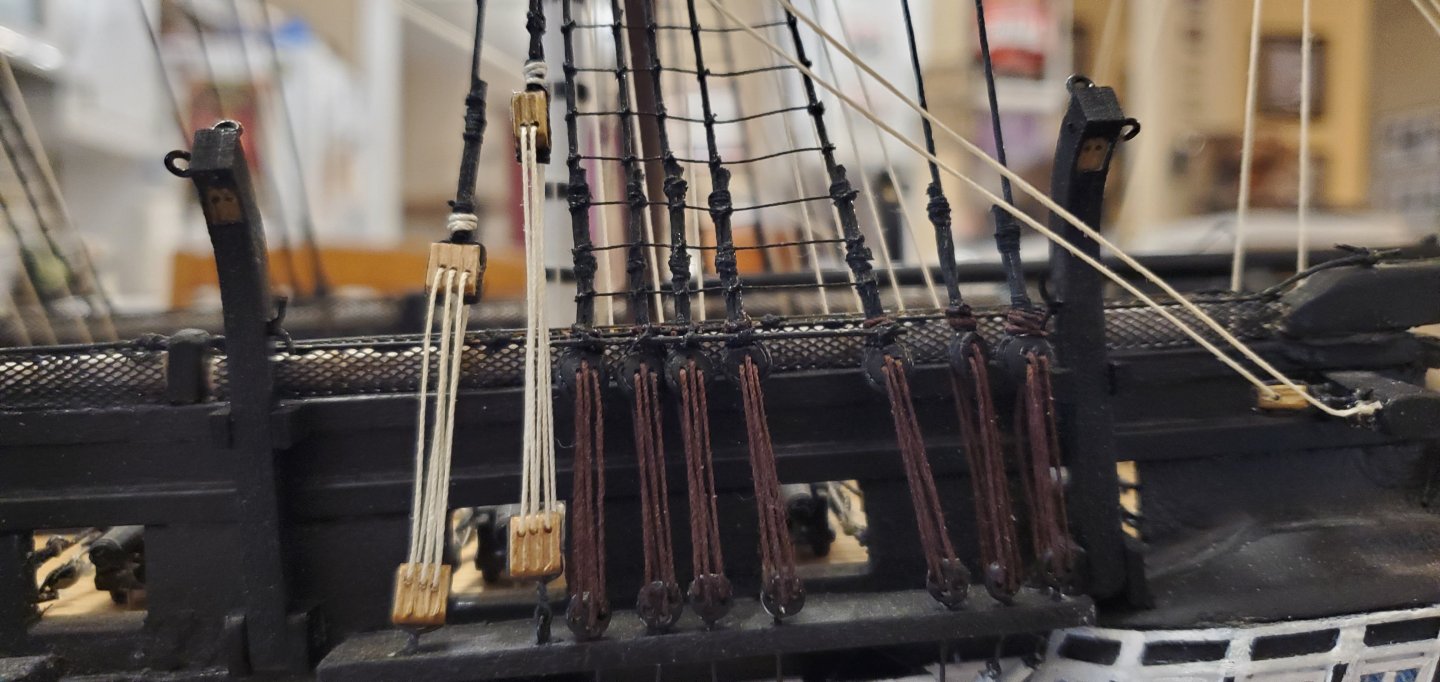
I snuck back over here and got a little more work done on the Constitution. The next thing on my list was the quarter davits - a fairly simple process. I drew them out on 1/4" thick basswood and cut them to shape. The instructions called for mortising a double block into the davit near the top end. Next was adding a hinge at the base and an eyebolt on top. Then painting. I also needed to add a cleat to the side of each davit. The original builder had already made and installed some cleats on other parts of the ship. It looked like he made them out of 2 bent pieces of wire. I liked the way they looked so I decided to do try the same thing. I took some .02" diameter music wire, bent the ends to shape, and soldered together. And here are the quarter davits completed and installed.
- 301 replies
-
- 13
-
-
- Constitution
- Bluejacket Shipcrafters
- (and 1 more)
-
That rigging is looking really good!
-
Nice, Ian! I found a video of what I'm pretty sure is a Texas penguin. He walks on ice and snow about as well as we drive on ice and snow down here! https://youtube.com/shorts/n9Fw2xrlszA?si=AXD9M3g5MM3Y-KTg
-
No doubt about it, Keith. And I'll probably have to drop those little houses onto the deck inside the bottle after the 2 halves of the hull are joined. Yippee. Nope. I'm sticking with the Bundy rum, Pat, and it's your fault!! 🍹🍹🍹
- 106 replies
-
- 7
-
-
-
- Kentoshi-Sen
- bottle
- (and 1 more)
-
Good to see you back at work on this beauty, Ian. I know true colors don't always show in pictures, but based on the second picture of this post, I agree that a somewhat darker shade of gray would look better against the red.
-
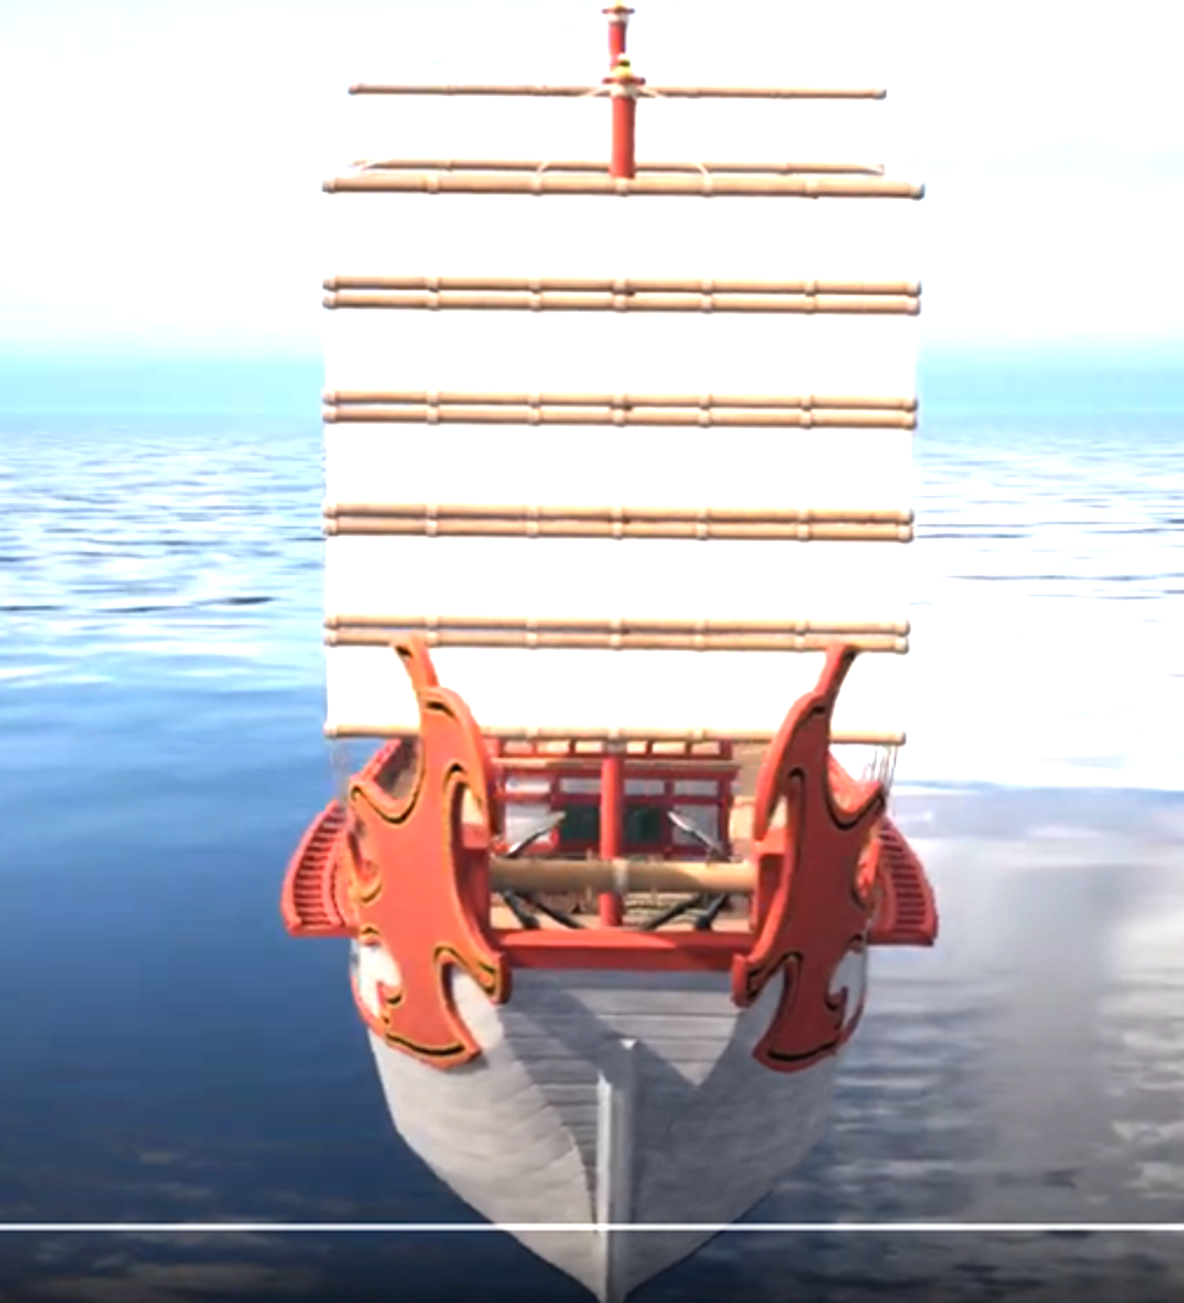
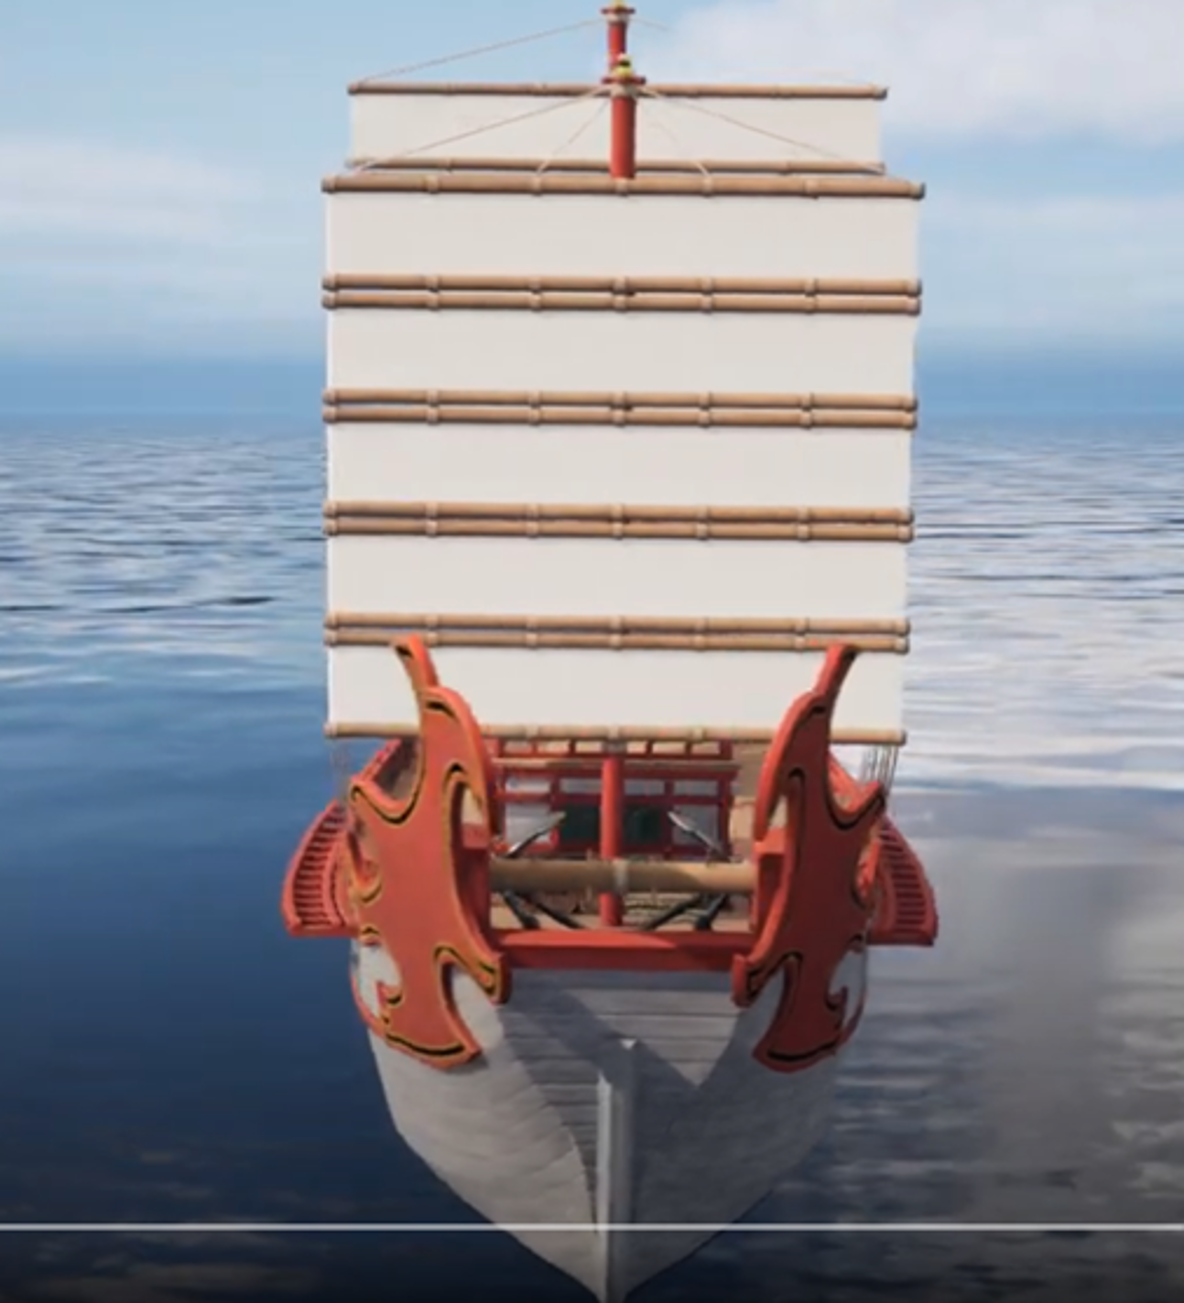
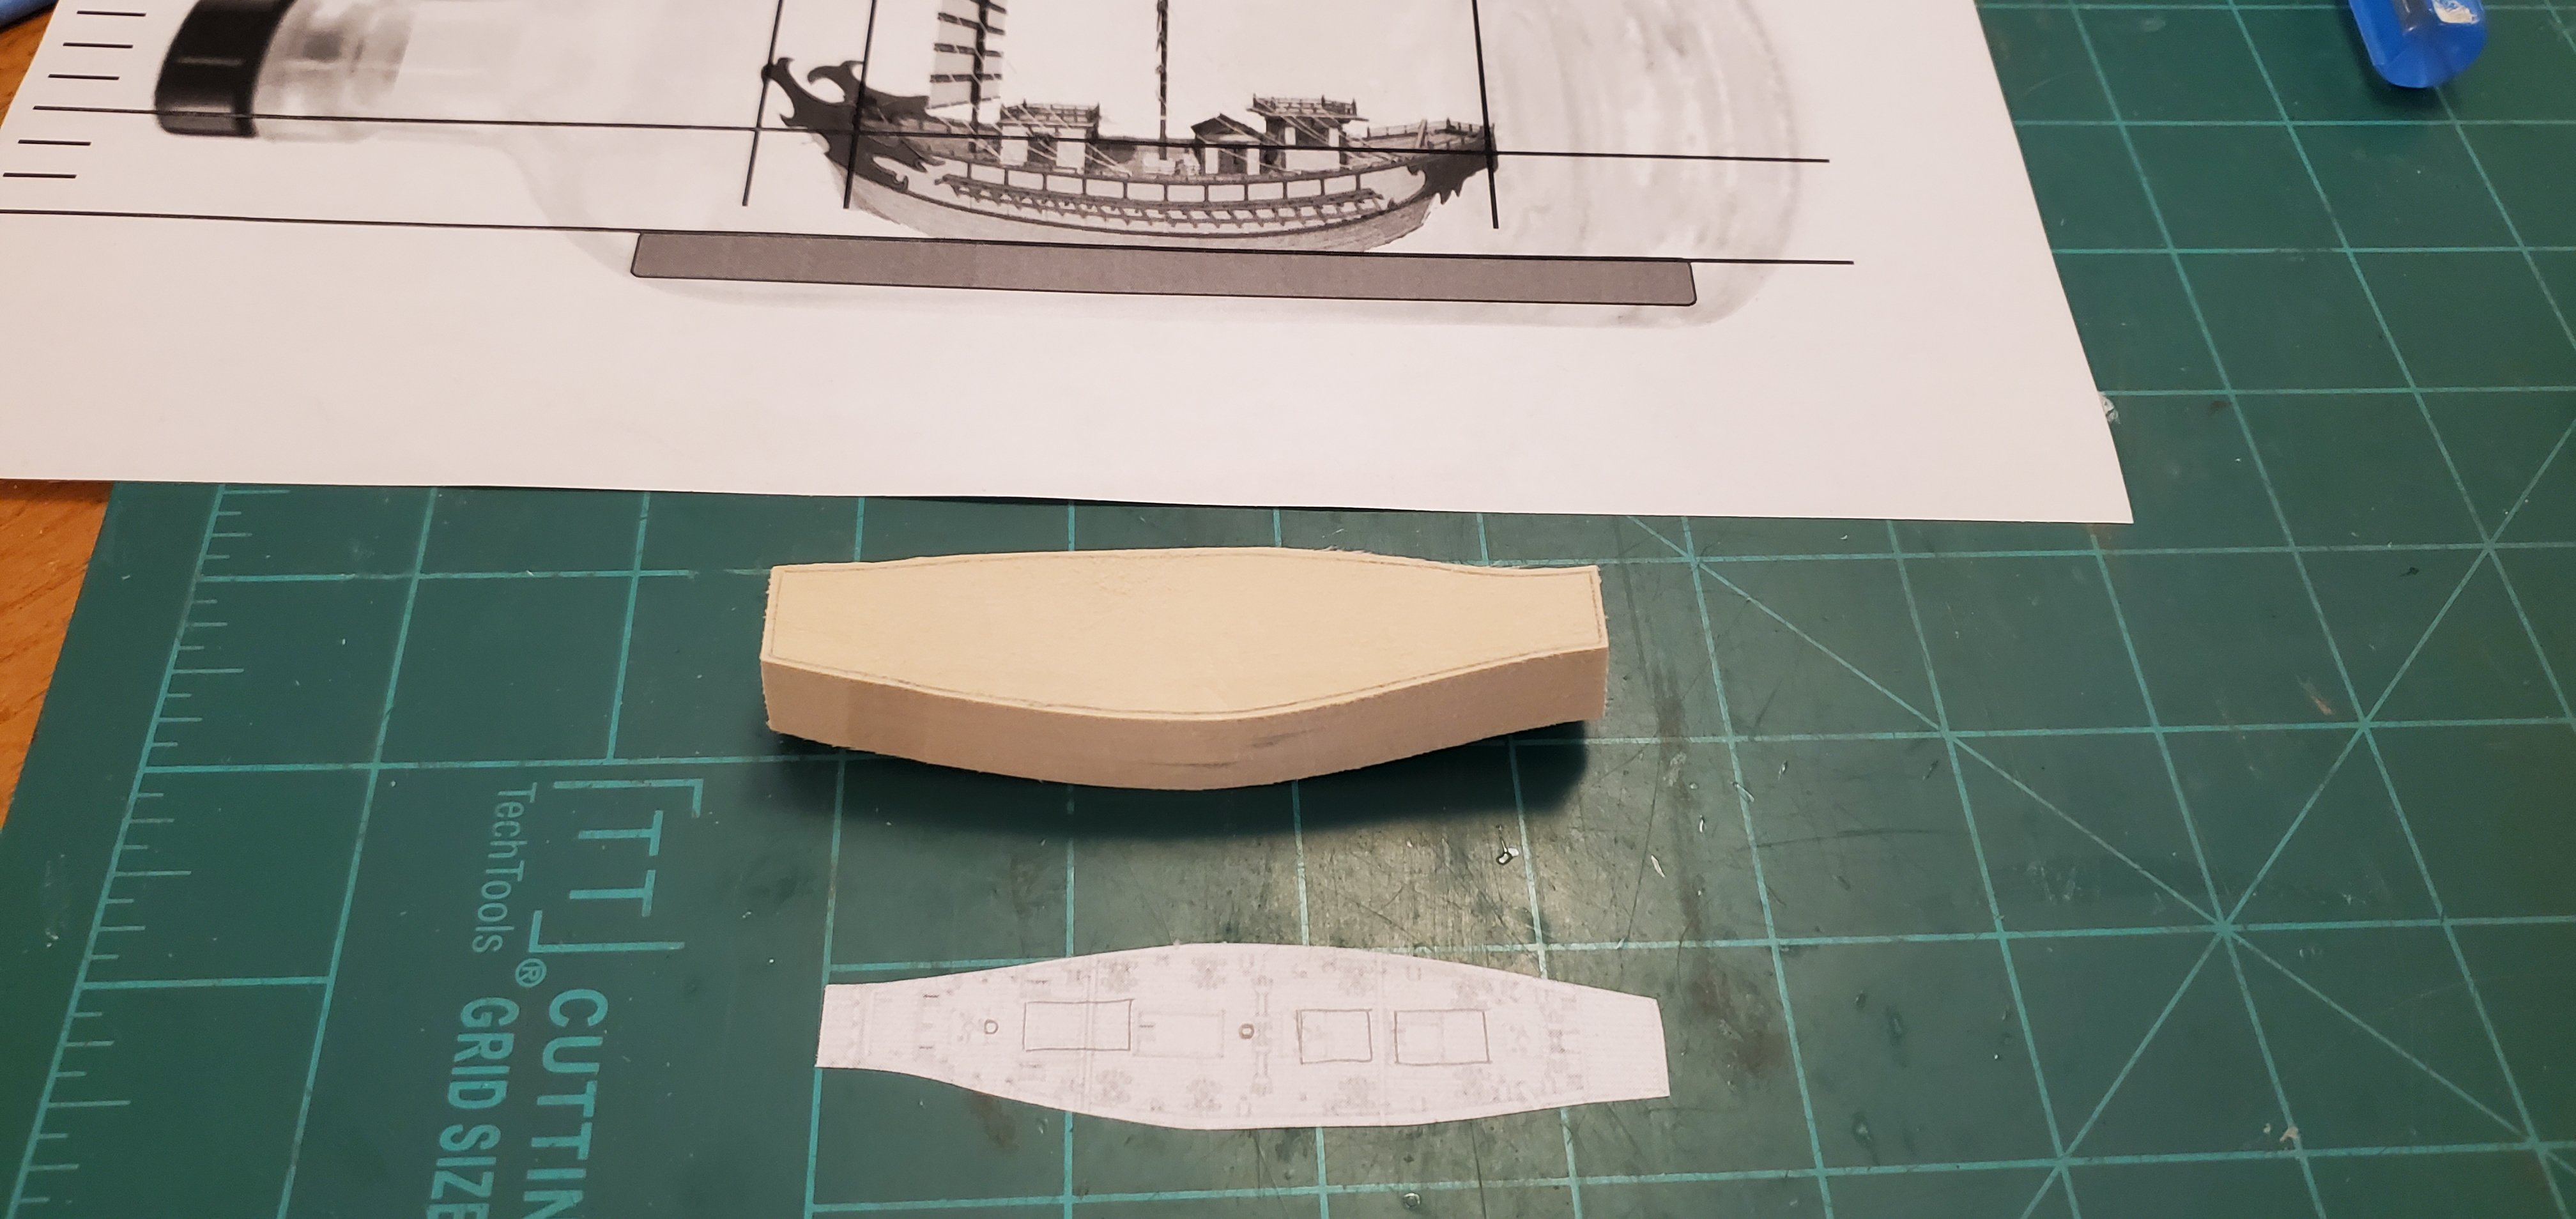
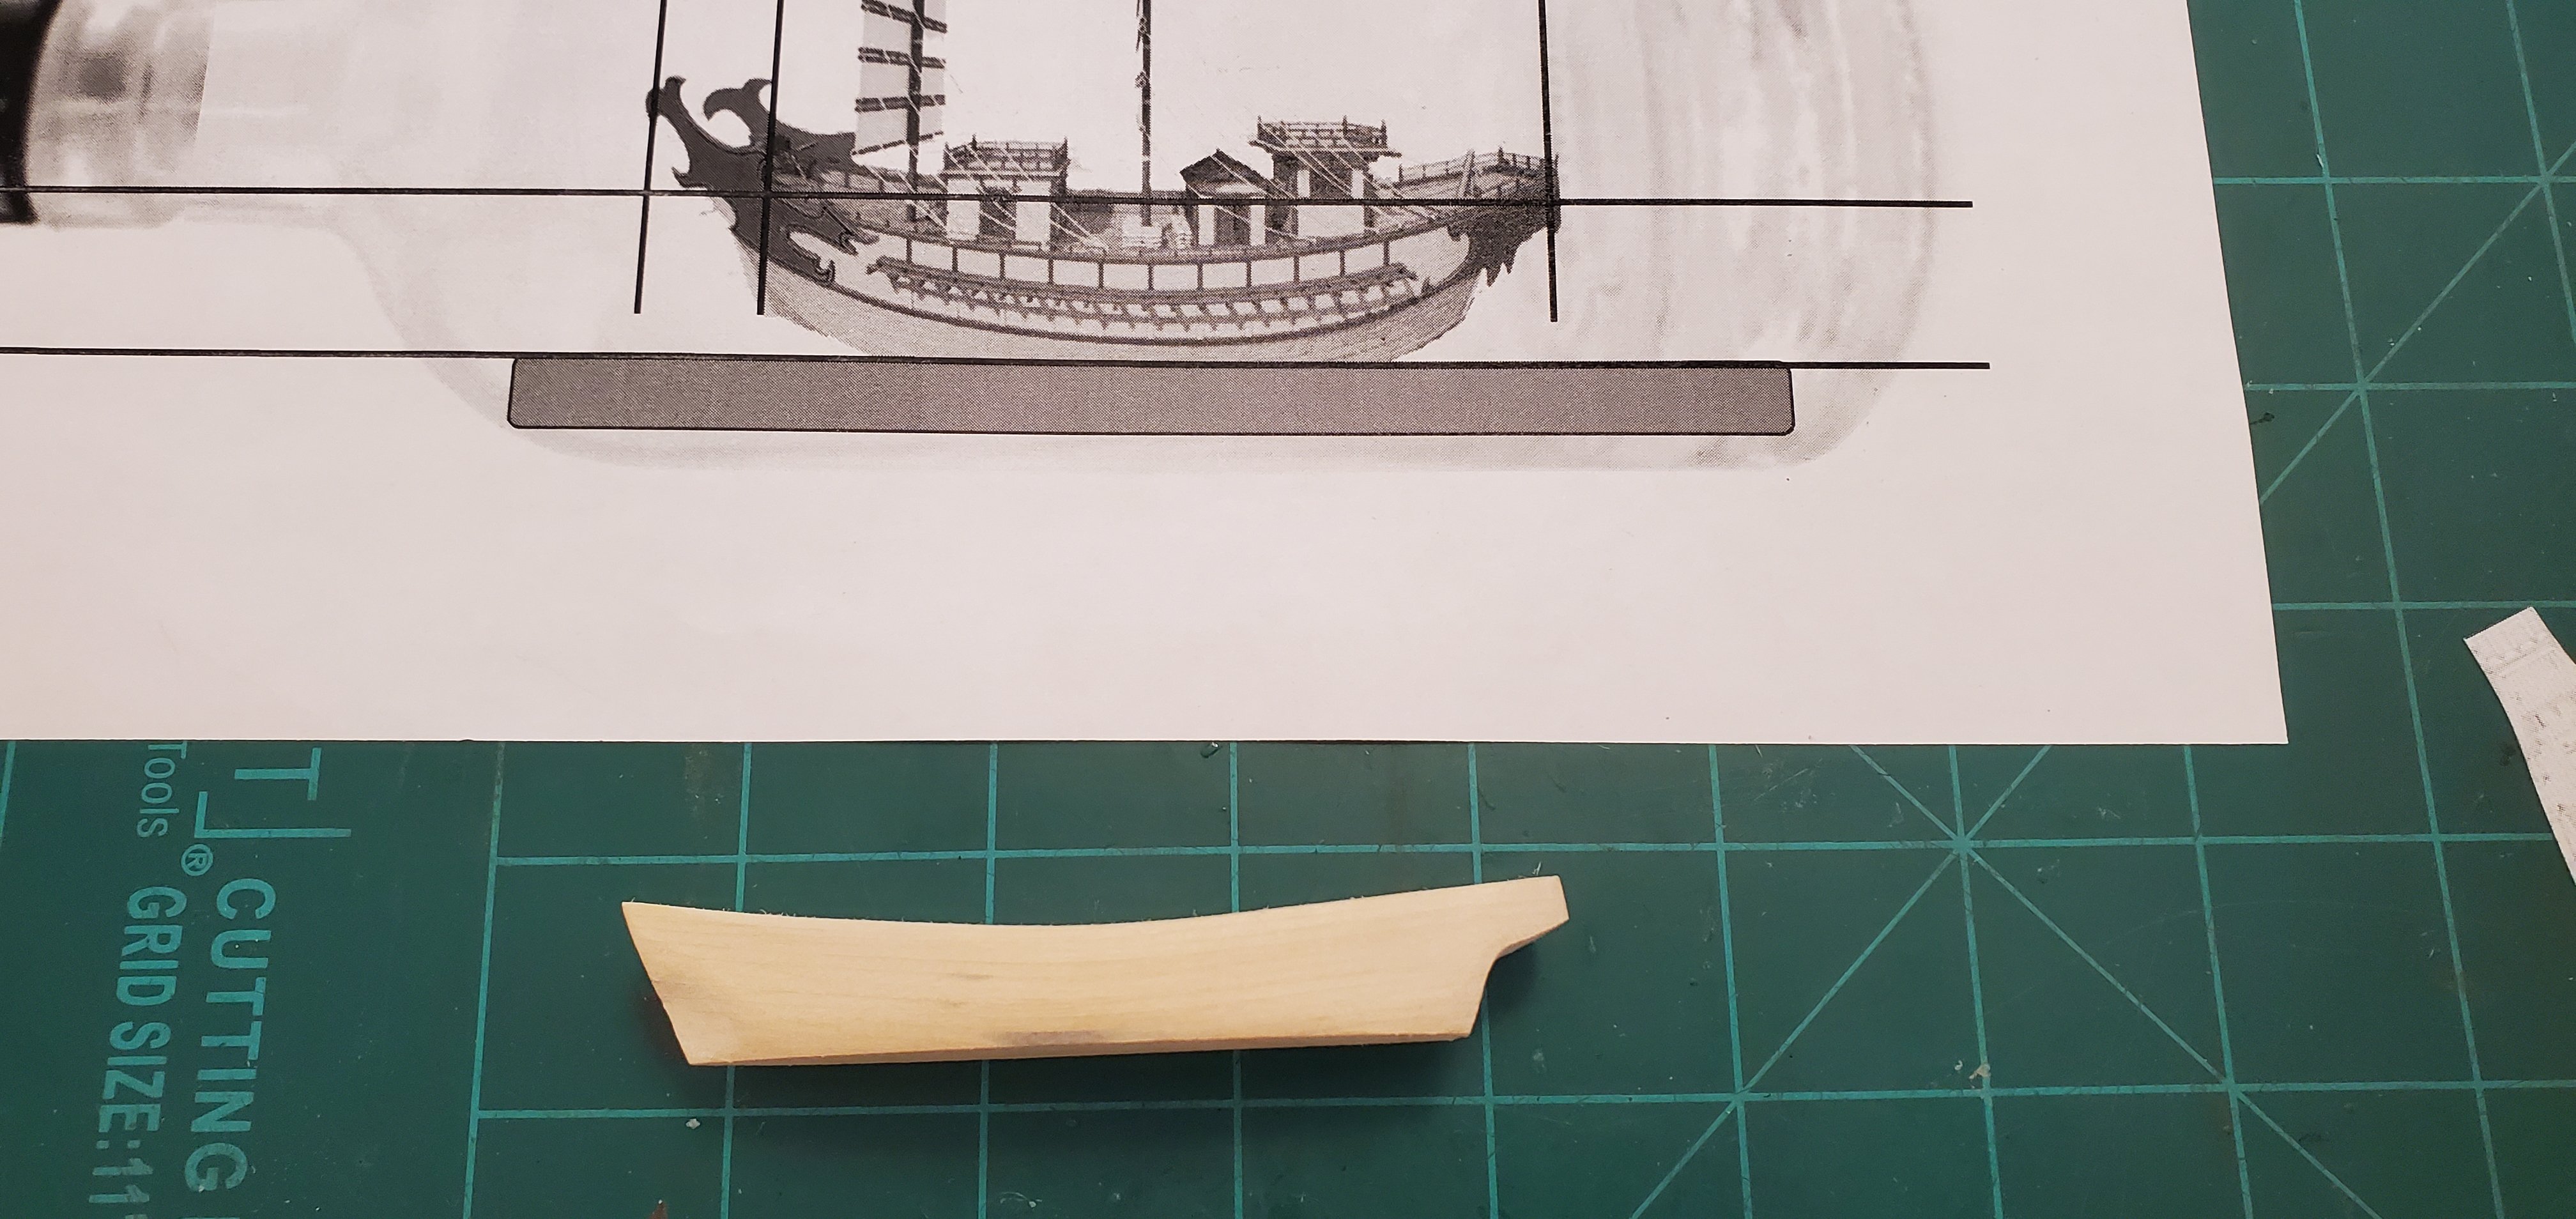
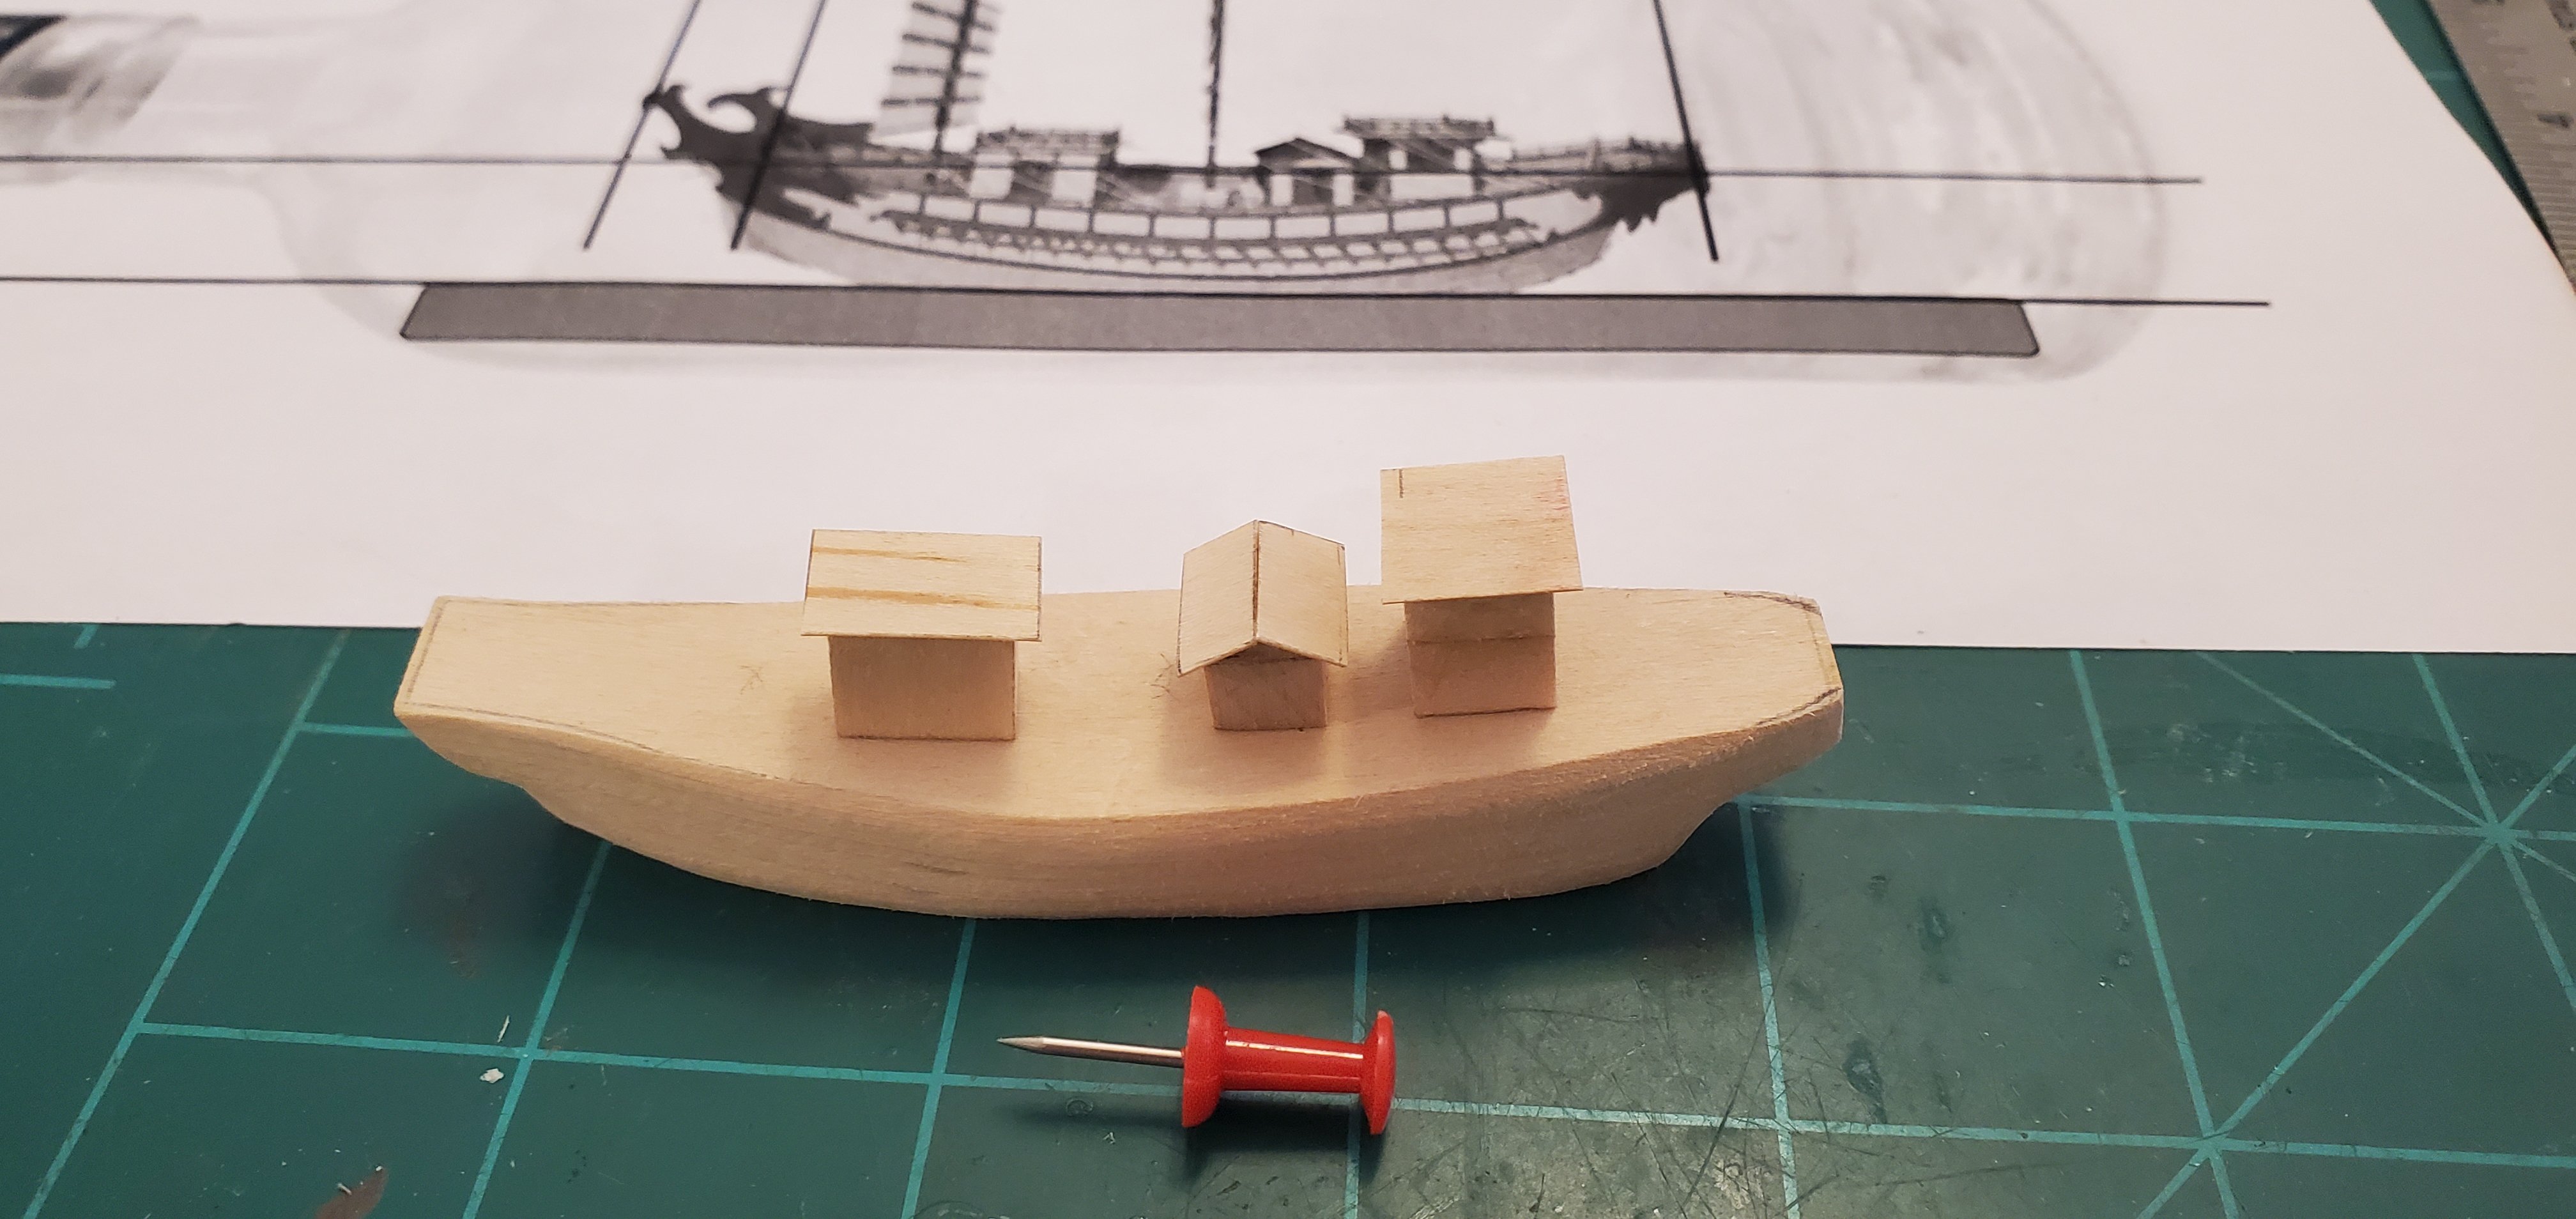
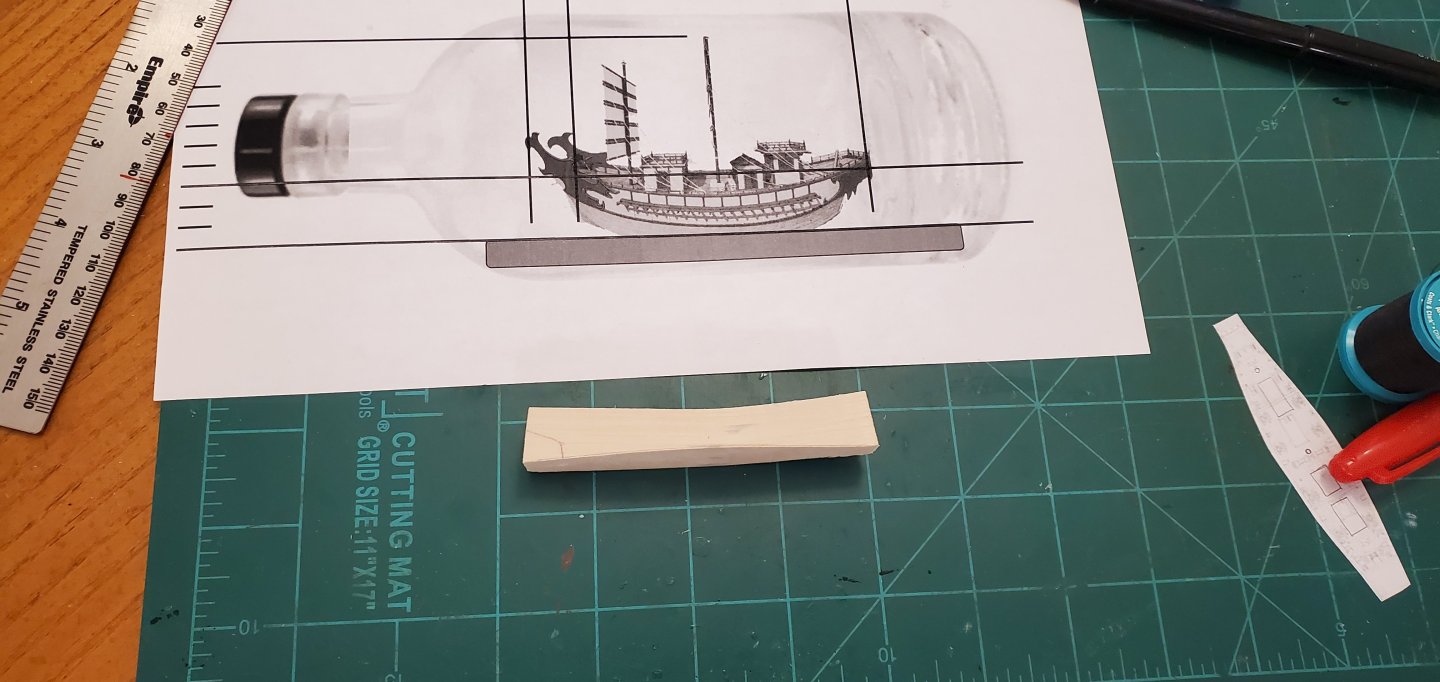
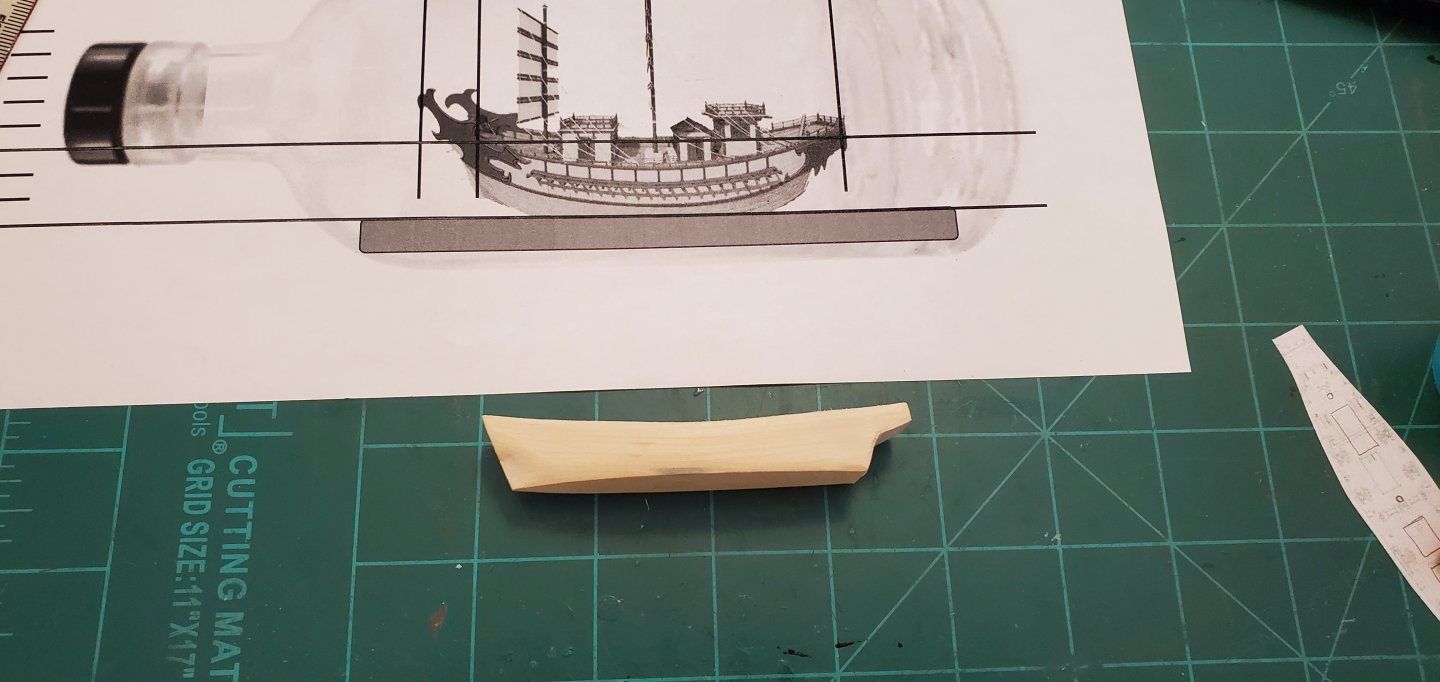
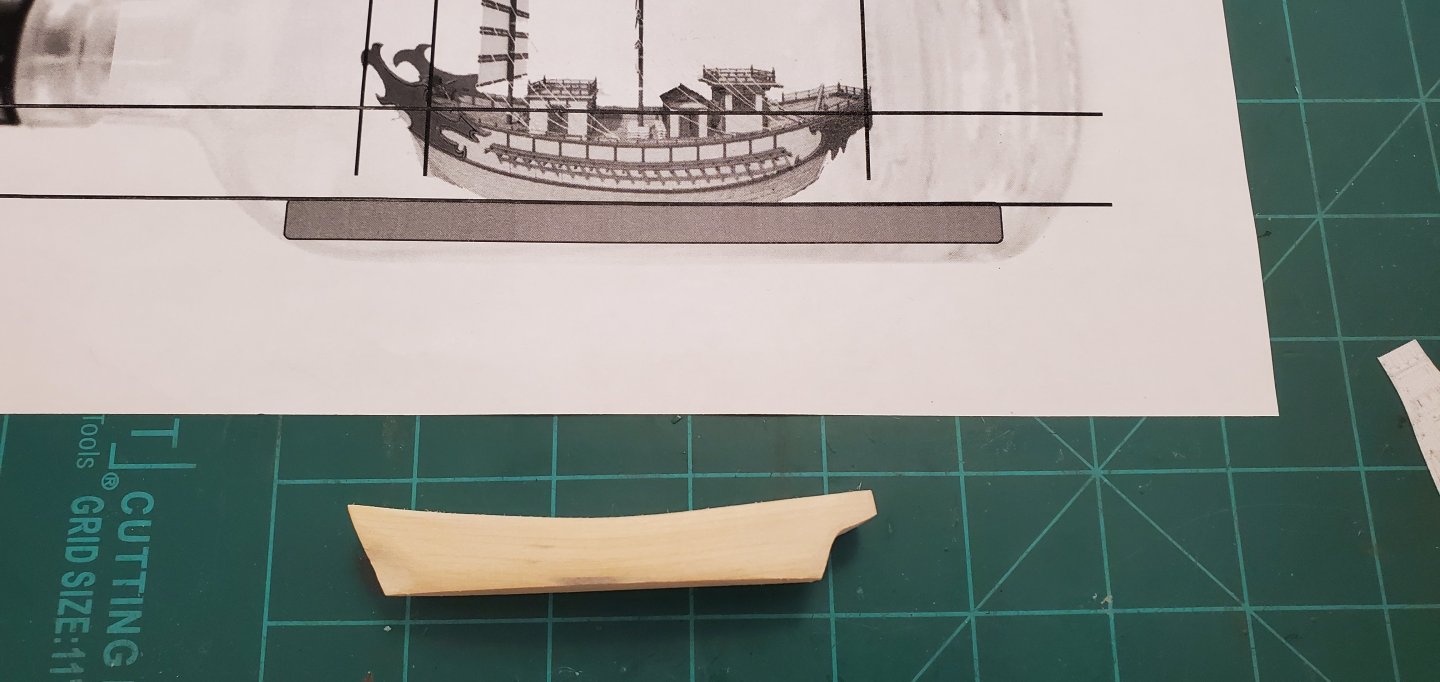
Next to getting the ship in the bottle, shaping the hull is probably the thing I struggle with the most with these SIB builds. And the hull shape is on this ship is quite interesting. I found this youtube video where someone did a 360 degree view which is proving quite helpful. https://www.youtube.com/watch?v=tn1IDvpRXVE Here are some screenshots from the video. The bow is squared off with the keel going about 3/4 of the way up. The stern is also squared off with a poop deck of sorts extending prominently. Here's the progression of work, doing my best to shape the hull to resemble the pictures. If I ever go to the dark side of 3D-printing, this is the first thing I will try! I also did some preliminary work on the 3 little deck houses. After seeing the amazing work that @Keith Black has done on his tiny Lula furniture, I thought about asking him to make these for me!


- 106 replies
-
- 13
-
-
- Kentoshi-Sen
- bottle
- (and 1 more)
-
I've had a Dremel for years and agree with Waldemar that it is loud and has a lot of vibration. I also have the drill press is even worse. It's poorly made and I've had to make some modifications to make it work. However, despite the issues, I'm still able to use the press and drill precision holes in my SIB ships with the smallest of drill bits (76, 78, 80). I don't use the Dremel outside the press. Last year I bought this rechargeable rotary tool off Amazon. It's cheap but works surprisingly well, at least for small sanding and shaping jobs like I primarily do. It's got enough power for what I need and the charge lasts a long time. If you're on a tight budget like me, it's not a bad option. https://www.amazon.com/dp/B08VHYX96W?ref_=ppx_hzsearch_conn_dt_b_fed_asin_title_1&th=1
- 117 replies
-
- 4
-
-
-
- ancre
- Bateau de Lanveoc
- (and 2 more)
-
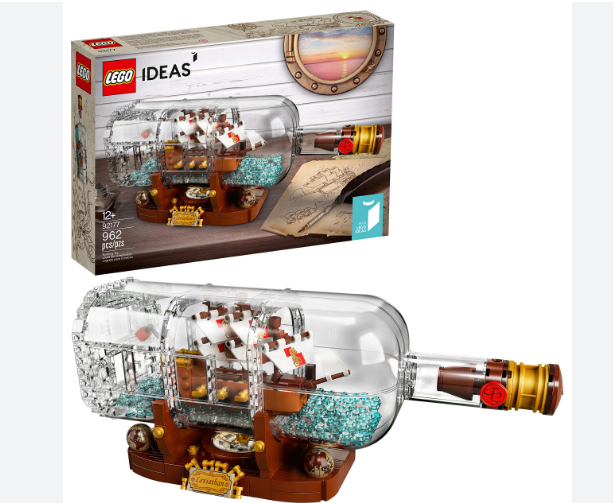
That is a cool looking bottle, Bryan! You definitely should do an SIB with it! There are other Lego ships you could choose too. There's even a Lego ship in bottle kit!
- 106 replies
-
- 4
-
-
-
- Kentoshi-Sen
- bottle
- (and 1 more)
-
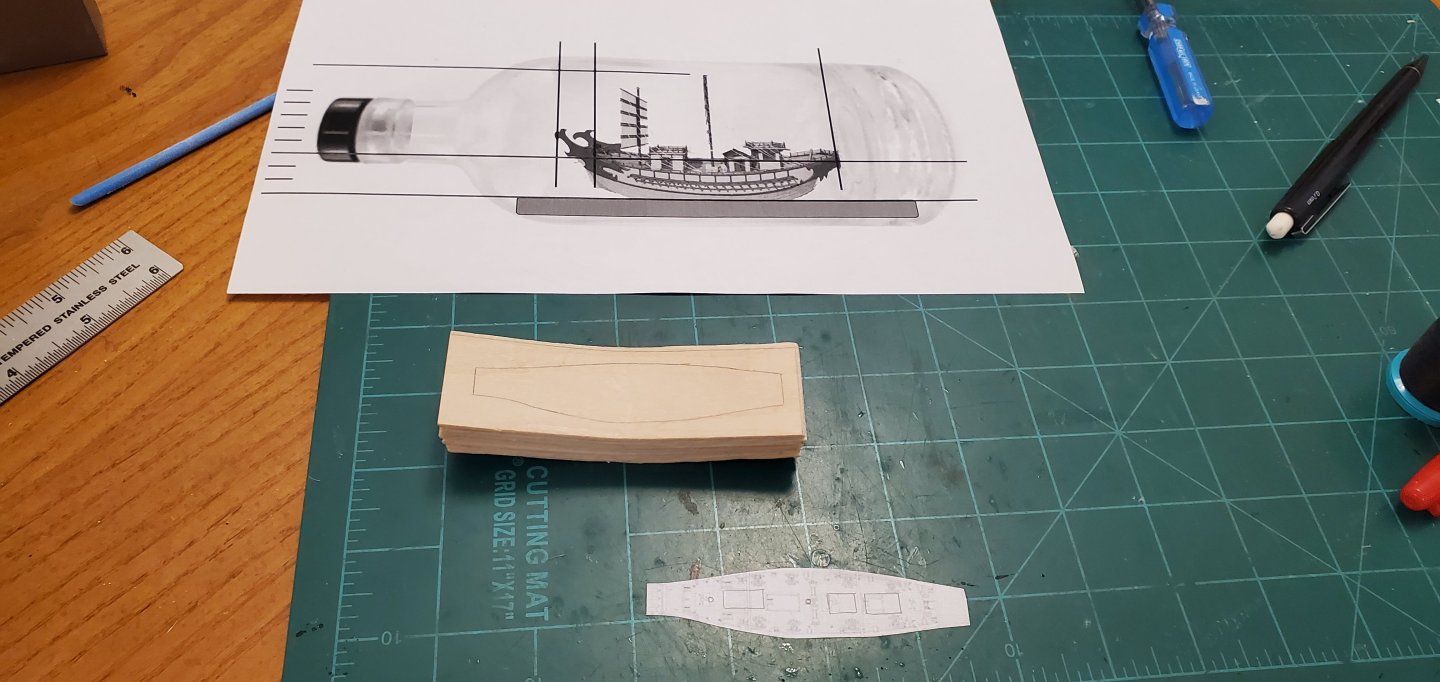
Hmmmm. TBD on that, Gary. I had not thought of that, but it is a very interesting idea! I agree, Thukydides. It definitely jumped out at me when I was searching around for a subject. It will also present some significant challenges. The bottle opening is small - just under 3/4" or about 18mm. The banks of oars on each side will put the width well outside 18mm, so I'll have to split the hull down the middle. The structures on the deck and the sculpted feature on the bow make it a rather tall ship too. So I'm not yet sure how I'm going to engineer the thing to make it fit thru the narrow opening. There may be a lot of assembly done inside the bottle. We will see. WOOHOO! Google translate says the Japanese word for woohoo is YATTA!!
- 106 replies
-
- 7
-
-
- Kentoshi-Sen
- bottle
- (and 1 more)