
HOLIDAY DONATION DRIVE - SUPPORT MSW - DO YOUR PART TO KEEP THIS GREAT FORUM GOING! (Only 20 donations so far - C'mon guys!)
×


Dan Vadas
-
Posts
3,261 -
Joined
-
Last visited
Content Type
Profiles
Forums
Gallery
Events
Everything posted by Dan Vadas
-
Thanks Rick and popeye. That area's actually all Black, and it's the same on both sides. Now that I've painted it there's no longer a problem - it looks like a small step-in, and as if it's supposed to be like that . BTW - "Black" isn't just black. It's a mix of 40% white, 50% black and 10% yellow ochre. A while ago I mixed up some Wood colour for a few small touch-ups on the main deck and it came out really well - you can't see them at all now. Instead of just attempting to do it with one colour I mixed it "as I went", starting off with the lightest coloured plank and adding a touch more Burnt Umber/Yellow Ochre for each following plank. Danny
-
I've built the Forward 3rd Deck. This went together well, though there is a slight mistake in one small area - it's going to be difficult to spot later on when other items are fitted, so I'll leave it : I've glued the 3rd deck to the 2nd deck. The mistake referred to earlier can be seen below, where the two decks don't align properly in the black area. A bit of paint will fix it : The balustrade at the forward end of the deck was difficult (I had to re-do it twice), mainly due to no instructions on how it went together. This is a recurring theme of this kit : Danny
.thumb.JPG.11e714f3ec0337c4ba95e57d6ea9cde8.JPG)
.thumb.JPG.6c268463eb87d09b8613509b0d31872a.JPG)
.thumb.JPG.5044fd9a7dc7415780feb3b6e6156571.JPG)
.thumb.JPG.00e11de6c35d2cf33ed465cf4a4f7957.JPG)
.thumb.JPG.5a2df995d73877ecd22d2d9bce4e306c.JPG)
.thumb.JPG.b34bd34d128c6d553a94d118f1d81f0d.JPG)
- 524 replies
-
- 17
-

-
Jan, did you give the printed sheets a coat of matt sealer before cutting them out? I found this helps a lot to protect the printing. Danny
- 64 replies
-
- 3
-
-
- v108
- digital navy
- (and 2 more)
-
I don't know yet Jan. The black cartridge in my old printer no longer works, so I'm going to use another printer we had lying around. Unfortunately it's out of ink at the moment so I have to wait for the postman . I'll find out in a couple of days. Danny
-
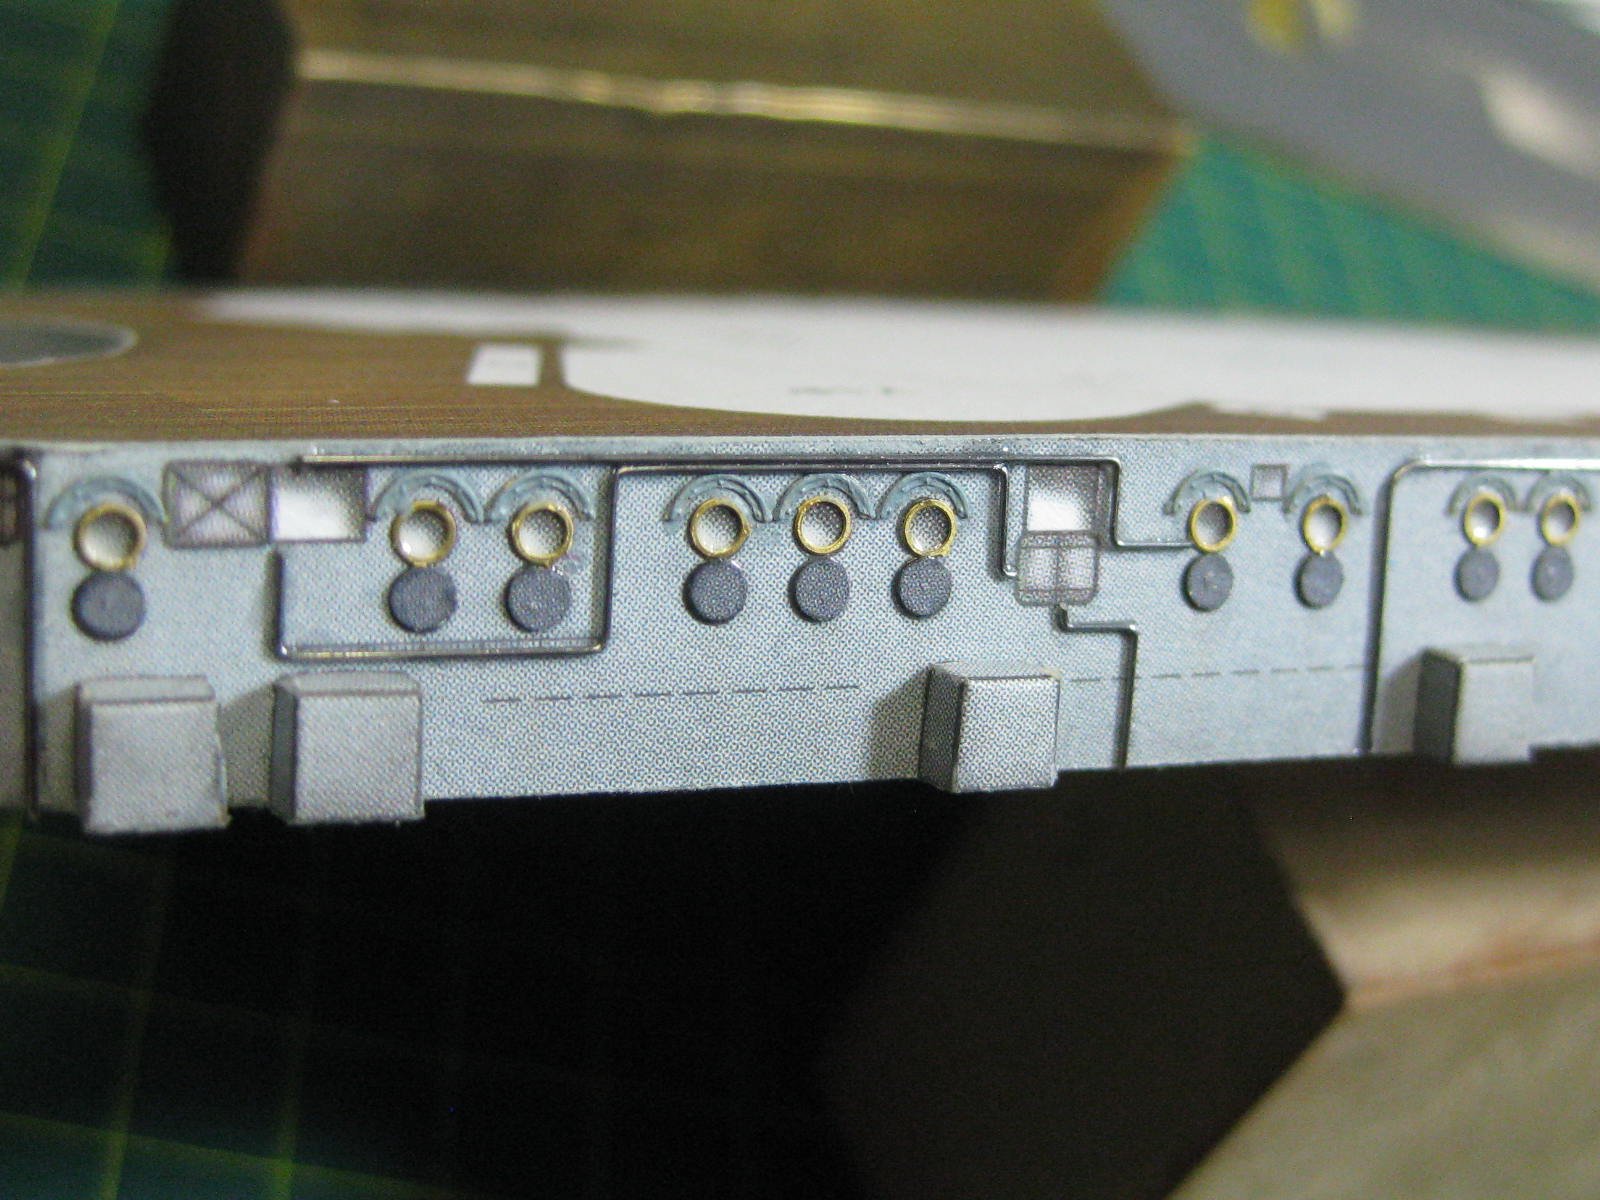
Thanks John and Popeye. After adding the previous details I decided I may as well do the rest of the deck sides. I've added the Piping, using 0.3mm nickel-silver wire. I'm thinking of leaving it as-is rather than painting it. I'll also add hatch covers when I can get my printer to work, I've already copied all the covers from a scan of the parts sheet : Danny
- 524 replies
-
- 15
-
-
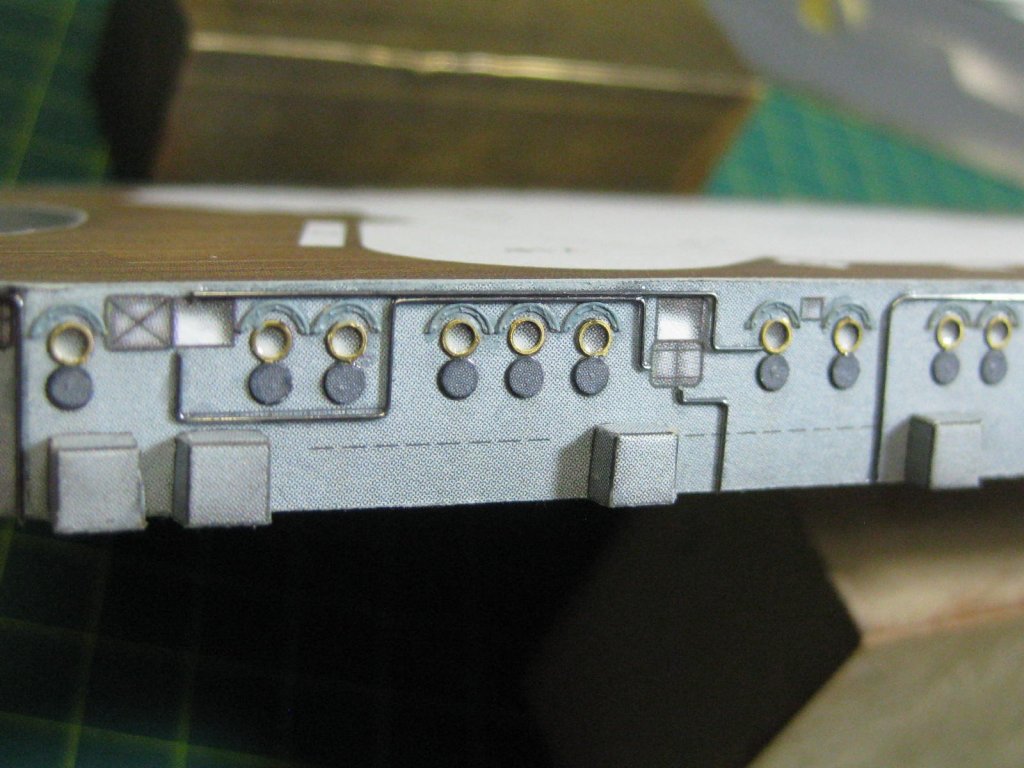
Details like the ones in the following pics are sucking up a lot of time . I've fitted all the PE portholes to the two lower decks. I decided to leave the rims in brass, because I like the effect, but I painted the "eyebrows". The lids are extras, made with my punch, because the printed ones looked way out of place against the PE rims. Oddly, the ones on the fore section of the deck are smaller than the aft section (1.6mm and 2.0mm). I don't know if this was a mis-print. The detail on the larger ones is a lot better : There are six ladders on the aft section : Also two lots of 1.6mm Step Irons, which I bent using the jig I made for Amatsukaze : And finally 12 small boxes, two larger ones, a couple of raised "doors" and two more grilles. I still need to do a bit of filling and paint touch-ups : Danny
.thumb.JPG.6fcd07b1486a224d06333f8cf46912b8.JPG)
.thumb.JPG.7094833f65577e29f375f71b5f198390.JPG)
.thumb.JPG.9b77e1f9cead5536b10105d3d327a3a4.JPG)
.thumb.JPG.5b2052b071654090e005e9b3e4c9891c.JPG)
.thumb.JPG.f481d868328d9fac4b360925eb2c3cb5.JPG)
.thumb.JPG.12e6cac8e6bc8ef214ccb9b3880995ef.JPG)
.thumb.JPG.d4ca72ab25c460ecc36fdff76e08b6a1.JPG)
.thumb.JPG.dbfd5c5796171df2556056a3d3a45e86.JPG)
.thumb.JPG.7b4a5837e7850b7c792427f00fc185f1.JPG)
.thumb.JPG.d23b02d229db1b1ba563945e63123b42.JPG)
- 524 replies
-
- 14
-
-
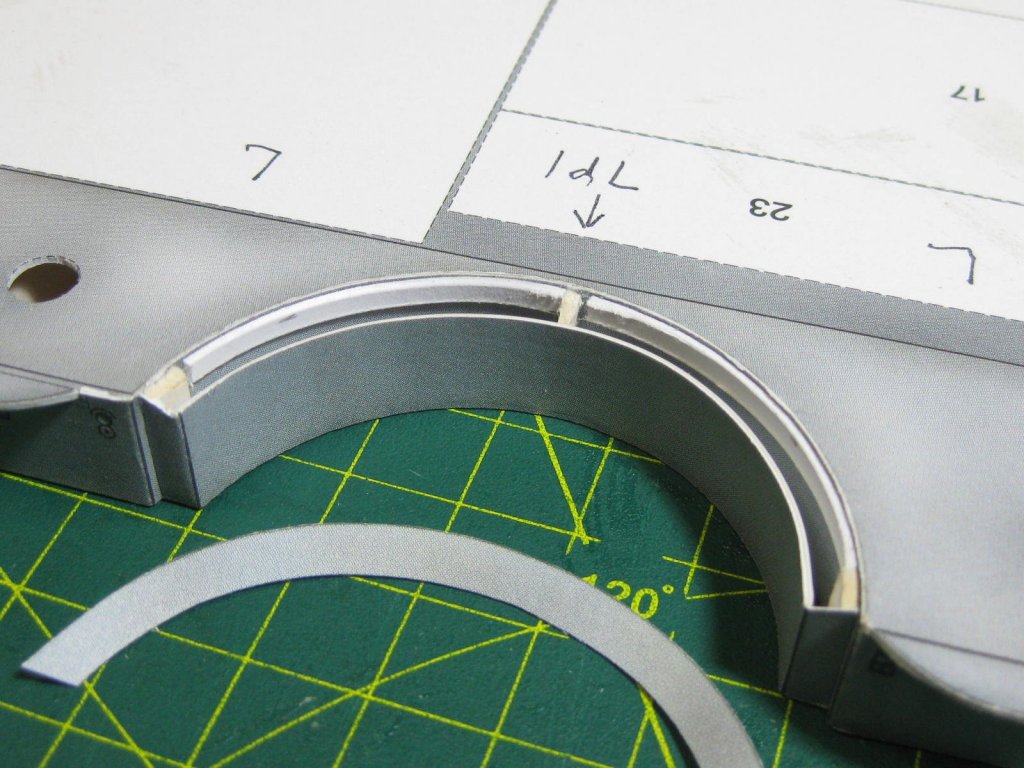
Thank you Michael, and welcome to the build . The tops of the curved bulkheads are fitted on an angle. Two of the kit ones were too narrow, so I used the wider ones for the ones that were the narrower of the two and cut two wider ones from spare sheet : The PE I bought is of very good quality. Here are a couple of examples of some of the parts that replace card ones : The two Catapults for the Seaplanes. The fit was excellent, but no instructions were supplied with them. I eventually worked out how they went together. I forgot to take pics of them before painting : Danny
.thumb.JPG.5e56854e05460738045017123d2ed178.JPG)
.thumb.JPG.a1e3da2e4293a30c04ea603aeb405f85.JPG)
.thumb.JPG.bffcd56b7339eb10eec1bd7a8b9d2467.JPG)
.thumb.JPG.768ca9545d3631e4514973d0a43e0f49.JPG)
- 524 replies
-
- 11
-
-
Oops, sorry Ron, I deleted the wrong pic in the previous post . Here's a tip for narrow pieces like the funnel "braces". After cutting the cross-piece out run some thin CA along the edges, this will stiffen the piece and prevent (or at least lessen) the piece from getting out of shape. You can still adjust them now, and then use the CA. I use a needle with the end of the eye ground off, held in an Xacto handle, to pick up the CA from a small puddle on an old spray can lid (the CA stays workable for a few hours). Danny
-
Hof, the Touch-ups MORE than make up for the printed pieces . The PE also needs to be painted. The printed card colours don't match the ready-mixed paint (Testors etc) and needs to be adjusted, so there's not all that much difference between Plastic and Card. Danny
-
I have no idea Greg, I don't know what's available in the hardware stores in the USA. I found this piece in my shed, probably a left-over from something I was working with years ago . Try a place that specializes in selling foam rubber, or try Google. I think it's actually known as "Closed Cell Foam" and is mainly used for Packaging. Danny
-
You're doing a great job Fernando, she's turning out much better than my first attempt many years ago . Your work is very clean and precise. Nothing to fear here, the rigging is really quite easy on this model. I don't remember if I used the kit-supplied rigging thread on mine, I have an idea I may have replaced it with some better quality stuff (or maybe Modellers Shipyard source theirs from a different supplier now). If you're not happy with it there is plenty of good thread available from sites like Syren Ship Models, one of our sponsors on MSW. I couldn't see whether you made the Mast Hoops before fitting the mast, and I don't remember whether the kit actually mentioned them, but if you are fitting sails you will need them. Click HERE to go to the appropriate post on my build log where I made mine. You could make them from brass wire if need be, but wooden ones would be more accurate. My rigging starts on the post following that one, if you need clarification on some detail. Keep up the good work, and I'll be dropping in to see your progress . Danny
-
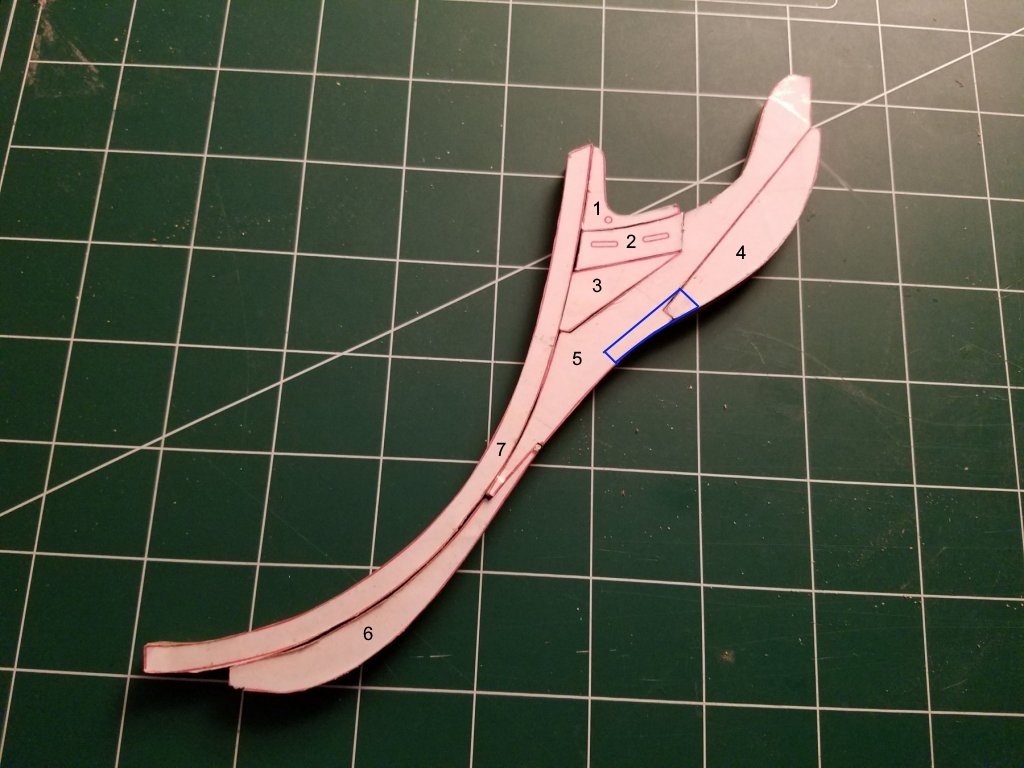
Ironically Jeff, the Cutwater is the only part of the whole assembly - correctly termed the "Knee of the Head" - that you HAVEN'T made . It's an extra narrow piece that fits in about the middle of the knee at water level (drawn in blue in the pic), and could be easily replaced if damaged. I find it useful to know the correct terminology for the parts of a ship, as it makes communicating with other builders a lot easier if you can refer to a part by it's real name (saves confusion, both in the modelling world AND on the real ship ). So for future reference the various parts of the Knee are : 1. Standard 2. Gammoning Piece 3. Chock 4. Bobstay Piece 5. Lacing Piece 6. Gripe 7. section of the Keel, not actually part of the Knee Not a bad job for your first attempt at scroll sawing, you'll get a lot better with more practice (I'm STILL learning ). A tip when making a complex part like this - cut, sand and fit ONE part at a time before cutting the next. This way you can use the already made parts as a template to mark the next pieces at the joins between them. Your deck nailing has come up really well - not overdone, but still visible . Danny
-
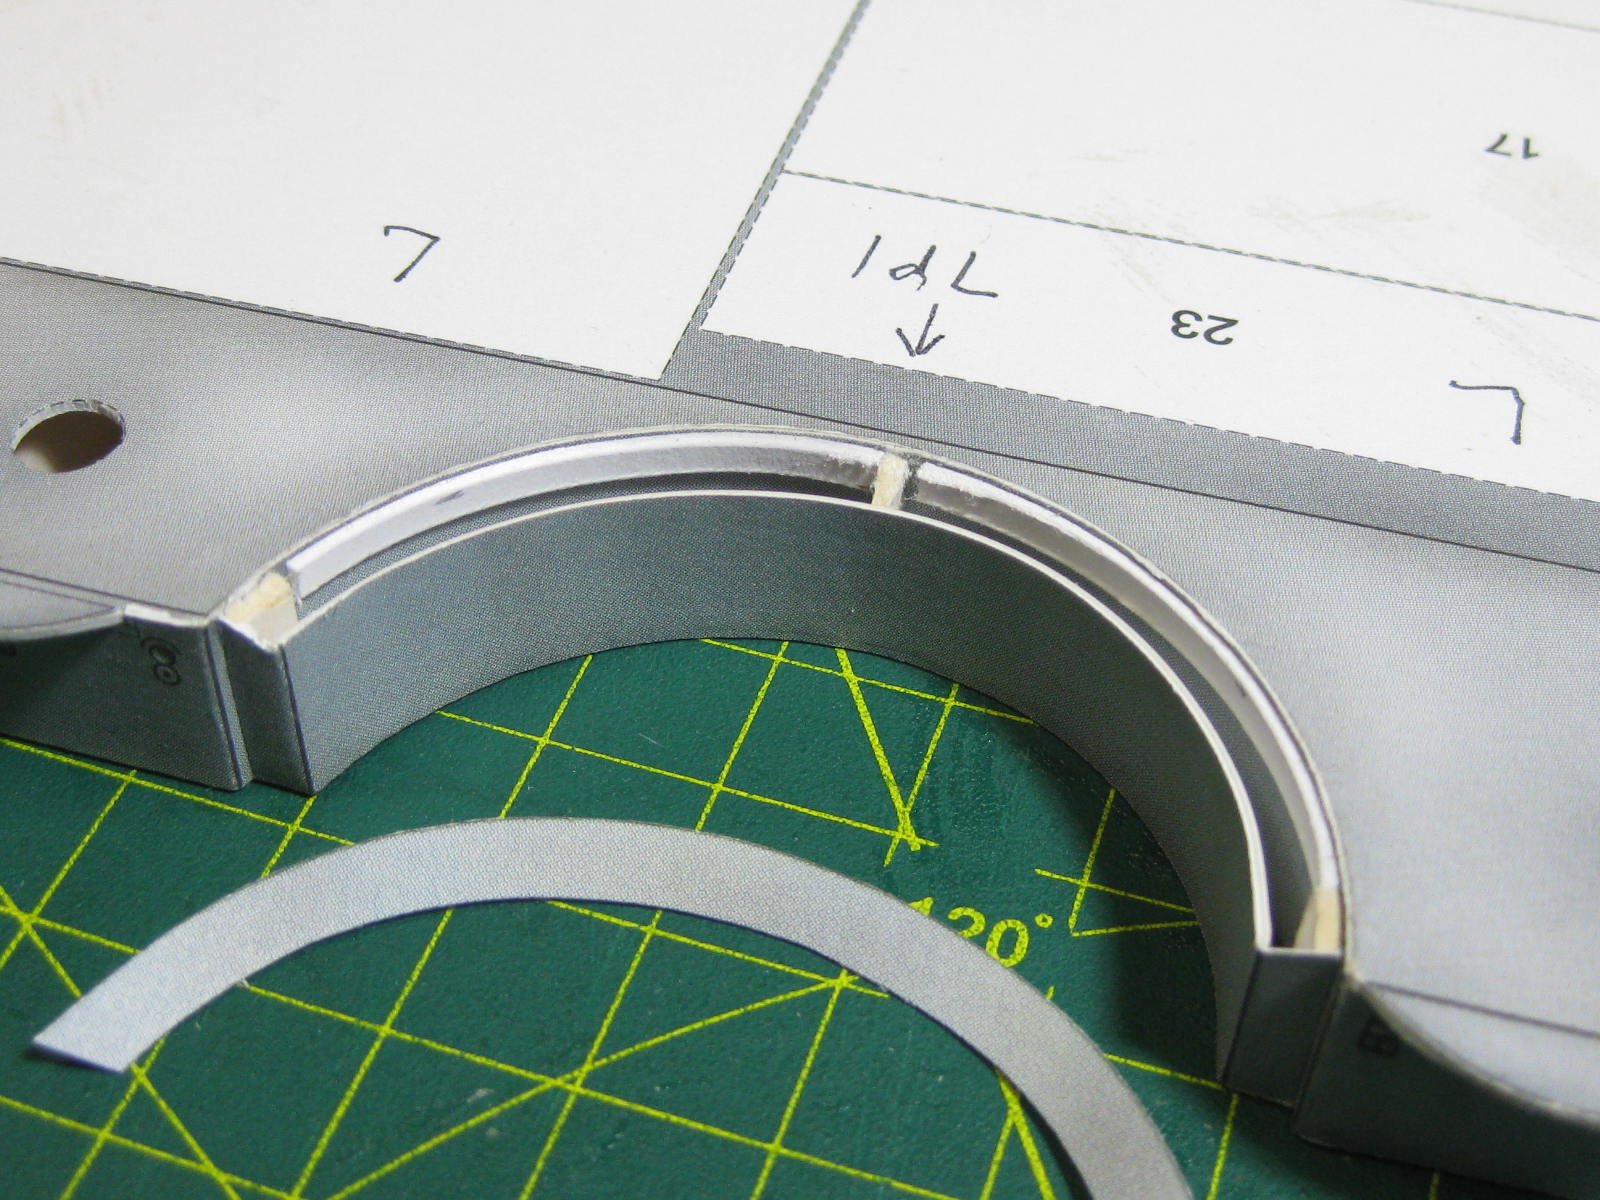
I couldn't find the side pieces for the fore and aft gun emplacements anywhere in the kit, so I made them from some of the spare printed card. Only later did I discover that they weren't necessary as they are completely covered by the gun mounts - ah well : I've finished all the side panels for the two 2nd Deck sections. I started gluing them on from the middle to lessen the chances of finishing up short on one end : There are four curved Bulkheads inside the sections where the guns will be fitted. It was a bit of a puzzle working out how to make them, but I've had success . I've discovered a rather good and easy way to roll round pieces. I use a piece of very high-density foam and an Xacto knife handle. It's a lot easier than using my left index finger like I did before : The tops of these pieces are on an angle. The little extensions should help in supporting them : Danny
.thumb.JPG.a2e002dffde1f2ee0ec0627f7a730800.JPG)
.thumb.JPG.68acd5c83c30fa82df32ba968dfe5a13.JPG)
.thumb.JPG.bbbff2a61b85b135cc0fda09c3099ded.JPG)
.thumb.JPG.6e0a9d9d4b727dad7cf69610449d6889.JPG)
.thumb.JPG.d1cccb6975139fdcef2cb4f467404d29.JPG)
.thumb.JPG.85bf2aa1a09df12107170492d8d51a1a.JPG)
.thumb.JPG.bd9e5695a05e103e18231daa790d9956.JPG)
- 524 replies
-
- 18
-
-
That works, but just make sure you don't set it hot enough to burn the wood (if it's adjustable). Danny
-
I use Silver Solder Paste and a butane Mini-Torch. The paste has the flux mixed in with it, and can be applied with a toothpick or similar. It comes in various ranges of Melting Point, but I don't think a soldering iron would get hot enough (at least my little El-Cheapo one doesn't ). The masts on Amatsukaze are CA glued together without any problems. I would have soldered them, but I was out of gas at the time . In either case a very neat joint is required, with a fair bit of filing involved on the rounded wire. Danny
-
Good advice. I actually OVER-bend the planks slightly in certain cases, as it's easier to push the middle of the plank onto the bulkheads (or frames) than the ends. Danny
-
They're actually called "Frames" Brian, and believe it or not the original ships had this many or more in larger ships. Fairing them is actually easier than doing kit bulkheads a lot further apart . Danny
-
Looking good Slog. The pic from the side gives a great idea of the unusual shape of the hull . I'd get as many of the smaller details onto the decks as you can, as long as they can't get damaged. It might be easier to do now rather than later when more of the superstructure might limit access to them. Danny
- 244 replies
-
- 4
-
-
- borodino
- dom bumagi
- (and 1 more)
-
Brian, if you thought the Norfolk Sloop had some tricky plank shaping .... check out the planking on my scratchbuilt HMS Vulture. It only has the one layer, all done in 1mm Castello and the inside was also visible, so I had to get it all right the first time . There are too many posts to give you a specific link to one that deals with only the hull planking, but HERE is a start. Oh and by the way, the 1st planking on my first wooden model wasn't any better than yours. Once the "lightbulb" goes on you'll be OK with every model after. Keep at it, you'll get the hang of it . Danny
.JPG.f12e51832a410b3353566abcf5e6fbbe.JPG)
.JPG.61db6615002e69384accc5a77661b83c.JPG)
.JPG.8b55b8c29a27111f17b687da47ff0004.JPG)
.JPG.971fe3d325a2e40c2dca42efe3ab645c.JPG)
.JPG.edd55480baaa4a5ba5bddf339e5bebc6.JPG)
.JPG.825ce17528ed1acd9037f962bcf77b36.JPG)
.JPG.bb33736c9c80f63a79f64d14fbd204b0.JPG)
.JPG.5ab83b35d582afd6525b541f63285de9.JPG)
.JPG.5d09c45d666f6b308b8a8dcdb4b35048.JPG)
.JPG.518030760b05eaa1b76548f4412ad469.JPG)
.JPG.f58bac0d9d6539e3eccc87105f84d6ce.JPG)
.JPG.0efdd14676eb170e9c8b700775cc5c7b.JPG)
.JPG.4ef06d9e69301d20242343a2835d7aec.JPG)
.JPG.c53ab09ee1bf0fdc2577f9ce6a1ff721.JPG)
.JPG.64a37e654b48e53236c8e1a31ecff37b.JPG)
.JPG.b4787a2d45aa57fd0dec391b6b700d67.JPG)
.JPG.6d41b2b36d39ba95d152ef695c4ea2b8.JPG)
.JPG.d4879ba52c72e4b6d0619dc08f2aa0b5.JPG)
.JPG.25cadb8171ad6f3ec1dcedd7132c069d.JPG)
.JPG.b65e7ff669d6f0b583738fa7c6b1691b.JPG)
.JPG.2cf88f31d98b576bfa60b2f6dae92737.JPG)
.JPG.c360829e6e1f50f2ba9561fa98ddda78.JPG)
.JPG.5d0bc710ee5362aa398f9418d7c0c6de.JPG)
.JPG.e73825aa24232d0b0408021a79c6a014.JPG)
.JPG.f4804b24b195c4d7ee6fed4fa8507185.JPG)
.JPG.7c31a9b74095a435284e2ea0c6af1c08.JPG)
.JPG.219fc6c99ebda610055a3ba2b58ac1ae.JPG)