


Dan Vadas
-
Posts
3,261 -
Joined
-
Last visited
Content Type
Profiles
Forums
Gallery
Events
Everything posted by Dan Vadas
-
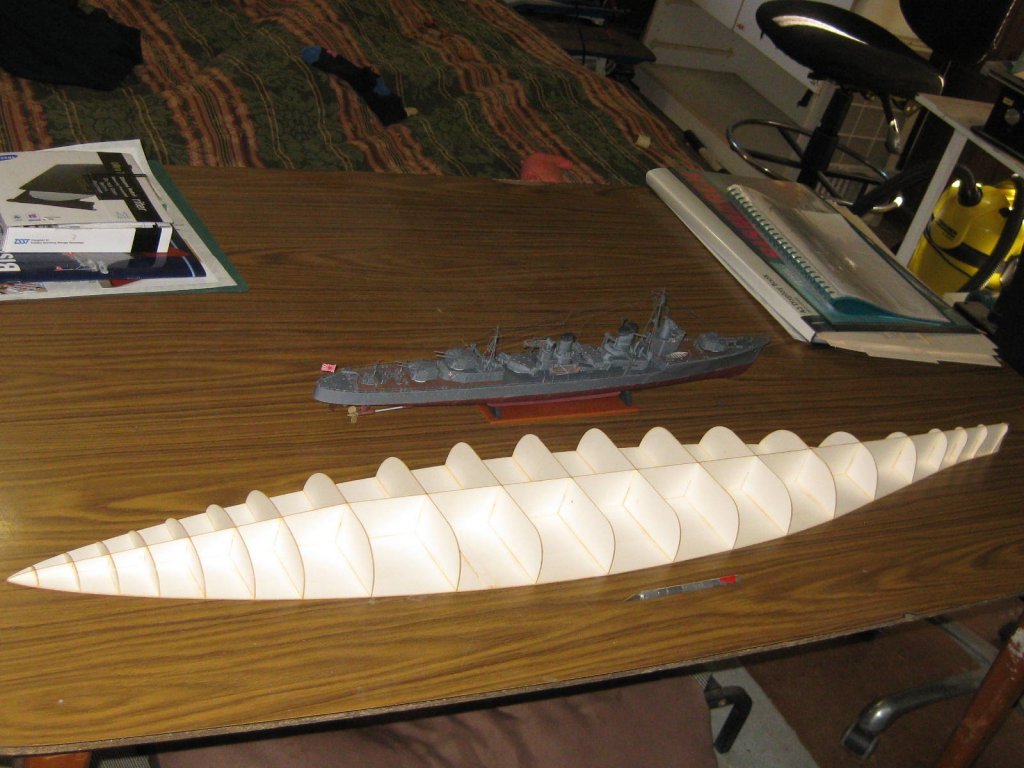
Welcome to the build Grant, Slog, Chris and Popeye . I've made a start to the actual build - wow, she's gonna be BIG . Gotta love those laser-cut frames, they've probably saved a week's work all up. These are only the lower frames, there are just as many or more above the waterline. I bought the table it's sitting on just for this build - my workbench isn't really big enough . And a comparison with Amatsukaze - they are both 1:200 scale : Danny
.thumb.JPG.6ddb9aa905b90c6c70bf87c70f3ce277.JPG)
.thumb.JPG.31c03a43cbb867074b2adbfe81f33b8a.JPG)
.thumb.JPG.a102c63c0082e6d7e7c2d6e7e0d5b170.JPG)
- 524 replies
-
- 18
-

-
David, I must have missed that bit when I built Vulture - no wonder I had a few problems fitting my Fish Davit . Danny
-
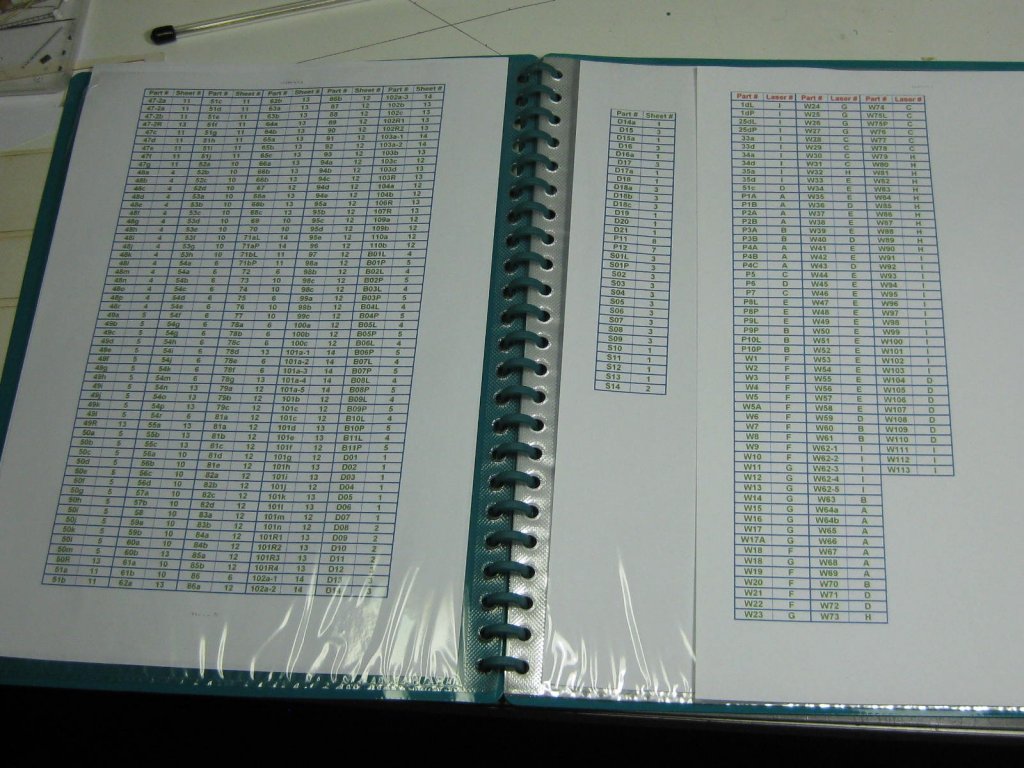
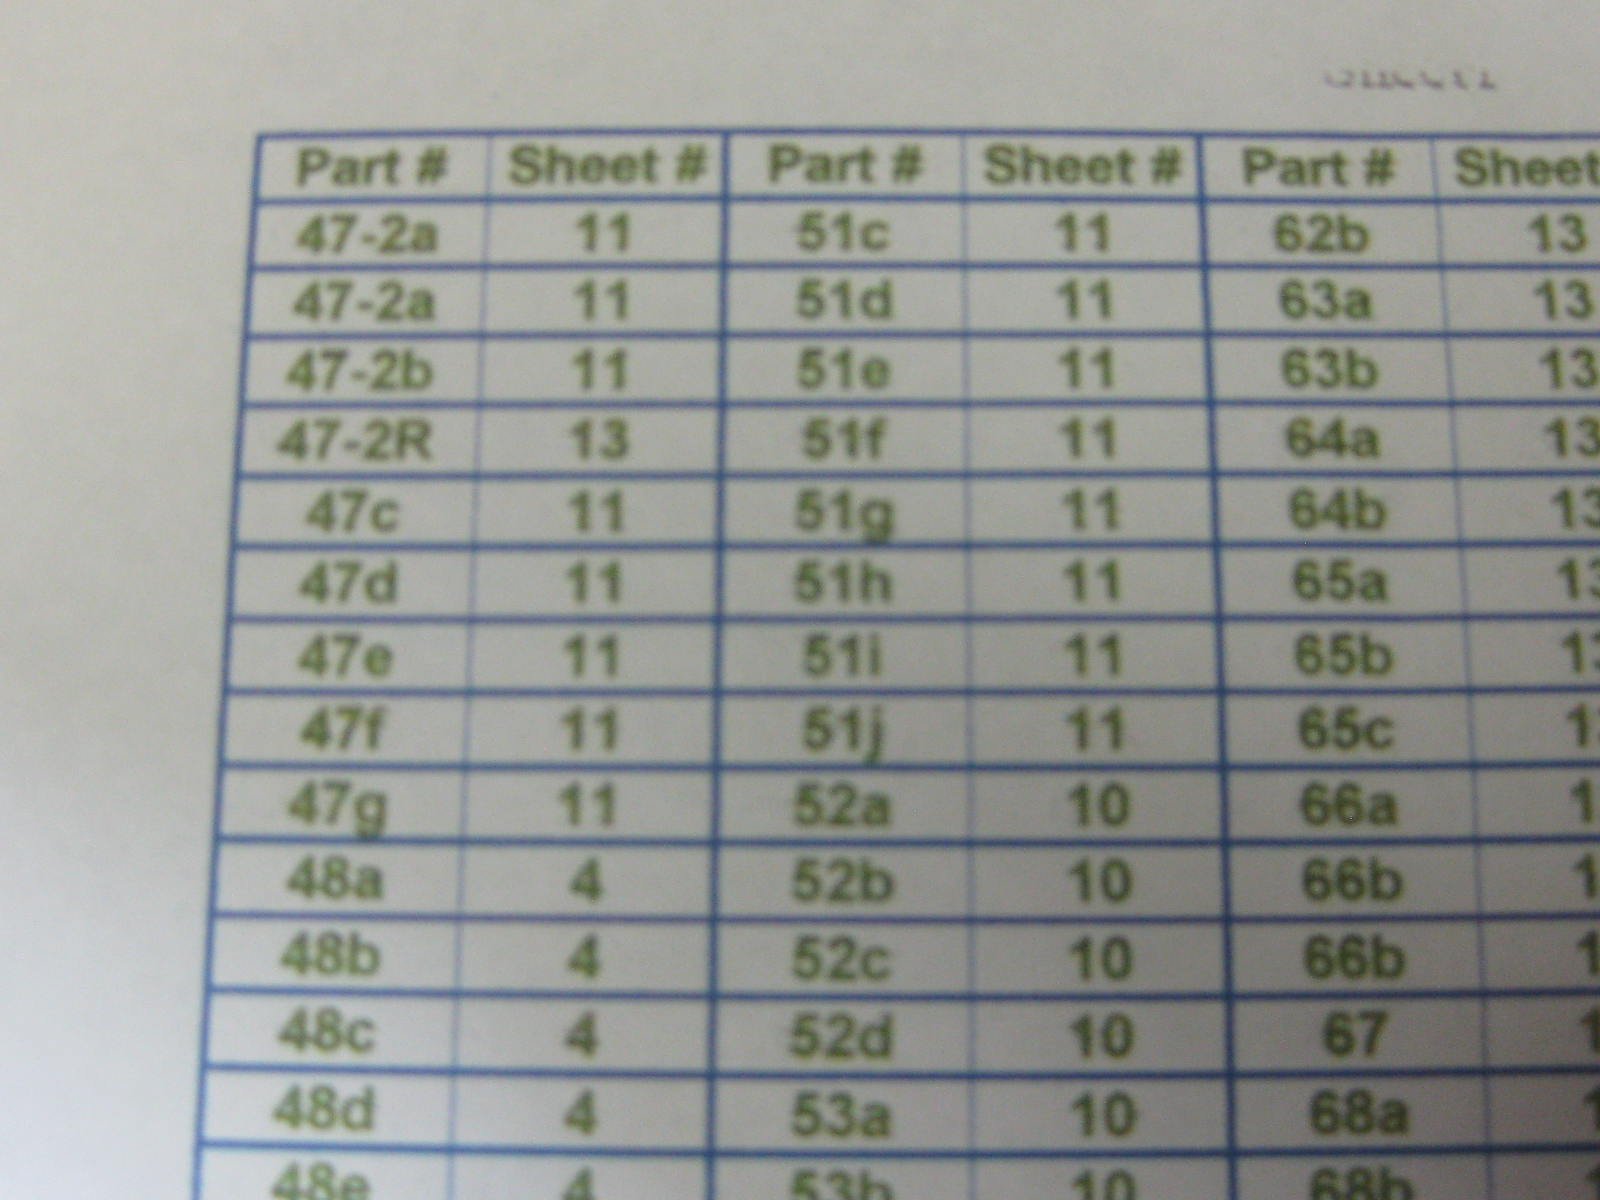
Hi all, I've done some preparations for my latest Card Kit, the famous (infamous? ) German WW2 Battleship "Bismarck". The "Kit" is published by GPM in Poland. My first impressions are that the printing is not quite up to the standard of my IJN Amatsukaze (Halinski), but still quite good. Halinski's models have a more pronounced "weathering" and texturing, widely regarded as one of the best available. The Instructions are once again in Polish, so Google Translate will be getting another workout . As with the Halinski kit there is nothing to indicate on which of the 25 Parts Sheets any of the parts are, so again I've spent a full day filling out a Data-sorted Spreadsheet to enable a quick find of them. This idea worked brilliantly on Amatsukaze, and is well worth the effort : I bought this kit from Pav (maaaslo) - he'd bought it a while ago from GPM but didn't think he'd ever start it. Along with the kit came the Laser Cut frames, a real timesaver . Unfortunately, there was a page missing. No big deal, as one side of the page was merely an Advert for other kits, but all the Instructions were on the reverse side. Luckily, Slog sent me a translation of the missing page, so all's well . I also have all (or at least most of) the extra Laser Cut Detail sets, a big stack of PE for the other details, and the full compliment of turned Gun Barrels. Danny

- 524 replies
-
- 16
-
-
My guess is that the plan is a bit simplified. The "horns" are actually a rebate for the Fish Davit which sits on top of the cleat. Danny
-
Toni, that looks to be the right position for the Fish Davit Cleats (scroll down to the bottom of the post). Danny
-
I was just about to ask the same thing Grant . This is certainly something different, it'll be interesting to see the finished thing . It looks like it will turn into a great build given your attention to detail, no doubt there will be a lot of modifications to the kit. BTW - you'll never get it off the ground . Danny
-
Cliff, I wouldn't paint the barrels - you'd lose too much detail, no matter how little paint you applied. Take another look at THIS post of my barrels after blackening. Danny
-
Thanks for the compliment Svein . That's great Cliff, glad you like them . They don't take a lot of cleaning up, apart from the obvious removal of the casting lug and some very minor flash. I think it took me an hour to do all my barrels. After removing the majority of the lug using a drum sander in my Dremel and filing them with needle files I used a wire brush in my Dremel to give them a "polish", then a bath in white vinegar and another in Acetone, and finally I blackened them using Birchwood Casey Brass Black diluted 1:10 with water for 1 or 2 minutes only. This left them a "bronzey" colour rather than solid black, leaving all the details showing up better. I also drilled the bores a few millimetres into the barrels before blackening. Danny
-
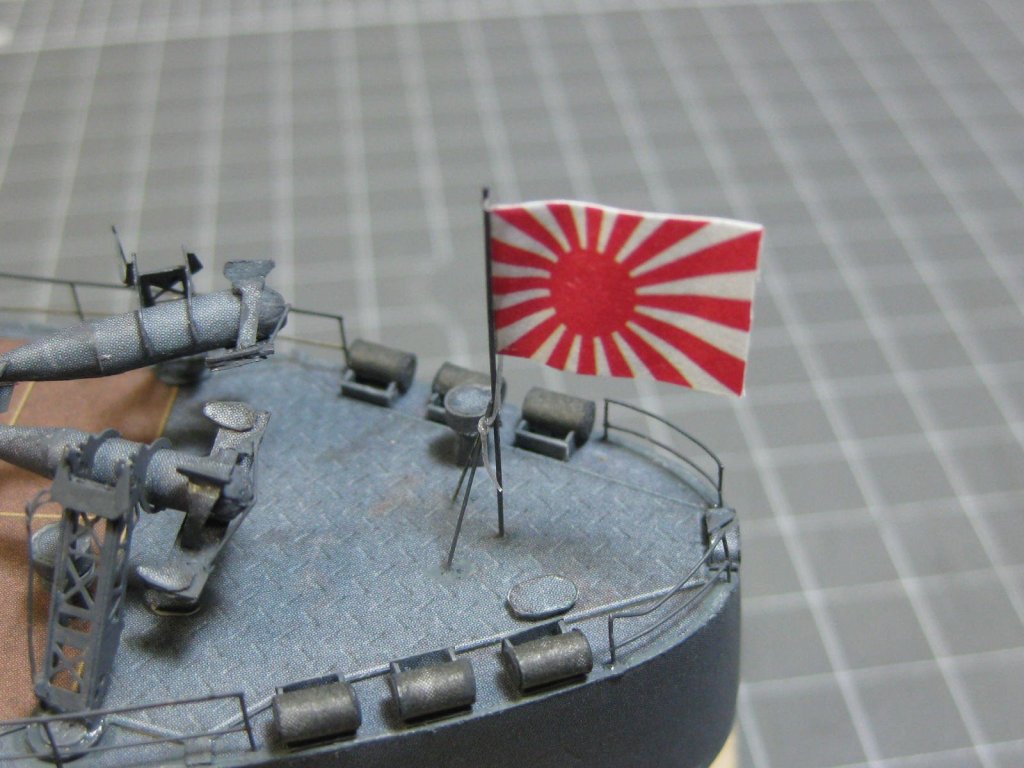
The Rigging is all finished, it only took about 3 hours . The last thing to be fitted is the one I usually try to leave to the end - the Ensign, or whatever the Japanese equivalent is . I just noticed that the railing at the stern is bent, good thing I took this pic or I may have missed it : And here are a couple of pics of the finished ship. I'll be putting more into the Gallery : Total time to build was exactly 3 months, about 6 months less than I was expecting it to take . Next up will be Bismarck, starting tomorrow. Danny
.thumb.JPG.457bfa213bdd4bd038d3f1758ae9d333.JPG)
.thumb.JPG.a41fa26b6814398c4b4e7e5187d00b03.JPG)
.thumb.JPG.acfe030cfb6068445ab0a7312714fb73.JPG)
.thumb.JPG.7cd86381ab435335c19373115f6b745b.JPG)
.thumb.JPG.eefb87b79549546d8b3f30edeb52de4d.JPG)
.thumb.JPG.01197bc51ee3e74e4447ee71a3710ff9.JPG)
.thumb.JPG.b182664eb2ec7ec46ec74c142d6769ea.JPG)
- 295 replies
-
- 19
-
-
- amatsukaze
- halinski
- (and 2 more)
-
Don't forget to Fair the bulkheads (and any extra card you may add), the same as you would for a wooden ship. They look thin enough not to worry about it, but trust me it's absolutely VITAL. Danny
- 64 replies
-
- 2
-
-
- v108
- digital navy
- (and 2 more)
-
No, you're thinking it out well . To my way of thinking there are two ways to modify the hull plating. The first is as you described, trim both skins by 0.3mm to get the join in the middle of the baseplate. This is double work as far as trimming goes and doesn't leave you much to glue the skins to. My preferred method would be to glue strips of 0.5mm or 0.8mm card UNDERNEATH the baseplate level with the edge of it and just trim the lower skins. Not only do you have to trim only the lower skins you get the added advantage of having a bit more surface to glue the skins to. It's not that easy butting two skins over a 0.6mm thick bulkhead or baseplate. I also suggest that you DON'T cut the extra 0.6mm off the lower skins at first. Spot glue each skin to the keel at the fore and aft edges, test the skin to make sure it's going to fit neatly to the upper skin (which you should always fit first) and then mark the cut positions, remove the skin again and trim the necessary amount off. Sometimes you can finish with a slight gap or overlap between the upper and lower skins if the bulkheads are a fraction out of shape. One last thing - there seem to be (at least) two areas where the bulkheads are a fair way apart. I had the same with my kit, so I glued some extra pieces of card longitudinally between them to lessen the chances of accidentally crushing the skins in those areas. Danny
- 64 replies
-
- 2
-
-
- v108
- digital navy
- (and 2 more)
-
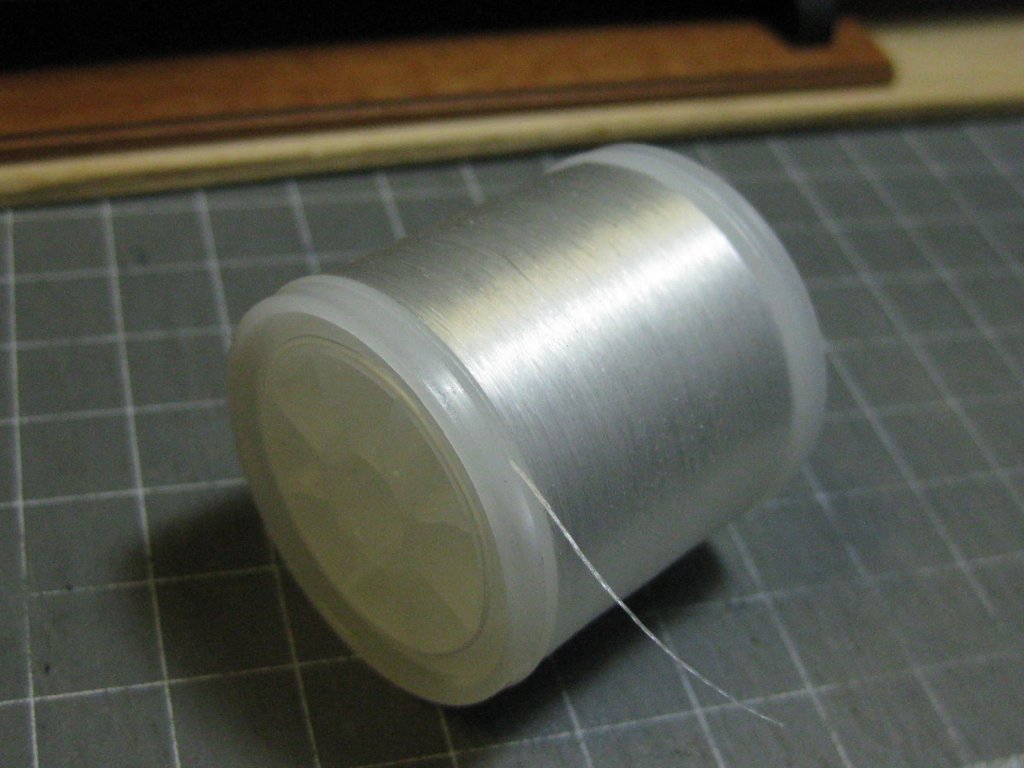
Grey would have been nice - save a lot of painting. It's working OK though . I think GPM only have it in white/translucent, at least that's what they gave me. Doesn't seem to be a colour option on their site. Here's a LINK to another site I just found. The same thread is usually also available from BNA Models for Aussie builders, but out of stock at the moment. Danny
- 295 replies
-
- 3
-
-
- amatsukaze
- halinski
- (and 2 more)
-
I'm not sure Chris. It has nothing on the reel. I bought it from GPM along with all my PE etc. I don't know what the 200mm in the link refers to - I think it was supposed to be 200 METRES. I know there's a LOT of thread on the reel . EDIT - thanks Grant. I was searching for the Link as you posted . Danny
- 295 replies
-
- 4
-
-
- amatsukaze
- halinski
- (and 2 more)
-
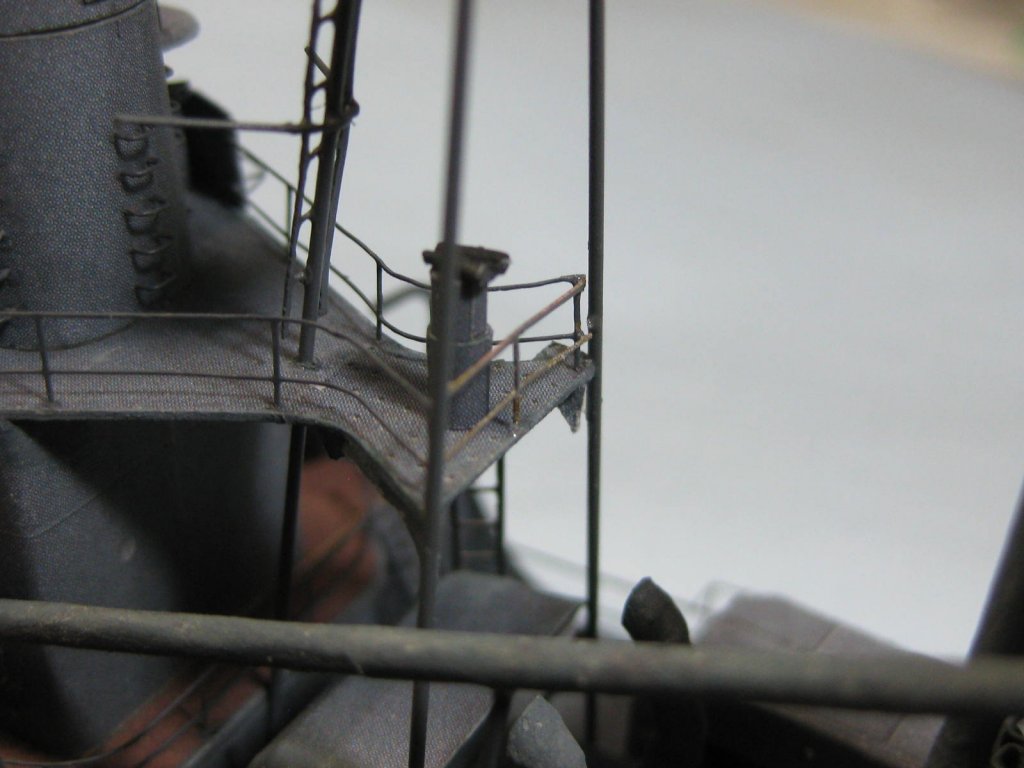
I was about to start the Rigging when I found that I'd missed fitting a Railing - and it HAD to be in the worst possible place, the aft end of the bridge platform . It took me about half an hour to fit, but it turned out better than some of the easy ones (still unpainted when I took the pic) : The Rigging Thread I'm using is a fairly thin Elastic one. I wouldn't use this on a wooden model (unless it was in a small scale one) as it has no definition at all. Initial testing came up with some observations : 1. It's extremely strong and flexible. I stretched out a test piece to see how far it would go before breaking - it went to 4x it's relaxed length and still didn't break, so I still don't really know, but that's a lot further than I'll ever have to stretch it. The further you stretch it, the thinner it gets. 2. CA glue is the preferred one - I used a simple overhand knot and a tiny dab of CA. It held without a problem even under 2x tension. 3. Excess line can be cut easily with a PE Side-cutter or sharp scalpel. 4. It's paintable with Acrylic (at the least - that's all I tried) and it won't flake off. 5. It's reasonably easy to manipulate and manoeuvre into a knot, even with tweezers. 6. As it's stretchy it doesn't sag - the main reason I'm using it. 7. All in all I'm quite pleased with it : Danny
.thumb.JPG.897b6a9cf045ea1cad3a2f986da61c9b.JPG)
.thumb.JPG.9ae48686b6addef042308f4984b80576.JPG)
- 295 replies
-
- 13
-
-
- amatsukaze
- halinski
- (and 2 more)
-
Not really Popeye. I drilled two shallow holes for the short bracing wires at the rear of the davit legs (their positions were marked on the deck), inserted one wire and CA glued it on, inserted the other wire brace and CA glued it as well, then glued down the card davit legs. As far as "flimsy" goes, the (double thickness) card davits were given a coat of CA along the edges after cutting them out. This wicked a fair way into the legs. They were probably stronger than wood . I surprised myself too Pav . Tomorrow will be exactly 3 months since I wrote my first post on this model . The only time I didn't do much on the model was a couple of weeks ago when I was bed-ridden with the 'flu for a few days. Danny
- 295 replies
-
- 5
-
-
- amatsukaze
- halinski
- (and 2 more)
-
The last pieces - the Entry Steps : And some overall pics. Only the Rigging left to do : Danny
.thumb.JPG.68adc2ce7de49584f263f3ef799dfcfa.JPG)
.thumb.JPG.8d53edd40ee0e13c94f76ea9028bfc0e.JPG)
.thumb.JPG.7cad4b4c3b176380f4def1a0e13c3e61.JPG)
- 295 replies
-
- 15
-
-
- amatsukaze
- halinski
- (and 2 more)
-
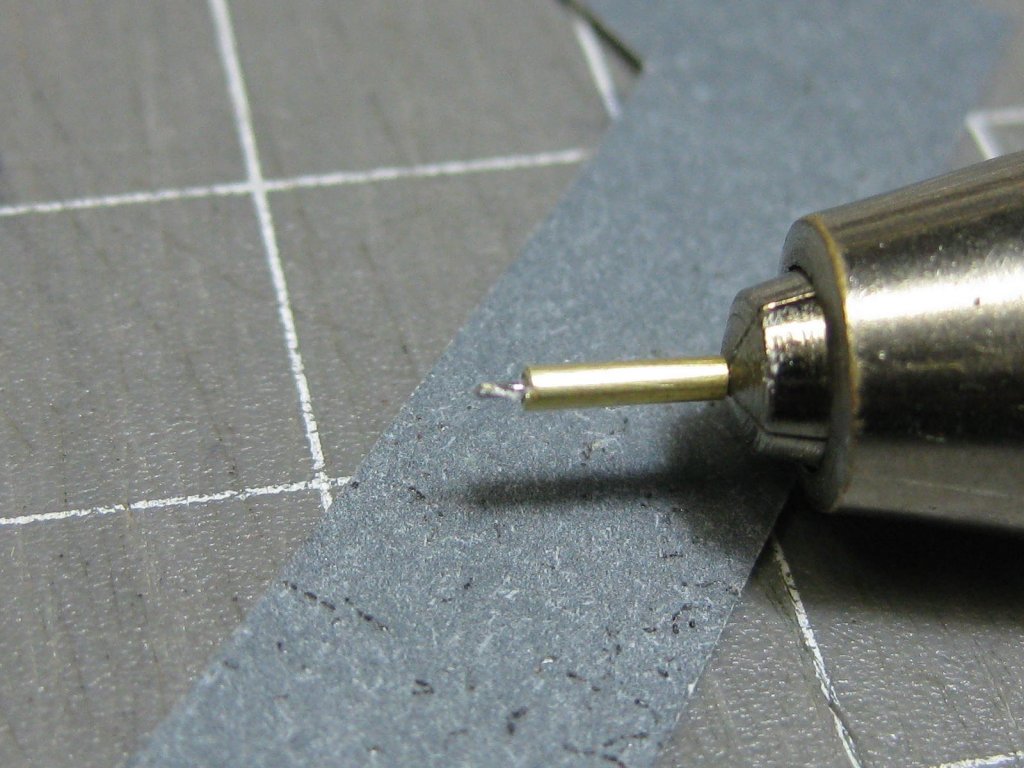
Thank you for the kind comments Carl, Popeye, Nick and Pat. Always appreciated . All the Railings are now fitted. They turned out quite well despite being very fragile, and I'm very happy with the way they turned out . There was a slight problem on the Foredeck where the deck has a dip in the middle (it's supposed to be like that). Trying to fit a 2-rail railing in the dip is impossible without cutting one of the rails as it wants to bend in or out. Sort of like trying to bend a piece of planking sideways : The top rail cut and CA glued back together : A tip for drilling holes for railings. I CA glued a 0.3mm drill bit into a piece of 0.3mm ID tubing, and then glued that inside some 0.6mm ID (0.8mm OD) tubing. I left about 1mm of the drill bit protruding. This has two advantages. First, it strengthens the small bit enormously - I drilled about 150 holes and DIDN'T BREAK ONE . Second, you can only drill to the depth of the protruding bit, so there is no sudden downward movement of the drill if you drill right through a deck - another major cause of drill breakage, and also possible damage to surrounding parts : Mounting the Motor Launches to their davits proved problematic, as they wanted to fly all over the workbench (and floor) at the slightest touch. To fix this I spent some time making a jig. This also helped a lot in getting the boats to sit at the right height and level : Rather than just using a piece of wire for the "tackle" I made up some doubled "line" and "blocks" from 0.2mm wire and 0.4mm ID tubing : One of the launches in the jig, almost ready to fit to the ship : And both launches fitted : Danny
.thumb.JPG.69e4068400de3aab236a14ddc511f49c.JPG)
.thumb.JPG.5d0be3772be18f7310bfbeb668d630ee.JPG)
.thumb.JPG.008d7353ccac9c1d957a8464ef071f01.JPG)
.thumb.JPG.c918d74c95789bd7d7276e365e2c38e7.JPG)
.thumb.JPG.6e5eb1eb1d837e570b46fdeaa5917fd5.JPG)
.thumb.JPG.4852b27ad380247c54643380f2d91c97.JPG)
.thumb.JPG.2effcf98b5a3ce6f028bd71fab134396.JPG)
.thumb.JPG.38643795d0339d6d8498e7fbf2b3e11b.JPG)
- 295 replies
-
- 17
-
-
- amatsukaze
- halinski
- (and 2 more)
-
Regarding Guns, a major problem with a lot of Kits (some are worse than others) is that they have a "one size fits all" policy, regardless of whether they are 4 Pounders or 24 Pounders and sometimes even the wrong scale altogether. Don't worry, I did the same thing on my first ship . Making it from individual pieces isn't all that difficult, and if you run the grain in different directions using "real" shipbuilding practices the effect is a lot more realistic and looks a lot better. It's worth the effort. Shape and glue the whole Knee of the Head together on the workbench, and glue it to the keel when it's finished. Or see THIS LINK for how I constructed Vulture's Knee. As far as the Gammoning Slots are concerned the easiest way is to drill a hole at each end and remove the middle with an Xacto knife or Xacto chisel. Danny
-
Hi Rich, Reading through the first page of this log I found a post where you were asking how to put this log into your Signature. I've cleaned your Signature up a bit - the ship's name is now also the Link. I also removed the link to HMS Surprise as the log no longer exists. Danny
- 1,135 replies
-
- 1
-
-
- model shipways
- syren
- (and 2 more)
-
Miniature Steam Models in Melbourne are the Australian agent for Caldercraft. I don't know how their prices compare with buying directly from overseas. Danny
-
G'day Snow. It would help if you told us where in the world you are, and also which ship/s you have in mind. You can add your Country and other details to your Profile (click on your Username at the top of the page to open the Profile Editor). Danny
-
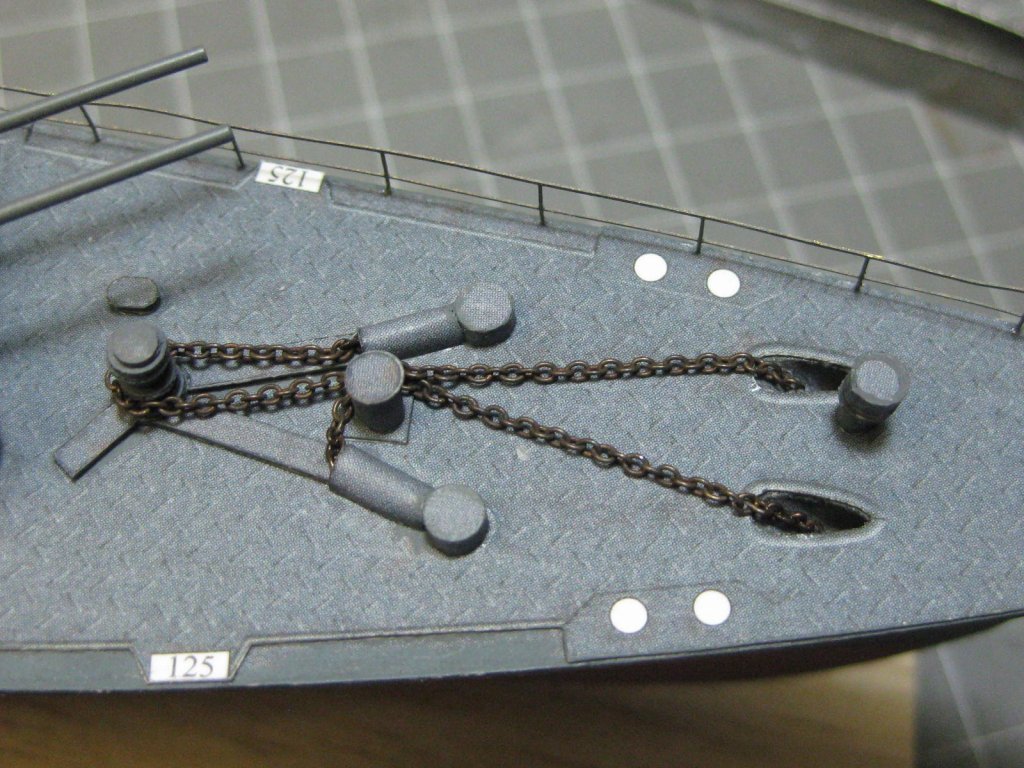
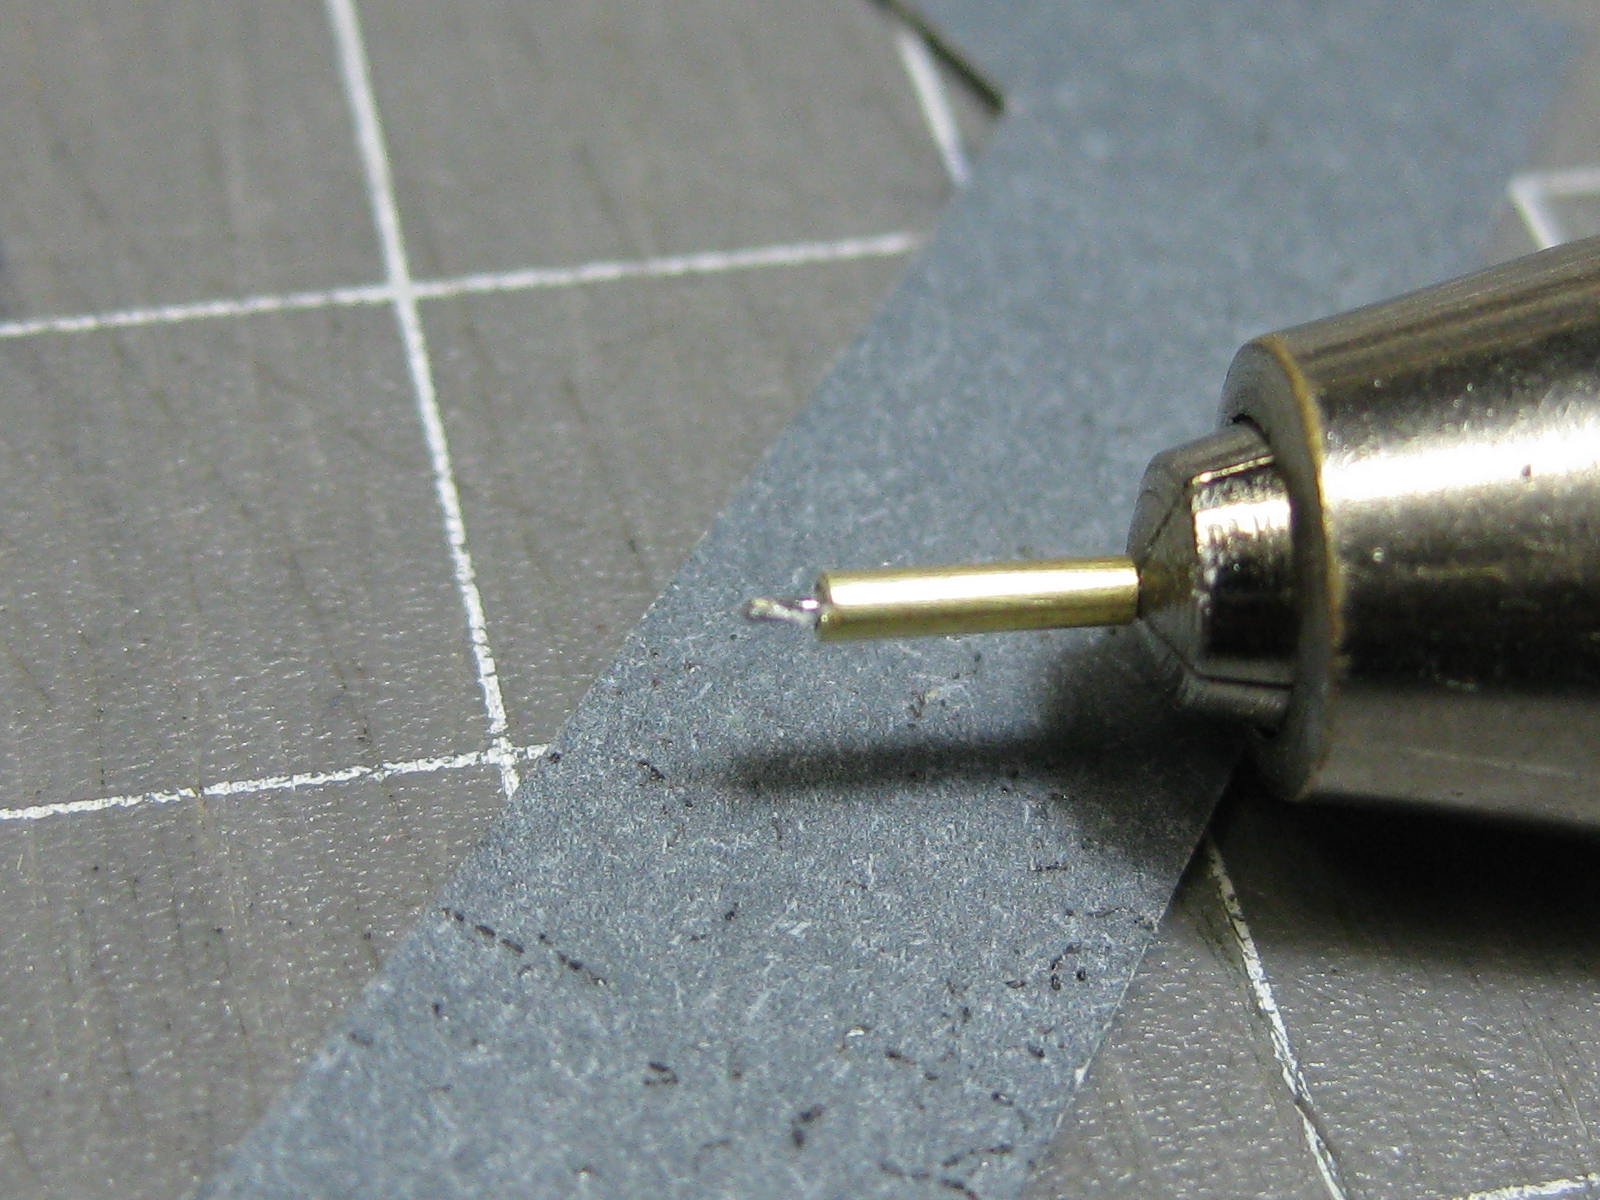
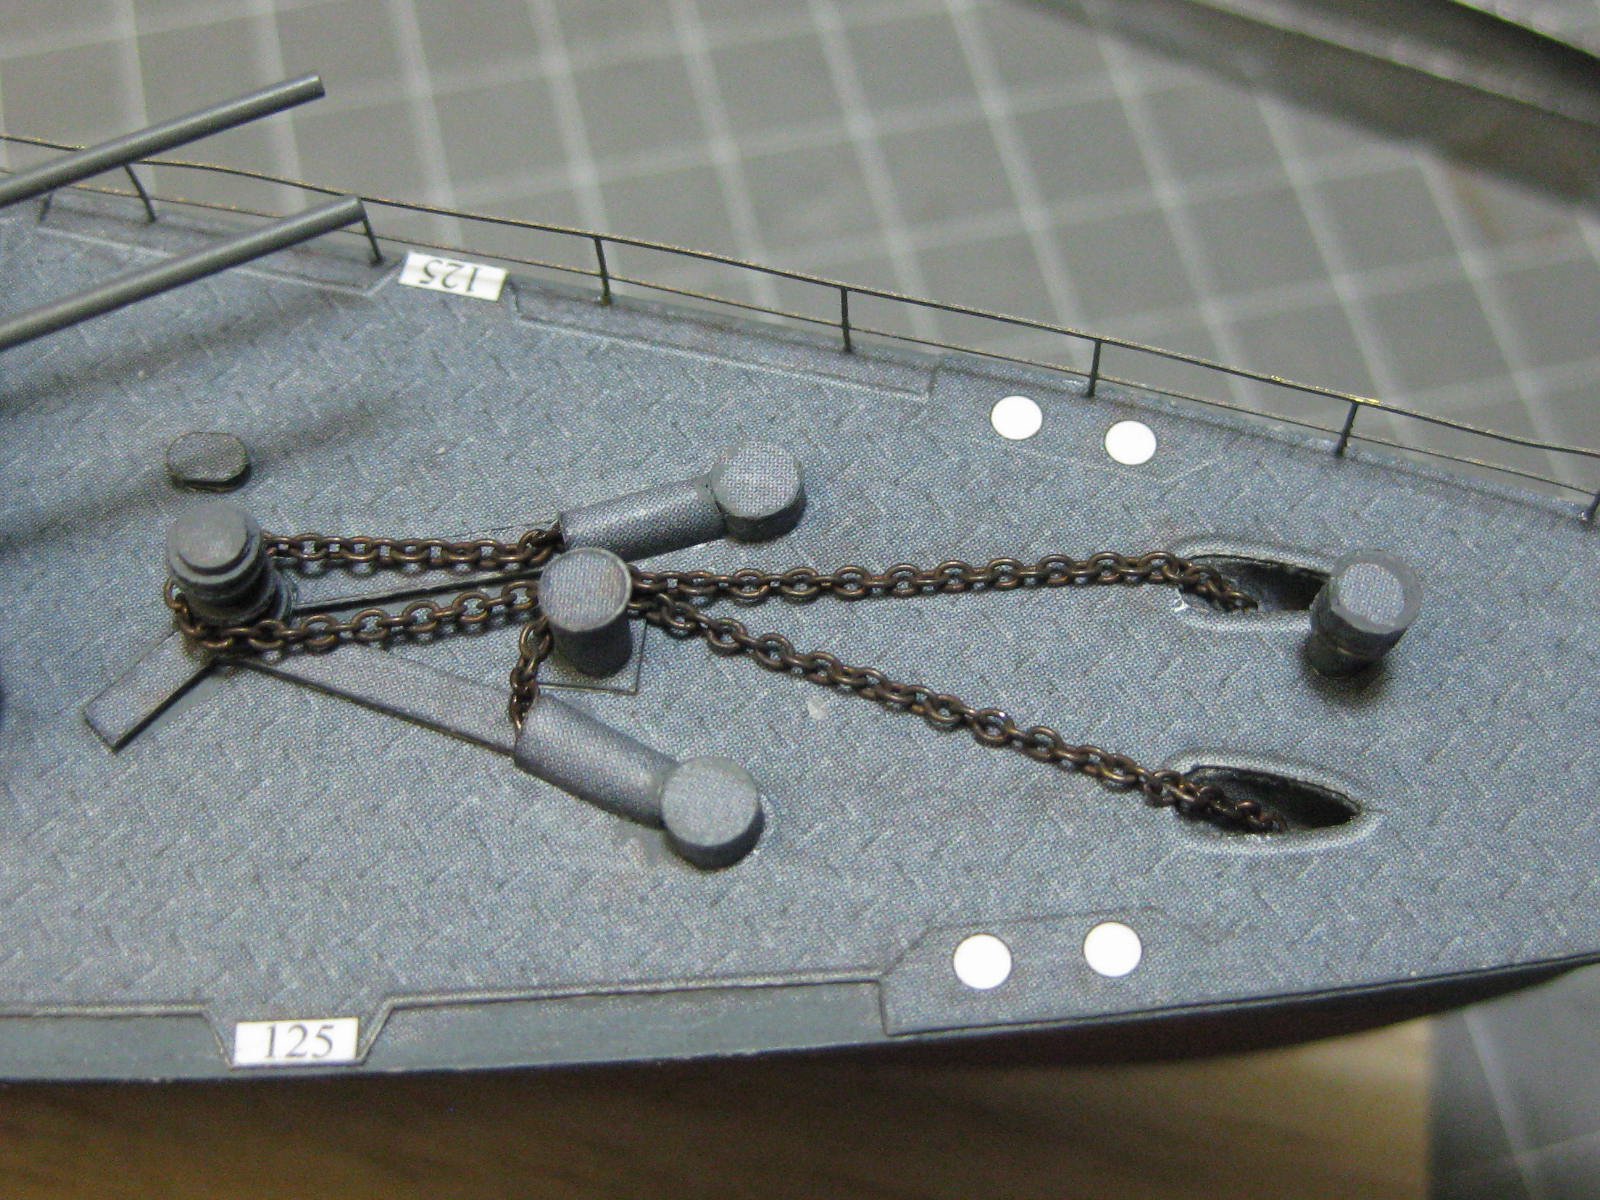
Thank you CDW. You'll find the Hole Punches to be very useful. I've got both the small ones and the large ones, and use them both a lot. There are 16 Bollards to be made. The tubes are solid rolled, these took me nearly an hour to make - quite an improvement on the first few I tried . Here's a few pics of how I handled these very small parts - note the double-sided tape and the moistened Q-tip I used to pick up the tiny tops and bottoms (the Hole Punches were a great help here) : There are two more Paravanes near the stern. I used a rounded dowel to help with gluing the ends : The paravane Cranes were part of the PE set I bought earlier : There are six Depth Charges held in housings in the stern. The ends of the housings were the smallest parts in the whole ship : Finally for now I fitted the Anchor Chains. There was no indication in the instructions about the size of the chain, but by counting the links in one of the pictures I came up with 27 links per inch : Danny
.thumb.JPG.513bc71ce2342db1260ad22e6f723251.JPG)
.thumb.JPG.8514952928da7b2995685f3c68c55fa8.JPG)
.thumb.JPG.ea4c9c7c6ac9087ec432c2f48fbdf49d.JPG)
.thumb.JPG.8ce4251126fdee8c33b44f63e482b26f.JPG)
.thumb.JPG.4ef4b8902c6d302a6e7adbb0015efd48.JPG)
.thumb.JPG.1dc31fb7cc8be52e7e25c681c381b109.JPG)
.thumb.JPG.728f4e28baf178e6608a30fb5c028929.JPG)
.thumb.JPG.7e3b9dd599f517aff9f931498b51224e.JPG)
.thumb.JPG.820a5789858aae218dde8332eb9cbc83.JPG)
.thumb.JPG.ecf05300bd39fdb736157c205dad3b92.JPG)
.thumb.JPG.d32851780e44cbc9c174a9c7be6e7eb2.JPG)
- 295 replies
-
- 18
-
-
- amatsukaze
- halinski
- (and 2 more)
-
Hello from Perth, Western Australia
Dan Vadas replied to Peter Bloemendaal's topic in New member Introductions
Actually Peter, there's another way of looking at so-called Beginners and Advanced Kits, and some of it depends on the manufacturers "Rating". AL Kits are more difficult to do than, say Caldercraft or Amati (among others) if you're looking for Realism and/or Authenticity. To get a typical AL kit (especially the later kits that are Made in Asia) to an acceptable level of authenticity requires a LOT of Scratch-building to replace the rubbish parts and instructions supplied in the kit, whereas the better quality kits require very little. Read THIS TOPIC. Even the best builders make mistakes, it's all part of the hobby so you'll be in good company . Danny -
Hello from Perth, Western Australia
Dan Vadas replied to Peter Bloemendaal's topic in New member Introductions
G'day Peter, and another welcome from the east coast. You'll probably find the Syren easier than the Artesania Kits you've been doing so far - I made the Supply about 10 years ago, and the kit was so bad I ended up Scratch-building most of it. It came out pretty well in the end, she now resides in the Pier Museum on Norfolk Island . A blessing in disguise, I've never gone back to Kits until I started my first Card model (I'm hooked on them now ). Good luck with Syren. Model Shipways Kits are generally pretty good. Danny -
Only another 1,744 to go Slog . Seriously good looking though, much better than the generic PE railings. I'm a bit lucky with Amatsukaze in that the stanchions, while not fitting exactly to the marked positions, are pretty close. Marking them for drilling is a pain though . Pity they didn't have the tab on the stanchions on the BOTTOM instead of the top - it would have made cutting them out of the tree a lot easier . I'd say the other guy's stanchions may have come from HERE. They have centred rails. BTW - have you seen these 3D Photo Etch Railings? Probably still have the problem with alignment though. Danny
- 244 replies
-
- 4
-
-
- borodino
- dom bumagi
- (and 1 more)
.JPG.7f13132cca3a7c74e108fd36f05e4263.JPG)
.JPG.0ca648e9329e512906dfce3d0e0c6b30.JPG)
.JPG.7352447a5debd71c0738ad8a23e8abbd.JPG)


.JPG.128ddd453b13506e9f3dff86c792549e.JPG)
.JPG.1c4c4f94bf8138788b72a2be6642cb5d.JPG)
.JPG.9cdc72ea95e174675895b3957268a436.JPG)
.JPG.a7f0c80b343b2a58a0c7204f66ff3242.JPG)

.JPG.a1e51e681301a6b5ee3ac0c8cb45b791.JPG)
.JPG.f5b6028241f1350d446a5e8cd8882f75.JPG)
.JPG.ec5f82fcac0593b7e55cdf3f776c8aaa.JPG)

.JPG.986530eb14280d451602d992fc903aed.JPG)
.JPG.d290f7d11d39c150d3baede72e8933ac.JPG)

.JPG.4e8e556d44f4ba6624d6ba111bf40196.JPG)
.JPG.a8d3bbd83ca873a9dc038212bff4d291.JPG)
.JPG.712a7778fadcef36e7741089f320e3b8.JPG)
.JPG.bc470b2fb8f236fe9d5c9a3ec469a763.JPG)
.JPG.7aecafa33e2cb2125c4781c757b24ee9.JPG)
.JPG.ec4b56e56531238663aeefb6d4b2fb60.JPG)
.JPG.4937f5d532fc808d10389ba3a5868544.JPG)
.JPG.b1473afe17e57509d70e721b0338154a.JPG)
.JPG.d5140b4be1a1fdfc7edbc3387f70516d.JPG)
.JPG.33f4e3d883e8b0f6e5387a3cf6d685ef.JPG)
.JPG.adf21102af103b3d8c9ed7c5ea9bbc10.JPG)
.JPG.597492f5a0564c238ef39a06d3155965.JPG)
.JPG.48e907948740a42e9733a8afa3bff3b6.JPG)
.JPG.adb9f44d48e2c651958bb1f015b7a7f2.JPG)
.JPG.d9244e8deb52deb7db0775ee35dd5997.JPG)
.JPG.5d9c6c4ed971b512973411bed9cea954.JPG)
.JPG.cb09b4e4cccd4c5299eb77b883b67cdb.JPG)
.JPG.1368b3f0b436d724563e3db82a6f41e3.JPG)
.JPG.3cc4de2f582f7d1c94e2475a32de83ce.JPG)
.JPG.cd48a0b85f8df4acfac9e77f947ed03f.JPG)
.JPG.28befc17a54f35e955557f5e81460015.JPG)
.JPG.c0a05a0ccc92c617bdef07315aba48ae.JPG)