
HOLIDAY DONATION DRIVE - SUPPORT MSW - DO YOUR PART TO KEEP THIS GREAT FORUM GOING! (Only 13 donations so far - C'mon guys!)
×


Dan Vadas
-
Posts
3,261 -
Joined
-
Last visited
Content Type
Profiles
Forums
Gallery
Events
Everything posted by Dan Vadas
-
Because, unlike most Kits, this is the way it really was done. Kits are fairly limited in how they present details like this. It would mean they have to add wider stock which can be cut into curved planks, thereby sending up the cost. The dollar rules I'm afraid . Danny
-
Thanks Pat. They're not really mods - I've built the guns the way the instructions show. Here are the finished guns before painting : And after painting : Danny
.thumb.JPG.afeb1229009d99cf879b7fd31be9de29.JPG)
.thumb.JPG.fa0e5748726ae2dabffa4810eb10bcdf.JPG)
.thumb.JPG.4200be59d9450fb87c3a15ad593ae4cd.JPG)
.thumb.JPG.e813f7ea839119a0571f778d4a193a91.JPG)
.thumb.JPG.5b4ebb2f013b504bfa85c83af9127a9b.JPG)
.thumb.JPG.ff912cf59e08130ba268b51e552ee314.JPG)
- 295 replies
-
- 23
-

-
- amatsukaze
- halinski
- (and 2 more)
-
Thanks guys . The Platform for the Anti-aircraft guns. Two tubes, two cones and seven gussets : The start of the 25mm AA Guns. There are only two of these. Each has 24 parts, a combination of paper and wire : The Gun Mechanisms are folded tubes 4mm long x 0.6mm x 1.0mm : The two Handwheels. The printed ones didn't look like much, the detail on them didn't jump out, so I scratchbuilt a couple. I used two small sections of PE handrail with a paper rim. To make the rim I first punched out the centre, CA'd the spokes in, and then cut the outside of the 1.5mm rim : The gun barrels are made from 0.3mm Ni-Ag tubing. The recoil springs are soft 0.2mm wire : Danny
.thumb.JPG.9897a6180aa4cf640996e2b0091b0f86.JPG)
.thumb.JPG.4a4d69c138793707f0eb4a4b338c6110.JPG)
.thumb.JPG.366a2b9b9d9b6a22c1e98d23a9120aea.JPG)
.thumb.JPG.ff57ff7ecac66bb5d0b3f50460ed891b.JPG)
.thumb.JPG.5ec5166fb9f1721ea55b1ed3df881f6b.JPG)
.thumb.JPG.c2e261570f61c59ca0a708ee9d00dce6.JPG)
.thumb.JPG.63d9808e64b3560340898cbc3ebacf79.JPG)
.thumb.JPG.bc1d3a7a6d91f21be2392b3b4bb0f0cd.JPG)
- 295 replies
-
- 14
-
-
- amatsukaze
- halinski
- (and 2 more)
-
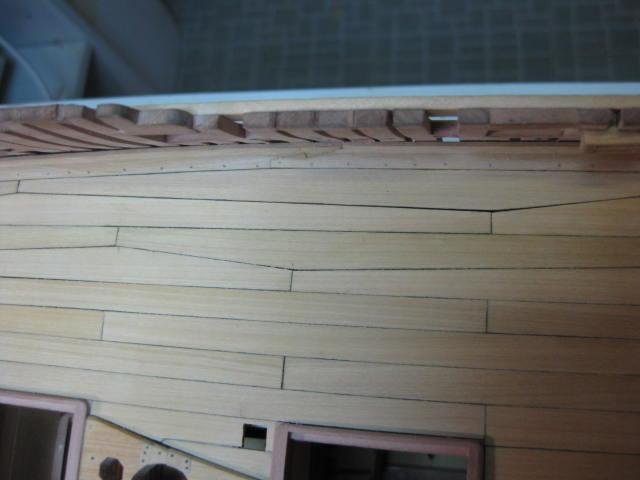
Nice work Jeff, but a few tips on deck planking if I may. Deck planks always have their butt joins on a Deck Beam. In the "real thing" these are usually spaced about 3 to 4 feet apart, with a couple of narrower Carlings between them. Check the pics in THIS LINK. The "Beams" in most kits are usually much further apart than in "real life" as they are only meant as supports for ply decks, not to simulate reality. Full planks range in length from about 20 feet to 30 feet, depending on what was available. Planks usually were laid in full lengths between hatches, unless they were more than 30 feet apart. Short lengths less than about 6 to 8 feet were avoided if a full plank would fit. That's just something to keep in mind for future work - I wouldn't start over again on this deck for such a minor detail . Danny
-
The Funnel Guards fitted. I made an error initially - I had the wrong one on the aft funnel and had to cut it off and replace it. You can see the mistake on the two arms at 10:00 and 2:00 on the rear part of the forward funnel, they should go to the edge of the funnel but I'd cut them too short. Oh well ..... Once they were painted the mistake wasn't so obvious : The aft funnel has been glued to the superstructure. There are four small boxes surrounding the funnel - there should be one more 1/2 the size of the smaller ones, but after spending 20 minutes making it I breathed a little heavily and ..... no doubt I'll find it one day years from now, unless my dog has eaten it . NOTE - The large pipe with the "rabbit-ear" cowl should NOT be fitted yet, despite what it shows in the instructions. I followed instructions and had to remove it again later . The AA gun platform has to go on first, and the bottom of the pipe sits on that (see post in next page). The horrors of Macro Photography : I've also finished all the pipes and supporting rods on the forward funnel. The two pipes are 0.3mm nickel-silver tubes, the rods are 0.2mm wire : An overall view of the main superstructure to this point. A couple of coats of Testor's Dullcote are yet to be applied : Danny
.thumb.JPG.78a04ff304a0c1245fc0ac96744aa615.JPG)
.thumb.JPG.6f7805a0f591a1ea6efcfe2ee0ea5971.JPG)
.thumb.JPG.58741f0d19e27c9fabe2695829a0e775.JPG)
.thumb.JPG.38bb335b3c7b90854a252a9fae5907ac.JPG)
.thumb.JPG.9cd2720394ce84df59f086d97df3f270.JPG)
.thumb.JPG.363e4ae84510602db12f97a7a2a66e46.JPG)
.thumb.JPG.e68d6606dc78118f356c39060a991ec2.JPG)
.thumb.JPG.a30ff754f43d1e3f6e96320dc2f674ce.JPG)
.thumb.JPG.499834bfc3322e09b77b1c6474d33c70.JPG)
- 295 replies
-
- 16
-
-
- amatsukaze
- halinski
- (and 2 more)
-
Hello i'm new here and to ship building
Dan Vadas replied to Derek C's topic in New member Introductions
Hi Derek, Welcome to MSW. Take a look at this BUILD LOG - it's Chuck Passarao's Prototype of the Kit you are building. You'll find a lot of useful information and pictures in there. Danny -
Thank you Popeye, and thanks for the explanations Pat. I'm getting better at fitting these rails - this is the Aft Funnel all done. Maybe I should zoom out a bit - they look MUCH better in real life . They will of course look better again when I paint them. But first I have to fit the Guards on their tops. Danny
.thumb.JPG.981c6dbaa90f5ab8572a06acb1ae4f8d.JPG)
.thumb.JPG.6d2d20939877eb39c57674970f650772.JPG)
.thumb.JPG.828c2a05c2727223273edff7d2eacc74.JPG)
- 295 replies
-
- 12
-
-
- amatsukaze
- halinski
- (and 2 more)
-
Personally I don't like the stuff much, but you could use a CA Kicker to make it go off immediately. Dampening the area before applying it also works, but you may get some whitening on the CA. Danny
-
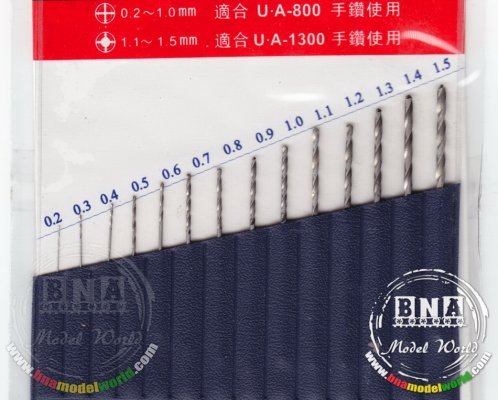
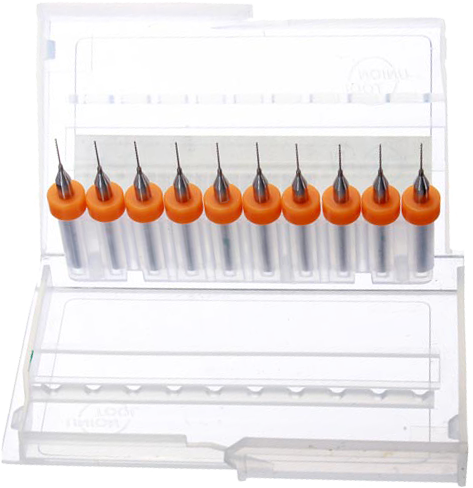
Greg, I just bought a set of these from BNA. The smallest as you can see is 0.2mm. Cheap enough ($11.95), and they drill really well (in Paper ). Haven't tried them on anything else yet. Carbide drills are notoriously fragile . I don't know how THESE 3D Printer Nozzle Cleaning Drills would go, but at under $3.00 per drill aren't bad value for that size. Damn sight cheaper than THESE ONES though . EDIT - Hold the fort - just found THESE on Ebay. Carbide, but a whole lot cheaper than the ones you've been buying (and FREE shipping). I'm going to get a couple of sets of the smaller sizes, I'll let you know if they're any good when I get them. Danny
-
Swan class 3D model in progress
Dan Vadas replied to dvm27's topic in CAD and 3D Modelling/Drafting Plans with Software
How good is that !!!! A pity it wasn't available 5 years ago before I started Vulture, I may have made a few less mistakes . BTW - I'd like to see anyone cut the rebates in the bottom of the Keelson that neatly .... AND get them to fit . Danny- 141 replies
-
- 6
-
-
- pof swan series
- swan
- (and 1 more)
-
I think you meant 0.1mm. I rather doubt anyone we know would make a one HUNDREDTH of a millimetre drill bit . Ah yes, I forgot about the PLASTIC bit. Even using a Pinvise the drill bit would clog. PE won't stick a 0.1mm point to paper either, which is why I drill mine (using a 0.2mm drill bit). Danny
-
Nice work Greg. A question regarding the handrails - is the bottom rail supposed to be there, or should it be cut off and holes drilled for the stanchions? It would certainly be easier to do it as you have. Danny
-
Thanks John. I've fitted the rails around the main funnel (anyone know what they are really called, and what they do?) These were a bit of a pain to fit, but they got a bit easier as I gained some experience. The holes for their legs are a tiny 0.2mm, so you can imagine how fragile these things are . A lesson learned here - never assume that the legs of the PE rails will fit the marked positions of the kit pieces, even if the same manufacturer makes both (I used PE from Tom's Model Works). They DON'T, especially on a round piece. I'll have about 50 little holes to re-fill . Danny
.thumb.JPG.c20d29d80739e4e5857927cc700df23e.JPG)
.thumb.JPG.3937f4dac2ba2eadfbeb65a2ad410c98.JPG)
.thumb.JPG.c692213c8133502596e30c743a7b8e1d.JPG)
- 295 replies
-
- 15
-
-
- amatsukaze
- halinski
- (and 2 more)
-
Just think how demoralising it would have been after you'd almost finished the model and THEN decided you didn't like it. Much better to bite the bullet and fix it before going too much further . The new planking looks a LOT better. Keep up the good work (and good attitude ). Danny
-
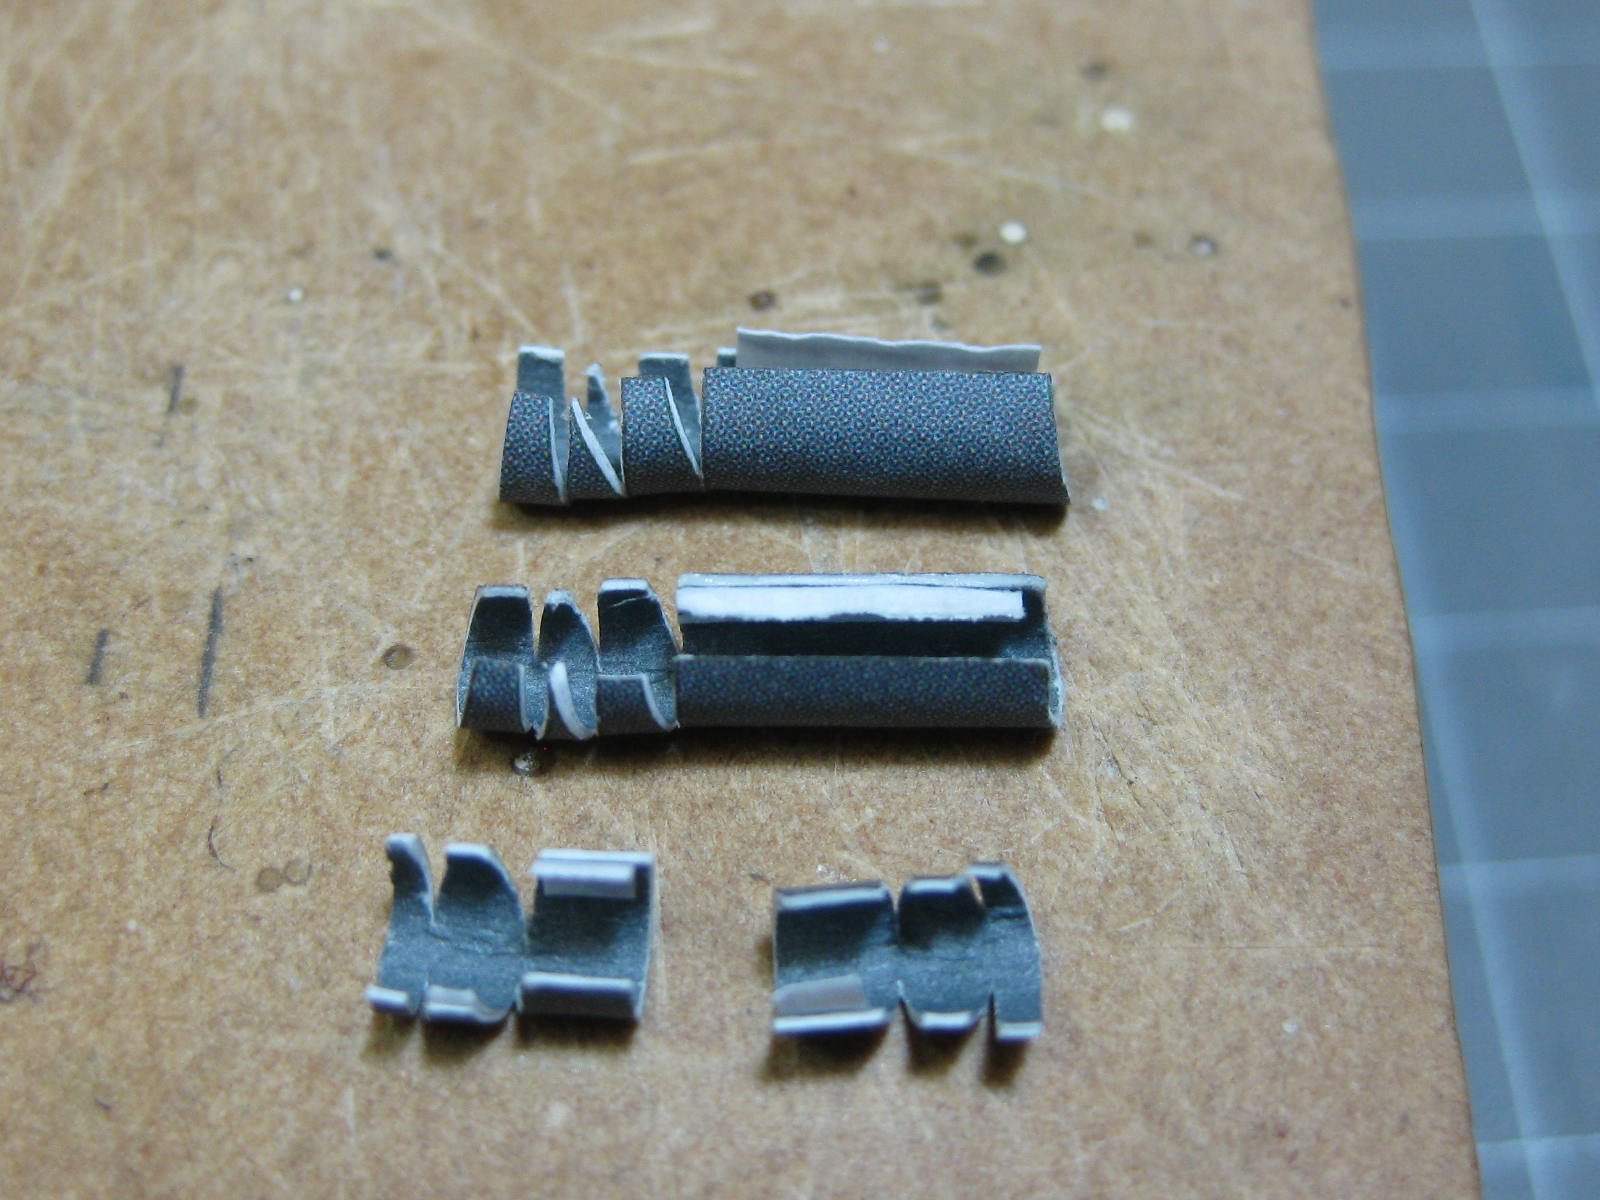
Thanks John and Carl. A lot of work has been done lately, even though I haven't posted an update in nearly a week. It might be time I did . I've made the Funnel Bases. These took some tricky rolling. I've filled and painted them, not much filler was needed . The paintwork comes up much better when the Testors Dullcote is applied later : I've also finished all the Pipework associated with the funnels. I'm quite happy with my improvement in this area : The Main Vent has been filled and painted : Last, I've made a Jig to bend the Step Irons for the funnels. There are about 50 or 60 of these to make for the model, and no doubt hundreds for Bismarck later on, so it was worth the effort. The irons are made from 0.2mm wire and are only 1.6mm wide. To see how the jig works follow THIS LINK : Danny
.thumb.JPG.dc6c87ff01575bc0326894c1401962ec.JPG)
.thumb.JPG.3001efb64d73f516a821b0f6f6c36ab0.JPG)
.thumb.JPG.36f036c6b0ab9f788f62d0f7df5bae79.JPG)
.thumb.JPG.44e84ca0f78315b8851122d7e705a7e1.JPG)
.thumb.JPG.26b964438c9a883d4ee91d83651b6643.JPG)
.thumb.JPG.6c0655d154c50d0897905f2ffce01583.JPG)
.thumb.JPG.526563d21f5930457aaaa1f75a058a14.JPG)
.thumb.JPG.65c92318574806967bacc5492b48b30e.JPG)
- 295 replies
-
- 16
-
-
- amatsukaze
- halinski
- (and 2 more)
-
I've rolled most of the Pipes for the funnels. I used various methods of getting a good straight tube out of them, including using a piece of PVC pipe drilled to the right size to clamp the joint together until the glue dried : For the long bent pipe I inserted a piece of 1.2mm OD brass tubing into it and bent the tubing into the correct shape. The tubing stays in the pipe for strength (besides, once it was bent it was no longer removable ) : Two of the pipes have "rabbit ear" cowls at the top. These were fairly easy to roll into the correct shape : The pipes still need cleaning up, filling and painting. Danny
.thumb.JPG.912651a6b02966493f4e62b752559f50.JPG)
.thumb.JPG.e903ba2290bcbb61f737a6a6fee60257.JPG)
.thumb.JPG.ea0d1ee398f54da7669b79fc341a4cc9.JPG)
.thumb.JPG.3aee6b6ff79474f2fd86e2718c73bd47.JPG)
.thumb.JPG.8f4cf72f6cdd0fb10392ecb09c146bd9.JPG)
.thumb.JPG.64ff6a18bc3744d5b18e82dd6793be26.JPG)
.thumb.JPG.7f8db8c6418013811b8812b8f917d7ae.JPG)
- 295 replies
-
- 17
-
-
- amatsukaze
- halinski
- (and 2 more)
-
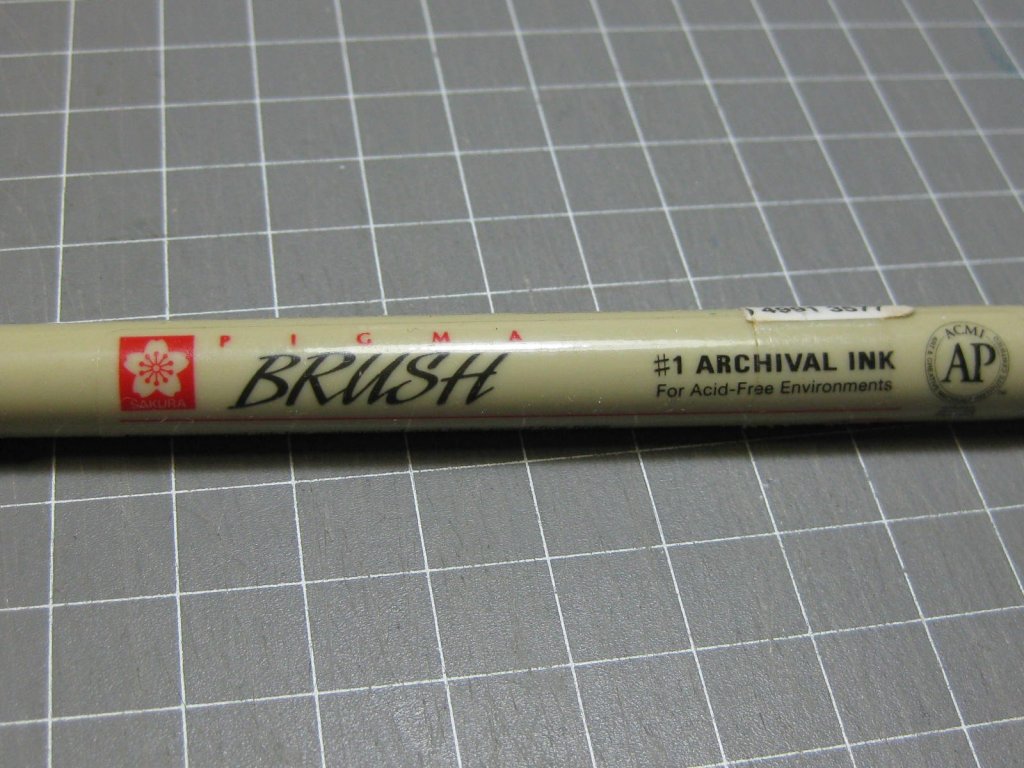
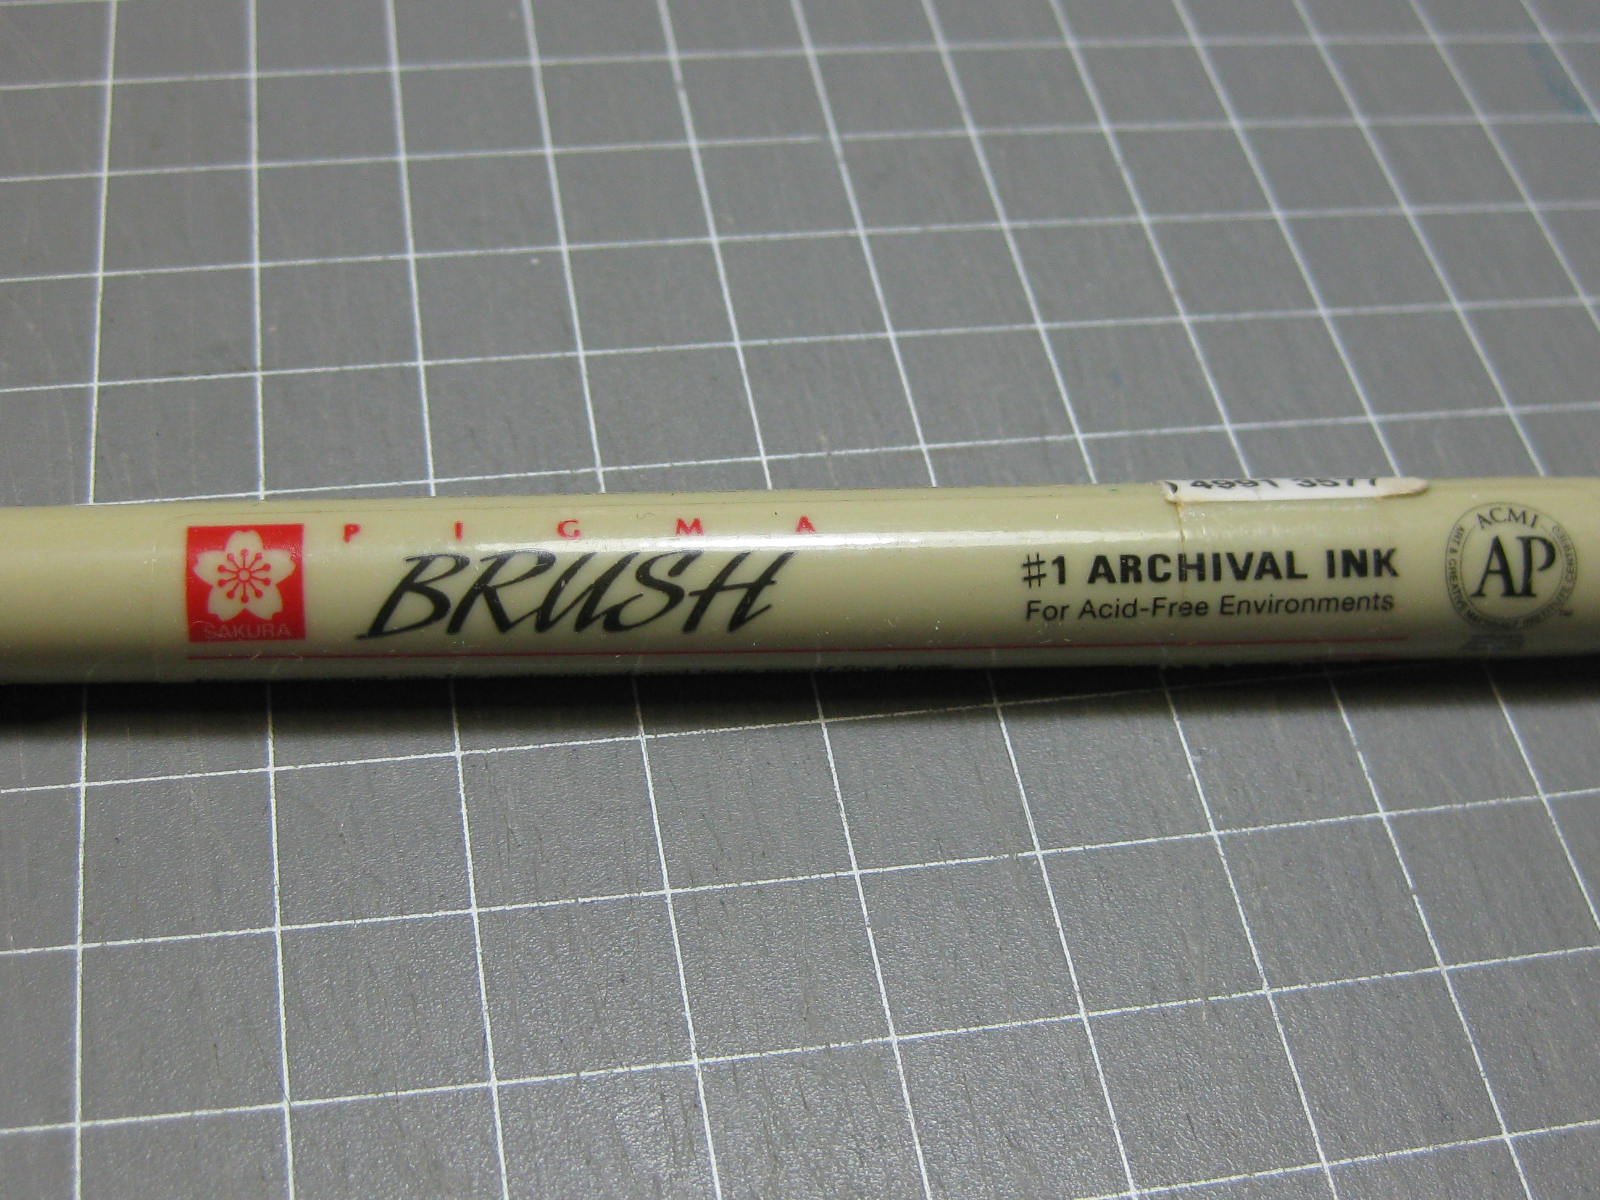
The best method I've found is to use a black "Brush" type Archival Ink Pen, available from most Art Supply stores. It's similar to a felt pen but the ink WON'T bleed into the timber. Use the SIDE of the tip, applied from the BACK side of the plank in case you slip, and on ONE edge and butt join of each plank : Danny
- 18 replies
-
- 11
-
-
G'day (insert your name here ), Welcome to MSW, good to see such a young and enthusiastic new member . Here's a LINK to the 1st post in my HMS Vulture build log where I start making the Stern Light Frames (most of the work starts on the following page). Unfortunately, you will need a Byrnes Table Saw to cut the various munions. It's a real good investment if you want to get into any serious Scratchbuilding, in fact I'd call it a "must have" . I feel your pain. It was an AL kit that sent me on the path of Scratchbuilding in the first place, something for which I'll forever be grateful to AL for (but not much else ). Good luck with your build, and I look forward to seeing your build log. Danny
-
Hi to all Australian members. I'd like to give a wrap to BNA Model World in Melbourne, Australia. I've found them to have most of what I need in the way of tools and modelling supplies, and they carry a huge range of hard-to-get items. Their prices are very reasonable in comparison with buying from overseas (and with most other model suppliers in Australia), and their service is excellent - usually 2 days from ordering to arriving at my door . They accept Credit/Debit cards and also PayPal. I give them 10 out of 10 and will continue to use them for most items I need . I have no affiliation with the company, other than as a very satisfied customer. Danny
-
Thank you popeye, Demetri, John and Thomas. Four kinds - mostly an acid-free PVA Craft Glue made by Mont Marte (straight or thinned with water where needed), Roket Card Glue (solvent based), thin and medium CA for attaching metal parts. Danny
- 295 replies
-
- 4
-
-
- amatsukaze
- halinski
- (and 2 more)
-
Thanks for the comment Pat - I'm getting the hang of cutting the edges with a bevel where needed. That makes for tighter joins. I also use my straight-edge on any straight section over 1mm long - this prevents any joins from having a slight gap top or bottom. I've made the Forward Funnel which has turned out really well. The thin angled band under the top section went on with no problems. I glued it a couple of millimetres at a time : I thought the angled deflectors at the top would have been problematic, but the accuracy of the printed parts made them really very easy to fit : There is a lot of Pipework surrounding the funnel, which I'm working on at the moment. There's also a lot of PE to come. Here's an overall pic of where I'm up to at the moment. The Sub-assemblies haven't been glued on yet - I'll complete each one before I fit them permanently : Danny
.thumb.JPG.82d46a73e95bf1d27c9b842563f69985.JPG)
.thumb.JPG.921370eba3348f295013b6ec81253c61.JPG)
.thumb.JPG.098e5e76d92024d240f44e2fca76f7df.JPG)
- 295 replies
-
- 20
-
-
- amatsukaze
- halinski
- (and 2 more)
-
They don't dry in the tubes Carl, rather on the palette. The paint revives with a little water and becomes usable again for about 3 minutes. Danny
- 295 replies
-
- 6
-
-
- amatsukaze
- halinski
- (and 2 more)
-
Thanks Frank, CDW, Jan and John. I use watercolors that come in tubes, brand is Mont Marte. Water needs to be added periodically, as they dry out fairly quickly but they keep working OK even when they do - still all right the next day . Danny
- 295 replies
-
- 8
-
-
- amatsukaze
- halinski
- (and 2 more)
-
Another update on the Main Superstructure. All the lower components are now done and ready for filler and painting : Danny
.thumb.JPG.3f6d5cd250cc9db0d2823efc1f2066cb.JPG)
.thumb.JPG.fa90348b7716df8bbda9e2019909497f.JPG)
.thumb.JPG.b6e3fc7253d769d47d78730291f2a08d.JPG)
.thumb.JPG.7a4bd79123a7a5fed4dba3273e0c1b2c.JPG)
.thumb.JPG.6997d405326575e5561585a1f9e5acdb.JPG)
.thumb.JPG.b55b1b6c03d7f31a39581f7684bf9a5d.JPG)
- 295 replies
-
- 22
-
-
- amatsukaze
- halinski
- (and 2 more)
.JPG.54fcb221d9df141994a81b6e315e77c5.JPG)
.JPG.6bda84de15344131b7c525cf24de37e9.JPG)
.JPG.bcc9f32269abcd70f249f5bf02db23f7.JPG)
.JPG.e5207a960849e0d1f819ff05754a10ef.JPG)
.JPG.0798f2b0e16893fae7fdbd9dce92eecd.JPG)
.JPG.e3838a65fef9b15bd0d99622be3eab08.JPG)
.JPG.98955e2806b43f3e1a8a6bd02a6a809b.JPG)
.JPG.f63747f8c714d063b5205dad9a7afe7e.JPG)
.JPG.009047882b6af587a7a9347547b1f647.JPG)
.JPG.afe70574bf52b2faedcda9298e5ee91f.JPG)
.JPG.2a96969343f9dd14c002866eda7c9a69.JPG)
.JPG.bdf98dd3332343e84666b61144c38e27.JPG)
.JPG.0460cce95941656efcadc2ff76ea49b7.JPG)
.JPG.f8bdded32f325157add4f505ffd02322.JPG)
.JPG.ca1996ee64c8deb628e9093ba702a7f1.JPG)
.JPG.15c953dd31aaade96daffa3555692e58.JPG)
.JPG.10153d7fe3f5f694505a29856fb7aa39.JPG)
.JPG.c9c19ea23684e0520f6be5220eb2ee17.JPG)
.JPG.5d967b443007425e4b09465453385db3.JPG)
.JPG.041c9f3aa33e6fae021fa0c089865395.JPG)
.JPG.d960ed486a5681380988cafb001d619c.JPG)
.JPG.0e69ac8b9fff612572b7cc82ad1d16e2.JPG)
.JPG.57f588345821cf786e20a41e9080c0ad.JPG)
.JPG.d670a5f7495ad43b5d0f9a14bc72cb9b.JPG)
.JPG.19d1a50956df10aa2be9a5bdda72fc22.JPG)
.JPG.9f9acc1269dcc86f99ef4ef653bb2518.JPG)
.JPG.fdcc38432bb1c5038b74385385680aa4.JPG)
.JPG.f04eb23c346d1ca309d7b5cd90fa54fb.JPG)
.JPG.722181bf38377b38b4eda10c3a290548.JPG)
.JPG.3424b4cc2c74ea2142529bb0cc550d27.JPG)
.JPG.b2b0717b6919c5f3993ebbd3db7a5d2c.JPG)
.JPG.fe3203fb82b138ae7ad025ba1f10c222.JPG)
.JPG.4926277e34846d9801c1f723e07f1743.JPG)
.JPG.02671535ff28abf16e6de546ab8ec068.JPG)
.JPG.a7cf8954ad790edfe6eb3eebb01979a6.JPG)
.JPG.1a55655d0d61f7c3481ea0454e2ff761.JPG)
.JPG.fe6784660c0fc2891f82779eb0f2dc23.JPG)
.JPG.463a7b58d5d320b3608d7f11d0ae7f67.JPG)
.JPG.8b00bacdba0a9c32a21d07c5bac5b050.JPG)
.JPG.47c3c45c0f7a5b25f0b4ff895f4469b0.JPG)
.JPG.4ab5f7edcd8ca69d75ca6ab7945df70f.JPG)
.JPG.072bf643b26c3f75ea939c73007ac13c.JPG)
.JPG.453ead39aaf1f775632a64534ad2fe3d.JPG)
.JPG.e8b4765338593191400056d01e45f344.JPG)
.JPG.d92483ece33fe8715c3615245bd3d711.JPG)
.JPG.3e5b1a5dab2db143301b67c8690493a4.JPG)

.JPG.abe62692005fb0854a0bf9598aab05ca.JPG)
.JPG.d9517a50b91b32a8d54cb4176d809b1e.JPG)
.JPG.e745b2725143788c4f5bf0fd1386ce3f.JPG)
.JPG.1cce816f1b332f6e59ecb3f054f8c944.JPG)
.JPG.69da8b3625d5d80317f142c448f7de71.JPG)
.JPG.36e242e64b4829328cb1b2f7bc4660a6.JPG)
.JPG.002b2470f2003aad5a7fd9851c09af67.JPG)