HOLIDAY DONATION DRIVE - SUPPORT MSW - DO YOUR PART TO KEEP THIS GREAT FORUM GOING! (Only 75 donations so far out of 49,000 members - C'mon guys!)
×


Thukydides
-
Posts
1,347 -
Joined
-
Last visited
Content Type
Profiles
Forums
Gallery
Events
Everything posted by Thukydides
-
 Looking good David. 32 pdr carronades would indeed have a single double combo for the the tackle with 8 inch (3mm) blocks according to a list I found from 1794. The tackles would be 2.5 inch cir or 0.3mm diameter at your scale. That being said the difference will not be super noticable. You could combo the 3mm double with the 2mm single, then you will get the correct flow of the tackles even if the sizes are not exactly correct. Edit: Here is the full table for carronades just for completeness: Table 5.X - Breechings, Tackle and Blocks Per Gun Circa 1765-1794 Breeching Size (in) Gun Tackle Size (in) Blocks (Single) Blocks (Double) Size (in) Number Size (in) Number Carronades 32 pdr 7 2½ 8 2 8 2 24 pdr 6½ 2 6½ 4 18 pdr 5½ 1½ 5 2 12 pdr 5½ 1½ 5 2 Source: TNA ADM 160/150; TNA WO 55/1745; Caruana, English Sea Ordnance, 229.
 -
She is quite the model. This will be a very impressive kit. It really is a pleasure to follow along and see how it developes.
-
Bower anchor project by Sizzolo
Thukydides replied to Sizzolo's topic in - Build logs for subjects built 1751 - 1800
Seems like an interesting project. I look forward to seeing what you do with it. One thing that stands out to me from the plans (though not strictly related to your project) is the use of the iron stock for the kedge. Do you know if this was common practice for the kedge? -
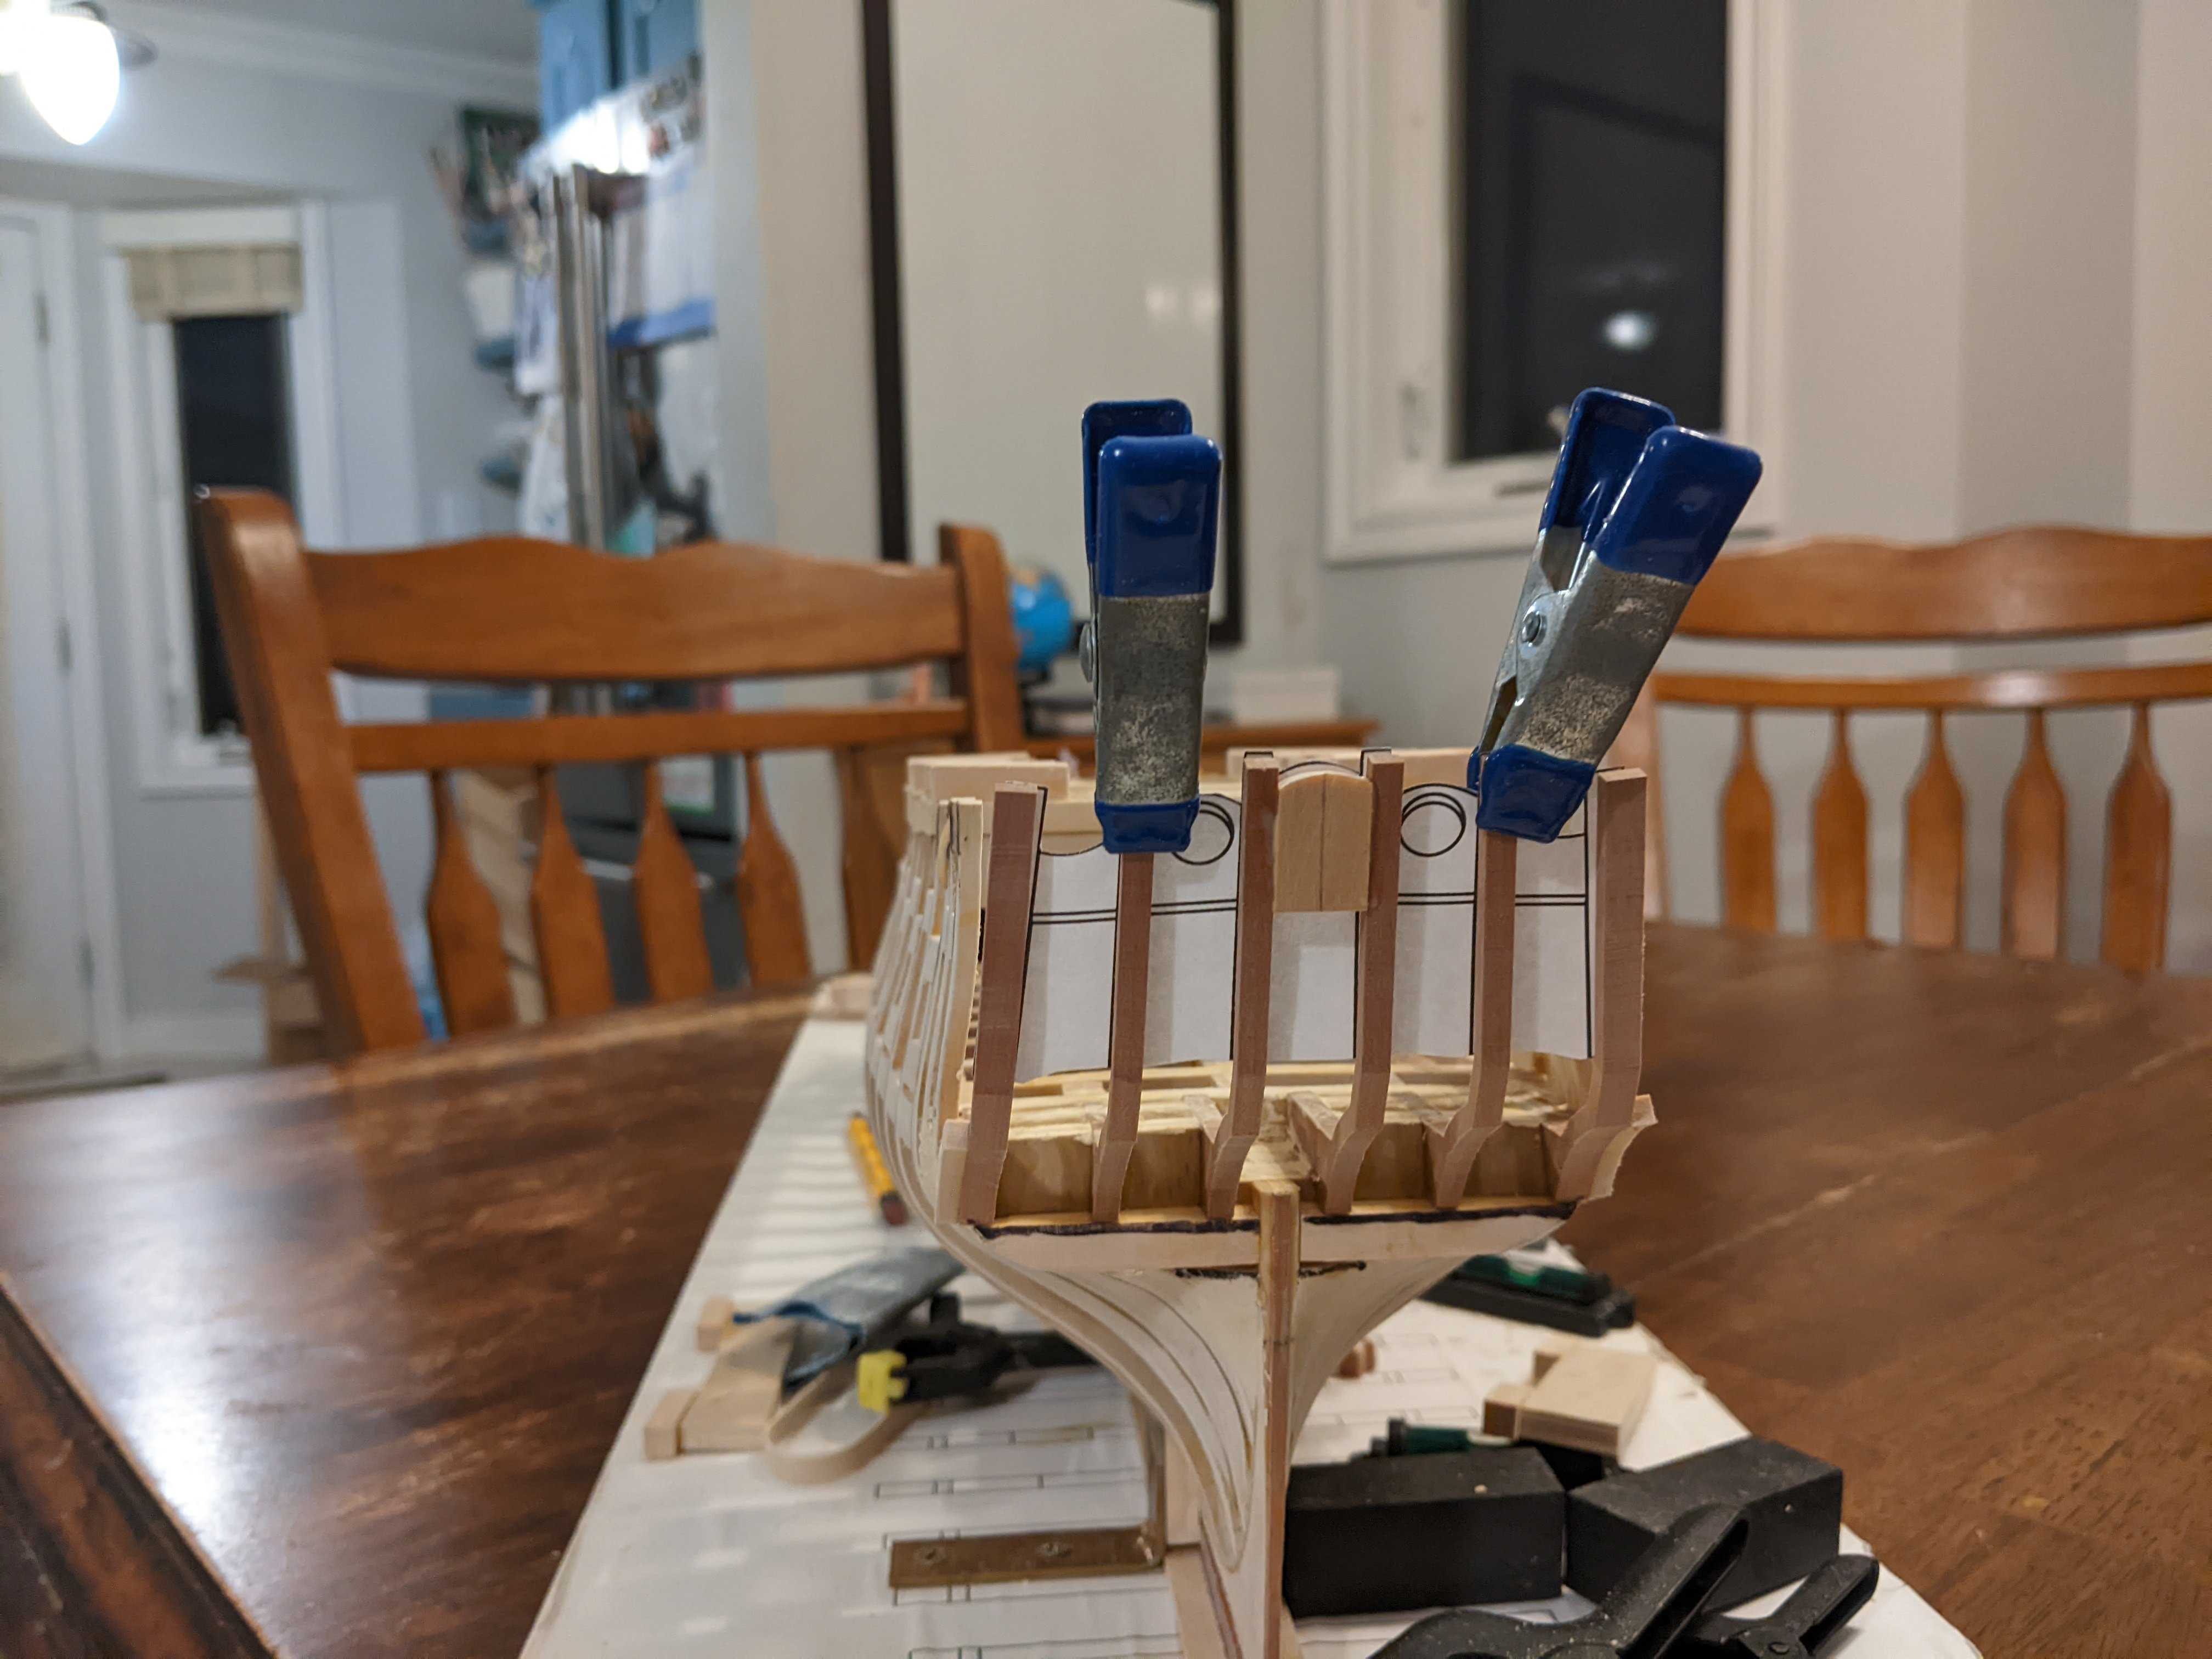
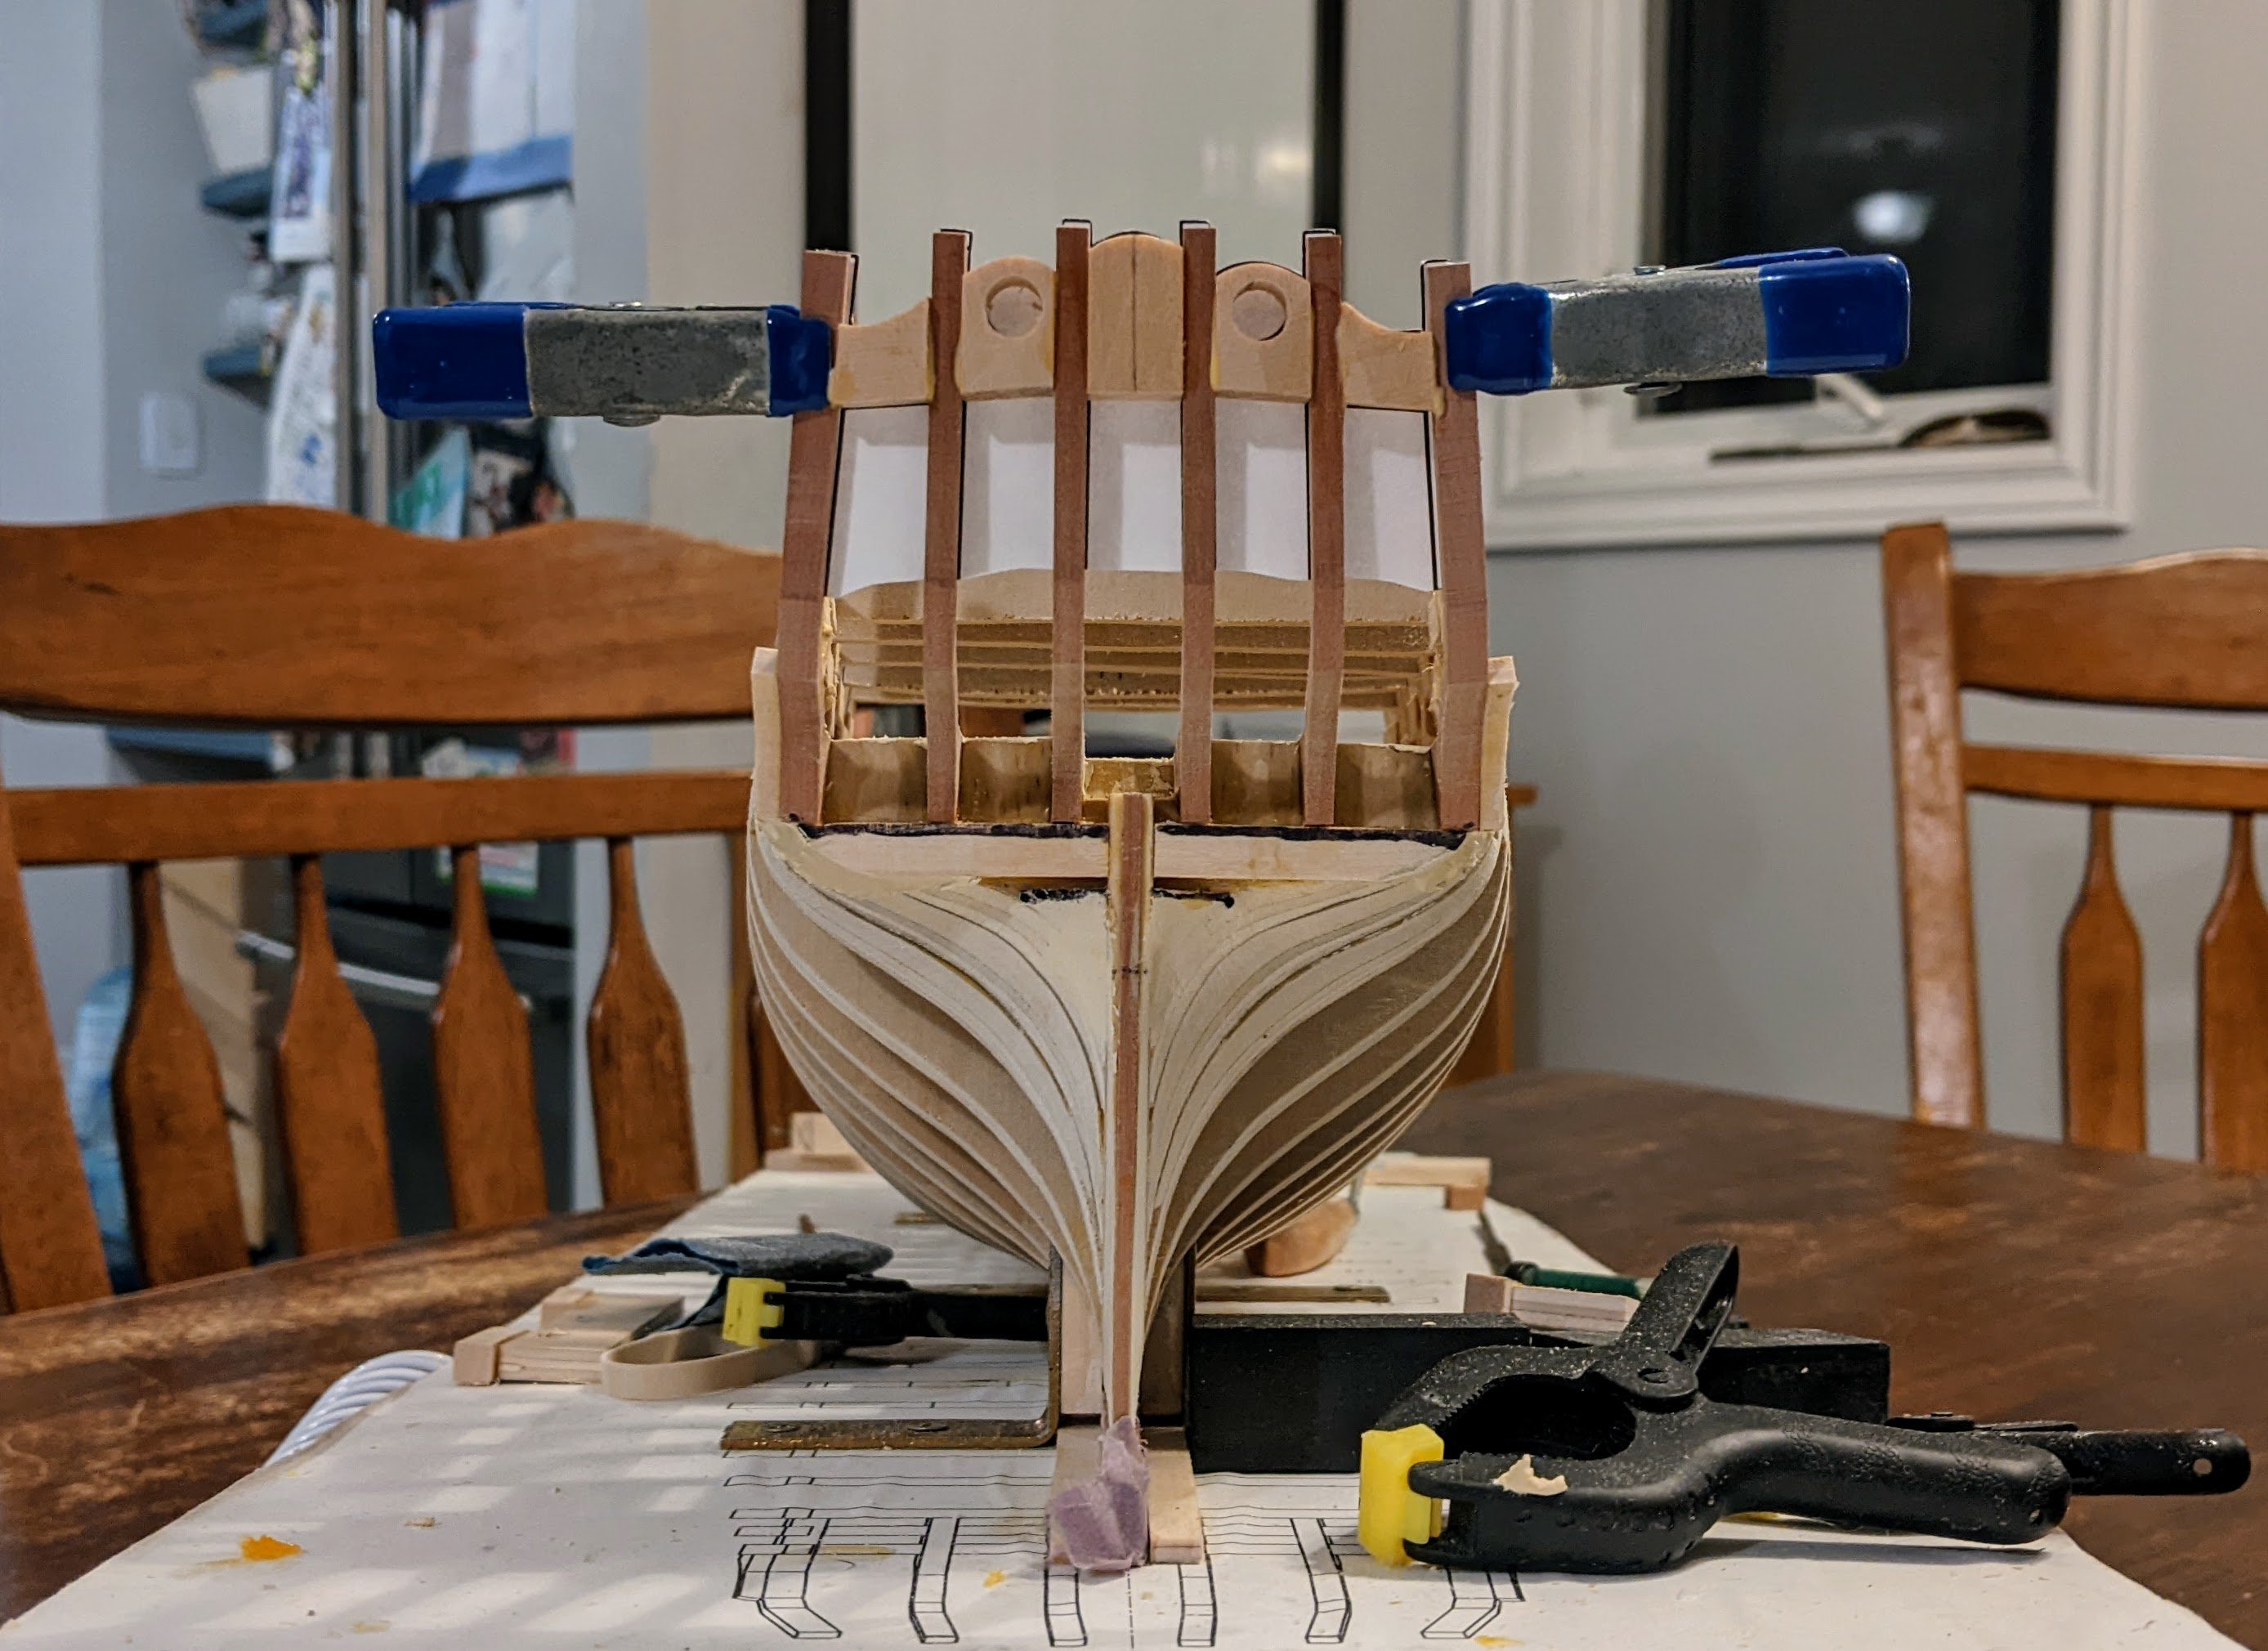
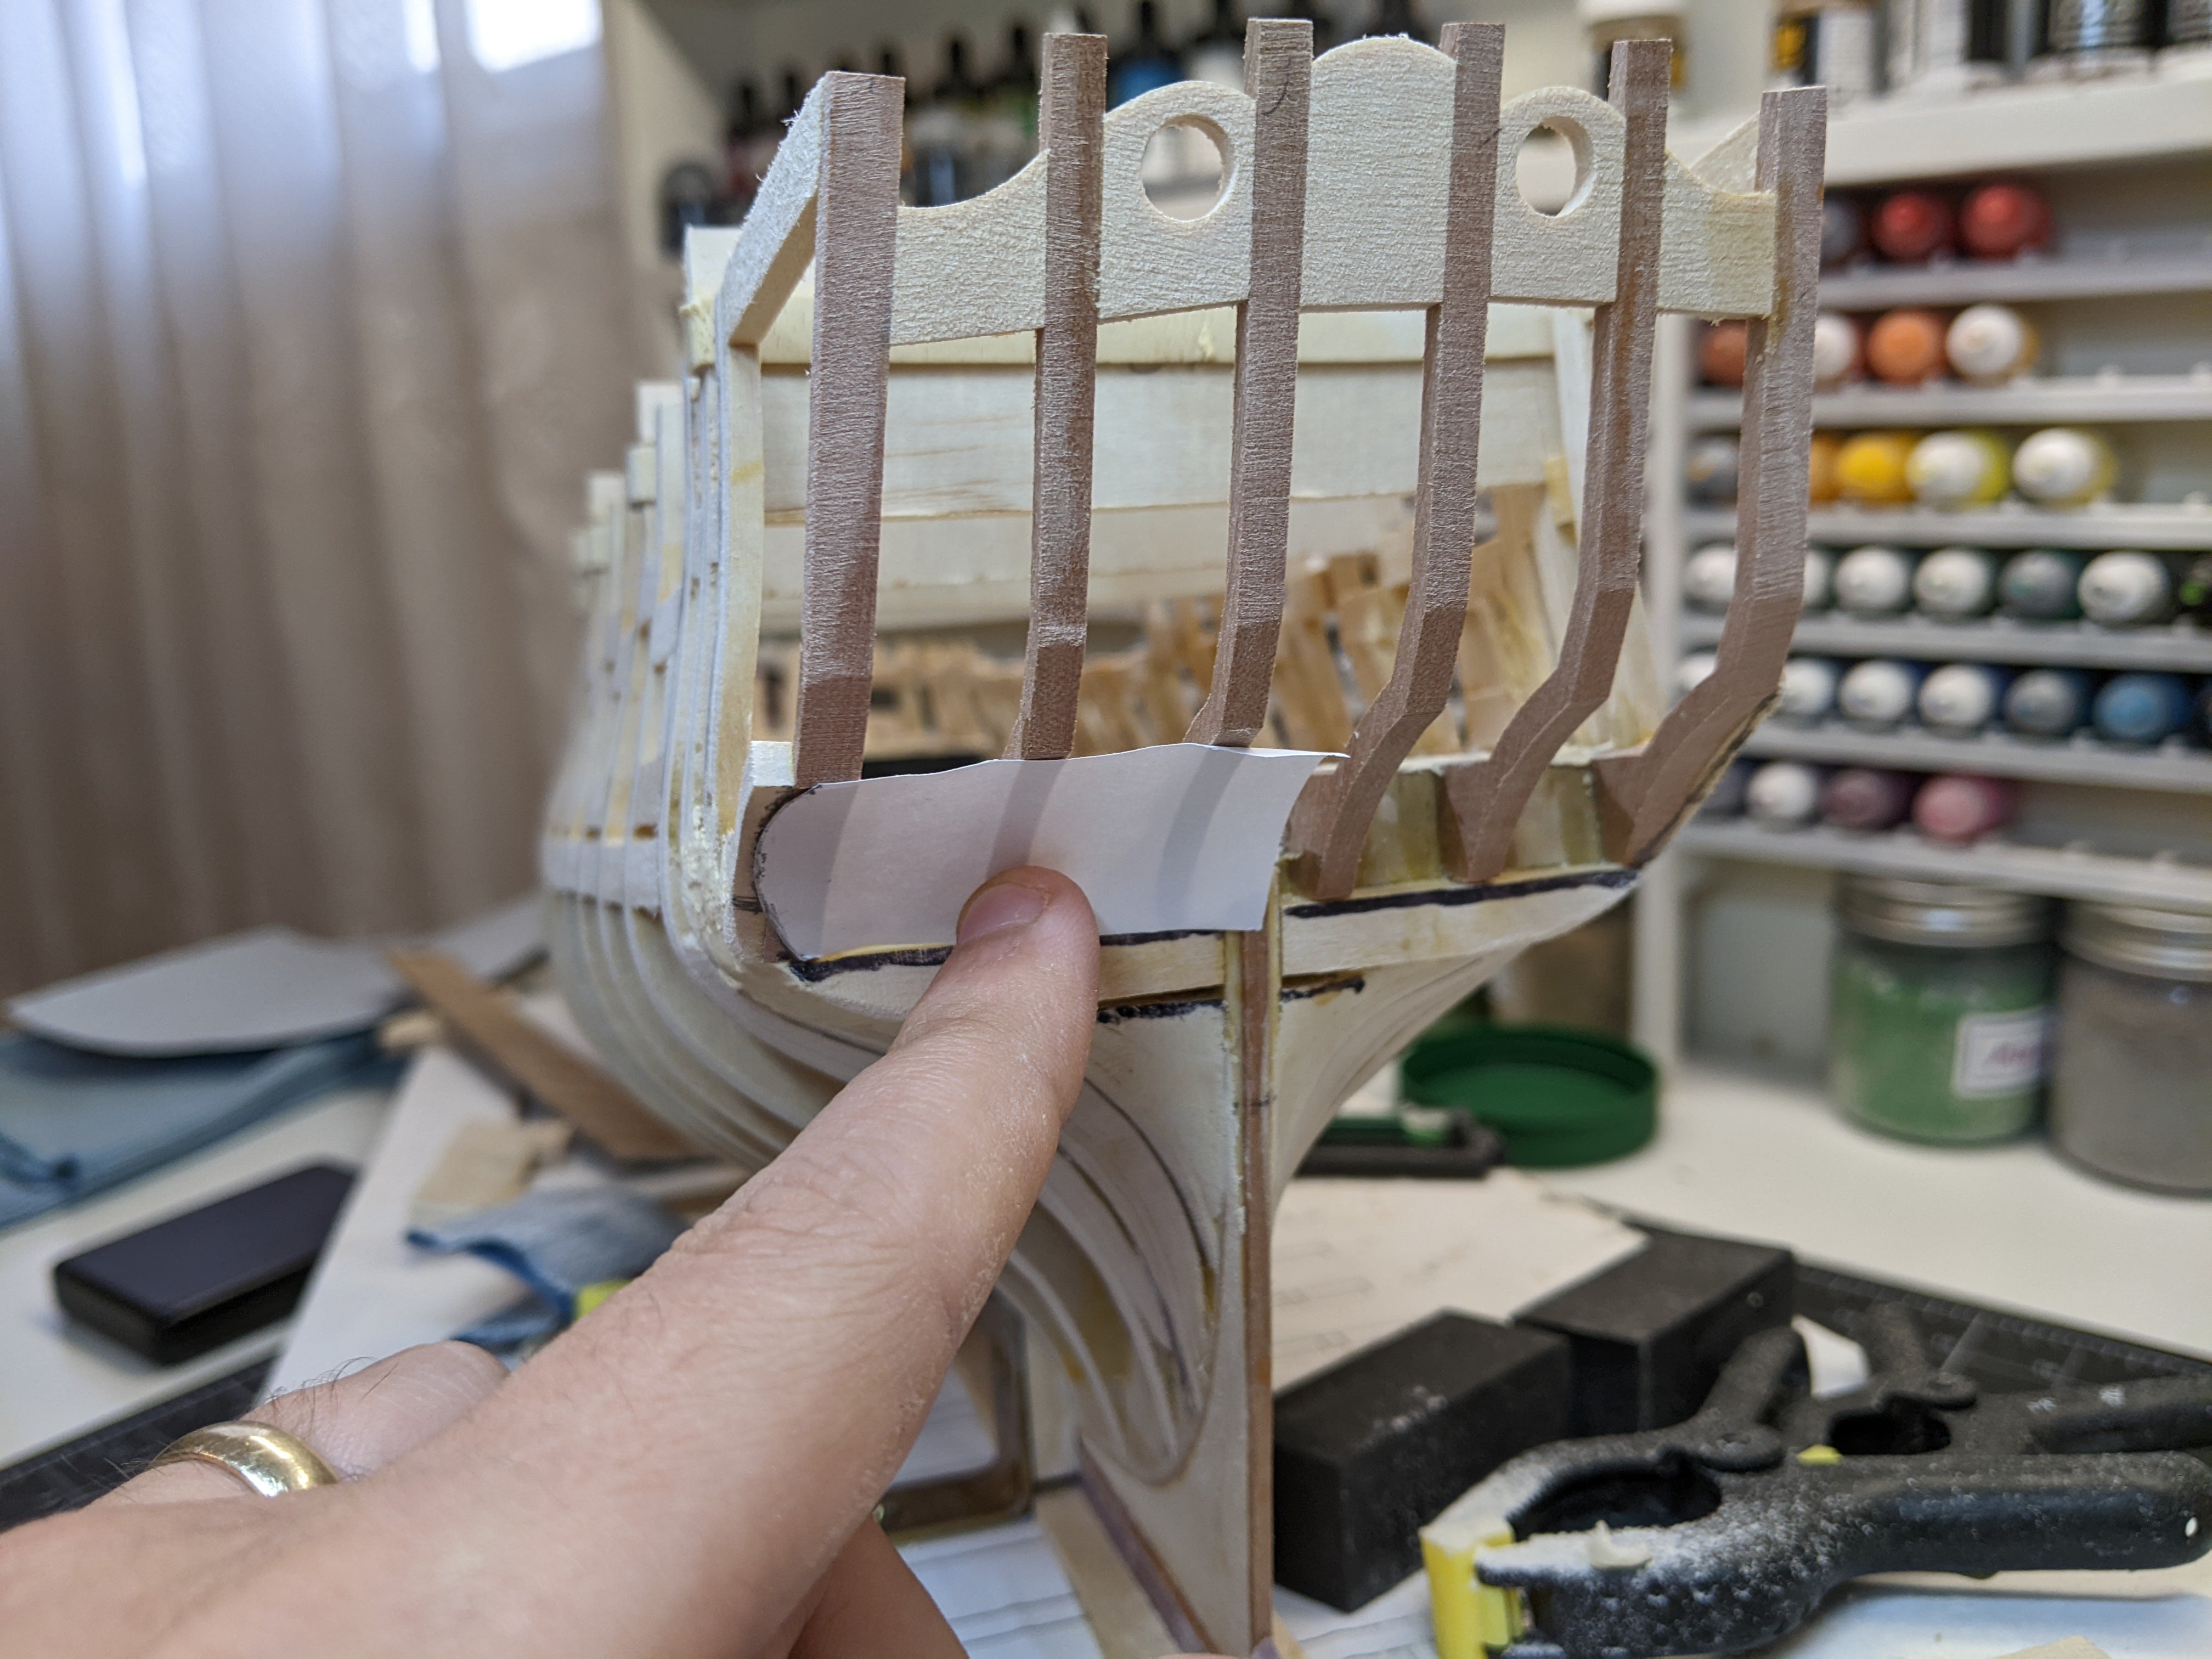
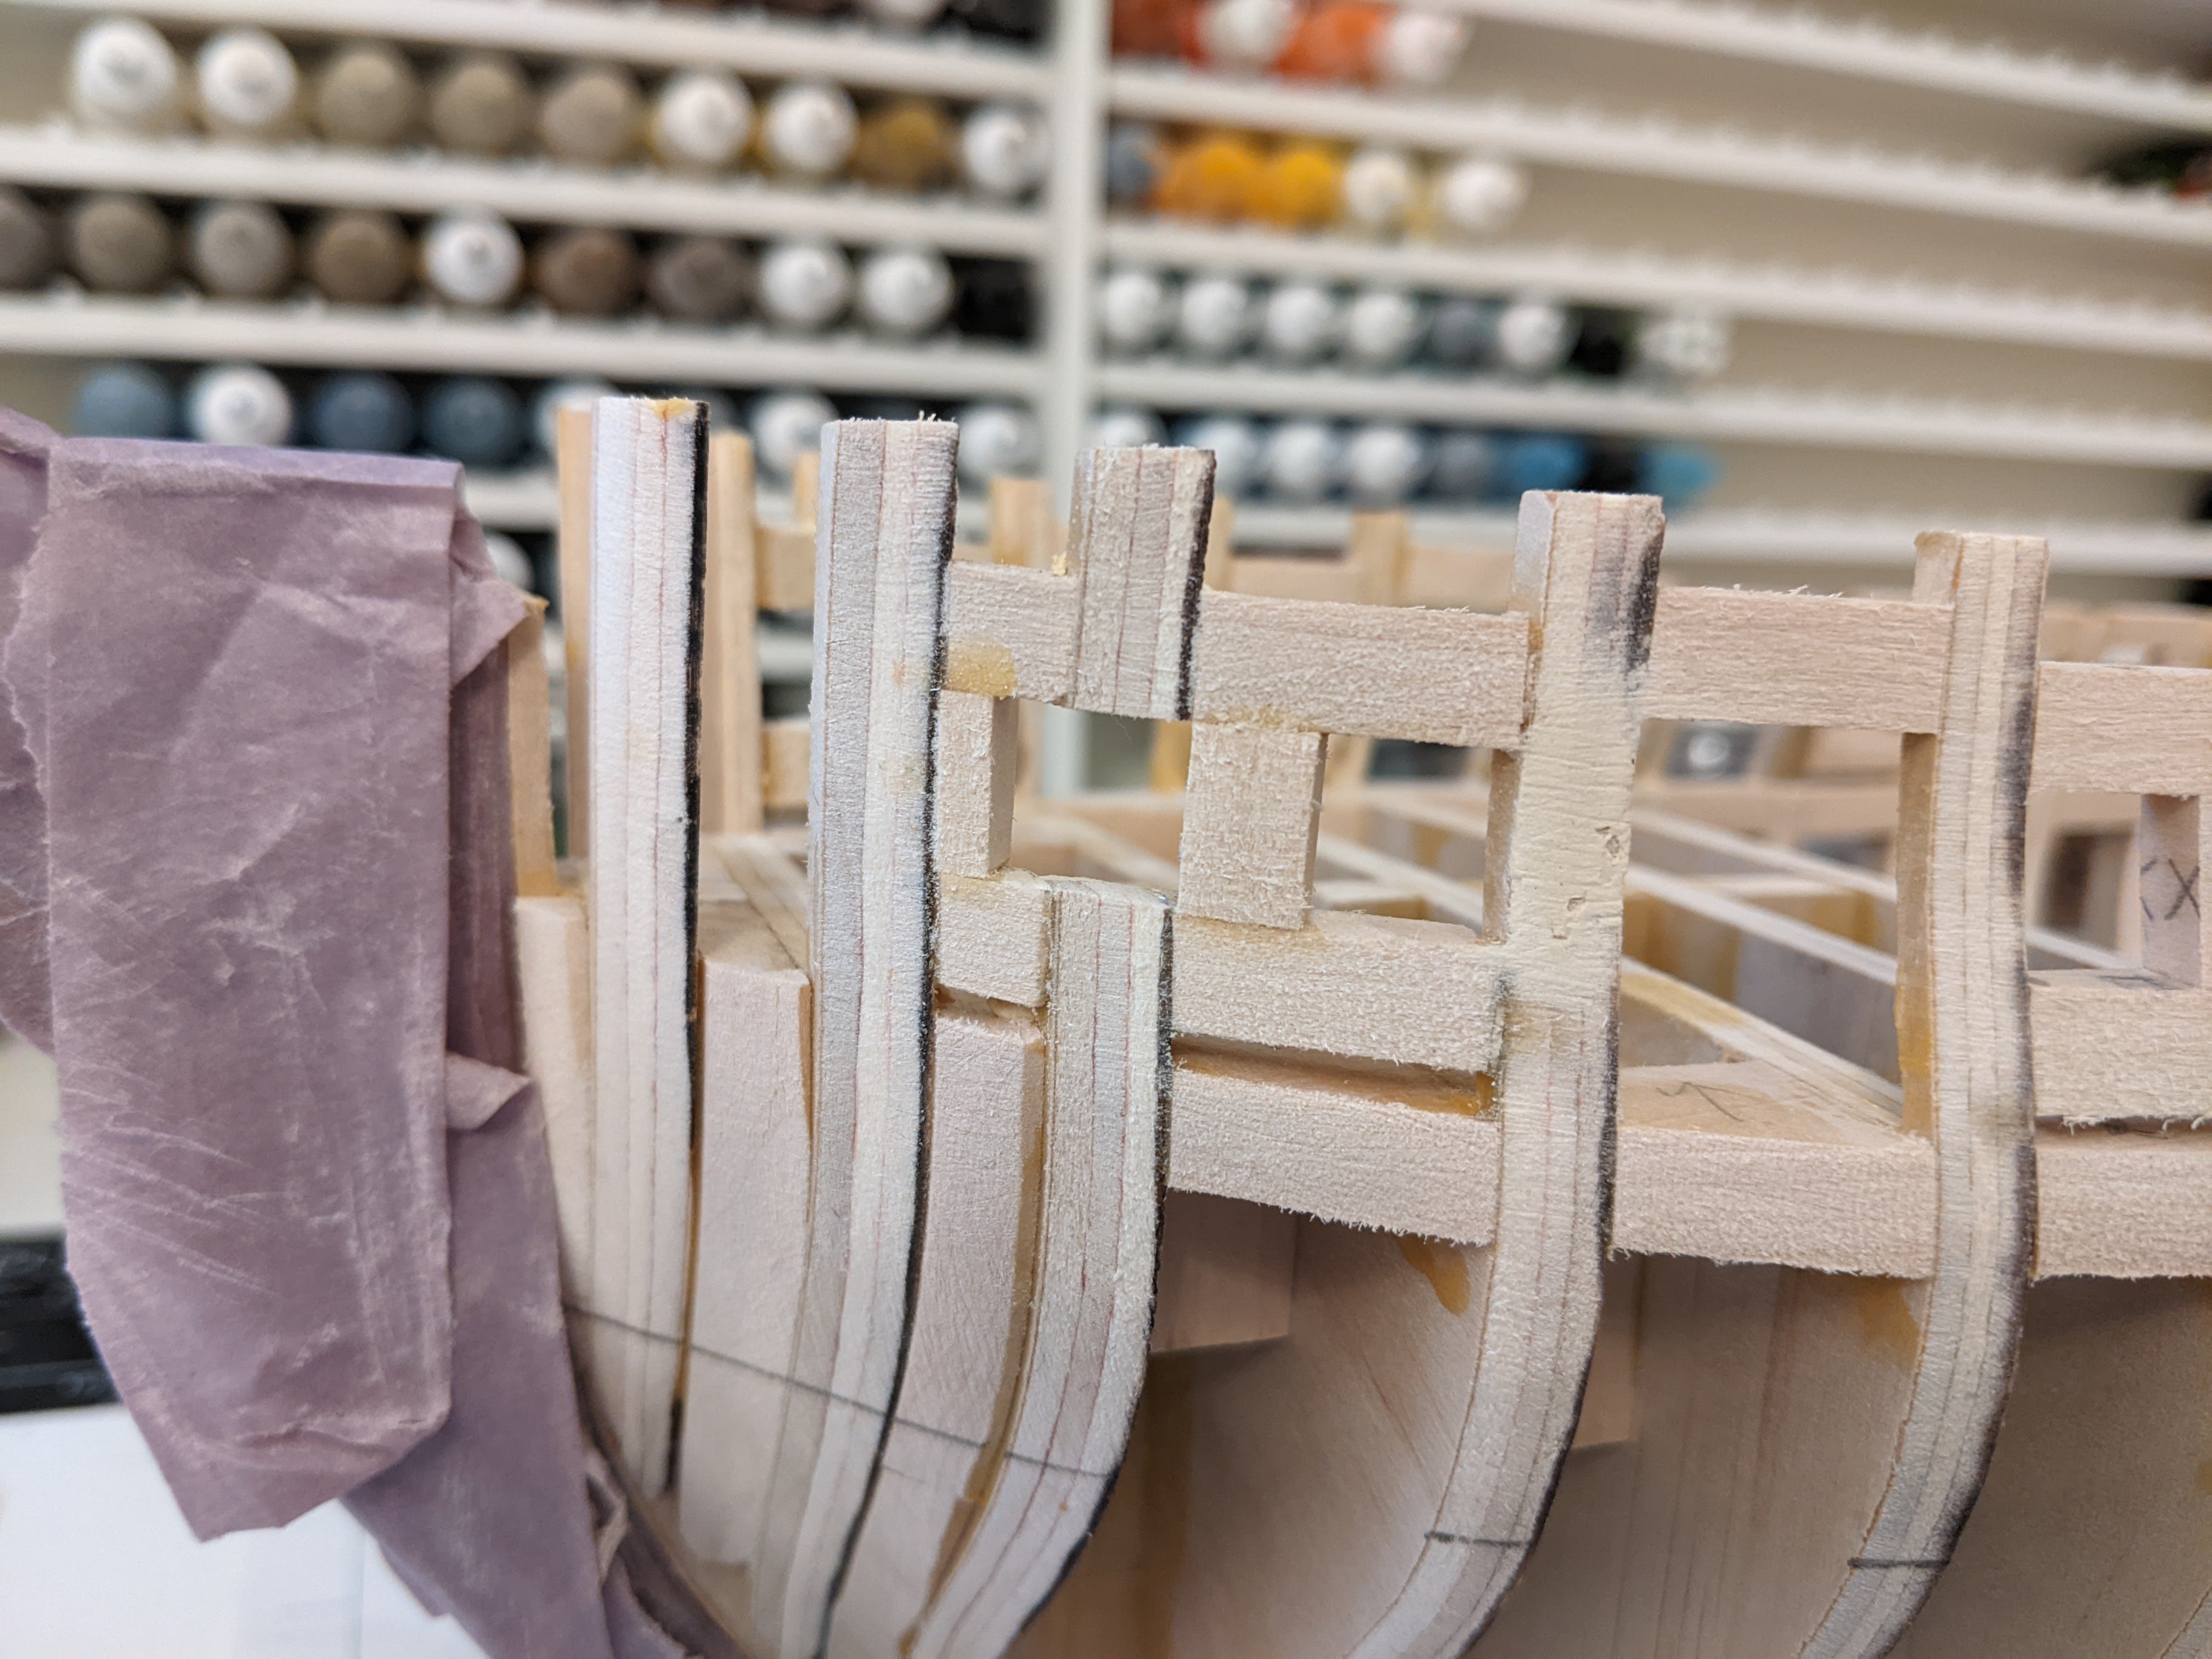
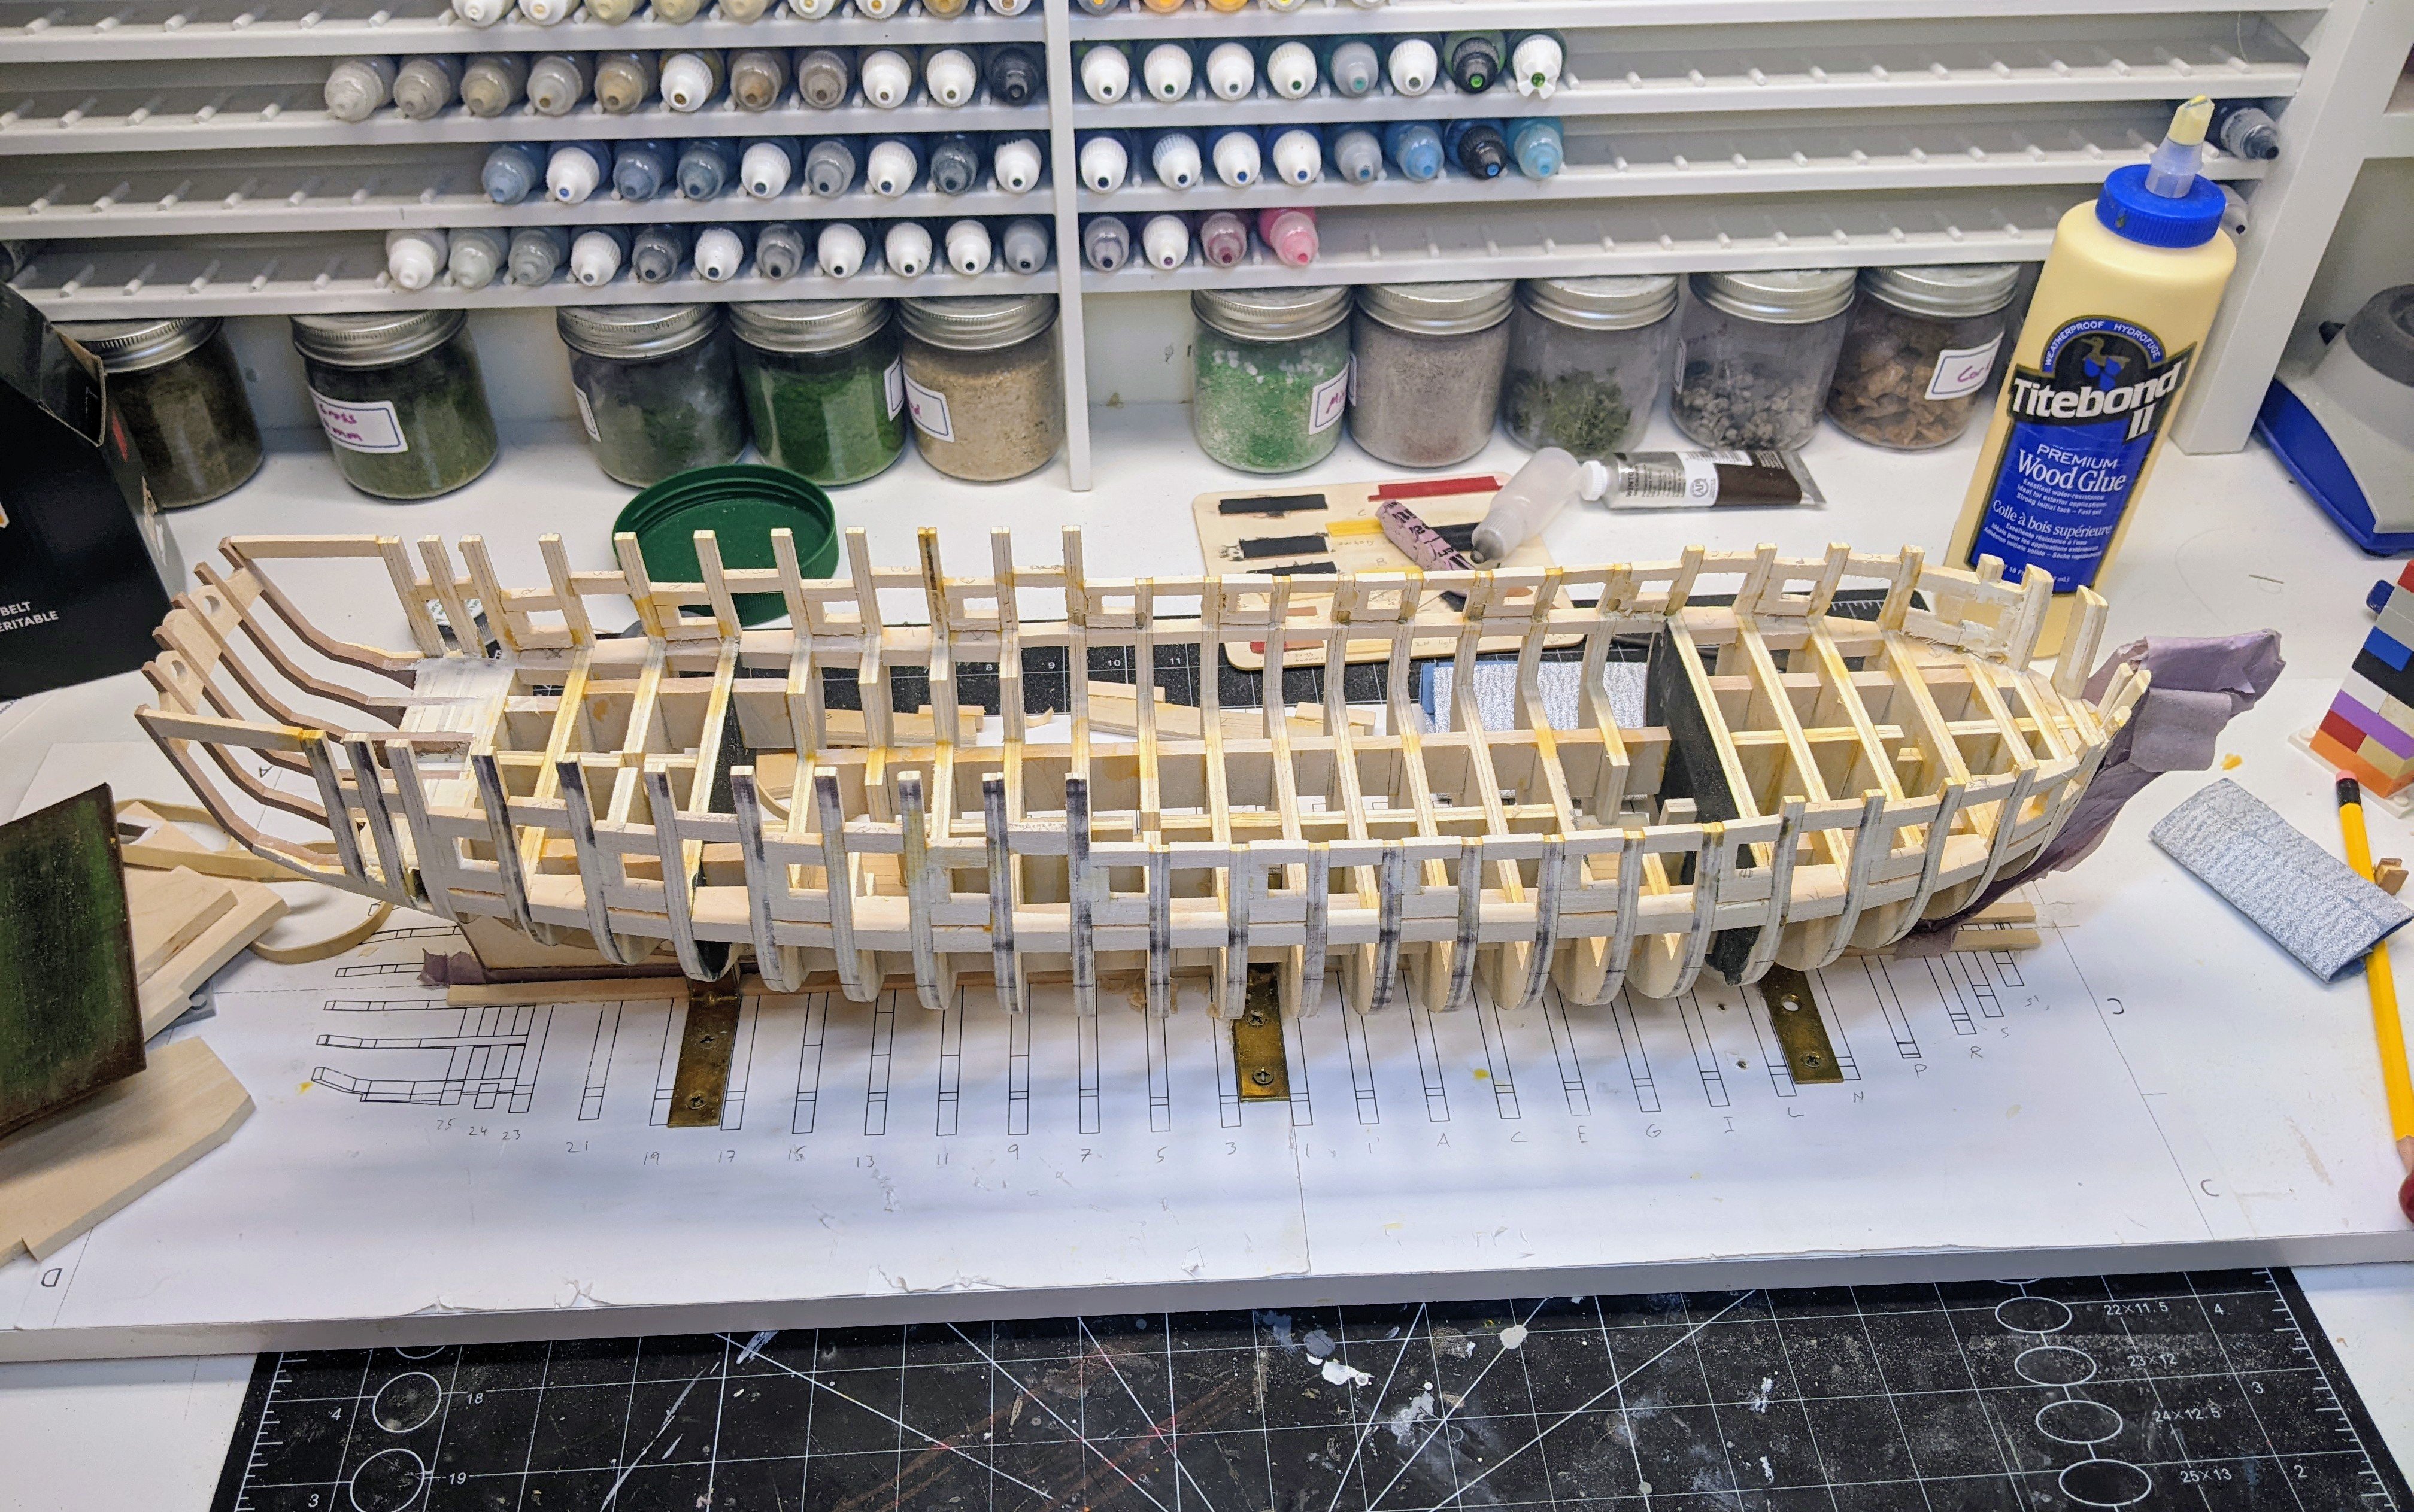
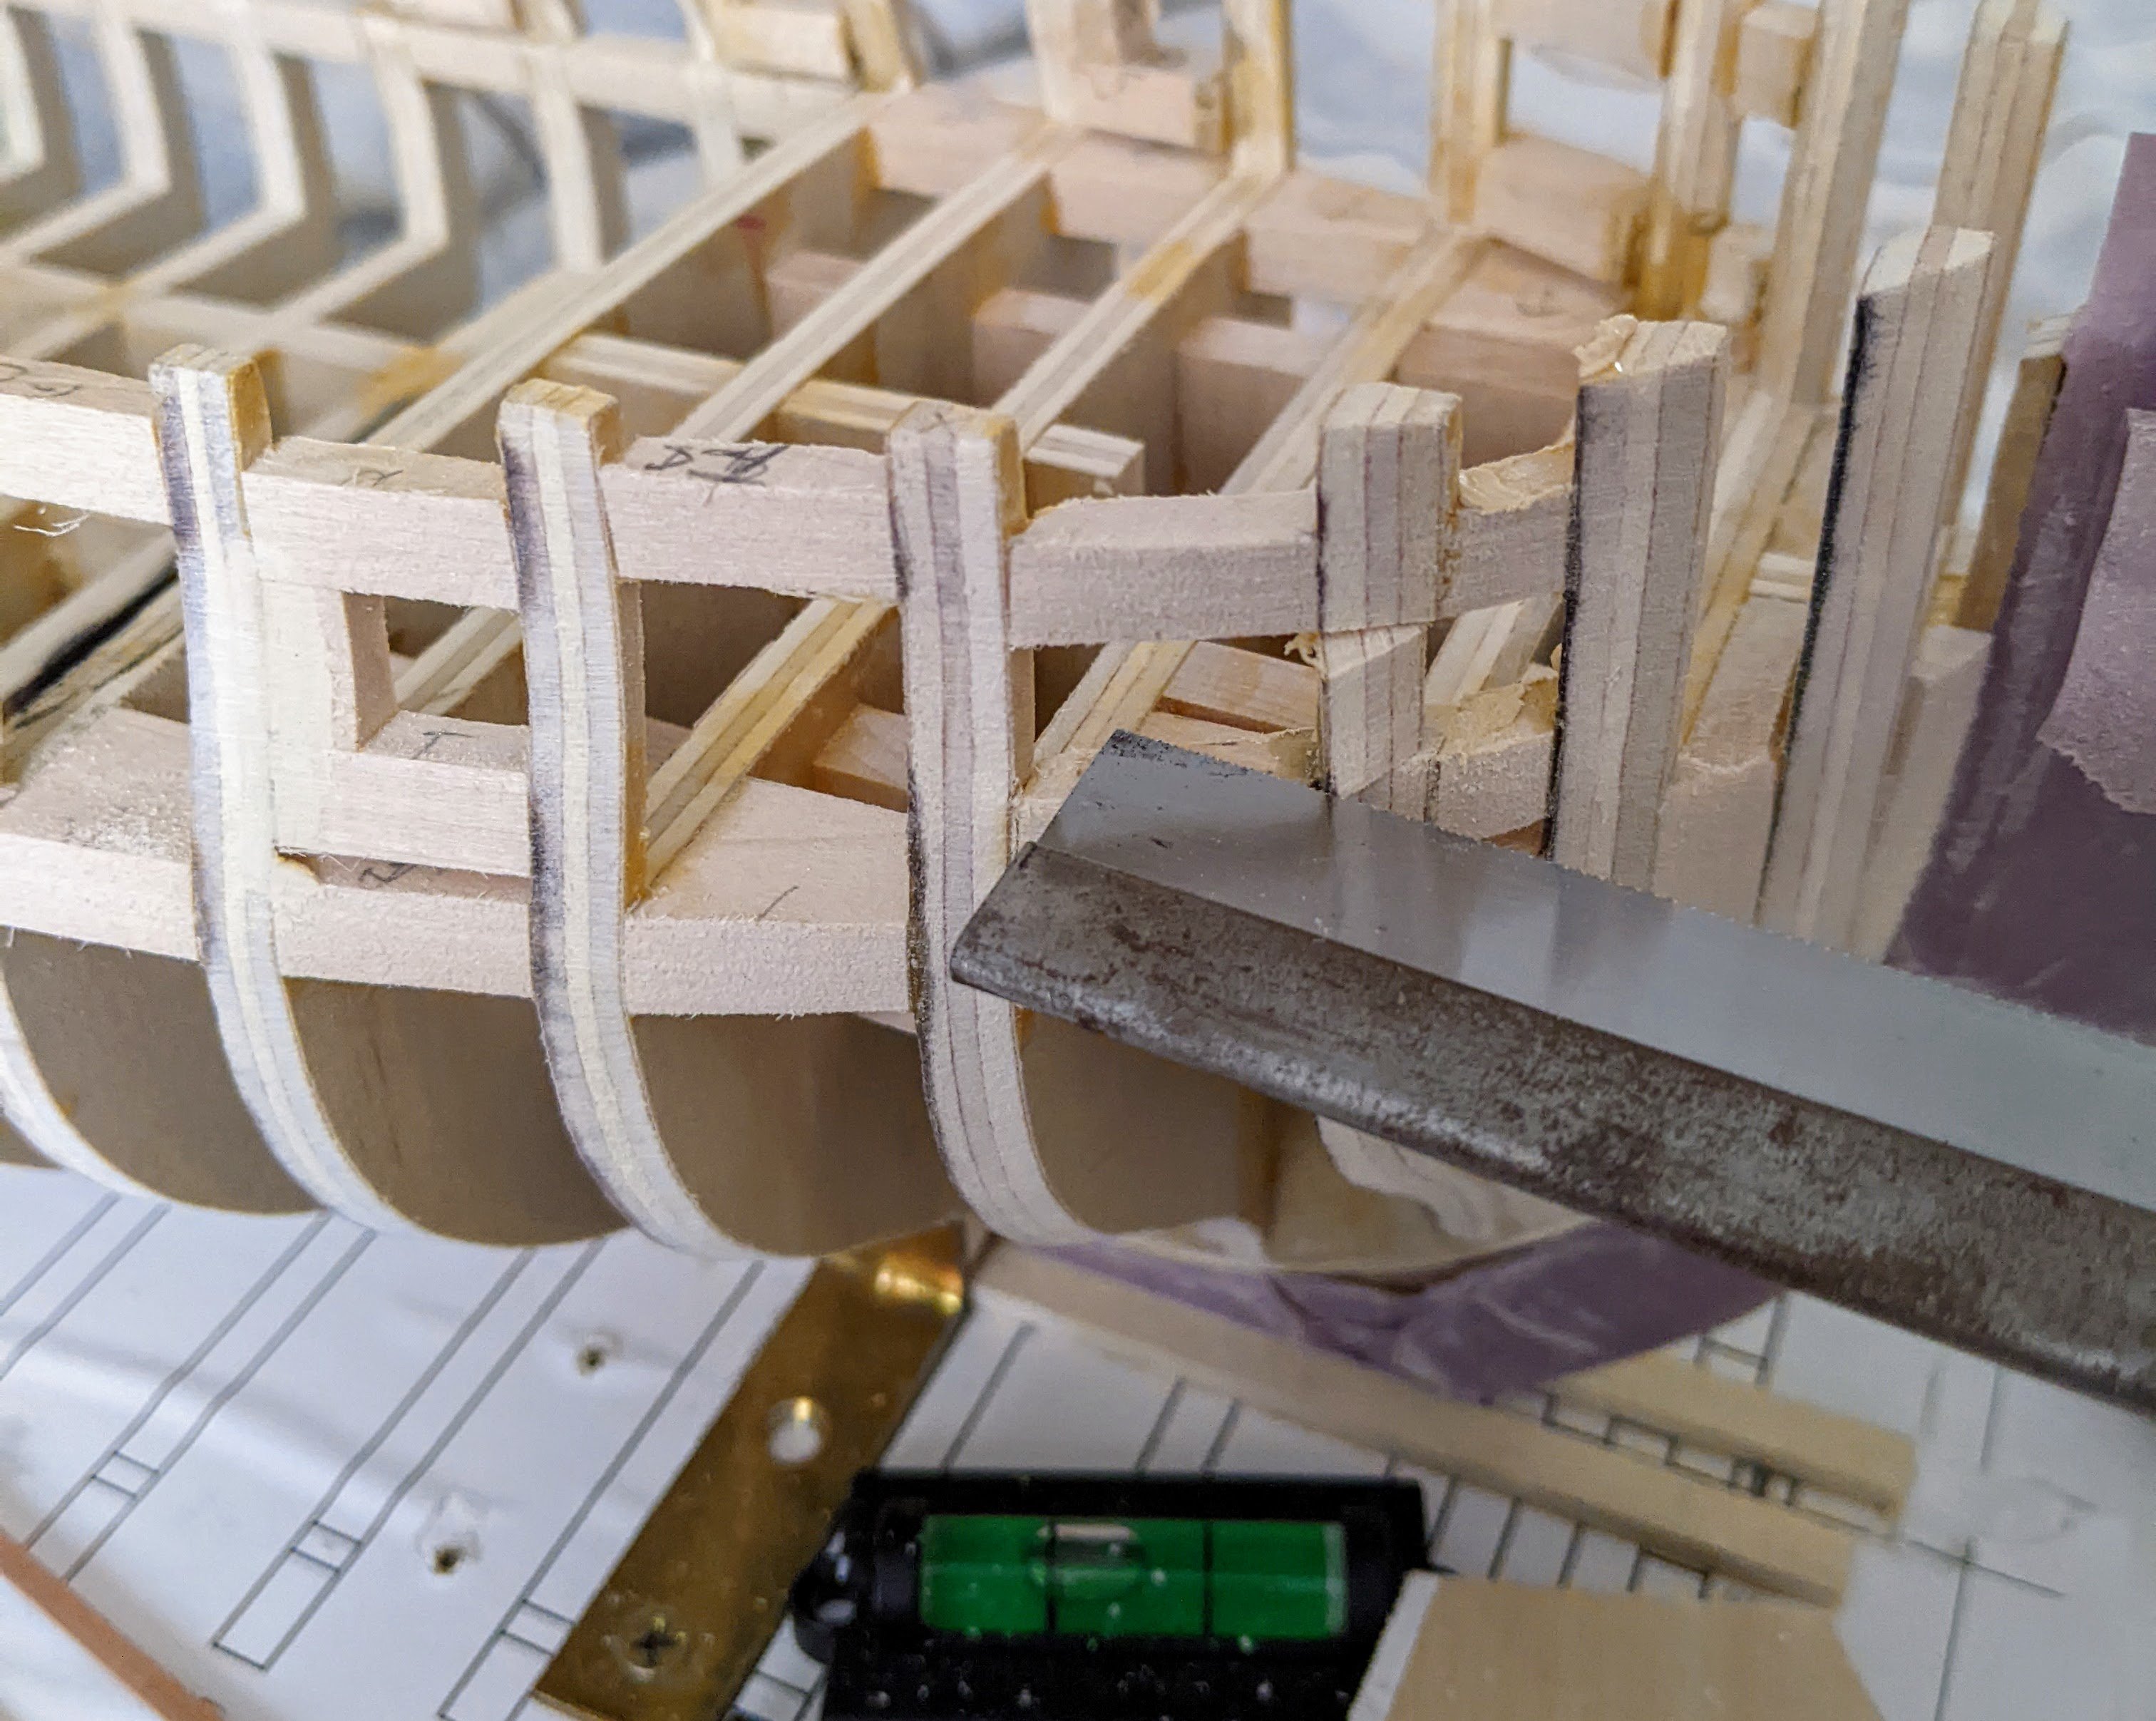
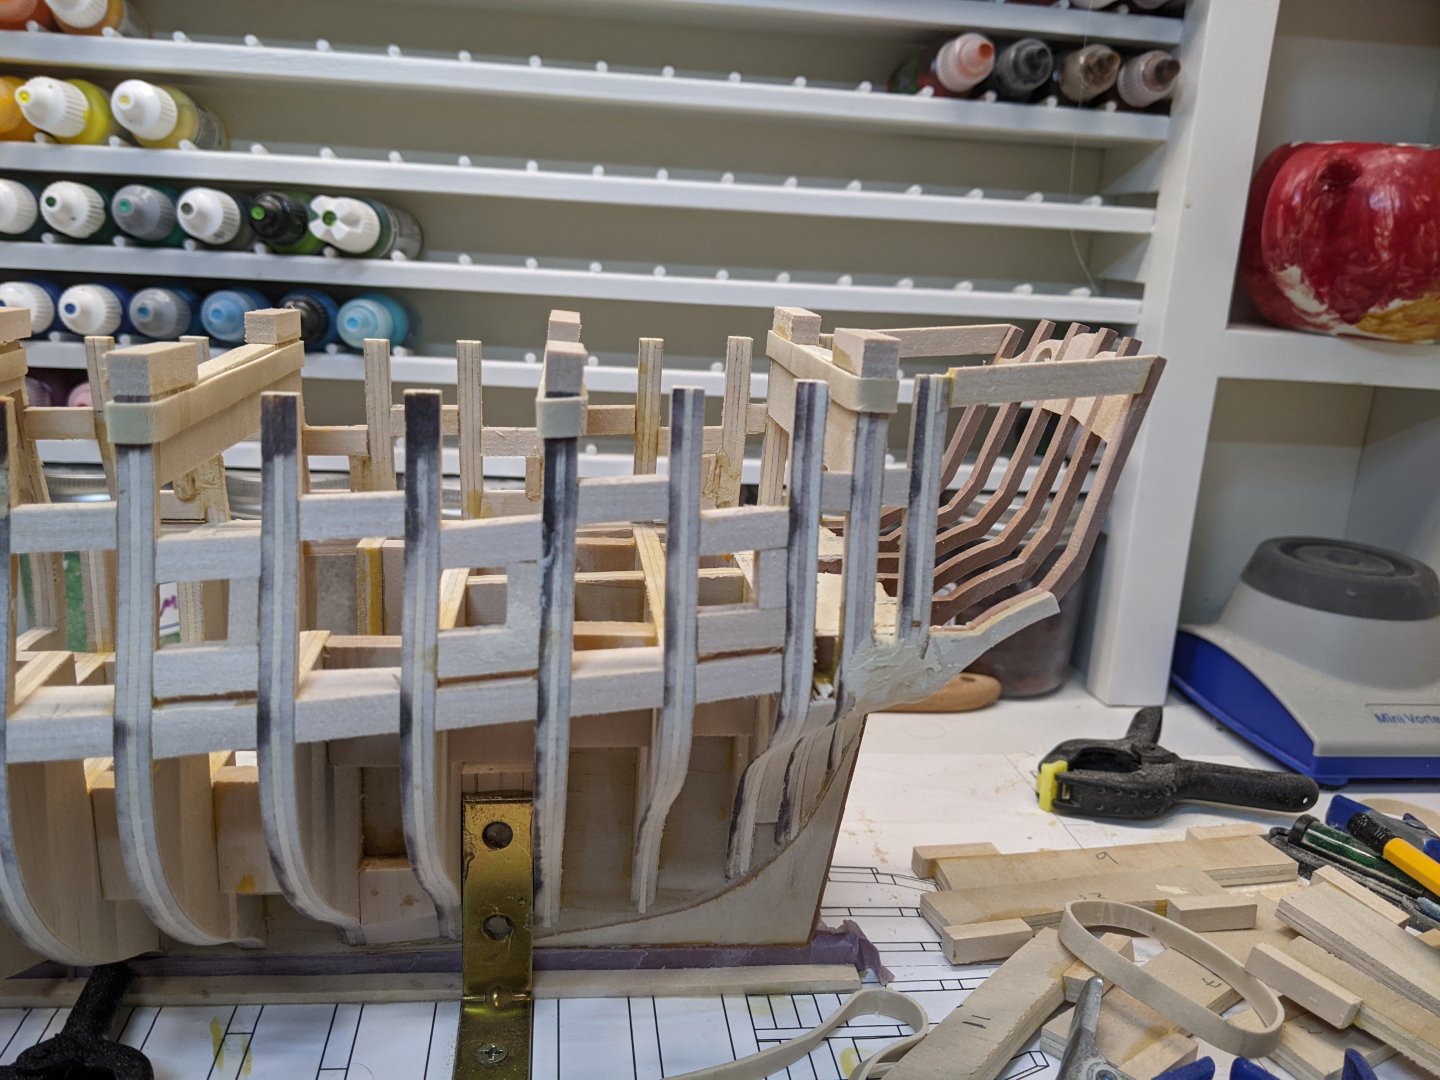
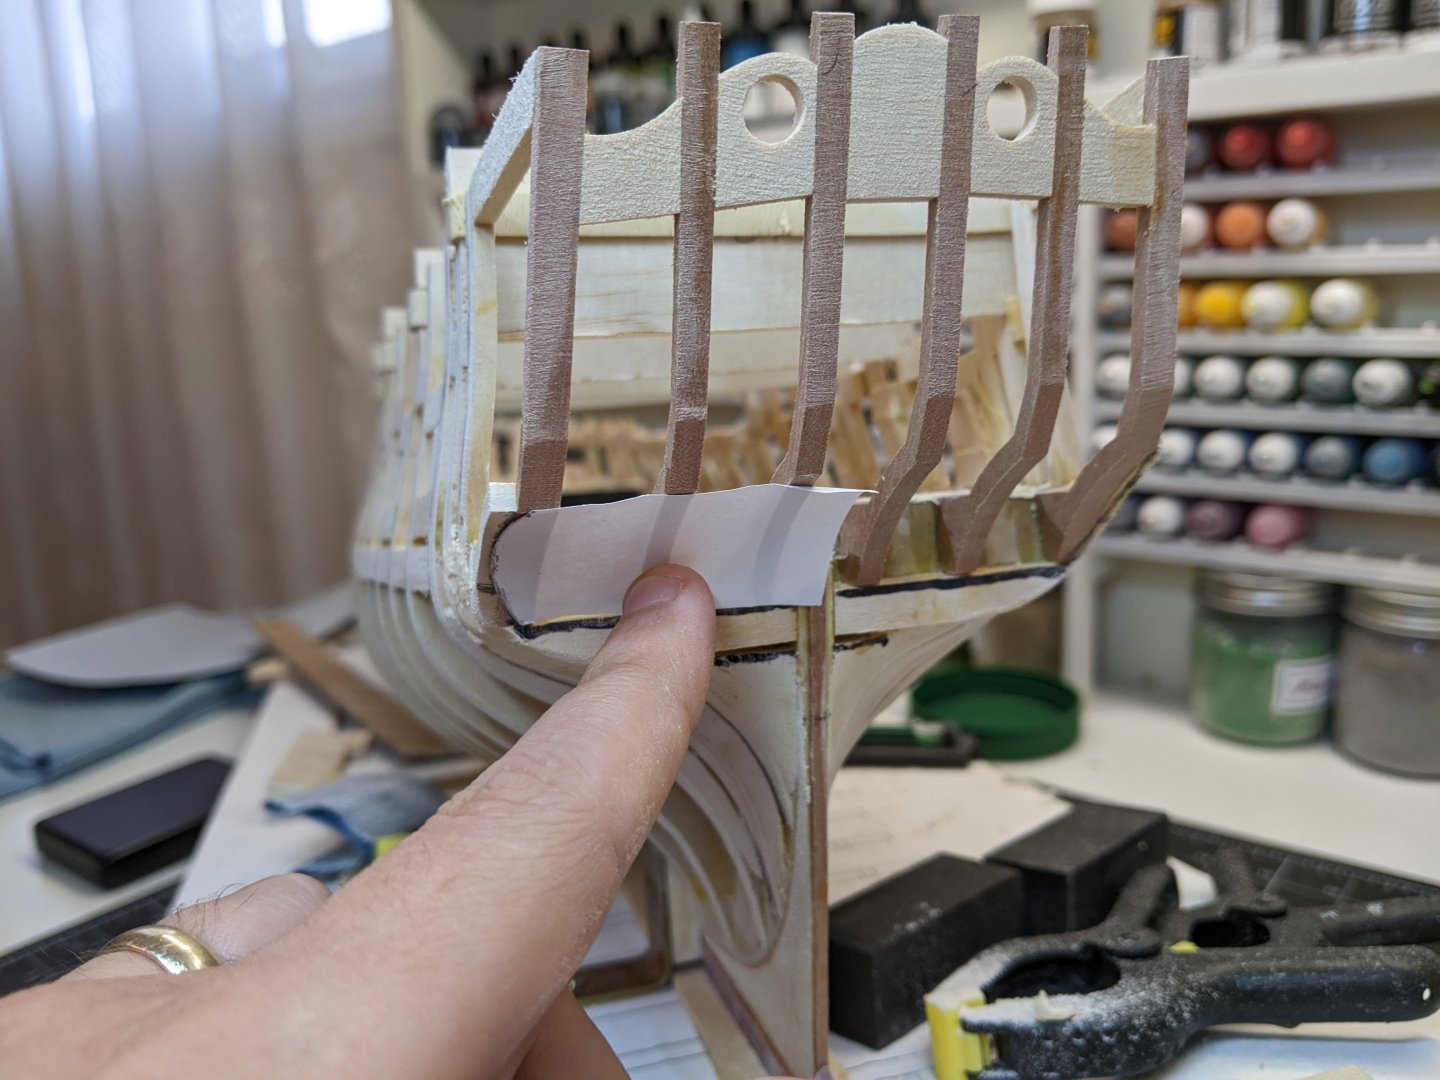
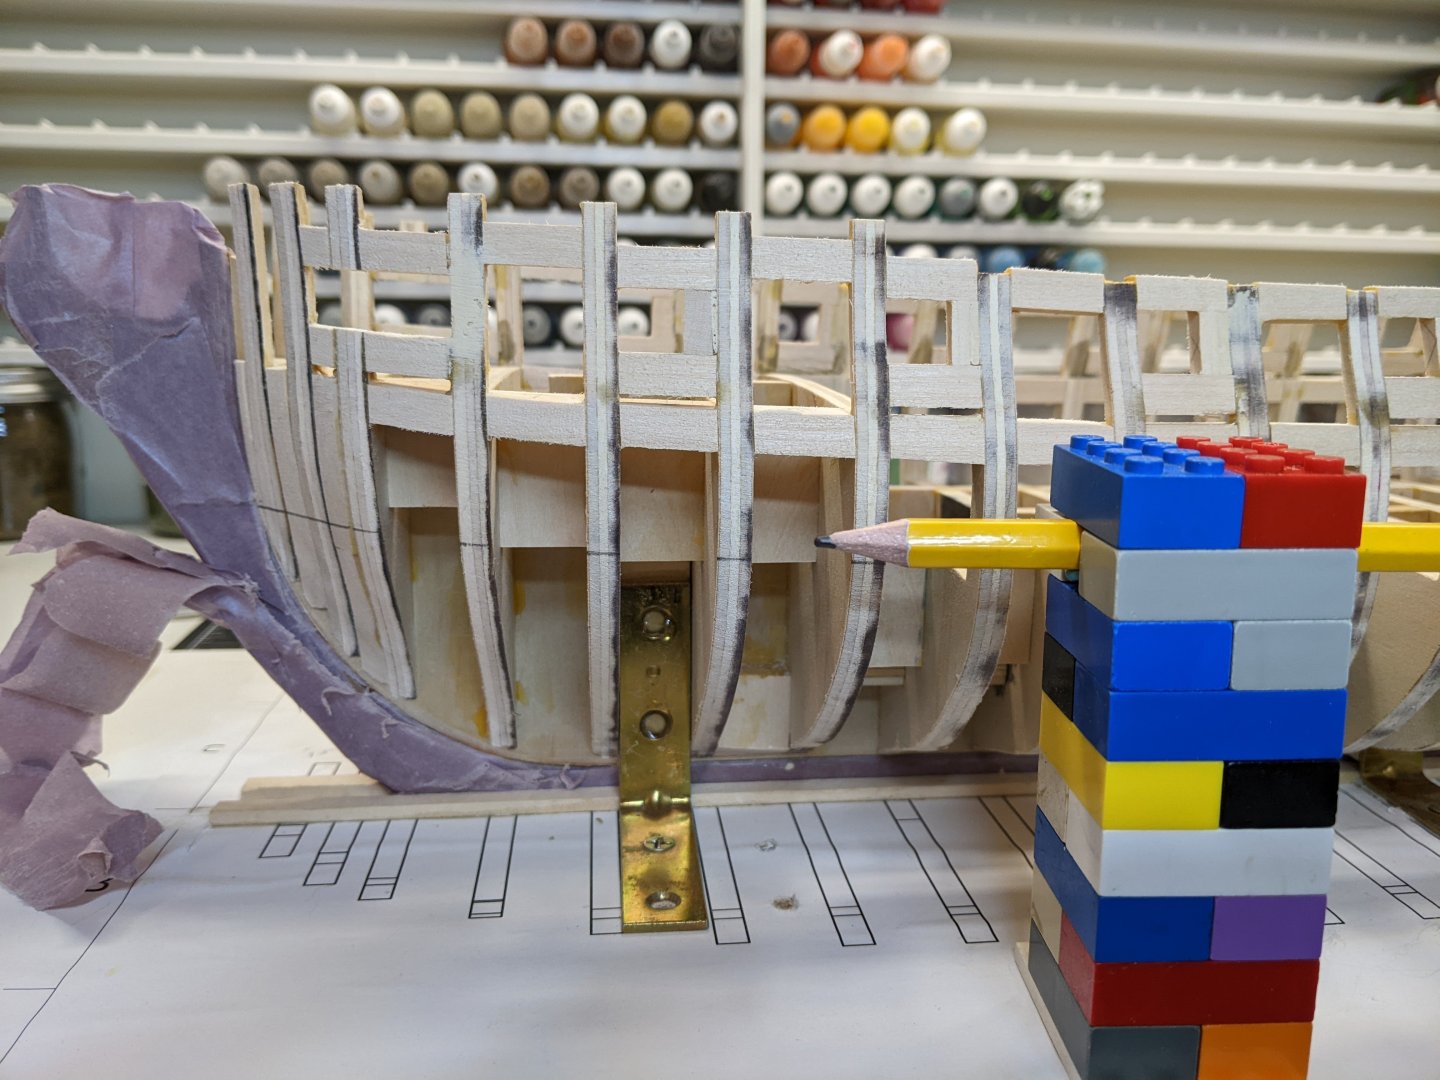
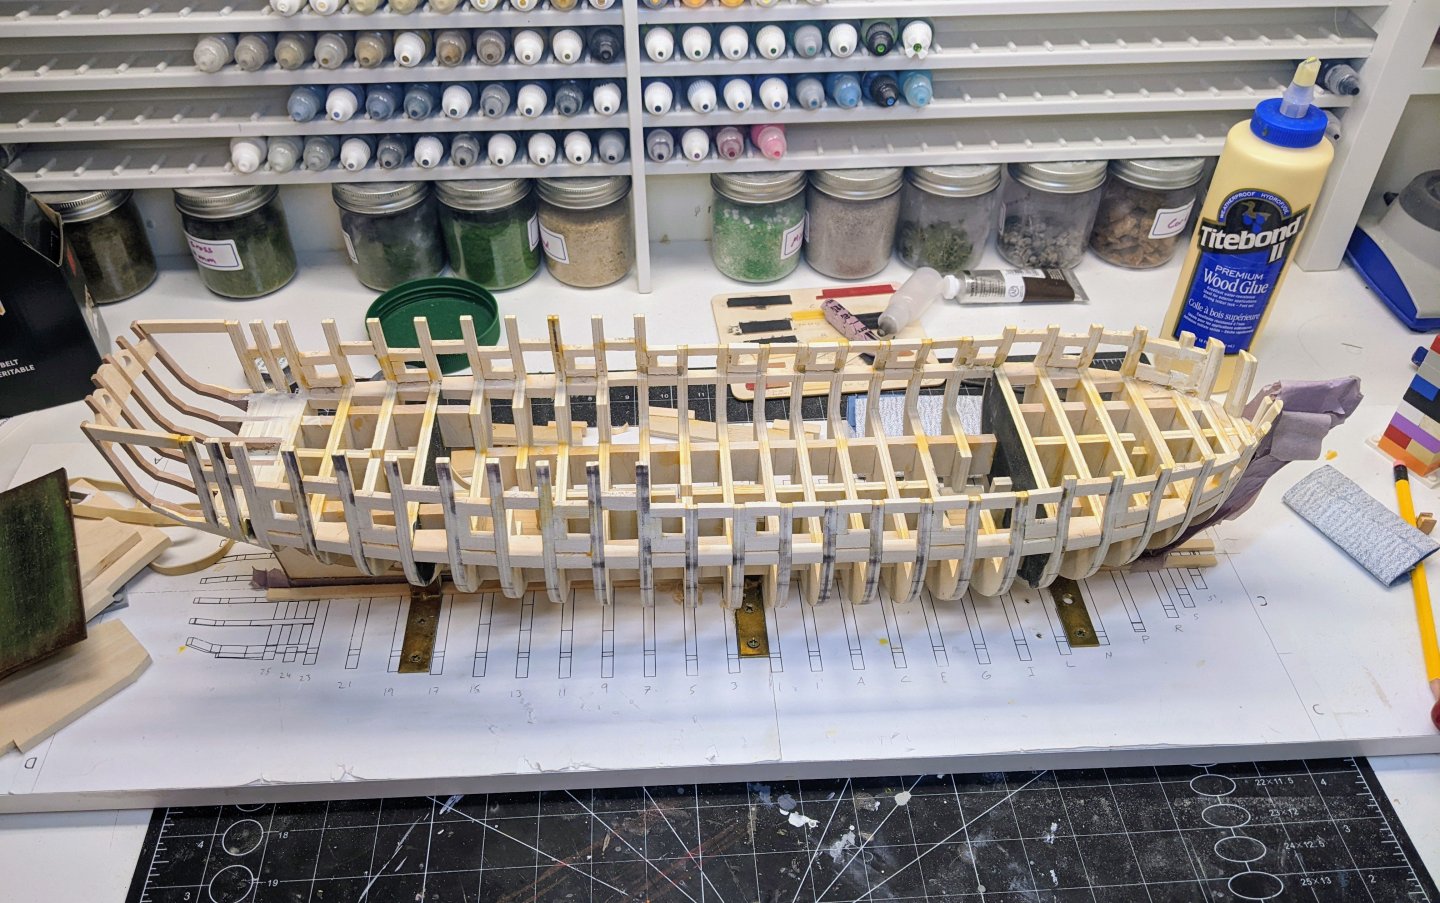
Log #31: Framing the Stern Part II It has been a while since I last posted as much of the work has been incremental small pieces and so I didn't really feel I had a cohesive narrative to share. So while I have titled this post as concerning the stern frames (which do make up a bunch of the work), in general this is more of a collection of odds and ends I have gotten done over the past month. Stern Framing The first step in finishing the stern framing was to add on the filler blocks to the outside of the outer frames. These blocks provide the material for me to shape the curve of the lower part of the frames. The we made using basswood so they can easily be sanded down. Next I needed to add filler pieces for the transom. These are designed to help with the shaping of the flow of the planks up to the stern which I figured would be much easier to do by faring as opposed to trying to perfectly design the pieces. To start with I cut two pieces matching the shape of the bottom of the lower counter from my plans. These were then glued in place with the upper edge darkened with marker. I do this to help avoid overfaring. Once the filler blocks were in place I started the process of gluing in the filler pieces for the upper part of the transom. First I had to sand down the various pieces at an angle to make them conform to the shape of the upper frames. I don't have any pictures of this process, but it was mostly just a bank and forth process making sure I was taking off the right amount of material at the correct angle. I then took a perspective plan of the transom perpendicular to the angle of the upper framing. I then held it in place with clips to allow me to adjust the positioning of the filler pieces. And here you can see all the filler pieces in place. I should note that I did leave a bunch of material on the filler pieces to allow me to sand them while on the frames to conform the shape to the proper curve. Then I turned my attention to the lower counter. I drafted a template for the shape of the outer curve which I used to mark where I needed to sand to. I used the same template flipped to the right to get the other side correct. You can see from the below picture that there is a minor issue with the position of the filling blocks for the upper transom. However, I am not really concerned with this as it look correct on the top and I left sufficient room between the bottom of the filler pieces and the upper framing of the windows to allow for me to make adjustments. The main point of these pieces is to correctly space the frames and define the shape of the upper quarter gallery. In the end they will not be visible as they will be fully covered. Then to stabilize the frames for the sanding I added two support pieces joining the final bulkhead to the stern frames. Bow Gunports The bow gunports also needed to be worked on. I had previously shown how I had added the bottom and tops of them, but now it was time to cut the bulkhead to make room for the port. I then carefully sanded the area before using the plans to mark the location of one side of the ports. These could not be done with the others as they need to be perpendicular to hull at that point since they are sided by cant frames. The same jigs as previously shown were used to make sure the port size was consitant. Waterline I also took this opportunity to mark the waterline. As previously mentioned the waterline is not actually parallel to the keel so I had previously measured and marked the point at the bow and stern to get the correct angle. Now tipping the model with the little bit of wiggle room available on my build board I used my trusty Lego + bluetack combo to mark the consistent waterline along the bulkheads. I need to do this now as I will need to know the position of the waterline as I plank. Also it will help with properly positioning the Wales as they touch the waterline around midships. Current State of Affairs And here is the current state of affairs after a whole bunch of sanding. I have not fully sanded the inside as I am probably going to wait until the external planking is complete to help with stability. However the rough shape is now correct. Next up I need to frame the quarter gallery doors.


-
There was quite a bit of variation in length of the cannons and there is likely no way to know what exact lengths were on Pegasus. In fact it is likely there was more than one length of cannon on her. That being said, I would recommend taking a look at Caruana's book on English sea ordinance (it is very expensive but you might be able to borrow it through your local library). He discusses the issue in detail and makes some general observations as to which lengths were used on which ships at which times. I will try to remember to take a look when I get home to see if he has anything to say about sloops in the late 18th century. The fully framed model books on the swan class ships which you can get from seawatch books likely have a discussion of the cannons. The authors did tonnes of research for those books so I would defer to whatever they have to say on the subject matter. @thibaultron has made available some very nice models of guns which you can find here: Finally, I have transcribed one set of dimensions from 1780 which I include part of below just in case you find them helpful. It has dimensions for three different sizes of 6pdrs. 1780 Gunnery Tables by Thomas Walton Source: RAM G3n/35a; Caruana, English Sea Ordnance, 218-219. Date: November 1780 DIMENSIONS of the EXTERNAL parts and CALIBRE of IRON GUNS of each NATURE and LENGTH in INCHES and DECIMALS. November 1780 Nature 9 6 4 3 Length in Feet 8½ 7½ 7 9 8 6 6 5½ 4½ On the Base Ring 17 17 17 15.88 15.8 15.5 13.6 13.6 11.6 Before the Base Ring 15.16 15.3 15.4 14.3 14.[0] 13.85 12.1 12.05 10.55 On the First Reinforce Ring 14.7 14.76 14.84 13.55 13.5 13.52 11.75 11.84 10.2 Behind the First Reinforce Ring 11.2 14.36 14.2 12.97 13.0 13.02 11.3 11.34 9.8 Before the first Reinforce Ring 13.34 13.42 13.4 12.2 12.25 12.18 10.57 10.57 9.3 On the Second Reinforce Ring 13.15 13.25 13.22 12.0 12.05 12.05 10.52 10.57 9.15 Behind the Second Reinforce Ring 12.63 12.75 12.8 12.52 11.55 11.55 10.25 10.07 8.75 Before the Second Reinforce Ring 11.76 11.86 11.7 10.7 10.7 10.67 9.3 9.3 8.25 At the Muzzle Astragal 10.16 10.15 10.5 9.2 9.2 9.35 8.18 8.18 7.15 At the swell of the Muzzle 13.15 13.25 13.3 11.87 12.05 11.95 10.4 10.52 9.[?] Thickness of Metal Before the Base Ring 5.47 5.54 5.59 5.32 5.27 5.09 4.44 4.42 3.[?] At the Muzzle Astragal 2.97 2.97 3.14 2.77 2.77 2.84 2.48 2.48 [?] At Charging Cylinder above the Calibre 1.26 1.33 1.38 1.66 1.61 1.43 1.23 1.21 [?] Distance From behind the Base Ring to the hinder parts of the Trunnions 3:5:61 3:0:51 2:9:9 3:8:45 3:5:1 2:5:01 2:5:24 2:2:66 1:8:[?] From behind the Base Ring to the First Reinforce 2:5:14 2:1:7 2:0:0 2:6:8 2:3:4 1:8:56 1:8:56 1:6:8 1:5:[?] From behind the Base Ring to the Second Reinforce 2:0:93 1:9:5 1:7:8 2:3:18 1:11:76 1:4:9 1:5:35 1:3:63 1:0:5 Diameter of the Calibre 4.21 3.66 3.21 2.91 [???] equal [???] parts of the Calibre 4.8 4.175 3.68 3.312
-
Great job, getting the planking done is an important milestone. For next time, one way to help with keeping things lined up is to do the planking in bands. Chuck's planking videos describe the process. You are now entering one of my favorite parts of a build. Lots of visible progress once you get past the planking.
- 63 replies
-
- 4
-

-
- First build
- Cutter
- (and 2 more)
-
Those are some very interesting pictures. The thing that stands out to me is the 3rd picture where it appears the double block has the same woven material over its strap as the mouse. Also the woven texture appears to continue down further on the rope in picture 2 not just over the mouse. I have never seen this before. Thanks for sharing them.
-
One question I have never been able to fully resolve which that picture brings up is worming without serving. Was it common for ropes to be wormed and tarred, but not served?
-
Just chiming in to note that this is all a very interesting discussion. I think in cases like this where there are probably several different options you could go with, it is always best to go with what you think will look best / are confident you can achieve to a high enough standard. If you don’t have a preference between the two my gut would be to go with somthing similar to the Berwick plans. It is closer to your time period and is roughly the same size of ship. Things did change a bunch from 1775 to 1810.
-
Yes you are likely right on the vibrant part. I did choose to paint my alert in that manner (vibrant colours and painted decorations the ship almost certainly didn’t have) purely because I liked how it looked. Another thing I forgot to mention is that figureheads were often painted. I haven’t come across anything concrete on Sphinx, but the yards would tend to paint them yellow ocre, but then the crews would almost immediately paint them in more “lifelike” colours. This was often a major source of pride for them. So Sphinx as launched may have had a yellow figurehead (as in the painting), but Sphinx in the first year of service may very well have had a more elaborately painted figurehead.
-
As per ordnance tables I have found (see below) it should be 6.5 in single blocks which would translate to 2.5mm blocks at 1/64 scale. When I did alert I followed Goodwin which I now believe to be incorrect. If I were doing it again I would stick with 2.5mm single blocks. The breeching would be 4.5 in circumferance which translates to 0.57mm diameter rope at scale, you could round up to 0.6mm. The tackles would be 2 in circumferance rope which translates to 0.25mm diameter rope at scale. Table 5.X - Breechings, Tackle and Blocks Per Gun Circa 1765-1794 Breeching Size (in) Gun Tackle Size (in) Blocks (Single) Blocks (Double) Size (in) Number Size (in) Number Guns 32 pdr 7 3 10 2 10 2 24 pdr 6½ 3 10 2 10 2 18 pdr 5½ 2½ 8 2 8 2 12 pdr 5½ 2½ 8 2 8 2 9 pdr 4½ 2 6½ 4 6 pdr 4½ 2 6½ 4 4 pdr 3½ 1½ 5 4 Carronades 32 pdr 7 2½ 8 2 8 2 24 pdr 6½ 2 6½ 4 18 pdr 5½ 1½ 5 2 12 pdr 5½ 1½ 5 2 Source: TNA ADM 160/150; TNA WO 55/1745; Caruana, English Sea Ordnance, 229. Take a look at the many alert build logs on the site. Lots of different takes and things to learn. Always better to lear from other’s mistakes. Make sure you start a build log .
-
This is a very important consideration. Models need to be treated as any other primary source piece of material and judged as such. There is also the question of the art of what you are doing. Very few of us can actually fully accomplish modelling every detail so in some respects every model is an interpretation of the actual vessel. Even though I tend to fall on the research it and get it as accurate as possible side of the modelling continuum I still believe that asthetic considerations are very important part of the decision making process, especially when it is unclear what the ship actually looked like. One thing to note with the Marshall painting is that there is no evidence that the painter ever saw the actual ship and the painting is not even based on an actual model. The painting was done based on a perspective drawing of the ship which was done by drafters based on the plans. The plans themselves have none of the painted decorations on them. Given the aesthetic similarities between the many of the Marshall paintings I suspect that the decorations were simply a product of his imagination and he chose to make the various ship models he did paintings of have a similar aesthetic as they were all meant to be displayed together. That being said it is possible he saw the actual ship and I suspect he knew better than I do what was typical for a ship of the period….
-
That deck does look very nice. Good job.
-
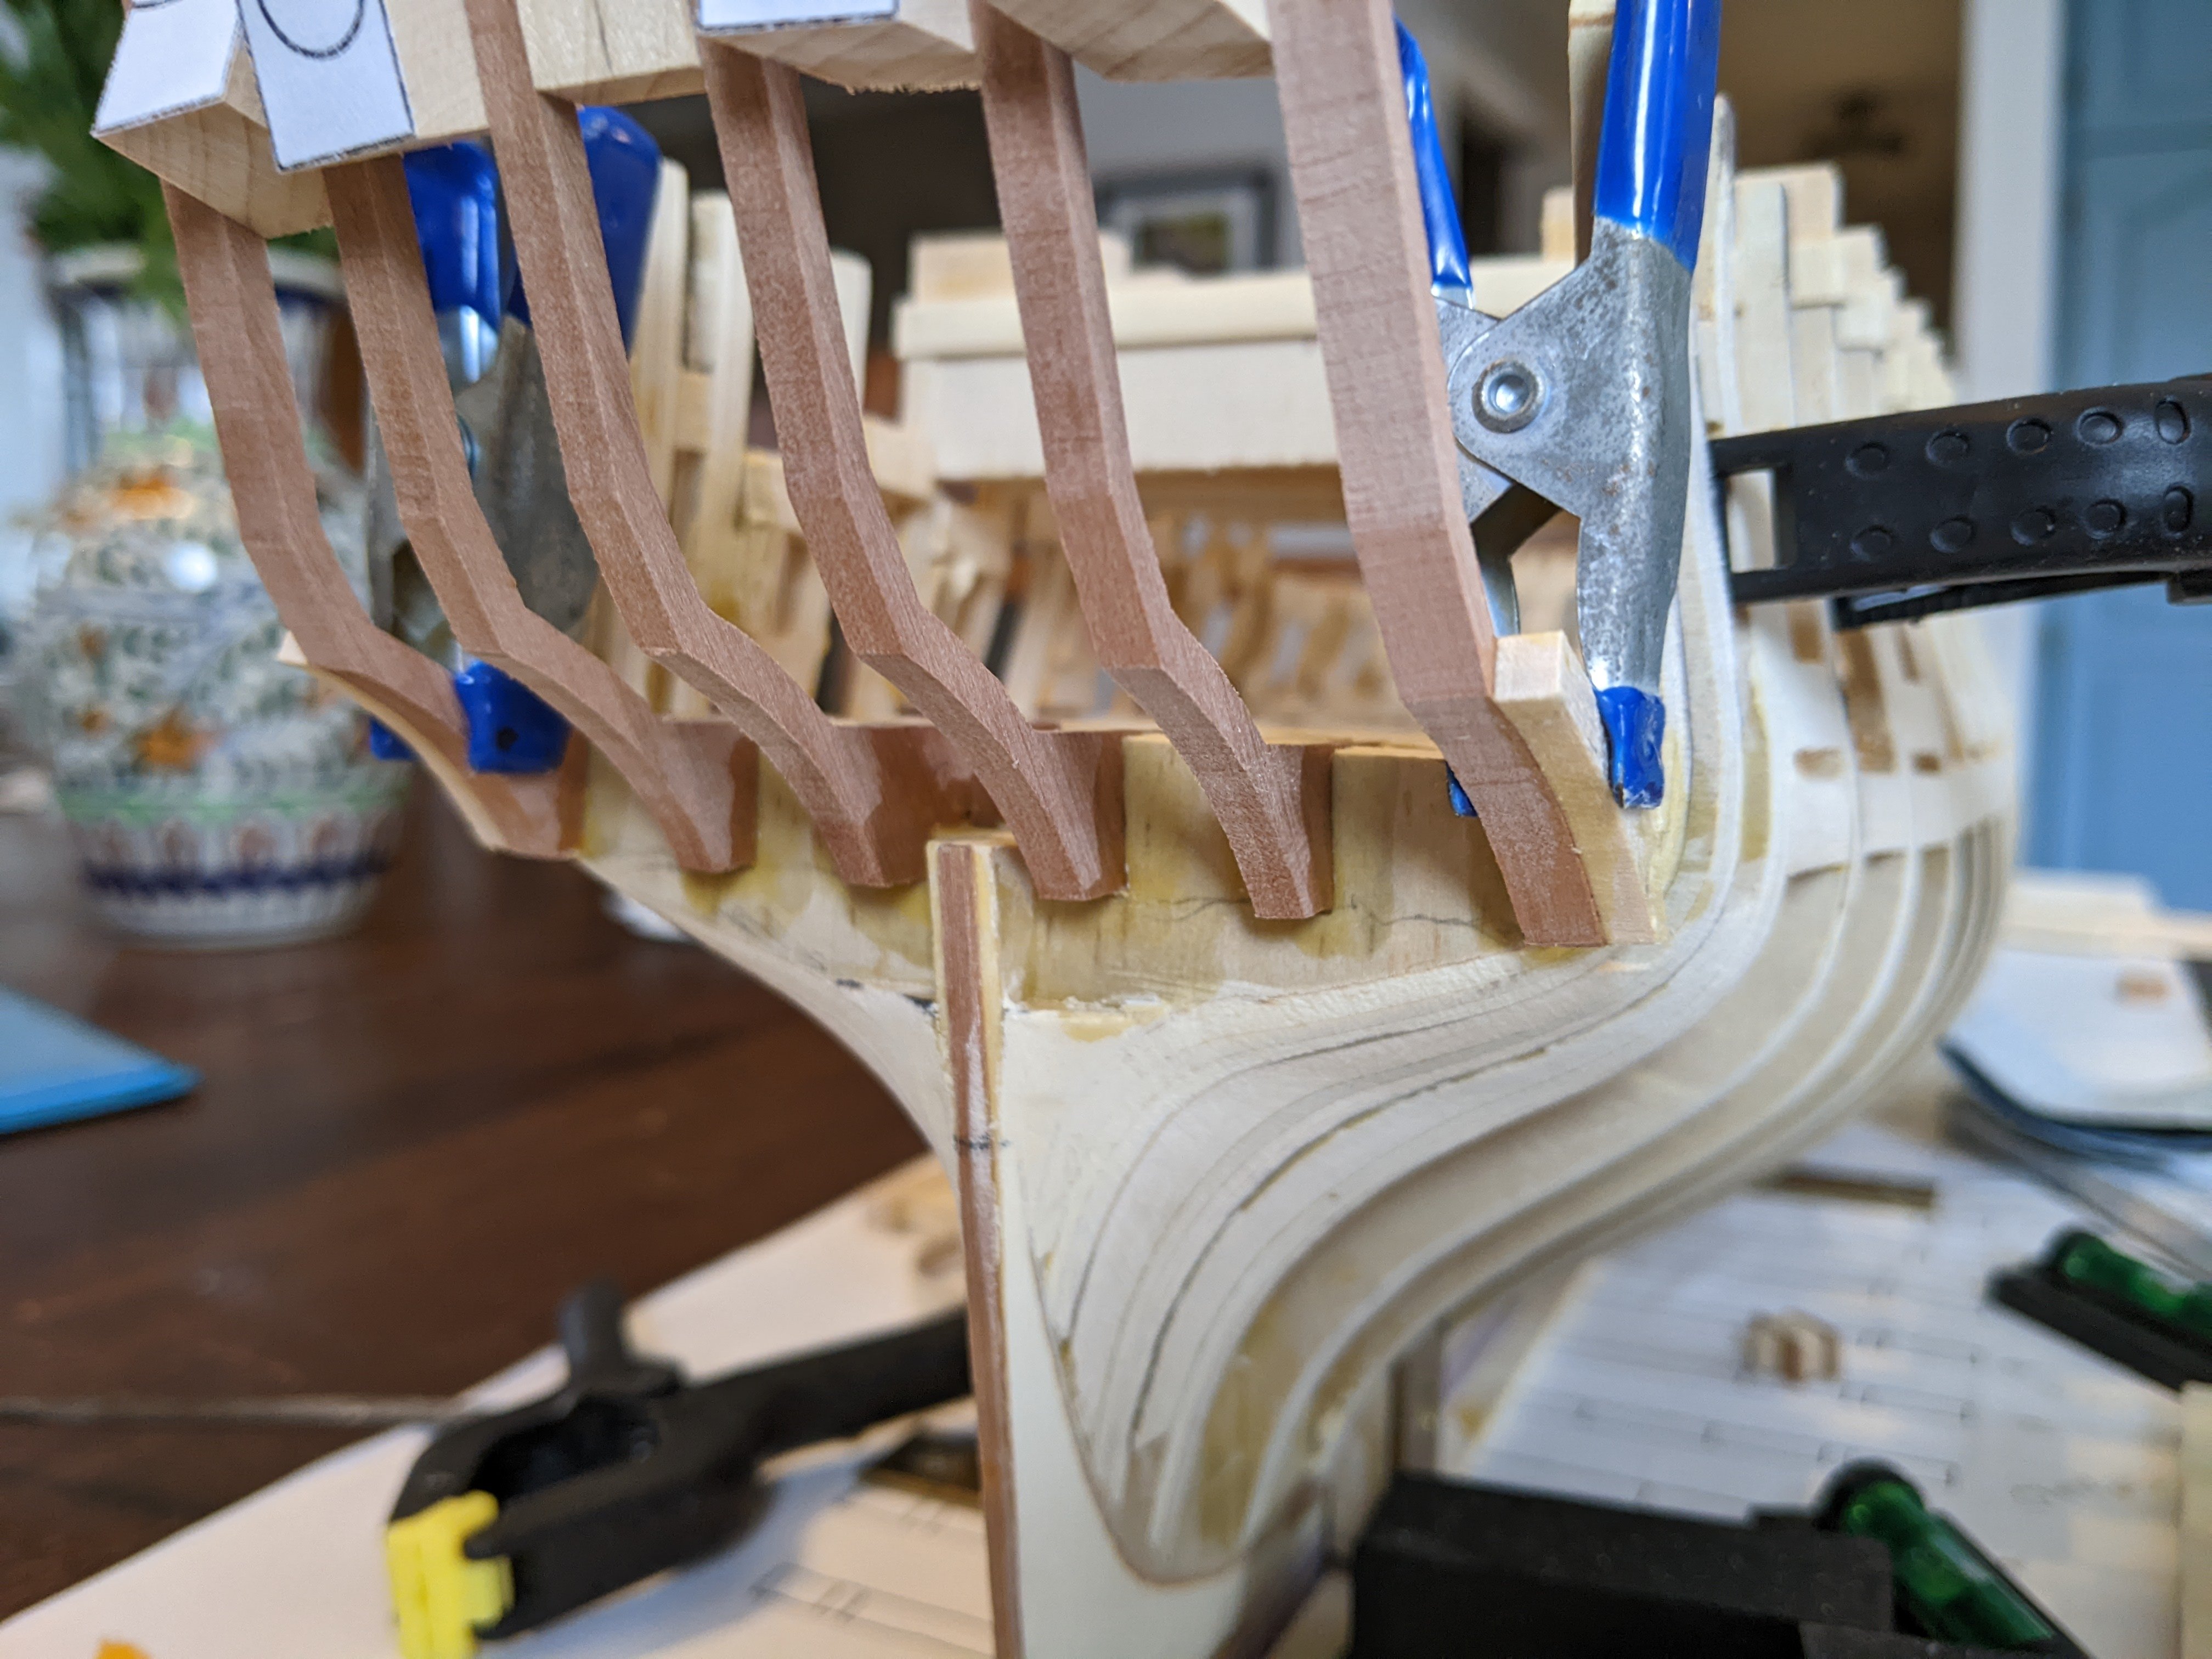
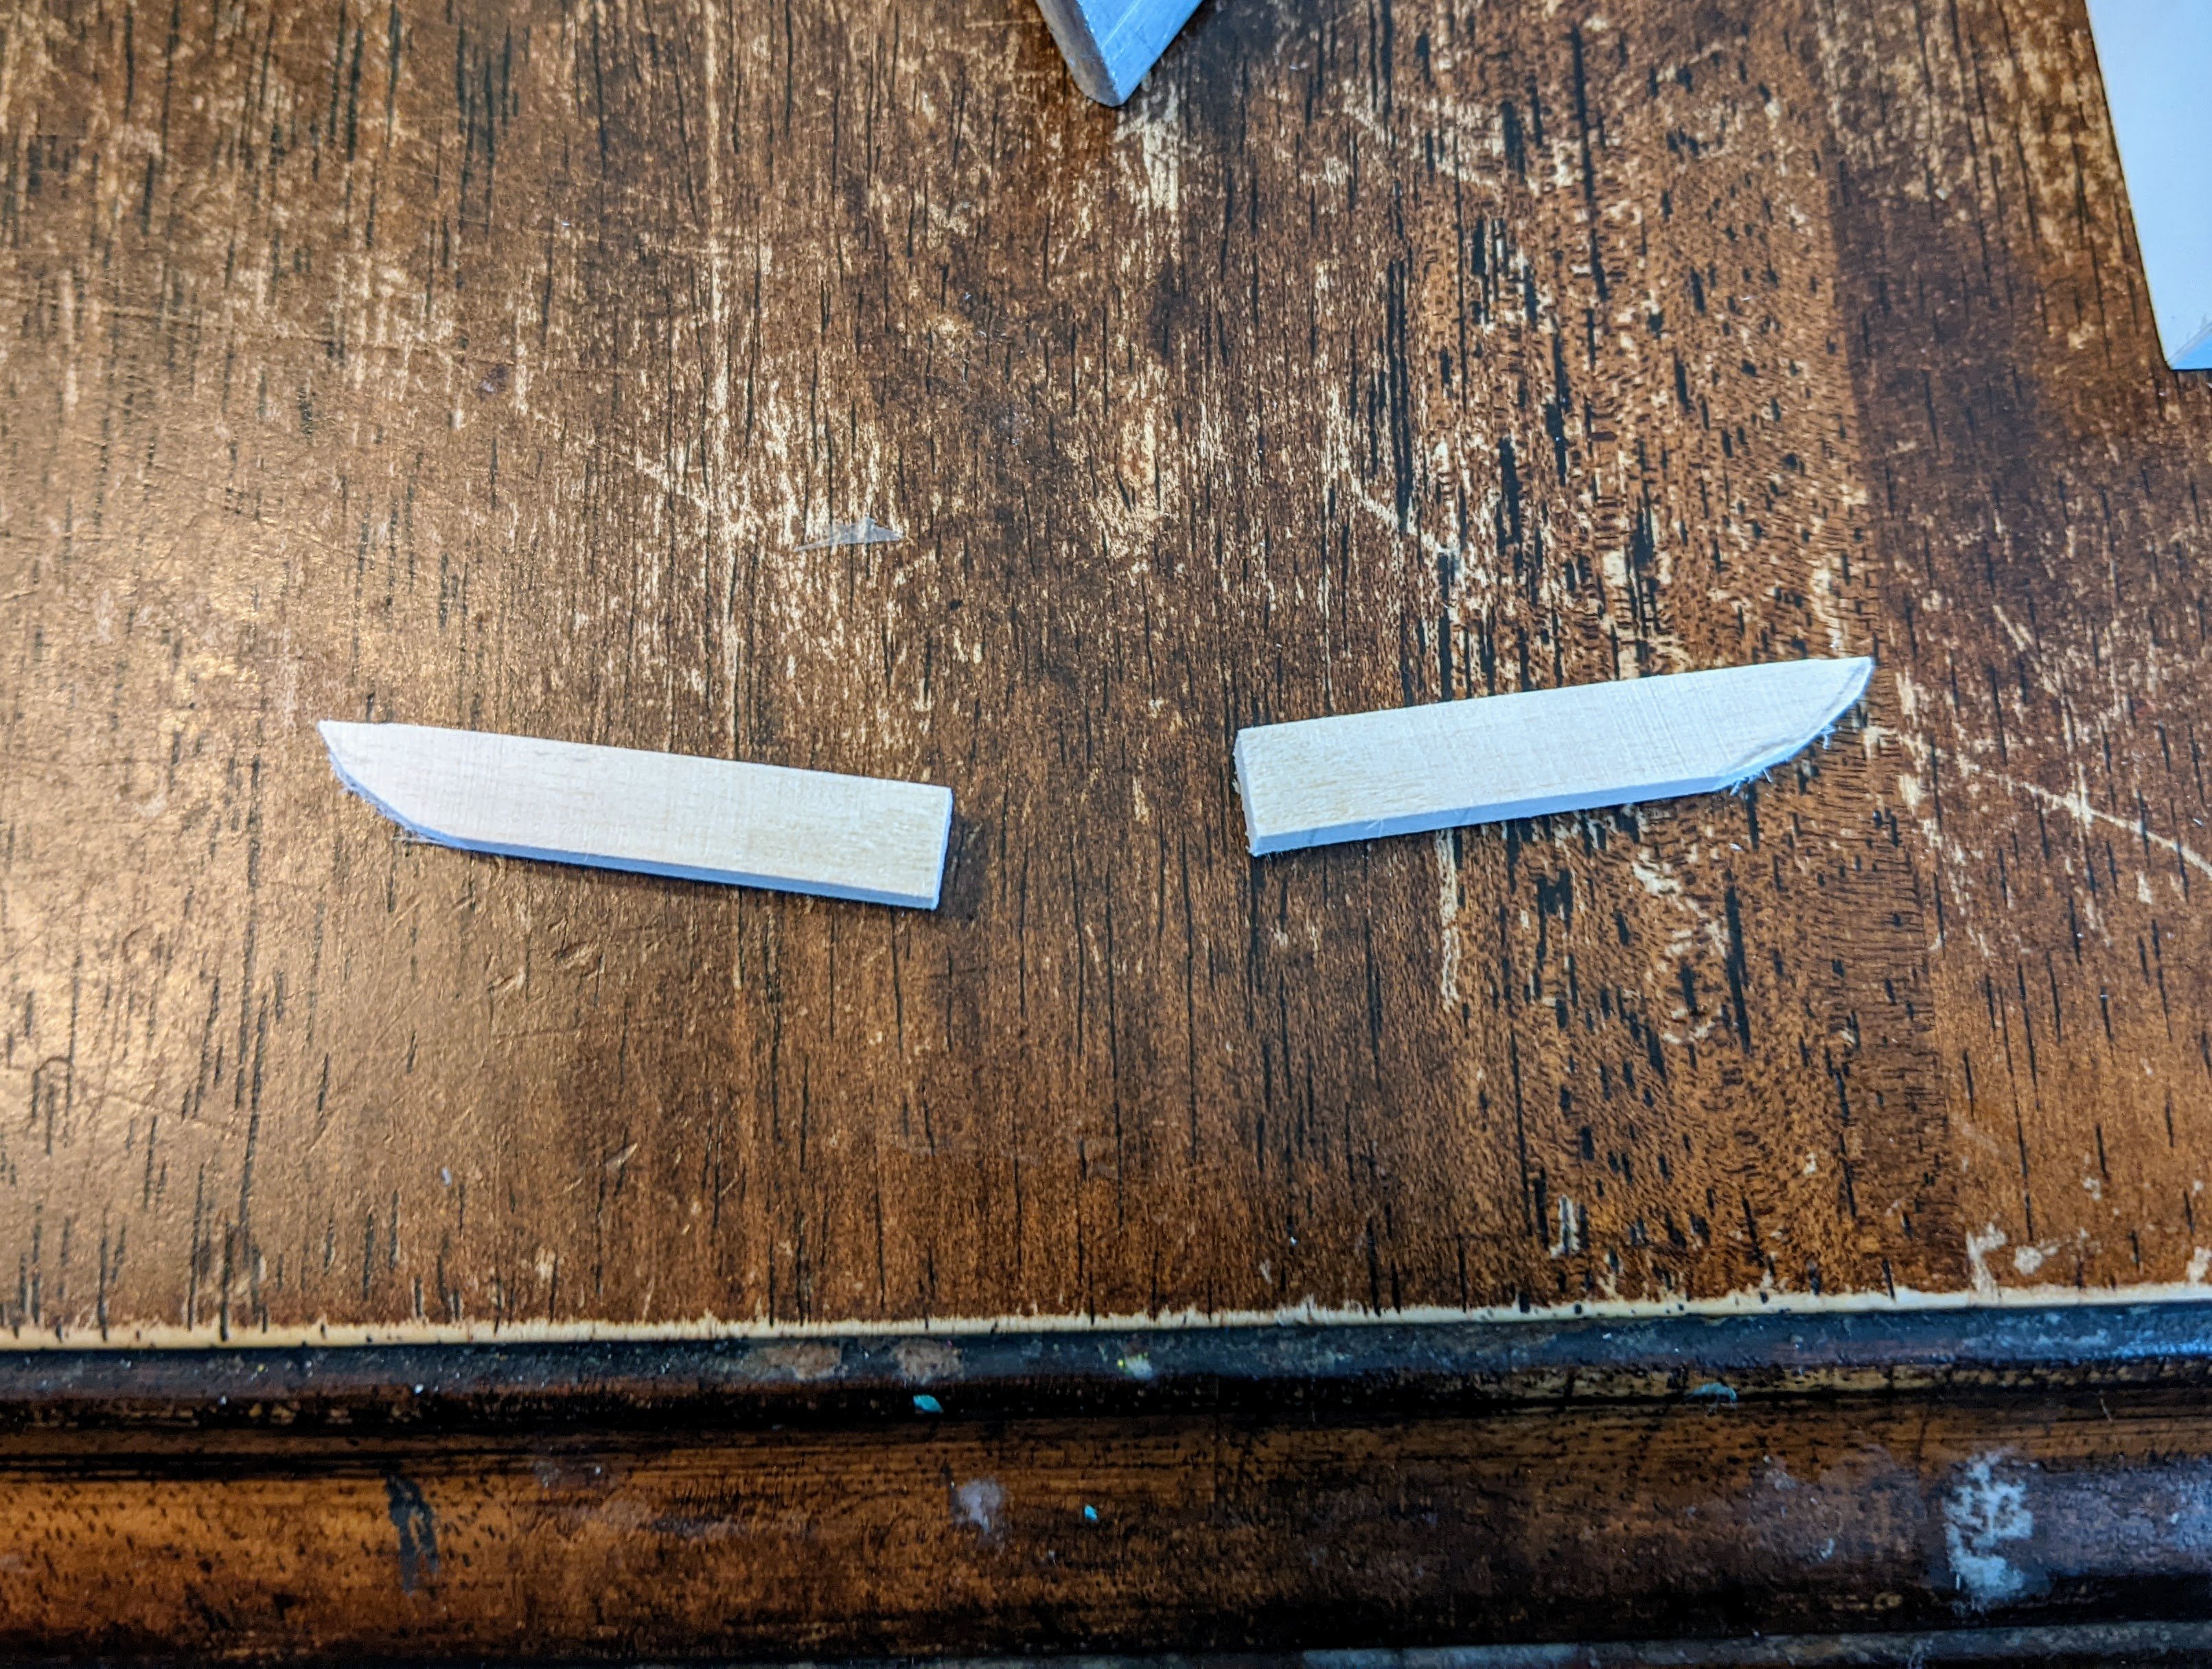
Log #30: Framing the Stern Part I As I alluded to in update 28, there were a few cases where I took too much off with the faring. One of those is visible in the last image in the post. I had been overzelous in my sanding around the reinforcement for the stern fastener and took too much off of one side. This was actually fixed just after I posted log 28, but I was waiting till my next progress post to show the correction. You can see I used a combination of scrap pear and wood filler to build up the area before sanding it back down. This time I paid careful attention to the run of the battons in the area and checked from the stern frequently to make sure the bulkheads were the same on both sides. With that correction done, it was time to turn my attention to the framing of the stern. I was pretty apprehensive about this part of the build as even slight issues are much harder to correct (can't just stick some filler on it). Cutting the stern framing pieces turned out to be much easier than I thought. I guess all my practice on the rest of the build has made me much more precise with the scroll saw, but I didn't have issues cutting them apart from the usual very small touchups needed with a file. I cut them out of pear for two reasons: Strength, the pear is much stronger than plywood of basswood. I have not yet fully decided what I am going to do finish wise around the stern galleries and so there is a chance that I might want to show bare wood. I tried to arrange them so as to minimize grain issues on the thin protruding parts of the pieces. You can see in the above picture me arranging the two inner frames. I have a basswood filler piece in-between them which represents the shape of the top of the transom. This serves two purposes. First, it will define the shape (though it will ultimately be covered by planking and a thin rail piece). Second, it helps me correctly adjust the spacing on the frames. I spent a long time getting these in just the right place. You can see how in the above picture I am using a square to make sure they are aligned properly with the build board. I would say I spent at least an hour making micro adjustments and looking at it from every angle. Once I was happy I then brushed watered down wood glue into the joints. I did this because I was not confident I could get the alignment done properly before the glue began to set, so it was better to get everything in place and then add the glue. And above you can see the state of affairs after the next two frames have been added. The filler pieces have not yet been thinned down for final installation, but they work fine as spacers for the moment. The process for adding all the subsequent frames was the same as the first and took place over multiple days. I waited for each set of frames to dry and brushed glue into the joints a second time for each to make sure there was no risk of things shifting. And here is the current state of affairs. I have added the final two frames, but they are not yet complete as I need to add some basswood filler pieces to the outside of them to represent the complex curve that the outer frames were made of. This technique I am copying from Chuck's Winchelsea instructions which I have relied on heavily in this structural phase of the project. You may also notice that the outer frames are slightly thicker. This is because they need to be sanded to have a slight curve, but this will not be done until the rest of the stern framing is complete. Thanks again to everyone who has stopped by to take a look and for all your encouragement.


-
Another fantastic model and build log complete. I really quite like the presentation you have gone for here with the topmasts struck.
- 332 replies
-
- 3
-
-

-
- Harpy
- Vanguard Models
- (and 1 more)
-
I used panty hoes. You can stretch it round the mouse to give a nice woven effect.
- 341 replies
-
- 3
-

-
-

-
- Sophie
- Vanguard Models
- (and 1 more)
-
Fantastic work Ronald. I too prefer the black look for the horseshoe even if the copper look is likely more accurate.
-
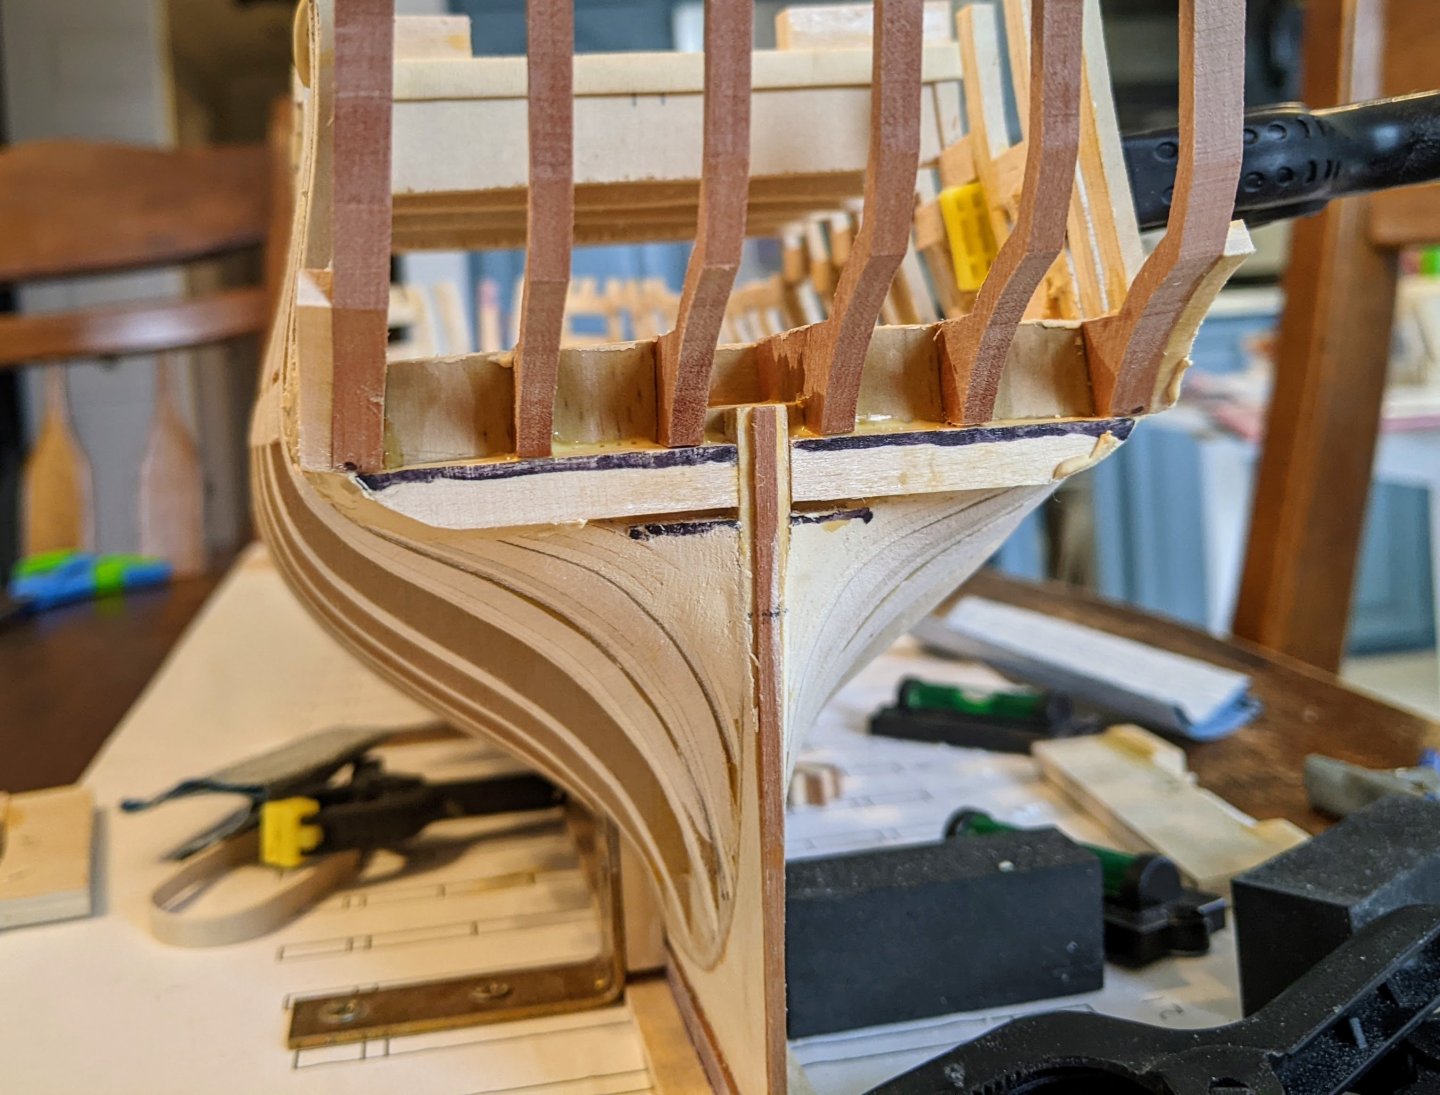
Just a small suggestion. Take a look at the planking tutorial under modeling techniques at the top of the page. It looks to me like you are not edge bending the bow enough. They shouldn't twist off the hull like that, but should lay flat. I also describe the process in my alert log.
- 20 replies
-
- 3
-
-
- Sherbourne
- Vanguard Models
- (and 1 more)
-
You have made a good start. Take it slow and careful with the faring. The bow looks like it could do with a bit more sanding. You essentially want only a thin line of the char on the one edge of each bulkhead. If you still see black all over then you have not taken enough off. Make sure you are careful not to sand the keel now that you have it on the model. One trick is to take some of the thin strips and hold them against the line of the hull at various angles. They should lie flat against the bulkheads in a smooth curve. If there are any air gaps it probably means you took too much off or the bulkheads on either side don't have enough taken off. Good luck.
- 20 replies
-
- 5
-
-
- Sherbourne
- Vanguard Models
- (and 1 more)
-
Those are some super cool options. I appreciate @chris wattonhow you are giving modelers flexibility. She is going to be quite the model. Just to add an interesting anecdote on gun carriage colours. I have even found some evidence which suggest that the one ship (mid 1770s) may have had guns in both colours. Those on the forecastle were painted red, but those on the main gun deck painted yellow. So I suspect there was a fair bit of variation.
-
Stunning work. The precision you display is an inspiration.
-
Welcome to MSW. Sherburne is a great choice for a first model. Good luck.