Thukydides
-
Posts
1,362 -
Joined
-
Last visited
Content Type
Profiles
Forums
Gallery
Events
Everything posted by Thukydides
-
 As per ordnance tables I have found (see below) it should be 6.5 in single blocks which would translate to 2.5mm blocks at 1/64 scale. When I did alert I followed Goodwin which I now believe to be incorrect. If I were doing it again I would stick with 2.5mm single blocks. The breeching would be 4.5 in circumferance which translates to 0.57mm diameter rope at scale, you could round up to 0.6mm. The tackles would be 2 in circumferance rope which translates to 0.25mm diameter rope at scale. Table 5.X - Breechings, Tackle and Blocks Per Gun Circa 1765-1794 Breeching Size (in) Gun Tackle Size (in) Blocks (Single) Blocks (Double) Size (in) Number Size (in) Number Guns 32 pdr 7 3 10 2 10 2 24 pdr 6½ 3 10 2 10 2 18 pdr 5½ 2½ 8 2 8 2 12 pdr 5½ 2½ 8 2 8 2 9 pdr 4½ 2 6½ 4 6 pdr 4½ 2 6½ 4 4 pdr 3½ 1½ 5 4 Carronades 32 pdr 7 2½ 8 2 8 2 24 pdr 6½ 2 6½ 4 18 pdr 5½ 1½ 5 2 12 pdr 5½ 1½ 5 2 Source: TNA ADM 160/150; TNA WO 55/1745; Caruana, English Sea Ordnance, 229. Take a look at the many alert build logs on the site. Lots of different takes and things to learn. Always better to lear from other’s mistakes. Make sure you start a build log .
 -
This is a very important consideration. Models need to be treated as any other primary source piece of material and judged as such. There is also the question of the art of what you are doing. Very few of us can actually fully accomplish modelling every detail so in some respects every model is an interpretation of the actual vessel. Even though I tend to fall on the research it and get it as accurate as possible side of the modelling continuum I still believe that asthetic considerations are very important part of the decision making process, especially when it is unclear what the ship actually looked like. One thing to note with the Marshall painting is that there is no evidence that the painter ever saw the actual ship and the painting is not even based on an actual model. The painting was done based on a perspective drawing of the ship which was done by drafters based on the plans. The plans themselves have none of the painted decorations on them. Given the aesthetic similarities between the many of the Marshall paintings I suspect that the decorations were simply a product of his imagination and he chose to make the various ship models he did paintings of have a similar aesthetic as they were all meant to be displayed together. That being said it is possible he saw the actual ship and I suspect he knew better than I do what was typical for a ship of the period….
-
That deck does look very nice. Good job.
-
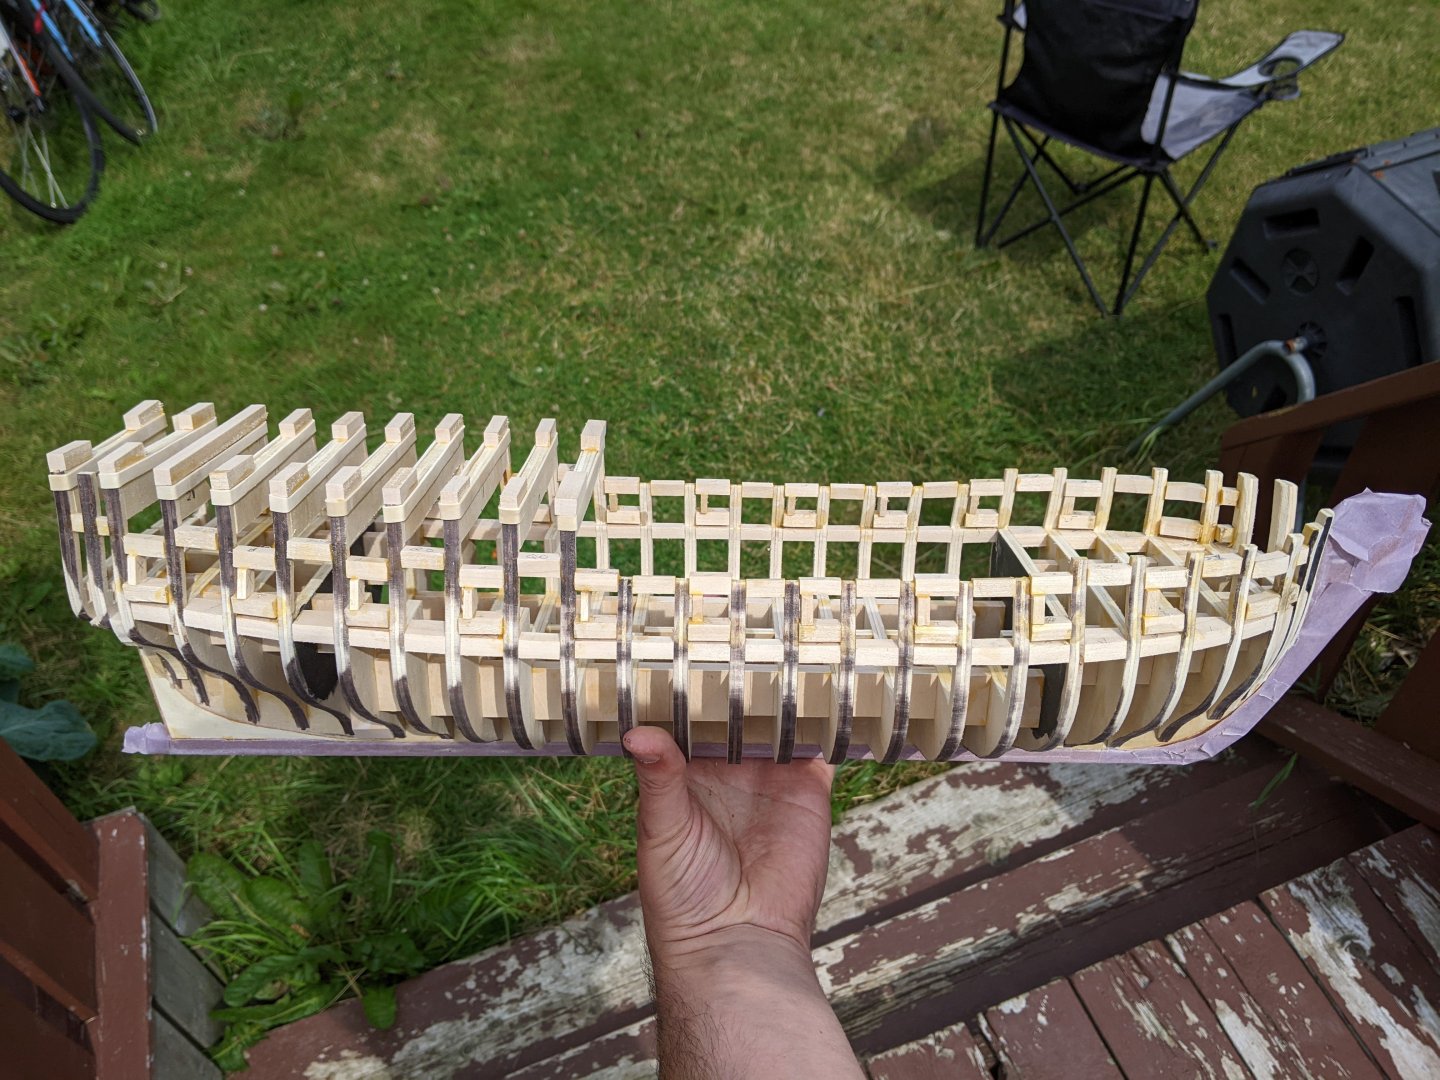
Log #30: Framing the Stern Part I As I alluded to in update 28, there were a few cases where I took too much off with the faring. One of those is visible in the last image in the post. I had been overzelous in my sanding around the reinforcement for the stern fastener and took too much off of one side. This was actually fixed just after I posted log 28, but I was waiting till my next progress post to show the correction. You can see I used a combination of scrap pear and wood filler to build up the area before sanding it back down. This time I paid careful attention to the run of the battons in the area and checked from the stern frequently to make sure the bulkheads were the same on both sides. With that correction done, it was time to turn my attention to the framing of the stern. I was pretty apprehensive about this part of the build as even slight issues are much harder to correct (can't just stick some filler on it). Cutting the stern framing pieces turned out to be much easier than I thought. I guess all my practice on the rest of the build has made me much more precise with the scroll saw, but I didn't have issues cutting them apart from the usual very small touchups needed with a file. I cut them out of pear for two reasons: Strength, the pear is much stronger than plywood of basswood. I have not yet fully decided what I am going to do finish wise around the stern galleries and so there is a chance that I might want to show bare wood. I tried to arrange them so as to minimize grain issues on the thin protruding parts of the pieces. You can see in the above picture me arranging the two inner frames. I have a basswood filler piece in-between them which represents the shape of the top of the transom. This serves two purposes. First, it will define the shape (though it will ultimately be covered by planking and a thin rail piece). Second, it helps me correctly adjust the spacing on the frames. I spent a long time getting these in just the right place. You can see how in the above picture I am using a square to make sure they are aligned properly with the build board. I would say I spent at least an hour making micro adjustments and looking at it from every angle. Once I was happy I then brushed watered down wood glue into the joints. I did this because I was not confident I could get the alignment done properly before the glue began to set, so it was better to get everything in place and then add the glue. And above you can see the state of affairs after the next two frames have been added. The filler pieces have not yet been thinned down for final installation, but they work fine as spacers for the moment. The process for adding all the subsequent frames was the same as the first and took place over multiple days. I waited for each set of frames to dry and brushed glue into the joints a second time for each to make sure there was no risk of things shifting. And here is the current state of affairs. I have added the final two frames, but they are not yet complete as I need to add some basswood filler pieces to the outside of them to represent the complex curve that the outer frames were made of. This technique I am copying from Chuck's Winchelsea instructions which I have relied on heavily in this structural phase of the project. You may also notice that the outer frames are slightly thicker. This is because they need to be sanded to have a slight curve, but this will not be done until the rest of the stern framing is complete. Thanks again to everyone who has stopped by to take a look and for all your encouragement.


-
Another fantastic model and build log complete. I really quite like the presentation you have gone for here with the topmasts struck.
- 332 replies
-
- 3
-

-

-
- Harpy
- Vanguard Models
- (and 1 more)
-
I used panty hoes. You can stretch it round the mouse to give a nice woven effect.
- 341 replies
-
- 3
-

-
-

-
- Sophie
- Vanguard Models
- (and 1 more)
-
Fantastic work Ronald. I too prefer the black look for the horseshoe even if the copper look is likely more accurate.
-
Just a small suggestion. Take a look at the planking tutorial under modeling techniques at the top of the page. It looks to me like you are not edge bending the bow enough. They shouldn't twist off the hull like that, but should lay flat. I also describe the process in my alert log.
- 20 replies
-
- 3
-
-
- Sherbourne
- Vanguard Models
- (and 1 more)
-
You have made a good start. Take it slow and careful with the faring. The bow looks like it could do with a bit more sanding. You essentially want only a thin line of the char on the one edge of each bulkhead. If you still see black all over then you have not taken enough off. Make sure you are careful not to sand the keel now that you have it on the model. One trick is to take some of the thin strips and hold them against the line of the hull at various angles. They should lie flat against the bulkheads in a smooth curve. If there are any air gaps it probably means you took too much off or the bulkheads on either side don't have enough taken off. Good luck.
- 20 replies
-
- 5
-
-
- Sherbourne
- Vanguard Models
- (and 1 more)
-
Those are some super cool options. I appreciate @chris wattonhow you are giving modelers flexibility. She is going to be quite the model. Just to add an interesting anecdote on gun carriage colours. I have even found some evidence which suggest that the one ship (mid 1770s) may have had guns in both colours. Those on the forecastle were painted red, but those on the main gun deck painted yellow. So I suspect there was a fair bit of variation.
-
Stunning work. The precision you display is an inspiration.
-
Welcome to MSW. Sherburne is a great choice for a first model. Good luck.
-
Good luck, getting those joints tight will not be easy. The orloop is looking very nice.
-
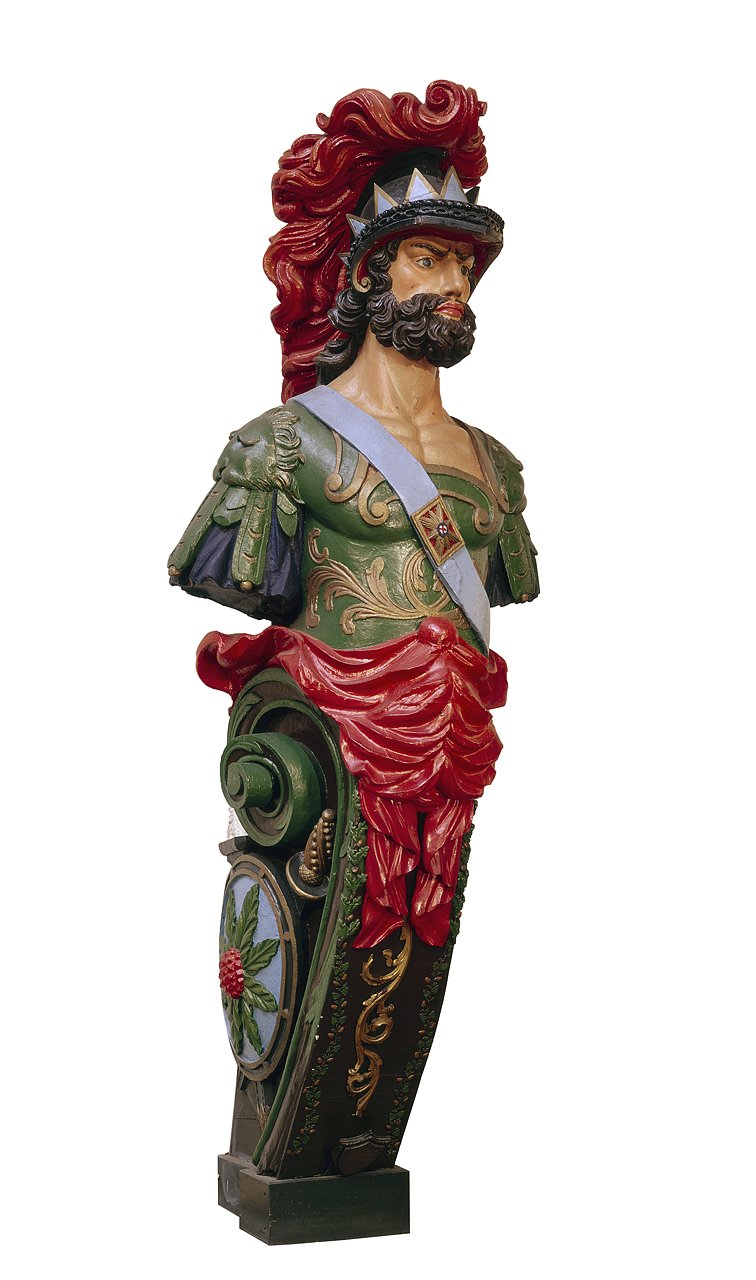
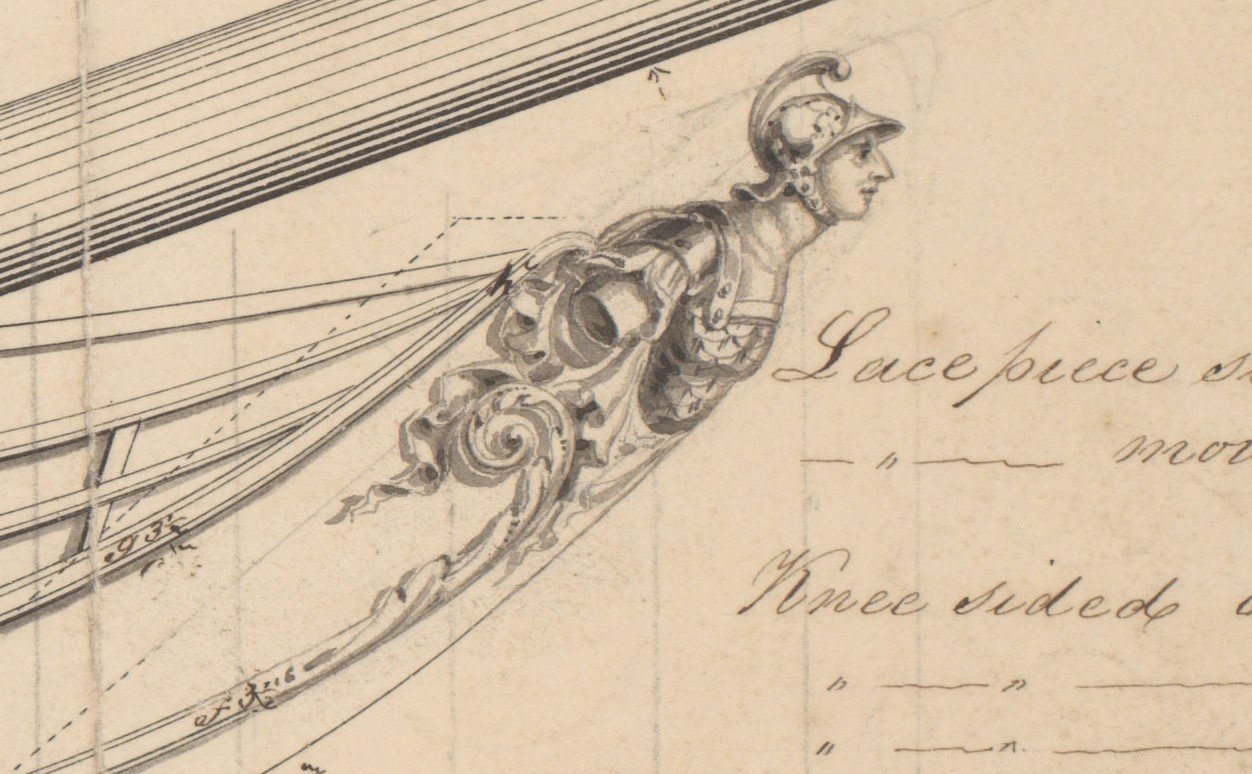
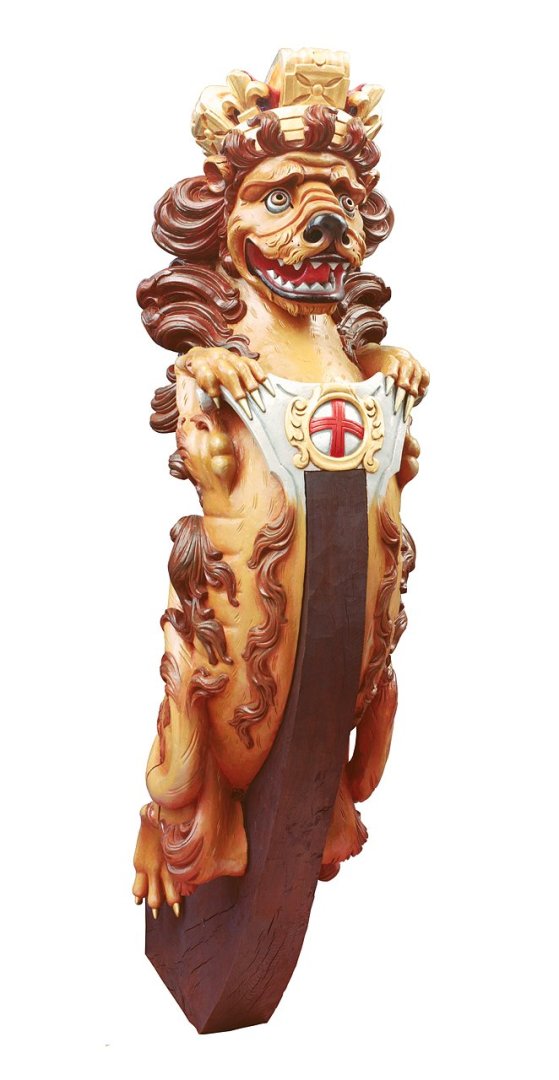
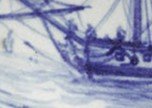
Log #29: Researching the Figurehead As the structure of the model gets closer and closer to being done, I have been turning my attention to trying to finalize my research on the things that will impact the next stage of the build. Much like my post on the wales, I am documenting the current state of my thoughts now to see if anyone has anything to add before I make firm decisions. In the background I have also been working on revising the research document to include parts of Chapter III (which will discuss the bow of the ship) as well as revisions and corrections to the already released sections incorporating feedback I have received as well as more information I have discovered. I am planning on releasing this revised version in the next week or two. The Figurehead Figureheads are in many ways one of the most striking parts of the 18th century sailing vessel. In the 17th century the majority of Royal Navy ships had a lion as a figurehead, but towards the later part of the 17th and into the 18th century the figures began to increase in complexity. By the late 18th century figures relating to the name of the vessel were the predominant choice, but at times the relationship to the name was tenuous at best. This was sometimes the result of renaming, but in other cases it is unclear why a particular figure was chosen. In his book Old Ship Figureheads & Sterns Carr Laughton recounts one particularly egregious example where the frigate Blonde was given a figurehead of a bearded warrior. Figureheads in the late 18th century were looked on with great pride by their crews. Even during the economy of Lord Spencer in 1794, when most new construction received only scrollwork in place of a figurehead, crews often took it upon themselves to add figureheads to their ships. There are accounts of crews adding painted detail to their figures with one captain writing that the figurehead of another sloop was “painted in colours with a bloody nose and a real broomstick in her hand.” National Maritime Museum, Greenwich, London. FHD0120. Despite the prevalence of figures, the lion remained common and there is no definitive evidence in the primary record to indicate what sort of figurehead Perseus was given. The contract for Perseus and Unicorn states that the ships were to receive figureheads, but does not specify beyond stating that they should be “lion or figure with a double trailboard as shall be directed.” Lion figureheads had a long history in the Royal Navy by the time Perseus was constructed and there are numerous examples in the historical record documenting them. One of the few figureheads that have been preserved from the 18th century is of a lion, likely the figurehead of an English 4th or 5th rate circa 1720. National Maritime Museum, Greenwich, London. FHD0088. A similar depiction can be seen in a 1741 model of a 24 gun sixth rate sloop. Most contemporary models seem to have depicted the figureheads painted gold or unpainted. However, many of these models were created by the shipwrights and the painting of the figureheads in more realistic colours was often done upon request or after launch by their crews. National Maritime Museum, Greenwich, London. SLR0461. Only four of the ten Sphinx class ships launched have their figureheads documented by the Admiralty. Plans for Sphinx, Camilla, Daphne and Vestal all show the carved decorations including the figurehead. In each of these cases, the figureheads are unique to the vessel and relate to their name. Though Perseus and Unicorn were not built in Navy Yards, it does seem to suggest that it is more probable that the figurehead related in some way to the name of the ship. Launched 85 years after Perseus 1776 at the end of the sailing era, Perseus 1861, a 17 gun Camelion-class wooden screw sloop, includes an image of the figurehead in the Admiralty plans. The figure is the upper half of a Greek warrior with the traditional forward curve on the helm seen on many contemporary statues depicting Perseus. He is clean shaven, wearing scale mail and is depicted without any limbs. The figure is in the style of other mid 19th century figureheads which dispensed with the full figures from the time of Perseus 1776. National Maritime Museum, Greenwich, London. DIC0111. Probably the most compelling evidence for a figure of Perseus is the blurry figure visible in the image of Perseus on a bowl from 1790. Though it is impossible to say definitively, the figure in the image appears to have an extended arm. Classical depictions of Perseus tend to depict him with the head of Medusa held out in front of him. It should be noted that the idea of having a figure with an extended hand was not uncommon in the period. Termagant, a 22 gun ship launched in 1780 , features a figure with their left hand extended forward as did Leopard 1790. National Maritime Museum, Greenwich, London. AAA4434. Perseus was a Greek mythical hero who is most famous for killing the gorgon Medusa using a polished shield given to him by Athena and winged sandals lent to him by Hermes which allowed him to fly. Perseus cut off Medusa’s head and Pegasus (a winged horse) and Chrysador (either a giant or a flying bore) were born from the severed neck. Perseus rescued Andromeda the daughter of Cepheus, the king of Aethiopia from being sacrificed to the sea monster Cetus before marrying her and founding the Mycenaean kingdom. Pegasus is often associated with Perseus as many later depictions show Perseus riding to Andromeda’s rescue on Pegasus. Contemporary artwork available from the period appears to universally portray Perseus holding the head of Medusa. In most of these examples he is portrayed as clean shaven. The stern carvings for Pegasus 1776, a 14 gun sloop launched the same year as Perseus, portray Perseus as a clean shaven man with a sword in his right hand and the head of Medusa in his left. National Maritime Museum, Greenwich, London. ZAZ4782. A statue depicting Perseus from the mid 19th century is held at the Victoria & Albert Museum. The statue shows Perseus in armour with a sword in his right hand and the head of Medusa held out in his left. Perseus can also be seen in a set of constellation cards dating from approximately 1825. Perseus is depicted again holding a sword in his right hand and the head of Medusa in his left. Victoria & Albert Museum. Mvsei Vaticani. Cat 969. National Maritime Museum, Greenwich, London. AST0049.


-
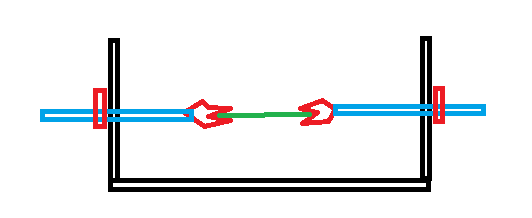
I also struggled with how to splice smaller lines and what I ended up doing was adding dowels to the end of two alligator clips. The dowels can then be slid through the holes and the second set of clips can then be used on the dowels to hold them the correct distance apart. I made a short one and a long one so I could use one or both of them depending on how much line I needed to serve. This allowed me to serve very small pieces that I needed to have the holding points much closer together. I was looking through my alert album and I don't seem to have a picture of it. I can take a picture later if you really want to see the actual setup, but the below drawing should illustrate it pretty well. The blue is the dowels, the red, the alligator clips and the green the line being served.
- 341 replies
-
- 5
-
-
-
- Sophie
- Vanguard Models
- (and 1 more)
-
Very pretty, the deck has a nice unique look to it with all those gratings around the sides.
-
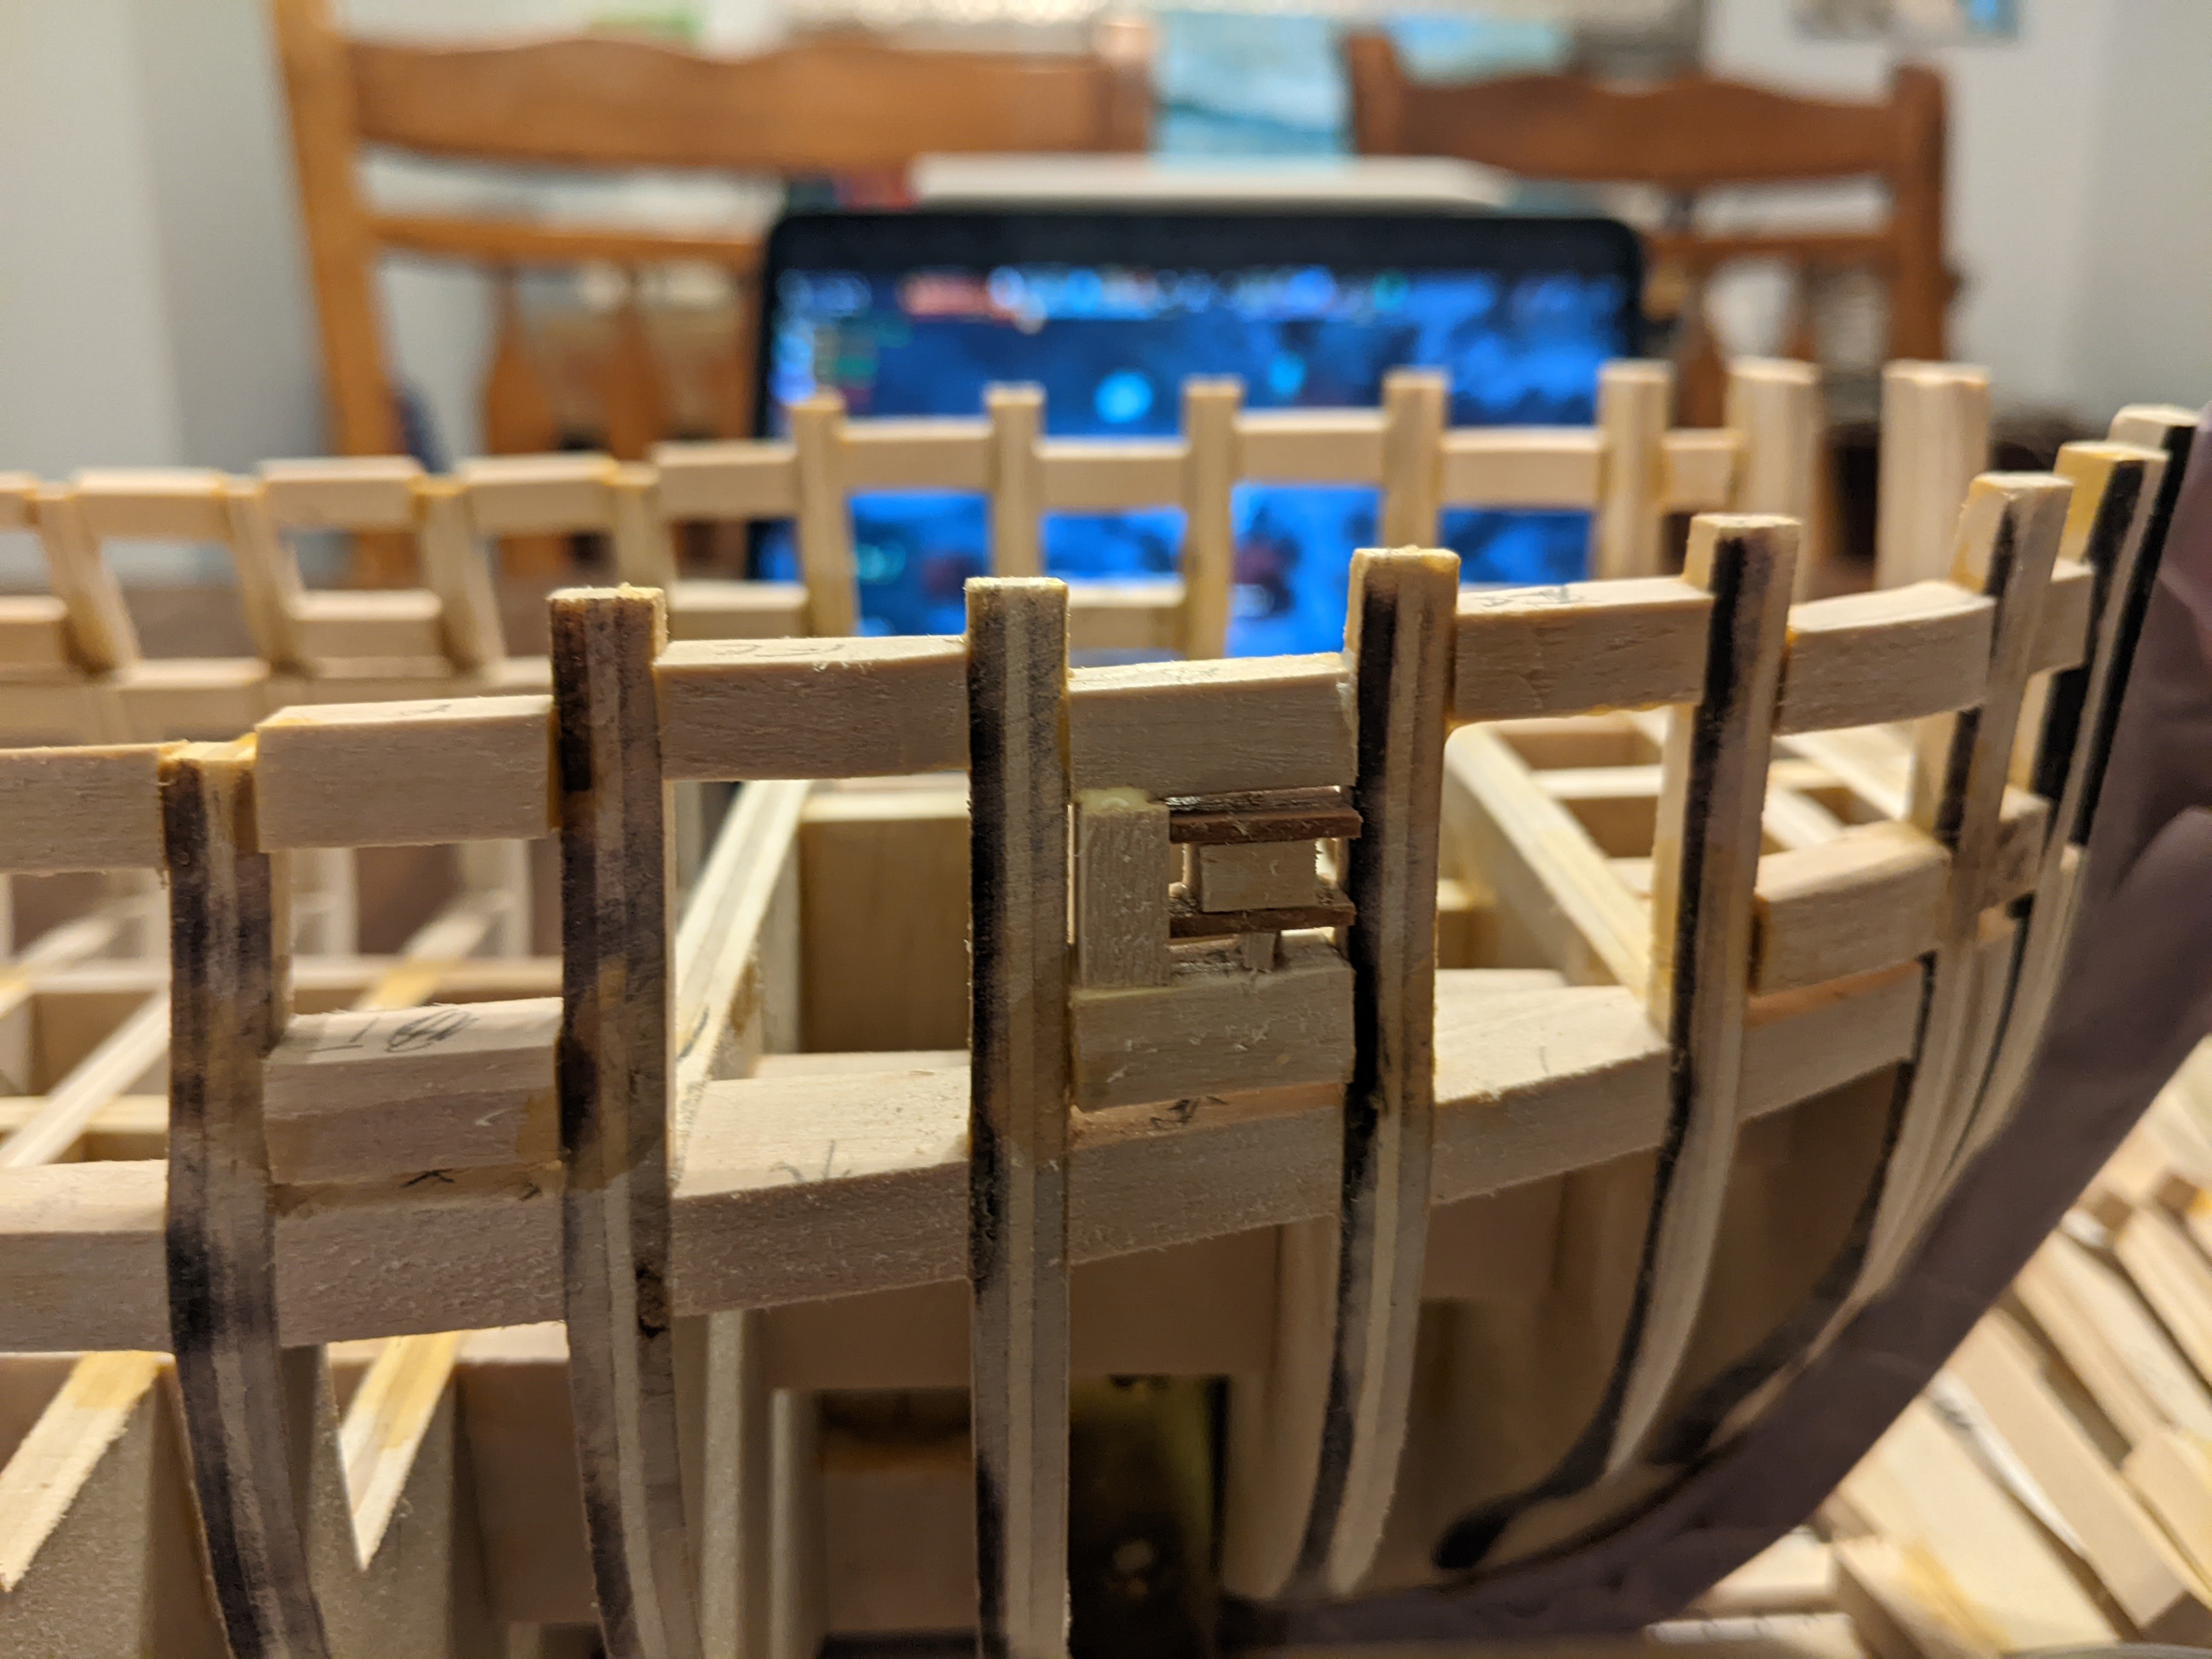
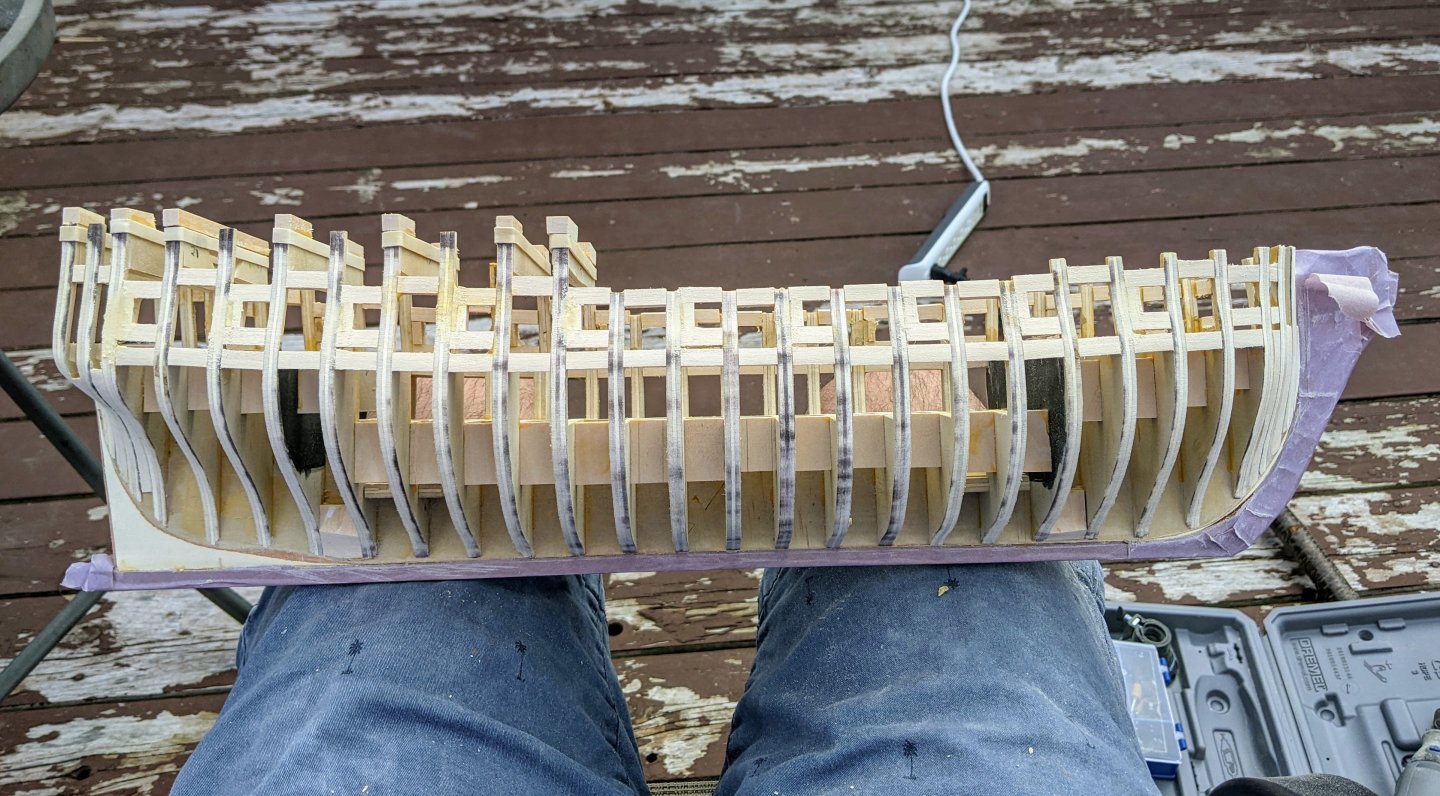
Log #28: Framing the Gun Ports Part II Thanks to everyone for all your encouragement and feedback. In particular thanks to @druxey and @Pirate adam for your insight on the wales question. Barring any significant evidence showing up I am planning on going with the double strake of top and butt and the single of butt for the wales as per what can be seen on the Sphinx planking expansion. Over the past few weeks I have continued my work on the gun ports. One happy coincidence of my plans is the fore side of all of the gun ports (except for the first on each side) lined up with a bulkhead, so my task with the ports was made much easier than it could have been. I made some jigs to allow me to place the other side of the port in the correct position aligning with the frame. The sides of the port are always perpendicular to the keel, but the angle of the top and bottom of the ports changes depending on the sheer of the deck at that location. The jig was essentially two pieces of wood which I precisely cut to the width of the ports (28 in according to the contract or 7/16 in at our scale). These were then aligned on a spacer bock and then a small piece of wood to hold the jig off the floor of the port to allow it to rotate to the correct angle for the bulkhead. You can see the jig below aligning one of the gun ports. As a general rule I used more material than was necessary as I would sand it all off later. You can see below what things looked like once all the ports (except for the most forward ones) were sided. This also represents the first time I have taken the ship off of the build board since I started construction. The hull is now rigid enough with all the bracing pieces I have added that it shouldn't twist anymore. I still keep it on the build board for storage, but faring is much easier if I can hold it on my lap. This brings us to the faring. I don't think much needs to be said about this as this topic has been covered by many logs in the past, but I will note a few things that I encountered which may be useful to keep in mind for other first time scratch builders. Slower is better - Faring is such a lengthy laborious process I am tempted to rush, but it is very easy with a few misplaced swipes to take off too much material. Thankfully I caught all of my mistakes along this line before they went too far, but something to keep an eye on. Having the marker on the outside of the frames so I could judge easily how much of them I had sanded was invaluable for this. Keep an eye on finished areas - The masking tape I have on to cover the keel and knee of the head needed to be replaced a few times (particularly around the bow) as it was easy for sanding to rub the area. Use the right tool for the job - Something I found helpful in avoiding oversanding was to make sure I was using the correct shape of sanding stick / block for the area I was working on. At midships you can use a large block and sand in all directions as the curve is convex, but in concave areas you need to carefully choose the size of your sanding stick and sand in very particular directions to get the correct run of the lines. And here is Perseus with one side preliminarily fared. Once I do the framing of the stern then I will do a final pass, but I don't expect to have to remove much more material. You may also notice that I filled in the gaps between the port sides and the next frame to strengthen the areas after one of them got a bit loose. That is all for now. Thanks for stopping by.

-
I agree with the others. They are probably just a little too far out. As BE said maybe countersink the holes a bit to allow them to go in further. Also if it looks funny to you now, it will be even more annoying to you in a month (I am speaking from experience).
-
Fantastic work. Those are some very neat looking frames
-
Yes that is the current plan. I feel like the combination of the Sphinx drawing (which probably dates to the late 1790s) and the fact that all of the three strake wale drawings from the time period (including Harpy which was taken at the time Perseus was building) show top and butt is reasonably conclusive. I remain open to any other info the comes my way (part of the reason for doing the post now as opposed to waiting till it was actually time to do the wales), but I suspect that top and butt is the way to go for Perseus and any other Sphinx class ships.
-
Log #27: Researching the Wales of Perseus It has been a little while since I did a log post on the research going on in the background and so I figured I would take some time to share some of what I have found. So below is what I have been gathering on the wales of Perseus. Please let me know if you know of any other contemporary sources I may have missed and as always I am interested to hear if you think I may be misinterpreting something or you have other evidence which might impact my conclusions. The Wales Naval shipwrights in the late 18th century appear to have employed at least four different methods of planking the wales of single deck ships of war. As the wales were the primary longitudinal stiffener for the hull of the ship, they were typically constructed with much thicker planks than the rest of the outer planking and tended to have the strakes locked into each other. There were three main ways of achieving this: top and butt, anchor stock and hook and butt. According to the contract, Perseus’ main wales were composed of three strakes. However, the contract does not specify the method by which the planks were to be laid apart from overall width and specifying the shift of the butts. The below table summarizes planking expansion plans held by the National Maritime Museum for single deck ships launched from 1770 to 1805. Of these plans, six depict a top and butt arrangement for the wales and one anchor stock. Planking Expansions For Ship Rigged Vessels 1770-1805 Name (Guns) Launch Date Plan Date Wales Planking Style Number of Strakes Sphinx (20) 1775 1808 Top & Butt 3 Hornet (14) 1776 1776 Top & Butt 3 Thisbe (28) 1783 1807 Anchor Stock 4 Squirrel (24) 1785 1808 Top & Butt 4 Hawk (16) 1793 1803 Top & Butt 3 Cormorant (16) 1794 1793 Top & Butt 4 Diana (38) 1794 1808 Top & Butt 4 Source: NMM ZAZ3918; ZAZ5119; ZAZ3442; ZAZ3704; ZAZ4731; ZAZ4347; ZAZ2343. The most obviously applicable of these plans is the planking expansion for Sphinx, the lead ship of the class Perseus belonged to. The wales on this plan show three strakes, consistent with the contract for Perseus, in a top and butt arrangement. The dating of the plan is after Perseus was broken up, but as has been discussed, the plan is likely consistent with Sphinx’s appearance much early in her life. However, perhaps the most interesting plan is of Hornet, a 14 gun sloop launched around the same time as Perseus. The plan is of particular interest as the lines were taken on 3 February 1776 while the vessel was under construction. Perseus was launched in March meaning that the lines were taken while Perseus was being constructed just down the river. Planking Plan, Hornet National Maritime Museum, Greenwich, London, ZAZ5119. It depicts the wales in three strakes with the upper strake planked in a butt pattern and the lower two using top and butt. Though the ship is a fair bit smaller than Perseus, the number of strakes used in the wales are the same. A frequently cited secondary source for the appearance of the Sphinx class ships is McKay’s book on HMS Pandora, a slightly larger contemporary vessel of 24 guns. The book depicts the wales in four strakes arranged in a hook and butt pattern. The source for this assertion is the contract for Squirrel 1785 which says: However, though a planking expansion for Squirrel dating to 1808 does indeed show 4 strakes, they are arranged in a top and butt fashion similar to the Sphinx plan. It is possible that the wales were modified at some point in her career, but alternatively it is possible that the language used in the contract does not actually imply hook and butt. Rather, the strakes were to lock into each other in some fashion and the exact method was left to the discretion of the shipwright. It should also be noted that Pandora was slightly larger than Sphinx and Squirrel larger again, over 11 feet longer than Sphinx. This is also reflected in the wider wales (four strakes for Squirrel vs three for Perseus). The National Maritime Museum holds two models contemporary to Perseus which depicted the wales in detail. The first of these dates to about 15 years prior to the launch of Perseus, while the second dates about 15 years afterwards. The first of these, a model of HMS Bellona, depicts a hook and butt pattern for the lower wales. The upper wales use simple butt joints. Model of HMS Bellona, Circa 1760 National Maritime Museum, Greenwich, London, SLR0503. A second model of an unnamed 3rd rate uses top and butt planking for the lower wales while the pattern for the upper wales cannot be discerned from the images available online. Model of 74 Gun Third Rate, Circa 1790 National Maritime Museum, Greenwich, London, SLR0558. While there is no definitive conclusion that can be made regarding the planking methods used for Perseus’ wales, it seems most probable that top and butt planking was used. The only example from the period using hook and butt appears to be Bellona, a much earlier and larger vessel. Almost all of the examples contemporary to Perseus show top and butt style planking of the wales.

.jpg.cbcad1869bb8fb438ea861ab6f9418e2.jpg)

-
Great fix. I actually think your repair is an improvement on the original even if you hadn't made the error.