HOLIDAY DONATION DRIVE - SUPPORT MSW - DO YOUR PART TO KEEP THIS GREAT FORUM GOING! (Only 13 donations so far - C'mon guys!)
×


Barbossa
-
Posts
509 -
Joined
-
Last visited
Content Type
Profiles
Forums
Gallery
Events
Everything posted by Barbossa
-
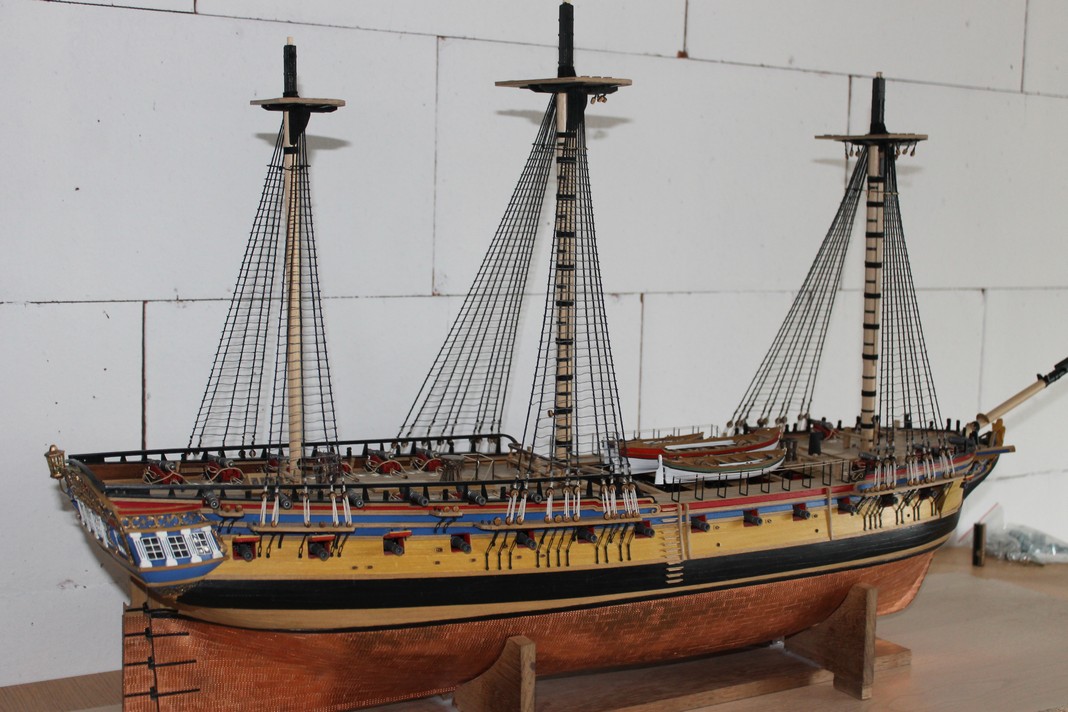
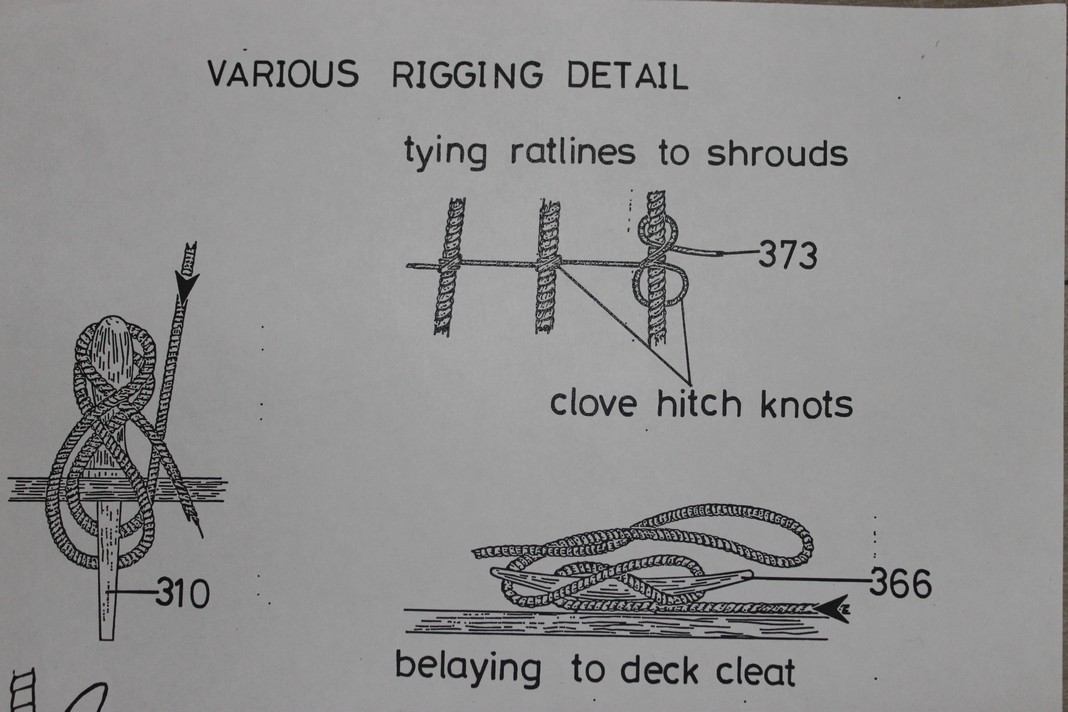
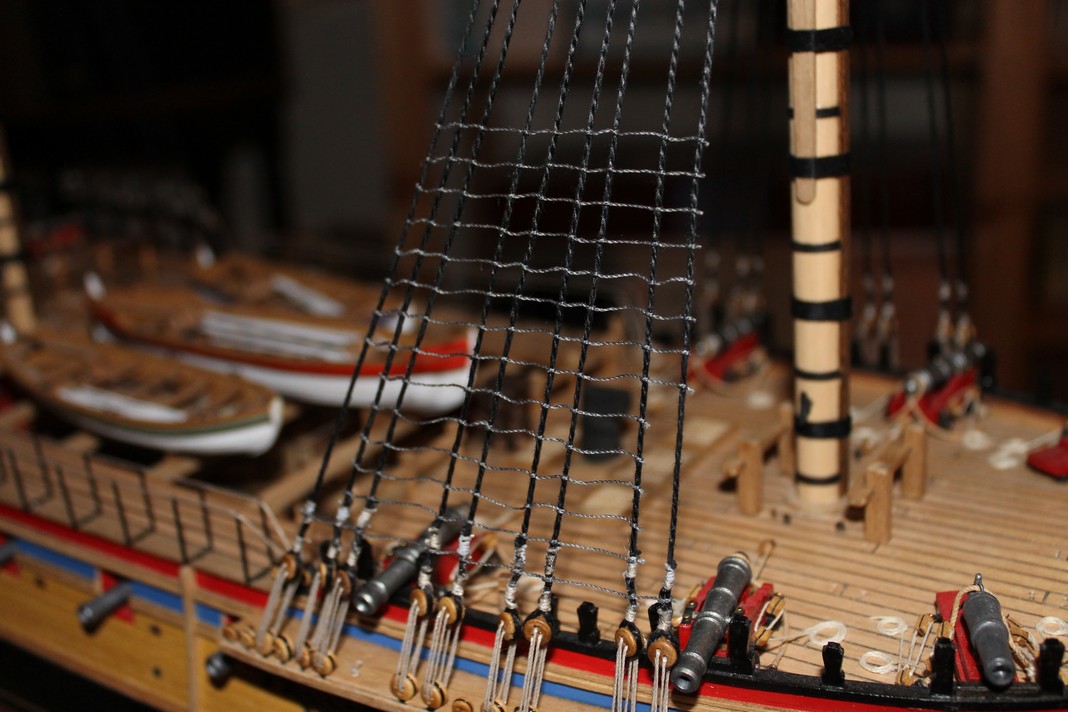
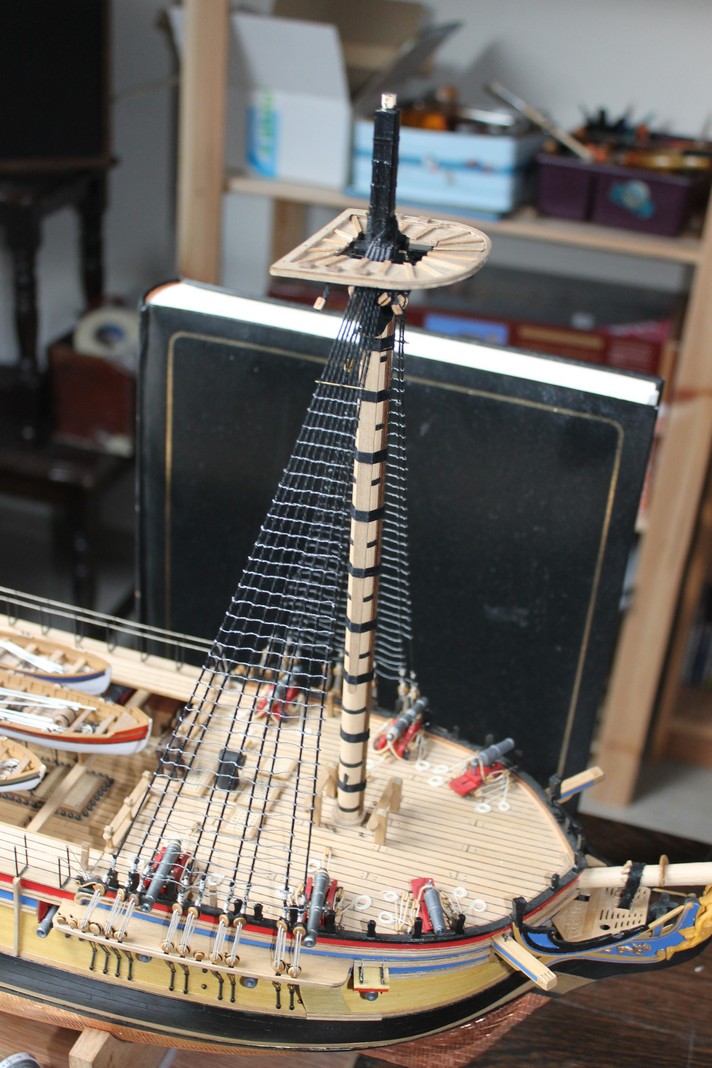
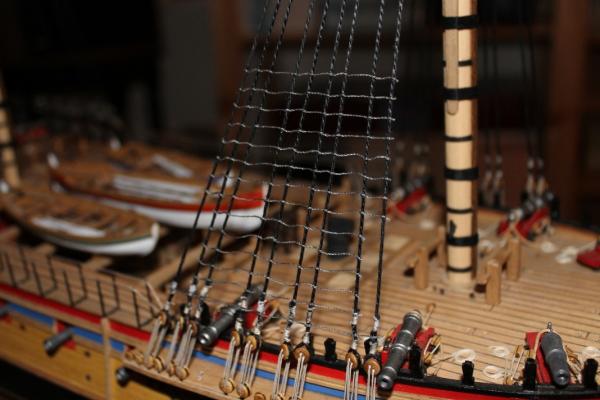
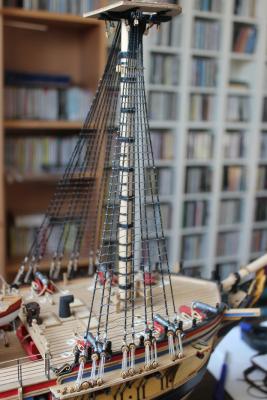
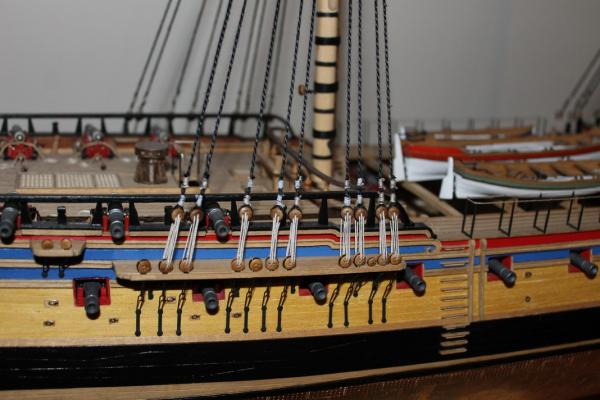
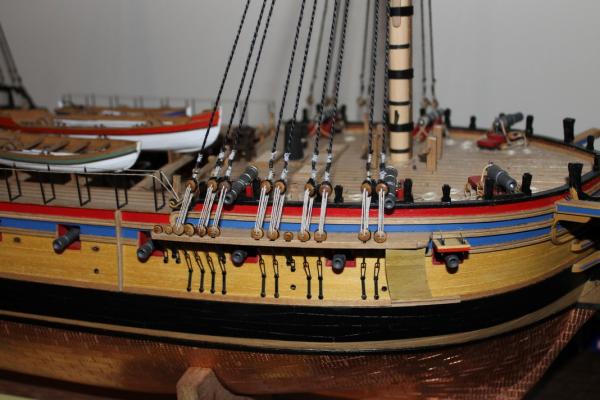
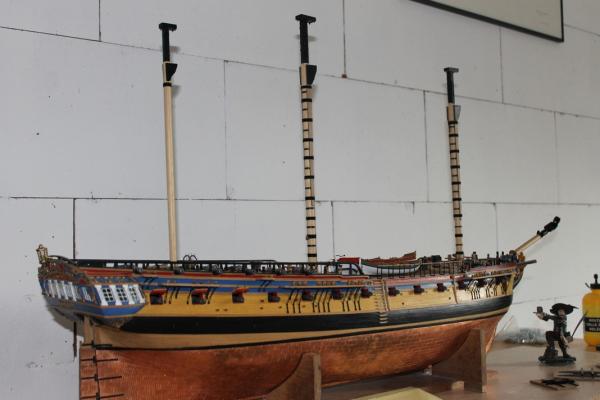
 Hi all, ratlines are completed but I have some mixed feelings about this. As the drawing suggets and the pics may show, the shrouds are a bit curved. So here's a question : If I were to space the first ratlines (+/- 5 cm ) and fill up the rest later on and use clove hitch knots instead of overhand knots, could this "evil" be avoided ? Scissors are at my disposal


-
Welcome back, Andy I'll follow along. To replace the copperplates is a wise decision ( I regret I didn't ).
-
Hi Nils, I second B.E. 's praise. Wonderful work By the way and just for your information : The captain and I spent a few days at the Belgian coast and in a second hand bookshop in Ostend I came across a book written by Georg Bessel : Norddeutscher Lloyd Line : Geschichte einer bremischer Reederei 1857-1957. Although my German is poor ( but I'm learning ! ), the book describes the company's interesting history and last pages mention a full list of all registered ships.
- 2,625 replies
-
- 4
-

-
- kaiser wilhelm der grosse
- passenger steamer
- (and 1 more)
-
Well done indeed, Jason ( also superb pics ) Looking forward for further updates and hitting the like button.
-
Hi Ken, it certainly helps, thanks a lot for your trouble & research. I really appreciate your input. Also went through the link Jason ( thanks again) posted here above, and it's a lot of info . Thank you guys !
-
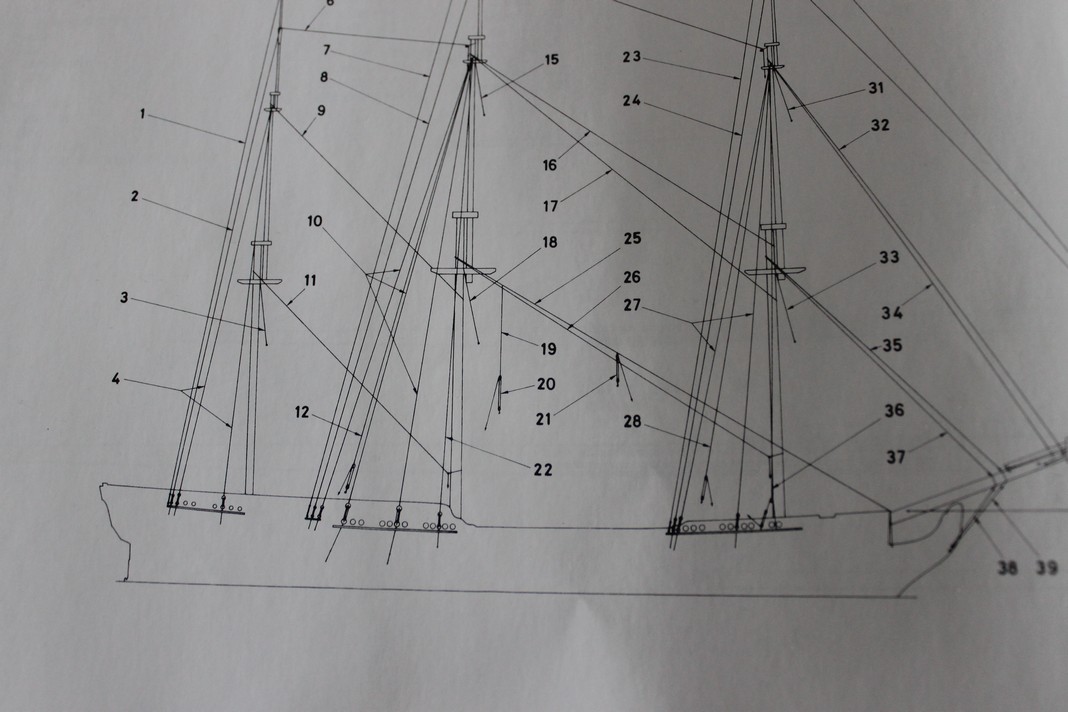
Hi Ken, Don't feel sorry. On the contrary, this is an interesting topic from which other members might benefit. Many thanks for these drawings : they seem to accord with some pics from the Bernard Frölich website ( at least when you take a close look at them) Quite rightly, you referred to the Burton pendants : this is another "pending" issue ( what's in a word ) to me . I went through Ray's Diana buildlog ( completed a couple of months ago ) , as I did not understood the purpose of this item, I did not fix them - until now. The more is : the Burton pendants are to be installed on the 3 masts , which only confuses me even more regarding the relationship between the Burton pendants and the tackles required for the lifeboats. Perhaps I should follow B.E. 's advice and purchase Steel's book about the rigging of ships. ( Amazon , here I come :) )
-
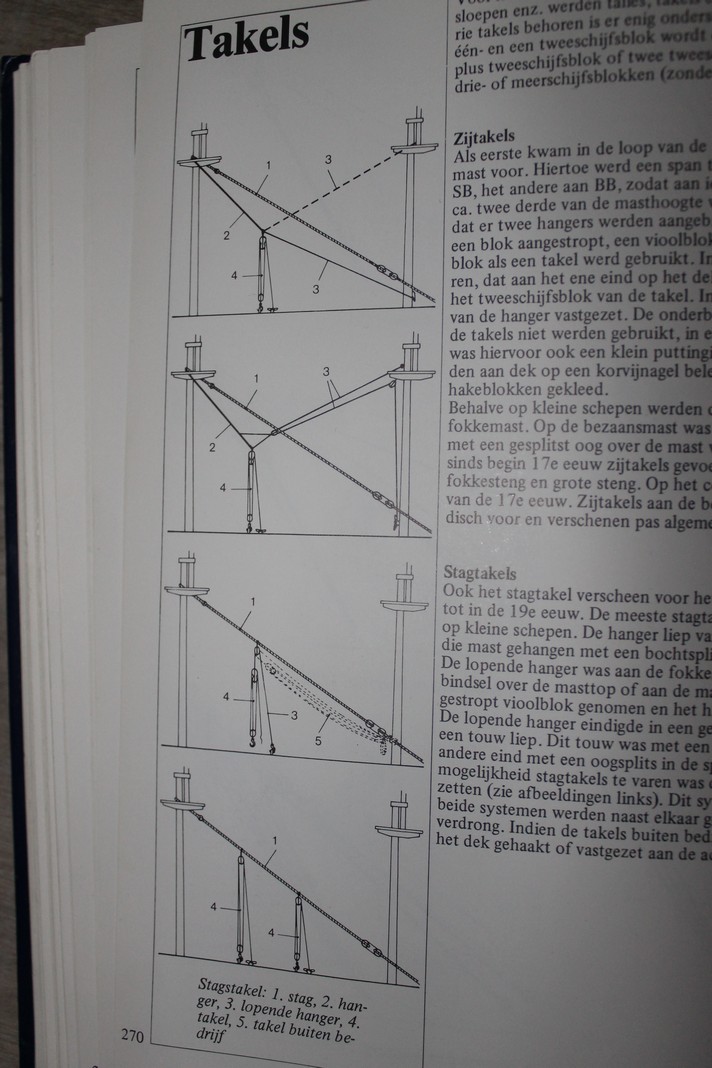
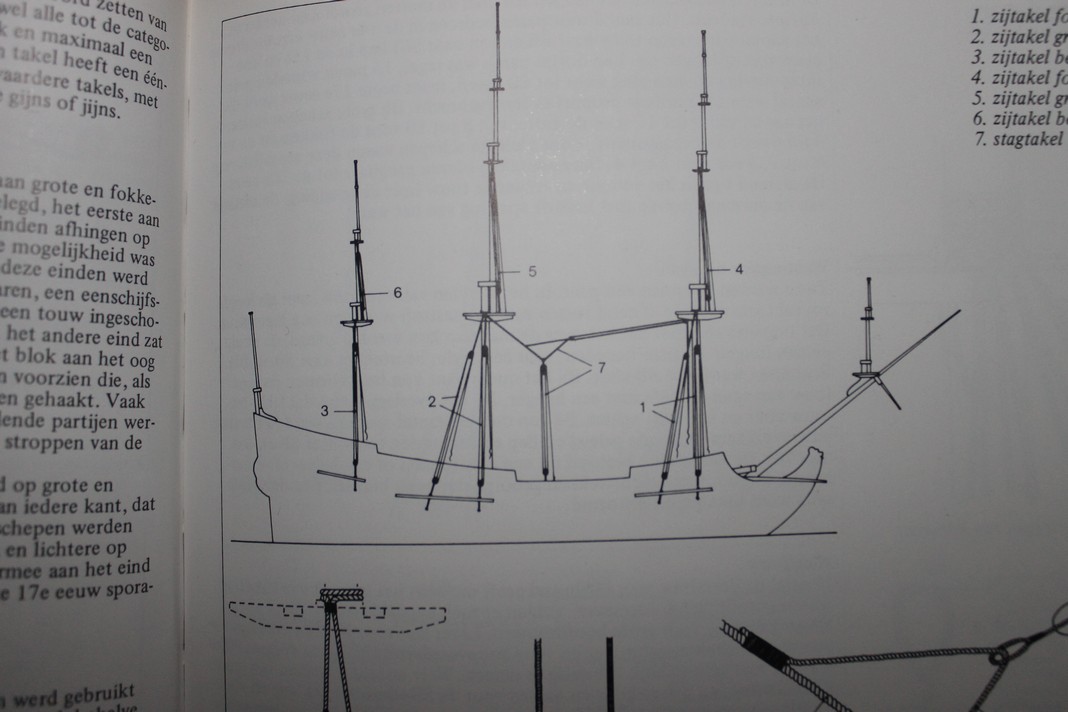
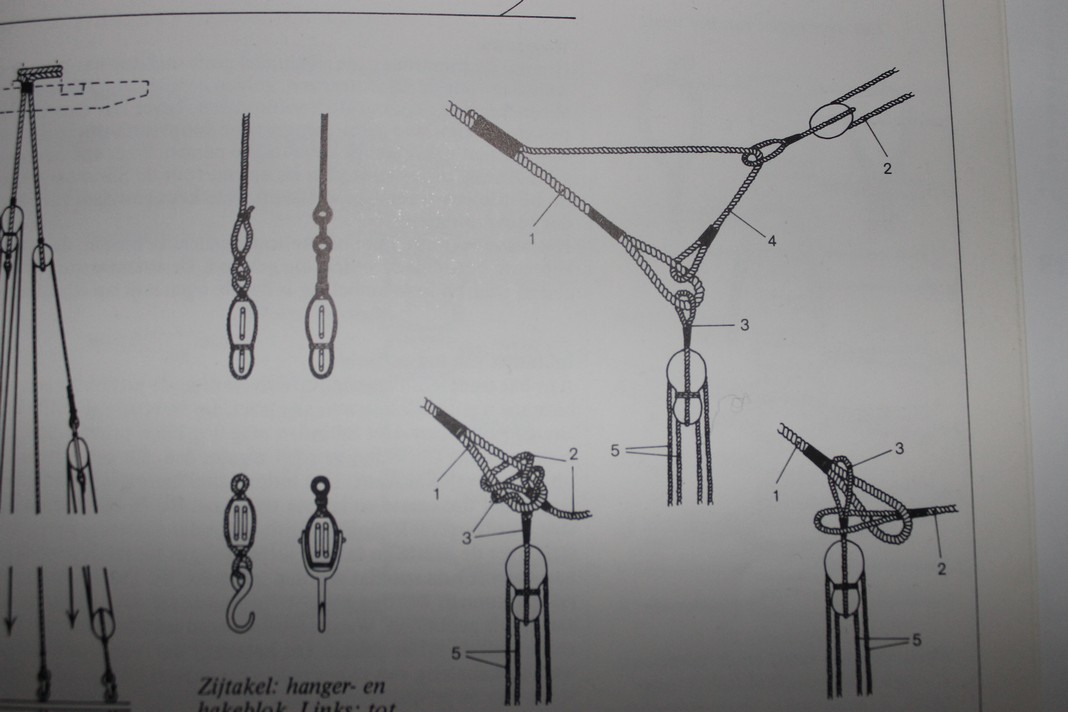
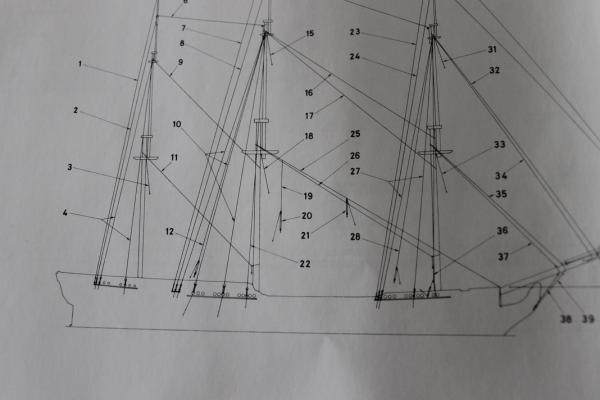
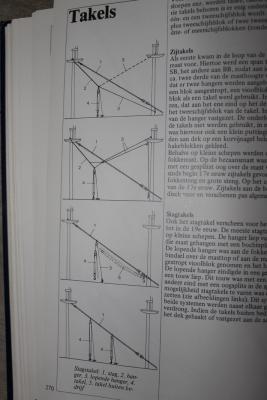
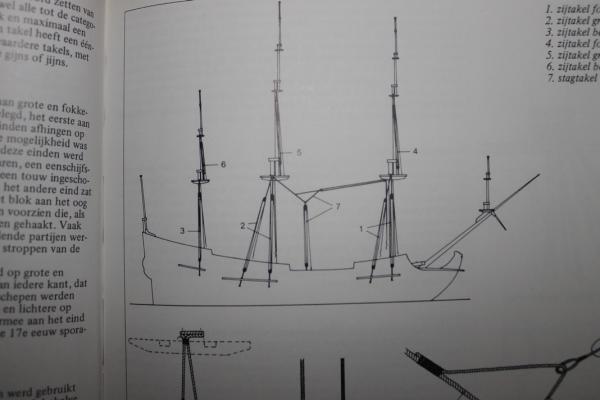
Hi Ken, Here's what I found from my (limited) sources - first pic is the scheme from the AoTS ( Hms Diana ) : parts 20 & 21 - 3 others from W. Zu Mondfeld ( it is a copy in Dutch) If you compare the AoTS ( Hms Diana ) photo with the 4th scheme of the second pic ( the one with the title "Takels"), both schemes seem to accord. Was there a difference between English and Continental systems ? I don't know. However the third photo and it's detail ( the 4 th photo) are both schemes that were applied in - at least 2 Mamoli kits - Friesland and La Gloire. Are the Mamoli plans from an historical point of view accurate, that also remains an open question

-
Hi Ken, thanks for looking in. About the knots : it's interesting to share different points of view and all are all valuable. I really appreciate your input, guys. The rigging of the ships : I haven't figured it out yet but a lifeboat "somehow" suspended between foremast and great mast is most appealing to me. Here's a wonderful example : http://modelisme.arsenal.free.fr/artdumodelisme/La%20Belle%20Poule/indexgb.html It's the frigate La Belle Poule by the french modelling expert Bernard Frölich. The pics are great but I'd like to learn more about this specific rigging scheme. The other lifeboats are to be secured later on.
-
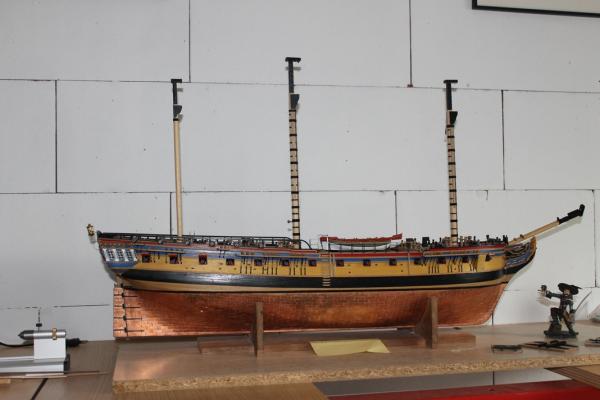
Hi Thunder You certainly have a point. If I understand correctly : the angle where you are referring to will be most noticeable where the distance between two shrouds is on its largest. ( e.g. when there's a gun that separates 2 lanyards ) Even on my build it is noticeable, I must admit. As often : it is check & balance operation : the choice between (as BE mentions) the bulky knots and on the other hand some awkward ratlines. Nonetheless : this is an interesting debate : which type of knot is most suitable for which scale ( 1/64-1/48-,...) ?
-
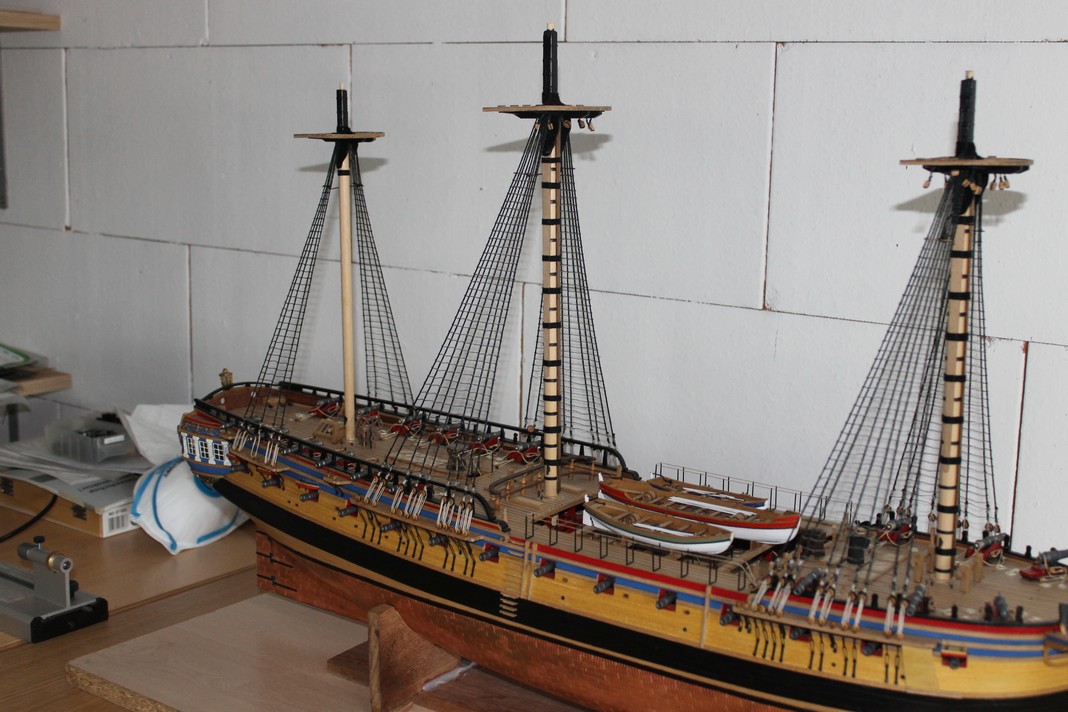
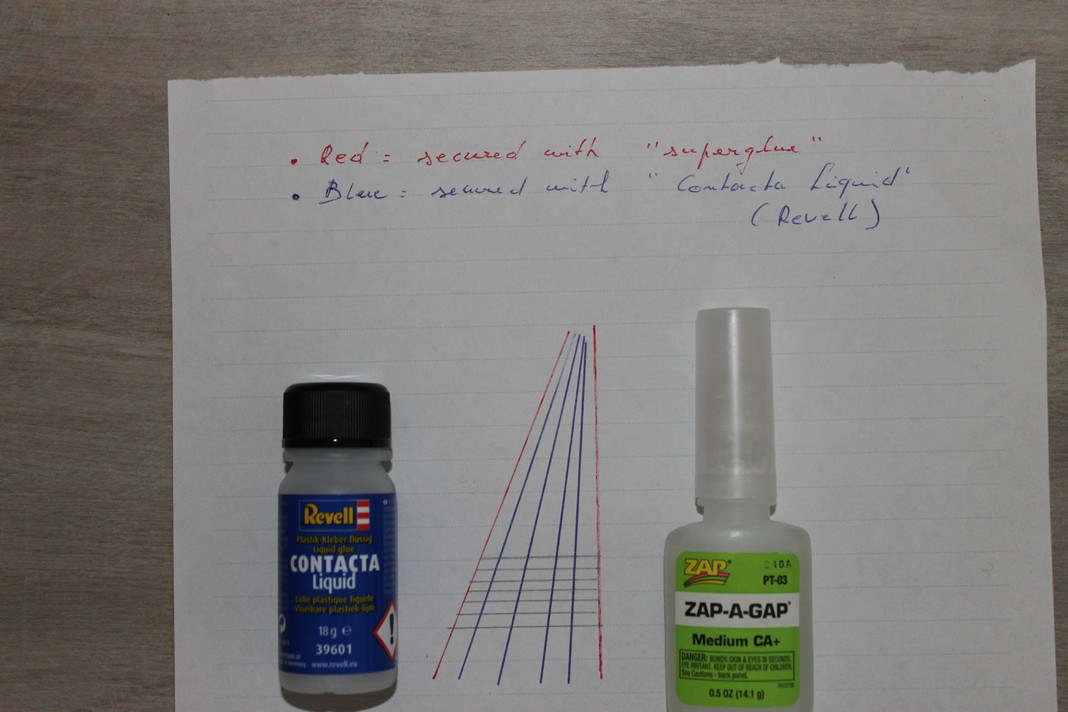
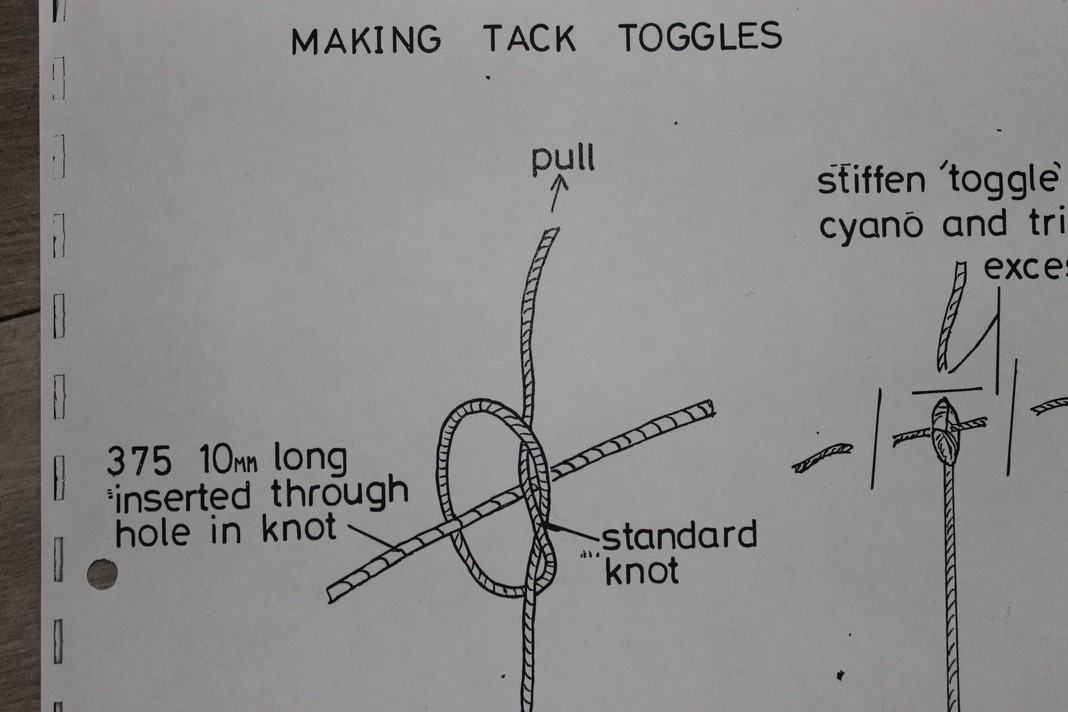
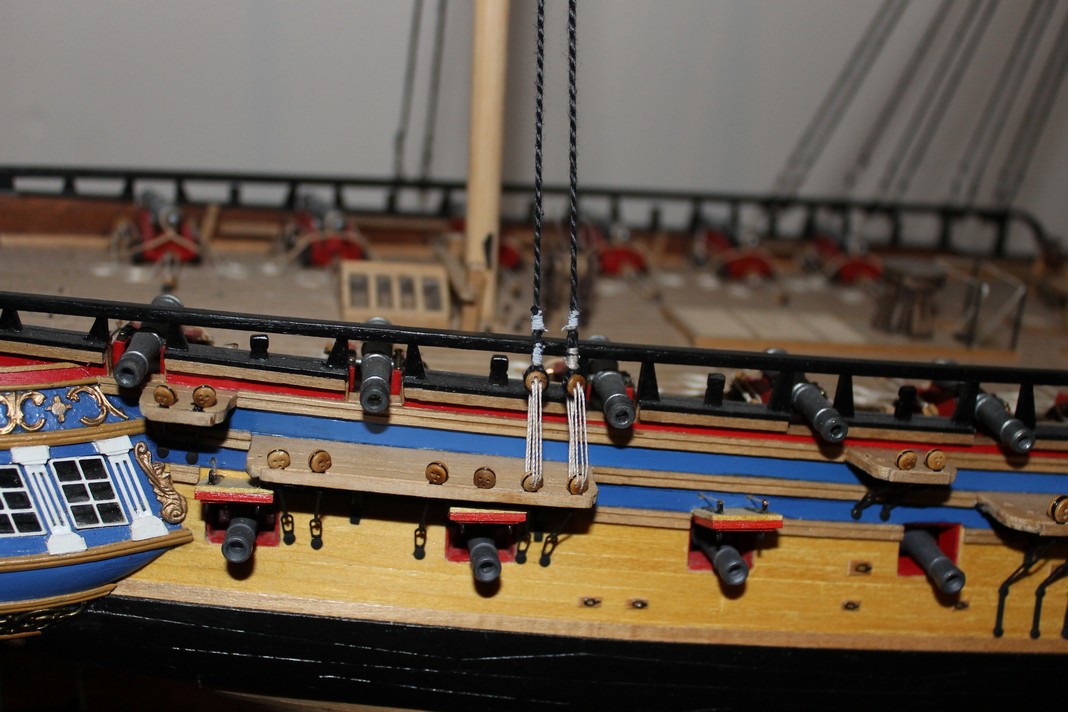
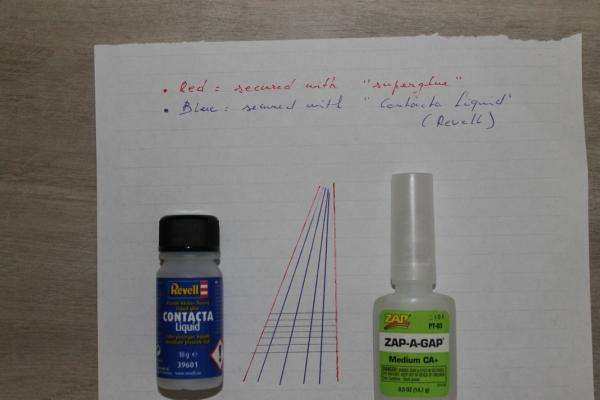
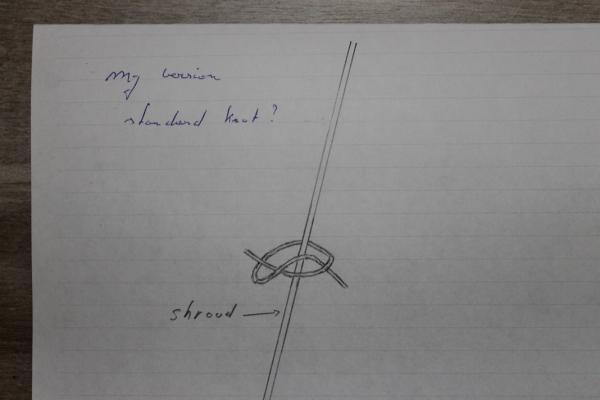
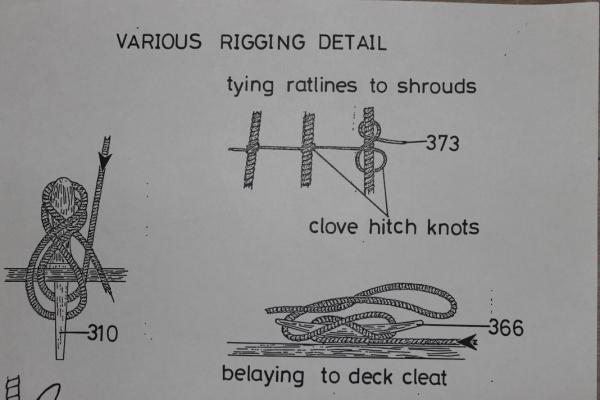
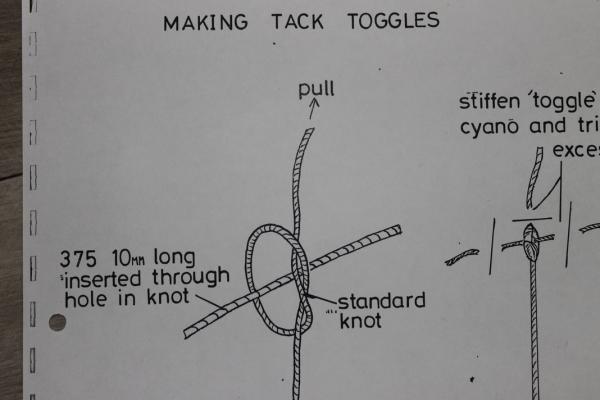
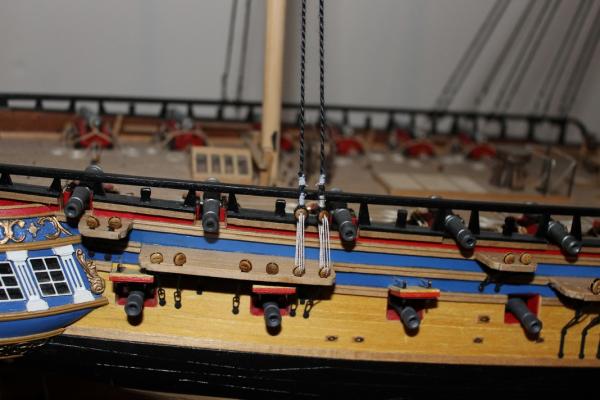
Hi, Thanks B.E. and Sjors : I appreciate input your input and sound advice. Moreover : whenever I visit your buildlogs : it's obviuos that I'm not the only one who's showing interest Also thanks for the likes : I'm also a "like button"-addict in many buildlogs Now back to topic : The knots : I believe I made standard knots or in other words the overhand knot. I guess photo's tell more than words in this matter. - Both extreme shoruds were secured with superglue - The inner shrouds with "Contacta liquid" from Revell ( a little brush is attached to the cover ) - last to pics are related to the building instructions related to different knots. O, before I forget ( as a reply to B.E. ) should we consider building instructions rather as "guidelines" ? ( cfr. "Pirates of the Caribbean )
-
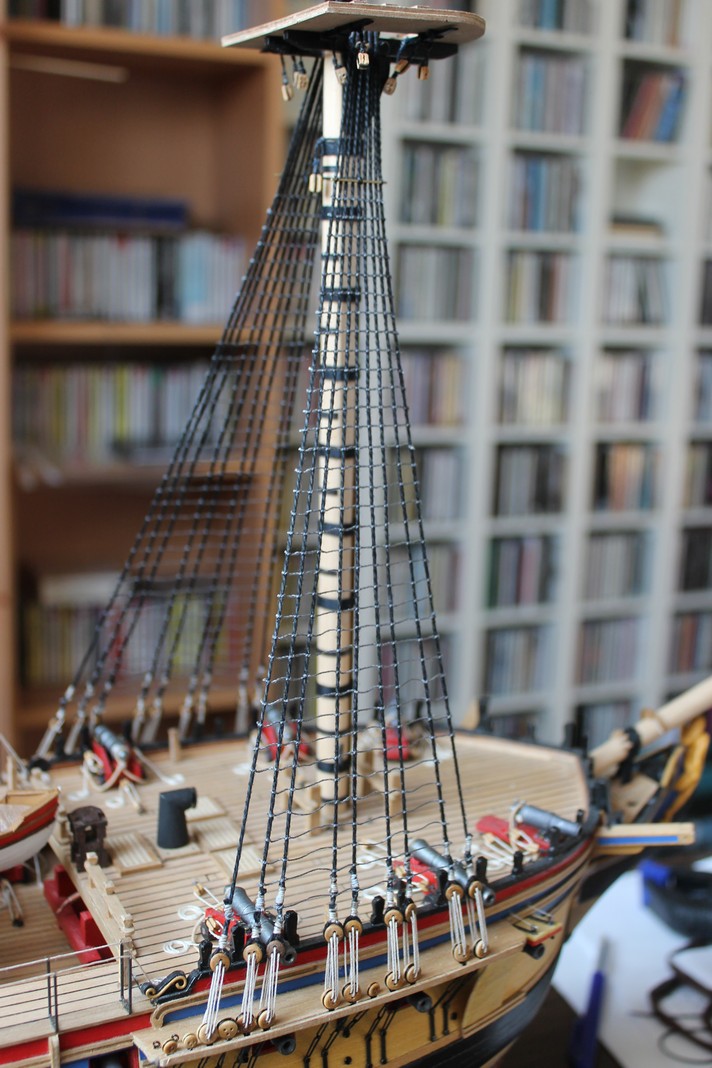
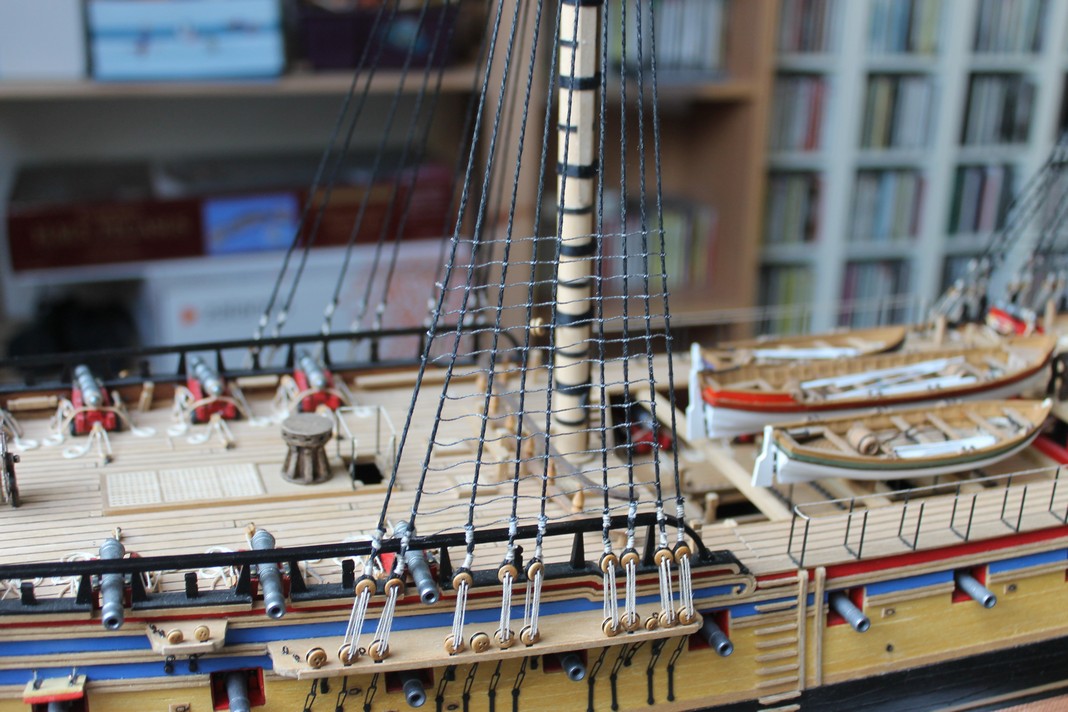
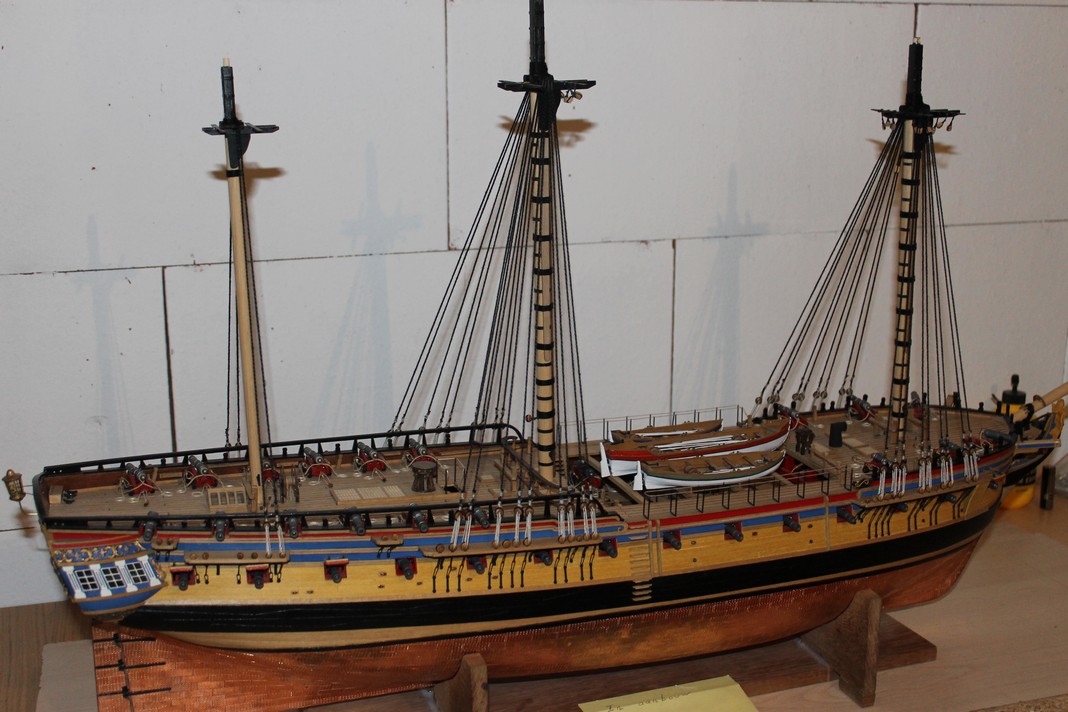
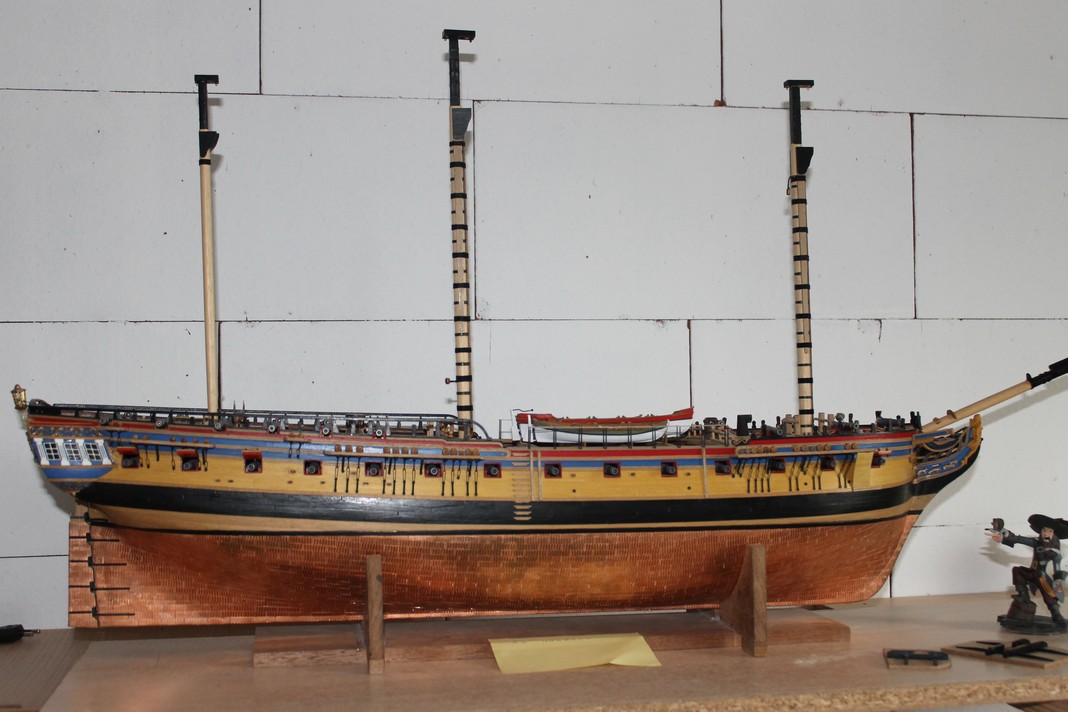
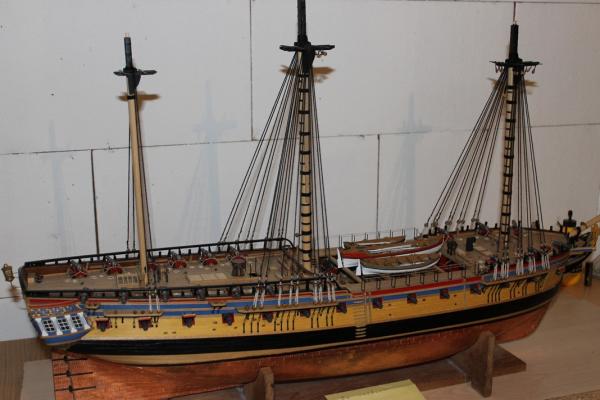
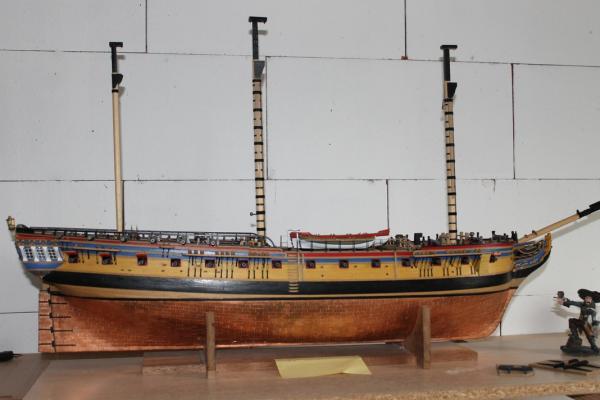
Ratlines & Shrouds : intermediate update Hi people : here's the actual status, almost halfway. For the ratlines I used Gütermann thread color code 701. The dark grey gives just that little contrast I was looking for. Although it's (always) recommendable to follow the instructions, here I'd like to quote the Caldercraft's "Ratlines chapter" : " When all the ratlines are finally tied, stain them by carefully brushing on Indian ink" Has anyone ever tried this ? Even with the necessary precautions, only the thought of spilling a drop of ink on the hull/decks makes me feel a bit incomfortable.


-
A bold decision but a wise decision. If something bothers you, you'll keep on focusing on it and you'll get more frustrated. The best of luck. Keep on the good work !
- 1,616 replies
-
- 6
-
-
- caldercraft
- agamemnon
- (and 1 more)
-
"Almost" indeed Sjors. Thanks for showing interest. Diana is far from completed : so I 'll alter ratlines with other fittings/stuff. Although....there's little shipbuilding scheduled this WE. The reason is simple : after a long period of almost ghastly weather ( rain, cold, grey, wind..you name it) we're enjoying-finally-some sunny weather. In that respect, I presume little difference between Bleiswijk and Zottegem ?
-
Hi Mobbsie : thanks for the tip ( nail clipper) No need to worry about Mrs. Barbossa covering her ears : 1) I'm working in the attic 2) Any music will do to reduce some awkward words or expressions Also thanks for the likes : much appreciated
-
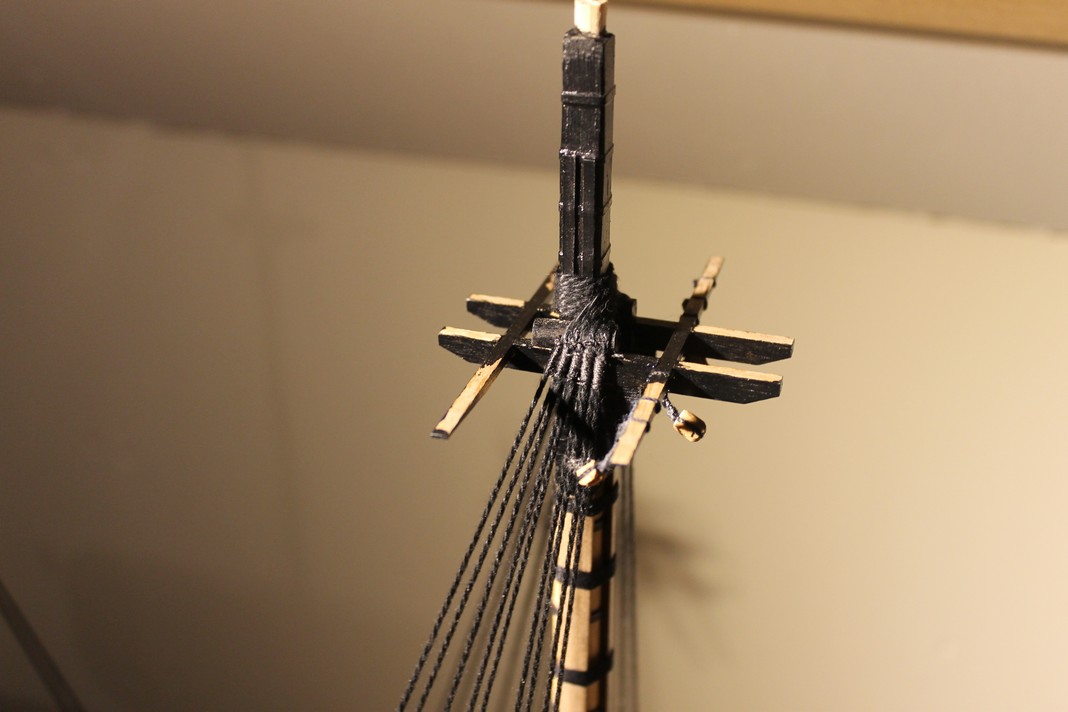
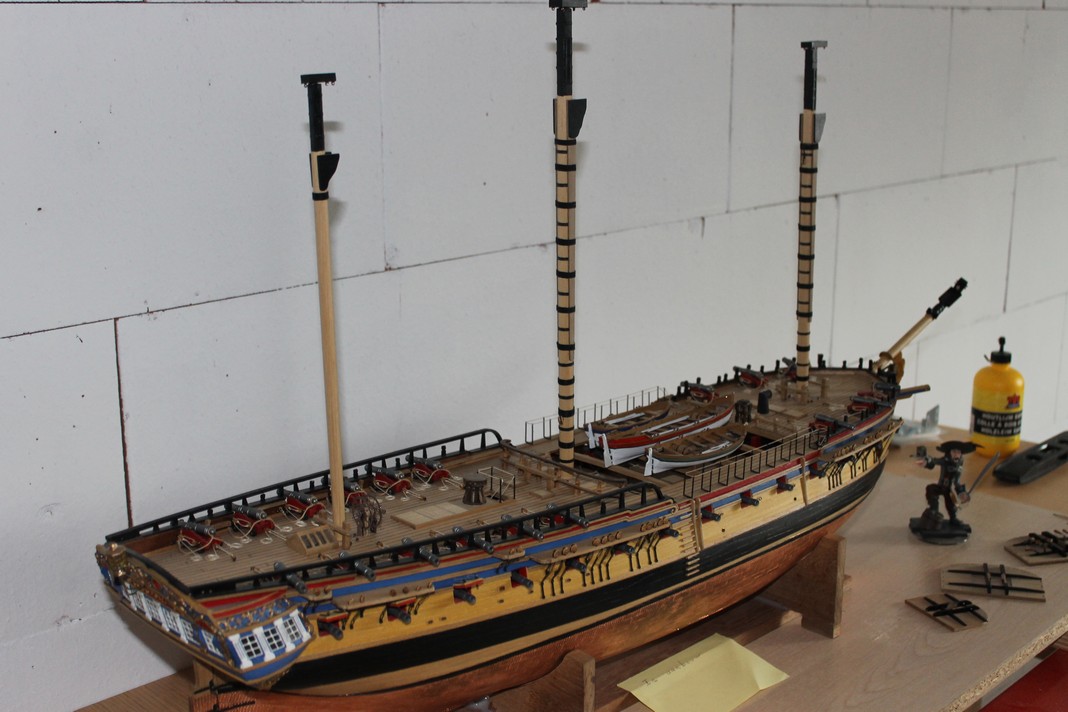
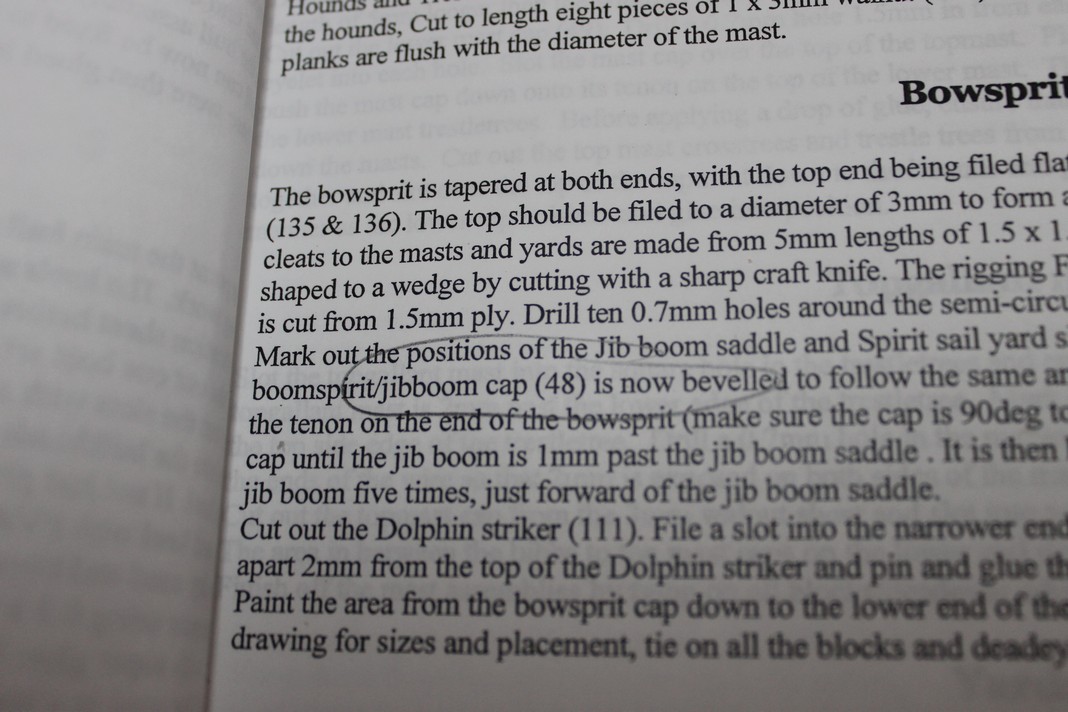
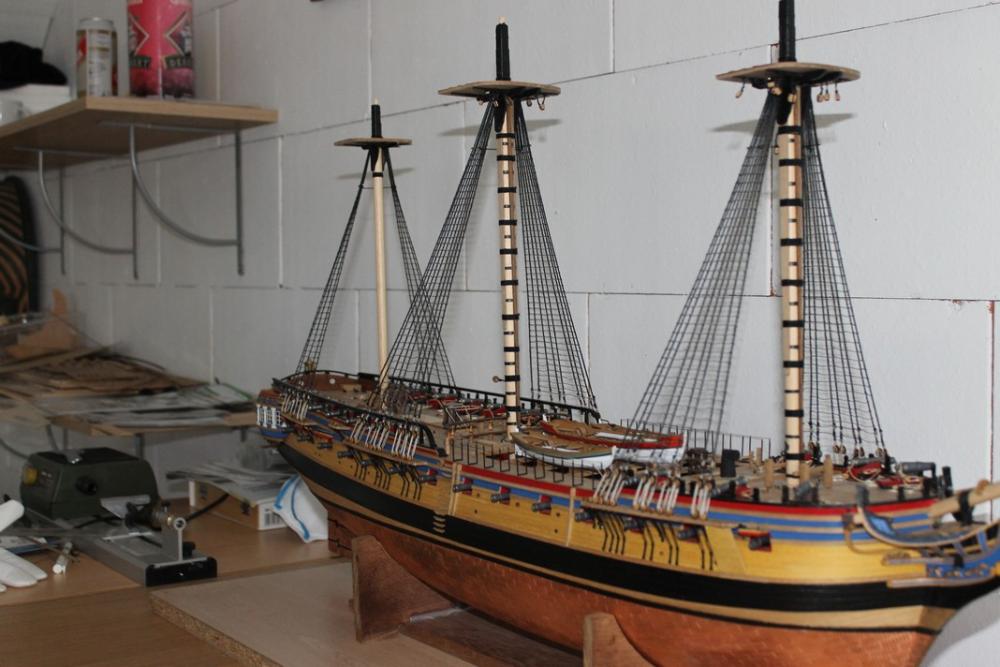
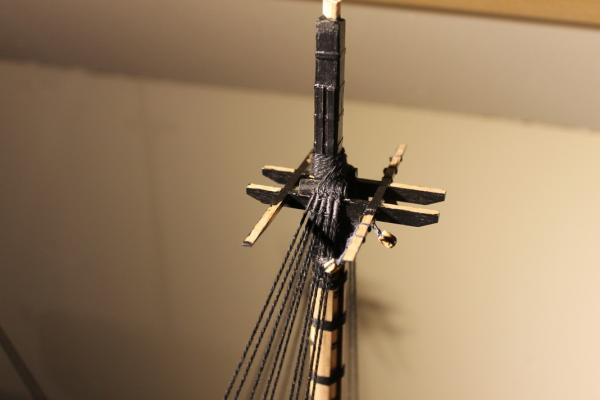
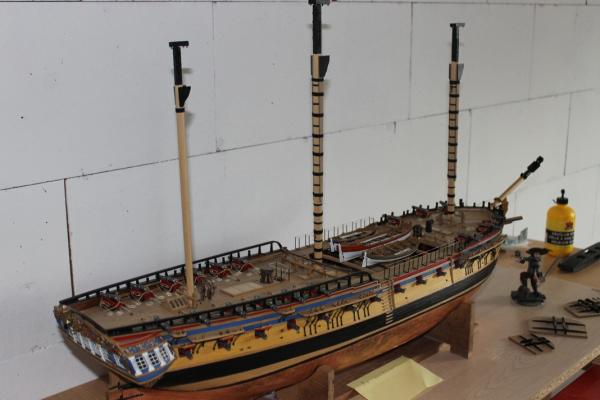
Hello Thanks to BE the problem related to the bowsprit cap is resolved Rigging and mast part started with the shrouds : I secured the shrouds near the mast top with Guterman thread col n° 36 (dark grey), as I wanted a little contrast with the black shrouds. Besides, the thread is rather thin which suites me fine as I wanted to avoid "sausages" Same remark about the lanyards : they're supposed to be black but I went for something more pale. The only problem I encountered was the necessary small drop of glue : it affected the pale color, so I carefully overpainted with diluted light grey. I'll see about some extra trimming : I'd like to remove the protruding parts of thread as much as possible without damaging the knots The thread I used for the shrouds is - regarding the thickness- a compromise. I did not use the one supplied in the box Almost there
-
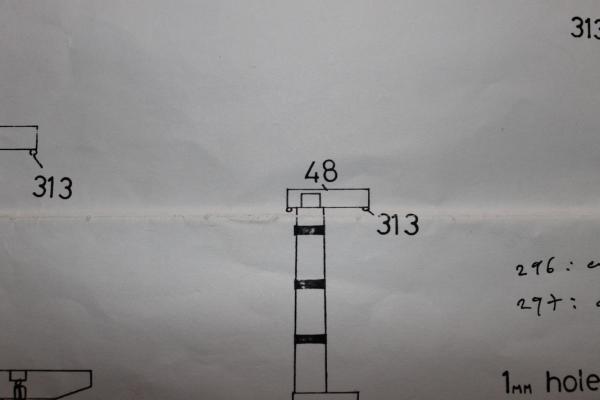
Thanks for the praise, BE and all the likes for showing interest. While we're at it , meaning the Bowsprit cap : before fixing, if my interpretation of the AoTS (regarding HMS Diana) drawings is correct, it appears that the same bowsprit cap also makes an angle in front view. In other words : bowsprit and jibboom are not 100% "vertical-perpendicular" in front view. All input regarding this specific matter is welcome.
-
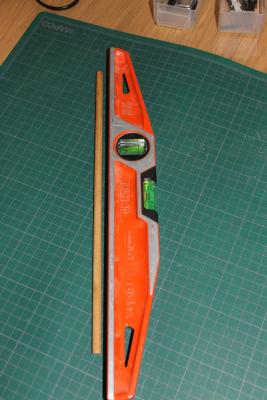
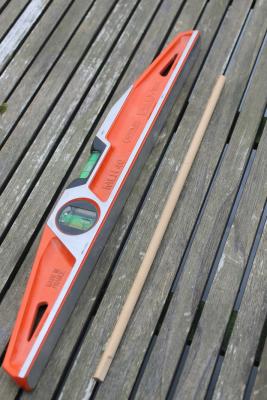
Thanks Mark & Jason and all the likes. Combined with a caliper, the level tool was quite inhandy for the job. By holding the dowel close to the leveltool against the light, the exeeding areas came out nicely. Given that the diameter of the "curved " dowel allows this and the curve is not that big, this might help
-
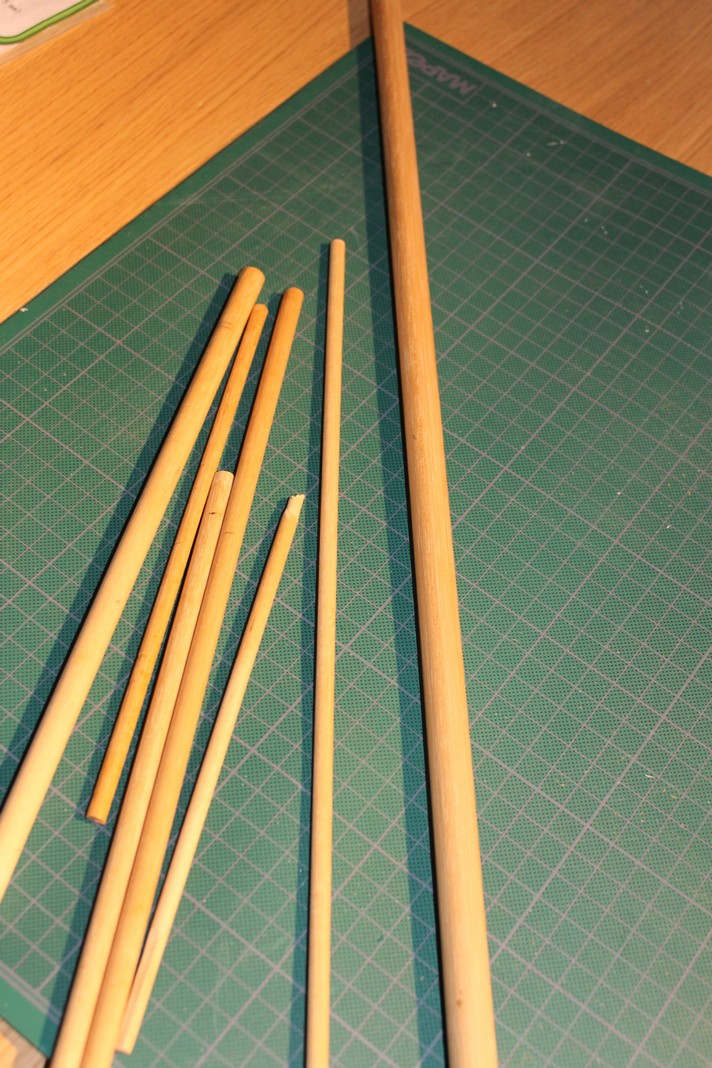
Hi Jason, In addition to previous post(s) : I had plenty of 12 mm dowel in stock , by consequence for main, foremast and bowsprit I had to reduce the diameters by 2 mm . As my lathe didn't allow dowels longer than 250 mm, I needed other options for main and foremast. So back to "old school methods" I sanded and used this level tool until diameters fitted. The slots in the outside garden table come out to be very convenient for this job. Far from being a specialist nor engineer my guess is that it's perhaps better to compensate a curve or a bent piece in "stand still" position rather while rotating ( in a lathe ). I hope this helps.
-
Hi Sjors, typical Dutch expression = "Het komt voor de bakker!" It's coming along , thanks to the baker, gnomes and fairies. Our English speaking friends probably assume we're talking in riddles now.
- 1,616 replies
-
- 4
-
-
- caldercraft
- agamemnon
- (and 1 more)
-
Hi Jason, Sjors & Mobbsie : you're all more than welcome Jason, referring to the dowels : tough question - Here's a pic of my already limited supply, and sources are different. A part are leftovers from previous kits but all coming from old continental brands such as Mamoli, Mantua and Corel. - Besides, those kits were completed long ago and before the internet-era. There were more retail shops related to modelling in business and they had an important supply : dowels, ornaments, all kind of fittings. But that's the past and those days are not coming back for sure, I'm afraid. Nonetheless , if I were in your place : why not contact a retailer such as Cornwall Model Boats ?.( there's no personal interest involved) I believe brands such as Mamoli, Mantua and Corel are incorporated in their stocklist. Moreover : I'm ginving it some thought to make the same move : I like the contrast between the yellow looking wood ( without paint ) and the black parts, as the walnut dowels do not seem very appealing to me. While making shrouds : there's plenty of time. But first , I'll complete the cross- and trestle trees.

-
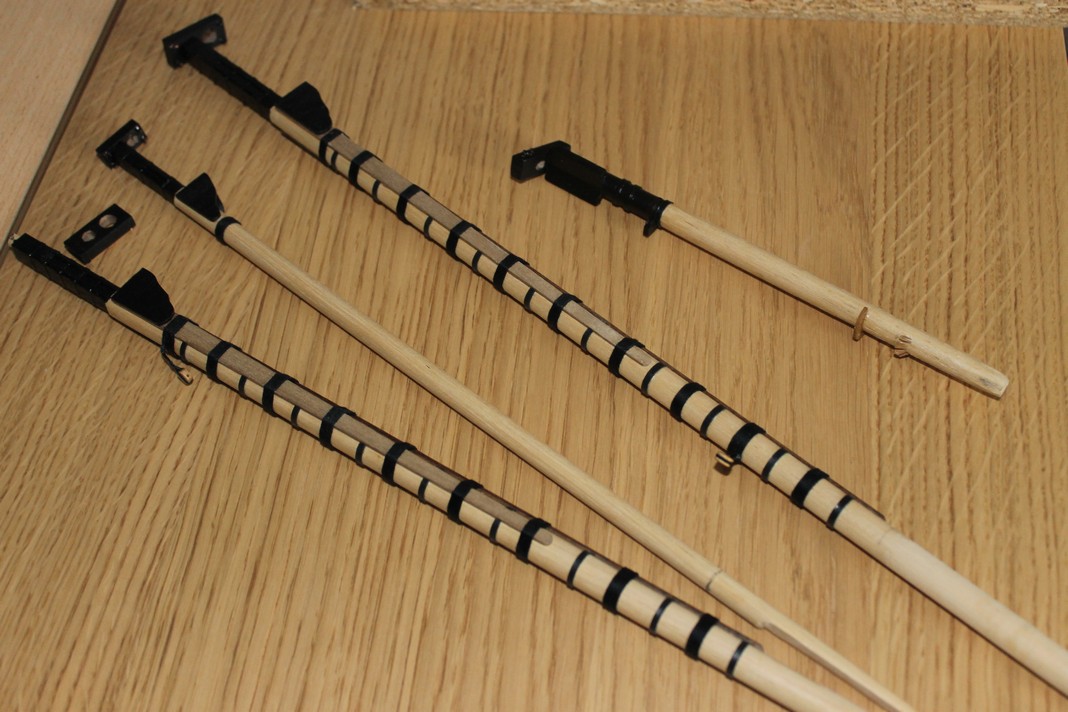
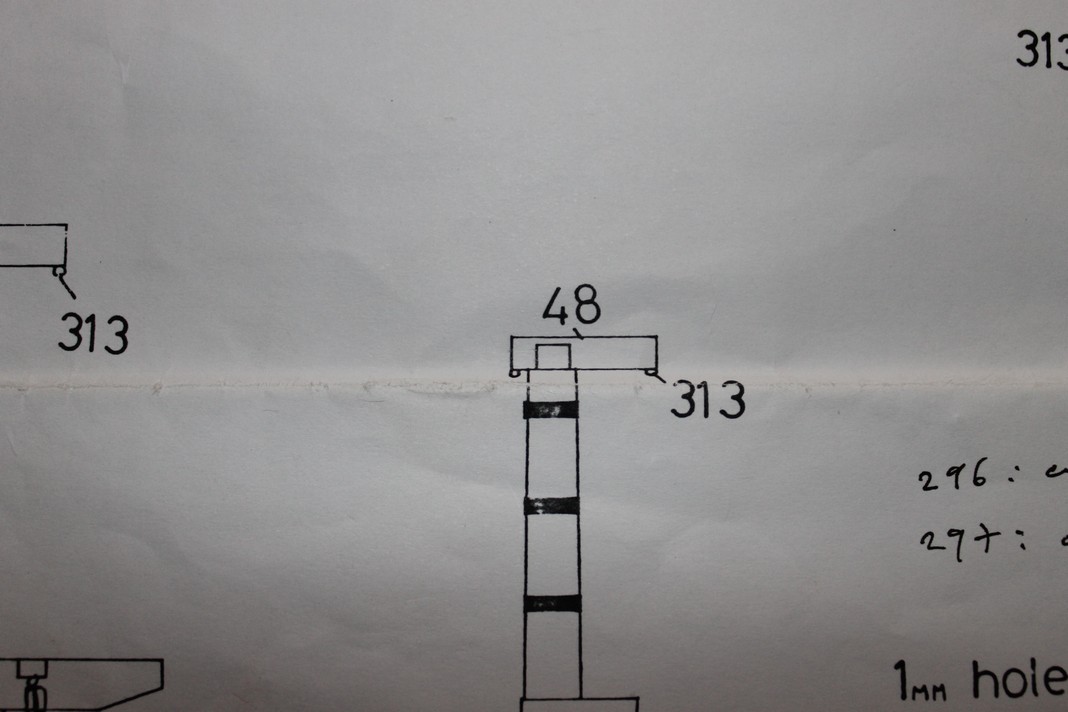
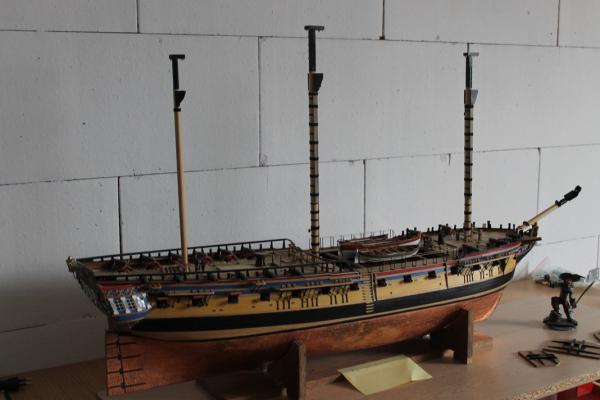
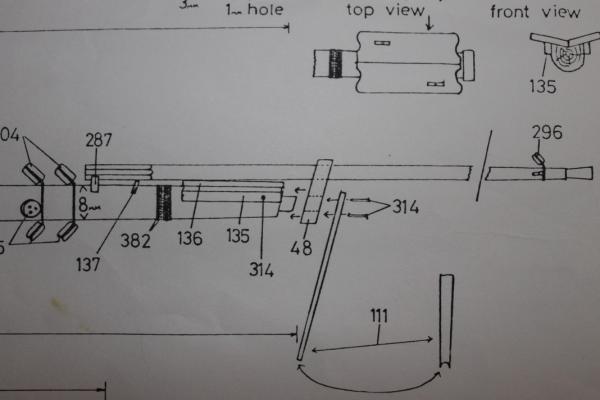
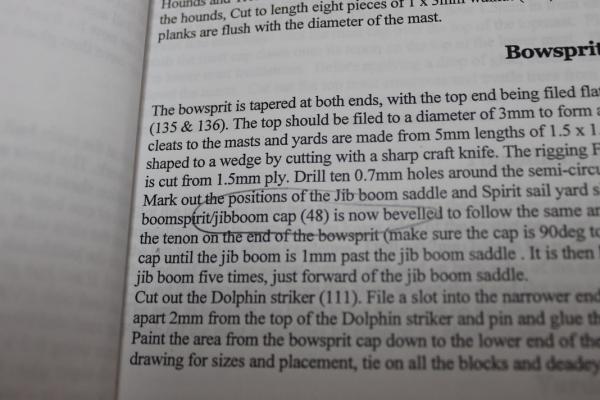
Hi, Update : lower parts of the masts (more or less) completed. As B.E. suggested I used Ramin (or something lookalike) for I was not keen painting them. Furthermore, I omitted the black paint between the cheecks for aesthecal reason. By chance I had some spare dowels at my disposal coming from previous builds, although some fiiting to correct diameters according to building instructions were required. A word of caution related to the bowsprit. ( see pics in attachment ) Part n° 48 . Unless I overlooked something, one and the same part can hardly being used to 2 different purposes. Meaning the same mastlock for bowsprit as well as mizzen-mast. But there was another snake in the grass : the bowsprit makes an angle towards the horizontal line of the ship. If the two holes in part n° 48 are plain vertical and the same part fitted on the bowsprit is supposed to stand vertical : there's a problem. The holes should be fored under the same angle to compensate, I guess. I wonder if other Diana-builders had this same experience ? So I made the lower bowsprit lock from scratch using the original frame, so I had already the correct thickness. Among many kit builders I also share the dream building a ship from (semi) scratch - plans only. So if I can't manage a mastlock, that would be shameful, n'est-ce pas ? Next step : why not the shrouds ?

-
Congrats Mark, I can imagine how rewarding the "right side up" sight felt. Best wishes for 2016 : good health in the first place and much fun while accomplishing this wonderful project.
-
Indeed Sir, and by doing so, you certainly enhanced your model. Having HMS Pegasus on the shelf, I've found the crowsfeet rigging scheme . Aside from Pegasus' plans I have a Proxxon catalogue at my disposal : a precision tool seems a requirement for drilling those mini-holes. Perhaps, a proposal for Santa Claus ? I think I'll follow your example. Again, I wish to thank everyone for the input and -of course- all the likes