chris watton
-
Posts
2,335 -
Joined
-
Last visited
Content Type
Profiles
Forums
Gallery
Events
Everything posted by chris watton
-
 Thank you, Ernie! I think my love of frigates will be well reflected in future developments. If all goes well, this will be my 'Flagship' model, as I have no desire to ever revisit Victory....
-
It is hard to work out the times involved, because I do this from home, so am always thinking about the designs and tweaking. Sometimes at 2 or 3 in the morning when I think of a solution to a problem that's been bugging me all day! I think perhaps one full week for the very small kits, with a lot more hours tweaking aspects of the initial designs. The more complex the design the longer it takes, but to the modeller, they wouldn't know as most of the hard parts are 'ironed out' before ever being kitted - although there's always something that slips through, no matter how much time I spend checking stuff... I would very much like to do an ancient vessel one day, I think perhaps one of Hatshepsut's vessels, complete with a scale figure of her would be pretty cool...
-
Cheers guys. I only said something because I always get asked about my past designs, the Nelson's Navy period was not a happy time and, TBH, still upsets me when I think of all the time and effort I put into doing those kits, to bring on a new marketable range so quickly. Anyway, now you know, so let's look forward rather than back - I just wish I had the balls to do this years ago. Still, better late than never...
-
Well, as far as I am concerned, that's now just history. I am very happy now, doing what I am doing without restriction.
-
I sent you a PM. You see, I did design a lot for them, but according to them, I designed nothing, it was their son, I was just a 'Factory Operative'
-
Cheers Mike. And yes, I did design Pegasus, along with all kits in the Victory Models range.
-
I must say, considering you are new to this, you have done a remarkable job on your model. very well done!
- 38 replies
-
- 3
-

-
- vanguard models
- fifie
- (and 2 more)
-
Well, you'll get no complaint from me!
-
Cheers again, very helpful posts. I shall probably go with a 20 gun and work up, as this make most sense. I have to be honest and say I have never bothered to see what other companies are doing, I have never cared one jot, as I have always preferred to do what I think is right/what I like, rather than reacting to what others are doing. Having said that, Initially, Atalanta was on the cards, as I bought the plans for that - but I now realise the everyone and their mother are now doing a Swan class, so I feel a 20 gun small frigate from the same period is a very good substitute. Out of all the kits I have designed in the past, there are only two I would very much like to revisit and give them the treatment/designs they so deserve, a brig and a small ship of the line, which I did two decades ago. Lou, I keep looking at my Bristol designs, and may carry on with them, but knowing what I know now, I need more slightly smaller kits before purchasing the large amount of materials needed for such a large kit. When I started Bristol, the plan was to use standard materials (basswood), and use my Italian sub contractor to laser cut the parts - but this has changed as I realised quickly that the standards/quality of cutting were not what I had envisaged. The upside to this is that it forced me to purchase my own laser machine, and a lot more freedom to design how I like without worrying about the costs of paying someone for the time, and wondering if all the parts I paid for will fit as I want them to. One more thing I would like to add, not a single part of my new kits are an 'afterthought', I try to give each and every part the attention they need, so that they fit with the 'whole'
-
There's a 20 gun, 32 gun, 38 gun and 44 gun razee. Head says the smallest or 32 gun, heart wants the biggest...
-
It will be one of these
-
Cheers The problem is that I no longer want to design 'block models', which the majority of mainstream kits are - just a keel and a few bulkheads and one full deck, perhaps one more not so full deck for larger kits and a few white metal parts or blocks of wood to fill in the design/production time saving gaps. When I populate the lower decks, the amount of materials (and cutting time) increases many fold. But this is the way I want to design the larger kits, as this is what I would want if I were choosing a kit. I like having the gratings put to one side so I can see down to the depths of the vessel, not have pretend shutters to hide the fact there's nothing there. Also for larger models, the new method of designing the gun port surrounds uses a lot of material, but I think, again, it is worth it, as it eliminates completely any ambiguity of having to mark out or, if it's a pre cut part, misaligning the ports. I guess my aim is to try and eliminate the guesswork involved in making the kits and make it as painless as I can. Some are expert and much better than me at building models, but there are many who do need an extra hand, and it is to these people I try and think about the most. The most experienced always go their own way anyway. I am always astonished at what some of you guys can do with the simplest of kits and make them your own.
-
Thank you, but no, I need to do the drawings from scratch, using the parts I have designed. The actual plans that I get the lines off are used only once to get all relevant lines and details, which are then expanded on to design the kit parts. After this, I will be working on larger stuff, but being larger, they will take more time. I have been worrying about material and final kit costs for larger kits. I am thinking that perhaps I could do standard kits using limewood for laser cut parts, and for those who do not mind paying more, have a pearwood edition. Or would most just prefer to pay more for the better (and much stronger) wood? I have a choice of 4 I really want to do next, and it's damn hard deciding which - head tells me one thing, heart pulls in the other direction....
-
I am hoping for a November release, all depends how long the CAD drawings take me. I cannot go much further until I have done hull and deck elevations, mast, yard and rigging plans, as I will need to work from these to make sure everything's OK. Lazy day today, though, as I am almost burnt out... ETA - Flirt boxes arrived today, and printed plans, manual and box labels arrive Thursday. All I will be waiting for after this are the shipping sleeves, which I ordered today, after measuring the new box sizes.
-
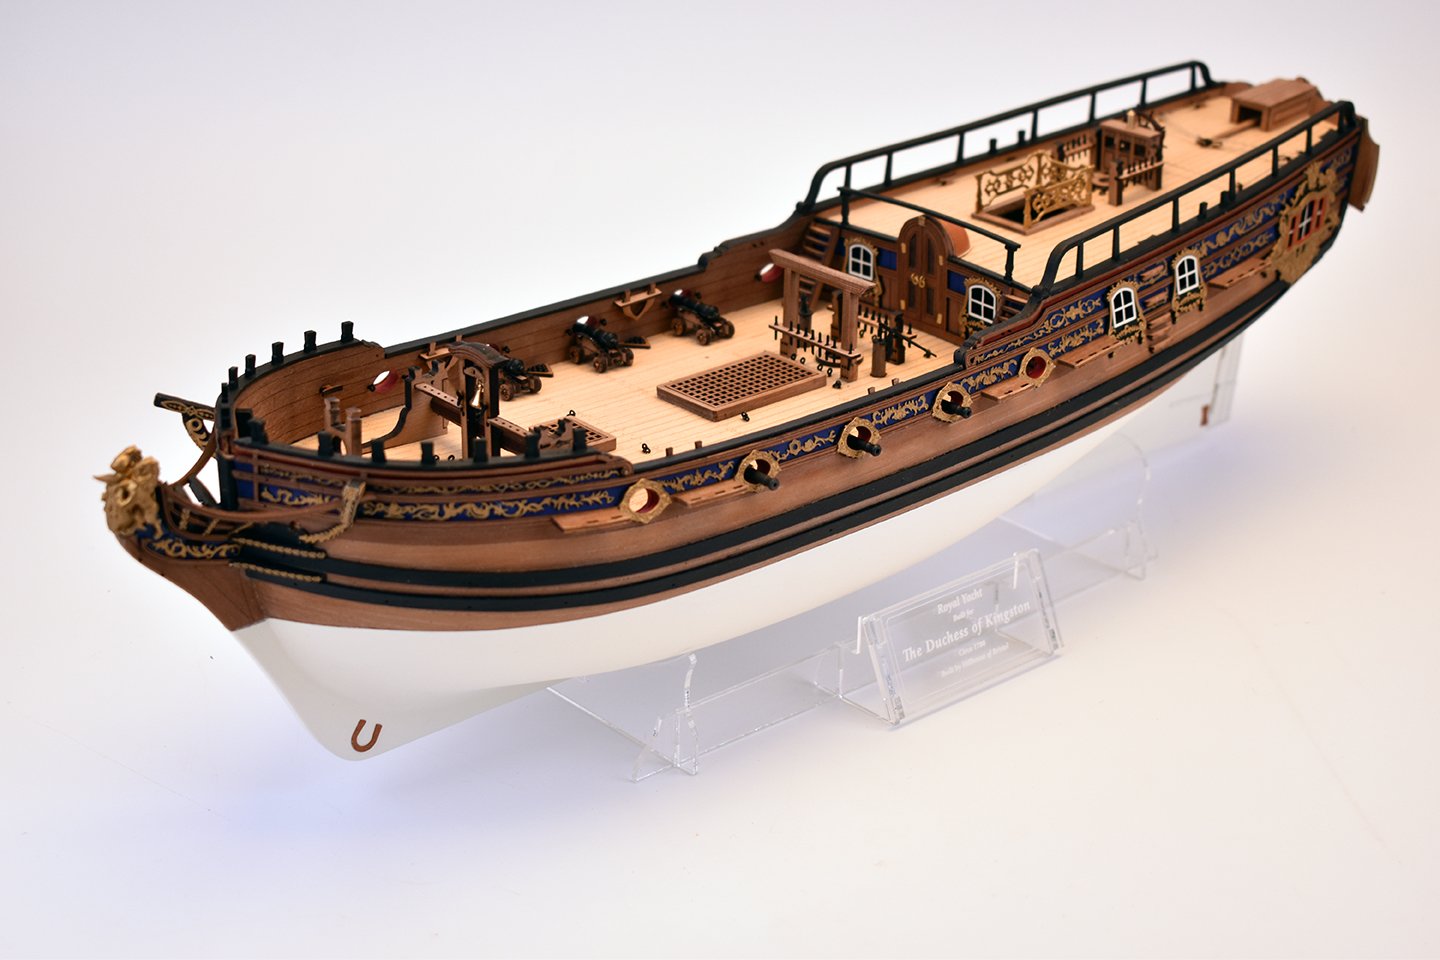
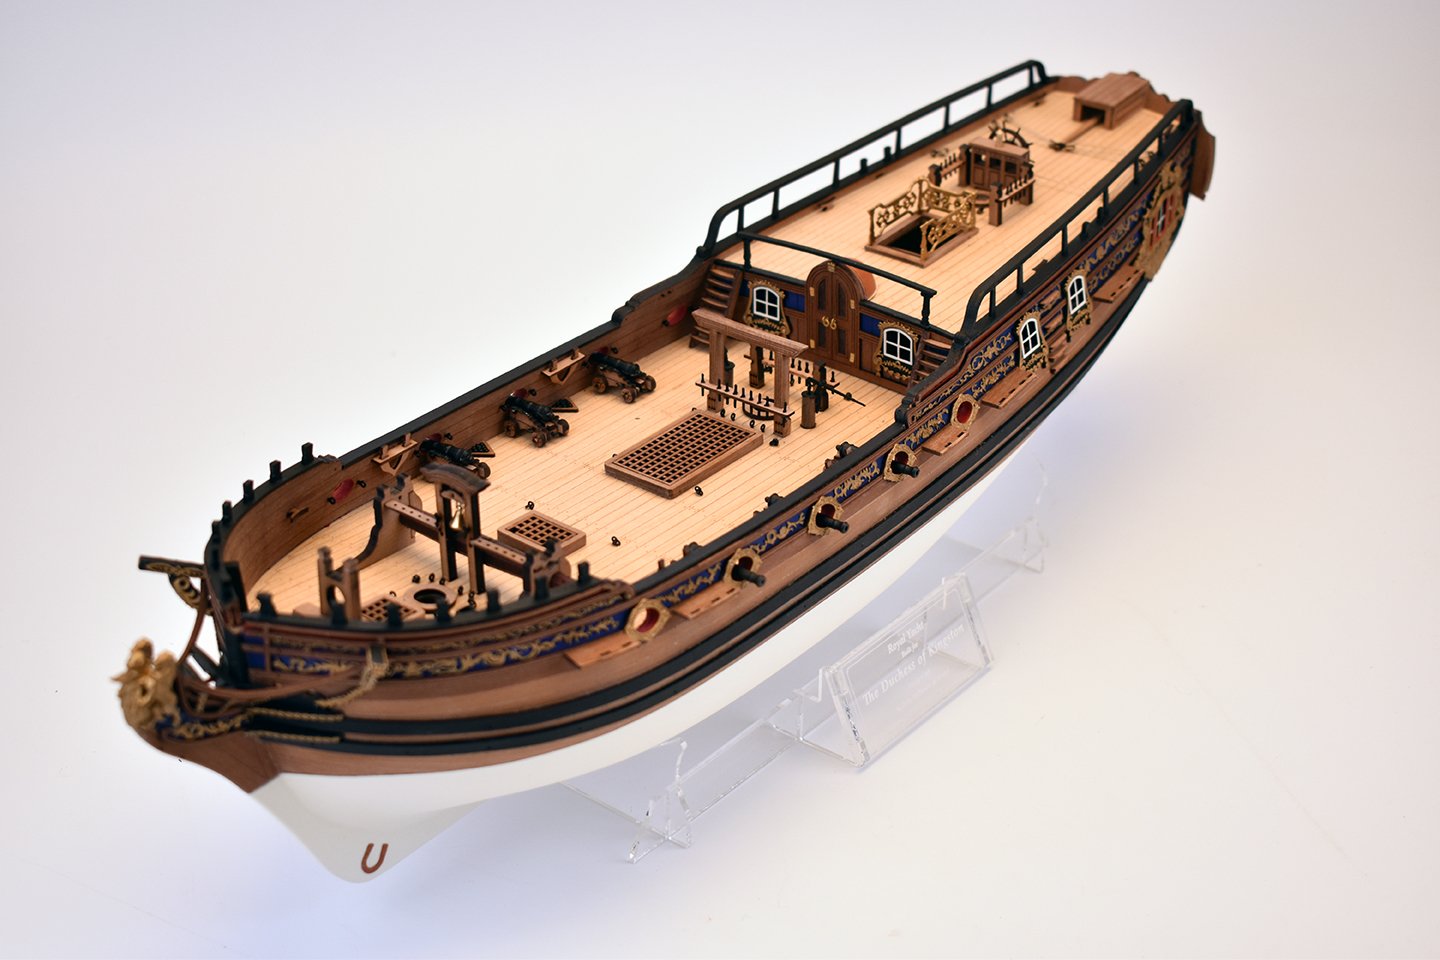
I am unsure of the history, I just knew I wanted to do it when I looked over the plans. Druxey did find something out, and I have a feeling the vessel is the same as what is referred to in this passage from a Wikipedia page: "Duchess of Kingston She lived for a time in Calais, and became mistress to Stefano Zannowich. 1777, after her acceptance by Russian royalty, the two had a boat built then made a spectacular entrance sailing into Kronstadt, the port of Saint Petersburg. In the Governorate of Estonia, she bought 3 properties: Toila, Orro, and Fockenhoff, consolidating them into an estate she named "Chudleigh". She planned to create a 'model Brit estate', imported spaniels and pointers and a collection of plants. She lived there in a clifftop house with a view of the Baltic Sea."
-
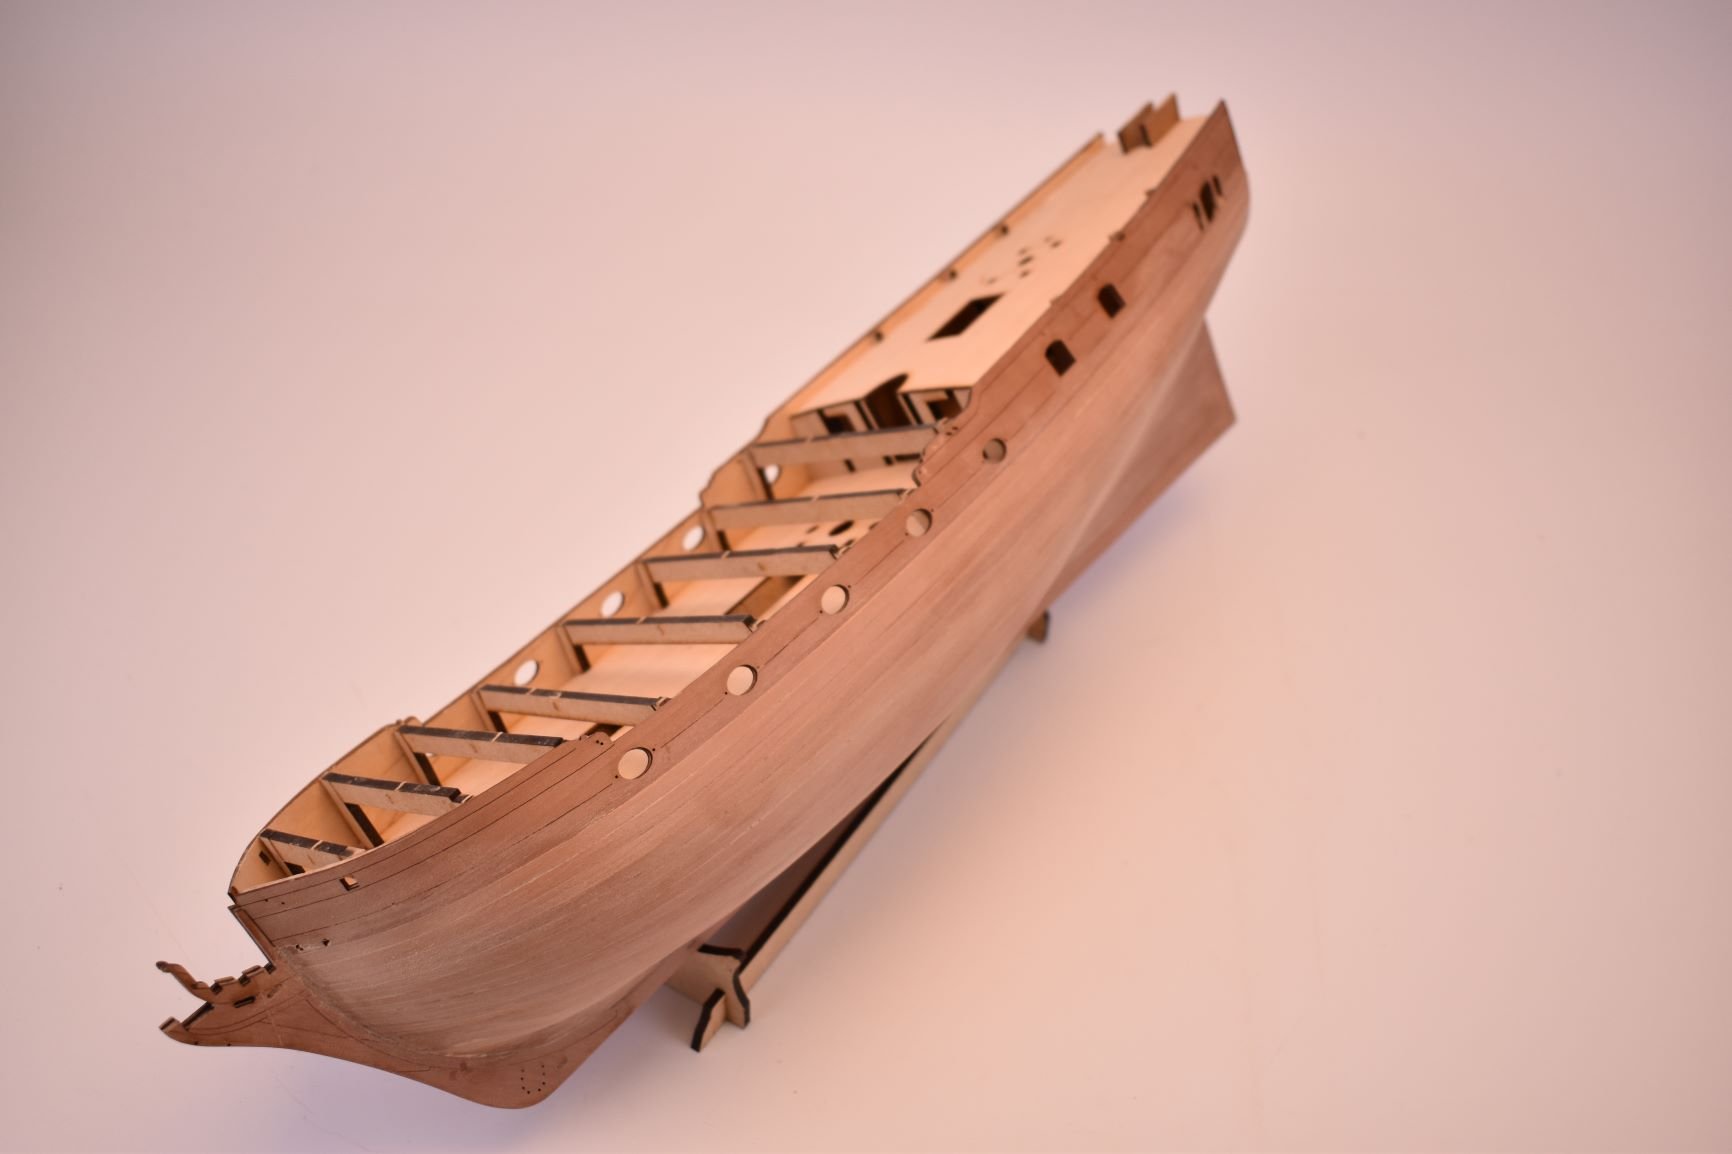
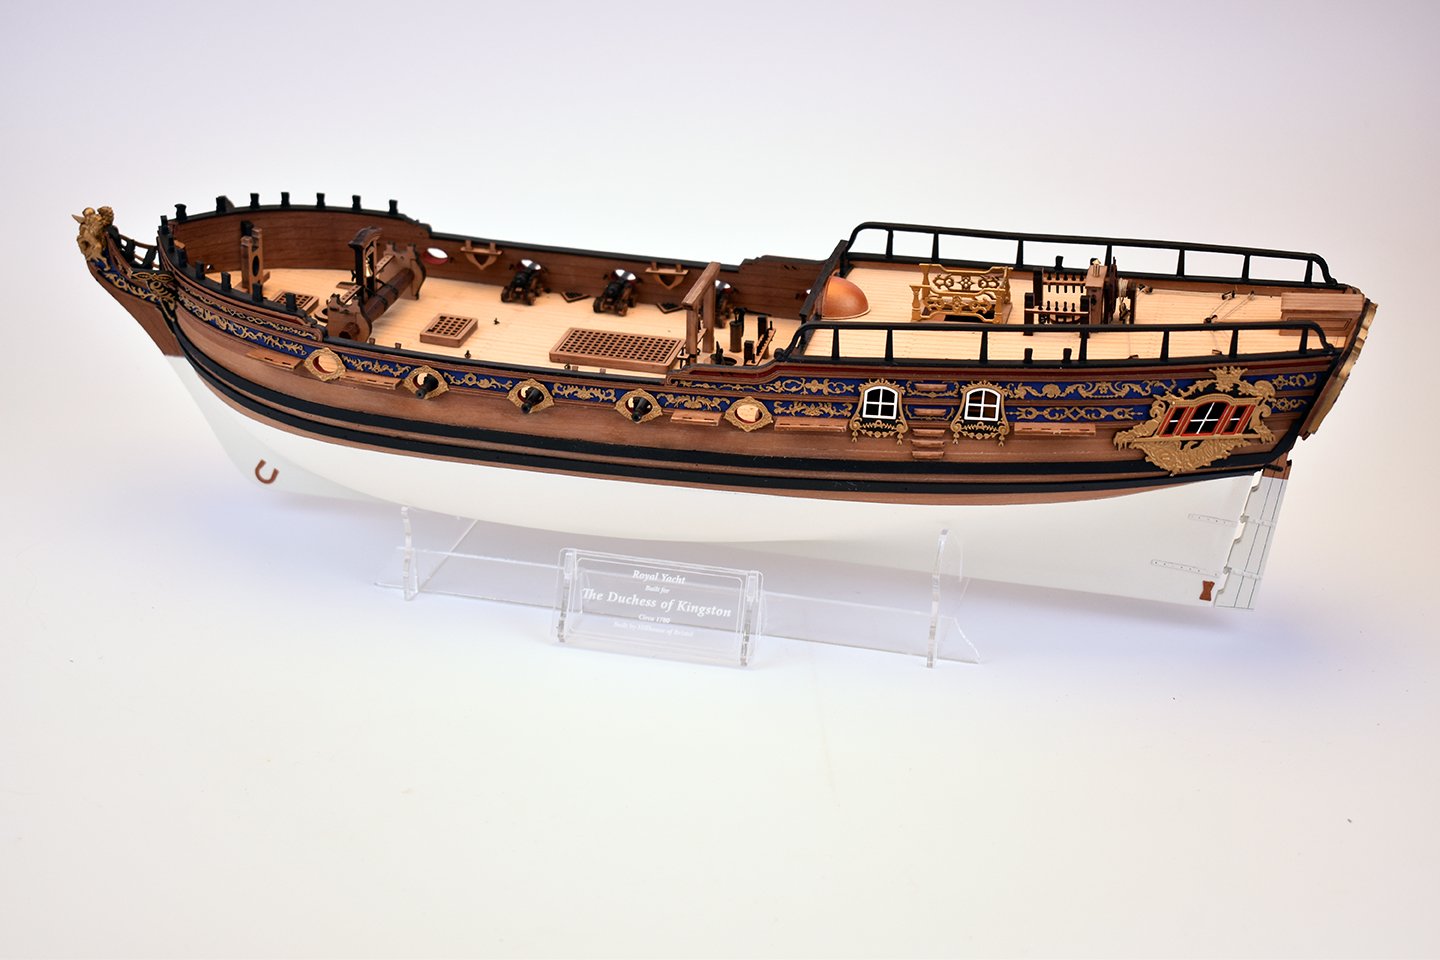
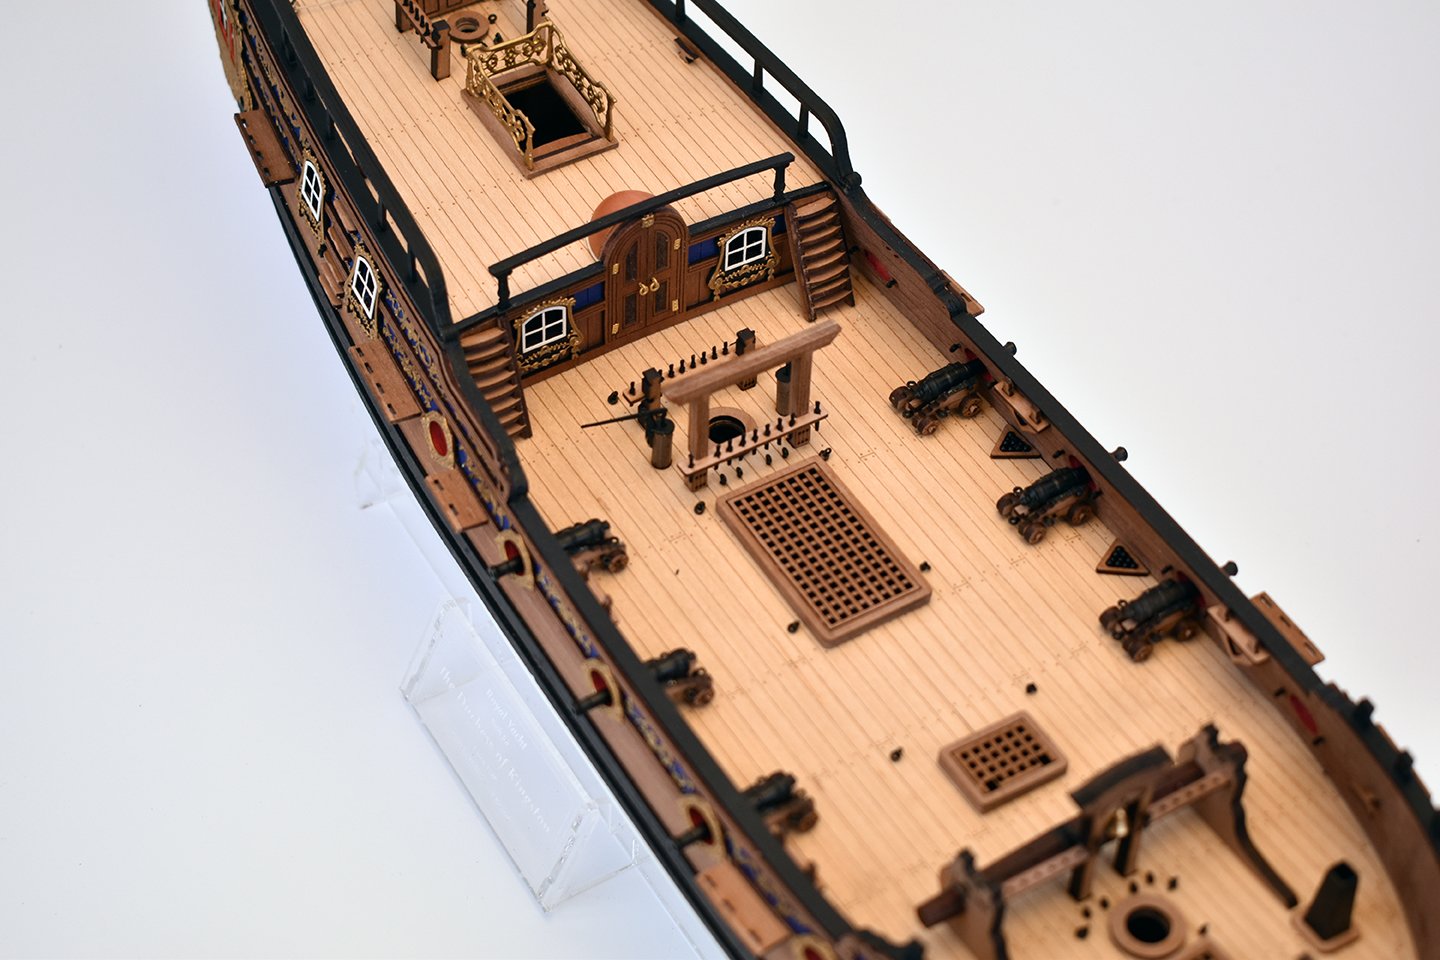
Here is a pic of one of the earlier stages, after second planking. I decided to add 'sacrificial' cross beams to the upper bulkhead tabs to eliminate the chances of breaking them when in planking stages. I thought of this after I planked, so in the kit, the beams are designed better to fit, rather than the ones in the pic. Also, I added etched line on the pre cut second layer. These lines are the painting positions, so the hull can be masked at these lines and the blue and red backgrounds painted before adding the pre cut rail pattern. This really helped as trying to paint in-between each rail would have took a long time, with probably not as neat an end result.

-
Yes, as soon as they are boxed, I will be sending some to them.
-
Thank you! this is still in development stages, I haven't done a single line drawing for it yet for kit plans, but I really wanted to get the designs and all cut files nailed before moving on. Good job too, as it has gone few quite a few design changes. I do all laser cutting in house, and all PE is done in Italy. I should mention that there will only be one version of this kit, as I want to sell it only with materials I have tested when building the prototypes, but it will be very high quality. I think the pear suits this model perfectly, and only painted what I felt I needed to, and left as much as I can unpainted. ETA - It is ship rigged, so three masts this time, but I feel this would look better with a lateen style mizzen yard. Ah, also, forgot to mention, like the Zulu and Fifie models, this has the same rabbet system, but with a little more detail etched into the parts
-
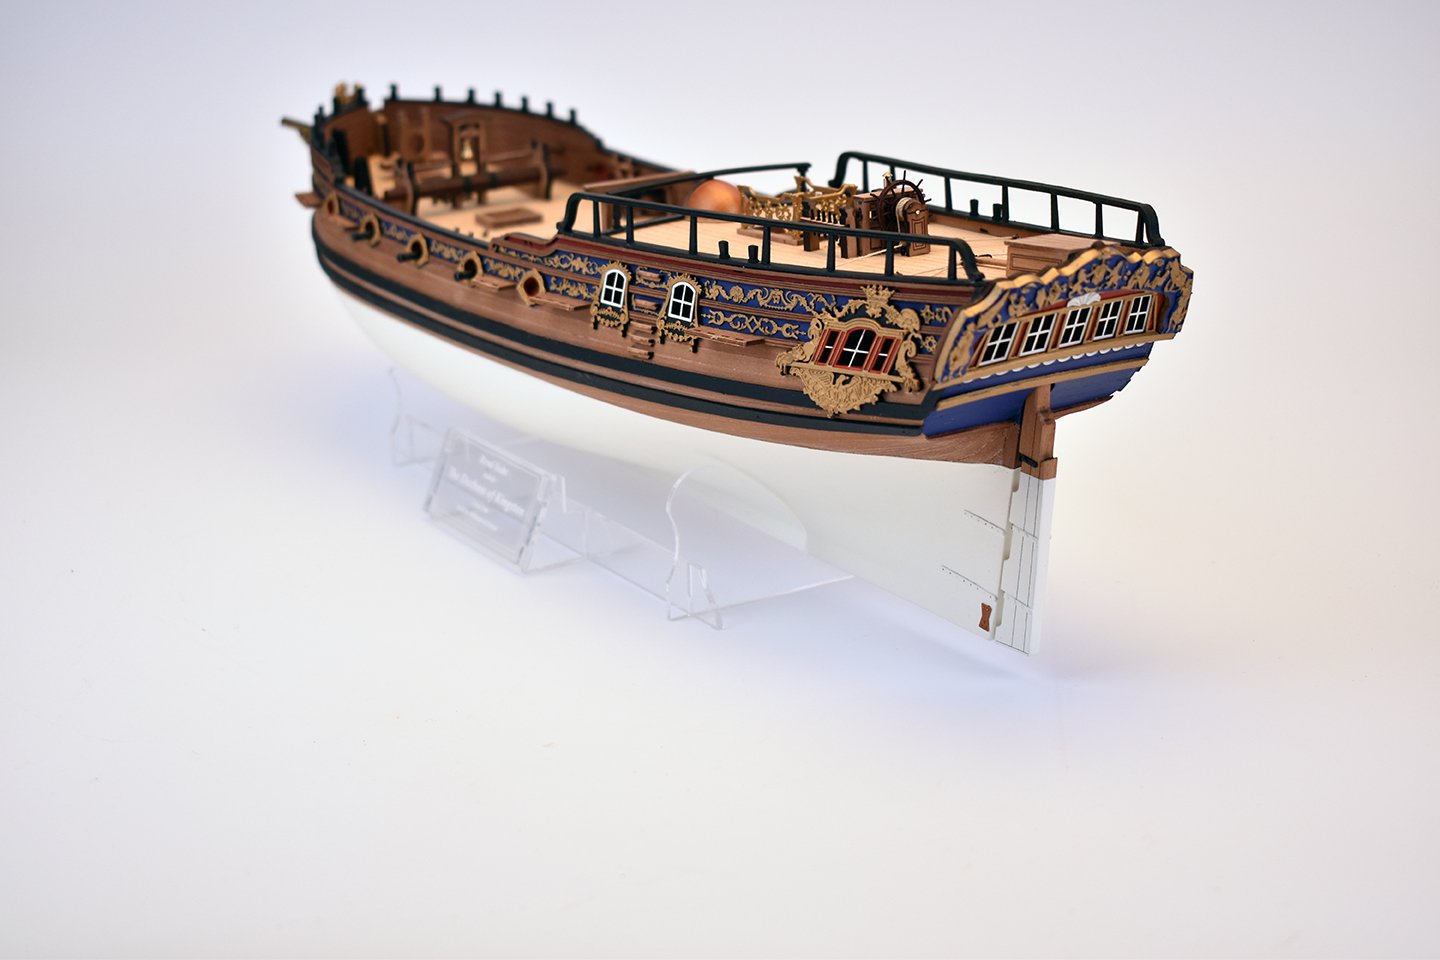
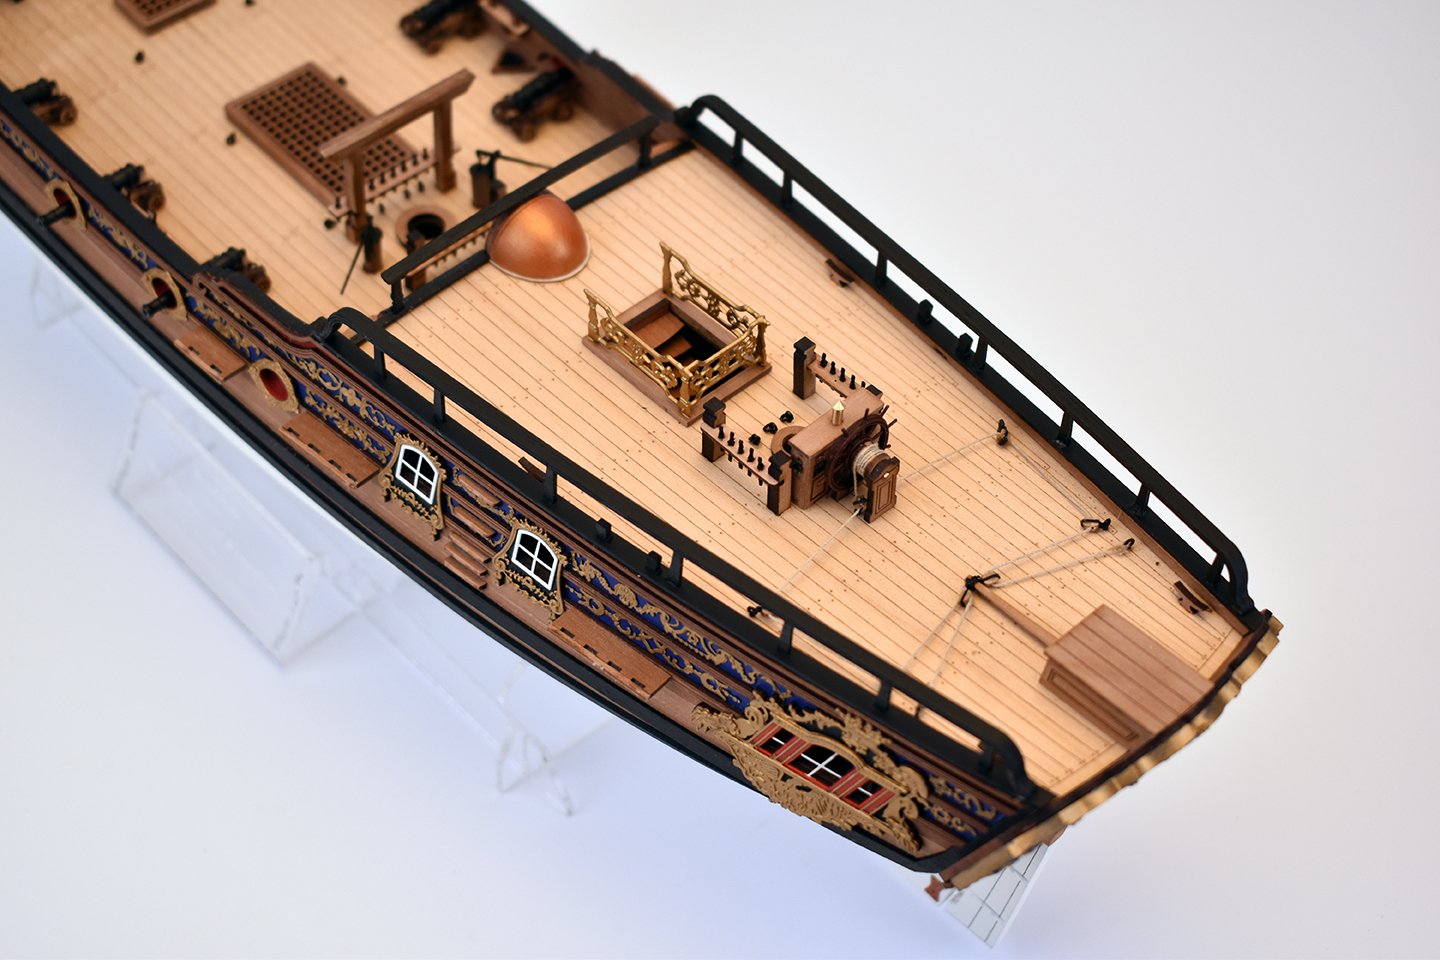
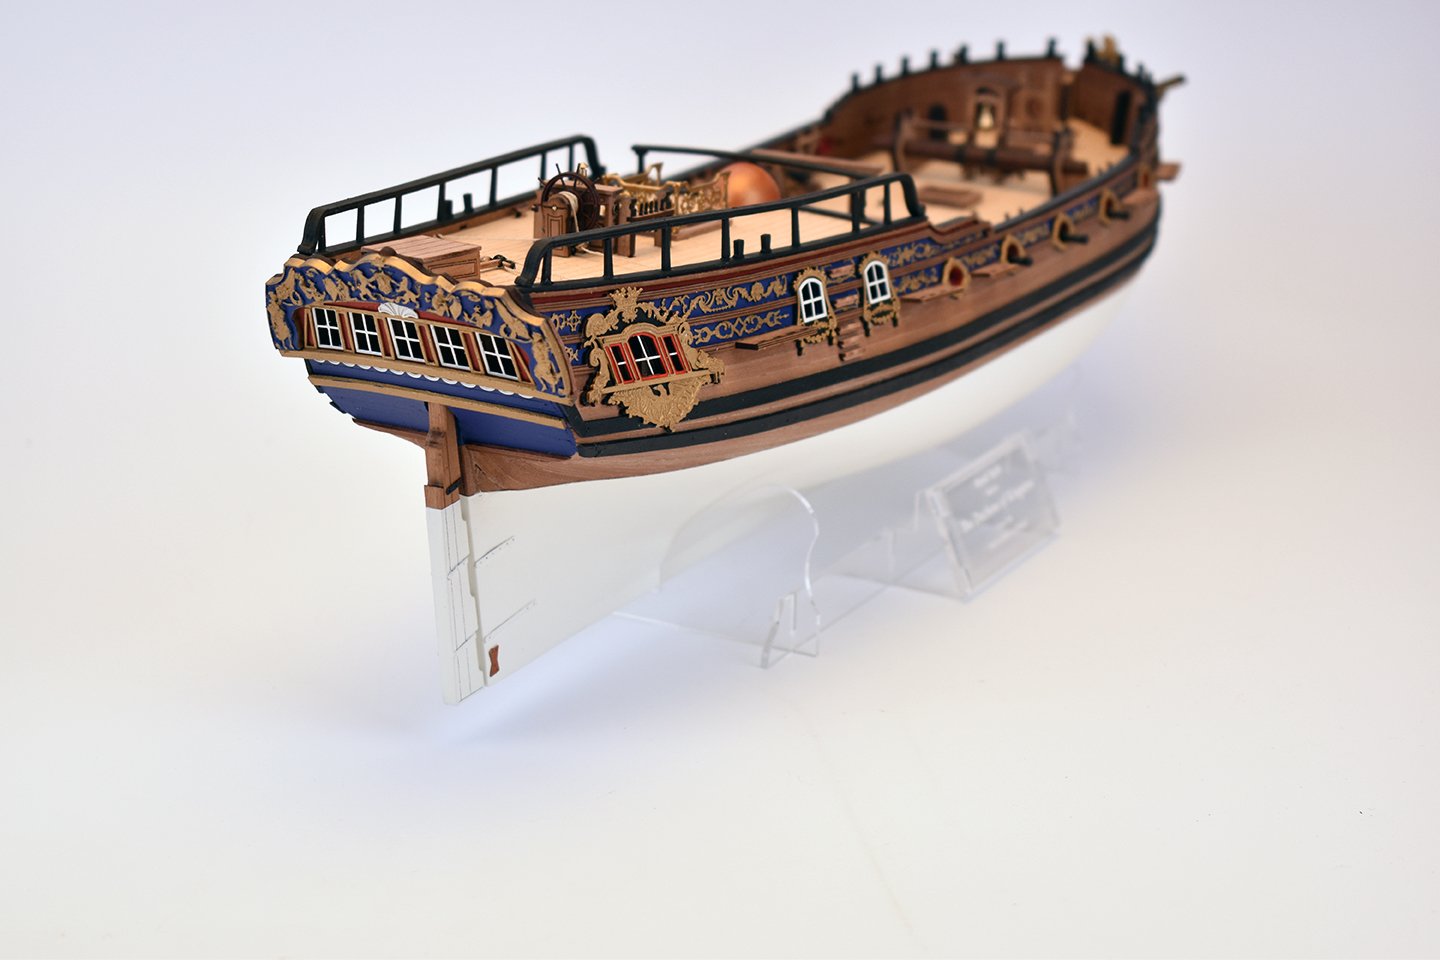
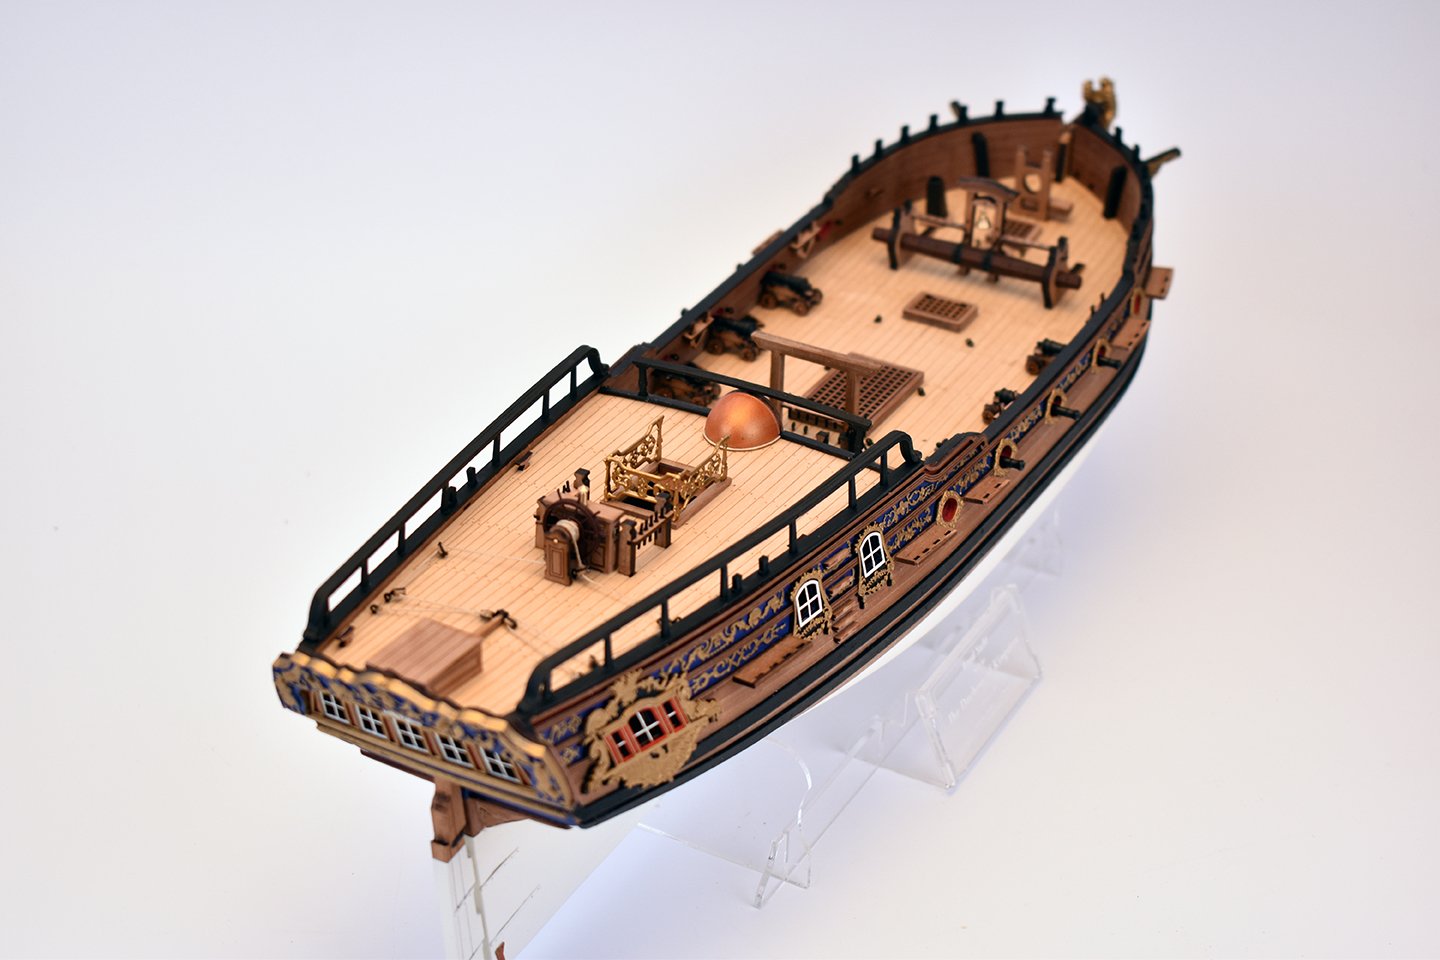
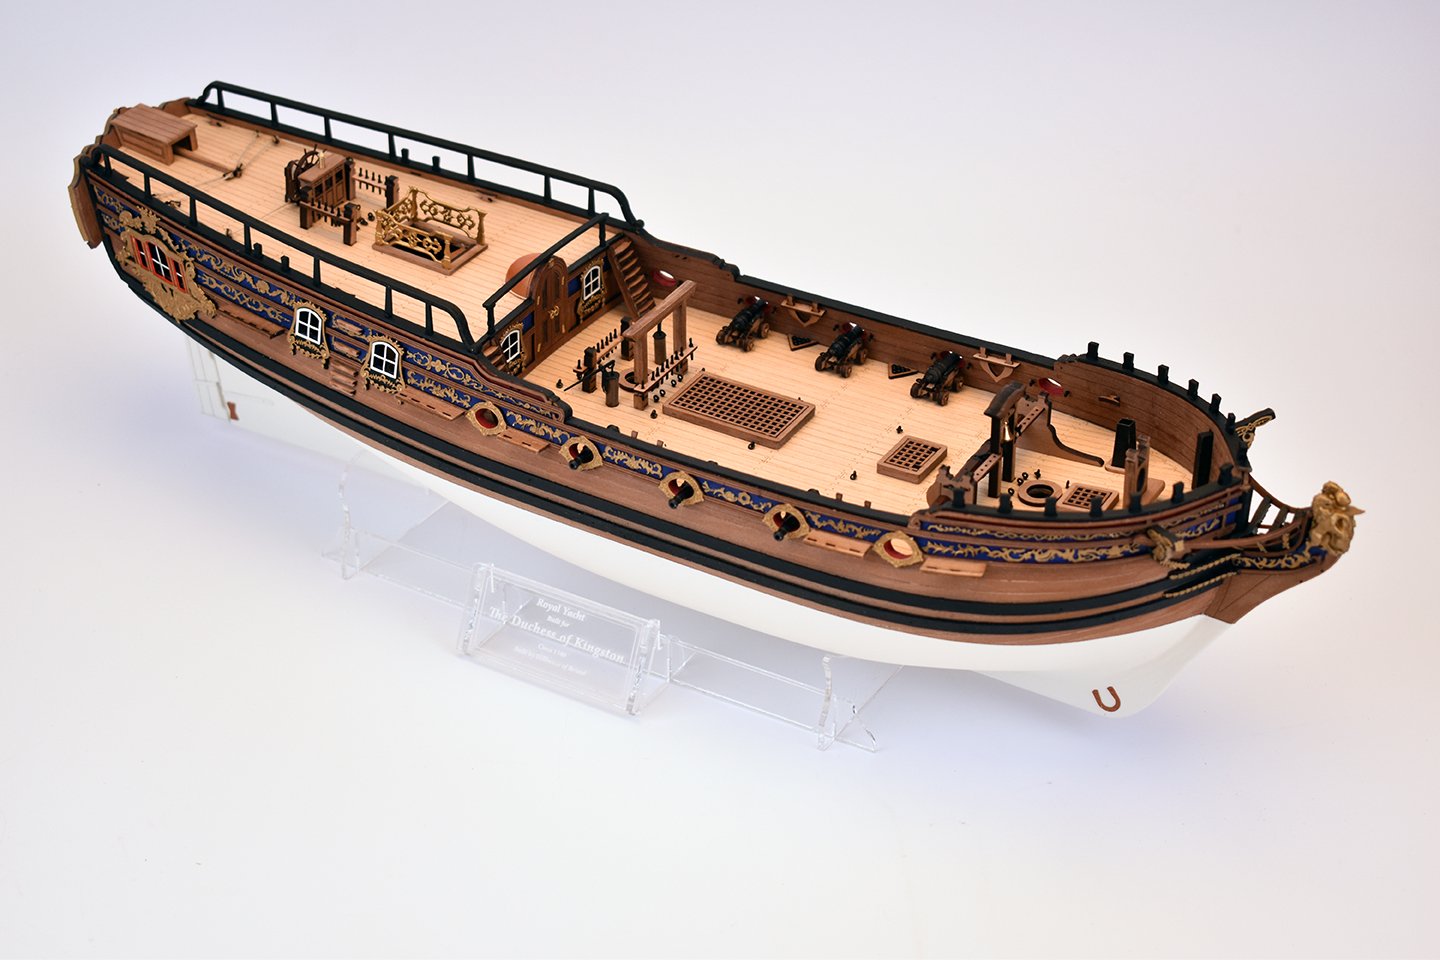
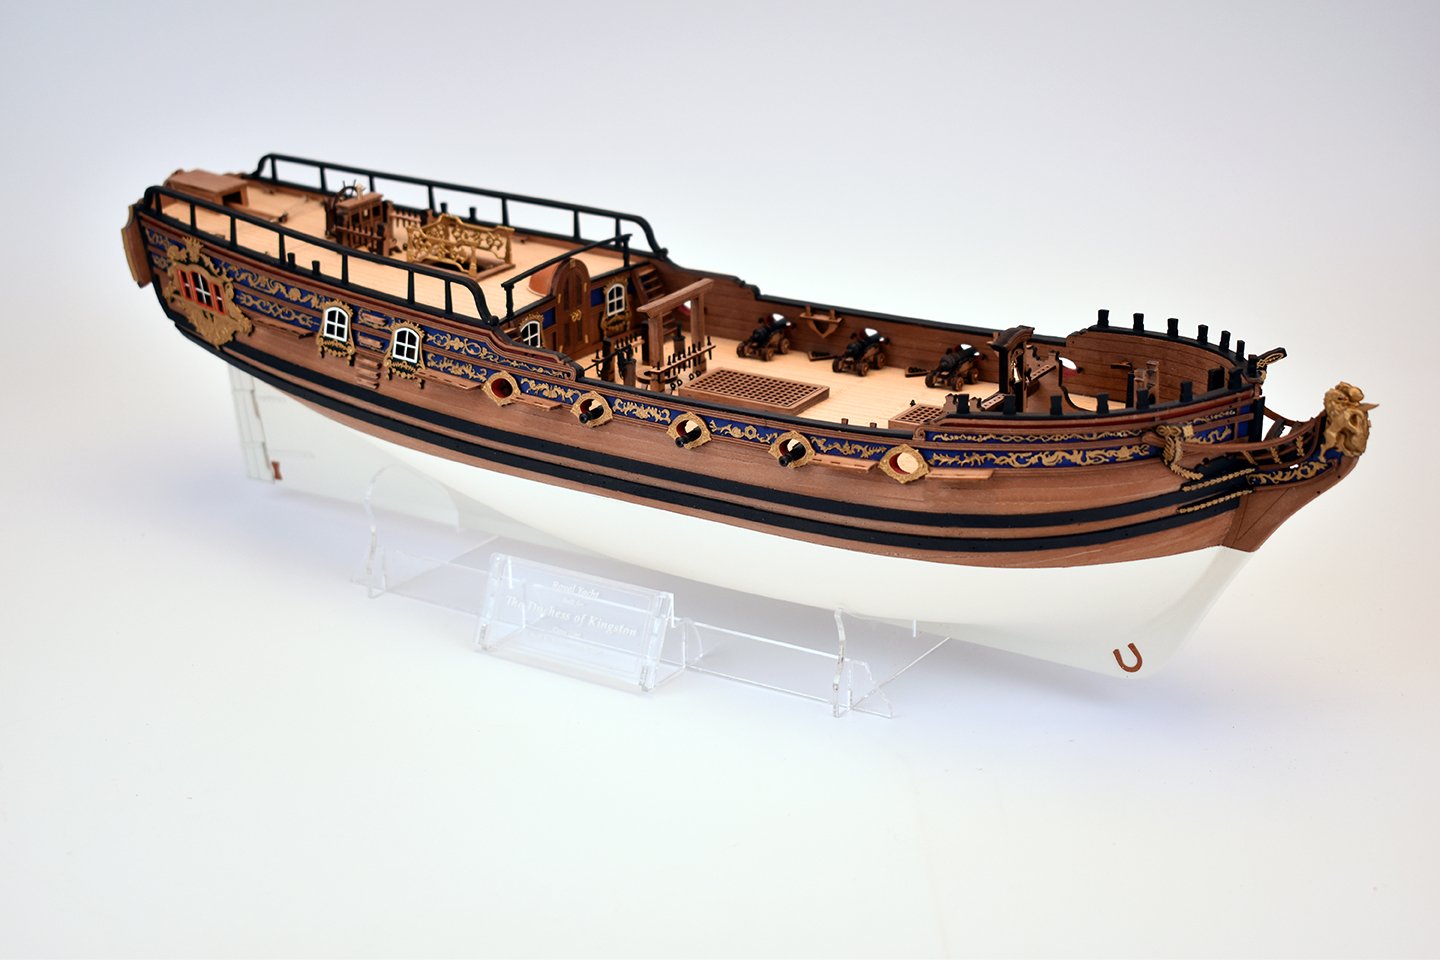
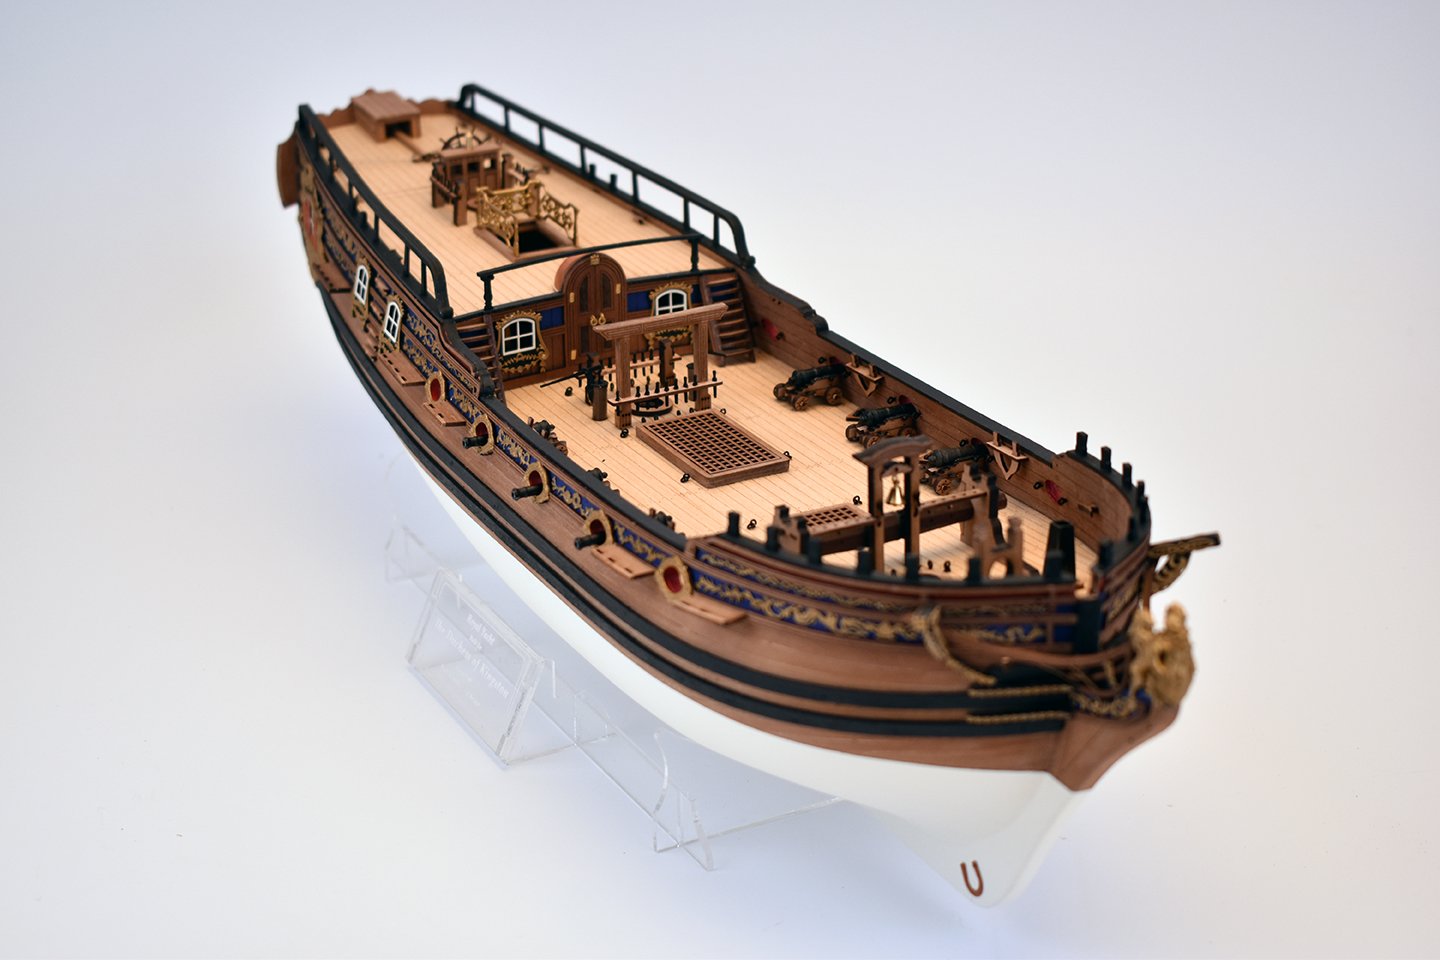
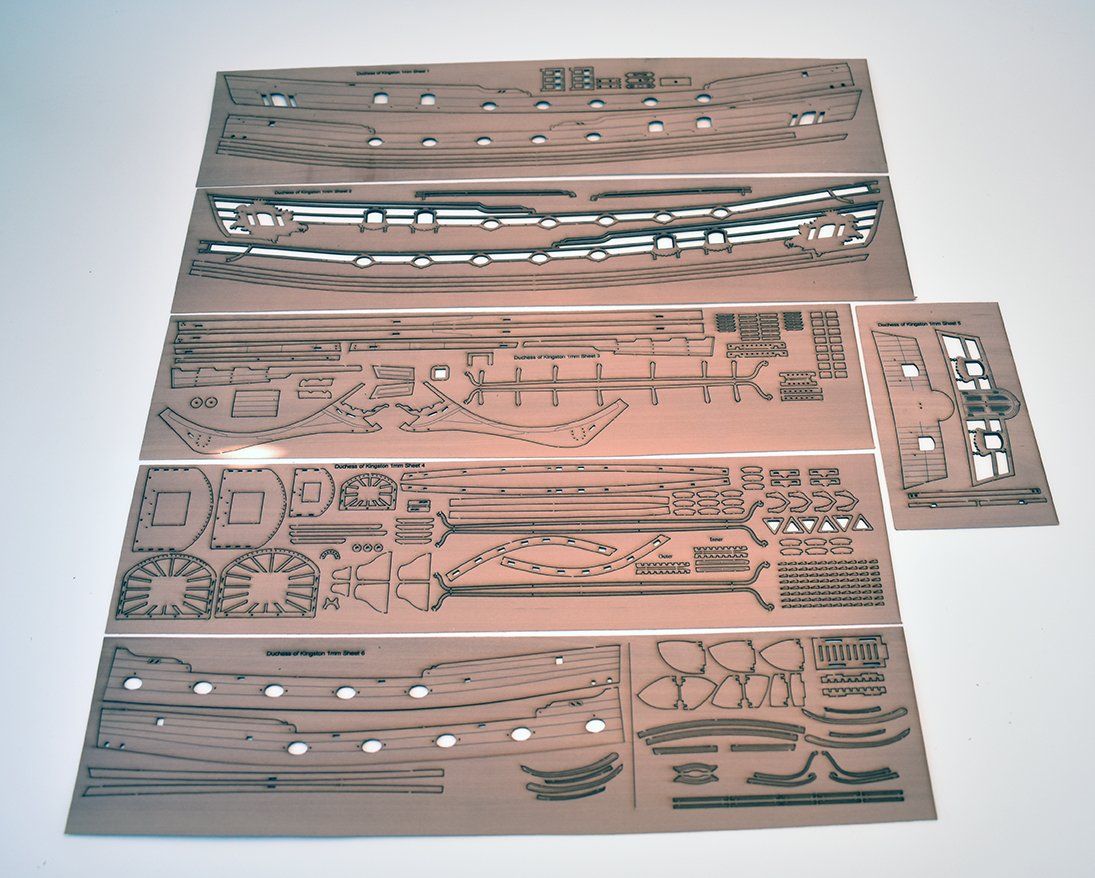
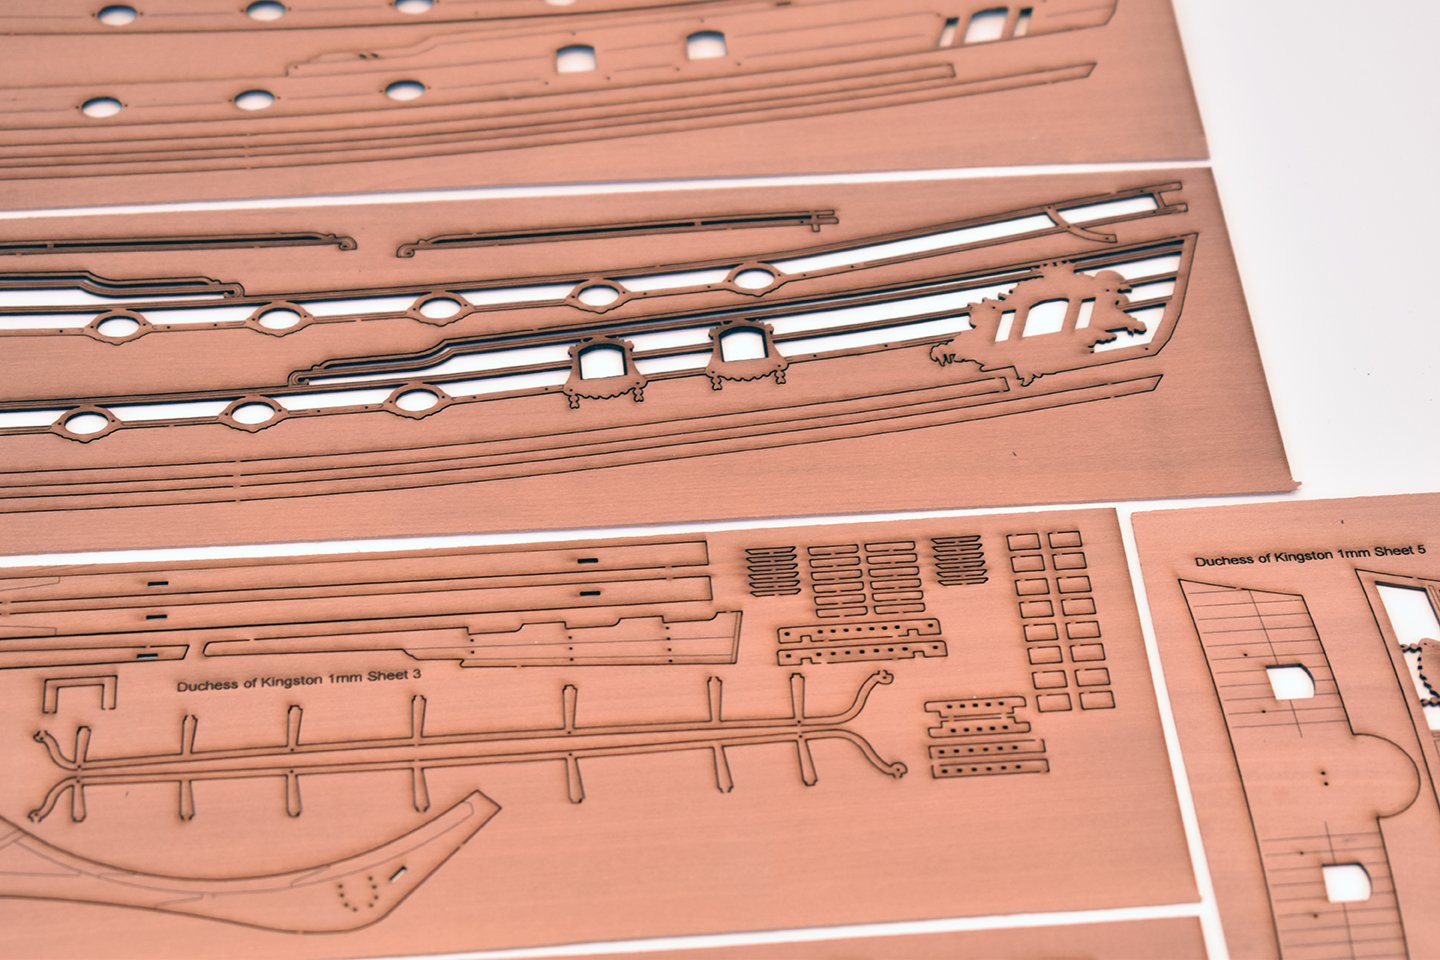
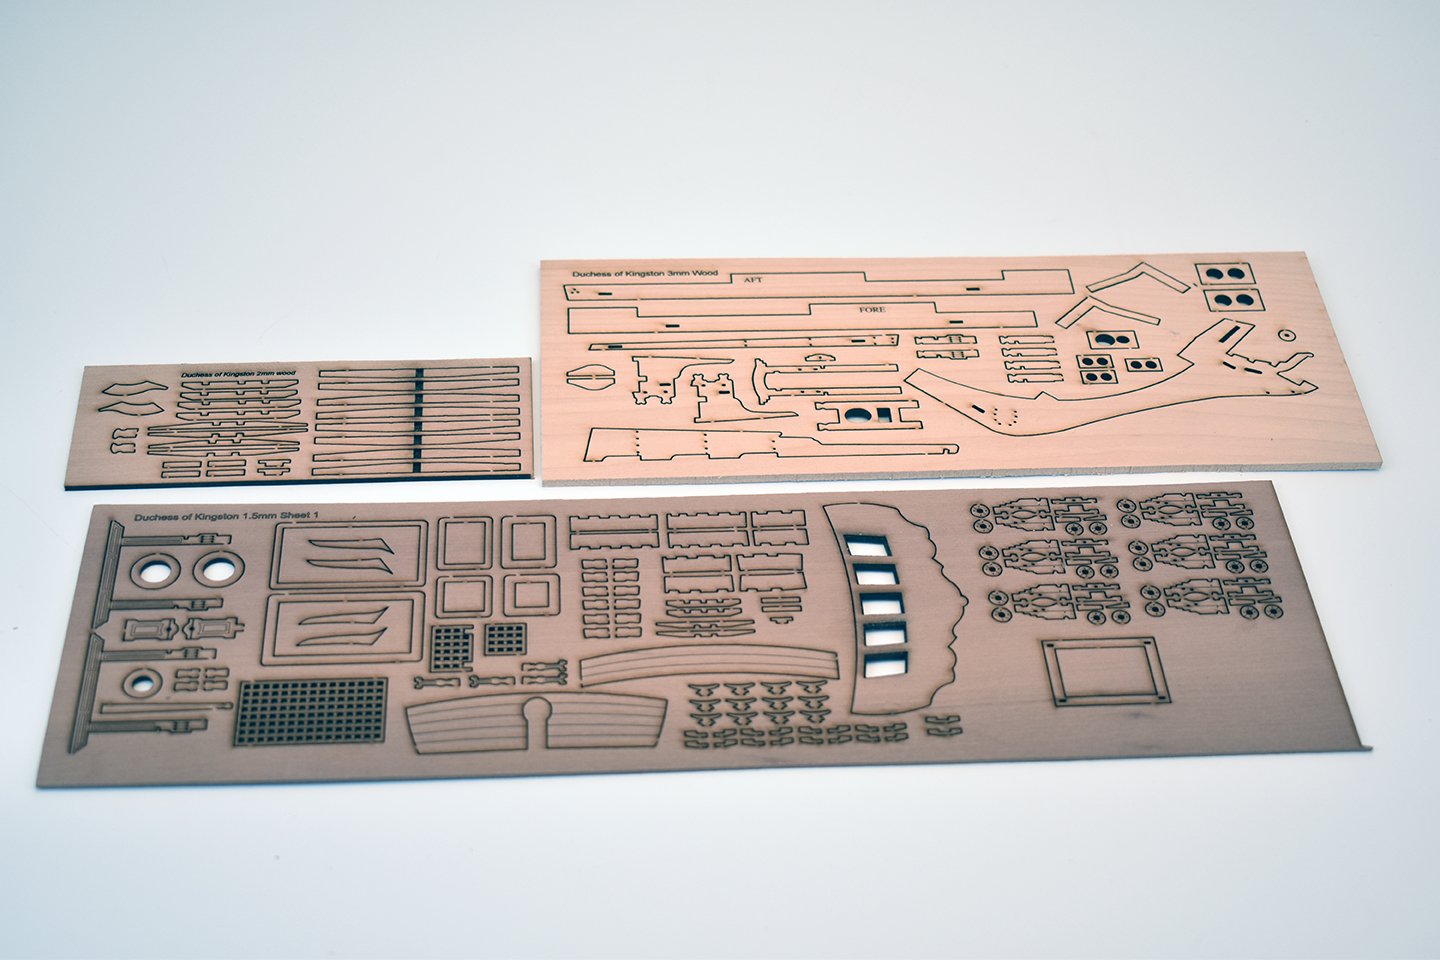
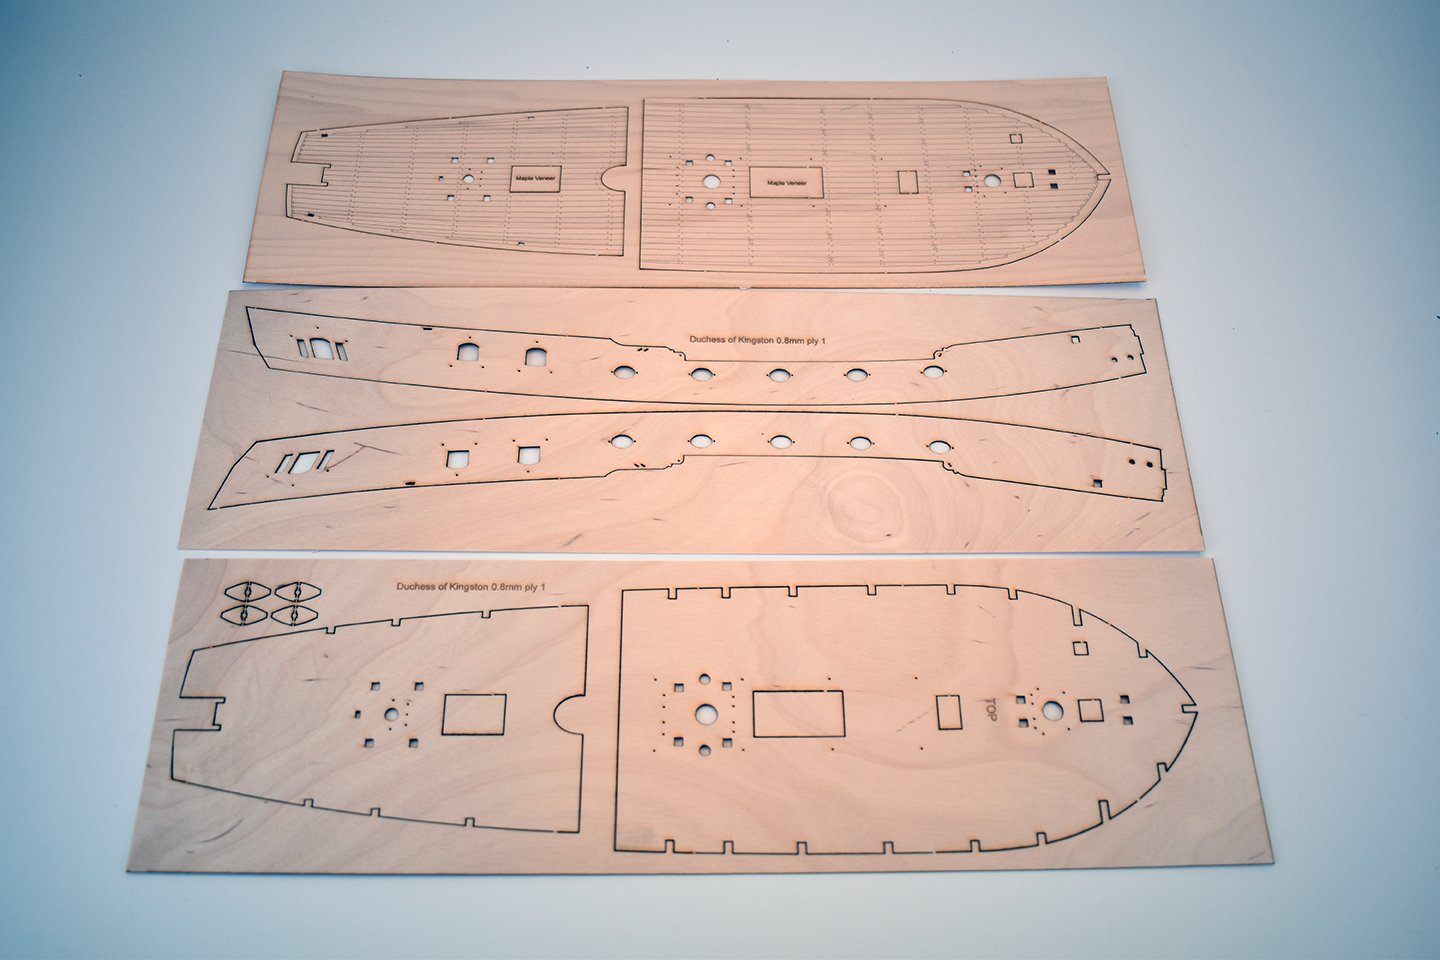
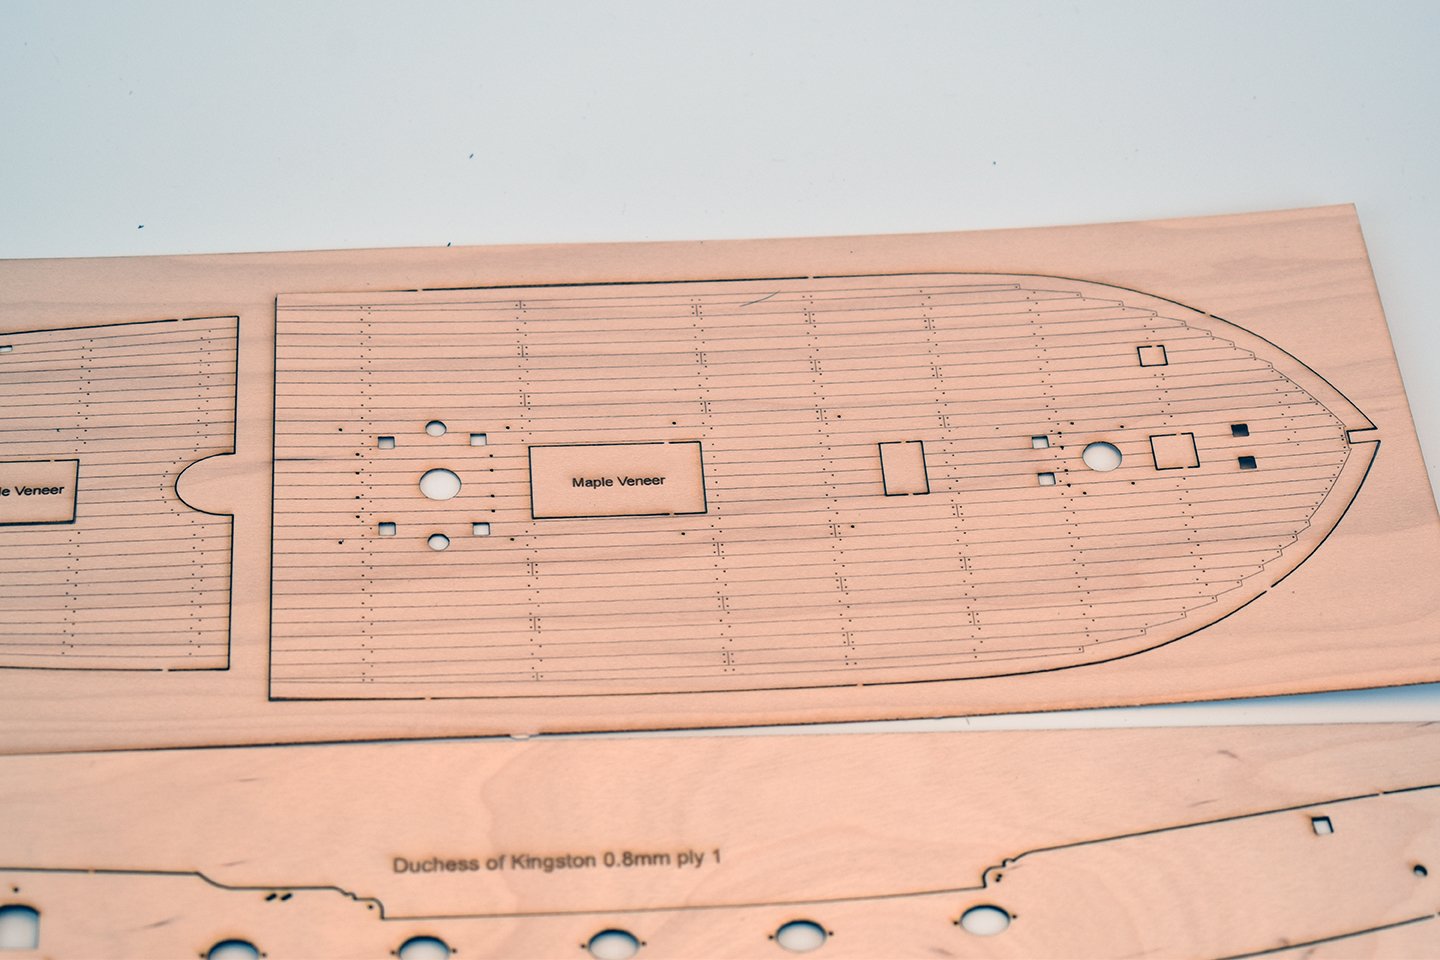
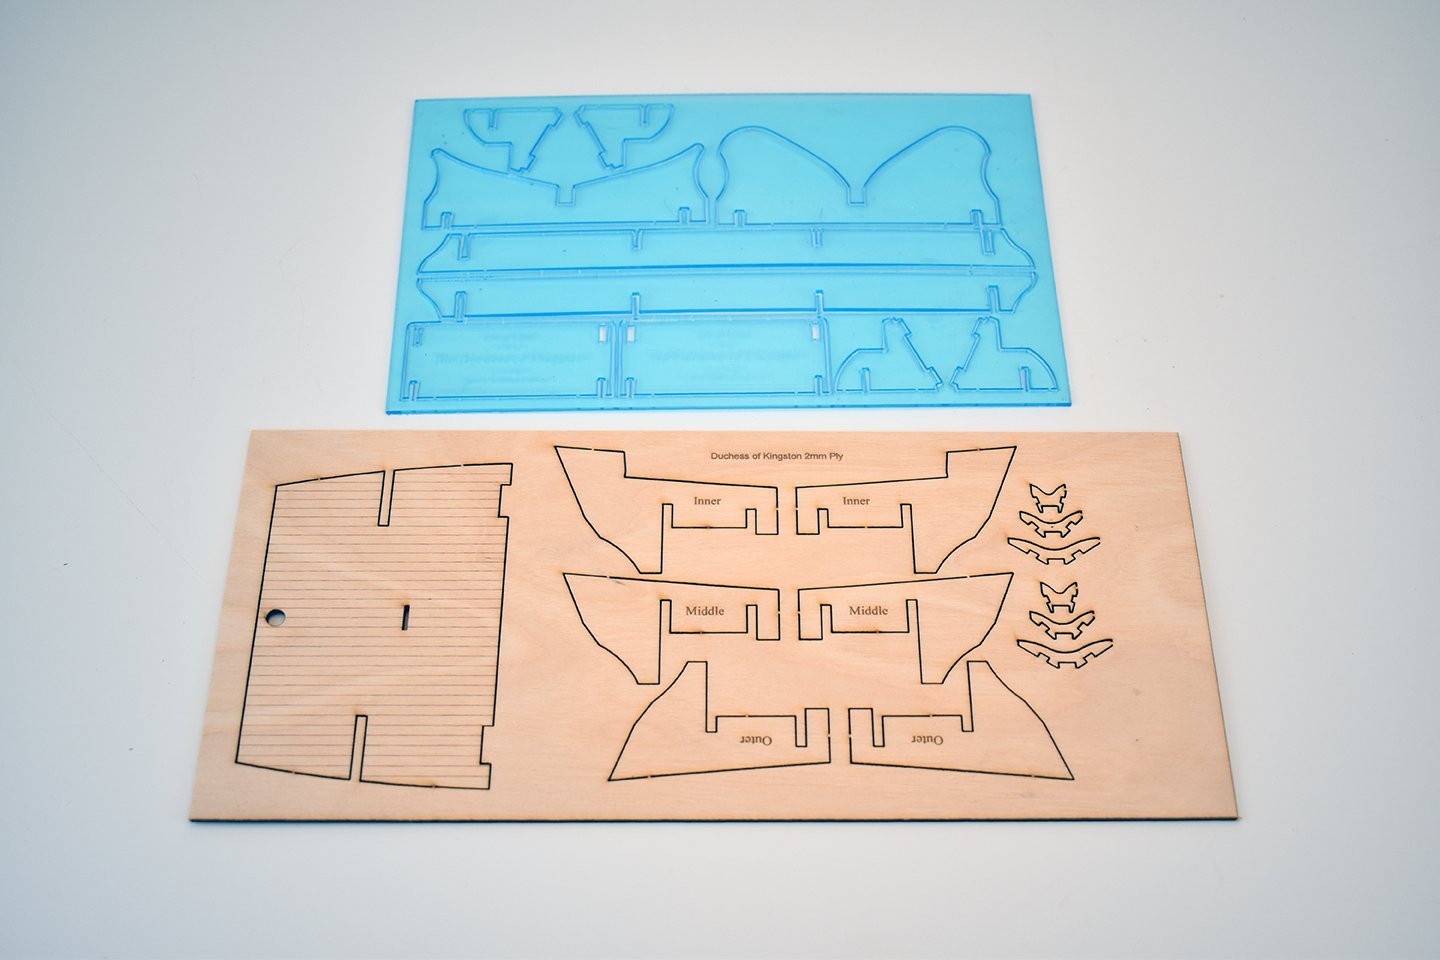
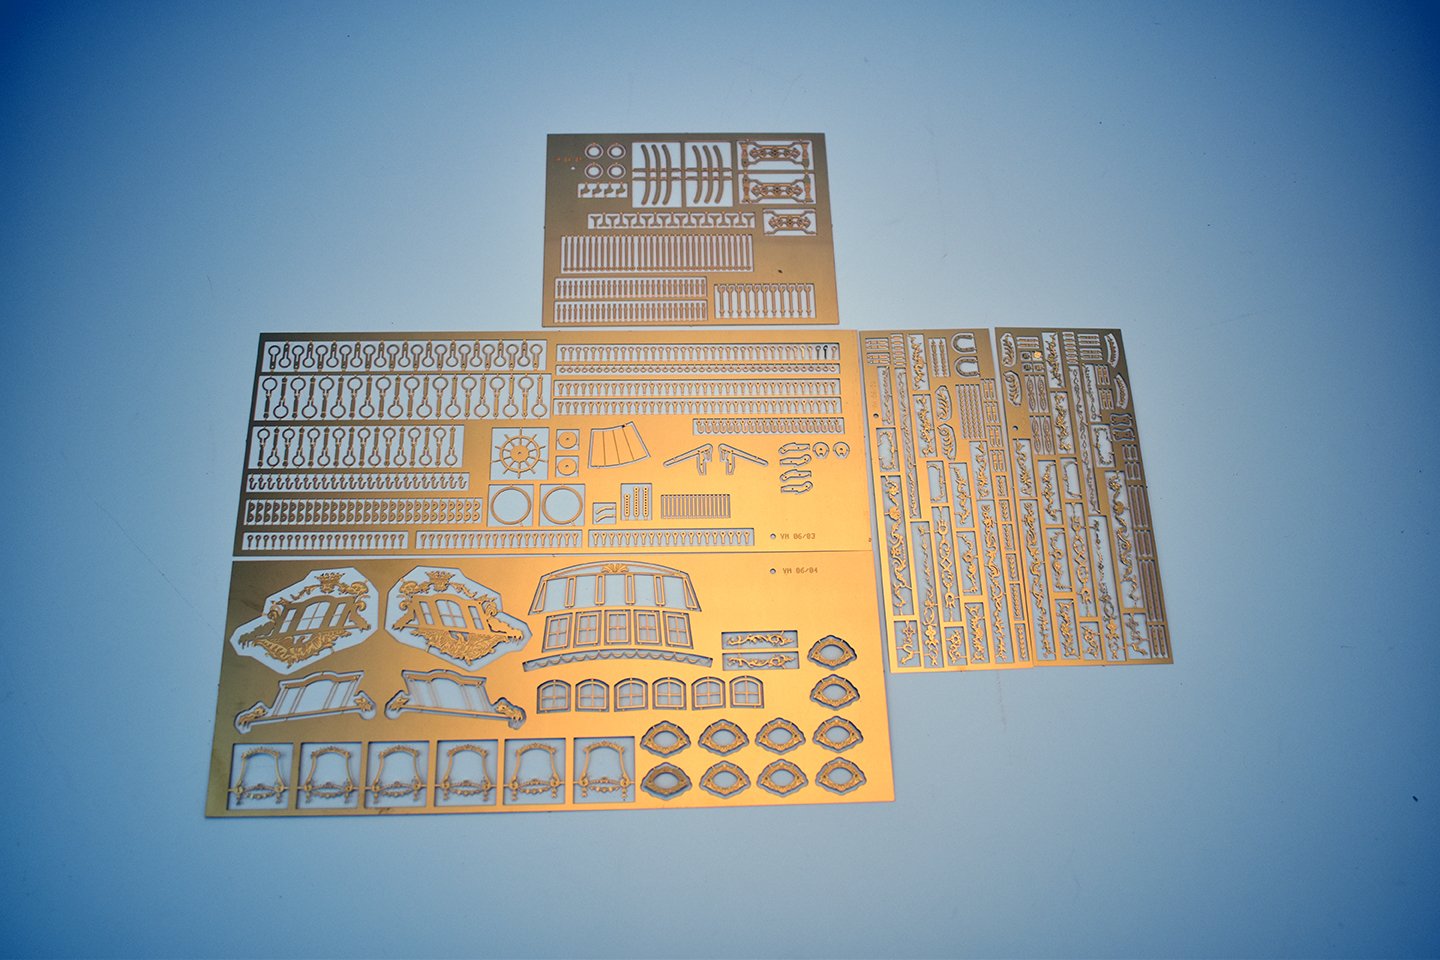
OK, it has been a good while since I did a proper update to this thread, but I have been really busy. As said, I had to sort out Flirt, getting this ready for release, which is imminent, just waiting for manuals and plans. However, whilst Jim was helping me by building the Flirt prototype and taking the pictures, I was (and still am) busy working on my sixth development. I thought this would be a release for next year, but thanks to Jim's help, and me being furloughed, I now aim for a Winter 2020 release for my last kit in the small/medium size range. This is part of my original choices when deciding what to develop when first starting out. I only have one plan set showing hull lines and bulkheads, together with decoration detail. Despite there only being this one plan, I felt compelled to turn this into a kit, and the 'balance' seems spot on between hull lines and decoration. I have called the model 'Duchess of Kingston', as it was built for her by JM Hillhouse of Bristol, probably in the late 1770's or very early 1780's. I have tried to emulate as much detail shown on the plans without too much deviation, and also added a little extra, the upper deck rails being one. It has been a very long design process for such a seemingly simple model, and many things have changed on the way, but the basic hull assembly never changed. I have now designed it so than all areas at deck level and above, both inner and outer, are all pre-cut. This have added much to the parts and materials, but feel it cancels out any ambiguity of port or window opening placements. I decided to maser cut the upper rails as one pieces, as there are so many intersecting parts, making misalignment mistakes a real danger. I have cancelled this out, I hope, completely. Material quantities are very high (6 sheets of 1mm pearwood alone), but I do not care, I am now happy with the designs, and I am happy (if a little nervous) to show you the result of these designs. The quarterdeck companion does have a spiral staircase, which you cannot really see from the pics. The model hull is about 90% complete, and still requires more touching up, adding of parts (windlass is dry fitted for pics and deadeyes/strops not yet fitted) and final varnishing. It has a cast resin figurehead and stern decoration, along with new windlass and canopy for the door. It is 64th scale and size wise, it is virtually the same as Speedy, with a hull length of around 450mm. I will add pics of the laser and PE materials, so you can see just how much is pre cut. I hope you like...

-
I have never removed char except when bevelling the edges. Never had cause to and never had a problem, and I have built dozens. All still seem to be holding up...
-
Italians seem to work in geological time frames. But hopefully this will not be the case in this instance...
-
I'm just glad I don't have to build it again!
-
Yes, the cutter is built on a frame plug, I find it's the best way to plank them. Just finished the stern area of my next kit, looks OK..... I think you may like it, very different to the other subjects.
-
Yes, as and when I develop new kits with boats, they will become available to buy as separate accessories.