NenadM
-
Posts
3,254 -
Joined
-
Last visited
Content Type
Profiles
Forums
Gallery
Events
Everything posted by NenadM
-

Cutty Sark by NenadM
NenadM replied to NenadM's topic in - Build logs for subjects built 1851 - 1900
Thx Izzy and Denis Yesterday, byin' some stuff for Hothead's exam modeling, I discovered resource of brass wire 0,5mm to up, brass pipes 1mm to up, wooden mouldings square and rounded, different foils and materials, on a place I never suppose to find it there ( supply shop for screen printing). Right on time for playing with cathead's fitting. And playing with soldier iron too (if it survive last Hothead's attack) Nils, please do not look at this baby steps of metal works which follow- 4,152 replies
-
- 7
-

-
- cutty sark
- tehnodidakta
- (and 1 more)
-
One of the pins?

-
Those days I felt some magic appear on MSW, but could not locate it Today I find your log, and now I know. You are obviously one of the MSW modeling wizards Can I join ? Fantastic work, as always
- 2,625 replies
-
- 6
-
-
- kaiser wilhelm der grosse
- passenger steamer
- (and 1 more)
-
Good points said here. I think there can be one more angle of view. If you enjoy in challenge, and just in making process (as me) , do the fun, and enjoy making details, no matter your model is up to. My model will be almost 100 cm long and over 70 cm high , and it is a great collection of mistakes and wrong made places and parts, but I enjoyed very much in last challenge I ordered to myself - make cathead 30x3,5x3,5 mm with three metal sheaves inside. I know rhat NOBODY can see this, but I was enjoying a lot making them. And I think that is a point - joy and fun

- 55 replies
-
- 15
-
-
Nice work. Some space between strips just has to be there, to show planking structure. Fine sanding will cover it, if you want, also finishing wirh wax, laquer or simillar. Also you can use mixture of sand dust made from same wood with transparent glue, used as a putty to fill gasps if you need/want, then sand it to level you need. In pictures above, it seems to me all is ok, even most critical part ( under stern) is not shown Wellcome back and keep a good work
- 74 replies
-
- 1
-
-
- del prado
- cutty sark
- (and 1 more)
-
Nice work Denis Caught by the wood magic? Be carefull, my friend, wood magic is so much stronger than a blood magic, which is, according to R.R.Martin, the strongest magic ever. I do not believe him, because he do not ever builds wooden ship models On the other side, I never heared about plastic magic. But ... watching and following your modeling work, I concluded you are some kind of wizard, so maybe there is a plastic magic somewhere arround you
-
All depends of you. You can bye "the best" kit and make bad model, and you can bye "the worst" kit and with modifications, to make exelent model
-
Cutty Sark by NenadM
NenadM replied to NenadM's topic in - Build logs for subjects built 1851 - 1900
Thanks George. Actuallly ... I dont know ... status quo couple of days, without moving forward ( bad news) and withlit moving backward (good news). Still very weak, unmovable, counting 23th day since surgery, still in intensive care- 4,152 replies
-
- 4
-
-
- cutty sark
- tehnodidakta
- (and 1 more)
-
Cutty Sark by NenadM
NenadM replied to NenadM's topic in - Build logs for subjects built 1851 - 1900
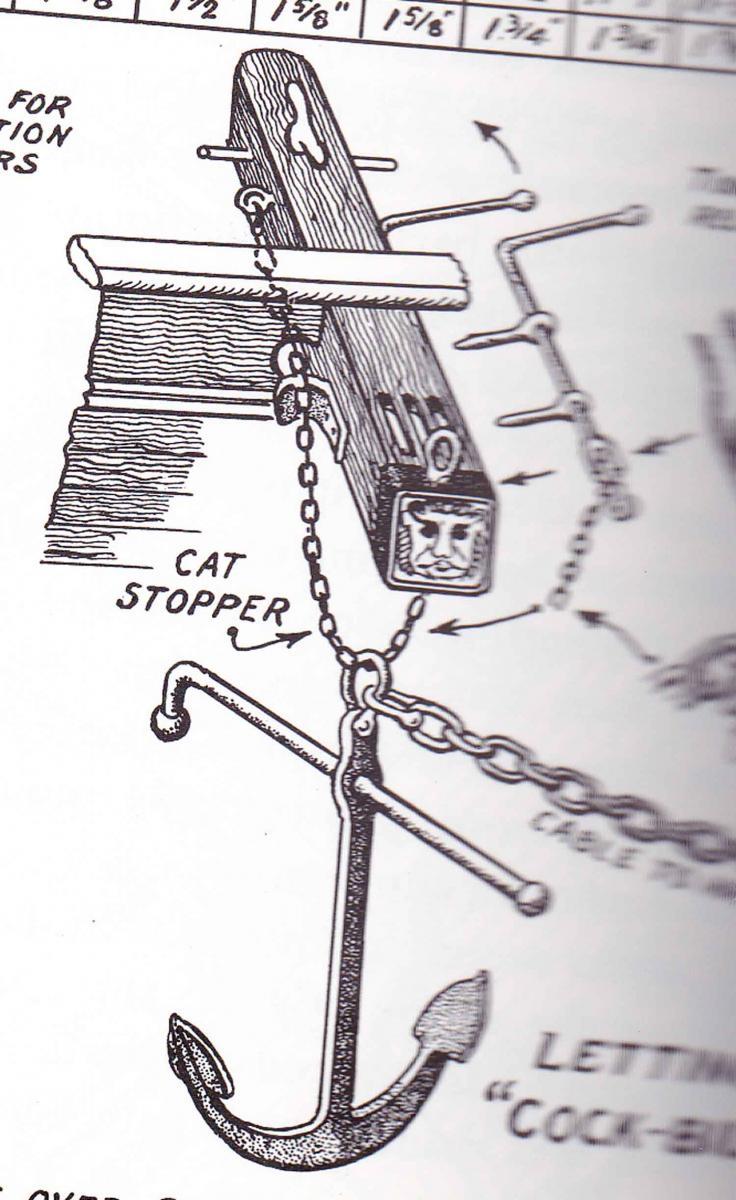
After putty, sanding and painting Next are metal fittings of Cathead, figure on top and mounting on fore deck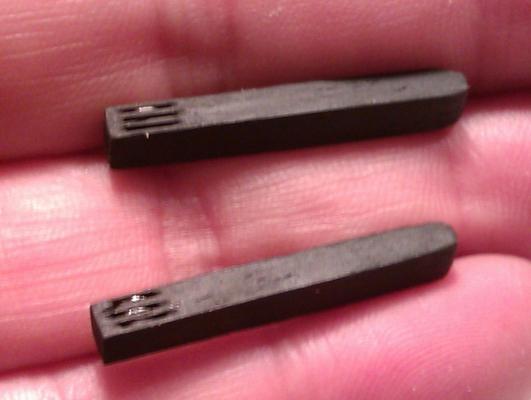
- 4,152 replies
-
- 10
-
-
- cutty sark
- tehnodidakta
- (and 1 more)
-
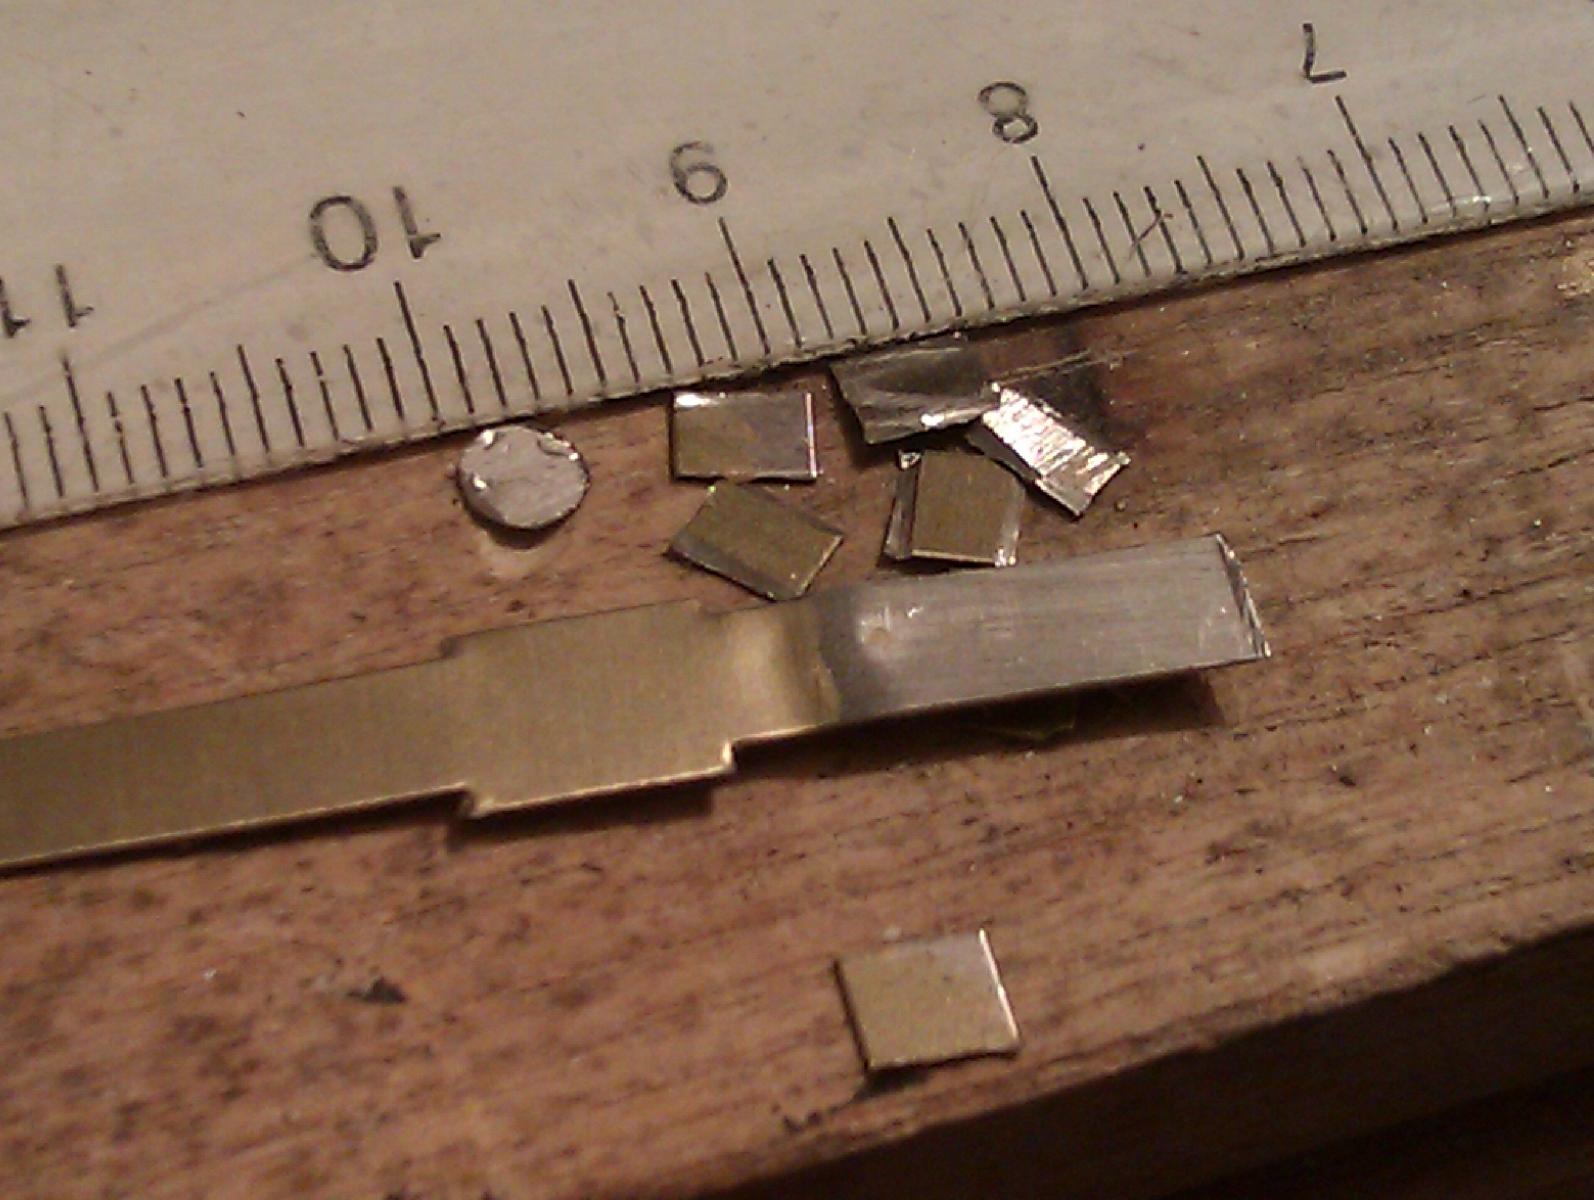
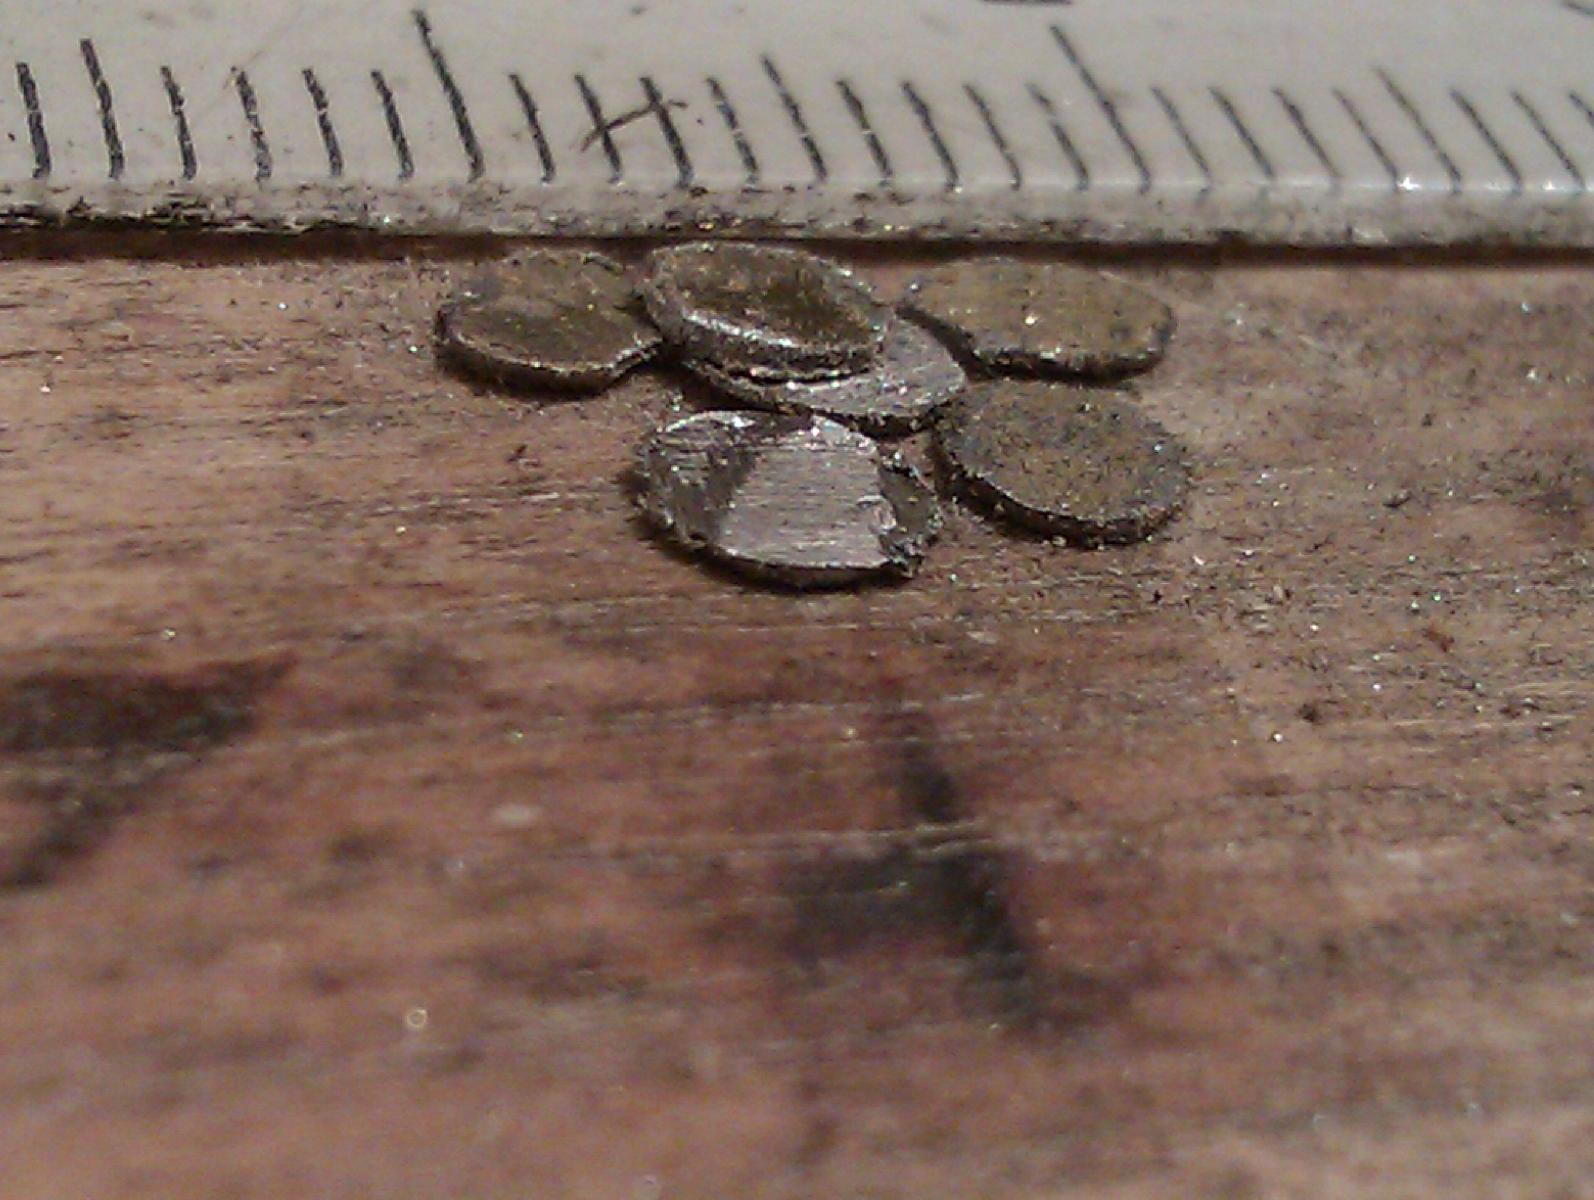
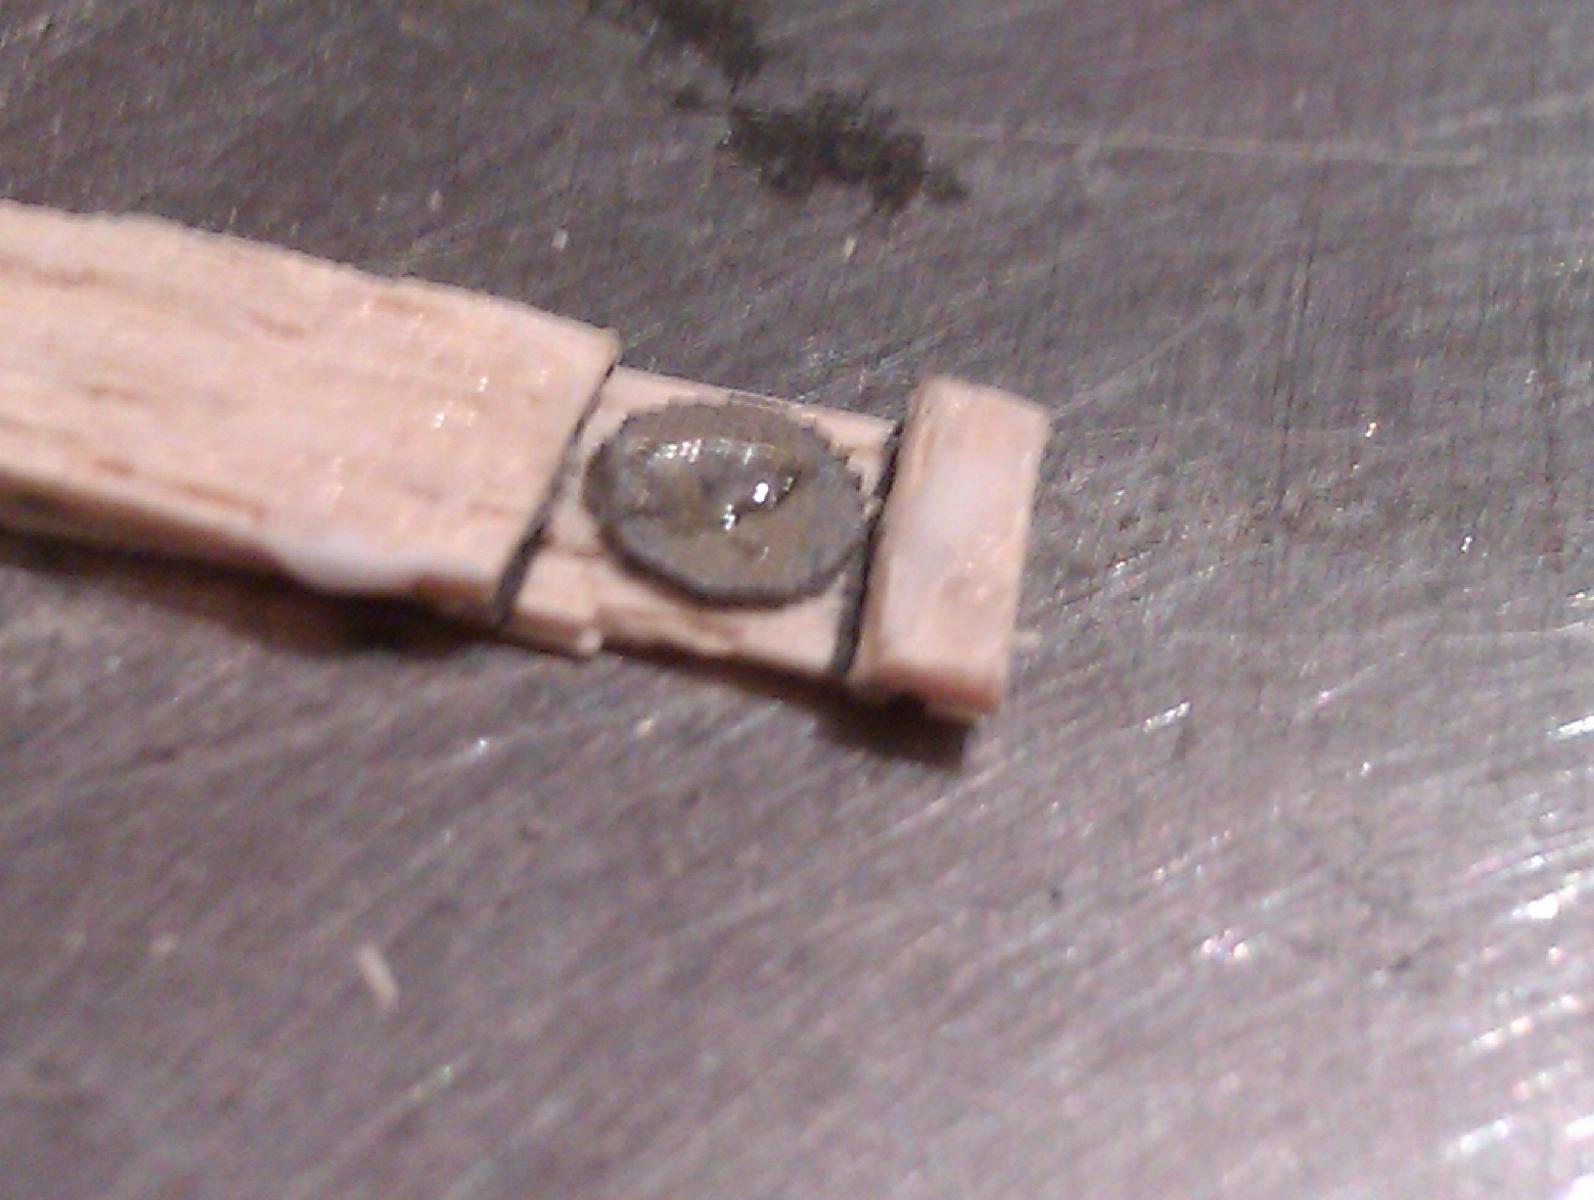
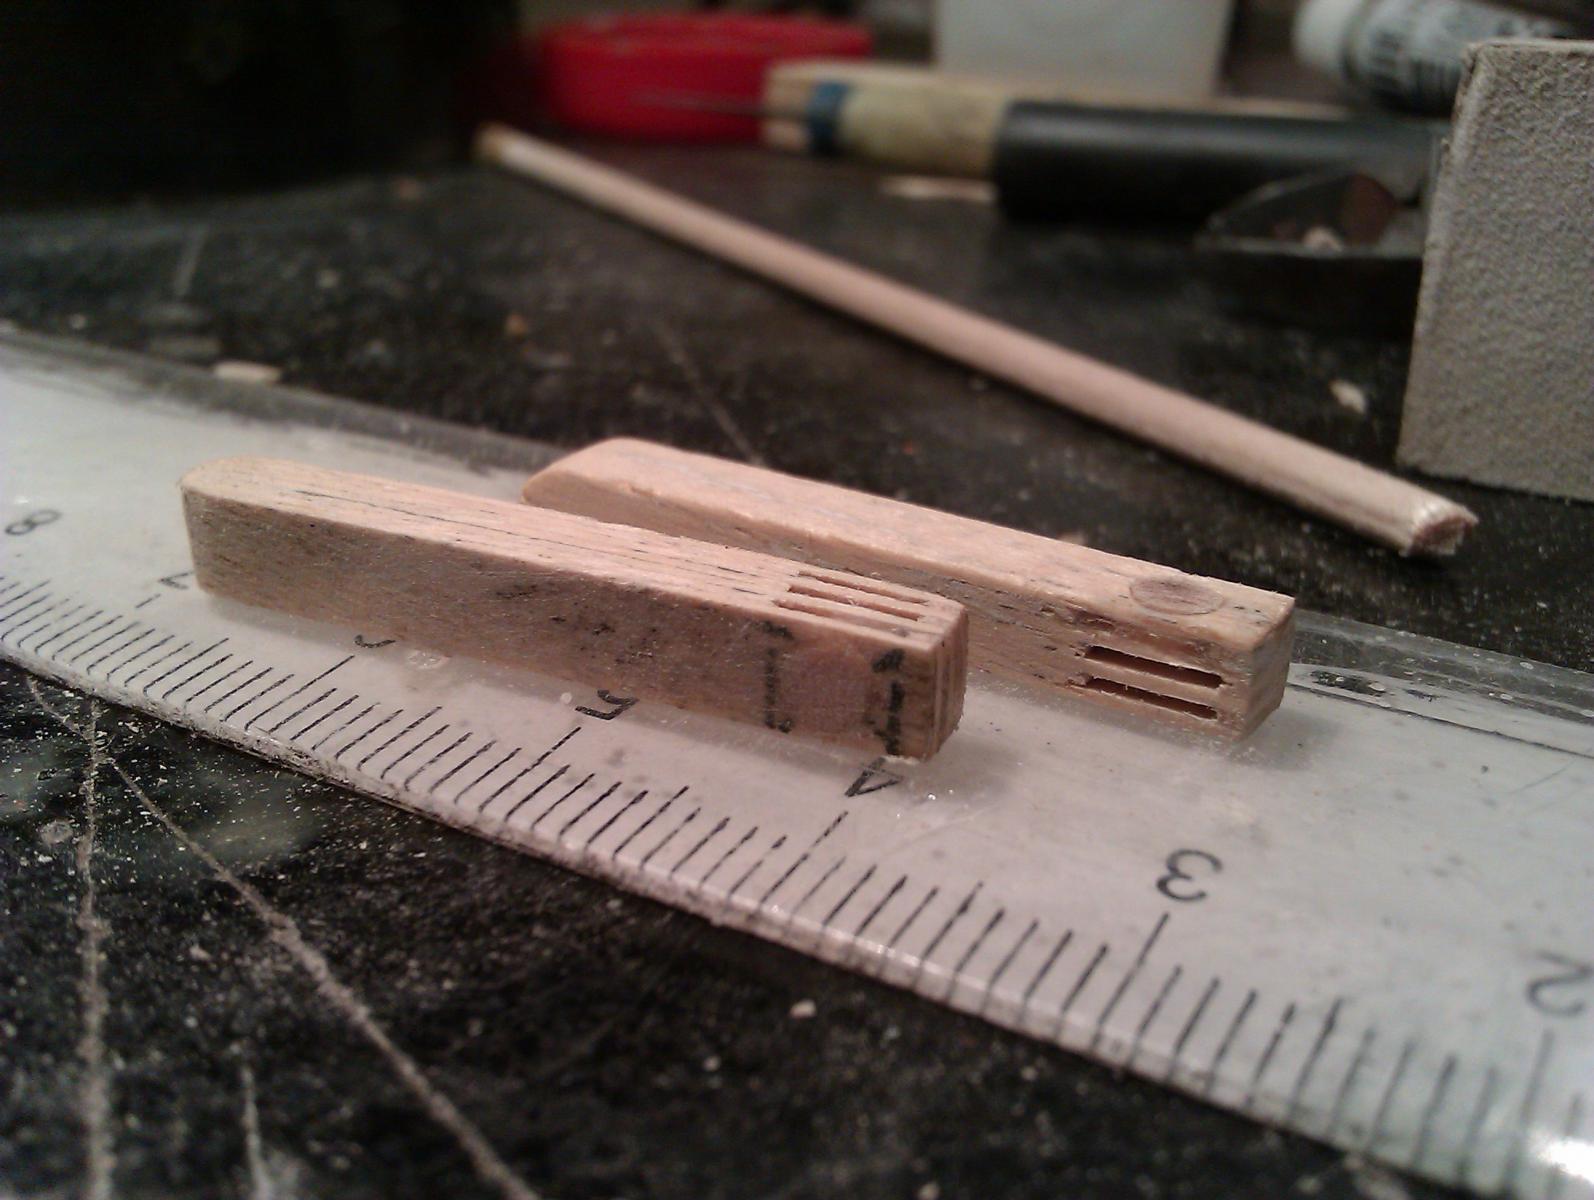
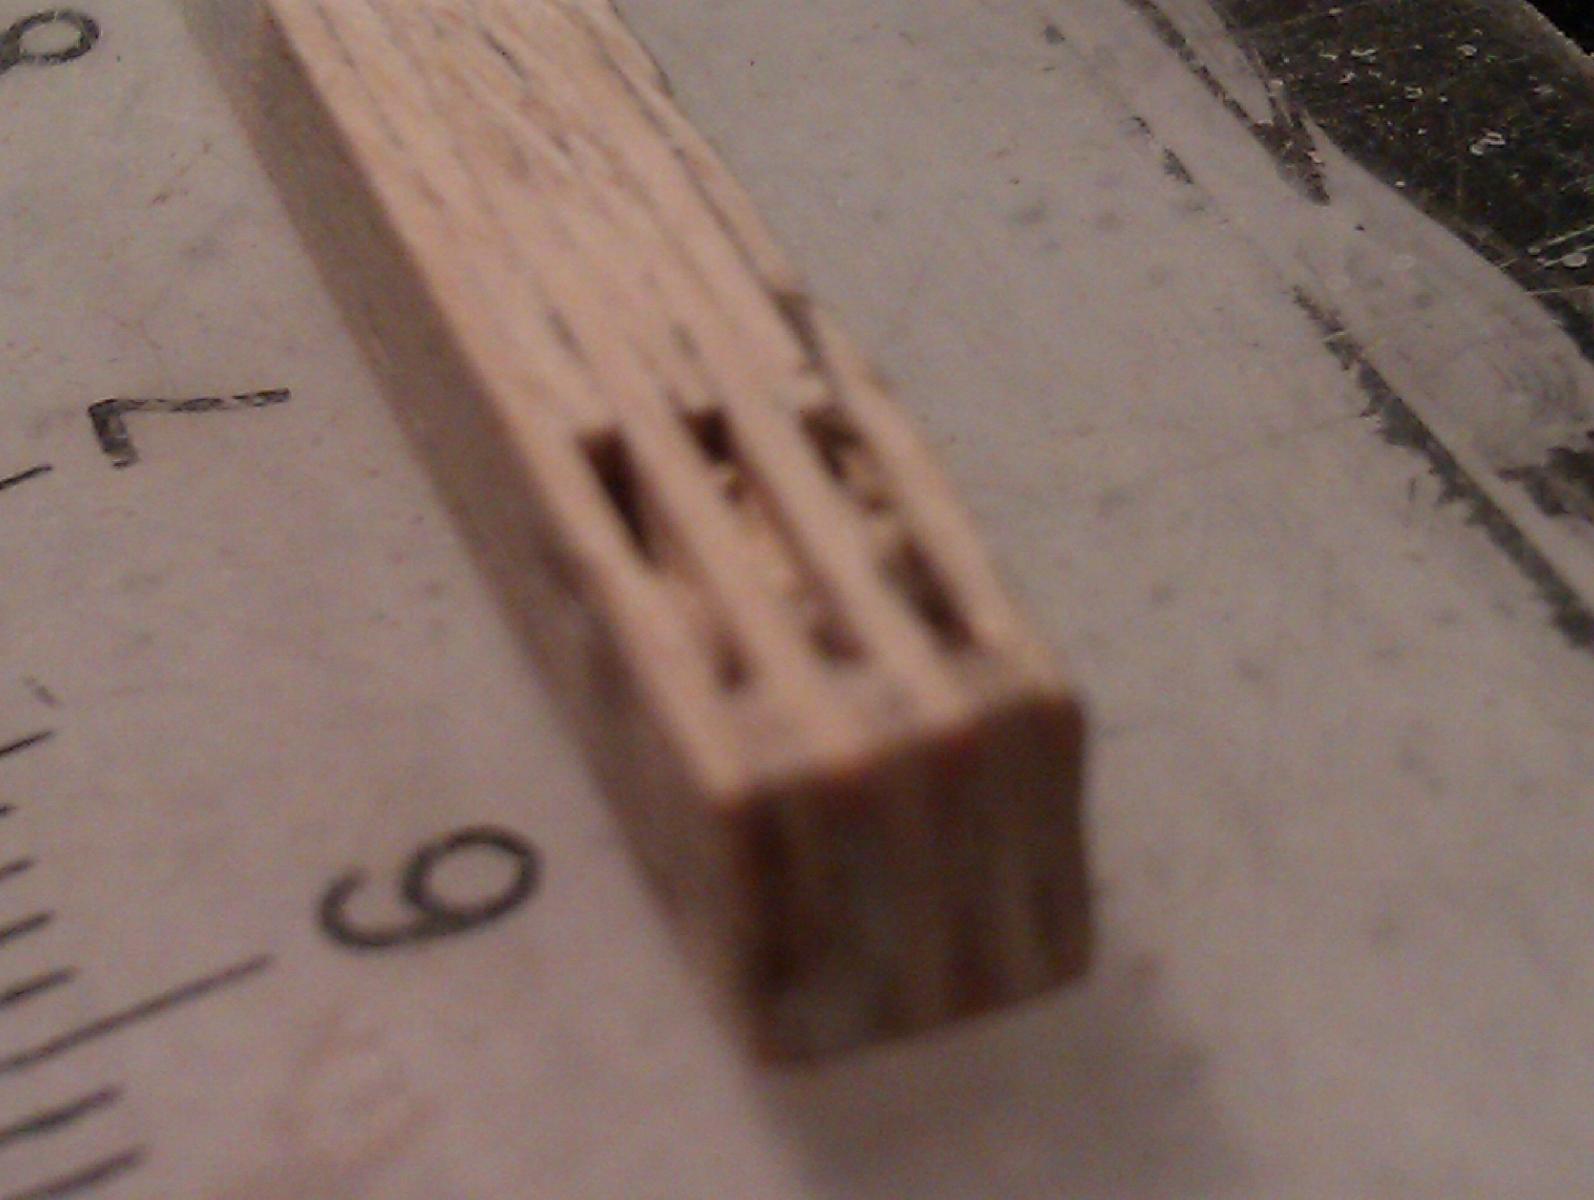
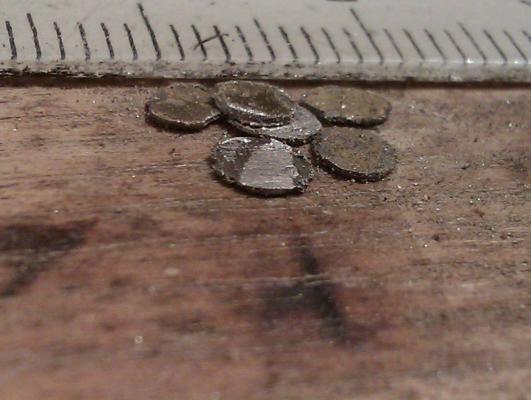
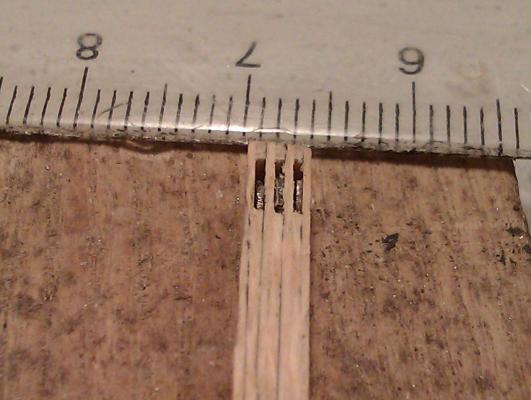
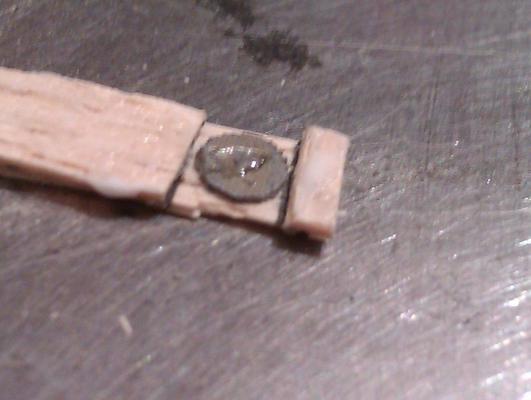
FOLDER MECHANISM - part 5 Sheaves again, but this time - sheaves inside Cat-head Dimensions of Cat 30 x 3,5 x 3,5 mm. Dimension of openings - 0,5 mm x 3 mm Folder metal strip is almost same thickness as veneer used for layers Round corner with dremell to circle shape Mounting (glue) inside Cat. If shevaes need to be movable, you can try to add some kind of axle throught center without glue. In this scale, and on my model, there are no ropes, so I didn`t do this ( to much small and complicated) After sanding, metal sheaves appears And final result after putty, fine sanding with 400 granulation and painting Still left to add metal fittings, but cathead body with sheaves is done


- 396 replies
-
- 7
-
-
- Idea
- Bright Idea
- (and 1 more)
-
Cutty Sark by NenadM
NenadM replied to NenadM's topic in - Build logs for subjects built 1851 - 1900
Final solution for sheaves - all-mighty folder mechanism metal strip Rounding corners and getting circle shape with dremell tool Body (layers) is made of fine sanded veneer, finished with 400 sandpaper. This is esential to get straight lines of every particular layer inside sheaves openings. Later it is impossible to correct. At the place. Veneer strips are 5mm wide, and sanding will put them to 3,5-4mm as it has to be according to my rescaled C-plans After rough sanding, sheaves appears, as I expect Macro shot Putty and paint left to be done, and Cats will be ready to mount. Now it will be easy to turn off excess of paint from metal, when wood soaks paint But at the end, there is still a question: Only 3,5x3,5 mm ... sheaves opening is 0,5x3mm, ... particular sheave is ... invisible ... was it really worth several attempts? Yes, having in mind playing, relaxing and fine tuning my skills. From other side, considering no rope goes through, I think - with no doubt, there is not possibity that anybodu will see sheaves openings, and sheaves inside without magnifier, just as my (ex Bob's) piggy under fore deck in piggpen


- 4,152 replies
-
- 5
-
-
- cutty sark
- tehnodidakta
- (and 1 more)
-
Photos ... where are photos? I am inpatient!
-
She is going well, no doubt. Upper quote and your posts reminds me to something I read somewhere: There are no little boy and little girl, and there are no grown man and woman There are only little woman and a boy, and a grown woman and grown boy Definite truth. We keep on playing in different ways all our "man`s" life ( with kids, car, guitar, with TV, video ..., with cells, PC and tablets, with tools, etc etc ... and with ... ahh ... our models )
-
Cutty Sark by NenadM
NenadM replied to NenadM's topic in - Build logs for subjects built 1851 - 1900
I agree, Dave Problem is my wish to finish my model in real time Maybe one more attempt Or two Looking for this on my office desk, silly idea comes for making sheaves instead to drill throught
- 4,152 replies
-
- 1
-
-
- cutty sark
- tehnodidakta
- (and 1 more)
-
Cutty Sark by NenadM
NenadM replied to NenadM's topic in - Build logs for subjects built 1851 - 1900
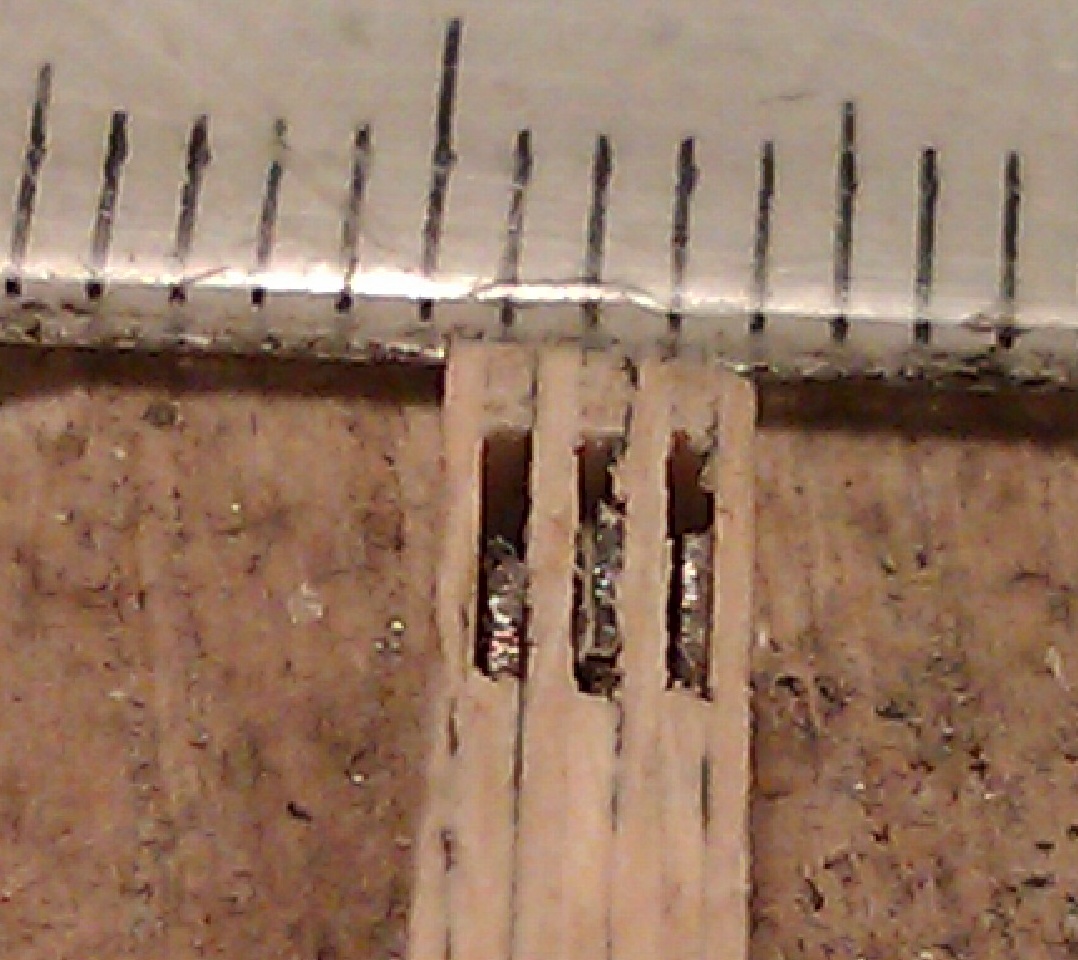
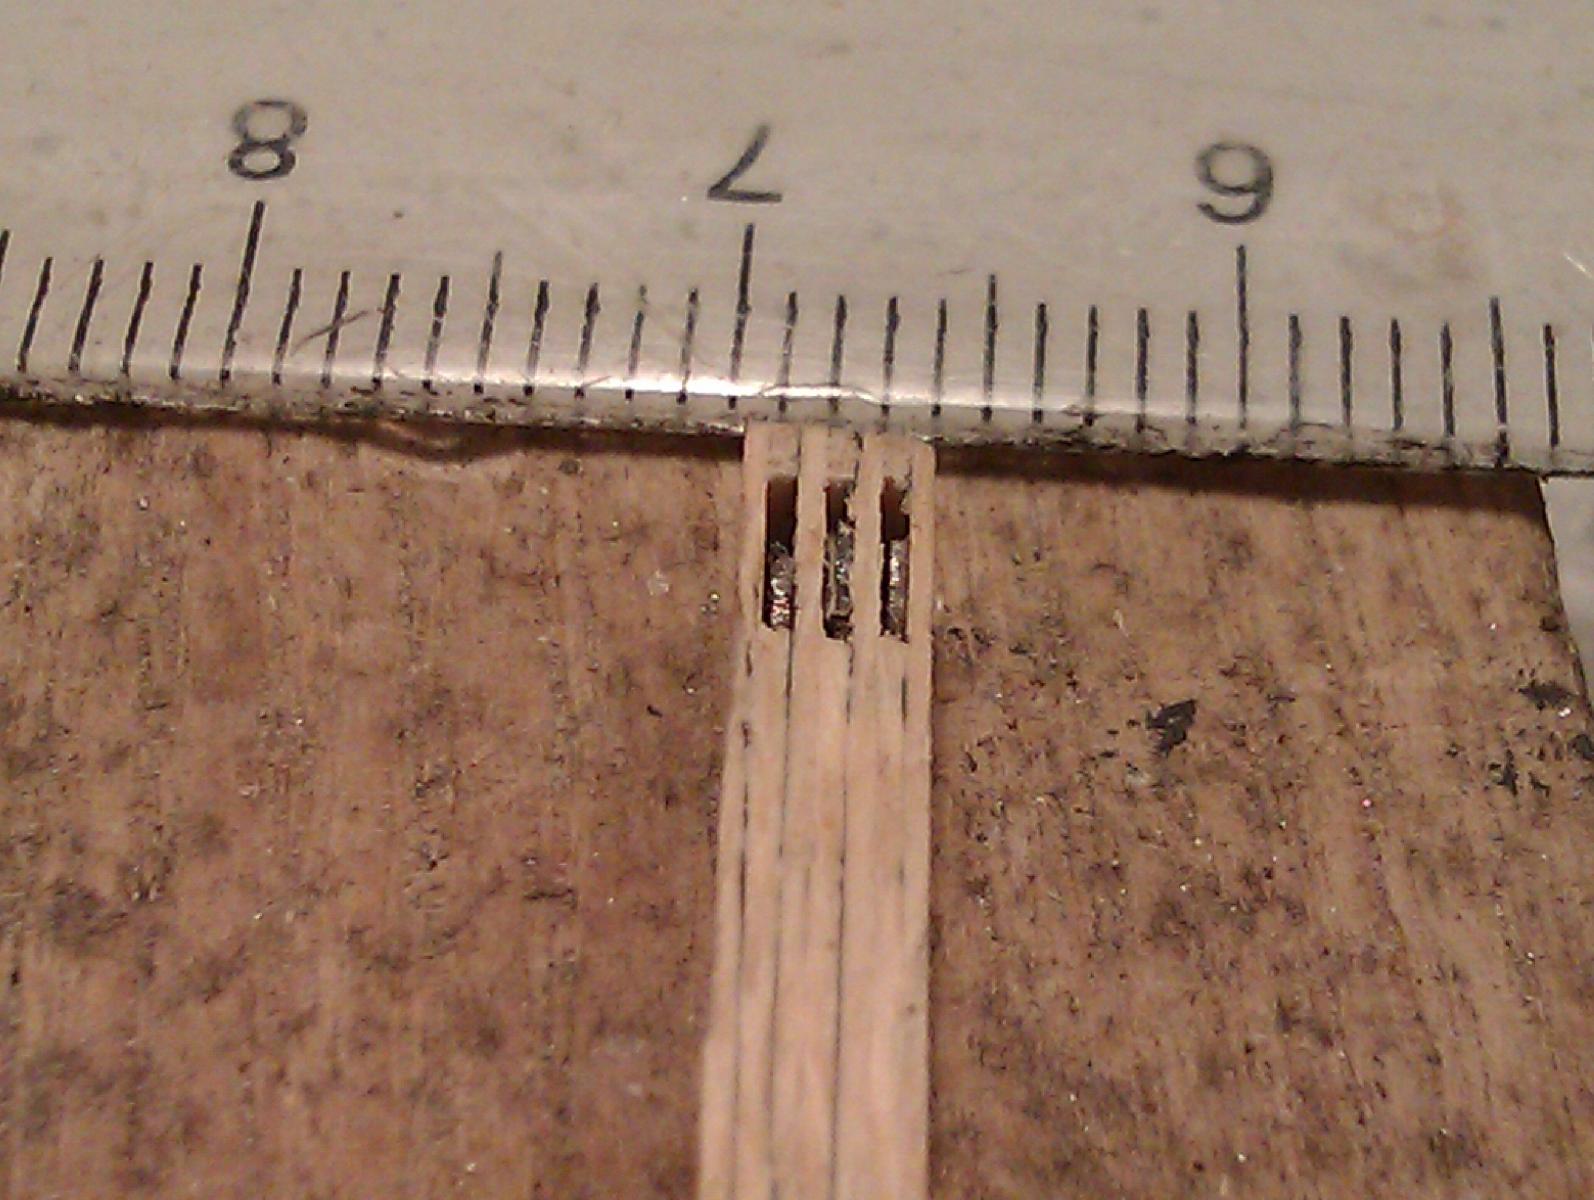
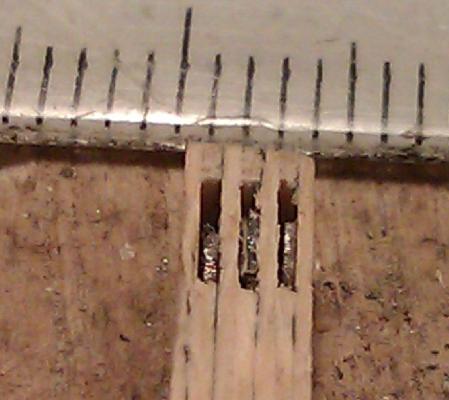
Izzy I made mistake. My unpatience (again). I had to clean dust from sheaves right after drilling hole, but ... Nenad is ... just Nenad ... didn't do it, and, being idiot, put CA on toothpick and turn it in hole, without thinking (again) that CA will interact with sanddust and little wooden pieces left in sheaves, and cemented them. Now, I have 0,5mm wide sheaves openings full of CA with dust and pieces, very very hardened... Here is macro shot of one of the openings This is the worst, almost full filled with hardened CA. And just try to imagine this 0,5mmx3mm space cleaning with anything without damage? Considering that baffles between openings are also 0,5 mm wide, I thing that cleaning without serious damage is mission imposible. It seems to be much easier to make them again, with usage of brain, this time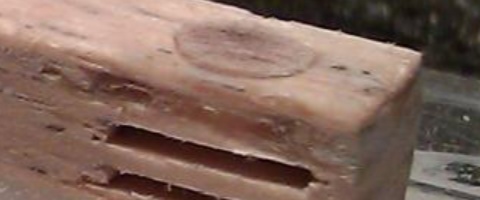
- 4,152 replies
-
- 8
-
-
- cutty sark
- tehnodidakta
- (and 1 more)
-
Cutty Sark by NenadM
NenadM replied to NenadM's topic in - Build logs for subjects built 1851 - 1900
Thank you for your kind words Nils. I wish I have even 10% of your skils.- 4,152 replies
-
- 3
-
-
- cutty sark
- tehnodidakta
- (and 1 more)
-
Cutty Sark by NenadM
NenadM replied to NenadM's topic in - Build logs for subjects built 1851 - 1900
As I remember, you did,something similar Bob? Btw, can you declare a time of your buildimg come back ? We miss you- 4,152 replies
-
- 2
-
-
- cutty sark
- tehnodidakta
- (and 1 more)
-
".....ignore all that gooey, kissy face stuff! why...... it's the spice!" But, there is a moment you could slide aside, Denis. You can easily get idea to make/reproduce famous painting scene ...

-
Just a idea ... Maybe you can watch movie "Titanic" on a another way, watching only ship details, not story, and capture details of ship you are interested in. Maybe you got some idea from that approach. I found interesting details accidenty caught on camera watching youtube tourist's clips of "my" ship Just maybe
-
Cutty Sark by NenadM
NenadM replied to NenadM's topic in - Build logs for subjects built 1851 - 1900
As I said Izzy, good idea, but in my scale, it is invisible Cats are 3cm long, with crossection 4x4 mm which means that sheaves openings are 3mm long and 0,5 mm wide. As it can be seen on picture, I drilled a hole, put inside 3mm barbeque toothpic 3mm dia, and ... where is it ? So little to be seen. Maybe some fine tuning and cleaning will help, we'll see This is tonight result

- 4,152 replies
-
- 13
-
-
- cutty sark
- tehnodidakta
- (and 1 more)
-
Ouch ! I am very sorry you crashed a bow. But devil is not black as it seems. It is oportunity to make bow profile as on C-plans (slightly different curvature) See if you are interested my correction http://modelshipworld.com/index.php/topic/2501-cutty-sark-by-nenad-started-as-tehnodidakta-and-scratched-by-campbells-plans/page-28#entry146850 Remaking my own bowsprit, I passed the same hard way working with hard artillery, and that what happened to you was my fear I was very affraid to be happened. I was lucky But, it can be fixed much easier than you think ! Knighthead also bothered me a lot, and I decided to make it wider, and to mount together with base of bowsprit only, not with whole bowsprit structure. Use strong glue, and after glue dry, cut off excess of material, and line it with outside bullwark line and rail of foredeck. Tricky, but it can be done. Putty and paint will make it ok. It will be easy to mount another part of bowsprit structure later. If you are interested, you can see in my thread, section: http://modelshipworld.com/index.php/topic/2501-cutty-sark-by-nenad-started-as-tehnodidakta-and-scratched-by-campbells-plans/page-95#entry291548 One important thing I realized : On bowsprit, there is a place where many little forces of tightened ropes will collect after rigging. Think about this on time to avoid another crash, and make bowsprit and all parts of bowsprit strong enough Good work so far
-
Cutty Sark by NenadM
NenadM replied to NenadM's topic in - Build logs for subjects built 1851 - 1900
Goooood idea!!! Thx, now I get it- 4,152 replies
-
- 6
-
-
- cutty sark
- tehnodidakta
- (and 1 more)
-
Cutty Sark by NenadM
NenadM replied to NenadM's topic in - Build logs for subjects built 1851 - 1900
Thanks Izzy, please put some photos, and explane wider ( my english ...) In mean time I`ll show some photos I picked One is from Rfolsom`s log, b/w is Lou`s and third is from net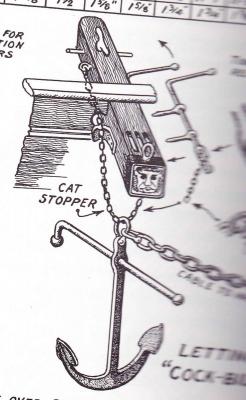
- 4,152 replies
-
- 5
-
-
- cutty sark
- tehnodidakta
- (and 1 more)
-
My dream is to build all wooden look model, but think I do not have enough skill. I like look of your Cutty. And don't see any sanding needed
-
Cutty Sark by NenadM
NenadM replied to NenadM's topic in - Build logs for subjects built 1851 - 1900
This is just test, Bob. I am carefully analyzing your posts/pics also photos I collected with cats on it to find final solution, and to find out how to do their details ...- 4,152 replies
-
- 4
-
-
- cutty sark
- tehnodidakta
- (and 1 more)