
MORE HANDBOOKS ARE ON THEIR WAY! We will let you know when they get here.
×


captainbob
-
Posts
3,498 -
Joined
-
Last visited
Content Type
Profiles
Forums
Gallery
Events
Everything posted by captainbob
-
Mario, I also wanted to build a steam launch, but now I've changed my mind. How could I possibly come close to matching your beautiful detail work. Bob
-
Nice work, Mario. Bob
-
Interesting looking carriage. I agree it will be a lot easier than lowering the mast. Bob
-
Nice looking rollers. Bob
-
I have both a scroll saw and a band saw. And I agree that the band saw is faster. But when I have to cut parts that have an inside curve that is smaller than the width of the band saw blade the scroll saw is much better. So it really depends on what you are cutting. Since Jan said he doesn't have much room and will have to build small boats the scroll saw will be better for his needs. Bob
-
Jan, Since you will be working in small scale, like I do, you will be cutting tight corners in thin wood. That is what a scroll saw is made for. A band saw is really not good for this kind of work, the blade is too wide to make the tight turns. Also to cut thin wood you need a fine toothed blade, there should be two or three teeth touching the wood at all times. As for the table saw, unless you plan on making your own lumber you will not need it. The thin wood used in small scale boats cuts easily with a knife and a metal straight edge. Bob
-
Wood filler vs. spackle
captainbob replied to rtropp's topic in Building, Framing, Planking and plating a ships hull and deck
I use Elmer's wood filler with bass wood and they seem to sand at the same rate. Elmer's is water based and can be thinned and painted on if needed. Bob -
Very good. I'm so glad I'm watching. Bob
-
Good brass work. Bob
-
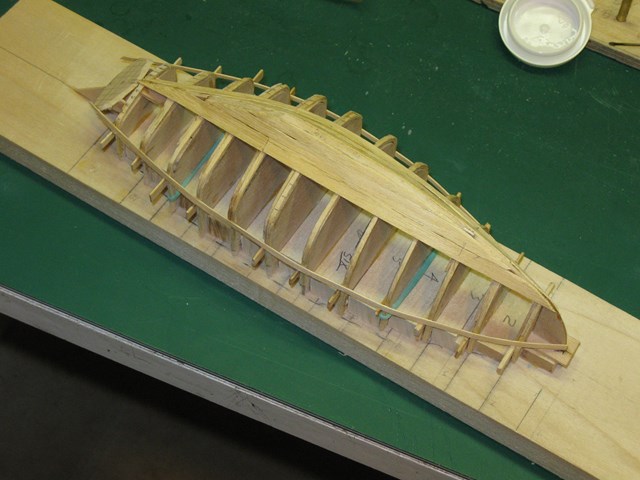
Thank you all, I also like the hull and the method but I had one problem. I put the last plank on and did a rough sanding on the hull. After that I used my side cutters to cut the frame extensions that I had glued to the mold bulkheads. I grabbed the hull to lift it off but it wouldn't come no matter how I pulled. After much scratching of the head and drinking of coffee (This was still early in the day.) I remembered I had glued the bow and stern supports to both the hull and the building board, before planking, for extra support. Ah, well, that's not as bad as other things I've forgotten. I would tell you about them too, but as I said I've forgotten them. Bob
-
Hi Allan, Makes a lot of sense and looks like a good start. Bob
-
Popeye, Tony, Thanks for stopping by. Obechi or obeche, Yep that's the wood. I have several sheets of poplar veneer and a little mahogany and have no problems with it. All veneers work better when wet but this stuff . . . Make you a deal, Popeye, if I ever get any more I'll send it to you. Bob
-
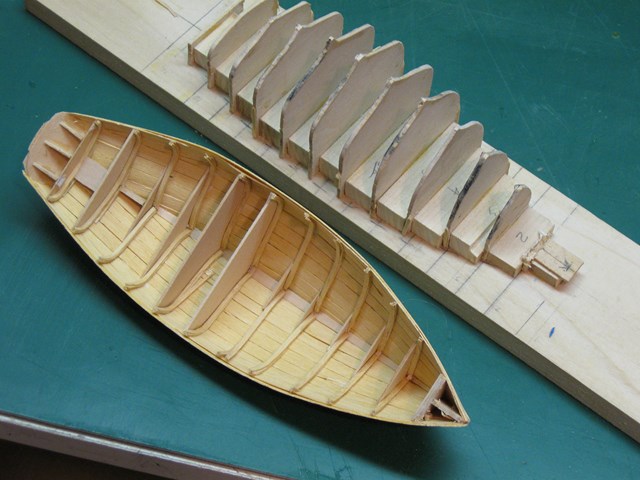
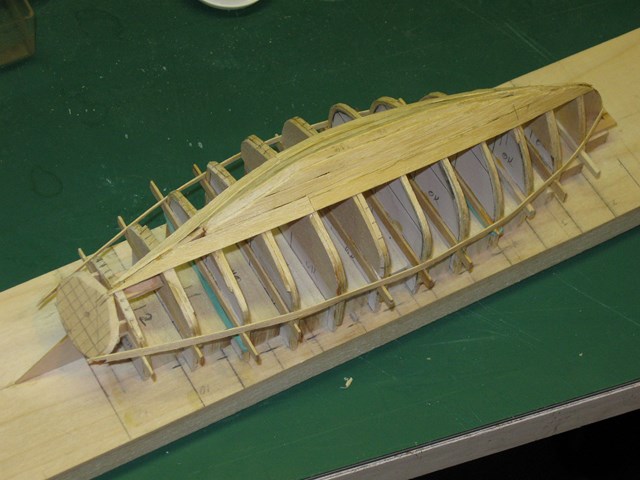
Well the planking is finished and you can see how brittle the wood is. I did the initial sanding while it was still on the mold. After removing the hull I noticed that some of the frames are delaminated. If I do this again I would build up the frames one layer at a time instead of bending all three layers at once. I was happy to see the floor timbers and bulkheads came out as I hoped. And I do feel the shape of the transition at the stern came out well. Now it’s add the keel, patch the holes with filler and sand, sand, sand. I am basically pleased with this method of building the hull for small boats like this. It was a fun learning experience. Bob
-
Martin, Glad to have you aboard. But I'm afraid the only thing that gets honed around here is the chisels. Bob
-
Rigging on the bow sprit looks good. Seems you have another masterpiece going. Bob
-
Sounds like fun. I'll be watching. Bob
-
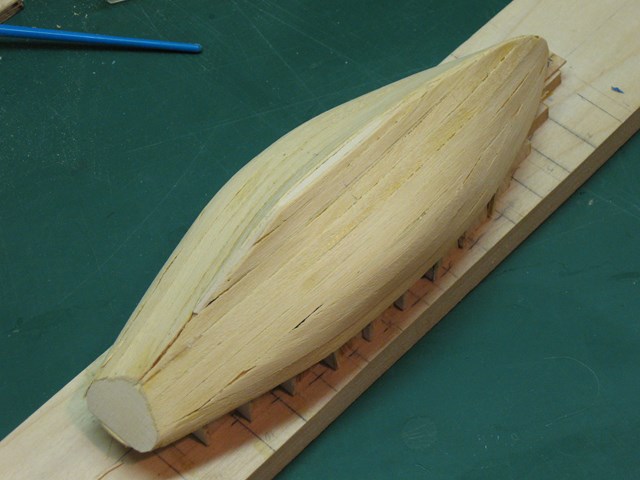
Hey Michel and Popeye, thanks for stopping by. With this wood you can't make a nice planking job. So,since I'm going to paint the hull, I'm not that concerned with the planking as long as after filling and sanding the shape is right. Bob
-
Ah, the joy of kit parts. Looks like you get a chance to do another metal part. Bob
-
Tom, Wayne, Thanks for the encouragement. I ran into a similar problem building the dragon, but the concave at the rudder came to a sharp corner, where on the Malabar Jr it stayed pretty round. The keel bridge seems to be the right way to go. Now to finish the planking. Bob
-
Thanks, That helps. Will you be going on to show how to obtain the frames and other parts? Bob
-
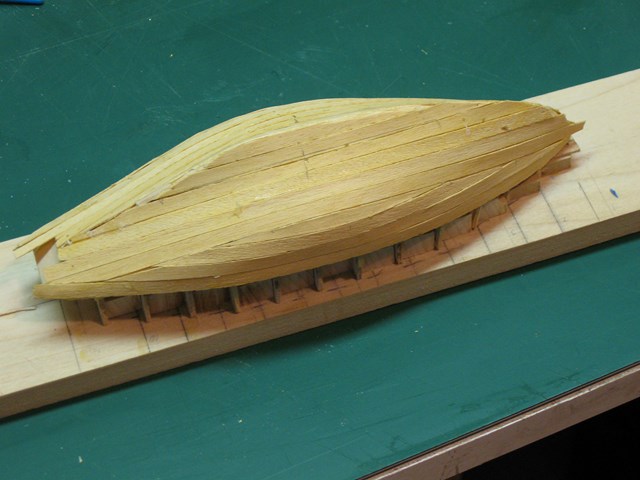
Daniel, here's more. The first layer of planking begins. I’m planking with the same wood that I used for the frames. It’s a terrible wood. I don’t know the name but I remember what it looks like from when I used to build kits . It’s a shade darker than bass wood and a lot more porous. The grain is all over the place and even when wet it is very brittle. It is probably the main wood that drove me to the darkside. So why am I using it now? I guess it is to prove to myself that I can. This is my modifications of the Malabar Jr. In checking the study plan lines I found them to be accurate, so except for changing the bow I used the stations for the frames. This caused a problem I did not notice until I started the planking. This is a keel boat, and as such there is a concave curve where the body joins the keel. The problem is that the keel stops at station 10, and stations 11 and 12 are round on the underside. On the other hand the transom shows a peak at the base. Going from a concave to a convex and back to a concave is ridiculous so I added a keel ridge across stations 11 and 12. In this way I removed the problem of going from a strong concave surface at the rudder (station 10) to round surface at station 11. Bob
-
Matt, What a beautiful hull. I think I'll stick around and watch. Bob
-
Leave them up. Looking good. Bob
-
Delftship question
captainbob replied to captainbob's topic in CAD and 3D Modelling/Drafting Plans with Software
Jaro, Please PM me when you start the tutorial, I wouldn't want to miss it. Bob -
I understand that. I also have a picture of a boat I want to build as my deck top. Bob
