


jud
-
Posts
1,171 -
Joined
-
Last visited
Reputation Activity
-


-
jud reacted to robnbill in Table Saw Hand Safety
The largest difference this jig has over push sticks and feather boards is the ability to control both sides of the wood through the entire path of the cut. This ensures there is no kickback since the wood does not veer side to side during the cut. It does not allow for cuts smaller than 1/8th but as Mike said, that does leave lots of cuts it does work for. The interior of the jig is movable so it can be adjusted for the various size cuts.
It still can be used to cut smaller thicknesses if you have the cutoff to the left of the blade. The jig would just not straddle the blade and only be used on the part to the right. This still leave you more in control than just pushing the wood through from the end.
I know others have used feather boards for this, but there is a guide for ripping thin sections for the table saw. It rides in the miter slot to the left of the blade. It has a wheel in the end to allow the wood to easily slip past. You set the width of the cut you want ( to the left of the blade) then slid the wood between the fence and the wheel. Make the cut and shift the fence to the left until the wood contacts the wheel again and make the second cut, snd so on. This allows for consistent thickness cuts to the left of the blade.
Anyway, both of these jigs/guides make my life easier and a bit safer. As Mike said, I don't have any interest in these companies other than I use their products. If you are interested both of these are available for a number of different sources on line.
-
jud reacted to nobotch in dust extraction
I hook up a self built cyclone separator between the dust/chip prodiuction site and the vacuum. This saves me dust bags (none at all needed) and keeps fine dust filters (if present) from clogging up too quickly.
I built my cyclone according to the scaleable plans of Bill Pentz's model (for those interested in building one: it helps a lot to read Bill's build-instructions on his website here and here). Its geometry is well calculated and the cyclone is very effective. But there are also simpler models of separators (less effective, let more fine particles through to the filter), like for example the Thien baffle Matthias Wandel shows here.
I took this picture of my cyclone a few years ago. Now the cyclone and the shop vac sit on a plywood board with 4 small swiveling wheels
-
 jud got a reaction from mtaylor in dust extraction
Might add to the shop vac system, another home grown system that uses a fan to circulate the air in the room. Place a furnace filter inside a shroud to force the fan discharge or intake through that filter, then clean or change often. That should trap most of the dust that the vacuum can't get. You might even find that running the home grown system, when the vac is not needed, has it's advantages.
jud
-
jud reacted to SARGOFAGUS in HMS Warspite by Sargofagus - RESTORATION
Hi All, I've just tried it and it seems to be working, so all the Warspite photos are now on this site, hope you like them, thanks to you all, especially to Reklein, for telling me where to do this, all the best
Glenn
-
jud reacted to mtaylor in HMS Warspite by Sargofagus - RESTORATION
Glenn,
It's not boring but fascinating. I'm one of those to whom a picture speaks as much if not more than words.
-
jud reacted to Morgan in HMS Warspite by Sargofagus - RESTORATION
Welcome onboard Sargofagus,
I'm looking forward to seeing your work and that of your colleagues. It's a couple of years since I made it from the other side of the town to the Headland (where the Heugh Battery is situated for those non Hartlepudleans!), and will have to call in to take a close look at your restoration project if that is OK.
Gary
-
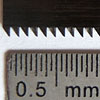
jud reacted to Landlubber Mike in Table Saw Hand Safety
Funny you should mention that Bill. Tonight I used the Microjig Grr-Ripper for the first time with my Byrnes saw and absolutely loved it. I am surprised more people on here aren't using it. It is fantastic - easy to use, keeps your hand away from the blade, and you no longer need to deal with featherboards, etc. Well worth the money in my opinion.
I used it to saw 0.5mm maple sheets for deck planking. I was having trouble cutting straight planks due to the fact that the wood was thin as paper and would slip under the fence at times, or even ride up over the blade. The Micro jig worked like a charm and made cutting straight planks a breeze - and with 100% safety. I wholeheartedly recommend it.
Here is a picture of it in case people are interested.
-
 jud got a reaction from CaptainSteve in Table Saw Hand Safety
Use the push sticks and guards along with the rule, never to turn the darn thing on when distracted or thinking of something other than the job at hand. If still a bit cautious, 'good', stay that way. If frightened about using the thing, get rid of it and stick with hand tools.
jud
-
 jud got a reaction from russ in Table Saw Hand Safety
Use the push sticks and guards along with the rule, never to turn the darn thing on when distracted or thinking of something other than the job at hand. If still a bit cautious, 'good', stay that way. If frightened about using the thing, get rid of it and stick with hand tools.
jud
-
 jud got a reaction from hexnut in Table Saw Hand Safety
Use the push sticks and guards along with the rule, never to turn the darn thing on when distracted or thinking of something other than the job at hand. If still a bit cautious, 'good', stay that way. If frightened about using the thing, get rid of it and stick with hand tools.
jud
-
 jud got a reaction from Kevin in Wood availablity in the UK for kevs new build
Were I you and had the ability to mill, re-saw, sand or plane to thickness, I would be down there looking at billets and blanks to find out what they had and in what form. You probably could find and use a local tree service outfit to obtain some limbs or small trunks of local wood. The wood the bowl makers have is probably seasoned, the tree service wood would not, but you could do that yourself. Take the time to look around and see what is available, bet there is something local you could find in abundance that would work well for you.
jud
-
 jud got a reaction from src in Table Saw Hand Safety
Use the push sticks and guards along with the rule, never to turn the darn thing on when distracted or thinking of something other than the job at hand. If still a bit cautious, 'good', stay that way. If frightened about using the thing, get rid of it and stick with hand tools.
jud
-
 jud got a reaction from jburchfield1@wowway.com in Table Saw Hand Safety
Use the push sticks and guards along with the rule, never to turn the darn thing on when distracted or thinking of something other than the job at hand. If still a bit cautious, 'good', stay that way. If frightened about using the thing, get rid of it and stick with hand tools.
jud
-
jud reacted to dafi in emergency steering chains
I think they do coincides because Longridge´s description is based on the Vic in P. ;-)
To me it looks strange that so much chain would drag in the water ...
Dirk/Dubz started a interesting conversation about the use of chains in our german forum.
He realised that Lees was taking on page 130 first about about chains and then, on the eyebolt/hook beside the stem already talks about the pendants. He found Steel also saying the same - witch contradicts the contemporary models.
Here are the parts that Dirk pointed out:
Lees p130:
Rudder pendants
Chains were shackled to eyes in the rudder, coming up each side of the rudder to under the transom.
- chains
To the end of the chains large rings were fitted and into these rings were hooked the rudder pendants.
- chains
These pendants had a thimble in each end with the hooks set round the thimbles.
- change to pendant
The hooks were moused.
- pendant
The pendants were seized to eyes or hooks set under the transom — one by the side of the rudder post, one half way along, and one under the quarter gallery.
- pendant
The end of the pendants were seized to the after end of the mizen channels.
- pendant
When required, a long tackle was hooked in the ends.
- pendant
The fall hooked to an eyebolt in the mizen chains and led in through a port
Steel wrote (CS.234)
“RUDDER-PENDENTS hook to the ring, in the end of the rudder-chains; the hook is moused; then stopped to hooks driven in the counter, over the rudder, at the quarters, and one between. A long tackle is hooked to a thimble, spliced in the ends of the pendents, and to an eye-bolt in the mizen-chains, and the fall leads in, through a port, upon the quarter-deck.”
Steel, p. 77
Rudder Tackles hook to the rudder chains or pendants, to steer the ship in case of accident to the tiller or rudder head.
Steel, p. 172
PENDENTS. Large, but short, ropes which go over the mast-heads, and to which are hooked the main and fore tackles. There are, besides, many other pendents, with a block or tackle attached to one end, all of which serve to transmit the effort of their tackles to some other object: such are the BILL-PENDENT, BRACE-PENDENTS, PREVENTER-BRACE-PENDENTS, BURTON-PENDENTS, FISH-PENDENTS, GUY-PENDENTS, MAIN-STAY-TACKLE-PENDENT, PENDENTS OF TACKLES, QUARTER-TACKLE-PENDENTS, REEF-TACKLE-PENDENTS, RUDDER-PENDENTS, STAY-TACKLE-PENDENTS, TOP-ROPE-PENDENTS, TRUSS-PENDENTS, VANG-PENDENTS, WINDING-TACKLE-PENDENTS, and YARD-TACKLE-PENDENTS.
Steel, p 178
RUDDER TACKLES are composed of long tackle blocks, and single blocks, strapped, with hooks and thimbles: they are used to save, or direct the rudder, when any accident happens to the tiller.
Steel, p192
RUDDER-PENDENTS are doubled and cut in the bight; they have a hook and thimble spliced in one end, and are served with spunyarn over the splice.
Luce Text-Book of Seamanship, 1891, Luce, S.477
RUDDER GONE.
If the rudder head only has been carried away, the rudder remaining shipped, it can be used for steering by means of the rudder chains. In view of this possibility, the rudder chains should be stopped up so that their ends are accessible in case of need.
The possibility of having to use rudder chains for steering purposes has sometimes been overlooked; the chains themselves are difficult to get at, the fastenings on the rudder have not been sufficiently far down, and only common bolts have been inserted instead of a stout metal strap, which should clasp the after part of the rudder.
The rudder chains should have pendants spliced into them, leading up over the taffrail where they can be got at.
In using them to steer the ship, the rudder head being wrenched off, lower the cross-jack yard on the rail, lash it there, and lead pendants from the rudder chains through blocks at the yard-arms, hooking tackles into the pendants.
And now the question to our nativ english speakers: Are we misunderstanding or misinterpreting the lines?
That is followed by the question how the delta to the contemporary models can be explained? Was the length of the chains not standardised?
Cheers and thanks to Dirk, Daniel
-
jud reacted to Piet in Hr. Ms. O 19 1938 by Piet - FINISHED - scale 1:50 - submarine of the Royal Navy Netherlands in service 1939 - 1945
Well folks, one of the last parts have been made and installed on the O19, it's the Low Frequency transmit antenna. That was a lot of fun to do. As I was making the parts I changed a few things in the process. In the end though it looks exactly the same as on the drawings and photos, which makes me very happy.
I immagine that this antenna can be removed and stowed when not in use and for submerged sailing. I tried to do the same but the parts on the antenna mast keep falling off when handling the model so I just made it permanent. We'll just have to imagine they can be unhooked.
The cradle cables at the bow and stern can be removed though. I made a few hooks that hook into the eyelets for that purpose.
I'm very happy with how she looks and for all practical purposes she's finished, except for the dingy, the crew and a few spare parts. I'll keep this log open till the dingy is done and the display board and case are completed and she's on display in my studio.
Here are a few pics of today's the work I did on the antenna over the last few days. I could only devote a few hours a day, too many chores to do.
This drawing shows the general layout of the O19. The Low Frequency antenna is shown at the top of the profile picture. As I have mentioned before there were a few changes the builder had to make by request of the KM (Royal Navy), which I incorporated in my model.
One of the changes I made was by removing the bracket I soldered to the mast top. In its place I soldered a small piece of tubing to the mast top. I attempted to make this thing move up and down via a simulated pulley system and then also with removable hooks that hold the antenna wires. Thinking about it some more I slapped my forehead and called myself domkop. This mast can be lowered and raised by the crew unhooking it would be an easy task. Yeah, I could have made the guides as hooks and drilled holes in that small cross piece but just soldered them in. Who knows, I may redo this at some other time.
This shows the bridle cable assembly. I made two, one for the bow and for for the stern (duh ) The cable is made from two 0.08 pieces of copper wire from a telephone wire and then twisted. The "trapeze" looking thingy is just a piece of 0.2 mm brass rod with a 0.1 mm brass wire soldered to it, then a small 0.5 brass tube where I soldered everting in. A few small hooks from 0.2 brass rod.
The bridle cable is hooked into the bow antenna and cable cutter frame. The bridle is kinda blending in with the low frequency sensing antenna but it runs above it. The stern picture shows it better.
The bow hookup seen from a different angle.
This shows the details of the antenna mast.
This is a better picture showing the antenna bridle and cable hooked into an eyebolt fastened to the aft deck. The crew escape hatch just misses it.
Starboard profile from the stern with the completed antenna installation. We can also clearly see Remco's decals and flags. They kept poor Remco from doing much work on his King Fisher As you can see there is a nice stiff breeze blowing.
Starboard profile from the bow with the completed antenna installation.
Cheers,
-
 jud got a reaction from themadchemist in The Byrnes Saw "inside and around"
The ad var, the measurements taken and the tools indicate that Francis is a machinist. a tool maker or something along those lines. Don't think he is looking for faults, he's having fun using his interests, knowledge and abilities to explore a machine that he admires.
Keep it up Francis, I'm enjoying and learning from your journey through a good machine while making it do what you want as you go. So far I see no damage to the machine that arrived at you house not long ago.
jud
-
jud got a reaction from themadchemist in The Byrnes Saw "inside and around"
Sounds to me like it needs adjusting 0.0072° = 0°00'26", just using the old rifleman's formula, that's almost a half inch at a 100 yards. My total station measures to one second, I can accept a 5' difference between direct and reversed, 26" would indicate the gun needed to be sent in for cleaning and adjustment. That saw has more precision than I would expect, blade distortion because of heat would be greater. Nice dial indicator you have there. Thanks for using it to measure and report on the precision of that saw. Impresses me.
jud
-
jud reacted to dafi in emergency steering chains
Some more findings
NMM Royal George SLR0336 http://collections.rmg.co.uk/collections/objects/66297.html
NMM "Barfleur" SLR0453 http://collections.rmg.co.uk/collections/objects/66414.html
"So called"-Vic SLR0513 http://collections.rmg.co.uk/collections/objects/66474.html
HMS Victory 2003 a bit free flying ...
and Bellona even more on the loose side of life ...
Bellona SLR0338 http://collections.rmg.co.uk/collections/objects/66299.html
Lee describes the pendants as seen on the first two pictures on page 130.
XXXDAn
-
jud reacted to nobotch in The Byrnes Saw "inside and around"
Maybe the following is more useful for most of you than precision measurments on a precision saw.
Of course, it is not confined to the Byrnes saw, hence a bit off-topic.
I usuallyy cut such tiny pieces using a chisel (a mirror sheen on its flat side makes cutting 90° and 45° angles really easy).
But when the Byrnes saw is already on the bench and in use it is very tempting doing such cuts with the new toy...
Hence, using "hinged chopsticks" instead of chopping off a fingertip may be a good idea (you may want to click on the pictures to enlarge).
Or simply use a chisel.
Cheers,
Markus
-
jud reacted to michael mott in The Byrnes Saw "inside and around"
Markus I like the chopsticks device. however I would use a sled rather than the mitre gauge. I realize that you are using a very small saw. and understand the waste issue with regard to production methods. I find that sometimes we follow along a line of thinking that boxes us in, I have done this many times where because I have used a particular tool or method, I seem to be locked into that tool or method and attempt to do the next job or task using it instead of thinking about what the big picture actually requires.
As you pointed out using the chisel with the mirrored surface give a perfectly clean 90 degree cut exactly illustrates what I am saying.
I am fortunate to have a large number of good tools that I have acquired over many years, and like yourself they are used for much more than model ship building. It has been my personal preference to use larger tools that are capable of cutting small sizes to good tolerances that to attempt to use small tools that are pushed to their limit cutting large stock.
All that said I am enjoying seeing your innovative attachments and ideas for this very high quality small machine.
Michael
-
 jud got a reaction from nobotch in The Byrnes Saw "inside and around"
The ad var, the measurements taken and the tools indicate that Francis is a machinist. a tool maker or something along those lines. Don't think he is looking for faults, he's having fun using his interests, knowledge and abilities to explore a machine that he admires.
Keep it up Francis, I'm enjoying and learning from your journey through a good machine while making it do what you want as you go. So far I see no damage to the machine that arrived at you house not long ago.
jud
-
jud got a reaction from nobotch in The Byrnes Saw "inside and around"
Sounds to me like it needs adjusting 0.0072° = 0°00'26", just using the old rifleman's formula, that's almost a half inch at a 100 yards. My total station measures to one second, I can accept a 5' difference between direct and reversed, 26" would indicate the gun needed to be sent in for cleaning and adjustment. That saw has more precision than I would expect, blade distortion because of heat would be greater. Nice dial indicator you have there. Thanks for using it to measure and report on the precision of that saw. Impresses me.
jud
-
 jud got a reaction from WackoWolf in The use of Applewood in modelling?
With good insulation, a 40 or maybe even a 20 watt bulb with ventilation you can adjust should be enough heat, want to dry it not burn it.
jud
-
jud got a reaction from mtaylor in The Byrnes Saw "inside and around"
Sounds to me like it needs adjusting 0.0072° = 0°00'26", just using the old rifleman's formula, that's almost a half inch at a 100 yards. My total station measures to one second, I can accept a 5' difference between direct and reversed, 26" would indicate the gun needed to be sent in for cleaning and adjustment. That saw has more precision than I would expect, blade distortion because of heat would be greater. Nice dial indicator you have there. Thanks for using it to measure and report on the precision of that saw. Impresses me.
jud