Mike Y
-
Posts
1,557 -
Joined
-
Last visited
Content Type
Profiles
Forums
Gallery
Events
Everything posted by Mike Y
-
 Fantastic! Crisp and clean, love the colours!
 -
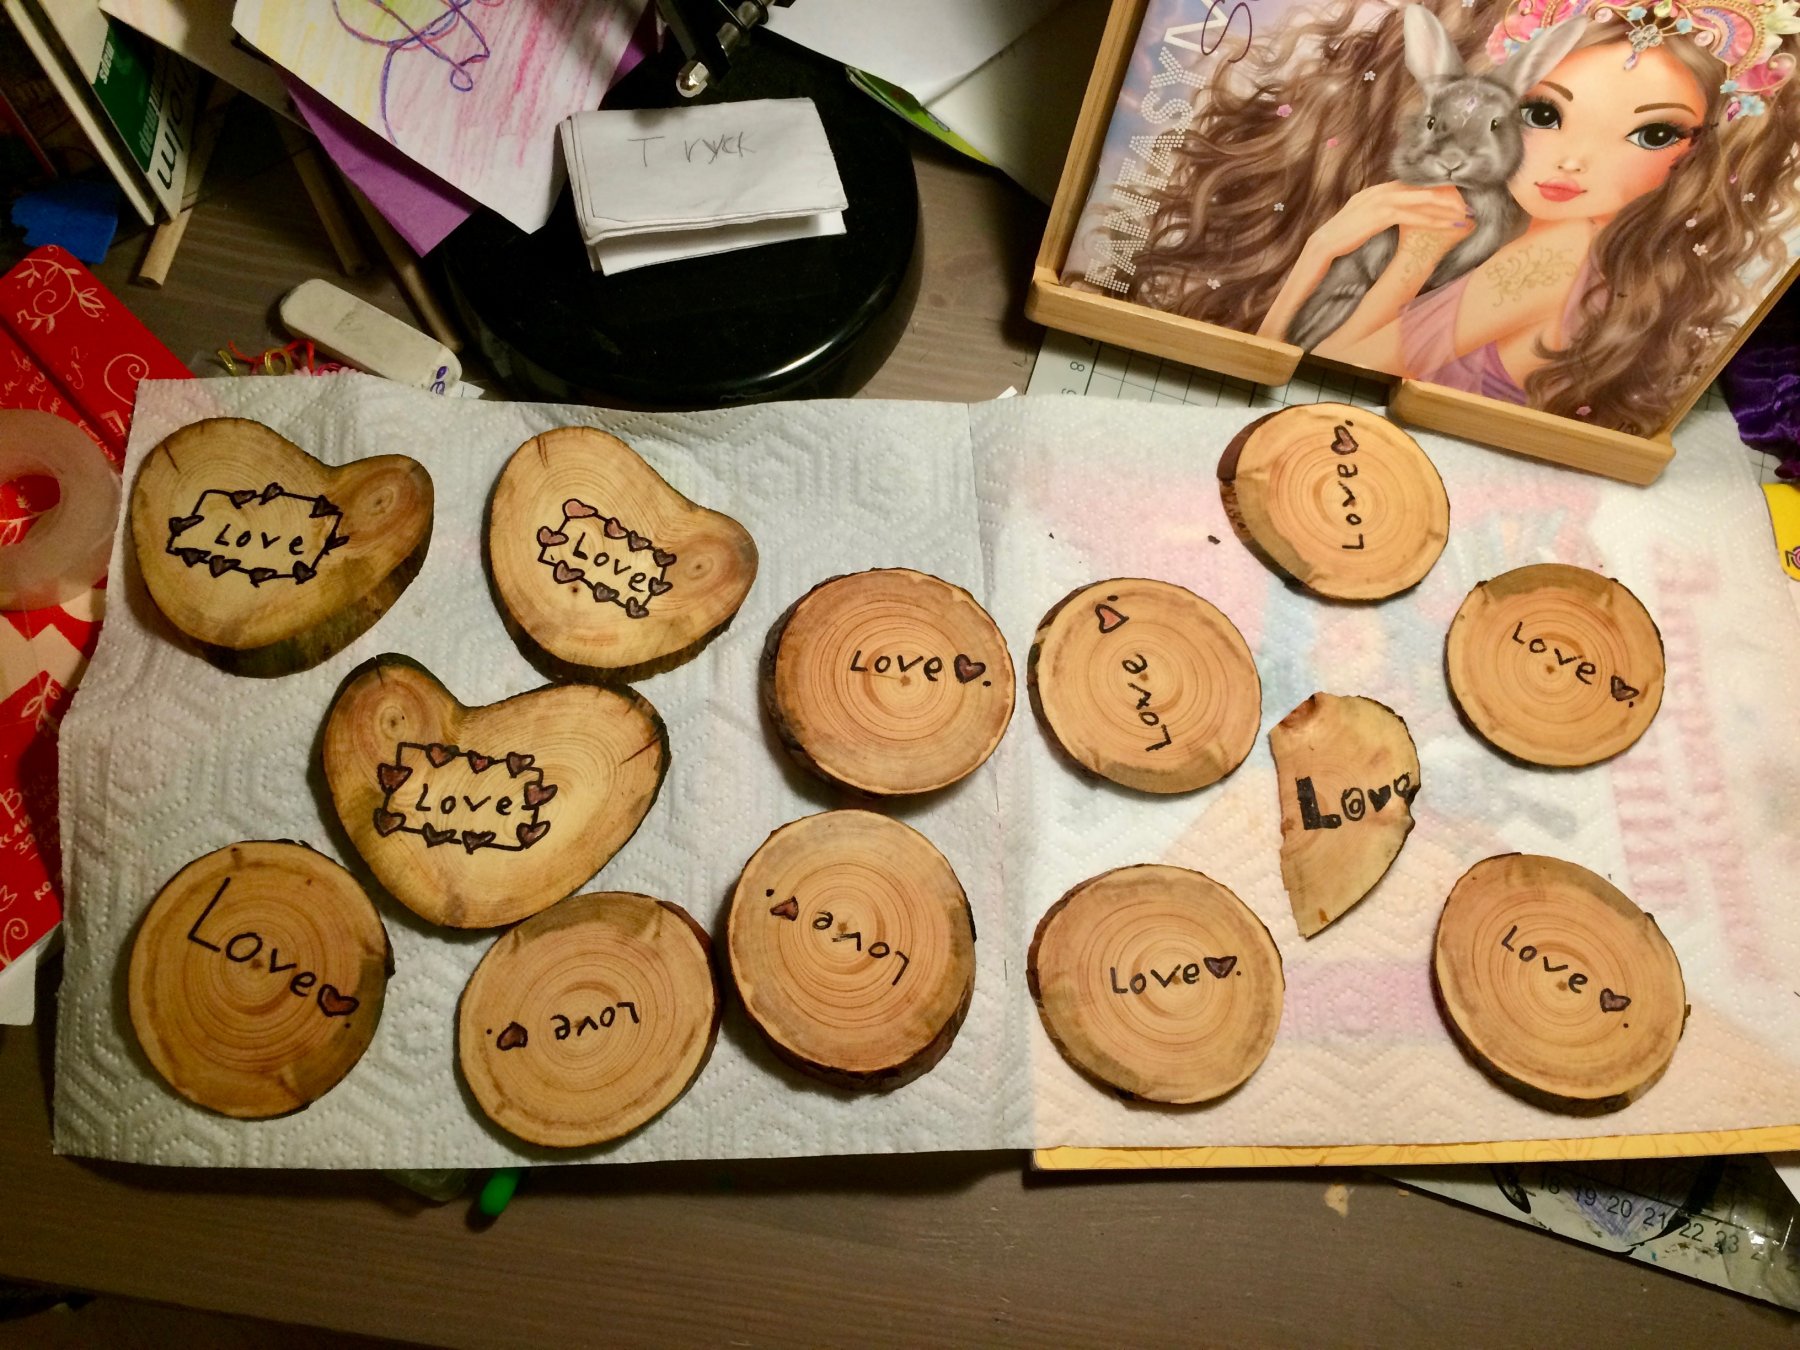
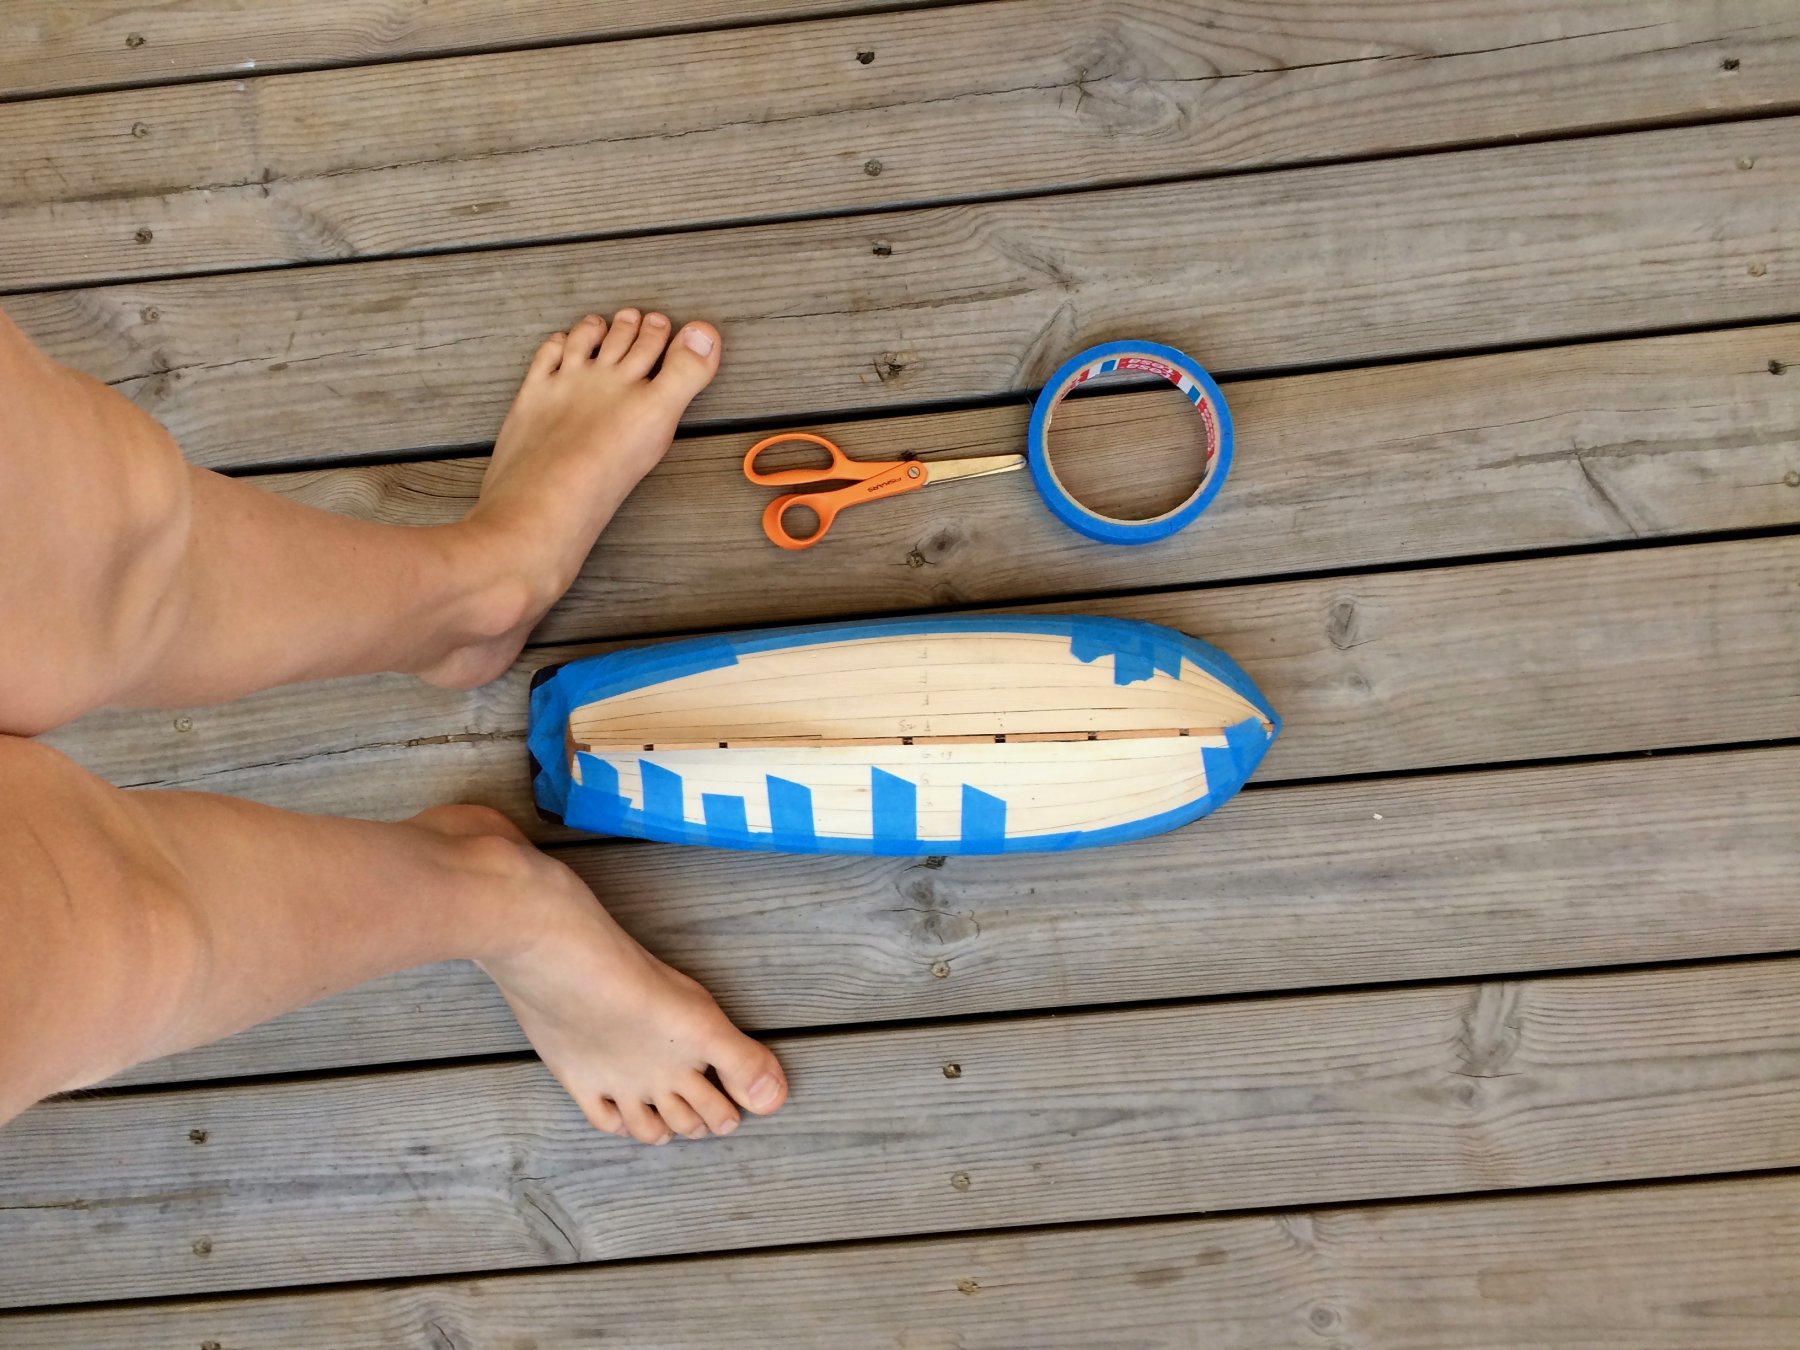
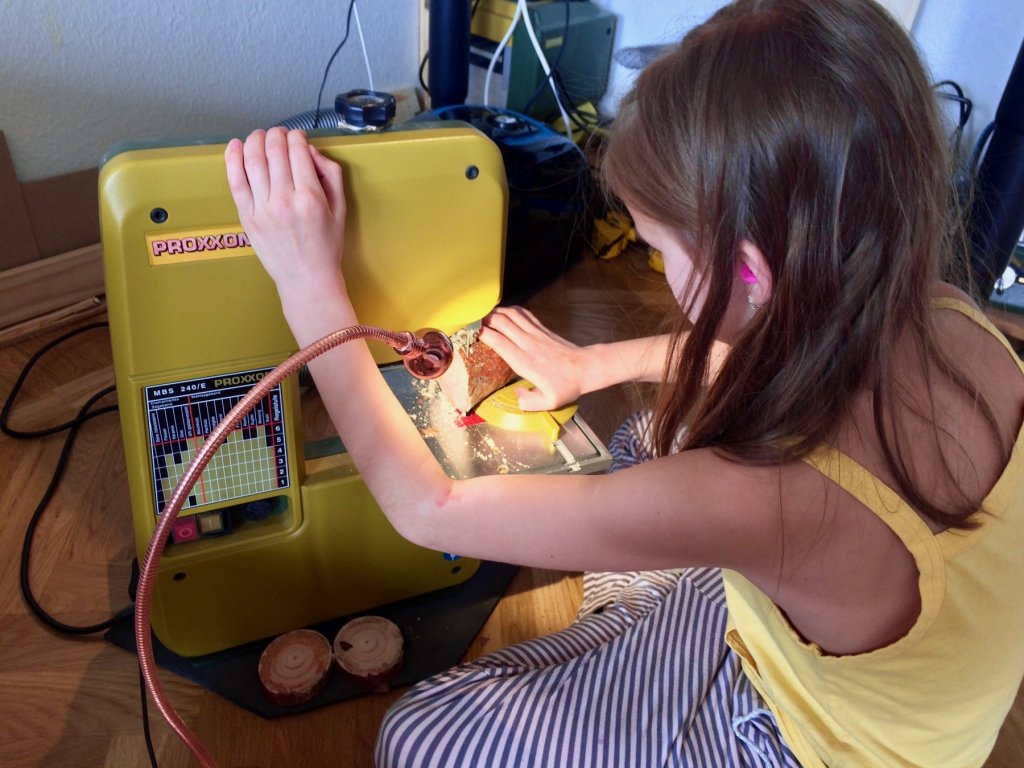
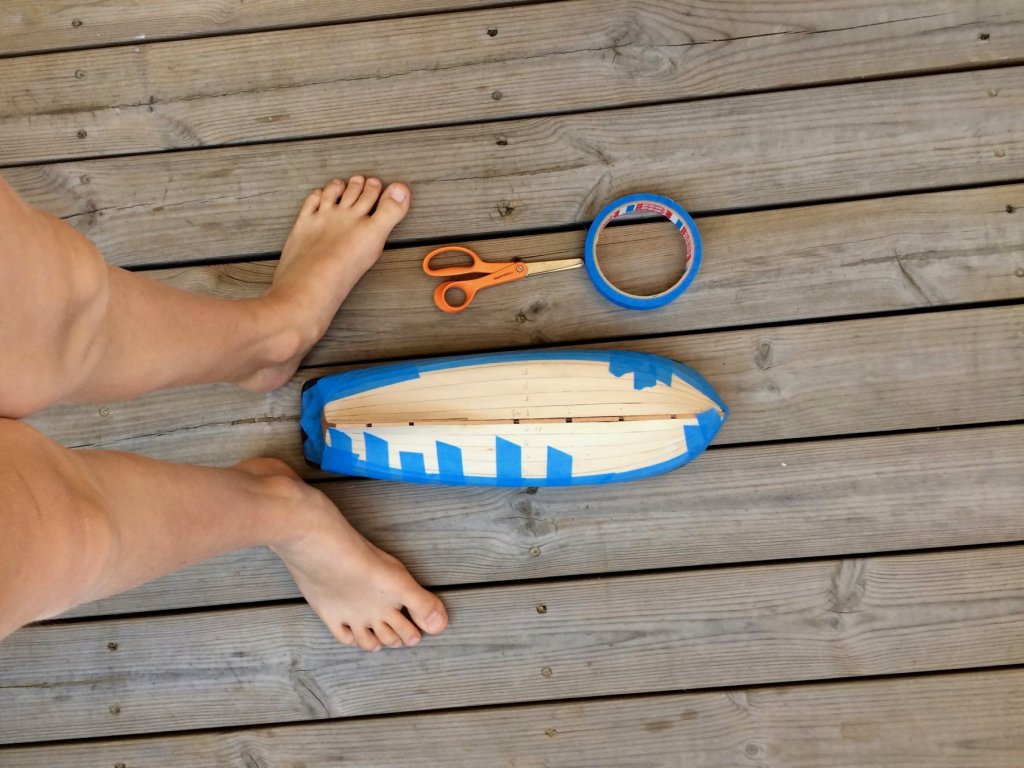
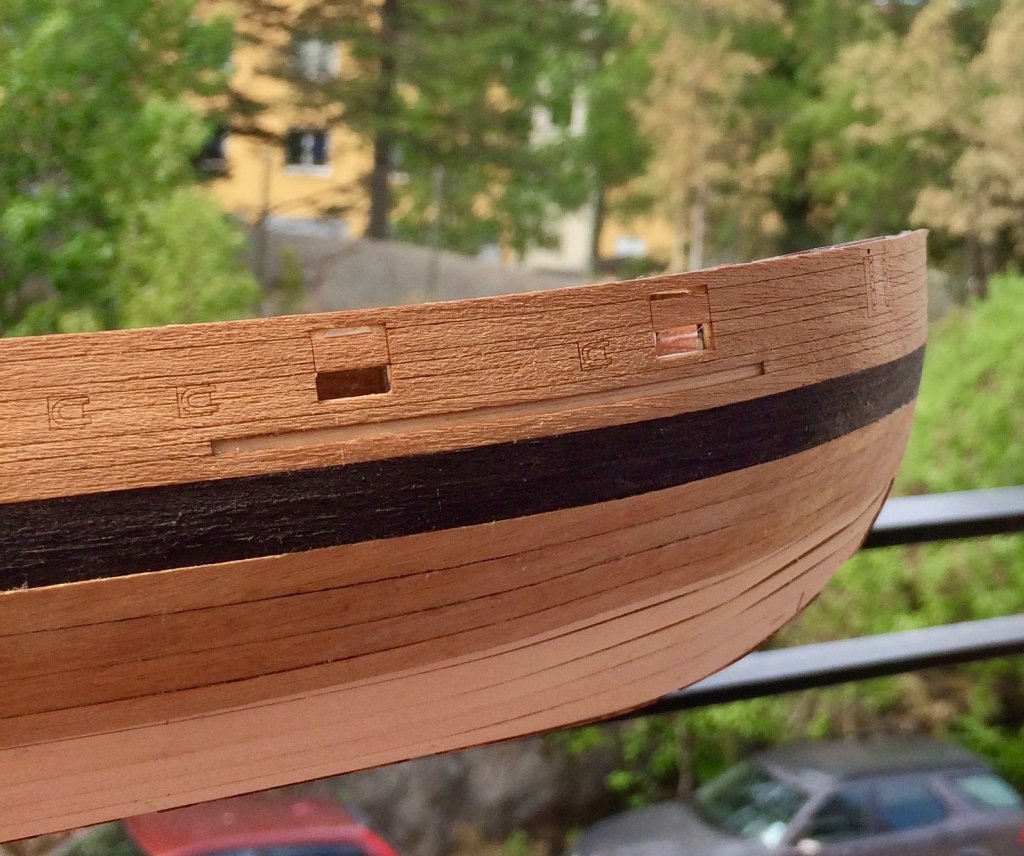
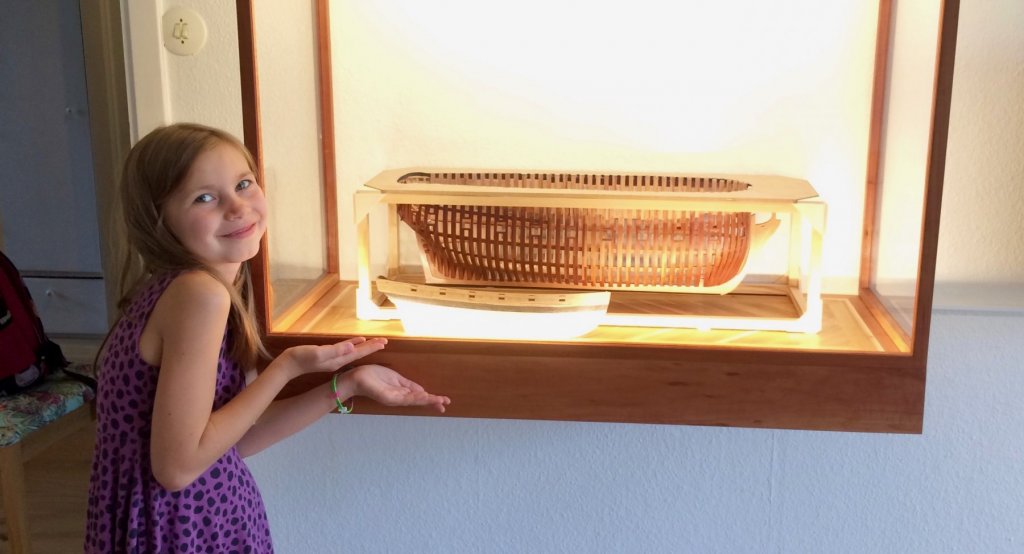
May was very busy, so we barely had any time for modelling. Daria also made some things for a school fair, using a wood pieces that we found in our neighbourhood. They are sanded and finished with Osmo Polyx, both processes were easy enough for her to do. I am a proud dad First time using bandsaw on her own (with my supervision, of course). Pro tip: avoid cutting pine, this stuff gums up everything - blade, bearings, etc. The model is slowly progressing. It goes well, though it would be nice to have a bit thicker veneer - it is quite thin, need to be very cautious when sanding it. Also, the grain is really out of scale, not much I can do about it. So far nothing is sanded, sorry. Using blue painters tape instead of clamps, works great! Daria is getting comfortable with a scalpel, learning proper holding angles and pressure. No self-cuts yet This is her favourite part of the planking process, for some reason. The current status: Aaand she is off to her grandparents, so the building will resume in the end of August


-
Interesting new model ship company
Mike Y replied to Erebus and Terror's topic in Wood ship model kits
I wonder why kit producers stick to lazer cutting, while well performing cnc cutters (especially semi-2d ones) are really affordable nowadays? Can't imagine sanding/scraping all that laser char... -
Amazing! Thanks for the nice process photos as well.
-
The group photo of all models lined up in one room - really looks like a future museum opening Excellent lighting and photos!
-
Apparently the Vasa museum (the oldest preserved ship on display from 1626) has a youtube channel with a lot of interesting background information, history, conservation story and a lot of great shots from inside the hull, the place that is not available for a regular visitors: https://www.youtube.com/channel/UCOpOsd0xVzgZAys0jF5dZfQ/videos Some videos are in swedish, but there are subtitles that could be enabled (click on the "settings" button in the bottom right corner of the video and select the subtitles).
- 1 reply
-
- 5
-

-
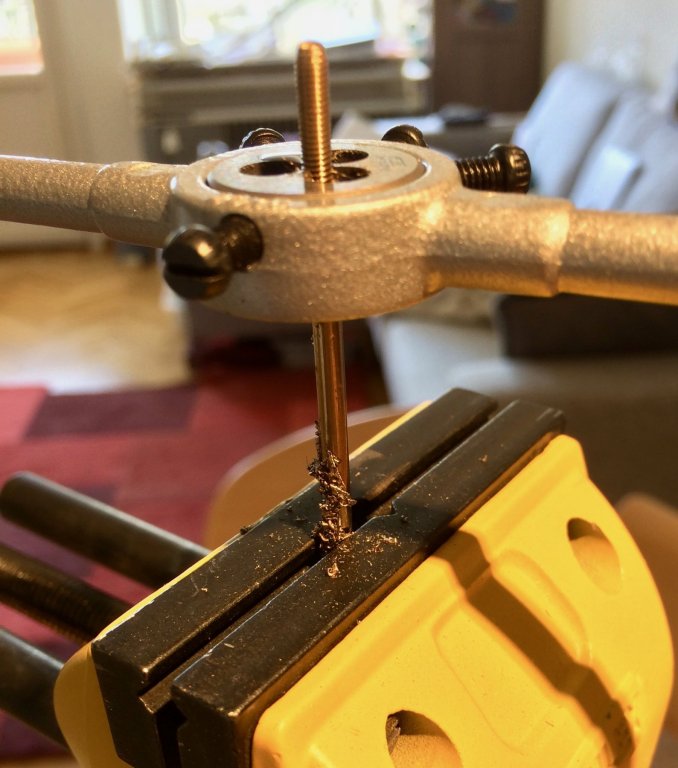
The rod diameter is 3mm, bushing has a 2.5mm hole. Both tap and die are the M3 size, DIN 223 standard. The rods are from the same batch, but I will doublecheck their diameters carefully. Everything is possible!
- 969 replies
-
- 3
-
-
- hahn
- oliver cromwell
- (and 1 more)
-
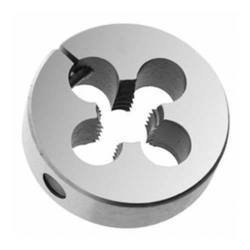
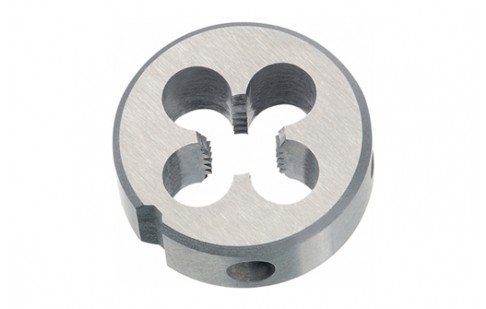
Grant, thanks for the info! Google says that it is a special die design, the ones that have a split and an adjustment screw. Like this: And here is my die, no split: So it is probably more related to the feeding speed (and, hence, temperature). Will try to feed slower and see how it goes.
- 969 replies
-
- 6
-
-
- hahn
- oliver cromwell
- (and 1 more)
-
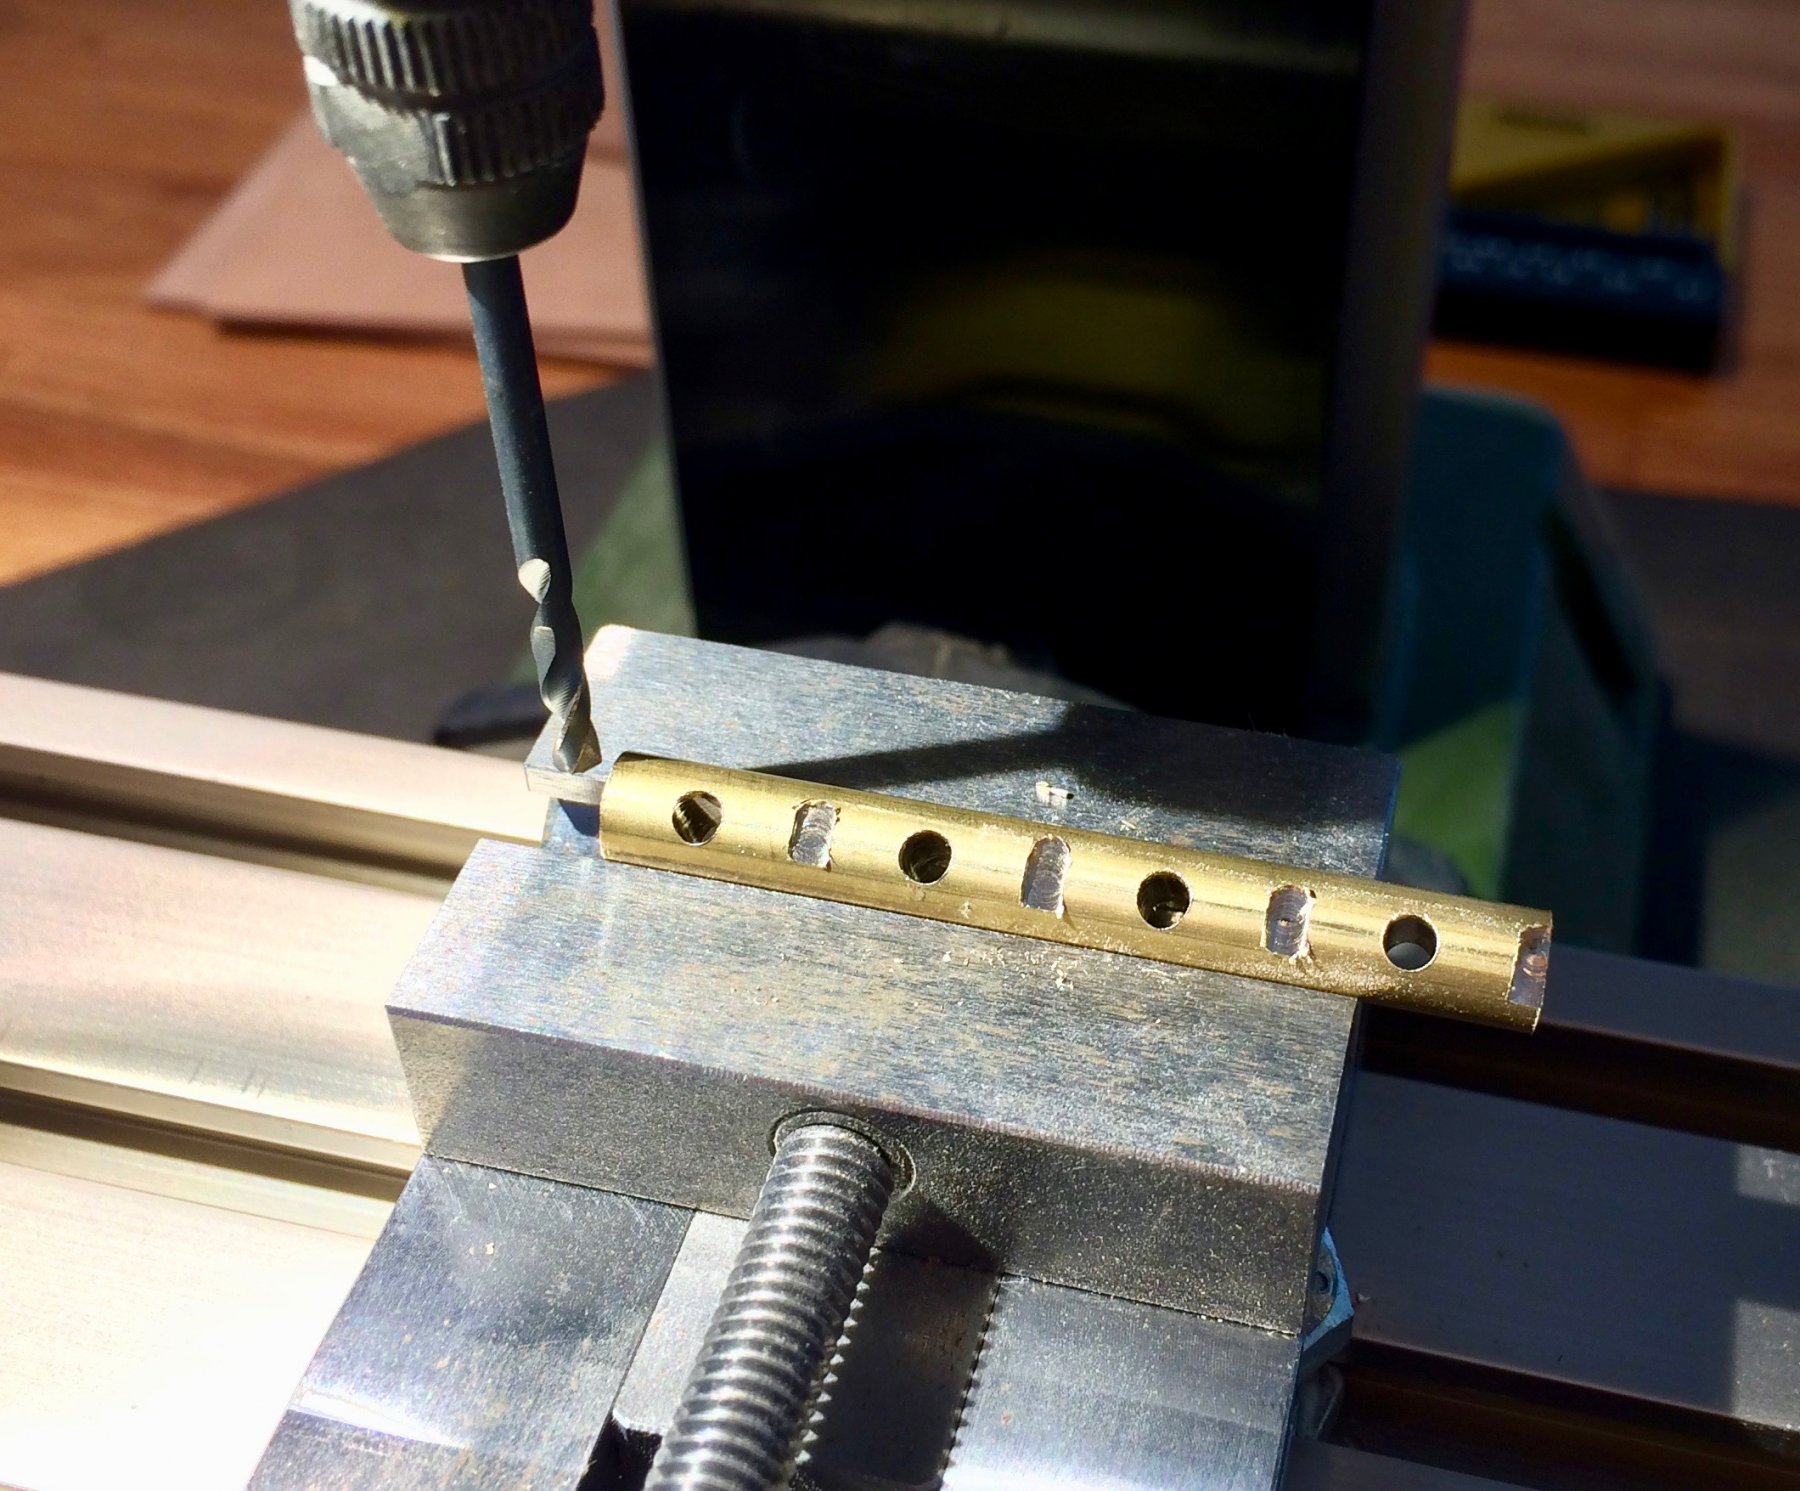
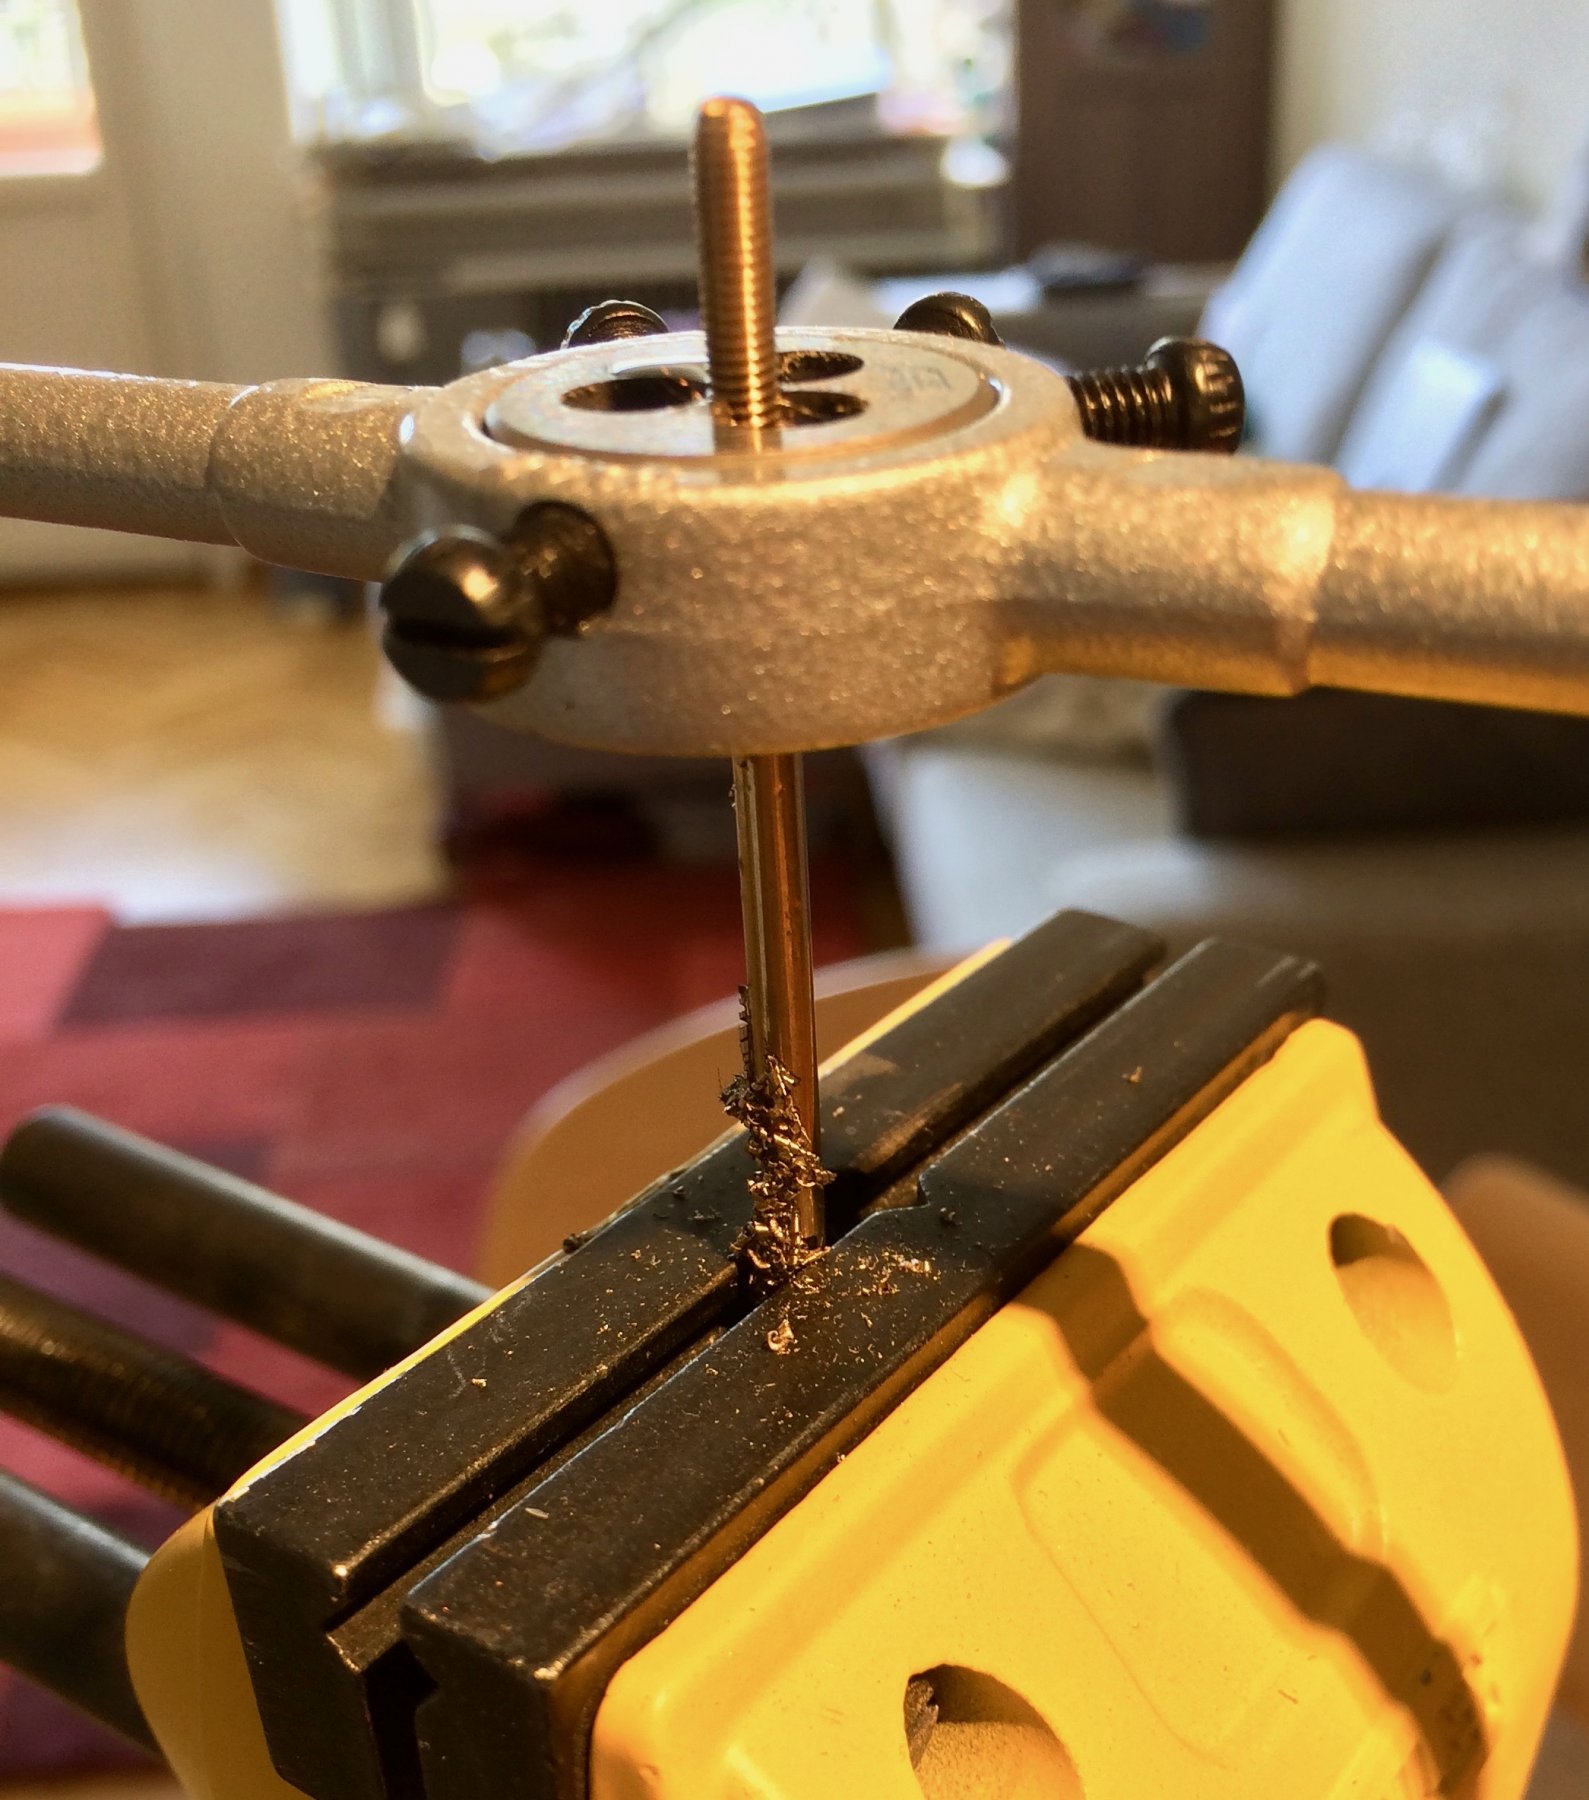
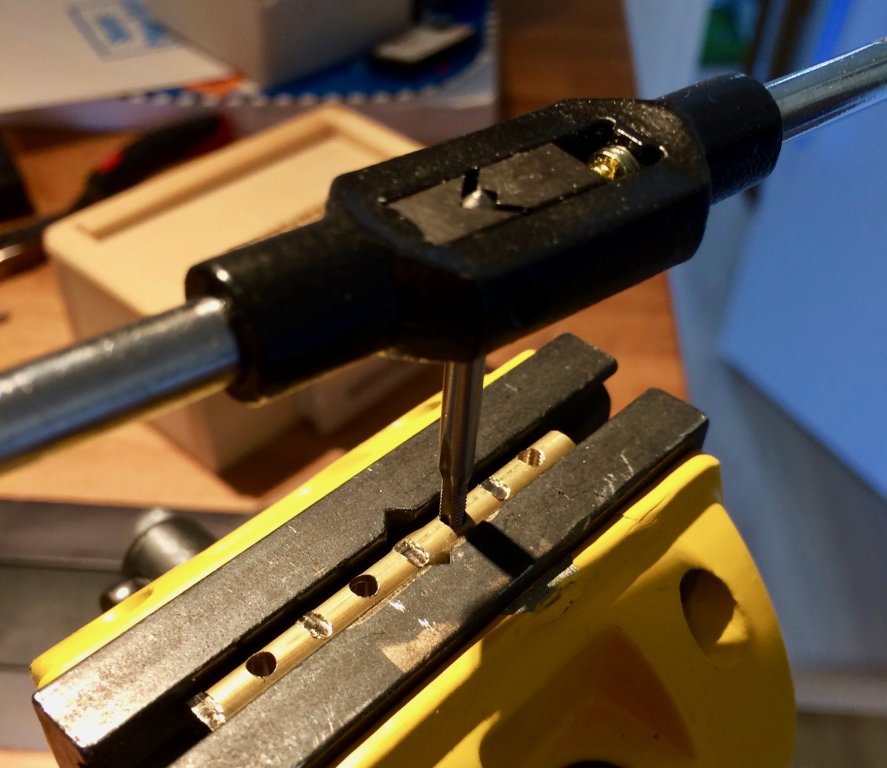
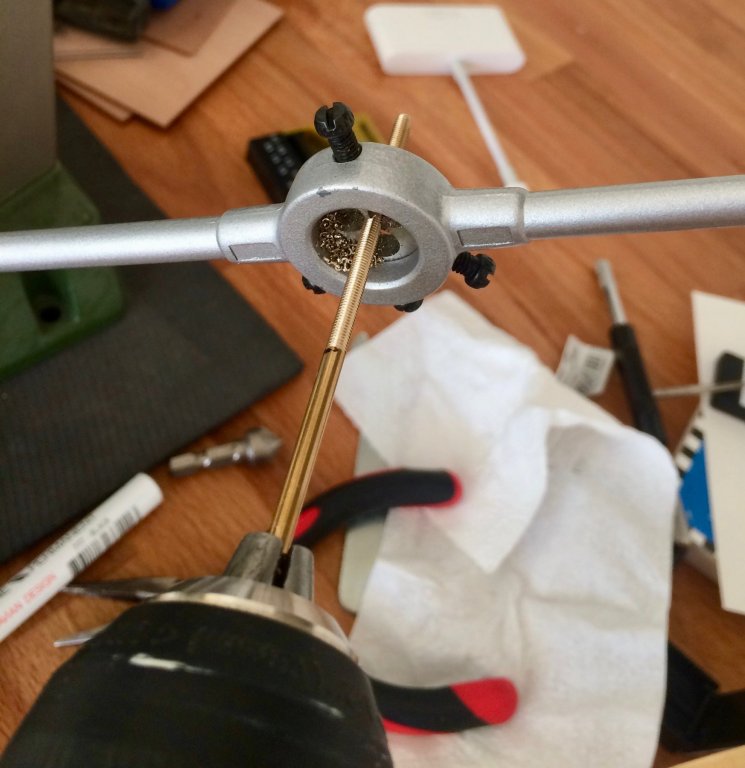
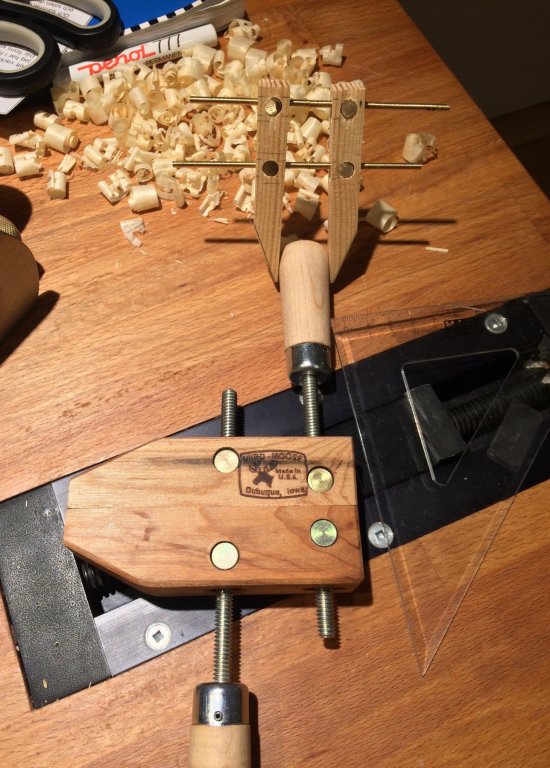
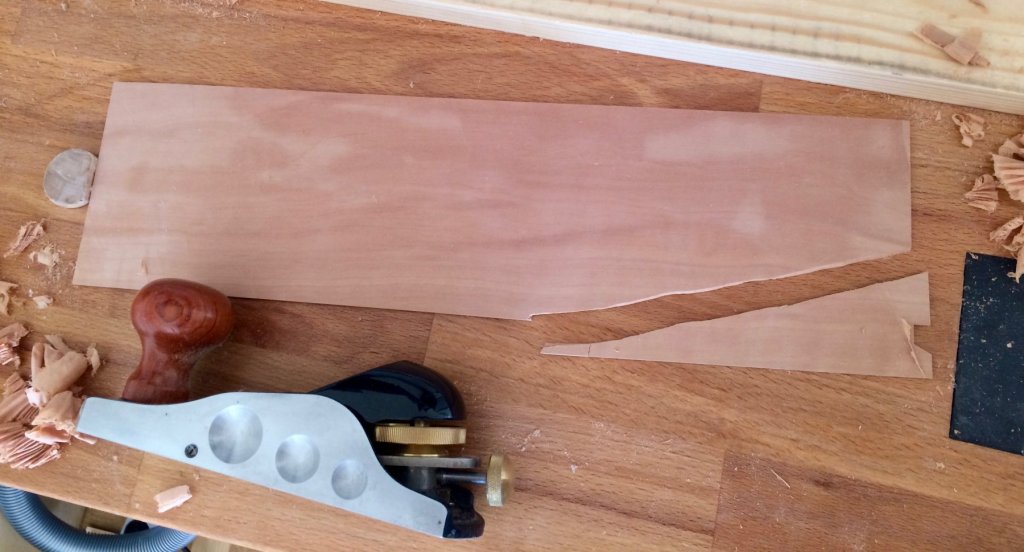
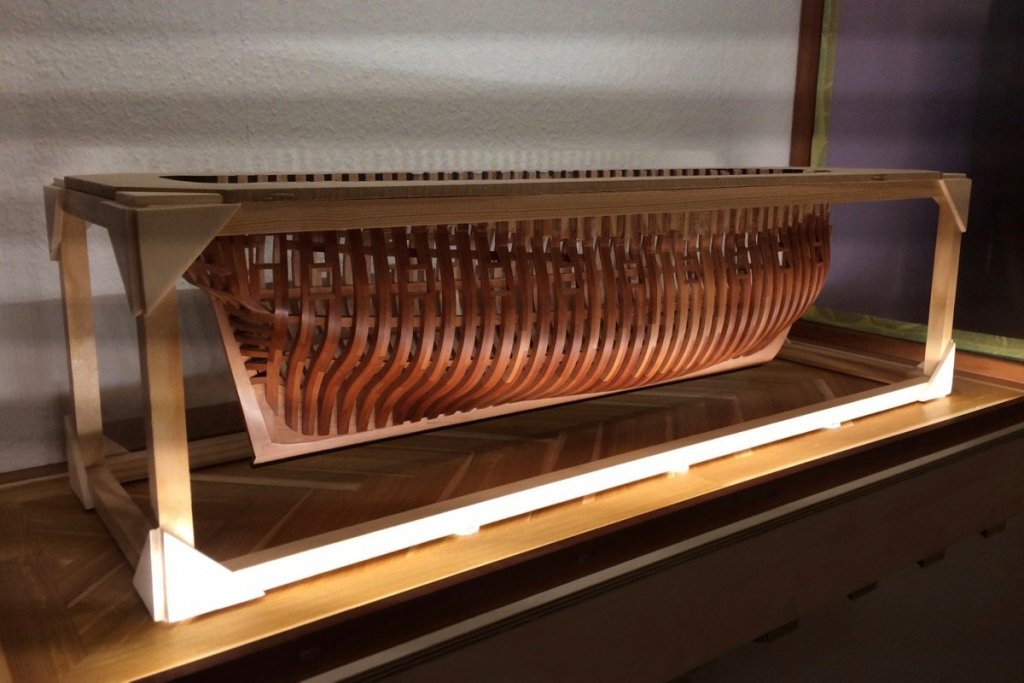
Finally back to the model building. To prepare, I need to make a set of Jorgensen-style clamps (also locally known as Tosti clamps on MSW for Ed, who popularised them in his Naiad build ). I bought a pair in Lee Valley, but they are way too big for the modelling purposes. But I loved the way they work, and I quickly got used to them. It is also my first time using tap & die (since that clamps require a mix of left-hand and right-hand threads) - I know the basic theory, but never had a need for cutting my own threads. So it was definitely a learning curve! More experienced man will chuckle reading that, so enjoy Bought a high quality tap&die tools from Völkel, famous Swiss manufacturer. So at least I am sure that my troubles are not because I was using a cheap chinesium tools. First drilling the holes in the round bushing. It went surprisingly ok with just a mill and a Proxxon metal cutting drill bit. I thought it would slip and bend, and was ready to pre-mill the flat surface first, but it was ok even without it: Second is tapping: And threading: Threading was harder than expected, the force required is quite high, so it was not easy to find a way to clamp the brass rod without damaging the thread that is already cut on its other end. I followed the rule of rotating it back every now and then to break the chips. It also took forever! To my surprise, the result was not good, especially on the left hand side - the bushing was rotating properly on some part of the rod, but getting tight or even jammed on the other part of the rod. I could not find a problem with a bare eye, no particles and the thread was looking quite even. Few extra runs of the die back and forth improved the situation, but just a bit. The next test rod I cut with a lubrication. That was easier, but lead to the same quality of the thread, and much more mess (also brass chips not falling out but getting stuck because of the oil). It helped to clamp the rod into a screwdriver and make a few passes with the bushing instead of a die. That way the rod and the bushing kind of adapted to each other, I guess.. Few more passes - and I ended up with a thread that is too loose. Whoops! Then I tried to use the screwdriver to cut the threads instead of manual cut. That was much better! So the next test rod was cut much faster and had a good fit from the start. Maybe a bit on a loose side, but I suspect it is because I was cutting too fast, and die and rod became too hot -> hence they expanded a bit -> and the thread ended up too loose because too much material was cut. But at least it worked! Few more cuts on a mill - and the test version of the clamp is done: It works, but needs some tweaking of proportions to look good. Once I am satisfied with its proportions - will start cutting the real clamps out of pear, lined with a super soft basswood on the inner surface, to avoid damaging the model parts.

- 969 replies
-
- 13
-
-
- hahn
- oliver cromwell
- (and 1 more)
-
Looks fantastic as usual! You set a high bar!
-
Kees, Lawrence, thanks! There is no stain, it is a natural colour of pear once it is oiled. Hmm, not sure what you mean, there is no gluing involved. Just cut one set of framing segments, fine tweak them to make sure they match the drawing, and then use these as templates to transfer sizes and rough angles to the framing stock. No gluing required. Then same templates are used to set a correct angle on the disk sander. Then you do not need to worry about precision when cutting the pieces on a bandsaw or a table saw. Just leave a margin of a millimiter or two, and finish it on a disk sander. Sorry for the brief explanation, hope it makes sense. Please PM me otherwise.
- 969 replies
-
- 3
-
-
- hahn
- oliver cromwell
- (and 1 more)
-
That nameplate shows the class really well - you managed to cut that super thin "bridges" between the letters in the center, fantastic! And looking forward for your approach to the LED lighting of the hold!
-
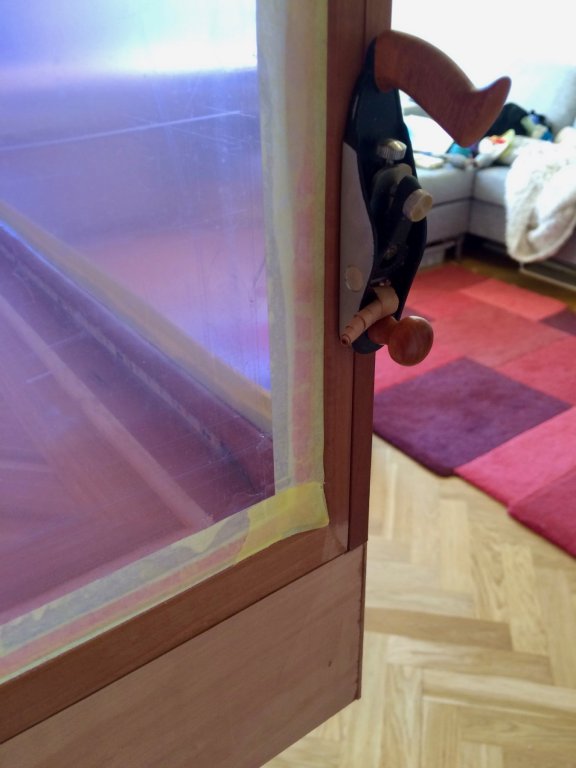
Thanks everybody! Chris, it is a Danish oil - pretty popular furniture finish. I tried tung oil, danish oil and osmo polyx - for this particular wood and application danish oil looked a bit better. Thanks for the advice, but french polish is a bit above my skill level at the moment, it requires quite a lot of time and effort to apply... Sorry that I confused you, the sanding sealer experiments are for the model scale only, not for the furniture. Gaetan, the case is designed to open easily - the front glass panel is just pulled out by hand, it is held in place with magnets. There are some detailed photos showing it in this comment: https://modelshipworld.com/index.php?/topic/7297-oliver-cromwell-by-mike-y-148-1777-pof-hahn-style/&do=findComment&comment=540399 Just need to be careful when pulling the panel to avoid leaving fingerprints on the glass Apart from that - that part of the case design works as intended, opening / closing the case is easy. I start to love magnet mounts more and more, they are easy to make and are fully invisible. The only nuance is picking up the right magnet size/strength for the job. With this case, I started with magnets that were a tiny bit too weak, but it was easy to solve - I just added a pair of stronger magnets into each top corner, and now it is quite strong. At the same time, you do not need to use a lot of force when removing the front panel.
- 969 replies
-
- 3
-
-
- hahn
- oliver cromwell
- (and 1 more)
-
Michael, nice photos! Looks like you was there at a right time, when the sun is out Note that the pear wood colour changes a bit depending on a finish you use. I am now experimenting with some sanding sealers, to keep the wood in its original colour instead of a darker shade that different kinds of oil lead to. Will post the test results once it's done.
- 969 replies
-
- 3
-
-
- hahn
- oliver cromwell
- (and 1 more)
-
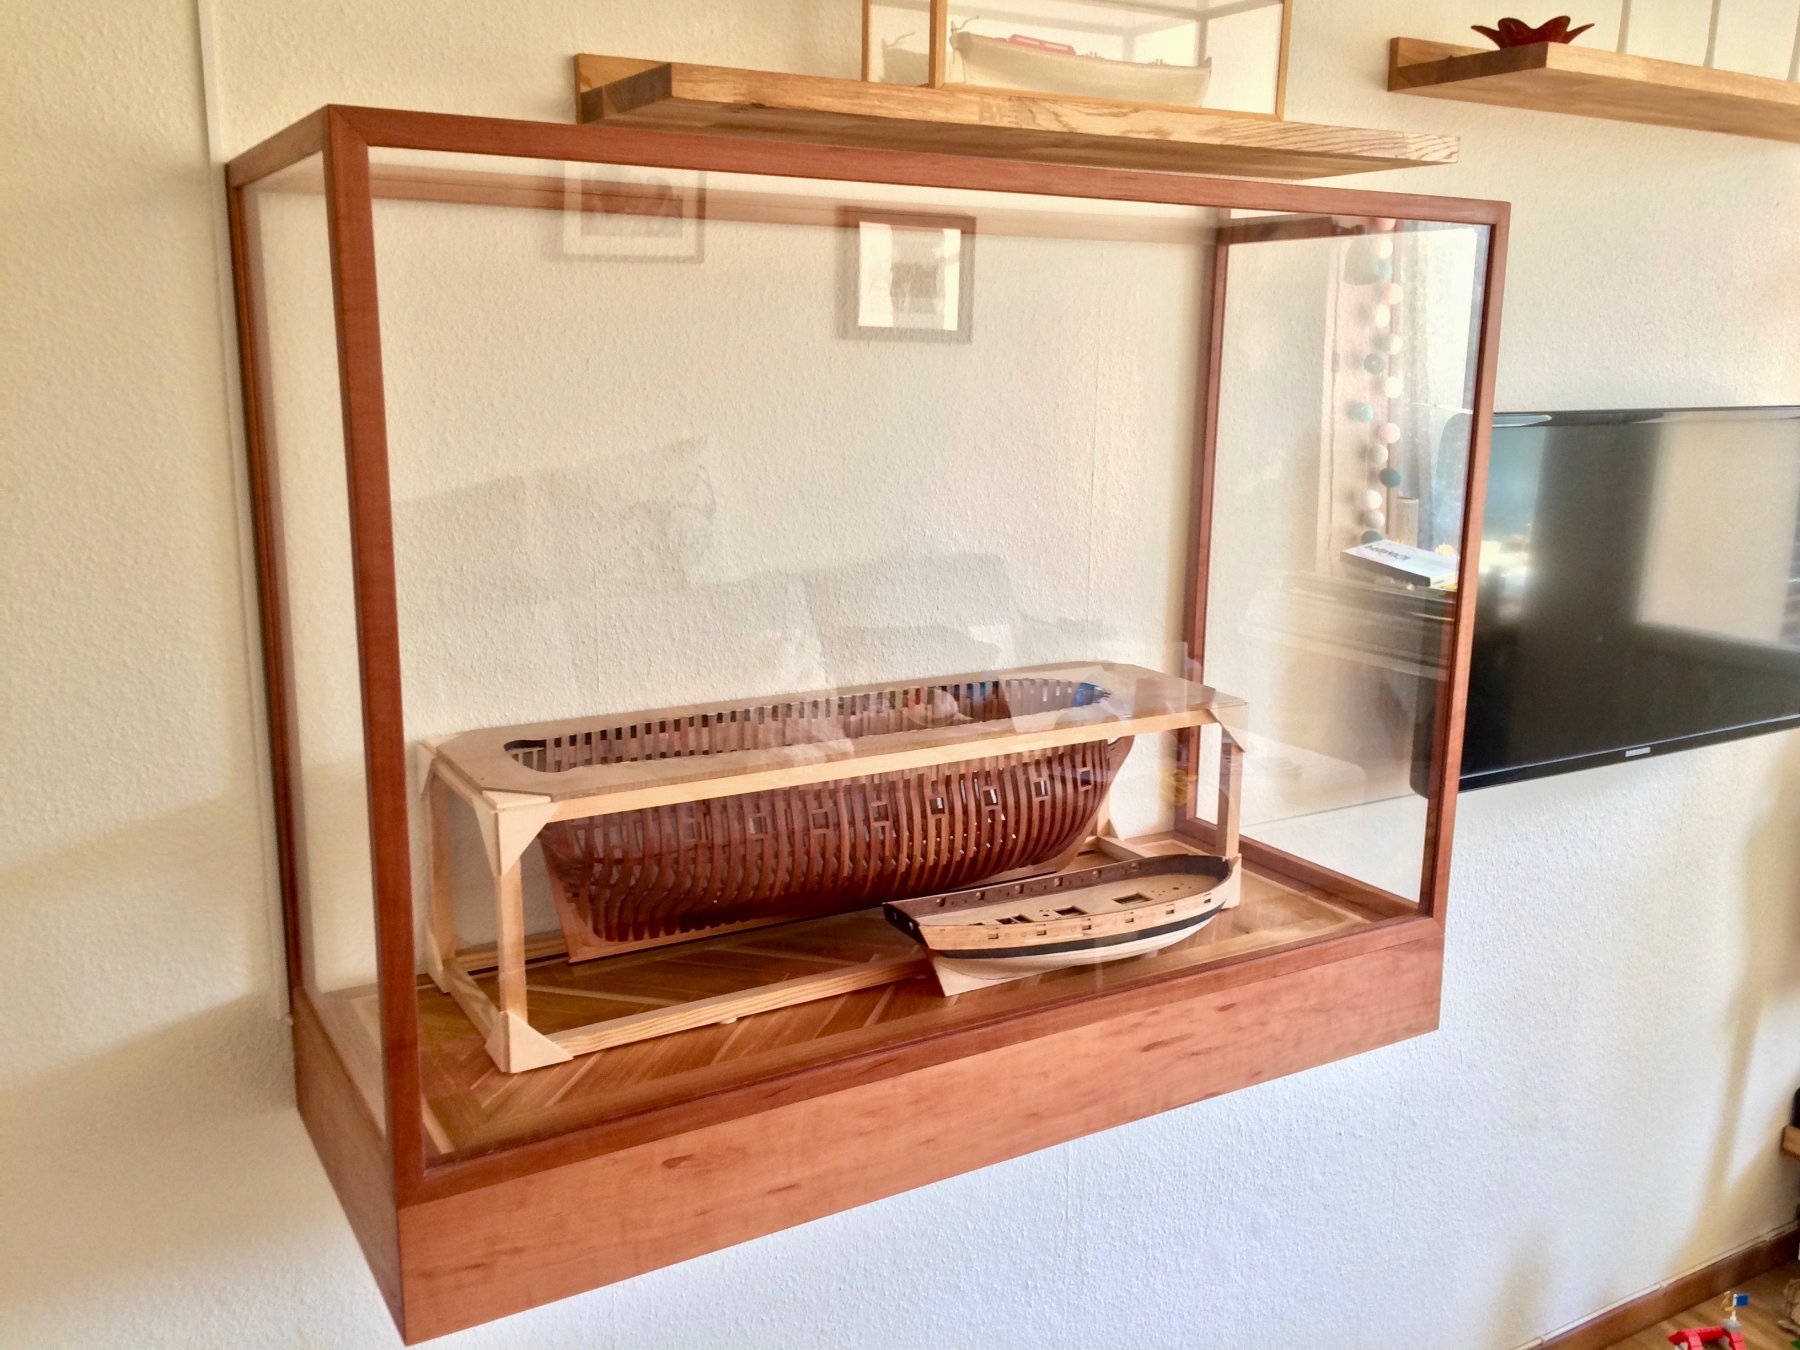
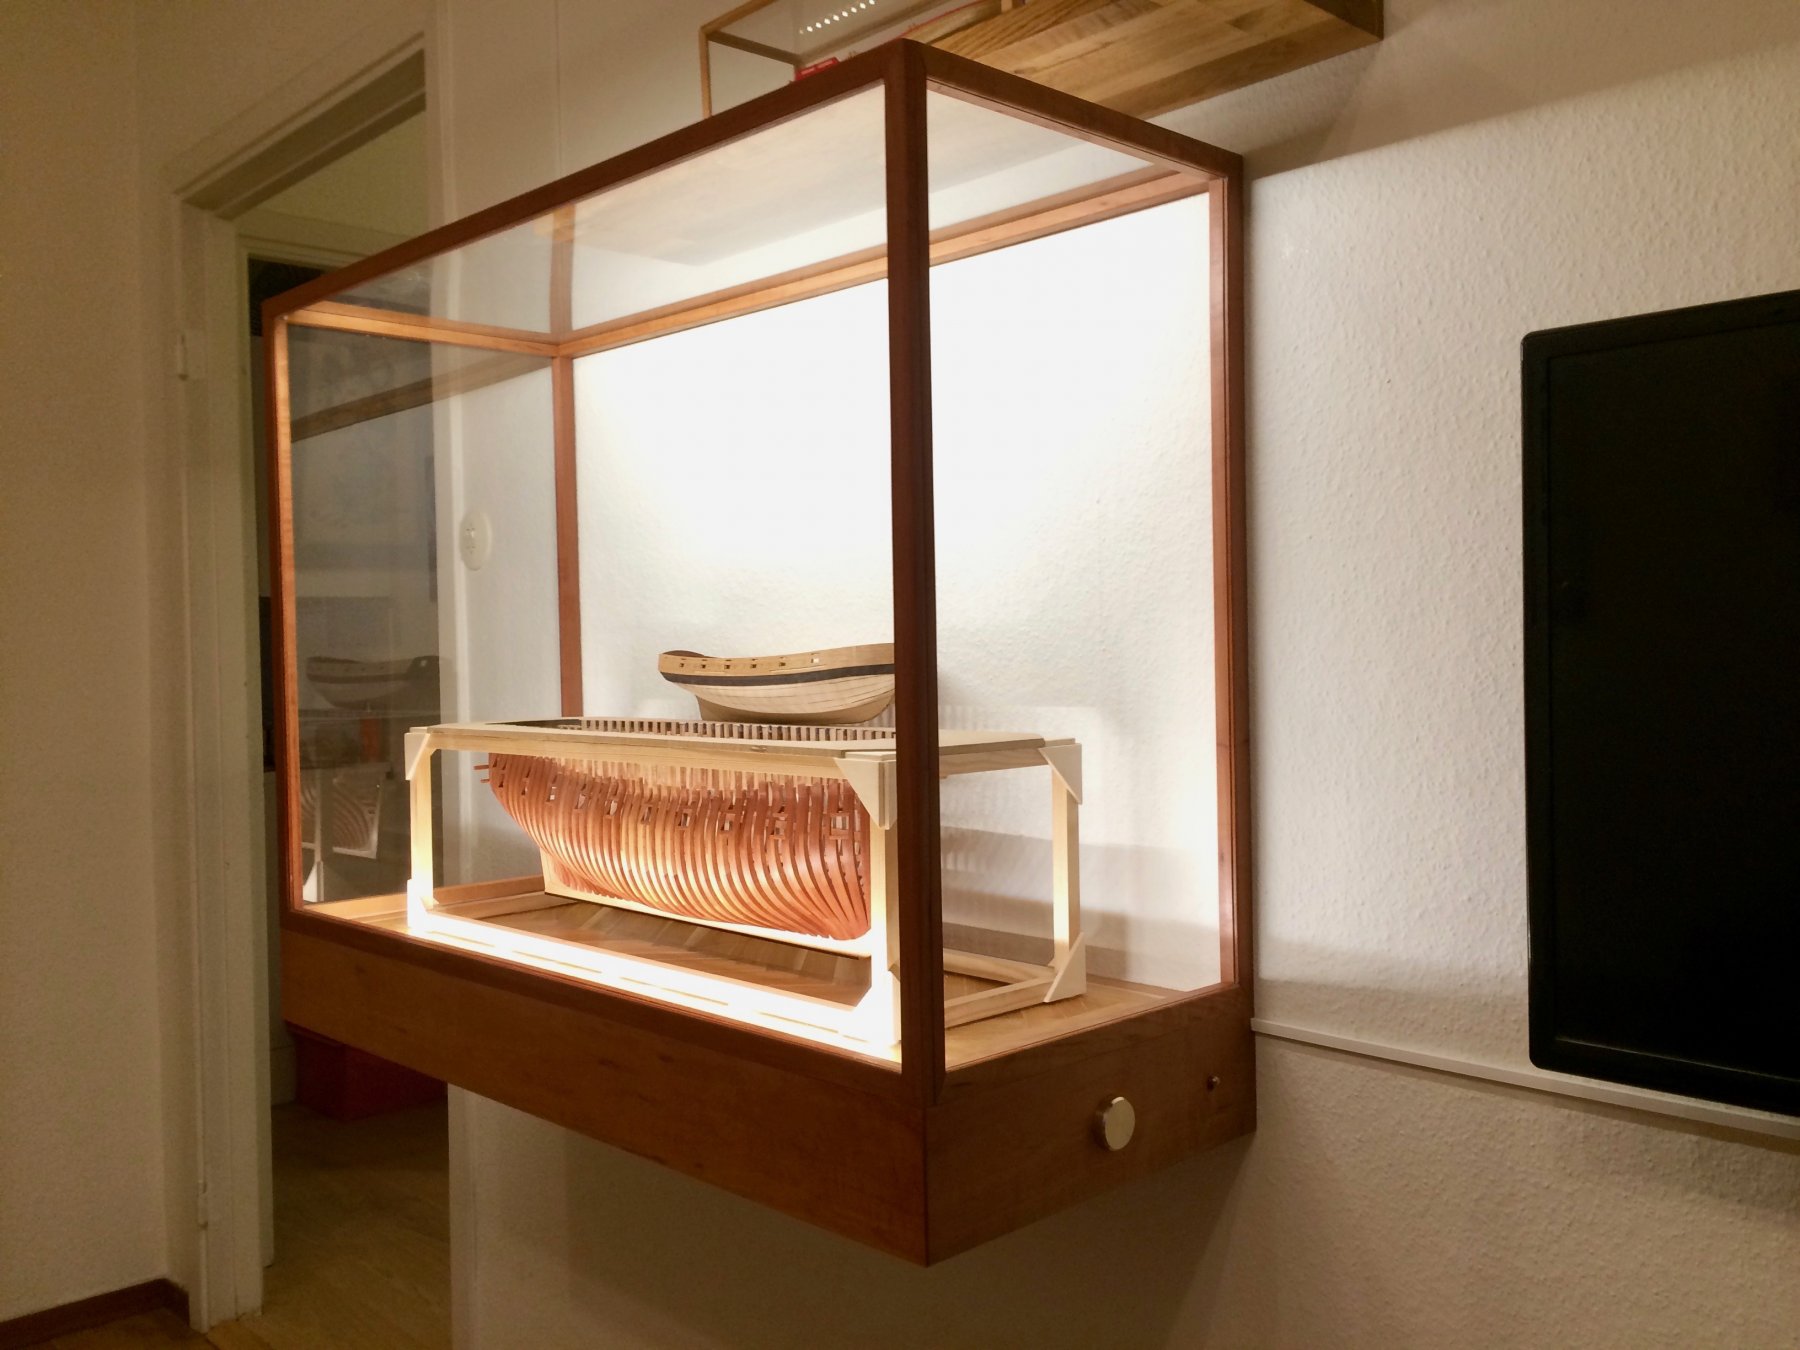
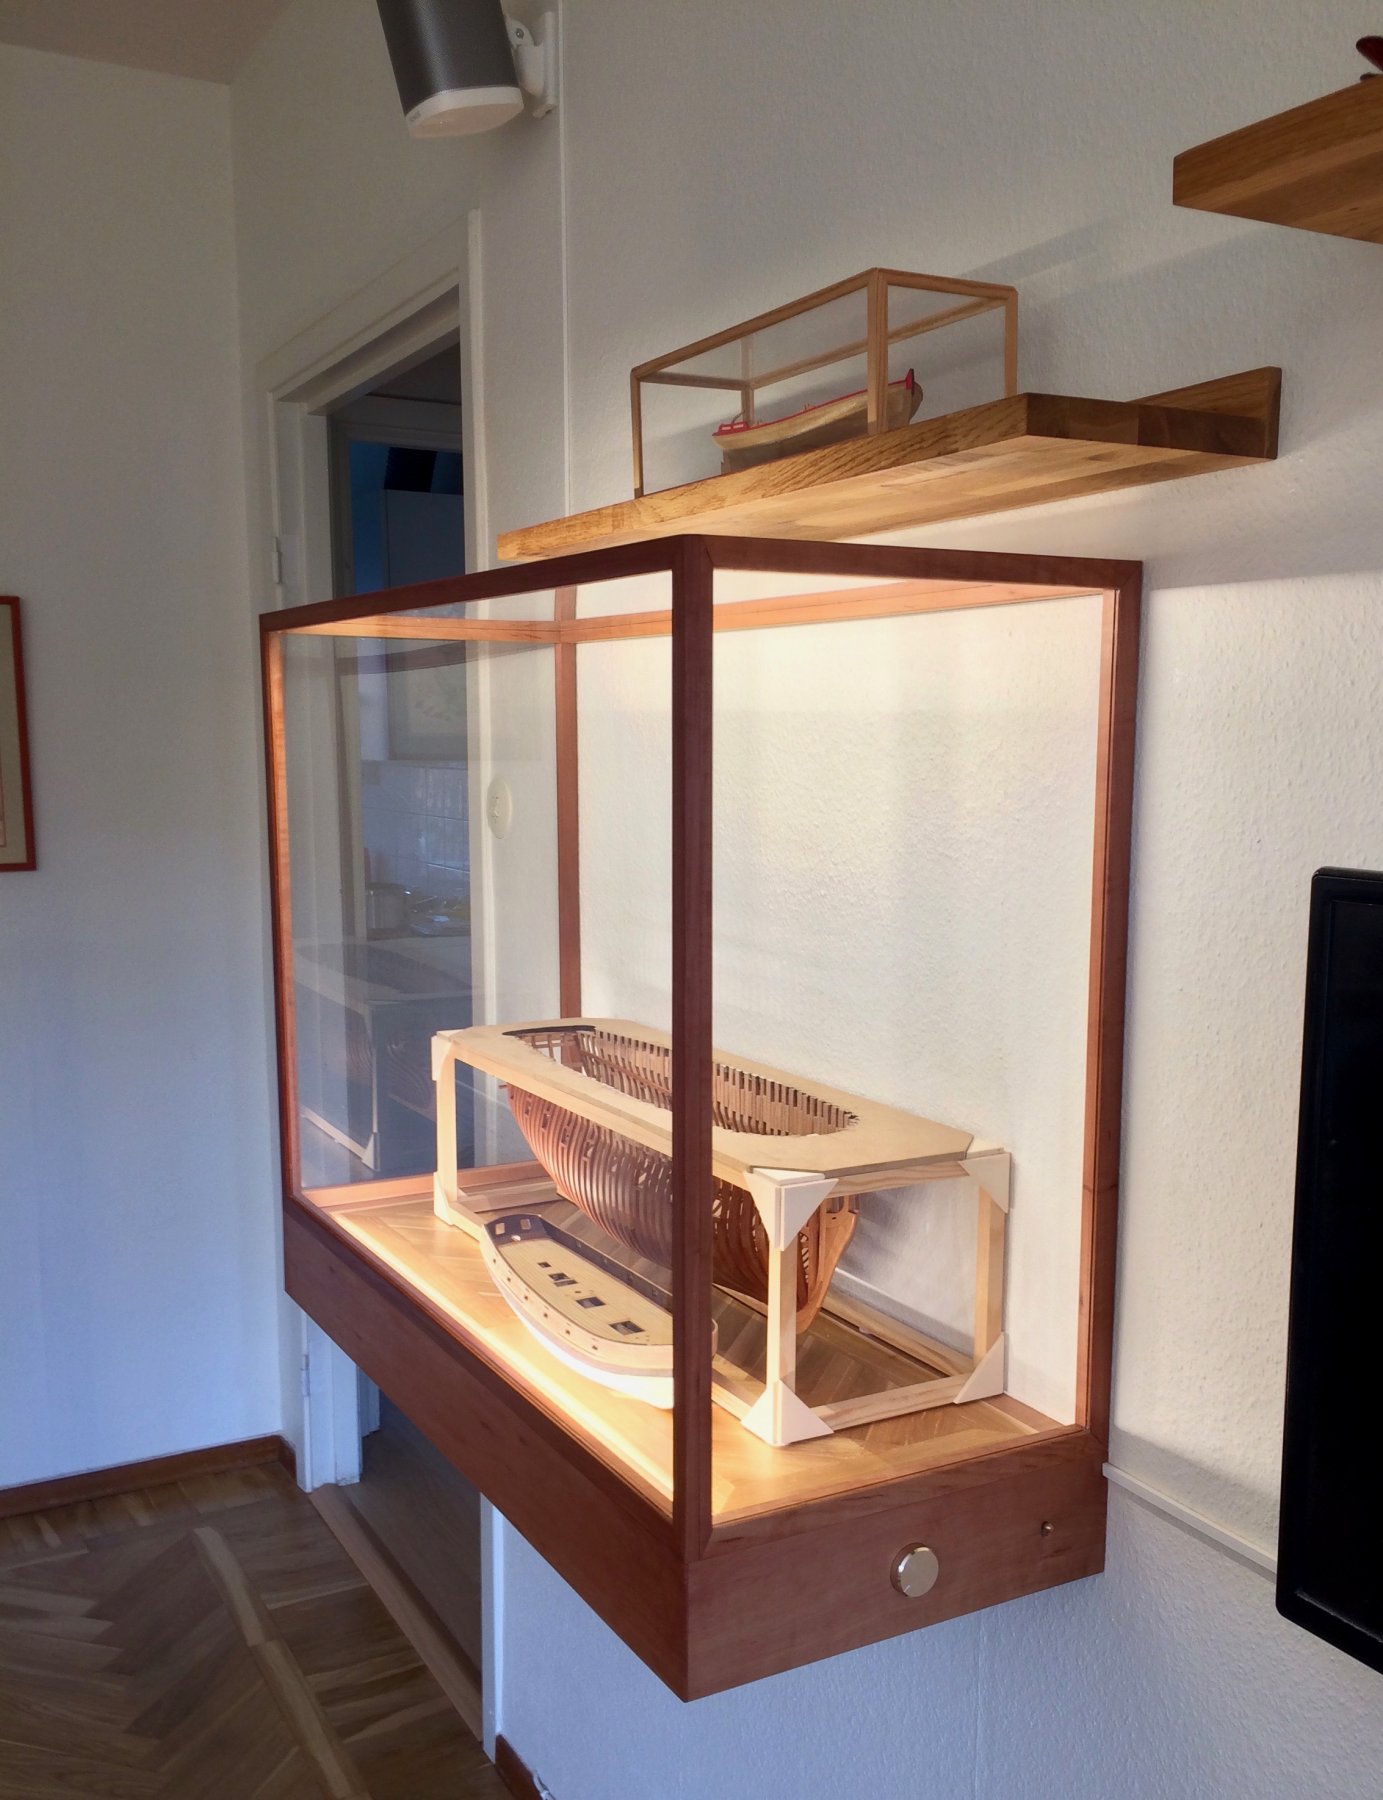
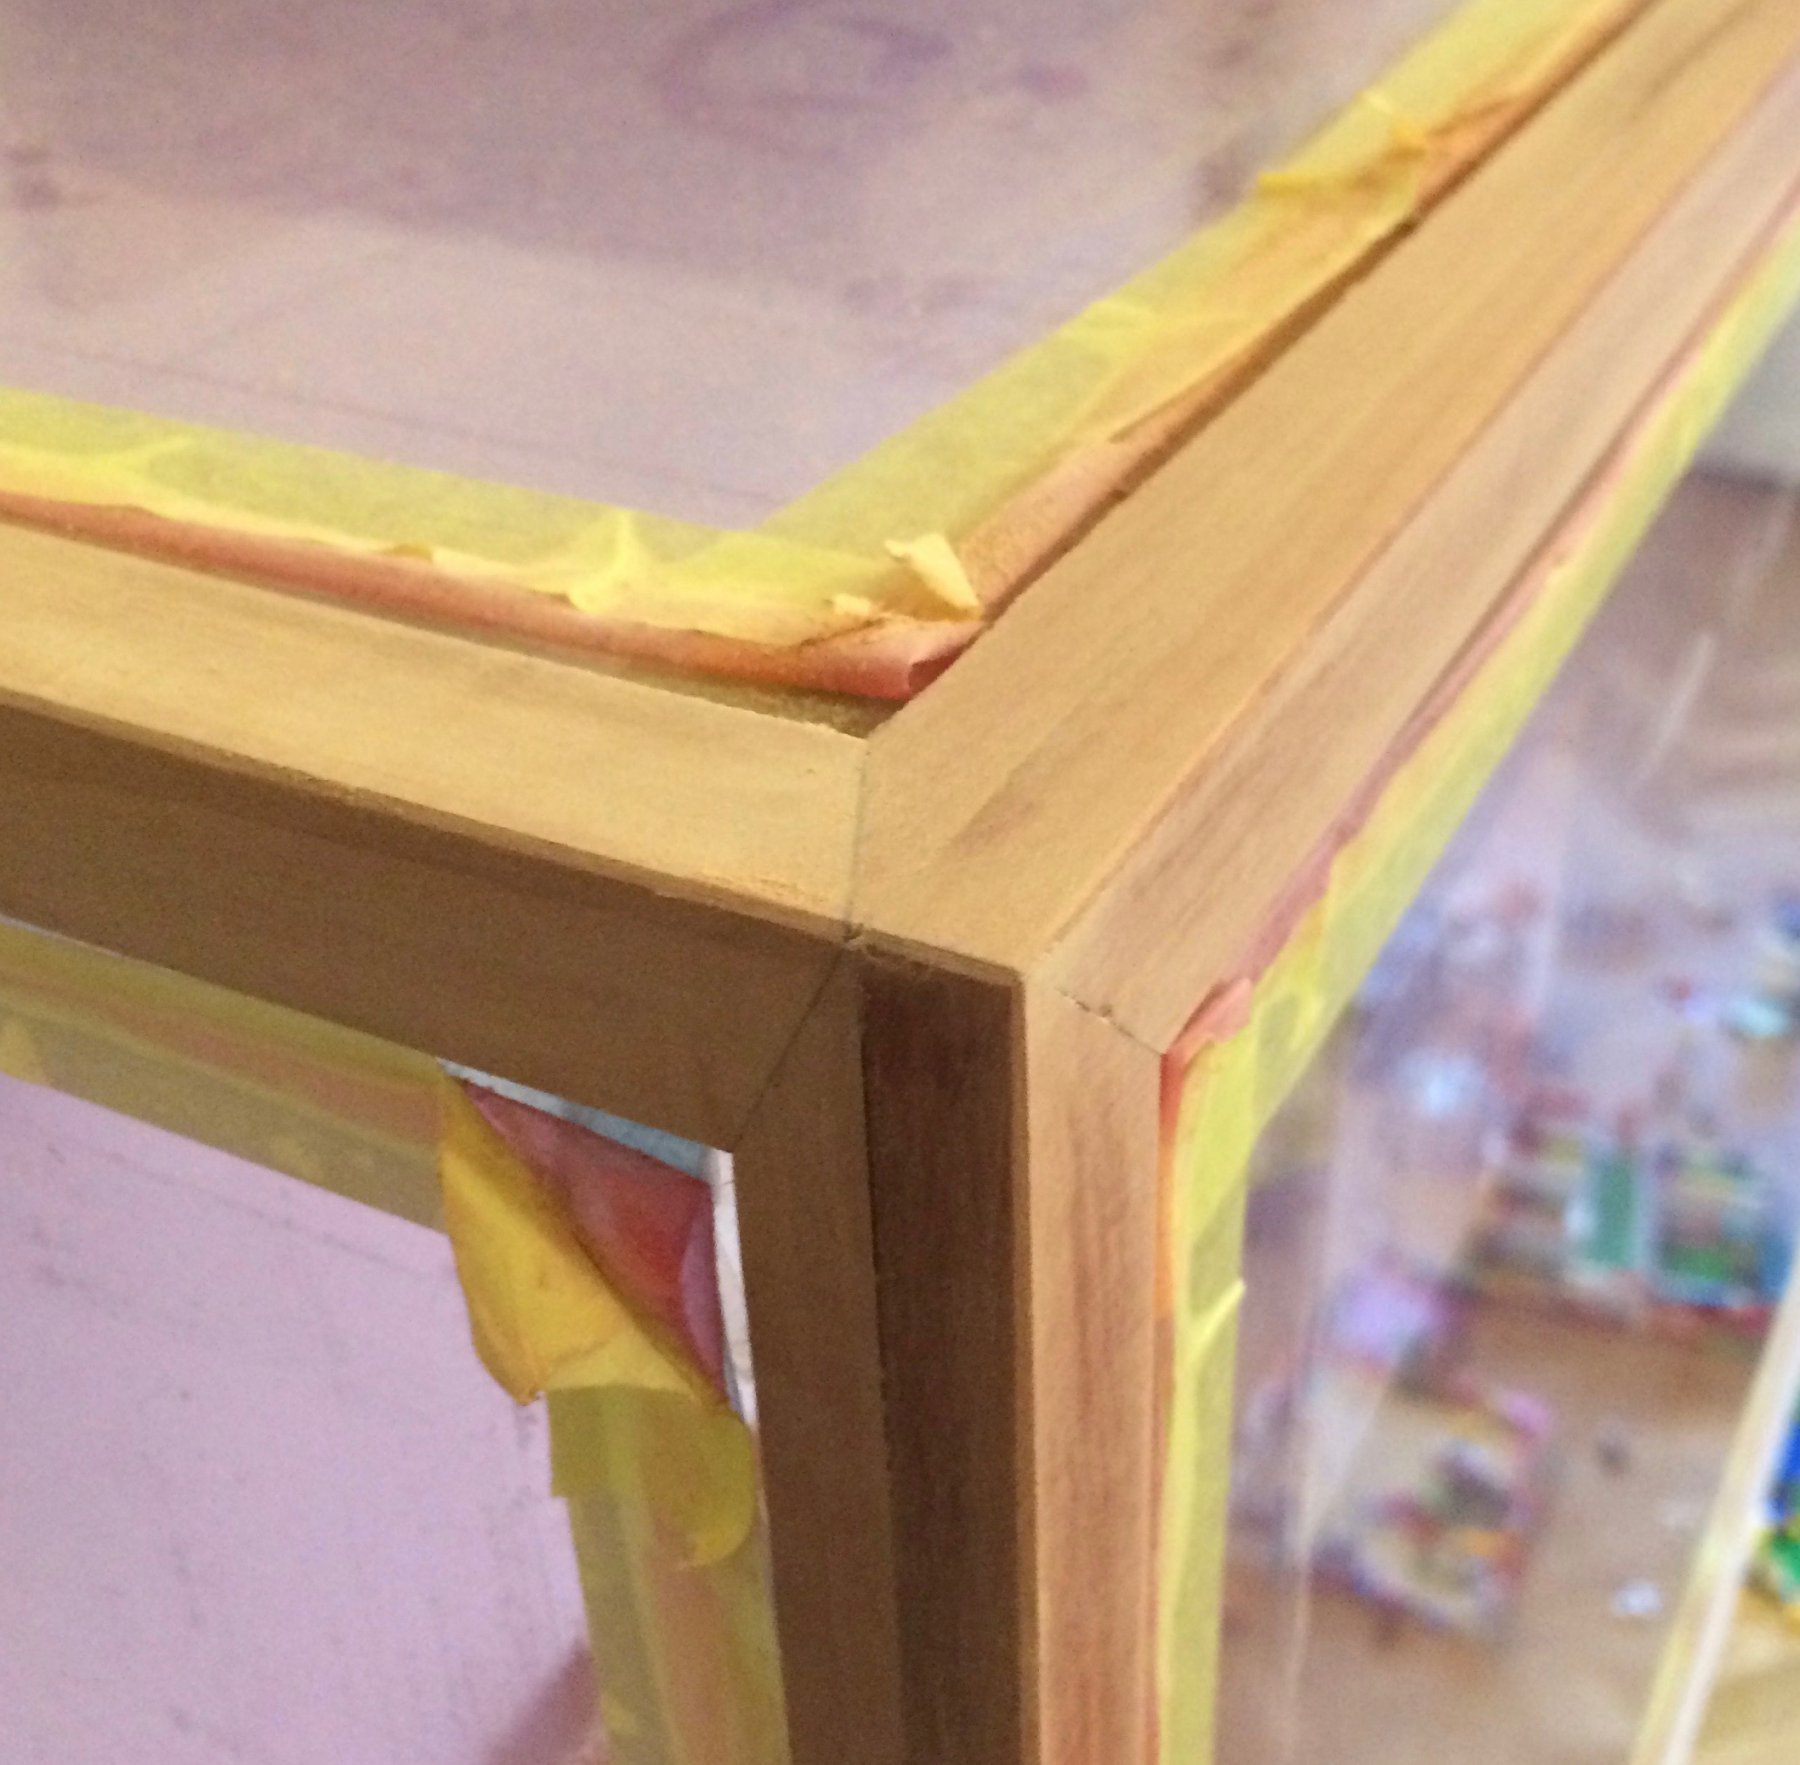
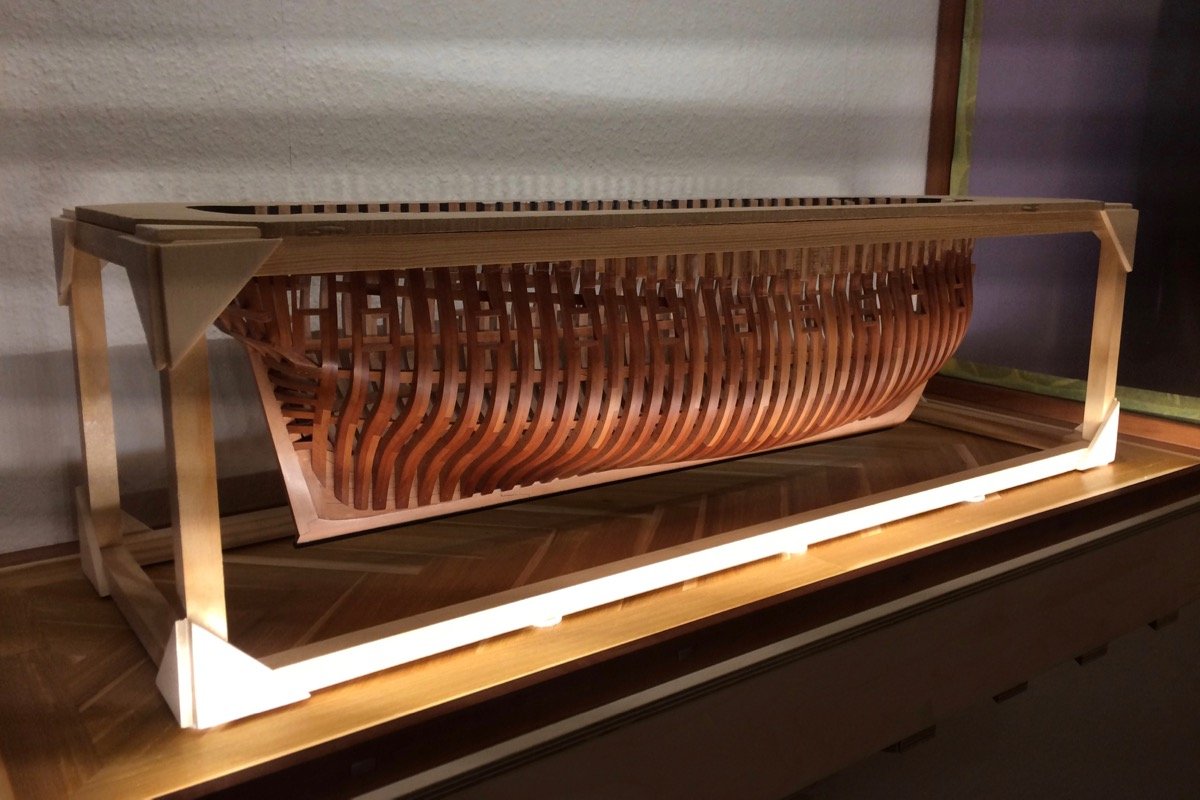
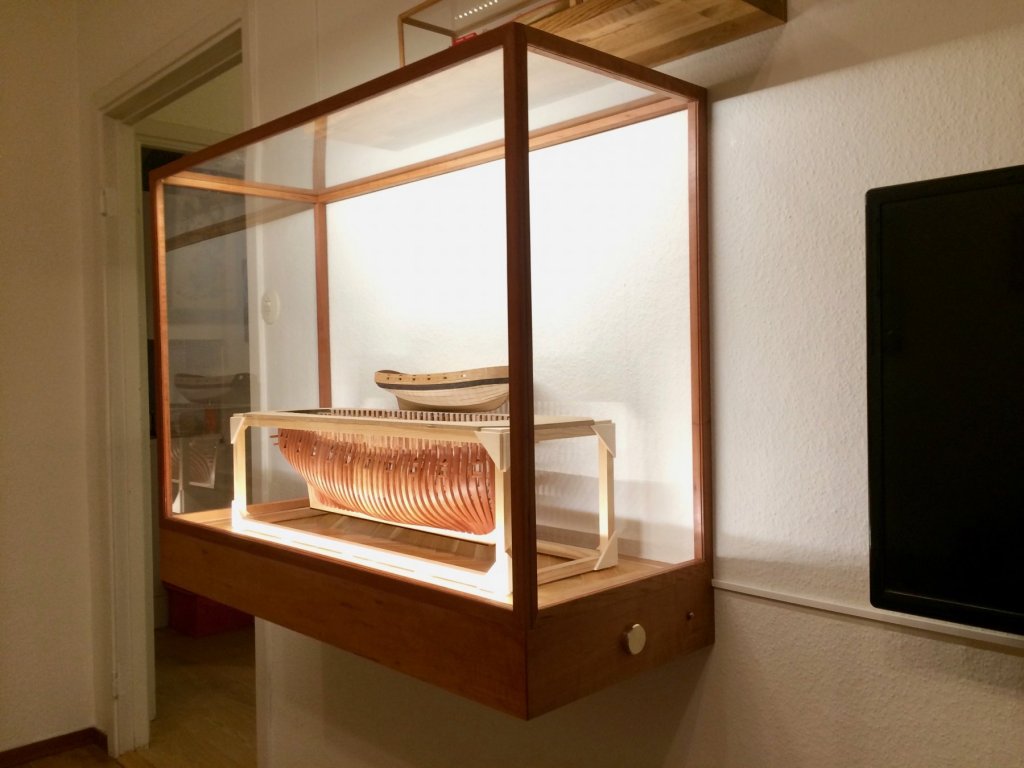
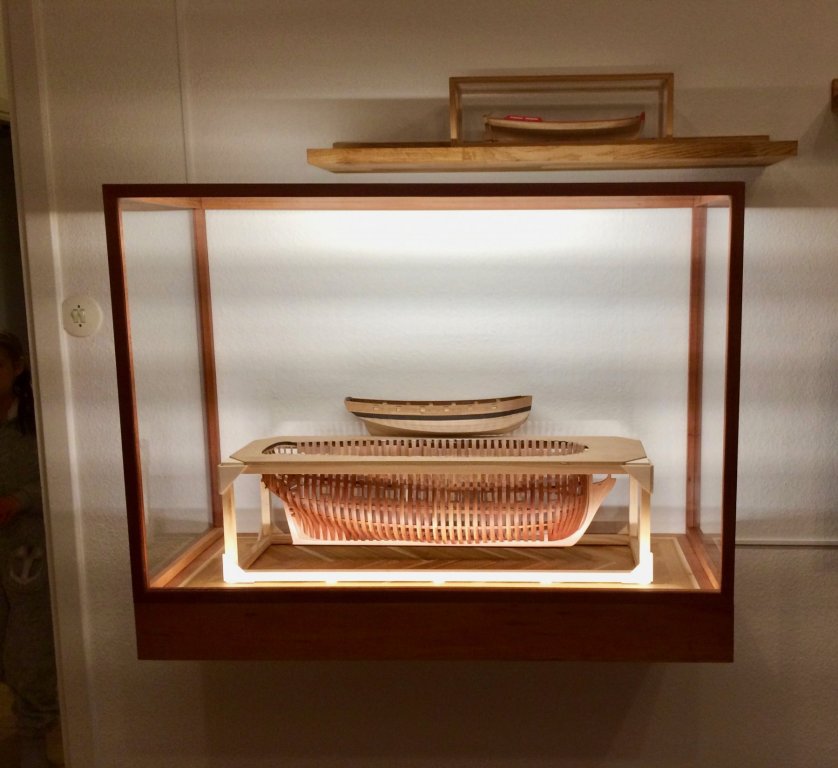
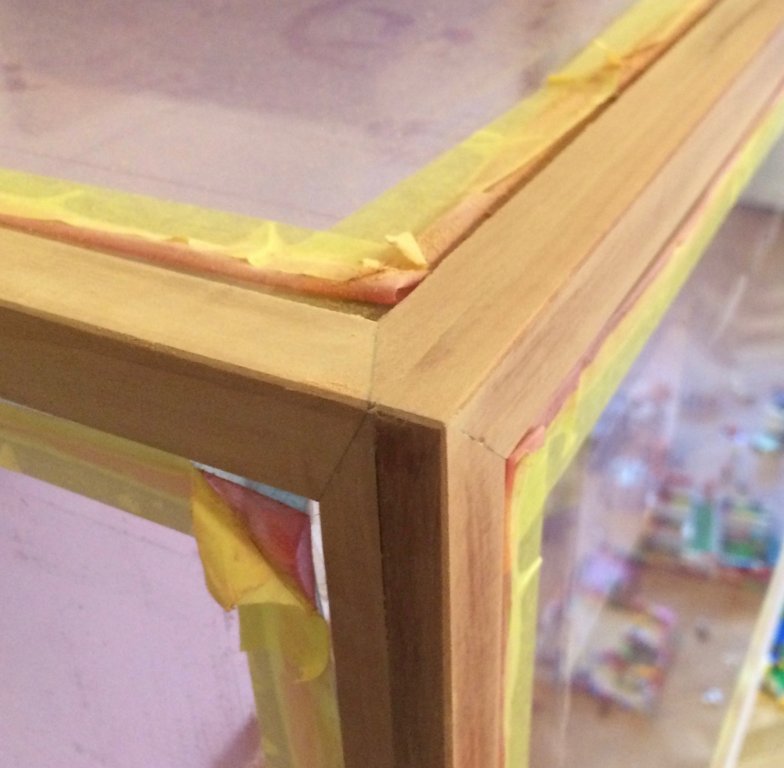
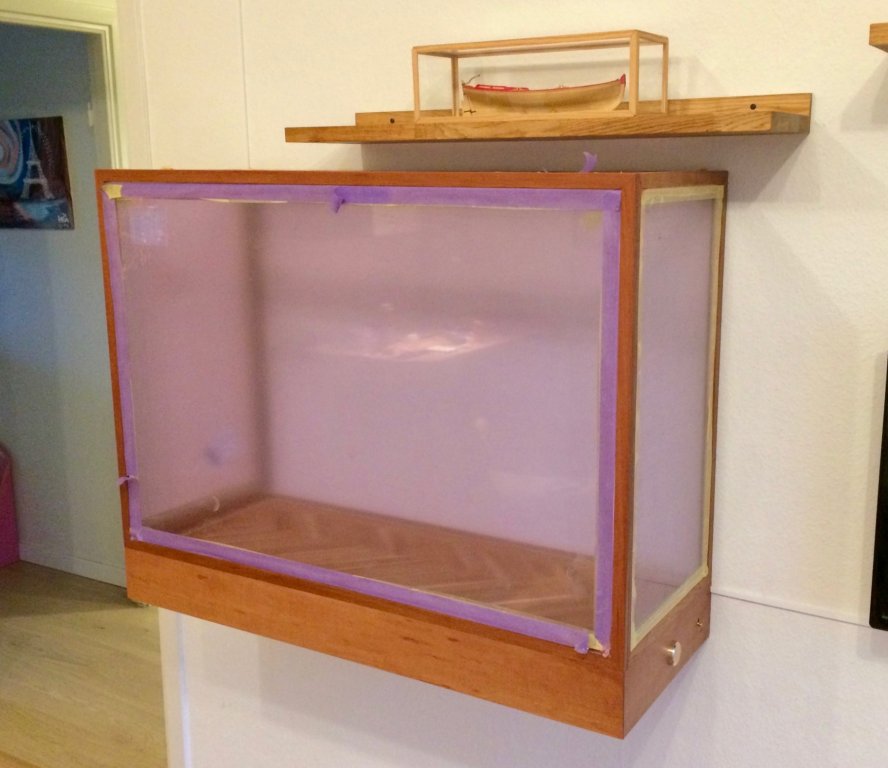
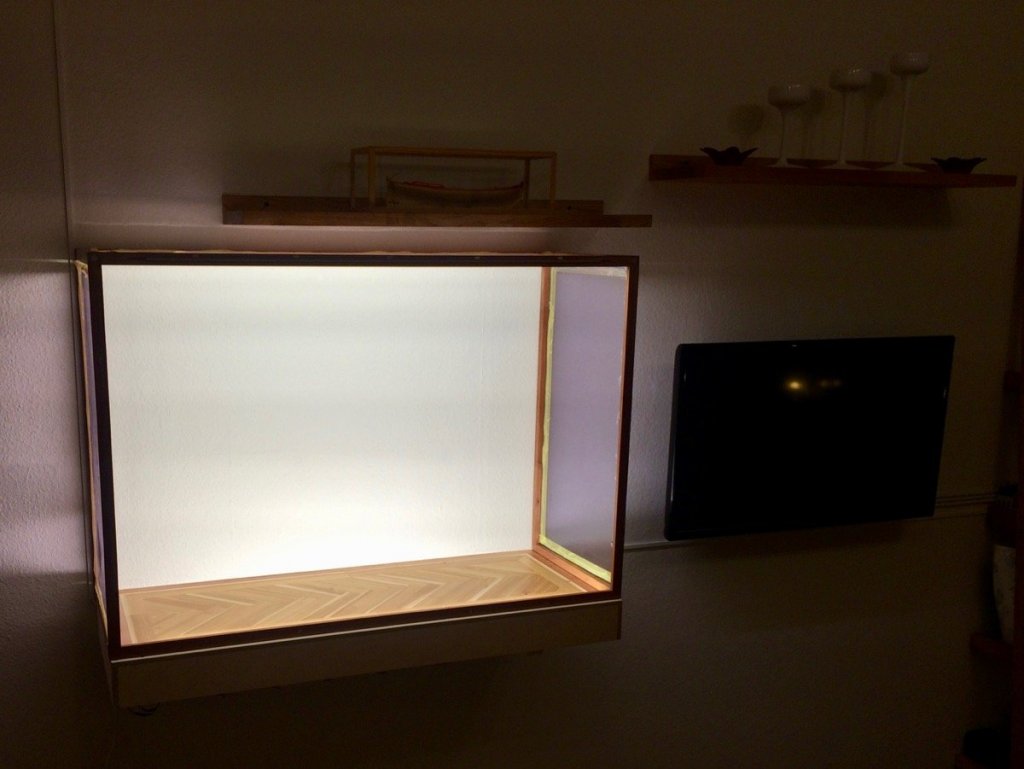
Phew, it's done! The film removed, no scratches underneath it. No more display case photos, I promise! This log will finally get some model updates. To summarise the experience from this case build: 1) Designing your own construction is fun and adds a lot of experience. It is difficult to estimate the proportions in SketchUp, I should have done some 1:1 mock-up with cardboard and sticks. If I do it again - I would make it flatter and lower. 2) Same for LEDs - test how the light hits the model. Both top and bottom strips are angled incorrectly (top one is hitting the wall, while bottom one is highlighting all the dust on the floor). Not a super big deal, but not as nice as I planned. 3) Epoxy is a blessing, holding together tiny crossgrain-to-crossgrain joints well enough. 4) Be super pedantic about square angles, even a tiny misalignment sums up to a big skew on a long distance. 5) Pear wood is nice. 6) Sanding is magic! 7) The Admiral is a keeper for tolerating that "hamster hut" in our living room Though I secured my daughter's support by promising her that her model would also be in that case.


- 969 replies
-
- 20
-
-
- hahn
- oliver cromwell
- (and 1 more)
-
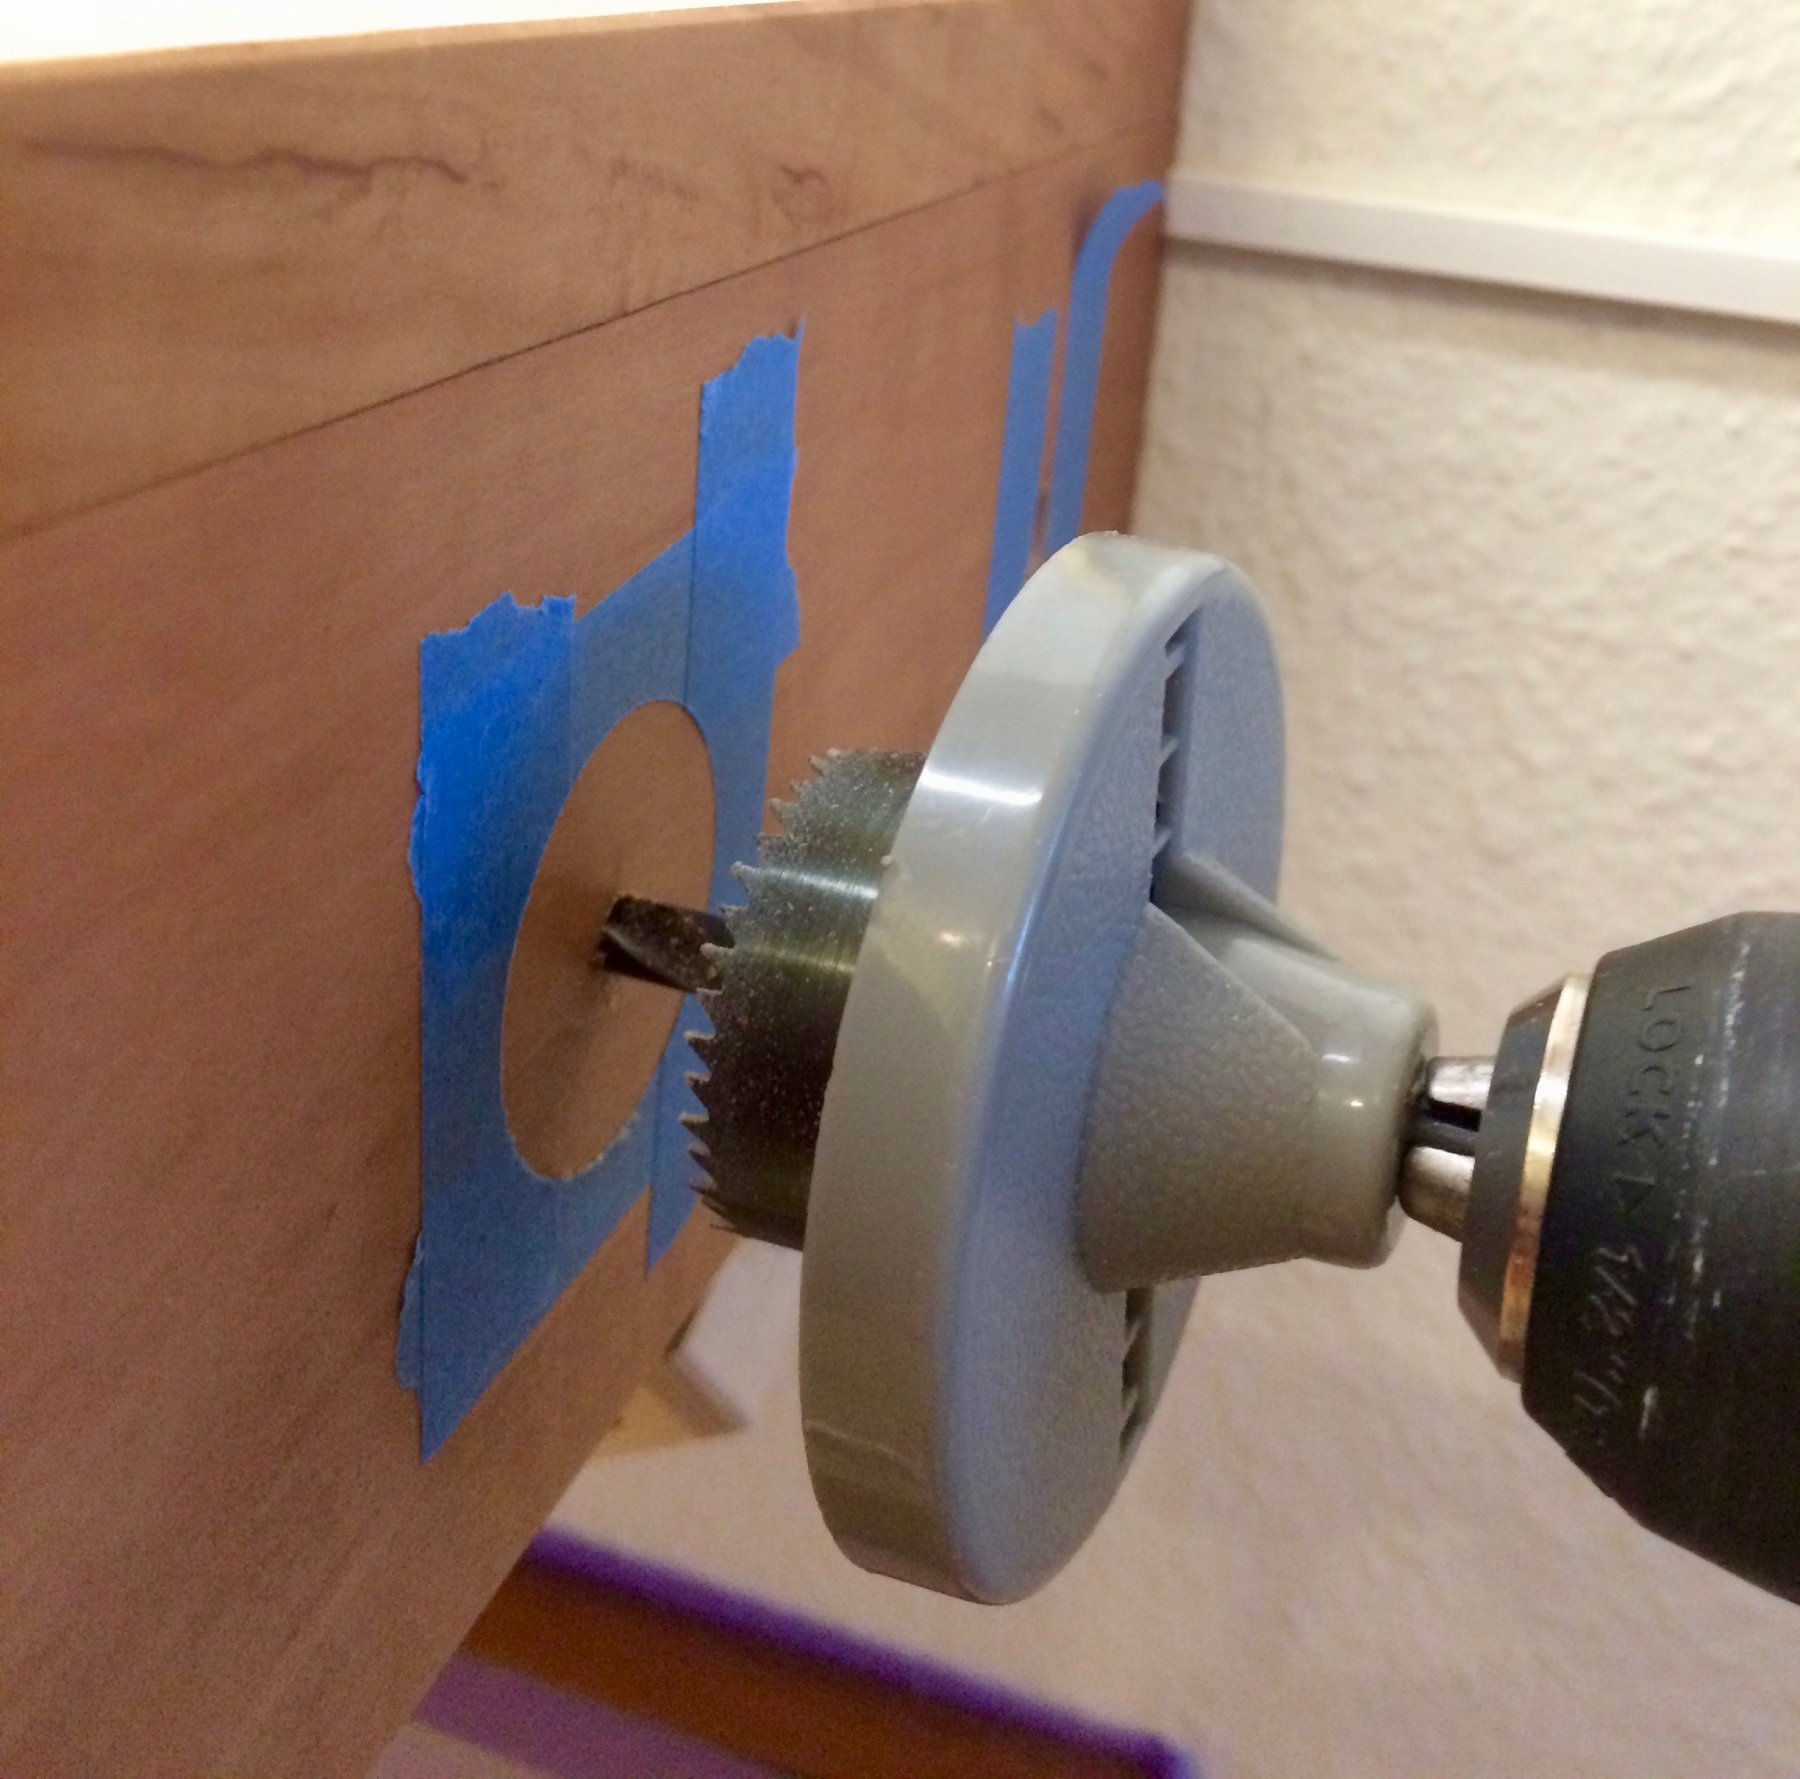
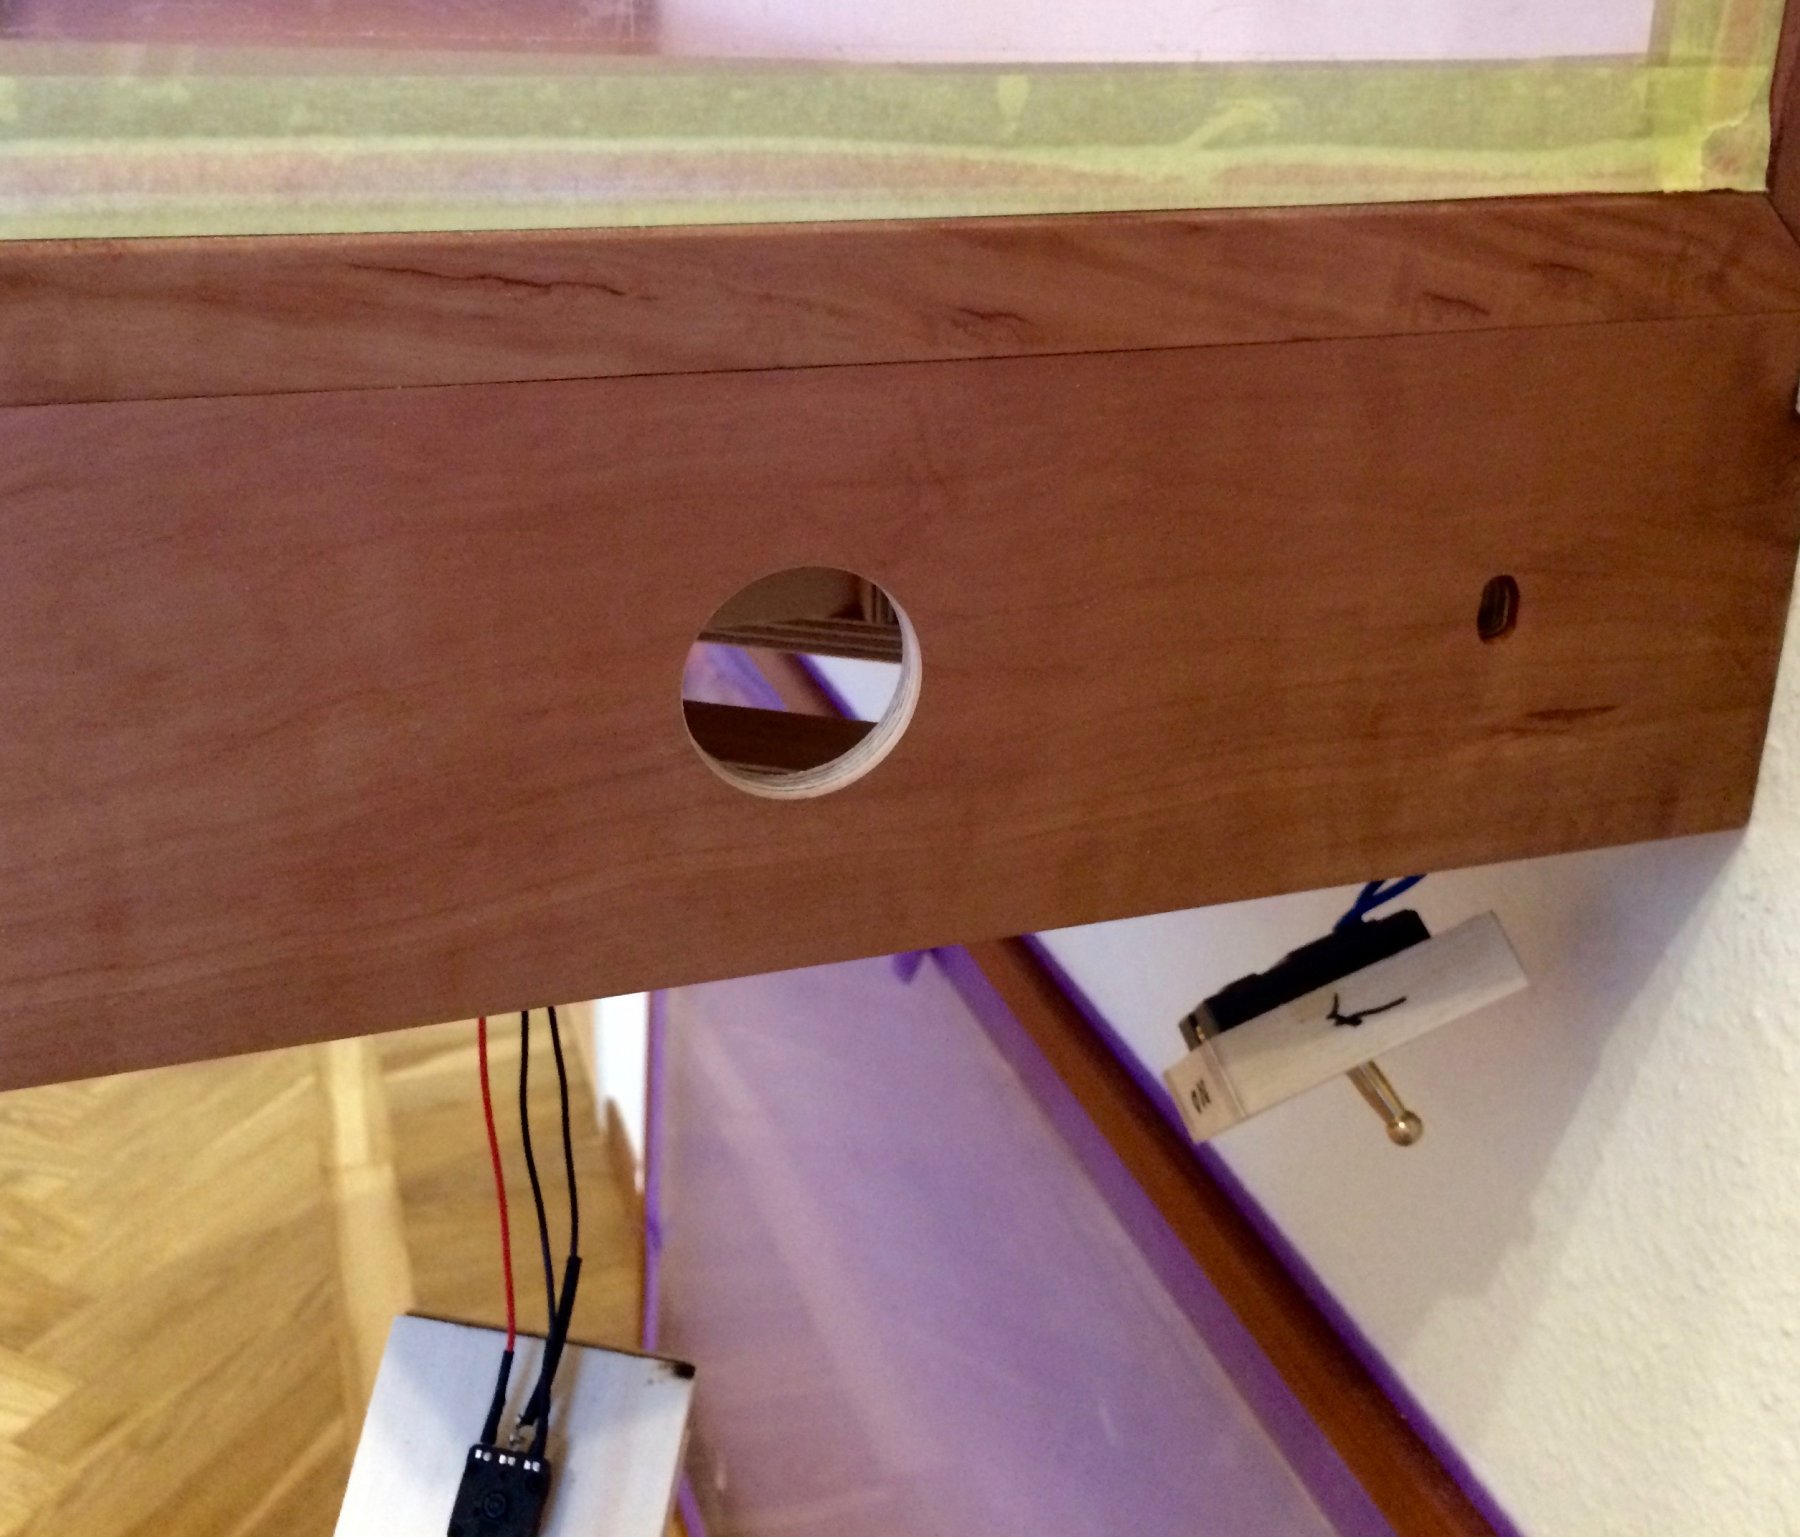
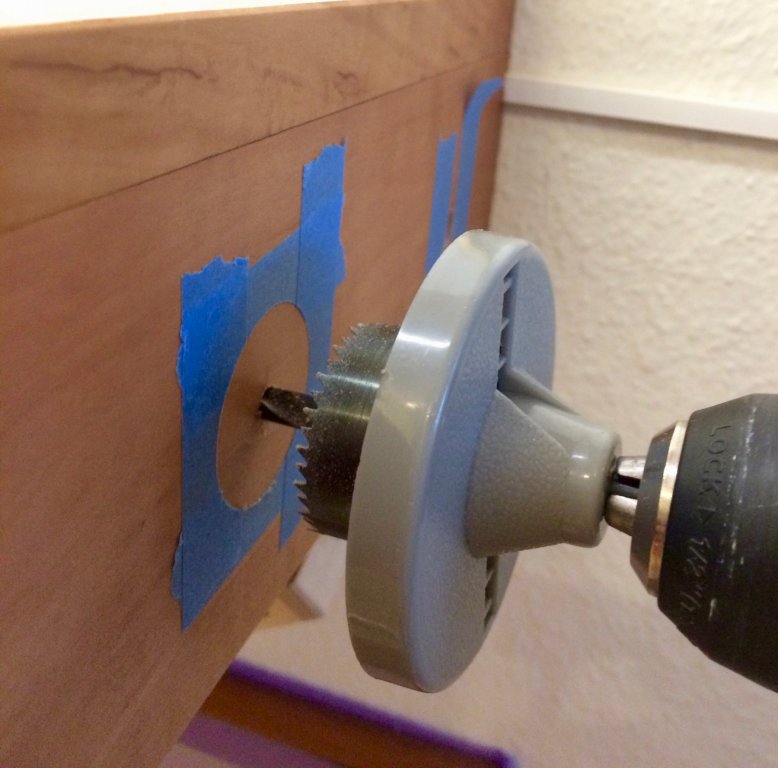
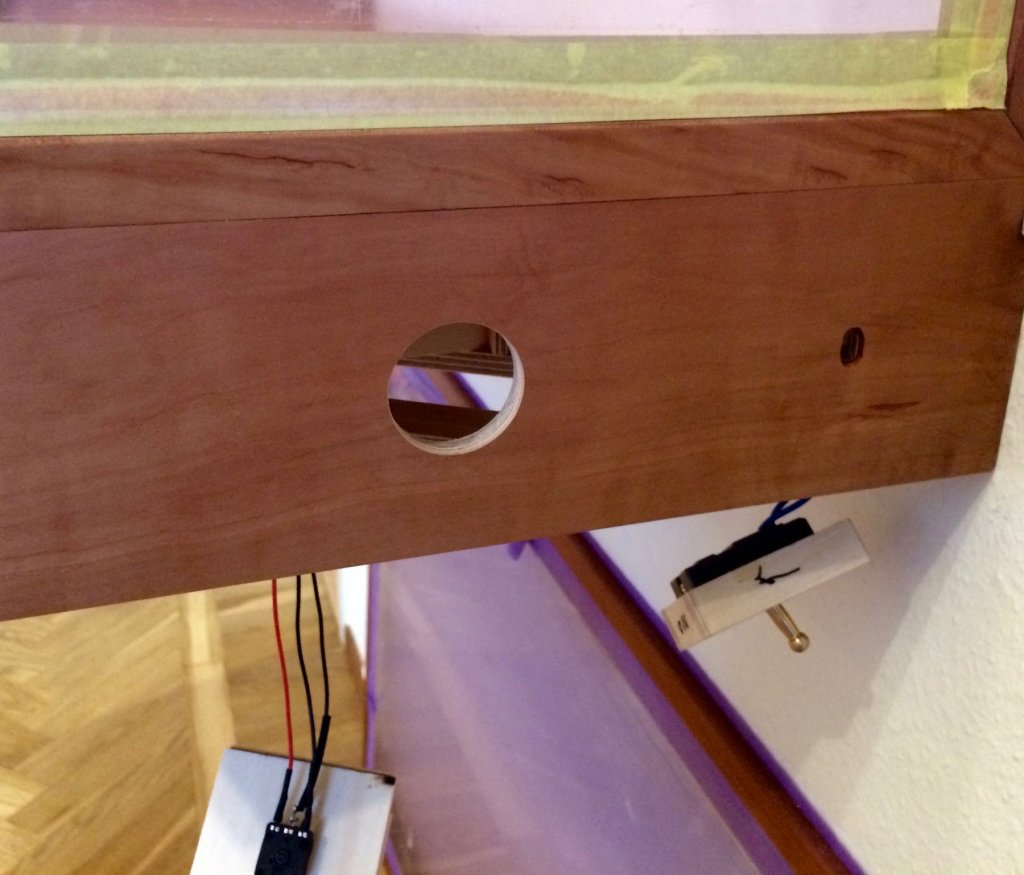
Thanks everybody! Kurt, it is not explicitly vented, but the wall is not ideally flat and the wallpaper is textured, so there are enough gaps on the back side of the case for air to flow in and out. Not planning any extra air holes (gaps), they will let too much dust inside. druxey, yes, a good forstner bit would make it easier and safer, but it is too expensive for a one-time operation. Also, could not find a bit of a right diameter (36mm), they are sold with pretty big diameter increments in that size range. Hole saw of this type could be squeezed with a ziptie to adjust the diameter +/- few mm.
- 969 replies
-
- 5
-
-
- hahn
- oliver cromwell
- (and 1 more)
-
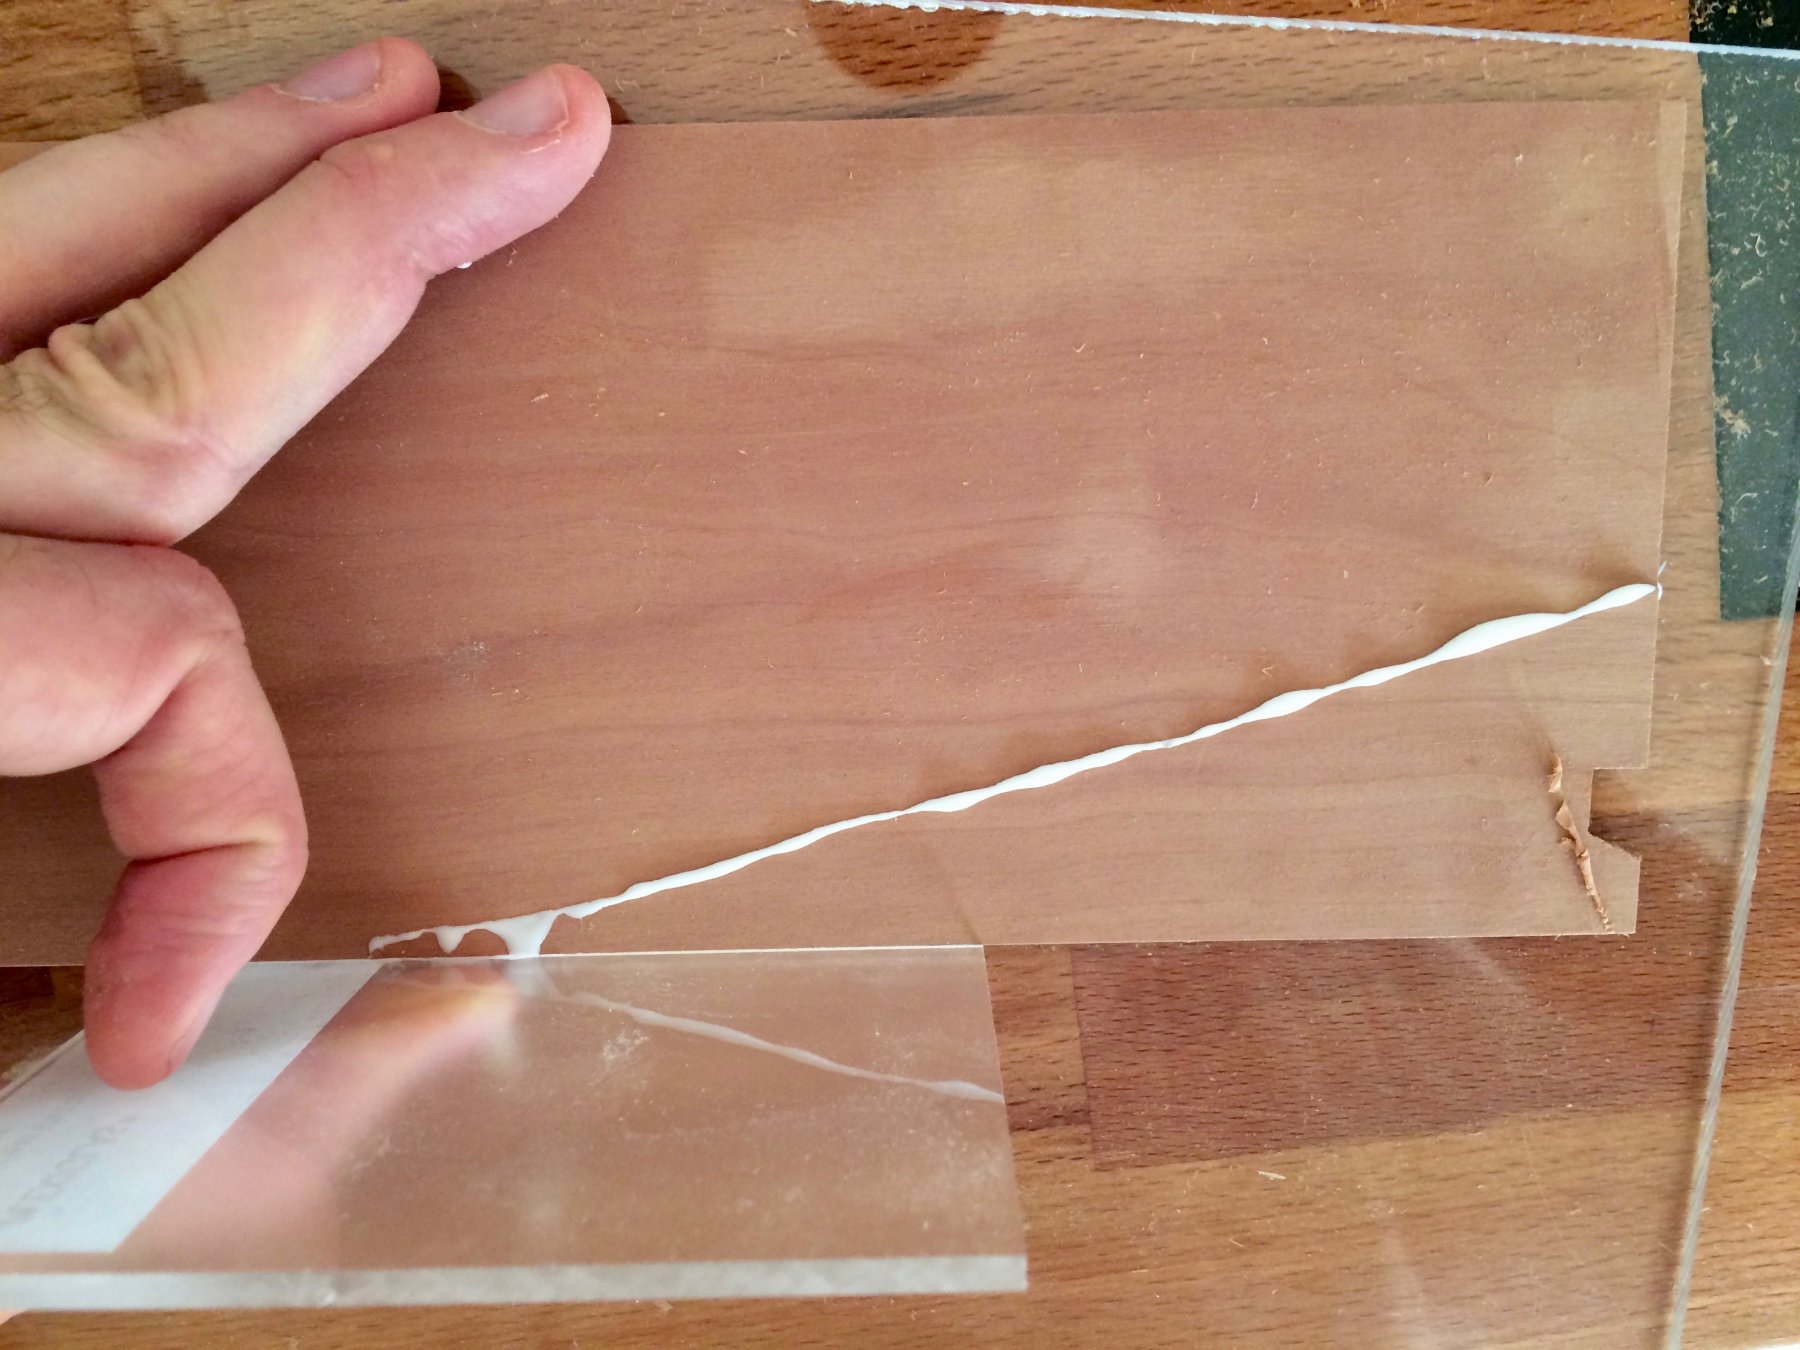
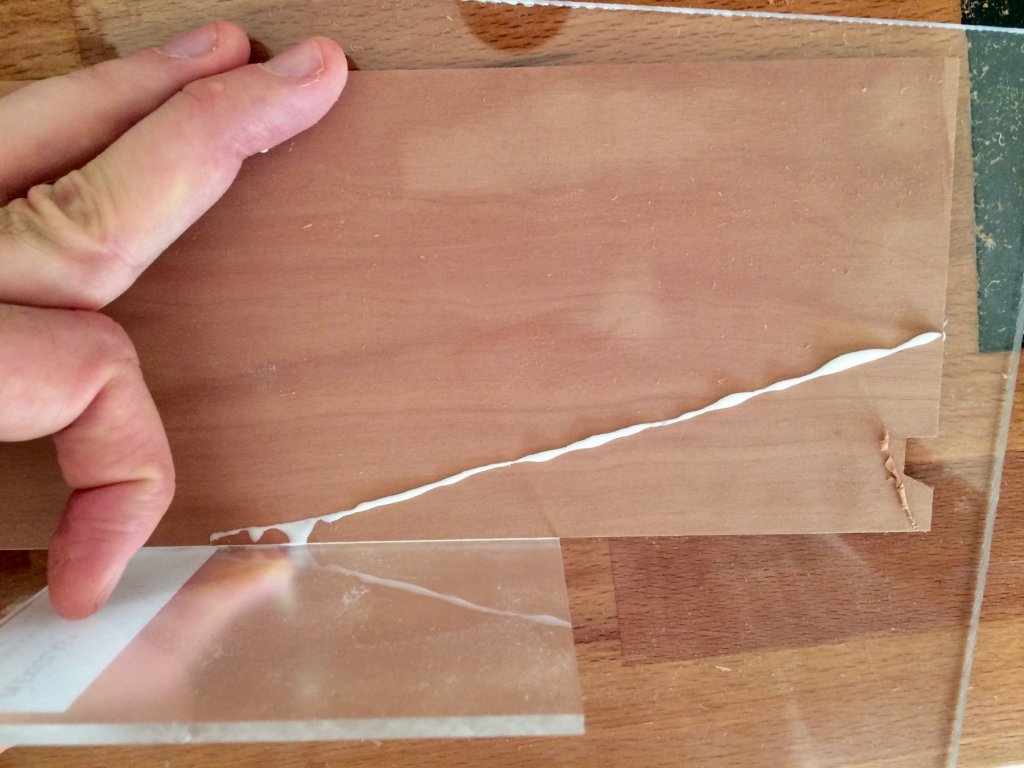
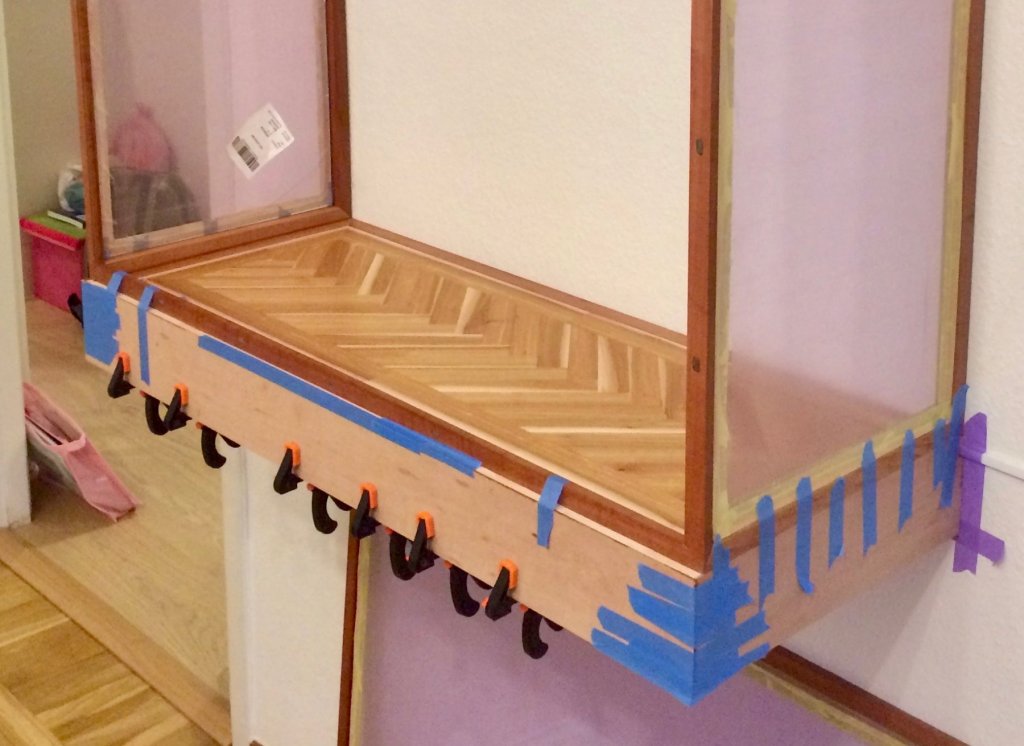
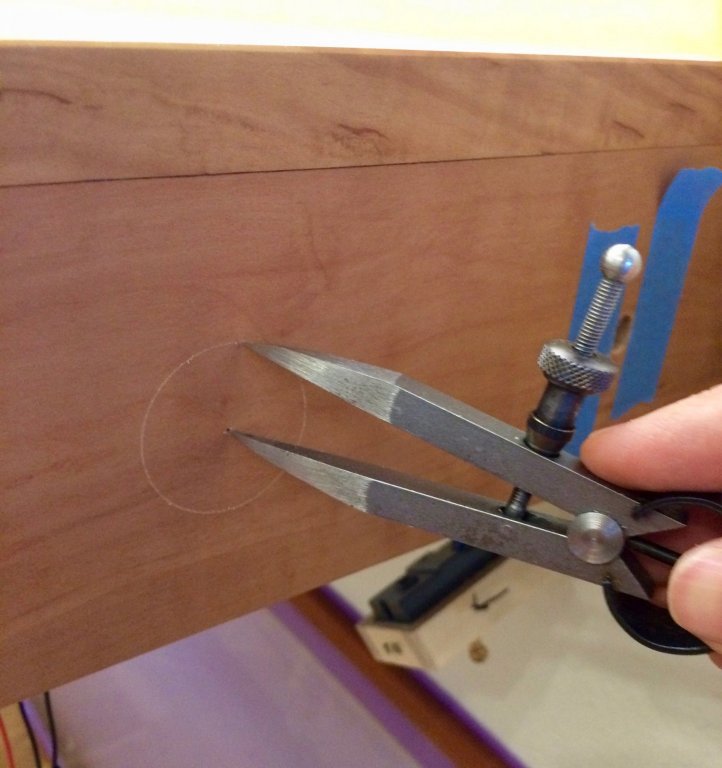
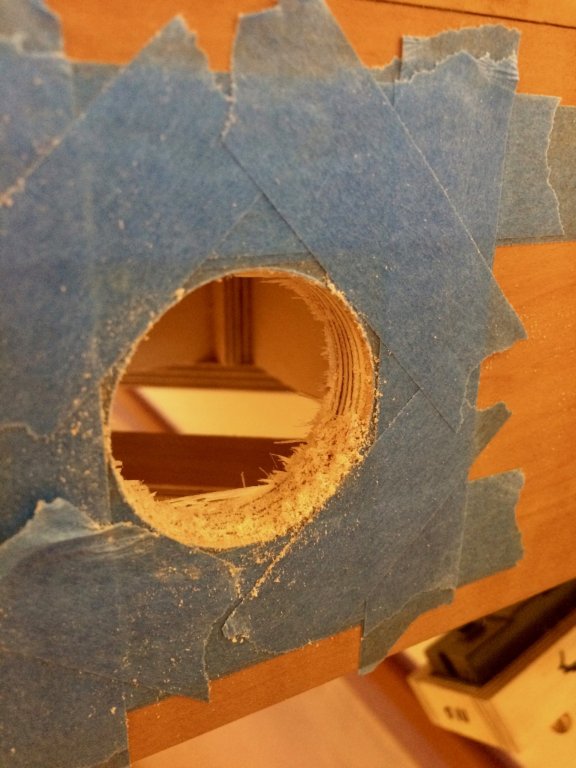
Final touches on the display case. Installing the pear "skirts". They needs to be thinned down a bit, and they are too wide for my thickness planer. So I planed them manually. Was a bit too aggressive, and, whooops! Argh! I do not have any spare wood, did not expected to break a simple flat sheet Luckily, it broke quite clearly, and it was easy to glue it back together: The crack is barely visible on the finished product. Installing the skirts. They are glued with epoxy, to avoid any cupping / warping due to moisture. It was a breeze, epoxy is so much better for that kind of work! Now I can fine fit all pieces together. A bit of planing: And then a lot of sanding. I love sanding, it turns ugly into smooth and beautiful, hiding all mistakes Now the part that made me nervous - cutting a hole for the LED control knob. There is only one chance to do it right, and no spare wood to cover mistakes. So I scored the circle to reduce tearout (breaking the wood fibers that could be teared apart by the drill otherwise): And then applied tonns of masking tape and started to drill, slooooooowly. The hole saw is adjusted to the precise diameter with a zip tie Few nervous minutes later - the hole looks pretty hole-ish! Phew, no screw-up. After a bit of sanding magic: And the final result: I'm a bit scared to pull all that plastic away, already got used to it
- 969 replies
-
- 26
-
-
- hahn
- oliver cromwell
- (and 1 more)
-
This is the first RC build that I see where the boat moves like a real thing. Smooth turns, the motor power is just right, it does not fly on top with an overpowered motor. Great work!
- 339 replies
-
- 4
-
-
- dumas
- Chris-Craft
- (and 3 more)
-
Carl, it is more than big enough, at least for my little apartment. Will build a bigger once once I get a villa Kurt, planing epoxy is quite easy. WestSystem epoxy that I use does not harden to rock-solid mass that plane will have problems with, it has a bit of elasticity, probably because it is designed for marine applications and it should not be brittle, and should handle temperature variations. Steve, Druxey - thanks!
- 969 replies
-
- 3
-
-
- hahn
- oliver cromwell
- (and 1 more)
-
The treenail colour also matters a lot. Real treenails are basically invisible, you need go come very close to see them (except iron bolts). Model ones are mostly an aesthetics choice, where colour contrast affects visual size much more than the diameter. It would be wise to make a large enough test piece, using the same wood and plank size as on a real model, and then experiment with various woods and sizes. Always put the finish on, since it changes the treenail colour a lot (absorbing into endgrain differently than into the plank). if you add various finishes in the mix - the number of test boards might increase
-
Thanks a lot for comments and likes! Let's make some epoxy mess first: Plane it: Sand it: The result is silky smooth, even before any finish! After two coats of OSMO Polyx finish, I finally connected all wiring and permanently glued the case in place. There is no way back! Oh, I also have a model of a ship, need to show it in the build log every now and then, as is tradition: Now just a bunch of small things are left - install the skirt, carefully plane/sand everything to get rid of any gaps, make holes for light controls, finish sand and refinish everything.


- 969 replies
-
- 23
-
-
- hahn
- oliver cromwell
- (and 1 more)
-
Thanks a lot for the tip, bought a bunch of sheets just for the future. So far the price from my favourite European vendor (Arkowood) is the same as it was in 2015, but good to know that it might increase soon!
- 1,784 replies
-
- 3
-
-
- winchelsea
- Syren Ship Model Company
- (and 1 more)
-
That is an impressive control and precision! A trick that only a true craftsman can achieve!
-
Fantastic research, and now I started watching The Terror show It is great when enthusiasts are recognised and are invited to participate in relevant projects. You are one of the luckiest modellers out there, your unique model got way more views by general public than most of the others. Looking forward for further updates in the log, and hope that the Occre story would have a semi-happy-ending!
- 346 replies
-
- 4
-
-
- terror
- polar exploration
- (and 2 more)
-
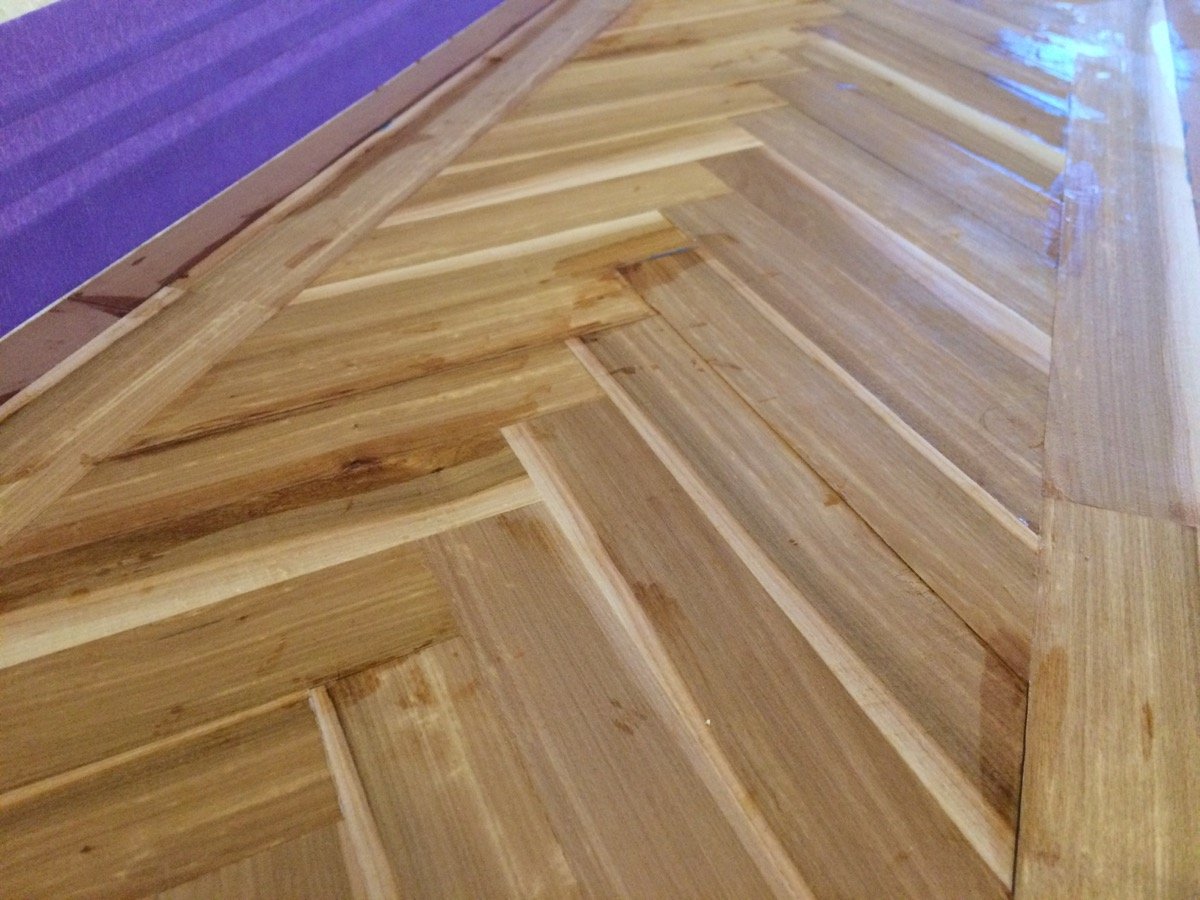
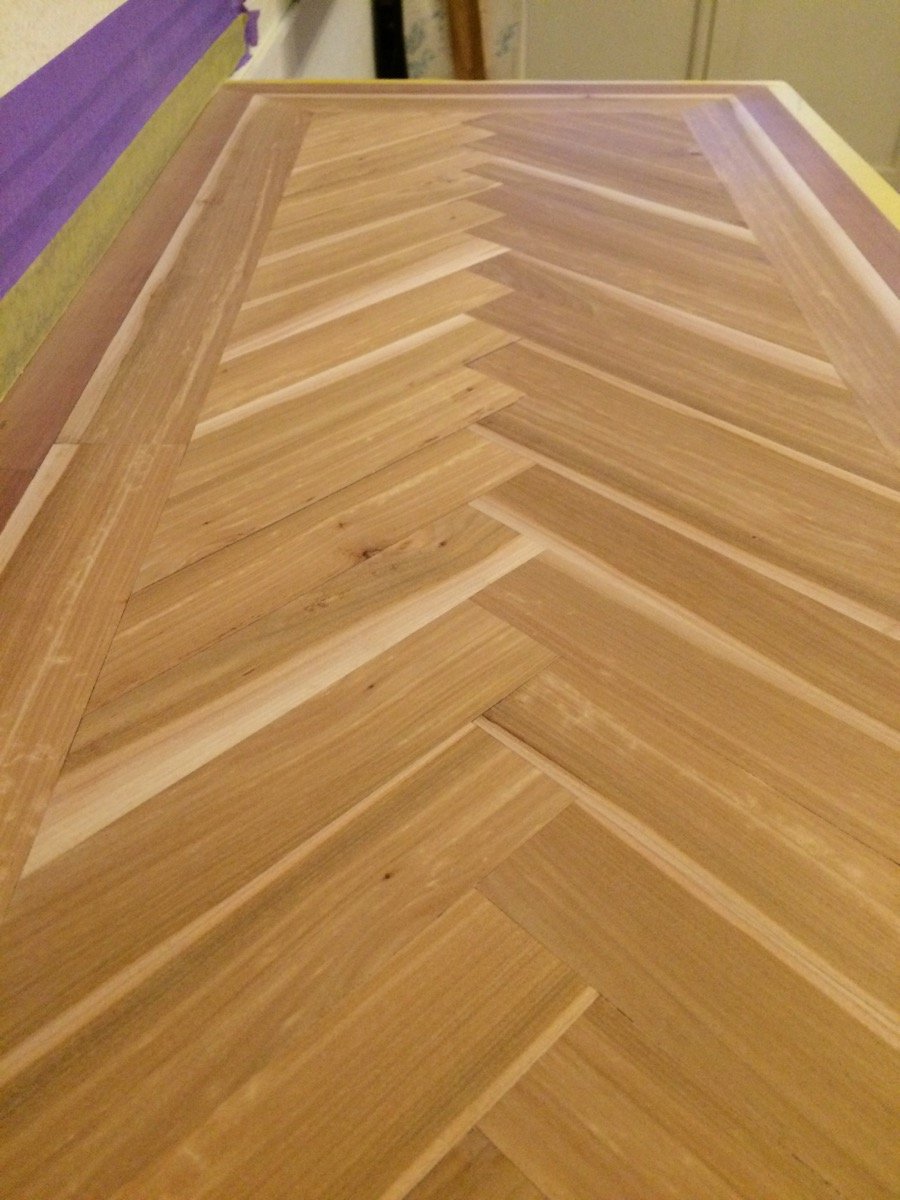
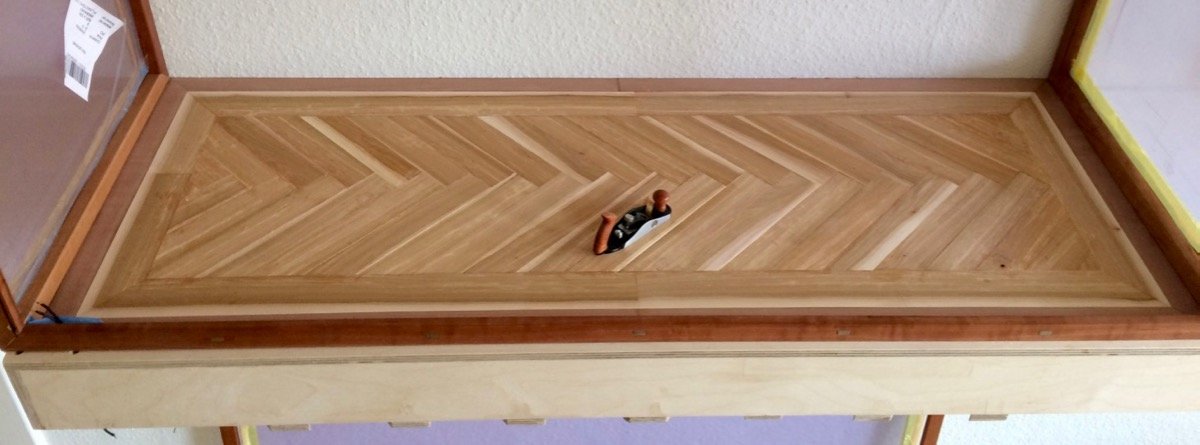
The floor is completed! I had no extra wood, every single plank was used, just a few cutoff pieces remaining. That was close! Now need to fill some gaps with epoxy, cross fingers and plane it smooth!

- 969 replies
-
- 15
-
-
- hahn
- oliver cromwell
- (and 1 more)