Mike Y
-
Posts
1,557 -
Joined
-
Last visited
Content Type
Profiles
Forums
Gallery
Events
Everything posted by Mike Y
-
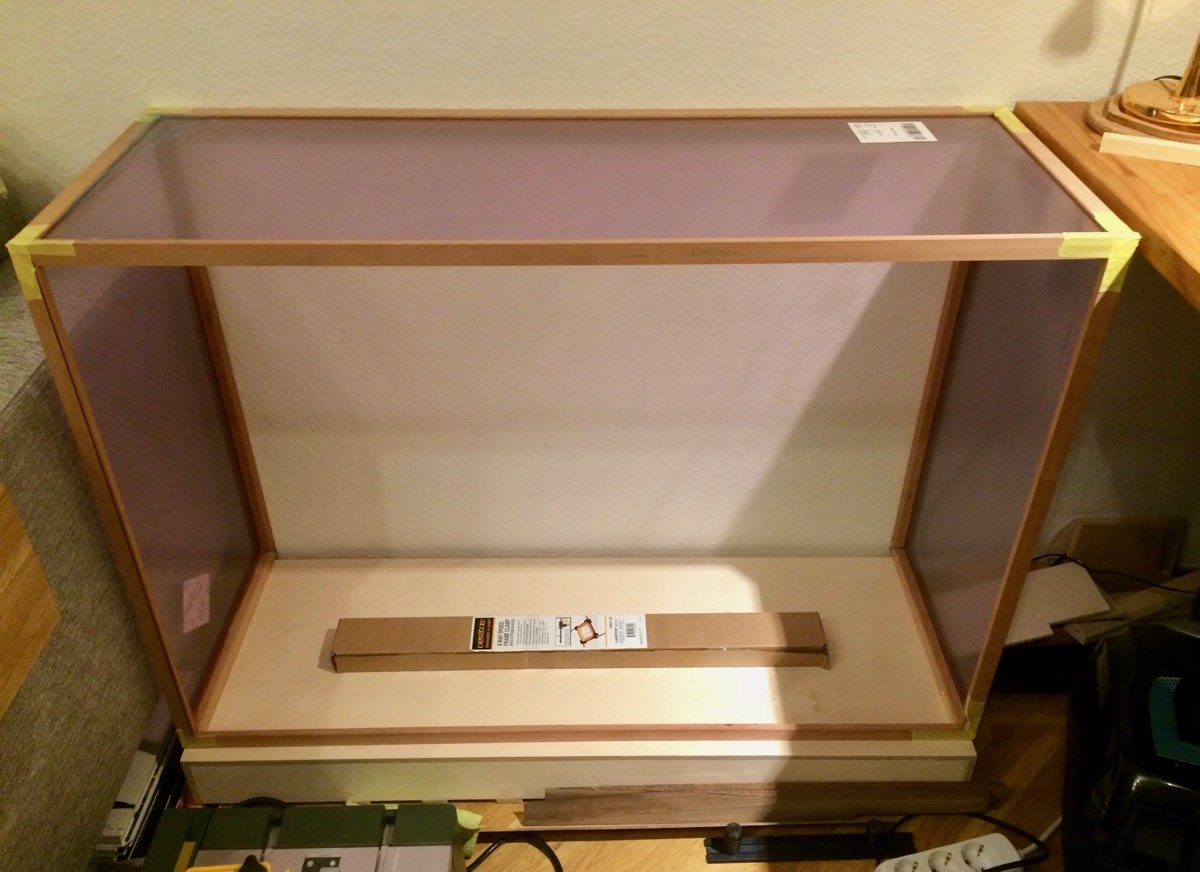
 The case is dry assembled, and after some fine tunings and adjustments everything fits perfectly! It has a bit more flex than I thought, 3mm plexiglas is not so strong. Who knew! I used some test pieces to pick up the glass thickness, but when you have a larger plane - it flexes differently. The photo is a bit distorted, it actually have just 1mm of sag in the front and no sag in the back (there is a 20mm square pear stock there). To prevent sagging, will add a reinforcement to the top part of it, which will lock the front glass frame with the front frame of the case. Now I can finally sand, finish and assemble it. Will use silicone to mount the glass and epoxy for the joints. When the top part is done, will rebuild the base out of thinner plywood - the base is probably 5x heavier than the case itself Also not sure how to plank the "floor" of the case (flat surface where the model will be). Planking it with pear would be boring, but I am on the edge between a lighter colour (that willow I cut down might come in handy) or a darker one (walnut). Aaargh, hate do to the colour choices!
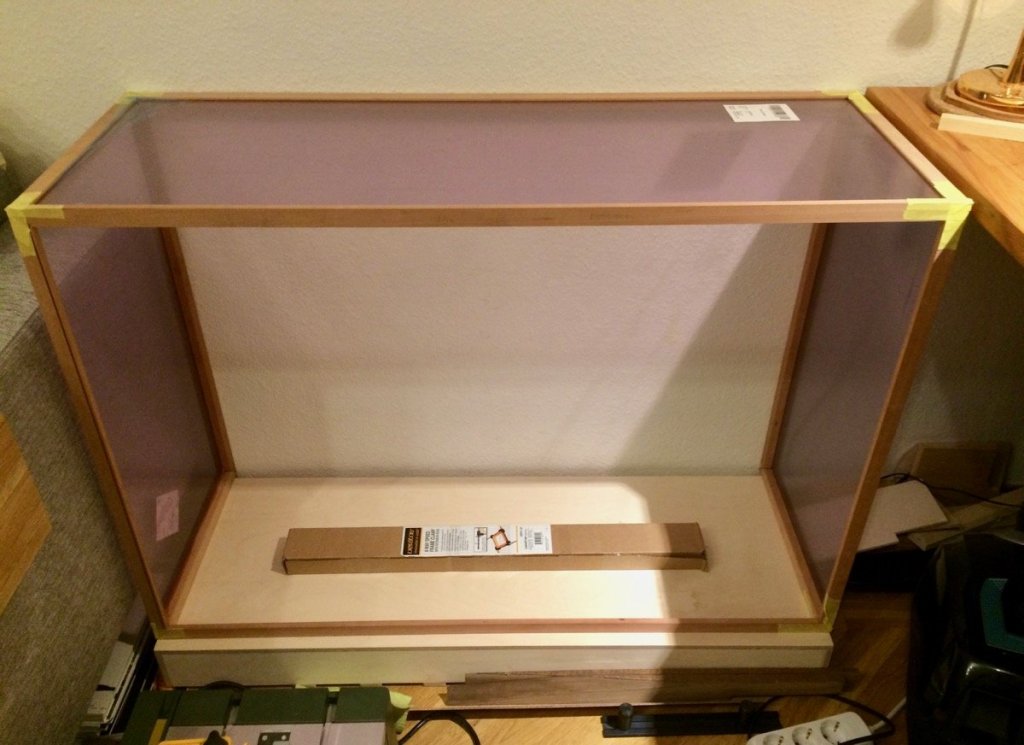
- 969 replies
-
- 17
-

-
- hahn
- oliver cromwell
- (and 1 more)
-
Would appreciate some first impressions, rookie mistakes and setup experience!
-
Still learning the best ways of working with epoxy. First gap filling had too much spillovers (tried to use a masking tape to contain the epoxy), so the second attempt relied on gravity to keep epoxy in place: Epoxy is a fantastic thing, but I need more practice to use it without making a mess. It sips under a masking tape as well. A bit about the lumber I cut, made a photo of a stump. Colleagues say it might be Willow. Looks similar!


- 969 replies
-
- 5
-
-
- hahn
- oliver cromwell
- (and 1 more)
-
Proxxon Micro MBS 240/E Band Saw Review
Mike Y replied to Blue Ensign's topic in Modeling tools and Workshop Equipment
Congrats! Please post some review after a few months of usage! That would be very beneficial for the modelling community on this side of the pond -
Proxxon Micro MBS 240/E Band Saw Review
Mike Y replied to Blue Ensign's topic in Modeling tools and Workshop Equipment
Also a good video on the bandsaw setup: -
Proxxon Micro MBS 240/E Band Saw Review
Mike Y replied to Blue Ensign's topic in Modeling tools and Workshop Equipment
Well, all bandsaws of that class look the same - Proxxon just made a smoother shape the difference is is quality (materials, bearings, alignment), which impacts the noise, vibrations and accuracy. the bearing guide is very important in my opinion, it greatly impacts the cut accuracy (so the blade will not drift to the sides). I never used a saw with the old style of guides though... But the axminster saw has the ball bearing guides, it is clearly stated in the description and photos (both upper and higher guide, while proxxon only has an upper guide). So seems to be good to go? http://www.axminster.co.uk/axminster-hobby-series-hbs250n-bandsaw-508204 Edit: sorry, right, the cheaper saw (HBS200N) does not have a bearing guides and the fence is optional, while the next model (HBS250N) has them. You might need to dig through various reviews to see how it works without the bearing guides... -
Proxxon Micro MBS 240/E Band Saw Review
Mike Y replied to Blue Ensign's topic in Modeling tools and Workshop Equipment
Andi, no worries part of the problem is that most of the US brands are not available in Europe (if you do bot want to pay for internetional shipping and customs). for example, this saw is really nice (saw it in person, saw some reviews, but no firsthand experience): http://www.leevalley.com/us/wood/page.aspx?p=75264&cat=1,41036,75262 but I was not able to find it on this side of the pond. Maybe your googling skills are better? But the main question that is left unanswered - what size are you looking for? 8 inch? 10 inch? Larger? And what are your main priorities when looking for the bandsaw, how are you going to use it? I really want to help, but it is hard without a proper starting info -
Proxxon Micro MBS 240/E Band Saw Review
Mike Y replied to Blue Ensign's topic in Modeling tools and Workshop Equipment
Andi, the decision is simple - go with the biggest bandsaw that fits your space and budget limitations I do not recall any reviews of Axminster on this forum (MSW), but from the reviews on youtube it seems quite good. See https://www.youtube.com/results?search_query=axminster+bandsaw -
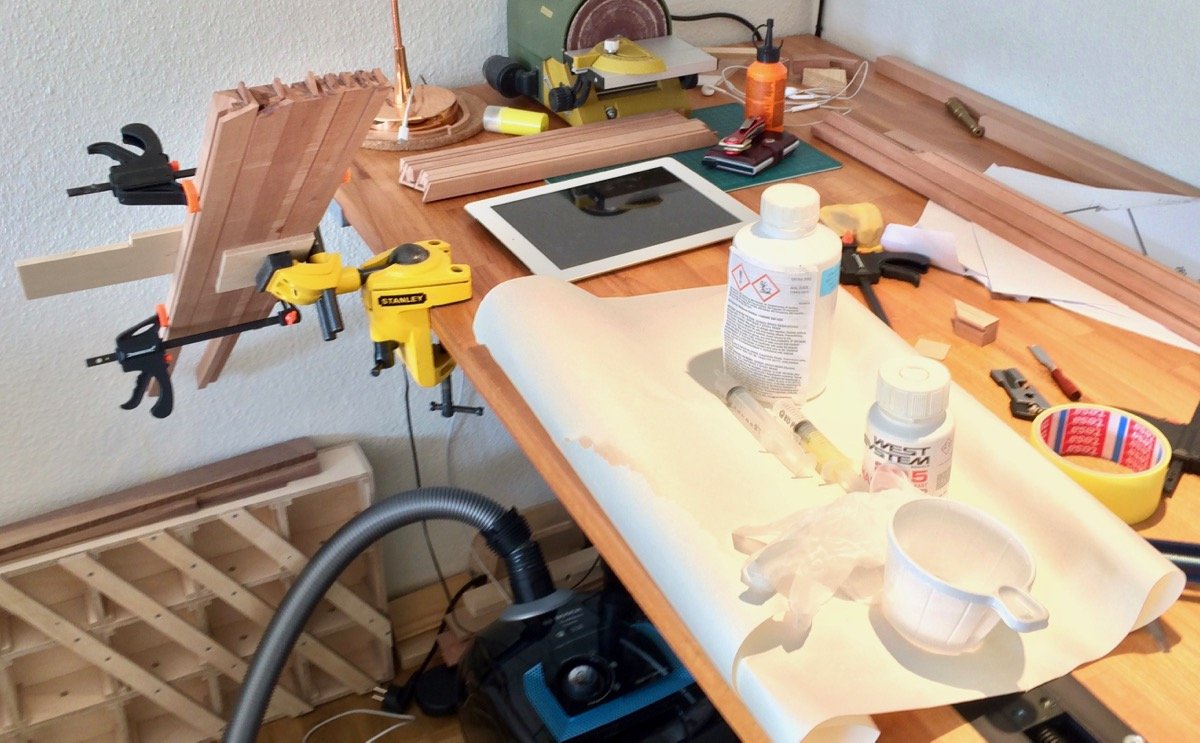
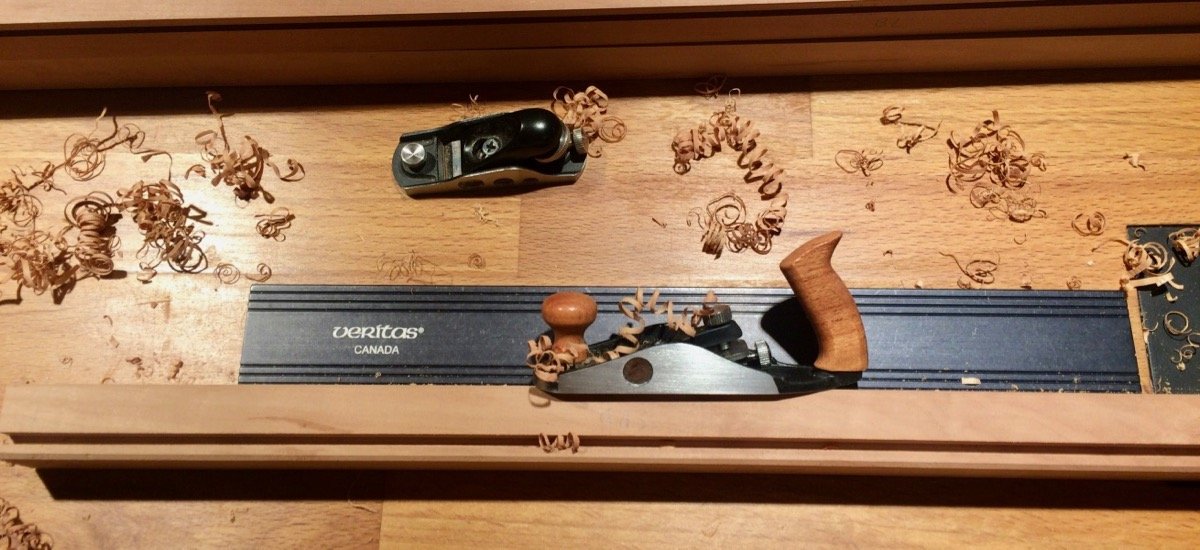
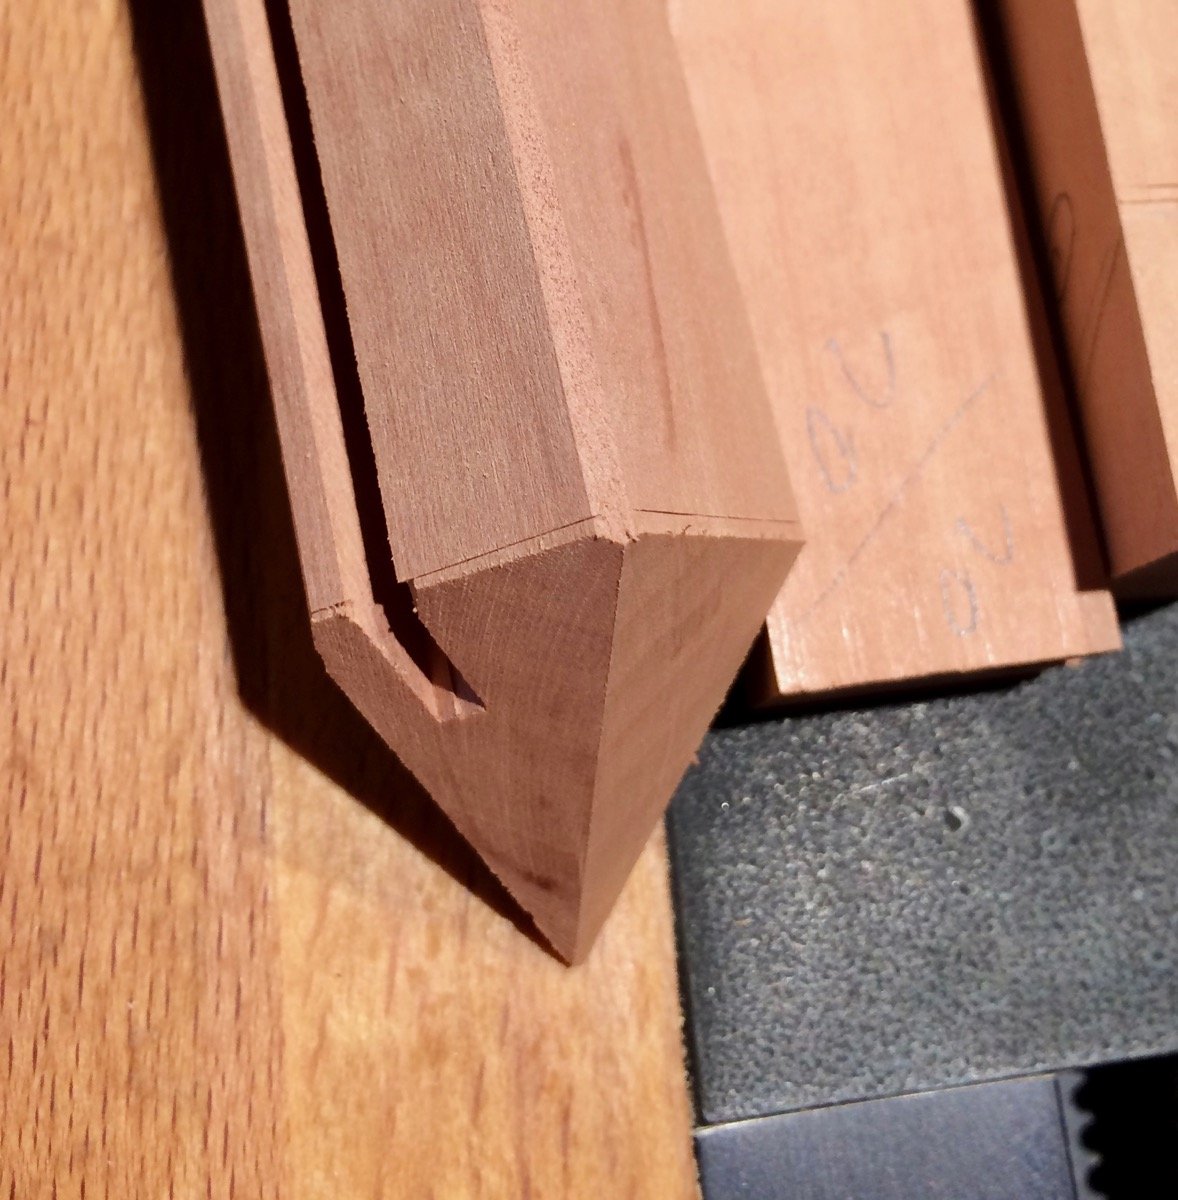
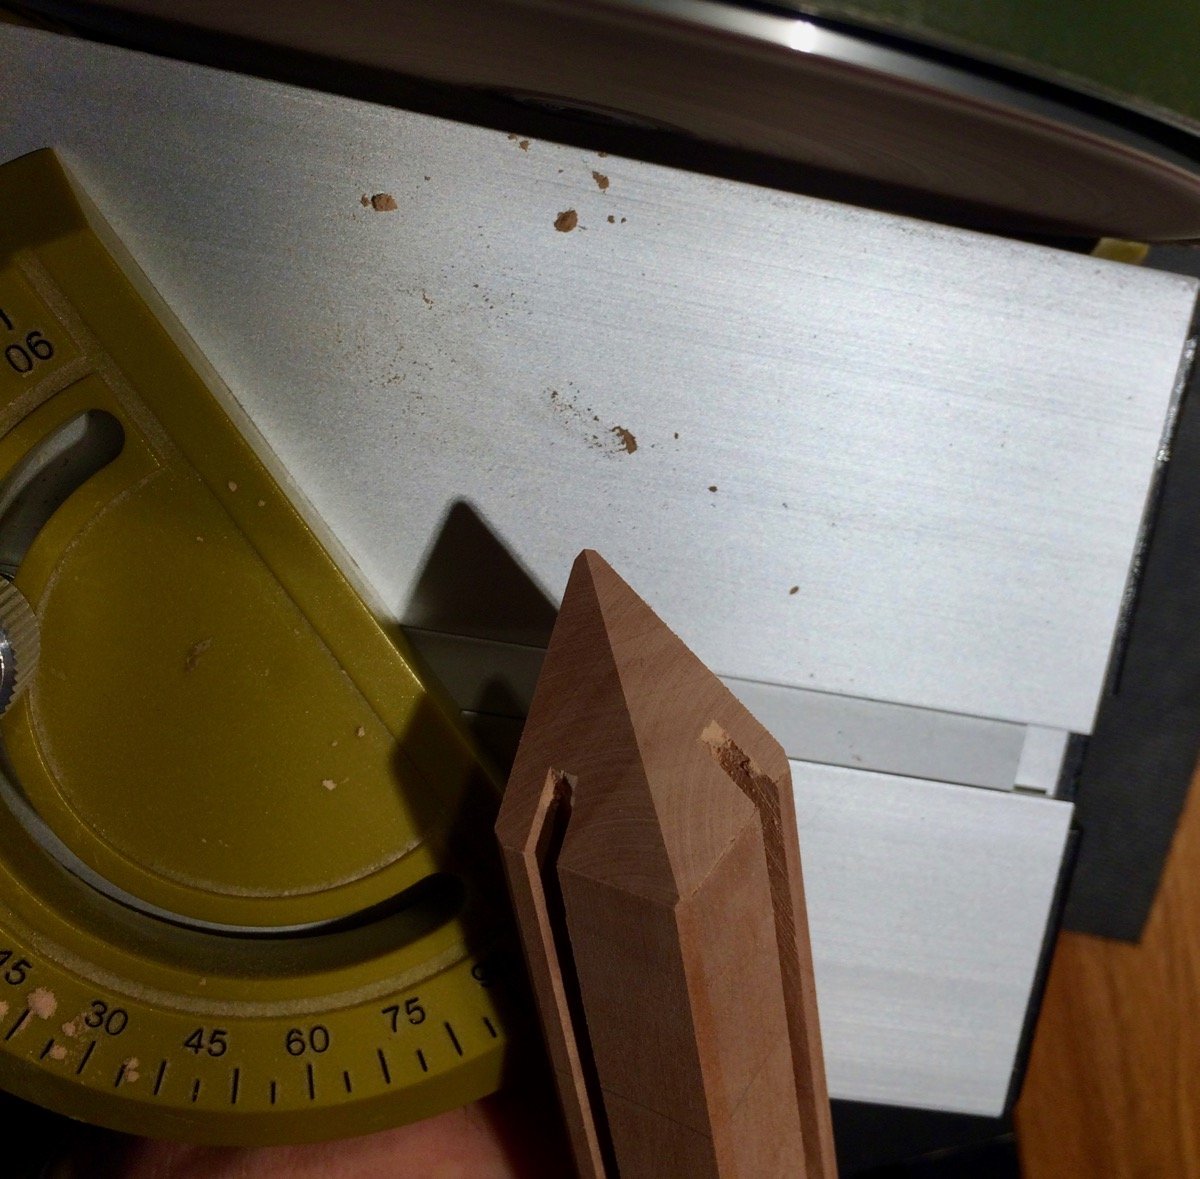
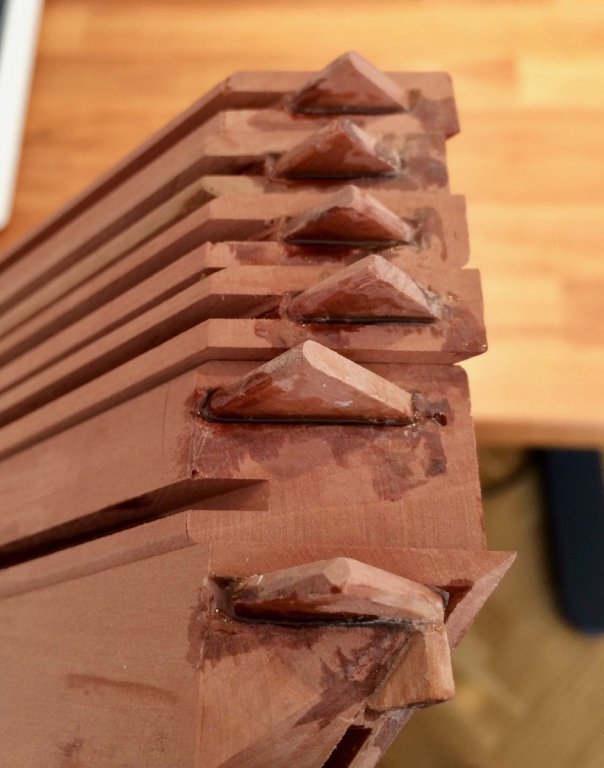
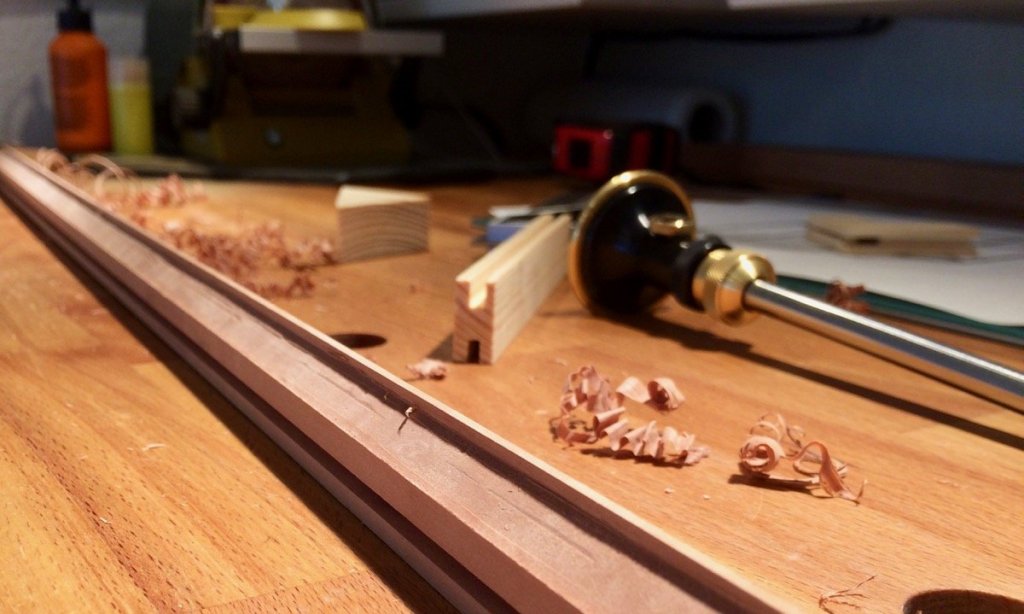
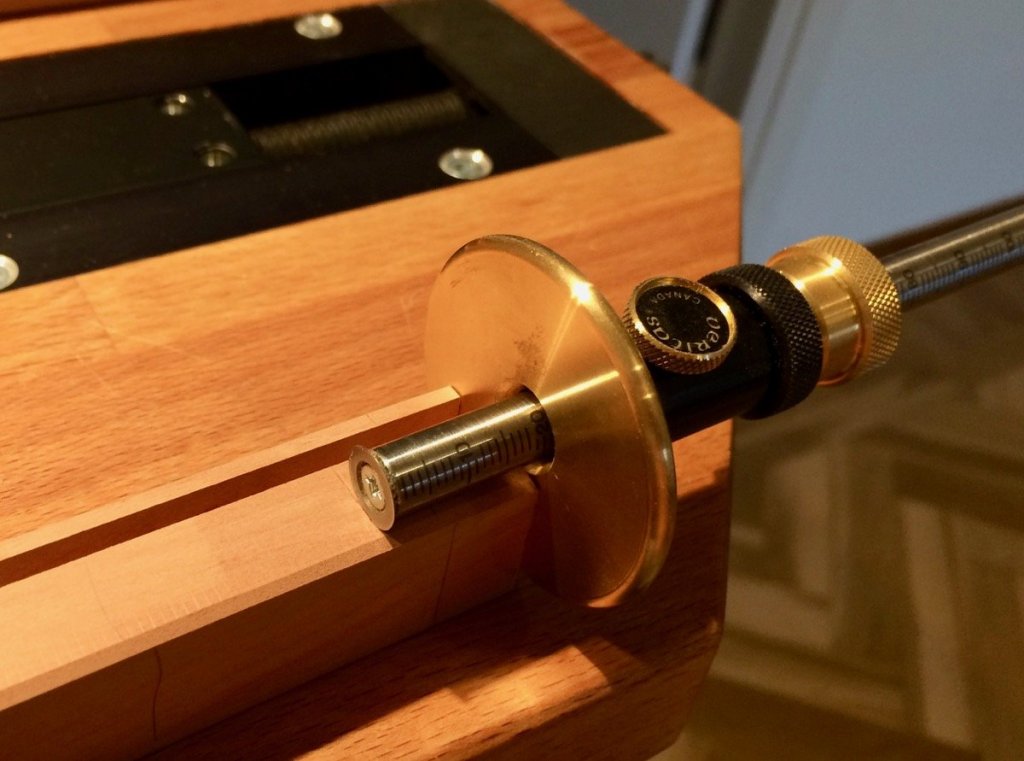
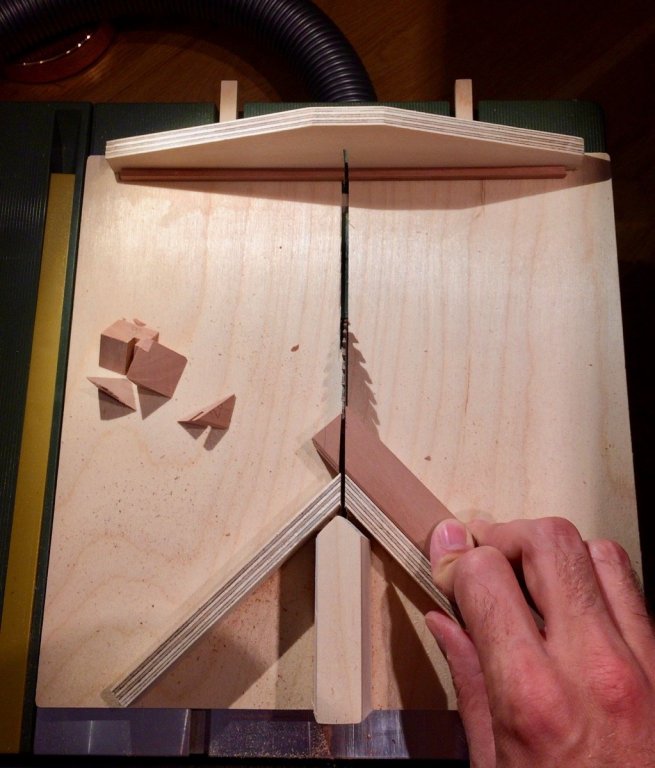
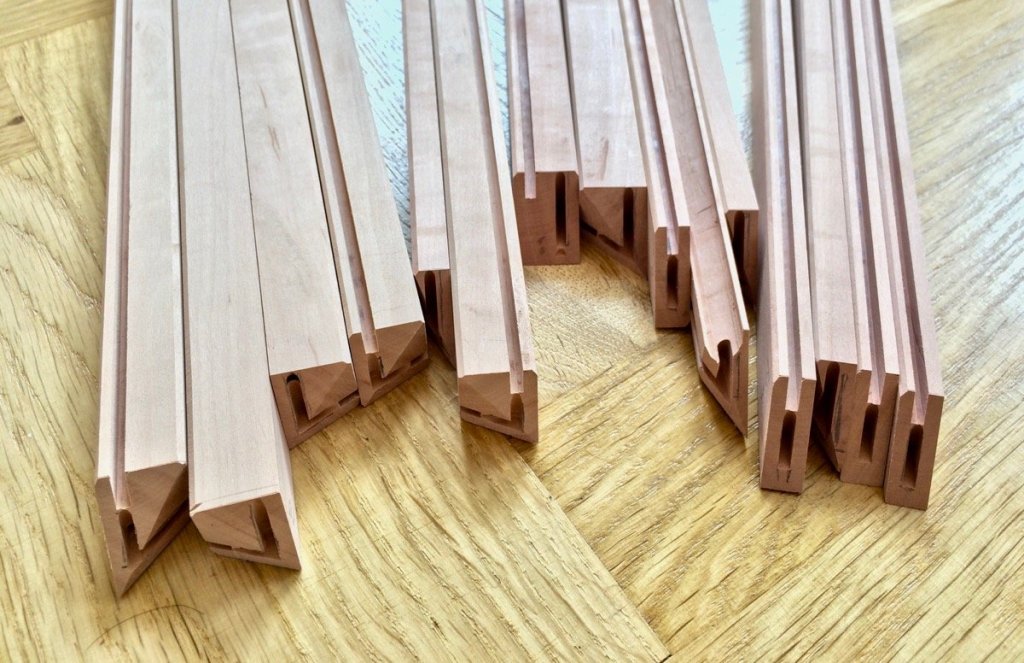
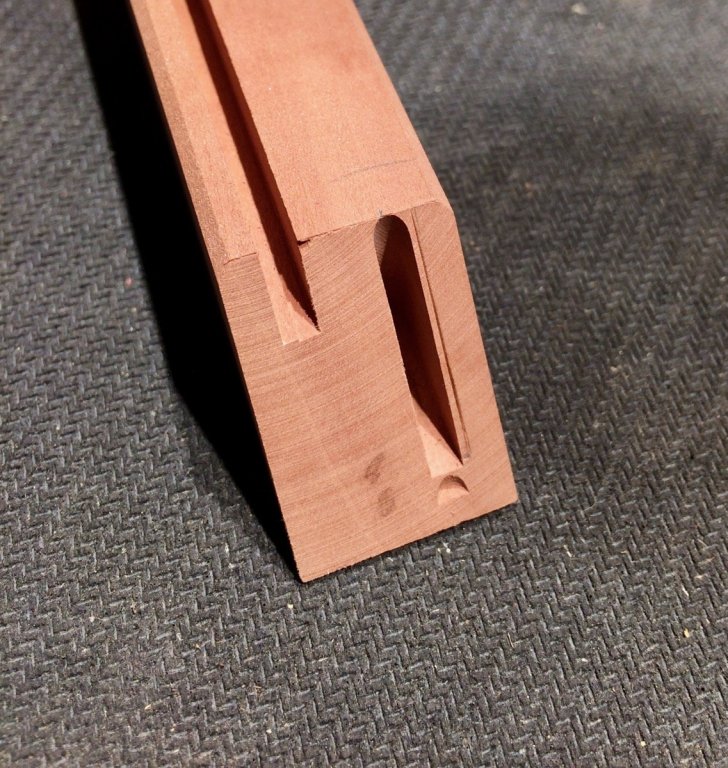
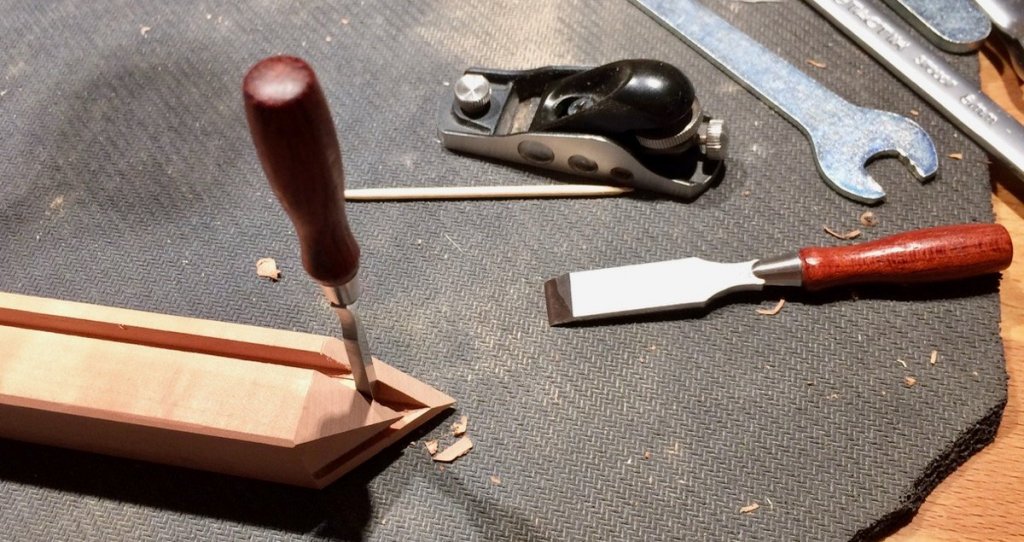
Horray, modelling weekend! I had a classic modelling block - "oops, lots of potential mistakes ahead, and the wood is expensive - I better do smth else for a while". But forced myself to start cutting that wood! Lovely morning. Lots of toys to play with! This update looks like a Veritas ad, for some reason I used most of the tools I had this time. Maybe I just missed them First I cut the glass grooves on the table saw, that was easy. And a groove for the LED strip: Making bevels on the edges. Surprisingly, mini plane was better than a block plane with bevel guide (which was too aggressive and left some tearout). Really happy with the new plane - it is more ergonomical than the smaller version of it. Using both depending on the task. Time to cut the miters, the most scary part of the project. Proper markup is the key: Miter sled was very handy, gives a good control with no slippage. But not all the angles are 90 degrees in this build Miters were undercut and finished on the disk sander. Sander is way more precise than the saw: Next I milled the slots for the reinforcements, otherwise the endgrain-to-endgrain joint would be too weak. Finished stock, no mistakes! Oh well, I was too optimistic Apparently my mill vice was installed with a bit of an angle, so the offset of the slots was different on different sides of the vice. Some slots turned out to be misaligned: Fixing them with a tiny chisels: That will effectively make some slots wider, but I will fill in the gaps with epoxy. It would be hidden anyway, and I hope that epoxy will provide enough support.


- 969 replies
-
- 13
-
-
- hahn
- oliver cromwell
- (and 1 more)
-
Proxxon Micro MBS 240/E Band Saw Review
Mike Y replied to Blue Ensign's topic in Modeling tools and Workshop Equipment
Hm, I probably have a newer version of the saw. I saw the previous version of it, it looks slightly different, maybe that is what you have? The blade guides are proper bearings, not a round brass rods. And I never had a single issue with that bearing guides - they work properly, easy to adjust and they keep the adjustment. No extra noise from them either. Zero complains to that part of the saw Also no issues with the alignment of the blade guide arm. So the only issues I have with my saw are: 1) Lack of fence (and not so easy to clamp smth since the underside of the table is not flat, but full of shapes to increase its rigidity). 2) Screaming upper bearing (cheap and easy to fix, just buy proper bearings from, say, SKF instead of the crap that is provided out of the box) 3) Super rare blade size, which means you can't buy any aftermarket blades. The Proxxon blades (3 or 4 types of them) are quite ok, not that I don't like them, but they do not offer any resaw blade, and you can't find it anywhere else due to a small size of it But for the shipmodelling use it is more than enough. We do not need a resaw capability or a fence, it is mostly used as a sort of a powerful no-vibration scroll saw. And it is really good for that - even with regular blades you can make pretty fine curves, while the narrow blade will allow even more. Pros: 1) Speed alignment 2) Overall construction is quite good and precise 3) Blade guide 4) Size. It is the smallest bandsaw in the market (excluding some chinese plastic crap). 5) Quality is good (except bearings). The table is flat and level. 6) Pretty powerful for it size - never made it stall or bog down when cutting smth big. Few years ago there was no alternatives to this saw (at least in Europe). Nowadays I see more and more 10 inch saws of decent quality, according to the reviews. And cheaper than proxxon. -
Proxxon Micro MBS 240/E Band Saw Review
Mike Y replied to Blue Ensign's topic in Modeling tools and Workshop Equipment
Andi, do you have a space for a slightly larger saw? There are plenty of models in 10 inch range, starting from the one sold by axminster in UK. They are even cheaper than proxxon, have a fence, you can find more blades in that size. The only reason to buy the Proxxon saw today is if you can't find a place for a slightly larger saw. That is basically the only reason I bought mine, and the only reason I haven't switched to anything else. The saw is OK, but the lack of blades (like a resaw blade, etc) is annoying, and the lack of fence as well. -
Super smooth! Love the way spacers line up! What have you done to prevent the hull from cracking/warping when humidity changes?
-
Wonderful and a very unusual model!
-
Yep! It was a very intense summer, but it was great! Now there is an itch to make some sawdust again. Occasionally. Roger, no worries! Removed my post as well.
- 969 replies
-
- 4
-
-
- hahn
- oliver cromwell
- (and 1 more)
-
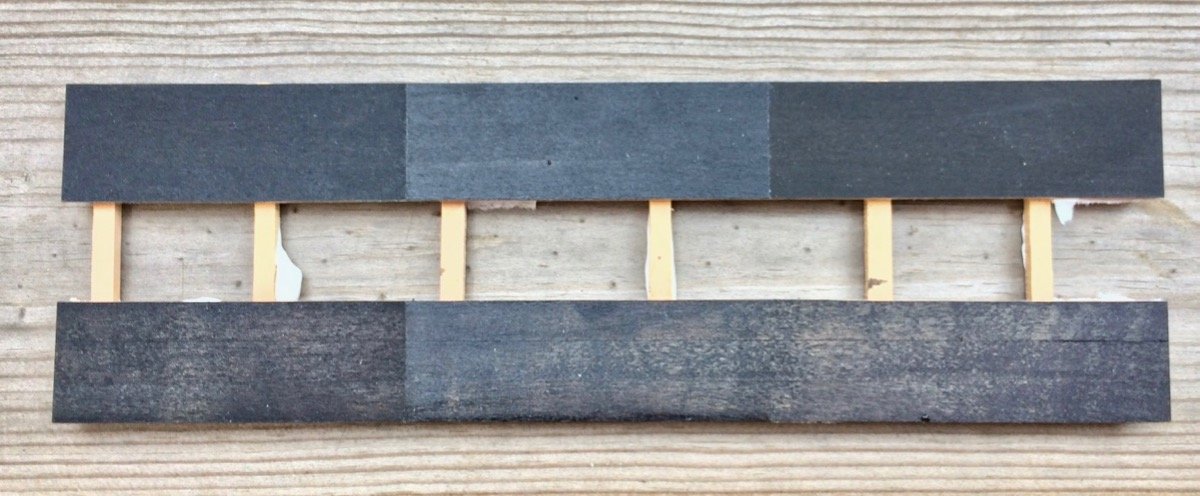
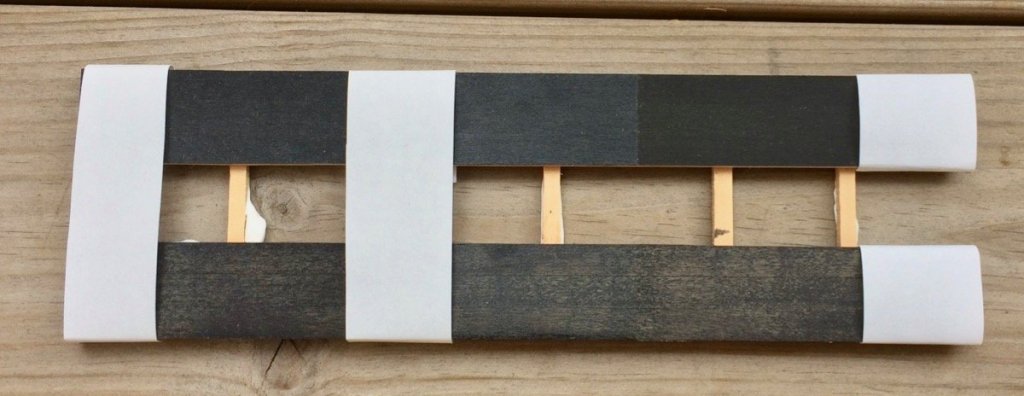
Had no modelling time for the last month, but hope to get back to the display case build next week. In a meanwhile, remember the ebony dye test that I did 10 months ago? Here is the comment with the "before" pictures: https://modelshipworld.com/index.php?/topic/7297-oliver-cromwell-by-mike-y-148-1777-pof-hahn-style/&do=findComment&comment=455741 It's time to check the results. It was mounted to be in the direct sunlight in the window facing south - basically getting maximum possible sun exposure during the winter and summer months. Parts of the piece were covered by paper to reduce the UV exposure (in hindsight, regular paper is probably not very effective for that). So here it is after 10 months of sun: And with paper removed: So it looks like paper did nothing to protect it from UV. The spirit-based dye (in the bottom) got severely affected by the sun, very blotchy and ugly. Water-based on (on top) shows no obvious signs of any discoloration. Note the top-right sector - it is a water-based dye with no finish. Tung oil finish (top-left) comes second, and danish oil (top-center) is too flat and glossy, without a proper texture. Looks like I will simply use unfinished water-based dye on my wales. If it survived on a direct sun - should not be any troubles in the spot that does not have any sun exposure.

- 969 replies
-
- 11
-
-
- hahn
- oliver cromwell
- (and 1 more)
-
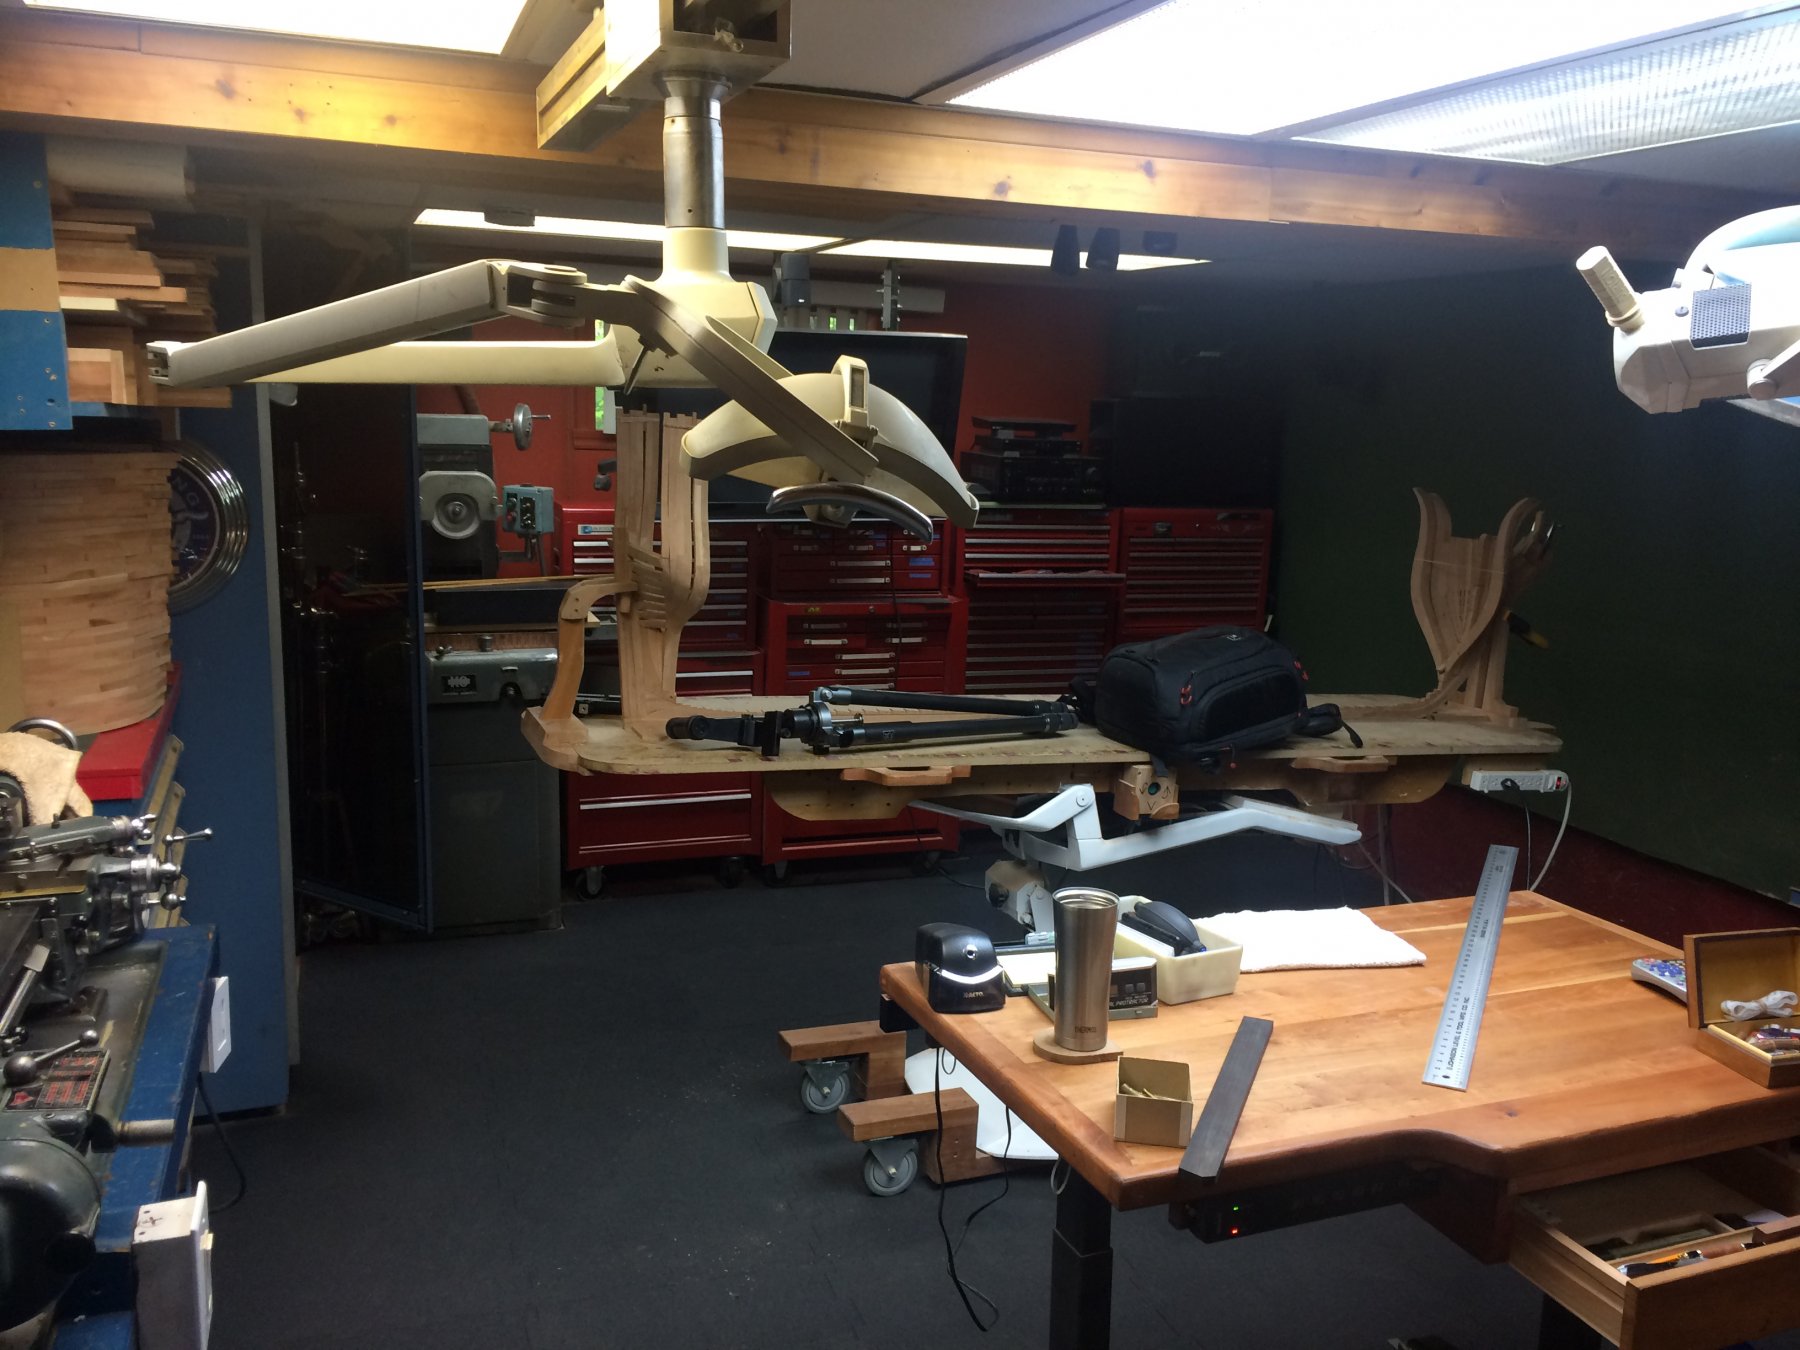
That was fantastic! Day well spent, strange that there are no reviews of this museum on tripadvisor It was a pleasure to meet Gaetan and his wife, see all that models in person (logs are logs, but it is always better in reality!). We are a rare bunch, and when you meet a man who shares the same passion - this makes that day very special. And now I know how the dream workshop looks like:


-
Is there a true POF kit in the market?
Mike Y replied to Ulises Victoria's topic in Wood ship model kits
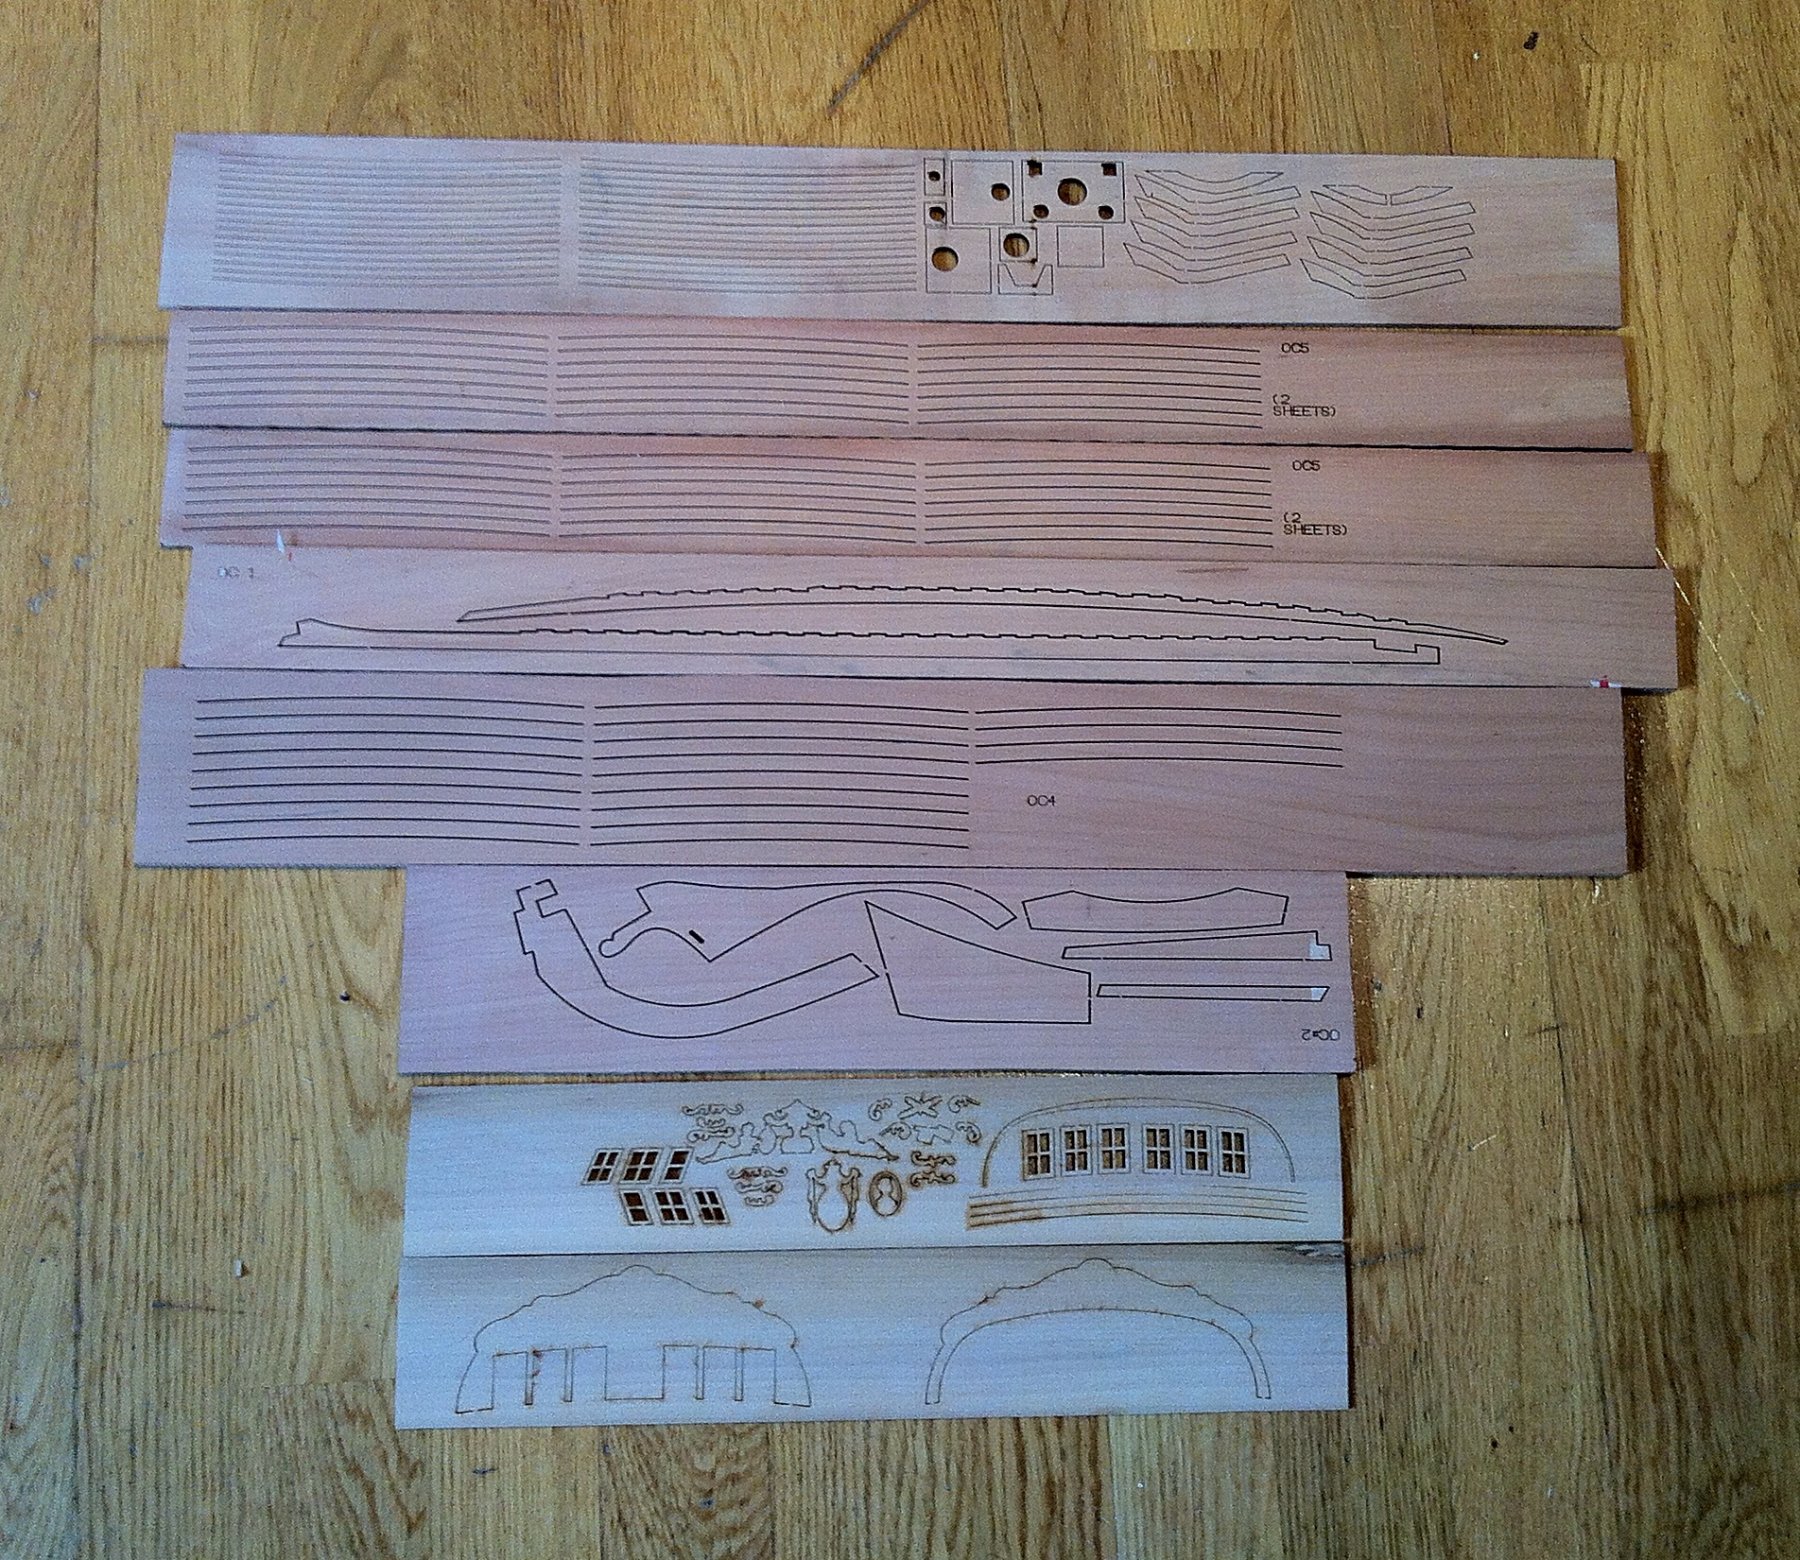
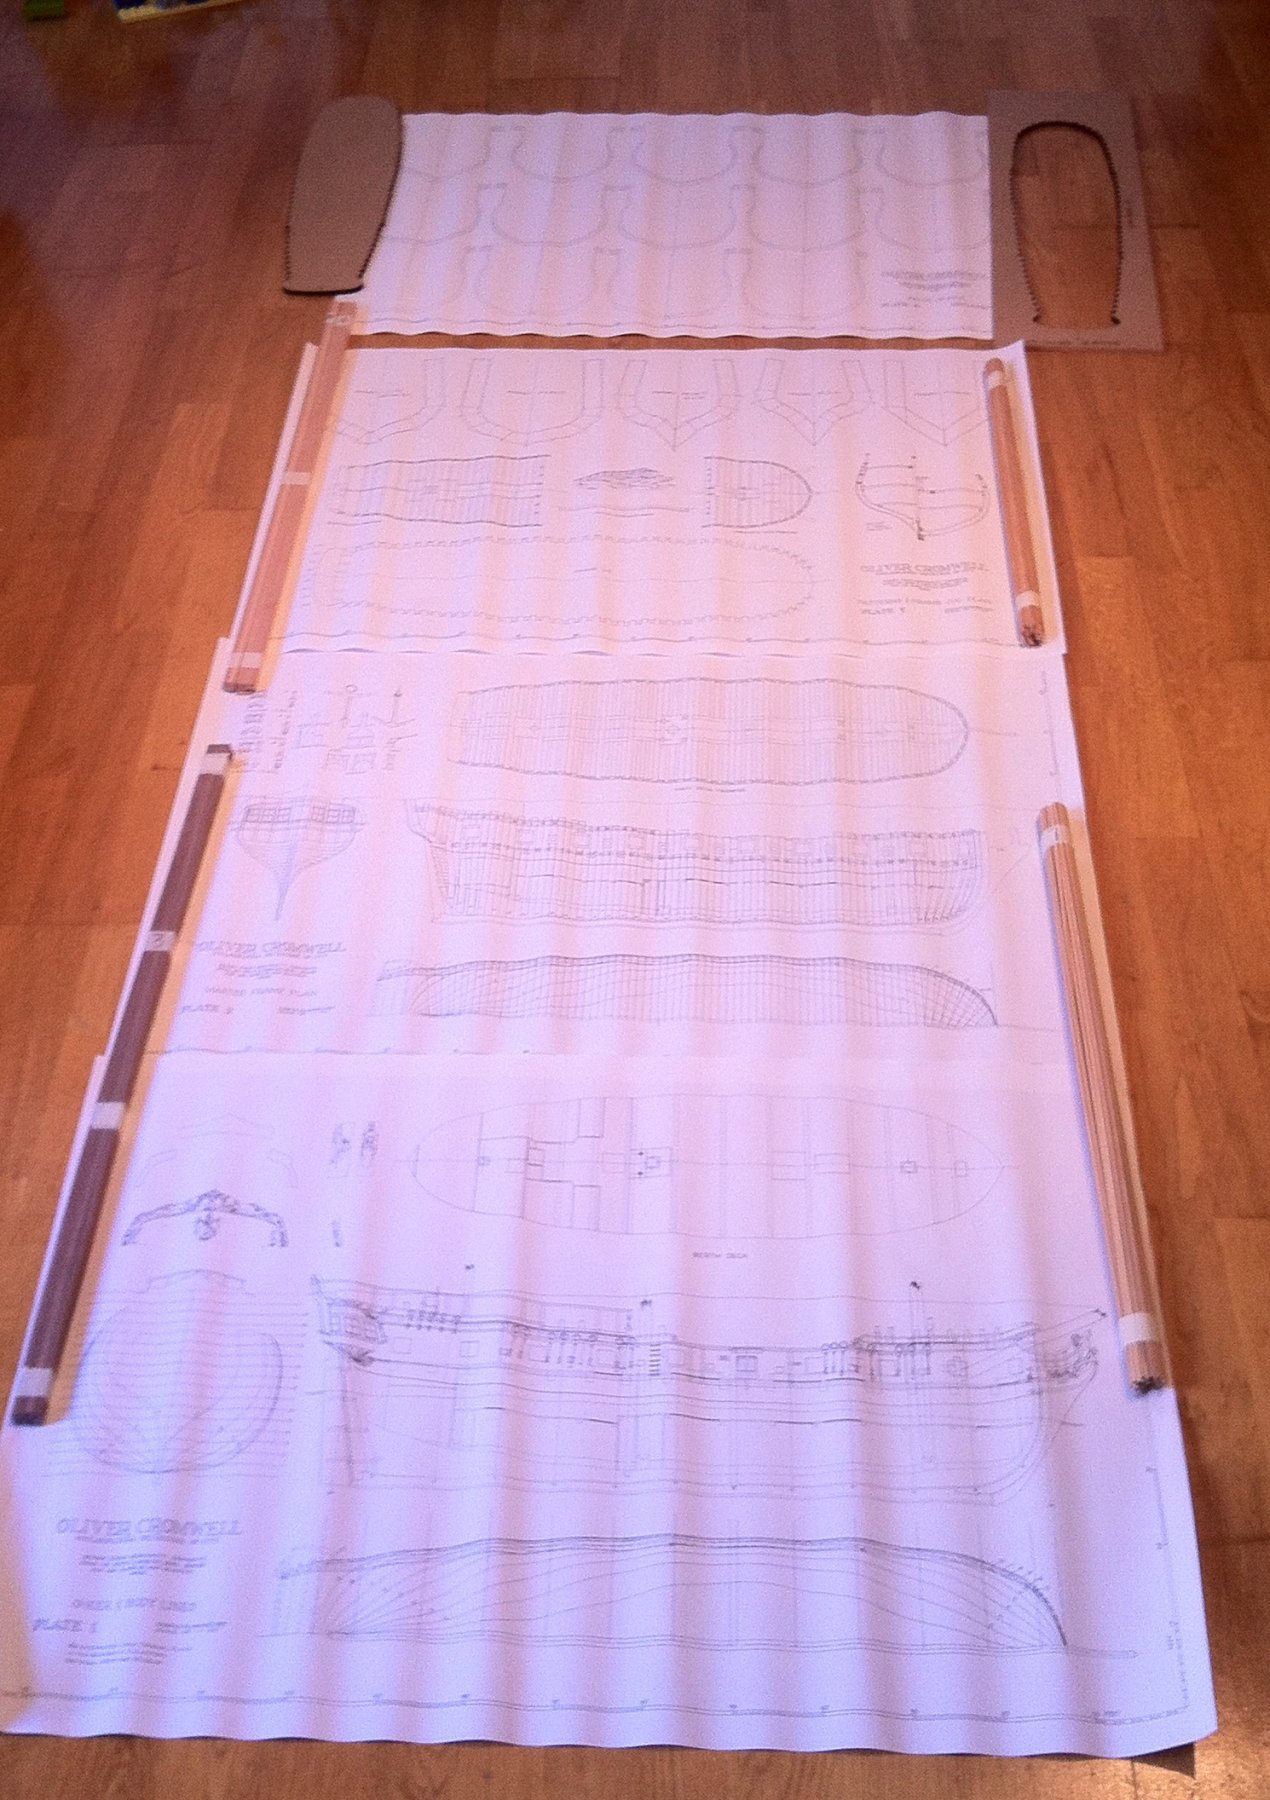
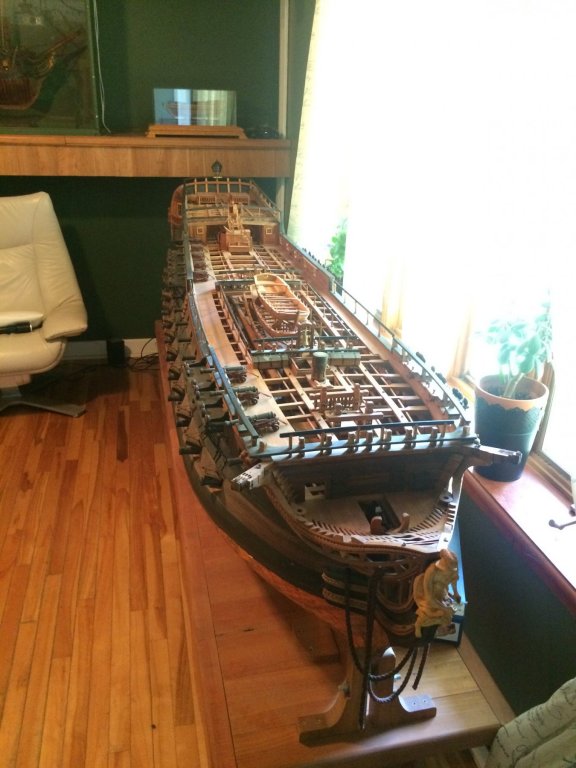
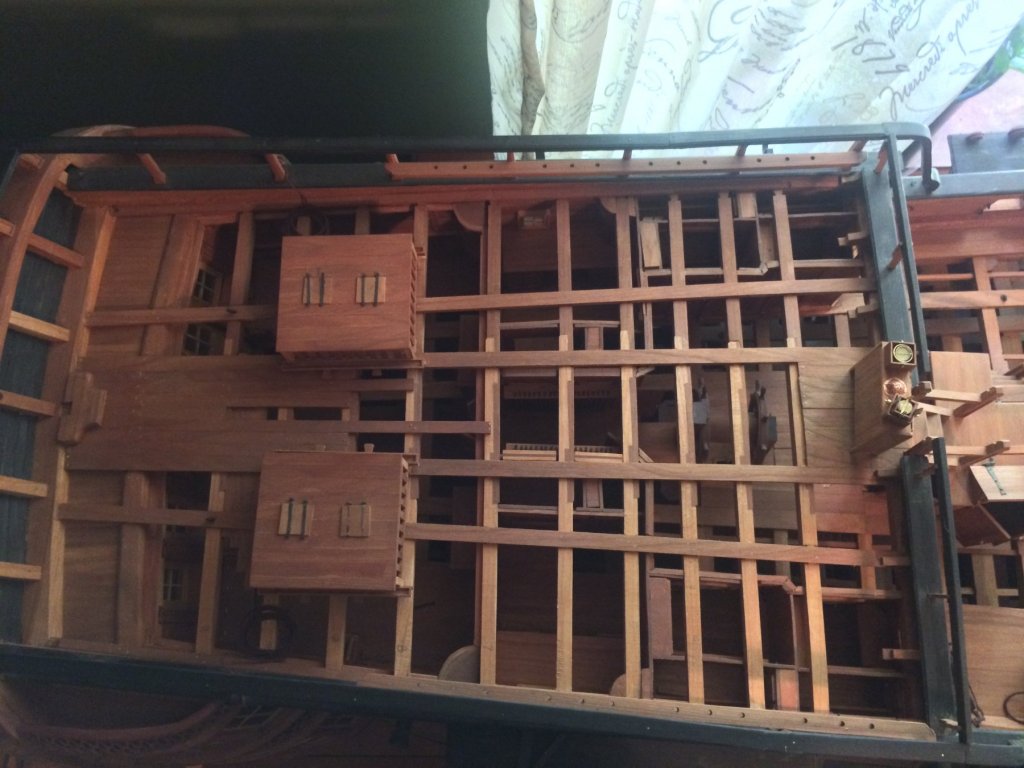
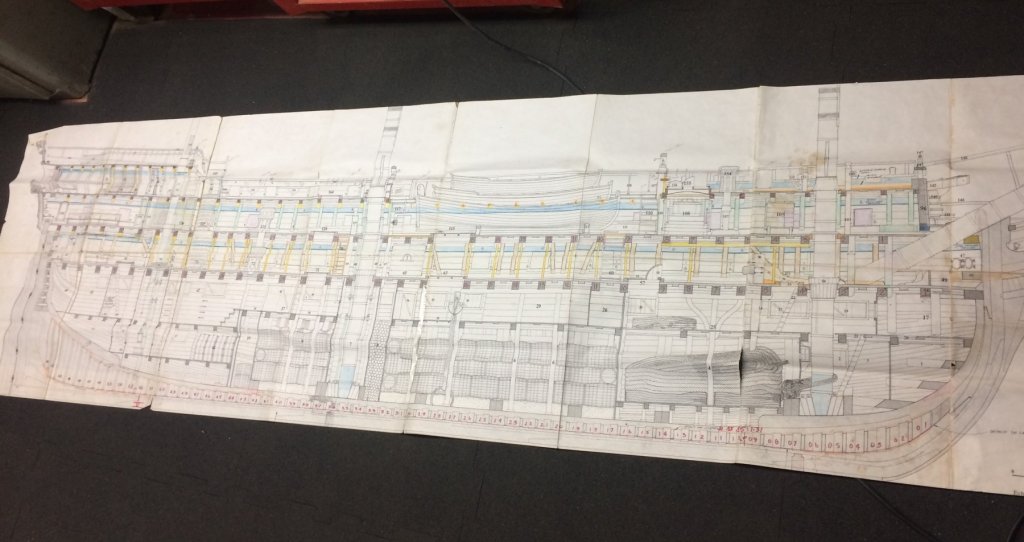
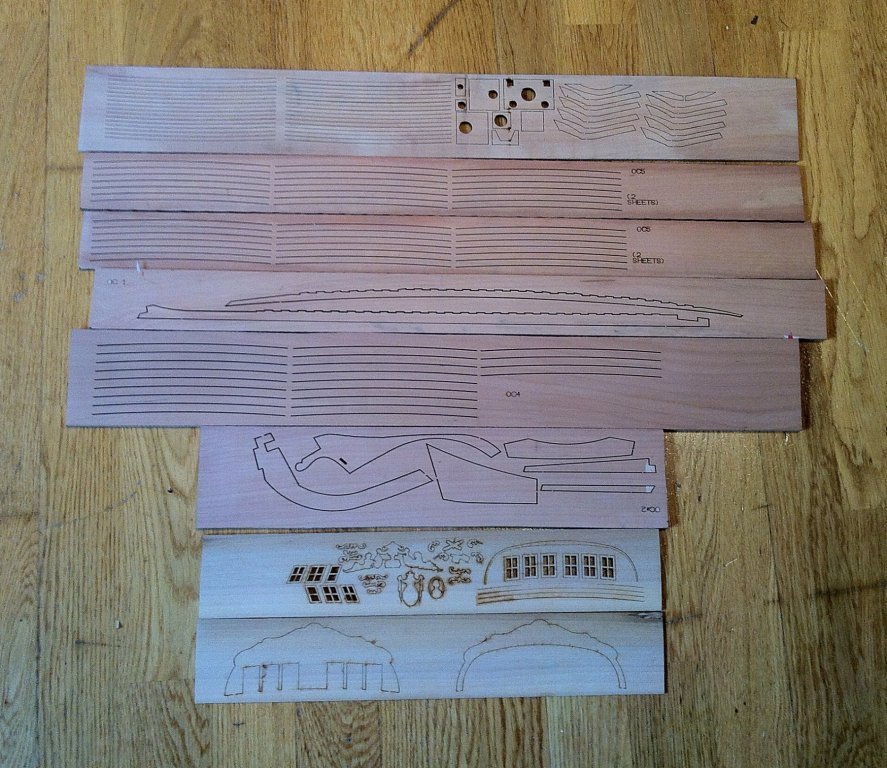
1/4 is 1:48 scale. Totally agree with you about "it is not clear what exactly do you get". Is it so hard to include some photos? Argh! So hope this will help: Oliver Cromwell is not really a kit - it is a laser cut jig, plans, wood sheets/strips, wood for frames, some laser cut parts. Here is the content of the box: Ended up fully scratching it and not using the parts provided, for various reasons. You can read first few pages of my build log, if interested To be honest, even if it is not a kit - I do not think it is very difficult. "Scratch building" is less scary than typically described, especially with lots of good logs on MSW that are better than any "practicums". I was thinking about starting with Hannah or Oneida (with laser cut frames) - but decided that cleaning up all that laser char is less pleasant than just cutting the frames using bandsaw / scroll saw. And I was really right about it! When I got that "timbering set" for Oliver Cromwell and tried to use the laser cut keel parts - cleaning up the char was a b%tch! It was not a fun process, and I hated every minute of it. I tried scraping it, sanding it, etc - takes a lot of efforts, it sits very deep into the pear wood, especially on the endgrain. You end up with very inaccurate parts after this, they do not fit together well enough. Way easier to just cut them out of the sheet of wood. Clean and no charring! Let me know if you have any additional questions, would be great to have another Oliver Cromwell log here! Feel free to PM

-
It is a free wood, so I am not that worried about a waste There is a place that will just charge an hourly rate for any machining you need, but that will become a golden log. Especially since I am not sure if it is a good wood at all. It is mostly for experience and sentimental value. I envy people who build a model out of their own pear tree harvested in their garden...
- 969 replies
-
- 6
-
-
- hahn
- oliver cromwell
- (and 1 more)
-
Just as an experiment. There was a fallen tree close by, it had a nice orange colour on a cross-cut section, so why not? Worst case scenario - will use it for some other projects. Druxey, considering the size of the log, quartersawing will leave next to nothing... Even if it warps - not a big deal, I will need to plane away at least 1/3 of the thickness due to very uneven cut lines.
- 969 replies
-
- 3
-
-
- hahn
- oliver cromwell
- (and 1 more)
-
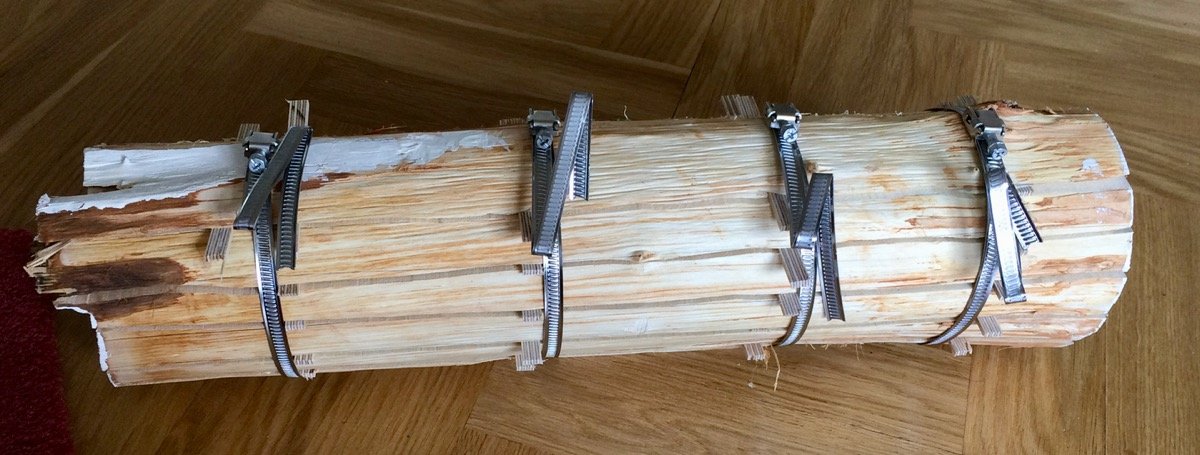
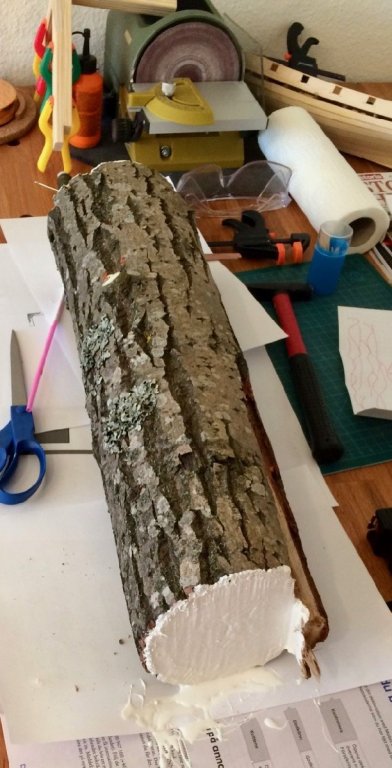
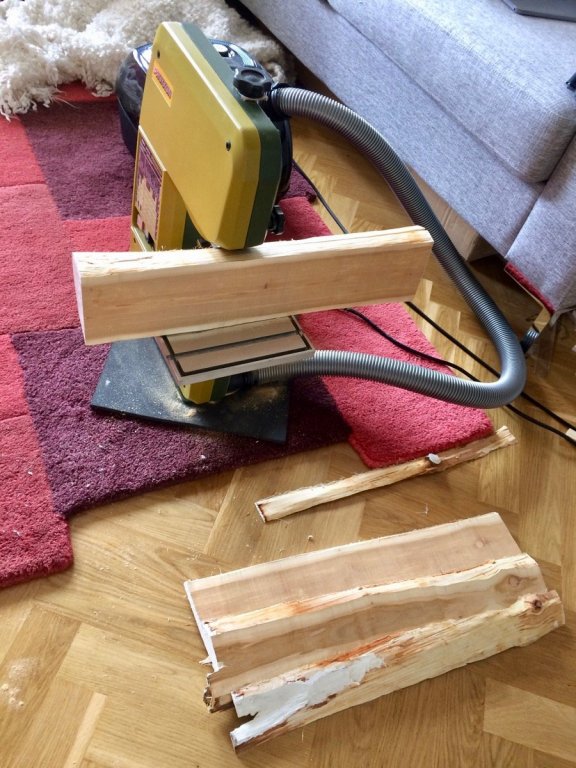
In a meanwhile, playing with milling my own wood. I cut it from the fallen tree that I found close to my apartment. I can't really identify the tree, would appreciate the hints if somebody have some ideas! The heartwood looks quite promising, I might even use it in the model. And there is something special in using your own wood in the model. Really hope it will be usable for that scale. The original mini-log: It was drying with bark off for 3 months (I am very scared of the wood-eating insects and parasites, so removed the bark and washed it before drying), and will dry for 3-6 more months. Slabbing it was not easy, since my bandsaw is small and do not have a proper resaw blades. To fit it into the bandsaw I needed to remove the blade guide, which made it more difficult to cut straight. Oh well, lots of planing ahead once it is dry Looks pathetic To reduce warping while drying, tightened the stack with some metal pipe clamps.


- 969 replies
-
- 8
-
-
- hahn
- oliver cromwell
- (and 1 more)
-
Looks like a great start!
-
... would be still interesting to see how you approach the display case build
- 452 replies
-
- 4
-
-
- cheerful
- Syren Ship Model Company
- (and 1 more)
-
Interesting vessel! Should be a fun build, and glad that you finally jumped into the framed mode!